Autogen Lights For UTX - Scenery Solutions · Autogen Lights For UTX ... you can exit the program...
18
Page | 1 Autogen Lights For UTX Contents Overview ................................................................................................................................................................................. 3 Quick Start............................................................................................................................................................................... 3 Running the LightsForUtx Interface .................................................................................................................................... 3 Adding Lights Using Default Settings .................................................................................................................................. 5 Performance Note ! ............................................................................................................................................................ 5 Custom Setup .......................................................................................................................................................................... 8 Removing All Light Assignments From UTX Roads.............................................................................................................. 8 Changing Light Assignments By Road Type......................................................................................................................... 8 What Is A Light Slot ? ....................................................................................................................................................... 10 Configuring Light Slots ...................................................................................................................................................... 10 Light Densities And Frame Rates .................................................................................................................................. 13 Light Offsets .................................................................................................................................................................. 13 Light Sizes ...................................................................................................................................................................... 13 Selecting an Alternate Library ........................................................................................................................................... 14 Selecting an Alternate Texture ......................................................................................................................................... 17
Transcript of Autogen Lights For UTX - Scenery Solutions · Autogen Lights For UTX ... you can exit the program...

Page | 1
Autogen Lights For UTX
Contents Overview ................................................................................................................................................................................. 3
Quick Start ............................................................................................................................................................................... 3
Running the LightsForUtx Interface .................................................................................................................................... 3
Adding Lights Using Default Settings .................................................................................................................................. 5
Performance Note ! ............................................................................................................................................................ 5
Custom Setup .......................................................................................................................................................................... 8
Removing All Light Assignments From UTX Roads .............................................................................................................. 8
Changing Light Assignments By Road Type......................................................................................................................... 8
What Is A Light Slot ? ....................................................................................................................................................... 10
Configuring Light Slots ...................................................................................................................................................... 10
Light Densities And Frame Rates .................................................................................................................................. 13
Light Offsets .................................................................................................................................................................. 13
Light Sizes ...................................................................................................................................................................... 13
Selecting an Alternate Library ........................................................................................................................................... 14
Selecting an Alternate Texture ......................................................................................................................................... 17

Page | 2
FAQ ........................................................................................................................................................................................ 18

Page | 3
Overview With UTX V2.0, we have added a new type of lighting option that allows different types of light objects to be attached to
UTX roads using custom autogen objects from the base simulator (i.e. FSX or Prepar3D). The LightsForUtx interface
allows you to have complete control over the way the lights look, behave and tweak for performance. This feature set
includes:
Adds 4 new, highly configurable autogen light slots to FSX/P3D.
Each light slot can be assigned to each unique type of UTX road.
Each light slot can be assigned to one of 12 possible light objects.
Each light slot can be assigned to varying light densities, distances between lights, road offset locations and scale
size.
Alternate object libraries can be selected, when available, to change light framework (shapes).
Alternate textures can be selected, when available, to change light color and look.
Quick Start
Running the LightsForUtx Interface
Each time you run the interface, you will see the validation window below:
Figure 1.
The validation process makes sure that your environment contains an installed UTX product that is ready to support
autogen lighting. If you see all 3 checkmarks in the validation window, your environment is good. If this is your first
time running the interface, you should see the window in Figure 2.
Figure 2

Page | 4
At this point, you should press OK. The interface will then add new autogen entries to your existing TERRAIN.CFG file.
The LightsForUTX interface will not use existing TERRAIN.CFG entries that may interfere with other products. When the
process is complete, you should see the main interface window in figure 3.
Figure 3
This is the main interface. At this time, no lights have been assigned yet to UTX roads. We will do that next.

Page | 5
Adding Lights Using Default Settings
The fastest way to add autogen lights to your roads is to press the “Set Light Assignments” button. This process will
only take a second or two and you should receive confirmation as shown in Figure 4.
Figure 4
At this point, you can exit the program and run FSX/P3D. At night in areas where UTX roads are present, you should
see all urban areas well light up.
The default setting puts lights on all urban roads, no matter what type. Different light colors are used to give some
variety.
That is all that is required if you want to use the default configuration. However, the LightsForUTX is a powerful tool
that allows you to tune your environment exactly to your liking. The interface will also allow you to make adjustments if
frame rates and performance are a concern. The remaining parts of this manual will cover the interface in more detail.
Performance Note !
Even though you can’t see the lighting objects during the day, they are still present and can impact frame rates. So, we
recommend that you consider turning off the lights during the day in FSX/P3D.
The quickest way to disable the night lighting within FSX/P3D is through the FSX/P3D “Settings – Scenery Library”.
From within the Scenery Library interface, uncheck the “Autogen Lighting For UTX” layer. You can do this prior to or
during flight. To turn the lighting back on later, just check the same box.
This is demonstrated in the following Figure 4b.

Page | 6
Figure 4b

Page | 7
Recommended Road Settings In UTX
The Ultimate Terrain Interface, which is provided as part of Ultimate Terrain, allows you to change the road texture
characteristics as one of its features. A common night configuration for our roads is to have embedded night light
images in the textures. With the autogen lighting (ground lighting version) these embedded lights are no longer
necessary and may conflict. You may consider removing all night light imprints from the roads similar to the screenshot
below:
Screenshot from UTX Setup Tool Interface:
Again, this screenshot is not part of the Autogen Lighting interface, it is part of the actual Ultimate Terrain interface. For
more information on this aspect of Ultimate Terrain, please see the Ultimate Terrain manual.

Page | 8
Custom Setup
Removing All Light Assignments From UTX Roads
In the quick start, we pressed the “Set Light Assignments” button to quickly assign the default lighting to UTX road
features. If you ever want to clear all lights assignments from UTX Roads, press the “Remove All Light Assignments”
button.
Changing Light Assignments By Road Type
In the main interface, you will see a listing of every available UTX road type that can have a light assigned to it. This is
shown in figure 5. There are more road types than can be displayed at once. Use the scroll bar to move the list up and
down.
Figure 5
Page | 9
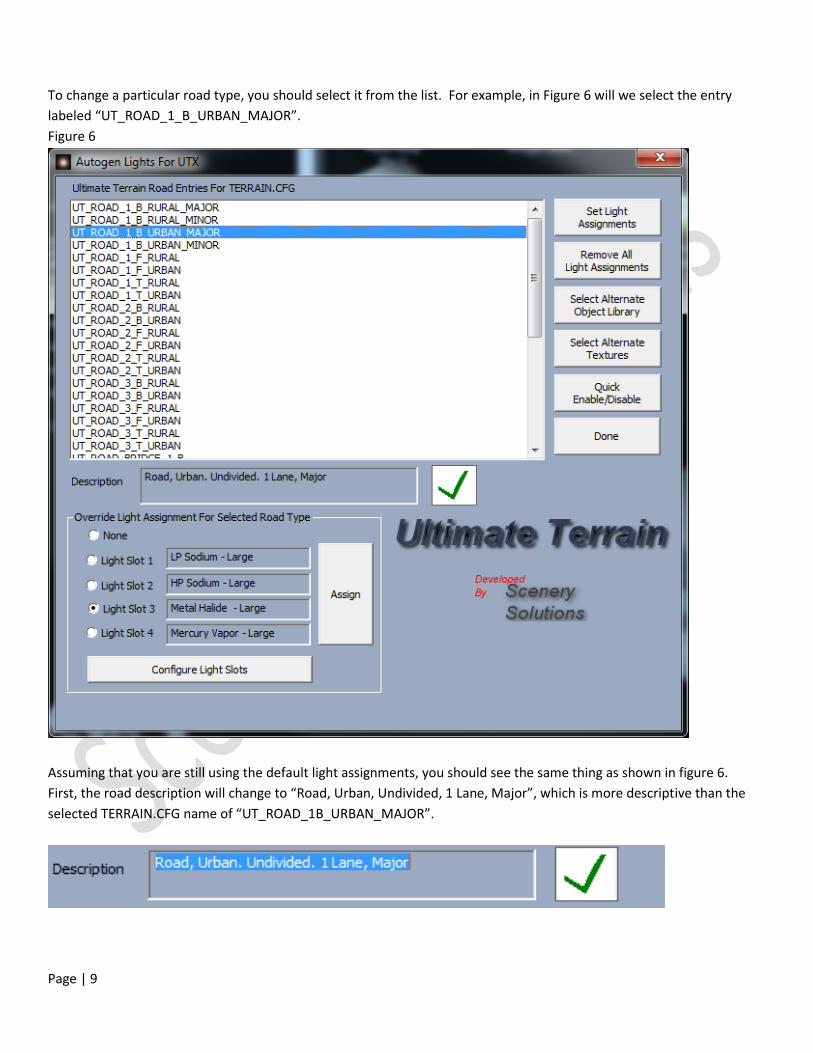
To change a particular road type, you should select it from the list. For example, in Figure 6 will we select the entry
labeled “UT_ROAD_1_B_URBAN_MAJOR”.
Figure 6
Assuming that you are still using the default light assignments, you should see the same thing as shown in figure 6.
First, the road description will change to “Road, Urban, Undivided, 1 Lane, Major”, which is more descriptive than the
selected TERRAIN.CFG name of “UT_ROAD_1B_URBAN_MAJOR”.
Page | 10
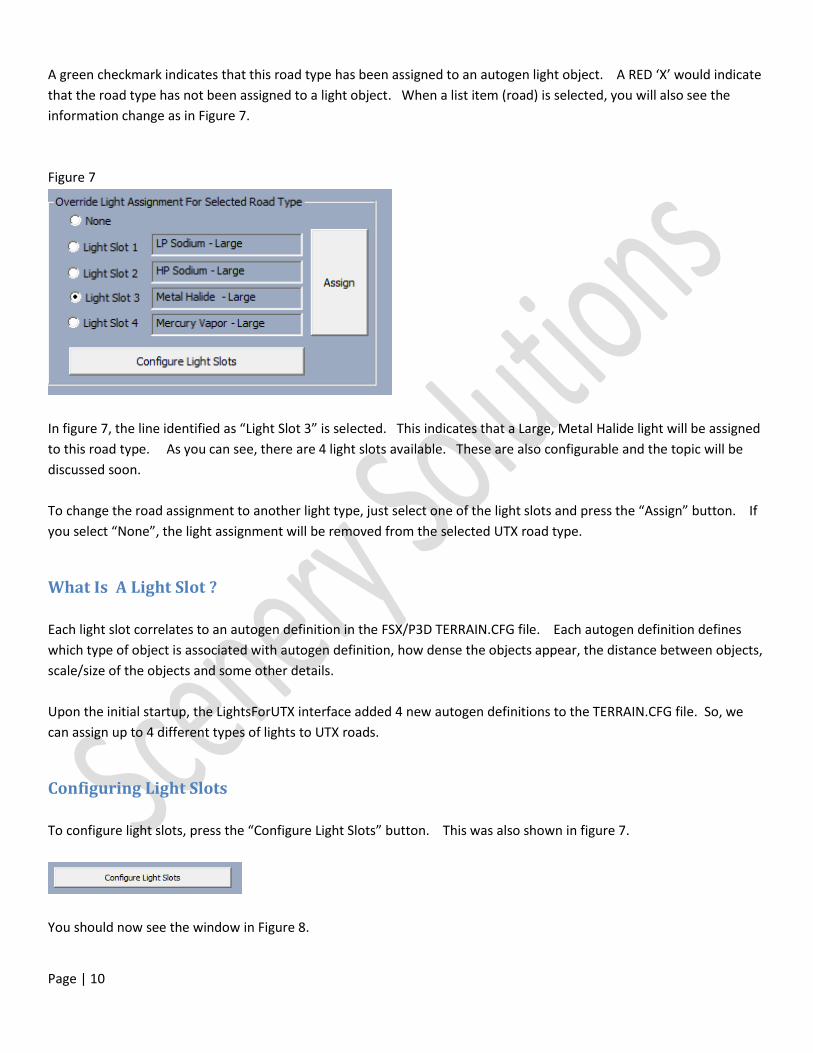
A green checkmark indicates that this road type has been assigned to an autogen light object. A RED ‘X’ would indicate
that the road type has not been assigned to a light object. When a list item (road) is selected, you will also see the
information change as in Figure 7.
Figure 7
In figure 7, the line identified as “Light Slot 3” is selected. This indicates that a Large, Metal Halide light will be assigned
to this road type. As you can see, there are 4 light slots available. These are also configurable and the topic will be
discussed soon.
To change the road assignment to another light type, just select one of the light slots and press the “Assign” button. If
you select “None”, the light assignment will be removed from the selected UTX road type.
What Is A Light Slot ?
Each light slot correlates to an autogen definition in the FSX/P3D TERRAIN.CFG file. Each autogen definition defines
which type of object is associated with autogen definition, how dense the objects appear, the distance between objects,
scale/size of the objects and some other details.
Upon the initial startup, the LightsForUTX interface added 4 new autogen definitions to the TERRAIN.CFG file. So, we
can assign up to 4 different types of lights to UTX roads.
Configuring Light Slots
To configure light slots, press the “Configure Light Slots” button. This was also shown in figure 7.
You should now see the window in Figure 8.

Page | 11
Figure 8
This is the interface that allows you to configure each light slot. As you can see, there are 4 light slots that can be
configured. The “Set” button is initially disabled, because a light slot has not yet been selected.
If we select “Light Slot 1”, you should see the window in Figure 9 (unless you have already made changes).
Page | 12
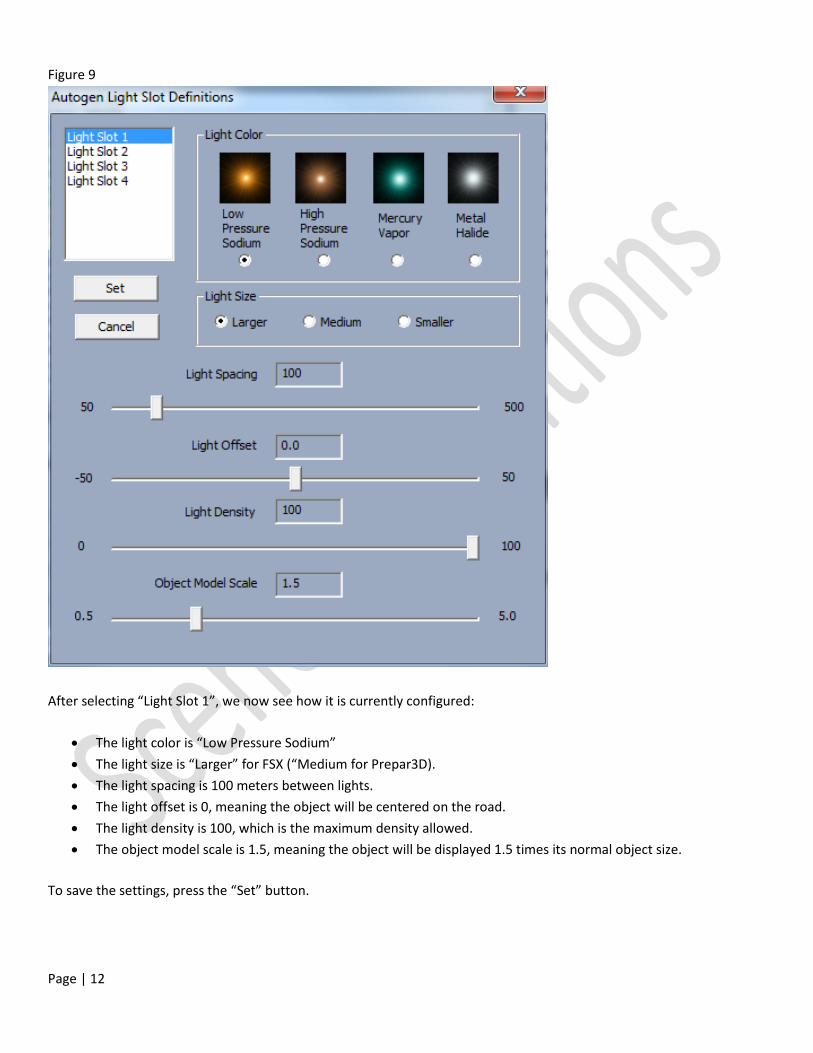
Figure 9
After selecting “Light Slot 1”, we now see how it is currently configured:
The light color is “Low Pressure Sodium”
The light size is “Larger” for FSX (“Medium for Prepar3D).
The light spacing is 100 meters between lights.
The light offset is 0, meaning the object will be centered on the road.
The light density is 100, which is the maximum density allowed.
The object model scale is 1.5, meaning the object will be displayed 1.5 times its normal object size.
To save the settings, press the “Set” button.

Page | 13
Light Densities And Frame Rates
Autogen processing in FSX/P3D is very efficient. However, with UTX autogen lighting it is possible to have huge
numbers of lights visible, which can have a noticeable impact on frame rates. Fortunately, we have given you an easy
way to tune your system for best performance. There are 2 slider settings that can have both an impact visually and
on frame rates.
The “Light Spacing” setting specifies the number of meters between light objects on a road. A value of 100 would be
100 meters between lights. This setting does not take into account roads that are intersecting or parallel. As a result,
you can have two or more lights on different roads which are closer than the distance in the “Light Spacing” setting. If
you want to improve frame rates, increase the “Light Spacing” setting which will reduce the overall number of lights.
The “Density” setting is the percentage of objects that will be placed on a road. For example, a value of 50 would place
50% of the light objects that would normally be placed according to the “Light Spacing” setting. The density setting is
further modified by the “Autogen Density” setting within FSX/P3D itself (display settings section). If the “Density” value
is set to 100 in LightsFoUTX, then all objects will be placed and the number will not be modified by the autogen density
setting within FSX/P3D. Increasing the density setting will display more lights, with more of a negative frame rate
impact.
Light Offsets
The light offset setting specifies the distance from the middle of the road that the lights should be positioned at. The
default offset is 0, which places the lights in the middle of the road. A negative value will place the light to the left side
of the road. A positive value will place the light to the right side of the road. For example, a value of -15 would place
the lights 15 meters from the center of the road on the left side.
Light Sizes
The light sizes can be Larger, Medium and Smaller. These are the actual widths of the available objects themselves in
the UTX custom object library. Larger objects are twice the size of the Smaller objects, with Medium sized objects in-
between them. While you cannot change the size of the compiled object models themselves, you can have FSX/P3D
change the model sizes at runtime by changing the “Scale”. Use the “Object Model Scale” slider to change the object
size at runtime. Scale sizes in this interface range from 0.5 (half) to 5.0 (5 times the size).
As you can see, you have 2 ways to change light sizes. Or, you can use a combination of both.

Page | 14
Selecting an Alternate Library
All object models for UTX autogen lights are stored in a custom library file. Each library file will contain 12 different
models (3 different sizes with 4 different light colors each). If available, a list of alternative object library files can be
viewed by pressing the “Select Alternate Object Library” button in the main interface
To install an alternate object library and replace the current one, select one of the list options as shown in figure 11 and
press the Install button.
Figure 10
At the time of release, there are 4 different object libraries available. Each of these can have either 3D or 4D lights,
with or without ground spots.
The difference between 3D and 4D lights is not really noticeable unless you are looking almost straight down. 3D lights
consist of 2 intersecting vertical planes. 4D lights add an intersecting horizontal plane so that the lights are more visible
when looking straight down. We use 3D lights as the default because they are a little more efficient and we feel that
they look better from most angles.
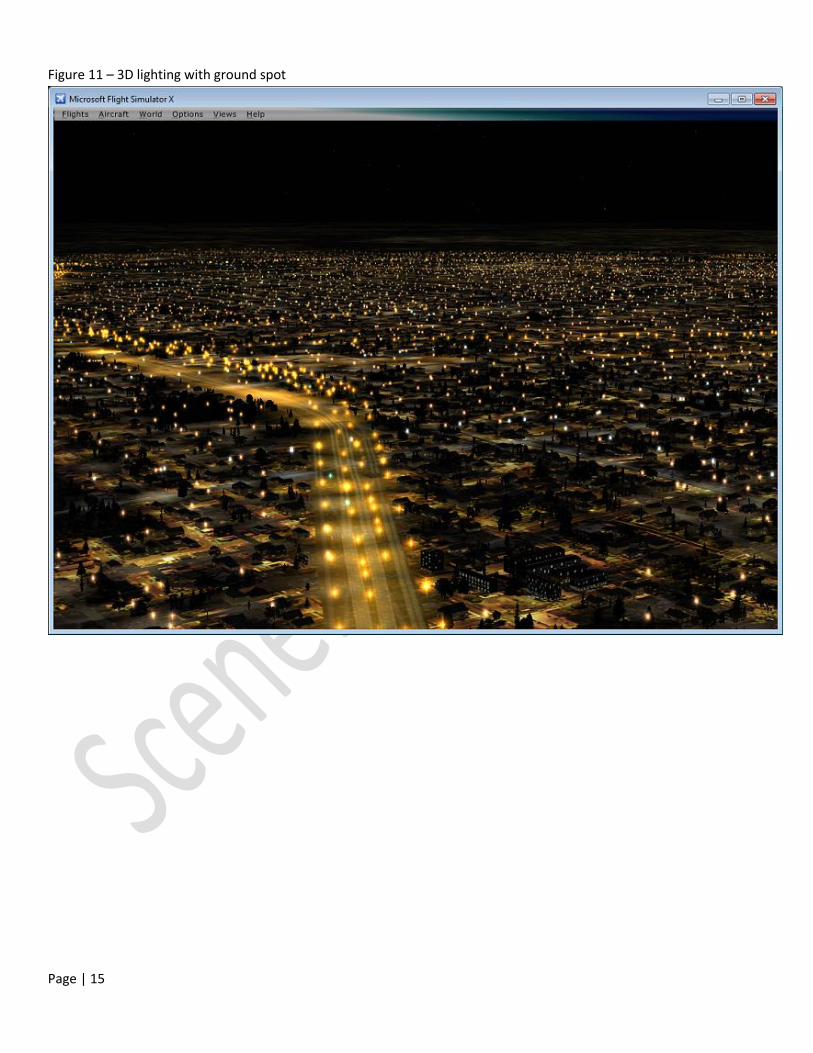
If you are worried about frame rates, select a version without ground spots as these seem to affect frame rates more.
Ground spots will light up the roads and terrain below the lights, adding an immersive effect that is more realistic.
Figures 11 and 12 show the difference between 3D lights with and without a ground spot.
Page | 15
Figure 11 – 3D lighting with ground spot

Page | 16
Figure 12 – 3D lighting with no ground spot

Page | 17
Selecting an Alternate Texture
Scenery Solutions, or other developers, may offer replacement light textures at some point in time. A list of available
replacement textures can be viewed by pressing the “Select Alternate Texture” button in the main interface. To install
an alternate texture, select the texture as shown in figure 13 and press the Install button.
Figure 13
By default upon installation, FSX uses the “Standard Lights, Brighter Ground Spot” texture
By default upon installation, Prepar3D uses the “Standard Lights, Darker Ground Spot” texture, because the lighting in
Prepar3D is brighter overall than FSX.

Page | 18
FAQ
I only See Lights On Major Roads And Highways
Have you disabled minor/residential roads using the UTX interface ?
Will Autogen Lights For UTX work with Photoscenery products ?
No. Autogen lights can only be displayed on vector roads. We do have a product called Xtreme Lighting that will
provide custom light objects that can be displayed over either vector terrain or photoscenery.
Will Autogen Lights For UTX work with the new Xtreme Cities product line by Scenery Solutions ?
Xtreme Cities provides it’s own lighting that is very similar and fully compatible with the UTX autogen lighting. The
autogen lighting will not be displayed in Xtreme Cities coverage areas. Instead, it will be replaced by the Xtreme Cities
lights.
Are The Lights Compatibility With Orbx Lighting ?
As UTX Lighting provides its own autogen definitions, there should be no conflict with Orbx products. Orbx Global base
lights will be displayed on top of the landclass textrures. UTX Autogen Lighting will be displayed on top of the UTX
vector roads.
Will the autogen lights work on all UTX regions ?
Yes, since all UTX products, old and new, share the same road textures, you will see autogen lighting on all UTX
products, even those prior to V2.0.
What Is The Difference Between UTX Autogen Lights And Xtreme Lighting ?
UTX Autogen Lights will only work on top of vector roads provided by UTX. Xtreme Lighting is created using custom
objects. As a result, Xtreme Lighting can be used with any type of product, even photoscenery.