AURICALOTOcam 300andthe...
32
AURICAL OTOcam 300 and the Video Otoscopy Module Reference Manual Doc. No. 7-50-1340-EN/04 Part No. 7-50-13400-EN
Transcript of AURICALOTOcam 300andthe...

AURICAL OTOcam 300 and theVideo Otoscopy Module
Reference ManualDoc. No. 7-50-1340-EN/04Part No. 7-50-13400-EN

CopyrightnoticeNopart of this documentation orprogrammay be reproduced, stored ina retrieval system, ortransmitted, in anyform orby anymeans, electronic,mechanical,photocopying, recording,or otherwise,without the priorwritten consent ofGN Otometrics A/S.
Copyright©2016,GN Otometrics A/SPublished in Denmark byGN Otometrics A/S, DenmarkAll information, illustrations, and specifications in this manual are based on the latest productinformation available at the time ofpublication.GN Otometrics A/Sreserves the right tomake changes atany time without notice.
Registered trademarks andTrademarksMADSEN Itera II,MADSEN OTOflex 100, OTOsuite,AURICAL FreeFit, AURICAL Visible Speech,MADSEN Astera²,MADSEN Xeta, ICSChartr 200 VNG/ENG, ICSChartr EP, OTOcam 300,MADSEN AccuScreen, MADSEN AccuLink,ICS AirCal, AURICAL Aud,AURICAL HIT,ICS Impulse,OTObase andMADSEN Capella² are either registered trademarks ortrademarks ofGN Otometrics A/S.
Versionrelease date2016-02-02 (126712)
TechnicalsupportPlease contact your supplier.
2 Otometrics - AURICAL OTOcam 300

Table of Contents
1 Introduction 51.1 Intendeduse 51.2 About this manual 5
1.2.1 Safety 61.3 Typographical conventions 6
1.3.1 Navigating this manual 6
2 Unpacking and Installing 72.1 Unpacking 72.2 Storing 72.3 Assembling AURICAL OTOcam 300 72.4 Connecting AURICAL OTOcam 300 82.5 Switching AURICAL OTOcam 300 on and off 82.6 The AURICAL OTOcam 300 cradle 9
3 Capturing and editing pictures 103.1 Tips onhow to use the specula 103.2 Tips on cerumen removal 103.3 Preparing for a session with a client 103.4 Viewing pictures from oldOTOcam 300 software 103.5 Themainwindow 113.6 Capturemode 12
3.6.1 Capture functions 123.6.2 Capturing a picture 133.6.3 Switching modes with AURICAL OTOcam 300 14
3.7 Edit mode 143.7.1 Right-click functions 153.7.2 Adding markers to a picture 163.7.3 Removing markers 163.7.4 Adding comments to a picture 173.7.5 Assigning a picture to the other ear 17
3.8 Deleting pictures 173.9 Copying pictures to the clipboard 173.10 Exporting pictures 183.11 Live Otoscopy in PMM 183.12 PC shortcut keys 18
4 Maintenance andCleaning of AURICAL OTOcam 300 204.1 Service and repair 204.2 Cleaning 20
4.2.1 Cleaning accessories 204.3 Troubleshooting 21
5 AURICALOTOcam 300 video otoscope standards and safety 225.1 Warning notes 225.2 Manufacturer 24
5.2.1 Responsibility of the manufacturer 24
App. 1 Technical Specifications 25App. 1.1 Accessories 25
Otometrics - AURICAL OTOcam 300 3

App. 1.2 Device 25App. 1.3 Notes on EMC (Electromagnetic Compatibility) 28
Index 31
4 Otometrics - AURICAL OTOcam 300

1 IntroductionAURICAL OTOcam 300 is a video otoscope (VO) for visually inspecting and capturing pic-tures of the ear canal, the tympanic membrane or other such applications. AURICALOTOcam 300 is used in connection with the OTOsuite Video Otoscopy module to cap-ture and edit pictures.
Easy touseAURICAL AURICAL OTOcam 300 is designed for optimal ease of use. The buttons on thecamera provide you with quick operation without having to reach out for the mouse orthe keyboard of your computer.
The OTOsuite Video Otoscopy moduleWith the OTOsuite Video Otoscopy module you can capture and edit pictures from AURICAL AURICAL OTOcam 300.
You can use the OTOsuite Video Otoscopy module as a module under Noah version 3.6.1 or higher, or directly as a modulein OTOsuite. When you use the Video Otoscopy module under Noah the captured pictures are integrated with other cli-ent data.
In order to easily identify and use the pictures, you can add markers and comments to the individual pictures, and use theOTOsuite Report Manager function to print reports.
1.1 Intended use
AURICALOTOcam 300 and the OTOsuite Video Otoscopy moduleAURICAL OTOcam 300 is intended for use in connection with the OTOsuite Video Otoscopy module to visually inspect theear canal and the tympanic membrane, and to capture and store pictures of the ear canal and the tympanic membrane, orother such applications performed by audiologists, hearing instrument dispensers, ENT doctors and other trained per-sonnel. Please note that local regulations may define users for video otoscopy differently. Local regulations must be com-plied with at all times.
Speculawith cerumenmanagementPlease note that the use of specula with cerumen management may require special training in order to authorize per-sonnel to carry out cerumen removal. These requirements are locally defined. Local regulations must be complied with atall times.GN Otometrics A/S cannot be held responsible for unauthorized use of specula.
1.2 About this manualThis is your guide to using the AURICAL OTOcam 300 and the OTOsuiteVideo Otoscopy module.
We strongly recommend that you read through the screen descriptions in thismanual before you use AURICALOTOcam 300 and the OTOsuite Video Otoscopy module for the first time.
Otometrics - AURICAL OTOcam 300 5
1 Introduction

Note• If you are using the OTOsuite Video Otoscopy module with Noah, we recommend that you be familiarwith the screens and functions provided in Noah.
After you install OTOsuite, you can find OTOsuite manuals and related documentation on your PC. In the Startmenu,open OTOsuite Manuals, which containsan overview with links to all manuals.
1.2.1 SafetyThismanual contains information and warningswhich must be followed to ensure the safe performance of AURICALOTOcam 300 and the OTOsuite Video Otoscopy module.
Warning• Local government rules and regulations, if applicable, should be followedat all times.
Safety information is stated where it is relevant, and general safety aspects are described in AURICAL OTOcam 300 videootoscope standards and safety ► 22
1.3 Typographical conventions
The use of Warning, Caution andNoteTo draw your attention to information regarding safe and appropriate use of the device or software, the manual uses pre-cautionary statements as follows:
Warning• Indicates that there is a risk of death or serious injury to the user or patient.
Caution• Indicates that there is a risk of injury to the user or patient or risk of damage to data or the device.
Note• Indicates that you should take special notice.
1.3.1 Navigating this manualMenus, icons and functions to select are shown in bold type, as for instance in:
Click the Set options icon on the toolbar or select Tools > Options...
6 Otometrics - AURICAL OTOcam 300
1 Introduction

2 Unpacking and Installing
Note•Make yourself familiar with the OTOsuite Video Otoscopy Module, AURICAL OTOcam 300, and their func-tions and settings, before you start using themwith a client.
To install and get started with OTOcam 300 and the OTOsuite Video Otoscopy module, follow the sequence below:
OTOsuite• Install OTOsuite on the PC. For instructions on installing OTOsuite, see the OTOsuite Installation Guide, which you can
find on the OTOsuite installation medium (disk or memory stick).
AURICALOTOcam 300• Unpack AURICAL OTOcam 300 (Unpacking ► 7).
• Assemble AURICAL OTOcam 300 (Assembling AURICAL OTOcam 300► 7).
• Connect AURICAL OTOcam 300 to the PC or to one of the USB connections on the rear of AURICAL Aud (ConnectingAURICALOTOcam 300► 8).
2.1 Unpacking1. Unpack AURICAL OTOcam 300 carefully.
When you unpack AURICAL OTOcam 300 and accessories, it is a good idea to keep the packing material in which theywere delivered.If you need to send AURICAL OTOcam 300 in for service, the original packing material will protectagainst damage during transport, etc.
2. Inspect the equipment for possible visual damage.If damage has occurred, do not put the device into operation. Contact your local distributor for assistance.
3. Check the packing list accompanying the package to make sure that you have received all necessary parts and accessor-ies. If your package is incomplete, contact your local distributor.
2.2 StoringIf you need to store AURICAL OTOcam 300 before you put it into operation, follow the guidelines below:• Store AURICAL OTOcam 300 and accessories in the boxes provided to protect the equipment from damage.
• Store AURICAL OTOcam 300 and accessories in adry environment.
2.3 Assembling AURICAL OTOcam 300Only the cradle needs to be assembled. Use the supplied Allen key, screws and washer to assemble the cradle as shown.
Otometrics - AURICAL OTOcam 300 7
2 Unpacking and Installing

2.4 Connecting AURICAL OTOcam 3001. Connect the USB cable of AURICAL OTOcam 300 to one of the computer’s USB ports.
AURICAL OTOcam 300 is powered through the USB connection to the PC.
If you are using AURICAL OTOcam 300 in connection with AURICAL Aud, you can alternatively connect AURICALOTOcam 300 to one of the USB connections on the rear of AURICAL Aud.
2. Launch OTOsuite and select the OTOsuite Video Otoscopy module.
AURICAL OTOcam 300 is automatically connected to the OTOsuite Video Otoscopy module.
2.5 Switching AURICAL OTOcam 300 on and off
Switchingon AURICAL OTOcam 3001. Start up the computer.
2. Connect the USB cable of AURICAL OTOcam 300 to one of the computer’s USB ports.
3. Launch OTOsuite and select the Video Otoscopymodule.
– If OTOcam 300 is not placed in its cradle, the light beam is switched on.
– IfOTOcam 300 is placed in its cradle, the light beam is not switched on.
8 Otometrics - AURICAL OTOcam 300
2 Unpacking and Installing

Warning•Do not stare into the light beam, or point the light beam in the direction of other people’s eyes. It candamage the eyes.
Switchingoff AURICAL OTOcam 300To switch off OTOcam 300, disconnect the USB cable from the computer or switch off the computer.
2.6 The AURICAL OTOcam 300 cradleThe cradle is amulti-functional holder for your AURICAL OTOcam 300 when it is not in use. It controls the light source andthe camera tip heating.
When AURICAL OTOcam 300 is placed in the cradle, the light source is turned off and the camera tip heating is turned on.
Nocondensation problemsIn most cases the camera tip has a lower temperature than the air in the ear canal. This causes condensation, whichreduces the image quality.
In AURICAL OTOcam 300 the built-in heater pre-heats the camera tip so that the temperature difference between thecamera tip and the air inside the ear canal isminimal. The pre-heating function is activated when the AURICALOTOcam 300 is plugged into the PC (which is powered on) and placed in its cradle. In order for the pre-heater to heat thecamera tip to body temperature, AURICAL OTOcam 300 should remain in the cradle for approx. 5 minutes before the cam-era is used.
Therefore, for optimal operating conditions, place AURICAL OTOcam 300 in the cradle when you are not using it.
Otometrics - AURICAL OTOcam 300 9
2 Unpacking and Installing

3 Capturing and editing pictures
3.1 Tips on how to use the specula
Warning•Be careful when you insert the speculum in the ear of the patient - there is a risk of damaging the wallof the ear canal and/or the tympanic membrane.
The specula are important elements in the hygienic aspect of video otoscopy. The specula must be disposed of after singleuse.
It is easy to snap the speculum onto and off the metal tip of the AURICAL OTOcam 300.• To attach the speculum, press the speculum onto the metal tip until a click is heard.
• To detach the speculum, press on the rim of the speculum with your thumb until it is released from the metal tip.
3.2 Tips on cerumen removal
Warning•Be careful when you insert the speculum in the ear of the patient - there is a risk of damaging the wallof the ear canal and/or the tympanic membrane.
You can use specula specifically designed for cerumen removal with AURICAL OTOcam 300.
Using a speculum to remove cerumen has several advantages over other techniques.• The lighted camera allows a full view of the area to be cleaned.
• If you use a cerumen removal speculum, it may not be necessary to apply any fluids in the ear canal. Thismakes thespeculum approach useful and effective, even for cases with PE tubes, and for other situations where the tympanicmembrane is not intact.
3.3 Preparing for a session with a client1. Connect AURICAL OTOcam 300 to the PC.
If you are using AURICAL OTOcam 300 in connection with AURICAL Aud, you can alternatively connect AURICALOTOcam 300 to one of the USB connections on the rear of AURICAL Aud.
2. Launch OTOsuite.
The basic OTOsuite functions are described in the OTOsuiteUser Guide.
3. If needed, create a client.
4. Click the Navigator icon in the OTOsuite toolbar to open the Navigation Panel.
3.4 Viewing pictures from old OTOcam 300 softwareIf you have launched the VideoOtoscopy module from Noah with a client selected, you can set up the VideoOtoscopymodule to show pictures captured in the old version of the OTOcam 300 software (non-OTOsuite). The screen will then
10 Otometrics - AURICAL OTOcam 300
3 Capturing and editing pictures

show results, if available, from a previous session selected in Noah.
If these pictures were made in the old version of the OTOcam 300 Software (non-OTOsuite), they are read-only in theVideoOtoscopy module.
1. Select Tools > ConfigurationWizard...
2. Click on Configure next to VideoOtoscopy.
3. Make sure that the path indicates the correct path to the old OTOcam 300 pictures. If it does not, click the arrow tobrowse and select the correct path.
3.5 The main windowThe VideoOtoscopy screen is divided into three main sections.
Before capturingpicturesIf AURICAL OTOcam 300 is connected, the VideoOtoscopy module opens up showing a live image.
A. Left Picture PanelB. Mainwork areaC. Right Picture Panel
Asdefault, the left Picture Panel is shown to the left of the screen. If you want to switch the right Picture Panel to the leftside, select Tools > Options > Video Otoscopy > General and set Picture Panel Viewing to Right-Left.
Otometrics - AURICAL OTOcam 300 11
3 Capturing and editing pictures

After capturingpictures
The left and right Pic-ture Panels list the pic-tures you capture.
Each picture istimestamped for easyidentification.
3.6 CapturemodeIn Capture mode you can visually inspect and capture pictures of the ear canal, the tympanic membrane or other suchapplications.
3.6.1 Capture functionsThe Capture toolbar
Delete All Pictures
Deletesall pictures captured in this session.
Icon AURICALOTOcam 300 Shortcut Capture
L Captures the picture as Left Ear.
R Captures the picture as Right Ear.
12 Otometrics - AURICAL OTOcam 300
3 Capturing and editing pictures

Freeze
You can freeze apicture before capturing it as a picture.
In regular screenmode1. When an image is obtained, click the Freeze icon in the toolbar or press the Spacebar.
2. If needed, click the Freeze icon or press the Spacebar to unfreeze the image.
In Full Screen mode1. When an image is obtained, press the Spacebar to freeze the image.
2. If needed, press the Spacebar to unfreeze the image.
3. Press Esc to return to regular viewing mode.
Full Screenmode
Displaysa full screen view of the selected picture.
1. When an image is obtained, press the Spacebar to freeze the image.
2. When a satisfactory image is obtained, press the Right Ear or Left Ear button on OTOcam 300 to capturethe image.
3. If needed, press the Spacebar to unfreeze the image.
4. Press Esc to return to regular viewing mode.
3.6.2 Capturing a picture1. In OTOsuite, click Capture in the VideoOtoscopy section of the Navigation Panel. The VideoOtoscopy module is
launched and AURICAL OTOcam 300 is active.
Warning•Do not stare into the light beam, or point the light beam in the direction of other people’s eyes. It candamage the eyes.
2. Press a speculum onto the tip of AURICAL OTOcam 300.
3. Insert the speculum on AURICAL OTOcam 300 in the ear of the client.
Otometrics - AURICAL OTOcam 300 13
3 Capturing and editing pictures

4. When a satisfactory image is obtained, press the Right Ear or Left Ear button on AURICAL OTOcam 300, or click theCapture Left or Capture Right icon in the toolbar.
3.6.3 Switching modes with AURICAL OTOcam 300If the VideoOtoscopy module is in Editmode, and you press the Right Ear or Left Ear button on AURICAL OTOcam 300,OTOsuite will switch to Capture mode.
Press the Right Ear or Left Ear button again to capture a picture.
3.7 Edit modeIn Editmode you can add markers and comments to the individual pictures.
If you have assigned apicture to the wrong ear when you captured it, you can assign it to the other ear.
The Edit toolbar
Delete All Pictures
Deletes all pictures captured in this session.
Markers
14 Otometrics - AURICAL OTOcam 300
3 Capturing and editing pictures

Markers
A marker consists of a circle or an arrowhead. When you place a marker on apicture, it will be identified by a markeridentifier (the letters A to Z). Depending on the picture, the markers are white or black for easy visibility.
Selecting a marker• To select a marker, click on the desired marker in the Edit toolbar.
Placinga marker on thepicture• To place the chosen marker on the picture, position the cursor at the point where you wish to place the marker
and click once.
Eraser tool
The Eraser tool removes individual markers. This is useful if you wish to remove several markers.• Select the Eraser tool and click on the marker.
• When you no longer want to use the Eraser tool, click on the Pointer tool or aMarker in the toolbar.
Pointer tool
The Pointer tool is selected as default.
• When you no longer want to use the Eraser tool or aMarker tool, click on the Pointer tool in the tool-bar.
3.7.1 Right-click functionsYou can right-click on a picture in one of the Picture Panels, and in Edit mode also on the central picture.
Delete
Deletes the selected picture.
Edit
Selects the picture for editing and displays it in the central work area.
Copy toClipboard
Copies the selected picture to the clipboard. Markers, if there are any, will beincluded. You can paste the picture into other software programs.
Otometrics - AURICAL OTOcam 300 15
3 Capturing and editing pictures

Swap Ear
If you have assigned a picture to the wrong ear when you captured it, you canassign it to the other ear. This will send the picture to the other Picture Panel.
Right-click functions on the central picture
Remove All Markers
Right-click anywhere in the central picture and select Remove All Markers .
Remove Marker
Right-click on one marker in the central picture and select Remove Marker.
3.7.2 Adding markers to a pictureYou can add markers to any picture.
1. Click on the picture in the right or left Picture Panel. The picture is shown in the cen-ter of the screen.
2. To add amarker, click on one of the markers in the toolbar and click on the relevantarea you wish to mark up on the central picture.
The markers will be listed ranging from A to Z.
The corresponding picture in the Picture Panel will be marked with aComment icon.
3.7.3 Removing markersYou can remove individual markers or all markers in apicture.
Removing individual markersYou can remove individual markers in two ways:
• Right-click on the marker in the central picture and select Remove Marker.
or
16 Otometrics - AURICAL OTOcam 300
3 Capturing and editing pictures

• Click on the Eraser tool in the toolbar and click on the relevant marker or markers you wish to delete.
Removingall markers
• Right-click on the central picture and select Remove All Markers.
3.7.4 Adding comments to a pictureYou can add comments to any picture.
1. Click on the picture in the right or left Picture Panel. The picture isshown in the center of the screen.
2. To add a comment, write your comment in the Comments fieldbelow the central picture.
The corresponding picture in the Picture Panel will be marked withaComment icon.
3.7.5 Assigning a picture to the other earIf you have assigned apicture to the wrong ear when you captured it, you can assign it to the other ear.
• Right-click on the relevant picture in the right or left Picture Panel and select Swap Ear.
3.8 Deleting picturesYou can delete individual pictures or all pictures.
Deleting individual pictures
• When you mouse over a picture in the right or left Picture Panel, aDelete icon is shown for that picture.
Deletingall pictures
• Click the Delete all pictures icon in the toolbar.
3.9 Copying pictures to the clipboard1. To copy a picture to the clipboard, right-click on the relevant picture and select Copy toClipboard. Markers,
if there are any, will be included.
2. You can paste the picture into other software programs.
Otometrics - AURICAL OTOcam 300 17
3 Capturing and editing pictures
3.10 Exporting pictures• To export a picture to .jpg format, right-click on the relevant picture and select Export.
You can export apicture with or without markers.
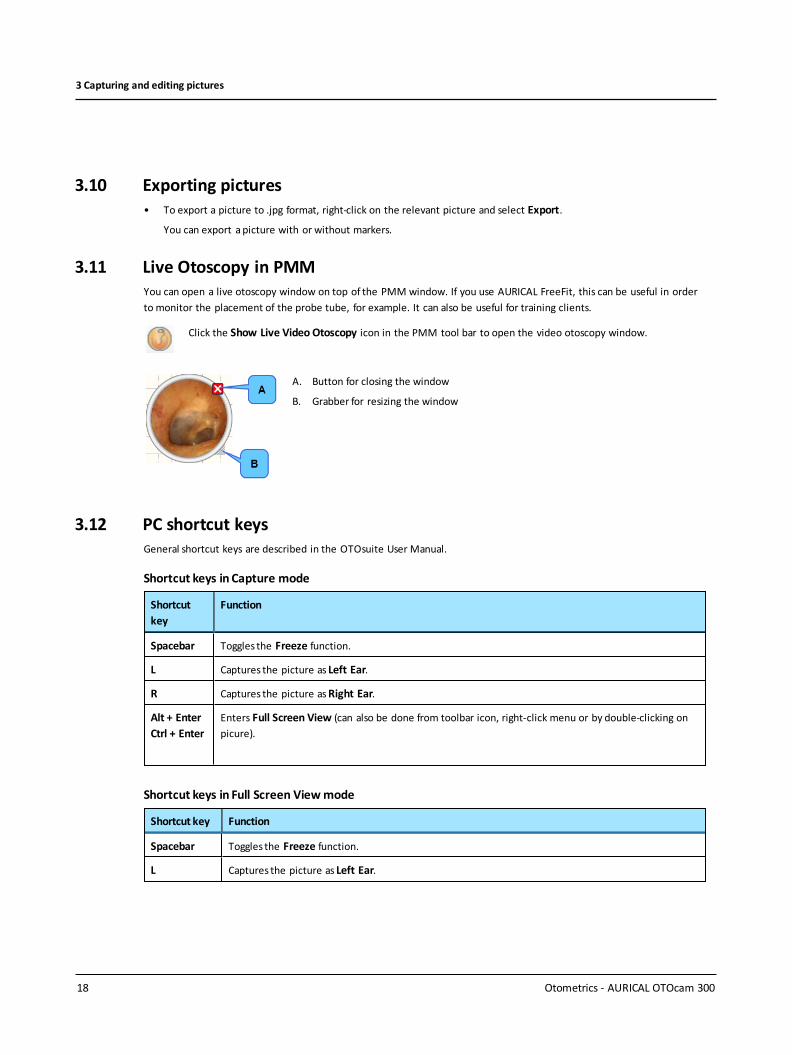
3.11 Live Otoscopy in PMMYou can open a live otoscopy window on top of the PMM window. If you use AURICAL FreeFit, this can be useful in orderto monitor the placement of the probe tube, for example. It can also be useful for training clients.
Click the Show Live VideoOtoscopy icon in the PMM tool bar to open the video otoscopy window.
A. Button for closing the window
B. Grabber for resizing the window
3.12 PC shortcut keysGeneral shortcut keys are described in the OTOsuite User Manual.
Shortcut keys in Capture mode
Shortcutkey
Function
Spacebar Toggles the Freeze function.
L Captures the picture as Left Ear.
R Captures the picture asRight Ear.
Alt + EnterCtrl + Enter
Enters Full Screen View (can also be done from toolbar icon, right-click menu or by double-clicking onpicure).
Shortcut keys in Full Screen Viewmode
Shortcut key Function
Spacebar Toggles the Freeze function.
L Captures the picture as Left Ear.
18 Otometrics - AURICAL OTOcam 300
3 Capturing and editing pictures

Shortcut key Function
R Captures the picture asRight Ear.
Escape (Esc) Closes Full Screen View (can also be done from right-click menu or by double-clicking on picure).
Alt + EnterCtrl + Enter
Closes Full Screen View.
Otometrics - AURICAL OTOcam 300 19
3 Capturing and editing pictures

4 Maintenance and Cleaning of AURICAL OTOcam 300
4.1 Service and repairWhen you unpack AURICAL OTOcam 300 and accessories, it is a good idea to keep the packing material in which they weredelivered.If you need to send AURICAL OTOcam 300 in for service, the original packing material will protect against dam-age during transport, etc.
Warning• For safety and in order not to void the warranty, the AURICAL OTOcam 300 housing should only beopened and serviced byauthorised service personnel at authorised workshops.
In case of any defects, please make adetailed description of the defect(s) and contact your local distributor. Do notuse a defective device.
Note•There are no user-serviceable parts inside the AURICAL OTOcam 300 housing.
4.2 CleaningNever use sharp or pointed objects for cleaning!
Warning•Do not clean the otoscope in an ultrasonic bath and do not gas-sterilize or autoclave the otoscope!
1. Disconnect AURICAL OTOcam 300 from the computer.
2. Use a soft, slightly damp cloth with a small amount ofmild detergent on it to clean the housing, camera head, plugsand cable.
Caution•Do not allow any moisture inside the device!
3. If the glass surface of the lens is very dirty, use a cotton pad with alcohol to clean it.
4. After cleaning, remove the cleaning agents thoroughly by wiping with a cloth dampened with pure, deionised water.
5. Finally, carefully dry all surfaces of AURICAL OTOcam 300 and the glass surface of the lens with a soft cloth.
4.2.1 Cleaning accessoriesSpeculaSpeculaare disposable and therefore should not be cleaned or re-used.
There are no special requirements for the disposal of specula.
20 Otometrics - AURICAL OTOcam 300
4Maintenance and Cleaning of AURICAL OTOcam 300

4.3 TroubleshootingProblem Cause Solution
The camera view area in the Video Otoscopymodule is black.
Direct 3D is not rendered correctly bythe graphics card.
Update the PC’s graphicscard driver.
Otometrics - AURICAL OTOcam 300 21
4 Maintenance and Cleaningof AURICAL OTOcam 300

5 AURICAL OTOcam 300 video otoscope standards andsafetyThismanual contains information and warnings, which must be followed to ensure the safe performance of the devices andsoftware covered by thismanual. Local government rules and regulations, if applicable, should also be followed at all times.
When the Video Otoscopymodule is used in conjunction with adevice (including devices other than those produced byOtometrics), make sure that all information and warnings in the documentation of the device are followed.
Complieswith Type BF requirements of IEC60601-1.
Complieswith Medical Devices Directive 93/42/EEC and RoHS Directive (2011/65/EC).
Consult user manual for warnings and cautions.
Follow instructions for use.
Complieswith Class II requirements of the safety standard IEC 60601-1.
MEDICAL - General Medical Equipment as to electrical shock, fire and mechanical hazards only in accord-ance with UL 60601-1, first edition, 2003 CAN/CSA-22.2 No. 601.1-M90.
Electronic equipment covered by the Directive 2002/96/EC on waste electrical and electronic equipment(WEEE).
All electrical and electronic products, batteries, and accumulators must be taken to separate collection atthe end of their working life. This requirement applies in the European Union. Do not dispose of theseproducts as unsorted municipal waste.
You can return your device and accessories to Otometrics, or to any Otometrics supplier. You can also con-tact your local authorities for advice on disposal.
Used in error message dialogs if software program fails. See the detailed information in the dialog box.
5.1 Warning notes
Warning•Do not stare into the light beam, or point the light beam in the direction of other people’seyes. It can damage the eyes.
22 Otometrics - AURICAL OTOcam 300
5 AURICAL OTOcam 300 video otoscope standards and safety

Warning• For continued protection against fire hazard, replace fuses with the same type and ratingonly.
• Do not use the instrument in the presence of flammable agents (gases) or in an oxygen-rich environment.
• No parts may be eaten, burnt, or in any way used for purposes other than the applications defined in the Intended Usesection of thismanual.
• For safety reasons and due to effectson EMC, accessories connected to the equipment's outlet fittings must beidentical to the type suppliedwith the system.
• This class of equipment is allowed in domestic establishments when used under the jurisdiction of a health care pro-fessional.
• Unwanted noise may occur if the device is exposed to a strong radio field. Such noise may interfere with the per-formance of the device. Many types of electrical devices, e.g. mobile telephones, may generate radio fields. Werecommend that the use of such devices in the vicinity of AURICAL OTOcam 300 be restricted.
• RF emissions from AURICAL OTOcam 300 are very low and are not likely to cause any interference in nearby elec-tronic equipment. However, local devices placed in close vicinity of AURICAL OTOcam 300 may experience a negativeeffect or loss of functionality..
• It is recommended to install the unit in an environment that minimizes the amount of static electricity. For example,anti-static carpeting is recommended.
• To prevent cross-infection or re-infection, the specula must be disposed of after single use.
• Accidental damage and incorrect handling can have a negative effect on the functionality of the device. Contact yoursupplier for advice.
• AURICAL OTOcam 300 is intended for use by audiologists and other trained health care professionals in visuallyinspecting the ear canal and tympanic membrane.
• Do not use the device for uses other than those described in the Intended Use section. For example, do not use thedevice for examination of nasal cavities, eyes or larynx.
• Do not store or operate AURICAL OTOcam 300 at temperatures and humidity exceeding those stated in Technical Spe-cifications. Noncompliance can have negative effectson performance and/or cause degradation of device components.
• Be careful when you insert the speculum in the ear of the patient - there is a risk of damaging the wall of the ear canaland/or the tympanic membrane. Do not apply excessive force to the outer ear with the speculum.
When you connect other electrical equipment to AURICAL OTOcam 300, remember that equipment that doesnot comply with the same safety standards as AURICAL OTOcam 300 can lead to a general reduction in the sys-tem's safety level. The equipment must comply with IEC 60950.
When selecting accessories connected to the AURICAL OTOcam 300, the following points must be considered:• Use of connected equipment in apatient environment
• Proof that connected equipment has been tested in accordance with IEC60601-1 and/or IEC60601-1-1Keep the unit away from liquids. Do not allow moisture inside the unit. Moisture inside the unit can damage the instru-ment and it may result in a risk of electrical shock to the user or patient.
Otometrics - AURICAL OTOcam 300 23
5 AURICAL OTOcam 300 video otoscope standards and safety

5.2 ManufacturerGN Otometrics A/SHoerskaetten 9, 2630 TaastrupDenmark( +45 45 75 55 557 +45 45 75 55 59www.otometrics.com
5.2.1 Responsibility of the manufacturerThe manufacturer is to be considered responsible for effects on safety, reliability, and performance of the equipment onlyif:
• All assembly operations, extensions, re-adjustments, modifications or repairs are carried out by the equipment man-ufacturer or personnel authorized by the manufacturer.
• The electrical installation to which the equipment is connected complies with EN/IEC requirements.
• The equipment is used in accordance with the instructions for use.
The manufacturer reserves the right to disclaim all responsibility for the operating safety, reliability and performance ofequipment serviced or repaired by other parties.
24 Otometrics - AURICAL OTOcam 300
5 AURICAL OTOcam 300 video otoscope standards and safety

App. 1 Technical Specifications
App. 1.1 AccessoriesAccessory Name Part Number
Desktop cradle 8-35-30800
OTOsuite PC software 8-49-75800
Specula, normal (12 pcs) 8-62-42700
Specula, with cerumen management (12 pcs) 8-62-42710
App. 1.2 Device
Type identification
AURICAL OTOcam 300 is type 1076 from GN Otometrics A/S.
Video system
Sensor 0.3 inch CMOS Digital Image Sensor
Lens System 10 micro lenses with fixed focus with large depth of field
Sensor resolution 720 (H) x 720 (V) pixels
Frame rate 24 frames/sec.
Output signals USB 2.0
Opticaldata
Minimumworking distance 10 mm (0.4 inches)
Preheater
The preheater is active when the AURICAL OTOcam 300 is plugged into the PC and placed in its cradle.
Preheater activation Activated by magnet in cradle.
Preheater power Heats camera distal tip to approx +5°C (9°F) above ambient temperature after 5minutesof activation
Buttons
Freeze frame Right/left ear
Otometrics - AURICAL OTOcam 300 25
App. 1 Technical Specifications

Electrical data
Supply voltage throughUSB port
Input power USB 2.0, Max. 500 mA.
Light source 2 LEDs, fibre-optic light guide
USB plug USB, type A (LED power supply/Camera/Pre-heating)
Switch activated by magnet contact used to switch between pre-heating and light.
Mechanical data
Cable length 2950mm (9.65 feet)
Length without cable 170mm ( 6.7 inches)
Weight including cable 225 g (8 ounces)
Largest diameter 45 mm (1.8 inches)
Distal diameter max. 3.4 mm (0.134 inches)
Total weight 1300 g
Service life
Expected Service life 5 years
Storage environment
Temperature -20°C to +60°C (-4°F to +140°F)
Operatingenvironment
Temperature +10°C to +30°C (+50°F to +86°F)
Air humidity 30% to 75%, non-condensing
Air pressure 600 hPa to 1060 hPa
Warm-up time
Warm-up time <20 seconds
Note• In order for the pre-heater to heat the camera tip to body temperature, AURICAL OTOcam 300 shouldremain in the cradle (connected to a PCwhich is powered on) for minimum 5 minutes before the camera isused. The time should be extended if AURICAL OTOcam 300 has been stored in a cold environment.
Standards
Patient Safety • IEC 60601-1, Class II, applied part Type BF;
• UL60601-1; CAN/CSA-C22.2 NO 601.1-90
EMC IEC 60601-1-2
26 Otometrics - AURICAL OTOcam 300
App. 1 Technical Specifications

Safety
Protection class II IEC 60601-1, IPX0
Application class BF
Otometrics - AURICAL OTOcam 300 27
App. 1 Technical Specifications

App. 1.3 Notes on EMC (Electromagnetic Compatibility)• AURICAL OTOcam 300 is part of amedical electrical system and is thus subject to special safety precautions. For this
reason, the installation and operating instructions provided in this document should be followed closely.
• Portable and mobile high-frequency communication devices, such as mobile phones, may interfere with the func-tioningof AURICAL OTOcam 300.
Guidanceand manufacturer's declaration - electromagnetic emissionsfor all equipment and systems
AURICALOTOcam 300 is intended for use in theelectromagnetic environment specified below. The user of AURICAL OTOcam 300should ensure that it is used in
such an environment.
Emissionstest Compliance Electromagnetic environment - guidance
RFemissions
CISPR 11
Group 1 AURICALOTOcam 300 usesRF energy only for its internal function. Therefore, its RFemis-
sionsarevery lowand are not likely to causeany interference in nearby electronic equip-
ment.
RFemissions
CISPR 11
ClassB AURICALOTOcam 300 is suitablefor use in all environments, includingdomestic envir-
onmentsand thosedirectly connected to the public low-voltage power supply network
that supplies buildingsused for domestic purposes.Harmonic emissions IEC 61000-3-2 Not applicable
Voltagefluctuations/flicker emissionsIEC
61000-3-3
Not applicable
Guidanceand manufacturer's declaration - electromagnetic immunity for all equipmentand systems
AURICALOTOcam 300 is intended for use in theelectromagnetic environment specified below. The user of AURICAL OTOcam 300should ensure that it is used in
such an environment.
Immunitytest IEC 60601
test level
Compliancelevel Electromagnetic environment - guidance
Electrostatic dis-charge (ESD)IEC 61000-4-2
+/- 6 kV contact
+/- 8 kVair
+/- 6 kV contact
+/- 8 kVair
Floors should bewood, concrete or ceramic tile. If floors arecovered with syn-
thetic material, the relative humidityshould be at least 30%.
Power frequency
(50/60Hz) magnetic field
IEC 61000-4-8
3A/m 3A/m Power frequencymagnetic fields should be at levels characteristic of a typical
location in a typical commercial or hospital environment.
Note • UT is theAC mainsvoltage prior to application of thetest level.
28 Otometrics - AURICAL OTOcam 300
App. 1 Technical Specifications

Guidanceand manufacturer's declaration - electromagnetic immunity - for equipmentand systems that are NOTlife-supporting
AURICALOTOcam 300 is intended for use in theelectromagnetic environment specified below. The user of AURICAL OTOcam 300should ensure that it is used in
such an environment.
Immunity test IEC 60601
test level
Compliancelevel Electromagnetic environment - guidance
Radiated RF
IEC 61000-4-3
150kHzto 80MHz
outsideISM bands
3V/m
80MHz to 2.5 GHz3V/m
Portableand mobile RFcommunications equip-
ment should be used no closer to any part of
AURICALOTOcam 300, including cables,than the
recommended separation distance calculated from
theequation applicableto thefrequency of the
transmitter.
Recommended separation distance:
d = 1.2 for 80MHz to 800 MHz
d = 2.3 for 80MHz to 2.5 GHz,
whereP is the maximumoutput power rating of
thetransmitter in watts (W) accordingto thetrans-
mitter manufacturer and d is therecommended
separation distance inmetres (m).
Field strengthsfrom fixed RF transmitters, as
determined by an electromagnetic site survey, a
should beless than thecompliance level in each
frequency range. b
Interferencemay occur in the vicinityof equip-
mentmarked with this symbol:
Note 1:At 80 MHzand 800MHz theseparation distancefor thehigher frequency rangeapplies.
Note 2:These guidelinesmay not apply in all situations. Electromagnetic propagation is affected by absorption and reflection from structures, objects and
people.
a. Field strengthsfrom fixed transmitters, such as basestations for radio (cellular/cordless) telephones and land mobile radios,amateur radio, AM and FMradio
broadcast and TVbroadcast cannot be predicted theoretically with accuracy.To assess the electromagnetic environment dueto fixed RF transmitters, an
electromagnetic site survey should beconsidered. If the measured field strength in the location in which AURICAL OTOcam 300 isused exceeds theapplic-
ableRFcompliance level above, the AURICAL OTOcam 300should be observed to verify normal operation. If abnormalperformance isobserved, additional
measuresmight benecessary, such as reorientingor relocatingAURICAL OTOcam 300.
b. Over thefrequency range150 kHzto 80MHz, field strengths should beless than 3 V/m.
Otometrics - AURICAL OTOcam 300 29
App. 1 Technical Specifications

Recommended separation distances between portable andmobile RF communications equipment and AURICAL OTOcam 300
TheAURICAL OTOcam 300is intended for use in an electromagnetic environment in which radiated RFdisturbances arecontrolled. Thecustomer or the user of
theAURICAL OTOcam 300can help prevent electromagnetic interferenceby maintaining a minimum distance between portableand mobile RF com-
municationsequipment (transmitters) and the AURICALOTOcam 300as recommended below, according to the maximum output power of thecom-
municationsequipment.
Rated maximum outputpower of transmitter
W
Separation distance according to frequency of transmitter
m
150 kHzto 80MHz
d = 1.2
80MHz to 800 MHz
d = 1.2
800MHz to 2.5 GHz
d = 2.3
0.01 0.12 0.12 0.23
0.1 0.38 0.38 0.73
1 1.2 1.2 2.3
10 3.8 3.8 7.3
100 12 12 23
For transmitters rated at a maximum output power not listed above, therecommended separation distance d inmeters (m) can be estimated using theequa-
tion applicableto thefrequency of thetransmitter,where P is themaximum output power rating of the transmitter in watts (W) according to thetransmitter
manufacturer.
Note 1:At 80 MHzand 800MHz theseparation distancefor thehigher frequency rangeapplies.
Note 2:These guidelinesmay not apply in all situations. Electromagnetic propagation is affected by absorption and reflection from structures, objects and
people.
30 Otometrics - AURICAL OTOcam 300
App. 1 Technical Specifications

Index
AAdding
comments to picture 17markers to picture 16
AssemblyOTOcam 300 7
CCapturing
functions 12picture 13
Cerumenremoval 10Cleaning 20Comments
adding 17Connecting OTOcam 300 8Copy to clipboard 17Cradle
assembly 7description 9
DDeleting pictures 17Device type 25Disposal of specula 20
EEditing
adding markers 16functions 14removing comments 17removing markers 16
Eraser tool 14Exporting pictures 18
FFreeze 12Full screen view 12
IIcons
Capture Left 12Capture Right 12Delete 12, 14Eraser tool 14Freeze 12Full screen view 12Pointer tool 14
InstallingOTOcam 300 7
Intendeduse 5Introduction 5
MMainwindow
Video Otoscopy 11Maintenance 20Manufacturer 24Markers 14
adding 16removing 16
OOTOcam 300
assembly 7cerumenremoval 10connecting 8cradle 7, 9device type 25introduction 5maintenance and cleaning 20safety 22storing 7switching on/off 8unpacking 7unpacking and installing 7using specula 10
PPictures
adding comments 17adding markers 16capturing 13
31 Otometrics - AURICAL OTOcam 300
Index

copying to clipboard 17deleting 17exporting 18removing markers 16swapping ear 17viewing old OTOcam
pictures 10Pointer tool 14Preparing for a session 10
RRemoving markers from picture 16Right-click functions 15
SSafety 22Screens
Video Otoscopy mainwindow 11
Service and repair 20Shortcut keys 18Specifications 25Specula 5
cerumenremoval 10disposal 20how to use 10
Storing the device 7Swap ear 17Switching OTOcam 300 on/off 8
TTechnical specifications 25
video system 25Toolbar
capture 12edit 14
UUnpacking and installing
OTOcam 300 7Unpacking the device 7
VVideo Otoscopy module
mainwindow 11
PC shortcut keys 18right-click functions 15
Video systemtechnical specifications 25
WWarning notes 22
Otometrics - AURICAL OTOcam 300 32
Index