
AUDIX Documentation for DEFINITY ONE Communications System · such as using DSA or Telnet. The...
26
Issue 1 December 1999 Getting Started - 1 Getting Started
Transcript of AUDIX Documentation for DEFINITY ONE Communications System · such as using DSA or Telnet. The...

Issue 1December 1999
Getting Started - 1
Getting Started

Getting Started - 2 Issue 1December 1999
Overview of Getting Started
Overview of Getting Started
This section explains the basic operations of the AUDIX system. It describes how to:
n Log in and log out of the AUDIX system
n Use the administration screens, including how to:
— Activate a screen
— Use the online help for screens and fields
— Move through the data-entry fields of a screen
— Enter data in a field
— Use the command line and function keys
n Print the contents of a screen
Who Should Read This Section
Read this section if you are a new administrator of an AUDIX system or if you want to review basic operations.

Getting Started - 3 Issue 1December 1999
Logging In
Logging In
You can use one of the following logins to the AUDIX system:
To log in to the AUDIX system:
1. Follow one of the access methods described in the DEFINITY ONE System Overview, such as using DSA or Telnet.
The system displays the following message:
login:
Table: AUDIX Logins
Login Definition Allows you to access:
sa System administrator
All AUDIX administration screens
vm Voice messaging administrator
Most AUDIX administration screens
NOTE:The sample screens provided in this help system may vary slightly from your system display.

Getting Started - 4 Issue 1December 1999
Logging In
2. Enter the appropriate login. The system is case sensitive, so use lowercase letters.
The system displays the following message:
password:
3. Enter the password for your login.
The system displays the following message:
terminal type:
4. Enter one of the following:
n 4410 for Terranova or PROCOMM PLUS 4410 emulation
n 513 for a Terranova emulation
n vt100 for a vt100 or vt131 terminal
NOTE:The passwords for sa and vm are set the same way as other system passwords. See the DEFINITY ONE Overview document for information about changing passwords.
NOTE:Additional terminal types can be used and may work with no noticeable difference in functionality. However, inconsistency in the appearance of function keys and displays may result when using some terminals or emulators.

Getting Started - 5 Issue 1December 1999
Logging In
5. The system displays the AUDIX Command Prompt Screen and the cursor appears as a blinking rectangle on the command line.
Once this screen is displayed, you can enter the commands that give you access to the various AUDIX screens.
6. Enter the command that allows you to access the AUDIX screen that you want.
Tip: Press F6 (Choices) or see The Command Line for a description of the AUDIX commands.
Procedure completed.

Getting Started - 6 Issue 1December 1999
AUDIX Administration Screens
AUDIX Administration Screens
Instructions in this help system assume that you used the sa login to access the AUIDX system. The instructions for screen navigation and data entry also apply to the vm login, although the vm login may not allow access to some AUDIX administration screens.
CAUTION:The AUDIX system allows more than one person to perform the same function using the same screen, for example, adding a user to the AUDIX system database. However, if two people happen to be, for example, editing the same user’s profile, only the changes made by the person who saves the screen last are written to the system database. The other person’s changes are lost.
Accessing Administration Screens
Through the AUDIX administration screens you view information, enter information, or select available system options. You access the various AUDIX administration screens primarily via commands that you type at the command line.
To follow along with explanations in this section, use the sa or vm login to access the AUDIX Command Prompt Screen. See Logging In for more information.
NOTE:The terms user and subscriber are used interchangeably throughout these procedures. They are equivalent terms; however, subscriber is used on the screens and is the command word you must type at the command line, for example, change subscriber “Jane Doe”.
The following sections describe how to use the AUDIX administration screens.

Getting Started - 7 Issue 1December 1999
AUDIX Administration Screens
Screen Layout
Layout of the AUDIX Command Prompt Screen represents the basic layout of the AUDIX Command Prompt (AUDIX Administration) screen.
Screen Components
The Component Descriptions: AUDIX Command Prompt Screen table provides details about each area of the AUDIX Command Prompt (AUDIX Administration) screen.
Standard Screen Function Keys
Several function keys perform standard actions regardless of the screen you are viewing. Other commands are unique to a particular screen. The following table describes the purpose of each standard function key.
Table: AUDIX Administration Standard Function Keys
Function Key Purpose
F1 (Cancel) Aborts the current activity and returns the cursor to the command line. When the cursor is on the command line, F1 erases the entire contents of the command line. On a help screen, F1 returns to the screen on which the help was requested.
F2 (Refresh) Repaints the screen.
(1 of 3)

Getting Started - 8 Issue 1December 1999
AUDIX Administration Screens
F3 (Enter) Submits the information entered on a screen for the action specified on the command line. When the cursor is in the command line, F3 requests execution of the command.
Note: RETURN has the same effect as F3 (Enter) when the cursor is on the command line. On a screen, RETURN moves the cursor forward from one field to the next.
F4 (Clear Fld) Clears an entire field in a screen or a single keyword from the command line. For example, if the command line contains the command list cos and you press F4, the command line changes to list.
F5 (Help) When the cursor is on the command line, pressing this key is identical to typing the help command; that is, it displays a screen explaining all the types of help available in the AUDIX system. When the cursor is on a screen, this key requests help for the entire screen.
Table: AUDIX Administration Standard Function Keys
Function Key Purpose
(2 of 3)

Getting Started - 9 Issue 1December 1999
AUDIX Administration Screens
Changing the Sequence of the AUDIX Function Keys
The function keys shown on the last line of the screen appear in the default order for AUDIX.
You can change the sequence of these function keys to match the sequence used by the System Access Terminal (SAT) or Manager 1 administration tools for the System 75 switch and the DEFINITY Communications System Generic 1 and 3.
F6 (Choices) When the cursor is on the command line, this key requests a menu of valid entries for command line keywords. Once a Choices menu is displayed, pressing F6 selects the highlighted item from the menu.
When the cursor is on a screen, F6 requests help for the particular field where the cursor appears. The field help menu provides an explanation of the field and a list of valid values or actions for the field. When a field menu is displayed, pressing F6 again selects the highlighted item from the menu.
F7 (NextPage) Moves forward through multiple pages of administration screens, reports, or help screens.
F8 (PrevPage) Moves backward through multiple pages of administration screens, reports, or help screens.
Table: AUDIX Administration Standard Function Keys
Function Key Purpose
(3 of 3)

Getting Started - 10 Issue 1December 1999
AUDIX Administration Screens
To change the sequence of keys:
1. Enter toggle function-keys at the command line.
The key sequence changes from the default order to that of the SAT or Manager 1, or vice-versa.
The Command Line This section describes the syntax for the commands that activate the AUDIX administration screens.
Verb-Object Syntax
The commands to activate the AUDIX administration screens follow a verb-object syntax. A qualifier such as a user or machine name may be added to some verb-object commands.
The structure of the AUDIX screen-activation commands is:
Verb or Verbs Object or Object Phrase Qualifier or Qualifiers
Each of these three elements of the command-line is described below.
See AUDIX Administration Screens Organized by Verb and By Object in the Screen Summary section for a complete list of the screen-activation commands.
Command-Line Verbs
The first element of the command-line is the verb, which specifies the type of action. The following is a list of AUDIX verbs in the command-line. Those marked with an asterisk (*) are complete commands; that is, they are never combined with objects or qualifiers.

Getting Started - 11 Issue 1December 1999
AUDIX Administration Screens
Command-Line Objects and Object Phrases
The second element of the command-line is the object or object phrase. This is usually a screen name. The screen name consists of one or more words that identify the screen. If more than one word is used, you must type a hyphen between the two words to ensure that the object phrase has no embedded spaces. Screen names are generally (but not always) the same as the title of the screen as it appears on your monitor. Examples of objects and object phrases are alarms, measurements, remote-messages, subscribers, and system-parameters.
Command-Line Qualifiers
The third element of the command-line is the qualifier. A command-line qualifier can be a user extension number (12345), a date (7/21/99), a user name (“Jane Doe”), and other specific parameters. Note that a qualifier with an embedded space, such as the user name Jane Doe, must be put in quotation marks, such as: “Jane Doe”.
Variations of Commands
You can activate most screens by more than one version of a command. The different versions of the screen-activation command are distinguished by the verb that begins the command line, and the qualifiers that end it. For example, there are four versions of the command to activate the Subscriber screen:
add audit change copy display exit*
get help* list logoff* print remove
reset test toggle trace

Getting Started - 12 Issue 1December 1999
AUDIX Administration Screens
n add subscriber name/number
n change subscriber name/number
n display subscriber name/number
n remove subscriber name/number
All of these commands activate the Subscriber screen with information about the user, whose name or telephone number you typed. The display and remove versions of the command activate a display-only version of the screen. The add and change versions of the command activate a data entry version of the screen that allows you to make changes to the features assigned to the AUDIX user specified by name/number.
Command-Line Abbreviation
For most screen-activation commands, you can enter a minimum unique subset of the full command string and the system expands the entry. For example, the command change system-parameters sending-restrictions can be abbreviated to ch sy s since this is a unique subset of the full command.
The abbreviation of each word in the command must be represented by the first n letters of the word in the correct spelling order, where n is the minimum number of letters that uniquely specifies the command word. As a general rule, n is equal to 2. In other words, it usually takes two characters to uniquely identify each element of the command line. There are two exceptions to the correct-spelling rule: announcement-set is abbreviated annc, and class of service is abbreviated cos.

Getting Started - 13 Issue 1December 1999
AUDIX Administration Screens
In the previous example, the string ch sys s is acceptable as a unique subset of the full command. However:
n The string chg sys s is not acceptable because chg is not the first three letters of "change"
n The string ch s s is not acceptable because ch s is not unique; that is, it could also mean change subscriber or change system-parameters.
Note that hyphenated words such as system-parameters and sending-restrictions are treated as single words.
Command Structure
You can build a command one word at a time. For example, at the beginning of the command line you can press F6 (Choices) to see a list of all valid command verbs. If you then enter ch, the system expands ch to change and lists all valid words that can follow change. If you then enter sy, the system expands the command line to change system-parameters and lists all valid words that can follow.
If you enter a string that is not a valid command word or is not a valid or unique abbreviation, the system notifies you of the mistake. If you omit a required command qualifier such as a user name or extension, or a port address, the system prompts you for the missing information.
Command-Line Help
While you are entering a command, pressing the F6 (Choices) function key displays a menu of allowable command words in the activity window. The choices displayed depend on the position of the cursor in the command line. That is, the allowable command words displayed when you press F6 (Choices) are only those command words that can follow the word or

Getting Started - 14 Issue 1December 1999
AUDIX Administration Screens
words that are currently to the left of the cursor, if any. Select from the choices displayed on the menu by using the TAB key or arrow keys, or by typing the first one or two characters of the desired menu choice.
Command History and Command-Line Editing
The system memory retains a list of the 10 most recently entered commands. After you enter a command, you can scroll back through a list of previous commands using the UP ARROW key. Each time you press the UP ARROW key, the previous command in the command list is retrieved. Each time you press the DOWN ARROW key, the next command in the command list is retrieved. The retrieved command is placed on the command line with the cursor at the end of the line. This is a convenient way to reenter commands containing user names or telephone numbers, for example, without retyping the entire command.
The following table shows the editing actions that are possible once you display a previously executed command on the command line.
Table: AUDIX Administration Command Line History and Editing
Key Purpose
F1 (Cancel) Erases the entire contents of the command line
LEFT ARROW Moves the cursor to the beginning of the previous word on the command line
TAB or RIGHT ARROW
Moves the cursor to the beginning of the next word on the command line
UP ARROW Moves through previously completed commands
(1 of 2)

Getting Started - 15 Issue 1December 1999
AUDIX Administration Screens
Example of Command Line History and Editing
You can also combine some of these editing operations. For example, suppose you need to add several users at one time.
To add the first user with extension 1000:
1. Type add subscriber 1000
2. Fill in the data entry fields on the screen.
DOWN ARROW If you have gone too far through previously completed commands, moves back through the commands
BACKSPACE Deletes the character preceding the cursor
F4 (Clear Fld) Clears a single keyword from the command line; for example, if the command line contains the command list cos and you press F4, the command line reads list.
F5 (Help) Displays a screen explaining the types of help available in the AUDIX system
F6 (Choices) Displays a menu of valid entries for command-line keywords. Once a Choices menu is displayed, press F6 to select the highlighted item from the menu.
F3 (Enter) Expands a shortened version of a command and activates the screen
Table: AUDIX Administration Command Line History and Editing
Key Purpose
(2 of 2)

Getting Started - 16 Issue 1December 1999
AUDIX Administration Screens
3. Press F3 (Enter) to save the information about this user to the system database.
To add the next user, a new user with extension 2000:
1. Press F4 (Clr Fld).
2. Enter 2000
This activates the Subscriber screen. It is now ready for you to enter information about the user with extension 2000.
Or, to change the record you just added:
1. Press the UP ARROW key to retrieve the previous command.
2. Press the LEFT ARROW key several times to move to the beginning of the line.
3. Press F1 (Clear Fld) to remove the add keyword.
4. Enter change in its place.
Using AUDIX Administration Screens to Enter Data
Some AUDIX Administration screens have data entry fields into which you enter values, such as user extension numbers, announcement IDs, or class of service names. Other fields are display-only fields. You cannot enter data into display-only fields.
Moving Between Data Entry Fields
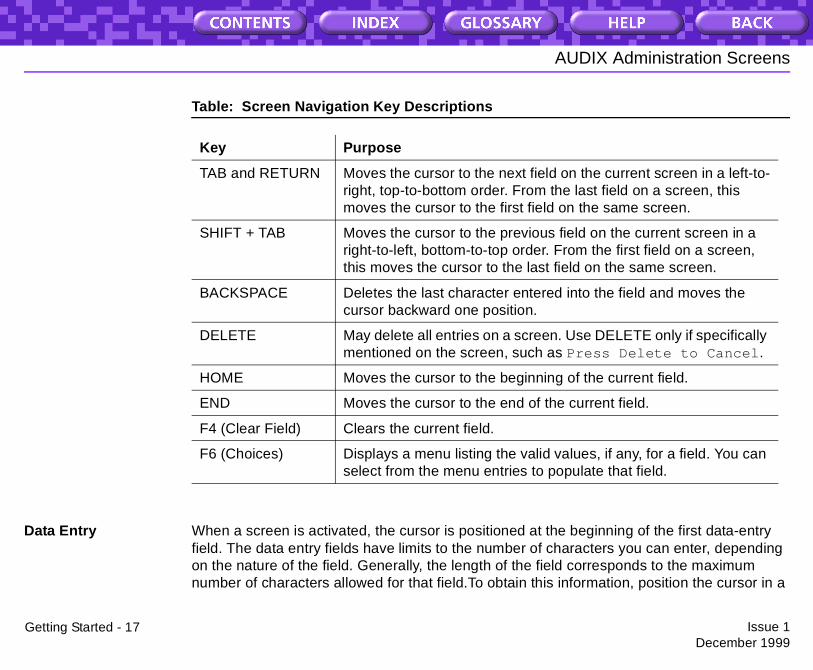
The Screen Navigation Key Descriptions table shows the keys that are used to move between data entry fields within a screen.
Getting Started - 17 Issue 1December 1999
AUDIX Administration Screens
Data Entry When a screen is activated, the cursor is positioned at the beginning of the first data-entry field. The data entry fields have limits to the number of characters you can enter, depending on the nature of the field. Generally, the length of the field corresponds to the maximum number of characters allowed for that field.To obtain this information, position the cursor in a
Table: Screen Navigation Key Descriptions
Key Purpose
TAB and RETURN Moves the cursor to the next field on the current screen in a left-to-right, top-to-bottom order. From the last field on a screen, this moves the cursor to the first field on the same screen.
SHIFT + TAB Moves the cursor to the previous field on the current screen in a right-to-left, bottom-to-top order. From the first field on a screen, this moves the cursor to the last field on the same screen.
BACKSPACE Deletes the last character entered into the field and moves the cursor backward one position.
DELETE May delete all entries on a screen. Use DELETE only if specifically mentioned on the screen, such as Press Delete to Cancel.
HOME Moves the cursor to the beginning of the current field.
END Moves the cursor to the end of the current field.
F4 (Clear Field) Clears the current field.
F6 (Choices) Displays a menu listing the valid values, if any, for a field. You can select from the menu entries to populate that field.

Getting Started - 18 Issue 1December 1999
AUDIX Administration Screens
data entry field and press F6 (Choices). If you type invalid information into a field, the system displays a help message containing information to help clarify the required input.
Some data entry fields are optional, while others require you to enter a value before saving the information to the system database. If you try to save information entered into a screen without entering all of the required information, the system displays a help message noting the missing information.
You can reuse a screen once information entered on it has been saved. Combine the editing and cursor movement operations to place the cursor back at the first data entry field as described in the example on Example of Command Line History and Editing. When you type a character into the first position of a field, the previous contents of the field are cleared and the new characters are entered into it.
Field Help and Selecting Valid Values from the Choices Screen
When the cursor is in a field, pressing the F6 (Choices) function key displays information about the field and lists the valid values that can be entered in that field, if any. If there are several valid values, you can select one from the list using TAB, SHIFT+TAB, and the arrow keys, or by typing the initial character of a value.

Getting Started - 19 Issue 1December 1999
Logging Out of the AUDIX System
Logging Out of the AUDIX System
To log out of the AUDIX system:
1. At the AUDIX Command Prompt screen enter command: prompt, enter exit
The system displays the login: prompt or closes the terminal emulator session.
Procedure completed.

Getting Started - 20 Issue 1December 1999
Remote Administration
Remote Administration
The AUDIX system supports both local access and remote access for system administration. Local access for administration is supported using the DEFINITY ONE system’s dedicated monitor and keyboard. Remote access for administration is supported through a terminal and modem connected to the first serial port on the CPU or to the multi-port serial card. Remote access capabilities are a standard AUDIX feature.
CAUTION:The AUDIX system allows more than one person to perform the same function on the same screen, for example, adding a user to the AUDIX system database. However, if two people happen to be editing the same user’s profile, only the changes made by the person who saves the screen last are written to the system database. The other person’s changes are lost.
Configurations and remote access sequences vary widely, depending on the site. You may need to refer to the documentation for your terminal or terminal emulator to find the remote access procedure that applies to your particular situation. Depending on your terminal emulator, you might have trouble correctly viewing some of the AUDIX screens. Try making changes from the terminal emulator’s Controls or Options menu. In particular, try turning word wrap or wraparound off.
With some remote administration setups, the function keys are inoperable in the AUDIX administration screens. Therefore it may be necessary to use keystrokes as a substitute for onscreen function keys.
The Function Key Substitutes table lists the keystrokes that you use in place of the function keys.

Getting Started - 21 Issue 1December 1999
Remote Administration
Table: Function Key Substitutes
Function Key Keystroke Substitution
F1 (Cancel) CONTROL+X
F2 (Refresh) CONTROL+L
F3 (Enter) CONTROL+E
F4 (Clear Fld) CONTROL+K
F5 (Help) CONTROL+W
F6 (Choices) CONTROL+C
F7 (NextPage) CONTROL+N
F8 (PrevPage) CONTROL+P
DOWN ARROW CONTROL+I
BACKSPACE CONTROL+H
TAB CONTROL+J
PRINT SCREEN CONTROL+O (This prints to a system printer only.)
Getting Started - 22 Issue 1December 1999
Printing Screen Contents and Reports
Printing Screen Contents and Reports
If your AUDIX system is equipped with a system printer, you can print the results of any display or list command. In addition, you can print the contents of any AUDIX screen by pressing F9 or CONTROL+O any time the cursor is not on the command line.
CAUTION:If you have not enabled a system printer, issuing a print command will fill up the print queue with print jobs that cannot be processed. This can result in a slowdown of other system processes.
To print a set of AUDIX screens or a multiple-page report:
1. Start at the AUDIX Command Prompt Screen.
2. At the enter command: prompt, type one of the following:
n print display qualifier
n print list qualifier
where qualifier is the report or screen name you want to print. For example, if you type print display system-parameters features, the system printer prints a copy of all four features pages. If you type print list extensions, the system printer prints a copy of all users and their extensions.
Procedure completed.

Getting Started - 23 Issue 1December 1999
AUDIX Command Prompt Screen
AUDIX Command Prompt Screen

Getting Started - 24 Issue 1December 1999
Layout of the AUDIX Command Prompt Screen
Layout of the AUDIX Command Prompt Screen
System status
Command history
Activity area
System messages
Command line

Getting Started - 25 Issue 1December 1999
Layout of the AUDIX Command Prompt Screen
Table: Component Descriptions: AUDIX Command Prompt Screen
Component Description
System status This line displays AUDIX system information. Starting from the left, the system status line indicates:
n The AUDIX system name
n Voice mail status (Active or Inactive)
n Any active alarms
M = Major
m = Minor
A = Administrative
w = Warning
n The number of people currently logged in
Command history This line displays the fully expanded command typed in the command line, the current page number, and the page count, for example, change subscriber Jane Doe Page 1 of 2.
If the active screen is a help screen, this line displays the title of the screen or field help, for example, change subscriber Jane Doe: field help Page 1 of 1.
(1 of 2)

Getting Started - 26 Issue 1December 1999
Layout of the AUDIX Command Prompt Screen
Activity area This area displays:
n Data entry fields, which are used to specify new or changed parameter values
n Display-only fields, which contain current parameter values that cannot be changed from this screen
n Report results, which display requested system information
n Help for screens and fields, which is activated with the F1 (Help) or F6 (Choices) keys
System messages This line displays system feedback, error messages, and prompts, for example, Command Successfully Completed
Command line This line is where you type commands to gain access to a new screen or exit AUDIX Administration.
Function key labels This line shows labels for function keys F1 through F8. Press the appropriate function key to activate the function.
Table: Component Descriptions: AUDIX Command Prompt Screen
Component Description
(2 of 2)