
ASI5788 - AudioScience
18
www.audioscience.com 1 15-Jan-20 ASI5788 LOW PROFILE PCI EXPRESS BROADCAST SOUND CARD DESCRIPTION 1 The ASI5788 is a member of the new generation of professional low profile PCI-Express sound card designed for use in radio broadcast automation. The new half-height PCI Express card format allows use in 2U servers facilitating increased density for high channel count audio applications. Providing 8 or 24 play streams that are mixed to 8 balanced stereo outputs and 8 record streams fed from 8 balanced stereo inputs, they feature AudioScience’s unique “anything to anywhere” mixing and routing. The ASI5788 provides both balanced analog and AES/EBU inputs and outputs. The maximum analog input and output level is +24dBu. Uncompressed PCM in a choice of precision is available for both recording and playback For surround sound applications, SSX™ mode allows multichannel streams of up to 8 channels to be played, recorded and mixed. FEATURES 2 8 balanced stereo analog inputs and outputs with levels to +24dBu. 8 AES/EBU inputs and outputs with sample rate converters on all inputs. Dedicated AES/EBU and Word clock Sync input. 8 or 24 stereo streams of playback into 8 stereo outputs 8 stereo or 16 mono streams of record from 8 stereo inputs Formats include 8, 16, 24 and 32 bit PCM with sample rates to 96kHz SSX mode for multichannel record, playback and mixing 24bit ADC and DAC with 110dB DNR and 0.0015% THD+N SoundGuard™ transient voltage suppression on all I/O Half height PCI Express card format Up to 8 cards in one system Windows 10, 7, Server 2012/20082016 and Linux software drivers available
Transcript of ASI5788 - AudioScience

www.audioscience.com 1 15-Jan-20
ASI5788 LOW PROFILE PCI EXPRESS BROADCAST SOUND CARD
DESCRIPTION 1The ASI5788 is a member of the new generation of professional low profile PCI-Express sound card designed for use in radio broadcast automation. The new half-height PCI Express card format allows use in 2U servers facilitating increased density for high channel count audio applications. Providing 8 or 24 play streams that are mixed to 8 balanced stereo outputs and 8 record streams fed from 8 balanced stereo inputs, they feature AudioScience’s unique “anything to anywhere” mixing and routing. The ASI5788 provides both balanced analog and AES/EBU inputs and outputs. The maximum analog input and output level is +24dBu. Uncompressed PCM in a choice of precision is available for both recording and playback For surround sound applications, SSX™ mode allows multichannel streams of up to 8 channels to be played, recorded and mixed.
FEATURES 2 8 balanced stereo analog inputs and outputs with levels to
+24dBu.
8 AES/EBU inputs and outputs with sample rate converters on all inputs.
Dedicated AES/EBU and Word clock Sync input.
8 or 24 stereo streams of playback into 8 stereo outputs
8 stereo or 16 mono streams of record from 8 stereo inputs
Formats include 8, 16, 24 and 32 bit PCM with sample rates to 96kHz
SSX mode for multichannel record, playback and mixing
24bit ADC and DAC with 110dB DNR and 0.0015% THD+N
SoundGuard™ transient voltage suppression on all I/O
Half height PCI Express card format
Up to 8 cards in one system
Windows 10, 7, Server 2012/20082016 and Linux software drivers available
ASI5788
www.audioscience.com 2 15-Jan-20
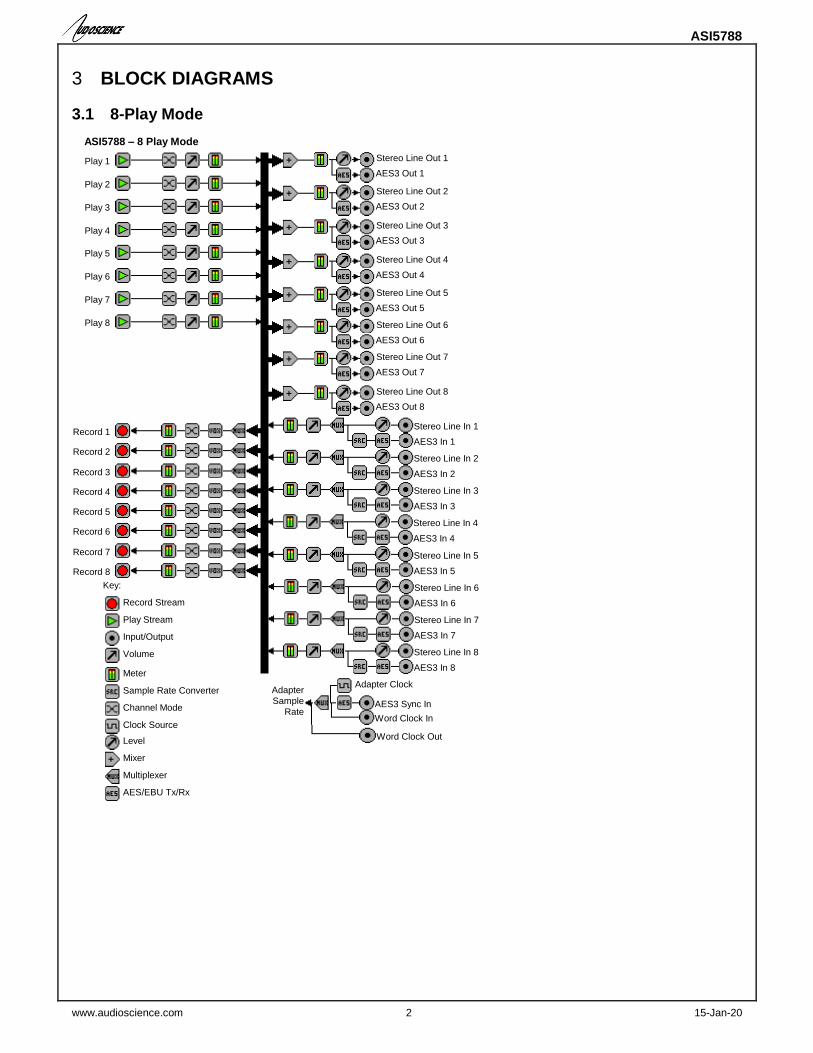
BLOCK DIAGRAMS 3
3.1 8-Play Mode
Stereo Line Out 1
AES3 Out 1
Stereo Line Out 2
AES3 Out 2
Stereo Line Out 3
AES3 Out 3
Stereo Line Out 4
AES3 Out 4
Stereo Line Out 5
AES3 Out 5
Stereo Line Out 8
AES3 Out 8
Stereo Line Out 6
AES3 Out 6
Stereo Line Out 7
AES3 Out 7
ASI5788 – 8 Play Mode
Record Stream
Key:
Play Stream
Input/Output
Volume
AES/EBU Tx/Rx
Level
Mixer
Multiplexer
Clock Source
Meter
Sample Rate Converter
Channel Mode
Adapter Clock
Adapter Sample
Rate
Word Clock In
AES3 Sync In
Word Clock Out
AES3 In 1
Stereo Line In 1
AES3 In 2
Stereo Line In 2
AES3 In 3
Stereo Line In 3
AES3 In 4
Stereo Line In 4
AES3 In 5
Stereo Line In 5
AES3 In 6
Stereo Line In 6
AES3 In 7
Stereo Line In 7
AES3 In 8
Stereo Line In 8
Play 5
Play 6
Play 7
Play 8
Play 1
Play 2
Play 3
Play 4
Record 1
Record 2
Record 3
Record 4
Record 5
Record 6
Record 7
Record 8

ASI5788
www.audioscience.com 3 15-Jan-20
3.2 24 Play Mode
ASI5788 – 24 Play Mode
Level
Mixer
Multiplexer
AES/EBU Tx/Rx
Input/Output
Key:
Volume
Play Stream
Record Stream
Clock Source
Meter
Sample Rate Converter
Channel Mode
Adapter Clock
Adapter Sample
Rate
Word Clock In
AES3 Sync In
Word Clock Out
Stereo Line Out 1
AES3 Out 1
Stereo Line Out 8
AES3 Out 8
AES3 In 1
Stereo Line In 1
AES3 In 8
Stereo Line In 8
Play 1
Play 24
Record 8
Record 1
3.3 SSX2 Mode
AES3 Out 1
ASI5788 – SSX Mode
Level
Mixer
Multiplexer
AES/EBU Tx/Rx
Input/Output
Key:
Volume
Play Stream
Record Stream
Clock Source
Meter
Sample Rate Converter
Channel Mode
Adapter Clock
Adapter
Sample Rate
Word Clock In
AES3 Sync In
Word Clock Out
Stereo Line Out 1
Stereo Line Out 8
AES3 Out 8
AES3 In 1
Stereo Line In 1
AES3 In 8
Stereo Line In 8
Play 1
Play 6
Record 1
Record 4

ASI5788
www.audioscience.com 4 15-Jan-20
SPECIFICATIONS 4ANALOG INPUT/OUTPUT
Type Balanced
Connector 68pin VHDCI
Input Level -10 to +24dBu in 0.5dBu steps
Input Impedance 10K ohms
A/D converter 24bit Over sampling
Output Level -10 to +24dBu in 0.5dBu steps
D/A converter 24bit Over sampling
Output Impedance 50ohms
Load Impedance 600ohms or greater
Dynamic Range [1] >=110dB (record or play)
THD+N [1] =<-96dB (0.0015%) (record or play)
Frequency Response 20Hz to 20kHz +0/-0.1dB 20Hz to 40kHz +0/-3dB
Inter-channel Phase <0.1 degrees (record or play)
Inter-channel Crosstalk >110dB (record or play)
DIGITAL INPUT/OUTPUT
Type AES/EBU (EIAJ CP-340 Type I / IEC-958 Professional)
Input/Output Impedance 110 ohms
Connector 68pin VHDCI
Sample Rates 32, 44.1, 48, 88.2, 96kHz with sample rate converters on inputs
SAMPLE RATE CLOCK
Internal (Adapter) 32, 44.1, 48, 88.2, 96kHz
AES/EBU Sync In 32, 44.1, 48, 88.2, 96kHz on dedicated AES/EBU input
Word In/Out 32, 44.1, 48, 88.2, 96kHz
SIGNAL PROCESSING
DSP Texas Instruments TMS320DM8147 floating point DSP @ 600MHz
Memory 64MB
Audio Formats 8 bit unsigned PCM 16 bit signed PCM 32 bit floating point PCM
GENERAL
Bus X1 PCI-Express.
Dimensions PCI half-height form factor – 5.4" x 2.75" x 0.6" (138mm x 70mm x 15mm)
Weight 8 oz (227g) max
Operating Temperature 0C to 60C
Power Requirements [email protected] +12V @ 300mA
BREAKOUT BOX
Analog BOB1038
AES/EBU+GPIO BOB1038
You will need one breakout box for each connection, if you intend to use both analog and digital you will need 2 BOB1038 breakout boxes
Notes: [1] Dynamic Range and THD+N measured using a +20dBu 1kHz sine wave sampled at 48kHz and A weighting filter.
ASI5788
www.audioscience.com 5 15-Jan-20
REVISIONS 5Date Description
16 March 2015 Created doc and modified from ASI6788 datasheet
26 March 2015 Minor spec updates
10 October 2015 Spec update and added additional ASIControl sections
22 October 2015 Spec update
11 March 2016 Fixed error in Mono mode description, added ASI5780
31 May 2017 Created separate doc for ASI5788
3 April 2019 Removed MRX referenced in error
1 January 2020 Updated operating temp range

ASI5788
www.audioscience.com 6 15-Jan-20
CONTENTS 6
DESCRIPTION ....................................................................................................................................................1 1
FEATURES .........................................................................................................................................................1 2
BLOCK DIAGRAMS ...........................................................................................................................................2 3
3.1 8-PLAY MODE ................................................................................................................................................................ 2 3.2 24 PLAY MODE .............................................................................................................................................................. 3 3.3 SSX2 MODE ................................................................................................................................................................... 3
SPECIFICATIONS ..............................................................................................................................................4 4
REVISIONS .........................................................................................................................................................5 5
CONTENTS .........................................................................................................................................................6 6
CONNECTORS ...................................................................................................................................................8 7
7.1 68PIN VHDCI – DIGITAL ............................................................................................................................................... 8 7.2 68PIN VHDCI – ANALOG ............................................................................................................................................... 8
BREAKOUT BOX ...............................................................................................................................................8 8
8.1 ANALOG ......................................................................................................................................................................... 8 8.2 AES/EBU ...................................................................................................................................................................... 8
HARDWARE INSTALLATION ............................................................................................................................8 9
9.1 SETTING ADAPTER INDEX – ONE ADAPTER IN THE PC ................................................................................................... 9 9.1.1 Setting Adapter Index - Two or More Adapters in the PC 9
SOFTWARE INSTALLATION .......................................................................................................................9 10
10.1 DRIVERS FOR WINDOWS 10, 8.X, 7, SERVER 2008, SERVER 2012 .............................................................................. 9 10.1.1 Combo Driver 10 10.1.2 ASIO 10 10.1.3 Driver Failure 10
10.2 DRIVERS FOR LINUX ................................................................................................................................................ 10 10.3 APPLICATIONS FOR WINDOWS ................................................................................................................................. 10
10.3.1 ASIControl 10
OPERATION USING ASICONTROL ......................................................................................................... 11 11
USER INTERFACE .................................................................................................................................... 11 12
12.1 ASICONTROL LAYOUT ............................................................................................................................................ 11 12.1.1 Adapter List Window 11 12.1.2 Adapter Topology Window 11 12.1.3 Node Controls Window 12 12.1.4 Adapter Information 12
12.2 MODES .................................................................................................................................................................... 12 12.2.1 Adapter Mode 12
12.3 SSX2 MODE ............................................................................................................................................................ 13 12.3.1 Enabling SSX2 13
12.4 PLAYER ................................................................................................................................................................... 13 12.4.1 Interface 13 12.4.2 How To Play a File 14 12.4.3 Using embedded sine wave generator 14 12.4.4 Developer 14
12.5 RECORDER ............................................................................................................................................................... 14 12.5.1 Interface 14 12.5.2 How To Record a File 15 12.5.3 Developer 15 12.5.4 Volume 15
12.6 METER ..................................................................................................................................................................... 16 12.6.1 Interface 16 12.6.2 Developer 16

ASI5788
www.audioscience.com 7 15-Jan-20
12.7 CHANNEL_MODE .................................................................................................................................................... 16 12.7.1 Interface 16
12.8 CLOCKSOURCEIN .................................................................................................................................................... 17 12.8.1 Interface 17
ASI5788
www.audioscience.com 8 15-Jan-20
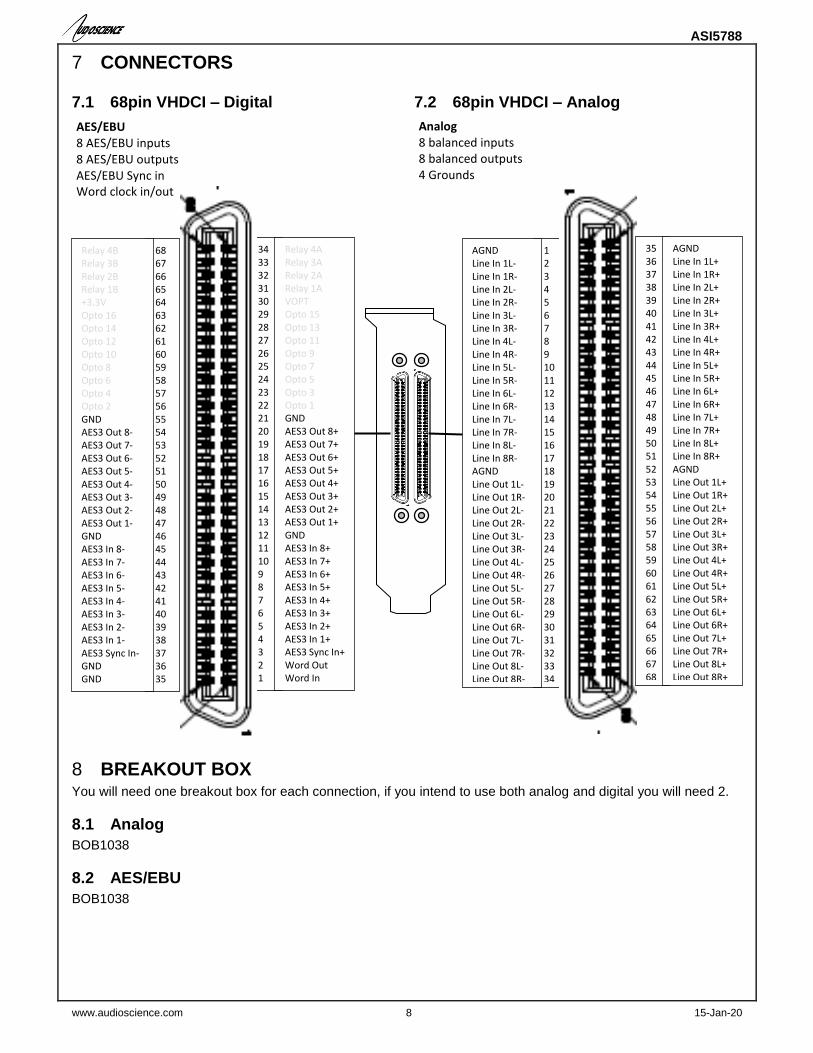
CONNECTORS 7
7.1 68pin VHDCI – Digital 7.2 68pin VHDCI – Analog
BREAKOUT BOX 8You will need one breakout box for each connection, if you intend to use both analog and digital you will need 2.
8.1 Analog
BOB1038
8.2 AES/EBU
BOB1038
AES/EBU 8 AES/EBU inputs 8 AES/EBU outputs AES/EBU Sync in Word clock in/out
Analog 8 balanced inputs 8 balanced outputs 4 Grounds
34 33 32 31 30 29 28 27 26 25 24 23 22 21 20 19 18 17 16 15 14 13 12 11 10 9 8 7 6 5 4 3 2 1
68 67 66 65 64 63 62 61 60 59 58 57 56 55 54 53 52 51 50 49 48 47 46 45 44 43 42 41 40 39 38 37 36 35
Relay 4A Relay 3A Relay 2A Relay 1A VOPT Opto 15 Opto 13 Opto 11 Opto 9 Opto 7 Opto 5 Opto 3 Opto 1 GND AES3 Out 8+ AES3 Out 7+ AES3 Out 6+ AES3 Out 5+ AES3 Out 4+ AES3 Out 3+ AES3 Out 2+ AES3 Out 1+ GND AES3 In 8+ AES3 In 7+ AES3 In 6+ AES3 In 5+ AES3 In 4+ AES3 In 3+ AES3 In 2+ AES3 In 1+ AES3 Sync In+ Word Out Word In
Relay 4B Relay 3B Relay 2B Relay 1B +3.3V Opto 16 Opto 14 Opto 12 Opto 10 Opto 8 Opto 6 Opto 4 Opto 2 GND AES3 Out 8- AES3 Out 7- AES3 Out 6- AES3 Out 5- AES3 Out 4- AES3 Out 3- AES3 Out 2- AES3 Out 1- GND AES3 In 8- AES3 In 7- AES3 In 6- AES3 In 5- AES3 In 4- AES3 In 3- AES3 In 2- AES3 In 1- AES3 Sync In- GND GND
1 2 3 4 5 6 7 8 9 10 11 12 13 14 15 16 17 18 19 20 21 22 23 24 25 26 27 28 29 30 31 32 33 34
35 36 37 38 39 40 41 42 43 44 45 46 47 48 49 50 51 52 53 54 55 56 57 58 59 60 61 62 63 64 65 66 67 68
AGND Line In 1L+ Line In 1R+ Line In 2L+ Line In 2R+ Line In 3L+ Line In 3R+ Line In 4L+ Line In 4R+ Line In 5L+ Line In 5R+ Line In 6L+ Line In 6R+ Line In 7L+ Line In 7R+ Line In 8L+ Line In 8R+ AGND Line Out 1L+ Line Out 1R+ Line Out 2L+ Line Out 2R+ Line Out 3L+ Line Out 3R+ Line Out 4L+ Line Out 4R+ Line Out 5L+ Line Out 5R+ Line Out 6L+ Line Out 6R+ Line Out 7L+ Line Out 7R+ Line Out 8L+ Line Out 8R+
AGND Line In 1L- Line In 1R- Line In 2L- Line In 2R- Line In 3L- Line In 3R- Line In 4L- Line In 4R- Line In 5L- Line In 5R- Line In 6L- Line In 6R- Line In 7L- Line In 7R- Line In 8L- Line In 8R- AGND Line Out 1L- Line Out 1R- Line Out 2L- Line Out 2R- Line Out 3L- Line Out 3R- Line Out 4L- Line Out 4R- Line Out 5L- Line Out 5R- Line Out 6L- Line Out 6R- Line Out 7L- Line Out 7R- Line Out 8L- Line Out 8R-
ASI5788
www.audioscience.com 9 15-Jan-20
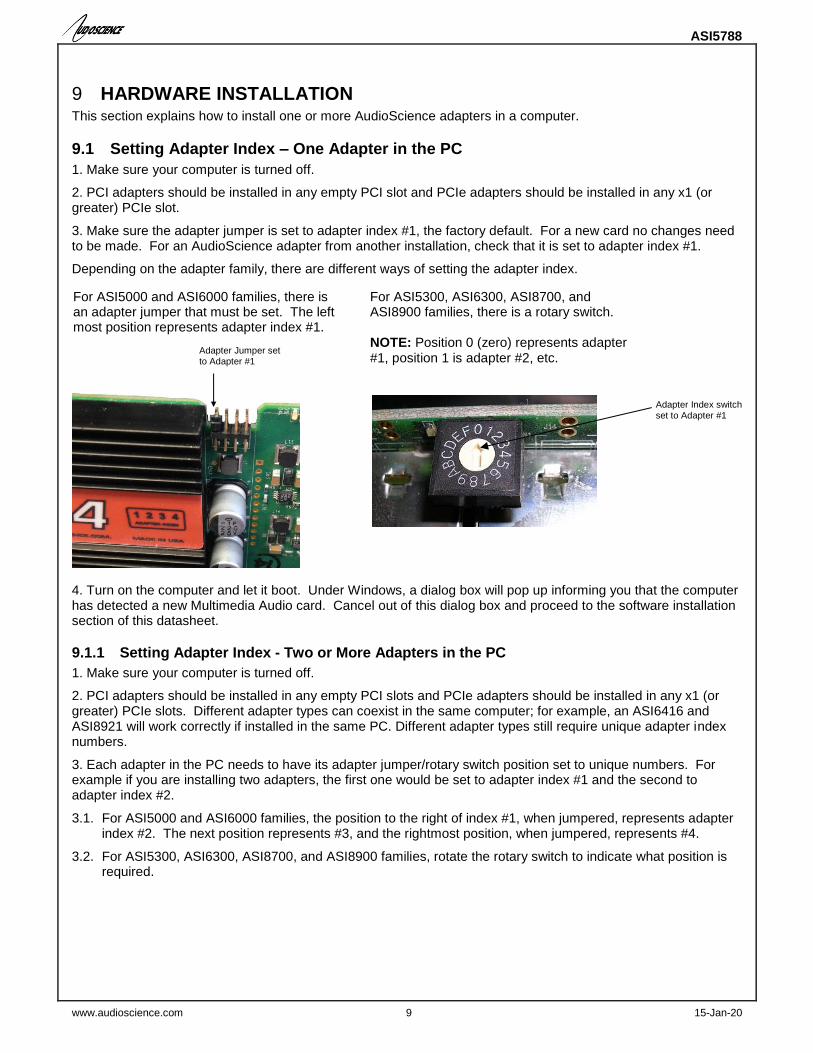
HARDWARE INSTALLATION 9This section explains how to install one or more AudioScience adapters in a computer.
9.1 Setting Adapter Index – One Adapter in the PC
1. Make sure your computer is turned off.
2. PCI adapters should be installed in any empty PCI slot and PCIe adapters should be installed in any x1 (or greater) PCIe slot.
3. Make sure the adapter jumper is set to adapter index #1, the factory default. For a new card no changes need to be made. For an AudioScience adapter from another installation, check that it is set to adapter index #1.
Depending on the adapter family, there are different ways of setting the adapter index.
4. Turn on the computer and let it boot. Under Windows, a dialog box will pop up informing you that the computer has detected a new Multimedia Audio card. Cancel out of this dialog box and proceed to the software installation section of this datasheet.
9.1.1 Setting Adapter Index - Two or More Adapters in the PC
1. Make sure your computer is turned off.
2. PCI adapters should be installed in any empty PCI slots and PCIe adapters should be installed in any x1 (or greater) PCIe slots. Different adapter types can coexist in the same computer; for example, an ASI6416 and ASI8921 will work correctly if installed in the same PC. Different adapter types still require unique adapter index numbers.
3. Each adapter in the PC needs to have its adapter jumper/rotary switch position set to unique numbers. For example if you are installing two adapters, the first one would be set to adapter index #1 and the second to adapter index #2.
3.1. For ASI5000 and ASI6000 families, the position to the right of index #1, when jumpered, represents adapter index #2. The next position represents #3, and the rightmost position, when jumpered, represents #4.
3.2. For ASI5300, ASI6300, ASI8700, and ASI8900 families, rotate the rotary switch to indicate what position is required.
Adapter Index switch set to Adapter #1
For ASI5000 and ASI6000 families, there is an adapter jumper that must be set. The left most position represents adapter index #1.
Adapter Jumper set to Adapter #1
For ASI5300, ASI6300, ASI8700, and ASI8900 families, there is a rotary switch. NOTE: Position 0 (zero) represents adapter #1, position 1 is adapter #2, etc.

ASI5788
www.audioscience.com 10 15-Jan-20
SOFTWARE INSTALLATION 10AudioScience makes audio adapters and drivers for various operating systems. Enhancements to an adapter’s utility come from the integrators software that uses the audio driver to implement sophisticated audio playback and recording functions.
10.1 Drivers for Windows 10, 7, Server 2008, Server 2012
Typically, drivers are not included with the hardware and will need to be downloaded from the AudioScience website. They can be found here: http://www.audioscience.com/internet/download/win_drivers.htm The first step is to determine what type of driver is needed for your operating system. Drivers are available for 32-bit and 64-bit Windows systems. Driver 3.10 and later present the user with three install options during installation:
Install Standard PCI/PCIe Driver.
Install Standard + Network Audio Driver.
Remove all driver components Traditional installs should select the first of these options. Users of AudioScience CobraNet and AVB products should select the second option with the “+Network Audio Driver.” in the text.
10.1.1 Combo Driver
The Combo driver installs WDM devices by default and presents an option to “Install legacy 32-bit WAVE driver” in case your application requires it. Download the file named ASICOMBO_xxxxxx.EXE from www.audioscience.com and run it (_xxxxxx is the version number). After the EXE has run, reboot your computer and the audio adapter will be operational. If the cover is off the computer, one can see one or two blinking LEDs on top of the card indicating its DSP is running and communicating with the driver. Verify that the adapter is running using ASIControl (see ASIControl section in this document).
10.1.2 ASIO
All AudioScience drivers also install an ASIO driver interface. It is installed by default.
10.1.3 Driver Failure
In the event that an adapter’s driver fails to load correctly, the OS’s event viewer should be checked. The event log is accessed from the Administrative Tools applet in Windows Control Panel under Event Viewer. The Windows Logs\System view should be selected. If two or more adapters are installed in the same system, the first thing to check is that the adapters were assigned unique adapter numbers. If issues persist, please email [email protected].
10.2 Drivers for Linux
The latest Linux driver can be downloaded from the AudioScience website – www.audioscience.com
10.3 Applications for Windows
AudioScience provides ASIControl for adapter set-up and configuration.
10.3.1 ASIControl
All Windows drivers install an AudioScience application called ASIControl that can be used to setup and verify functionality of adapters. ASIControl provides a common interface for users across all driver types. From the Windows Start menu, navigate to StartProgramsAudioScience and run the ASIControl program.

ASI5788
www.audioscience.com 11 15-Jan-20
OPERATION USING ASICONTROL 11Using ASIControl, the ASI5788 will look similar to this:
USER INTERFACE 12
12.1 ASIControl Layout
ASIControl consists of three main windows: the adapter list in the top portion of the window, the adapter topology view on the left hand side, and the node control list on the right hand side.
12.1.1 Adapter List Window
The top portion of ASIControl shows a list of all the adapters that the application has found. By default, only bus based (i.e. PCI and/or PCI Express) adapters will be shown. If the network portion of the driver is installed (by selecting “Install Standard + Networked Audio Driver” after running the driver installer) and “Local PCI(e) + Networked adapters” is selected from ASIControl’s OptionsConfigure adapter interface, then AudioScience and other third party CobraNet devices will be shown. Adapters are listed in order of adapter index. For bus-based adapters, this is determined by the adapter index jumper on the card. For AudioScience CobraNet devices this is calculated from the unit’s MAC address. Third party CobraNet devices are listed last as they have no AudioScience index.
12.1.2 Adapter Topology Window
The left hand side of ASIControl contains the topology view of the adapter. It is essentially a block diagram of the device showing the available physical inputs and outputs on the right hand side of the black, vertical ‘bus’ line. On the left hand side of the bus line, bus-based adapters show player and recorder streams, while CobraNet adapters show their network connections. Each of the inputs and outputs is referred to as a node and each Node contains one or more controls. The topology shows each control as a small icon. A non-exhaustive list of nodes follows:
Line In Player CobraNet In Line Out Recorder CobraNet Out AES/EBU In Tuner AES/EBU Out Clock Source In
Adapter List Window
Node Controls Window
Adapter Topology Window
ASI5788
www.audioscience.com 12 15-Jan-20
Hovering the mouse over a particular node will highlight it. Clicking on a node will bring up the controls resident on that node in the right hand control list. There is an adapter node in the top left corner of the topology window. Clicking on this will show adapter-specific controls and properties on the right hand side. Not all adapters have all nodes.
12.1.3 Node Controls Window
The right hand side of ASIControl shows the controls associated with the selected node in the topology view. The controls are arranged, from top to bottom, in order of audio signal flow, i.e. the audio signal can be viewed as entering the node at the top control and leaving at the bottom control. Controls may be used to either manipulate the audio as it passes through the node, or report back control status information. For a comprehensive listing of controls and how to operate ASIControl, please see the ASIControl manual available from www.audioscience.com and also installed by the driver. Not all adapters have all controls. The section below lists some common and any specific controls, as seen in ASIControl, for this adapter.
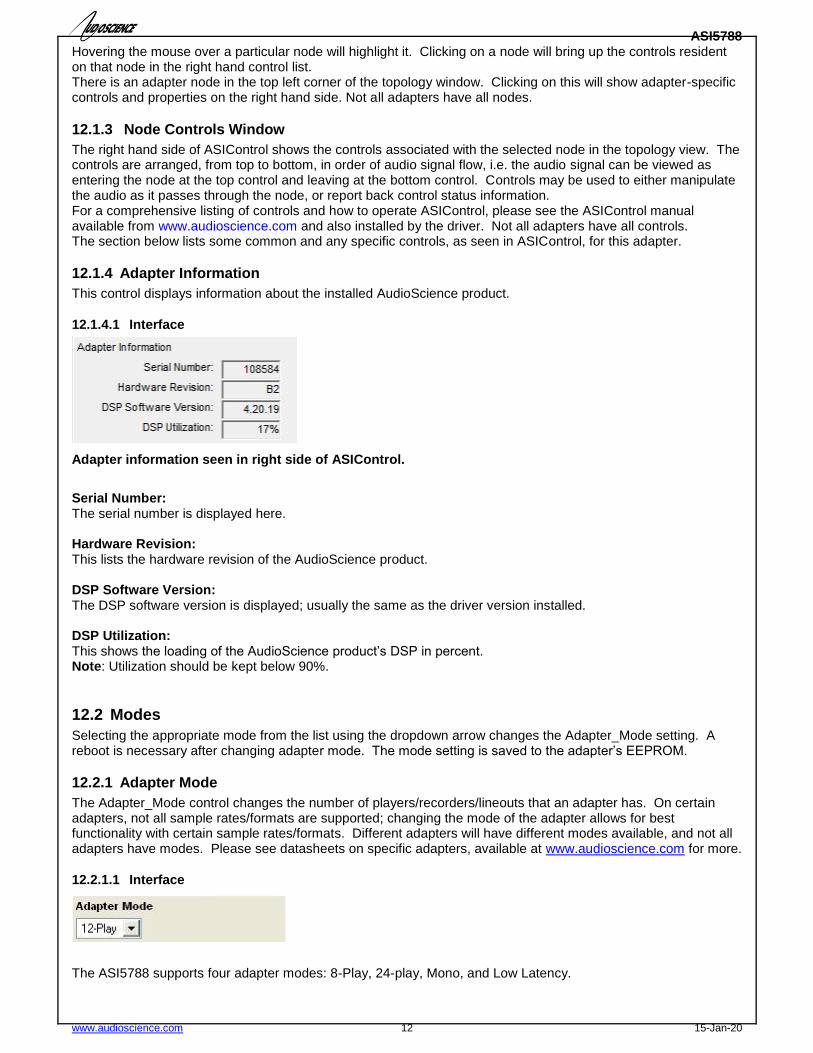
12.1.4 Adapter Information
This control displays information about the installed AudioScience product.
12.1.4.1 Interface
Adapter information seen in right side of ASIControl.
Serial Number: The serial number is displayed here. Hardware Revision: This lists the hardware revision of the AudioScience product. DSP Software Version: The DSP software version is displayed; usually the same as the driver version installed. DSP Utilization: This shows the loading of the AudioScience product’s DSP in percent. Note: Utilization should be kept below 90%.
12.2 Modes
Selecting the appropriate mode from the list using the dropdown arrow changes the Adapter_Mode setting. A reboot is necessary after changing adapter mode. The mode setting is saved to the adapter’s EEPROM.
12.2.1 Adapter Mode
The Adapter_Mode control changes the number of players/recorders/lineouts that an adapter has. On certain adapters, not all sample rates/formats are supported; changing the mode of the adapter allows for best functionality with certain sample rates/formats. Different adapters will have different modes available, and not all adapters have modes. Please see datasheets on specific adapters, available at www.audioscience.com for more.
12.2.1.1 Interface
The ASI5788 supports four adapter modes: 8-Play, 24-play, Mono, and Low Latency.
ASI5788
www.audioscience.com 13 15-Jan-20
12.2.1.2 8-Play
This mode supports 8 mono/stereo Play streams and 8 mono/stereo Record streams with full mixing capabilities.
12.2.1.3 24-Play
This mode supports 24 mono/stereo Play streams and 8 mono/stereo Record streams with full mixing capabilities.
12.2.1.4 Mono
This mode supports 16 mono Play streams and 16 mono Record streams with full mixing capabilities. Mono mode supports mapping a single Play or Line_In device to a single Line_Out channel.
12.2.1.5 Low Latency
This mode supports a single multichannel audio stream enabling live sound processing in ASIO and Core Audio applications. See the Low Latency Mode datasheet for further information.
12.3 SSX2 Mode
The AudioScience Surround Sound eXtension v2 (SSX2) mode control changes the players/recorders of an adapter to be able to play/record multichannel files of 2, 4, 6, or 8 channels. Implementing SSX2 mode is slightly different depending on what driver version is installed with the AudioScience adapter’ see below. SSX2 Mode and Adapter Mode can be used in conjunction with each other. Set the required Adapter Mode (Mono mode cannot be used with SSX2 Mode), set SSX2 Mode to On and then reboot. For example, an ASI6518 set to “16-Play” in Adapter Mode and “On” in SSX2 Mode will show 4 multichannel players after reboot. An ASI6518 set to “8-Play” in Adapter Mode and “On” in SSX2 to on will show 2 multichannel players after reboot. Note that in ASIControl, the Player volumes cannot be unlocked to move the left and right channels independently when an adapter is in SSX2 mode. For further information on SSX2, see its datasheet under the Technology section at www.audioscience.com.
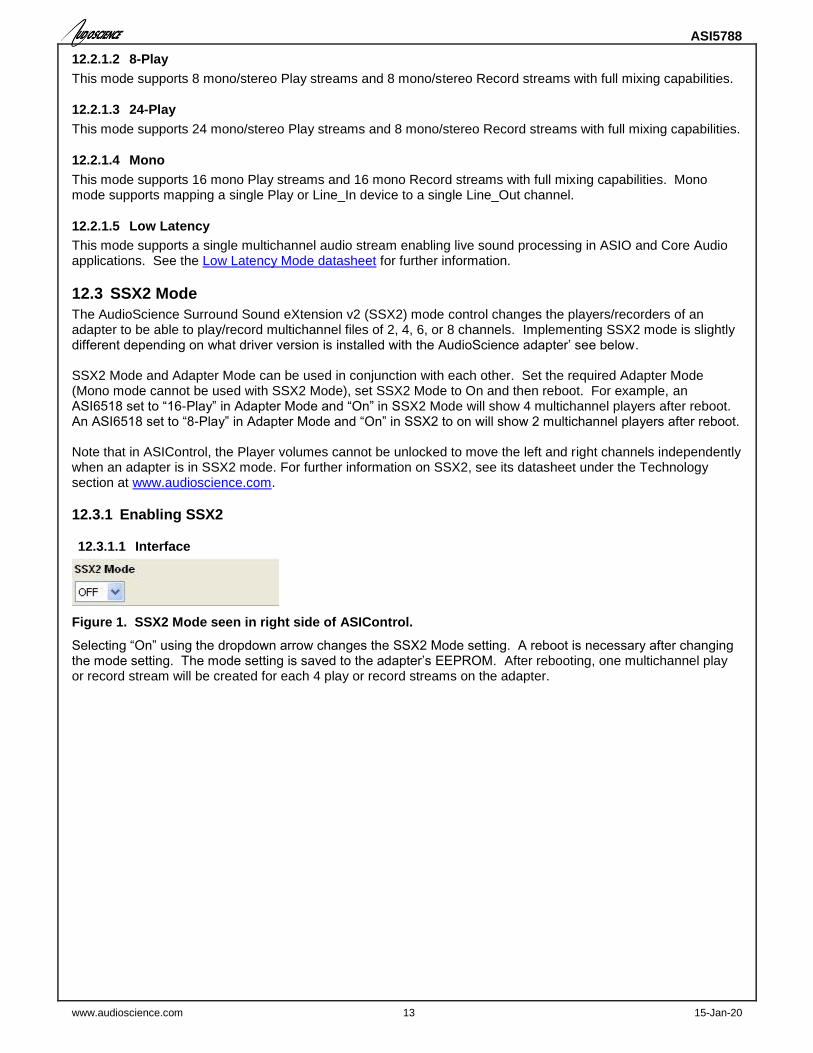
12.3.1 Enabling SSX2
12.3.1.1 Interface
Figure 1. SSX2 Mode seen in right side of ASIControl.
Selecting “On” using the dropdown arrow changes the SSX2 Mode setting. A reboot is necessary after changing the mode setting. The mode setting is saved to the adapter’s EEPROM. After rebooting, one multichannel play or record stream will be created for each 4 play or record streams on the adapter.
ASI5788
www.audioscience.com 14 15-Jan-20
12.4 Player
The Player control supports playback of an audio file from the computer’s hard drive.
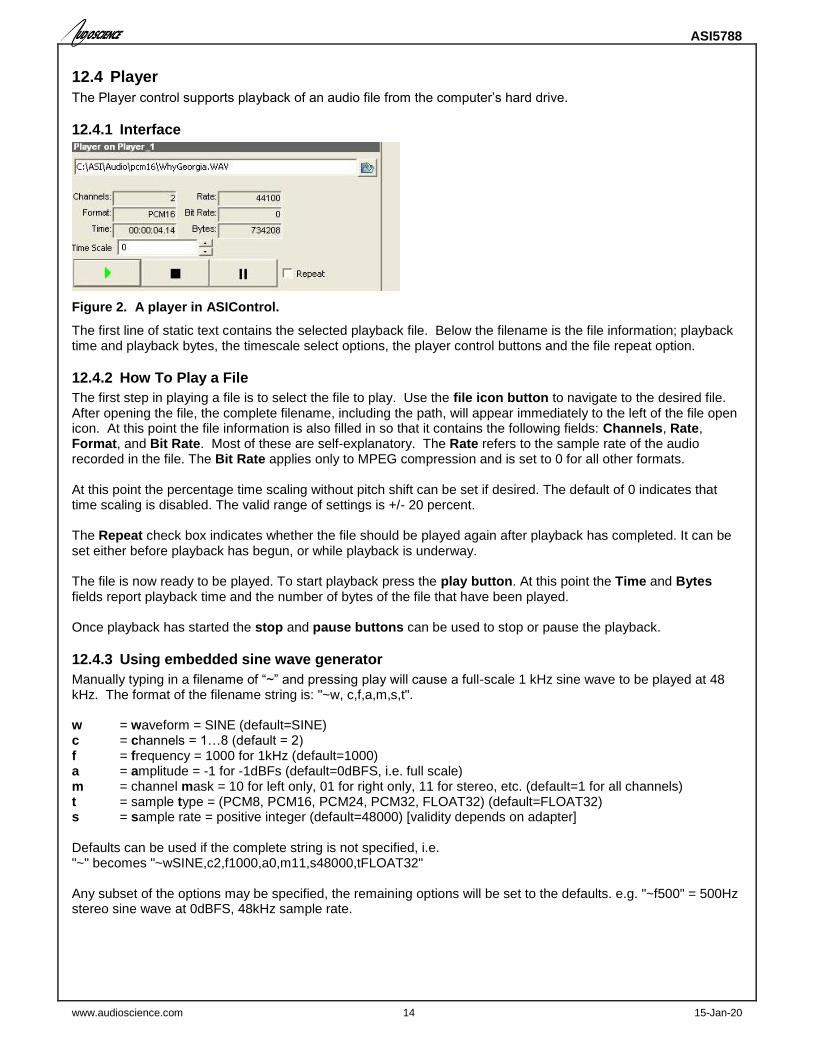
12.4.1 Interface
Figure 2. A player in ASIControl.
The first line of static text contains the selected playback file. Below the filename is the file information; playback time and playback bytes, the timescale select options, the player control buttons and the file repeat option.
12.4.2 How To Play a File
The first step in playing a file is to select the file to play. Use the file icon button to navigate to the desired file. After opening the file, the complete filename, including the path, will appear immediately to the left of the file open icon. At this point the file information is also filled in so that it contains the following fields: Channels, Rate, Format, and Bit Rate. Most of these are self-explanatory. The Rate refers to the sample rate of the audio recorded in the file. The Bit Rate applies only to MPEG compression and is set to 0 for all other formats. At this point the percentage time scaling without pitch shift can be set if desired. The default of 0 indicates that time scaling is disabled. The valid range of settings is +/- 20 percent.
The Repeat check box indicates whether the file should be played again after playback has completed. It can be set either before playback has begun, or while playback is underway. The file is now ready to be played. To start playback press the play button. At this point the Time and Bytes fields report playback time and the number of bytes of the file that have been played. Once playback has started the stop and pause buttons can be used to stop or pause the playback.
12.4.3 Using embedded sine wave generator
Manually typing in a filename of “~” and pressing play will cause a full-scale 1 kHz sine wave to be played at 48 kHz. The format of the filename string is: "~w, c,f,a,m,s,t". w = waveform = SINE (default=SINE) c = channels = 1…8 (default = 2) f = frequency = 1000 for 1kHz (default=1000) a = amplitude = -1 for -1dBFs (default=0dBFS, i.e. full scale) m = channel mask = 10 for left only, 01 for right only, 11 for stereo, etc. (default=1 for all channels) t = sample type = (PCM8, PCM16, PCM24, PCM32, FLOAT32) (default=FLOAT32) s = sample rate = positive integer (default=48000) [validity depends on adapter] Defaults can be used if the complete string is not specified, i.e. "~" becomes "~wSINE,c2,f1000,a0,m11,s48000,tFLOAT32" Any subset of the options may be specified, the remaining options will be set to the defaults. e.g. "~f500" = 500Hz stereo sine wave at 0dBFS, 48kHz sample rate.
ASI5788
www.audioscience.com 15 15-Jan-20
12.4.4 Developer
12.4.4.1 Windows APIs
Wave – waveOutOpen(), waveOutWrite(), waveOutClose() etc. HPI – Output stream functions documented here. ASX – ASX Player control functions documented here.
12.4.4.2 Linux APIs
HPI – Output stream functions documented here. ASX – ASX Player control functions documented here. ALSA – https://www.alsa-project.org/alsa-doc/alsa-lib/
12.5 Recorder
The Recorder control supports recording of an audio file.
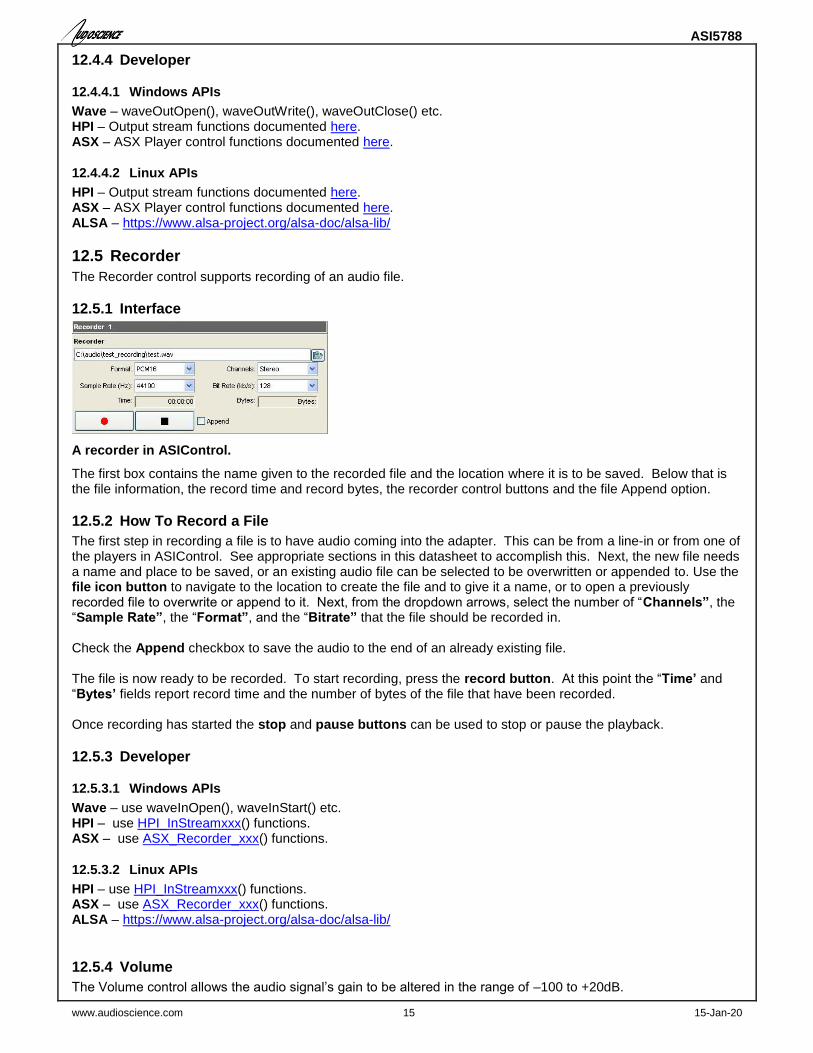
12.5.1 Interface
A recorder in ASIControl.
The first box contains the name given to the recorded file and the location where it is to be saved. Below that is the file information, the record time and record bytes, the recorder control buttons and the file Append option.
12.5.2 How To Record a File
The first step in recording a file is to have audio coming into the adapter. This can be from a line-in or from one of the players in ASIControl. See appropriate sections in this datasheet to accomplish this. Next, the new file needs a name and place to be saved, or an existing audio file can be selected to be overwritten or appended to. Use the file icon button to navigate to the location to create the file and to give it a name, or to open a previously recorded file to overwrite or append to it. Next, from the dropdown arrows, select the number of “Channels”, the “Sample Rate”, the “Format”, and the “Bitrate” that the file should be recorded in. Check the Append checkbox to save the audio to the end of an already existing file. The file is now ready to be recorded. To start recording, press the record button. At this point the “Time’ and “Bytes’ fields report record time and the number of bytes of the file that have been recorded. Once recording has started the stop and pause buttons can be used to stop or pause the playback.
12.5.3 Developer
12.5.3.1 Windows APIs
Wave – use waveInOpen(), waveInStart() etc. HPI – use HPI_InStreamxxx() functions. ASX – use ASX_Recorder_xxx() functions.
12.5.3.2 Linux APIs
HPI – use HPI_InStreamxxx() functions. ASX – use ASX_Recorder_xxx() functions. ALSA – https://www.alsa-project.org/alsa-doc/alsa-lib/
12.5.4 Volume
The Volume control allows the audio signal’s gain to be altered in the range of –100 to +20dB.
ASI5788
www.audioscience.com 16 15-Jan-20
12.5.4.1 Interface
A Player volume in ASIControl.
Left and Right display boxes: Displays the gain settings that the slider bars are set to.
Slider Bars: Click on the bar with the mouse and drag to desired gain. Once the bars are selected, the left and right arrow keys can also be used to change the settings.
Lock: When checked, locks the left and right channels to the same gain value. When unchecked, allows the left and right channels to have independent gains. (Note that if an adapter is in SSX2 mode, the Player volumes cannot be unlocked to move the left and right channels independently.) Mute: Check this box to mute the volume.
Fade: When pressed, automatically fades the volume to the opposite end of the scale.
12.5.4.2 Developer
12.5.4.2.1 Windows APIs
Wave/Mixer – MIXERCONTROL_CONTROLTYPE_VOLUME This is a Windows standard volume control. Settings are in the range of 0 to 65535, where 0 completely mutes the output and 65535 is the maximum volume. HPI – HPI_Volume APIs. ASX – ASX_Volume APIs.
12.5.4.2.2 Linux APIs
HPI –HPI_Volume APIs. ASX –ASX_Volume APIs. ALSA – https://www.alsa-project.org/alsa-doc/alsa-lib/
12.6 Meter
Meters in ASIControl are located on audio nodes and display the audio level as the audio signal passes through the node. Most AudioScience devices return both RMS and peak level readings and ASIControl displays both simultaneously.
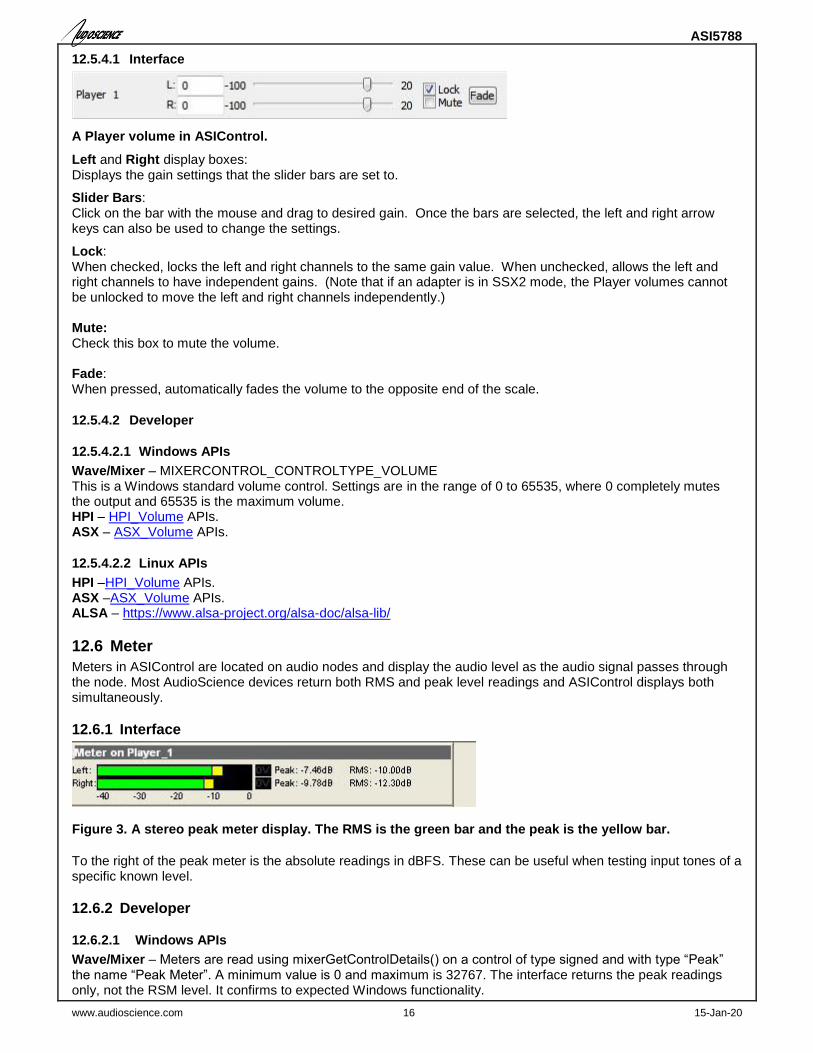
12.6.1 Interface
To the right of the peak meter is the absolute readings in dBFS. These can be useful when testing input tones of a specific known level.
12.6.2 Developer
12.6.2.1 Windows APIs
Wave/Mixer – Meters are read using mixerGetControlDetails() on a control of type signed and with type “Peak” the name “Peak Meter”. A minimum value is 0 and maximum is 32767. The interface returns the peak readings only, not the RSM level. It confirms to expected Windows functionality.
Figure 3. A stereo peak meter display. The RMS is the green bar and the peak is the yellow bar.

ASI5788
www.audioscience.com 17 15-Jan-20
HPI – Meters are read using the HPI_Meterxxx() API. ASX – Meters are read using the ASX_Meter_xxx() API.
12.6.2.2 Linux APIs
HPI – Meters are read using the HPI_Meterxxx() API. ASX – Meters are read using the ASX_Meter_xxx() API. ALSA – https://www.alsa-project.org/alsa-doc/alsa-lib/
12.7 Channel_Mode
The channel mode is a mechanism for handling mono to stereo conversions and directing the output to either left or right channels, as well as outputting left to stereo and right to stereo.
12.7.1 Interface
ASIControl view of a player’s channel mode control.
Default playback of either mono or stereo files causes audio to be output from the player on both the left and right audio channels. The channel mode control can allow the audio to be directed to either the left only or the right only. Select a channel mode setting from the dropdown list. Valid settings are:
Normal – left channel out left channel, right channel out right channel
Swap – left channel out right channel and right channel out left channel
Left_to_stereo – left channel out to both left and right channels
Right_to_stereo – right channel out to both left and right channels
Stereo_to_left – left and right channels out to left channel
Stereo_to_right – left and right channels out to right channel
12.8 ClockSourceIn
In the topology pane of ASIControl, click on Clock Source 1
and in the node pane, select where the adapter is to get its clock source from using the Clock Source dropdown list, as well as the sample rate to use if clocking from adapter. Note that for CobraNet and Livewire devices, the sample rate is fixed at 48kHz.
Left Right
Left Right
Left Right
Left Right
Left Right
Left Right
Left Right
Left Right
Left Right
Left Right
+
Left Right
Left Right +

ASI5788
www.audioscience.com 18 15-Jan-20
12.8.1 Interface
Clock Source information as seen in ASIControl.
Local Rate: Select from the dropdown list the supported rates of the adapter. Clock Source: From the dropdown list, select the source for the adapter’s clocking. Selections, depending on the adapter, include:
- Local – adapter rate is used; select a supported sample rate in Local Rate dropdown list - Word – Word clock from Word clock BNC connector on digital cable loom (or BOB1024) - WordHeader – Word clock from header on adapter (ASI61xx only) - AES/EBU Sync – AES/EBU Sync from AES/EBU Sync XLR connector on digital cable loom (or
BOB1024) - AES/EBU In 1-4 – rate taken from specific digital input - AES/EBU Auto – rate taken from first valid digital input; looks at digital input 1 first, then up to digital
input 4 - Blu link
Adapter Rate: Displays the current adapter operating rate <end>


