Arsenic & Old Lace Afghan: Scalloped Leaf Edge design by M ... · especially love what she does...
9
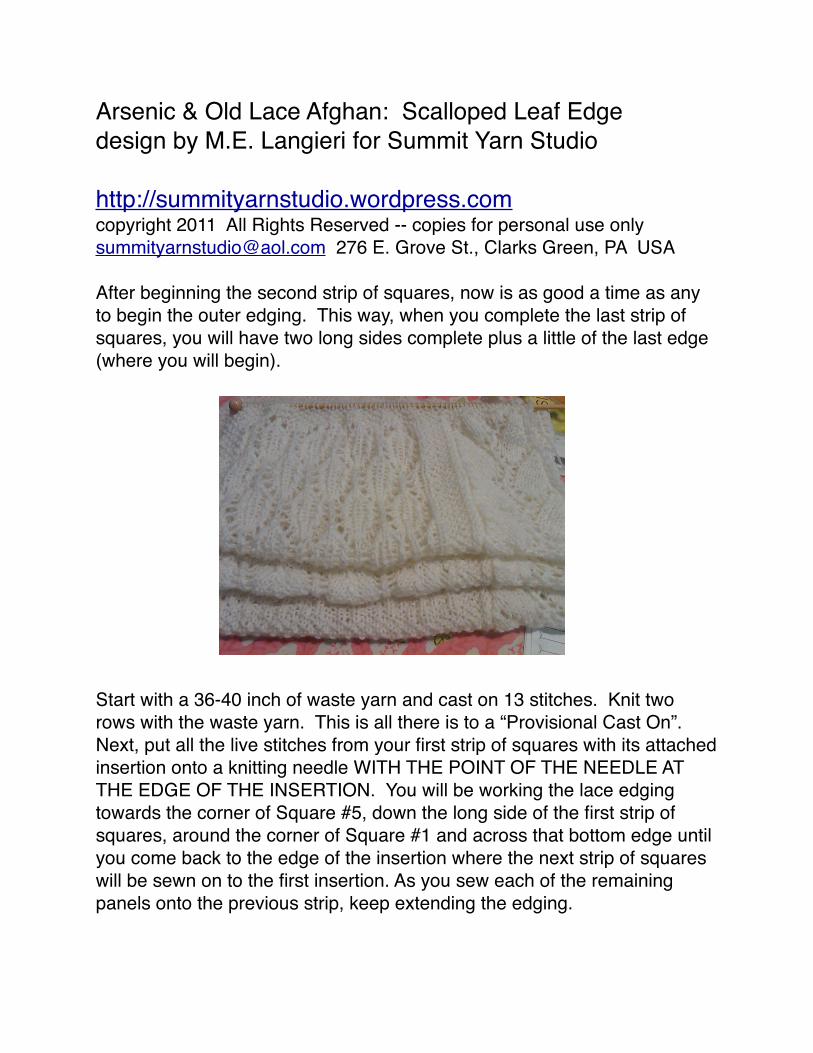
Arsenic & Old Lace Afghan: Scalloped Leaf Edge design by M.E. Langieri for Summit Yarn Studio http://summityarnstudio.wordpress.com copyright 2011 All Rights Reserved -- copies for personal use only [email protected] 276 E. Grove St., Clarks Green, PA USA After beginning the second strip of squares, now is as good a time as any to begin the outer edging. This way, when you complete the last strip of squares, you will have two long sides complete plus a little of the last edge (where you will begin). Start with a 36-40 inch of waste yarn and cast on 13 stitches. Knit two rows with the waste yarn. This is all there is to a “Provisional Cast On”. Next, put all the live stitches from your first strip of squares with its attached insertion onto a knitting needle WITH THE POINT OF THE NEEDLE AT THE EDGE OF THE INSERTION. You will be working the lace edging towards the corner of Square #5, down the long side of the first strip of squares, around the corner of Square #1 and across that bottom edge until you come back to the edge of the insertion where the next strip of squares will be sewn on to the first insertion. As you sew each of the remaining panels onto the previous strip, keep extending the edging.
Transcript of Arsenic & Old Lace Afghan: Scalloped Leaf Edge design by M ... · especially love what she does...
Arsenic & Old Lace Afghan: Scalloped Leaf Edge design by M.E. Langieri for Summit Yarn Studio
http://summityarnstudio.wordpress.com copyright 2011 All Rights Reserved -- copies for personal use [email protected] 276 E. Grove St., Clarks Green, PA USA
After beginning the second strip of squares, now is as good a time as any to begin the outer edging. This way, when you complete the last strip of squares, you will have two long sides complete plus a little of the last edge (where you will begin).
Start with a 36-40 inch of waste yarn and cast on 13 stitches. Knit two rows with the waste yarn. This is all there is to a “Provisional Cast On”. Next, put all the live stitches from your first strip of squares with its attached insertion onto a knitting needle WITH THE POINT OF THE NEEDLE AT THE EDGE OF THE INSERTION. You will be working the lace edging towards the corner of Square #5, down the long side of the first strip of squares, around the corner of Square #1 and across that bottom edge until you come back to the edge of the insertion where the next strip of squares will be sewn on to the first insertion. As you sew each of the remaining panels onto the previous strip, keep extending the edging.

On the left you can see the pink waste yarn. On the right is the insertion edge of the first strip with the yarn the edging will be knit from drawn through the first stitch (bury the end invisibly later) -- the wrong side of the fabric will be facing you (purl side). Purl across the 13 stitches of the waste yarn and then you are ready to begin the pattern rows of this beautiful edging.
In the picture above, you can see that I have purled across the pink waste yarn in my afghan yarn. The wrong side of the fabric is facing us in this photograph. Turn your work now so that the knit, or right side, of the fabric is facing you.

The first thirteen (13) stitches are the edging stitches. The other stitches are the live stitches from the combined first strip of squares and insertion. On every RIGHT SIDE ROW of the edging you will be knitting the last stitch of the edging to one live stitch of that first strip -- very much like knitting the insertion onto the first strip of squares...just that here (at first) the stitches are already waiting for you and do not have to be picked up as we did with the insertion.
Before you begin the pattern row repeats please humor me and do this: take two safety or coilless pins and mark the tenth stitch from the end of your needle and what will be then tenth picked up stitch on the first side of the first strip of squares -- as in these photographs:

This picture shows a safety pin marking the tenth stitch in from the end of the live stitches, near the outer corner of Square #5.
This photo shows you two things: the pin marking the site of what will be the tenth picked-up stitch down the outer edge of that first strip of squares and EXACTLY where to pick up the stitches as you attach the edging to the sides of this afghan. These stitches are the strand of yarn between the “knots” formed at the end of every seed stitch row.

This is Corinaʼs demo photograph on her blog: http://handwerktuin.blogspot.com/ (from The Netherlands). Corina has been kind enough to translate these patterns into Dutch AND if you go to her blog there is a button to select so we can read her wonderful blog in English. She is incredibly talented and into all kinds of fiber art. I especially love what she does with tatting (Frivolite)!

You will work across the first 12 edge stitches in pattern using Row 1 and the 13th stitch will be knit together THROUGH THE BACK LOOPS with the first of the live stitches of the insertion. This is what the photograph above is showing you. Then turn your work and work the even numbered rows of the edging as written (purl all thirteen stitches).
When you come to the end of the second right side row there will be a visible gap between the last edge stitch and the next live stitch of the afghan strip (as in the photo above).

Here is a photo of my edging-in-progress as I am attaching it from the right towards the left on my afghan. Ready?
This is a detailed leaf with a seed stitch center defined by directional decreases. It has a scalloped edge and is the perfect complement to this afghan. There have been a few knitters who at first thought they might pass on this edge, but after they applied it confessed to be very happy because it brings the afghan together as a whole. Once you work all the way around to where you began the edging you will graft the stitches together to the cast on edge using Kitchener Stitch. For a perfect close you may need to count your rows and work them out so the graft meets at the right place. If you need help, please email me and I will be here for you!

Leaf Edge Pattern Rows: (always slip sts purlwise unless otherwise indicated by the pattern)
Row 1: sl 1 K-wise, sl1-K2tog-PSSO, YO, K5, YO, K1tbl (through the back loop), YO, sl1-K1-PSSO, K1 tog with live st from afghan edge TBL, turn.
Row 2: purl all 13 stitches of the edging.
Row 3: sl 1 K-wise, K1 tbl, YO, K1, K2togTBL, P1, sl1-K1-PSSO, K1, YO, K1tbl, YO, sl1-K1-PSSO, K1 tog with live st from afghan edge TBL, turn.
Row 4: purl all 13 sts of the edging.
Row 5: sl 1 K-wise, K1tbl, YO, K1, K2togTBL, P1, sl1-K1-PSSO, K1, YO, K1tbl, YO, sl1-K1-PSSO, K1 tog with live st from afghan edge TBL, turn.
Row 6: purl all 13 sts of the edging.
Row 7: sl 1 K-wise, sl1-K1-PSSO, YO, K2togTBL, P1, sl1-K1-PSSO, (YO, K1tbl) X2, YO, sl1-K1-PSSO, K1 tog with live st from afghan edge TBL, turn.
Row 8: purl all 13 sts of the edging.
Row 9: sl 1 K-wise, sl1-K1-PSSO, YO, K3togTBL, YO, K3, YO, K1tbl, YO, sl1-K1-PSSO, K1 tog with live st from afghan edge TBL, turn.
Row 10: purl all 13 sts of the edging.
When you get to the safety pin markers then work two (2) right side rows into EACH STITCH instead of just one right side row into a stitch. This will ease the edging around the corner nicely. From one safety pin to the second safety pin will be a total of 40 rows.

Please mark all four corners in this way. Go ahead and mark the lower corner of the first strip. This is why the cast on is a knit cast on -- here is a photo of the placement of my safety pins:
The above is me demonstrating how to pick up the stitches at the cast on edge. Pointy needles are a total plus.
Take care and always feel free to contact me and of course, I LOVE TO SEE PICTURES OF YOUR BEAUTIFUL WORK! It thrills me!With loads of love, light and laughter always, Mary Ellen Langieri