ALM Octane Installation Guide for Windows - Micro …. Permissions Filesystem...
60
Software Version: 12.55.32 ALM Octane Installation Guide for Windows Go to HELP CENTER ONLINE http://admhelp.microfocus.com/octane/ Document Release Date: June 03, 2018 | Software Release Date: June 2018
Transcript of ALM Octane Installation Guide for Windows - Micro …. Permissions Filesystem...
Software Version: 12.55.32
ALM Octane
Installation Guide for Windows
Go to HELP CENTER ONLINEhttp://admhelp.microfocus.com/octane/
Document Release Date: June 03, 2018 | Software Release Date: June 2018
Legal Notices
DisclaimerCertain versions of software and/or documents (“Material”) accessible here may contain branding from Hewlett-Packard Company
(now HP Inc.) and Hewlett Packard Enterprise Company. As of September 1, 2017, the Material is now offered by Micro Focus, a
separately owned and operated company. Any reference to the HP and Hewlett Packard Enterprise/HPE marks is historical in nature,
and the HP and Hewlett Packard Enterprise/HPE marks are the property of their respective owners.
WarrantyThe only warranties for products and services of Micro Focus and its affiliates and licensors (“Micro Focus”) are set forth in the
express warranty statements accompanying such products and services. Nothing herein should be construed as constituting an
additional warranty. Micro Focus shall not be liable for technical or editorial errors or omissions contained herein. The information
contained herein is subject to change without notice.
Restricted Rights LegendContains Confidential Information. Except as specifically indicated otherwise, a valid license is required for possession, use or
copying. Consistent with FAR 12.211 and 12.212, Commercial Computer Software, Computer Software Documentation, and Technical
Data for Commercial Items are licensed to the U.S. Government under vendor's standard commercial license.
Copyright Notice© Copyright 2016-2018 Micro Focus or one of its affiliates
Trademark NoticesAdobe™ is a trademark of Adobe Systems Incorporated.
Microsoft® and Windows® are U.S. registered trademarks of Microsoft Corporation.
UNIX® is a registered trademark of The Open Group.
This product includes an interface of the 'zlib' general purpose compression library, which is Copyright © 1995-2002 Jean-loup
Gailly and Mark Adler.
Comodo Code Signing CertificateThe code signing certificate for ALM Octane was changed from Verisign to Comodo starting on January1, 2017.
If you are installing this product on a computer with an older version of Windows, or on a computerwithout automatic Windows updates, the Comodo root certificate may not automatically be included asa trusted root certificate.
In such cases, we recommend manually configuring Comodo as a trusted root certificate.
For more details, see: https://technet.microsoft.com/en-gb/library/dn265983.aspx.
ALM Octane (12.55.32) Page 2 of 60
Contents
ALM Octane 1Architecture 4
Basic configuration 4
Enterprise configuration 6
Components 7
Installation types 9
Installation flow 10
Prerequisites 11
Checklist 12
Permissions 15
Installation 18
Deploy ALM Octane 19
Configure initial site settings 20
Database server settings 21
Oracle server settings 23
SQL Server settings 23
Site actions 23
Space settings 24
Elasticsearch settings 24
Site admin credential settings 25
Repository settings 25
Additional settings 25
Configure other settings 26
Overview 26
Rules for editing the octane.yml file 26
General server settings 27
LDAP settings 28
License settings 33
Oracle settings 34
Update settings 34
Initialize the ALM Octane server 34
Log in to ALM Octane 35
Cluster installation (optional) 36
Overview 36
How to install ALM Octane in a cluster configuration 37
Upgrade 39
Before you upgrade 39
Deploy 40
Prepare to configure 41
Configure initial settings 41
Installation Guide for WindowsALM Octane
ALM Octane (12.55.32) Page 3 of 60
Configure other settings 42
Upgrade 50
Configure and upgrade cluster nodes 50
Upgrade spaces in ALM Octane 50
Restart all Jetty servers 51
After the upgrade 51
Rollback 52
After the upgrade's setup validation phase 52
After site schema has been upgraded 52
After space schema has been upgraded 53
After upgrade completed 54
After upgrading cluster nodes 54
Management 55
Start the ALM Octane server manually 56
Handle database-related issues 56
Change site schema settings and reinitialize 56
Configure trust on the ALM Octane server 57
Configure a secure connection to the ALM Octane server (Jetty) 57
Uninstall 58
Send Us Feedback 59
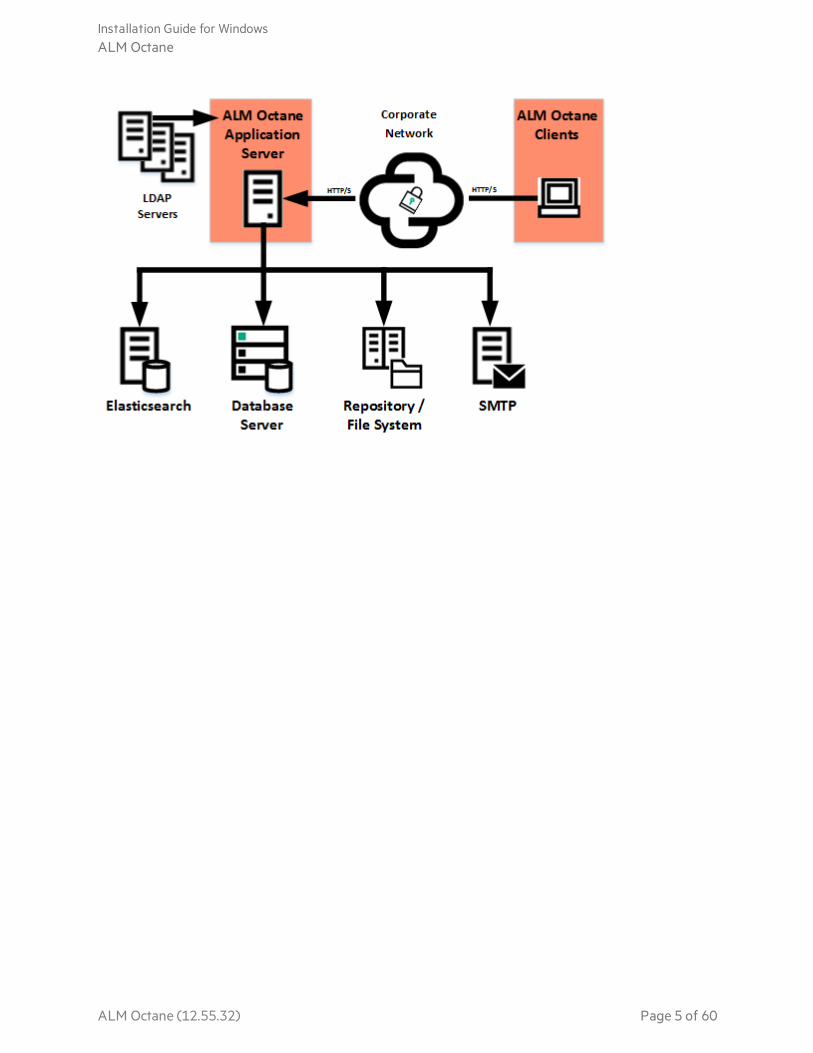
ArchitectureYou can set up ALM Octane as a single node, or in a cluster configuration. The following diagramsillustrate the system architecture for both options. These are followed by descriptions of each of thecomponents.
l "Basic configuration" below
l "Enterprise configuration" on page 6
l "Components" on page 7
Basic configurationThe following diagram illustrates the system architecture of a single-node configuration.
Note: The ALM Octane, database, and Elasticsearch servers should each reside on separatemachines.
Installation Guide for WindowsALM Octane
ALM Octane (12.55.32) Page 4 of 60
Installation Guide for WindowsALM Octane
ALM Octane (12.55.32) Page 5 of 60

Enterprise configurationThe following diagram illustrates the system architecture of an enterprise, cluster configuration:
Installation Guide for WindowsALM Octane
ALM Octane (12.55.32) Page 6 of 60

Components
Components Description
ALM Octane clients The clients communicate with the ALM Octane server over HTTP/S.
Integration bridge and external sources Enterprise configuration: The integration bridge enables ALM Octane
to integrate with external applications ("off-organization" communication).
This is generally optional, but required for synchronization. Also used for
Trigger Webhook rules to an endpoint URL, SaaS deployments, and for
communication between Micro Focus SaaS and an on-premises deployment.
ALM Octane Server application nodes Client requests from ALM Octane are dispatched to the deployed
application.
Note: The ALM Octane, database, and Elasticsearch servers should
each reside on separate machines.
ALM Octane application additional
cluster (sync) nodes
Cluster configuration: A cluster is a group of application servers that run
as a single system. Each application server in a cluster is referred to as a
"node."
l All nodes must have access to the database server on which the site
database schema resides.
l All nodes must have access to the repository.
Generally, the repository will be located on an NFS or SAN server.
l All nodes must have access to each other.
Integration bridge service nodes The service handles communication between the Integration Bridge and
Synchronizer.
Synchronizer service nodes The service nodes handle synchronization between ALM Octane and ALM.
In addition, synchronization between ALM Octane and JIRA is supported as
technical preview.
Repository / File system Stores all files to be used by all the projects in the system, such as templates
and attachments.
Cluster configuration: When working in a clustered configuration, the
repository must be accessible by all nodes. Also, the repository must be
configured to use the same path on all nodes.
Installation Guide for WindowsALM Octane
ALM Octane (12.55.32) Page 7 of 60
Components Description
Database server A relational database management system, either Oracle RAC or Microsoft
SQL Server.
The database server stores the following schemas:
l Space schema. All space information, such as workspaces, users, and
roles..
l Site schema. Stores all site-related information, such as database
servers, cluster nodes, the SMTP servers, and configuration.
This server can be shared with other applications with the following
constraints:
l The database must be able to sustain the load of all the applications.
l Future versions of ALM Octane might require a database upgrade. This
may necessitate migration of data if other applications sharing the same
database will not support the database version that ALM Octane
requires.
Note: The ALM Octane, database, and Elasticsearch servers should
each reside on separate machines.
Elasticsearch server (or cluster) A Java-based, open-source search engine. This component is used for
various aspects of the application, such as global search and trends.
This server can be shared with other applications with the following
constraints:
l The database must be able to sustain the load of all the applications.
l Future versions of ALM Octane might require a database upgrade. This
may necessitate migration of data if other applications sharing the same
database will not support the database version that ALM Octane
requires.
Note: The ALM Octane, database, and Elasticsearch servers should
each reside on separate machines.
A working Elasticsearch server is a requirement for working with ALM
Octane. For details, see the knowledge base article KM02494295.
Load balancer Cluster configuration: When working with a load balancer, client
requests are transmitted to the load balancer and distributed according to
server availability within the cluster.
If you are using a load balancer, we recommend you utilize SSL offloading.
Installation Guide for WindowsALM Octane
ALM Octane (12.55.32) Page 8 of 60
Components Description
High availability load balancers Cluster configuration: These can be "VIPs" (virtual IP addresses) of one
physical load balancer.
DMZ An optional, demilitarized zone.
High availability reverse proxies and
SSL offloading
Cluster configuration: Optional configuration for load balancing using a
software solution (for example, NGINX).
SMTP A mail server.
Jenkins (with ALM Octane plugin) Enterprise configuration: You can integrate ALM Octane with a Jenkins
CI server using the HPE Application Automation Tools Plugin on your
CI server.
TeamCity, Bamboo, or TFS server (with
ALM Octane plugin)
Enterprise configuration: You can integrate ALM Octane with a
TeamCity, Bamboo, or TFS CI server using the ALM Octane CI Plugin on your
CI server.
Slack Integration with Slack, which enables all stakeholders of a backlog item or
pipeline run failure to collaborate and communicate. You can integrate with
Slack by adding it as a collaboration tool associating it with a workspace.
Micro Focus testing tools: LeanFT, UFT,
LoadRunner, StormRunner Functional,
StormRunner Load, Performance Center
You can integrate ALM Octane with Micro Focus testing tools. For details, seethe topic on ALM Octane DevOps integrations in the ALM Octane HelpCenter.
Installation typesThis document describes the necessary requirements and procedures for the installation of ALMOctane server on Microsoft Windows, and initial setup steps.
Type Description
This Windows Installation Instructions for installing on:
l A single node.
l A cluster configuration.
For details, see "Installation" on page 18.
See also:l "Prerequisites" on page 11
l "Deploy ALM Octane" on page 19
l "Configure initial site settings " on page 20
l "Configure other settings" on page 26
Installation Guide for WindowsALM Octane
ALM Octane (12.55.32) Page 9 of 60

Installation flowThis document describes the overall flow for installing the ALM Octane server on Windows.
The installation process comprises the following high-level steps:
Prerequisites
Verify your system meets hardware and software requirements.
This includes setting up permissions, opening ports, database configuration, and more.
You need three separate server machines.
l ALM Octane server
l Database server
l Elasticsearch server
For details, see "Prerequisites" on the next page.
Note: We recommend you review security considerations in the knowledge base articleKM02707977. This article contains Instructions on how to set up a secure configuration forALM Octane.
Deployment
Deploy ALM Octane on a machine dedicated for the ALM Octane server on Windows.
ALM Octane is deployed using an installation program.
The default deployment path is C:\octane.
The command to deploy is: octane-onprem-<version>.exe
For details, see "Deploy ALM Octane" on page 19.
Configuration
Configure ALM Octane by editing these files with your site's settings:
l setup.xml for initial configuration
l octane.yml for ongoing configuration
Installation Guide for WindowsALM Octane
ALM Octane (12.55.32) Page 10 of 60
The path to these files is C:\octane\conf.
For details, see "Configure initial site settings " on page 20and "Configure other settings" on page 26.
If you have previously installed ALM Octane on this machine, select Start > ALM Octane > UpdateSettings. For details, see "Update settings" on page 34.
Initialization
Select Start > ALM Octane > Initialize Server.
This also starts the server.
For details, see "Initialize the ALM Octane server" on page 34.
Verify and log in
Verify that ALM Octane was properly installed.
Log into ALM Octane. For details, see "Log in to ALM Octane" on page 35.
Cluster configuration (optional)
After starting the server on the first machine, configure and initialize each additional cluster node. Fordetails, see "Cluster installation (optional)" on page 36.
PrerequisitesVerify that your system meets the requirements in System requirements.
For security requirements, see Software Self-solve knowledge base article KM02707977.
In this topic:
l "Checklist" on the next page
l "Permissions" on page 15
Installation Guide for WindowsALM Octane
ALM Octane (12.55.32) Page 11 of 60

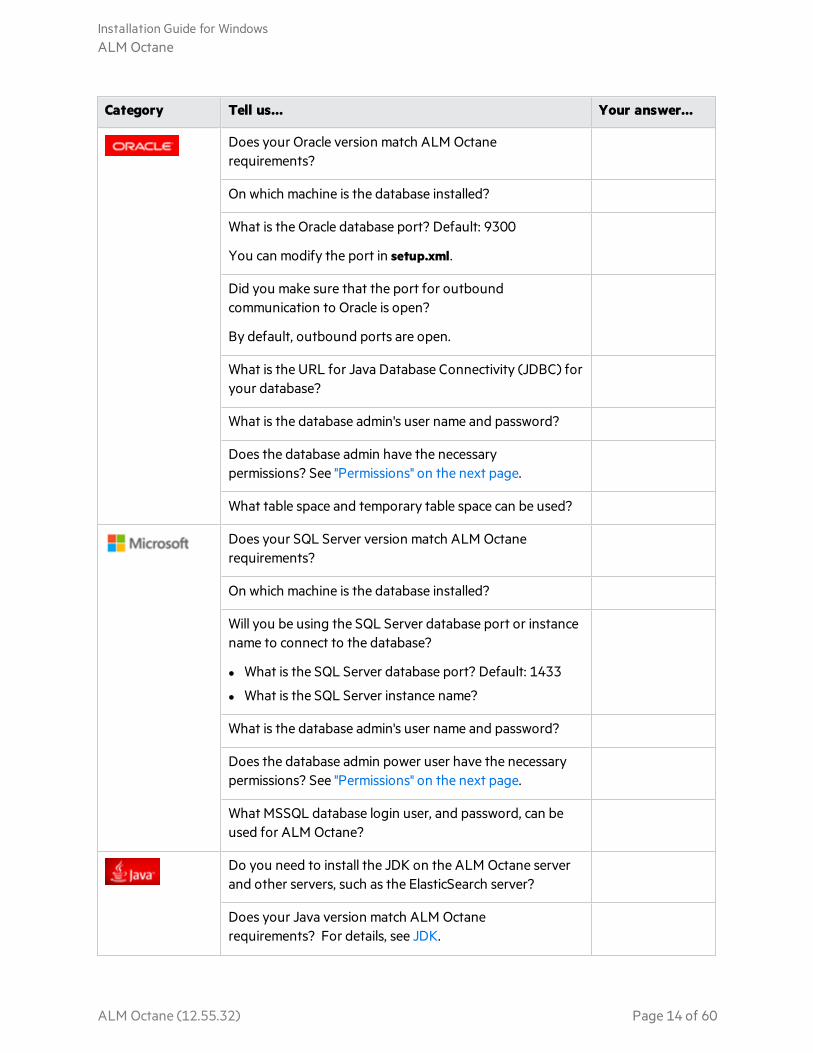
ChecklistUse the following questions to make sure you are ready to install.
Category Tell us... Your answer...
On which machine will you be installing ALM Octane?
Does the machine have a Quad Core AMD64 processor orequivalent x86-compatible processor?
How much memory does the machine have?
You need a minimum of 8 GB. Contact customer supportfor site-specific recommendations.
Does the machine have a minimum of 8 GB free disk space?
Contact customer support for site-specificrecommendations.
What Microsoft Windows operating system is on themachine?
What is the user name and password you will use for theinstallation user?
Are your browsers and screen resolutions compatible withALM Octane?
On-premises installation of ALM Octane supports onlyEnglish characters for the names of schemas, operatingsystems, users, and so on. Did you check?
Installation Guide for WindowsALM Octane
ALM Octane (12.55.32) Page 12 of 60

Category Tell us... Your answer...
Elasticsearchenables trendreporting andsearchfunctionality inALM Octane.
What Elasticsearch version matches ALM Octanerequirements?
Do you need to download Elasticsearch?
You can download Elasticsearch from: -https://www.elastic.co/downloads/past-releases/elasticsearch-5-6-5.
Did you check knowledge base article KM02494295?
On which machine is Elasticsearch installed?
What is the Elasticsearch port? Default: 1521
You can modify the port in the ConnectionString field insetup.xml.
Did you make sure that the port for outboundcommunication to Elasticsearch is open?
By default, outbound ports are open.
Did you make sure that the Elasticsearch ports (such as9300 and 9200) are accessible directly from the ALMOctane server, not just by checking the HTTP connection?
What is the name of the Elasticsearch cluster you haveconfigured?
Was Elasticsearch configured according to ALM Octanerequirements? For details, see Database and Elasticsearch.
Is the Elasticsearch accessible from the ALM Octane server?
Installation Guide for WindowsALM Octane
ALM Octane (12.55.32) Page 13 of 60
Category Tell us... Your answer...
Does your Oracle version match ALM Octanerequirements?
On which machine is the database installed?
What is the Oracle database port? Default: 9300
You can modify the port in setup.xml.
Did you make sure that the port for outboundcommunication to Oracle is open?
By default, outbound ports are open.
What is the URL for Java Database Connectivity (JDBC) foryour database?
What is the database admin's user name and password?
Does the database admin have the necessarypermissions? See "Permissions" on the next page.
What table space and temporary table space can be used?
Does your SQL Server version match ALM Octanerequirements?
On which machine is the database installed?
Will you be using the SQL Server database port or instancename to connect to the database?
l What is the SQL Server database port? Default: 1433
l What is the SQL Server instance name?
What is the database admin's user name and password?
Does the database admin power user have the necessarypermissions? See "Permissions" on the next page.
What MSSQL database login user, and password, can beused for ALM Octane?
Do you need to install the JDK on the ALM Octane serverand other servers, such as the ElasticSearch server?
Does your Java version match ALM Octanerequirements? For details, see JDK.
Installation Guide for WindowsALM Octane
ALM Octane (12.55.32) Page 14 of 60
Category Tell us... Your answer...
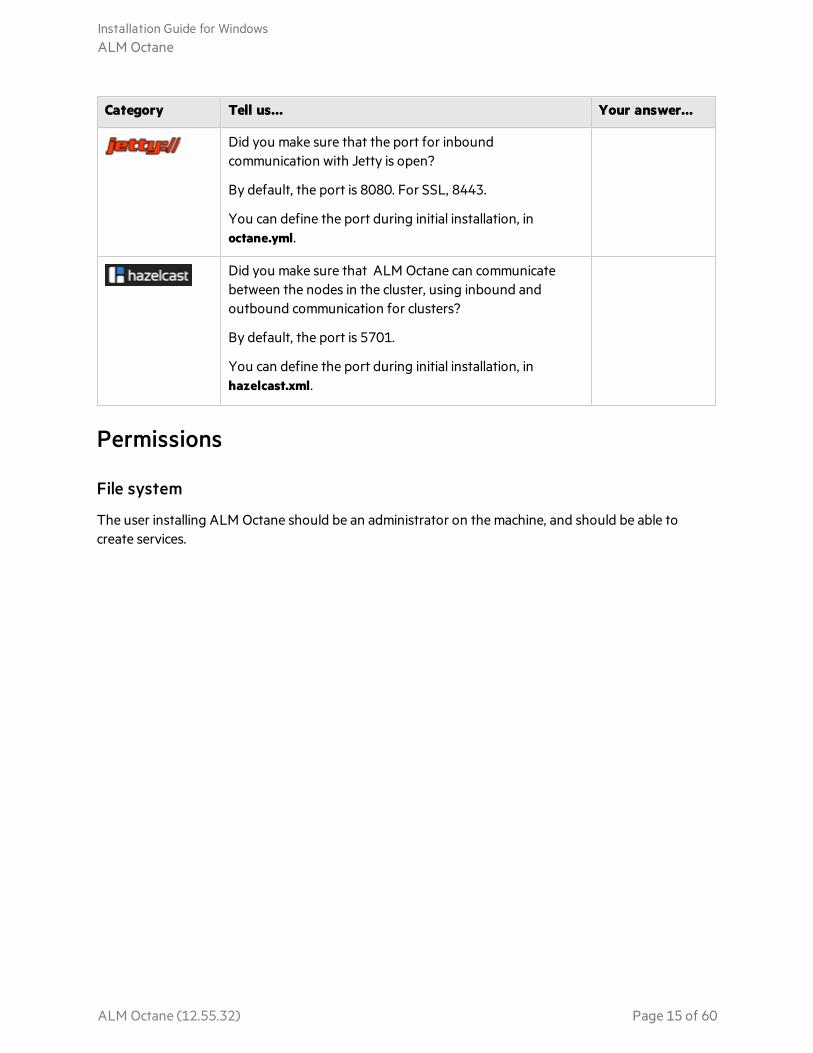
Did you make sure that the port for inboundcommunication with Jetty is open?
By default, the port is 8080. For SSL, 8443.
You can define the port during initial installation, inoctane.yml.
Did you make sure that ALM Octane can communicatebetween the nodes in the cluster, using inbound andoutbound communication for clusters?
By default, the port is 5701.
You can define the port during initial installation, inhazelcast.xml.
Permissions
File system
The user installing ALM Octane should be an administrator on the machine, and should be able tocreate services.
Installation Guide for WindowsALM Octane
ALM Octane (12.55.32) Page 15 of 60
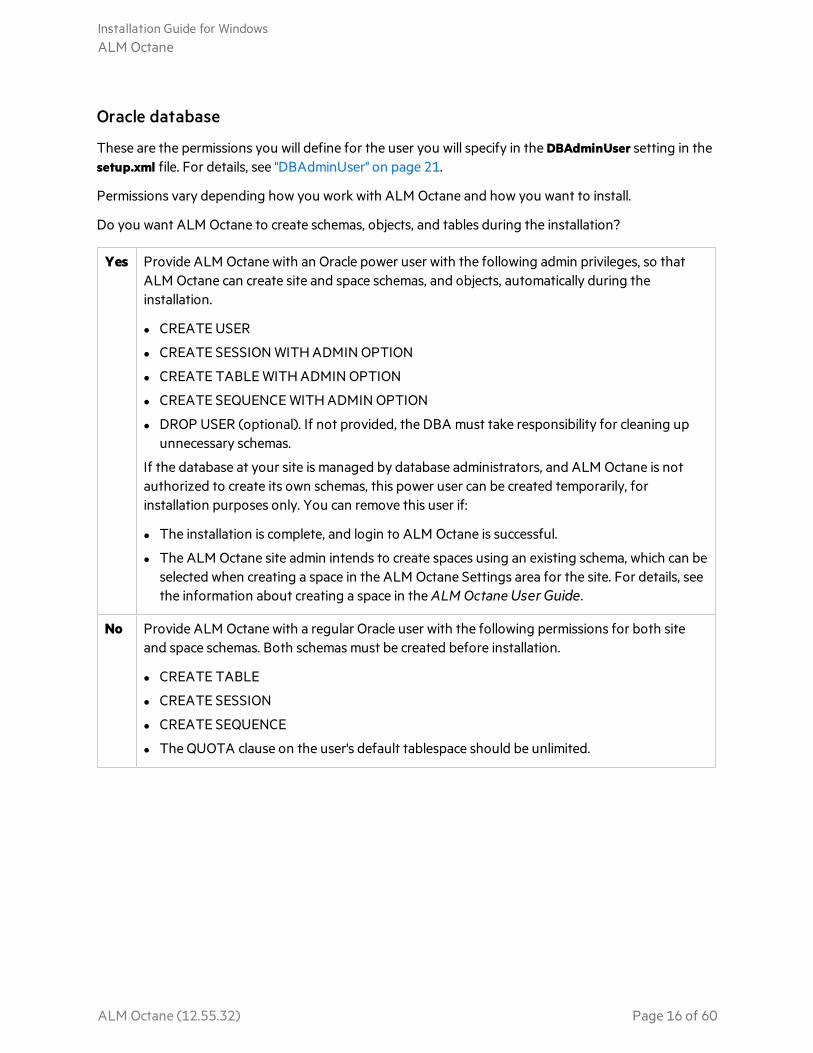
Oracle database
These are the permissions you will define for the user you will specify in the DBAdminUser setting in thesetup.xml file. For details, see "DBAdminUser" on page 21.
Permissions vary depending how you work with ALM Octane and how you want to install.
Do you want ALM Octane to create schemas, objects, and tables during the installation?
Yes Provide ALM Octane with an Oracle power user with the following admin privileges, so thatALM Octane can create site and space schemas, and objects, automatically during theinstallation.
l CREATE USER
l CREATE SESSION WITH ADMIN OPTION
l CREATE TABLE WITH ADMIN OPTION
l CREATE SEQUENCE WITH ADMIN OPTION
l DROP USER (optional). If not provided, the DBA must take responsibility for cleaning upunnecessary schemas.
If the database at your site is managed by database administrators, and ALM Octane is notauthorized to create its own schemas, this power user can be created temporarily, forinstallation purposes only. You can remove this user if:
l The installation is complete, and login to ALM Octane is successful.
l The ALM Octane site admin intends to create spaces using an existing schema, which can beselected when creating a space in the ALM Octane Settings area for the site. For details, seethe information about creating a space in the ALM Octane User Guide.
No Provide ALM Octane with a regular Oracle user with the following permissions for both siteand space schemas. Both schemas must be created before installation.
l CREATE TABLE
l CREATE SESSION
l CREATE SEQUENCE
l The QUOTA clause on the user's default tablespace should be unlimited.
Installation Guide for WindowsALM Octane
ALM Octane (12.55.32) Page 16 of 60
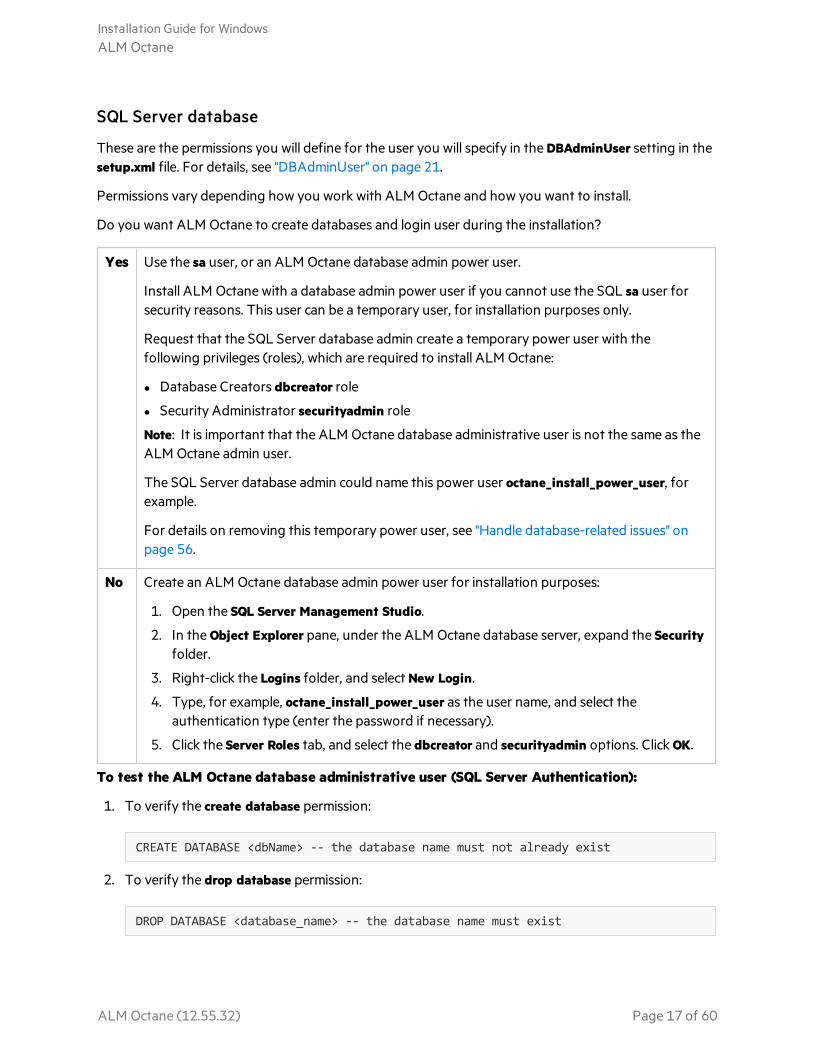
SQL Server database
These are the permissions you will define for the user you will specify in the DBAdminUser setting in thesetup.xml file. For details, see "DBAdminUser" on page 21.
Permissions vary depending how you work with ALM Octane and how you want to install.
Do you want ALM Octane to create databases and login user during the installation?
Yes Use the sa user, or an ALM Octane database admin power user.
Install ALM Octane with a database admin power user if you cannot use the SQL sa user forsecurity reasons. This user can be a temporary user, for installation purposes only.
Request that the SQL Server database admin create a temporary power user with thefollowing privileges (roles), which are required to install ALM Octane:
l Database Creators dbcreator role
l Security Administrator securityadmin role
Note: It is important that the ALM Octane database administrative user is not the same as theALM Octane admin user.
The SQL Server database admin could name this power user octane_install_power_user, forexample.
For details on removing this temporary power user, see "Handle database-related issues" onpage 56.
No Create an ALM Octane database admin power user for installation purposes:
1. Open the SQL Server Management Studio.
2. In the Object Explorer pane, under the ALM Octane database server, expand the Securityfolder.
3. Right-click the Logins folder, and select New Login.
4. Type, for example, octane_install_power_user as the user name, and select theauthentication type (enter the password if necessary).
5. Click the Server Roles tab, and select the dbcreator and securityadmin options. Click OK.
To test the ALM Octane database administrative user (SQL Server Authentication):
1. To verify the create database permission:
CREATE DATABASE <dbName> -- the database name must not already exist
2. To verify the drop database permission:
DROP DATABASE <database_name> -- the database name must exist
Installation Guide for WindowsALM Octane
ALM Octane (12.55.32) Page 17 of 60
Next steps:l "Deploy ALM Octane" on the next page
InstallationThis section describes how to install an on-premises ALM Octane server using Microsoft Windows.
Before installing:
l Verify that your server fulfills all prerequisites. For details, see "Prerequisites" on page 11.
l Review security considerations in the knowledge base article KM02707977.
Language support: On-premises installation of ALM Octane supports only English. This meansonly English characters can be specified for the names of schemas, operating systems, users, andso on.
This section includes:
• Deploy ALM Octane 19• Configure initial site settings 20• Configure other settings 26• Update settings 34• Initialize the ALM Octane server 34
Installation Guide for WindowsALM Octane
ALM Octane (12.55.32) Page 18 of 60
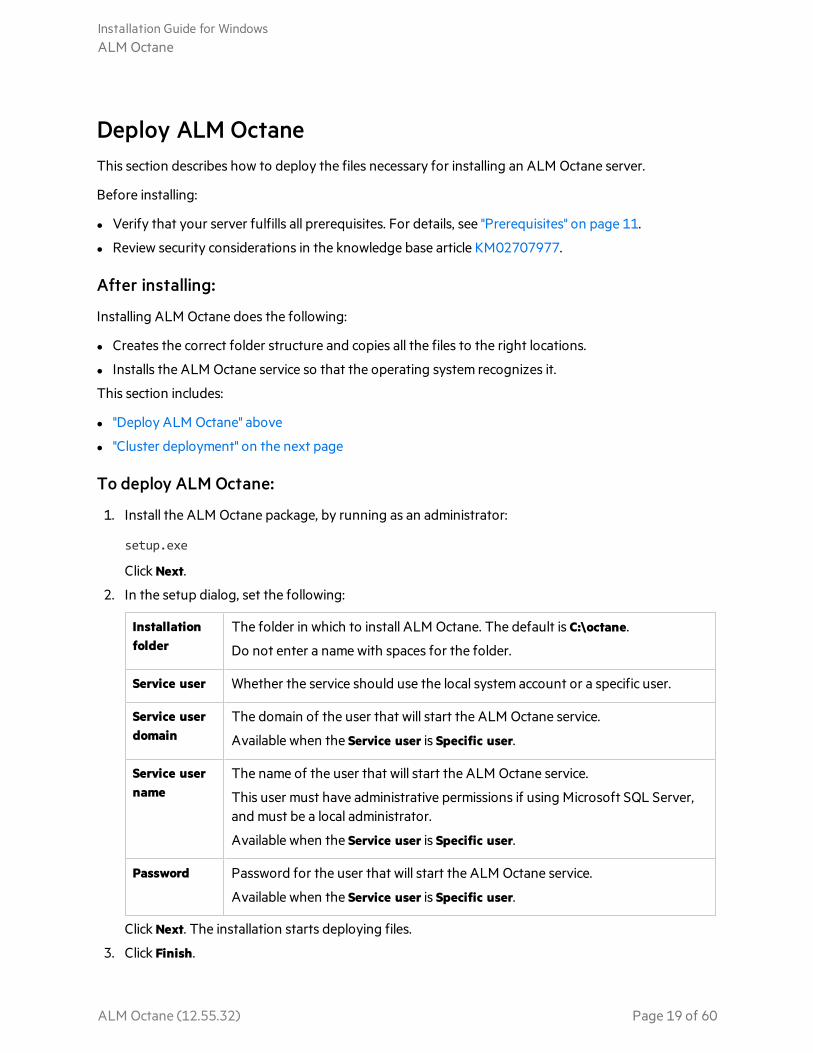
Deploy ALM OctaneThis section describes how to deploy the files necessary for installing an ALM Octane server.
Before installing:
l Verify that your server fulfills all prerequisites. For details, see "Prerequisites" on page 11.
l Review security considerations in the knowledge base article KM02707977.
After installing:
Installing ALM Octane does the following:
l Creates the correct folder structure and copies all the files to the right locations.
l Installs the ALM Octane service so that the operating system recognizes it.
This section includes:
l "Deploy ALM Octane" above
l "Cluster deployment" on the next page
To deploy ALM Octane:
1. Install the ALM Octane package, by running as an administrator:
setup.exe
Click Next.
2. In the setup dialog, set the following:
Installationfolder
The folder in which to install ALM Octane. The default is C:\octane.
Do not enter a name with spaces for the folder.
Service user Whether the service should use the local system account or a specific user.
Service userdomain
The domain of the user that will start the ALM Octane service.
Available when the Service user is Specific user.
Service username
The name of the user that will start the ALM Octane service.
This user must have administrative permissions if using Microsoft SQL Server,and must be a local administrator.
Available when the Service user is Specific user.
Password Password for the user that will start the ALM Octane service.
Available when the Service user is Specific user.
Click Next. The installation starts deploying files.
3. Click Finish.
Installation Guide for WindowsALM Octane
ALM Octane (12.55.32) Page 19 of 60
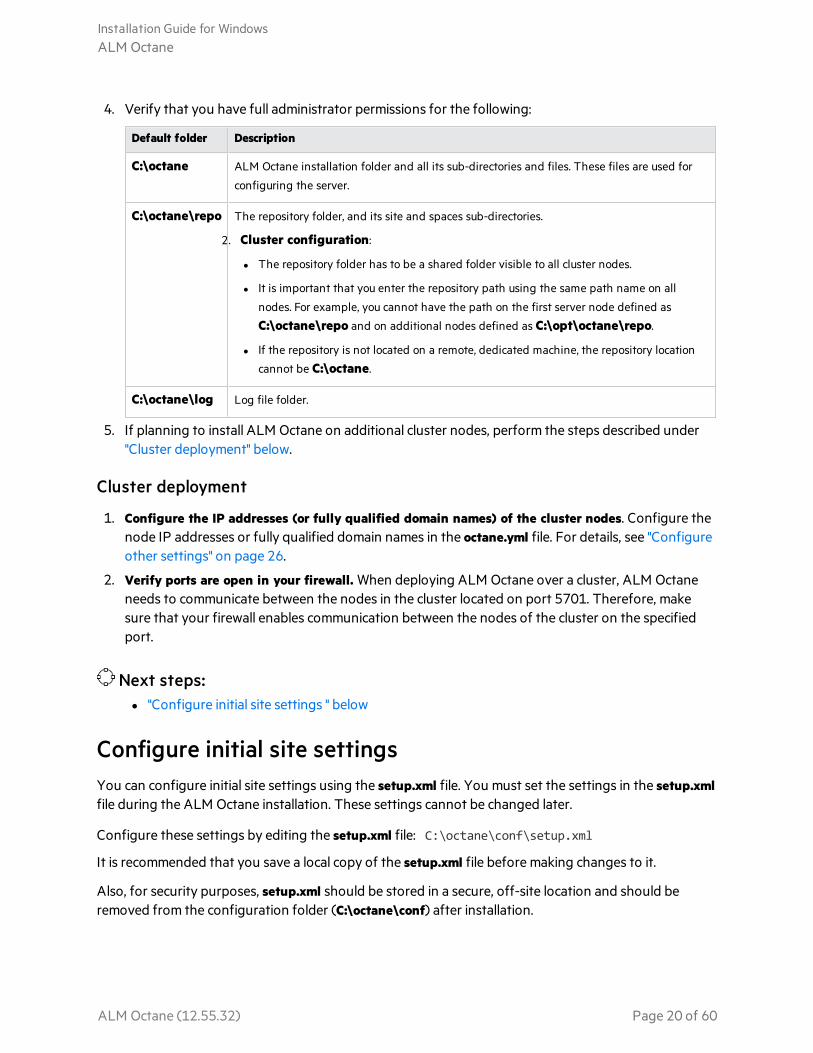
4. Verify that you have full administrator permissions for the following:
Default folder Description
C:\octane ALM Octane installation folder and all its sub-directories and files. These files are used for
configuring the server.
C:\octane\repo The repository folder, and its site and spaces sub-directories.
2. Cluster configuration:
l The repository folder has to be a shared folder visible to all cluster nodes.
l It is important that you enter the repository path using the same path name on all
nodes. For example, you cannot have the path on the first server node defined as
C:\octane\repo and on additional nodes defined as C:\opt\octane\repo.
l If the repository is not located on a remote, dedicated machine, the repository location
cannot be C:\octane.
C:\octane\log Log file folder.
5. If planning to install ALM Octane on additional cluster nodes, perform the steps described under"Cluster deployment" below.
Cluster deployment
1. Configure the IP addresses (or fully qualified domain names) of the cluster nodes. Configure thenode IP addresses or fully qualified domain names in the octane.yml file. For details, see "Configureother settings" on page 26.
2. Verify ports are open in your firewall. When deploying ALM Octane over a cluster, ALM Octaneneeds to communicate between the nodes in the cluster located on port 5701. Therefore, makesure that your firewall enables communication between the nodes of the cluster on the specifiedport.
Next steps:l "Configure initial site settings " below
Configure initial site settingsYou can configure initial site settings using the setup.xml file. You must set the settings in the setup.xmlfile during the ALM Octane installation. These settings cannot be changed later.
Configure these settings by editing the setup.xml file: C:\octane\conf\setup.xml
It is recommended that you save a local copy of the setup.xml file before making changes to it.
Also, for security purposes, setup.xml should be stored in a secure, off-site location and should beremoved from the configuration folder (C:\octane\conf) after installation.
Installation Guide for WindowsALM Octane
ALM Octane (12.55.32) Page 20 of 60
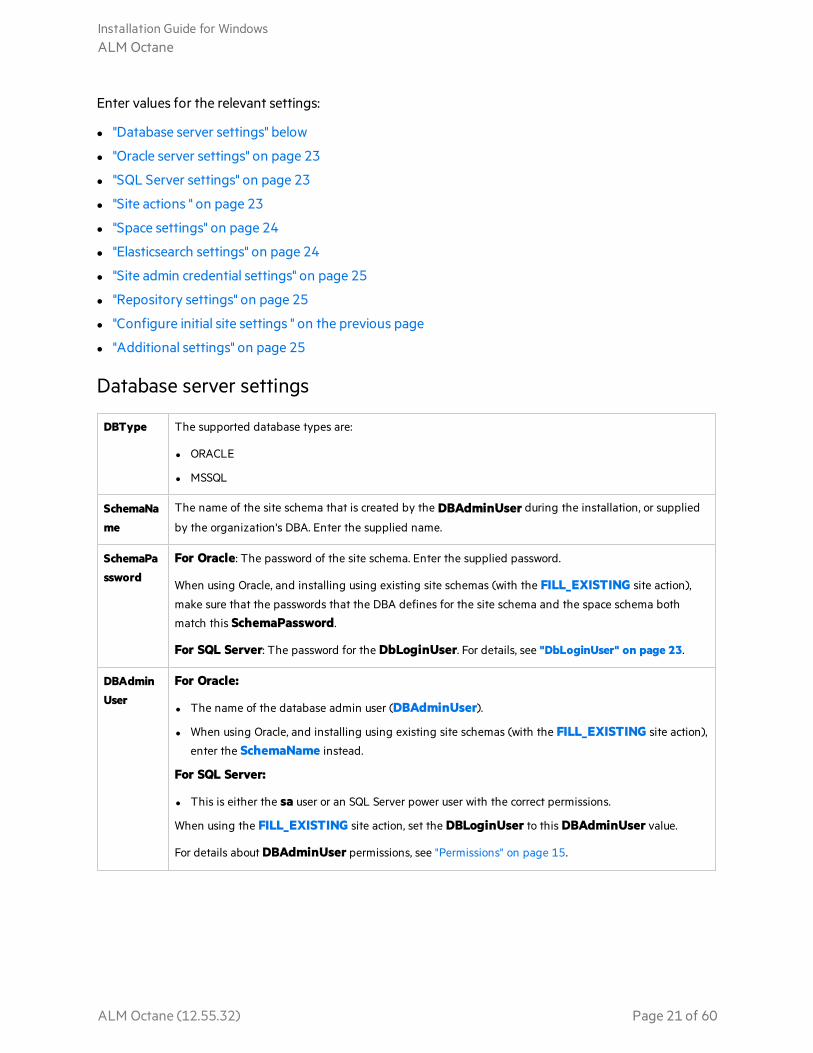
Enter values for the relevant settings:
l "Database server settings" below
l "Oracle server settings" on page 23
l "SQL Server settings" on page 23
l "Site actions " on page 23
l "Space settings" on page 24
l "Elasticsearch settings" on page 24
l "Site admin credential settings" on page 25
l "Repository settings" on page 25
l "Configure initial site settings " on the previous page
l "Additional settings" on page 25
Database server settings
DBType The supported database types are:
l ORACLE
l MSSQL
SchemaName
The name of the site schema that is created by the DBAdminUser during the installation, or supplied
by the organization's DBA. Enter the supplied name.
SchemaPassword
For Oracle: The password of the site schema. Enter the supplied password.
When using Oracle, and installing using existing site schemas (with the FILL_EXISTING site action),
make sure that the passwords that the DBA defines for the site schema and the space schema both
match this SchemaPassword.
For SQL Server: The password for the DbLoginUser. For details, see "DbLoginUser" on page 23.
DBAdminUser
For Oracle:
l The name of the database admin user (DBAdminUser).
l When using Oracle, and installing using existing site schemas (with the FILL_EXISTING site action),
enter the SchemaName instead.
For SQL Server:
l This is either the sa user or an SQL Server power user with the correct permissions.
When using the FILL_EXISTING site action, set the DBLoginUser to this DBAdminUser value.
For details about DBAdminUser permissions, see "Permissions" on page 15.
Installation Guide for WindowsALM Octane
ALM Octane (12.55.32) Page 21 of 60

DBAdminPassword
For Oracle: The password of the database admin user (DBAdminUser).
l Do not include a pound sign (#) or accented characters (such as, ä, ç, ñ).
l When installing using existing site schemas (with the FILL_EXISTING site action), enter the
SchemaPassword instead.
For SQL Server: The Password for the sa user or the SQL Server power user defined with the
DBAdminUser setting.
l When installing using existing site schemas (with the FILL_EXISTING site action), enter the
SchemaPassword instead.
ConnectionString
The Java Database Connectivity (JDBC) database connection string. It includes the following details:
database type, database server name, database server port number, service name.
The instructions below demonstrate how to set up the string with non-secured database access. However,
you can use this connection string to configure secure access to the database. For details, see Configure
secure database access (such as with SSL).
Oracle
l Syntax using TNS alias names:
To use TNS alias names, make sure to provide a value for the DBServerName setting.
<entrykey="ConnectionString">jdbc:mercury:oracle:TNSNamesFile=/<path>/tnsnames.ora;TNSServerName=<server_name></entry>
Example:
jdbc:mercury:oracle:TNSNamesFile=/etc/tnsnames.ora;TNSServerName=ora12
l Syntax using service names:
<entry key="ConnectionString">jdbc:mercury:oracle://<DB_SERVER_NAME>:<DB_SERVER_PORT>;servicename=<DB_SERVICE_NAME></entry>
Example:
jdbc:mercury:oracle://dbserver1.net:1521;servicename=orcl
To connect to Oracle RAC, use the Single Client Access Name (SCAN) instead of the database server
name.
SQL
Syntax:
<entry key="ConnectionString">jdbc:mercury:sqlserver://DB_SERVER_NAME:DB_SERVER_PORT</entry>
Example:
jdbc:mercury:sqlserver://dbserver1:1433
Installation Guide for WindowsALM Octane
ALM Octane (12.55.32) Page 22 of 60
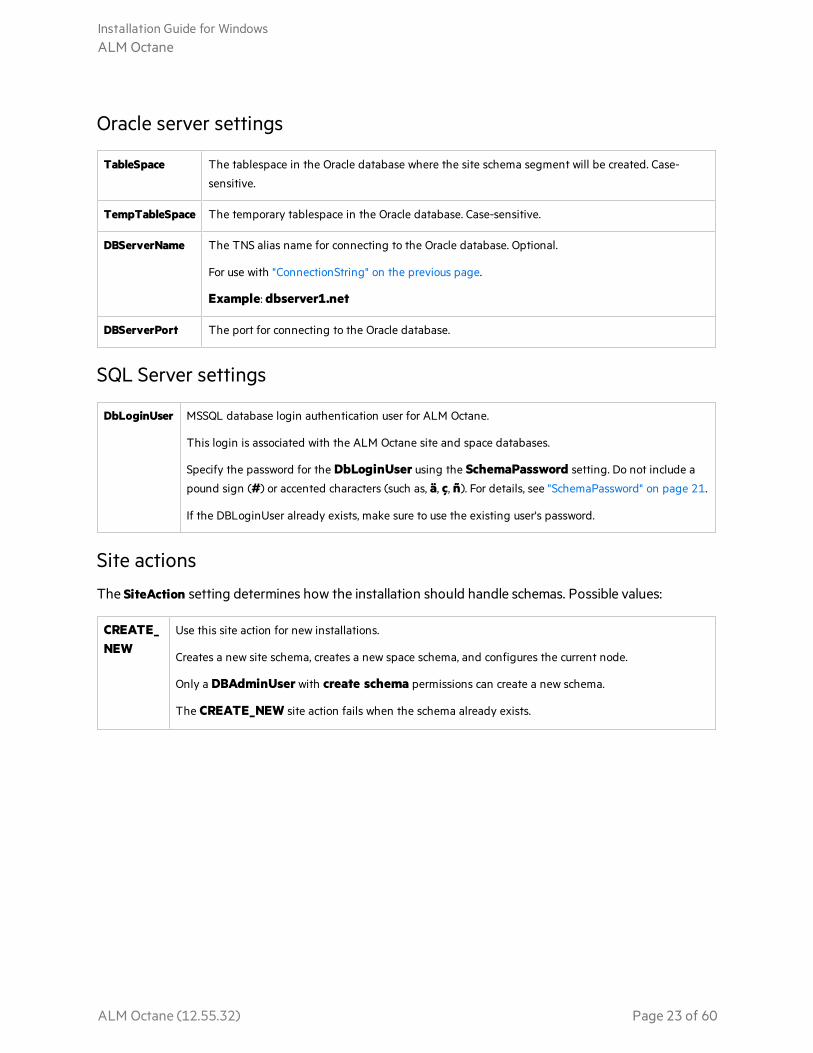
Oracle server settings
TableSpace The tablespace in the Oracle database where the site schema segment will be created. Case-
sensitive.
TempTableSpace The temporary tablespace in the Oracle database. Case-sensitive.
DBServerName The TNS alias name for connecting to the Oracle database. Optional.
For use with "ConnectionString" on the previous page.
Example: dbserver1.net
DBServerPort The port for connecting to the Oracle database.
SQL Server settings
DbLoginUser MSSQL database login authentication user for ALM Octane.
This login is associated with the ALM Octane site and space databases.
Specify the password for the DbLoginUser using the SchemaPassword setting. Do not include a
pound sign (#) or accented characters (such as, ä, ç, ñ). For details, see "SchemaPassword" on page 21.
If the DBLoginUser already exists, make sure to use the existing user's password.
Site actions
The SiteAction setting determines how the installation should handle schemas. Possible values:
CREATE_NEW
Use this site action for new installations.
Creates a new site schema, creates a new space schema, and configures the current node.
Only a DBAdminUser with create schema permissions can create a new schema.
The CREATE_NEW site action fails when the schema already exists.
Installation Guide for WindowsALM Octane
ALM Octane (12.55.32) Page 23 of 60
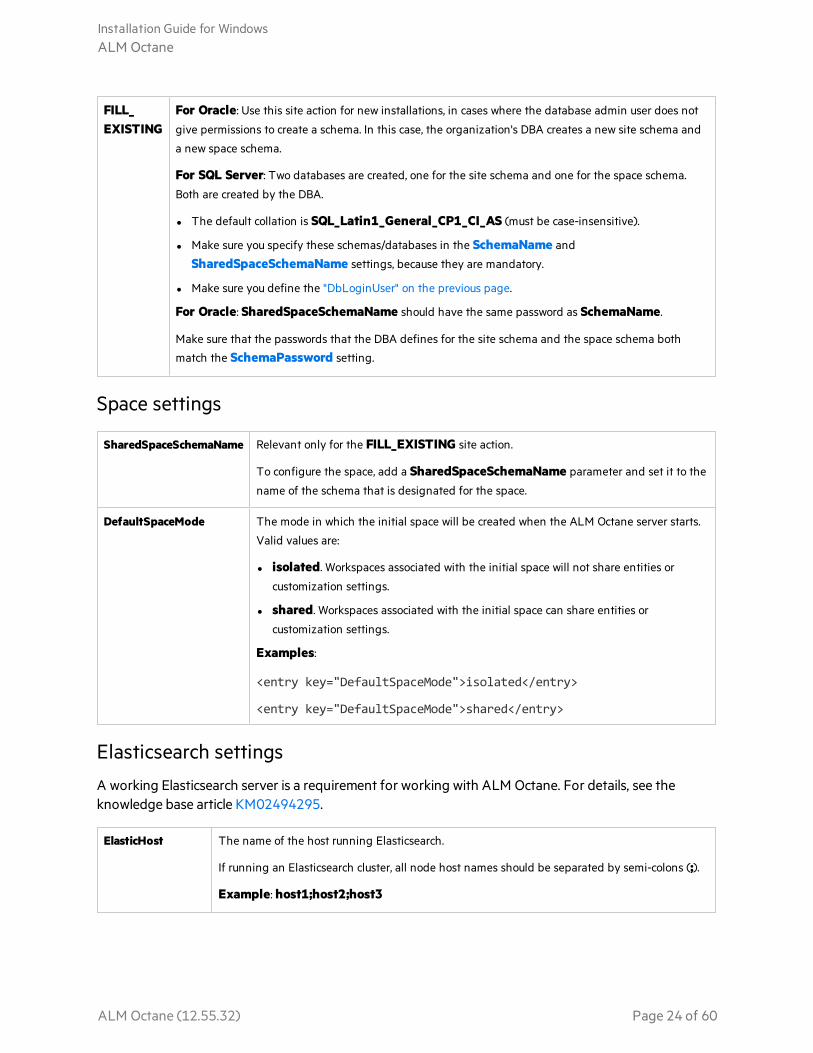
FILL_EXISTING
For Oracle: Use this site action for new installations, in cases where the database admin user does not
give permissions to create a schema. In this case, the organization's DBA creates a new site schema and
a new space schema.
For SQL Server: Two databases are created, one for the site schema and one for the space schema.
Both are created by the DBA.
l The default collation is SQL_Latin1_General_CP1_CI_AS (must be case-insensitive).
l Make sure you specify these schemas/databases in the SchemaName and
SharedSpaceSchemaName settings, because they are mandatory.
l Make sure you define the "DbLoginUser" on the previous page.
For Oracle: SharedSpaceSchemaName should have the same password as SchemaName.
Make sure that the passwords that the DBA defines for the site schema and the space schema both
match the SchemaPassword setting.
Space settings
SharedSpaceSchemaName Relevant only for the FILL_EXISTING site action.
To configure the space, add a SharedSpaceSchemaName parameter and set it to the
name of the schema that is designated for the space.
DefaultSpaceMode The mode in which the initial space will be created when the ALM Octane server starts.
Valid values are:
l isolated. Workspaces associated with the initial space will not share entities or
customization settings.
l shared. Workspaces associated with the initial space can share entities or
customization settings.
Examples:
<entry key="DefaultSpaceMode">isolated</entry>
<entry key="DefaultSpaceMode">shared</entry>
Elasticsearch settings
A working Elasticsearch server is a requirement for working with ALM Octane. For details, see theknowledge base article KM02494295.
ElasticHost The name of the host running Elasticsearch.
If running an Elasticsearch cluster, all node host names should be separated by semi-colons (;).
Example: host1;host2;host3
Installation Guide for WindowsALM Octane
ALM Octane (12.55.32) Page 24 of 60
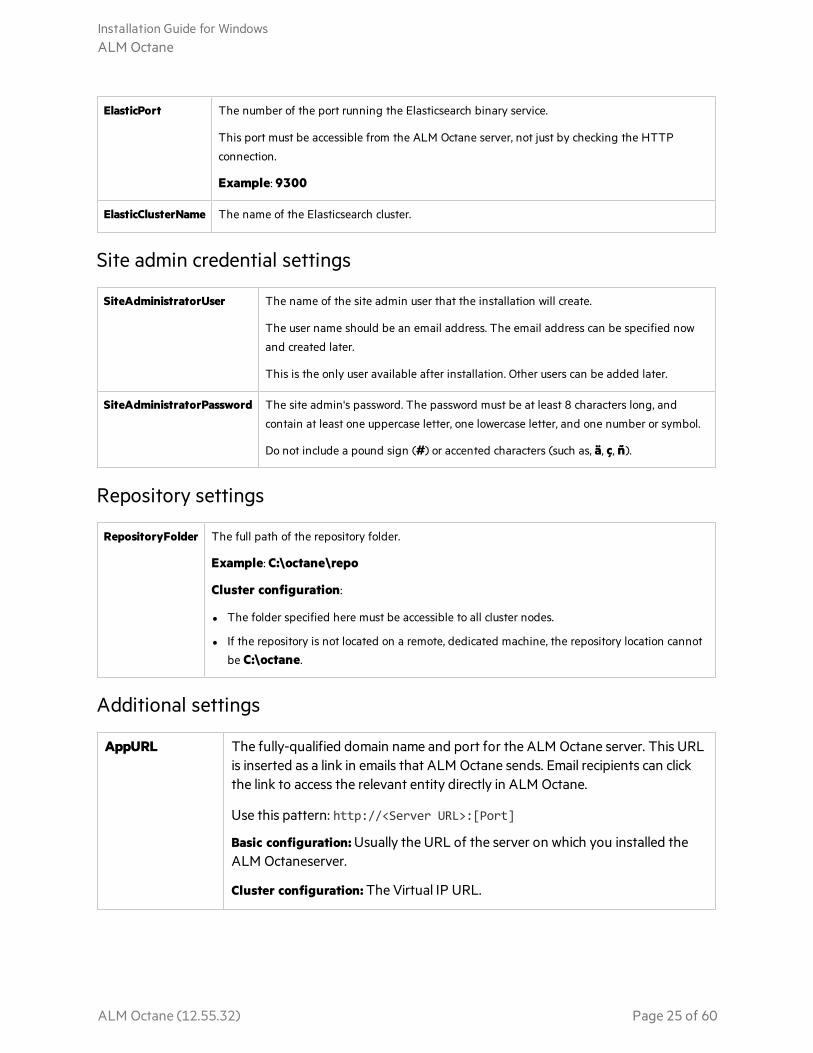
ElasticPort The number of the port running the Elasticsearch binary service.
This port must be accessible from the ALM Octane server, not just by checking the HTTP
connection.
Example: 9300
ElasticClusterName The name of the Elasticsearch cluster.
Site admin credential settings
SiteAdministratorUser The name of the site admin user that the installation will create.
The user name should be an email address. The email address can be specified now
and created later.
This is the only user available after installation. Other users can be added later.
SiteAdministratorPassword The site admin's password. The password must be at least 8 characters long, and
contain at least one uppercase letter, one lowercase letter, and one number or symbol.
Do not include a pound sign (#) or accented characters (such as, ä, ç, ñ).
Repository settings
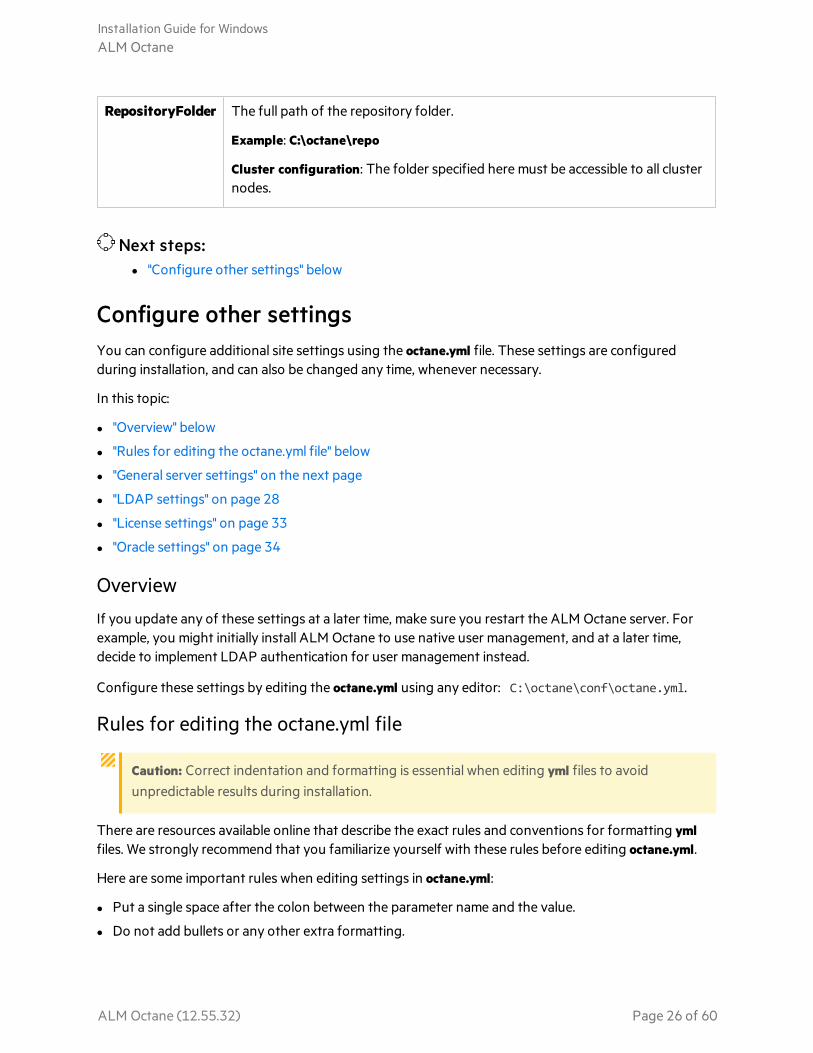
RepositoryFolder The full path of the repository folder.
Example: C:\octane\repo
Cluster configuration:
l The folder specified here must be accessible to all cluster nodes.
l If the repository is not located on a remote, dedicated machine, the repository location cannot
be C:\octane.
Additional settings
AppURL The fully-qualified domain name and port for the ALM Octane server. This URLis inserted as a link in emails that ALM Octane sends. Email recipients can clickthe link to access the relevant entity directly in ALM Octane.
Use this pattern: http://<Server URL>:[Port]
Basic configuration: Usually the URL of the server on which you installed theALM Octaneserver.
Cluster configuration: The Virtual IP URL.
Installation Guide for WindowsALM Octane
ALM Octane (12.55.32) Page 25 of 60
RepositoryFolder The full path of the repository folder.
Example: C:\octane\repo
Cluster configuration: The folder specified here must be accessible to all clusternodes.
Next steps:l "Configure other settings" below
Configure other settingsYou can configure additional site settings using the octane.yml file. These settings are configuredduring installation, and can also be changed any time, whenever necessary.
In this topic:
l "Overview" below
l "Rules for editing the octane.yml file" below
l "General server settings" on the next page
l "LDAP settings" on page 28
l "License settings" on page 33
l "Oracle settings" on page 34
Overview
If you update any of these settings at a later time, make sure you restart the ALM Octane server. Forexample, you might initially install ALM Octane to use native user management, and at a later time,decide to implement LDAP authentication for user management instead.
Configure these settings by editing the octane.yml using any editor: C:\octane\conf\octane.yml.
Rules for editing the octane.yml file
Caution: Correct indentation and formatting is essential when editing yml files to avoidunpredictable results during installation.
There are resources available online that describe the exact rules and conventions for formatting ymlfiles. We strongly recommend that you familiarize yourself with these rules before editing octane.yml.
Here are some important rules when editing settings in octane.yml:
l Put a single space after the colon between the parameter name and the value.
l Do not add bullets or any other extra formatting.
Installation Guide for WindowsALM Octane
ALM Octane (12.55.32) Page 26 of 60

l Do not add extra spaces.
l Use double quotes to enclose any values that include special characters, especially the #.
A # that is not enclosed in quotes marks the beginning of a comment. Any text after it, until the endof the line, is ignored. The octane.yml file is then interpreted incorrectly during installation and causeserrors.
If these conventions are not followed, ALM Octane initialization or upgrade can fail.
For an example, see the sample octaneExample.yml file.
General server settings
cluster Cluster configuration: Enter a comma-separated list of node host names or IPs in the
cluster.
Example: 10.0.0.24,10.0.0.99,10.0.0.23
This is a mandatory setting.
By default, the cluster is not configured, and the default value is blank. This indicates a
standalone ALM Octane server.
heapSize Before starting the ALM Octane server the first time, change the heap memory values on all
active cluster nodes.
For example, you may need to increase the heap size if there is an increase in the number of
active workspaces in ALM Octane, or an increase in the number of concurrent user sessions.
heapSize should be set to half of available server memory on a dedicated server, regardless of
load.
Heap size should not exceed 31 GB.
Values should be specified in MB (for example, 4096 for 4 GB).
Default: 4096
Installation Guide for WindowsALM Octane
ALM Octane (12.55.32) Page 27 of 60
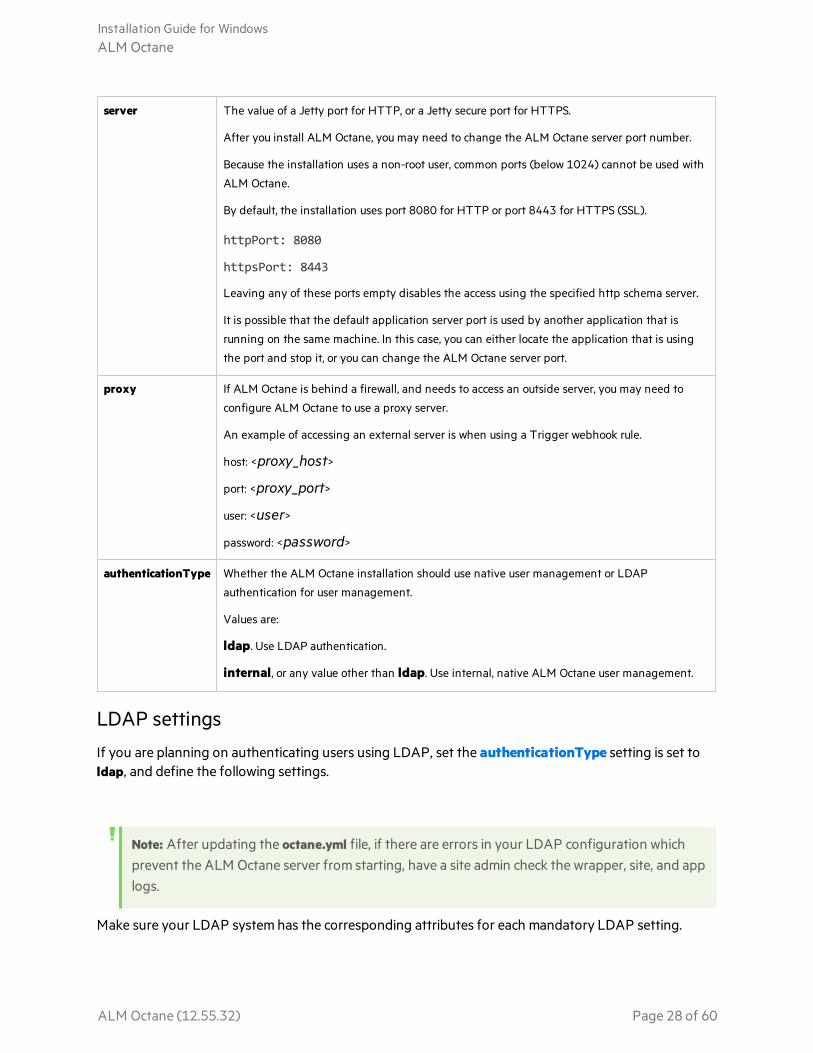
server The value of a Jetty port for HTTP, or a Jetty secure port for HTTPS.
After you install ALM Octane, you may need to change the ALM Octane server port number.
Because the installation uses a non-root user, common ports (below 1024) cannot be used with
ALM Octane.
By default, the installation uses port 8080 for HTTP or port 8443 for HTTPS (SSL).
httpPort: 8080
httpsPort: 8443
Leaving any of these ports empty disables the access using the specified http schema server.
It is possible that the default application server port is used by another application that is
running on the same machine. In this case, you can either locate the application that is using
the port and stop it, or you can change the ALM Octane server port.
proxy If ALM Octane is behind a firewall, and needs to access an outside server, you may need to
configure ALM Octane to use a proxy server.
An example of accessing an external server is when using a Trigger webhook rule.
host: <proxy_host>
port: <proxy_port>
user: <user>
password: <password>
authenticationType Whether the ALM Octane installation should use native user management or LDAP
authentication for user management.
Values are:
ldap. Use LDAP authentication.
internal, or any value other than ldap. Use internal, native ALM Octane user management.
LDAP settings
If you are planning on authenticating users using LDAP, set the authenticationType setting is set toldap, and define the following settings.
Note: After updating the octane.yml file, if there are errors in your LDAP configuration whichprevent the ALM Octane server from starting, have a site admin check the wrapper, site, and applogs.
Make sure your LDAP system has the corresponding attributes for each mandatory LDAP setting.
Installation Guide for WindowsALM Octane
ALM Octane (12.55.32) Page 28 of 60
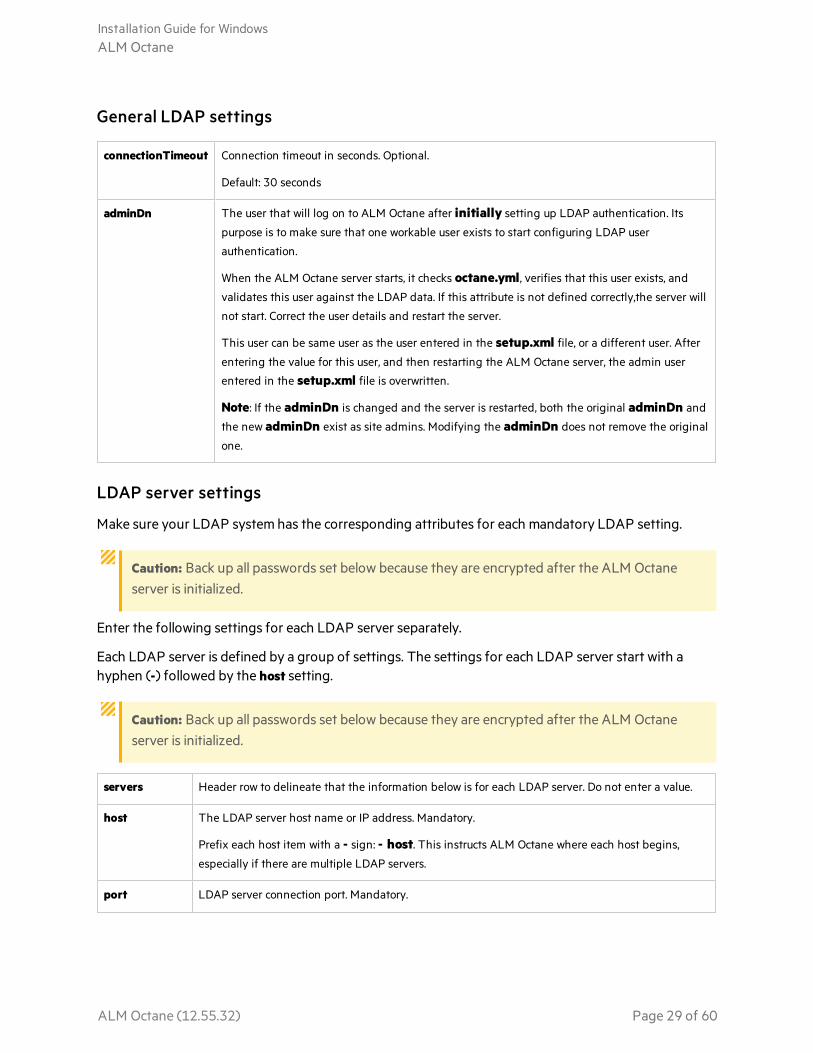
General LDAP settings
connectionTimeout Connection timeout in seconds. Optional.
Default: 30 seconds
adminDn The user that will log on to ALM Octane after initially setting up LDAP authentication. Its
purpose is to make sure that one workable user exists to start configuring LDAP user
authentication.
When the ALM Octane server starts, it checks octane.yml, verifies that this user exists, and
validates this user against the LDAP data. If this attribute is not defined correctly,the server will
not start. Correct the user details and restart the server.
This user can be same user as the user entered in the setup.xml file, or a different user. After
entering the value for this user, and then restarting the ALM Octane server, the admin user
entered in the setup.xml file is overwritten.
Note: If the adminDn is changed and the server is restarted, both the original adminDn and
the new adminDn exist as site admins. Modifying the adminDn does not remove the original
one.
LDAP server settings
Make sure your LDAP system has the corresponding attributes for each mandatory LDAP setting.
Caution: Back up all passwords set below because they are encrypted after the ALM Octaneserver is initialized.
Enter the following settings for each LDAP server separately.
Each LDAP server is defined by a group of settings. The settings for each LDAP server start with ahyphen (-) followed by the host setting.
Caution: Back up all passwords set below because they are encrypted after the ALM Octaneserver is initialized.
servers Header row to delineate that the information below is for each LDAP server. Do not enter a value.
host The LDAP server host name or IP address. Mandatory.
Prefix each host item with a - sign: - host. This instructs ALM Octane where each host begins,
especially if there are multiple LDAP servers.
port LDAP server connection port. Mandatory.
Installation Guide for WindowsALM Octane
ALM Octane (12.55.32) Page 29 of 60

isSsl Whether the LDAP server uses SSL. Mandatory.
Enter Y or N.
If Y, establish trust to the certificate authority that issued the LDAP server certificate. For details, see
Configure trust on the server.
description Description of the LDAP server. Optional.
baseDirectories Root of the LDAP path to use to search for users when including new LDAP users in ALM Octane
spaces. This can be a list of common names and domain components (cns and dns), a list of
organizational units (ou), and so on.
Optional. Default: Blank.
If specified,
Make sure to put a space after hyphen ( - ) before specifying the filter.
Example:
baseDirectories:
- ou=Groups,o=organization.com- dc=maxcrc,dc=com
baseFilters Filters to use to refine the search for users when including new LDAP users in ALM Octane spaces.
This is generally a list of LDAP objectClasses.
Optional. Default: (objectClass=*)
Make sure to put a space after hyphen ( - ) before specifying the filter.
Example:
baseFilters:
- (objectClass=*)- (&(objectClass=user)(objectCategory=person))
authentication: Header row to delineate that the information below is for authentication. Do not enter a value.
method The LDAP authentication method supported by the LDAP server. Authentication method used by
the LDAP server. The following methods are supported:
l anonymous. In this case, skip the next two parameters, user and password.
l simple, user, and password are mandatory.
user Only required if you set the authentication parameter to simple.
User name for accessing the LDAP server. This user must have at least read permissions for the
LDAP server.
password Only required if you set the authentication parameter to simple.
Password for accessing the LDAP server.
This password will be encrypted.
Installation Guide for WindowsALM Octane
ALM Octane (12.55.32) Page 30 of 60
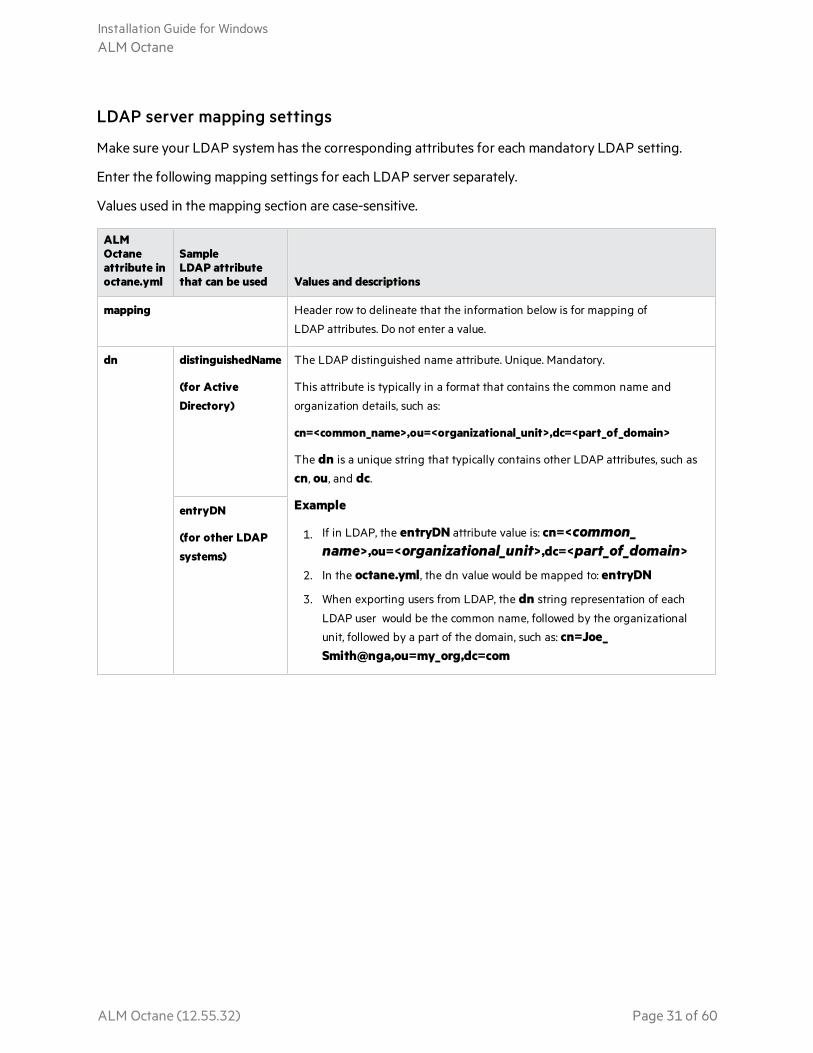
LDAP server mapping settings
Make sure your LDAP system has the corresponding attributes for each mandatory LDAP setting.
Enter the following mapping settings for each LDAP server separately.
Values used in the mapping section are case-sensitive.
ALMOctaneattribute inoctane.yml
SampleLDAP attributethat can be used Values and descriptions
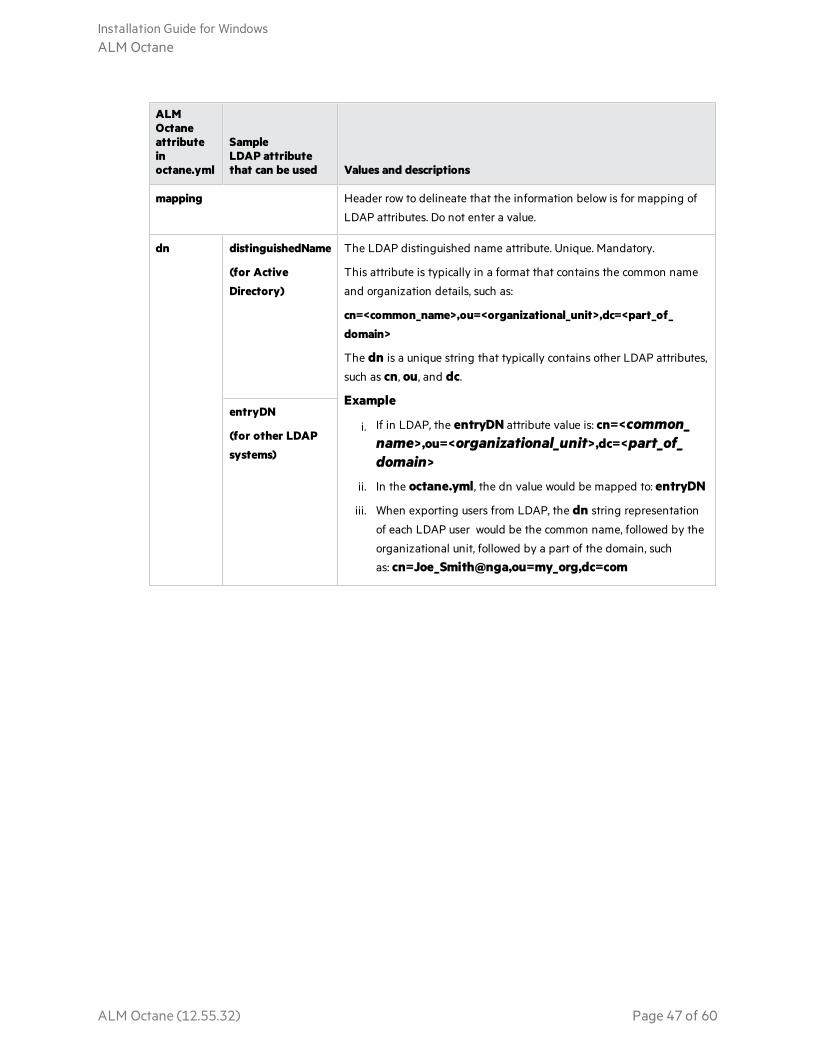
mapping Header row to delineate that the information below is for mapping of
LDAP attributes. Do not enter a value.
dn distinguishedName
(for ActiveDirectory)
The LDAP distinguished name attribute. Unique. Mandatory.
This attribute is typically in a format that contains the common name and
organization details, such as:
cn=<common_name>,ou=<organizational_unit>,dc=<part_of_domain>
The dn is a unique string that typically contains other LDAP attributes, such as
cn, ou, and dc.
Example
1. If in LDAP, the entryDN attribute value is: cn=<common_name>,ou=<organizational_unit>,dc=<part_of_domain>
2. In the octane.yml, the dn value would be mapped to: entryDN
3. When exporting users from LDAP, the dn string representation of each
LDAP user would be the common name, followed by the organizational
unit, followed by a part of the domain, such as: cn=Joe_Smith@nga,ou=my_org,dc=com
entryDN
(for other LDAPsystems)
Installation Guide for WindowsALM Octane
ALM Octane (12.55.32) Page 31 of 60
ALMOctaneattribute inoctane.yml
SampleLDAP attributethat can be used Values and descriptions
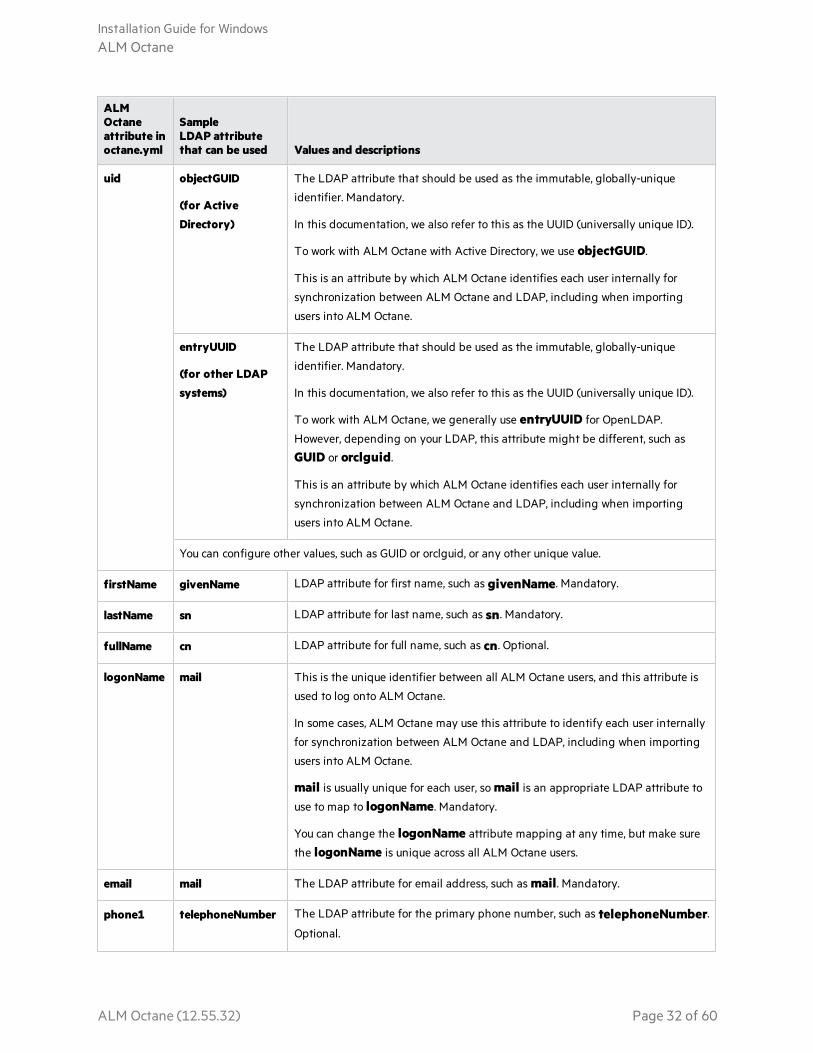
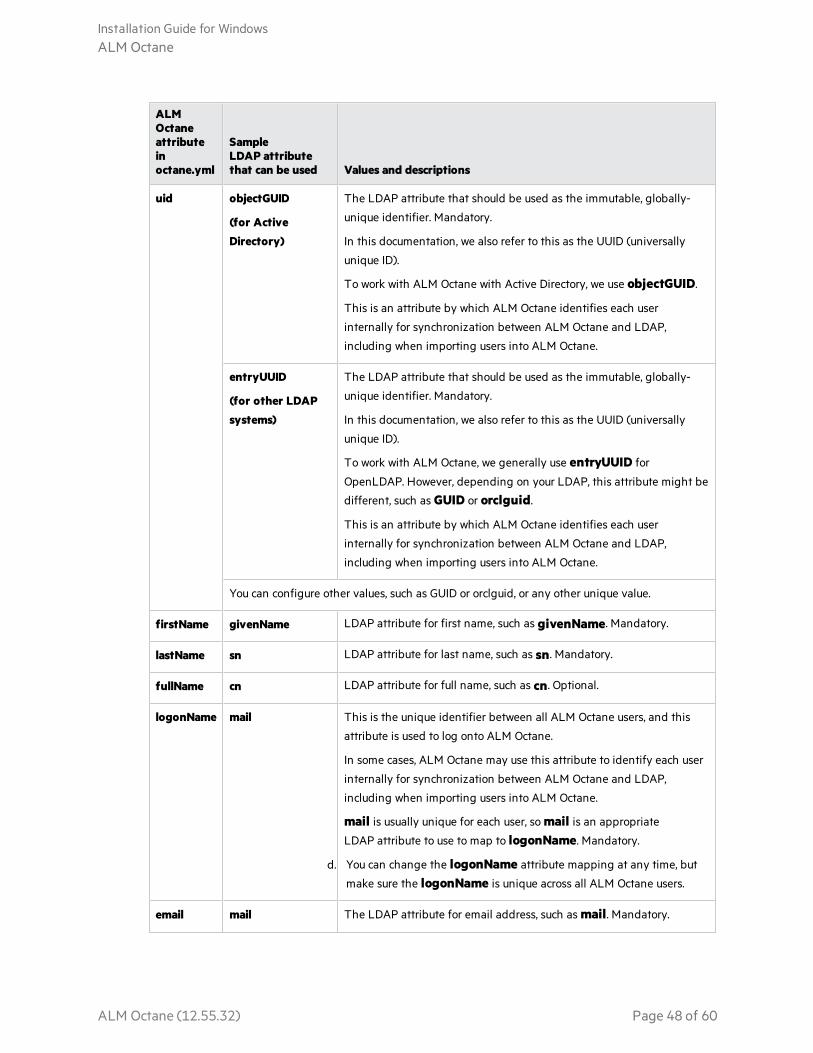
uid objectGUID
(for ActiveDirectory)
The LDAP attribute that should be used as the immutable, globally-unique
identifier. Mandatory.
In this documentation, we also refer to this as the UUID (universally unique ID).
To work with ALM Octane with Active Directory, we use objectGUID.
This is an attribute by which ALM Octane identifies each user internally for
synchronization between ALM Octane and LDAP, including when importing
users into ALM Octane.
entryUUID
(for other LDAPsystems)
The LDAP attribute that should be used as the immutable, globally-unique
identifier. Mandatory.
In this documentation, we also refer to this as the UUID (universally unique ID).
To work with ALM Octane, we generally use entryUUID for OpenLDAP.
However, depending on your LDAP, this attribute might be different, such as
GUID or orclguid.
This is an attribute by which ALM Octane identifies each user internally for
synchronization between ALM Octane and LDAP, including when importing
users into ALM Octane.
You can configure other values, such as GUID or orclguid, or any other unique value.
firstName givenName LDAP attribute for first name, such as givenName. Mandatory.
lastName sn LDAP attribute for last name, such as sn. Mandatory.
fullName cn LDAP attribute for full name, such as cn. Optional.
logonName mail This is the unique identifier between all ALM Octane users, and this attribute is
used to log onto ALM Octane.
In some cases, ALM Octane may use this attribute to identify each user internally
for synchronization between ALM Octane and LDAP, including when importing
users into ALM Octane.
mail is usually unique for each user, so mail is an appropriate LDAP attribute to
use to map to logonName. Mandatory.
You can change the logonName attribute mapping at any time, but make sure
the logonName is unique across all ALM Octane users.
email mail The LDAP attribute for email address, such as mail. Mandatory.
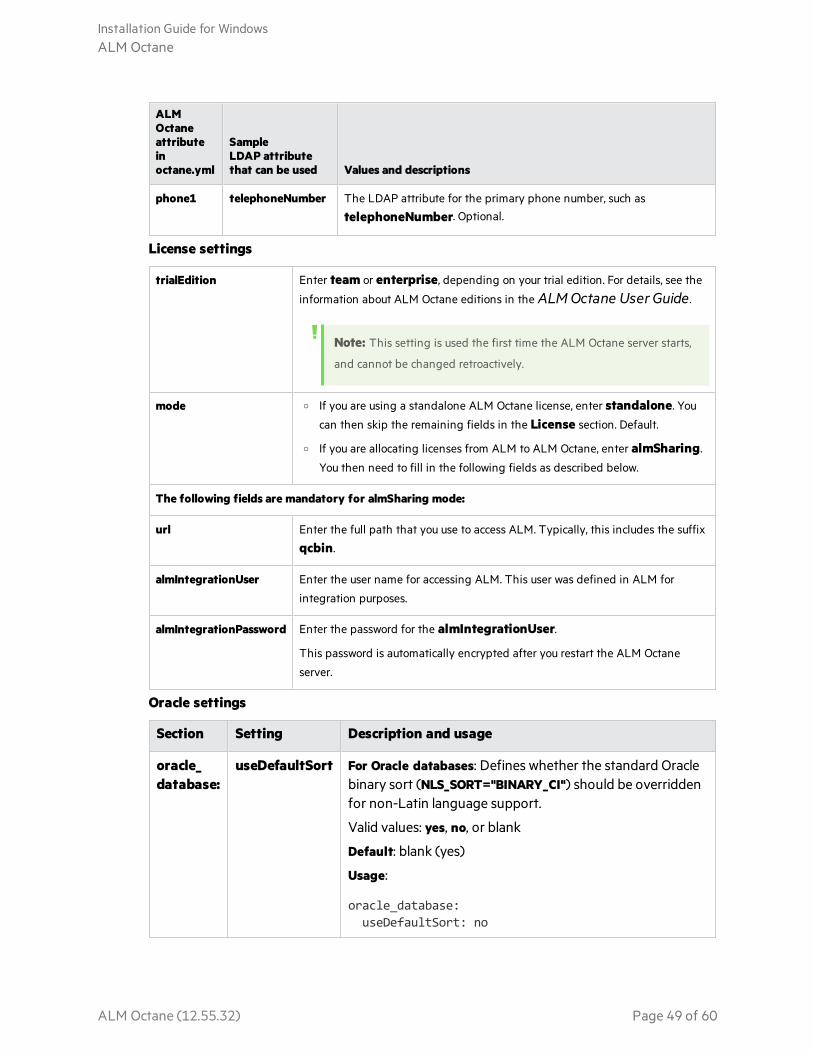
phone1 telephoneNumber The LDAP attribute for the primary phone number, such as telephoneNumber.Optional.
Installation Guide for WindowsALM Octane
ALM Octane (12.55.32) Page 32 of 60
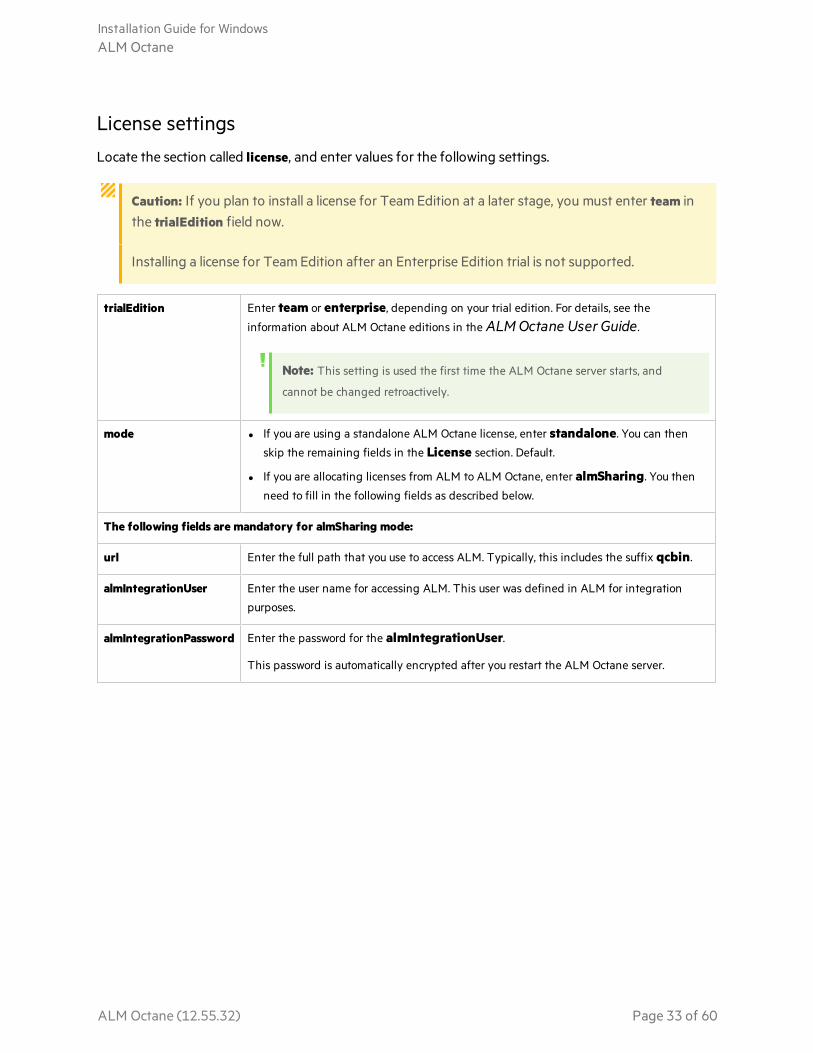
License settings
Locate the section called license, and enter values for the following settings.
Caution: If you plan to install a license for Team Edition at a later stage, you must enter team inthe trialEdition field now.
Installing a license for Team Edition after an Enterprise Edition trial is not supported.
trialEdition Enter team or enterprise, depending on your trial edition. For details, see the
information about ALM Octane editions in the ALM Octane User Guide.
Note: This setting is used the first time the ALM Octane server starts, and
cannot be changed retroactively.
mode l If you are using a standalone ALM Octane license, enter standalone. You can then
skip the remaining fields in the License section. Default.
l If you are allocating licenses from ALM to ALM Octane, enter almSharing. You then
need to fill in the following fields as described below.
The following fields are mandatory for almSharing mode:
url Enter the full path that you use to access ALM. Typically, this includes the suffix qcbin.
almIntegrationUser Enter the user name for accessing ALM. This user was defined in ALM for integration
purposes.
almIntegrationPassword Enter the password for the almIntegrationUser.
This password is automatically encrypted after you restart the ALM Octane server.
Installation Guide for WindowsALM Octane
ALM Octane (12.55.32) Page 33 of 60
Oracle settings
The following Oracle section and its settings are also available.
Section Setting Description and usage
oracle_database:
useDefaultSort For Oracle databases: Defines whether the standard Oracle binarysort (NLS_SORT="BINARY_CI") should be overridden for non-Latinlanguage support.
Valid values: yes, no, or blank
Default: blank (yes)
Usage:
oracle_database:useDefaultSort: no
Next steps:l "Update settings" below
Update settingsIf you have previously installed ALM Octane before, update the configuration settings.
If you have never installed ALM Octane on this machine, skip to "Initialize the ALM Octane server"below.
To update settings:
1. Select Start > ALM Octane > Update Settings.
Alternatively, open a command prompt and run:
C:\octane\install\updatesettings.bat
Next steps:l "Initialize the ALM Octane server" below
Initialize the ALM Octane serverYou are now ready to initialize the ALM Octane server by starting the Micro Focus ALM Octane service.
Installation Guide for WindowsALM Octane
ALM Octane (12.55.32) Page 34 of 60
To initialize:
1. Select Start > ALM Octane > Initialize Server.
Alternatively, run initserver.bat:
C:\octane\install\initserver.bat
The initialization keeps track of the last successful step that it performed; If for some reason you haveto rerun initserver.bat, it only starts at the relevant point.
The ALM Octane service is now running. You can check Microsoft Windows Services to verify.
You are now ready to:
l Single-node configuration: Log in and create additional users. For details, see "Log in to ALMOctane" below.
Check connectivity by logging in, after initializing the first node and before installing the remainingcluster nodes.
l Cluster configuration: Optional.
For details on installing on a cluster, see "Cluster installation (optional)" on the next page.
Next steps:l "Log in to ALM Octane" below
Log in to ALM Octane
Tip: When you first start using ALM Octane, you automatically receive a Trial license which givesyou a 90-day trial for 100 users. For details, see the information about Trial licenses in the ALMOctane User Guide.
1. In a browser, navigate to <serverURL>:<serverport>/ui.Make sure to specify a fully-qualified domain name for the server. The name must include at leastone period. Do not specify an IP address.
Cluster configuration: Use the load balancer URL.
2. Log in with the site admin user name and password you provided in the setup.xml file usingsettings SiteAdministratorUser and SiteAdministratorPassword.
Next steps:l Cluster configuration: If you successfully installed and logged into ALM Octane on the first cluster
node, continue installing on additional cluster nodes. See:Linux: Cluster installation (optional)Windows: "Cluster installation (optional)" on the next page
l Set configuration parameters, such as FORGET_USER_ON_DELETE and SMTP_NOTIFICATION_SENDER_EMAIL. See the ALM Octane User Guide.
Installation Guide for WindowsALM Octane
ALM Octane (12.55.32) Page 35 of 60

l Create spaces. See the ALM Octane User Guide.
l Once you have logged on as the shared space admin, you can create other users and workspaces. Seethe ALM Octane User Guide.
Cluster installation (optional)This section provides an end-to-end instructions for installing an on-premises ALM Octane server in acluster configuration on Windows.
OverviewA cluster is a group of application servers that run as a single system. Each application server in a clusteris referred to as a "node."
We install ALM Octane in a cluster configuration by:
1. Verifying all requirements and prerequisites for every node in the configuration.
2. Installing ALM Octane on a cluster node.
3. Connecting additional cluster nodes to the first node.
See also "Installation flow" on page 10.
Installation Guide for WindowsALM Octane
ALM Octane (12.55.32) Page 36 of 60

How to install ALM Octane in a cluster configuration1. For each node in the cluster, check requirements and access
Checkrequirements
Verify that the all cluster nodes, including the first, meet all requirements andprerequisites. For details, see System requirements and "Prerequisites" onpage 11.
Checkdatabaseserver access
All cluster nodes, including the first, must have access to the database server onwhich the site database schema resides.
Checkrepositoryaccess
The repository directory has to be a shared directory visible to all cluster nodes.All nodes must have read and write access to the repository.
Generally, the repository is located on an NFS or SAN server.
If the repository is not located on a remote, dedicated machine, the repositorylocation cannot be C:\opt\octane.
The repository must be configured to use the same mount point (path) on allnodes.
It is important that you enter the repository path using the same path name onall nodes. For example, you cannot have the path on the first server nodedefined as C:\octane\repo and on additional nodes defined asC:\server1\octane\repo.
Check accessbetweennodes
All nodes must have access to each other. Verify ports are open in your firewall.
ALM Octane needs to communicate between the nodes in the cluster on port5701. Therefore, make sure that your firewall enables communication betweenthe nodes of the cluster on the specified port..
By default, outbound ports are open. Check inbound ports. For details, seeInbound and outbound communication for clusters.
2. Install ALM Octane on the first cluster node
Install ALM Octane on the first cluster node, as described under "Installation" on page 18.
a. "Deploy ALM Octane" on page 19
Here we deploy the ALM Octane installation files onto the first node.
b. "Configure initial site settings " on page 20
We configure ALM Octane by modifying the setup.xml configuration file.
Make sure to set the following settings to values that all cluster nodes can access.
DBServerName The database server on which the site database schema resides.
Installation Guide for WindowsALM Octane
ALM Octane (12.55.32) Page 37 of 60

RepositoryFolder The shared repository that all cluster nodes can access (read andwrite).
c. "Configure other settings" on page 26
We configure other ALM Octane settings by modifying the octane.yml configuration file.
cluster Enter a comma-separated list of node host names or IPs in the cluster.
Make sure to configure the IP addresses or fully qualified domain names for eachcluster node.
d. "Initialize the ALM Octane server" on page 34
On the first node only, we initialize by running initserver.bat.
Caution: Never run initserver.bat on any other cluster nodes.
3. Set up a secure configuration on the first cluster node
If you want to set up a secure configuration for ALM Octane, follow these instructions: SoftwareSelf-solve knowledge base article KM02707977.
4. Make sure ALM Octane is running on the first node in the cluster
Before installing on remaining cluster nodes, log in to ALM Octane.
For details, see "Log in to ALM Octane" on page 35.
5. Only after you successfully log in, deploy ALM Octane installation files on each additionalcluster node
Download and deploy the ALM Octane package on each cluster node. For details, see "Deploy ALMOctane" on page 19 and "Cluster deployment" on page 20.
Caution: Do not do the following:
l Do not configure the setup.xml and octane.yml files. This is done automatically for youin the next step.
l Do not initialize by running initserver.bat. Instead, we run the connectnode.bat script inthe next step.
6. Connect and initialize each additional cluster node
Run connectnode.bat on each additional node to install, configure, and initialize ALM Octane:
C:\octane\install\connectnode.bat <path_to_repository>
7. Set up a secure configuration on each additional cluster node
If you want to set up a secure configuration for ALM Octane in a cluster configuration, follow theseinstructions on each additional cluster node: Software Self-solve knowledge base articleKM02707977.
Installation Guide for WindowsALM Octane
ALM Octane (12.55.32) Page 38 of 60
8. Make sure ALM Octane is running on each additional node in the cluster
For details, see "Log in to ALM Octane" on page 35. Use the load balancer URL when you log in.
UpgradeThis section describes how to upgrade an existing installation of an on-premises ALM Octane server onWindows.
In this topic:
l "Before you upgrade " below
l "Deploy" on the next page
l "Prepare to configure" on page 41
l "Configure initial settings" on page 41
l "Configure other settings" on page 42
l "Upgrade" on page 50
l "Configure and upgrade cluster nodes" on page 50
l "Upgrade spaces in ALM Octane" on page 50
l "Restart all Jetty servers" on page 51
l "After the upgrade" on page 51
Before you upgrade1. Verify that your server machine, and if relevant, all cluster nodes, meet all prerequisites.
For details, see "Prerequisites" on page 11.
Note: If the following are both true, add the CREATE SEQUENCE privilege to the site andshared space schemas:
l You are upgrading from an ALM Octane version earlier than 12.55.3.
l You are upgrading an installation without a DB admin, for example, your original ALMOctane was installed using the FILL_EXISTING site action.
2. Create backups of:
l Existing ALM Octane repository files, including setup.xml and octane.yml
l Your database
l Elasticsearch
l If you are using ALM Octane Synchronizer, back up : o C:\octane\wrapper\wrapper.confo Service.locator.properties.example (C:\octane\webapps)
Installation Guide for WindowsALM Octane
ALM Octane (12.55.32) Page 39 of 60
3. Take note of any special aspects of your configuration, such as:
Special configuration Recommendation
Did you install ALM Octane to alocation other than C:\octane?
Refer to the location you used while upgrading.
Did you modifiy theC:\opt\octane\webapps\root\WEB-INF\classes\hpssoconfig.xml file tocontrol session timeouts?
If you modified the this file to control session timeouts,your updates will be overwritten by the upgrade.
After upgrading, control session timeouts by setting theMINUTES_UNTIL_GLOBAL_SESSION_TIMEOUT andMINUTES_UNTIL_IDLE_SESSION_TIMEOUT configurationparameters instead. For details on setting configurationparameters, see ALM Octane User Help or the ALMOctane Developer Help.
Do you want to switch from nativeuser management to LDAP usermanagement with this upgrade?
If you are upgrading from an ALM Octane version usingnative user management, and want to start usingLDAP user management with this new ALM Octaneversion:
a. Realize that once you configure for LDAP usermanagement, you cannot return back to native,internal user management.
b. When configuring initial settings in the setup.xml file,set the DefaultSpaceMode to isolated. For details, see"DefaultSpaceMode" on page 24.
c. Upgrade ALM Octane without configuring for LDAP.This means, when modifying the octane.yml file, donot enter any values in the LDAP Settings section.
d. After the upgrade is complete, configure for LDAP.
e. Deactivate any native, internal users afterLDAP configuration. These users can no longer loginto ALM Octane (except for the adminDN user).
4. Stop the ALM Octane service on the server, and if relevant, all cluster nodes.
DeployDownload and deploy the new version of ALM Octane using:
setup.exe
For details, see "Deploy ALM Octane" on page 19.
Installation Guide for WindowsALM Octane
ALM Octane (12.55.32) Page 40 of 60
Prepare to configureHere we describe some steps to perform before configuring initial settings.
1. Prepare a setup.xml file for upgrading
Note: In this step, if you cannot locate the C:\octane\repo\conf\setup_upgrade.xml, you canuse the original setup.xml file, located at C:\octane\conf. In this file, change the SiteActionsetting to UPGRADE and make other modifications as necessary Then skip to "Manuallyadd newly-introduced settings to setup.xml" below.
We are now going to use the C:\octane\repo\conf\setup_upgrade.xml file as the setup.xml file ofthe new version:
a. Navigate to the C:\octane\conf directory.
b. Copy the C:\octane\repo\conf\setup_upgrade.xml file to C:\octane\conf\setup.xml.
Configure initial settingsHere we describe how to modify settings in the setup.xml file.
1. Verify that the site action is UPGRADE
Verify that the site action setting in the /opt/octane/conf/setup.xml file is set to UPGRADE.
a. Open C:\octane\conf\setup.xml using an editor.
b. Locate the SiteAction setting in the file. If it looks like one of the following:
o <entry key="SiteAction">CREATE_NEW</entry>
o <entry key="SiteAction">FILL_EXISTING</entry>
c. Modify the line so it looks like:
<entry key="SiteAction">UPGRADE</entry>
2. Manually add newly-introduced settings to setup.xml
With each version of ALM Octane, settings are added to support new features. To upgrade to thenew version, add the newly-introduced settings as listed in the table below to the setup.xml file.
Give these new settings values.
Here is a list of introduced settings for setup.xml by version:
Version New Setting Example
Introduced in 12.55.4, butmandatory as of 12.55.17
DefaultSpaceMode <entrykey="DefaultSpaceMode">shared</entry>
Installation Guide for WindowsALM Octane
ALM Octane (12.55.32) Page 41 of 60
a. If not already open, open C:\octane\conf\setup.xml using an editor.
b. Add any missing settings using this format:
<entry key="<setting>"><setting value></entry>
Do not modify any text in the <entry> and </entry> tags themselves. Only modify text betweenthese tags.
c. Save the file.
For a full list of settings for the current ALM Octane installation and their syntax, see "Configure initialsite settings " on page 20.
Configure other settingsHere we describe how to modify settings in the octane.yml file.
1. Learn the format for yml files
<setting>: <setting value>
Caution: Correct indentation and formatting is essential when editing yml files to avoidunpredictable results during installation.
There are resources available online that describe the exact rules and conventions for formattingyml files. We strongly recommend that you familiarize yourself with these rules before editingoctane.yml.
Here are some important rules when editing settings in octane.yml:
l Put a single space after the colon between the parameter name and the value.
l Do not add bullets or any other extra formatting.
l Do not add extra spaces.
l Use double quotes to enclose any values that include special characters, especially the #.
A # that is not enclosed in quotes marks the beginning of a comment. Any text after it, until theend of the line, is ignored. The octane.yml file is then interpreted incorrectly during installationand causes errors.
If these conventions are not followed, ALM Octane initialization or upgrade can fail.
For an example, see the sample octaneExample.yml file.
2. Determine settings to add to, and remove from, octane.yml
With each version of ALM Octane, settings are added to support new features. To upgrade to thenew version, add the newly-introduced settings as listed in the table below to the octane.yml file.
Version Added / Removed Example
12.55.17 In the License settings section, added the trialEdition setting. See licenses below.
Installation Guide for WindowsALM Octane
ALM Octane (12.55.32) Page 42 of 60
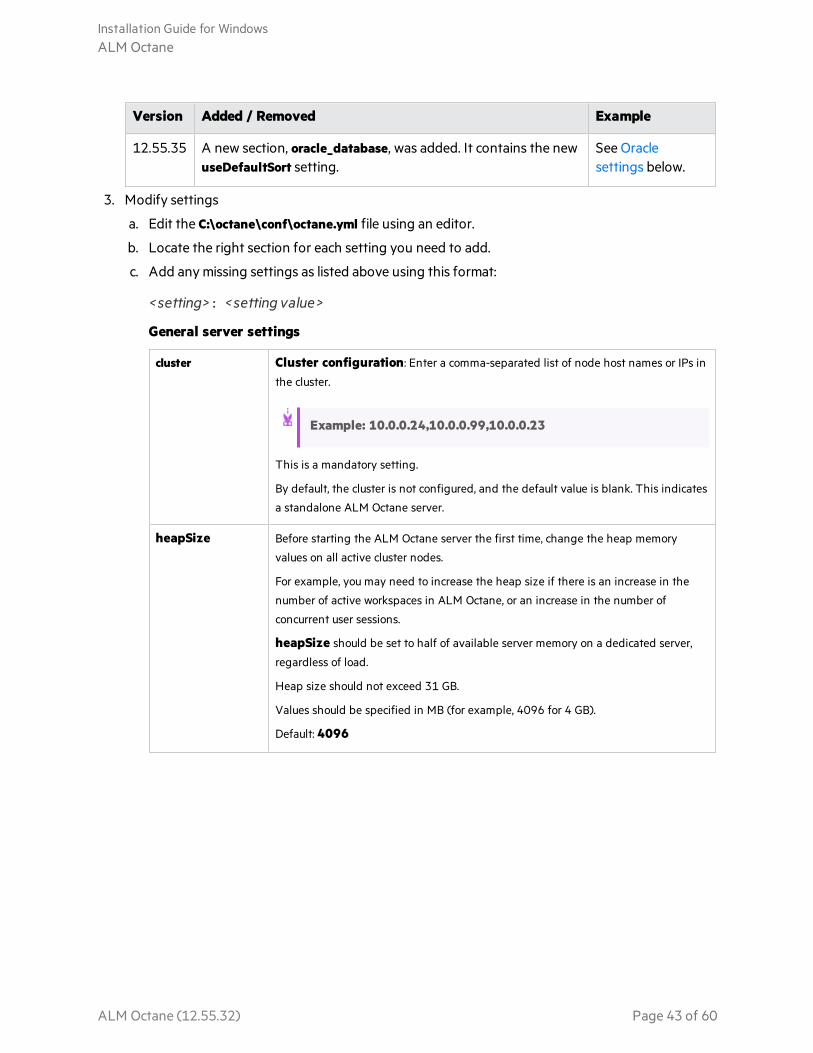
Version Added / Removed Example
12.55.35 A new section, oracle_database, was added. It contains the newuseDefaultSort setting.
See Oraclesettings below.
3. Modify settings
a. Edit the C:\octane\conf\octane.yml file using an editor.
b. Locate the right section for each setting you need to add.
c. Add any missing settings as listed above using this format:
<setting>: <setting value>
General server settings
cluster Cluster configuration: Enter a comma-separated list of node host names or IPs in
the cluster.
Example: 10.0.0.24,10.0.0.99,10.0.0.23
This is a mandatory setting.
By default, the cluster is not configured, and the default value is blank. This indicates
a standalone ALM Octane server.
heapSize Before starting the ALM Octane server the first time, change the heap memory
values on all active cluster nodes.
For example, you may need to increase the heap size if there is an increase in the
number of active workspaces in ALM Octane, or an increase in the number of
concurrent user sessions.
heapSize should be set to half of available server memory on a dedicated server,
regardless of load.
Heap size should not exceed 31 GB.
Values should be specified in MB (for example, 4096 for 4 GB).
Default: 4096
Installation Guide for WindowsALM Octane
ALM Octane (12.55.32) Page 43 of 60
server The value of a Jetty port for HTTP, or a Jetty secure port for HTTPS.
After you install ALM Octane, you may need to change the ALM Octane server port
number.
Because the installation uses a non-root user, common ports (below 1024) cannot be
used with ALM Octane.
By default, the installation uses port 8080 for HTTP or port 8443 for HTTPS (SSL).
httpPort: 8080
httpsPort: 8443
Leaving any of these ports empty disables the access using the specified http
schema server.
It is possible that the default application server port is used by another application
that is running on the same machine. In this case, you can either locate the
application that is using the port and stop it, or you can change the ALM Octane
server port.
proxy If ALM Octane is behind a firewall, and needs to access an outside server, you may
need to configure ALM Octane to use a proxy server.
An example of accessing an external server is when using a Trigger webhook rule.
host: <proxy_host>
port: <proxy_port>
user: <user>
password: <password>
authenticationType Whether the ALM Octane installation should use native user management or LDAP
authentication for user management.
Values are:
ldap. Use LDAP authentication.
internal, or any value other than ldap. Use internal, native ALM Octane user
management.
LDAP settings
Make sure your LDAP system has the corresponding attributes for each mandatoryLDAP setting.
connectionTimeout Connection timeout in seconds. Optional.
Default: 30 seconds
Installation Guide for WindowsALM Octane
ALM Octane (12.55.32) Page 44 of 60
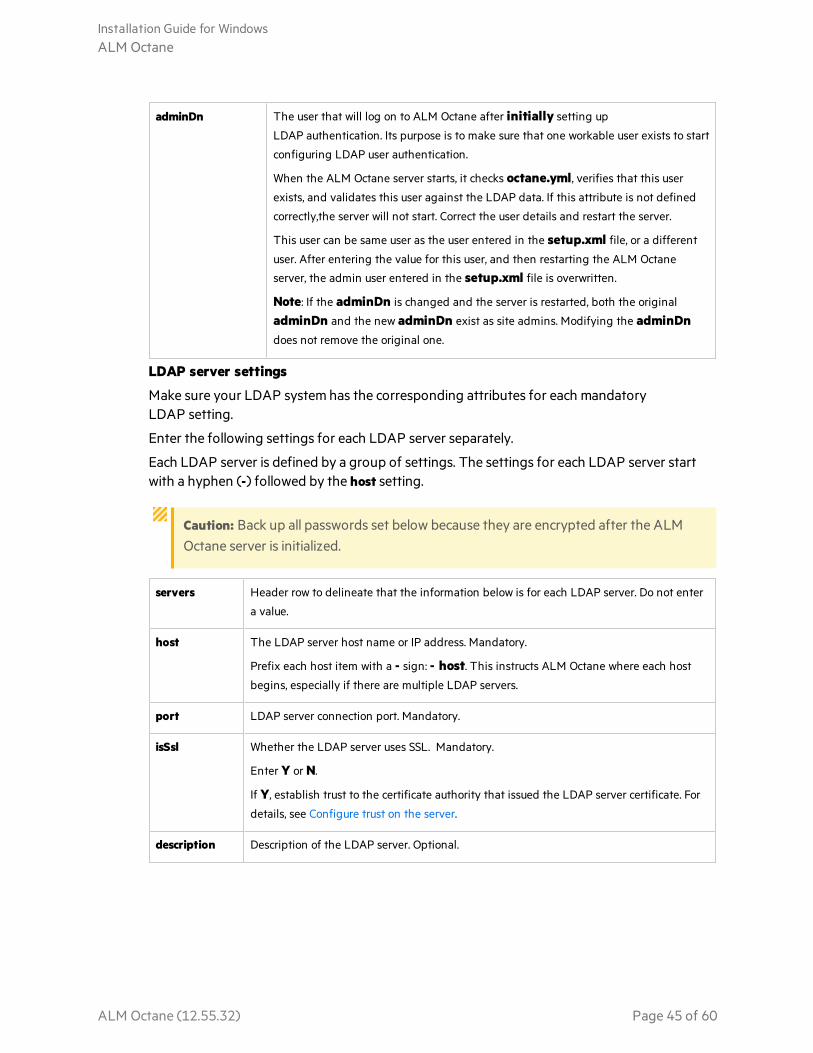
adminDn The user that will log on to ALM Octane after initially setting up
LDAP authentication. Its purpose is to make sure that one workable user exists to start
configuring LDAP user authentication.
When the ALM Octane server starts, it checks octane.yml, verifies that this user
exists, and validates this user against the LDAP data. If this attribute is not defined
correctly,the server will not start. Correct the user details and restart the server.
This user can be same user as the user entered in the setup.xml file, or a different
user. After entering the value for this user, and then restarting the ALM Octane
server, the admin user entered in the setup.xml file is overwritten.
Note: If the adminDn is changed and the server is restarted, both the original
adminDn and the new adminDn exist as site admins. Modifying the adminDndoes not remove the original one.
LDAP server settings
Make sure your LDAP system has the corresponding attributes for each mandatoryLDAP setting.
Enter the following settings for each LDAP server separately.
Each LDAP server is defined by a group of settings. The settings for each LDAP server startwith a hyphen (-) followed by the host setting.
Caution: Back up all passwords set below because they are encrypted after the ALMOctane server is initialized.
servers Header row to delineate that the information below is for each LDAP server. Do not enter
a value.
host The LDAP server host name or IP address. Mandatory.
Prefix each host item with a - sign: - host. This instructs ALM Octane where each host
begins, especially if there are multiple LDAP servers.
port LDAP server connection port. Mandatory.
isSsl Whether the LDAP server uses SSL. Mandatory.
Enter Y or N.
If Y, establish trust to the certificate authority that issued the LDAP server certificate. For
details, see Configure trust on the server.
description Description of the LDAP server. Optional.
Installation Guide for WindowsALM Octane
ALM Octane (12.55.32) Page 45 of 60
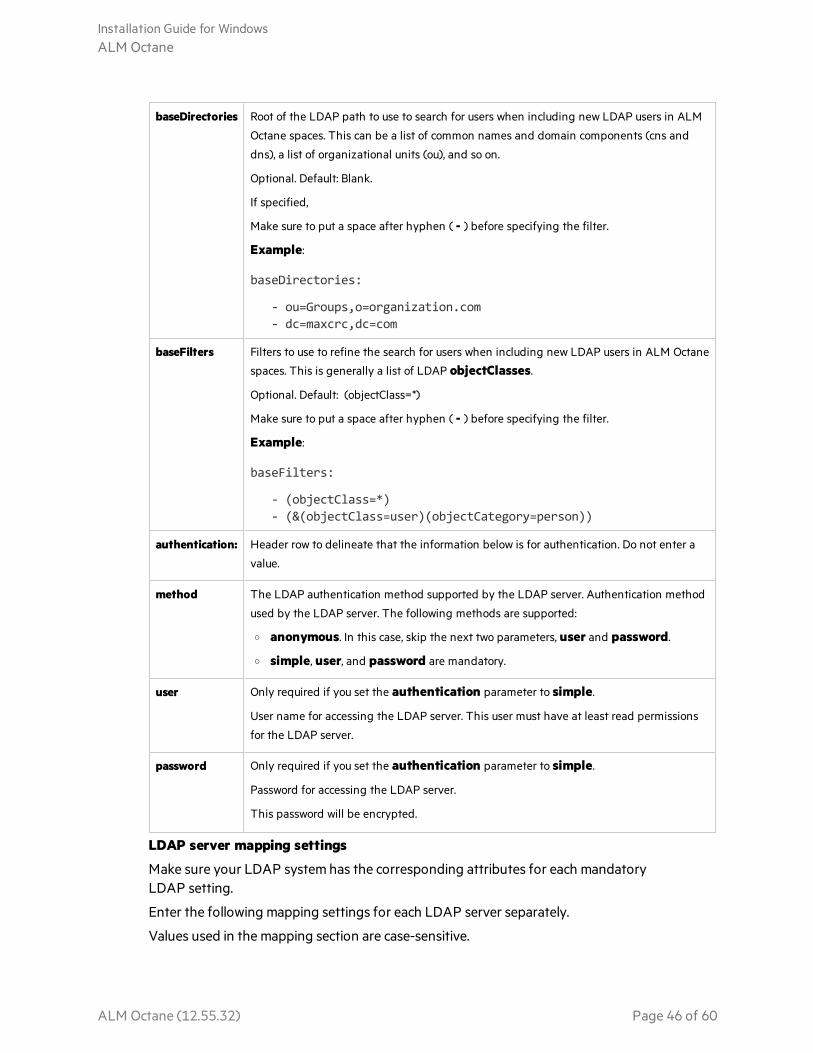
baseDirectories Root of the LDAP path to use to search for users when including new LDAP users in ALM
Octane spaces. This can be a list of common names and domain components (cns and
dns), a list of organizational units (ou), and so on.
Optional. Default: Blank.
If specified,
Make sure to put a space after hyphen ( - ) before specifying the filter.
Example:
baseDirectories:
- ou=Groups,o=organization.com- dc=maxcrc,dc=com
baseFilters Filters to use to refine the search for users when including new LDAP users in ALM Octane
spaces. This is generally a list of LDAP objectClasses.
Optional. Default: (objectClass=*)
Make sure to put a space after hyphen ( - ) before specifying the filter.
Example:
baseFilters:
- (objectClass=*)- (&(objectClass=user)(objectCategory=person))
authentication: Header row to delineate that the information below is for authentication. Do not enter a
value.
method The LDAP authentication method supported by the LDAP server. Authentication method
used by the LDAP server. The following methods are supported:
o anonymous. In this case, skip the next two parameters, user and password.
o simple, user, and password are mandatory.
user Only required if you set the authentication parameter to simple.
User name for accessing the LDAP server. This user must have at least read permissions
for the LDAP server.
password Only required if you set the authentication parameter to simple.
Password for accessing the LDAP server.
This password will be encrypted.
LDAP server mapping settings
Make sure your LDAP system has the corresponding attributes for each mandatoryLDAP setting.
Enter the following mapping settings for each LDAP server separately.
Values used in the mapping section are case-sensitive.
Installation Guide for WindowsALM Octane
ALM Octane (12.55.32) Page 46 of 60
ALMOctaneattributeinoctane.yml
SampleLDAP attributethat can be used Values and descriptions
mapping Header row to delineate that the information below is for mapping of
LDAP attributes. Do not enter a value.
dn distinguishedName
(for ActiveDirectory)
The LDAP distinguished name attribute. Unique. Mandatory.
This attribute is typically in a format that contains the common name
and organization details, such as:
cn=<common_name>,ou=<organizational_unit>,dc=<part_of_domain>
The dn is a unique string that typically contains other LDAP attributes,
such as cn, ou, and dc.
Example
i. If in LDAP, the entryDN attribute value is: cn=<common_name>,ou=<organizational_unit>,dc=<part_of_domain>
ii. In the octane.yml, the dn value would be mapped to: entryDN
iii. When exporting users from LDAP, the dn string representation
of each LDAP user would be the common name, followed by the
organizational unit, followed by a part of the domain, such
as: cn=Joe_Smith@nga,ou=my_org,dc=com
entryDN
(for other LDAPsystems)
Installation Guide for WindowsALM Octane
ALM Octane (12.55.32) Page 47 of 60
ALMOctaneattributeinoctane.yml
SampleLDAP attributethat can be used Values and descriptions
uid objectGUID
(for ActiveDirectory)
The LDAP attribute that should be used as the immutable, globally-
unique identifier. Mandatory.
In this documentation, we also refer to this as the UUID (universally
unique ID).
To work with ALM Octane with Active Directory, we use objectGUID.
This is an attribute by which ALM Octane identifies each user
internally for synchronization between ALM Octane and LDAP,
including when importing users into ALM Octane.
entryUUID
(for other LDAPsystems)
The LDAP attribute that should be used as the immutable, globally-
unique identifier. Mandatory.
In this documentation, we also refer to this as the UUID (universally
unique ID).
To work with ALM Octane, we generally use entryUUID for
OpenLDAP. However, depending on your LDAP, this attribute might be
different, such as GUID or orclguid.
This is an attribute by which ALM Octane identifies each user
internally for synchronization between ALM Octane and LDAP,
including when importing users into ALM Octane.
You can configure other values, such as GUID or orclguid, or any other unique value.
firstName givenName LDAP attribute for first name, such as givenName. Mandatory.
lastName sn LDAP attribute for last name, such as sn. Mandatory.
fullName cn LDAP attribute for full name, such as cn. Optional.
logonName mail This is the unique identifier between all ALM Octane users, and this
attribute is used to log onto ALM Octane.
In some cases, ALM Octane may use this attribute to identify each user
internally for synchronization between ALM Octane and LDAP,
including when importing users into ALM Octane.
mail is usually unique for each user, so mail is an appropriate
LDAP attribute to use to map to logonName. Mandatory.
d. You can change the logonName attribute mapping at any time, but
make sure the logonName is unique across all ALM Octane users.
email mail The LDAP attribute for email address, such as mail. Mandatory.
Installation Guide for WindowsALM Octane
ALM Octane (12.55.32) Page 48 of 60
ALMOctaneattributeinoctane.yml
SampleLDAP attributethat can be used Values and descriptions
phone1 telephoneNumber The LDAP attribute for the primary phone number, such as
telephoneNumber. Optional.
License settings
trialEdition Enter team or enterprise, depending on your trial edition. For details, see the
information about ALM Octane editions in the ALM Octane User Guide.
Note: This setting is used the first time the ALM Octane server starts,
and cannot be changed retroactively.
mode o If you are using a standalone ALM Octane license, enter standalone. You
can then skip the remaining fields in the License section. Default.
o If you are allocating licenses from ALM to ALM Octane, enter almSharing.
You then need to fill in the following fields as described below.
The following fields are mandatory for almSharing mode:
url Enter the full path that you use to access ALM. Typically, this includes the suffix
qcbin.
almIntegrationUser Enter the user name for accessing ALM. This user was defined in ALM for
integration purposes.
almIntegrationPassword Enter the password for the almIntegrationUser.
This password is automatically encrypted after you restart the ALM Octane
server.
Oracle settings
Section Setting Description and usage
oracle_database:
useDefaultSort For Oracle databases: Defines whether the standard Oraclebinary sort (NLS_SORT="BINARY_CI") should be overriddenfor non-Latin language support.
Valid values: yes, no, or blank
Default: blank (yes)
Usage:
oracle_database:useDefaultSort: no
Installation Guide for WindowsALM Octane
ALM Octane (12.55.32) Page 49 of 60
d. Save the file.
Upgrade1. On the server machine, select Start > ALM Octane > Initialize Server.
Alternatively, run initserver.bat:
C:\octane\install\initserver.bat
2. Check the C:\octane\log\wrapper.log file. If you do not see the "Server is ready!" message, correctthe errors shown in the log.
Caution: Do not use ALM Octane until you have completed "Upgrade spaces in ALM Octane"below.
Configure and upgrade cluster nodes
Caution: Do not use ALM Octane until you have completed "Upgrade spaces in ALM Octane"below.
After the upgrade on the first node has completed successfully, you can then upgrade the remainingnodes in a cluster.
1. Copy setup_upgrade.xml to each node, renaming it to setup.xml.
2. Run connectnode.bat on each additional node to install and initialize ALM Octane:
C:\octane\install\connectnode.bat <path_to_repository>
For details, see "Cluster installation (optional)" on page 36.
Upgrade spaces in ALM OctaneAfter upgrading, log into ALM Octane as the site admin to upgrade each space.
1. In a browser, navigate to <ServerURL>:<port>/ui?site.
2. Log in as the shared space admin, with the user name and password you provided in the setup.xmlfile.
3. Click Site and then click the Spaces tab.
Installation Guide for WindowsALM Octane
ALM Octane (12.55.32) Page 50 of 60
4. Select the space and click Upgrade.
Upgrade is available only if the space needs to be upgraded.
Click Refresh to see the updated status for the space.
Note: Upgraded spaces are, by default, isolated. To work with shared spaces, create newspaces.
5. Individual workspaces are upgraded in the background. In Settings > Spaces, click BackgroundJobs to track the progress of the workspace upgrades.
Note: Until all of the background jobs have completed, some data may be unavailable intrend graphs.
For details on upgrading the space, see the information about managing sites in the ALM Octane UserGuide.
Restart all Jetty serversAfter upgrading the spaces in Settings, clear caches:
1. Stop all Jetty servers.
2. Restart each Jetty server.
Note: Make sure all Jetty servers are stopped at the same time before restarting even one ofthem.
After the upgradeAfter the upgrade has completed successfully:
l The space status becomes Active.
l The space version is updated to the current version.
Next steps:l Update mandatory configuration parameters, such as SMTP_NOTIFICATION_SENDER_EMAIL.
See the information about setting configuration parameters in the ALM Octane Developer Helpor the ALM Octane User Guide.
l Download the newest IDE plugins for this ALM Octane version. See the information aboutintegrations in the ALM Octane User Guide.
l If you work with the REST API, you might want to check if any API resources have been deprecated.While the deprecated resources are supported for a while, we recommend that you start updating
Installation Guide for WindowsALM Octane
ALM Octane (12.55.32) Page 51 of 60
your code so that you use the resource aliases instead. To see deprecated resources for a particularversion, see the corresponding REST API example and how to use the interactive API client in theALM Octane Developer Help.
l "Rollback" below
RollbackThis section describes how to roll back after upgrading an on-premises ALM Octane server. This may benecessary if for some reason the upgrade fails or performance is slow.
Depending on when you want to roll back, there are different steps to perform.
l "After the upgrade's setup validation phase" below
l "After site schema has been upgraded" below
l "After space schema has been upgraded" on the next page
l "After upgrade completed" on page 54
l "After upgrading cluster nodes" on page 54
After the upgrade's setup validation phase
You can roll back after the upgrade's setup validation phase, whether it passed or failed.
If the upgrade reached setup validation, the following have been modified:
l Previously-deployed files
l setup.xml and octane.yml configuration files
To roll back the deployed files, including the setup.xml, and octane.yml files
1. Back up the setup.xml file, the octane.yml file, and the folder in which you stored the repository,such as C:\octane\repo\, if it is located inside the installation folder.
2. Uninstall the new ALM Octane version using Windows Add/Remove Programs. For details, see"Uninstall" on page 58.
3. Install the previous ALM Octane version. For details, see "Installation" on page 18.
4. Copy back the setup.xml, and octane.yml files.
5. If necessary, copy back the folder in which you stored the repository, such as C:\octane\repo\.
6. Re-initialize the ALM Octane service. For details, see "Start the ALM Octane server manually" onpage 56.
After site schema has been upgraded
You can roll back after the upgrade's site schema have been upgraded.
Installation Guide for WindowsALM Octane
ALM Octane (12.55.32) Page 52 of 60
If the upgrade upgraded the site schema, the following has been modified:
l Previously-deployed files
l setup.xml and octane.yml configuration files
l The site schema
To roll back the site schema
1. Stop the ALM Octane service.
2. Back up the setup.xml file, the octane.yml file, and the C:\octane\repo\ folder, if it is located insidethe installation folder.
3. Revert to a backup of the site schema.
4. Uninstall the new ALM Octane version using Windows Add/Remove Programs. For details, see"Uninstall" on page 58.
5. Install the previous ALM Octane version. For details, see "Installation" on page 18.
6. If necessary, copy back the C:\octane\repo\ folder.
7. Revert to backups of setup.xml and octane.yml configuration files.
8. Re-initialize the ALM Octane service. For details, see "Start the ALM Octane server manually" onpage 56.
After space schema has been upgraded
If the upgrade upgraded the site schema, the following have been modified:
l The space schema
l Elasticsearch indexes
l ALM Octane repository files
Follow the steps for one of the following options.
Installation Guide for WindowsALM Octane
ALM Octane (12.55.32) Page 53 of 60
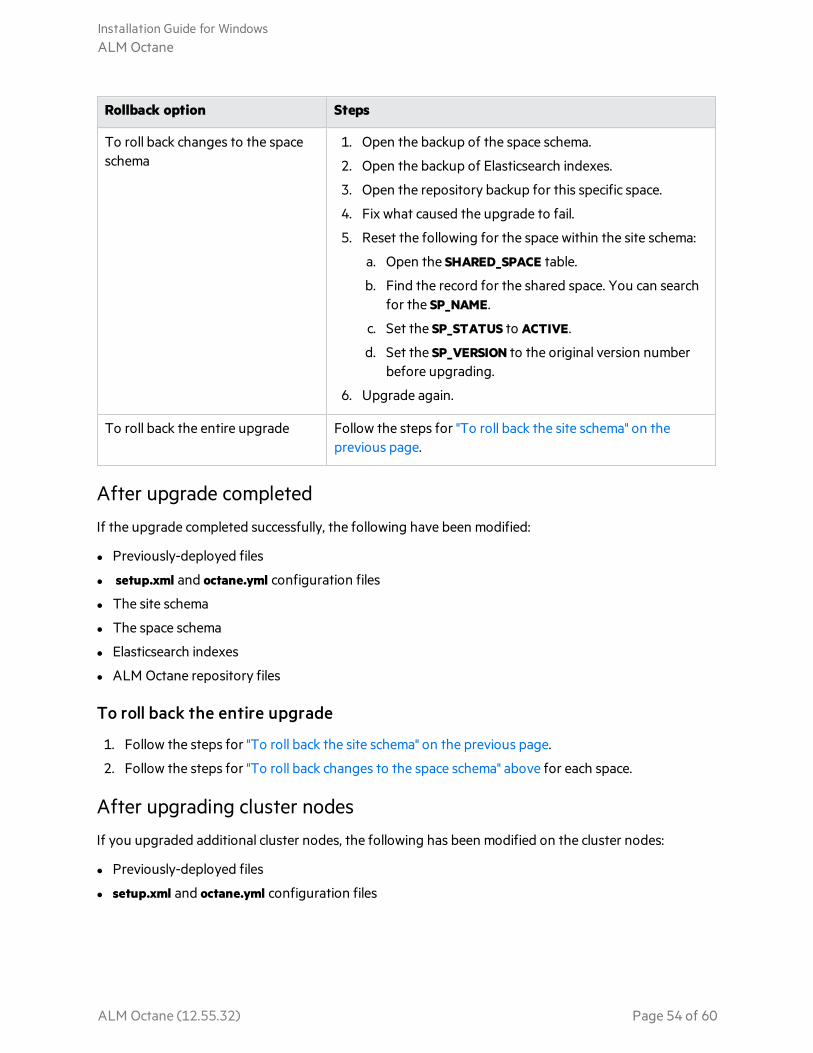
Rollback option Steps
To roll back changes to the spaceschema
1. Open the backup of the space schema.
2. Open the backup of Elasticsearch indexes.
3. Open the repository backup for this specific space.
4. Fix what caused the upgrade to fail.
5. Reset the following for the space within the site schema:
a. Open the SHARED_SPACE table.
b. Find the record for the shared space. You can searchfor the SP_NAME.
c. Set the SP_STATUS to ACTIVE.
d. Set the SP_VERSION to the original version numberbefore upgrading.
6. Upgrade again.
To roll back the entire upgrade Follow the steps for "To roll back the site schema" on theprevious page.
After upgrade completed
If the upgrade completed successfully, the following have been modified:
l Previously-deployed files
l setup.xml and octane.yml configuration files
l The site schema
l The space schema
l Elasticsearch indexes
l ALM Octane repository files
To roll back the entire upgrade
1. Follow the steps for "To roll back the site schema" on the previous page.
2. Follow the steps for "To roll back changes to the space schema" above for each space.
After upgrading cluster nodes
If you upgraded additional cluster nodes, the following has been modified on the cluster nodes:
l Previously-deployed files
l setup.xml and octane.yml configuration files
Installation Guide for WindowsALM Octane
ALM Octane (12.55.32) Page 54 of 60
To roll back the previously-deployed files
1. Uninstall the current version. For details, see "Uninstall" on page 58.
2. Install the previous version on a node.
3. Run connectnode.bat on each additional cluster node. For details, see "Cluster installation(optional)" on page 36.
4. Re-initialize the ALM Octane service on each cluster node. For details, see "Start the ALM Octaneserver manually" on the next page.
ManagementHere are some management tasks you may have to perform during or after installation.
This section includes:
• Start the ALM Octane server manually 56• Handle database-related issues 56• Configure trust on the ALM Octane server 57• Configure a secure connection to the ALM Octane server (Jetty) 57
Installation Guide for WindowsALM Octane
ALM Octane (12.55.32) Page 55 of 60
Including these management tasks, you can also set configuration parameters to define how your siteoperates:
l Configuration parameters for the site are set using Settings. For details, see the relevant section inthe ALM Octane User Help.
l Configuration parameters for spaces are set using the REST API. For details, see the relevant sectionin the ALM Octane Developer Help.
Start the ALM Octane server manuallyWhen installing ALM Octane, the ALM Octane server is started as part of running initserver.bat (on thefirst node) and connectnode.bat (on other cluster nodes).
If you need to start the ALM Octane server manually, perform the following.
To start (or restart) the ALM Octane server:
Select Start > ALM Octane > Start Server
or
Start > ALM Octane > Restart Server
The service runs in the background.
To start (or restart) ALM Octane in a cluster configuration:
All nodes must be restarted.
Handle database-related issuesThis topic provides details for database-related management tasks.
In this topic:
l "Change site schema settings and reinitialize" below
Change site schema settings and reinitialize
If you need to make changes to the site schema settings, make the changes in the setup.xml file.
1. Obtain the names of the indexes related to your instance of ALM Octane in the sharedspace_logical_name.txt in the C:\octane\server\conf\ folder.
2. Delete the database site schema.
3. Delete the repository.
4. Delete the mqm_<sp_logical_name> index from Elasticsearch. From the command prompt on theALM Octane server, run:
Installation Guide for WindowsALM Octane
ALM Octane (12.55.32) Page 56 of 60
curl -XDELETE 'http://<server address>:9200/mqm_<sp_logical_name>/'
5. Run initserver.bat with the site action CREATE_NEW in the setup.xml file to create a new siteschema.
C:\octane\install\initserver.bat
Configure trust on the ALM Octane serverConfigure trust on the ALM Octane server when you connect to any remote server (such as a databaseserver, an LDAP server, license sharing with ALM, and so on) over a secure channel.
Note: When connecting to a database server with SSL, or an LDAP server, over a secure channel,you must configure trust before initializing the ALM Octane server by running initserver.bat.
To configure trust on the ALM Octane server:
1. Obtain the certificate of the root and any intermediate Certificate Authority that issued the remoteserver certificate.
2. Import each certificate into the ALM Octane java truststore using a keytool command.
l Locate your <java_home> folder. One way to check the location of the <java_home> folder isto check the environment information settings in the C:\octane\log\wrapper.log file.
Example: C:\Program Files\java\<jdkversion>\jrel Locate your keystore cacerts file, which is usually here: <java_home>\jre\lib\security\cacertsl Import each certificate.
Example:
cd <java_home>\bin
.\keytool -import -trustcacerts -alias <CA> -file <path to the CA certificatefile> -keystore ..\lib\security\cacerts
3. If the ALM Octane service is running, restart it.
Configure a secure connection to the ALM Octane server(Jetty)This topic describes how to configure a secure connection to the ALM Octane server with Jetty.
Installation Guide for WindowsALM Octane
ALM Octane (12.55.32) Page 57 of 60
Note: ALM Octane uses the TLSv1.2 secure protocol.
1. Obtain the server certificate issued to the name of this server in java keystore format (.jks) issued tothe fully qualified domain name of ALM Octane server. It must contain a private key and thecertificate authority that issued it. For details on creating certificates using the CertificateAuthority, see Software Self-solve knowledge base article KM02707977.
2. Copy your keystore file to the C:\octane\conf folder. Name the file keystore.jks.
3. Run C:\octane\install\enablessl.bat, supplying the certificate password as a parameter to thescript.
Note the following limitations:
l When you install a single node configuration for the Jetty server, you need to use the fulladdress to access it. Meaning, if the Jetty server was installed on a machine namedmyserver.mydomain.com, then you access it via: http[s]://myserver.mydomain.com:<port>and not via http[s]://myserver:<port> if there are client-side DNS shortcuts installed.
l When you install a cluster Jetty server environment, the load balancer and all Jetty nodesshould all be accessible from one another. The same rules for accessing the server via the loadbalancer from the client side apply. Meaning, the full address of the load balancer should beused for access.
UninstallTo uninstall the ALM Octane server, use the uninstall feature from the WindowsControl Panel.
The uninstall process does not delete the repository, log, and configuration directories, in case you wantto reinstall. Delete them if necessary.
Installation Guide for WindowsALM Octane
ALM Octane (12.55.32) Page 58 of 60

Send Us FeedbackLet us know how we can improve your experience with the Installation Guide forWindows.Send your email to: [email protected]
Installation Guide for WindowsSend Us Feedback
ALM Octane (12.55.32) Page 59 of 60