ALEKS PPL Learning Module User Manual · ALEKS PPL Learning Module User Manual This manual is a...
26
ALEKS PPL Learning Module User Manual This manual is a concise introduction to the features of the ALEKS PPL Learning Modules. Heads up: The page numbers begin with 13! Homepage 13 Header Bar 14 Account Information 14 Settings 14 Help 14 Logout 15 Notifications 15 Working in the Prep and Learning Module 15 Learning Page 15 Progress Indicator 17 Explanation Page 23 Topic Carousel 23 How to Switch Topics 24 Topic Carousel Filter 25 Review Filter 25 Notifications 25 Timeline and ALEKS Pie 26 Timeline 26 Learning Pie 27 How to Navigate 28 Primary Guidance Menu 28 Unlocking Placement Assessments 29 Navigation Menu 29 Progress Knowledge Check 31 Next Knowledge Check Indicator 31 Starting a Knowledge Check 31 Review for Knowledge Check 31 Topics Lost in Knowledge Check 32 Review Topics Lost in Knowledge Check (Needs More Practice) 32 Celebration 33 Reports 34 Placement Assessment Results 35 Learning Pie 35 Learning Progress History 36 Learning Time and Topic 36
Transcript of ALEKS PPL Learning Module User Manual · ALEKS PPL Learning Module User Manual This manual is a...

ALEKS PPL Learning Module User Manual This manual is a concise introduction to the features of the ALEKS PPL Learning Modules. Heads up: The page numbers begin with 13! Homepage 13 Header Bar 14 Account Information 14 Settings 14 Help 14 Logout 15 Notifications 15
Working in the Prep and Learning Module 15 Learning Page 15 Progress Indicator 17 Explanation Page 23 Topic Carousel 23 How to Switch Topics 24 Topic Carousel Filter 25 Review Filter 25 Notifications 25
Timeline and ALEKS Pie 26 Timeline 26 Learning Pie 27 How to Navigate 28 Primary Guidance Menu 28 Unlocking Placement Assessments 29 Navigation Menu 29
Progress Knowledge Check 31 Next Knowledge Check Indicator 31 Starting a Knowledge Check 31 Review for Knowledge Check 31 Topics Lost in Knowledge Check 32 Review Topics Lost in Knowledge Check (Needs More Practice) 32
Celebration 33
Reports 34 Placement Assessment Results 35 Learning Pie 35 Learning Progress History 36 Learning Time and Topic 36

©2016 McGraw-Hill Education | Reference Guide: Student Module | Last Updated: 05.31.2016 13
HOMEPAGE
Students transition to their personal homepage. Upon first time use, students see quick tips that point out important features of the homepage, including the ALEKS Learning Pie and how it works. The number in the center of pie represents the total number of topics the student mastered in the Prep and Learning Module based on their Initial Placement Assessment.
Selecting a slice in the Learning Pie opens more information about the slice, including the number of topics Mastered, Learned, and Remaining in each slice.

©2016 McGraw-Hill Education | Reference Guide: Student Module | Last Updated: 05.31.2016 14
Key Areas of the Homepage
Below are some key areas of the homepage, and an overview description of each feature. For more details, please select the links to go to the applicable section in this document.
1) Navigation Menu: Provides access to important features in ALEKS.
2) ALEKS Logo: Returns students to their homepage from any page in the new Student Module.
3) Cohort Name Display: Displays the name of the cohort the student is enrolled in.
4) Progress Bar: Displays the number of topics Mastered, Learned and Remaining in real-time.
5) Notifications: Students are alerted with real-time notifications such as new messages.
6) Account Settings: Displays the student’s account settings.
7) Next Knowledge Check Indicator: Displays when the next Knowledge Check will occur.
8) Timeline/Learning Pie: Students can toggle their view between the timeline to see their progress in the Prep and Learning Module (default view), or the Learning Pie to see their progress within each slice.
9) Primary Guidance Menu: Contains the primary call to action, which is working on the learning path. It also con-tains secondary tasks, such as taking additional Placement Assessments or viewing past assessment results.
10) Timeline Marker: Shows where the student is on the timeline.
11) Timeline Detail: Students can view their timeline detail and filter their view by week, month, or day.
Header Bar
The header bar area allows access to the Navigation Menu, displays the cohort name that the student is enrolled in, provides real-time cohort progress information, Message Center alerts, and access to the student’s account settings.
How to Find It: Located at the top of first-level pages in the New Student Module.
Account Information
Students can access their account settings and log out of ALEKS by selecting their account name in the up-per-right corner.
Settings
This page contains the student's email address and allows students to change their password.
How to Find It: Select the account name in the upper-right corner | Select Settings
Help
This page contains keyboard shortcuts.
How to Find It: Select the account name in the upper-right corner | Select Help
©2016 McGraw-Hill Education | Reference Guide: Student Module | Last Updated: 05.31.2016 15
Logout
How to Find It: Select the account name in the upper-right corner | Select Logout
Notifications
The header bar displays a counter for real-time notifications and messages from administrators and ALEKS Cus-tomer Support. Students are alerted when there is a new notification. A number appears above the bell to show the number of unread notifications. When the bell icon is selected, a box displays a list of chronological notifica-tions with the newest at the top. After viewing the new notification, the number disappears.
How to Find It: Located in the header bar at the top of first-level pages in the Student Module.
WORKING IN THE PREP AND LEARNING MODULE
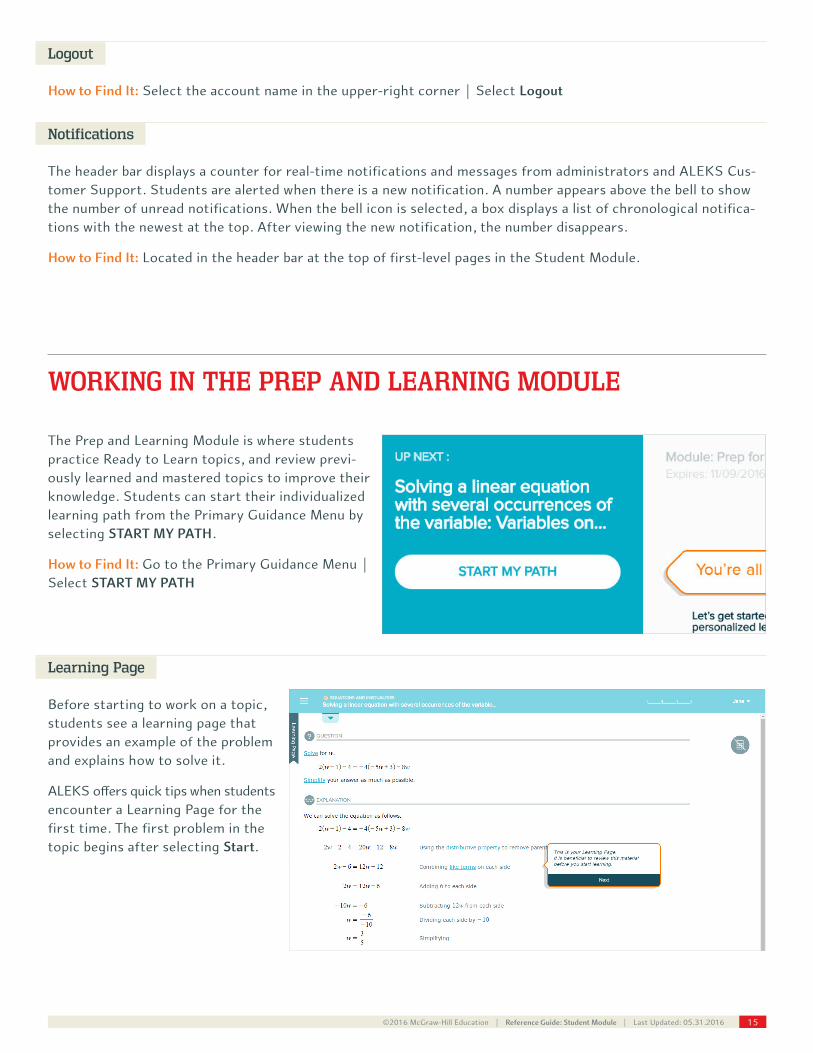
The Prep and Learning Module is where students practice Ready to Learn topics, and review previ-ously learned and mastered topics to improve their knowledge. Students can start their individualized learning path from the Primary Guidance Menu by selecting START MY PATH.
How to Find It: Go to the Primary Guidance Menu | Select START MY PATH
Learning Page
Before starting to work on a topic, students see a learning page that provides an example of the problem and explains how to solve it.
ALEKS o!ers quick tips when students encounter a Learning Page for the first time. The first problem in the topic begins after selecting Start.
©2016 McGraw-Hill Education | Reference Guide: Student Module | Last Updated: 05.31.2016 16
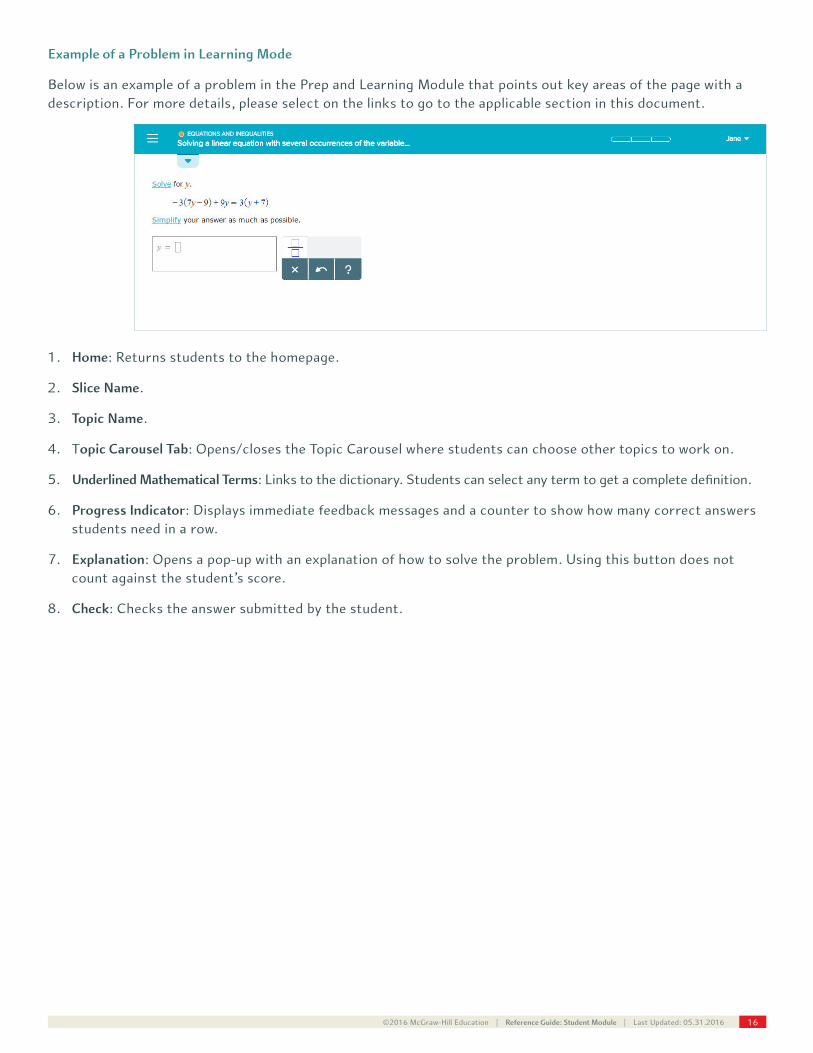
Example of a Problem in Learning Mode
Below is an example of a problem in the Prep and Learning Module that points out key areas of the page with a description. For more details, please select on the links to go to the applicable section in this document.
1. Home: Returns students to the homepage.
2. Slice Name.
3. Topic Name.
4. Topic Carousel Tab: Opens/closes the Topic Carousel where students can choose other topics to work on.
5. Underlined Mathematical Terms: Links to the dictionary. Students can select any term to get a complete definition.
6. Progress Indicator: Displays immediate feedback messages and a counter to show how many correct answers students need in a row.
7. Explanation: Opens a pop-up with an explanation of how to solve the problem. Using this button does not count against the student’s score.
8. Check: Checks the answer submitted by the student.

©2016 McGraw-Hill Education | Reference Guide: Student Module | Last Updated: 05.31.2016 17
Resources Available on Problem Pages and Explanation Pages
For help on a problem or Explanation Page, students may have access to learning resources (i.e., tools on the right side of the page) such as the ALEKS dictionary or calculator (when available).
Below is an example showing resources available on a problem in the Prep and Learning Module. Selecting an icon opens a pop-up with more details about the resource.
Progress Indicator
When students answer a problem in the Prep and Learning Module, they can immediately see how they per-formed. The progress indicator in the top-right corner displays messages and a counter to show when problems are answered right or wrong.
How the Progress Indicator Works
Problems are based on a point system. ALEKS considers a topic learned when a student achieves a total of 5 points per topic. The bars in the progress indicator represent how many problems the student needs to answer correctly in a row before the topic is considered learned. The student is then moved on to the next topic in the Topic Carousel. This is helpful for students as they can visually see how close they are to achieving their goal. Students receive one point for each correct answer, and one point subtracted for each incorrect answer. If two problems are answered in a row correctly without using the Explanation Page, double credit (2 points) is received. The number of points cannot go below zero.
The progress bars are dynamic and change colors. Bars are shaded in green based on the number of points achieved after a correct answer. The goal is for students to have a fully shaded progress indicator:
©2016 McGraw-Hill Education | Reference Guide: Student Module | Last Updated: 05.31.2016 18
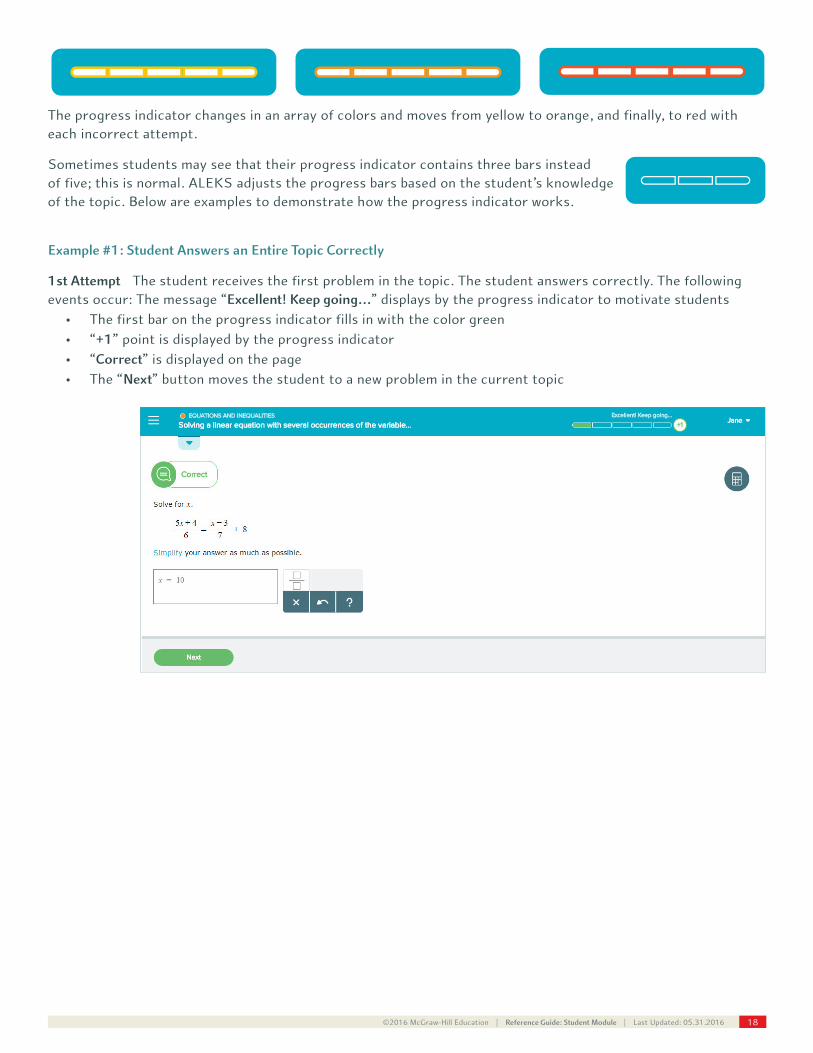
The progress indicator changes in an array of colors and moves from yellow to orange, and finally, to red with each incorrect attempt.
Sometimes students may see that their progress indicator contains three bars instead of five; this is normal. ALEKS adjusts the progress bars based on the student’s knowledge of the topic. Below are examples to demonstrate how the progress indicator works.
Example #1: Student Answers an Entire Topic Correctly
1st Attempt The student receives the first problem in the topic. The student answers correctly. The following events occur: The message “Excellent! Keep going…” displays by the progress indicator to motivate students
• The first bar on the progress indicator fills in with the color green • “+1” point is displayed by the progress indicator • “Correct” is displayed on the page • The “Next” button moves the student to a new problem in the current topic
©2016 McGraw-Hill Education | Reference Guide: Student Module | Last Updated: 05.31.2016 19
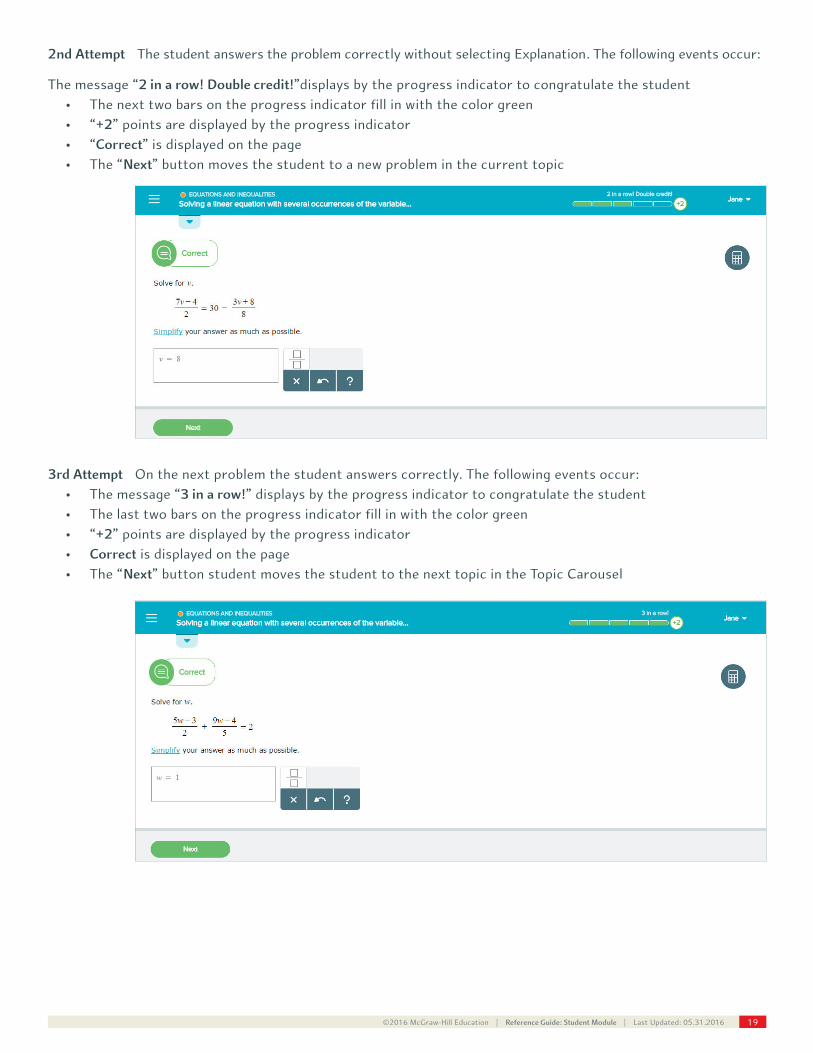
2nd Attempt The student answers the problem correctly without selecting Explanation. The following events occur:
The message “2 in a row! Double credit!”displays by the progress indicator to congratulate the student • The next two bars on the progress indicator fill in with the color green • “+2” points are displayed by the progress indicator • “Correct” is displayed on the page • The “Next” button moves the student to a new problem in the current topic
3rd Attempt On the next problem the student answers correctly. The following events occur: • The message “3 in a row!” displays by the progress indicator to congratulate the student • The last two bars on the progress indicator fill in with the color green • “+2” points are displayed by the progress indicator • Correct is displayed on the page • The “Next” button student moves the student to the next topic in the Topic Carousel
©2016 McGraw-Hill Education | Reference Guide: Student Module | Last Updated: 05.31.2016 20
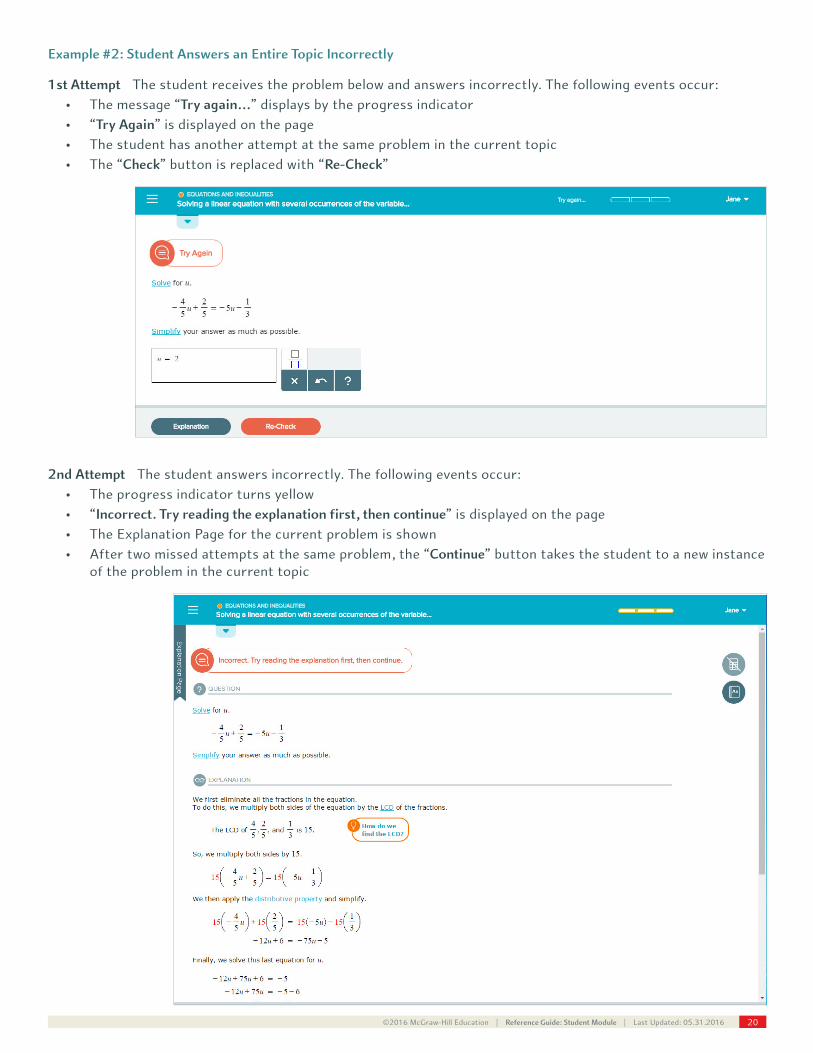
Example #2: Student Answers an Entire Topic Incorrectly
1st Attempt The student receives the problem below and answers incorrectly. The following events occur: • The message “Try again…” displays by the progress indicator • “Try Again” is displayed on the page • The student has another attempt at the same problem in the current topic • The “Check” button is replaced with “Re-Check”
2nd Attempt The student answers incorrectly. The following events occur: • The progress indicator turns yellow • “Incorrect. Try reading the explanation first, then continue” is displayed on the page • The Explanation Page for the current problem is shown • After two missed attempts at the same problem, the “Continue” button takes the student to a new instance
of the problem in the current topic
©2016 McGraw-Hill Education | Reference Guide: Student Module | Last Updated: 05.31.2016 21
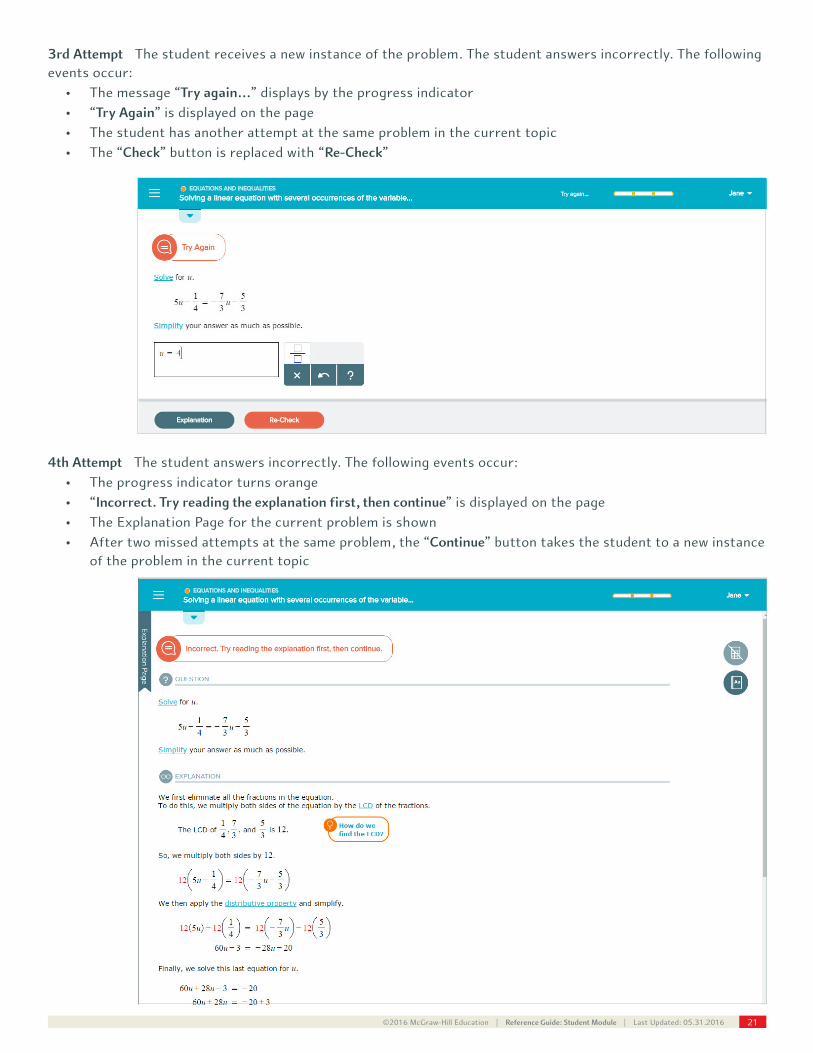
3rd Attempt The student receives a new instance of the problem. The student answers incorrectly. The following events occur:
• The message “Try again…” displays by the progress indicator • “Try Again” is displayed on the page • The student has another attempt at the same problem in the current topic • The “Check” button is replaced with “Re-Check”
4th Attempt The student answers incorrectly. The following events occur: • The progress indicator turns orange • “Incorrect. Try reading the explanation first, then continue” is displayed on the page • The Explanation Page for the current problem is shown • After two missed attempts at the same problem, the “Continue” button takes the student to a new instance
of the problem in the current topic
©2016 McGraw-Hill Education | Reference Guide: Student Module | Last Updated: 05.31.2016 22
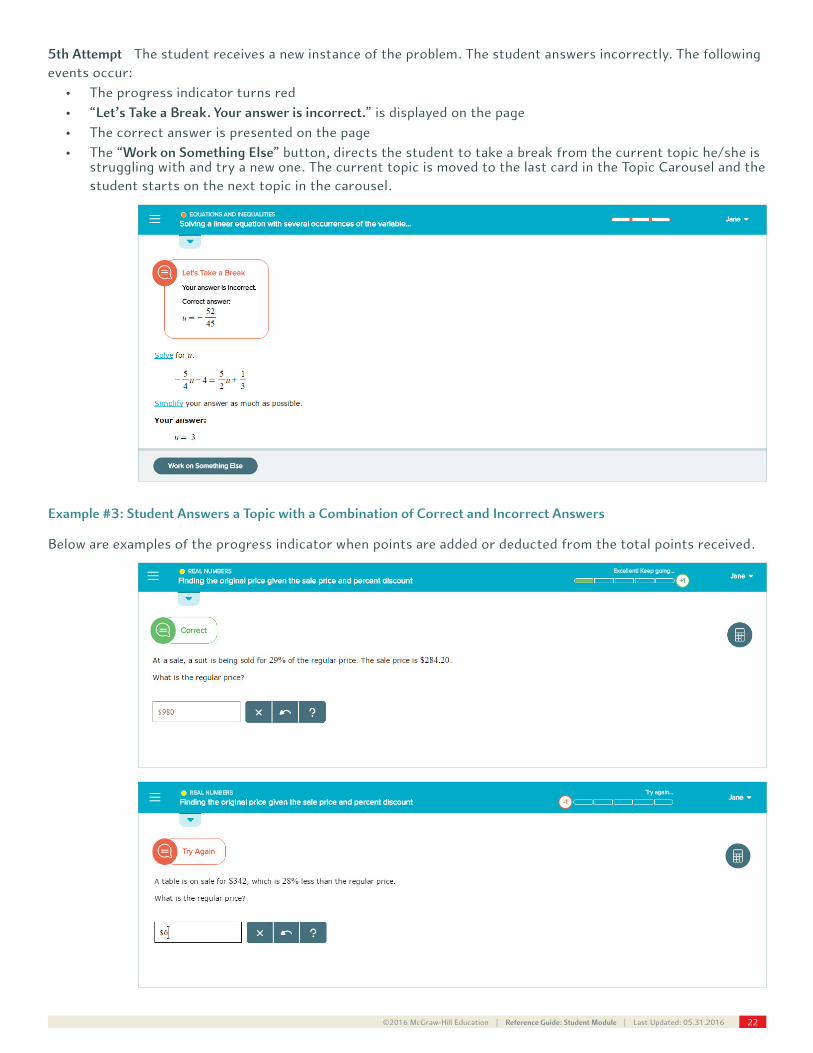
5th Attempt The student receives a new instance of the problem. The student answers incorrectly. The following events occur:
• The progress indicator turns red • “Let’s Take a Break. Your answer is incorrect.” is displayed on the page • The correct answer is presented on the page • The “Work on Something Else” button, directs the student to take a break from the current topic he/she is
struggling with and try a new one. The current topic is moved to the last card in the Topic Carousel and the student starts on the next topic in the carousel.
Example #3: Student Answers a Topic with a Combination of Correct and Incorrect Answers
Below are examples of the progress indicator when points are added or deducted from the total points received.
©2016 McGraw-Hill Education | Reference Guide: Student Module | Last Updated: 05.31.2016 23
One point is received for each problem answered correctly. Double credit (2 points) is received when two prob-lems in a row are answered correctly without selecting Explanation. One point is subtracted from the point total when a problem is answered incorrectly.
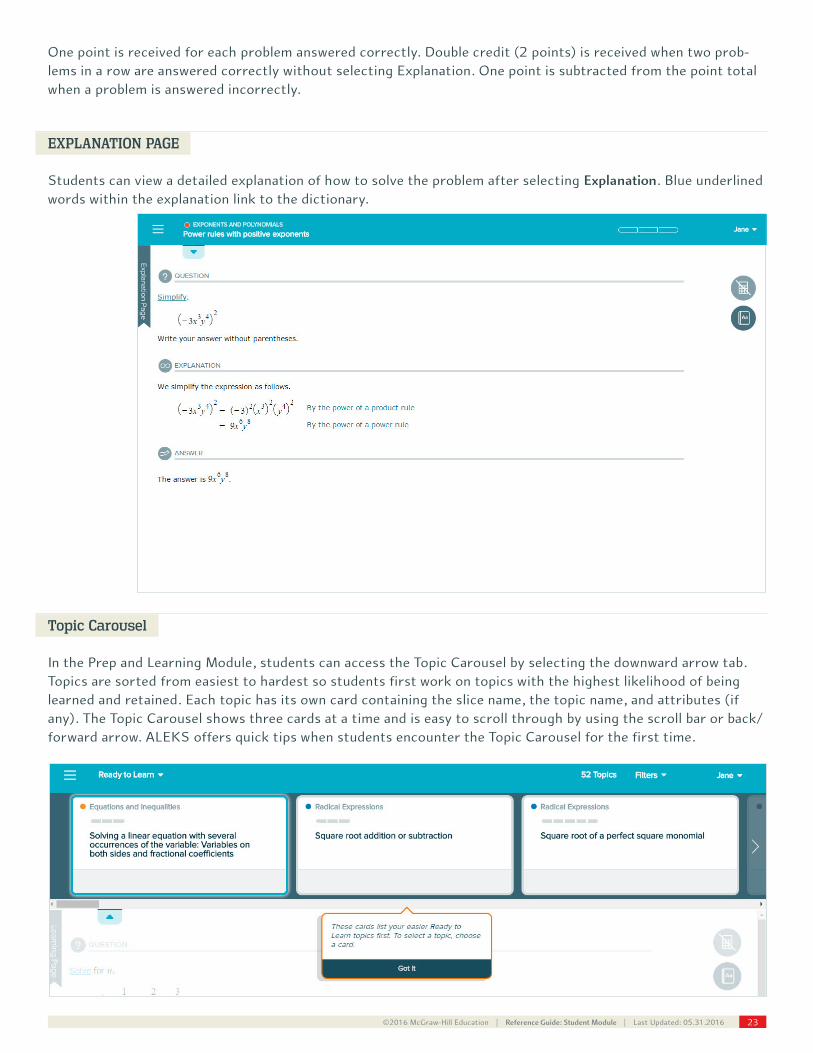
EXPLANATION PAGE
Students can view a detailed explanation of how to solve the problem after selecting Explanation. Blue underlined words within the explanation link to the dictionary.
Topic Carousel
In the Prep and Learning Module, students can access the Topic Carousel by selecting the downward arrow tab. Topics are sorted from easiest to hardest so students first work on topics with the highest likelihood of being learned and retained. Each topic has its own card containing the slice name, the topic name, and attributes (if any). The Topic Carousel shows three cards at a time and is easy to scroll through by using the scroll bar or back/forward arrow. ALEKS offers quick tips when students encounter the Topic Carousel for the first time.
©2016 McGraw-Hill Education | Reference Guide: Student Module | Last Updated: 05.31.2016 24
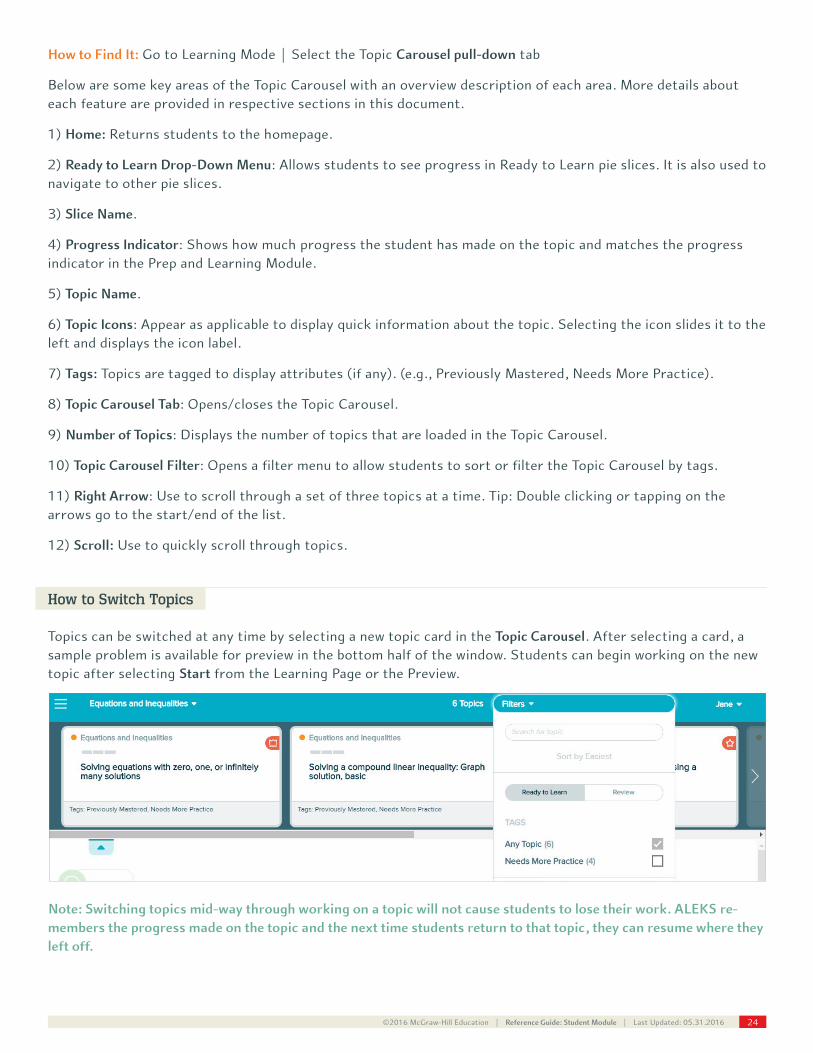
How to Find It: Go to Learning Mode | Select the Topic Carousel pull-down tab
Below are some key areas of the Topic Carousel with an overview description of each area. More details about each feature are provided in respective sections in this document.
1) Home: Returns students to the homepage.
2) Ready to Learn Drop-Down Menu: Allows students to see progress in Ready to Learn pie slices. It is also used to navigate to other pie slices.
3) Slice Name.
4) Progress Indicator: Shows how much progress the student has made on the topic and matches the progress indicator in the Prep and Learning Module.
5) Topic Name.
6) Topic Icons: Appear as applicable to display quick information about the topic. Selecting the icon slides it to the left and displays the icon label.
7) Tags: Topics are tagged to display attributes (if any). (e.g., Previously Mastered, Needs More Practice).
8) Topic Carousel Tab: Opens/closes the Topic Carousel.
9) Number of Topics: Displays the number of topics that are loaded in the Topic Carousel.
10) Topic Carousel Filter: Opens a filter menu to allow students to sort or filter the Topic Carousel by tags.
11) Right Arrow: Use to scroll through a set of three topics at a time. Tip: Double clicking or tapping on the arrows go to the start/end of the list.
12) Scroll: Use to quickly scroll through topics.
How to Switch Topics
Topics can be switched at any time by selecting a new topic card in the Topic Carousel. After selecting a card, a sample problem is available for preview in the bottom half of the window. Students can begin working on the new topic after selecting Start from the Learning Page or the Preview.
Note: Switching topics mid-way through working on a topic will not cause students to lose their work. ALEKS re-members the progress made on the topic and the next time students return to that topic, they can resume where they left off.

©2016 McGraw-Hill Education | Reference Guide: Student Module | Last Updated: 05.31.2016 25
TOPIC CAROUSEL FILTER
The Topic Carousel is useful for filtering specific topics, reordering topics in the carousel, or filtering topics by specific attributes, such as needs more practice, goal topic, etc. Students can also enter words to search for topics by name. Topics are tagged to display attributes (if any). Here is an example of a topic that is tagged with attributes.
How to Find It: Go to Learning Mode | Select Filters in the upper-right corner
By default, the Topic Carousel is sorted from the easiest to hardest Ready to Learn topics. However, if students prefer to work on Ready to Learn topics by pie slice, they can use the filter to reorder the Topic Carousel by selecting Pie Slice.
By default, the Show All Topics filter is selected to show all Ready to Learn topics in the Topic Carousel. Students can select Show Recommended Topics to filter the Topic Carousel to approximately 30 topics and focus on a limited amount of problems.
Note: The sort setting is saved until a change is made, meaning that if the filter default settings are modified, they will remain as such until the student resets or updates the filter or logs out of ALEKS.
REVIEW FILTER
By default, the Topic Carousel displays Ready to Learn topics. However, if students want to review and practice previously learned and mastered topics, they can use the filter to load the Topic Carousel with review topics by selecting Review.
How to Find It: Go to the Prep and Learning Module | Select Filters | Select Review
NOTIFICATIONS
Notifications appear on the homepage or in Learning Mode. The notifica-tion appears in the upper-right corner of the page the student is currently on.
Most notifications are actionable and students can navigate to the corresponding content by selecting on the notification. For example, students can select on a new message notification to open the message in the ALEKS Message Center.
Notifications must be closed with the X button. They do not close on their own and will stay open until closed by the student or when the student navigates to a different screen.
©2016 McGraw-Hill Education | Reference Guide: Student Module | Last Updated: 05.31.2016 26
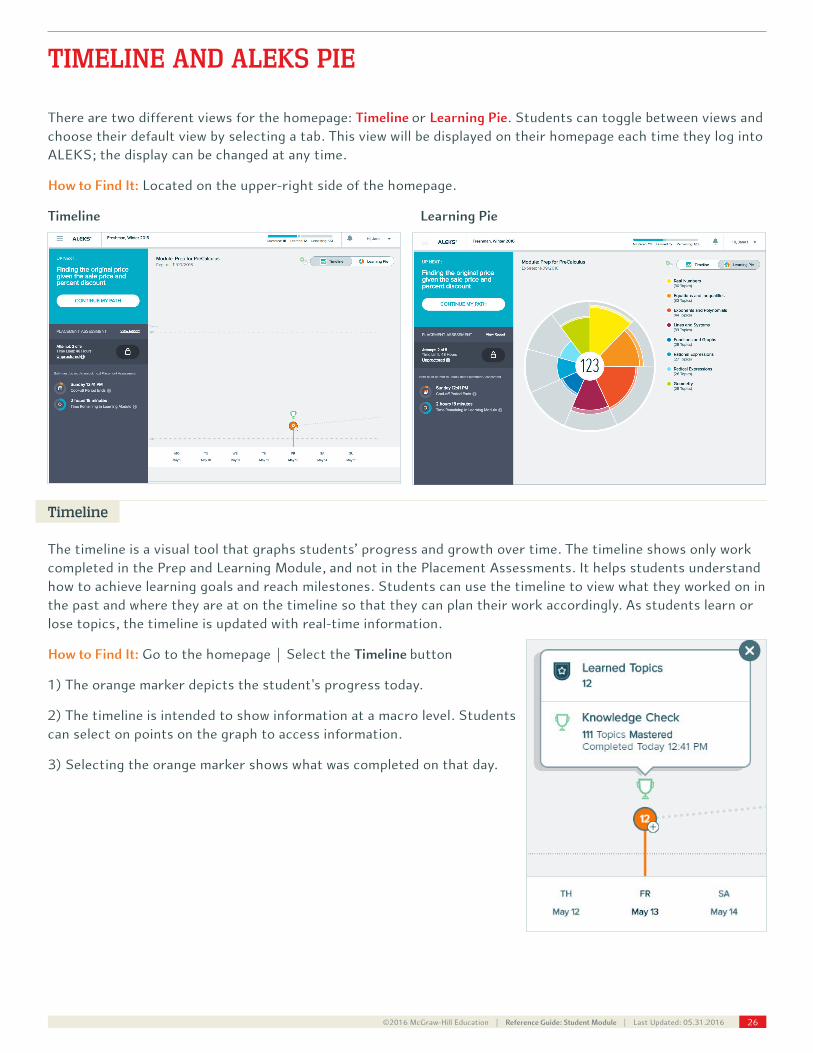
TIMELINE AND ALEKS PIE
There are two different views for the homepage: Timeline or Learning Pie. Students can toggle between views and choose their default view by selecting a tab. This view will be displayed on their homepage each time they log into ALEKS; the display can be changed at any time.
How to Find It: Located on the upper-right side of the homepage.
Timeline Learning Pie
Timeline
The timeline is a visual tool that graphs students’ progress and growth over time. The timeline shows only work completed in the Prep and Learning Module, and not in the Placement Assessments. It helps students understand how to achieve learning goals and reach milestones. Students can use the timeline to view what they worked on in the past and where they are at on the timeline so that they can plan their work accordingly. As students learn or lose topics, the timeline is updated with real-time information.
How to Find It: Go to the homepage | Select the Timeline button
1) The orange marker depicts the student's progress today.
2) The timeline is intended to show information at a macro level. Students can select on points on the graph to access information.
3) Selecting the orange marker shows what was completed on that day.

©2016 McGraw-Hill Education | Reference Guide: Student Module | Last Updated: 05.31.2016 27
Learning Pie
The Learning Pie provides an opportunity for students to see their overall progress toward completion of the Prep and Learning Module. Slices represent topic categories. Mastered, Learned, and Remaining topics are shown as different colors within each slice. Each pie slice is color-coded to match up with learning progress information shown in the list next to the Learning Pie. The darker color in the slice represents topics Mastered; the lighter color represents topics Learned, and the outer space without color represents the topics Remaining to be learned and mastered.
How to Find It: Go to the homepage | Select the Learning Pie button
Learning Progress Information
Students can view their real-time learning progress information by selecting a pie slice. The area to the right is a legend that updates with the slice name and the number of topics Mastered, Learned, and Remaining in each category for the correlated slice. The delineation is helpful for understanding that topics learned in the Prep and Learning Module are not considered mastered until retention is demonstrated in a Knowledge Check.
Mastered—The number of topics the student has demonstrated mastery of in a Knowledge Check.
Learned—The number of topics that the student has practiced successful-ly in the Prep and Learning Module, but has not yet been assessed on through a Knowledge Check.
Remaining—The number of topics the student has left to learn.
The number in the middle of the Learning Pie is a counter that rep-resents the number of topics the student has mastered plus learned.
TIMELINE DETAIL BUTTON
This view of the timeline provides a more detailed full-screen view and longer time range than the timeline shown on the homepage. Students can filter their timeline view by day, week, or month.
How to Find It: The Timeline Detail button is located on the bottom-right corner of the homepage
©2016 McGraw-Hill Education | Reference Guide: Student Module | Last Updated: 05.31.2016 28
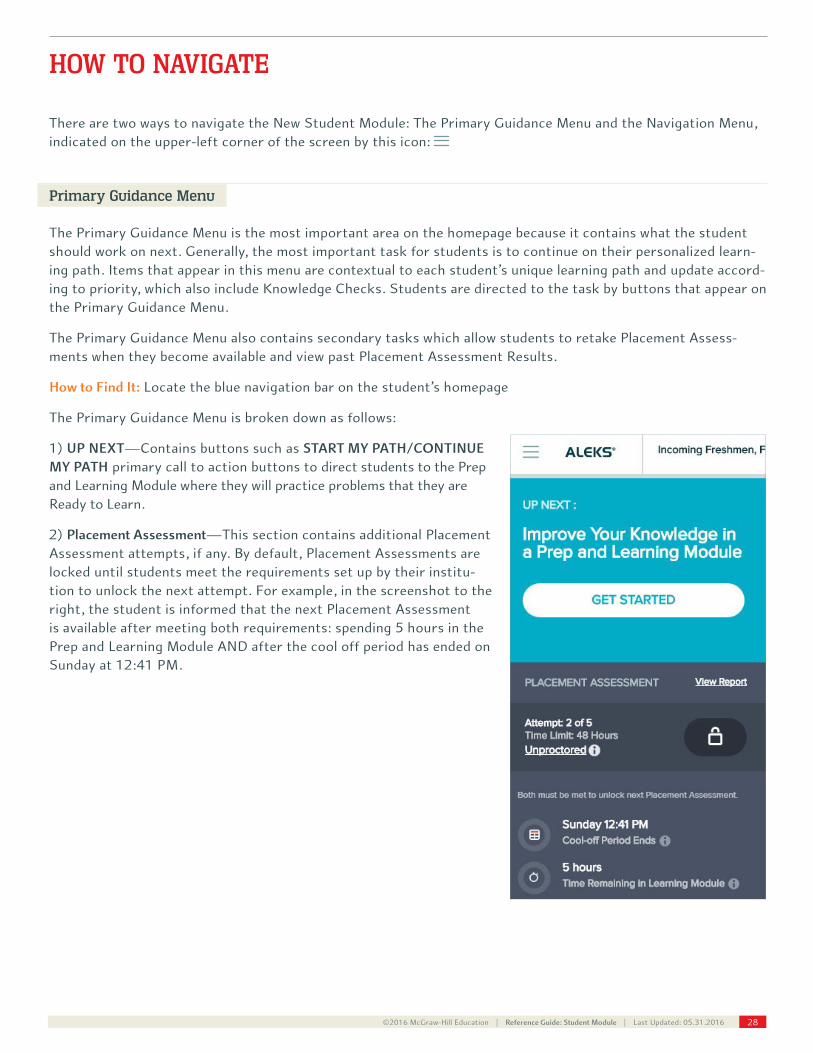
HOW TO NAVIGATE
There are two ways to navigate the New Student Module: The Primary Guidance Menu and the Navigation Menu, indicated on the upper-left corner of the screen by this icon:
Primary Guidance Menu
The Primary Guidance Menu is the most important area on the homepage because it contains what the student should work on next. Generally, the most important task for students is to continue on their personalized learn-ing path. Items that appear in this menu are contextual to each student’s unique learning path and update accord-ing to priority, which also include Knowledge Checks. Students are directed to the task by buttons that appear on the Primary Guidance Menu.
The Primary Guidance Menu also contains secondary tasks which allow students to retake Placement Assess-ments when they become available and view past Placement Assessment Results.
How to Find It: Locate the blue navigation bar on the student’s homepage
The Primary Guidance Menu is broken down as follows:
1) UP NEXT—Contains buttons such as START MY PATH/CONTINUE MY PATH primary call to action buttons to direct students to the Prep and Learning Module where they will practice problems that they are Ready to Learn.
2) Placement Assessment—This section contains additional Placement Assessment attempts, if any. By default, Placement Assessments are locked until students meet the requirements set up by their institu-tion to unlock the next attempt. For example, in the screenshot to the right, the student is informed that the next Placement Assessment is available after meeting both requirements: spending 5 hours in the Prep and Learning Module AND after the cool off period has ended on Sunday at 12:41 PM.

©2016 McGraw-Hill Education | Reference Guide: Student Module | Last Updated: 05.31.2016 29
Unlocking Placement Assessments
After students meet the requirements to unlock the next Placement Assessment, the lock icon will be replaced with a START button.
Proctored vs Unproctored Placement Assessments
Students can view details about their Placement Assessments and if future assessments are proctored or un-proctored by selecting the Proctored/Unproctored link. A pop-up box appears which displays the total number of Placement Assessments in the cohort and their status: Completed, Available, or Locked.
Placement Assessment Override
This pop-up box also contains the Placement Assessment Override that enables Proctors to change a Placement Assessment from unproctored to proctored so that a student can take a Placement Assessment immedi-ately.
Note: The override setting appears only if the Administrator configured the Placement Cohort to enable this setting.
After selecting the Placement Assessment Override link, proctors must enter the designated password to begin the assessment.
Proctored Placement Assessments (Password-Proctected)
Placement Assessments are unproctored by default. Meaning that students can take the Placement Assess-ment without a proctor present. However, when Placement Assessments are setup as proctored, a password must be entered to begin the assessment. Designated Proctors who have been given access to the cohort must enter the correct password that was set up for the assessment.
NAVIGATION MENU
The left-side navigation menu ( ) provides access to features in the New Student Module.
How to Find It: Select the menu in the upper-left corner | The menu slides open to display menu options | Close the menu by selecting the X or selecting the menu icon again.
Home
When the menu is open, students can return to their homepage by selecting Home.
How to Find It: Select the menu in the upper-left corner | Select Home
Debra Lewis
Debra Lewis

©2016 McGraw-Hill Education | Reference Guide: Student Module | Last Updated: 05.31.2016 30
Learn
Takes students to the Prep and Learning Module where they can practice topics.
How to Find It: Select the menu in the upper-left corner | Select Learn
Review
Takes students to review mode where they can practice previously mastered and learned topics.
How to Find It: Select the menu in the upper-left corner | Select Review
Reports
Takes students to their Reports Dashboard
How to Find It: Select the menu in the upper-left corner | Select Reports
Message Center
Students have access to the ALEKS Message Center. Students can only send messages to ALEKS Customer Support, but an also receive messages from their Placement Administrator.
How to Find It: Select the menu in the upper-left corner | Select Message Center
Dictionary
Students can search an online dictionary of terms relevant to their course subject.
How to Find It: Select the menu in the upper-left corner | Select Dictionary
Manage My Classes (Student Account Home)
Students can manage their Placement Cohorts from their Student Account Home. The Account Home groups all cohorts and ALEKS classes for a single student under the same um-brella account, meaning students can manage past and current cohorts and sign up for more ALEKS classes within their umbrella account. With Student Account Home, students have one ALEKS login name and password for all their ALEKS classes. Current and previous cohorts /classes are listed and include options to sign up for new classes, switch classes, etc.
How to Find It: Select the menu in the upper-left corner | Select Manage My Classes
©2016 McGraw-Hill Education | Reference Guide: Student Module | Last Updated: 05.31.2016 31
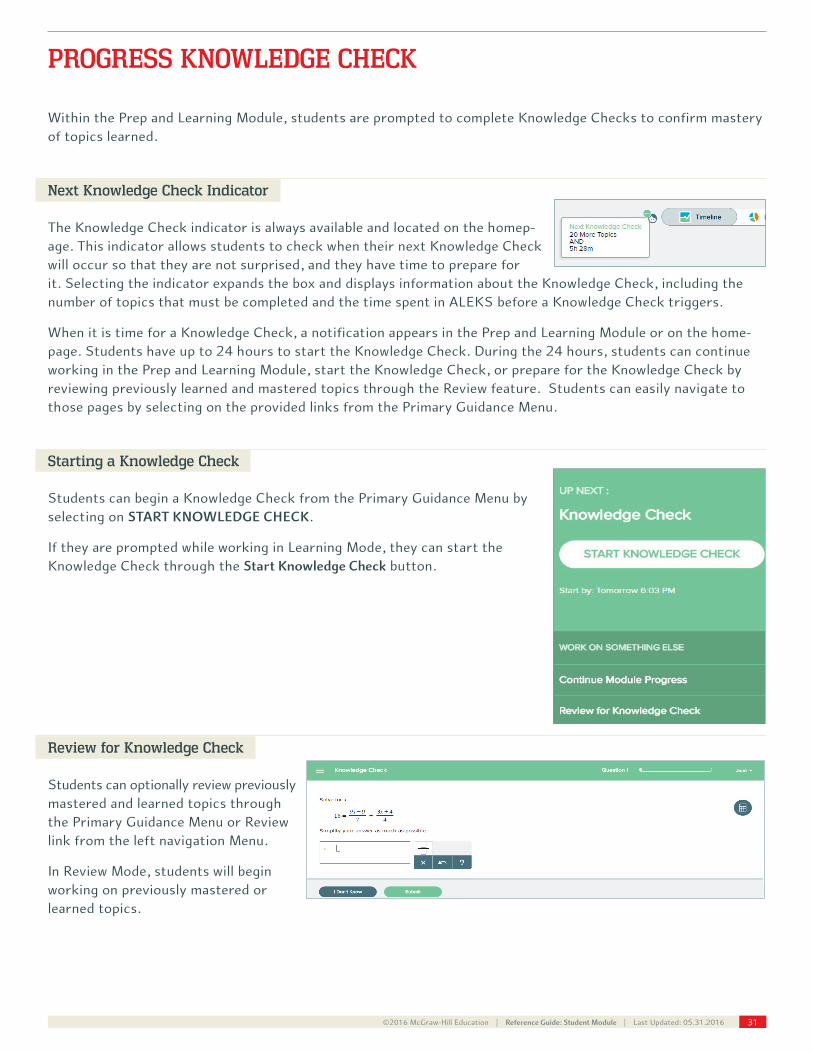
PROGRESS KNOWLEDGE CHECK
Within the Prep and Learning Module, students are prompted to complete Knowledge Checks to confirm mastery of topics learned.
Next Knowledge Check Indicator
The Knowledge Check indicator is always available and located on the homep-age. This indicator allows students to check when their next Knowledge Check will occur so that they are not surprised, and they have time to prepare for it. Selecting the indicator expands the box and displays information about the Knowledge Check, including the number of topics that must be completed and the time spent in ALEKS before a Knowledge Check triggers.
When it is time for a Knowledge Check, a notification appears in the Prep and Learning Module or on the home-page. Students have up to 24 hours to start the Knowledge Check. During the 24 hours, students can continue working in the Prep and Learning Module, start the Knowledge Check, or prepare for the Knowledge Check by reviewing previously learned and mastered topics through the Review feature. Students can easily navigate to those pages by selecting on the provided links from the Primary Guidance Menu.
Starting a Knowledge Check
Students can begin a Knowledge Check from the Primary Guidance Menu by selecting on START KNOWLEDGE CHECK.
If they are prompted while working in Learning Mode, they can start the Knowledge Check through the Start Knowledge Check button.
Review for Knowledge Check
Students can optionally review previously mastered and learned topics through the Primary Guidance Menu or Review link from the left navigation Menu.
In Review Mode, students will begin working on previously mastered or learned topics.
©2016 McGraw-Hill Education | Reference Guide: Student Module | Last Updated: 05.31.2016 32
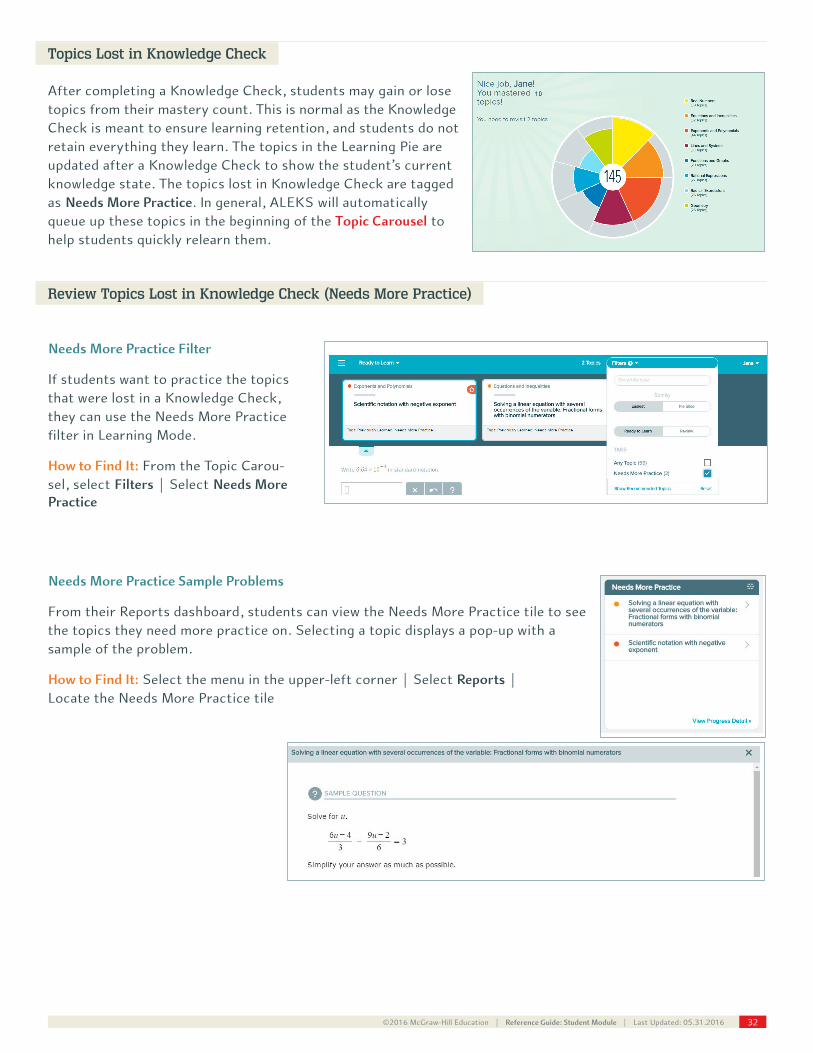
Topics Lost in Knowledge Check
After completing a Knowledge Check, students may gain or lose topics from their mastery count. This is normal as the Knowledge Check is meant to ensure learning retention, and students do not retain everything they learn. The topics in the Learning Pie are updated after a Knowledge Check to show the student’s current knowledge state. The topics lost in Knowledge Check are tagged as Needs More Practice. In general, ALEKS will automatically queue up these topics in the beginning of the Topic Carousel to help students quickly relearn them.
Review Topics Lost in Knowledge Check (Needs More Practice)
Needs More Practice Filter
If students want to practice the topics that were lost in a Knowledge Check, they can use the Needs More Practice filter in Learning Mode.
How to Find It: From the Topic Carou-sel, select Filters | Select Needs More Practice
Needs More Practice Sample Problems
From their Reports dashboard, students can view the Needs More Practice tile to see the topics they need more practice on. Selecting a topic displays a pop-up with a sample of the problem.
How to Find It: Select the menu in the upper-left corner | Select Reports | Locate the Needs More Practice tile
©2016 McGraw-Hill Education | Reference Guide: Student Module | Last Updated: 05.31.2016 33
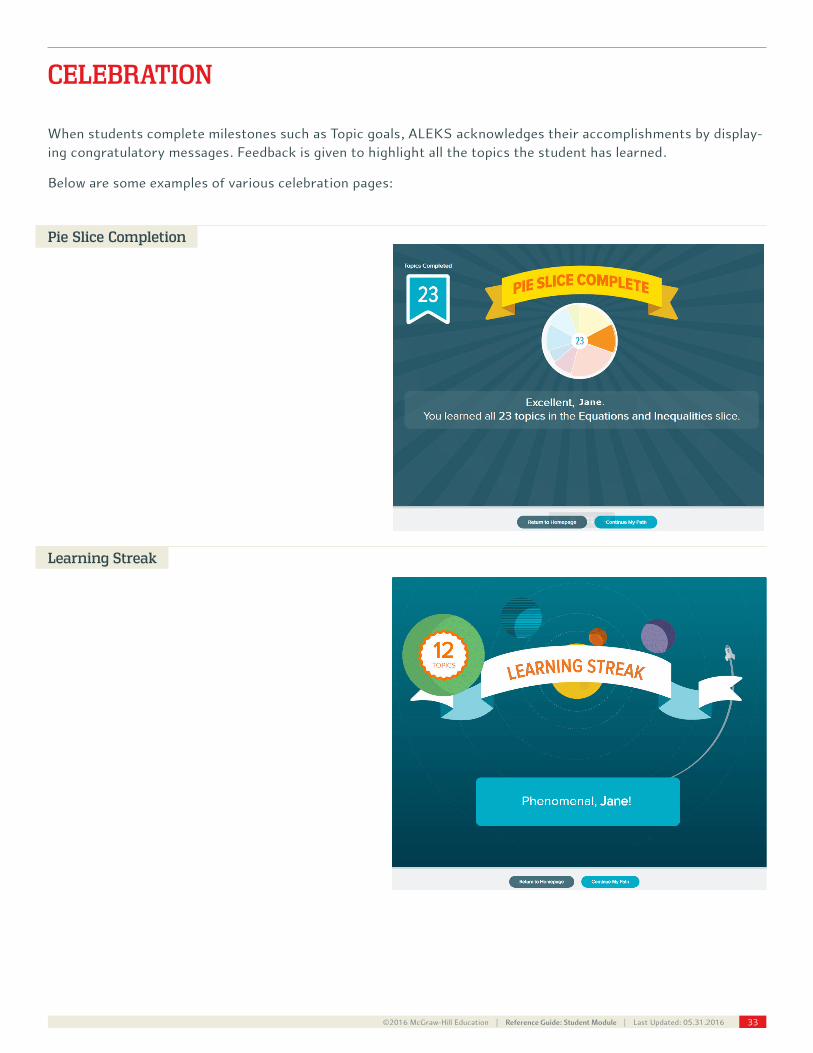
CELEBRATION
When students complete milestones such as Topic goals, ALEKS acknowledges their accomplishments by display-ing congratulatory messages. Feedback is given to highlight all the topics the student has learned.
Below are some examples of various celebration pages:
Pie Slice Completion
Learning Streak
©2016 McGraw-Hill Education | Reference Guide: Student Module | Last Updated: 05.31.2016 34
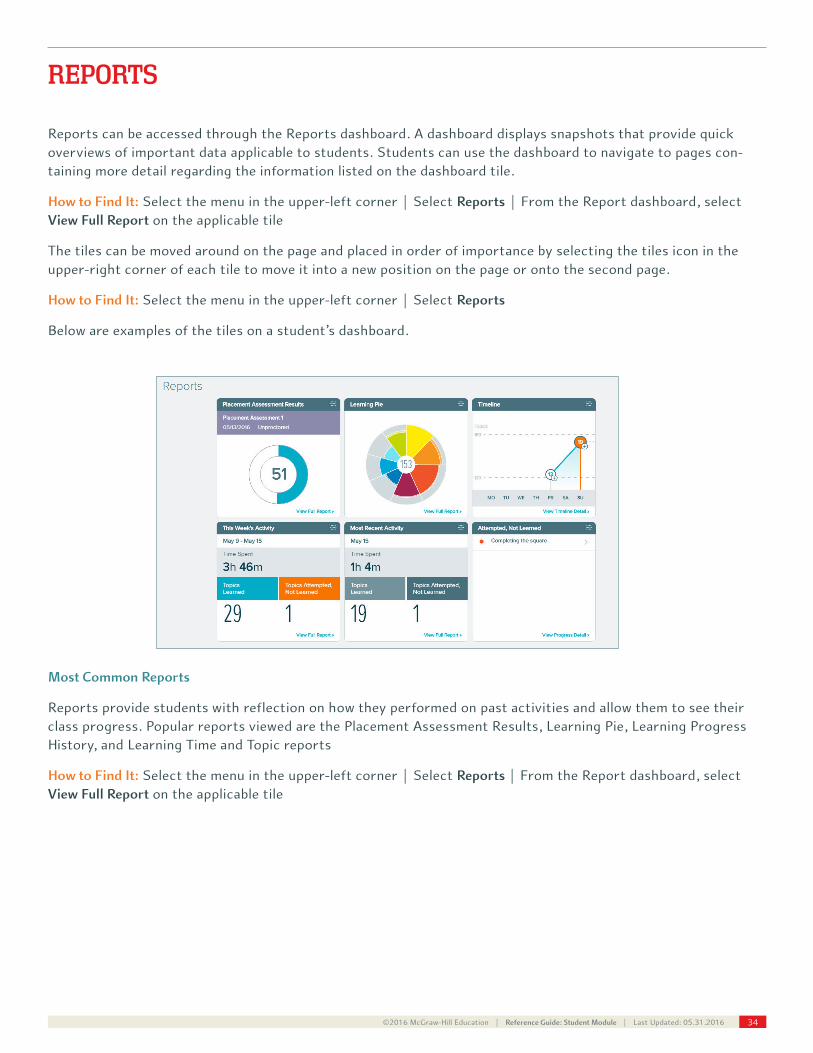
REPORTS
Reports can be accessed through the Reports dashboard. A dashboard displays snapshots that provide quick overviews of important data applicable to students. Students can use the dashboard to navigate to pages con-taining more detail regarding the information listed on the dashboard tile.
How to Find It: Select the menu in the upper-left corner | Select Reports | From the Report dashboard, select View Full Report on the applicable tile
The tiles can be moved around on the page and placed in order of importance by selecting the tiles icon in the upper-right corner of each tile to move it into a new position on the page or onto the second page.
How to Find It: Select the menu in the upper-left corner | Select Reports
Below are examples of the tiles on a student’s dashboard.
Most Common Reports
Reports provide students with reflection on how they performed on past activities and allow them to see their class progress. Popular reports viewed are the Placement Assessment Results, Learning Pie, Learning Progress History, and Learning Time and Topic reports
How to Find It: Select the menu in the upper-left corner | Select Reports | From the Report dashboard, select View Full Report on the applicable tile

©2016 McGraw-Hill Education | Reference Guide: Student Module | Last Updated: 05.31.2016 35
Placement Assessment Results
This report shows the student’s result on Placement Assessments taken, cut score information, Placement Assessment details, and the slice names. Students can also select the provided link to navigate to their institu-tion’s placement webpage.
Learning Pie
This report shows the Learning Pie progress broken down by the topics the student has Mastered, Learned, and Remaining in each pie slice.
How to Find It: From the Report dashboard, locate the Learning Pie tile | Select View Full Report
Category headings can be expanded to view progress and sample problems from the Ready to Learn, Learned, or Mastered categories.
©2016 McGraw-Hill Education | Reference Guide: Student Module | Last Updated: 05.31.2016 36
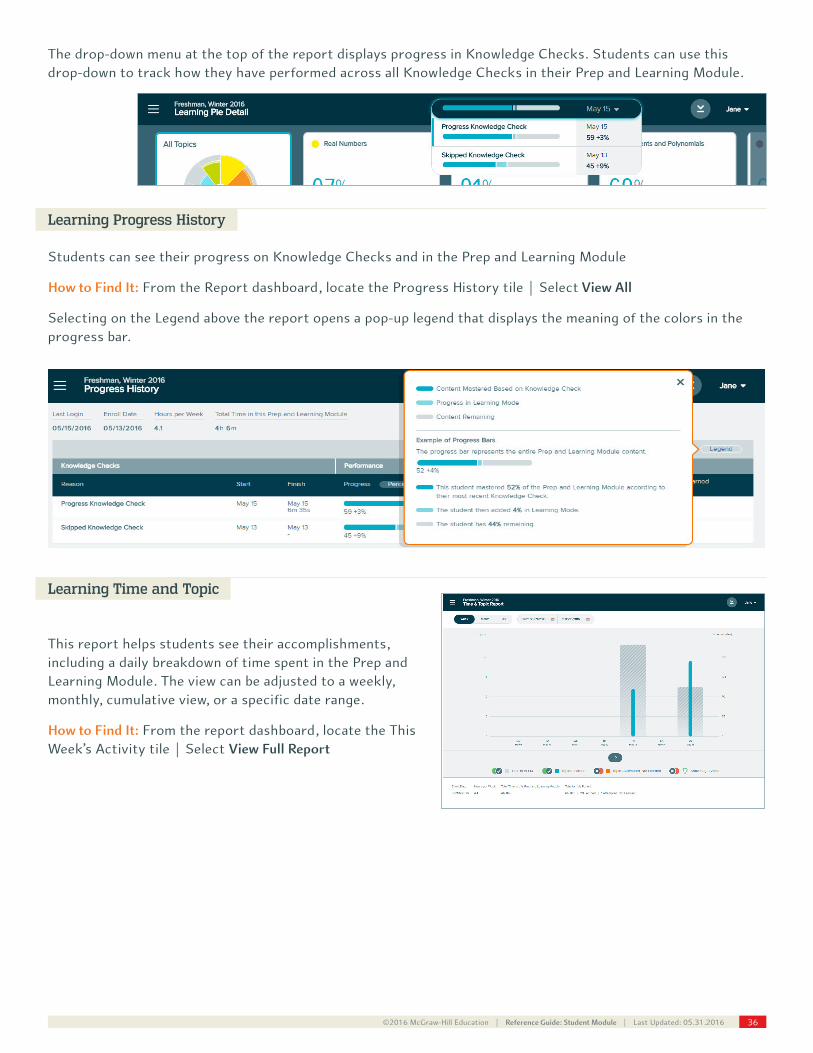
The drop-down menu at the top of the report displays progress in Knowledge Checks. Students can use this drop-down to track how they have performed across all Knowledge Checks in their Prep and Learning Module.
Learning Progress History
Students can see their progress on Knowledge Checks and in the Prep and Learning Module
How to Find It: From the Report dashboard, locate the Progress History tile | Select View All
Selecting on the Legend above the report opens a pop-up legend that displays the meaning of the colors in the progress bar.
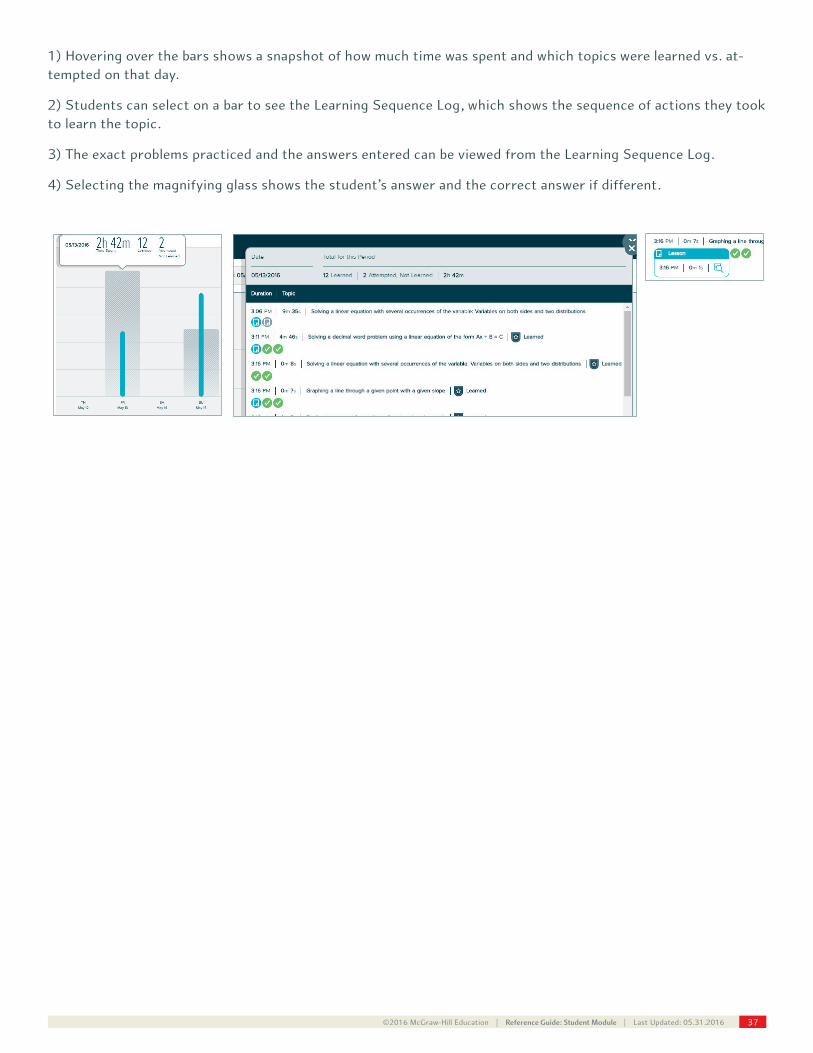
Learning Time and Topic
This report helps students see their accomplishments, including a daily breakdown of time spent in the Prep and Learning Module. The view can be adjusted to a weekly, monthly, cumulative view, or a specific date range.
How to Find It: From the report dashboard, locate the This Week’s Activity tile | Select View Full Report
©2016 McGraw-Hill Education | Reference Guide: Student Module | Last Updated: 05.31.2016 37
1) Hovering over the bars shows a snapshot of how much time was spent and which topics were learned vs. at-tempted on that day.
2) Students can select on a bar to see the Learning Sequence Log, which shows the sequence of actions they took to learn the topic.
3) The exact problems practiced and the answers entered can be viewed from the Learning Sequence Log.
4) Selecting the magnifying glass shows the student’s answer and the correct answer if different.