Agilent MassHunter BioConfirm Software · Agilent MassHunter BioConfirm Software Quick Start Guide...
52
Agilent MassHunter BioConfirm Software Quick Start Guide For Research Use Only. Not for use in diagnostic procedures. What is Agilent MassHunter BioConfirm Software? 3 Agilent MassHunter BioConfirm Software Installation 7 User Interface 8 Workflows and Sequences 17 Intact Protein Workflow 20 To run the Intact Protein workflow 22 To find biomolecules by Protein Deconvolution 23 To deconvolute selected spectra 24 To match sequences for intact protein biomolecules 25 To view protein deconvolution results 26 To view deconvolution biomolecules 30 To print a report with deconvolution results 31 To automate protein confirmation 32 Protein Digest Workflow 33 To run the Protein Digest workflow 35 To find peptides 37 To match sequences for protein digest biomolecules 38 To view peptide biomolecules 40 To view sequence coverage results for protein digests 41 To print a report with peptide results 42 Review Results 43 To reprocess samples 43 To use Result Review mode 45 Setting Up Sequences 46
Transcript of Agilent MassHunter BioConfirm Software · Agilent MassHunter BioConfirm Software Quick Start Guide...

Agilent MassHunter BioConfirm
Software
Quick Start Guide
For Research Use Only. Not for use in diagnostic procedures.What is Agilent MassHunter BioConfirm Software? 3Agilent MassHunter BioConfirm Software Installation 7User Interface 8Workflows and Sequences 17Intact Protein Workflow 20 To run the Intact Protein workflow 22 To find biomolecules by Protein Deconvolution 23 To deconvolute selected spectra 24 To match sequences for intact protein biomolecules 25 To view protein deconvolution results 26 To view deconvolution biomolecules 30 To print a report with deconvolution results 31 To automate protein confirmation 32Protein Digest Workflow 33 To run the Protein Digest workflow 35 To find peptides 37 To match sequences for protein digest biomolecules 38 To view peptide biomolecules 40 To view sequence coverage results for protein digests 41 To print a report with peptide results 42Review Results 43 To reprocess samples 43 To use Result Review mode 45Setting Up Sequences 46
To create or edit a sequence 46 To add or edit the sequence text 47 To apply or edit modifications 48 To apply or edit links 50
Where to find more information
• Agilent MassHunter BioConfirm Software Familiarization Guide
• Online Help provides in-depth information and can be displayed in the following ways:
• Click Contents, Index, or Search from the Help menu.
• Press the F1 key to get more information about a window or dialog box.
2 Agilent MassHunter BioConfirm Software Quick Start Guide

What is Agilent MassHunter BioConfirm Software?
What is Agilent MassHunter BioConfirm Software?
Agilent MassHunter BioConfirm Software provides automated and interactive protein confirmation for TOF and Q-TOF data, with the following features:
• Automated post acquisition data analysis and report generation.
• Biomolecule-centric navigation for peptides and proteins.
• Intact protein UI functionality, most notably the visualization of ion sets and showing deconvoluted spectra in a separate window.
• Protein sequence matching, including target protein and potential modifications for intact protein and protein digest sequence types.
• Lets you assign site specific variable modification for protein, protein digest and synthetic peptide sequence types.
• Protein Molecular Feature Extractor for finding protein compounds in complex LC/MS data.
• Relative protein level can be measured either by height from the deconvoluted spectrum or height/area of EIC using all ion set peaks.
• Protein biomolecule quality filters, which prevent “noise” peaks from the deconvoluted spectrum being considered a biomolecule, by requiring sufficient evidence in the m/z spectrum.
• Sequence editing/matching.
• Linked navigation between biomolecules with assigned protein digest matches and peptide sequence within the Sequence Coverage Map.
• Sequential-enzyme digestion, where a protein digest is first digested with a first reagent, and then the resulting digest is digested with the second reagent, and so on.
Agilent MassHunter BioConfirm Software Quick Start Guide 3
What is Agilent MassHunter BioConfirm Software?
What’s New in B.08.00
What’s New in B.08.00
Major changes and enhancements
• BioConfirm is a separate program. It can be installed and uninstalled separately from the MassHunter Qualitative Analysis program.
• BioConfirm user interface has been highly streamlined and tightly focused for the Intact Protein and Protein Digest workflows.
• Result review mode allows batch review with ability to change simple parameters and then reprocess the sample for biologists.
• BioConfirm can automatically detect an appropriate mass range for deconvolution for your sample to allow detection of characterized proteins and variants.
• BioConfirm can automatically choose between the TIC or BPC MS chromatogram for intact protein deconvolution based on the signal to noise ratio for a given sample.
• The Method Automation section of the Method Editor allows you to run a workflow with a single click.
• BioConfirm considers disulfide bonds when calculating intact protein match so that you can analyze your native intact protein.
• BioConfirm can perform disulfide bond scrambling calculations for protein digest.
• Excel 2016 is supported.
• BioConfirm automation is available in the Data Acquisition program and in the Walkup program.
• The Agilent Sequence Manager program allows you to add, edit or remove sequences. You can also import and export sequences and manage chains and modifications for a sequence.
Sequence improvements
• The Sequence Coverage Map window has been simplified.
• When a sample with the same sequence, modifications, enzymes, and condition (non-reduced) is matched more than one time, the second time and onward the result generation for sequence matching is significantly faster.
4 Agilent MassHunter BioConfirm Software Quick Start Guide
What is Agilent MassHunter BioConfirm Software?
What’s New in B.08.00
• You can specify a default sequence in the Method Editor which is used if you don’t specify one in the worklist.
• Multiple chains are shown in the same list in the Sequence Coverage Map window.
• You can limit the number of modifications per biomolecule in the Chemical Data Dictionary Editor.
Navigation improvements
• You can extract an EIC when you double-click a Biomolecule MS or MS/MS spectrum. This EIC is automatically integrated.
• The new Sample Table provides quick and easy navigation between results of different samples.
• You can reprocess a sample in the Sample Table and change the Workflow, the Condition, the Sequence, the Mods and Profiles, and the Enzymes.
• The Method Editor window contains a navigation pane to switch between sections in the method.
• You can set confirmation options for Intact Protein and Protein Digest workflows and then see the confirmation status in the Sample Table window.
• The Biomolecule Table has column super headers for better data interpretation: General, Sequence Match, and Molecular Feature.
Workflow improvements
• You can run a workflow on the selected sample in the Sample Table window with a single click.
• You can automatically extract additional chromatograms, specify the report to run, and specify how to export the results during method automation.
• You can interactively see how your method will behave when run through method automation.
• For Intact Protein workflow, you can set the Matching Rule for whether or not to allow protein truncation.
• For Protein Digest workflow, you can set the Matching Rule for whether or not to allow free cysteines (non-reduced condition).
• You can specify a different report template for Intact Protein and Protein Digest workflows.
Agilent MassHunter BioConfirm Software Quick Start Guide 5
What is Agilent MassHunter BioConfirm Software?
What’s New in B.08.00
• You can create a custom workflow in Method Automation. You specify the actions to run for this custom workflow.
• You can extract a TWC and use it as the starting chromatogram from the Intact Protein workflow.
• You can specify the maximum number of missed cleavages when you are using the Peptide Digest workflow.
Result windows improvements
• Comparison of Biomolecule Chromatograms from multiple files is available within Sample Chromatogram Results window.
• Comparison of Biomolecule Spectra from multiple files is available within Biomolecule MS Spectrum Results window.
• You can pin a deconvoluted spectra to the Deconvolution Results window.
• You can see the spectrum peak list for the deconvoluted spectrum in the Deconvolution Results window.
• You can see the integration peak list for the sample chromatograms in the Sample Chromatogram Results window.
6 Agilent MassHunter BioConfirm Software Quick Start Guide
Agilent MassHunter BioConfirm Software Installation
To install the software
Agilent MassHunter BioConfirm Software Installation
To install the software
If the G6829AA Agilent MassHunter BioConfirm Software is not already installed on your system, install it as follows.
1 Insert the disk labeled G6829AA into the disk drive.
2 From the installation disk, right-click Setup.exe, and then select Run as administrator.
3 Follow the instructions on the screen to install the software.
For Excel based reporting to work properly in the BioConfirm program, after installing Excel 2013 or Excel 2016, you need to open Excel and click Accept on the “First things first” message.
To remove the software
Use Programs and Features in Windows Control Panel to remove Agilent MassHunter Workstation BioConfirm Software.
Agilent MassHunter BioConfirm Software Quick Start Guide 7

User Interface
Main Functional Areas
User Interface
Main Functional Areas
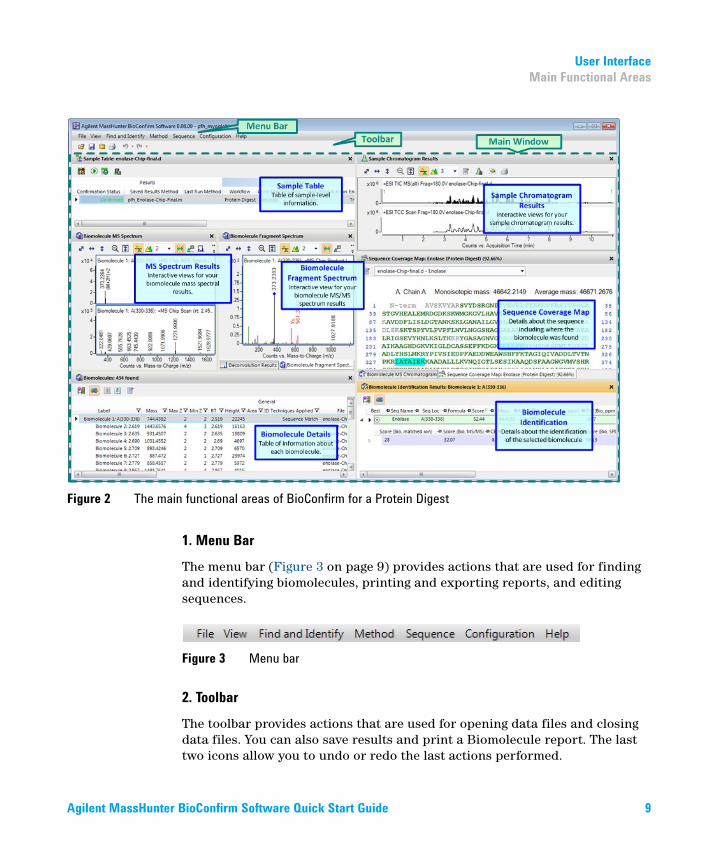
The main BioConfirm window consists of three parts: (1) the Menu Bar, (2) the Toolbar, and (3) the Main Window. The main functional areas are shown in Figure 2 and Figure 2 on page 9.
Figure 1 The main functional areas of BioConfirm for an Intact Protein
8 Agilent MassHunter BioConfirm Software Quick Start Guide
User Interface
Main Functional Areas
1. Menu Bar
The menu bar (Figure 3 on page 9) provides actions that are used for finding and identifying biomolecules, printing and exporting reports, and editing sequences.
2. Toolbar
The toolbar provides actions that are used for opening data files and closing data files. You can also save results and print a Biomolecule report. The last two icons allow you to undo or redo the last actions performed.
Figure 2 The main functional areas of BioConfirm for a Protein Digest
Figure 3 Menu bar
Agilent MassHunter BioConfirm Software Quick Start Guide 9

User Interface
Main Functional Areas
3. Main window
The main window, see Figure 2 on page 9, is further divided into up to eleven areas: Sample Table, Method Editor, Sample Chromatogram Results, Biomolecule MS Chromatogram, Biomolecule MS Spectrum, Biomolecule Fragment Spectrum, Deconvolution Results, Deconvolution Mirror Plot, Biomolecules, Biomolecule Identification Results, and Sequence Coverage Map. You toggle whether these windows are visible in the View menu.
Sample Table The Sample Table shows information for each sample that is opened. The sample or samples which you select in this window are displayed in the other windows. You can reprocess the selected sample.
Method Editor A method is a set of parameters that are associated with the different algorithms that you can run. Methods containing these parameters can be saved using unique file names.
You select the section of the method to display in the left pane. The right pane contains either a single section or multiple tabs. You can get help for each tab or section in the Method Editor when you press F1.
Toolbar Icon Action• File > Open Data File• File > Save Results• File > Close Data File• File > Print > Biomolecule Report
• Undoes last action performed• Redoes last action undone.
Figure 4 Sample Table window
10 Agilent MassHunter BioConfirm Software Quick Start Guide
User Interface
Main Functional Areas
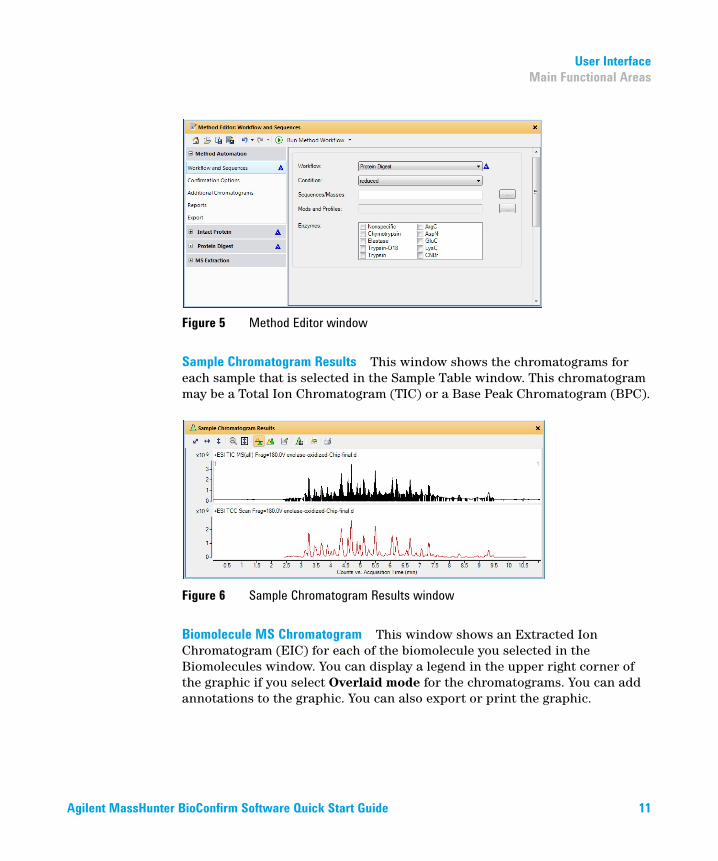
Sample Chromatogram Results This window shows the chromatograms for each sample that is selected in the Sample Table window. This chromatogram may be a Total Ion Chromatogram (TIC) or a Base Peak Chromatogram (BPC).
Biomolecule MS Chromatogram This window shows an Extracted Ion Chromatogram (EIC) for each of the biomolecule you selected in the Biomolecules window. You can display a legend in the upper right corner of the graphic if you select Overlaid mode for the chromatograms. You can add annotations to the graphic. You can also export or print the graphic.
Figure 5 Method Editor window
Figure 6 Sample Chromatogram Results window
Agilent MassHunter BioConfirm Software Quick Start Guide 11

User Interface
Main Functional Areas
Biomolecule MS Spectrum This window shows any MS spectrum. MS/MS spectra are displayed in the Biomolecule Fragment Spectrum window. You can add annotations and calipers to a spectrum in this window. You can also display the peak list which is displayed in a table on the right-side of this window. You can deconvolute, print, and export spectra in this window.
Biomolecule Fragment Spectrum This window shows any MS/MS spectrum. MS spectra are displayed in the Biomolecule MS Spectrum window. You can also annotate and add calipers to a Fragment Spectrum.
Figure 7 Biomolecule MS Chromatogram window
Figure 8 Biomolecule MS Spectrum window
12 Agilent MassHunter BioConfirm Software Quick Start Guide

User Interface
Main Functional Areas
Deconvolution Results This window shows deconvoluted mass spectra. You can add annotations and calipers to a spectrum in this window. You can also display the peak list which is displayed in a table on the right-side of this window. You can deconvolute, print, and export spectra in this window.
Deconvolution Mirror Plot This window displays two deconvoluted spectra selected from the Deconvolution Results window. The first spectra is displayed as the top plot, and the second spectra is displayed as the inverted or bottom plot.
Figure 9 Biomolecule Fragment Spectrum window
Figure 10 Deconvolution Results window in Overlaid mode
Agilent MassHunter BioConfirm Software Quick Start Guide 13

User Interface
Main Functional Areas
Biomolecules This window shows all of the biomolecules which were found for the selected sample files. You can add and remove columns from this table, and you can change the order of the columns.
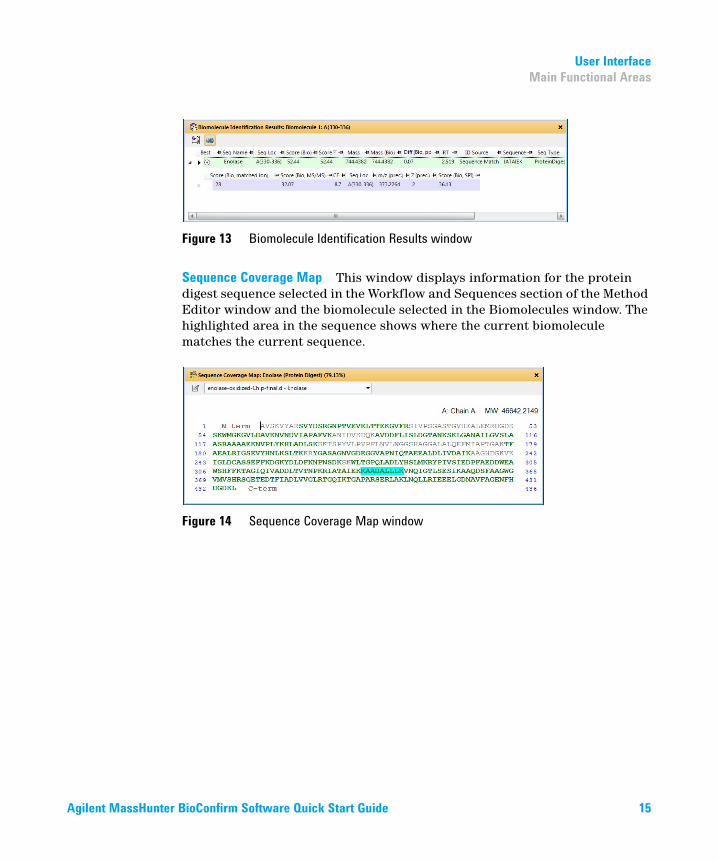
Biomolecule Identification Results This window shows the results of running the Match Sequences algorithm on the biomolecules in the Biomolecules table. If you see Sequence Match as the value for the ID Techniques Applied column, then you can see additional information about that match in this window.
Figure 11 Deconvolution Mirror Plot
Figure 12 Biomolecules window
14 Agilent MassHunter BioConfirm Software Quick Start Guide
User Interface
Main Functional Areas
Sequence Coverage Map This window displays information for the protein digest sequence selected in the Workflow and Sequences section of the Method Editor window and the biomolecule selected in the Biomolecules window. The highlighted area in the sequence shows where the current biomolecule matches the current sequence.
Figure 13 Biomolecule Identification Results window
Figure 14 Sequence Coverage Map window
Agilent MassHunter BioConfirm Software Quick Start Guide 15
User Interface
Sequence Dialog Boxes
Sequence Dialog Boxes
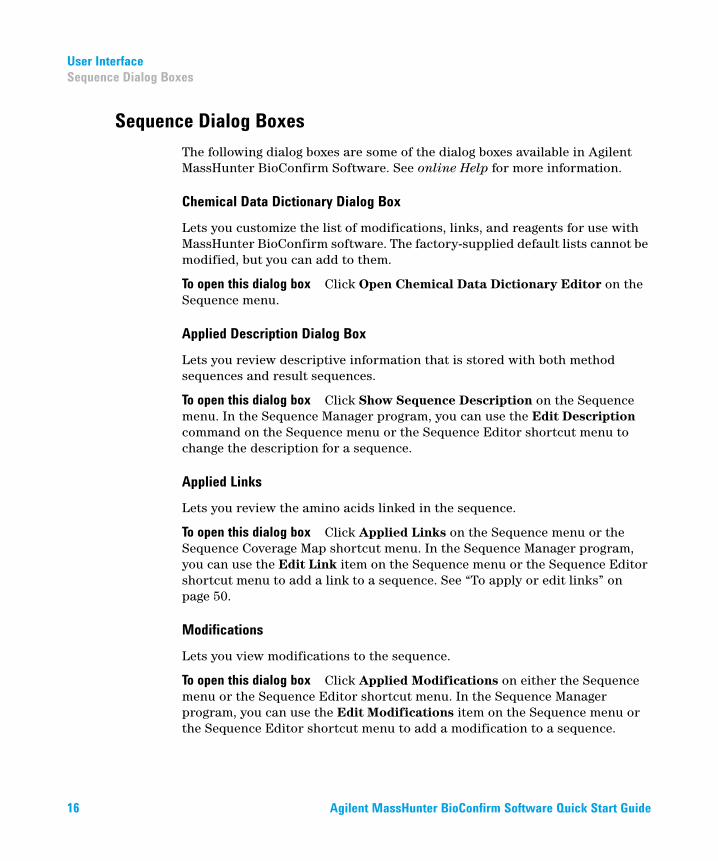
The following dialog boxes are some of the dialog boxes available in Agilent MassHunter BioConfirm Software. See online Help for more information.
Chemical Data Dictionary Dialog Box
Lets you customize the list of modifications, links, and reagents for use with MassHunter BioConfirm software. The factory-supplied default lists cannot be modified, but you can add to them.
To open this dialog box Click Open Chemical Data Dictionary Editor on the Sequence menu.
Applied Description Dialog Box
Lets you review descriptive information that is stored with both method sequences and result sequences.
To open this dialog box Click Show Sequence Description on the Sequence menu. In the Sequence Manager program, you can use the Edit Description command on the Sequence menu or the Sequence Editor shortcut menu to change the description for a sequence.
Applied Links
Lets you review the amino acids linked in the sequence.
To open this dialog box Click Applied Links on the Sequence menu or the Sequence Coverage Map shortcut menu. In the Sequence Manager program, you can use the Edit Link item on the Sequence menu or the Sequence Editor shortcut menu to add a link to a sequence. See “To apply or edit links” on page 50.
Modifications
Lets you view modifications to the sequence.
To open this dialog box Click Applied Modifications on either the Sequence menu or the Sequence Editor shortcut menu. In the Sequence Manager program, you can use the Edit Modifications item on the Sequence menu or the Sequence Editor shortcut menu to add a modification to a sequence.
16 Agilent MassHunter BioConfirm Software Quick Start Guide

Workflows and Sequences
Workflows
Workflows and Sequences
In the Method Editor in the Method Automation > Workflow and Sequences section, you set several parameters including the Workflow and the Sequences.
Workflows
You select a workflow in the Method Editor window in the Method Automation > Workflow and Sequences section. This workflow decides what operations are to be run and how the sequence match is to be done when you run the method. You select one of these three workflows: Intact Protein, Protein Digest, and Custom.
Intact Protein
The workflow runs the Find Peptides algorithm, digest sequence using the enzyme selected, and then runs Protein Digest matching rules. A Biomolecule report is generated using the Intact Protein report template selected on the Method Automation > Reports > Templates tab.
Protein Digest
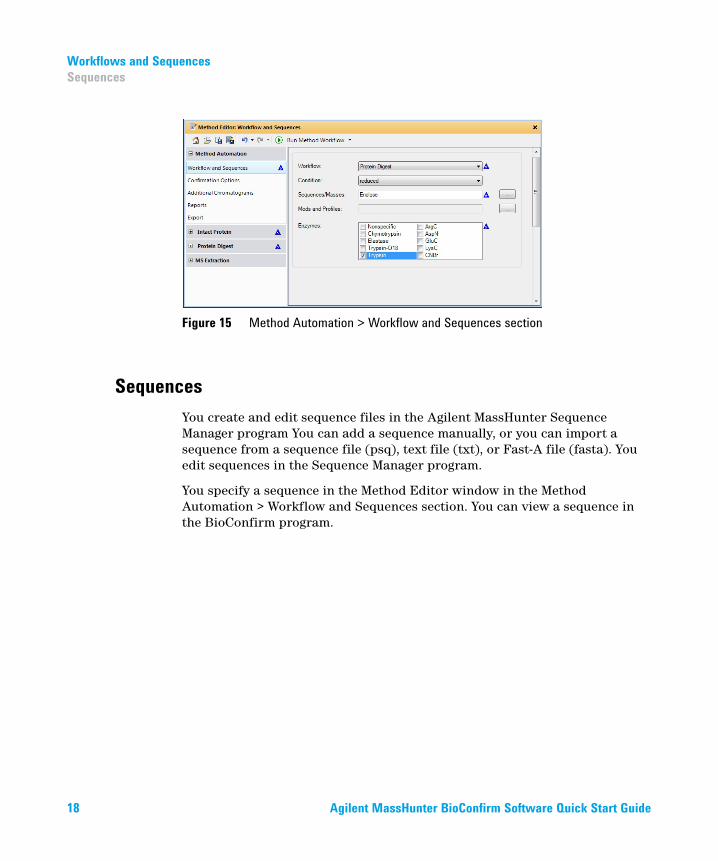
This workflow runs the Find by Protein Deconvolution algorithm and uses protein matching rules (Intact Protein, Predicted Modifications). You can select whether or not to use Protein Truncation. The workflow also runs the Match Sequence algorithm with the Sequence you entered. See Figure 15 on page 18. A Biomolecule report is generated using the Protein Digest report template selected on the Method Automation > Reports > Templates tab.
Custom
This workflow runs the actions which you select in the Workflow and Sequences section. You select the actions from the Available actions list and place them in the Actions to be run list. The order of the actions in the Actions to be run list is the order in which the actions are executed. If you generate a biomolecule report, it uses the Protein Digest report template if you used the Find Peptides algorithm; otherwise, it uses the Intact Protein report template.
Agilent MassHunter BioConfirm Software Quick Start Guide 17
Workflows and Sequences
Sequences
Sequences
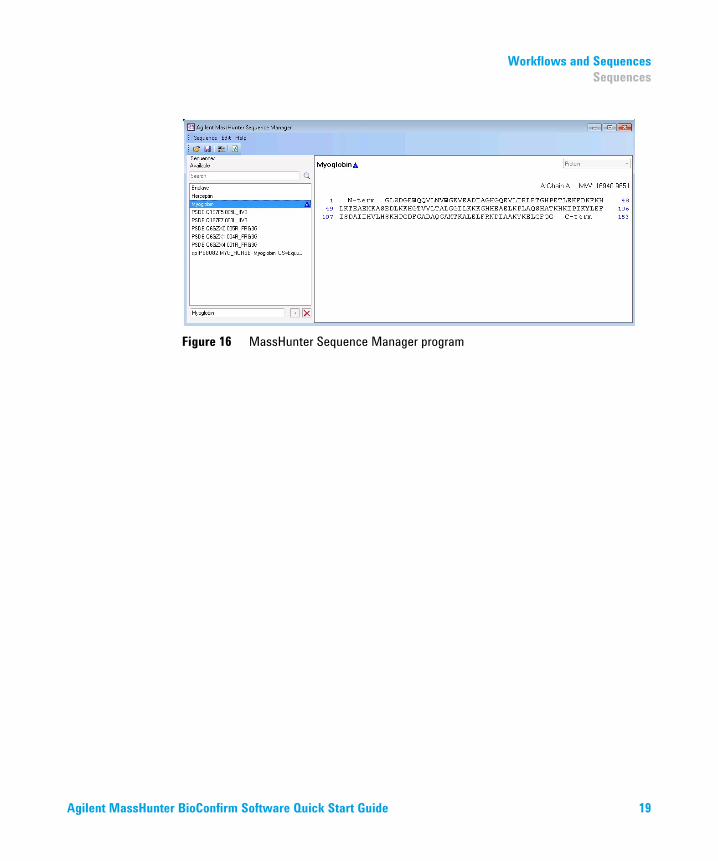
You create and edit sequence files in the Agilent MassHunter Sequence Manager program You can add a sequence manually, or you can import a sequence from a sequence file (psq), text file (txt), or Fast-A file (fasta). You edit sequences in the Sequence Manager program.
You specify a sequence in the Method Editor window in the Method Automation > Workflow and Sequences section. You can view a sequence in the BioConfirm program.
Figure 15 Method Automation > Workflow and Sequences section
18 Agilent MassHunter BioConfirm Software Quick Start Guide
Workflows and Sequences
Sequences
Figure 16 MassHunter Sequence Manager program
Agilent MassHunter BioConfirm Software Quick Start Guide 19
Intact Protein Workflow
Sequences
Intact Protein Workflow
The topics in this section will help you get started using the Intact Protein workflow features of Agilent MassHunter BioConfirm Software.
• “To run the Intact Protein workflow” on page 22
• “To find biomolecules by Protein Deconvolution” on page 23
• “To match sequences for intact protein biomolecules” on page 25
• “To view protein deconvolution results” on page 26
• “To view deconvolution biomolecules” on page 30
• “To print a report with deconvolution results” on page 31
• “To automate protein confirmation” on page 32
What is deconvolution?
Deconvolution software does charge state deconvolution of mass spectra of large molecules with high charge states. Singly-charged ions with m/z values greater than a few thousand Thomsons are beyond the mass range of the Agilent TOF instrument. However, multiply-charged ions can be observed if their mass-to-charge ratio (m/z) falls within the instrument range. This applies to proteins which typically become multiply-charged.
20 Agilent MassHunter BioConfirm Software Quick Start Guide

Intact Protein Workflow
Sequences
Guidelines
• Based on the maximum entropy result, peak modeling (pMod) automatically generates peak models without manual intervention and applies these models through fitting and validating procedures to provide a highly resolved zero-charge spectrum and a set of mass error assessments for each peak. pMod can be selected as the Deconvolution algorithm on the Deconvolution tab.
• For these BioConfirm analysis, use Find by Protein Deconvolution.
• Use Find Peptides for synthetic peptides, and peptides from protein digests with the Target data type on the Find Peptides > Extraction tab set to Small molecules (chromatographic).
• For other BioConfirm analyses, use Find Peptides. You can set the Target data type to Small Molecules (infusion) or Large molecules (proteins, oligos).
Agilent MassHunter BioConfirm Software Quick Start Guide 21

Intact Protein Workflow
To run the Intact Protein workflow
To run the Intact Protein workflow
When you run an Intact Protein workflow, the workflow automatically does these steps:
• Find by Protein Deconvolution
• Match Sequences
1 Open the data file that contains the biomolecules of interest.
2 Open the BioConfirmProteinDigest-Default.m method. Click Method > Open.
3 Select Method Automation > Workflow and Sequences.
4 Select Intact Protein for the Workflow.
5 Select either reduced or native for the Condition.
6 Click the button next to the Sequence/Masses parameter to select a sequence.
7 Click the button next to the Mods and Profiles parameter to select modifications and profiles.
8 Save the method. Click Method > Save As to save to a new name.
9 Click the button on the Method Editor toolbar to run the method workflow.
10 View biomolecules as described in “To view deconvolution biomolecules” on page 30.
Figure 17 Workflow and Sequences section for an Intact Protein workflow
22 Agilent MassHunter BioConfirm Software Quick Start Guide
Intact Protein Workflow
To find biomolecules by Protein Deconvolution
To find biomolecules by Protein Deconvolution
Use this procedure to deconvolute proteins and create a biomolecule list.
1 Open the data file that contains the spectra of interest as described in online Help.
2 In the Method Editor window, select Intact Protein > Deconvolute (Protein) in the left pane.
3 Set parameters in the Method Editor window in the Deconvolute (Protein) > Deconvolution section.
4 Click the button on the Method Editor toolbar to start processing. You can instead click Find and Identify > Find by Protein Deconvolution.
5 Review results in the Deconvolution Results window. If this window is not currently displayed, click View > Deconvolution Results.
6 View deconvolution biomolecules as described in “To view deconvolution biomolecules” on page 30.
Agilent MassHunter BioConfirm Software Quick Start Guide 23

Intact Protein Workflow
To deconvolute selected spectra
To deconvolute selected spectra
Use this procedure to deconvolute selected m/z spectra and create a biomolecule list.
1 Open the data file that contains the spectra of interest. Click File > Open Data File. This process is described in online Help.
2 Select a spectrum as described in online Help.
• Double-click the Sample Chromatogram Results window. or
• Select a range in the Sample Chromatogram Results window and double-click that range.
3 In the Method Editor window, select Intact Protein > Deconvolute (Protein) in the left pane.
4 Set parameters in the Method Editor window in the Deconvolute (Protein) > Deconvolution section.
5 Click the arrow next to the button on the Method Editor toolbar and select Deconvolute (Protein) to start processing.
Tip You can also initiate deconvolution when you right-click an MS spectrum in the Biomolecule MS Spectrum window and click Deconvolute from the shortcut menu.
6 Review results in the Deconvolution Results window. If this window is not currently displayed, click View > Deconvolution Results.
7 View deconvolution biomolecules as described in “To view deconvolution biomolecules” on page 30.
24 Agilent MassHunter BioConfirm Software Quick Start Guide
Intact Protein Workflow
To match sequences for intact protein biomolecules
To match sequences for intact protein biomolecules
Use this procedure to match sequences for biomolecules that were found using deconvolution. You need to specify the sequence and modifications and profiles in the Method Automation > Workflow and Sequences section.
1 Create biomolecules through deconvolution. See “To find biomolecules by Protein Deconvolution” on page 23 or “To deconvolute selected spectra” on page 24.
2 Select Method Automation > Workflow and Sequences.
3 Select Intact Protein for the Workflow.
4 Select either reduced or native for the Condition.
5 Click the button next to the Sequence/Masses parameter to select a sequence.
6 Click the button next to the Mods and Profiles parameter to select modifications and profiles.
7 In the Method Editor window, select Intact Protein > Match Tolerances in the left pane.
Make sure to choose the Intact Protein > Match Tolerances section.
Do not select the Protein Digest > Match Tolerances section.
8 Review the parameters on the Mass Matching, Matching Rules, and Results tabs.
9 Click the button on the Method Editor toolbar to run the Match Sequences algorithm.
Tip You can also start Match Sequences when you click Find and Identify > Match Sequences.
10 View deconvolution biomolecules as described in “To view deconvolution biomolecules” on page 30.
Agilent MassHunter BioConfirm Software Quick Start Guide 25

Intact Protein Workflow
To view protein deconvolution results
To view protein deconvolution results
Use this procedure to review the results from the following deconvolution process:
• “To run the Intact Protein workflow” on page 22
• “To find biomolecules by Protein Deconvolution” on page 23
• “To deconvolute selected spectra” on page 24
1 If the Deconvolution Results window is not currently displayed, click View > Deconvolution Results.
2 If the Biomolecules window is not currently displayed, click View > Biomolecules.
3 Select a biomolecule in the Biomolecules window.
4 Use the following mouse actions to change the display of data:
• Click to select a single mass in the spectrum.
• Drag to select a mass range in the spectrum.
• Ctrl+drag to select another area and keeps the previous area/time selected.
• Drag axes to scroll the axes in the direction you are moving the mouse.
• Right-drag to expand the selected area. The area you define is shown as a rectangle outlined in black. The Y-scale of the zoomed in display is controlled by the Auto-Scale Y-axis mode.
• Right-drag axes to scale the axis. Dragging to the right (x-axis) or to the top (y-axis) zooms in on that axis. Dragging to the left (x-axis) or to the bottom (y-axis) zooms out on that axis. Click Unzoom from the shortcut menu to return to the previous display scale.
Tip To return to the previous display scale, click the Unzoom toolbar button or click Unzoom from the shortcut menu.
26 Agilent MassHunter BioConfirm Software Quick Start Guide

Intact Protein Workflow
To view protein deconvolution results
5 Use the following toolbar buttons to change the display of data:
Toolbar button Action/Meaning
Scales the x-axis and y-axis automatically to fit the displayed data.
Scales the x-axis automatically to fit the displayed data.
Scales the y-axis automatically to fit the displayed data.
Returns to the previous display scale (undoes last zoom operation).
• When this mode is on, the vertical plot range is automatically scaled to fit the data in the selected horizontal range when you zoom in.
• When the Autoscale y-axis during Zoom mode is off, the vertical plot range is set to the limits you specify by dragging the mouse.
Plots each spectrum separately. The spectra share the same x-axis, but each spectrum has a separate y-axis.
Overlays all spectra. The spectra are shown with the same x- and y-axes.
Cycles to previous chromatogram. This toolbar button is only available when you have overlaid the chromatograms.
Cycles to next chromatogram. This toolbar button is only available when you have overlaid the chromatograms.
Turns on the Range Select tool.
Turns on the Manual Peak Integration tool. When you select a peak, two black boxes are drawn at the beginning and end of that peak. You can drag those boxes to change the integration.
Turns on the Annotate tool, which lets you add various annotations.
Turns on the Caliper tool, which lets you measure Modifications, Amino Acids, or Delta Mass between peaks or points.
Pins the selected plot to the window.
Stops normalizing the deconvolution spectra.
Agilent MassHunter BioConfirm Software Quick Start Guide 27

Intact Protein Workflow
To view protein deconvolution results
Normalizes all deconvoluted spectra. All deconvoluted spectra are normalized to the largest peak in any of the chromatograms.
Normalizes all chromatograms. Each chromatogram is normalized to the largest peak in itself.
Normalizes each chromatogram to the highest peak within the selected range.
Displays the two, selected deconvoluted spectra in the Deconvolution Mirror Plot window. This button is only available if two deconvoluted spectra are selected.
Displays the Method Editor window as a floating window. This button is not a toggle.
Toggles the display of the peak list tabs in this window. If this option is on, then the right pane of this window contains a tab for each deconvoluted spectra. Each tab contains a table of information about a deconvoluted spectrum.
Opens the Deconvoluted Spectra Display Options dialog box.
Prints an image of the contents of the Deconvolution Results window and puts it in a PDF file. This PDF is opened automatically.
Toolbar button Action/Meaning
28 Agilent MassHunter BioConfirm Software Quick Start Guide

Intact Protein Workflow
To view protein deconvolution results
6 Right-click the graph to display the following shortcut menu commands:
• Create Biomolecule from Highlighted Range on Deconvoluted Spectrum > Add Highest Peak - Creates a new biomolecule using the highest peak in the selected range.
• Create Compound from Highlighted Range on Deconvoluted Spectrum > Add Average Mass - Creates a new biomolecule using the average mass in the selected range.
• Copy Deconvolution Settings to Method - Copies the settings that were used to create the Deconvolution Results the Deconvolute (MS): Maximum Entropy section of the Method Editor window.
• Delete - Deletes the currently highlighted chromatograms and spectra.
• Copy to Clipboard - Copies spectra that are currently visible in the Deconvolution Results window to the Clipboard for use with other applications.
• Print - Lets you print the Deconvolution Results window.
• Export - Lets you export data and graphics.
7 (optional) To change the number of significant digits in the deconvoluted spectrum, click Configuration > Deconvoluted Spectra Display Options. Set the Digits after the decimal value and click OK.
8 To compare two deconvoluted spectra:
a Highlight the two spectra of interest in the Deconvolution Results window.
b Click the Deconvolution Mirror Plot Results button .
The Deconvolution Mirror Plot Results window appears with the first spectra displayed as the top plot and the second spectra displayed as the inverted or bottom plot. See “Deconvolution Mirror Plot” on page 13.
c Click the button to reverse the two plots.
See online Help for more display options in the Deconvolution Mirror Plot Results window.
9 (optional) To move the window, drag it to a new position on the screen. To return it to its default position, right-click the title bar and click the Floating command.
Agilent MassHunter BioConfirm Software Quick Start Guide 29
Intact Protein Workflow
To view deconvolution biomolecules
To view deconvolution biomolecules
Biomolecules are created for proteins that are confidently found. You can view these compounds as follows:
1 If necessary, click View > Biomolecules.
2 If necessary, click View > Biomolecule Identification Results.
3 Click a biomolecule of interest. Associated data in the following windows are displayed:
• Deconvolution Results window
• Biomolecule MS Chromatogram Results window shows an EIC
• Biomolecule MS spectrum displays all the different peaks in the raw m/z spectrum that indicate the presence of the deconvoluted protein mass in the Biomolecule MS Spectrum Results window
• Biomolecule Identification Results if you also ran the Match Sequences algorithm.
• Sequence Coverage Map, if you selected the Protein Digest workflow
4 Review the results in the Deconvolution Results window. See “To view protein deconvolution results” on page 26.
5 Click on the Deconvolution Results toolbar.
6 View the following information for the deconvoluted spectrum in the Deconvolution Results window:
7 Review the columns in the Biomolecule Identification Results window.
8 Right-click the table in the Biomolecule Identification Results window to see the shortcut menu. You can add and remove columns, copy to Clipboard, print, export and other features.
• Peak • Charge • Mass • Height
• Fit • Max Abund • Expected m/z • Area
30 Agilent MassHunter BioConfirm Software Quick Start Guide
Intact Protein Workflow
To print a report with deconvolution results
To print a report with deconvolution results
1 Select Method Automation > Reports in the Method Editor window.
2 Review the options in the Destination section.
3 Review the options in the Contents section. Verify that the sections that you want included in the report are marked.
4 Review the parameters in both the Templates and Layouts tabs. Select both the Intact Protein report template and the Protein Digest report template.
• BioConfirmProteinBiomoleculeReport.xslt (for intact proteins)
• BioConfirmProteinDigestBiomoleculeReport.xslt (for protein digests)
5 Click Biomolecule Report from the File > Print menu to print the report. You can instead click the button on the main toolbar.
Tip To print deconvolution spectra, right-click the graph area of the Deconvolution Results window and click Print from the shortcut menu.
Tip A report is automatically created if you run Method Automation. Method Automation first runs the method workflow and then generates a biomolecule report. You can run Method Automation when you click Method > Run Method Automation.
Agilent MassHunter BioConfirm Software Quick Start Guide 31

Intact Protein Workflow
To automate protein confirmation
To automate protein confirmation
Use this procedure to do protein confirmation automatically for samples in a worklist. See the BioConfirm Familiarization Guide for more information.
1 In the Method Editor window, select Method Automation > Workflow and Sequences.
2 Select Intact Protein as the Workflow.
3 Select either reduced or non-reduced as the Condition.
4 Click the button to select a sequence. The Select Sequences dialog box opens. Select the sequence or sequences, and then click OK.
5 Click the button to select the Mods and Profiles. The Select Modifications and Profiles dialog box opens. Select the modifications and profiles, and then click OK.
6 Save the method in any of the following ways:
• Click Save or Save As from the Method menu.
• Click the Save button in the Method Editor toolbar.
• Click Save Method from Method Editor shortcut menu (right-click).
7 Assign this method to samples of interest when setting up a worklist as described in the online Help for your instrument.
8 To run this workflow interactively, do the following:
• Click Method > Run Method Workflow or
• Click the button in the Sample Table.
9 To run this workflow and generate a report interactively, do the following:
• Click Method > Run Method Automation (Workflow + Reports).
32 Agilent MassHunter BioConfirm Software Quick Start Guide
Protein Digest Workflow
To automate protein confirmation
Protein Digest Workflow
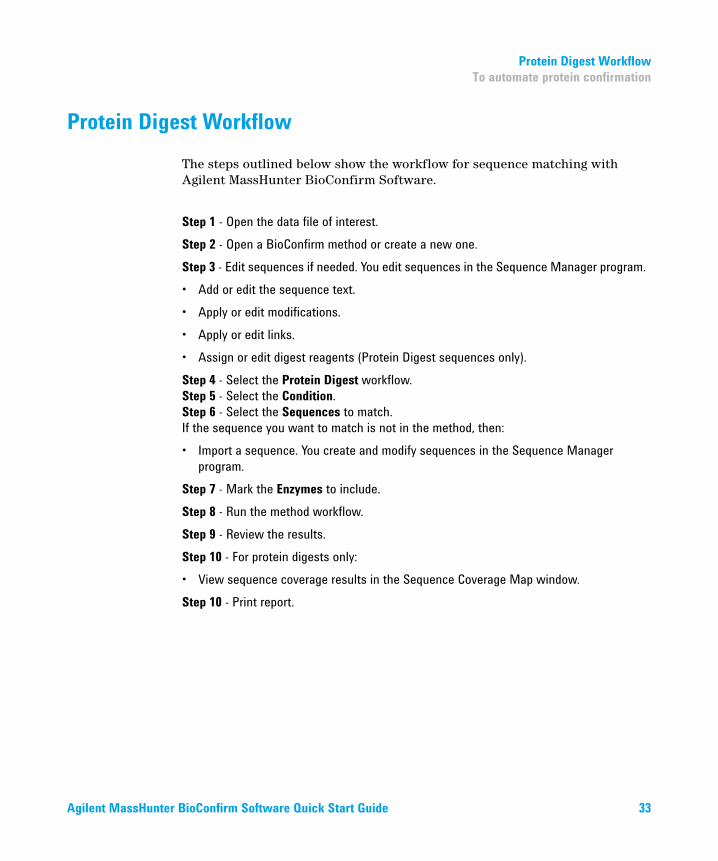
The steps outlined below show the workflow for sequence matching with Agilent MassHunter BioConfirm Software.
Step 1 - Open the data file of interest.Step 2 - Open a BioConfirm method or create a new one.Step 3 - Edit sequences if needed. You edit sequences in the Sequence Manager program.• Add or edit the sequence text.• Apply or edit modifications.• Apply or edit links.• Assign or edit digest reagents (Protein Digest sequences only).Step 4 - Select the Protein Digest workflow.Step 5 - Select the Condition. Step 6 - Select the Sequences to match. If the sequence you want to match is not in the method, then:• Import a sequence. You create and modify sequences in the Sequence Manager
program.Step 7 - Mark the Enzymes to include.Step 8 - Run the method workflow.Step 9 - Review the results.Step 10 - For protein digests only: • View sequence coverage results in the Sequence Coverage Map window.Step 10 - Print report.
Agilent MassHunter BioConfirm Software Quick Start Guide 33
Protein Digest Workflow
To automate protein confirmation
The topics in this section will help you get started using the Protein Digest workflow features of Agilent MassHunter BioConfirm Software.
• “To run the Protein Digest workflow” on page 35
• “To find peptides” on page 37
• “To match sequences for protein digest biomolecules” on page 38
• “To view peptide biomolecules” on page 40
• “To view sequence coverage results for protein digests” on page 41
• “To print a report with peptide results” on page 42
34 Agilent MassHunter BioConfirm Software Quick Start Guide
Protein Digest Workflow
To run the Protein Digest workflow
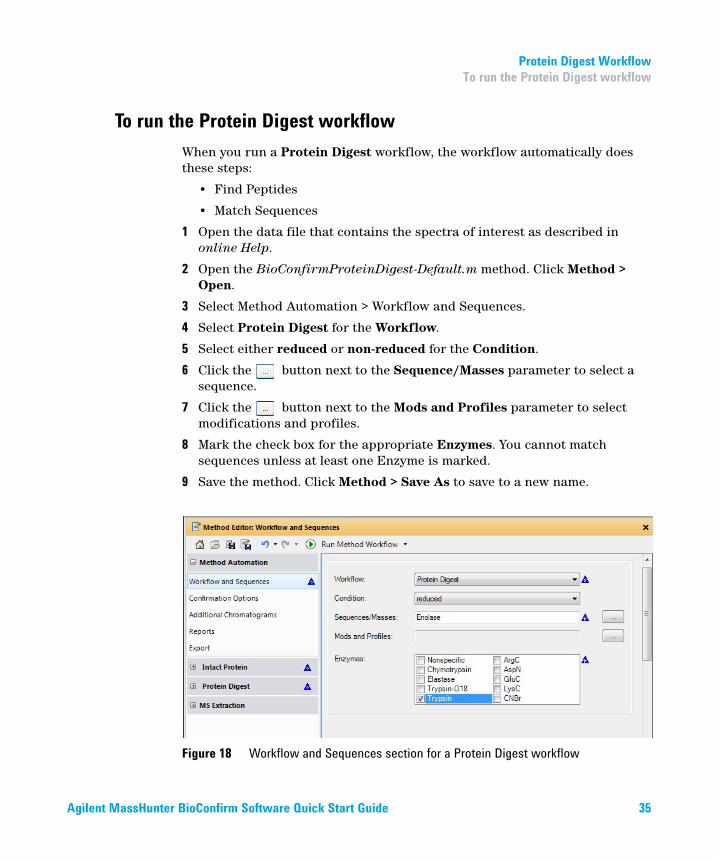
To run the Protein Digest workflow
When you run a Protein Digest workflow, the workflow automatically does these steps:
• Find Peptides
• Match Sequences
1 Open the data file that contains the spectra of interest as described in online Help.
2 Open the BioConfirmProteinDigest-Default.m method. Click Method > Open.
3 Select Method Automation > Workflow and Sequences.
4 Select Protein Digest for the Workflow.
5 Select either reduced or non-reduced for the Condition.
6 Click the button next to the Sequence/Masses parameter to select a sequence.
7 Click the button next to the Mods and Profiles parameter to select modifications and profiles.
8 Mark the check box for the appropriate Enzymes. You cannot match sequences unless at least one Enzyme is marked.
9 Save the method. Click Method > Save As to save to a new name.
Figure 18 Workflow and Sequences section for a Protein Digest workflow
Agilent MassHunter BioConfirm Software Quick Start Guide 35
Protein Digest Workflow
To run the Protein Digest workflow
10 Click the button on the Method Editor toolbar to run the method workflow. You could instead click Method > Run Method Workflow.
11 View biomolecules as described in “To view peptide biomolecules” on page 40.
36 Agilent MassHunter BioConfirm Software Quick Start Guide
Protein Digest Workflow
To find peptides
To find peptides
Use this procedure to run the Find Peptides algorithm to create a biomolecule list. This algorithm is part of the Protein Digest workflow.
The default method often does not need to be modified. The parameters for the Find Peptides algorithm are in the Protein Digest > Find Peptides section.
1 Open the data file.
2 Click Method > Open and open BioConfirmProteinDigest-Default.m.
3 Click Find and Identify > Find Peptides.
4 View biomolecules as described in “To view peptide biomolecules” on page 40.
Agilent MassHunter BioConfirm Software Quick Start Guide 37
Protein Digest Workflow
To match sequences for protein digest biomolecules
To match sequences for protein digest biomolecules
Use this procedure to match sequences for biomolecules that were found using Find Peptides. You need to specify the sequence and modifications and profiles in the Method Automation > Workflow and Sequences section.
1 Create biomolecules using Find Peptides. See “To find peptides” on page 37.
2 Select Method Automation > Workflow and Sequences.
3 Select Protein Digest for the Workflow.
4 Select either reduced or non-reduced for the Condition.
5 Click the button next to the Sequence/Masses parameter to select a sequence.
6 Click the button next to the Mods and Profiles parameter to select modifications and profiles.
7 Mark the check box for the appropriate Enzymes. You cannot match sequences unless at least one Enzyme is marked.
8 In the Method Editor window, select Protein Digest > Match Tolerances in the left pane.
Make sure to choose the Protein Digest > Match Tolerances section.
Do not select the Intact Protein > Match Tolerances section.
9 Review the parameters on the Mass Matching, Matching Rules, and Results tabs.
38 Agilent MassHunter BioConfirm Software Quick Start Guide

Protein Digest Workflow
To match sequences for protein digest biomolecules
10 Click the button on the Method Editor toolbar to run the Match Sequences algorithm.
Tip You can also start Match Sequences when you click Find and Identify > Match Sequences.
11 View peptide biomolecules as described in “To view peptide biomolecules” on page 40.
Figure 19 Protein Digest > Match Tolerances section in the Method Editor
Agilent MassHunter BioConfirm Software Quick Start Guide 39

Protein Digest Workflow
To view peptide biomolecules
To view peptide biomolecules
You can view these compounds as follows:
1 If necessary, click View > Biomolecules.
2 If necessary, click View > Biomolecule Identification Results.
3 Click a biomolecule of interest. The following windows are updated when you select a biomolecule:
• Biomolecule MS Spectrum window
• Biomolecule Fragment Spectrum window
• Biomolecule Identification Results if you also ran the Match Sequences algorithm.
• Sequence Coverage Map if you also ran the Match Sequences algorithm
4 To see other information for biomolecules in the list, right-click the table, and then click Add/Remove Columns from the shortcut menu.
5 See “To view sequence coverage results for protein digests” on page 41.
6 Review the columns in the Biomolecule Identification Results window.
7 Right-click the table in the Biomolecule Identification Results window to see the shortcut menu. You can add and remove columns, copy to Clipboard, print, export and other features.
40 Agilent MassHunter BioConfirm Software Quick Start Guide
Protein Digest Workflow
To view sequence coverage results for protein digests
To view sequence coverage results for protein digests
The location in the sequence which was matched is highlighted.
1 To display the Sequence Coverage Map window, click View > Sequence Coverage Map.
2 Click the following items on the Sequence Coverage Map shortcut menu to view more information about the current sequence:
• Applied Modifications
• Applied Links
• Show Sequence Description
3 Select another sequence match result to view by selecting a different row in the Biomolecules window which has Sequence Match as the value in the ID Techniques Applied column.
Agilent MassHunter BioConfirm Software Quick Start Guide 41

Protein Digest Workflow
To print a report with peptide results
To print a report with peptide results
1 Select Method Automation > Reports in the Method Editor window.
2 Review the options in the Destination section.
3 Review the parameters in both the Templates and Layouts tabs. Select the Protein Digest report template.
• BioConfirmProteinDigestBiomoleculeReport.xltx (for protein digests)
4 Click Biomolecule Report from the File > Print menu to print the report. You can instead click the button on the main toolbar.
Tip To print deconvolution spectra, right-click the graph area of the Deconvolution Results window and click Print from the shortcut menu.
Tip A report is automatically created if you run Method Automation. Method Automation first runs the method workflow and then generates a biomolecule report. You can run Method Automation when you click Method > Run Method Automation.
Figure 20 Print Biomolecule Report Dialog Box
42 Agilent MassHunter BioConfirm Software Quick Start Guide
Review Results
To reprocess samples
Review Results
The topics in this section will help you get started using the Intact Protein workflow features of Agilent MassHunter BioConfirm Software.
• “To reprocess samples” on page 43
• “To use Result Review mode” on page 45
To reprocess samples
You can reprocess data files using the Sample Table toolbar, and you can review results in the usual windows.
1 Open multiple data files.
2 Examine the Confirmation Status column. The values can be Confirmed, Partially Confirmed, Not Confirmed, and Undetermined.
3 Select a row that is Not Confirmed or Undetermined.
4 (optional) Load a method to use with the sample you selected.
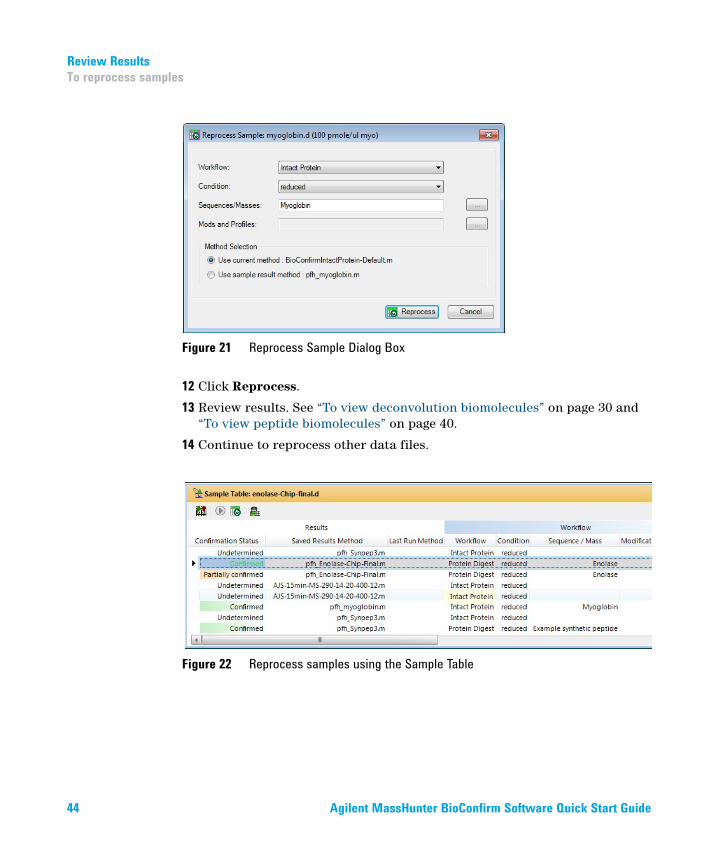
5 Click the button in the Sample Table toolbar. The Reprocess Sample dialog box opens.
6 Select the Workflow.
7 Select the Condition.
8 Select the Sequences/Masses. Click the button to select a different sequence.
9 Select the Mods and Profiles. Click the button to select different modifications and profiles.
10 If the Workflow is Protein Digest, mark the Enzymes to use.
11 If you have a choice, click either Use current method or Use sample result method. You can reprocess using the current method in the BioConfirm program or you can reprocess using the same method that was used to create previous sample results.
Agilent MassHunter BioConfirm Software Quick Start Guide 43
Review Results
To reprocess samples
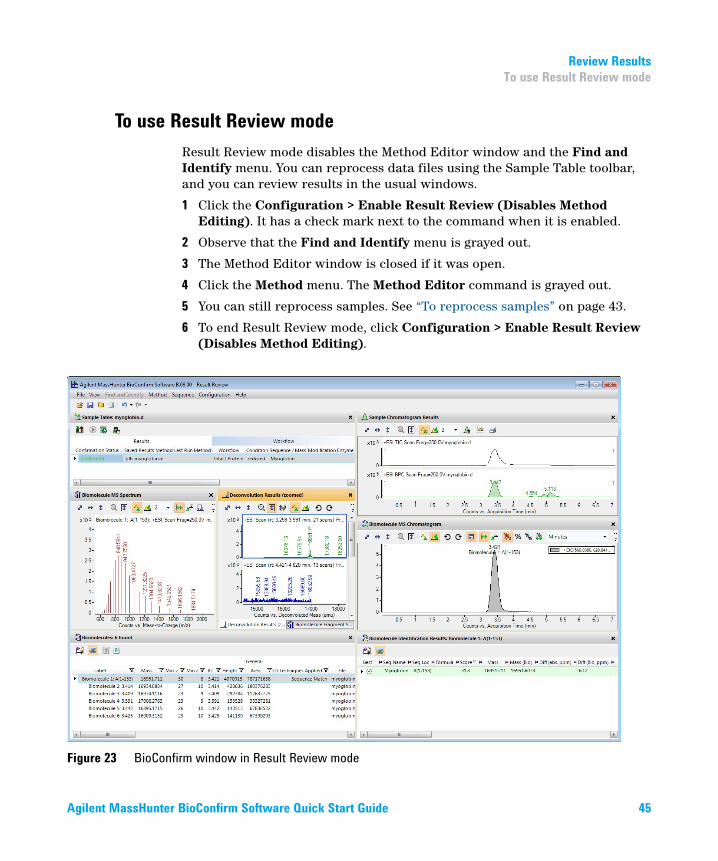
12 Click Reprocess.
13 Review results. See “To view deconvolution biomolecules” on page 30 and “To view peptide biomolecules” on page 40.
14 Continue to reprocess other data files.
Figure 21 Reprocess Sample Dialog Box
Figure 22 Reprocess samples using the Sample Table
44 Agilent MassHunter BioConfirm Software Quick Start Guide
Review Results
To use Result Review mode
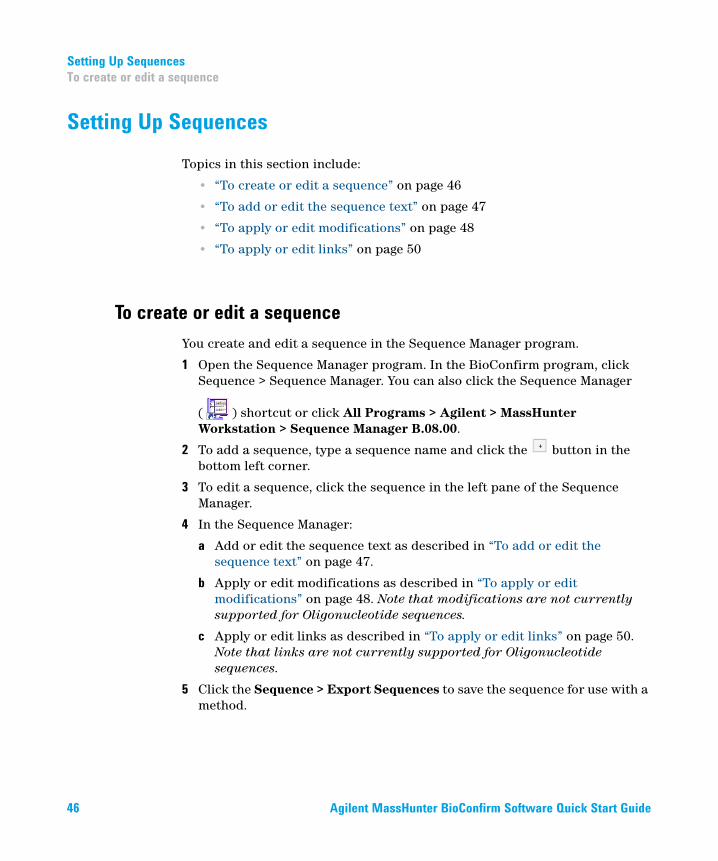
To use Result Review mode
Result Review mode disables the Method Editor window and the Find and Identify menu. You can reprocess data files using the Sample Table toolbar, and you can review results in the usual windows.
1 Click the Configuration > Enable Result Review (Disables Method Editing). It has a check mark next to the command when it is enabled.
2 Observe that the Find and Identify menu is grayed out.
3 The Method Editor window is closed if it was open.
4 Click the Method menu. The Method Editor command is grayed out.
5 You can still reprocess samples. See “To reprocess samples” on page 43.
6 To end Result Review mode, click Configuration > Enable Result Review (Disables Method Editing).
Figure 23 BioConfirm window in Result Review mode
Agilent MassHunter BioConfirm Software Quick Start Guide 45
Setting Up Sequences
To create or edit a sequence
Setting Up Sequences
Topics in this section include:
• “To create or edit a sequence” on page 46
• “To add or edit the sequence text” on page 47
• “To apply or edit modifications” on page 48
• “To apply or edit links” on page 50
To create or edit a sequence
You create and edit a sequence in the Sequence Manager program.
1 Open the Sequence Manager program. In the BioConfirm program, click Sequence > Sequence Manager. You can also click the Sequence Manager
( ) shortcut or click All Programs > Agilent > MassHunter Workstation > Sequence Manager B.08.00.
2 To add a sequence, type a sequence name and click the button in the bottom left corner.
3 To edit a sequence, click the sequence in the left pane of the Sequence Manager.
4 In the Sequence Manager:
a Add or edit the sequence text as described in “To add or edit the sequence text” on page 47.
b Apply or edit modifications as described in “To apply or edit modifications” on page 48. Note that modifications are not currently supported for Oligonucleotide sequences.
c Apply or edit links as described in “To apply or edit links” on page 50. Note that links are not currently supported for Oligonucleotide sequences.
5 Click the Sequence > Export Sequences to save the sequence for use with a method.
46 Agilent MassHunter BioConfirm Software Quick Start Guide
Setting Up Sequences
To add or edit the sequence text
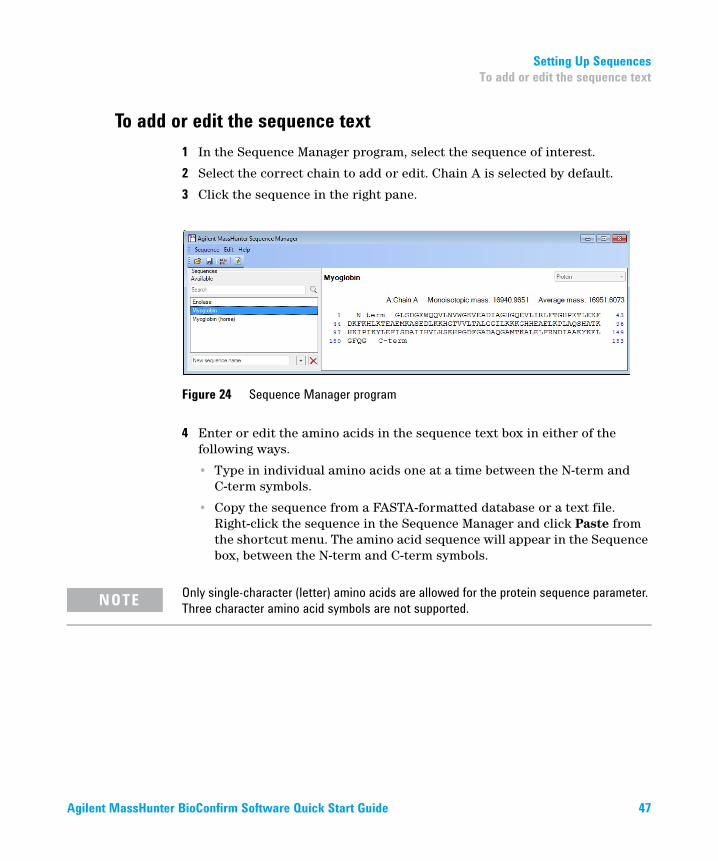
To add or edit the sequence text
1 In the Sequence Manager program, select the sequence of interest.
2 Select the correct chain to add or edit. Chain A is selected by default.
3 Click the sequence in the right pane.
4 Enter or edit the amino acids in the sequence text box in either of the following ways.
• Type in individual amino acids one at a time between the N-term and C-term symbols.
• Copy the sequence from a FASTA-formatted database or a text file. Right-click the sequence in the Sequence Manager and click Paste from the shortcut menu. The amino acid sequence will appear in the Sequence box, between the N-term and C-term symbols.
Figure 24 Sequence Manager program
NOTEOnly single-character (letter) amino acids are allowed for the protein sequence parameter. Three character amino acid symbols are not supported.
Agilent MassHunter BioConfirm Software Quick Start Guide 47
Setting Up Sequences
To apply or edit modifications
To apply or edit modifications
1 In the Sequence Manager program, select the sequence of interest. Note that modifications are not currently supported for Oligonucleotide sequences.
2 Right-click that sequence, and click Edit Modifications from the shortcut menu to open the Modifications dialog box.
3 To select and apply global modifications:
a On the Global tab, select the desired modification from the list of Available modifications.
• If desired, you can customize the list of available modifications using the Chemical Data Dictionary; see online help for more information.
• Note that many N-linked glycans with numerical abbreviations, such as “2000 0A 0G”, are included in the Chemical Data Dictionary; see online help for more information.
b Select the amino acids to modify in the Apply to all list. Use Shift+click or Ctrl+click to select multiple amino acids, if desired.
c Click Apply to apply the specified modification to the selected amino acids throughout the sequence.
d Repeat step a - step c to select and apply other global modifications.
4 To select and apply local modifications:
a On the Local tab, select the location in the sequence to modify: C-terminus, N-terminus, or the position in the sequence. Use the blue index numbers shown for each row of the sequence in the Sequence Manager program to determine the proper index number for the selected position.
b Select the desired modification from the Applicable modifications list.
c Mark the Variable modification check box if you want to create a variable modification for sequence matching. When marked, sequences that contain that amino acid site are matched both with and without this modification.
d Click Apply to apply the selected modification to the specified location (amino acid) in the sequence.
e Repeat step a - step d to select and apply other local modifications.
5 Click OK to close the Modifications dialog box. Note that the molecular weight and formula have been updated in the Sequence Manager.
48 Agilent MassHunter BioConfirm Software Quick Start Guide
Setting Up Sequences
To apply or edit modifications
To remove modifications
1 Click Edit Modifications on either the Edit menu or the Sequence shortcut menu to open the Modifications dialog box.
2 Click the Applied tab and review the list of modifications.
3 Click to select the modifications you want to delete.
4 Click Delete to remove the selected modifications.
5 Click OK.
To migrate method from B.07.00 to B.08.00
It is recommended that you open an old method in B.08.00 and save it before using it through the Data Acquisition worklist or Walkup program.
1 In BioConfirm B.08.00, load a method saved from BioConfirm B.07.00.
2 Load the data file of interest.
3 Run Find by Protein Deconvolution.
4 Click Sequence > Open Chemical Data Dictionary Editor.
5 Create a custom modification profile, with name such as B07Mods.
6 Search for custom modification(s).
Once found, the modifications appear in the list of Available modifications.
7 Add the custom modification(s) found in the previous step to the custom modification profile created earlier (with a name such as B07Mods). You can add preset modifications to the custom profile as well.
8 Click OK to close the Chemical Data Dictionary and save the changes.
To use the migrated modification profile
1 In the Sequence Manager program, import the sequence of interest.
2 Click Sequence > Edit Matching Rules to open the Rules dialog box.
3 Move the Modification profile created above from the Available modifications list to the Selected modifications list, and then click OK.
4 Save the sequence.
Agilent MassHunter BioConfirm Software Quick Start Guide 49

Setting Up Sequences
To apply or edit links
To apply or edit links
1 In the Sequence Manager program, select the sequence of interest in the left pane. Note that links are not currently supported for Oligonucleotide sequences.
2 Right-click the sequence in the pane on the right side, and click Edit Links from the shortcut menu to open the Links dialog box. You can also click Edit > Edit Links.
3 Enter the index number for one end of the link in the From index box and select the chain (if other than the default Chain A).
4 Enter the index number for the other end of the link in the To index box and select the chain (if other than the default Chain A).
5 Select a link from the Link types list.
Tip You can customize the list of links types using the Chemical Data Dictionary; see online help for more information.
6 Click Apply to link the selected amino acids in the sequence.
7 Repeat Steps 3 -6 to create additional links.
8 Click OK to close the Links dialog box. Note that the molecular weight and formula have been updated in the Sequence Editor.
To remove links
1 Click Edit Links on either the Sequence menu or the Sequence Manager shortcut menu to open the Links dialog box.
2 Click the Applied tab and review the list of links.
3 Click the links you want to delete.
4 Click Delete to remove the selected links.
50 Agilent MassHunter BioConfirm Software Quick Start Guide

Setting Up Sequences
To apply or edit links
Agilent MassHunter BioConfirm Software Quick Start Guide 51
Agilent Technologies, Inc. 2016
Printed in USA Revision A, May 2016
*G6829-90019*G6829-90019
www.agilent.com
In This Guide
This guide has instructions for installing and using the Agilent MassHunter BioConfirm Software.
This guide is valid for the B.08.00 revision or higher of the G6829AA Agilent MassHunter BioConfirm Software, until superseded.