
Add sound to each slide in your PowerPoint presentation · Add sound to each slide in your...
3
1 Add sound to each slide in your PowerPoint presentation Office 365 version - Guide for teachers. Updated 06 March 2020 Screendumps in this guide are from a Mac computer. The procedure is identical on a PC computer. There are smaller differences in the Powerpoint program layout on PC, but just look for the same functions and buttons. There are two ways to add sound (narration) to your PowerPoint presentation: A. Record your entire presentation in one video: You speak to the Powerpoint and save as a video file and upload to Absalon. This method is good, as the student view the video directly in Absalon. It is recommended also to upload the .ppt-presentation along with the video, for the students to grab text and images. If your .ppt includes animations, option A. is a better choice. Find guide on the obl.ku.dk site. B. Add sound to each slide (this guide): This method is easier to use but is complicated if you have many animations in your slides. You record a sound file on each slide. Your file is saved as a Powerpoint. The students need to download the file, to hear the speak. Please note that method A only works with Powerpoint Office 365 version, not PPT 2016 and before. --------------------------------------------------- Step 1: Open your presentation in PowerPoint. On each slide, click the Insert tab in the top-menu and then find the sound-icon to record sound. Step 2: Click the red button to start recording, and the square to stop. Click Insert to add your recording to the slide. Step 3: Then you will see a loudspeaker icon on the slide. Move the icon to the corner of the slide, where it is visible, it makes students aware of that they should turn on the sound. (it is also possible to delete the icon, the sound will still be there)
Transcript of Add sound to each slide in your PowerPoint presentation · Add sound to each slide in your...

1
Add sound to each slide in your PowerPoint presentation Office 365 version - Guide for teachers. Updated 06 March 2020 Screendumps in this guide are from a Mac computer. The procedure is identical on a PC computer. There are smaller differences in the Powerpoint program layout on PC, but just look for the same functions and buttons. There are two ways to add sound (narration) to your PowerPoint presentation:
A. Record your entire presentation in one video: You speak to the Powerpoint and save as a video file and upload to Absalon. This method is good, as the student view the video directly in Absalon. It is recommended also to upload the .ppt-presentation along with the video, for the students to grab text and images. If your .ppt includes animations, option A. is a better choice. Find guide on the obl.ku.dk site.
B. Add sound to each slide (this guide): This method is easier to use but is complicated if you have many animations in your slides. You record a sound file on each slide. Your file is saved as a Powerpoint. The students need to download the file, to hear the speak.
Please note that method A only works with Powerpoint Office 365 version, not PPT 2016 and before.
--------------------------------------------------- Step 1: Open your presentation in PowerPoint. On each slide, click the Insert tab in the top-menu and then find the sound-icon to record sound.
Step 2: Click the red button to start recording, and the square to stop. Click Insert to add your recording to the slide.
Step 3: Then you will see a loudspeaker icon on the slide. Move the icon to the corner of the slide, where it is visible, it makes students aware of that they should turn on the sound. (it is also possible to delete the icon, the sound will still be there)
2
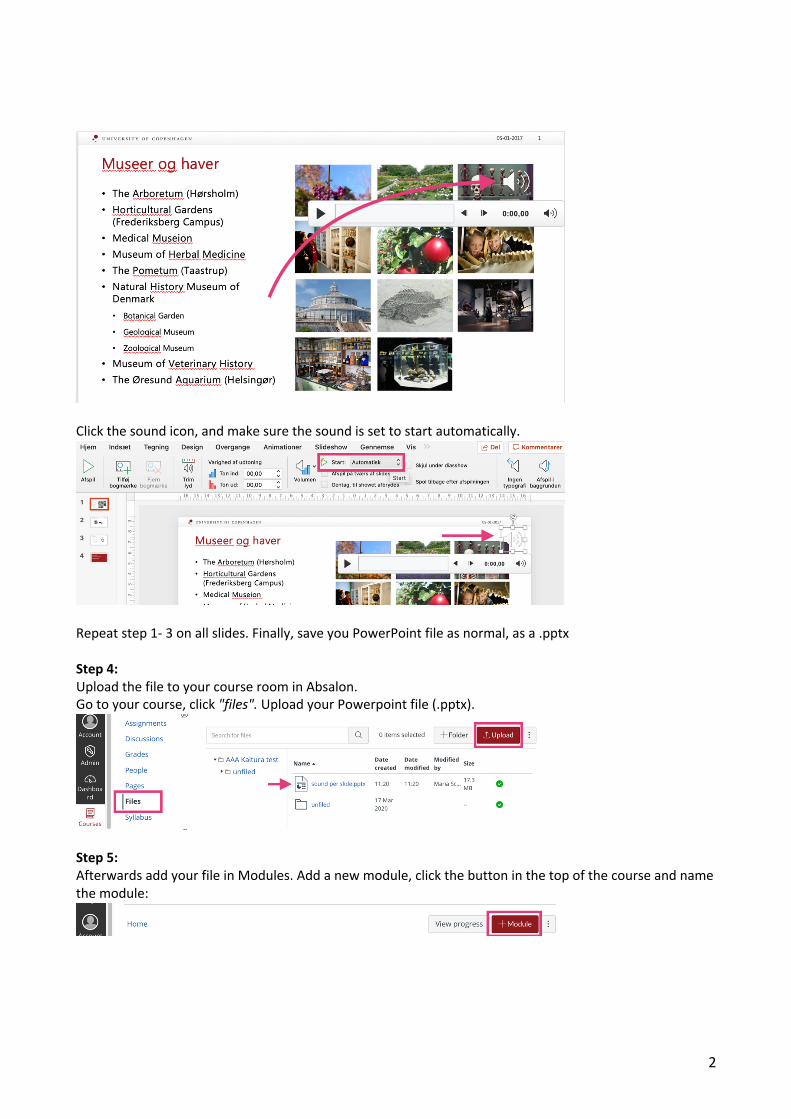
Click the sound icon, and make sure the sound is set to start automatically.
Repeat step 1- 3 on all slides. Finally, save you PowerPoint file as normal, as a .pptx Step 4: Upload the file to your course room in Absalon. Go to your course, click "files". Upload your Powerpoint file (.pptx).
Step 5: Afterwards add your file in Modules. Add a new module, click the button in the top of the course and name the module:

3
Step 6: Click the plus icon on the newly created module and add a Page.
Choose "Page" and give it a title.
Remember to Publish the page.
Step 7: Insert the Powerpoint file. Inserting the link on a Page, forces the file to download, which is necessary for the speak to play. Inform the students clearly, like this:
NOTE: It is also possible to save the file as a Powerpoint show (.ppsx), this forces the presentation top open up in presentation mode directly, so the sound plays, but is a closed "package" , it does not let students copy text or images. If you choose that file format, then also provide students with the normal .pptx file, to be able to copy content for their note taking process)


![Just add water - EBU add water.pdf · 2 just add water just add water 3 contents ... creating a sound business climate and attracting new markets [2] ... Long haul shipping is done](https://static.fdocuments.net/doc/165x107/5f12c5d83accb12610200525/just-add-water-add-waterpdf-2-just-add-water-just-add-water-3-contents-.jpg)


