able of Contents - Amazon S3 · able of C ontents Models JJW9527, JJW9627, JJW9530, ... In Case of...
24
♦ ♦ ♦ ♦ ♦ ♦ ♦ ♦ ♦ ♦ ♦ ♦ ♦ ♦ ♦ ♦ ♦ ♦ ♦ ♦ ♦ ♦ ♦ ♦ ♦ ♦ ♦ ♦ ♦ ♦ ♦ ♦ ♦ ♦ ♦ ♦ ♦ ♦ ♦ ♦ ♦ ♦ ♦ ♦ ♦ ♦ ♦ ♦ ♦ ♦ ♦ ♦ ♦ ♦ ♦ ♦ ♦ ♦ ♦ ♦ ♦ ♦ ♦ ♦ ♦ ♦ ♦ ♦ ♦ ♦ ♦ ♦ T able of Contents Models JJW9527, JJW9627, JJW9530, JJW9630, JMW9527, JMW9530 Electric Convection Wall Oven Guide For Future Assistance .............................. 1 Safety Instructions ............................... 2-3 Controls at a Glance ............................ 4-6 Function Pads .................................. 4-5 Setting the Clock ................................ 5 Setting the Timers ........................... 5-6 Oven Control Lockout ....................... 6 Adjusting Oven Temperature ............ 7 Oven Vent & Light ............................. 7 Oven Operation .................................. 8-16 Baking, Roasting and ........................... Convection Cooking ..................... 8 Oven Fans ........................................... 8 Convenience Foods ............................ 9 Oven Racks and Positions ................. 9 Baking Chart .................................... 10 Probe ................................................. 11 Broiling ............................................. 12 Clock Controlled .................................. Oven Operations ................... 13-14 Drying .......................................... 15-16 Care and Cleaning ........................... 17-20 Self-Clean Oven .......................... 17-18 Cleaning Chart ................................. 19 Maintenance .......................................... 20 Before You Call for Service .............. 21-22 If You Need Service ................................ 22 Warranty ................................................ 23 ® T able of Contents
Transcript of able of Contents - Amazon S3 · able of C ontents Models JJW9527, JJW9627, JJW9530, ... In Case of...
♦ ♦ ♦ ♦ ♦ ♦ ♦ ♦ ♦ ♦ ♦ ♦ ♦ ♦ ♦ ♦ ♦ ♦ ♦ ♦ ♦ ♦ ♦ ♦ ♦ ♦ ♦ ♦ ♦ ♦ ♦ ♦ ♦ ♦ ♦ ♦
♦ ♦ ♦ ♦ ♦ ♦ ♦ ♦ ♦ ♦ ♦ ♦ ♦ ♦ ♦ ♦ ♦ ♦ ♦ ♦ ♦ ♦ ♦ ♦ ♦ ♦ ♦ ♦ ♦ ♦ ♦ ♦ ♦ ♦ ♦ ♦
Table of Contents
Models JJW9527, JJW9627, JJW9530,
JJW9630, JMW9527, JMW9530
Electric ConvectionWall Oven Guide
For Future Assistance .............................. 1
Safety Instructions ...............................2-3
Controls at a Glance ............................4-6Function Pads ..................................4-5Setting the Clock................................ 5Setting the Timers ...........................5-6Oven Control Lockout ....................... 6Adjusting Oven Temperature ............ 7Oven Vent & Light ............................. 7
Oven Operation ..................................8-16Baking, Roasting and ...........................
Convection Cooking ..................... 8Oven Fans ........................................... 8Convenience Foods ............................ 9Oven Racks and Positions................. 9Baking Chart .................................... 10Probe ................................................. 11Broiling ............................................. 12Clock Controlled..................................
Oven Operations ...................13-14Drying ..........................................15-16
Care and Cleaning........................... 17-20Self-Clean Oven ..........................17-18Cleaning Chart ................................. 19
Maintenance .......................................... 20
Before You Call for Service.............. 21-22
If You Need Service................................ 22
Warranty ................................................ 23
®
Table of Contents

Congratulations on your choice of a Jenn-Air electric walloven. Your complete satisfaction is very important to us.
Read this user’s guide carefully. It is intended to help youoperate and maintain your new wall oven.
In addition, you will find a booklet entitled “Cooking MadeSimple.” It contains information on selecting bakeware andprovides baking, roasting and broiling tips.
Save time and money. Check the “Before You Call” sectionof this guide. It lists causes of minor operating problems thatyou can correct yourself.
However, should you need service, it is helpful to have themodel and serial numbers available. This information can befound on the data plate located on the oven front frame.
These numbers are also on the Product Registration card thatcame with your appliance. Before sending in this card, recordthese numbers along with the purchase date below.
1 For Future Assistance
Model Number
–– �––� ––� –– �––� –– –– �––� ––� ––
Serial Number
–– �––� ––� –– �––� –– –– �––� ––� ––
Date of Purchase
_______________________________
IMPORTANT: Keep this guide and the sales receipt in asafe place for future reference. Proof of original purchasedate is needed for warranty service.
If you have questions, write us (include your model numberand phone number) or call:
Jenn-Air Customer AssistanceAttn: CAIR® CenterP.O. Box 2370Cleveland, TN 37320-23701-800-688-11001-800-688-2080 (U.S. TTY for deaf, hearing impaired or speech impaired)(Mon. - Fri., 8 am-8pm Eastern Time)Internet: http://www.maytag.com
For service information, see back page.
♦ In our continuing effort to improve the quality andperformance of our cooking products, it may be nec-essary to make changes to the appliance without re-vising this guide.
♦ For Microwave Oven operation (select models), re-fer to the use and care guide packed in microwaveoven.
Notes . . .
♦ ♦ ♦ ♦ ♦ ♦ ♦ ♦ ♦ ♦ ♦ ♦ ♦ ♦ ♦ ♦ ♦ ♦ ♦ ♦ ♦ ♦ ♦ ♦ ♦ ♦ ♦ ♦ ♦ ♦ ♦ ♦ ♦ ♦ ♦ ♦ ♦ ♦ ♦ ♦ ♦

Important Safety Instructions 2The following instructions are based on safety considerationsand must be strictly followed to eliminate the potential risksof fire, electric shock, or personal injury.
Installation and Repair
♦ Have your appliance installed and properly grounded bya qualified installer according to the installation instruc-tions.
♦ To ensure proper operation and avoid possible injury ordamage to unit do not attempt to adjust repair, service, orreplace any part of your appliance unless it is speciallyrecommended in this book. All of the servicing should bereferred to a qualified installer or servicer.
To Prevent Fire or Smoke Damage
♦ Be sure all packing materials are removed from the ap-pliance before operating it.
♦ Keep area around appliance clear and free from combus-tible materials. Flammable materials should not be storedin an oven.
♦ Many plastics are vulnerable to heat. Keep plastics awayfrom parts of the appliance that may become warm orhot.
♦ To prevent grease fires, do not let cooking grease or otherflammable materials accumulate in or near the appliance.
In Case of Fire
♦ Use dry chemical or foam-type extinguisher or bakingsoda to smother fire or flame. Never use water on a greasefire.
1. Turn off appliance to avoid spreading the flame.
2. NEVER pick up or move a flaming pan.
3. Smother fire or flame by closing the oven door.
Child Safety
♦ NEVER leave children alone or unsupervised near theappliance when it is in use or is still hot. Children shouldnever be allowed to sit or stand on any part of the appli-ance as they could be injured or burned.
♦ Children must be taught that the appliance and utensils init can be hot. Let hot utensils cool in a safe place, out ofreach of small children. Children should be taught that anappliance is not a toy. Children should not be allowed toplay with controls or other parts of the unit.
♦ CAUTION: NEVER store items of interest to children incabinets above an appliance. Children climbing on the ap-pliance or on the appliance door to reach items could beseriously injured.
About Your Appliance
♦ To prevent potential hazard to the user and damage to theappliance, do not use appliance as a space heater to heator warm a room. Also, do not use the oven as a storagearea for food or cooking utensils.
♦ Do not obstruct the flow of air by blocking the oven vent.
♦ DO NOT TOUCH HEATING ELEMENTS OR INTE-RIOR SURFACES OF OVEN. Heating elements may behot even though they are dark in color. Interior surfaces ofany oven become hot enough to cause burns. During andafter use, do not touch, or let clothing or other flammablematerials contact heating elements or interior surfaces ofoven until they have had sufficient time to cool. Othersurfaces of the appliance may become hot enough to causeburns – among these surfaces are: oven vent openings andsurfaces near these openings, oven doors, windows of ovendoors.
♦ CAUTION: NEVER use an appliance as a step to reachcabinets above. Misuse of appliance doors, such as step-ping, leaning or sitting on the door, may result in possibletipping of the appliance, breakage of door, and seriousinjuries.
♦ Do not touch a hot oven light bulb with a damp cloth asthe bulb could break. Should the bulb break, disconnectpower to the appliance before removing bulb to avoid elec-trical shock.
♦ A fan should be heard during the bake, convect bake, con-vect roast, broil and cleaning cycles. If you do not hearthe fan, call an authorized servicer.
♦ NEVER use aluminum foil to cover an oven rack or ovenbottom. Misuse could result in risk of electric shock, fire,or damage to the appliance. Use foil only as directed inthis guide.
♦ ♦ ♦ ♦ ♦ ♦ ♦ ♦ ♦ ♦ ♦ ♦ ♦ ♦ ♦ ♦ ♦ ♦ ♦ ♦ ♦ ♦ ♦ ♦ ♦ ♦ ♦ ♦ ♦ ♦ ♦ ♦ ♦ ♦ ♦ ♦ ♦ ♦ ♦ ♦ ♦
3 Important Safety Instructions
Cooking Safety
♦ Never heat an unopened food container in the oven. Pres-sure build-up may cause container to burst resulting in se-rious personal injury or damage to the appliance.
♦ Use dry, sturdy potholders. Damp potholders may causeburns from steam. Dish towels or other substitutes shouldnever be used as potholders because they can trail acrosshot elements and ignite or get caught on appliance parts.
♦ Wear proper apparel. Loose fitting or long hanging-sleevedapparel should not be worn while cooking. Clothing mayignite and cause burns if garment comes in contact withheating elements.
♦ Always place oven racks in the desired positions while ovenis cool. Slide oven rack out to add or remove food, usingdry, sturdy potholders. Always avoid reaching into the ovento add or remove food. If a rack must be moved while hot,use a dry potholder. Do not let potholder contact hot ele-ment in oven.
♦ Use care when opening the oven door. Let hot air or steamescape before removing or replacing food.
♦ PREPARED FOOD WARNING: Follow food manu-facturer’s instructions. If a plastic frozen food container and/or its cover distorts, warps, or is otherwise damaged duringcooking, immediately discard the food and its container.The food could be contaminated.
♦ Do not allow aluminum foil or meat probe to contact heat-ing element.
♦ Always turn off all controls when cooking is completed.
Utensil Safety
♦ Follow the manufacturer’s directions when using ovencooking bags.
♦ This appliance has been tested for safe performance usingconventional cookware. Do not use any devices or acces-sories that are not specifically recommended in this manual.Do not use add-on oven convection systems. The use ofdevices or accessories that are not expressly recommendedin this guide can create serious safety hazards, result in per-formance problems, and reduce the life of the componentsof the appliance.
♦ Only certain types of glass, glass/ceramic, ceramic, earth-enware, or other glazed utensils are suitable for oven ser-vice without breaking due to the sudden change in tem-perature. Follow utensil manufacturer’s instructions whenusing glass.
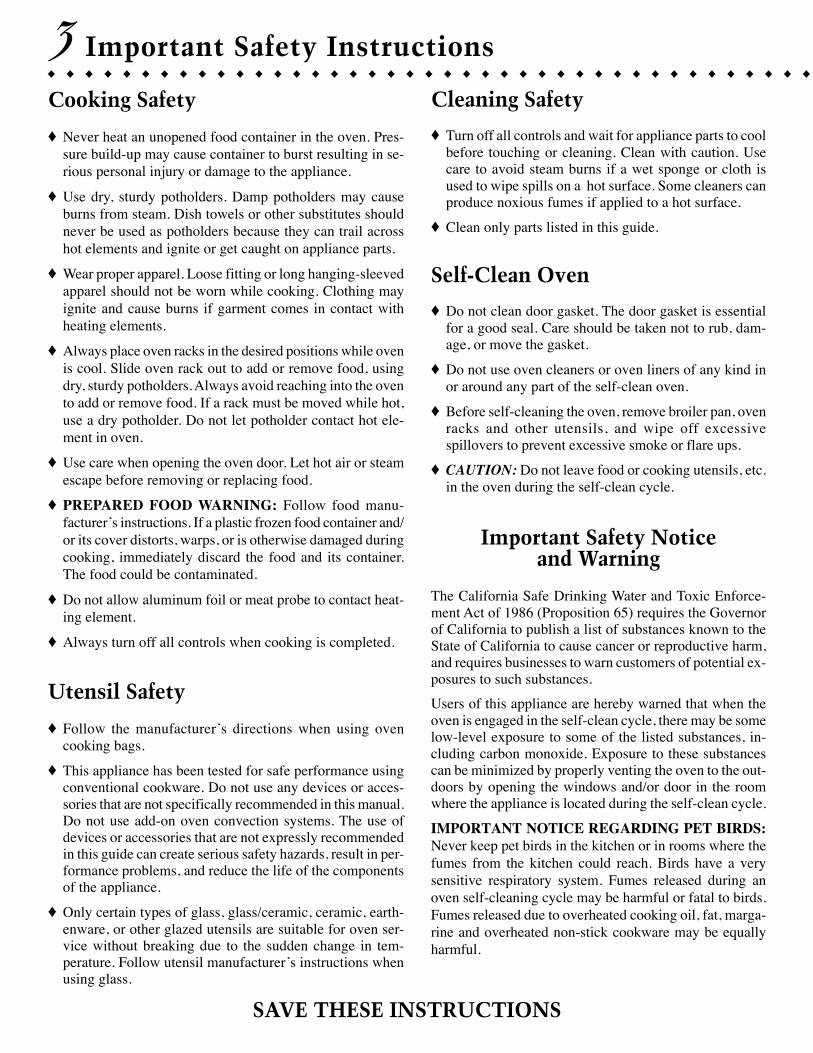
Cleaning Safety
♦ Turn off all controls and wait for appliance parts to coolbefore touching or cleaning. Clean with caution. Usecare to avoid steam burns if a wet sponge or cloth isused to wipe spills on a hot surface. Some cleaners canproduce noxious fumes if applied to a hot surface.
♦ Clean only parts listed in this guide.
Self-Clean Oven
♦ Do not clean door gasket. The door gasket is essentialfor a good seal. Care should be taken not to rub, dam-age, or move the gasket.
♦ Do not use oven cleaners or oven liners of any kind inor around any part of the self-clean oven.
♦ Before self-cleaning the oven, remove broiler pan, ovenracks and other utensils, and wipe off excessivespillovers to prevent excessive smoke or flare ups.
♦ CAUTION: Do not leave food or cooking utensils, etc.in the oven during the self-clean cycle.
Important Safety Noticeand Warning
The California Safe Drinking Water and Toxic Enforce-ment Act of 1986 (Proposition 65) requires the Governorof California to publish a list of substances known to theState of California to cause cancer or reproductive harm,and requires businesses to warn customers of potential ex-posures to such substances.
Users of this appliance are hereby warned that when theoven is engaged in the self-clean cycle, there may be somelow-level exposure to some of the listed substances, in-cluding carbon monoxide. Exposure to these substancescan be minimized by properly venting the oven to the out-doors by opening the windows and/or door in the roomwhere the appliance is located during the self-clean cycle.
IMPORTANT NOTICE REGARDING PET BIRDS:Never keep pet birds in the kitchen or in rooms where thefumes from the kitchen could reach. Birds have a verysensitive respiratory system. Fumes released during anoven self-cleaning cycle may be harmful or fatal to birds.Fumes released due to overheated cooking oil, fat, marga-rine and overheated non-stick cookware may be equallyharmful.
SAVE THESE INSTRUCTIONS
♦ ♦ ♦ ♦ ♦ ♦ ♦ ♦ ♦ ♦ ♦ ♦ ♦ ♦ ♦ ♦ ♦ ♦ ♦ ♦ ♦ ♦ ♦ ♦ ♦ ♦ ♦ ♦ ♦ ♦ ♦ ♦ ♦ ♦ ♦ ♦ ♦ ♦ ♦ ♦ ♦
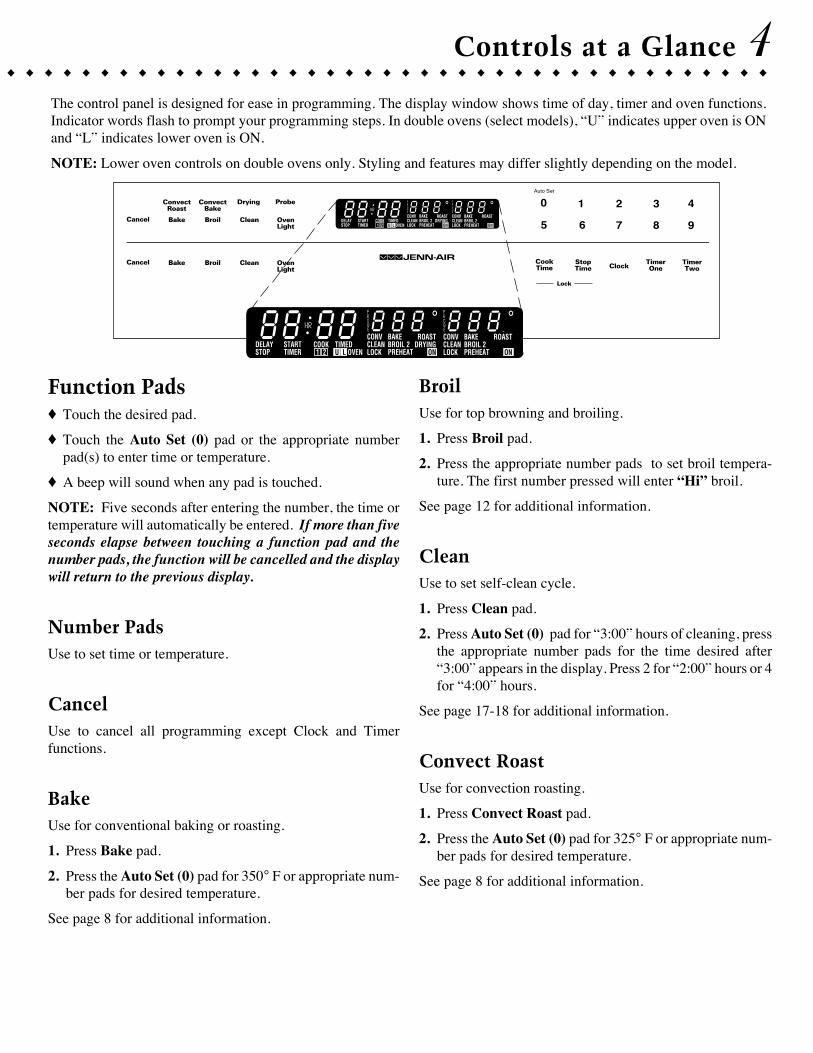
Controls at a Glance 4The control panel is designed for ease in programming. The display window shows time of day, timer and oven functions.Indicator words flash to prompt your programming steps. In double ovens (select models), “U” indicates upper oven is ONand “L” indicates lower oven is ON.
NOTE: Lower oven controls on double ovens only. Styling and features may differ slightly depending on the model.
BroilUse for top browning and broiling.
1. Press Broil pad.
2. Press the appropriate number pads to set broil tempera-ture. The first number pressed will enter “Hi” broil.
See page 12 for additional information.
CleanUse to set self-clean cycle.
1. Press Clean pad.
2. Press Auto Set (0) pad for “3:00” hours of cleaning, pressthe appropriate number pads for the time desired after“3:00” appears in the display. Press 2 for “2:00” hours or 4for “4:00” hours.
See page 17-18 for additional information.
Convect RoastUse for convection roasting.
1. Press Convect Roast pad.
2. Press the Auto Set (0) pad for 325° F or appropriate num-ber pads for desired temperature.
See page 8 for additional information.
Function Pads♦ Touch the desired pad.
♦ Touch the Auto Set (0) pad or the appropriate numberpad(s) to enter time or temperature.
♦ A beep will sound when any pad is touched.
NOTE: Five seconds after entering the number, the time ortemperature will automatically be entered. If more than fiveseconds elapse between touching a function pad and thenumber pads, the function will be cancelled and the displaywill return to the previous display.
Number PadsUse to set time or temperature.
CancelUse to cancel all programming except Clock and Timerfunctions.
BakeUse for conventional baking or roasting.
1. Press Bake pad.
2. Press the Auto Set (0) pad for 350° F or appropriate num-ber pads for desired temperature.
See page 8 for additional information.
HR
DELAYSTOP
ConvectRoast
0
7 8 9
4
5 6
1 2 3ProbeDrying
Auto Set
ConvectBake
BroilBake Clean OvenLight
Cancel
BroilBake Clean OvenLight
Cancel
ClockStopTime
TimerOne
TimerTwo
CookTime
Lock
STARTTIMER
COOK1 2
CONVCLEANLOCK
BAKEBROIL 2PREHEAT
C
PROBE
CONVCLEANLOCK
BAKEBROIL 2PREHEAT
C
PROBE
TIMEDU L OVEN
ROASTSTEAM
ON
ROASTDRYING
ON
HR
DELAYSTOP
STARTTIMER
COOK1 2
CONVCLEANLOCK
BAKEBROIL 2PREHEAT
C
PROBE
CONVCLEANLOCK
BAKEBROIL 2PREHEAT
C
PROBE
TIMEDU L OVEN
ROASTSTEAM
ON
ROASTDRYING
ON
♦ ♦ ♦ ♦ ♦ ♦ ♦ ♦ ♦ ♦ ♦ ♦ ♦ ♦ ♦ ♦ ♦ ♦ ♦ ♦ ♦ ♦ ♦ ♦ ♦ ♦ ♦ ♦ ♦ ♦ ♦ ♦ ♦ ♦ ♦ ♦ ♦ ♦ ♦ ♦ ♦

5 Controls at a Glance
Convect BakeUse for convection baking.
1. Press Convect Bake pad.
2. Press the Auto Set (0) pad for 325° F or appropriate num-ber pads for desired temperature.
See page 8 for additional information.
DryingUse to dehydrate foods such as fruits, vegetables and herbs.
1. Press Drying pad.
2. Press the Auto Set (0) pad for 140° F or appropriate num-ber pads for desired temperature.
See page 15-16 for additional information.
ProbeUse to set desired internal temperature of a food when usingthe Probe accessory.
1. Insert probe into food and oven receptacle.
2. Press Probe pad. Press the appropriate number pads to setthe desired internal temperature of the food.
3. Press Bake or Convect Roast pad. Press the appropriatenumber pads for desired bake or roast temperature.
See page 11 for additional information.
Cook Time/Stop TimeUse to program the oven to start and stop automatically.
1. Press Bake, Convect Bake, or Convect Roast pad. Pressthe appropriate number pads for desired temperature.
2. Press Cook Time pad. Press the appropriate number padsto enter cooking time in hours and minutes.
3. To delay the start of cooking, press Stop Time pad. Pressthe appropriate number pads to enter the time you want theoven to stop.
See page 13-14 for additional information.
Setting the Clock1. Press Clock pad.
♦ The indicator word TIME will flash in the display.
2. Press the appropriate number pads until the correct time ofday appears in the display.
When electrical power is supplied or after a power interrup-tion, the last clock time, before power was interrupted, willflash.
To recall the time of day when another time function isshowing, press the Clock pad.
Clock time cannot be changed when the oven has beenprogrammed for clock controlled oven operations or self-clean.
Setting the Timer One/TwoUse to set and then signal the completion of a time period upto 11 hours and 55 minutes (11:55).
The timers can be used independently of any other ovenactivity and can be set while another oven function is operat-ing. The timers do not control the oven.
1. Press a Timer pad.
♦ The indicator word TIMER will flash along with # 1 or #2 plus “0HR:00” appears in the display.
2. Press the appropriate number pads until the desired num-ber of minutes or hours and minutes appear in the display.
Example: To set Timer One for 5 minutes, press theTimer One pad and the number 5 pad. After five seconds,the display will show:
Example: To set Timer Two for 1 hour and 30 minutes,press the Timer Two pad and the numbers 1,3,0 pads.After five seconds the display will show:
NOTE: If both timers are set, the timer with the leastamount of time remaining will have display prece-dence.
♦ ♦ ♦ ♦ ♦ ♦ ♦ ♦ ♦ ♦ ♦ ♦ ♦ ♦ ♦ ♦ ♦ ♦ ♦ ♦ ♦ ♦ ♦ ♦ ♦ ♦ ♦ ♦ ♦ ♦ ♦ ♦ ♦ ♦ ♦ ♦ ♦ ♦ ♦ ♦ ♦
Controls at a Glance 63. At the end of the time set, the timer will chime four times and
“End” will appear in the display. If the timer is not cancelled(see “To cancel” below), “End” will remain in the displayand there will be two chimes every 30 seconds for fiveminutes.
To cancel:1. Press and hold Timer pad. After a slight delay the time of
day will reappear.
OR
2. Press the Timer pad and the “0” number pad. After a slightdelay the time of day will reappear.
Notes . . .◆ Pressing Cancel pad to cancel the timer will cancel
ALL selected oven functions except the timer.
◆ If you would like to eliminate all the “reminder”chimes, press and hold the Cancel pad for 12 secondsuntil a beep sounds. (This will not eliminate the initialfour chimes.) To restore the reminder chimes, pressand hold the Cancel pad for 12 seconds.
♦ ♦ ♦ ♦ ♦ ♦ ♦ ♦ ♦ ♦ ♦ ♦ ♦ ♦ ♦ ♦ ♦ ♦ ♦ ♦ ♦ ♦ ♦ ♦ ♦ ♦ ♦ ♦ ♦ ♦ ♦ ♦ ♦ ♦ ♦ ♦ ♦ ♦ ♦ ♦ ♦
Oven Control LockoutThe oven operation controls - Bake, Broil and Self-Clean -can be locked in the “OFF” position. The Timer and Clockcontrols can always be used regardless of the lockout.
If an oven function is currently being used, the controlscannot be locked off.
To Set Controls
1. Press and hold the Cook Time pad and the Stop Time padat the same time for several seconds.
♦ The indicator word “OFF” will appear and remain inthe display for 15 seconds.
♦ If someone presses an oven function pad while controlsare locked off, the indicator word “OFF” will reappearin the display for 15 seconds.
To cancel: Press and hold the Cook Time pad and the StopTime pad at the same time for four seconds. The indicatorword “OFF” will appear briefly and then disappear.

7 Oven Operation♦ ♦ ♦ ♦ ♦ ♦ ♦ ♦ ♦ ♦ ♦ ♦ ♦ ♦ ♦ ♦ ♦ ♦ ♦ ♦ ♦ ♦ ♦ ♦ ♦ ♦ ♦ ♦ ♦ ♦ ♦ ♦ ♦ ♦ ♦ ♦ ♦ ♦ ♦ ♦ ♦
Adjusting Oven TemperatureIf you think the oven should be hotter or cooler, you can adjustit yourself. To decide how much to change the thermostat, setthe oven temperature 25°F higher or lower than the tempera-ture in your recipe, then bake. The results of the “test” shouldgive you an idea of how much to adjust the thermostat.
To adjust the thermostat:
1.Press the Bake pad.
2.Enter 500° by pressing the number pads “5, 0, 0”.
3. Press and hold the Bake pad for several seconds until 00°appears in the display.
♦ If the oven temperature was previously adjusted, thechange will be displayed. For example, if the oven
tem- perature was reduced by 15°, the display will show- 15°.
4.Press the appropriate number pads to select the tempera-ture change desired.
♦ The oven temperature can be increased up to 35° (+35°)or reduced by as much as 35° (-35°) in 5° increments.
♦ Pressing the Broil pad will change the - sign to apositive number or back to a negative number.
5.The oven will now bake at the adjusted temperature. It isnot necessary to readjust the oven temperature if there is apower interruption. This adjustment will not affect broilor clean temperatures.
NOTE: Do not change the temperature setting more than10° at a time before testing the oven.
Oven LightThe oven light automatically comes on whenever the ovendoor is opened. When the door is closed, press the OvenLight pad to turn the oven light on or off. A beep will soundevery time the Oven Light pad is touched.
Oven VentWhen the oven is in use, the area near the oven vent mayfeel warm to the touch. Do not block the vent opening forbest baking results.
The oven vent is located below the control panel on your walloven.

Baking, Roasting andConvection Cooking
Every oven has its own characteristics. You may find that thecooking times and temperatures vary slightly from your oldoven. This is normal.
Oven FansA cooling fan will automatically turn on during cleaning,broiling and some baking operations. It is used to help keepinternal parts on the control panel cool. The fan will automati-cally turn off when parts have cooled. The fan may continueto operate after the oven has been turned off. This is normal.
A convection fan is used to circulate hot air in the oven whenthe convection feature is selected. It automatically turns onwhenever the CONVECT pads are pressed and will turn offwhen CONVECT is canceled.
NOTE: The convection fan will automatically stop wheneverthe oven door is opened.
Setting the Controls for Baking,Roasting, Convection Bakingand Convection Roasting1. Place oven racks on proper rack positions. (See page 9.)
2. Press Bake, Convect Bake or Convect Roast pad.
♦ The indicator word BAKE, CONV BAKE or CONVROAST will flash and three dashes will appear.
3. Press the Auto Set (0) pad to set 350° F automatically.When convection cooking, 325° F will automatically setwhen Auto Set (0) pad is pressed. Or, press the appropriatenumber pads for the desired oven temperature.
♦ The temperature can be set from 100° to 550° F. in5° increments.
♦ After five seconds the oven will begin to preheat. Theindicator words ON and PREHEAT will appear in thedisplay and 100° or the actual oven temperature, which-ever is higher.
♦ The temperature in the display will increase in 5°increments until the oven reaches the presettemperature.
Oven Operation 8♦ ♦ ♦ ♦ ♦ ♦ ♦ ♦ ♦ ♦ ♦ ♦ ♦ ♦ ♦ ♦ ♦ ♦ ♦ ♦ ♦ ♦ ♦ ♦ ♦ ♦ ♦ ♦ ♦ ♦ ♦ ♦ ♦ ♦ ♦ ♦ ♦ ♦ ♦ ♦ ♦
Notes . . .◆ If more than five seconds elapse between pressing a
pad and pressing a number pad, the display willreturn to the previous display.
◆ Whenever the ON indicator word appears in thedisplay, the oven is heating.
◆ To recall the set temperature during preheat, press theBake, Convect Bake or Convect Roast pad. The settemperature will be displayed briefly and then returnto the on-going program.
◆ To change the oven temperature during cooking,press the Bake, Convect Bake or Convect Roastpad and the appropriate number pads for the desiredoven temperature. If you are lowering the tempera-ture below the current oven temperature, the indica-tor words PREHEAT and ON will appear briefly andthe preheat chime will sound.
◆ As a general rule when convection baking, set theoven temperature 25° F lower than the conven-tional recipe or prepared mix directions. Times willbe similar to a few minutes less than directions. (Seechart on page 10 to compare times and temperaturesof many baked foods.)
◆ When using the Convect Roast pad, roasting timesare generally 25-30% less. (Maintain conventionalroasting temperature.)
◆ For additional baking, roasting and convection cook-ing tips plus a roasting chart with recommendedroasting temperatures and times, see “Cooking MadeSimple” booklet.
◆ When the oven is preheated, the oven will chime andthe ON and PREHEAT indicator words will go off.Allow 7–11 minutes for the oven to preheat.
4. At the end of cooking, turn the oven off by pressing theCancel pad. Remove food from oven. The oven willcontinue operating until the Cancel pad is pressed.

Oven RacksSingle Oven – two flat racks and one offset rack werepackaged with your oven.
Double Oven – two flat racks and one offset rack plus anadditional offset and flat rack for the lower oven werepackaged in your oven.
To remove:Pull forward to the “stop” position; lift up on thefront of the rack and pull out.
To replace: Place rack onthe rack support in theoven; tilt the front end upslightly; slide rack backuntil it clears the lock-stopposition; lower front andslide into the oven.
Rack Positions
Three rack convection cooking.
Rack Position #4o (offset rack on #4):Most broiling.
Rack Position #3:Most baked goods on a cookie sheet or jelly roll pan.
Rack Position #3o (offset rack on #3):Most baked goods, pies, layer cakes.
Rack Position #2:Roasting small cuts of meat, cakes in tube or bundt pans,casseroles.
Rack Position #2o (offset on #2):Roasting, loaves of bread, angel food cake.
Rack Position #1:Large cuts of meat and turkey, custard pie, dessertsouffle.
Multiple Rack Cooking:
Two racks: Use #2o and #4.
Three racks (convection cooking): Use #1, #3o, #4. (Seeillustration above.)
Notes . . .◆ The use of the offset rack is denoted in the list above
and in the charts as an “o” after the rack positionnumber.
◆ Do not cover an entire rack with aluminum foil orplace foil on the oven bottom. Baking results will beaffected and damage may occur to the oven bottom.
9 Oven Operation♦ ♦ ♦ ♦ ♦ ♦ ♦ ♦ ♦ ♦ ♦ ♦ ♦ ♦ ♦ ♦ ♦ ♦ ♦ ♦ ♦ ♦ ♦ ♦ ♦ ♦ ♦ ♦ ♦ ♦ ♦ ♦ ♦ ♦ ♦ ♦ ♦ ♦ ♦ ♦ ♦
Convection Cooking ofConvenience Foods◆ For best results, use the Convect Roast pad.
◆ Preheating the oven is not necessary.
◆ Follow package recommendations for oven temperature,foil covering and the use of cookie sheets. Cooking timeswill be similar. (See chart below for some exceptions.)
◆ Most foods are cooked on rack position #3o (offset on#3).
◆ For multiple rack cooking with convection, use racks #1and 3o and 4. However, pizzas should be placed oncookie sheets and cooked on rack positions #2o, 3 and 4.
Cooking Chart for Convenience FoodsConvect Roast
Oven Not PreheatedFrozen RackConvenience Foods Position* Temp. ° F Minutes **Chicken, fried 3o 375° 40-45Fish Sticks 3 400° 13-18French Fries 3 450° 15-25Pot Pies 3o 400° 30-35Pizza 3o 400° 13-18
* An “o” after a rack number implies that the offset rack should be used.** The times given are based on specific brands of mixes or recipestested. Actual times will depend on the ones you cook.
4 (flat rack)
3o (offset rack)
1 (flat rack)

Oven Operation 10♦ ♦ ♦ ♦ ♦ ♦ ♦ ♦ ♦ ♦ ♦ ♦ ♦ ♦ ♦ ♦ ♦ ♦ ♦ ♦ ♦ ♦ ♦ ♦ ♦ ♦ ♦ ♦ ♦ ♦ ♦ ♦ ♦ ♦ ♦ ♦ ♦ ♦ ♦ ♦ ♦
Baking ChartConvection Bake Conventional Bake
Preheated PreheatedProduct Pan Rack Temp. Temp.and Type Size Position (°F)** Min.** (°F) Min.**
CakeWhite -- 2 layer 9" 3o or 3 325° 20-30 350° 25-30Chocolate -- 2 layer 9” 3o or 3 325° 25-30 350° 30-35Angel Food tube 2o or 2 350° 30-35 375° 30-40Pound Cake 9x5 loaf 2 300° 50-60 325° 55-65Cupcakes 2 pans 2o & 4 325° 15-20 350° 15-25
Pie -- Two Crust, 9" 3o 350°-400° 45-60 375°-425° 45-60 Fruit, FreshPie -- One Crust, 9" 1 325°-375° 40-50 350°-400° 40-60 Custard, Fresh
CookiesChocolate Chip 3 3o or 3 325°-350° 6-10 350°-375° 7-11Sugar 3 3o or 3 325°-375° 6-10 350-400° 7-11Brownies 9x13" 3o 325° 20-26 350° 25-31
Breads - YeastLoaf 9x5" 1 or 2o 350° 17-23 375° 18-28Rolls 3o 350°-375° 9-14 375°-400° 12-15
Breads - QuickLoaf 8x4" 2o 325°-350° 40-55 350°-375° 50-65Cornbread 8x8” 3o 375°-420° 13-28 400°-450° 15-30Biscuits 3 or 3o 375°-400° 7-11 400°-425° 8-15Muffins 3o 350°-400° 15-20 375°-425° 15-25
VegetablesPotatoes (med.) Do not wrap in foil, prick with fork. 3o 400° 45-50 425° 55-65Squash Casserole 3o 325° 45-55 350° 55-65
* An “o” after a rack number implies that the offset rack should be used.
** The times given are based on specific brands of mixes or recipes tested. Actual timeswill depend on the ones you bake.
*** The Convect Bake temperature is 25° F lower than recommended on package mix orrecipe.

11 Oven Operation♦ ♦ ♦ ♦ ♦ ♦ ♦ ♦ ♦ ♦ ♦ ♦ ♦ ♦ ♦ ♦ ♦ ♦ ♦ ♦ ♦ ♦ ♦ ♦ ♦ ♦ ♦ ♦ ♦ ♦ ♦ ♦ ♦ ♦ ♦ ♦ ♦ ♦ ♦ ♦ ♦
Notes . . .◆ The probe must be removed from the oven when it is
not being used.
◆ Because of the excellent insulation of the oven, theretained heat continues to cook the food after thesignal has sounded and the oven has cycled off. Forthis reason it is important to remove the food from theoven as soon as the signal sounds.
◆ Use the handle of the probe for inserting or removing.Do not pull on the cable. Use a potholder to removesince probe becomes hot.
◆ For frozen meats, insert probe after 1–2 hours ofroasting.
◆ To clean cooled probe, wipe with a soapy dishcloth.Do not submerge probe in water.
Probe
To assure excellent results every time when roasting, use theprobe supplied with your wall oven.
Installing and Setting the Probe
1. Insert the probe into the food item. (For meats, the probetip should be located in the center of the thickest part of themeat and not into the fat or touching a bone.)
2. Insert the probe plug into the receptacle located on the topleft of the oven. Be certain to insert plug into the recep-tacle all the way.
◆ After the probe is in-serted, the indicatorword PROBE will flashand a beep will soundreminding you to enterthe desired probe temp-erature.
3. Press Probe pad. The display will show three dashes.
4. Press the appropriate number pads to set the internaltemperature desired. (Allowable range is 100° to 200°F.)
◆ After five seconds the display will show probetemperature or 95°, whichever is higher. Indicatorwords CONV, BAKE, ROAST will flash.
5. Press Bake or Convect Roast pad. The display will showthree dashes.
6. Press the appropriate number pads for desired oven tem-perature.
7. When the selected internal temperature of the food hasbeen reached, the oven will shut off and a chime will soundfour times. Plus, the actual probe temperature will flashand the word “End” will be shown in the display.
A chime will sound every minute for 10 minutes or untilthe Cancel pad is pressed.
◆ If the probe is not removed, a beep will soundcontinuously until the probe is removed. (Holdprobe plug with a potholder when removing fromthe oven.)

Oven Operation 12♦ ♦ ♦ ♦ ♦ ♦ ♦ ♦ ♦ ♦ ♦ ♦ ♦ ♦ ♦ ♦ ♦ ♦ ♦ ♦ ♦ ♦ ♦ ♦ ♦ ♦ ♦ ♦ ♦ ♦ ♦ ♦ ♦ ♦ ♦ ♦ ♦ ♦ ♦ ♦ ♦
BroilingFor best results, use a pan designed for broiling. For addi-tional broiling tips, see “Cooking Made Simple” booklet.
Setting the Controls for Broiling1. Place the oven rack on the proper rack positon.
(See following chart.)
2. Press the Broil pad.
◆ Indicator word BROIL will flash and three dashes willappear.
3. Press the appropriate number pad(s). The first number padpressed will enter “Hi” broil.
◆ The oven has a variable broil feature which means thata lower broil temperature can be selected. To select alower temperature, press the appropriate number padsfor the temperature desired after “Hi” appears in thedisplay.
◆ Five seconds after entering “Hi” or a temperature, thebroil element will come on and the indicator wordsBROIL and ON will remain in the display. (If alower temperature is selected, the ON indicator wordwill cycle on and off with the element.)
4. Preheat five minutes until broil element is red. Cook foodaccording to the following broiling chart. Oven doorMUST be left open at the broil stop position duringcooking.
5. Press the Cancel to turn off oven when food is cooked.
Notes . . .◆ If more that five seconds elapse between pressing the
Broil pad and number pad, the oven is not set and thedisplay will return to the previous display.
◆ “Hi” is used for most broiling. Use a lower broiltemperature when broiling longer cooking foods orthin pieces of food. The lower temperature allowsfood to cook to the well done stage without excessivebrowning.
Broiling ChartChart time based on a preheated broil element using the “Hi” setting
Rack Approx. (Minutes/Side)Foods Position* 1st Side 2nd Side
BeefSteak (1"): Medium 4o 9 7 Well 4o 11 8Hamburgers (3/4"): Medium 4o 5 3-4 Well 4o 6 4-5
PorkChops (1/2") 4o 7 5-6Chops (1") 3 10-11 9-10Ham Slice 4o 4 2-3
PoultryBreast Halves(Bone-in) 3 11-12 9-11
SeafoodFish Steaks,Buttered (1") 4o 8-10 (no turning)
*An "o" after the rack number implies that the offset rack should be used.
Note: This chart is a suggested guide. The times may varywith food being cooked.
◆ A cooling fan will automatically turn on duringbroiling. If it does not operate, contact an authorizedservicer.
◆ Expect broil times to increase and browning to beslightly lighter if appliance is installed on a 208 voltcircuit.

13 Oven Operation♦ ♦ ♦ ♦ ♦ ♦ ♦ ♦ ♦ ♦ ♦ ♦ ♦ ♦ ♦ ♦ ♦ ♦ ♦ ♦ ♦ ♦ ♦ ♦ ♦ ♦ ♦ ♦ ♦ ♦ ♦ ♦ ♦ ♦ ♦ ♦ ♦ ♦ ♦ ♦ ♦
Clock ControlledOven Operations
The clock controlled oven cooking feature is used to turn theoven off at a preset time of day or delay the start and then turnoff the oven.
The clock must be functioning and set at the correct time ofday for this feature to operate correctly.
The feature can be used with either oven cooking or self –cleaning. See page 18 for instructions on delaying the start ofa clean cycle.
Setting the Controls
To Start Immediately and Turn Off Automatically:
1. Press the Bake pad.
◆ The indicator word BAKE will flash and three dasheswill appear in the display.
2. Press the Auto Set (0) pad or the appropriate number padsfor the desired oven temperature.
◆ The temperature can be set from 100° to 550° in 5°increments.
◆ After five seconds the oven will begin to preheat. Theindicator words ON and PREHEAT will appear in thedisplay and 100° or the actual oven temperature, which-ever is higher.
3. Press the Cook Time pad. The indicator words COOKTIME will flash and the display will show “0HR:00”.
4. Press the appropriate number pads to enter cooking hoursand minutes. (Allowable range is 5 minutes to 11 hoursand 55 minutes.)
Example: If cooking time selected for convection bakingis 2 hours and 30 minutes, the display will show:
After five seconds, the time of day returns to the display.
◆ The temperature in the display will increase in 5°increments until the oven reaches the presettemperature.
◆ When the oven is preheated, the oven will chime andthe ON and PREHEAT indicator words will go off.
5. At the end of the programmed Cook Time, the oven willshut off automatically and a “chime” will be heard fourtimes and “End” will appear in the display. Press theCancel pad.
If oven is not cancelled, “End” will remain in thedisplay and there will be one chime every minute for 10minutes.
To Delay the Start and Turn Off Automatically:
1–4. Follow preceding steps 1–4.
5. Press the Stop Time pad. Indicator words STOP andTIME will flash. (Display will show the calculated stoptime based on the current time of day and the cook timethat you entered previously.)
Notes . . .◆ One minute before the end of Cook time, the oven
light will come on until the end-of-cycle chimes arecompleted. The light can be turned off prior to the endof the chimes by pressing the Oven Light pad orpressing the Cancel pad. (Pressing the Cancel padwill also cancel the operation.)
Oven Operation 14♦ ♦ ♦ ♦ ♦ ♦ ♦ ♦ ♦ ♦ ♦ ♦ ♦ ♦ ♦ ♦ ♦ ♦ ♦ ♦ ♦ ♦ ♦ ♦ ♦ ♦ ♦ ♦ ♦ ♦ ♦ ♦ ♦ ♦ ♦ ♦ ♦ ♦ ♦ ♦ ♦
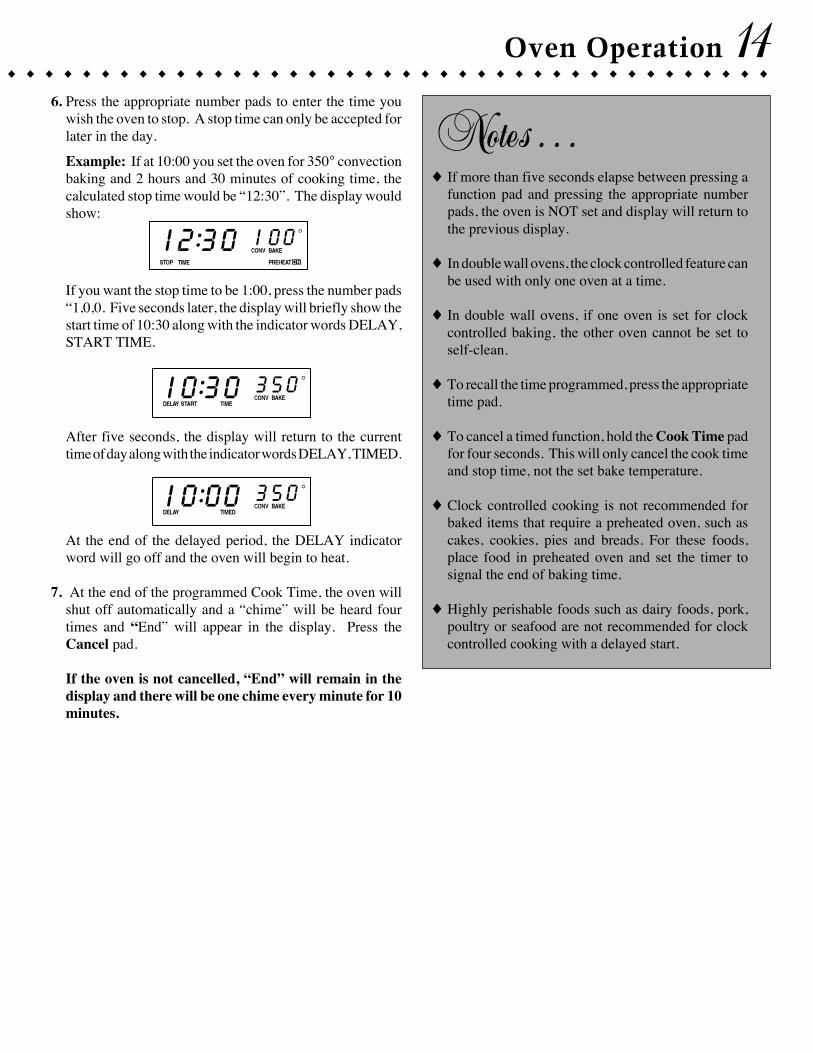
6. Press the appropriate number pads to enter the time youwish the oven to stop. A stop time can only be accepted forlater in the day.
Example: If at 10:00 you set the oven for 350° convectionbaking and 2 hours and 30 minutes of cooking time, thecalculated stop time would be “12:30”. The display wouldshow:
If you want the stop time to be 1:00, press the number pads“1,0,0. Five seconds later, the display will briefly show thestart time of 10:30 along with the indicator words DELAY,START TIME.
After five seconds, the display will return to the currenttime of day along with the indicator words DELAY, TIMED.
At the end of the delayed period, the DELAY indicatorword will go off and the oven will begin to heat.
7. At the end of the programmed Cook Time, the oven willshut off automatically and a “chime” will be heard fourtimes and “End” will appear in the display. Press theCancel pad.
If the oven is not cancelled, “End” will remain in thedisplay and there will be one chime every minute for 10minutes.
Notes . . .◆ If more than five seconds elapse between pressing a
function pad and pressing the appropriate numberpads, the oven is NOT set and display will return tothe previous display.
◆ In double wall ovens, the clock controlled feature canbe used with only one oven at a time.
◆ In double wall ovens, if one oven is set for clockcontrolled baking, the other oven cannot be set toself-clean.
◆ To recall the time programmed, press the appropriatetime pad.
◆ To cancel a timed function, hold the Cook Time padfor four seconds. This will only cancel the cook timeand stop time, not the set bake temperature.
◆ Clock controlled cooking is not recommended forbaked items that require a preheated oven, such ascakes, cookies, pies and breads. For these foods,place food in preheated oven and set the timer tosignal the end of baking time.
◆ Highly perishable foods such as dairy foods, pork,poultry or seafood are not recommended for clockcontrolled cooking with a delayed start.

Notes . . .
15 Oven Operation♦ ♦ ♦ ♦ ♦ ♦ ♦ ♦ ♦ ♦ ♦ ♦ ♦ ♦ ♦ ♦ ♦ ♦ ♦ ♦ ♦ ♦ ♦ ♦ ♦ ♦ ♦ ♦ ♦ ♦ ♦ ♦ ♦ ♦ ♦ ♦ ♦ ♦ ♦ ♦ ♦
For best results, use a drying rack. It allows air to circulateevenly around the food.
The convection fan will operate during the drying procedure.
Setting the Controls for Drying1. Press the Drying pad.
♦ The indicator word DRYING will flash and three dasheswill appear.
2. Press the Auto Set pad for 140° F or press the appropriatenumber pads for the desired drying temperature.
♦ The temperature may be set between 100° - 200° F.
3. The oven door needs to be opened slightly to allow moistureto escape from the oven during the drying process.
♦ Open the oven door slightly.
♦ Place the magnetic door spacer (Part No. 8010P131-60)on the slightly recessed circular area on the upper centerof the oven door. The spacer provides a gap between theoven frame and the ovendoor allowing moistureto escape.
NOTE: If thespacer is notplaced correctly,the convection fanwill not operate.
♦ Gently close the oven dooruntil the spacer rests againstthe oven frame and light plungerThe oven light will remain OFF whenthe spacer is in the correct location.
Follow the drying guide on page 16 fordrying times. Cool foods to room temperature beforetesting for doneness.
4. When drying is complete, turn the oven off by pressing theCancel pad. Using a potholder, remove the magneticspacer.
NOTE: Please keep the magnetic spacer in a safe andconvenient place for easy access. To replace, call 1-800-688-8408 to order Part No. 8010P131-60.
◆ To purchase a drying rack, contact your Jenn-Airdealer for the “DRYINGRACK” Accessory Kit orcall 1-800-688-8408.
◆ Most fruits and vegetables dry well and retain theircolor when dried at 140° F. Meat and jerky should bedried at 145° - 150° F. For optimal flavor, dry herbsat 100° F, however, at this lower temperature expectextended drying times of up to 8 hours.
◆ The length of drying times vary due to the following:Water and sugar content of food, size of food pieces,amount of food being dried, humidity in the air.
◆ Check foods at the minimum drying time. Dry longerif necessary.
◆ Fruits that turn brown when exposed to air should betreated with an antioxidant. Try one of the followingmethods:1. Dip fruit in a mixture of two parts bottled lemon
juice to one part cool water.2. Soak fruit in a solution of 1 tsp. ascorbic acid or
commercial antioxidant to 1 quart of cold water.
◆ Foods may drip during the drying process. Afterdrying high acid or sugary foods, clean the ovenbottom with soap and water. The porcelain ovenfinish may discolor if acid or sugary food soils are notwiped up prior to high heat or a self-cleaning cycle.
◆ More than one rack of food may be dried at the sametime. However, additional drying time is needed.
◆ Refer to other resources at your local library or callyour local County Extension service for additionalinformation.
Drying
spacer
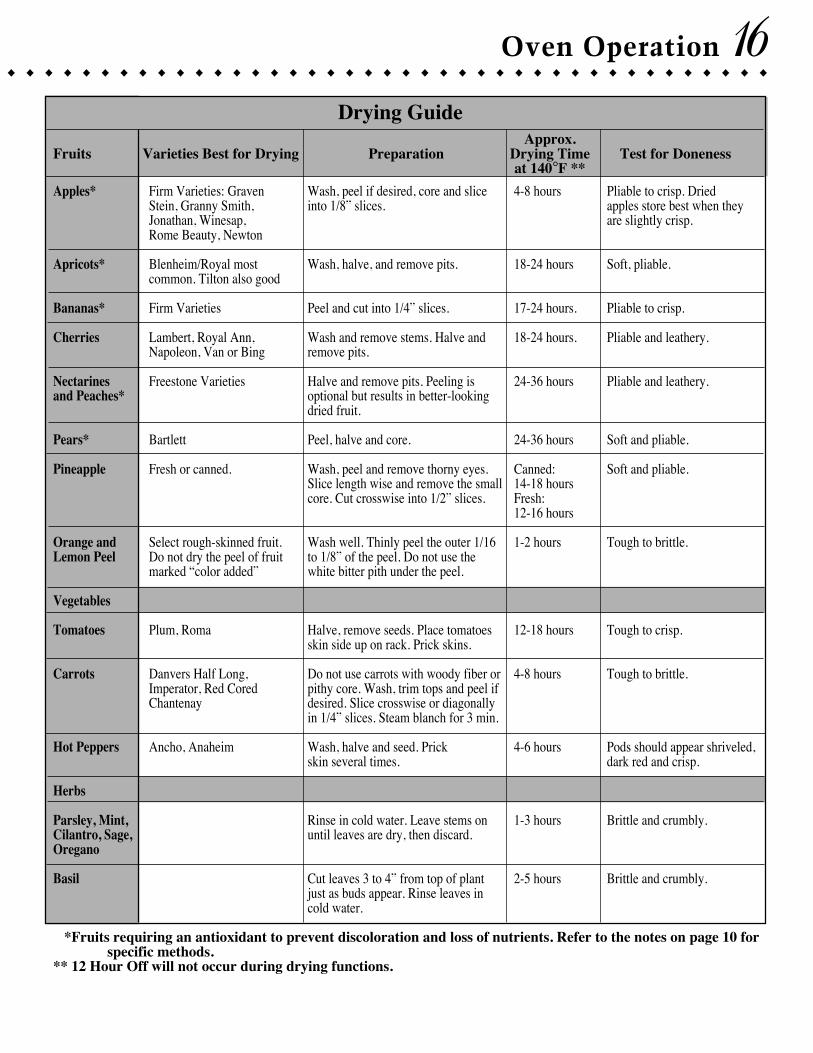
Drying Guide
Oven Operation 16♦ ♦ ♦ ♦ ♦ ♦ ♦ ♦ ♦ ♦ ♦ ♦ ♦ ♦ ♦ ♦ ♦ ♦ ♦ ♦ ♦ ♦ ♦ ♦ ♦ ♦ ♦ ♦ ♦ ♦ ♦ ♦ ♦ ♦ ♦ ♦ ♦ ♦ ♦ ♦ ♦
Approx.Fruits Varieties Best for Drying Preparation Drying Time Test for Doneness
at 140°F **
Apples* Firm Varieties: Graven Wash, peel if desired, core and slice 4-8 hours Pliable to crisp. DriedStein, Granny Smith, into 1/8” slices. apples store best when theyJonathan, Winesap, are slightly crisp.Rome Beauty, Newton
Apricots* Blenheim/Royal most Wash, halve, and remove pits. 18-24 hours Soft, pliable.common. Tilton also good
Bananas* Firm Varieties Peel and cut into 1/4” slices. 17-24 hours. Pliable to crisp.
Cherries Lambert, Royal Ann, Wash and remove stems. Halve and 18-24 hours. Pliable and leathery.Napoleon, Van or Bing remove pits.
Nectarines Freestone Varieties Halve and remove pits. Peeling is 24-36 hours Pliable and leathery.and Peaches* optional but results in better-looking
dried fruit.
Pears* Bartlett Peel, halve and core. 24-36 hours Soft and pliable.
Pineapple Fresh or canned. Wash, peel and remove thorny eyes. Canned: Soft and pliable.Slice length wise and remove the small 14-18 hourscore. Cut crosswise into 1/2” slices. Fresh:
12-16 hours
Orange and Select rough-skinned fruit. Wash well. Thinly peel the outer 1/16 1-2 hours Tough to brittle.Lemon Peel Do not dry the peel of fruit to 1/8” of the peel. Do not use the
marked “color added” white bitter pith under the peel.
Vegetables
Tomatoes Plum, Roma Halve, remove seeds. Place tomatoes 12-18 hours Tough to crisp.skin side up on rack. Prick skins.
Carrots Danvers Half Long, Do not use carrots with woody fiber or 4-8 hours Tough to brittle.Imperator, Red Cored pithy core. Wash, trim tops and peel ifChantenay desired. Slice crosswise or diagonally
in 1/4” slices. Steam blanch for 3 min.
Hot Peppers Ancho, Anaheim Wash, halve and seed. Prick 4-6 hours Pods should appear shriveled,skin several times. dark red and crisp.
Herbs
Parsley, Mint, Rinse in cold water. Leave stems on 1-3 hours Brittle and crumbly.Cilantro, Sage, until leaves are dry, then discard.Oregano
Basil Cut leaves 3 to 4” from top of plant 2-5 hours Brittle and crumbly.just as buds appear. Rinse leaves incold water.
*Fruits requiring an antioxidant to prevent discoloration and loss of nutrients. Refer to the notes on page 10 for specific methods.
** 12 Hour Off will not occur during drying functions.

17 Care and Cleaning♦ ♦ ♦ ♦ ♦ ♦ ♦ ♦ ♦ ♦ ♦ ♦ ♦ ♦ ♦ ♦ ♦ ♦ ♦ ♦ ♦ ♦ ♦ ♦ ♦ ♦ ♦ ♦ ♦ ♦ ♦ ♦ ♦ ♦ ♦ ♦ ♦ ♦ ♦ ♦ ♦
Self–Clean Oven
The self-clean cycle uses above normal cooking tempera-tures to automatically clean the entire oven interior. Whilethis occurs, a device in the oven vent helps consume normalamounts of smoke. The oven is vented through an openingunder the control panel.
NOTE: Both ovens cannot be self-cleaned at the same timein double wall oven models.
It is normal for flare-ups, smoking or flaming to occur duringcleaning if the oven is heavily soiled.
It is better to clean the oven regularly rather than to wait untilthere is a heavy build-up of soil in the oven.
During the cleaning process, the kitchen should be wellventilated to help eliminate normal odors associated withcleaning.
Do not use commercial oven cleaners on the self-clean ovenfinish or around any part of the oven as they will damage thefinish or parts.
Before Self-Cleaning
Remove broiler pan, all pans and the oven racks from theoven. The oven racks will discolor and may not slide easilyafter a self-clean cycle.
Clean oven frame, door frame (area outside the door gasket)and around the opening in the door gasket with a non-abrasive cleaning agent such as Bon Ami* or detergent andwater. These areas are not exposed to cleaning temperaturesand should be cleaned to prevent soil from baking on duringthe clean cycle.
To prevent damage, donot clean or rub the gas-ket around the oven door.The gasket is designed toseal in heat during theclean cycle.
Wipe up excess grease orspillovers from the ovenbottom to prevent excessive smoking, flare-ups or flamingduring the clean cycle. For ease of cleaning, the heating el-ement can be lifted slightly (1 to 1-1/2 inches).
Wipe up sugary spillovers and acid spillovers such as lemonjuice, tomato sauce or milk-based sauces. Porcelain enamelis acid resistant, not acid proof. The porcelain finish maydiscolor if acid spills are not wiped up prior to a self-cleancycle.
Setting the Controls for a Self–Clean Cycle
1. Close the oven door.
2. Press the Clean pad.
♦ The indicator words CLEAN TIME will flash and thedisplay will show “__HR:__ __”. (Double wall ovenmodels will also have a”U” or “L” indicating upper orlower oven.)
3. Press Auto Set (0) pad and “3:00” hours will appear in thedisplay for an average soiled oven.
♦ The cleaning time can be varied depending on theamount of soil. After “3:00” appears in the display,press the number 2 pad and enter “2:00” hours ofcleaning for light soil. The number 4 pad will enter“4:00” hours for heavy soil.
♦ Five seconds after entering the cleaning time, the ovendoor will automatically latch and the cooling fan willcome on.
♦ The indicator words LOCK and ON will come on whenthe door is latched.
♦ The indicator word ON will cycle with the elements asthe cleaning temperature is maintained.
4. When the cleaning time has been completed, the indicatorwords CLEAN and ON will go off. The indicator wordLOCK and the cooling fan will remain on until the ovenhas cooled and the door has unlocked.
After Self-Cleaning
About one hour after the end of the clean cycle, the lockwill disengage and the LOCK indicator word will turn off.At this point, the door can be unlocked and opened.
Some soil may leave a light gray, powdery ash which can beremoved with a damp cloth. If soil remains, it indicates thatthe clean cycle was not long enough. The soil will be re-moved during the next clean cycle.
If the oven racks were left in the oven and do not slidesmoothly after a clean cycle, wipe racks and embossed racksupports with a small amount of vegetable oil to restore easeof movement.
A white discoloration may appear after cleaning if acid orsugary foods were not wiped up before the clean cycle. Thisis normal and will NOT affect performance.
Care and Cleaning 18♦ ♦ ♦ ♦ ♦ ♦ ♦ ♦ ♦ ♦ ♦ ♦ ♦ ♦ ♦ ♦ ♦ ♦ ♦ ♦ ♦ ♦ ♦ ♦ ♦ ♦ ♦ ♦ ♦ ♦ ♦ ♦ ♦ ♦ ♦ ♦ ♦ ♦ ♦ ♦ ♦
To Delay the Start of a Clean Cycle
1–3. Follow steps 1–3 on page 14.
4. Press the Stop Time pad. Indicator words STOP TIMEwill flash in the display and CLEAN and the calculatedstop time will also appear in the display.
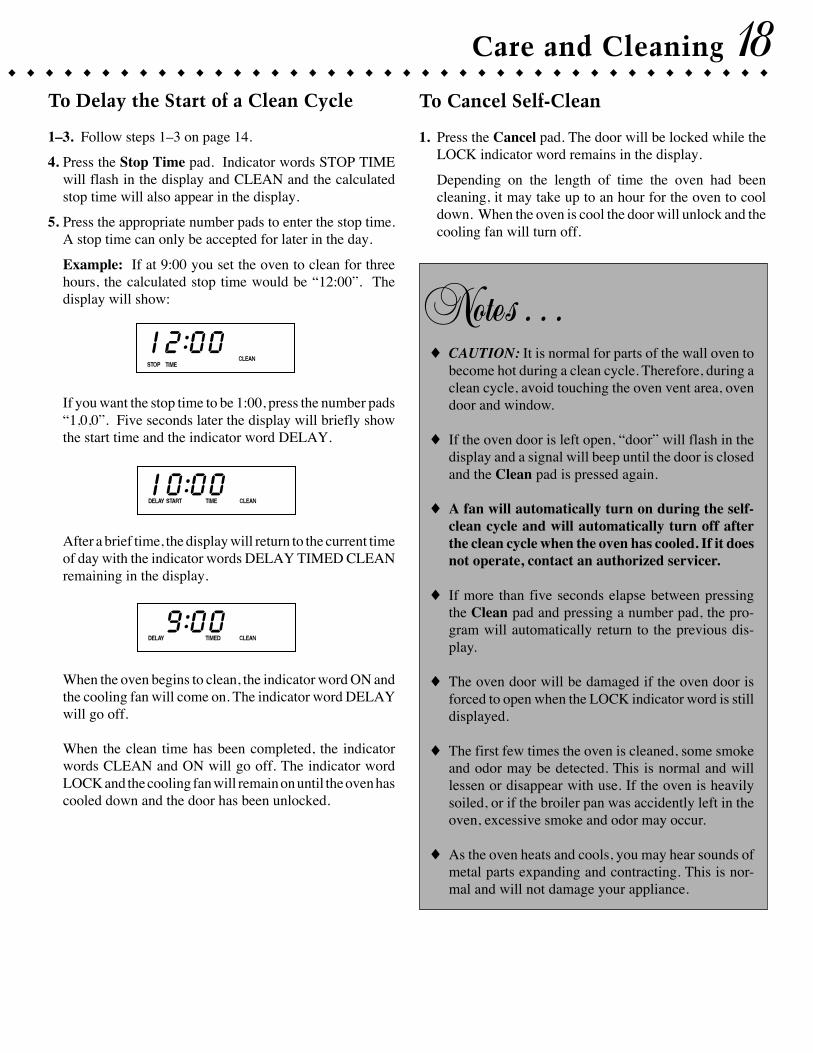
5. Press the appropriate number pads to enter the stop time.A stop time can only be accepted for later in the day.
Example: If at 9:00 you set the oven to clean for threehours, the calculated stop time would be “12:00”. Thedisplay will show:
If you want the stop time to be 1:00, press the number pads“1,0,0”. Five seconds later the display will briefly showthe start time and the indicator word DELAY.
After a brief time, the display will return to the current timeof day with the indicator words DELAY TIMED CLEANremaining in the display.
When the oven begins to clean, the indicator word ON andthe cooling fan will come on. The indicator word DELAYwill go off.
When the clean time has been completed, the indicatorwords CLEAN and ON will go off. The indicator wordLOCK and the cooling fan will remain on until the oven hascooled down and the door has been unlocked.
To Cancel Self-Clean
1. Press the Cancel pad. The door will be locked while theLOCK indicator word remains in the display.
Depending on the length of time the oven had beencleaning, it may take up to an hour for the oven to cooldown. When the oven is cool the door will unlock and thecooling fan will turn off.
Notes . . .◆ CAUTION: It is normal for parts of the wall oven to
become hot during a clean cycle. Therefore, during aclean cycle, avoid touching the oven vent area, ovendoor and window.
◆ If the oven door is left open, “door” will flash in thedisplay and a signal will beep until the door is closedand the Clean pad is pressed again.
◆ A fan will automatically turn on during the self-clean cycle and will automatically turn off afterthe clean cycle when the oven has cooled. If it doesnot operate, contact an authorized servicer.
◆ If more than five seconds elapse between pressingthe Clean pad and pressing a number pad, the pro-gram will automatically return to the previous dis-play.
◆ The oven door will be damaged if the oven door isforced to open when the LOCK indicator word is stilldisplayed.
◆ The first few times the oven is cleaned, some smokeand odor may be detected. This is normal and willlessen or disappear with use. If the oven is heavilysoiled, or if the broiler pan was accidently left in theoven, excessive smoke and odor may occur.
◆ As the oven heats and cools, you may hear sounds ofmetal parts expanding and contracting. This is nor-mal and will not damage your appliance.

19 Care and Cleaning♦ ♦ ♦ ♦ ♦ ♦ ♦ ♦ ♦ ♦ ♦ ♦ ♦ ♦ ♦ ♦ ♦ ♦ ♦ ♦ ♦ ♦ ♦ ♦ ♦ ♦ ♦ ♦ ♦ ♦ ♦ ♦ ♦ ♦ ♦ ♦ ♦ ♦ ♦ ♦ ♦
Cleaning ChartParts Cleaning Procedure
Broiler Pan Never cover insert with aluminum foil as this prevents the fat from draining to the pan below.and Insert ♦ Place soapy cloth over insert and pan; let soak to loosen soil.
♦ Wash in warm, soapy water. Use soap-filled souring pad to remove stubborn soil.♦ Broiler pan and insert can be cleaned in dishwasher.
Control Panel ♦ Wipe with a damp cloth. Dry thoroughly.♦ Glass cleaners may be used if sprayed on a cloth first. Do Not Spray Directly On The Panel.♦ Do not use other cleaning sprays, abrasive cleaners or large amounts of water on the panel.
Plastic Finishes ♦ Wash with soap and water or mild liquid sprays and a soft cloth. Do not use abrasive cleaners or- Door Handle Area oven cleaners on plastic finishes.
♦ To prevent staining or discoloration, wipe up fat, grease or acid (tomato, lemon, vinegar, milk, fruitjuice, marinade) immediately with a dry paper towel or cloth.
Glass ♦ Wash with soap and water or glass cleaner. Avoid using excessive amounts of water which may- Window seep behind or under the glass.- Oven Door ♦ Do not use abrasive cleaners.
Metal Finishes ♦ Wash with soap and water, glass cleaners or mild liquid sprays. Avoid using excessive amounts- Oven Trim of water.
♦ Remove stubborn soils with nonabrasive cleaners such as Bon Ami* or a baking soda and waterpaste; rinse and dry. Do not use abrasive cleaners.
Oven Interior ♦ See pages 17 and 18 for information on the self-clean oven.♦ To remove occasional spillovers between cleanings, use a plastic soap-filled scouring pad;
rinse well.♦ Wipe up sugary spillovers and acid spillovers such as lemon juice, tomato sauce or milk-based
sauces. Porcelain enamel is acid resistant, not acid proof. The porcelain finish may discolor if acidspills are not wiped up prior to a self-clean cycle.
Oven Racks ♦ Rub with a sponge or cloth using one of the following cleaners: Bon-Ami*, Soft Scrub* orComet*. Rinse and dry.
♦ For hard to remove soils, use a dampened soap-filled scouring pad. Rinse and dry.♦ Racks will permanently discolor and may not slide smoothly if left in the oven during a self-clean
operation. If this occurs, wipe the rack and embossed rack supports with a small amount ofvegetable oil to restore ease of movement, then wipe off excess oil.
○ ○ ○ ○ ○ ○ ○ ○ ○ ○ ○ ○ ○ ○ ○ ○ ○ ○ ○ ○ ○ ○ ○ ○ ○ ○ ○ ○ ○ ○ ○ ○ ○ ○ ○ ○ ○ ○ ○ ○ ○ ○ ○ ○ ○ ○ ○ ○ ○ ○ ○ ○ ○ ○ ○ ○ ○ ○ ○ ○ ○ ○ ○ ○ ○ ○ ○ ○
○ ○ ○ ○ ○ ○ ○ ○ ○ ○ ○ ○ ○ ○ ○ ○ ○ ○ ○ ○ ○ ○ ○ ○ ○ ○ ○ ○ ○ ○ ○ ○ ○ ○ ○ ○ ○ ○ ○ ○ ○ ○ ○ ○ ○ ○ ○ ○ ○ ○ ○ ○ ○ ○ ○ ○ ○ ○ ○ ○ ○ ○ ○ ○ ○ ○ ○ ○
○ ○ ○ ○ ○ ○ ○ ○ ○ ○ ○ ○ ○ ○ ○ ○ ○ ○ ○ ○ ○ ○ ○ ○ ○ ○ ○ ○ ○ ○ ○ ○ ○ ○ ○ ○ ○ ○ ○ ○ ○ ○ ○ ○ ○ ○ ○ ○ ○ ○ ○ ○ ○ ○ ○ ○ ○ ○ ○ ○ ○ ○ ○ ○ ○ ○ ○ ○
○ ○ ○ ○ ○ ○ ○ ○ ○ ○ ○ ○ ○ ○ ○ ○ ○ ○ ○ ○ ○ ○ ○ ○ ○ ○ ○ ○ ○ ○ ○ ○ ○ ○ ○ ○ ○ ○ ○ ○ ○ ○ ○ ○ ○ ○ ○ ○ ○ ○ ○ ○ ○ ○ ○ ○ ○ ○ ○ ○ ○ ○ ○ ○ ○ ○ ○ ○
○ ○ ○ ○ ○ ○ ○ ○ ○ ○ ○ ○ ○ ○ ○ ○ ○ ○ ○ ○ ○ ○ ○ ○ ○ ○ ○ ○ ○ ○ ○ ○ ○ ○ ○ ○ ○ ○ ○ ○ ○ ○ ○ ○ ○ ○ ○ ○ ○ ○ ○ ○ ○ ○ ○ ○ ○ ○ ○ ○ ○ ○ ○ ○ ○ ○ ○ ○
Be sure all controls are OFF and all parts are cool before cleaning.• To prevent staining or discoloration, clean appliance • If a part is removed, be sured it is correctly replaced.
after each use.
○ ○ ○ ○ ○ ○ ○ ○ ○ ○ ○ ○ ○ ○ ○ ○ ○ ○ ○ ○ ○ ○ ○ ○ ○ ○ ○ ○ ○ ○ ○ ○ ○ ○ ○ ○ ○ ○ ○ ○ ○ ○ ○ ○ ○ ○ ○ ○ ○ ○ ○ ○ ○ ○ ○ ○ ○ ○ ○ ○ ○ ○ ○ ○ ○ ○ ○ ○
* Brand names for cleaning products are registered trademarks of the respective manufacturers.
Maintenance 20♦ ♦ ♦ ♦ ♦ ♦ ♦ ♦ ♦ ♦ ♦ ♦ ♦ ♦ ♦ ♦ ♦ ♦ ♦ ♦ ♦ ♦ ♦ ♦ ♦ ♦ ♦ ♦ ♦ ♦ ♦ ♦ ♦ ♦ ♦ ♦ ♦ ♦ ♦ ♦ ♦
Oven Light
Before replacing light bulb, DISCONNECT POWER TOOVEN. Be sure bulb is cool. Do not touch a hot bulb with adamp cloth as the bulb may break.
To replace oven light:
Use a dry potholder and very carefully unscrew bulb coverand bulb. Replace with a 40 watt, oven-rated appliance bulb.Bulb with a brass base is recommended to prevent fusing ofbulb into socket.
Replace bulb cover and reconnect power to oven. Resetclock.
Oven WindowTo protect the oven door window:
1. Do not use abrasive cleaning agents such as steel woolscouring pads or powdered cleansers as they may scratchthe glass.
2. Do not hit the glass with pots, pans, furniture, toys, or otherobjects.
3. Do not close the oven door until the oven racks are in place.
Scratching, hitting, jarring or stressing the glass may weakenits structure causing an increased risk of breakage at a laterdate.
About Cleaning Products
Because of the many new cleaning products introduced in themarketplace each year, it is not possible to list all productsthat can be safely used to clean this appliance. Listed beloware just a few examples of recommended products.
REMEMBER, ALWAYS READ THE MANU-FACTURER’S INSTRUCTIONS to be sure the cleaner canbe safely used on this appliance.
To determine if a cleaning product is safe, test a smallinconspicuous area using a very light pressure to see if thesurface may scratch or discolor. This is particularly impor-tant for porcelain enamel, highly polished, shiny, painted, orplastic surfaces.
The following brands may help you to make an appropriateselection:
♦ Glass Cleaners - Cinch, Glass Plus, Windex.
♦ Dishwashing Liquid Detergents - Dawn, Ivory, Joy.
♦ Mild Liquid Spray Cleaners - Fantastik, Formula 409.
♦ Multi-Surface Cleaners - Formula 409 Glass & Surface,Windex Glass & Surface.
♦ Nonabrasive Cleaners - Bon Ami, paste of baking sodaand water.
♦ Mildly Abrasive Powder or Liquid Cleaners - Ajax,Barkeepers Friend, Cameo, Soft Scrub, Smart Cleanser.(Note: If the cleaner is recommended for use on plastic,glass, or porcelain finishes, it can be used on the same typeof appliance finish.)
♦ Nonabrasive or Scratchless Plastic or Nylon ScouringPads or Sponges - Chore Boy Plastic Cleaning Puff,Scrunge Scrub Sponges, Scotch-Brite No Scratch Pads.
♦ Abrasive Scouring Pads - S.O.S., Brillo Steel Wool Soap,Scotch-Brite Wool Soap Pads.
(Brand names for the above cleaning products are registeredtrademarks of the respective manufacturers.)
21 Before You Call for Service♦ ♦ ♦ ♦ ♦ ♦ ♦ ♦ ♦ ♦ ♦ ♦ ♦ ♦ ♦ ♦ ♦ ♦ ♦ ♦ ♦ ♦ ♦ ♦ ♦ ♦ ♦ ♦ ♦ ♦ ♦ ♦ ♦ ♦ ♦ ♦ ♦ ♦ ♦ ♦ ♦
If foods do not broil properly:
♦ The control may not be set properly.
♦ Check rack position. (See pages 9 and 12.)
♦ Voltage into house may be low.
If baked food is burned or too brown on top:
♦ Food may be positioned incorrectly in oven. (See“Cooking Made Simple” booklet.)
♦ Oven not preheated properly.
If foods bake unevenly:
♦ The oven may be installed improperly.
♦ Check the oven rack with a level.
♦ Stagger pans, do not allow pans to touch each other oroven wall.
♦ Check instructions for suggested placement of pans on ovenrack. (See “Cooking Made Simple” booklet.)
If oven door will not unlock:
♦ Oven may not have cooled to safe temperature after self-cleaning process.
If oven baking results are less than expected:
♦ The pans being used may not be of the size or materialrecommended for best results. (See “Cooking MadeSimple” booklet).
♦ There may not be sufficient room around sides of the pansfor proper air circulation in the oven.
♦ Check instructions for preheating, rack position and oventemperature.
♦ Check oven temperature when convection baking.Decrease conventional baking temperatures by 25°F.
If baking results differ from previous oven:
♦ Oven thermostat calibration may differ between old andnew ovens. Follow recipe and use the directions in thisguide before calling for service since the calibration onthe previous oven may have drifted to a too high or toolow setting. (See p. 7 - Adjusting Oven Temperature.)
Check the following list to be sure a service call is really necessary. A quick reference of this guide may prevent an unneededservice call.
If the oven fails to operate:
♦ Check for a blown fuse or a tripped circuit breaker.
♦ Check if oven is properly connected to electric outlet.
If clock, indicator words, and/or lights operate but ovendoes not heat:
♦ The controls may have been set incorrectly.
♦ Clock controls may be set for a delayed bake function.
♦ The Oven Control Lockout may have been set. (See page6.)
If the oven light and/or clock does not function:
♦ The light bulb is loose or defective.
♦ Check power supply, circuit breaker or fuse.
♦ The oven light does not work during self-cleaning pro-cess.
There is a strong odor or light smoke when
oven is turned on:
♦ This is normal for a new wall oven and will disappearafter a few uses. Initiating a clean cycle will “burn off”the smells more quickly. Turning on a ventilation fan willhelp remove the smoke and/or odor.
♦ Excessive food soils on the oven bottom. Use a self-cleancycle.
If oven will not activate the self-cleaning process:
♦ Controls may be improperly set.
♦ Check the “Clean” and “Stop” time settings and the cur-rent time of day on the clock.
If oven did not clean properly:
♦ Oven may need longer cleaning time.
♦ Excessive spills were not removed prior to self-cleaning
process.

Before You Call for Service 22♦ ♦ ♦ ♦ ♦ ♦ ♦ ♦ ♦ ♦ ♦ ♦ ♦ ♦ ♦ ♦ ♦ ♦ ♦ ♦ ♦ ♦ ♦ ♦ ♦ ♦ ♦ ♦ ♦ ♦ ♦ ♦ ♦ ♦ ♦ ♦ ♦ ♦ ♦ ♦ ♦
If the cooling fan continues to operate after the oven hasbeen turned off:
♦ This is normal and the fan will automatically shut off whenthe oven is cooled.
If a fan is heard while using the broil and clean modes:
♦ This is the cooling fan and is normal. The fan will con-tinue to run after use until the oven cools.
If probe does not work:♦ check to be sure probe plug is properly inserted into oven
receptacle.♦ probe may not be positioned in food properly.♦ probe temperature may have been improperly set.
If convection fan does not operate during drying:♦ Check that the magnetic door spacer was correctly placed
on the slightly recessed circular area on the upper centerof the oven door. (See pages 15 and 16.)
Fault Codes
♦ Fault codes are shown in the display as “F” and a number.If a fault code appears in the display and beeps sound,press the Cancel pad. If the fault code and beeps continueafter pressing Cancel, disconnect power to the oven. Waita few minutes, then reconnect power to the oven. If thefault code and beeps still continue, disconnect power tothe wall oven and call an authorized servicer.
♦ If the oven is heavily soiled, excessive flare-ups may re-sult in a fault code during a clean cycle. Press Cancel padand allow the oven to cool for one hour, then reset theclean cycle. If the fault code and beeps still continue, dis-connect power to the appliance and call an authorizedservicer.
♦ If an error beep sounds (two short beeps) with no faultcode in the display, clean any spill from key pad area within30 seconds. If, after 30 seconds the spill is not removed oranother problem exists, an F7 fault code will be displayed.Disconnect power to the appliance and call an authorizedservicer.
If You Need Service:♦ Call the dealer from whom your appliance was purchased
or call Maytag Appliances Sales Company, Jenn-AirCustomer Assistance at 1-800-688-1100 or 1-423-472-3333 to locate an authorized servicer.
♦ Be sure to retain proof of purchase to verify warrantystatus. Refer to WARRANTY (last page) for furtherinformation of owner's responsibilities for warranty service.
♦ If the dealer or service company cannot resolve theproblem, write to Maytag Appliances Sales Company,Attn: CAIR® Center, P.O. Box 2370, Cleveland, TN37320-2370, or call 1-800-688-1100 or 1-423-472-3333.
U.S. customers using TTY for deaf, hearing impaired orspeech impaired, call 1-800-688-2080.
NOTE: When writing or calling about a service problem,please include the following information:
a. Your name, address and telepohone number;b. Model number and serial number;c. Name and address of your dealer or servicer;d. A clear description of the problem you are having;e. Proof of ourchase (sales receipt).
♦ User’s guides, service manuals, and parts information areavailable from Maytag Appliances Sales Company, Jenn-Air Customer Assistance.
All specifications subject to change by manufacturerwithout notice.

♦ ♦ ♦ ♦ ♦ ♦ ♦ ♦ ♦ ♦ ♦ ♦ ♦ ♦ ♦ ♦ ♦ ♦ ♦ ♦ ♦ ♦ ♦ ♦ ♦ ♦ ♦ ♦ ♦ ♦ ♦ ♦ ♦ ♦ ♦ ♦ ♦ ♦ ♦ ♦ ♦
Printed in U.S.A. Part No. 8112P175-60 A/11/00©2000 Jenn-Air
23 Warranty
403 WEST FOURTH STREET NORTH • PO BOX 39 • NEWTON, IA 50208
®
JENN-AIR COOKING APPLIANCE WARRANTYFull One Year Warranty - Parts and Labor
For one (1) year from the original retail purchase date, any part which fails in normal home use will be repaired or replaced free of charge.
Limited Warranties - Parts Only
Second Year - After the first year from the original purchase date, parts which fail in normal home use will be repaired or replaced free of chargefor the part itself, with the owner paying all other costs, including labor, mileage and transportation.
Third Through Fifth Year - From the original purchase date, parts listed below which fail in normal home use will be repaired or replaced freeof charge for the part itself, with the owner paying all other costs, including labor, mileage and transportation.
• Electronic Controls• Electric Heating Elements: surface, broil and bake elements on electric cooking appliances.
Canadian Residents
The above warranties only cover an appliance installed in Canada that has been certified or listed by appropriate test agencies for compliance toa National Standard of Canada unless the appliance was brought into Canada due to transfer of residence from the United States to Canada.
Limited Warranty Outside the United States and Canada - Parts Only
For two (2) years from the date of original retail purchase, any part which fails in normal home use will be repaired or replaced free of charge forthe part itself, with the owner paying all other costs, including labor, mileage and transportation.
The specific warranties expressed above are the ONLY warranties provided by the manufacturer. These warranties give you specific legal rights,and you may also have other rights which vary from state to state.
What is Not Covered By These Warranties:1. Conditions and damages resulting from any of the following:
a. Improper installation, delivery, or maintenance.b. Any repair, modification, alteration, or adjustment not au-thorized by the manufacturer or an authorizedservicer.c. Misuse, abuse, accidents, or unreasonable use.d.Incorrect electric current, voltage, or supply.e. Improper setting of any control.
2. Warranties are void if the original serial numbers have beenremoved, altered, or cannot be readily determined.
3. Light bulbs.
4. Products purchased for commercial or industrial use.
5. The cost of service or service call to:a. Correct installation errors.b. Instruct the user on the proper use of the product.c. Transport the appliance to the servicer.
6. Consequential or incidental damages sustained by any personas a result of any breach of these warranties.
Some states do not allow the exclusion or limitation of conse-quential or incidental damages, so the above exclusion maynot apply.

![PIV9..D [en] Instruction manual Hob · Cookware Only use ferromagnetic cookware for induction cooking, such as: Cookware made from enamelled steel Cookware made from cast iron Special](https://static.fdocuments.net/doc/165x107/601026b502b9b3768575707a/piv9d-en-instruction-manual-hob-cookware-only-use-ferromagnetic-cookware-for.jpg)