› sites › default › files › support › pe16 › QuickBooks.… · QuickBooks Link Guide -...
47
Amicus Link Guide: QuickBooks © 2016 Gavel & Gown Software Inc. 1 Amicus Link Guide Designed for use with QuickBooks® Pro, Premier & Enterprise Applies to: Amicus Attorney 2016 (with or without Amicus Billing) Synchronize your Amicus and QuickBooks files/jobs and contacts/customers, and dynamically exchange your Amicus time entries or General Ledger transactions to QuickBooks. About the Link 2 What you need 2 What information is exchanged 3 Mappings 5 Link setup checklist 6 Initialization and exchange details 7 File/Job record match criteria 8 File/Job field mapping 8 Contact/Customer record match criteria 9 Contact/Customer field mapping 11 Contact/Vendor record match criteria 11 Vendor field mapping 12 WITHOUT BILLING: About Billing Rates and Service Items 12 WITHOUT BILLING: About Time Entries 13 WITH BILLING: Account mapping 14 Preparing your data 15 Special preparation prior to database conversion from an earlier version of Amicus Attorney 15 General Preparation 15 Configuring the Link 17 Welcome dialog 18 Step 1 - Set the QuickBooks Company File for the Link and test the connection 19 Step 2 - Set the Link preferences 20 Step 3 - Map the common lists 26 Step 4 - Review the field mapping and matching criteria 35 Initializing the Link 36 Maintaining the Link 38 Resetting the Link 38 Using the Link 40 Using Client IDs in Amicus Attorney 40 Adding a File in Amicus Attorney 40 Using the Accounting Link Details view 41 Exchanging an individual File 42
Transcript of › sites › default › files › support › pe16 › QuickBooks.… · QuickBooks Link Guide -...

Amicus Link Guide: QuickBooks © 2016 Gavel & Gown Software Inc. 1
Amicus Link Guide
Designed for use with QuickBooks® Pro, Premier & Enterprise
Applies to: Amicus Attorney 2016 (with or without Amicus Billing)
Synchronize your Amicus and QuickBooks files/jobs and contacts/customers, and
dynamically exchange your Amicus time entries or General Ledger transactions to
QuickBooks.
About the Link 2
What you need 2 What information is exchanged 3 Mappings 5
Link setup checklist 6 Initialization and exchange details 7
File/Job record match criteria 8 File/Job field mapping 8 Contact/Customer record match criteria 9 Contact/Customer field mapping 11 Contact/Vendor record match criteria 11 Vendor field mapping 12 WITHOUT BILLING: About Billing Rates and Service Items 12 WITHOUT BILLING: About Time Entries 13 WITH BILLING: Account mapping 14
Preparing your data 15 Special preparation prior to database conversion from an earlier version of Amicus Attorney 15 General Preparation 15
Configuring the Link 17 Welcome dialog 18 Step 1 - Set the QuickBooks Company File for the Link and test the connection 19 Step 2 - Set the Link preferences 20 Step 3 - Map the common lists 26 Step 4 - Review the field mapping and matching criteria 35
Initializing the Link 36 Maintaining the Link 38
Resetting the Link 38 Using the Link 40
Using Client IDs in Amicus Attorney 40 Adding a File in Amicus Attorney 40 Using the Accounting Link Details view 41 Exchanging an individual File 42

Amicus Link Guide: QuickBooks © 2016 Gavel & Gown Software Inc. 2
Global exchange 42 WITH BILLING: Exchanging General Ledger transactions 43 Viewing and changing Job billing address information 44 WITHOUT BILLING: Posting Time Entries to QuickBooks 44 WITH BILLING: Importing Client Costs to Amicus as Expenses 45
Troubleshooting 47
About the Link NOTE: Some configuration and features depend on whether or not your firm is licensed for Amicus Billing. Convention used in this Guide: WITHOUT BILLING – Link for Amicus Attorney without Amicus Billing WITH BILLING – Link for Amicus Attorney with Amicus Billing
Amicus Attorney users can increase the efficiency of their firm by exchanging their data with QuickBooks. There is no need to enter data twice. The dynamic link with QuickBooks provides seamless bi-directional integration by saving time while ensuring consistency.
You can exchange Amicus File and Contact information with QuickBooks Job and Customer information, map Amicus Firm Members to QuickBooks Employees, Files Types to Types of Law, and optionally take advantage of QuickBooks Class Lists. A Link Wizard easily guides you through configuration of the exchange options. The link ensures that Amicus Billing Rates are available in QuickBooks without the need for a separate exchange process.
You have the choice of exchanging Amicus Files individually or performing a global exchange of all Files and Contacts.
WITHOUT BILLING: The Link ensures that posted Time goes directly to QuickBooks without the need for a separate exchange process.
WITH BILLING: Client Bills are generated and paid within Amicus. Instead of exchanging Amicus Time Entries to QuickBooks, the Link sends Amicus Billing transactions (Receipts, General Retainer activity, Trust Receipts, Trust Checks, Trust to AR Transfers, and Trust File-to-File Transfers) to QuickBooks. During setup, billing-related posting options are provided and your Amicus accounts must be mapped to QuickBooks Accounts. QuickBooks Client Costs can be imported to Amicus as Expenses.
The first and second parts of this Guide are primarily written for Amicus Administrators, describing how to set up and maintain the Link. Amicus Firm Members should see “Using the Link” on page 40 for details on daily use of the link functions.
What you need The Link requires: Installed on the Amicus Attorney Application Server:
Amicus Attorney Server WITHOUT BILLING: U.S. or Canadian Editions — QuickBooks Pro, Premier, or Enterprise
WITH BILLING: U.S. Editions only — QuickBooks Pro, Premier, or Enterprise
Installed on the workstations of users who wish to use the Link: Amicus Attorney Workstation
For a list of supported QuickBooks versions, see the Amicus Attorney Software & Hardware
Requirements, available from the Technical Guides section of our website.

Amicus Link Guide: QuickBooks © 2016 Gavel & Gown Software Inc. 3
IMPORTANT: For the QuickBooks Link to work without interruption in normal day-to-day use, we strongly recommend that Amicus Server be run under Windows Server 2012 / 2012 R2 with Remote Desktop Services enabled.
What information is exchanged Records are exchanged between Amicus Attorney and QuickBooks in the directions indicated, using appropriate match criteria.
WITHOUT BILLING:
Amicus record type Exchange direction QuickBooks record type
Files ◄──────► Jobs
Client Contacts ◄──────► Customers
Vendor Contacts ◄─────── (optional exchange)
Vendors
Time Entries ───────► Time Tracking Entries
Billing Rates ───────► Service Items
WITH BILLING:
Amicus record type Exchange direction QuickBooks record type
Files ◄──────► Jobs
Client Contacts ◄──────► Customers
Vendor Contacts ◄─────── (optional exchange)
Vendors
Billing Transactions ───────► General Ledger Transactions
Expenses (Hard Cost) ◄─────── (optional import)
Client Costs
Scope In some instances the above noted records are filtered based on certain criteria such as their current status (i.e., Open versus Closed). The following rules apply:
General Rule: WITHOUT BILLING: Record Deletions are not supported in the Link and therefore must be
performed manually in both applications.
WITH BILLING: While File/Job, Client/Customer, and Vendor deletions are not supported in the Link and must therefore be performed manually in both applications, Amicus Billing transaction deletions and key field edits are supported. For example, Amicus users may delete a Trust Receipt, or edit the amounts in a Trust File-to-File Transfer, and a reversing entry will be exchanged to QuickBooks.
Files/Jobs: Only Amicus Open Billable Files with an associated Client where the Responsible Lawyer is mapped
to a QuickBooks Sales Rep will be exchanged.
Amicus Files set to be Excluded from the Link will not be exchanged.

Amicus Link Guide: QuickBooks © 2016 Gavel & Gown Software Inc. 4
Only QuickBooks Active Customer:Jobs where the Sales Rep is mapped to an Amicus Timekeeper will be exchanged.
Updates will not be sent over from Amicus where the Amicus File is Active and the QuickBooks Job is Inactive. Therefore, changes must be manually input.
Updates to some fields are not supported in QuickBooks. For details, see “File/Job field mapping” on page 8.
Clients/Customers: Only Amicus Primary Clients on Files that meet the scope requirements above are exchanged with
QuickBooks Customers Only QuickBooks Customers with eligible Jobs are exchanged.
Vendors: Only QuickBooks Vendors marked Active will be exchanged.
A QuickBooks Vendor cannot be matched with an Amicus Contact record if that record is already linked to a QuickBooks Customer as a Primary Client.
WITHOUT BILLING: Billing Rates/Service Items Billing Rates that do not exist as Service Items in QuickBooks will be added.
A “parent” Service Item for the Amicus Timekeeper will be created in QuickBooks, with “sub items” created for each Billing Rate.
Updates to Service Items that match a Billing Rate are not supported.
WITHOUT BILLING: Time Entries Time Entries are sent to QuickBooks from Amicus directly by Firm Members by using the Posting
function.
Updates to Time Entries already posted to QuickBooks are not supported. Revisions must be made directly in QuickBooks.
WITH BILLING: Expenses/Costs QuickBooks Client Costs can be imported to Amicus as "Hard Cost" Expenses on Files, by Billing
Supervisors using the Import QuickBooks Costs function.
Updates or deletions to Costs already imported to Amicus are not supported. Revisions must be made directly in Amicus Expenses. However, voided checks and refunded credit card transactions in QuickBooks can be imported as negative (reversing) Expenses.

Amicus Link Guide: QuickBooks © 2016 Gavel & Gown Software Inc. 5
Mappings The following common list items must be mapped through the QuickBooks Link Configuration wizard in Amicus. For example, in order to successfully exchange an Amicus File of a particular File Type with a QuickBooks Job of a particular Job Type, the File Type and Job Type must have first been mapped. Mapping facilitates differences in naming convention between the two applications. It is important to map new common list items as they are added in either application. For more information, see “Maintaining the Link” on page 38.
Amicus items QuickBooks items
Timekeepers/ Responsible Lawyer 1 Sales Reps (based on Employees)
File Types Job Types
WITHOUT BILLING: File Types OR Billing Categories OR Timekeepers OR Office Location 2
Classes
WITH BILLING: File Types OR Billing Categories Classes
WITH BILLING: Expense Codes Items 1 Amicus Firm Members are designated as Timekeepers in the Administration Profile of their Contact record. 2 Optionally, one of File Types, Billing Categories, Timekeepers, or Office Locations can be exchanged with QuickBooks Classes. Office Locations are stored as part of the Firm Member record—they are not technically mapped as an item, but rather added to QuickBooks during an exchange if necessary based on a text-string match.

Amicus Link Guide: QuickBooks © 2016 Gavel & Gown Software Inc. 6
Link setup checklist The Link is configured by the Amicus Administrator from the Amicus Attorney Office module. When you set up the Link, you will need to complete several steps, listed below and described in more detail throughout this Link Guide. It is assumed that you have installed and configured Amicus Attorney and have ensured that it is running properly.
1 Read this Link Guide to gain an understanding of how data in the two applications will be exchanged and matched.
2 Install QuickBooks on the Amicus Attorney Application Server.
Ensure that any QuickBooks service/maintenance releases are applied if applicable.
Configure QuickBooks to use the Company File (QuickBooks database) you want Amicus Attorney to link with. If a Company File does not exist, create one.
WITHOUT BILLING: Navigate to QB Preferences > Time Tracking > Company Preferences, and select the Yes option under “Do you Track Time?”.
If you want to use Classes, navigate to QuickBooks Preferences > Accounting > Company Preferences > and select the Use Class Tracking checkbox.
3 Prepare your data where necessary in both applications as detailed in this Guide.
4 Ensure that QuickBooks is not running on the workstations.
5 In Amicus Attorney, at the Amicus Attorney Application Server, go to Firm Settings > Time – Accounting and set your Accounting System to QuickBooks and click Install Components to install the necessary components.
NOTE: If running with User Access Control (UAC) enabled (e.g. under Windows 8, 7, or Vista), first right-click the “Amicus Attorney” icon on your Desktop and choose “Run as administrator”.
6 In Amicus Attorney, run the Link Configuration wizard. Complete Step 1 of the Wizard, and then configure the QuickBooks Integrated Applications setting. Continue with the remaining Steps.
7 Perform the initialization.
IMPORTANT: For performance reasons, we recommend that QuickBooks be running on the Server whenever the Link is in use. To ensure that added or edited records are exchanged, all views should be closed in QuickBooks on the Server (most importantly the Customer Job List).
Amicus Attorney and QuickBooks will now be ready to allow users to perform exchanges and post Time Entries.
Administrators will need to maintain common list mappings on an on-going basis as items are added or deleted in either application.
RESTARTING THE SERVER: Whenever the Amicus Application Server is restarted, someone must log in to Windows at the Server before Amicus may communicate with QuickBooks.

Amicus Link Guide: QuickBooks © 2016 Gavel & Gown Software Inc. 7
Initialization and exchange details The Link exchanges File/Job and Contact/Customer information between Amicus Attorney and QuickBooks. The following sections describe how records are matched and how fields are mapped in order to facilitate the proper supply of information to the records that are updated or created in the other application.
For a complete list of field mappings, see “Preparing your data” on page 15.
Exchange methods There are two exchange methods:
Individual File exchange—involves a single Amicus File and its Primary Client Contact record with the corresponding QuickBooks Job and Customer. Individual File exchange is performed from the Accounting Link Details view of the File Detail in Amicus Attorney.
Global exchange—involves additions or modifications since the last exchange in either database involving the following record types:
All eligible Amicus Files and Primary Clients, and all eligible QuickBooks Jobs and Customers. Amicus Billing Rates and the corresponding QuickBooks Service Items (includes updates where
supported) All eligible QuickBooks Vendors.
Exchange direction The Link Configuration Wizard allows you to set which application takes priority for the purposes of those records types that involve a bi-directional exchange during each of initialization and subsequent exchanges.
Match Criteria Eligible records that meet the scope requirements (see “Scope” on page 3) are matched based on the Key Identifiers in each record. This matching is not case sensitive, but spaces and punctuation do matter.
If a match is not found, the Link will create a new record so that there are corresponding records in both applications.
If a match is found, either the Amicus record or the QuickBooks record is updated (where updates are supported by the QuickBooks API). Where a record has been changed in both applications, conflicts are resolved based on the Link priority options set by the Amicus Administrator as noted above.
If more than one match is found an error is logged.

Amicus Link Guide: QuickBooks © 2016 Gavel & Gown Software Inc. 8
File/Job record match criteria A Job in QuickBooks is the equivalent of an Amicus File.
The match criteria for exchanging Files is dependent on whether you identify your Customer:Jobs according to Client ID:Matter ID or Client Name:Matter Name. It is important that your Link Configuration settings properly reflect the naming convention you use in QuickBooks, and that all records use the same naming convention.
NOTE: Amicus and QuickBooks fields containing French characters are not supported by the Link.
Key Identifiers If you choose to identify Customer:Jobs according to Client Name:Matter Name, the Full
Client Name and the Full Matter Name in the Amicus File will be used to identify the Customer and Job in QuickBooks.
If you choose to identify Customer:Jobs according to Client ID:Matter ID, the Client ID and Matter ID in the Amicus File will be used to identify the Customer and Job in QuickBooks.
Additionally a secondary check on Client/Contact Name is optionally done during initialization. If this option is selected in the Link Configuration wizard, then in addition to the File/Job match described above, the Primary Client Name in Amicus is compared to the Customer Name in QuickBooks. If the names do not match exactly, the File/Job will be skipped during Initialization. If the option is not selected, the result will be that the Name in one application will update the other (according to your Priority preference in Step 2a).
IMPORTANT: You must ensure that Jobs are separate records and not part of the Customer parent record. For information, see “Preparing your data” on page 15.
File/Job field mapping The following field mapping is used when an Amicus File is created or updated from a QuickBooks Job, or vice versa.
Amicus File field QuickBooks Job field
Client ID (or Full Client Name) Client Name
Matter ID (or Full Matter Name) Job Name
Full Matter Name3 Job Description3
Responsible Lawyer 1 Sales Rep1
File Type 1 Job Type 1
File Status: “Active” 1 Active 1
File Open Date 1 Job Start Date 1
Primary Client Entity (Individual or Company)
Customer Type
Job Bill To Address 2 Bill To Address
Job First Name 2 First Name
Job Last Name 2 Last Name
Job Fax 2 Fax
Amicus Link Guide: QuickBooks © 2016 Gavel & Gown Software Inc. 9
Amicus File field QuickBooks Job field
Job Alt. Ph. 2 Alt. Ph.
Job E-mail 2 E-mail 1
Updates are not supported.
2These fields are located on Billing Info view of the File Details. 3 This mapping only applies if Client ID/Matter ID used as Key Identifiers.
Responsible Lawyer assignments The Responsible Lawyer/Sales Rep assignment is exchanged in new records. Because a QuickBooks Job has a Customer assigned, and the Customer is in turn associated with a Sales Rep, all new Amicus Files created by the Link for the same Primary Client will have the same Responsible Lawyer.
Firm Member assignments to Amicus Files If a new Amicus File is created from a QuickBooks Job, the Responsible Lawyer (mapped from the Sales Rep on the Job’s Customer) is assigned to the File. In addition, the Firm Members who are specified in that Responsible Lawyer’s Amicus Preferences as the ones to be assigned by default to new Files are assigned to the File.
Short File Name in Amicus If a new Amicus File is created from a QuickBooks Job (during an exchange), the Amicus Short File Name is constructed from the QuickBooks Job information as follows:
Customer Name <SPACE> <HYPHEN> <SPACE> Job Name
For example, a generated Amicus Short File Name might be: Berwood Construction Ltd. – Wrongful dismissal
Contact/Customer record match criteria A Customer in QuickBooks is the equivalent of an Amicus Primary Client on a File.
NOTE: Amicus and QuickBooks fields containing French characters are not supported by the Link.
Key Identifiers Amicus-to-QuickBooks exchange: If you choose to identify Customer:Jobs according to Client Name:Matter Name, the Amicus Full Client Name field in Contact records will be compared with the Customer Name in QuickBooks. If you choose to identify Customer:Jobs according to Client ID:Matter ID, the Amicus Client ID field in Contact records will be compared with the Customer Name in QuickBooks.

Amicus Link Guide: QuickBooks © 2016 Gavel & Gown Software Inc. 10
QuickBooks-to-Amicus exchange: The above criteria are first applied. If a Contact match is not found this way (which may be the case when a new Customer:Job is being exchanged), then the following match criteria is used:
Key Identifier fields when there is a QuickBooks Company:
Amicus Contact field QuickBooks Customer field
Company Name Company Name
First Name First Name
Last Name Last Name
Business Phone or Primary Phone
Phone
Business Address City or Primary Address City
Address City
If the QuickBooks Customer has a First and/or Last Name but no Company Name, an Amicus Contact record must be an Individual to be eligible for a match.
Key Identifier fields when there is no QuickBooks Company:
Amicus Contact field QuickBooks Customer field
First Name First Name
Last Name Last Name
Home Phone or Primary Phone
Phone
Home Address City or Primary Address City
Address City
Phone format As noted above Phone information may be part of the Key Identifier for QuickBooks-to-Amicus record match criteria.
Amicus Phone information is divided into four components: Country Code, Area Code, Local Number, and Extension. QuickBooks Phone information is in one, undivided field.
To ensure proper matching and avoid the creation of duplicate records in Amicus, use any the following formats when entering Phone information in QuickBooks:
+CountryCode <SPACE> (AreaCode) <SPACE> LocalNumber <SPACE> xExtension
+CountryCode <SPACE> (AreaCode) <SPACE> LocalNumber
(AreaCode) <SPACE> LocalNumber <SPACE> xExtension
(AreaCode) <SPACE> LocalNumber
LocalNumber <SPACE> xExtension
LocalNumber
Note that a space is required between each division, a Country Code must be preceded by a plus sign, an Area Code must be surrounded by parentheses, and an “x” must precede an Extension.

Amicus Link Guide: QuickBooks © 2016 Gavel & Gown Software Inc. 11
Contact/Customer field mapping The following field mapping is used when an Amicus File is created or updated from a QuickBooks Job, or vice versa.
Amicus Contact field QuickBooks Customer field
If Contact/Customer is
Prefix Mr. / Ms /… Company or Individual
First Name First Name Company or Individual
Middle Name Middle Initial Company or Individual
Last Name Last Name Company or Individual
Company Name Company Name Company or Individual
Business Phone Phone Company
Home Phone Phone Individual
Business Fax Fax Company
Home Fax Fax Individual
Business 2 Phone Alt. Phone Company
Home 2 Phone Alt. Phone Individual
Business E-mail E-mail Company
Home E-mail E-mail Individual
Business Address Bill To Address Company
Home Address Bill To Address Individual
Contact Entity (Individual / Company) Customer Type Company or Individual
NOTE: All four lines of address information in a QuickBooks Customer record are exchanged with Amicus.
Firm Members assigned to Amicus Contact records If an Amicus Contact is created or updated from a QuickBooks Customer, the Firm Members who are assigned to the Amicus File on which this Contact is the Primary Client are automatically assigned to the Contact.
Contact/Vendor record match criteria QuickBooks Vendors may be optionally transferred one-way to Amicus as Contact records.
Key Identifiers
Amicus Contact field QuickBooks Vendor field
Company Name Company Name
First Name First Name
Last Name Last Name
Business Phone or Primary Phone
Phone
Business Address City or Primary Address City
Address City

Amicus Link Guide: QuickBooks © 2016 Gavel & Gown Software Inc. 12
Vendor field mapping The following field mapping is used when an Amicus Contact is created or updated from a QuickBooks Vendor.
Amicus Contact field QuickBooks Vendor field If QuickBooks Vendor is
Prefix Mr. / Ms./… Individual
First Name First Name Individual
Middle Name Middle Initial Individual
Last Name Last Name Individual
Company Name Company Name Individual or Company
Business Phone Phone Individual or Company
Business Fax Fax Individual or Company
Business 2 Phone Alt. Phone Individual or Company
Business E-mail E-mail Individual or Company
Business Address Address Individual or Company
Amicus Contact Record Entity and Group If the QuickBooks Vendor has only a Company Name, an Amicus Company Contact record is
created, and assigned to the “Vendors” People Group.
If the QuickBooks Vendor has a First Name and/or Last Name, an Amicus Individual Contact record and assigned to the “Vendors” People Group.
Firm Members assignment When a new Contact record is created in Amicus from a QuickBooks Vendor, all Amicus Timekeepers are automatically assigned to it.
WITHOUT BILLING: About Billing Rates and Service Items Billing Rates are exchanged in one direction only—from Amicus to QuickBooks, as Service Items. This is to ensure that any Billing Rate used in an Amicus Time Entry will exist as a Service Item in QuickBooks. A Service Item parent record will be created during initialization or exchange for each Timekeeper, if one does not already exist, with Sub items for each Billing Rate, including Non-billable and Contingency. For example, the Amicus Timekeeper, “Heather Gavel”, is matched with the QuickBooks Service Item (parent item) of the same name*, and the Amicus Billing Rates belonging to that Timekeeper for each Billing Category (i.e., “Normal”, “Discount”, etc.) are matched with the QuickBooks Sub items of the same names.
The following illustrates how the Timekeeper and Billing Rates appear as a Service Item and Sub items, respectively, in the QuickBooks Item List:
* Please note that the Amicus Timekeeper is matched with the QuickBooks Service Item (parent item) according to the Mapped Name. No rate or description is required for the parent record.

Amicus Link Guide: QuickBooks © 2016 Gavel & Gown Software Inc. 13
WITHOUT BILLING: About Time Entries Time Entries in Amicus are exchanged with QuickBooks in one direction—from Amicus to QuickBooks. Time Entries are sent to QuickBooks through the Posting function in the Time module, not through the Exchange function in the Office module. This model maintains the law firm workflow within which lawyers are accustomed to working. It allows the lawyer to be confident that the Time Entries will not be billed until they are finalized.
The following table shows what information is exchanged to QuickBooks, depending on the Billing Category and Billing/Time Tracking Rate assigned in the Amicus Time Entry.
Amicus QuickBooks
Billing Category
Billing/Time Tracking Rate
Duration
Billable Attribute
Service Item Service Item Price
Fixed Fee File Fee or Flat Rate 1 Billable [Rate Label] – [Fee Amount] Fee Amount
Fixed Fee Normal, Other, etc. Duration Non-Billable “Fixed Fee Tracking - $0.00” $0
Contingency File Fee or Flat Rate 1 Billable “Contingency” – [Fee Amount] Fee Amount
Contingency Normal, Other, etc. Duration Non-Billable “Contingency Tracking - $0.00” $0
Billable 1 Flat Rate 1 Billable “Flat Rate” – [Fee Amount] Fee Amount
Billable 1 Non-Billable Duration Non-Billable “Non-Billable - $0.00” $0
Billable 1 Normal, etc. Duration Billable [Timekeeper]: [Rate Label] 3 Rate Value
Billable 1 Other Duration Billable “Other Rate” – [Rate Value] Rate Value
Non-Billable 2 Normal, etc. Duration Non-Billable [Timekeeper]: [Rate Label] 3 Rate Value
Non-Billable 2 Other Duration Non-Billable “Other Rate” – [Rate Value] Rate Value
1 Billable = Billing Categories assigned the “Billable” attribute, excluding Fixed Fee and Contingency. 2 Non-Billable = Billing Categories not assigned the “Billable” attribute, including Vacation and Personal. 3 Sub item under the Timekeeper Service Item.

Amicus Link Guide: QuickBooks © 2016 Gavel & Gown Software Inc. 14
WITH BILLING: Account mapping When configuring the Link you must map the Amicus accounts to QuickBooks accounts. We recommend that you consult your accountant. Note that you may map multiple Amicus accounts to the same QuickBooks account where appropriate.
Amicus Accounts QuickBooks Accounts
General Bank Account(s) One or more Accounts of type “General” (as specified in your Firm Settings > Billing - Bank Accounts list)
Undeposited Funds (Asset) account. TIP: We recommend subsequently depositing funds to the appropriate General Bank account(s) in QuickBooks.
Trust Bank Account(s) Zero, one, or more Accounts of type “Trust” (as specified in your Firm Settings > Billing - Bank Accounts list), and only if you configure the Link Posting Options to post Trust activity
If you wish to use the Undeposited Funds (Asset) account, you should split the Trust Check and Trust Receipt mapping. If you wish to use a single account for both Trust Checks and Trust Receipts, consider mapping the Amicus accounts to a QuickBooks clearing (exchange) account. This enables a QuickBooks user to print checks and receipts against this clearing account, upon which the funds would be transferred as appropriate.
Client Funds in Trust Only if you configure the Link Posting Options to post Trust activity
Trust Liability account
General Retainers General Retainer account, typically, an Expense (Cash) or Asset (Modified Cash) account, but alternatively a Revenue account
Fees Fees Income Account
Fee Revenue account(s) You may choose to map the Amicus account to a single General Fee account, a separate account per Amicus File Type, or a separate account per Amicus Lawyer to which Fees are distributed.
Client Recoverable Expense We recommend using only one account.
Typically, an Expense or Asset account. You may choose to map the Amicus account to a single account, a separate account per Amicus File Type, or a separate account per Amicus File Responsible Lawyer.
Interest Income Used in exchanges only if interest is applied by the firm on overdue client accounts (as specified in your Firm Settings > Billing - Interest & Reminder Statements)
Interest Revenue account
[Tax 1 Name] Only if Tax 1 is applied by the firm on client fees and/or expenses (as specified in your Firm Settings > General - Tax Settings)
A clearing (exchange) Liability account. Do NOT map the real QuickBooks Tax Liability account.
[Tax 2 Name] Only if Tax 2 is applied by the firm on client fees and/or expenses (as specified in your Firm Settings > General - Tax Settings)
A clearing (exchange) Liability account. Do NOT map the real QuickBooks Tax Liability account.

Amicus Link Guide: QuickBooks © 2016 Gavel & Gown Software Inc. 15
Preparing your data We recommend that the firm’s QuickBooks/Amicus expert, with the assistance of the Amicus Administrator and QuickBooks Administrator, prepares the firm’s data for Link configuration and initialization.
Special preparation prior to database conversion from an earlier version of Amicus Attorney
The Amicus Attorney link with QuickBooks includes new processes that require that data eligible for exchange with QuickBooks be “clean” prior to initialization. There are huge advantages to this approach. It allows for a prompt-free initialization, it avoids duplicates, and more importantly, it ensures that the link runs as smoothly as possible thereafter.
Completing some preliminary reclassification and data checks PRIOR TO CONVERTING DATA FROM AN EARLIER VERSION OF AMICUS ATTORNEY will facilitate a smooth Initialization process.
If upgrading from Amicus Small Firm, we recommend that you run the Accounting Integration Consistency Checker in Small Firm. This utility enables you to test your Amicus Attorney database for data inconsistencies, and directly open any problem Files for viewing and/or editing. For details, see the Accounting Integration Consistency Checker document, available from the Support > Technical Resource Guides section of our website.
General Preparation Common Lists It is not necessary that corresponding common list item names match exactly in each application, as the Link Configuration wizard will permit items to be mapped. For example, Litigation - Civil Civil Litigation. In addition, the Common Lists Alignment dialogs of the wizard permit you to directly add some list items from one program to the other.
Amicus QuickBooks Add to Amicus via the wizard
Add to QuickBooks via the wizard
File Types Types of Law YES YES*
Timekeepers Sales Reps No No
WITHOUT BILLING: Timekeepers
Classes No YES
WITHOUT BILLING: Office Location
Classes No No
File Types Classes No YES
Billing Categories Classes No YES
WITH BILLING: Expense Codes
Items YES No
* Ensure that any File Type name added to QuickBooks does not contain a colon (:)

Amicus Link Guide: QuickBooks © 2016 Gavel & Gown Software Inc. 16
QuickBooks data Confirm that every QuickBooks Customer eligible for exchange has been assigned a Sales Rep.
Confirm that QuickBooks Jobs have been moved out of the Customer records. Although QuickBooks allows a Job to be embedded in a Customer record, the Link only supports Jobs that are separate, listed beneath the Customer record in the Customer:Job list. To manually separate a Job from a Customer, select the Customer in the Customer:Job list, choose Customer:Job > Add Job, click OK in the Moving Exiting Job Information prompt that appears, and then click Cancel in the New Job window that appears. Finally, open the Job record, edit the Job Name, and click OK. See your QuickBooks documentation for further details.
Amicus data Confirm that every Amicus File eligible for exchange has a Primary Client, a Responsible Lawyer,
and, depending on your Key Identifiers for match criteria, either a Client ID/Matter ID or a Full Client Name/Full Matter Name.
Ensure that the Amicus File Preference that specifies the Firm Members to be automatically assigned to new Files is set properly for each Responsible Lawyer.
TIP: If the Pre-Initialization Check fails on any Files that the initializing Amicus Administrator is Restricted from viewing or editing, the error log will simply report “restricted” rather than the specific Short File Name. We therefore recommend that all Files be made accessible to that Amicus Administrator for the period of initialization. On each File, either remove Restrictions or assign the Amicus Administrator and ensure they have Edit rights.
Additional preparation
If your data is either all in QuickBooks or all in Amicus, then complete the following steps: Because an exchange will transfer only Open Files/Jobs that are not flagged as Excluded, and only
if the Sales Rep in QuickBooks is mapped to a Timekeeper in Amicus, ensure that these are set properly.
If your data is in both Amicus and QuickBooks, then complete the above steps and also the following additional steps: For initialization purposes, decide which side should take priority in the exchange of Files/Jobs and
Contacts/Customers.
Check that corresponding Amicus Client IDs and Matter IDs (or alternatively, Full Client Names and Full Matter Names) match QuickBooks Customer Names and Job Names, and vice versa.
Check that Primary Client/Customer information (name, phone, and address) is consistent on both sides, to help avoid the creation of duplicate records. Check phone formatting in particular.
It may be necessary to exclude some Files from exchange. For instructions on how to exclude Amicus Files, see “Excluding an Amicus File from the Link” on page 41.
You are now ready to proceed to configuring the Link.

Amicus Link Guide: QuickBooks © 2016 Gavel & Gown Software Inc. 17
Configuring the Link The Link Configuration Wizard is available to Amicus Administrators in the Firm Settings dialog, accessible from the Office module. Follow the steps below:
1 Perform the configuration on your Amicus Attorney Application Server.
2 Ensure that QuickBooks is currently running on the Amicus Attorney Application Server and you are logged into QuickBooks as the QuickBooks Administrator.
3 Ensure that QuickBooks is running in Single-User Mode, so that you will receive the security prompt when testing the connection in Step 1 below.
4 Choose Firm Settings on the navigation list in the control panel of the Office module. The Firm Settings view appears. Then choose Time > Accounting on the navigation list in the view. The Accounting System view of the Firm Settings dialog appears.
WITHOUT BILLING:

Amicus Link Guide: QuickBooks © 2016 Gavel & Gown Software Inc. 18
WITH BILLING:
5 Select “QuickBooks” in the accounting system list box.
6 Click Configure to run the Link Configuration wizard. Complete each of the multi-dialog steps in order, as described in the following sections.
Welcome dialog The Welcome dialog of the wizard displays the current completion status of each step in the configuration
You can click Print Settings to print your settings.
Complete the configuration steps as described in the following sections. The completion status of each step is shown at the right.

Amicus Link Guide: QuickBooks © 2016 Gavel & Gown Software Inc. 19
Step 1 - Set the QuickBooks Company File for the Link and test the connection Click Step 1 in the Welcome dialog of the Link Configuration wizard. The Company File dialog appears.
Enter the path to the QuickBooks Company File, or click Browse, select the *.QBW file, and click Open. For optimal performance, consider storing the QuickBooks database on the Amicus Attorney Application Server.
IMPORTANT: If you specify a different QuickBooks Company File after you have performed an initialization, the Link is automatically reset and you will be required to reconfigure and Re-Initialize the Link before using it again. This may be a lengthy process.
Then click Test Connection to ensure that the File can be properly accessed by the Link. A QuickBooks - Application With No Certificate dialog appears, asking whether you trust this connection—choose the "Yes, always, allow access even if QuickBooks is not running" option.
Then click Finish. The Welcome dialog reappears.
At this point, you will need to go to QuickBooks on the Amicus Attorney Application Server and perform the step outlined below.
Step 1a - Automatic login of Amicus Attorney to QuickBooks IMPORTANT: Because QuickBooks on the Amicus Attorney Application Server is not continuously updated with all record changes and additions done in QuickBooks at the workstations, QuickBooks should not be running at the workstations and you must set QuickBooks to allow Amicus Attorney to automatically log in as “Admin”. This will ensure that the initialization and exchange processes use all current information.
Before doing initialization or exchange, complete the following steps in QuickBooks:
1 Choose Edit > Preferences
2 Choose Integrated Applications at the left. Choose the Company Preferences tab.
3 Then select Amicus Attorney and click Properties.
4 In the Access Rights tab, select the “Allow this application to login automatically” option, select “Admin” from the Login As list, and click OK.
Amicus Link Guide: QuickBooks © 2016 Gavel & Gown Software Inc. 20
We recommend that users now exit QuickBooks on any computer other than the Amicus Attorney Application Server.
Step 2 - Set the Link preferences Click Step 2 in the Welcome dialog of the Link Configuration wizard. In this step, you set general initialization and exchange preferences for the Link.
Step 2a - Initialization options
Specify whether Amicus Attorney or QuickBooks takes priority during initialization. Then click Next.

Amicus Link Guide: QuickBooks © 2016 Gavel & Gown Software Inc. 21
Step 2b - Exchange
Specify whether and when a Global Exchange should occur daily automatically. A Global Exchange includes all Files and Contacts added or modified since the last exchange in either Amicus or the accounting application. We recommend that you choose a time that is off-hours, and does not conflict with other scheduled services, such as automatic backups your firm may have scheduled, or the Amicus Daily Checks routines which run at midnight.
Specify whether Amicus Attorney or QuickBooks takes priority in exchanges. Then click Next.

Amicus Link Guide: QuickBooks © 2016 Gavel & Gown Software Inc. 22
WITH BILLING: Step 2c – Posting Options
Specify the General Ledger transaction posting options. Date—Specify the date for which you want GL transactions to start exchanging to QuickBooks. In
general, you will set this date when you first implement the Link, in order to exclude old transactions from affecting your QuickBooks.
Posting Trust transactions—Choose whether to exchange Trust Account transactions and, if so, the transactions start date, and whether to post Trust Check and Trust Receipt transactions to separate QuickBooks accounts or together to a single account.
Posting Fee payments—Choose whether to exchange Payments for Fees to one QuickBooks account, or to various ones based on the Amicus File Type or Lawyer related to the Fee. For example, you could have Fees on “Litigation” Files go to one QuickBooks account, while Fees on “Real Estate” Files go to a different account. Or you could have Fees distributed to Lawyer “TF” go to one QuickBooks account, while Fees to Lawyer “BK” go to a different account.
Posting Expense payments—Choose whether to exchange Payments for Expenses to one QuickBooks account, or to various ones based on the Amicus File Type or Responsible Lawyer. For example, you could have Expenses on “Litigation” Files go to one QuickBooks account, while Expenses on “Real Estate” Files go to a different account. Or you could have Expenses on Files for which Lawyer “TF” is responsible go to one QuickBooks account, while Expenses on Files for which Lawyer “BK” is responsible go to a different account.
Descriptions—Select what description information to include in each transaction exchanged to QuickBooks (where it will appear in the Memo field), and indicate the sequence in which that information should appear. For example, you could include the Amicus transaction Description text followed by the Invoice Number (if any).
Specify the Cost import options. Enable Cost Import—Choose whether Billing Supervisors will be able to import QuickBooks Costs to
Amicus as Expenses via the Import QuickBooks Costs function in Amicus.
Date—Specify the transaction date from which you want Costs available for import.

Amicus Link Guide: QuickBooks © 2016 Gavel & Gown Software Inc. 23
Cost Types—Choose which types of hard cost charges you want available for import: Checks, Vendor Bills, Credit Card charges, and/or Credit Card Refunds.
Bank Account Exclusions—Click the "Select accounts" button to select the QuickBooks Bank Accounts from which customer and vendor checks will be excluded from import.
IMPORTANT: We recommend you exclude Trust Bank Accounts because checks written out of them are not billed to clients as expenses but rather as simply trust entries.
Step 2d - Additional Options
File Identification—Specify how Files/Jobs and Contacts/Customers are identified for matching
during the exchanges.
Match Criteria—select the option if you want a secondary check on names done during initialization. Then, once a File/Job that matches on Client and Matter IDs (or Full Names), the Primary Client’s Name in Amicus Attorney is compared to the Customer’s Name in QuickBooks. If the names do not match exactly, the File/Job will not be exchanged. If you do NOT select this option, minor differences in the names (e.g. “Chris” vs. “Christopher”, or punctuation) will not cause the match to fail, and will result in the names from one application overwriting those in the other
Amicus Link Guide: QuickBooks © 2016 Gavel & Gown Software Inc. 24
application during initialization (according to your Priority preference in Step 2a), even if the names are quite different.
Then click Next.
IMPORTANT: Do not Reset the Link and change this setting after initialization because that would cause the creation of duplicate records in both systems.
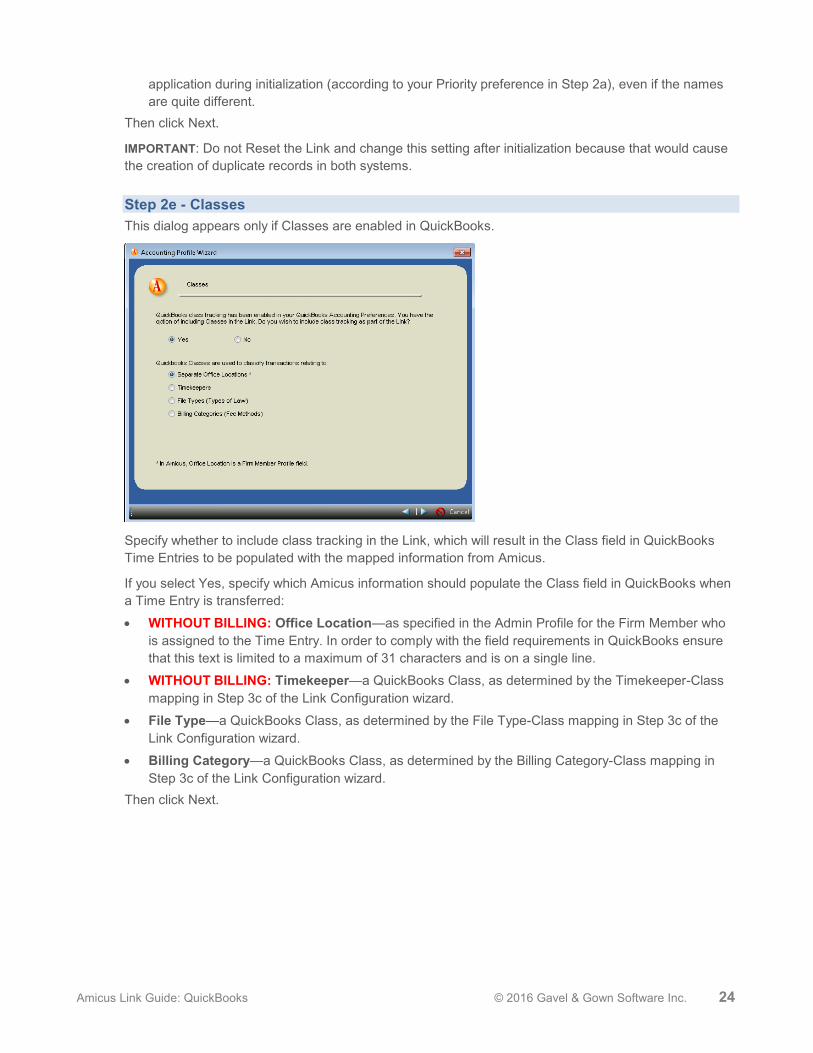
Step 2e - Classes This dialog appears only if Classes are enabled in QuickBooks.
Specify whether to include class tracking in the Link, which will result in the Class field in QuickBooks Time Entries to be populated with the mapped information from Amicus.
If you select Yes, specify which Amicus information should populate the Class field in QuickBooks when a Time Entry is transferred:
WITHOUT BILLING: Office Location—as specified in the Admin Profile for the Firm Member who is assigned to the Time Entry. In order to comply with the field requirements in QuickBooks ensure that this text is limited to a maximum of 31 characters and is on a single line.
WITHOUT BILLING: Timekeeper—a QuickBooks Class, as determined by the Timekeeper-Class mapping in Step 3c of the Link Configuration wizard.
File Type—a QuickBooks Class, as determined by the File Type-Class mapping in Step 3c of the Link Configuration wizard.
Billing Category—a QuickBooks Class, as determined by the Billing Category-Class mapping in Step 3c of the Link Configuration wizard.
Then click Next.

Amicus Link Guide: QuickBooks © 2016 Gavel & Gown Software Inc. 25
WITHOUT BILLING: Step 2f - Fee Income Account Each QuickBooks Time Entry is associated with a Service Item, which carries a Rate. The Link creates a QuickBooks Service Item for each Timekeeper Billing Rate—if there are 5 Amicus Timekeepers and each has 3 Billing Rates, then 5 main Service Items are created in QuickBooks for Timekeepers, each with 3 Sub items for a total of 15 Sub items.
Select the QuickBooks Income Account (of type “Income”) that you want these Service Items assigned to. Then click Next.
Step 2g – Vendors
Specify whether to transfer QuickBooks Vendors to Amicus during exchanges. You can turn this transfer on or off when you wish. If you transfer Vendors, we recommend that you add and edit Vendors only in QuickBooks given that the exchange direction is one-way.
Then click Finish. The Welcome dialog reappears.

Amicus Link Guide: QuickBooks © 2016 Gavel & Gown Software Inc. 26
Step 3 - Map the common lists Click Step 3 in the Welcome dialog of the Link Configuration wizard. In this step, you map and add (where supported) shared list items to ensure that they are available in both Amicus and QuickBooks.
WITHOUT BILLING:
WITH BILLING:
NOTE: The following mapping dialogs include an Auto button that enables you to quickly and automatically map matching items.

Amicus Link Guide: QuickBooks © 2016 Gavel & Gown Software Inc. 27
Step 3a - Map QuickBooks Sales Reps with Amicus Timekeepers After an informational dialog, the Map Timekeepers/Sales Reps dialog appears.
Map the QuickBooks Sales Reps to Amicus Timekeepers. All Amicus Timekeepers must be mapped. You can have more Sales Reps in QuickBooks than Timekeepers in Amicus. A QuickBooks Sales Rep can be mapped to only one Amicus Timekeeper, and vice versa.
The Sales Reps available for mapping are Active Sales Reps based on Active Employees. Click Next.
Step 3b - Map QuickBooks Job Types with Amicus File Types
Map the QuickBooks Job Types to Amicus File Types. Add new QuickBooks Job Types or Amicus File Types if necessary. You must map all File Types and all Active Job Types. The Amicus File Types that you add to QuickBooks from this dialog must not contain colons (:).
Then click Next. Or, if you are not including QuickBooks class tracking as part of the Link, click Finish.
Amicus Link Guide: QuickBooks © 2016 Gavel & Gown Software Inc. 28
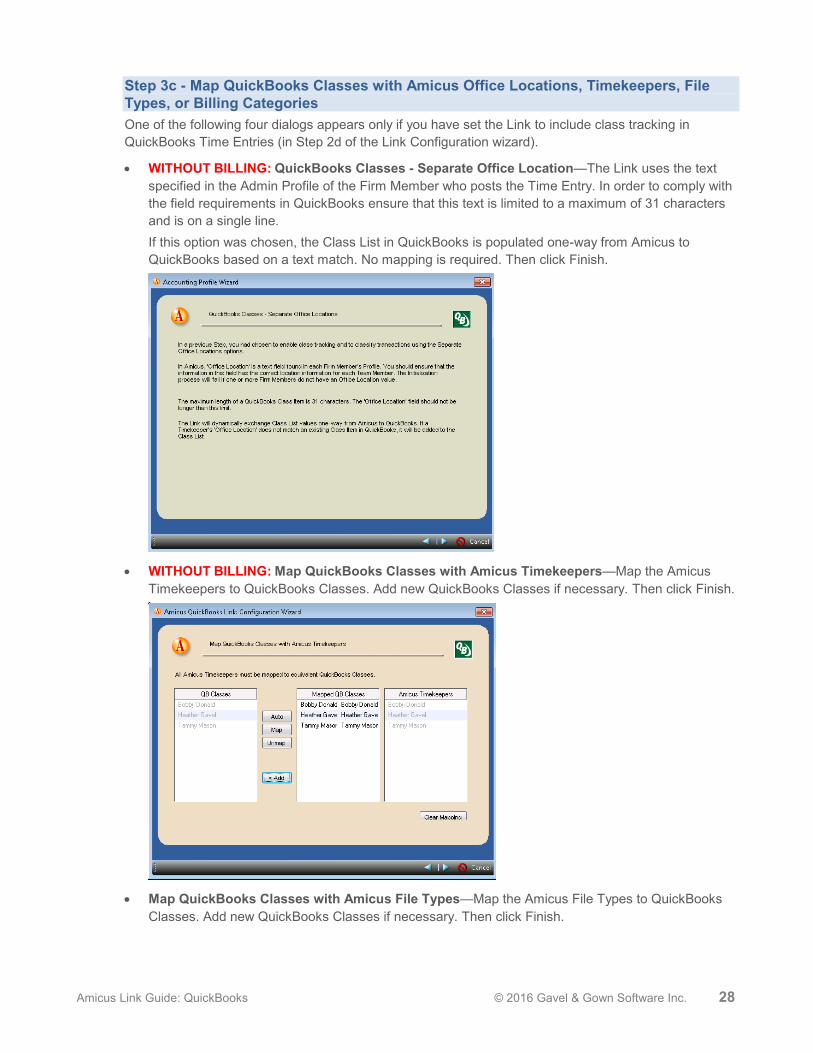
Step 3c - Map QuickBooks Classes with Amicus Office Locations, Timekeepers, File Types, or Billing Categories One of the following four dialogs appears only if you have set the Link to include class tracking in QuickBooks Time Entries (in Step 2d of the Link Configuration wizard).
WITHOUT BILLING: QuickBooks Classes - Separate Office Location—The Link uses the text specified in the Admin Profile of the Firm Member who posts the Time Entry. In order to comply with the field requirements in QuickBooks ensure that this text is limited to a maximum of 31 characters and is on a single line. If this option was chosen, the Class List in QuickBooks is populated one-way from Amicus to QuickBooks based on a text match. No mapping is required. Then click Finish.
WITHOUT BILLING: Map QuickBooks Classes with Amicus Timekeepers—Map the Amicus Timekeepers to QuickBooks Classes. Add new QuickBooks Classes if necessary. Then click Finish.
Map QuickBooks Classes with Amicus File Types—Map the Amicus File Types to QuickBooks Classes. Add new QuickBooks Classes if necessary. Then click Finish.

Amicus Link Guide: QuickBooks © 2016 Gavel & Gown Software Inc. 29
Map QuickBooks Classes with Amicus Billing Categories—Map the Amicus Billing Categories to QuickBooks Classes. Add new QuickBooks Classes if necessary. Then click Finish.
WITH BILLING: Step 3d - Map QuickBooks Accounts with Amicus Accounts If you configure the Link (in Step 2c). to exchange Fees, Expenses, and optionally Trust each to a single account, then all Amicus accounts are listed in the Account Mapping dialog, and all account mapping is done there. Otherwise, one or more of the subsequent dialogs will also appear.
Account Mapping—Map all Amicus Accounts listed. You can map multiple Amicus Accounts to the same QuickBooks Account where appropriate.

Amicus Link Guide: QuickBooks © 2016 Gavel & Gown Software Inc. 30
Fee Account Mapping (optional)—Map all Amicus File Types or Lawyers. You can map multiple Amicus Accounts to the same QuickBooks Account where appropriate.
Mapping by File Type

Amicus Link Guide: QuickBooks © 2016 Gavel & Gown Software Inc. 31
Mapping by Lawyer
Expense Account Mapping (optional)—Map all Amicus File Types or Lawyers. You can map multiple Amicus Accounts to the same QuickBooks Account where appropriate.
Mapping by File Type

Amicus Link Guide: QuickBooks © 2016 Gavel & Gown Software Inc. 32
Mapping by Lawyer
Trust Receipt Account Mapping (optional)—Map all Amicus Trust Accounts. You can map multiple Amicus Accounts to the same QuickBooks Account where appropriate.

Amicus Link Guide: QuickBooks © 2016 Gavel & Gown Software Inc. 33
Trust Check Account Mapping (optional)—Map all Amicus Trust Accounts. You can map multiple Amicus Accounts to the same QuickBooks Account where appropriate.

Amicus Link Guide: QuickBooks © 2016 Gavel & Gown Software Inc. 34
WITH BILLING: Step 3e - Map QuickBooks Items with Amicus Expense Codes If you configure the Link (in Step 2c). to enable the importing of QuickBooks Costs to Amicus as Expenses, then all QuickBooks Active Items (Services, Other Charges, and Non Inventory) and all Amicus Active Expense Codes are listed in the Account Mapping dialog.
The mapping is optional. If importing a Cost whose Item Name is mapped to an Expense Code, default information from the Expense Code will be included in the new Expense's description, tax setting, and "combine on bills" setting.
Item Mapping—Map QuickBooks Item Names as desired. This is optional. You can map multiple Items to the same Amicus Expense Code where appropriate.
If you use the Wizard to add a new Expense Code to Amicus from a QuickBooks Item, it will have:
Rate Per Unit from the QuickBooks Rate (if Service item), Price (if Non-Inventory item), or Amount (if Other Charge item)
Combine on Bills set to "Never"
Apply Tax 1 / Apply Tax 2 flag(s) selected if the QuickBooks Item has Tax Code set to "Tax" The QuickBooks Item's Subitem, Manufacturer's Part Number, and Account information is not transferred to the new Amicus Expense Code.

Amicus Link Guide: QuickBooks © 2016 Gavel & Gown Software Inc. 35
Step 4 - Review the field mapping and matching criteria Click Step 4 in the Welcome dialog of the Link Configuration wizard.
Several informational dialogs are provided as a quick reference on how:
Contact/Customer fields are mapped
File/Job fields are mapped
QuickBooks Vendor fields are mapped to Amicus Contact fields, if you selected this option
Files and Jobs are matched
Primary Clients and Customers are matched
Vendors and Contacts are matched, if you selected this option

Amicus Link Guide: QuickBooks © 2016 Gavel & Gown Software Inc. 36
Initializing the Link You are now ready to exchange information between Amicus and QuickBooks. An Amicus Administrator performs the initialization (i.e. the first exchange).
1 IMPORTANT: Back up both the QuickBooks database and the Amicus database.
2 Prepare your data in both applications (as outlined earlier in this Guide).
3 Ensure that all users are logged out of Amicus Attorney.
4 Ensure that QuickBooks is running in Single-User Mode, and you are logged in as the QuickBooks Administrator. (This mode will prevent other users from launching QuickBooks on another computer.)
5 To start initialization, first click Step 5 in the Welcome dialog of the Link Configuration wizard.
Then click Begin Initialization in the Initialization dialog.
6 The Link does a Pre-initialization Check to ensure that initialization will produce good results.
If the pre-initialization fails, errors will be noted in an error log on the Amicus Attorney Application Server). All issues must be resolved before initialization can take place.
The log is named AmicusPEQB.log and is located in the folder accessed by choosing Amicus > (Amicus Attorney Premium Tools >) Server Logs from the Windows Start menu
The following issues are checked for in Amicus Attorney: Files that do not have a both a Client ID and a Matter ID or both a Full Client Name and a
Full Matter Name, depending on your choice of Key Identifiers for Files/Jobs. Files that do not have a Primary Client two or more Primary Clients that have the same Client ID (or alternatively Full Client Name) Primary Clients that have different Client IDs on different Files (or alternatively Full Client
Name)
The following problem is checked for in QuickBooks: Customers that have a Job embedded in their Customer record
See “Preparing your data” on page 15.
If the Link passes the Pre-initialization Check, initialization starts automatically.
7 The Link performs the following tasks:
synchronizes Amicus Files with QuickBooks Jobs, and Amicus People with QuickBooks Customers
optionally, transfers QuickBooks Vendors to Amicus Contacts
creates a QuickBooks Service Item for each Amicus Timekeeper Billing Rate—these Items are assigned to the Time Entries posted from Amicus Attorney
adds “Individual” and “Corporate” to the QuickBooks Customer Type list—this setting is used for assignment of the Individual/Company property of the Client Role On The File in Amicus Files
8 If initialization fails, review the error log, resolve all issues, and repeat the initialization process.
9 A secondary check is done during initialization. For a matching File/Job, if the Primary Client’s Name in Amicus is different from the Customer’s Name in QuickBooks, the File/Job will not be exchanged. Instead, the Names will be listed in a Resolve Mismatched Clients dialog after initialization.

Amicus Link Guide: QuickBooks © 2016 Gavel & Gown Software Inc. 37
We recommend that, before regular, day-to-day use of the link by Firm Members, you align Client/Customer names and exchange these Files/Jobs. Alternatively, you may click Cancel at this time and align Client/Customer Names later, before regular, day-to-day use of the link by Firm Members.
10 You can now set QuickBooks to run in Multi-User Mode if desired.
IMPORTANT: For performance reasons, we recommend that QuickBooks be running on the Server whenever the Link is in use. To ensure that added or edited records are exchanged, all views should be closed in QuickBooks on the Serve (most importantly the Customer Job List).

Amicus Link Guide: QuickBooks © 2016 Gavel & Gown Software Inc. 38
Maintaining the Link
The common lists The Amicus Administrator and QuickBooks Administrator must maintain the common lists of Amicus Timekeepers/QuickBooks Sales Reps, Amicus File Types/QuickBooks Job Types, and Classes. For a table of these lists, see “Preparing your data” on page 15.
For example, if you add a File Type in Amicus, you will need to add a corresponding Job Type in QuickBooks too, and then map the two items via the Link Configuration wizard. Note that for some items (as indicated in the table of lists), you can use the convenient Add feature in the Link Configuration wizard to transfer the new list items you create in one program directly to the other program, without having to manually create them twice. Care should be taken when deleting common list items in either application as existing data may be affected. We recommend that before deleting common list items in QuickBooks, you first unmap them using Step 3 of the Link Configuration wizard.
Resetting the Link The Amicus Administrator can reset the Link if necessary. This unlinks all Files/Jobs and unlinks all Contacts/Customers.
WARNING: We highly recommend that you reset the Link only with the assistance of Gavel & Gown Technical Support (at 1-800-472-2289). The Link should be reset only under the following conditions: after recovering your Amicus database or QuickBooks database, or
after restoring a backup in Amicus or QuickBooks
To reset the Link, perform the following steps:
1 IMPORTANT: Back up the QuickBooks database and the Amicus database before resetting the Link.
2 Ensure that all users are logged out of both Amicus Attorney and QuickBooks.
3 Ensure that QuickBooks is running in Single-User Mode, and you are logged in as the QuickBooks Administrator.
4 Choose Firm Settings on the navigation list in the control panel the Office module. The Firm Settings view appears.
5 Choose Time > Accounting in the view. The Accounting System view of the Firm Settings dialog appears.
6 Click Configure to run the Link Configuration wizard.
7 Click Step 1 in the Welcome dialog of the Link Configuration wizard. The Company File dialog appears.

Amicus Link Guide: QuickBooks © 2016 Gavel & Gown Software Inc. 39
8 Select the Yes option in the Reset Link section at the bottom of the dialog, and then click Finish. The Link is reset.
9 After resetting the Link, you will need to repeat Steps 2 to 5 in the wizard and initialize the Link again in order to resume sharing data with QuickBooks.
10 You can now set QuickBooks to run in Multi-User Mode if desired.

Amicus Link Guide: QuickBooks © 2016 Gavel & Gown Software Inc. 40
Using the Link Once the Amicus Administrator has configured and Initialized the Link, Amicus Attorney and QuickBooks users can use the Link functions in various ways, including:
Using Client IDs in Amicus
Adding a File in Amicus and sending it to QuickBooks.
Using the Accounting Link Details view of a File in Amicus to exclude the File from exchanges or unlink the File from a QuickBooks Job.
Using the Billing Info view of a File in Amicus to change the QuickBooks Job Bill To Address information.
Doing an individual File exchange from Amicus (your Amicus Administrator can also do global File exchanges).
Creating and posting Time Entries from Amicus.
RESTARTING THE SERVER: Whenever the Amicus Application Server is restarted, someone must log in to Windows at the Server before Amicus may communicate with QuickBooks.
Using Client IDs in Amicus Attorney Client IDs are shown in the File Details dialog, Files Index, Person Edit dialog, and People Index.
If the Amicus Contact is NOT linked to a QuickBooks Client, you may create or edit their Client ID from File Details (in which the Contact is assigned as the Primary Client). For more information, see the next section. Additionally, you may delete their Client ID from Person Edit (by clicking the Clear button next to the field).
If the Amicus Contact is linked to a QuickBooks Client, you must unlink (exclude) all Files on which that Contact is the Primary Client. You may then change their Client ID from File Details or Person Edit.
Adding a File in Amicus Attorney IMPORTANT: Follow the firm’s policy on creating all new Files either in Amicus Attorney only or in QuickBooks only. Note that if you add a File in Amicus, you can send it to QuickBooks immediately upon creation, but if you add a Job in QuickBooks, a global exchange is required to send it to Amicus.
When you add a new File in Amicus, it must contain certain required information in order for it to be eligible for exchange with a QuickBooks Job. This required information is: Primary Client, Client ID (or Full Client Name), Matter ID (or Full Matter Name), Responsible Lawyer, and File Type. Required information is dependant upon how your Amicus Administrator has configured the Link.
From the Admin > General view of the Amicus File:
To identify the Primary Client, click the Select People button under the Primary Client heading, select a Person in the dialog that appears, and click OK. The Client ID field is automatically filled in assuming that the Amicus Person already has an ID assigned. If the Amicus Person is not already linked to a QuickBooks Customer, the field is left editable. Alternatively, if the Link is set to use Full Client Name and Full Matter Name for matching, the Full Client Name field is automatically filled in provided that the Primary Client is also the Primary Client on another File, in which case that Full Client Name is used. If the Primary Client is not already linked to a QuickBooks Customer, the field is left editable.
You must also enter a Matter ID (or Full Matter Name).
Amicus Link Guide: QuickBooks © 2016 Gavel & Gown Software Inc. 41
To identify the Responsible Lawyer on the File, you can click the Select People button under the Responsible Lawyer heading, select a Person in the dialog that appears, and click OK.
Enter a unique Short File Name and select a File Type as well. NOTE: If you create a File based on another File that has a Primary Client, the Primary Client is automatically assigned in the new File.
Saving the new File When you save the new File, you are prompted “Do you wish to send this Client/Customer and File/Job information to QuickBooks now?”
If you click Yes, and all required fields are present (Primary Client, Client ID or Full Client Name, Matter ID or Full Matter Name, Responsible Lawyer, File Type, and Short File Name), and additionally, the Responsible Lawyer has been mapped as a Link setting to a QuickBooks Sales Rep based on an Employee, then the File will be saved and sent to QuickBooks.
If you click No, the File will be saved. The Exclude This File checkbox is automatically selected (in the Accounting Link Details view). Later, you can clear the Exclude checkbox and then proceed to exchange the File with QuickBooks.
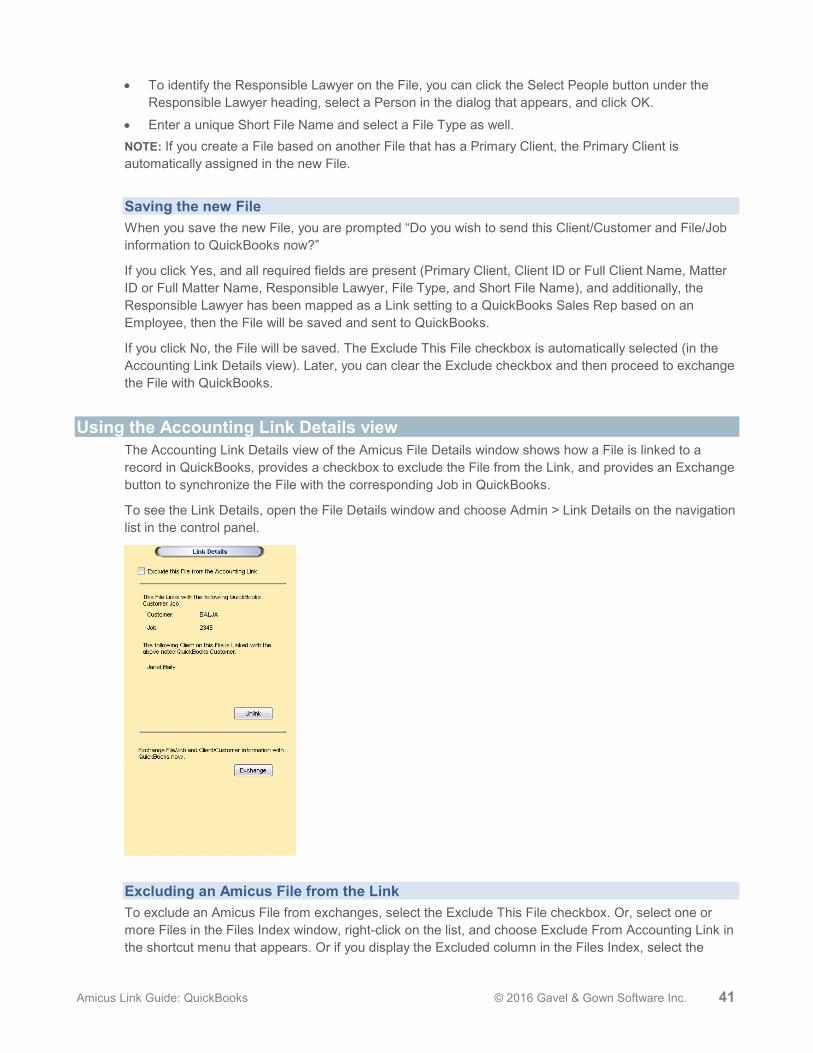
Using the Accounting Link Details view The Accounting Link Details view of the Amicus File Details window shows how a File is linked to a record in QuickBooks, provides a checkbox to exclude the File from the Link, and provides an Exchange button to synchronize the File with the corresponding Job in QuickBooks.
To see the Link Details, open the File Details window and choose Admin > Link Details on the navigation list in the control panel.
Excluding an Amicus File from the Link To exclude an Amicus File from exchanges, select the Exclude This File checkbox. Or, select one or more Files in the Files Index window, right-click on the list, and choose Exclude From Accounting Link in the shortcut menu that appears. Or if you display the Excluded column in the Files Index, select the

Amicus Link Guide: QuickBooks © 2016 Gavel & Gown Software Inc. 42
checkbox in that column. If the File is already linked to a QuickBooks Job, the link with the corresponding QuickBooks Job is maintained, but the File is excluded from any future exchanges.
We recommend that you also exclude the corresponding QuickBooks Job from exchange, by making it Inactive or changing its Job Status to Not Awarded, Closed, or Pending. Clearing the checkbox will make the File eligible for exchange. If the File is already linked to a QuickBooks Job, be sure that the QuickBooks Job is not excluded from exchanges (by making it Active or changing its Job Status to something other than Not Awarded, Closed, or Pending). A prompt may appear, informing you of any other requirements before the File may be included in the next exchange, such as assigning a unique Client ID and/or Matter ID.
Unlinking an Amicus File from a QuickBooks Job To unlink an Amicus File from a QuickBooks Job, perhaps because the wrong records were linked by mistake, you can click Unlink in the Amicus File’s Link Details dialog. This breaks the link between the Amicus File and the QuickBooks Job. If the Primary Client on that Amicus File is also the Primary Client on other Amicus Files that are linked to QuickBooks Jobs, then the link between the Primary Client and the QuickBooks Customer is maintained. If you want to prevent the Link from being automatically reestablished on the next exchange (by match criteria), select the Exclude This File checkbox in the File, and exclude the corresponding Job in QuickBooks from the Link (by making it Inactive or changing its Job Status to Not Awarded, Closed, or Pending).
Exchanging an individual File One method of exchanging an Amicus File with a QuickBooks Job is the individual File exchange. This involves a single File along with its Primary Client’s Person record, and the corresponding QuickBooks Job and Customer. To exchange a single File, go to the Link Details view of File Details and click Exchange.
Global exchange Your Amicus Administrator can perform a global exchange, which involves all Files/Jobs and Contacts/Customers added or modified since the last exchange in either database. To perform a global exchange, go to the Office module and choose Accounting Exchange on the Actions menu. It is not necessary for Amicus Attorney users to be logged out during a global exchange—if any relevant Files or People are locked (in use), those particular records will be skipped at this time and dealt with on a subsequent exchange. NOTE: If a Sales Representative has been assigned to a Job in QuickBooks, it will be exchanged with Amicus only if the Job itself was modified.

Amicus Link Guide: QuickBooks © 2016 Gavel & Gown Software Inc. 43
WITH BILLING: Exchanging General Ledger transactions From Actions > Billing Exchange in the Office module, an Amicus Administrator (or Billing Supervisor) can exchange all outstanding General Ledger transactions to QuickBooks.
Errors will be noted in the error log on the Amicus Attorney Application Server. The log is named AmicusPEQB.log and is located in the folder accessed by choosing Amicus > (Amicus Attorney Premium Tools >) Server Logs from the Windows Start menu.
LIMITATION: In Amicus, do not perform transactions that transfer funds to multiple Files (e.g. a Trust Receipt to multiple Files) because QuickBooks can transfer funds to only a single Job per transaction.
GL Transaction Report You can run the GL Transaction Report to see which Transactions over a selected period have been exchanged (“posted”) and which have not.

Amicus Link Guide: QuickBooks © 2016 Gavel & Gown Software Inc. 44
Viewing and changing Job billing address information The Billing Info view of File Details shows the QuickBooks Job Bill To Address information, which may be different than the Primary Client/Customer address information.
WITH BILLING: The Billing Info information may also be different than the Bill To information at the bottom of the People On File panel in the Billing-side File Details.
To see the Billing Info view, open the File Details window and choose Admin > Billing Info on the navigation list in the control panel.
This Billing Info address is synchronized on exchange. You can edit it in either QuickBooks or Amicus Attorney.
WITHOUT BILLING: Posting Time Entries to QuickBooks You can post Time Entries directly from Amicus Attorney to QuickBooks, from the Time module. In order to post a Time Entry successfully, the following conditions must be met:
The Amicus File associated with the Time Entry must already be linked to, and exchangeable with, a QuickBooks Job—the link could have been established by an exchange or by the saving and sending of a new File.
The Timekeeper who owns the Time Entry must be mapped to a valid QuickBooks Sales Rep based on an Employee.
The Time Entry’s rate and time are transferred. Make sure your Amicus Attorney preferences for minimum and rounding up times are set appropriately. For more information about posting Time Entries, see the “Time” topic of the online User Help.
Non-Timekeepers cannot post Time Entries from their own Office. However, any Firm Member with permission may open a Timekeeper’s Office in Amicus Attorney and post Time Entries for that Timekeeper.

Amicus Link Guide: QuickBooks © 2016 Gavel & Gown Software Inc. 45
WITH BILLING: Importing Client Costs to Amicus as Expenses If the Link is configured to allow the import of QuickBooks Costs to Amicus as Expenses, then from Actions > Import QuickBooks Costs on the Billing side of the Office module, a Billing Supervisor can display QuickBooks Costs and choose which to import to Amicus.
TIP: Perform a global Accounting Exchange first, to ensure that any new Files/Jobs are added as appropriate.
Filter the list of QuickBooks Costs
Choose the transaction date range of Costs to list, whether to include Costs previously set to be ignored, and whether to include Costs that aren't on a QuickBooks Job matched to an Amicus File.
Choose what description to include when Expenses are created: QuickBooks entry--always use the memo field from the QuickBooks Cost line item
Expense Code default--use the description from the Expense Code if the Cost's Item Name is mapped to an Expense Code, and otherwise use the memo field from the QuickBooks Cost line item.
Click Proceed.
Working with the list of QuickBooks Costs
Costs from Checks ("Chk"), Vendor Bills ("V.Bill"), Credit Card charges ("CC"), and/or Credit Card Refunds ("CCR") are listed, depending on your Link configuration. Each Cost is listed separately—for example, a Check might include several categorized and uncategorized items.

Amicus Link Guide: QuickBooks © 2016 Gavel & Gown Software Inc. 46
Ignore Costs: Some Costs might be ones that you don't intend importing. For convenience you can mark them to be ignored—select their checkboxes at the left and click Ignore. The list refreshes and those Costs are now either shown in grey text or hidden, depending on how your list is filtered.
Import Costs: If a Cost does not have a corresponding File shown, click the Select File icon and assign one.
Select the Costs' checkboxes at the left and click Create Expenses. The list refreshes and those Costs no longer appear. Expenses are created.
Notes Expense details: Imported Client Expenses include transaction date, unit price, total cost, Expense
Code (if the Cost's Item Name is mapped to one in the Link configuration), and tax (if set for both the File and the Expense Code).
Costs edited or deleted in QuickBooks: If the original Costs have not yet been imported, these changes are reflected in the Import QuickBooks Costs list—an edited Cost shows its changed information in the list, and a deleted Cost is simply omitted from the list. If a Cost has already been imported, you'll need to manually edit or delete the corresponding Expense in Amicus as appropriate.
Voided Checks in QuickBooks: Voided Checks are listed as separate (zero) Costs (with a description prefixed with "VOID"), and can be imported as new Expenses. If the original Check transaction has not yet been imported, then neither that Cost nor the voided
Cost are listed.
If the original Check transaction has already been imported, then the voided Cost is listed.
Refunded Credit Card transactions in QuickBooks: Credit Card Refunds are listed as separate (negative) Costs (with a description prefixed with "CCR"), and can be imported as new Expenses. If the original Credit Card transaction has not yet been imported, then neither that Cost nor the
refunded Cost are listed.
If the original Credit Card transaction has already been imported, then the refunded Cost is listed.
Import errors: Will be noted in the error log on the Amicus Attorney Application Server. The log is named AmicusPEQB.log and is located in the folder accessed by choosing Amicus > (Amicus Attorney Premium Tools >) Server Logs from the Windows Start menu.
Client Expense Report: Distinguishes "Hard (QB)" costs (imported from QuickBooks) from "Hard" costs (created within Amicus).
Amicus Link Guide: QuickBooks © 2016 Gavel & Gown Software Inc. 47
Troubleshooting
39456 If exchanges stop occurring, it might be necessary to restart the Amicus PE Service.
39295 Posting Time Entries might fail for a Timekeeper added and mapped since the Link was initialized, and the following message appears: "The integration with your accounting application is currently unavailable. You may continue working…" TIP: In QuickBooks, add the corresponding Sales Rep to the Item List, as a Service type item with its Account set to the Fee Income Account (set in Step 2 of your Link Configuration wizard).
39294 Posting Time Entries might fail for a Timekeeper, and the log shows the following error: "TimeTracking. QuickBooks error message: The employee is set to have activities transferred to paychecks". TIP: In QuickBooks, go to the Employee Center and edit the corresponding Employee's Payroll Info (or Personal info)—select the "Use time data to create paychecks" checkbox, click OK, and then return and deselect the checkbox.
And see "Link setup checklist" on page 6 for important tips about keeping QuickBooks running and restarting the Amicus Server.
Gavel & Gown Software Inc.,
a subsidiary of Abacus Data Systems, Inc.
Phone: 800-472-2289
416-977-6633
www.amicusattorney.com
Copyright © 2016 Gavel & Gown Software Inc.
All rights reserved.
AMICUS and AMICUS ATTORNEY are registered
trademarks of Gavel & Gown Software Inc.
All other trademarks referenced are the property of their
respective owner. Gavel & Gown Software Inc. disclaims
any proprietary interest in trademarks other than its own.
August 2016