
4.2.0 SIP Call Server Release Notes -...
63
Aastra BluStar TM 8000i Desktop Media Phone / Aastra BluStar TM for Conference Room 4.2.0 SIP Call Server Release Notes 41-001468-02 REV00 – 06.2013
Transcript of 4.2.0 SIP Call Server Release Notes -...
Aastra BluStarTM 8000i Desktop Media Phone / Aastra BluStarTM for Conference Room
4.2.0 SIP Call Server Release Notes
41-001468-02 REV00 – 06.2013
Content
SIP Call Server Release Notes 4.2.0 . . . . . . . . . . . . . . . . . . . . . . . . . . . . . . . . . . . . . . . 1
About this document . . . . . . . . . . . . . . . . . . . . . . . . . . . . . . . . . . . . . . . . . . . . . . . . . . . . . . 1
Release notes topics . . . . . . . . . . . . . . . . . . . . . . . . . . . . . . . . . . . . . . . . . . . . . . . . . . . . . . . 1
General information. . . . . . . . . . . . . . . . . . . . . . . . . . . . . . . . . . . . . . . . . . . . . . . . . . . . . . . 2Release content information . . . . . . . . . . . . . . . . . . . . . . . . . . . . . . . . . . . . . . . . . . . . . . . 2Update URL . . . . . . . . . . . . . . . . . . . . . . . . . . . . . . . . . . . . . . . . . . . . . . . . . . . . . . . . . . . . . . . . 2Important BluStar 8000i firmware upgrade/downgrade information . . . . . . . . . 2
New Features in Release 4.2.0 . . . . . . . . . . . . . . . . . . . . . . . . . . . . . . . . . . . . . . . . . . . . . 3Configuration Features . . . . . . . . . . . . . . . . . . . . . . . . . . . . . . . . . . . . . . . . . . . . . . . . . . . . . 3SIP Features. . . . . . . . . . . . . . . . . . . . . . . . . . . . . . . . . . . . . . . . . . . . . . . . . . . . . . . . . . . . . . . . 4User Interface Features . . . . . . . . . . . . . . . . . . . . . . . . . . . . . . . . . . . . . . . . . . . . . . . . . . . . . 5
Additional Information . . . . . . . . . . . . . . . . . . . . . . . . . . . . . . . . . . . . . . . . . . . . . . . . . . . . . 6
Configuration Features . . . . . . . . . . . . . . . . . . . . . . . . . . . . . . . . . . . . . . . . . . . . . . . . . . . . 6VLAN ID Assignment Using DHCP. . . . . . . . . . . . . . . . . . . . . . . . . . . . . . . . . . . . . . . . . . . 6Picture Caller ID TFTP Support . . . . . . . . . . . . . . . . . . . . . . . . . . . . . . . . . . . . . . . . . . . . . . 8Microsoft Exchange 2007 SP1 (or Greater) Support and Configurable Defaults for Various Exchange Settings. . . . . . . . . . . . . . . . . . . 10Internet Access Using HTTP Proxy . . . . . . . . . . . . . . . . . . . . . . . . . . . . . . . . . . . . . . . . . 17Configurable RTP Ports . . . . . . . . . . . . . . . . . . . . . . . . . . . . . . . . . . . . . . . . . . . . . . . . . . . . 18ISO-8859-1 to UTF-8 Character Transcoding for Non-Active-Directory LDAP Directories . . . . . . . . . . . . . . . . . . . . . . . . . . . . . . . . . 19Configuration File Transfer Status Details . . . . . . . . . . . . . . . . . . . . . . . . . . . . . . . . . . 20Configurable Dial Plan Terminator . . . . . . . . . . . . . . . . . . . . . . . . . . . . . . . . . . . . . . . . . 22Autologin Upon Restart . . . . . . . . . . . . . . . . . . . . . . . . . . . . . . . . . . . . . . . . . . . . . . . . . . . 23
SIP Features . . . . . . . . . . . . . . . . . . . . . . . . . . . . . . . . . . . . . . . . . . . . . . . . . . . . . . . . . . . . . . 27Transport Layer Security (TLS) Support. . . . . . . . . . . . . . . . . . . . . . . . . . . . . . . . . . . . . 27Link Layer Discovery Protocol for Media Endpoint Devices (LLDP-MED) Support . . . . . . . . . . . . . . . . . . . . . . . . . . . . . . . . . . . . . . . . . . . . . . . . . . . . . . 37Four-Way Conference Call Support . . . . . . . . . . . . . . . . . . . . . . . . . . . . . . . . . . . . . . . . 40
II 41-001468-02 REV00 - 06.2013
Content
User Interface Features . . . . . . . . . . . . . . . . . . . . . . . . . . . . . . . . . . . . . . . . . . . . . . . . . . . 44Dutch Language Support . . . . . . . . . . . . . . . . . . . . . . . . . . . . . . . . . . . . . . . . . . . . . . . . . 44Eco-Off Mode Button. . . . . . . . . . . . . . . . . . . . . . . . . . . . . . . . . . . . . . . . . . . . . . . . . . . . . . 45Option to Disable the Do Not Disturb Function. . . . . . . . . . . . . . . . . . . . . . . . . . . . . 47Missed Call Indication During Screen Saving and Eco-Off Modes . . . . . . . . . . . . 48BluStar for Conference Room Remote Camera Control . . . . . . . . . . . . . . . . . . . . . 49
Issues Resolved in Release 4.2.0. . . . . . . . . . . . . . . . . . . . . . . . . . . . . . . . . . . . . . . . . . 51
Contacting Aastra Telecom Support . . . . . . . . . . . . . . . . . . . . . . . . . . . . . . . . . . . . 59
41-001468-02 REV00 - 06.2013 III

SIP Call Server Release Notes 4.2.0
About this documentThis document provides details on new features and/or issues resolved for the BluStar 8000i Desktop Media Phone and BluStar for Conference Room in SIP Call Server mode, for Release 4.2.0.
For more detailed information about features associated with the BluStar devices, and for information on how to use the devices, see the Quick Start Guide or the SIP Call Server User Guide for your respective device.
For detailed information regarding more advanced features, see the Aastra BluStar 8000i Desktop Media Phone / Aastra BluStar for Conference Room SIP Call Server Administrator Guide.
Release notes topicsTopics in these release notes include:
• General information
• New Features in Release 4.2.0
• Additional Information
• Issues Resolved in Release 4.2.0
• Contacting Aastra Telecom Support
Notes:• Release 4.2.0 is the first release integrating firmware for both the BluStar 8000i
Desktop Media Phone and the newest addition to the BluStar Ecosystem, the BluStar for Conference Room.
• The BluStar for Conference Room model identifier is 8000icr (i.e. the filename for the <model>.cfg file for the BluStar for Conference Room is 8000icr.cfg as opposed to 8000i.cfg for the BluStar 8000i). Filenames for the <model>.cfg are case sensitive.
• The term “BluStar device(s)” in this document refers only to the BluStar 8000i Desktop Media Phone and/or the BluStar for Conference Room, unless statedotherwise.
1 41-001468-02 REV00 - 06.2013
SIP Call Server Release Notes 4.2.0
General information
Release content information
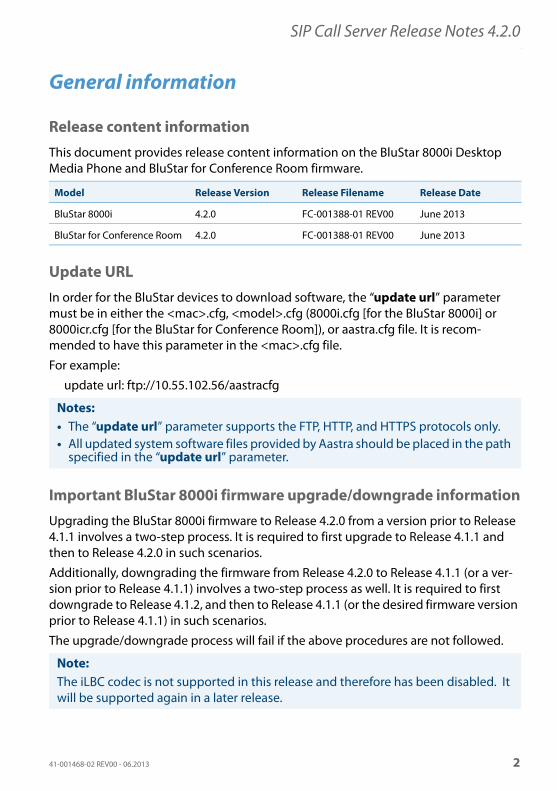
This document provides release content information on the BluStar 8000i Desktop Media Phone and BluStar for Conference Room firmware.
Update URL
In order for the BluStar devices to download software, the “update url” parameter must be in either the <mac>.cfg, <model>.cfg (8000i.cfg [for the BluStar 8000i] or 8000icr.cfg [for the BluStar for Conference Room]), or aastra.cfg file. It is recom-mended to have this parameter in the <mac>.cfg file.
For example:
update url: ftp://10.55.102.56/aastracfg
Important BluStar 8000i firmware upgrade/downgrade information
Upgrading the BluStar 8000i firmware to Release 4.2.0 from a version prior to Release 4.1.1 involves a two-step process. It is required to first upgrade to Release 4.1.1 and then to Release 4.2.0 in such scenarios.
Additionally, downgrading the firmware from Release 4.2.0 to Release 4.1.1 (or a ver-sion prior to Release 4.1.1) involves a two-step process as well. It is required to first downgrade to Release 4.1.2, and then to Release 4.1.1 (or the desired firmware version prior to Release 4.1.1) in such scenarios.
The upgrade/downgrade process will fail if the above procedures are not followed.
Model Release Version Release Filename Release Date
BluStar 8000i 4.2.0 FC-001388-01 REV00 June 2013
BluStar for Conference Room 4.2.0 FC-001388-01 REV00 June 2013
Notes:• The “update url” parameter supports the FTP, HTTP, and HTTPS protocols only.• All updated system software files provided by Aastra should be placed in the path
specified in the “update url” parameter.
Note:The iLBC codec is not supported in this release and therefore has been disabled. It will be supported again in a later release.
41-001468-02 REV00 - 06.2013 2
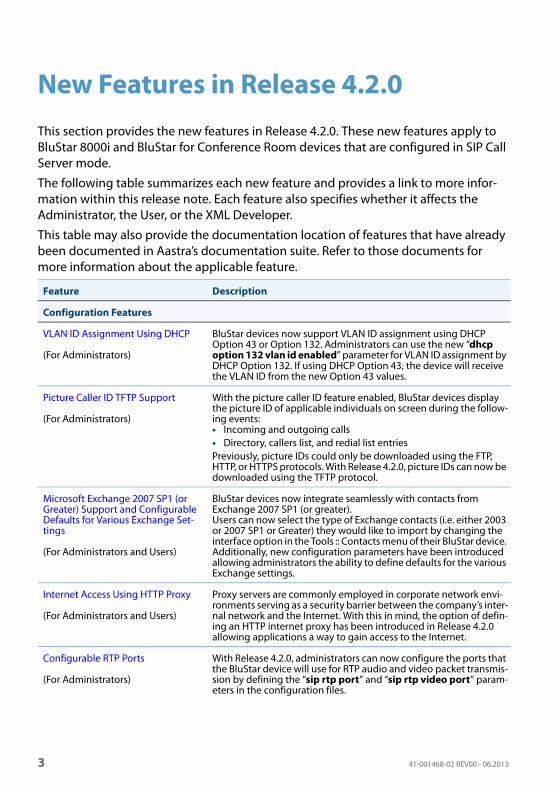
New Features in Release 4.2.0This section provides the new features in Release 4.2.0. These new features apply to BluStar 8000i and BluStar for Conference Room devices that are configured in SIP Call Server mode.
The following table summarizes each new feature and provides a link to more infor-mation within this release note. Each feature also specifies whether it affects the Administrator, the User, or the XML Developer.
This table may also provide the documentation location of features that have already been documented in Aastra’s documentation suite. Refer to those documents for more information about the applicable feature.
Feature Description
Configuration Features
VLAN ID Assignment Using DHCP
(For Administrators)
BluStar devices now support VLAN ID assignment using DHCP Option 43 or Option 132. Administrators can use the new “dhcp option 132 vlan id enabled” parameter for VLAN ID assignment by DHCP Option 132. If using DHCP Option 43, the device will receive the VLAN ID from the new Option 43 values.
Picture Caller ID TFTP Support
(For Administrators)
With the picture caller ID feature enabled, BluStar devices display the picture ID of applicable individuals on screen during the follow-ing events:• Incoming and outgoing calls• Directory, callers list, and redial list entriesPreviously, picture IDs could only be downloaded using the FTP, HTTP, or HTTPS protocols. With Release 4.2.0, picture IDs can now be downloaded using the TFTP protocol.
Microsoft Exchange 2007 SP1 (or Greater) Support and Configurable Defaults for Various Exchange Set-tings
(For Administrators and Users)
BluStar devices now integrate seamlessly with contacts from Exchange 2007 SP1 (or greater). Users can now select the type of Exchange contacts (i.e. either 2003 or 2007 SP1 or Greater) they would like to import by changing the interface option in the Tools :: Contacts menu of their BluStar device. Additionally, new configuration parameters have been introduced allowing administrators the ability to define defaults for the various Exchange settings.
Internet Access Using HTTP Proxy
(For Administrators and Users)
Proxy servers are commonly employed in corporate network envi-ronments serving as a security barrier between the company’s inter-nal network and the Internet. With this in mind, the option of defin-ing an HTTP internet proxy has been introduced in Release 4.2.0 allowing applications a way to gain access to the Internet.
Configurable RTP Ports
(For Administrators)
With Release 4.2.0, administrators can now configure the ports that the BluStar device will use for RTP audio and video packet transmis-sion by defining the “sip rtp port” and “sip rtp video port” param-eters in the configuration files.
3 41-001468-02 REV00 - 06.2013
New Features in Release 4.2.0
ISO-8859-1 to UTF-8 Character Transcoding for Non-Active-Direc-tory LDAP Directories
(For Administrators)
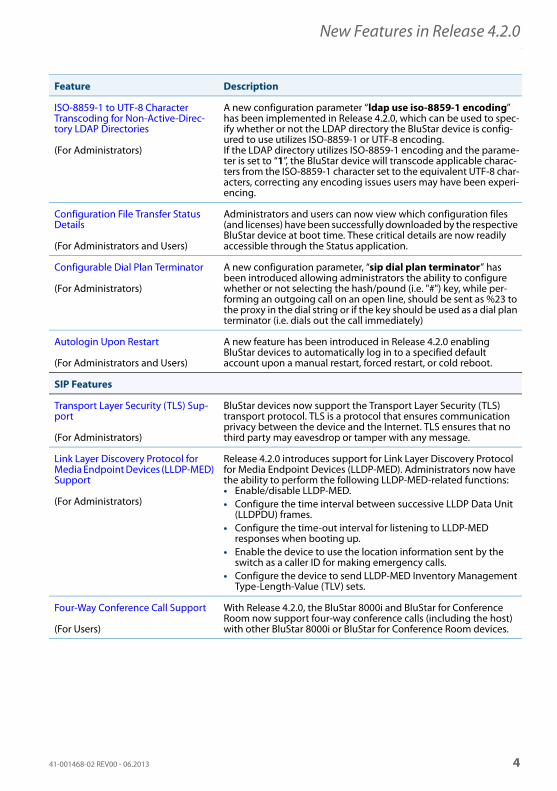
A new configuration parameter “ldap use iso-8859-1 encoding” has been implemented in Release 4.2.0, which can be used to spec-ify whether or not the LDAP directory the BluStar device is config-ured to use utilizes ISO-8859-1 or UTF-8 encoding.If the LDAP directory utilizes ISO-8859-1 encoding and the parame-ter is set to “1”, the BluStar device will transcode applicable charac-ters from the ISO-8859-1 character set to the equivalent UTF-8 char-acters, correcting any encoding issues users may have been experi-encing.
Configuration File Transfer Status Details
(For Administrators and Users)
Administrators and users can now view which configuration files (and licenses) have been successfully downloaded by the respective BluStar device at boot time. These critical details are now readily accessible through the Status application.
Configurable Dial Plan Terminator
(For Administrators)
A new configuration parameter, “sip dial plan terminator” has been introduced allowing administrators the ability to configure whether or not selecting the hash/pound (i.e. "#") key, while per-forming an outgoing call on an open line, should be sent as %23 to the proxy in the dial string or if the key should be used as a dial plan terminator (i.e. dials out the call immediately)
Autologin Upon Restart
(For Administrators and Users)
A new feature has been introduced in Release 4.2.0 enabling BluStar devices to automatically log in to a specified default account upon a manual restart, forced restart, or cold reboot.
SIP Features
Transport Layer Security (TLS) Sup-port
(For Administrators)
BluStar devices now support the Transport Layer Security (TLS) transport protocol. TLS is a protocol that ensures communication privacy between the device and the Internet. TLS ensures that no third party may eavesdrop or tamper with any message.
Link Layer Discovery Protocol for Media Endpoint Devices (LLDP-MED) Support
(For Administrators)
Release 4.2.0 introduces support for Link Layer Discovery Protocol for Media Endpoint Devices (LLDP-MED). Administrators now have the ability to perform the following LLDP-MED-related functions:• Enable/disable LLDP-MED.• Configure the time interval between successive LLDP Data Unit
(LLDPDU) frames.• Configure the time-out interval for listening to LLDP-MED
responses when booting up.• Enable the device to use the location information sent by the
switch as a caller ID for making emergency calls.• Configure the device to send LLDP-MED Inventory Management
Type-Length-Value (TLV) sets.
Four-Way Conference Call Support
(For Users)
With Release 4.2.0, the BluStar 8000i and BluStar for Conference Room now support four-way conference calls (including the host) with other BluStar 8000i or BluStar for Conference Room devices.
Feature Description
41-001468-02 REV00 - 06.2013 4
New Features in Release 4.2.0
User Interface Features
Dutch Language Support
(For Administrators and Users)
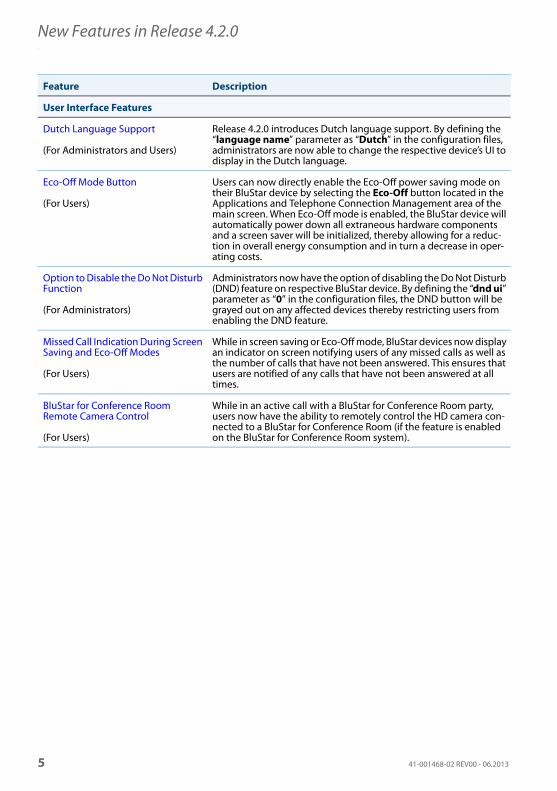
Release 4.2.0 introduces Dutch language support. By defining the “language name” parameter as “Dutch” in the configuration files, administrators are now able to change the respective device’s UI to display in the Dutch language.
Eco-Off Mode Button
(For Users)
Users can now directly enable the Eco-Off power saving mode on their BluStar device by selecting the Eco-Off button located in the Applications and Telephone Connection Management area of the main screen. When Eco-Off mode is enabled, the BluStar device will automatically power down all extraneous hardware components and a screen saver will be initialized, thereby allowing for a reduc-tion in overall energy consumption and in turn a decrease in oper-ating costs.
Option to Disable the Do Not Disturb Function
(For Administrators)
Administrators now have the option of disabling the Do Not Disturb (DND) feature on respective BluStar device. By defining the “dnd ui” parameter as “0” in the configuration files, the DND button will be grayed out on any affected devices thereby restricting users from enabling the DND feature.
Missed Call Indication During Screen Saving and Eco-Off Modes
(For Users)
While in screen saving or Eco-Off mode, BluStar devices now display an indicator on screen notifying users of any missed calls as well as the number of calls that have not been answered. This ensures that users are notified of any calls that have not been answered at all times.
BluStar for Conference Room Remote Camera Control
(For Users)
While in an active call with a BluStar for Conference Room party, users now have the ability to remotely control the HD camera con-nected to a BluStar for Conference Room (if the feature is enabled on the BluStar for Conference Room system).
Feature Description
5 41-001468-02 REV00 - 06.2013
Additional Information
VLAN ID Assignment Using DHCP
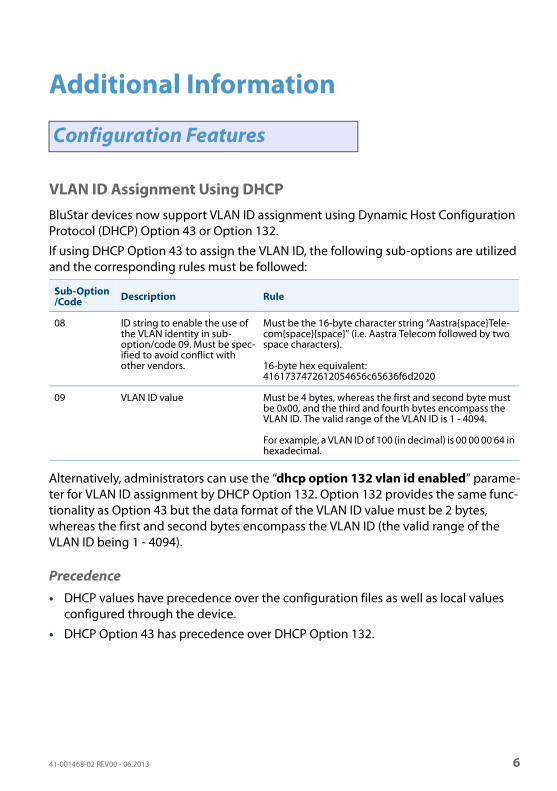
BluStar devices now support VLAN ID assignment using Dynamic Host Configuration Protocol (DHCP) Option 43 or Option 132.
If using DHCP Option 43 to assign the VLAN ID, the following sub-options are utilized and the corresponding rules must be followed:
Alternatively, administrators can use the “dhcp option 132 vlan id enabled” parame-ter for VLAN ID assignment by DHCP Option 132. Option 132 provides the same func-tionality as Option 43 but the data format of the VLAN ID value must be 2 bytes, whereas the first and second bytes encompass the VLAN ID (the valid range of the VLAN ID being 1 - 4094).
Precedence• DHCP values have precedence over the configuration files as well as local values
configured through the device.
• DHCP Option 43 has precedence over DHCP Option 132.
Configuration Features
Sub-Option/Code Description Rule
08 ID string to enable the use of the VLAN identity in sub-option/code 09. Must be spec-ified to avoid conflict with other vendors.
Must be the 16-byte character string “Aastra{space}Tele-com{space}{space}” (i.e. Aastra Telecom followed by two space characters).
16-byte hex equivalent: 4161737472612054656c65636f6d2020
09 VLAN ID value Must be 4 bytes, whereas the first and second byte must be 0x00, and the third and fourth bytes encompass the VLAN ID. The valid range of the VLAN ID is 1 - 4094.
For example, a VLAN ID of 100 (in decimal) is 00 00 00 64 in hexadecimal.
41-001468-02 REV00 - 06.2013 6
Additional Information
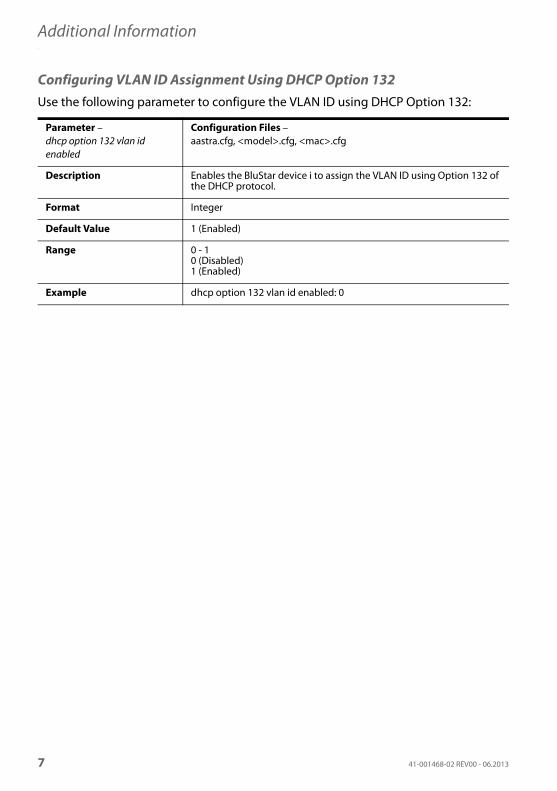
Configuring VLAN ID Assignment Using DHCP Option 132Use the following parameter to configure the VLAN ID using DHCP Option 132:
Parameter – dhcp option 132 vlan id enabled
Configuration Files –aastra.cfg, <model>.cfg, <mac>.cfg
Description Enables the BluStar device i to assign the VLAN ID using Option 132 of the DHCP protocol.
Format Integer
Default Value 1 (Enabled)
Range 0 - 10 (Disabled)1 (Enabled)
Example dhcp option 132 vlan id enabled: 0
7 41-001468-02 REV00 - 06.2013
Additional Information
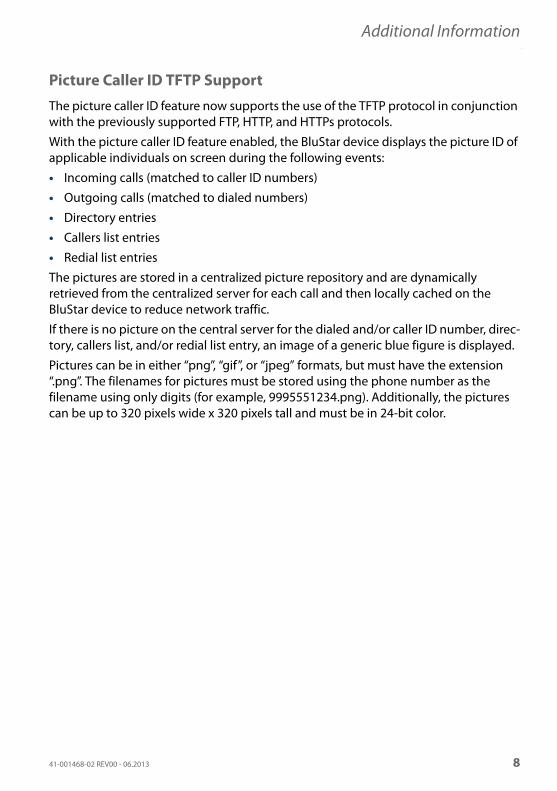
Picture Caller ID TFTP Support
The picture caller ID feature now supports the use of the TFTP protocol in conjunction with the previously supported FTP, HTTP, and HTTPs protocols.
With the picture caller ID feature enabled, the BluStar device displays the picture ID of applicable individuals on screen during the following events:
• Incoming calls (matched to caller ID numbers)
• Outgoing calls (matched to dialed numbers)
• Directory entries
• Callers list entries
• Redial list entries
The pictures are stored in a centralized picture repository and are dynamically retrieved from the centralized server for each call and then locally cached on the BluStar device to reduce network traffic.
If there is no picture on the central server for the dialed and/or caller ID number, direc-tory, callers list, and/or redial list entry, an image of a generic blue figure is displayed.
Pictures can be in either “png”, “gif”, or “jpeg” formats, but must have the extension “.png”. The filenames for pictures must be stored using the phone number as the filename using only digits (for example, 9995551234.png). Additionally, the pictures can be up to 320 pixels wide x 320 pixels tall and must be in 24-bit color.
41-001468-02 REV00 - 06.2013 8
Additional Information
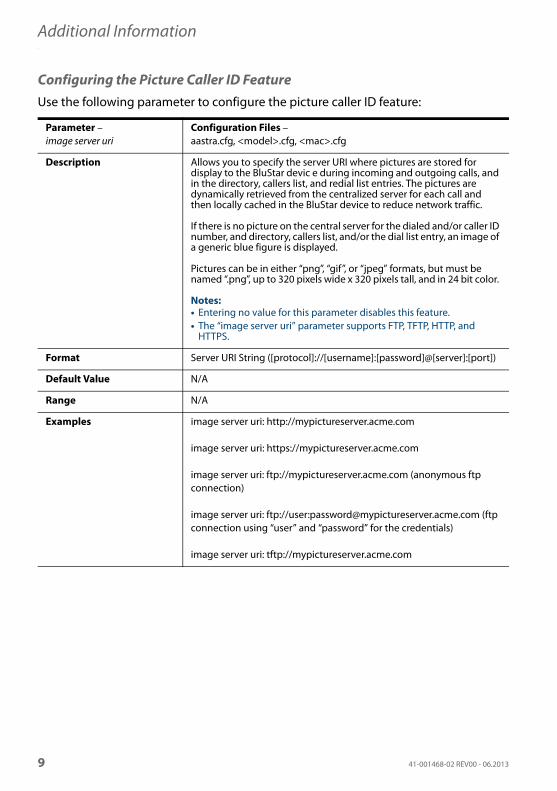
Configuring the Picture Caller ID FeatureUse the following parameter to configure the picture caller ID feature:
Parameter – image server uri
Configuration Files –aastra.cfg, <model>.cfg, <mac>.cfg
Description Allows you to specify the server URI where pictures are stored for display to the BluStar devic e during incoming and outgoing calls, and in the directory, callers list, and redial list entries. The pictures are dynamically retrieved from the centralized server for each call and then locally cached in the BluStar device to reduce network traffic.
If there is no picture on the central server for the dialed and/or caller ID number, and directory, callers list, and/or the dial list entry, an image of a generic blue figure is displayed.
Pictures can be in either “png”, “gif”, or “jpeg” formats, but must be named “.png”, up to 320 pixels wide x 320 pixels tall, and in 24 bit color.
Notes:• Entering no value for this parameter disables this feature.• The “image server uri” parameter supports FTP, TFTP, HTTP, and
HTTPS.
Format Server URI String ([protocol]://[username]:[password]@[server]:[port])
Default Value N/A
Range N/A
Examples image server uri: http://mypictureserver.acme.com
image server uri: https://mypictureserver.acme.com
image server uri: ftp://mypictureserver.acme.com (anonymous ftp connection)
image server uri: ftp://user:[email protected] (ftp connection using “user” and “password” for the credentials)
image server uri: tftp://mypictureserver.acme.com
9 41-001468-02 REV00 - 06.2013
Additional Information
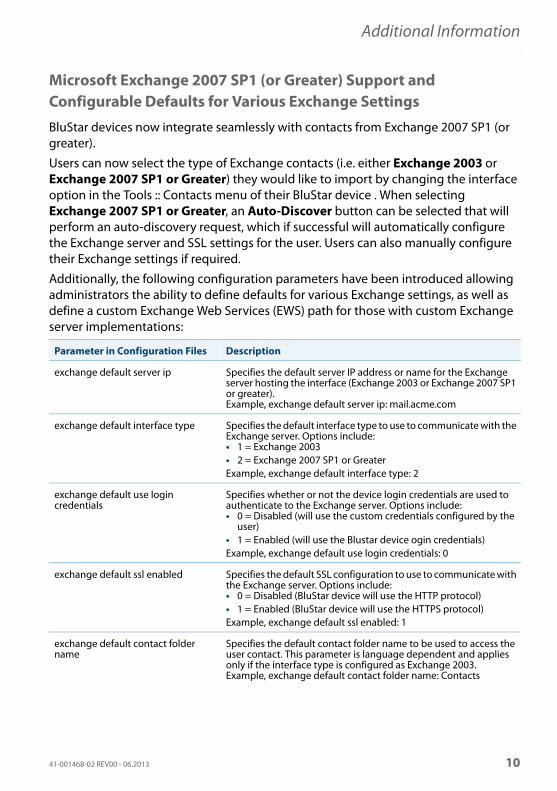
Microsoft Exchange 2007 SP1 (or Greater) Support and Configurable Defaults for Various Exchange Settings
BluStar devices now integrate seamlessly with contacts from Exchange 2007 SP1 (or greater).
Users can now select the type of Exchange contacts (i.e. either Exchange 2003 or Exchange 2007 SP1 or Greater) they would like to import by changing the interface option in the Tools :: Contacts menu of their BluStar device . When selecting Exchange 2007 SP1 or Greater, an Auto-Discover button can be selected that will perform an auto-discovery request, which if successful will automatically configure the Exchange server and SSL settings for the user. Users can also manually configure their Exchange settings if required.
Additionally, the following configuration parameters have been introduced allowing administrators the ability to define defaults for various Exchange settings, as well as define a custom Exchange Web Services (EWS) path for those with custom Exchange server implementations:
Parameter in Configuration Files Description
exchange default server ip Specifies the default server IP address or name for the Exchange server hosting the interface (Exchange 2003 or Exchange 2007 SP1 or greater).Example, exchange default server ip: mail.acme.com
exchange default interface type Specifies the default interface type to use to communicate with the Exchange server. Options include:• 1 = Exchange 2003• 2 = Exchange 2007 SP1 or GreaterExample, exchange default interface type: 2
exchange default use login credentials
Specifies whether or not the device login credentials are used to authenticate to the Exchange server. Options include:• 0 = Disabled (will use the custom credentials configured by the
user)• 1 = Enabled (will use the Blustar device ogin credentials)Example, exchange default use login credentials: 0
exchange default ssl enabled Specifies the default SSL configuration to use to communicate with the Exchange server. Options include:• 0 = Disabled (BluStar device will use the HTTP protocol)• 1 = Enabled (BluStar device will use the HTTPS protocol)Example, exchange default ssl enabled: 1
exchange default contact folder name
Specifies the default contact folder name to be used to access the user contact. This parameter is language dependent and applies only if the interface type is configured as Exchange 2003. Example, exchange default contact folder name: Contacts
41-001468-02 REV00 - 06.2013 10
Additional Information
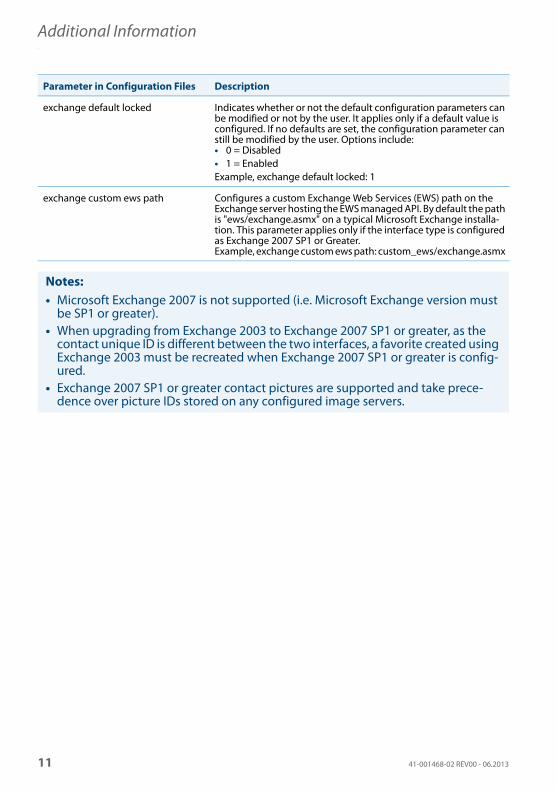
exchange default locked Indicates whether or not the default configuration parameters can be modified or not by the user. It applies only if a default value is configured. If no defaults are set, the configuration parameter can still be modified by the user. Options include:• 0 = Disabled• 1 = EnabledExample, exchange default locked: 1
exchange custom ews path Configures a custom Exchange Web Services (EWS) path on the Exchange server hosting the EWS managed API. By default the path is "ews/exchange.asmx" on a typical Microsoft Exchange installa-tion. This parameter applies only if the interface type is configured as Exchange 2007 SP1 or Greater.Example, exchange custom ews path: custom_ews/exchange.asmx
Notes:• Microsoft Exchange 2007 is not supported (i.e. Microsoft Exchange version must
be SP1 or greater).• When upgrading from Exchange 2003 to Exchange 2007 SP1 or greater, as the
contact unique ID is different between the two interfaces, a favorite created using Exchange 2003 must be recreated when Exchange 2007 SP1 or greater is config-ured.
• Exchange 2007 SP1 or greater contact pictures are supported and take prece-dence over picture IDs stored on any configured image servers.
Parameter in Configuration Files Description
11 41-001468-02 REV00 - 06.2013
Additional Information
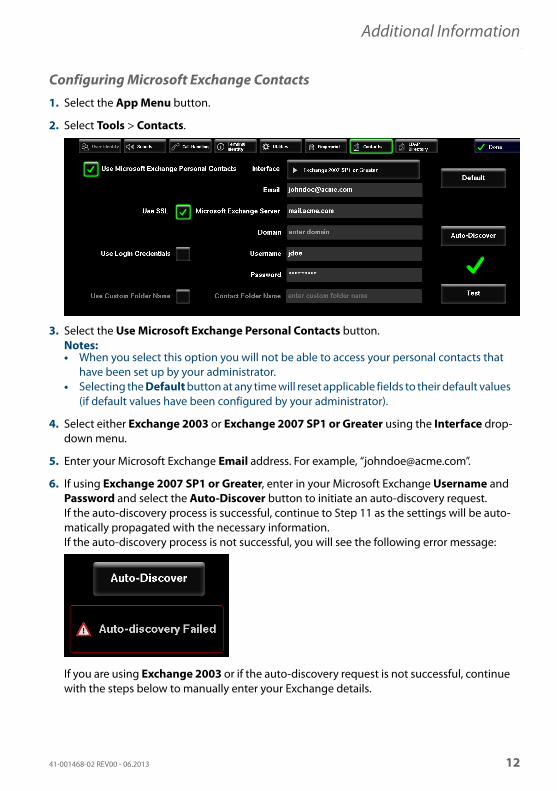
Configuring Microsoft Exchange Contacts 1. Select the App Menu button.
2. Select Tools > Contacts.
3. Select the Use Microsoft Exchange Personal Contacts button.Notes:• When you select this option you will not be able to access your personal contacts that
have been set up by your administrator.• Selecting the Default button at any time will reset applicable fields to their default values
(if default values have been configured by your administrator).
4. Select either Exchange 2003 or Exchange 2007 SP1 or Greater using the Interface drop-down menu.
5. Enter your Microsoft Exchange Email address. For example, “[email protected]”.
6. If using Exchange 2007 SP1 or Greater, enter in your Microsoft Exchange Username and Password and select the Auto-Discover button to initiate an auto-discovery request. If the auto-discovery process is successful, continue to Step 11 as the settings will be auto-matically propagated with the necessary information.If the auto-discovery process is not successful, you will see the following error message:
If you are using Exchange 2003 or if the auto-discovery request is not successful, continue with the steps below to manually enter your Exchange details.
41-001468-02 REV00 - 06.2013 12
Additional Information
Configuring Defaults for Various Exchange Settings
Use the following parameters to configure defaults for the various Exchange settings:
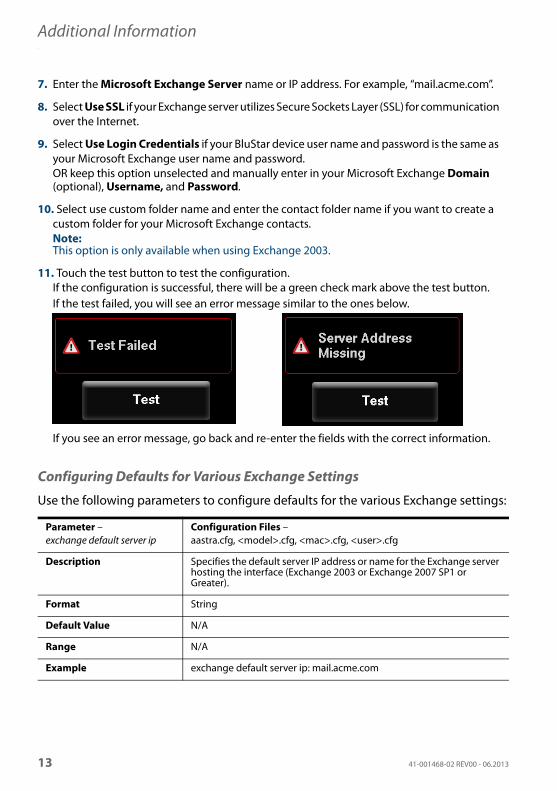
7. Enter the Microsoft Exchange Server name or IP address. For example, “mail.acme.com”.
8. Select Use SSL if your Exchange server utilizes Secure Sockets Layer (SSL) for communication over the Internet.
9. Select Use Login Credentials if your BluStar device user name and password is the same as your Microsoft Exchange user name and password. OR keep this option unselected and manually enter in your Microsoft Exchange Domain (optional), Username, and Password.
10. Select use custom folder name and enter the contact folder name if you want to create a custom folder for your Microsoft Exchange contacts.Note:This option is only available when using Exchange 2003.
11. Touch the test button to test the configuration. If the configuration is successful, there will be a green check mark above the test button. If the test failed, you will see an error message similar to the ones below.
If you see an error message, go back and re-enter the fields with the correct information.
Parameter – exchange default server ip
Configuration Files –aastra.cfg, <model>.cfg, <mac>.cfg, <user>.cfg
Description Specifies the default server IP address or name for the Exchange server hosting the interface (Exchange 2003 or Exchange 2007 SP1 or Greater).
Format String
Default Value N/A
Range N/A
Example exchange default server ip: mail.acme.com
13 41-001468-02 REV00 - 06.2013

Additional Information
Parameter – exchange default interface type
Configuration Files –aastra.cfg, <model>.cfg, <mac>.cfg, <user>.cfg
Description Specifies the default interface type to use to communicate with the Exchange server.
Format Integer
Default Value N/A
Range 1 - 21 = Exchange 20032 = Exchange 2007 SP1 or Greater
Example exchange default interface type: 2
Parameter – exchange default use login credentials
Configuration Files –aastra.cfg, <model>.cfg, <mac>.cfg, <user>.cfg
Description Specifies whether or not the BluStar device login credentials are used to authenticate to the Exchange server.
Format Boolean
Default Value N/A
Range 0 - 10 = Disabled (will use the custom credentials configured by the user)1 = Enabled (will use the BluStar device login credentials)
Example exchange default use login credentials: 0
Parameter – exchange default ssl enabled
Configuration Files –aastra.cfg, <model>.cfg, <mac>.cfg, <user>.cfg
Description Specifies the default SSL configuration to use to communicate with the Exchange server.
Format Boolean
Default Value N/A
Range 0 - 10 = Disabled (BluStar device will use the HTTP protocol)1 = Enabled (BluStar device will use the HTTPS protocol)
Example exchange default ssl enabled: 1
41-001468-02 REV00 - 06.2013 14
Additional Information
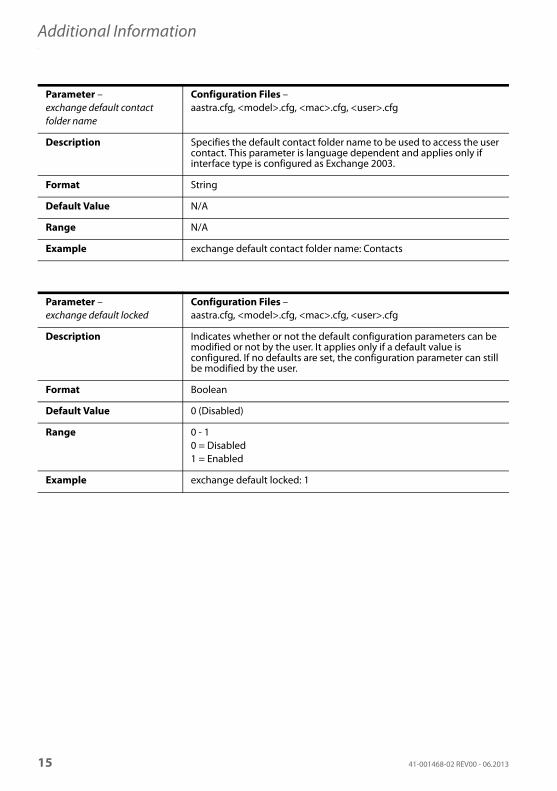
Parameter – exchange default contact folder name
Configuration Files –aastra.cfg, <model>.cfg, <mac>.cfg, <user>.cfg
Description Specifies the default contact folder name to be used to access the user contact. This parameter is language dependent and applies only if interface type is configured as Exchange 2003.
Format String
Default Value N/A
Range N/A
Example exchange default contact folder name: Contacts
Parameter – exchange default locked
Configuration Files –aastra.cfg, <model>.cfg, <mac>.cfg, <user>.cfg
Description Indicates whether or not the default configuration parameters can be modified or not by the user. It applies only if a default value is configured. If no defaults are set, the configuration parameter can still be modified by the user.
Format Boolean
Default Value 0 (Disabled)
Range 0 - 10 = Disabled1 = Enabled
Example exchange default locked: 1
15 41-001468-02 REV00 - 06.2013
Additional Information
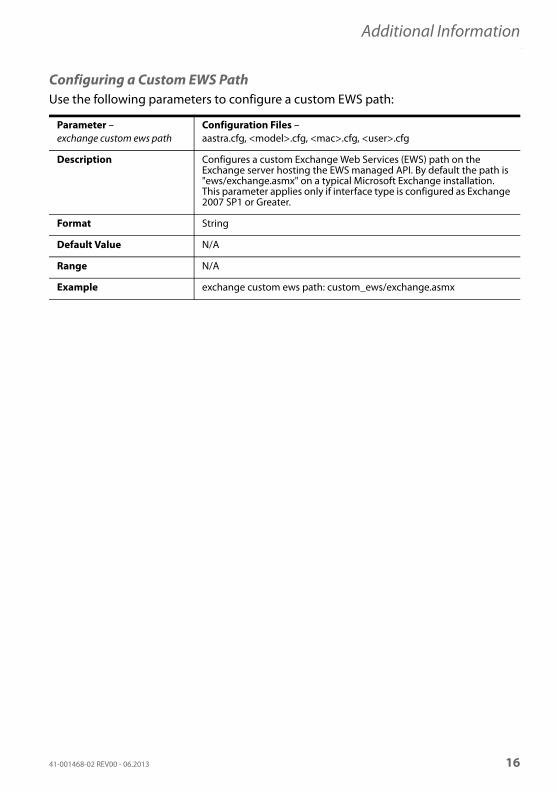
Configuring a Custom EWS PathUse the following parameters to configure a custom EWS path:
Parameter – exchange custom ews path
Configuration Files –aastra.cfg, <model>.cfg, <mac>.cfg, <user>.cfg
Description Configures a custom Exchange Web Services (EWS) path on the Exchange server hosting the EWS managed API. By default the path is "ews/exchange.asmx" on a typical Microsoft Exchange installation. This parameter applies only if interface type is configured as Exchange 2007 SP1 or Greater.
Format String
Default Value N/A
Range N/A
Example exchange custom ews path: custom_ews/exchange.asmx
41-001468-02 REV00 - 06.2013 16
Additional Information
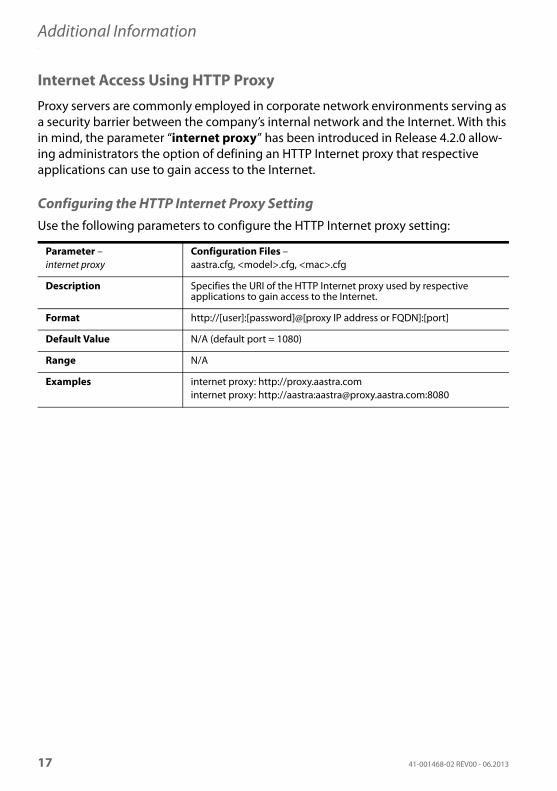
Internet Access Using HTTP Proxy
Proxy servers are commonly employed in corporate network environments serving as a security barrier between the company’s internal network and the Internet. With this in mind, the parameter “internet proxy” has been introduced in Release 4.2.0 allow-ing administrators the option of defining an HTTP Internet proxy that respective applications can use to gain access to the Internet.
Configuring the HTTP Internet Proxy SettingUse the following parameters to configure the HTTP Internet proxy setting:
Parameter – internet proxy
Configuration Files –aastra.cfg, <model>.cfg, <mac>.cfg
Description Specifies the URI of the HTTP Internet proxy used by respective applications to gain access to the Internet.
Format http://[user]:[password]@[proxy IP address or FQDN]:[port]
Default Value N/A (default port = 1080)
Range N/A
Examples internet proxy: http://proxy.aastra.cominternet proxy: http://aastra:[email protected]:8080
17 41-001468-02 REV00 - 06.2013
Additional Information
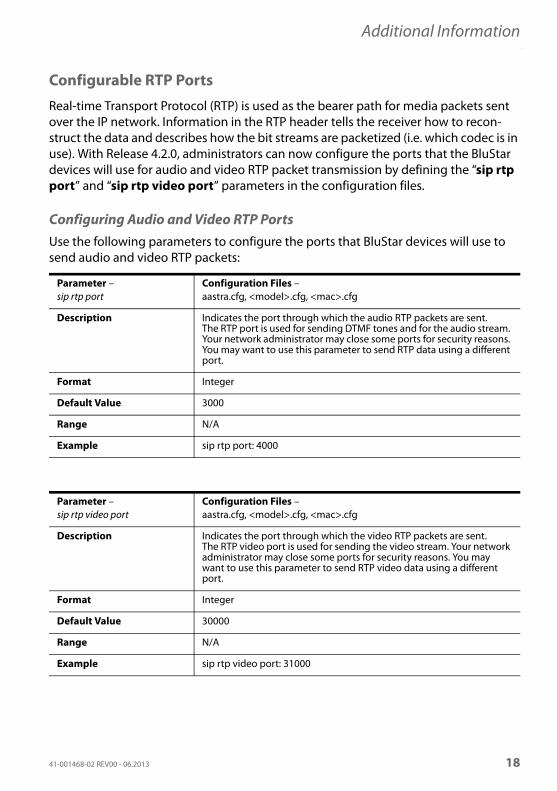
Configurable RTP Ports
Real-time Transport Protocol (RTP) is used as the bearer path for media packets sent over the IP network. Information in the RTP header tells the receiver how to recon-struct the data and describes how the bit streams are packetized (i.e. which codec is in use). With Release 4.2.0, administrators can now configure the ports that the BluStar devices will use for audio and video RTP packet transmission by defining the “sip rtp port” and “sip rtp video port” parameters in the configuration files.
Configuring Audio and Video RTP PortsUse the following parameters to configure the ports that BluStar devices will use to send audio and video RTP packets:
Parameter – sip rtp port
Configuration Files –aastra.cfg, <model>.cfg, <mac>.cfg
Description Indicates the port through which the audio RTP packets are sent. The RTP port is used for sending DTMF tones and for the audio stream. Your network administrator may close some ports for security reasons. You may want to use this parameter to send RTP data using a different port.
Format Integer
Default Value 3000
Range N/A
Example sip rtp port: 4000
Parameter – sip rtp video port
Configuration Files –aastra.cfg, <model>.cfg, <mac>.cfg
Description Indicates the port through which the video RTP packets are sent.The RTP video port is used for sending the video stream. Your network administrator may close some ports for security reasons. You may want to use this parameter to send RTP video data using a different port.
Format Integer
Default Value 30000
Range N/A
Example sip rtp video port: 31000
41-001468-02 REV00 - 06.2013 18
Additional Information
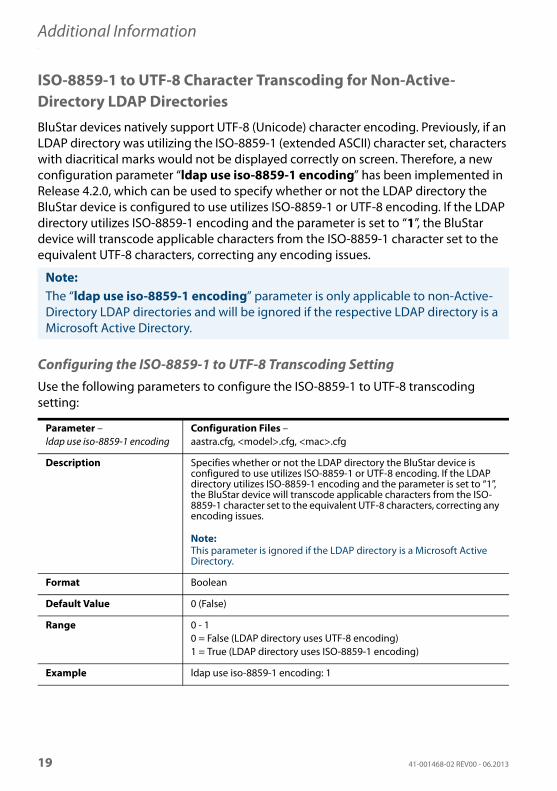
ISO-8859-1 to UTF-8 Character Transcoding for Non-Active-Directory LDAP Directories
BluStar devices natively support UTF-8 (Unicode) character encoding. Previously, if an LDAP directory was utilizing the ISO-8859-1 (extended ASCII) character set, characters with diacritical marks would not be displayed correctly on screen. Therefore, a new configuration parameter “ldap use iso-8859-1 encoding” has been implemented in Release 4.2.0, which can be used to specify whether or not the LDAP directory the BluStar device is configured to use utilizes ISO-8859-1 or UTF-8 encoding. If the LDAP directory utilizes ISO-8859-1 encoding and the parameter is set to “1”, the BluStar device will transcode applicable characters from the ISO-8859-1 character set to the equivalent UTF-8 characters, correcting any encoding issues.
Configuring the ISO-8859-1 to UTF-8 Transcoding SettingUse the following parameters to configure the ISO-8859-1 to UTF-8 transcoding setting:
Note:The “ldap use iso-8859-1 encoding” parameter is only applicable to non-Active-Directory LDAP directories and will be ignored if the respective LDAP directory is a Microsoft Active Directory.
Parameter – ldap use iso-8859-1 encoding
Configuration Files –aastra.cfg, <model>.cfg, <mac>.cfg
Description Specifies whether or not the LDAP directory the BluStar device is configured to use utilizes ISO-8859-1 or UTF-8 encoding. If the LDAP directory utilizes ISO-8859-1 encoding and the parameter is set to “1”, the BluStar device will transcode applicable characters from the ISO-8859-1 character set to the equivalent UTF-8 characters, correcting any encoding issues.
Note:This parameter is ignored if the LDAP directory is a Microsoft Active Directory.
Format Boolean
Default Value 0 (False)
Range 0 - 10 = False (LDAP directory uses UTF-8 encoding)1 = True (LDAP directory uses ISO-8859-1 encoding)
Example ldap use iso-8859-1 encoding: 1
19 41-001468-02 REV00 - 06.2013
Additional Information
Configuration File Transfer Status Details
Administrators and users can now view which system configuration files (i.e. secu-rity.tuz, aastra.cfg/tuz, <model>.cfg/tuz, and <mac>.cfg/tuz), user configuration files (i.e. security.tuz, <user>.cfg/tuz, <user>_local.cfg/tuz), and licenses have been suc-cessfully downloaded by the respective BluStar device at boot time. These important details are now readily accessible through the Status application.
Note:Critical file transfer failures are indicated in bold red on the Status screen.
41-001468-02 REV00 - 06.2013 20
Additional Information
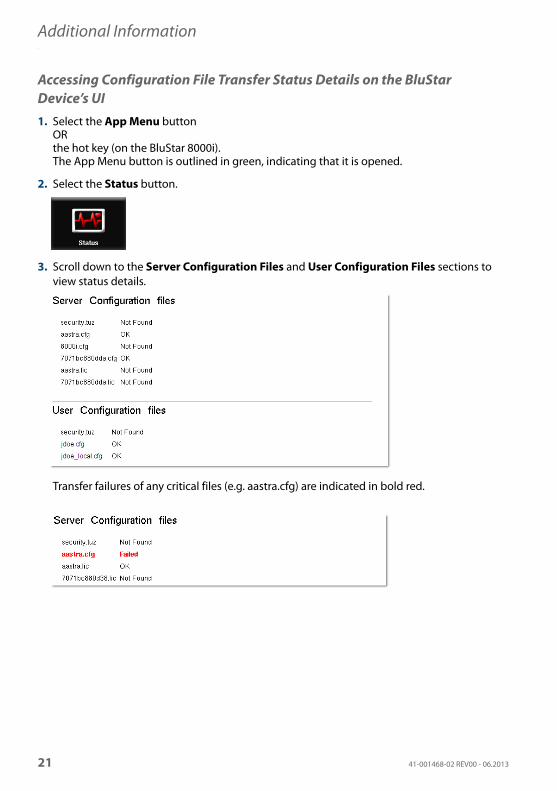
Accessing Configuration File Transfer Status Details on the BluStarDevice’s UI1. Select the App Menu button
ORthe hot key (on the BluStar 8000i).The App Menu button is outlined in green, indicating that it is opened.
2. Select the Status button.
3. Scroll down to the Server Configuration Files and User Configuration Files sections to view status details.
Transfer failures of any critical files (e.g. aastra.cfg) are indicated in bold red.
21 41-001468-02 REV00 - 06.2013
Additional Information
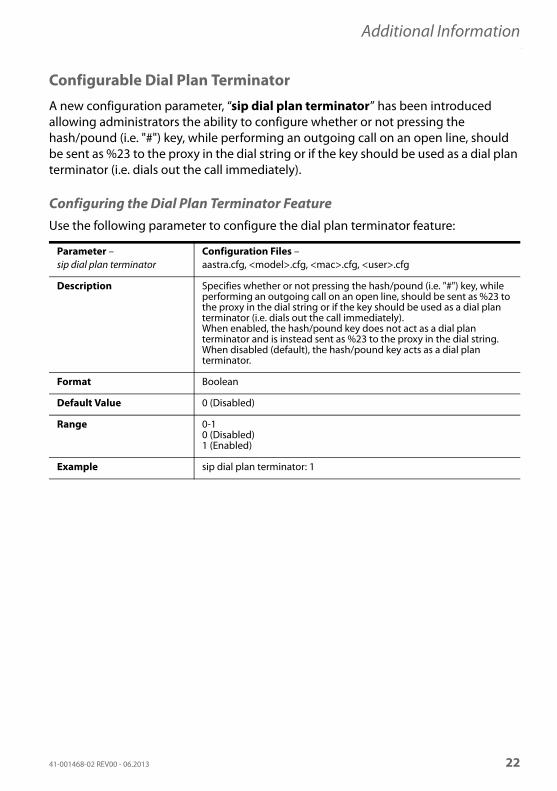
Configurable Dial Plan Terminator
A new configuration parameter, “sip dial plan terminator” has been introduced allowing administrators the ability to configure whether or not pressing the hash/pound (i.e. "#") key, while performing an outgoing call on an open line, should be sent as %23 to the proxy in the dial string or if the key should be used as a dial plan terminator (i.e. dials out the call immediately).
Configuring the Dial Plan Terminator FeatureUse the following parameter to configure the dial plan terminator feature:
Parameter – sip dial plan terminator
Configuration Files –aastra.cfg, <model>.cfg, <mac>.cfg, <user>.cfg
Description Specifies whether or not pressing the hash/pound (i.e. "#") key, while performing an outgoing call on an open line, should be sent as %23 to the proxy in the dial string or if the key should be used as a dial plan terminator (i.e. dials out the call immediately).When enabled, the hash/pound key does not act as a dial plan terminator and is instead sent as %23 to the proxy in the dial string.When disabled (default), the hash/pound key acts as a dial plan terminator.
Format Boolean
Default Value 0 (Disabled)
Range 0-10 (Disabled)1 (Enabled)
Example sip dial plan terminator: 1
41-001468-02 REV00 - 06.2013 22
Additional Information
Autologin Upon Restart
A new feature has been introduced in Release 4.2.0 enabling BluStar for Conference Room systems and BluStar 8000i terminals to automatically log in to a specified default account upon a manual restart, forced restart, or cold reboot. These three pro-cesses can be defined as follows:
• Manual restart - user initiated (e.g. when a user selects the Restart button).
• Forced restart - software initiated but influenced by a user’s action (e.g. when a user changes a terminal setting whereby the device requires a restart for the setting to take effect).
• Cold reboot - when a software upgrade has been initiatedor when an interruption of power has occured (e.g. power failure or power cycle).
This feature is especially useful when a device is configured for one primary account as it ensures that the account is logged in automatically even after a cold reboot has occurred.
Administrators can enable or disable this feature by defining the “enable user autologin” parameter in the aastra.cfg, <model>.cfg, or <mac>.cfg files. This feature is disabled by default. As with all parameters administrators can enable and limit the feature to specific devices or specific models, if required. For example, to limit the fea-ture to only the BluStar for Conference Room systems, administrators can disable the parameter in the aastra.cfg file (i.e. enable user autologin: 0) and enable the parame-ter in the 8000icr.cfg (case sensitive) file (i.e. enable user autologin: 1).
Notes:• If a BluStar device is in a locked state before a forced restart, the device will still
retain its locked state after it is restarted and automatically logged in.• The configured autologin account will be removed if the device is reset to factory
defaults.
23 41-001468-02 REV00 - 06.2013
Additional Information
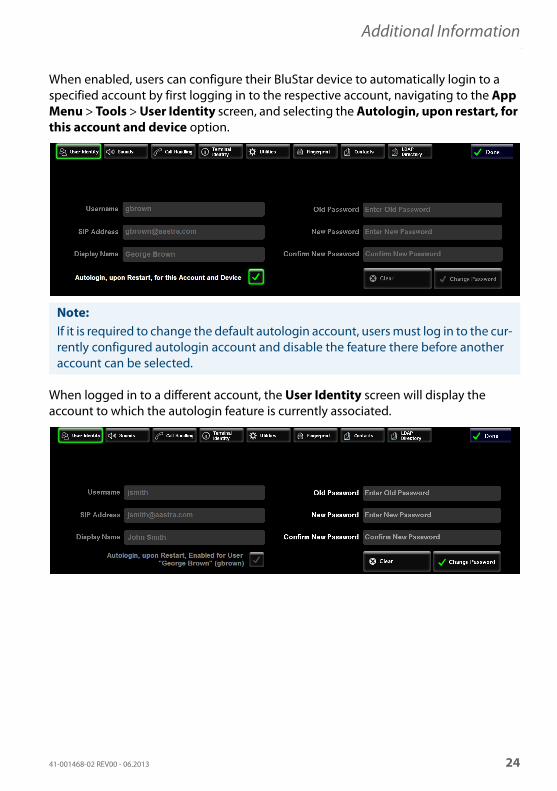
When enabled, users can configure their BluStar device to automatically login to a specified account by first logging in to the respective account, navigating to the App Menu > Tools > User Identity screen, and selecting the Autologin, upon restart, for this account and device option.
When logged in to a different account, the User Identity screen will display the account to which the autologin feature is currently associated.
Note:If it is required to change the default autologin account, users must log in to the cur-rently configured autologin account and disable the feature there before another account can be selected.
41-001468-02 REV00 - 06.2013 24
Additional Information
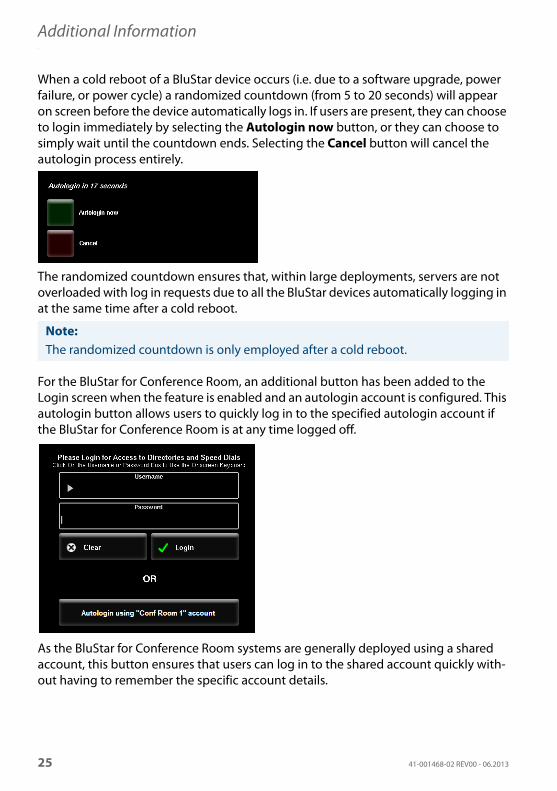
When a cold reboot of a BluStar device occurs (i.e. due to a software upgrade, power failure, or power cycle) a randomized countdown (from 5 to 20 seconds) will appear on screen before the device automatically logs in. If users are present, they can choose to login immediately by selecting the Autologin now button, or they can choose to simply wait until the countdown ends. Selecting the Cancel button will cancel the autologin process entirely.
The randomized countdown ensures that, within large deployments, servers are not overloaded with log in requests due to all the BluStar devices automatically logging in at the same time after a cold reboot.
For the BluStar for Conference Room, an additional button has been added to the Login screen when the feature is enabled and an autologin account is configured. This autologin button allows users to quickly log in to the specified autologin account if the BluStar for Conference Room is at any time logged off.
As the BluStar for Conference Room systems are generally deployed using a shared account, this button ensures that users can log in to the shared account quickly with-out having to remember the specific account details.
Note:The randomized countdown is only employed after a cold reboot.
25 41-001468-02 REV00 - 06.2013
Additional Information
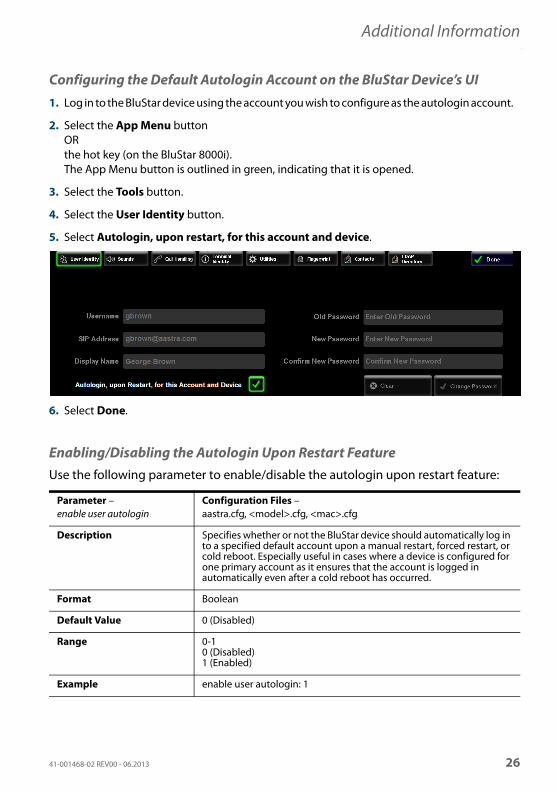
Configuring the Default Autologin Account on the BluStar Device’s UI
Enabling/Disabling the Autologin Upon Restart FeatureUse the following parameter to enable/disable the autologin upon restart feature:
1. Log in to the BluStar device using the account you wish to configure as the autologin account.
2. Select the App Menu buttonORthe hot key (on the BluStar 8000i).The App Menu button is outlined in green, indicating that it is opened.
3. Select the Tools button.
4. Select the User Identity button.
5. Select Autologin, upon restart, for this account and device.
6. Select Done.
Parameter – enable user autologin
Configuration Files –aastra.cfg, <model>.cfg, <mac>.cfg
Description Specifies whether or not the BluStar device should automatically log in to a specified default account upon a manual restart, forced restart, or cold reboot. Especially useful in cases where a device is configured for one primary account as it ensures that the account is logged in automatically even after a cold reboot has occurred.
Format Boolean
Default Value 0 (Disabled)
Range 0-10 (Disabled)1 (Enabled)
Example enable user autologin: 1
41-001468-02 REV00 - 06.2013 26
Additional Information
Transport Layer Security (TLS) Support
BluStar devices now support the Transport Layer Security (TLS) transport protocol. TLS is a protocol that ensures communication privacy between the device and the Internet. TLS ensures that no third party may eavesdrop or tamper with any message.
TLS is composed of two layers: the TLS Record Protocol and the TLS Handshake proto-col. The TLS Record Protocol provides connection security using an encryption method, such as Data Encryption Standard (DES). The TLS Handshake Protocol is used for server/client authentication as well as for negotiating the encryption algorithm and cryptographic keys before data is exchanged. TLS requires the use of the follow-ing security certificate files to perform the TLS handshake:
• Root and Intermediate Certificates
• Local Certificate
• Private Key
• Trusted Certificate
When the device uses TLS to authenticate with the server, each individual call initiates a new TLS connection. This can prolong the time it takes to place a call. Thus, the BluS-tar devices also have a feature that allows you to setup the connection to the server once and re-use that one connection for all calls from the device. This feature is called Persistent TLS. The connection for Persistent TLS is established during the registration of the device. If the device l is configured to use Persistent TLS and a call is made from the device, this call and all subsequent calls use the same authenticated connection. This significantly reduces the amount of time it takes to place a call. An administrator can configure TLS and Persistent TLS using the configuration files.
SIP Features
Notes:• Persistent TLS requires the “sip outbound proxy” and “sip outbound proxy
port” parameters be configured in the configuration files. • There can be only one Persistent TLS connection created per device. The device
establishes the TLS connection to the configured outbound proxy.• If you configure the device to use Persistent TLS, you must also specify the Trusted
Certificate file to use. The Root and Intermediate Certificates, Local Certificate, and Private Key files are optional.
27 41-001468-02 REV00 - 06.2013
Additional Information
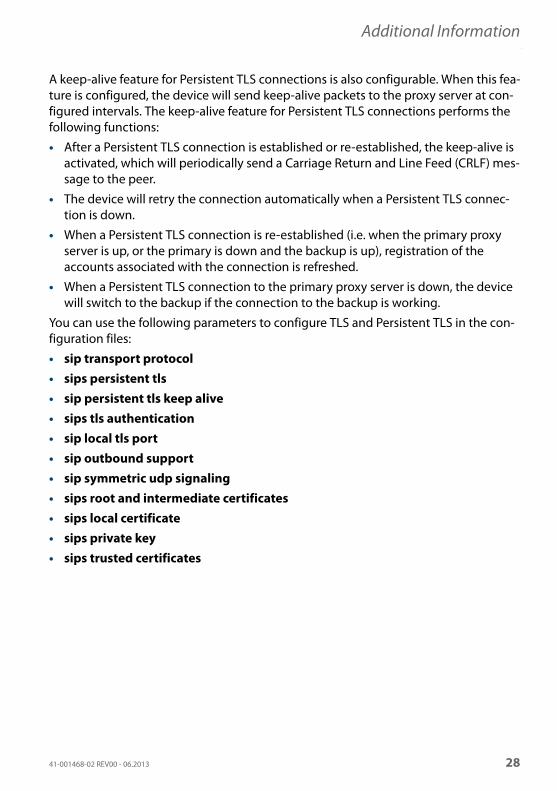
A keep-alive feature for Persistent TLS connections is also configurable. When this fea-ture is configured, the device will send keep-alive packets to the proxy server at con-figured intervals. The keep-alive feature for Persistent TLS connections performs the following functions:
• After a Persistent TLS connection is established or re-established, the keep-alive is activated, which will periodically send a Carriage Return and Line Feed (CRLF) mes-sage to the peer.
• The device will retry the connection automatically when a Persistent TLS connec-tion is down.
• When a Persistent TLS connection is re-established (i.e. when the primary proxy server is up, or the primary is down and the backup is up), registration of the accounts associated with the connection is refreshed.
• When a Persistent TLS connection to the primary proxy server is down, the device will switch to the backup if the connection to the backup is working.
You can use the following parameters to configure TLS and Persistent TLS in the con-figuration files:
• sip transport protocol• sips persistent tls• sip persistent tls keep alive• sips tls authentication• sip local tls port• sip outbound support• sip symmetric udp signaling• sips root and intermediate certificates• sips local certificate• sips private key• sips trusted certificates
41-001468-02 REV00 - 06.2013 28
Additional Information
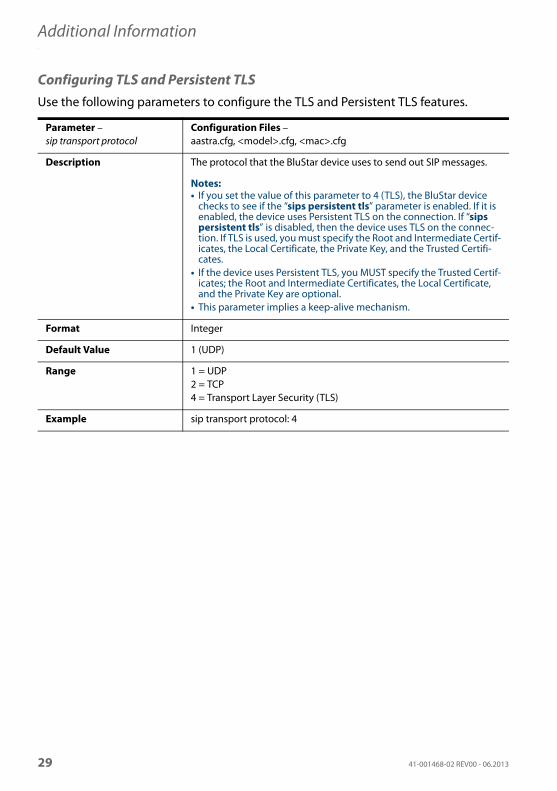
Configuring TLS and Persistent TLSUse the following parameters to configure the TLS and Persistent TLS features.
Parameter – sip transport protocol
Configuration Files –aastra.cfg, <model>.cfg, <mac>.cfg
Description The protocol that the BluStar device uses to send out SIP messages.
Notes:• If you set the value of this parameter to 4 (TLS), the BluStar device
checks to see if the “sips persistent tls” parameter is enabled. If it is enabled, the device uses Persistent TLS on the connection. If “sips persistent tls” is disabled, then the device uses TLS on the connec-tion. If TLS is used, you must specify the Root and Intermediate Certif-icates, the Local Certificate, the Private Key, and the Trusted Certifi-cates.
• If the device uses Persistent TLS, you MUST specify the Trusted Certif-icates; the Root and Intermediate Certificates, the Local Certificate, and the Private Key are optional.
• This parameter implies a keep-alive mechanism.
Format Integer
Default Value 1 (UDP)
Range 1 = UDP2 = TCP4 = Transport Layer Security (TLS)
Example sip transport protocol: 4
29 41-001468-02 REV00 - 06.2013
Additional Information
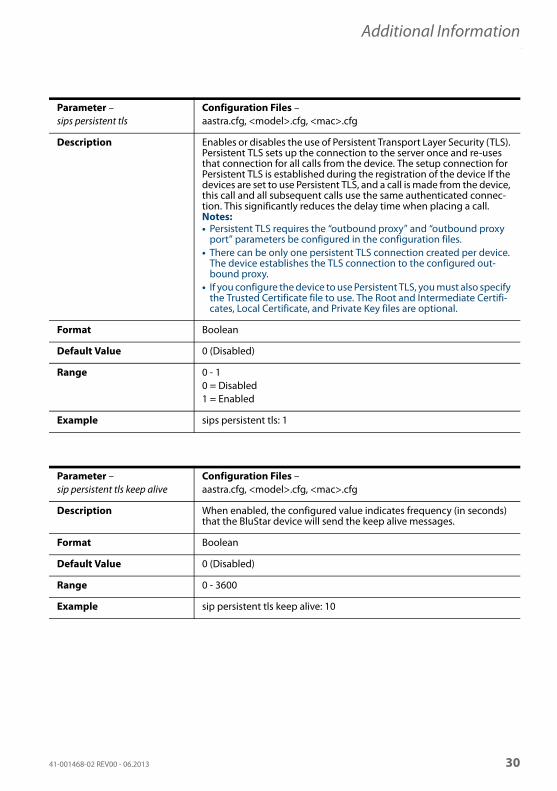
Parameter – sips persistent tls
Configuration Files –aastra.cfg, <model>.cfg, <mac>.cfg
Description Enables or disables the use of Persistent Transport Layer Security (TLS). Persistent TLS sets up the connection to the server once and re-uses that connection for all calls from the device. The setup connection for Persistent TLS is established during the registration of the device If the devices are set to use Persistent TLS, and a call is made from the device, this call and all subsequent calls use the same authenticated connec-tion. This significantly reduces the delay time when placing a call.Notes:• Persistent TLS requires the “outbound proxy” and “outbound proxy
port” parameters be configured in the configuration files. • There can be only one persistent TLS connection created per device.
The device establishes the TLS connection to the configured out-bound proxy.
• If you configure the device to use Persistent TLS, you must also specify the Trusted Certificate file to use. The Root and Intermediate Certifi-cates, Local Certificate, and Private Key files are optional.
Format Boolean
Default Value 0 (Disabled)
Range 0 - 1 0 = Disabled1 = Enabled
Example sips persistent tls: 1
Parameter – sip persistent tls keep alive
Configuration Files –aastra.cfg, <model>.cfg, <mac>.cfg
Description When enabled, the configured value indicates frequency (in seconds) that the BluStar device will send the keep alive messages.
Format Boolean
Default Value 0 (Disabled)
Range 0 - 3600
Example sip persistent tls keep alive: 10
41-001468-02 REV00 - 06.2013 30
Additional Information
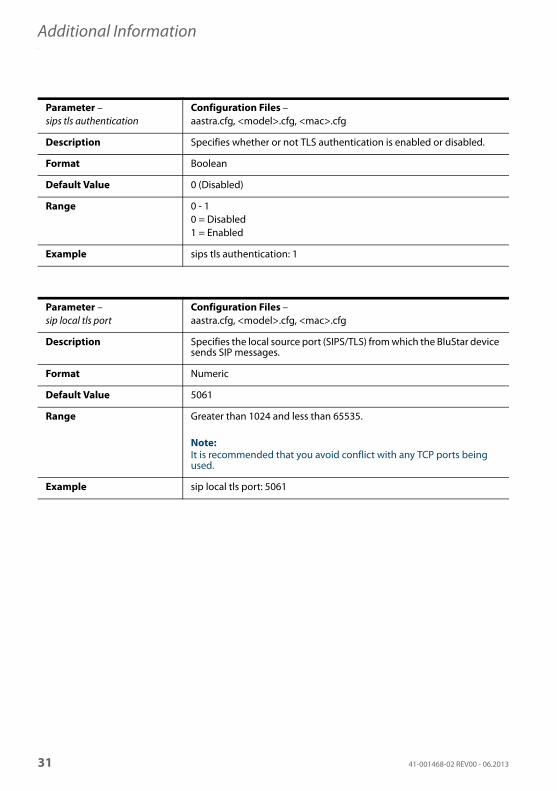
Parameter – sips tls authentication
Configuration Files –aastra.cfg, <model>.cfg, <mac>.cfg
Description Specifies whether or not TLS authentication is enabled or disabled.
Format Boolean
Default Value 0 (Disabled)
Range 0 - 1 0 = Disabled1 = Enabled
Example sips tls authentication: 1
Parameter – sip local tls port
Configuration Files –aastra.cfg, <model>.cfg, <mac>.cfg
Description Specifies the local source port (SIPS/TLS) from which the BluStar device sends SIP messages.
Format Numeric
Default Value 5061
Range Greater than 1024 and less than 65535.
Note:It is recommended that you avoid conflict with any TCP ports being used.
Example sip local tls port: 5061
31 41-001468-02 REV00 - 06.2013
Additional Information
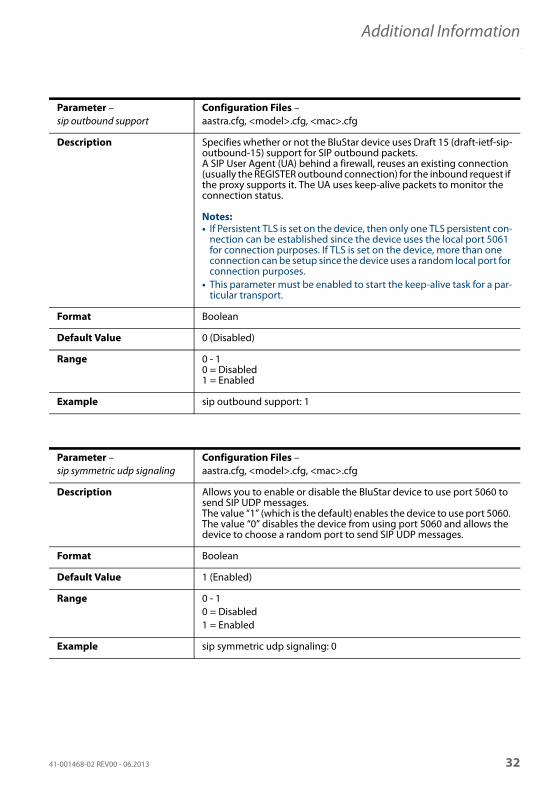
Parameter – sip outbound support
Configuration Files –aastra.cfg, <model>.cfg, <mac>.cfg
Description Specifies whether or not the BluStar device uses Draft 15 (draft-ietf-sip-outbound-15) support for SIP outbound packets. A SIP User Agent (UA) behind a firewall, reuses an existing connection (usually the REGISTER outbound connection) for the inbound request if the proxy supports it. The UA uses keep-alive packets to monitor the connection status.
Notes:• If Persistent TLS is set on the device, then only one TLS persistent con-
nection can be established since the device uses the local port 5061 for connection purposes. If TLS is set on the device, more than one connection can be setup since the device uses a random local port for connection purposes.
• This parameter must be enabled to start the keep-alive task for a par-ticular transport.
Format Boolean
Default Value 0 (Disabled)
Range 0 - 10 = Disabled1 = Enabled
Example sip outbound support: 1
Parameter – sip symmetric udp signaling
Configuration Files –aastra.cfg, <model>.cfg, <mac>.cfg
Description Allows you to enable or disable the BluStar device to use port 5060 to send SIP UDP messages.The value “1” (which is the default) enables the device to use port 5060. The value “0” disables the device from using port 5060 and allows the device to choose a random port to send SIP UDP messages.
Format Boolean
Default Value 1 (Enabled)
Range 0 - 1 0 = Disabled1 = Enabled
Example sip symmetric udp signaling: 0
41-001468-02 REV00 - 06.2013 32
Additional Information
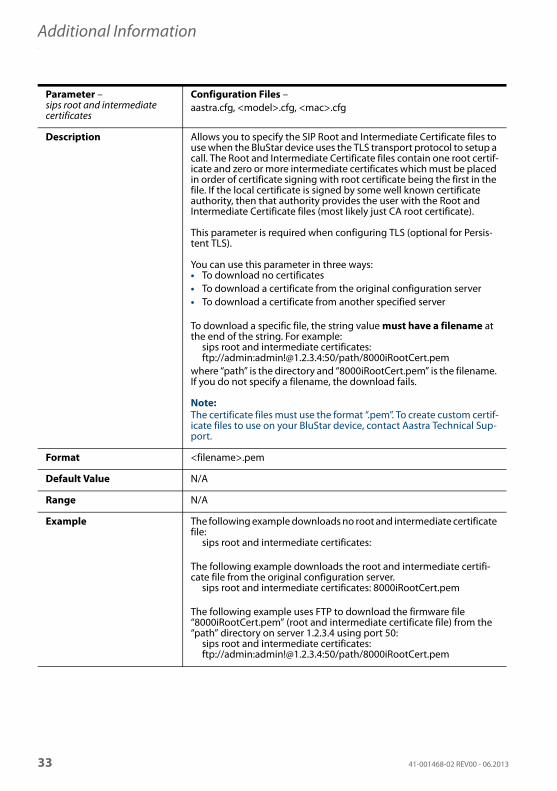
Parameter – sips root and intermediate certificates
Configuration Files –aastra.cfg, <model>.cfg, <mac>.cfg
Description Allows you to specify the SIP Root and Intermediate Certificate files to use when the BluStar device uses the TLS transport protocol to setup a call. The Root and Intermediate Certificate files contain one root certif-icate and zero or more intermediate certificates which must be placed in order of certificate signing with root certificate being the first in the file. If the local certificate is signed by some well known certificate authority, then that authority provides the user with the Root and Intermediate Certificate files (most likely just CA root certificate).
This parameter is required when configuring TLS (optional for Persis-tent TLS).
You can use this parameter in three ways:• To download no certificates• To download a certificate from the original configuration server• To download a certificate from another specified server
To download a specific file, the string value must have a filename at the end of the string. For example:
sips root and intermediate certificates:ftp://admin:[email protected]:50/path/8000iRootCert.pem
where “path” is the directory and “8000iRootCert.pem” is the filename. If you do not specify a filename, the download fails.
Note:The certificate files must use the format “.pem”. To create custom certif-icate files to use on your BluStar device, contact Aastra Technical Sup-port.
Format <filename>.pem
Default Value N/A
Range N/A
Example The following example downloads no root and intermediate certificate file:
sips root and intermediate certificates:
The following example downloads the root and intermediate certifi-cate file from the original configuration server.
sips root and intermediate certificates: 8000iRootCert.pem
The following example uses FTP to download the firmware file “8000iRootCert.pem” (root and intermediate certificate file) from the “path” directory on server 1.2.3.4 using port 50:
sips root and intermediate certificates: ftp://admin:[email protected]:50/path/8000iRootCert.pem
33 41-001468-02 REV00 - 06.2013
Additional Information
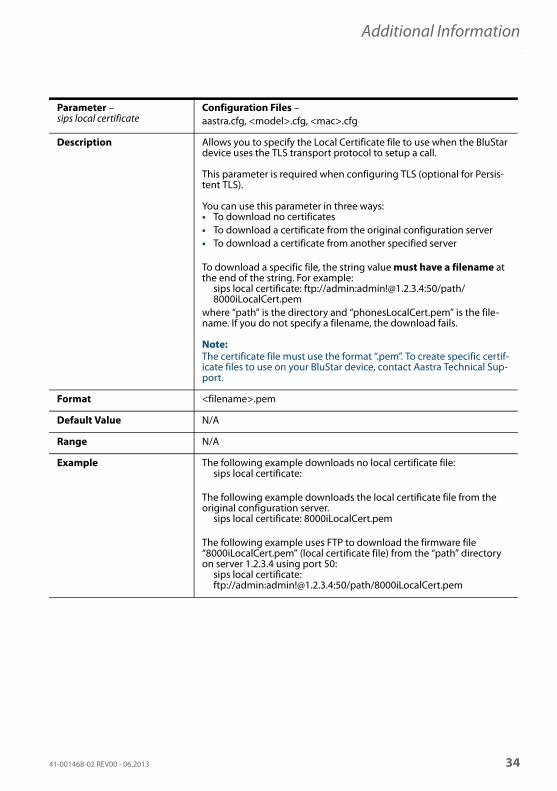
Parameter – sips local certificate
Configuration Files –aastra.cfg, <model>.cfg, <mac>.cfg
Description Allows you to specify the Local Certificate file to use when the BluStar device uses the TLS transport protocol to setup a call.
This parameter is required when configuring TLS (optional for Persis-tent TLS).
You can use this parameter in three ways:• To download no certificates• To download a certificate from the original configuration server• To download a certificate from another specified server
To download a specific file, the string value must have a filename at the end of the string. For example:
sips local certificate: ftp://admin:[email protected]:50/path/8000iLocalCert.pem
where “path” is the directory and “phonesLocalCert.pem” is the file-name. If you do not specify a filename, the download fails.
Note:The certificate file must use the format “.pem”. To create specific certif-icate files to use on your BluStar device, contact Aastra Technical Sup-port.
Format <filename>.pem
Default Value N/A
Range N/A
Example The following example downloads no local certificate file:sips local certificate:
The following example downloads the local certificate file from the original configuration server.
sips local certificate: 8000iLocalCert.pem
The following example uses FTP to download the firmware file “8000iLocalCert.pem” (local certificate file) from the “path” directory on server 1.2.3.4 using port 50:
sips local certificate: ftp://admin:[email protected]:50/path/8000iLocalCert.pem
41-001468-02 REV00 - 06.2013 34
Additional Information
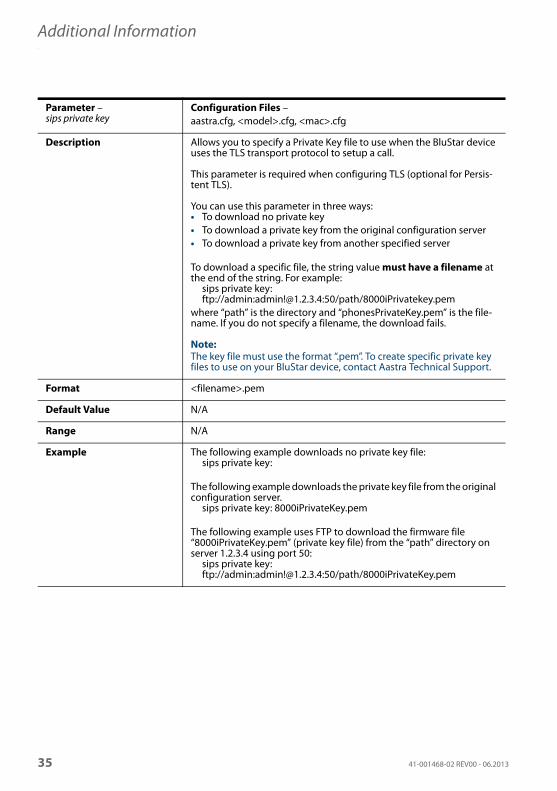
Parameter – sips private key
Configuration Files –aastra.cfg, <model>.cfg, <mac>.cfg
Description Allows you to specify a Private Key file to use when the BluStar device uses the TLS transport protocol to setup a call.
This parameter is required when configuring TLS (optional for Persis-tent TLS).
You can use this parameter in three ways:• To download no private key• To download a private key from the original configuration server• To download a private key from another specified server
To download a specific file, the string value must have a filename at the end of the string. For example:
sips private key: ftp://admin:[email protected]:50/path/8000iPrivatekey.pem
where “path” is the directory and “phonesPrivateKey.pem” is the file-name. If you do not specify a filename, the download fails.
Note:The key file must use the format “.pem”. To create specific private key files to use on your BluStar device, contact Aastra Technical Support.
Format <filename>.pem
Default Value N/A
Range N/A
Example The following example downloads no private key file:sips private key:
The following example downloads the private key file from the original configuration server.
sips private key: 8000iPrivateKey.pem
The following example uses FTP to download the firmware file “8000iPrivateKey.pem” (private key file) from the “path” directory on server 1.2.3.4 using port 50:
sips private key: ftp://admin:[email protected]:50/path/8000iPrivateKey.pem
35 41-001468-02 REV00 - 06.2013
Additional Information
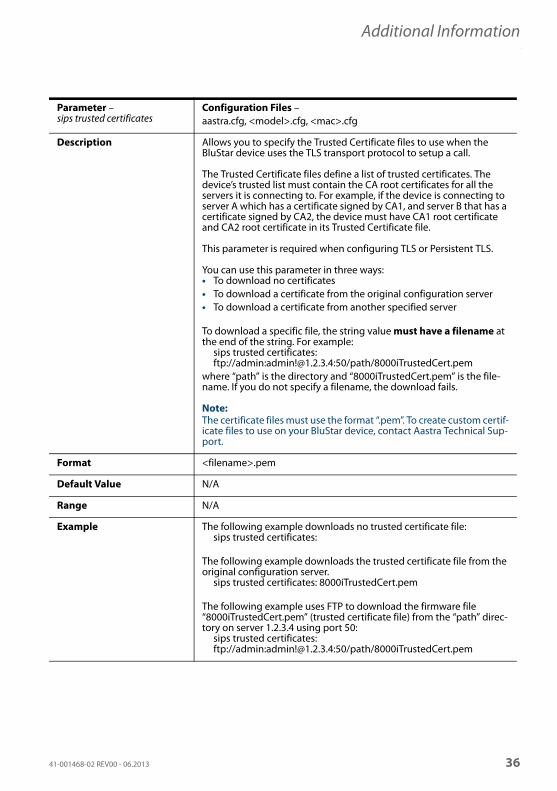
Parameter – sips trusted certificates
Configuration Files –aastra.cfg, <model>.cfg, <mac>.cfg
Description Allows you to specify the Trusted Certificate files to use when the BluStar device uses the TLS transport protocol to setup a call.
The Trusted Certificate files define a list of trusted certificates. The device’s trusted list must contain the CA root certificates for all the servers it is connecting to. For example, if the device is connecting to server A which has a certificate signed by CA1, and server B that has a certificate signed by CA2, the device must have CA1 root certificate and CA2 root certificate in its Trusted Certificate file.
This parameter is required when configuring TLS or Persistent TLS.
You can use this parameter in three ways:• To download no certificates• To download a certificate from the original configuration server• To download a certificate from another specified server
To download a specific file, the string value must have a filename at the end of the string. For example:
sips trusted certificates: ftp://admin:[email protected]:50/path/8000iTrustedCert.pem
where “path” is the directory and “8000iTrustedCert.pem” is the file-name. If you do not specify a filename, the download fails.
Note:The certificate files must use the format “.pem”. To create custom certif-icate files to use on your BluStar device, contact Aastra Technical Sup-port.
Format <filename>.pem
Default Value N/A
Range N/A
Example The following example downloads no trusted certificate file:sips trusted certificates:
The following example downloads the trusted certificate file from the original configuration server.
sips trusted certificates: 8000iTrustedCert.pem
The following example uses FTP to download the firmware file “8000iTrustedCert.pem” (trusted certificate file) from the “path” direc-tory on server 1.2.3.4 using port 50:
sips trusted certificates: ftp://admin:[email protected]:50/path/8000iTrustedCert.pem
41-001468-02 REV00 - 06.2013 36
Additional Information
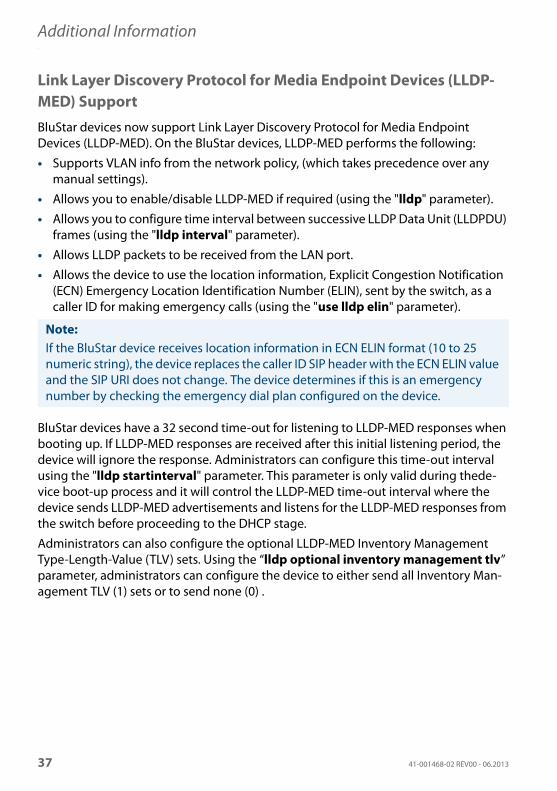
Link Layer Discovery Protocol for Media Endpoint Devices (LLDP-MED) Support
BluStar devices now support Link Layer Discovery Protocol for Media Endpoint Devices (LLDP-MED). On the BluStar devices, LLDP-MED performs the following:
• Supports VLAN info from the network policy, (which takes precedence over any manual settings).
• Allows you to enable/disable LLDP-MED if required (using the "lldp" parameter).
• Allows you to configure time interval between successive LLDP Data Unit (LLDPDU) frames (using the "lldp interval" parameter).
• Allows LLDP packets to be received from the LAN port.
• Allows the device to use the location information, Explicit Congestion Notification (ECN) Emergency Location Identification Number (ELIN), sent by the switch, as a caller ID for making emergency calls (using the "use lldp elin" parameter).
BluStar devices have a 32 second time-out for listening to LLDP-MED responses when booting up. If LLDP-MED responses are received after this initial listening period, the device will ignore the response. Administrators can configure this time-out interval using the "lldp startinterval" parameter. This parameter is only valid during thede-vice boot-up process and it will control the LLDP-MED time-out interval where the device sends LLDP-MED advertisements and listens for the LLDP-MED responses from the switch before proceeding to the DHCP stage.
Administrators can also configure the optional LLDP-MED Inventory Management Type-Length-Value (TLV) sets. Using the “lldp optional inventory management tlv” parameter, administrators can configure the device to either send all Inventory Man-agement TLV (1) sets or to send none (0) .
Note:If the BluStar device receives location information in ECN ELIN format (10 to 25 numeric string), the device replaces the caller ID SIP header with the ECN ELIN value and the SIP URI does not change. The device determines if this is an emergency number by checking the emergency dial plan configured on the device.
37 41-001468-02 REV00 - 06.2013
Additional Information
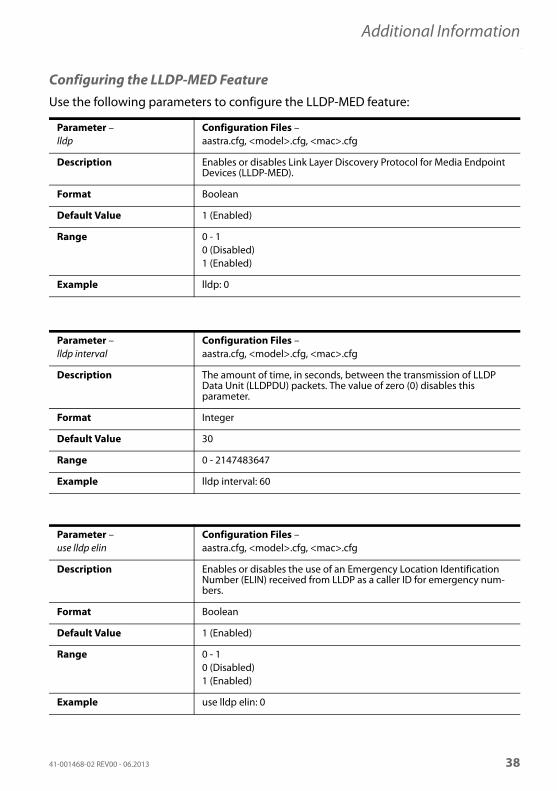
Configuring the LLDP-MED FeatureUse the following parameters to configure the LLDP-MED feature:
Parameter – lldp
Configuration Files –aastra.cfg, <model>.cfg, <mac>.cfg
Description Enables or disables Link Layer Discovery Protocol for Media Endpoint Devices (LLDP-MED).
Format Boolean
Default Value 1 (Enabled)
Range 0 - 10 (Disabled)1 (Enabled)
Example lldp: 0
Parameter – lldp interval
Configuration Files –aastra.cfg, <model>.cfg, <mac>.cfg
Description The amount of time, in seconds, between the transmission of LLDP Data Unit (LLDPDU) packets. The value of zero (0) disables this parameter.
Format Integer
Default Value 30
Range 0 - 2147483647
Example lldp interval: 60
Parameter – use lldp elin
Configuration Files –aastra.cfg, <model>.cfg, <mac>.cfg
Description Enables or disables the use of an Emergency Location Identification Number (ELIN) received from LLDP as a caller ID for emergency num-bers.
Format Boolean
Default Value 1 (Enabled)
Range 0 - 10 (Disabled)1 (Enabled)
Example use lldp elin: 0
41-001468-02 REV00 - 06.2013 38
Additional Information
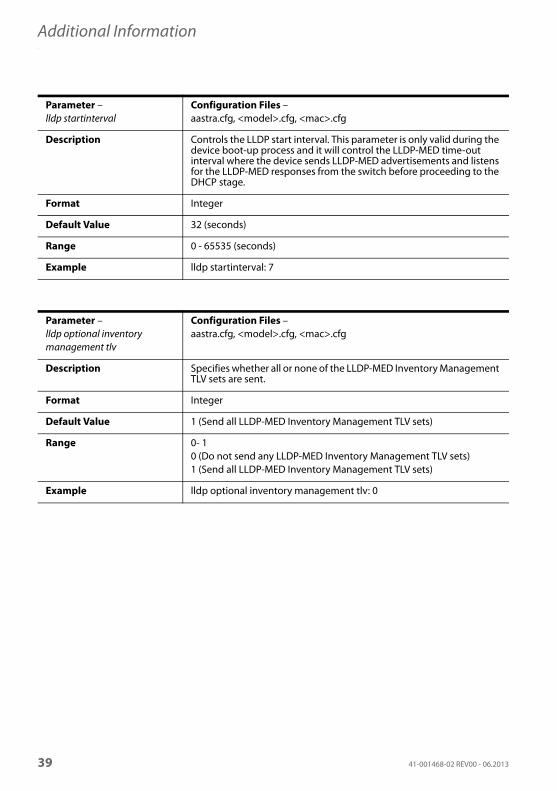
Parameter – lldp startinterval
Configuration Files –aastra.cfg, <model>.cfg, <mac>.cfg
Description Controls the LLDP start interval. This parameter is only valid during the device boot-up process and it will control the LLDP-MED time-out interval where the device sends LLDP-MED advertisements and listens for the LLDP-MED responses from the switch before proceeding to the DHCP stage.
Format Integer
Default Value 32 (seconds)
Range 0 - 65535 (seconds)
Example lldp startinterval: 7
Parameter – lldp optional inventory management tlv
Configuration Files –aastra.cfg, <model>.cfg, <mac>.cfg
Description Specifies whether all or none of the LLDP-MED Inventory Management TLV sets are sent.
Format Integer
Default Value 1 (Send all LLDP-MED Inventory Management TLV sets)
Range 0- 10 (Do not send any LLDP-MED Inventory Management TLV sets)1 (Send all LLDP-MED Inventory Management TLV sets)
Example lldp optional inventory management tlv: 0
39 41-001468-02 REV00 - 06.2013
Additional Information
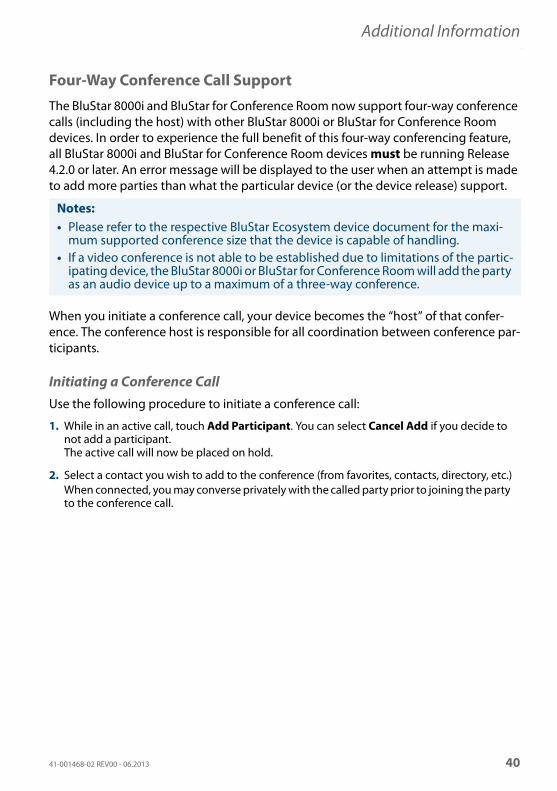
Four-Way Conference Call Support
The BluStar 8000i and BluStar for Conference Room now support four-way conference calls (including the host) with other BluStar 8000i or BluStar for Conference Room devices. In order to experience the full benefit of this four-way conferencing feature, all BluStar 8000i and BluStar for Conference Room devices must be running Release 4.2.0 or later. An error message will be displayed to the user when an attempt is made to add more parties than what the particular device (or the device release) support.
When you initiate a conference call, your device becomes the “host” of that confer-ence. The conference host is responsible for all coordination between conference par-ticipants.
Initiating a Conference CallUse the following procedure to initiate a conference call:
Notes:• Please refer to the respective BluStar Ecosystem device document for the maxi-
mum supported conference size that the device is capable of handling.• If a video conference is not able to be established due to limitations of the partic-
ipating device, the BluStar 8000i or BluStar for Conference Room will add the party as an audio device up to a maximum of a three-way conference.
1. While in an active call, touch Add Participant. You can select Cancel Add if you decide to not add a participant. The active call will now be placed on hold.
2. Select a contact you wish to add to the conference (from favorites, contacts, directory, etc.)When connected, you may converse privately with the called party prior to joining the party to the conference call.
41-001468-02 REV00 - 06.2013 40

Additional Information
Cancelling a Called Party before it Joins a ConferenceUse the following procedure to cancel a called party before it has joined a conference:
Adding a Call On Hold to an Existing ConferenceUse the following procedure to add a call on hold to an existing conference call:
3. Select the Join button that appears on the screen of the active caller.
OrSelect the Calls on Hold button and select the Join button under the call appearance bar of the caller that is on hold. You are now in a conference call and both participants will appear in the two large windows on your screen. Any other calls (that are not in the conference) remain on hold (if applicable).
4. If desired, select the Options button on the caller’s window to adjust the relative volume of that party using the up/down arrows or Mute button.
5. When finished, select Done to hide the options panel.
1. Select the Goodbye button below the call appearance bar of the party you were attempting to add. This terminates the call with the contact you were attempting to add to the conference call.
1. Select the Calls on Hold button and select the Join button under the conference call appear-ance bar. The caller is now in the conference call. Any other calls (that are not on the conference) remain on hold (if applicable).
2. If desired, select the Options button on the caller’s window to adjust the relative volume of that party using the up/down arrows or Mute button.
3. When finished, select Done to hide the options panel.
41 41-001468-02 REV00 - 06.2013

Additional Information
Conferencing an Incoming CallUse the following procedure to answer an incoming call and join it to an existing con-ference call:
1. On the incoming call appearance, select the Pickup button to answer. The conference call will be placed on hold. If you wish to decline the call, select the Goodbye button to terminate the incoming call.
2. Select the Calls on Hold button and select the Join button under conference call appearance bar that is on hold.
You are now in a conference call and participants will appear in the windows on your screen. Any other calls (that are not on the conference) remain on hold (if applicable).
3. If desired, select the Options button on the caller’s window to adjust the relative volume of that party using the up/down arrows or Mute button.
4. When finished, select Done to hide the options panel.
41-001468-02 REV00 - 06.2013 42

Additional Information
Ending a Conference CallUse the following procedure to end a conference call:
1. When your conference is over and all of your participants have been disconnected, select the Goodbye button.
43 41-001468-02 REV00 - 06.2013
Additional Information
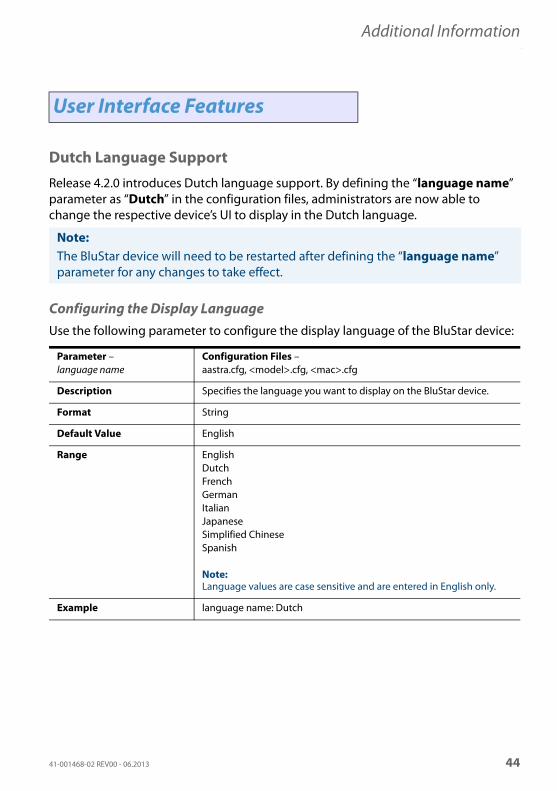
Dutch Language Support
Release 4.2.0 introduces Dutch language support. By defining the “language name” parameter as “Dutch” in the configuration files, administrators are now able to change the respective device’s UI to display in the Dutch language.
Configuring the Display LanguageUse the following parameter to configure the display language of the BluStar device:
User Interface Features
Note:The BluStar device will need to be restarted after defining the “language name” parameter for any changes to take effect.
Parameter – language name
Configuration Files –aastra.cfg, <model>.cfg, <mac>.cfg
Description Specifies the language you want to display on the BluStar device.
Format String
Default Value English
Range EnglishDutchFrenchGermanItalianJapaneseSimplified ChineseSpanish
Note:Language values are case sensitive and are entered in English only.
Example language name: Dutch
41-001468-02 REV00 - 06.2013 44
Additional Information
Eco-Off Mode Button
Users can now directly enable the Eco-Off power saving mode on their BluStar device by selecting the Eco-Off button located in the Applications and Telephone Connec-tion Management area of the screen.
When Eco-Off mode is enabled, the BluStar device will automatically power down all extraneous hardware components and a screen saver will be initialized, thereby allowing for a reduction in overall energy consumption and in turn a decrease in oper-ating costs.
Users can “wake up” the BluStar device while in Eco-Off mode by pressing any key on the BluStar for Conference Room keyboard or by either touching the screen, pressing any hard key, lifting the handset, or (when not logged in) using the fingerprint reader on the BluStar 8000i.
Notes:• If the BluStar device is “woken up” while in Eco-Off mode, the device will not
return to Eco-Off mode until the next scheduled power saving period or until Eco-Off mode is directly enabled by selecting the Eco-Off button.
• Incoming calls will be ignored by the BluStar device if it is in Eco-Off mode. A busy tone will be played back to any callers and your status will be displayed to others as “Unavailable”.
• The BluStar device will automatically exit Eco-Off mode at the scheduled start of the normal operating/business hours if a power saving schedule has been config-ured and the user is logged in. To create a power saving schedule, please refer to the Aastra BluStar 800i Desktop Media Phone / Aastra BluStar for Conference Room SIP Call Server Administrator Guide or Aastra BluStar 8000i Desktop Media Phone or Aastra BluStar for Conference Room SIP Call Server User Guides.
45 41-001468-02 REV00 - 06.2013

Additional Information
Directly Enabling Eco-Off Mode
Waking Up the BluStar Device from Eco-Off Mode
1. Select the Eco-Off button located in the Applications and Telephone Connection Manage-ment area of the main screen.
The BluStar device will automatically power down all extraneous hardware components and a screen saver will be initialized.
1a. For the BluStar 8000i, touch any part of the screen.orPress any key on the BluStar 8000i.or Lift the handset.
Note:If you are not logged in to your account, the fingerprint reader can also be used to wake up the BluStar 8000i from Eco-Off Mode .
1b. For the BluStar for Conference Room, press any key on the keyboard.
The following progress bar will be displayed on screen:
After powering up, the BluStar 8000i will be ready for normal operation.
41-001468-02 REV00 - 06.2013 46
Additional Information
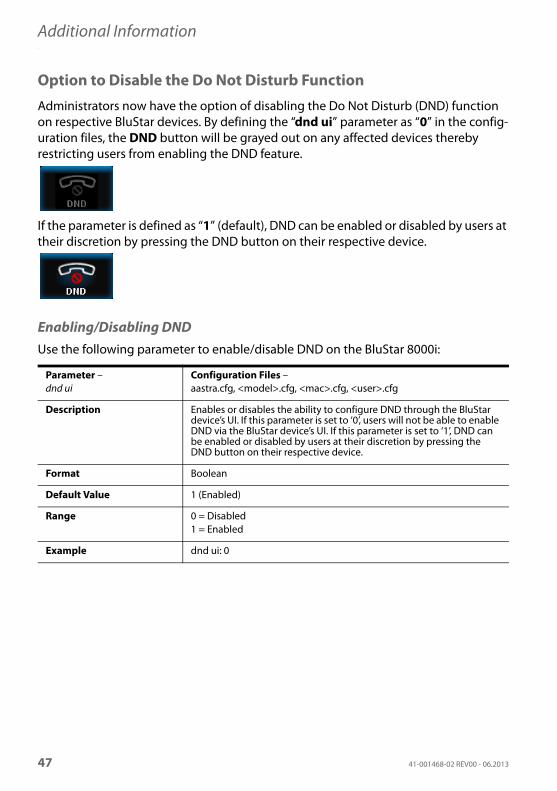
Option to Disable the Do Not Disturb Function
Administrators now have the option of disabling the Do Not Disturb (DND) function on respective BluStar devices. By defining the “dnd ui” parameter as “0” in the config-uration files, the DND button will be grayed out on any affected devices thereby restricting users from enabling the DND feature.
If the parameter is defined as “1” (default), DND can be enabled or disabled by users at their discretion by pressing the DND button on their respective device.
Enabling/Disabling DNDUse the following parameter to enable/disable DND on the BluStar 8000i:
Parameter – dnd ui
Configuration Files –aastra.cfg, <model>.cfg, <mac>.cfg, <user>.cfg
Description Enables or disables the ability to configure DND through the BluStar device’s UI. If this parameter is set to ‘0’, users will not be able to enable DND via the BluStar device’s UI. If this parameter is set to ‘1’, DND can be enabled or disabled by users at their discretion by pressing the DND button on their respective device.
Format Boolean
Default Value 1 (Enabled)
Range 0 = Disabled1 = Enabled
Example dnd ui: 0
47 41-001468-02 REV00 - 06.2013
Additional Information
Missed Call Indication During Screen Saving and Eco-Off Modes
Previously, users were notified of missed calls through the indicator located on the History button while the BluStar device was in an idle or active state. With Release 4.2.0, the BluStar device now also displays a missed calls indicator on screen while in screen saving or Eco-Off mode.
This ensures that users are notified of any calls that have not been answered (as well as the number of missed calls) at all times.
41-001468-02 REV00 - 06.2013 48
Additional Information
BluStar for Conference Room Remote Camera Control
While in an active call with a BluStar for Conference Room party, users now have the ability to remotely control the HD camera connected to a BluStar for Conference Room (if the feature is enabled on the BluStar for Conference Room system).
Enabling Remote Camera Control on the BluStar for Conference Room
Notes:• This feature is only applicable to the HD camera connected to a BluStar for Con-
ference Room. The HD camera on the BluStar 8000i can only be repositioned man-ually by phsyical means.
• The remote HD camera on a BluStar for Conference Room can only be controlled by a BluStar 8000i terminal or another BluStar for Conference Room device.
• During a conference call, remote camera control functionality is restricted to the BluStar for Conference Room HD camera owner and the conference host (i.e. the conference call initiator).
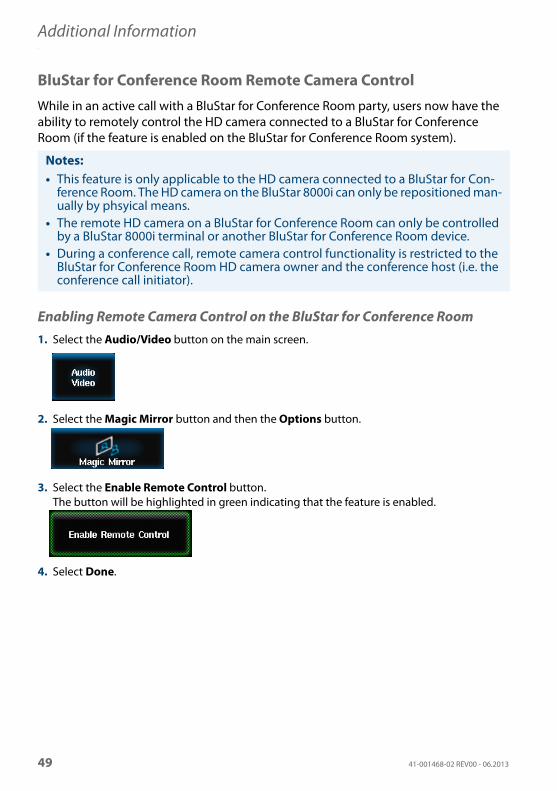
1. Select the Audio/Video button on the main screen.
2. Select the Magic Mirror button and then the Options button.
3. Select the Enable Remote Control button.The button will be highlighted in green indicating that the feature is enabled.
4. Select Done.
49 41-001468-02 REV00 - 06.2013
Additional Information
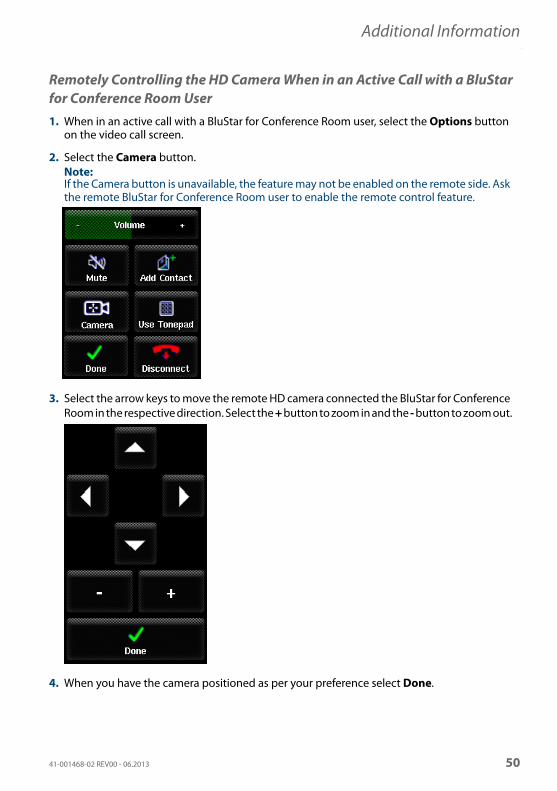
Remotely Controlling the HD Camera When in an Active Call with a BluStar for Conference Room User1. When in an active call with a BluStar for Conference Room user, select the Options button
on the video call screen.
2. Select the Camera button.Note:If the Camera button is unavailable, the feature may not be enabled on the remote side. Ask the remote BluStar for Conference Room user to enable the remote control feature.
3. Select the arrow keys to move the remote HD camera connected the BluStar for Conference Room in the respective direction. Select the + button to zoom in and the - button to zoom out.
4. When you have the camera positioned as per your preference select Done.
41-001468-02 REV00 - 06.2013 50
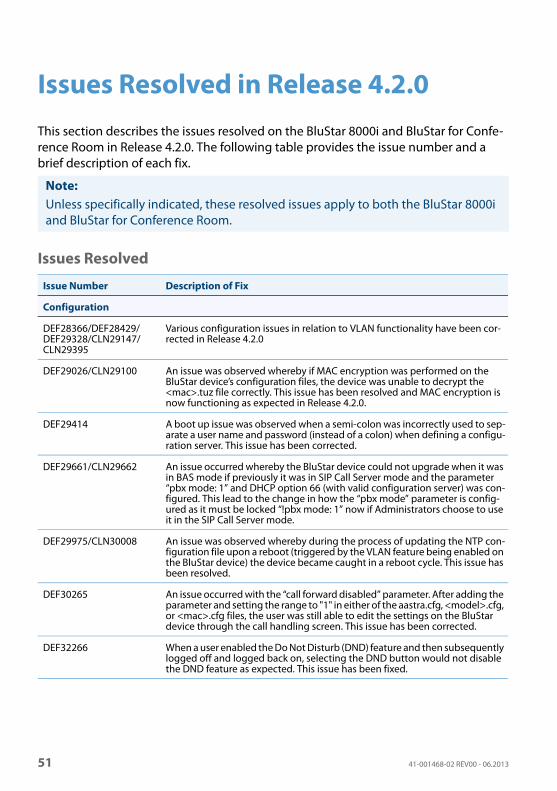
Issues Resolved in Release 4.2.0This section describes the issues resolved on the BluStar 8000i and BluStar for Confe-rence Room in Release 4.2.0. The following table provides the issue number and a brief description of each fix.
Issues Resolved
Note:Unless specifically indicated, these resolved issues apply to both the BluStar 8000i and BluStar for Conference Room.
Issue Number Description of Fix
Configuration
DEF28366/DEF28429/DEF29328/CLN29147/CLN29395
Various configuration issues in relation to VLAN functionality have been cor-rected in Release 4.2.0
DEF29026/CLN29100 An issue was observed whereby if MAC encryption was performed on the BluStar device’s configuration files, the device was unable to decrypt the <mac>.tuz file correctly. This issue has been resolved and MAC encryption is now functioning as expected in Release 4.2.0.
DEF29414 A boot up issue was observed when a semi-colon was incorrectly used to sep-arate a user name and password (instead of a colon) when defining a configu-ration server. This issue has been corrected.
DEF29661/CLN29662 An issue occurred whereby the BluStar device could not upgrade when it was in BAS mode if previously it was in SIP Call Server mode and the parameter “pbx mode: 1” and DHCP option 66 (with valid configuration server) was con-figured. This lead to the change in how the “pbx mode” parameter is config-ured as it must be locked “!pbx mode: 1” now if Administrators choose to use it in the SIP Call Server mode.
DEF29975/CLN30008 An issue was observed whereby during the process of updating the NTP con-figuration file upon a reboot (triggered by the VLAN feature being enabled on the BluStar device) the device became caught in a reboot cycle. This issue has been resolved.
DEF30265 An issue occurred with the “call forward disabled” parameter. After adding the parameter and setting the range to "1" in either of the aastra.cfg, <model>.cfg, or <mac>.cfg files, the user was still able to edit the settings on the BluStar device through the call handling screen. This issue has been corrected.
DEF32266 When a user enabled the Do Not Disturb (DND) feature and then subsequently logged off and logged back on, selecting the DND button would not disable the DND feature as expected. This issue has been fixed.
51 41-001468-02 REV00 - 06.2013
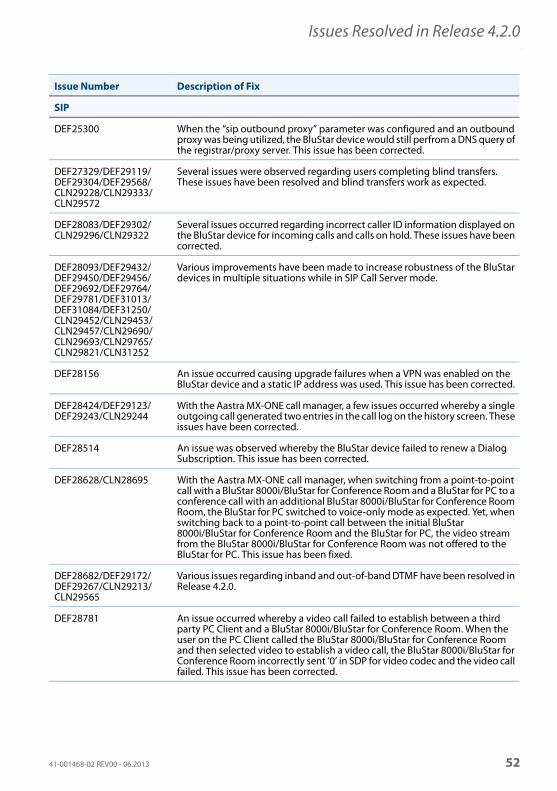
Issues Resolved in Release 4.2.0
SIP
DEF25300 When the “sip outbound proxy” parameter was configured and an outbound proxy was being utilized, the BluStar device would still perfrom a DNS query of the registrar/proxy server. This issue has been corrected.
DEF27329/DEF29119/DEF29304/DEF29568/CLN29228/CLN29333/CLN29572
Several issues were observed regarding users completing blind transfers. These issues have been resolved and blind transfers work as expected.
DEF28083/DEF29302/CLN29296/CLN29322
Several issues occurred regarding incorrect caller ID information displayed on the BluStar device for incoming calls and calls on hold. These issues have been corrected.
DEF28093/DEF29432/DEF29450/DEF29456/DEF29692/DEF29764/DEF29781/DEF31013/DEF31084/DEF31250/CLN29452/CLN29453/CLN29457/CLN29690/CLN29693/CLN29765/CLN29821/CLN31252
Various improvements have been made to increase robustness of the BluStar devices in multiple situations while in SIP Call Server mode.
DEF28156 An issue occurred causing upgrade failures when a VPN was enabled on the BluStar device and a static IP address was used. This issue has been corrected.
DEF28424/DEF29123/DEF29243/CLN29244
With the Aastra MX-ONE call manager, a few issues occurred whereby a single outgoing call generated two entries in the call log on the history screen. These issues have been corrected.
DEF28514 An issue was observed whereby the BluStar device failed to renew a Dialog Subscription. This issue has been corrected.
DEF28628/CLN28695 With the Aastra MX-ONE call manager, when switching from a point-to-point call with a BluStar 8000i/BluStar for Conference Room and a BluStar for PC to a conference call with an additional BluStar 8000i/BluStar for Conference Room Room, the BluStar for PC switched to voice-only mode as expected. Yet, when switching back to a point-to-point call between the initial BluStar 8000i/BluStar for Conference Room and the BluStar for PC, the video stream from the BluStar 8000i/BluStar for Conference Room was not offered to the BluStar for PC. This issue has been fixed.
DEF28682/DEF29172/DEF29267/CLN29213/CLN29565
Various issues regarding inband and out-of-band DTMF have been resolved in Release 4.2.0.
DEF28781 An issue occurred whereby a video call failed to establish between a third party PC Client and a BluStar 8000i/BluStar for Conference Room. When the user on the PC Client called the BluStar 8000i/BluStar for Conference Room and then selected video to establish a video call, the BluStar 8000i/BluStar for Conference Room incorrectly sent ‘0’ in SDP for video codec and the video call failed. This issue has been corrected.
Issue Number Description of Fix
41-001468-02 REV00 - 06.2013 52
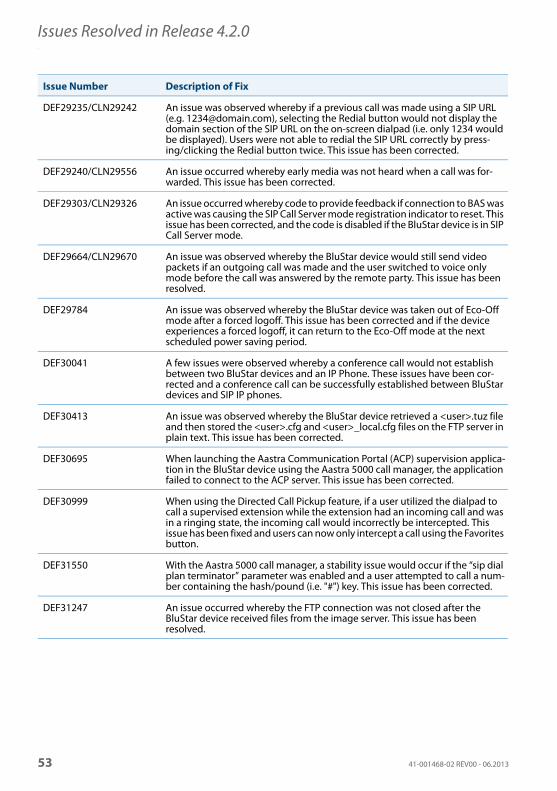
Issues Resolved in Release 4.2.0
DEF29235/CLN29242 An issue was observed whereby if a previous call was made using a SIP URL (e.g. [email protected]), selecting the Redial button would not display the domain section of the SIP URL on the on-screen dialpad (i.e. only 1234 would be displayed). Users were not able to redial the SIP URL correctly by press-ing/clicking the Redial button twice. This issue has been corrected.
DEF29240/CLN29556 An issue occurred whereby early media was not heard when a call was for-warded. This issue has been corrected.
DEF29303/CLN29326 An issue occurred whereby code to provide feedback if connection to BAS was active was causing the SIP Call Server mode registration indicator to reset. This issue has been corrected, and the code is disabled if the BluStar device is in SIP Call Server mode.
DEF29664/CLN29670 An issue was observed whereby the BluStar device would still send video packets if an outgoing call was made and the user switched to voice only mode before the call was answered by the remote party. This issue has been resolved.
DEF29784 An issue was observed whereby the BluStar device was taken out of Eco-Off mode after a forced logoff. This issue has been corrected and if the device experiences a forced logoff, it can return to the Eco-Off mode at the next scheduled power saving period.
DEF30041 A few issues were observed whereby a conference call would not establish between two BluStar devices and an IP Phone. These issues have been cor-rected and a conference call can be successfully established between BluStar devices and SIP IP phones.
DEF30413 An issue was observed whereby the BluStar device retrieved a <user>.tuz file and then stored the <user>.cfg and <user>_local.cfg files on the FTP server in plain text. This issue has been corrected.
DEF30695 When launching the Aastra Communication Portal (ACP) supervision applica-tion in the BluStar device using the Aastra 5000 call manager, the application failed to connect to the ACP server. This issue has been corrected.
DEF30999 When using the Directed Call Pickup feature, if a user utilized the dialpad to call a supervised extension while the extension had an incoming call and was in a ringing state, the incoming call would incorrectly be intercepted. This issue has been fixed and users can now only intercept a call using the Favorites button.
DEF31550 With the Aastra 5000 call manager, a stability issue would occur if the “sip dial plan terminator” parameter was enabled and a user attempted to call a num-ber containing the hash/pound (i.e. "#") key. This issue has been corrected.
DEF31247 An issue occurred whereby the FTP connection was not closed after the BluStar device received files from the image server. This issue has been resolved.
Issue Number Description of Fix
53 41-001468-02 REV00 - 06.2013
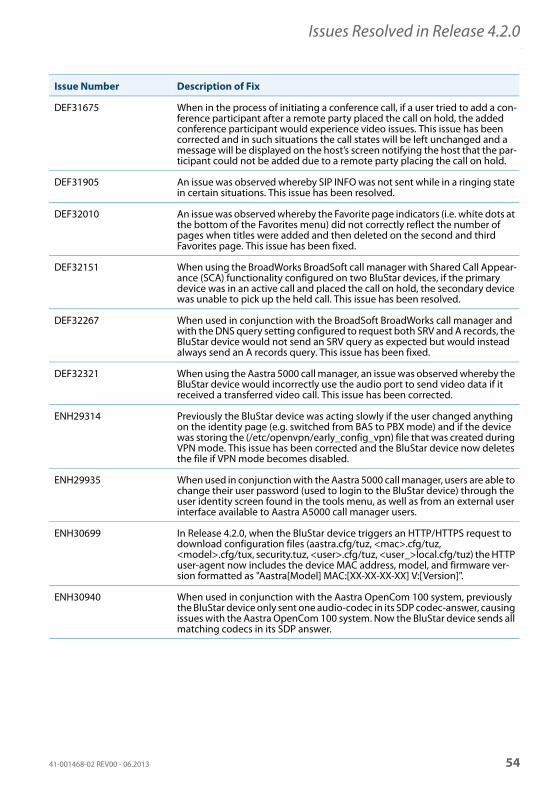
Issues Resolved in Release 4.2.0
DEF31675 When in the process of initiating a conference call, if a user tried to add a con-ference participant after a remote party placed the call on hold, the added conference participant would experience video issues. This issue has been corrected and in such situations the call states will be left unchanged and a message will be displayed on the host’s screen notifying the host that the par-ticipant could not be added due to a remote party placing the call on hold.
DEF31905 An issue was observed whereby SIP INFO was not sent while in a ringing state in certain situations. This issue has been resolved.
DEF32010 An issue was observed whereby the Favorite page indicators (i.e. white dots at the bottom of the Favorites menu) did not correctly reflect the number of pages when titles were added and then deleted on the second and third Favorites page. This issue has been fixed.
DEF32151 When using the BroadWorks BroadSoft call manager with Shared Call Appear-ance (SCA) functionality configured on two BluStar devices, if the primary device was in an active call and placed the call on hold, the secondary device was unable to pick up the held call. This issue has been resolved.
DEF32267 When used in conjunction with the BroadSoft BroadWorks call manager and with the DNS query setting configured to request both SRV and A records, the BluStar device would not send an SRV query as expected but would instead always send an A records query. This issue has been fixed.
DEF32321 When using the Aastra 5000 call manager, an issue was observed whereby the BluStar device would incorrectly use the audio port to send video data if it received a transferred video call. This issue has been corrected.
ENH29314 Previously the BluStar device was acting slowly if the user changed anything on the identity page (e.g. switched from BAS to PBX mode) and if the device was storing the (/etc/openvpn/early_config_vpn) file that was created during VPN mode. This issue has been corrected and the BluStar device now deletes the file if VPN mode becomes disabled.
ENH29935 When used in conjunction with the Aastra 5000 call manager, users are able to change their user password (used to login to the BluStar device) through the user identity screen found in the tools menu, as well as from an external user interface available to Aastra A5000 call manager users.
ENH30699 In Release 4.2.0, when the BluStar device triggers an HTTP/HTTPS request to download configuration files (aastra.cfg/tuz, <mac>.cfg/tuz, <model>.cfg/tux, security.tuz, <user>.cfg/tuz, <user_>local.cfg/tuz) the HTTP user-agent now includes the device MAC address, model, and firmware ver-sion formatted as "Aastra[Model] MAC:[XX-XX-XX-XX] V:[Version]".
ENH30940 When used in conjunction with the Aastra OpenCom 100 system, previously the BluStar device only sent one audio-codec in its SDP codec-answer, causing issues with the Aastra OpenCom 100 system. Now the BluStar device sends all matching codecs in its SDP answer.
Issue Number Description of Fix
41-001468-02 REV00 - 06.2013 54
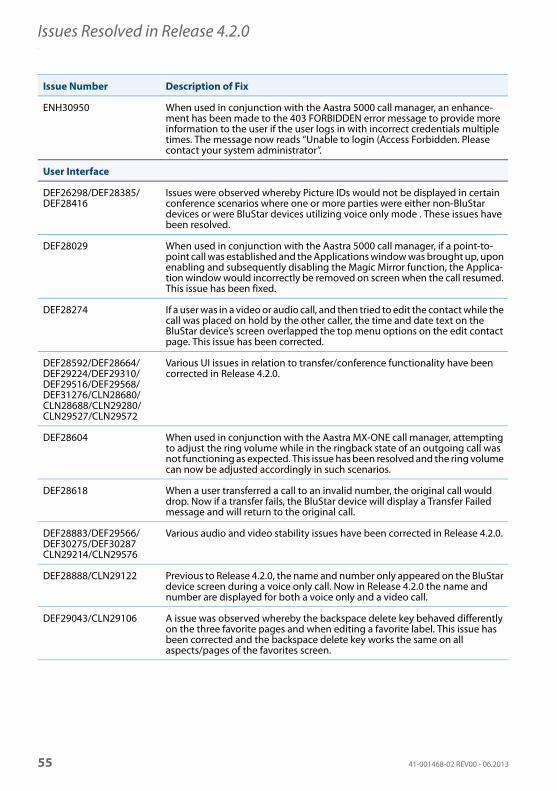
Issues Resolved in Release 4.2.0
ENH30950 When used in conjunction with the Aastra 5000 call manager, an enhance-ment has been made to the 403 FORBIDDEN error message to provide more information to the user if the user logs in with incorrect credentials multiple times. The message now reads “Unable to login (Access Forbidden. Please contact your system administrator”.
User Interface
DEF26298/DEF28385/DEF28416
Issues were observed whereby Picture IDs would not be displayed in certain conference scenarios where one or more parties were either non-BluStar devices or were BluStar devices utilizing voice only mode . These issues have been resolved.
DEF28029 When used in conjunction with the Aastra 5000 call manager, if a point-to-point call was established and the Applications window was brought up, upon enabling and subsequently disabling the Magic Mirror function, the Applica-tion window would incorrectly be removed on screen when the call resumed. This issue has been fixed.
DEF28274 If a user was in a video or audio call, and then tried to edit the contact while the call was placed on hold by the other caller, the time and date text on the BluStar device’s screen overlapped the top menu options on the edit contact page. This issue has been corrected.
DEF28592/DEF28664/DEF29224/DEF29310/DEF29516/DEF29568/DEF31276/CLN28680/CLN28688/CLN29280/CLN29527/CLN29572
Various UI issues in relation to transfer/conference functionality have been corrected in Release 4.2.0.
DEF28604 When used in conjunction with the Aastra MX-ONE call manager, attempting to adjust the ring volume while in the ringback state of an outgoing call was not functioning as expected. This issue has been resolved and the ring volume can now be adjusted accordingly in such scenarios.
DEF28618 When a user transferred a call to an invalid number, the original call would drop. Now if a transfer fails, the BluStar device will display a Transfer Failed message and will return to the original call.
DEF28883/DEF29566/DEF30275/DEF30287CLN29214/CLN29576
Various audio and video stability issues have been corrected in Release 4.2.0.
DEF28888/CLN29122 Previous to Release 4.2.0, the name and number only appeared on the BluStar device screen during a voice only call. Now in Release 4.2.0 the name and number are displayed for both a voice only and a video call.
DEF29043/CLN29106 A issue was observed whereby the backspace delete key behaved differently on the three favorite pages and when editing a favorite label. This issue has been corrected and the backspace delete key works the same on all aspects/pages of the favorites screen.
Issue Number Description of Fix
55 41-001468-02 REV00 - 06.2013
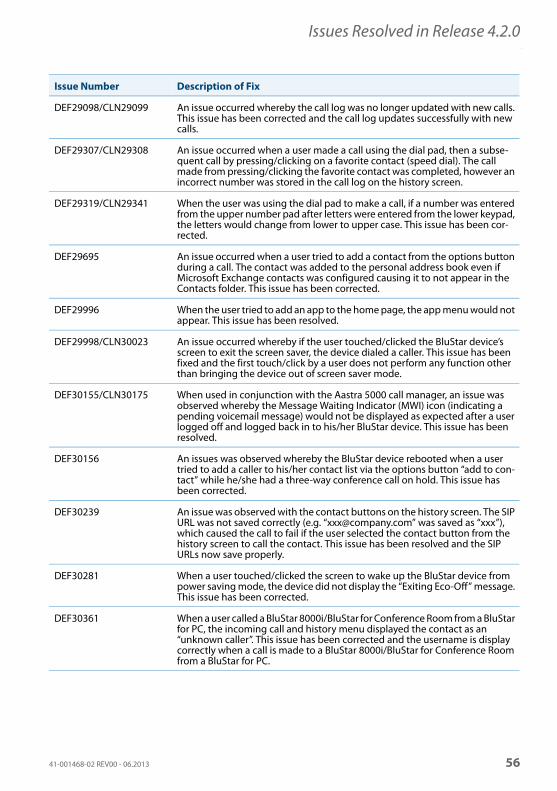
Issues Resolved in Release 4.2.0
DEF29098/CLN29099 An issue occurred whereby the call log was no longer updated with new calls. This issue has been corrected and the call log updates successfully with new calls.
DEF29307/CLN29308 An issue occurred when a user made a call using the dial pad, then a subse-quent call by pressing/clicking on a favorite contact (speed dial). The call made from pressing/clicking the favorite contact was completed, however an incorrect number was stored in the call log on the history screen.
DEF29319/CLN29341 When the user was using the dial pad to make a call, if a number was entered from the upper number pad after letters were entered from the lower keypad, the letters would change from lower to upper case. This issue has been cor-rected.
DEF29695 An issue occurred when a user tried to add a contact from the options button during a call. The contact was added to the personal address book even if Microsoft Exchange contacts was configured causing it to not appear in the Contacts folder. This issue has been corrected.
DEF29996 When the user tried to add an app to the home page, the app menu would not appear. This issue has been resolved.
DEF29998/CLN30023 An issue occurred whereby if the user touched/clicked the BluStar device’s screen to exit the screen saver, the device dialed a caller. This issue has been fixed and the first touch/click by a user does not perform any function other than bringing the device out of screen saver mode.
DEF30155/CLN30175 When used in conjunction with the Aastra 5000 call manager, an issue was observed whereby the Message Waiting Indicator (MWI) icon (indicating a pending voicemail message) would not be displayed as expected after a user logged off and logged back in to his/her BluStar device. This issue has been resolved.
DEF30156 An issues was observed whereby the BluStar device rebooted when a user tried to add a caller to his/her contact list via the options button “add to con-tact” while he/she had a three-way conference call on hold. This issue has been corrected.
DEF30239 An issue was observed with the contact buttons on the history screen. The SIP URL was not saved correctly (e.g. “[email protected]” was saved as “xxx”), which caused the call to fail if the user selected the contact button from the history screen to call the contact. This issue has been resolved and the SIP URLs now save properly.
DEF30281 When a user touched/clicked the screen to wake up the BluStar device from power saving mode, the device did not display the “Exiting Eco-Off” message. This issue has been corrected.
DEF30361 When a user called a BluStar 8000i/BluStar for Conference Room from a BluStar for PC, the incoming call and history menu displayed the contact as an “unknown caller”. This issue has been corrected and the username is display correctly when a call is made to a BluStar 8000i/BluStar for Conference Room from a BluStar for PC.
Issue Number Description of Fix
41-001468-02 REV00 - 06.2013 56
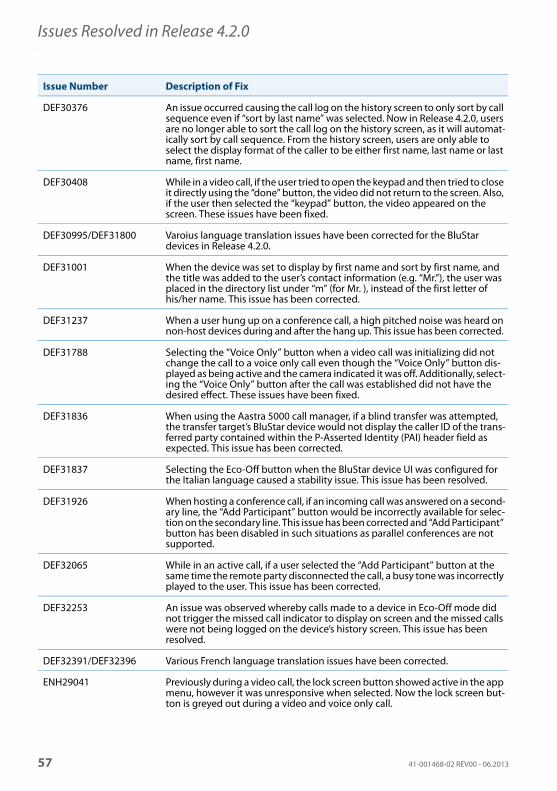
Issues Resolved in Release 4.2.0
DEF30376 An issue occurred causing the call log on the history screen to only sort by call sequence even if “sort by last name” was selected. Now in Release 4.2.0, users are no longer able to sort the call log on the history screen, as it will automat-ically sort by call sequence. From the history screen, users are only able to select the display format of the caller to be either first name, last name or last name, first name.
DEF30408 While in a video call, if the user tried to open the keypad and then tried to close it directly using the “done” button, the video did not return to the screen. Also, if the user then selected the “keypad” button, the video appeared on the screen. These issues have been fixed.
DEF30995/DEF31800 Varoius language translation issues have been corrected for the BluStar devices in Release 4.2.0.
DEF31001 When the device was set to display by first name and sort by first name, and the title was added to the user’s contact information (e.g. “Mr.”), the user was placed in the directory list under “m” (for Mr. ), instead of the first letter of his/her name. This issue has been corrected.
DEF31237 When a user hung up on a conference call, a high pitched noise was heard on non-host devices during and after the hang up. This issue has been corrected.
DEF31788 Selecting the “Voice Only” button when a video call was initializing did not change the call to a voice only call even though the “Voice Only” button dis-played as being active and the camera indicated it was off. Additionally, select-ing the “Voice Only” button after the call was established did not have the desired effect. These issues have been fixed.
DEF31836 When using the Aastra 5000 call manager, if a blind transfer was attempted, the transfer target’s BluStar device would not display the caller ID of the trans-ferred party contained within the P-Asserted Identity (PAI) header field as expected. This issue has been corrected.
DEF31837 Selecting the Eco-Off button when the BluStar device UI was configured for the Italian language caused a stability issue. This issue has been resolved.
DEF31926 When hosting a conference call, if an incoming call was answered on a second-ary line, the “Add Participant” button would be incorrectly available for selec-tion on the secondary line. This issue has been corrected and “Add Participant” button has been disabled in such situations as parallel conferences are not supported.
DEF32065 While in an active call, if a user selected the “Add Participant” button at the same time the remote party disconnected the call, a busy tone was incorrectly played to the user. This issue has been corrected.
DEF32253 An issue was observed whereby calls made to a device in Eco-Off mode did not trigger the missed call indicator to display on screen and the missed calls were not being logged on the device’s history screen. This issue has been resolved.
DEF32391/DEF32396 Various French language translation issues have been corrected.
ENH29041 Previously during a video call, the lock screen button showed active in the app menu, however it was unresponsive when selected. Now the lock screen but-ton is greyed out during a video and voice only call.
Issue Number Description of Fix
57 41-001468-02 REV00 - 06.2013
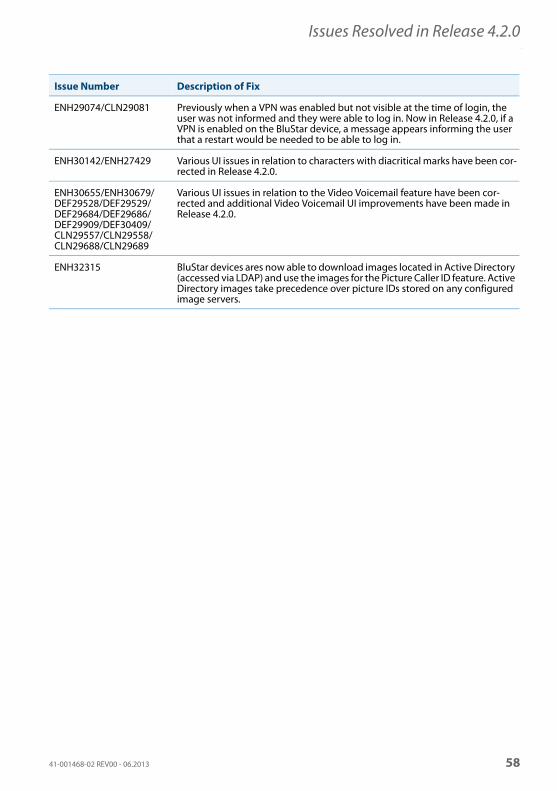
Issues Resolved in Release 4.2.0
ENH29074/CLN29081 Previously when a VPN was enabled but not visible at the time of login, the user was not informed and they were able to log in. Now in Release 4.2.0, if a VPN is enabled on the BluStar device, a message appears informing the user that a restart would be needed to be able to log in.
ENH30142/ENH27429 Various UI issues in relation to characters with diacritical marks have been cor-rected in Release 4.2.0.
ENH30655/ENH30679/DEF29528/DEF29529/DEF29684/DEF29686/DEF29909/DEF30409/CLN29557/CLN29558/CLN29688/CLN29689
Various UI issues in relation to the Video Voicemail feature have been cor-rected and additional Video Voicemail UI improvements have been made in Release 4.2.0.
ENH32315 BluStar devices ares now able to download images located in Active Directory (accessed via LDAP) and use the images for the Picture Caller ID feature. Active Directory images take precedence over picture IDs stored on any configured image servers.
Issue Number Description of Fix
41-001468-02 REV00 - 06.2013 58
Contacting Aastra Telecom SupportIf you have read this release note, and consulted the Troubleshooting section of your phone model’s manual and still have problems, please contact Aastra Telecom Support via one of these methods:
North America• Toll Free 1-800-574-1611
• Direct +1-469-365-3639
• Online at http://www.aastratelecom.com/support, click on Contact Technical Support
Outside North AmericaPlease contact your regional Aastra Technical Support.
59 41-001468-02 REV00 - 06.2013

Disclaimer
Aastra Telecom Inc. will not accept liability for any damages and/or long distance charges, which result from unauthorized and/or unlawful use. While every effort has been made to ensure accuracy, Aastra Telecom Inc. will not be liable for technical or editorial errors or omissions contained within this documentation. The information contained in this documentation is subject to change without notice.
Copyright © 2013 Aastra Technologies Limited, www.aastra.com.


![[MS-SIP]: Session Initiation Protocol ExtensionsMS-SIP].pdfSession Initiation Protocol Extensions SIP. . SIP message. .](https://static.fdocuments.net/doc/165x107/5e7f8669844925290d6f8357/ms-sip-session-initiation-protocol-extensions-ms-sippdf-session-initiation.jpg)


