
3M Coban 2 Lite Compression System Application for the ... · PDF file3M™ Coban™ 2...
2
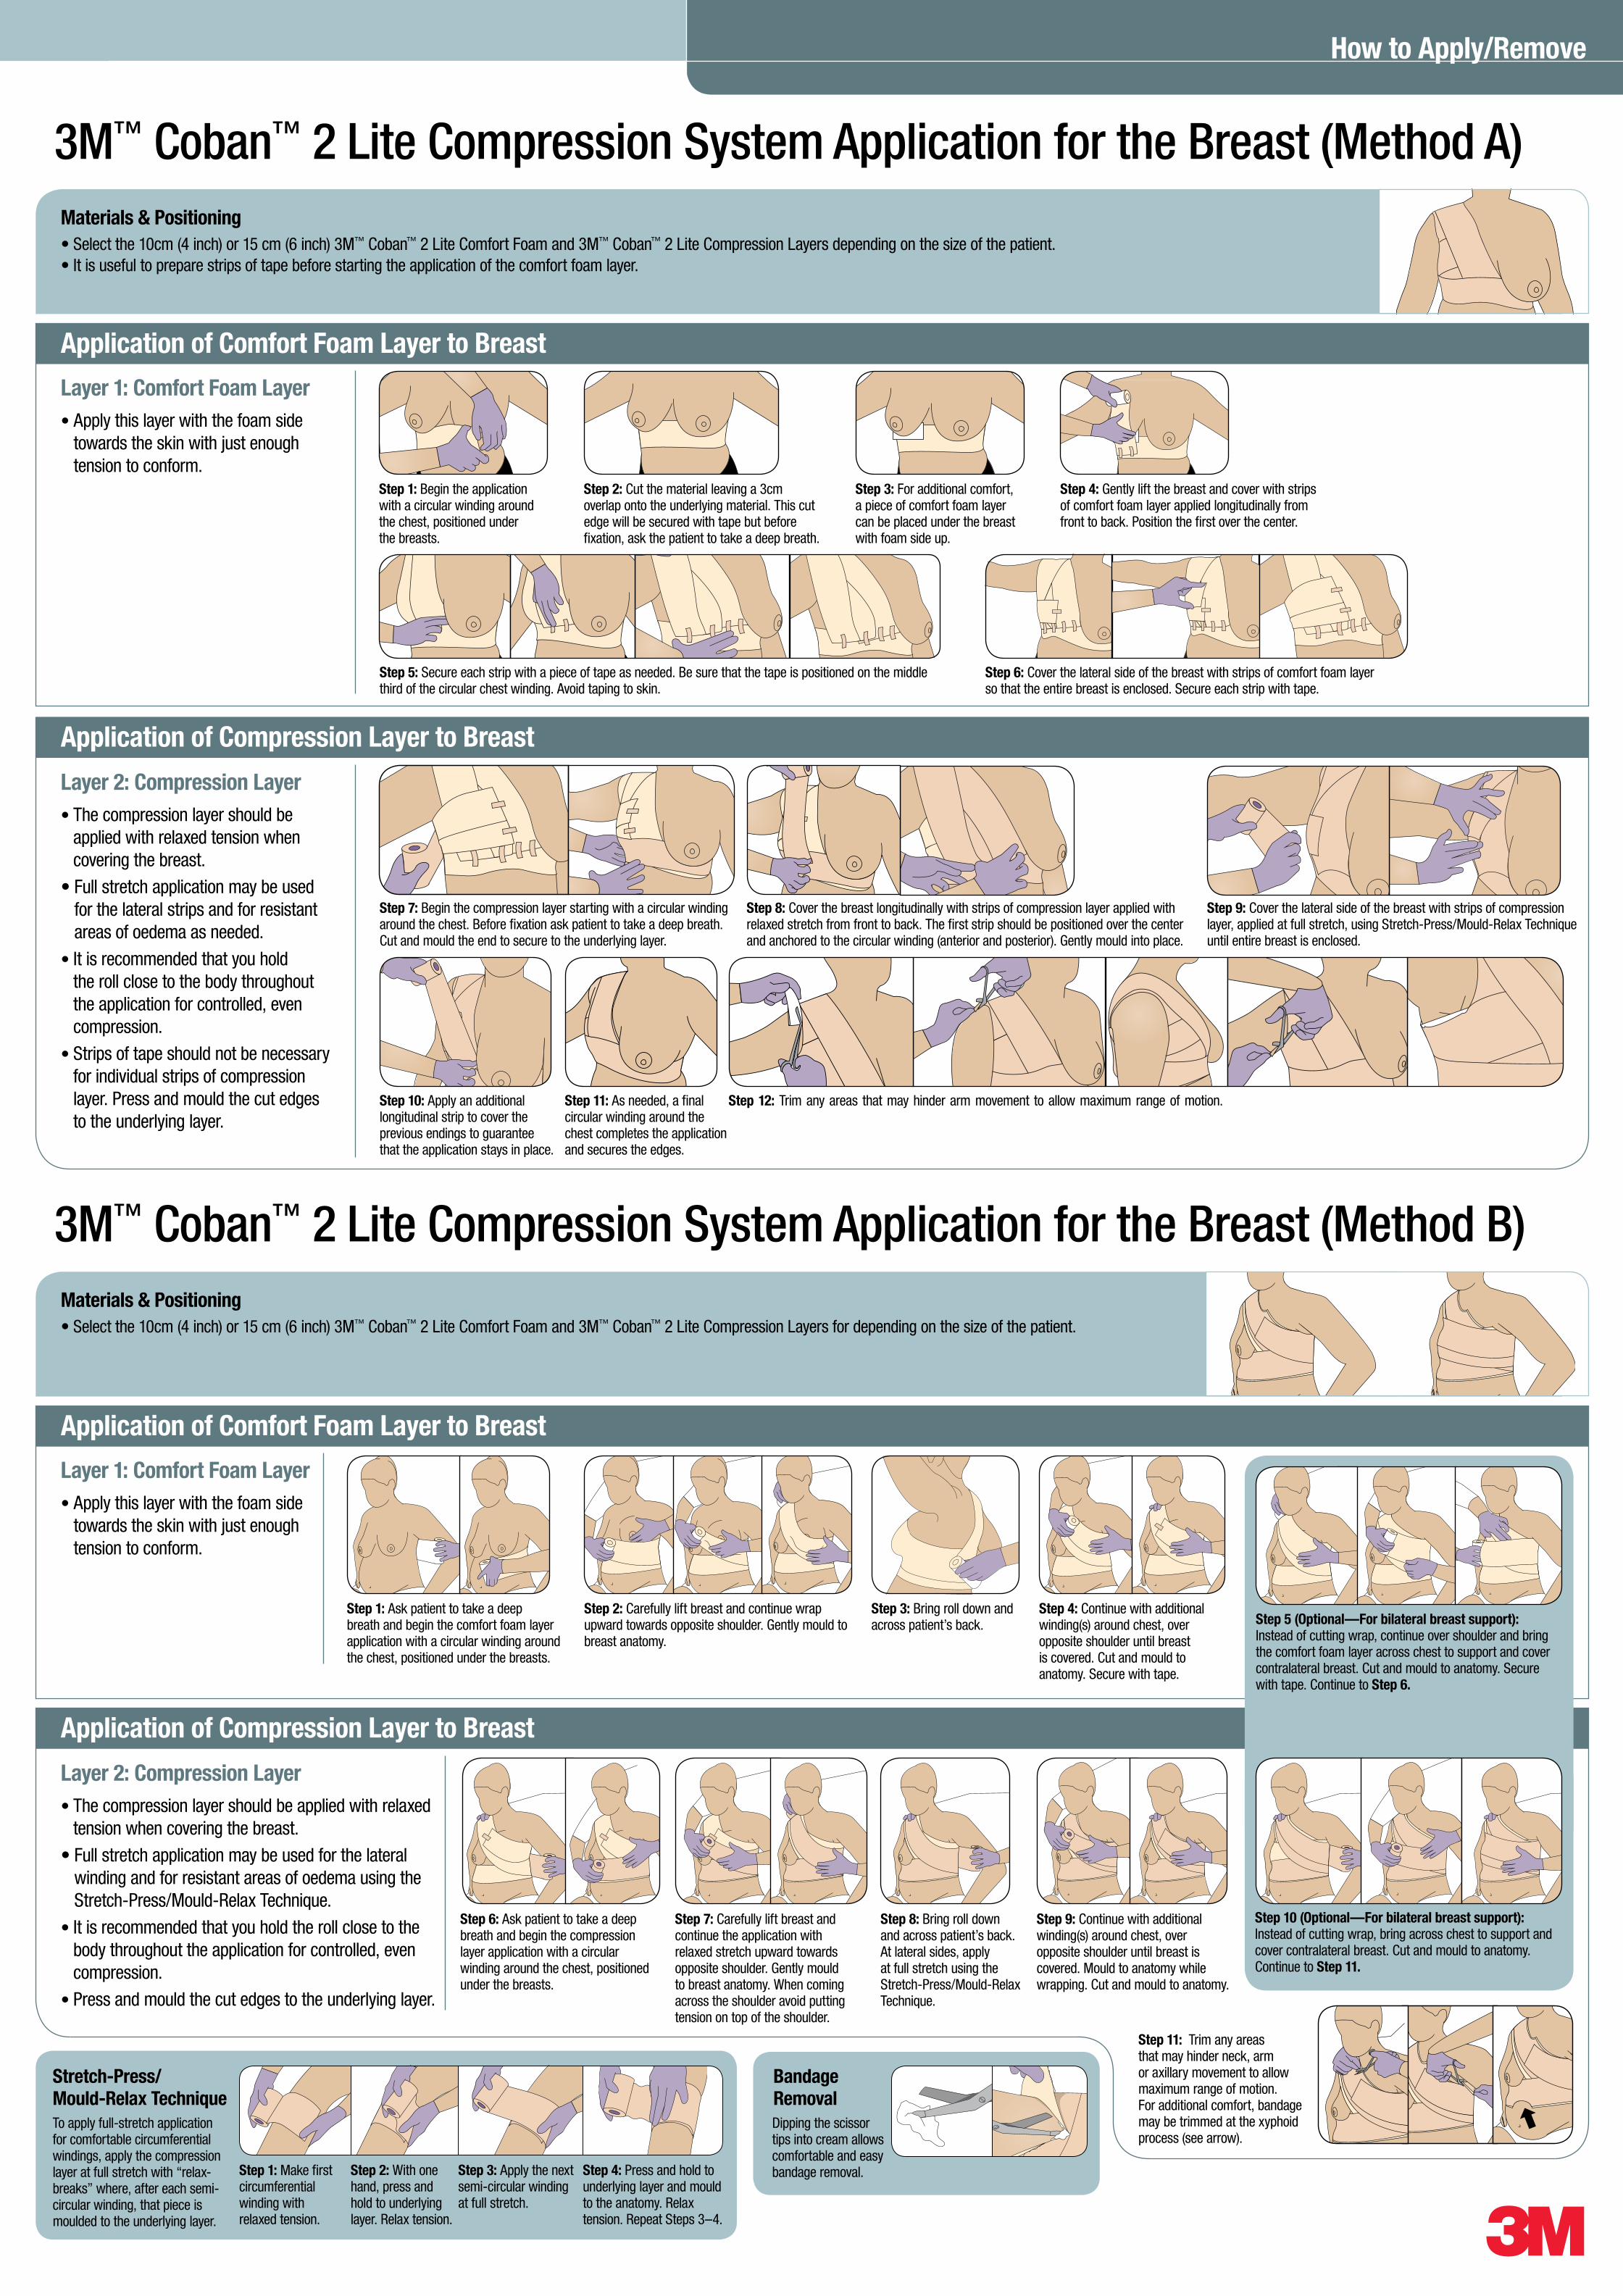
3M ™ Coban ™ 2 Lite Compression System Application for the Breast (Method A) 3M ™ Coban ™ 2 Lite Compression System Application for the Breast (Method B) How to Apply/Remove Materials & Positioning • Select the 10cm (4 inch) or 15 cm (6 inch) 3M ™ Coban ™ 2 Lite Comfort Foam and 3M ™ Coban ™ 2 Lite Compression Layers depending on the size of the patient. • It is useful to prepare strips of tape before starting the application of the comfort foam layer. Materials & Positioning • Select the 10cm (4 inch) or 15 cm (6 inch) 3M ™ Coban ™ 2 Lite Comfort Foam and 3M ™ Coban ™ 2 Lite Compression Layers for depending on the size of the patient. Application of Comfort Foam Layer to Breast Application of Comfort Foam Layer to Breast Layer 1: Comfort Foam Layer • Apply this layer with the foam side towards the skin with just enough tension to conform. Layer 1: Comfort Foam Layer • Apply this layer with the foam side towards the skin with just enough tension to conform. Step 1: Begin the application with a circular winding around the chest, positioned under the breasts. Step 3: For additional comfort, a piece of comfort foam layer can be placed under the breast with foam side up. Step 4: Gently lift the breast and cover with strips of comfort foam layer applied longitudinally from front to back. Position the first over the center. Step 2: Cut the material leaving a 3cm overlap onto the underlying material. This cut edge will be secured with tape but before fixation, ask the patient to take a deep breath. Step 5: Secure each strip with a piece of tape as needed. Be sure that the tape is positioned on the middle third of the circular chest winding. Avoid taping to skin. Step 6: Cover the lateral side of the breast with strips of comfort foam layer so that the entire breast is enclosed. Secure each strip with tape. Application of Compression Layer to Breast Application of Compression Layer to Breast Layer 2: Compression Layer • The compression layer should be applied with relaxed tension when covering the breast. • Full stretch application may be used for the lateral strips and for resistant areas of oedema as needed. • It is recommended that you hold the roll close to the body throughout the application for controlled, even compression. • Strips of tape should not be necessary for individual strips of compression layer. Press and mould the cut edges to the underlying layer. Layer 2: Compression Layer • The compression layer should be applied with relaxed tension when covering the breast. • Full stretch application may be used for the lateral winding and for resistant areas of oedema using the Stretch-Press/Mould-Relax Technique. • It is recommended that you hold the roll close to the body throughout the application for controlled, even compression. • Press and mould the cut edges to the underlying layer. Step 11: As needed, a final circular winding around the chest completes the application and secures the edges. Step 10: Apply an additional longitudinal strip to cover the previous endings to guarantee that the application stays in place. Step 1: Ask patient to take a deep breath and begin the comfort foam layer application with a circular winding around the chest, positioned under the breasts. Step 6: Ask patient to take a deep breath and begin the compression layer application with a circular winding around the chest, positioned under the breasts. Step 2: Carefully lift breast and continue wrap upward towards opposite shoulder. Gently mould to breast anatomy. Step 7: Carefully lift breast and continue the application with relaxed stretch upward towards opposite shoulder. Gently mould to breast anatomy. When coming across the shoulder avoid putting tension on top of the shoulder. Step 3: Bring roll down and across patient’s back. Step 8: Bring roll down and across patient’s back. At lateral sides, apply at full stretch using the Stretch-Press/Mould-Relax Technique. Step 4: Continue with additional winding(s) around chest, over opposite shoulder until breast is covered. Cut and mould to anatomy. Secure with tape. Step 9: Continue with additional winding(s) around chest, over opposite shoulder until breast is covered. Mould to anatomy while wrapping. Cut and mould to anatomy. Step 11: Trim any areas that may hinder neck, arm or axillary movement to allow maximum range of motion. For additional comfort, bandage may be trimmed at the xyphoid process (see arrow). Step 9: Cover the lateral side of the breast with strips of compression layer, applied at full stretch, using Stretch-Press/Mould-Relax Technique until entire breast is enclosed. Step 12: Trim any areas that may hinder arm movement to allow maximum range of motion. Step 7: Begin the compression layer starting with a circular winding around the chest. Before fixation ask patient to take a deep breath. Cut and mould the end to secure to the underlying layer. Step 8: Cover the breast longitudinally with strips of compression layer applied with relaxed stretch from front to back. The first strip should be positioned over the center and anchored to the circular winding (anterior and posterior). Gently mould into place. To apply full-stretch application for comfortable circumferential windings, apply the compression layer at full stretch with “relax- breaks” where, after each semi- circular winding, that piece is moulded to the underlying layer. Step 1: Make first circumferential winding with relaxed tension. Step 2: With one hand, press and hold to underlying layer. Relax tension. Step 3: Apply the next semi-circular winding at full stretch. Step 4: Press and hold to underlying layer and mould to the anatomy. Relax tension. Repeat Steps 3–4. Stretch-Press/ Mould-Relax Technique Dipping the scissor tips into cream allows comfortable and easy bandage removal. Bandage Removal Step 10 (Optional—For bilateral breast support): Instead of cutting wrap, bring across chest to support and cover contralateral breast. Cut and mould to anatomy. Continue to Step 11. Step 5 (Optional—For bilateral breast support): Instead of cutting wrap, continue over shoulder and bring the comfort foam layer across chest to support and cover contralateral breast. Cut and mould to anatomy. Secure with tape. Continue to Step 6.
-
Upload
truongdung -
Category
Documents
-
view
232 -
download
2
Transcript of 3M Coban 2 Lite Compression System Application for the ... · PDF file3M™ Coban™ 2...
3M™ Coban™ 2 Lite Compression System Application for the Breast (Method A)
3M™ Coban™ 2 Lite Compression System Application for the Breast (Method B)
How to Apply/Remove
Materials & Positioning• Select the 10cm (4 inch) or 15 cm (6 inch) 3M™ Coban™ 2 Lite Comfort Foam and 3M™ Coban™ 2 Lite Compression Layers depending on the size of the patient.• It is useful to prepare strips of tape before starting the application of the comfort foam layer.
Materials & Positioning• Select the 10cm (4 inch) or 15 cm (6 inch) 3M™ Coban™ 2 Lite Comfort Foam and 3M™ Coban™ 2 Lite Compression Layers for depending on the size of the patient.
Application of Comfort Foam Layer to Breast
Application of Comfort Foam Layer to Breast
Layer 1: Comfort Foam Layer • Apply this layer with the foam side
towards the skin with just enough tension to conform.
Layer 1: Comfort Foam Layer • Apply this layer with the foam side
towards the skin with just enough tension to conform.
Step 1: Begin the application with a circular winding around the chest, positioned under the breasts.
Step 3: For additional comfort, a piece of comfort foam layer can be placed under the breast with foam side up.
Step 4: Gently lift the breast and cover with strips of comfort foam layer applied longitudinally from front to back. Position the first over the center.
Step 2: Cut the material leaving a 3cm overlap onto the underlying material. This cut edge will be secured with tape but before fixation, ask the patient to take a deep breath.
Step 5: Secure each strip with a piece of tape as needed. Be sure that the tape is positioned on the middle third of the circular chest winding. Avoid taping to skin.
Step 6: Cover the lateral side of the breast with strips of comfort foam layer so that the entire breast is enclosed. Secure each strip with tape.
Application of Compression Layer to Breast
Application of Compression Layer to Breast
Layer 2: Compression Layer • The compression layer should be
applied with relaxed tension when covering the breast.
• Full stretch application may be used for the lateral strips and for resistant areas of oedema as needed.
• It is recommended that you hold the roll close to the body throughout the application for controlled, even compression.
• Strips of tape should not be necessary for individual strips of compression layer. Press and mould the cut edges to the underlying layer.
Layer 2: Compression Layer • The compression layer should be applied with relaxed
tension when covering the breast. • Full stretch application may be used for the lateral
winding and for resistant areas of oedema using the Stretch-Press/Mould-Relax Technique.
• It is recommended that you hold the roll close to the body throughout the application for controlled, even compression.
• Press and mould the cut edges to the underlying layer.
Step 11: As needed, a final circular winding around the chest completes the application and secures the edges.
Step 10: Apply an additional longitudinal strip to cover the previous endings to guarantee that the application stays in place.
Step 1: Ask patient to take a deep breath and begin the comfort foam layer application with a circular winding around the chest, positioned under the breasts.
Step 6: Ask patient to take a deep breath and begin the compression layer application with a circular winding around the chest, positioned under the breasts.
Step 2: Carefully lift breast and continue wrap upward towards opposite shoulder. Gently mould to breast anatomy.
Step 7: Carefully lift breast and continue the application with relaxed stretch upward towards opposite shoulder. Gently mould to breast anatomy. When coming across the shoulder avoid putting tension on top of the shoulder.
Step 3: Bring roll down and across patient’s back.
Step 8: Bring roll down and across patient’s back. At lateral sides, apply at full stretch using the Stretch-Press/Mould-Relax Technique.
Step 4: Continue with additional winding(s) around chest, over opposite shoulder until breast is covered. Cut and mould to anatomy. Secure with tape.
Step 9: Continue with additional winding(s) around chest, over opposite shoulder until breast is covered. Mould to anatomy while wrapping. Cut and mould to anatomy.
Step 11: Trim any areas that may hinder neck, arm or axillary movement to allow maximum range of motion. For additional comfort, bandage may be trimmed at the xyphoid process (see arrow).
Step 9: Cover the lateral side of the breast with strips of compression layer, applied at full stretch, using Stretch-Press/Mould-Relax Technique until entire breast is enclosed.
Step 12: Trim any areas that may hinder arm movement to allow maximum range of motion.
Step 7: Begin the compression layer starting with a circular winding around the chest. Before fixation ask patient to take a deep breath. Cut and mould the end to secure to the underlying layer.
Step 8: Cover the breast longitudinally with strips of compression layer applied with relaxed stretch from front to back. The first strip should be positioned over the center and anchored to the circular winding (anterior and posterior). Gently mould into place.
To apply full-stretch application for comfortable circumferential windings, apply the compression layer at full stretch with “relax-breaks” where, after each semi-circular winding, that piece is moulded to the underlying layer.
Step 1: Make first circumferential winding with relaxed tension.
Step 2: With one hand, press and hold to underlying layer. Relax tension.
Step 3: Apply the next semi-circular winding at full stretch.
Step 4: Press and hold to underlying layer and mould to the anatomy. Relax tension. Repeat Steps 3–4.
Stretch-Press/ Mould-Relax Technique
Dipping the scissor tips into cream allows comfortable and easy bandage removal.
Bandage Removal
Step 10 (Optional—For bilateral breast support): Instead of cutting wrap, bring across chest to support and cover contralateral breast. Cut and mould to anatomy. Continue to Step 11.
Step 5 (Optional—For bilateral breast support): Instead of cutting wrap, continue over shoulder and bring the comfort foam layer across chest to support and cover contralateral breast. Cut and mould to anatomy. Secure with tape. Continue to Step 6.

3M Canada CompanyP.O. Box 5757London, Ontario N6A 4T1Canada1-800-364-3577www.3M.ca/coban2layer
3
3M Deutschland GmbHHealth Care BusinessCarl-Schurz-Str.141453 Neuss Germany
3M and Coban are trademarks of 3M. Used under license in Canada. © 2012, 3M. All rights reserved. Printed in Canada. Please recycle. 1208-02239