2 Install your Ring Doorbell Pro - Smarthome · 4 Faceplates Pick the one that best matches your...
10
Install your Ring Doorbell Pro 2
Transcript of 2 Install your Ring Doorbell Pro - Smarthome · 4 Faceplates Pick the one that best matches your...

Install your Ring Doorbell Pro2

If you need extra help…Ring Community Support is available 7 days a week, and our online help center is accessible 24/7.
Visit our online help center at: ring.com/help
Contact Ring Community Support directly at:
US 1.800.656.1918 UK 01727 263045 Worldwide +1 310.929.7085 [email protected]
22

There’s even a video on this whole process…There’s a video in the Ring app on the installation process outlined in this manual. We recommend watching that first, and referring to this manual if you need extra help.
Select the + sign to Add a New Device (or tap Set Up a Device), then select Video Doorbell Pro to access this video:
33

4 Faceplates Pick the one that best matches your home…or your mood. Change it any time.
Step 1Say “Hello” to your Ring Video Doorbell Pro
Terminals(attach your existing wiring here)
BackFront
Setup button
Mounting holes
3 43 4

Step 1Say “Hello” to your Ring Video Doorbell Pro
Step 2Check out all the cool stuff in the box1 Screwdriver - Use the Phillips end for the mounting
screws and star-shaped end for the security screw.
3 Anchors - For installing on concrete, stucco, or brick.
1 Drill Bit - To drill holes for the (optional) anchors.
3 Mounting Screws - Use two to mount your Ring.
2 Security Screws - Use one to secure the faceplate.
2 Extra Wires - To attach your existing wires to your Ring.
2 Wire connectors - To connect the extra wires
(above) to your existing wires.
2520AF680L-B0455
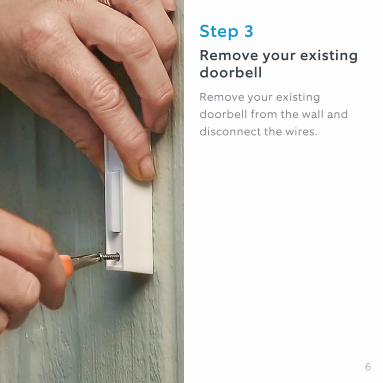
Step 3Remove your existing doorbellRemove your existing doorbell from the wall and disconnect the wires.
Installing Anchors (optional)
66

Installing Anchors (optional)Step 4Install anchors (on stucco, brick, or concrete)
On stucco, brick, or concrete, use the provided bit to drill two holes in your wall, and install the anchors.
If you’re installing on wood or siding, put the anchors in that drawer of stuff you never use and skip this step.
77

Installing Anchors (optional)Step 5Remove the Faceplate
Remove the faceplate on your Ring Doorbell Pro to access the mounting holes.
After your Ring Doorbell is installed, remove the faceplate like this:
7 87 8
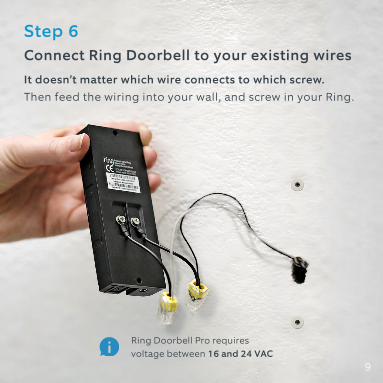
Step 6 Connect Ring Doorbell to your existing wiresIt doesn’t matter which wire connects to which screw. Then feed the wiring into your wall, and screw in your Ring.
Ring Doorbell Pro requires voltage between 16 and 24 VAC
9

Step 7Restore power at the breakerThe hard part is over–congrats! After restoring power at the breaker, open the Ring app, select the option to Set Up a New Device, and follow the in-app instructions.
2520AF680L-B0410