
16 Regarding user support
16
1 Windows Hello Face supporting Web Camera UCAM-CF20FB User Manual Before using Please read through the following contents before using. Safety Precautions • Please connect this to a USB-A port supplying 5V, 500mA power. • This product’s stand may not be able to fit on your laptop or display screen. • If you are unable to fit the stand on, please place it on a flat surface. • Please ensure that this product is placed such that the cable is not pulled taut when using. If the cable is pulled taut, this product may fall off when the cable is caught and pulled. This may cause damage to the product and surrounding devices. • When changing the direction of the camera, please ensure that you hold down the stand portion while moving it. Moving it forcibly may cause the product to fall from where it is placed. This may cause damage to the product and surrounding devices. • Please do not place the camera on an uneven or slanted place. This product may fall off the unstable surface. This may cause damage to the product and surrounding devices. • Please do not attach the camera to soft items or structurally weak parts. This product may fall off the unstable surface. This may cause damage to the product and surrounding devices. Precautions • Please do not touch the lens using your fingers. If there is dust on the lens, use a lens blower to remove it. • Video calls above VGA size may not be possible depending on the chat software you use. • Depending on the internet environment you are using, you may not be able to use every software. • Sound quality and video processing may not perform well depending on your hardware’s processing capabilities. • Due to the nature of this product and depending on your computer, your computer may stop recognizing this product when it enters standby, hibernation or sleep mode. When in use, cancel settings for standby, hibernation or sleep mode. • If the PC does not recognize this product, disconnect it from the PC and try connecting it again. • When using the camera, please do not set the computer to battery-saving mode. When switching your computer to battery-saving mode, please end the application that the camera is using first. • This product is made for Japanese domestic use. Warranty and support services are not available for use of this product outside of Japan. * This product uses USB2.0. It does not support USB1.1 interface. Cleaning the Product If the product body becomes dirty, wipe it with a soft, dry cloth. Use of a volatile liquid (such as paint thinner, benzene or alcohol) may affect the material quality and color of the product.
Transcript of 16 Regarding user support

1
Windows Hello Face supporting Web CameraUCAM-CF20FB
User Manual
Before using
Please read through the following contents before using.
Safety Precautions• Please connect this to a USB-A port supplying 5V, 500mA power.• This product’s stand may not be able to fit on your laptop or display screen.• If you are unable to fit the stand on, please place it on a flat surface.• Please ensure that this product is placed such that the cable is not pulled taut when using. If the
cable is pulled taut, this product may fall off when the cable is caught and pulled. This may cause damage to the product and surrounding devices.
• When changing the direction of the camera, please ensure that you hold down the stand portion while moving it. Moving it forcibly may cause the product to fall from where it is placed. This may cause damage to the product and surrounding devices.
• Please do not place the camera on an uneven or slanted place. This product may fall off the unstable surface. This may cause damage to the product and surrounding devices.
• Please do not attach the camera to soft items or structurally weak parts. This product may fall off the unstable surface. This may cause damage to the product and surrounding devices.
Precautions• Please do not touch the lens using your fingers. If there is dust on the lens, use a lens blower to remove it.• Video calls above VGA size may not be possible depending on the chat software you use.• Depending on the internet environment you are using, you may not be able to use every software.• Sound quality and video processing may not perform well depending on your hardware’s
processing capabilities.• Due to the nature of this product and depending on your computer, your computer may stop
recognizing this product when it enters standby, hibernation or sleep mode. When in use, cancel settings for standby, hibernation or sleep mode.
• If the PC does not recognize this product, disconnect it from the PC and try connecting it again.• When using the camera, please do not set the computer to battery-saving mode. When switching
your computer to battery-saving mode, please end the application that the camera is using first.• This product is made for Japanese domestic use. Warranty and support services are not available
for use of this product outside of Japan.* This product uses USB2.0. It does not support USB1.1 interface.
Cleaning the Product
If the product body becomes dirty, wipe it with a soft, dry cloth.
Use of a volatile liquid (such as paint thinner, benzene or alcohol) may affect the material quality and color of the product.
Before using ・・・・・・・・・・・・・・・・・・・・・・・・・・・・・・・・・・・・・・・・・・・・・・・・・・・・・・・・・・・・・・・・・・・・・・・・・・・・・・・・・・・・・・・・・・・・・・・・・・・・・・・・・・・・・・・・・・・・・・・・・・・・・・・・・・・・・・・・・・・・・・・・・・・・・・・・・・・・・・・・・・・・・・・・・・・・・・・・・・・・・・・・・・・・・・・・・・・・・・・・・・・・・・・・・・・・・・・・・・・・・・・・・・・・・・・・・・・・・・・・・・・・・・・・・・・・・・・・・・・・・・・・・・・・・・・・・・・・・・・・・・・・・・・・・・・・・・・・・・・・・・・・・・・・・・・・・・・・・・・・・・・・・・・・・・・・・・・・・・・・・・・・・・・・・・・・・・・・・・・・・・・・・・・・・・・・・・・・・・・・・・・・・・・・・・・・・・・・・・・・・・・・・・・・・・・・・・・・・・・・・・・・・・・・・・・・・・・・・・・・・・・・・・・・・・・・・・・・・・
1
Safety Precautions 1
Precautions 1
Cleaning the Product 1
Name and function of each part ・・・・・・・・・・・・・・・・・・・・・・・・・・・・・・・・・・・・・・・・・・・・・・・・・・・・・・・・・・・・・・・・・・・・・・・・・・・・・・・・・・・・・・・・・・・・・・・・・・・・・・・・・・・・・・・・・・・・・・・・・・・・・・・・・・・・・・・・・・・・・・・・・・・・・・・・・・・・・・・・・・・・・・・・・・・・・・・・・・・・・・・・・・・・・・・・・・・・・・・・・・・・・・・・・・・・・・・・・・・・・・・・・・・・・・・・・・・・・・・・・・・・・・・・・・・・・・・・・・・・・・・・・・・・・・・・・・・・・・・・・・・・・・・・・・・・・・・・・・・・・・・・・・・・・・・・・・・・・・・・・・・・・・・・・・・・・・・・・・・・・・・・・・・・・・・・・・・・・・・・・・・・・・・・・・・・・・・・・・・・・・・・・・・・・・・・・・・・・・・・・・・・・・・・・・・・・・・・・・・・・・・・・・・・・・・・・・・・・・・・・・・・・・・・・・・
2
How to use the camera ・・・・・・・・・・・・・・・・・・・・・・・・・・・・・・・・・・・・・・・・・・・・・・・・・・・・・・・・・・・・・・・・・・・・・・・・・・・・・・・・・・・・・・・・・・・・・・・・・・・・・・・・・・・・・・・・・・・・・・・・・・・・・・・・・・・・・・・・・・・・・・・・・・・・・・・・・・・・・・・・・・・・・・・・・・・・・・・・・・・・・・・・・・・・・・・・・・・・・・・・・・・・・・・・・・・・・・・・・・・・・・・・・・・・・・・・・・・・・・・・・・・・・・・・・・・・・・・・・・・・・・・・・・・・・・・・・・・・・・・・・・・・・・・・・・・・・・・・・・・・・・・・・・・・・・・・・・・・・・・・・・・・・・・・・・・・・・・・・・・・・・・・・・・・・・・・・・・・・・・・・・・・・・・・・・・・・・・・・・・・・・・・・・・・・・・・・・・・・・・・・・・・・・・・・・・・・・・・・・・・・・・・・・・・・・・・・・・・・・・・・・・・・・・・・・・・・・・・・・・
3
Step 1 Attaching the camera ・・・・・・・・・・・・・・・・・・・・・・・・・・・・・・・・・・・・・・・・・・・・・・・・・・・・・・・・・・・・・・・・・・・・・・・・・・・・・・・・・・・・・・・・・・・・・・・・・・・・・・・・・・・・・・・・・・・・・・・・・・・・・・・・・・・・・・・・・・・・・・・・・・・・・・・・・・・・・・・・・・・・・・・・・・・・・・・・・・・・・・・・・・・・・・・・・・・・・・・・・・・・・・・・・・・・・・・・・・・・・・・・・・・・・・・・・・・・・・・・・・・・・・・・・・・・・・・・・・・・・・・・・・・・・・・・・・・・・・・・・・・・・・・・・・・・・・・・・・・・・・・・・・・・・・・・・・・・・・・・・・・・・・・・・・・・・・・・・・・・・・・・・・・・・・・・・・・・・・・・・・・・・・・・・・・・・・・・・・・・・・・・・・・・・・・・・・・・・・・・・・・・・・・・・・・・・・・・・・・・・・・・・・・・・・・・・・・・・・・・・・・・
3
Step 2 Connecting the camera ・・・・・・・・・・・・・・・・・・・・・・・・・・・・・・・・・・・・・・・・・・・・・・・・・・・・・・・・・・・・・・・・・・・・・・・・・・・・・・・・・・・・・・・・・・・・・・・・・・・・・・・・・・・・・・・・・・・・・・・・・・・・・・・・・・・・・・・・・・・・・・・・・・・・・・・・・・・・・・・・・・・・・・・・・・・・・・・・・・・・・・・・・・・・・・・・・・・・・・・・・・・・・・・・・・・・・・・・・・・・・・・・・・・・・・・・・・・・・・・・・・・・・・・・・・・・・・・・・・・・・・・・・・・・・・・・・・・・・・・・・・・・・・・・・・・・・・・・・・・・・・・・・・・・・・・・・・・・・・・・・・・・・・・・・・・・・・・・・・・・・・・・・・・・・・・・・・・・・・・・・・・・・・・・・・・・・・・・・・・・・・・・・・・・・・・・・・・・・・・・・・・・・・・・・・・・・・・・・・・・・・・・・・・・・・・・・・・・・・・・・・
3
Set up Windows Hello Face ・・・・・・・・・・・・・・・・・・・・・・・・・・・・・・・・・・・・・・・・・・・・・・・・・・・・・・・・・・・・・・・・・・・・・・・・・・・・・・・・・・・・・・・・・・・・・・・・・・・・・・・・・・・・・・・・・・・・・・・・・・・・・・・・・・・・・・・・・・・・・・・・・・・・・・・・・・・・・・・・・・・・・・・・・・・・・・・・・・・・・・・・・・・・・・・・・・・・・・・・・・・・・・・・・・・・・・・・・・・・・・・・・・・・・・・・・・・・・・・・・・・・・・・・・・・・・・・・・・・・・・・・・・・・・・・・・・・・・・・・・・・・・・・・・・・・・・・・・・・・・・・・・・・・・・・・・・・・・・・・・・・・・・・・・・・・・・・・・・・・・・・・・・・・・・・・・・・・・・・・・・・・・・・・・・・・・・・・・・・・・・・・・・・・・・・・・・・・・・・・・・・・・・・・・・・・・・・・・・・・・・・・・・・・・・・・・・・・・・・・・・・・・・・・・・・・・・・
4
Before setting up ・・・・・・・・・・・・・・・・・・・・・・・・・・・・・・・・・・・・・・・・・・・・・・・・・・・・・・・・・・・・・・・・・・・・・・・・・・・・・・・・・・・・・・・・・・・・・・・・・・・・・・・・・・・・・・・・・・・・・・・・・・・・・・・・・・・・・・・・・・・・・・・・・・・・・・・・・・・・・・・・・・・・・・・・・・・・・・・・・・・・・・・・・・・・・・・・・・・・・・・・・・・・・・・・・・・・・・・・・・・・・・・・・・・・・・・・・・・・・・・・・・・・・・・・・・・・・・・・・・・・・・・・・・・・・・・・・・・・・・・・・・・・・・・・・・・・・・・・・・・・・・・・・・・・・・・・・・・・・・・・・・・・・・・・・・・・・・・・・・・・・・・・・・・・・・・・・・・・・・・・・・・・・・・・・・・・・・・・・・・・・・・・・・・・・・・・・・・・・・・・・・・・・・・・・・・・・・・・・・・・・・・・・・・・・・・・・・・・・・・・・・・・・・・・・・・・・・
4
Set up face recognition・・・・・・・・・・・・・・・・・・・・・・・・・・・・・・・・・・・・・・・・・・・・・・・・・・・・・・・・・・・・・・・・・・・・・・・・・・・・・・・・・・・・・・・・・・・・・・・・・・・・・・・・・・・・・・・・・・・・・・・・・・・・・・・・・・・・・・・・・・・・・・・・・・・・・・・・・・・・・・・・・・・・・・・・・・・・・・・・・・・・・・・・・・・・・・・・・・・・・・・・・・・・・・・・・・・・・・・・・・・・・・・・・・・・・・・・・・・・・・・・・・・・・・・・・・・・・・・・・・・・・・・・・・・・・・・・・・・・・・・・・・・・・・・・・・・・・・・・・・・・・・・・・・・・・・・・・・・・・・・・・・・・・・・・・・・・・・・・・・・・・・・・・・・・・・・・・・・・・・・・・・・・・・・・・・・・・・・・・・・・・・・・・・・・・・・・・・・・・・・・・・・・・・・・・・・・・・・・・・・・・・・・・・・・・・・・・・・・・・・・・・・・・・・・・
4
To unlock the screen ・・・・・・・・・・・・・・・・・・・・・・・・・・・・・・・・・・・・・・・・・・・・・・・・・・・・・・・・・・・・・・・・・・・・・・・・・・・・・・・・・・・・・・・・・・・・・・・・・・・・・・・・・・・・・・・・・・・・・・・・・・・・・・・・・・・・・・・・・・・・・・・・・・・・・・・・・・・・・・・・・・・・・・・・・・・・・・・・・・・・・・・・・・・・・・・・・・・・・・・・・・・・・・・・・・・・・・・・・・・・・・・・・・・・・・・・・・・・・・・・・・・・・・・・・・・・・・・・・・・・・・・・・・・・・・・・・・・・・・・・・・・・・・・・・・・・・・・・・・・・・・・・・・・・・・・・・・・・・・・・・・・・・・・・・・・・・・・・・・・・・・・・・・・・・・・・・・・・・・・・・・・・・・・・・・・・・・・・・・・・・・・・・・・・・・・・・・・・・・・・・・・・・・・・・・・・・・・・・・・・・・・・・・・・・・・・・・・・・・・・・・・・・・・・・・・
8
Install the driver ・・・・・・・・・・・・・・・・・・・・・・・・・・・・・・・・・・・・・・・・・・・・・・・・・・・・・・・・・・・・・・・・・・・・・・・・・・・・・・・・・・・・・・・・・・・・・・・・・・・・・・・・・・・・・・・・・・・・・・・・・・・・・・・・・・・・・・・・・・・・・・・・・・・・・・・・・・・・・・・・・・・・・・・・・・・・・・・・・・・・・・・・・・・・・・・・・・・・・・・・・・・・・・・・・・・・・・・・・・・・・・・・・・・・・・・・・・・・・・・・・・・・・・・・・・・・・・・・・・・・・・・・・・・・・・・・・・・・・・・・・・・・・・・・・・・・・・・・・・・・・・・・・・・・・・・・・・・・・・・・・・・・・・・・・・・・・・・・・・・・・・・・・・・・・・・・・・・・・・・・・・・・・・・・・・・・・・・・・・・・・・・・・・・・・・・・・・・・・・・・・・・・・・・・・・・・・・・・・・・・・・・・・・・・・・・・・・・・・・・・・・・・・・・・・・・・・・・
9
Download the driver 9
Install the driver 9
Use with other chat software ・・・・・・・・・・・・・・・・・・・・・・・・・・・・・・・・・・・・・・・・・・・・・・・・・・・・・・・・・・・・・・・・・・・・・・・・・・・・・・・・・・・・・・・・・・・・・・・・・・・・・・・・・・・・・・・・・・・・・・・・・・・・・・・・・・・・・・・・・・・・・・・・・・・・・・・・・・・・・・・・・・・・・・・・・・・・・・・・・・・・・・・・・・・・・・・・・・・・・・・・・・・・・・・・・・・・・・・・・・・・・・・・・・・・・・・・・・・・・・・・・・・・・・・・・・・・・・・・・・・・・・・・・・・・・・・・・・・・・・・・・・・・・・・・・・・・・・・・・・・・・・・・・・・・・・・・・・・・・・・・・・・・・・・・・・・・・・・・・・・・・・・・・・・・・・・・・・・・・・・・・・・・・・・・・・・・・・・・・・・・・・・・・・・・・・・・・・・・・・・・・・・・・・・・・・・・・・・・・・・・・・・・・・・・・・・・・・・・・・・・・・・・・・・・・・・・・・
11
Use with Skype™ 11
Use with Zoom 13
Basic Specifications ・・・・・・・・・・・・・・・・・・・・・・・・・・・・・・・・・・・・・・・・・・・・・・・・・・・・・・・・・・・・・・・・・・・・・・・・・・・・・・・・・・・・・・・・・・・・・・・・・・・・・・・・・・・・・・・・・・・・・・・・・・・・・・・・・・・・・・・・・・・・・・・・・・・・・・・・・・・・・・・・・・・・・・・・・・・・・・・・・・・・・・・・・・・・・・・・・・・・・・・・・・・・・・・・・・・・・・・・・・・・・・・・・・・・・・・・・・・・・・・・・・・・・・・・・・・・・・・・・・・・・・・・・・・・・・・・・・・・・・・・・・・・・・・・・・・・・・・・・・・・・・・・・・・・・・・・・・・・・・・・・・・・・・・・・・・・・・・・・・・・・・・・・・・・・・・・・・・・・・・・・・・・・・・・・・・・・・・・・・・・・・・・・・・・・・・・・・・・・・・・・・・・・・・・・・・・・・・・・・・・・・・・・・・・・・・・・・・・・・・・・・・・・・・・・・・・・・・・・・・・・・
15
Camera main body・・・・・・・・・・・・・・・・・・・・・・・・・・・・・・・・・・・・・・・・・・・・・・・・・・・・・・・・・・・・・・・・・・・・・・・・・・・・・・・・・・・・・・・・・・・・・・・・・・・・・・・・・・・・・・・・・・・・・・・・・・・・・・・・・・・・・・・・・・・・・・・・・・・・・・・・・・・・・・・・・・・・・・・・・・・・・・・・・・・・・・・・・・・・・・・・・・・・・・・・・・・・・・・・・・・・・・・・・・・・・・・・・・・・・・・・・・・・・・・・・・・・・・・・・・・・・・・・・・・・・・・・・・・・・・・・・・・・・・・・・・・・・・・・・・・・・・・・・・・・・・・・・・・・・・・・・・・・・・・・・・・・・・・・・・・・・・・・・・・・・・・・・・・・・・・・・・・・・・・・・・・・・・・・・・・・・・・・・・・・・・・・・・・・・・・・・・・・・・・・・・・・・・・・・・・・・・・・・・・・・・・・・・・・・・・・・・・・・・・・・・・・・・・・・・・・・
15
Hardware operating environment ・・・・・・・・・・・・・・・・・・・・・・・・・・・・・・・・・・・・・・・・・・・・・・・・・・・・・・・・・・・・・・・・・・・・・・・・・・・・・・・・・・・・・・・・・・・・・・・・・・・・・・・・・・・・・・・・・・・・・・・・・・・・・・・・・・・・・・・・・・・・・・・・・・・・・・・・・・・・・・・・・・・・・・・・・・・・・・・・・・・・・・・・・・・・・・・・・・・・・・・・・・・・・・・・・・・・・・・・・・・・・・・・・・・・・・・・・・・・・・・・・・・・・・・・・・・・・・・・・・・・・・・・・・・・・・・・・・・・・・・・・・・・・・・・・・・・・・・・・・・・・・・・・・・・・・・・・・・・・・・・・・・・・・・・・・・・・・・・・・・・・・・・・・・・・・・・・・・・・・・・・・・・・・・・・・・・・・・・・・・・・・・・・・・・・・・・・・・・・・・・・・・・・・・・・・・・・・・・・・・・・・・・・・・・・・・・・・・・・・・・
15
Regarding user support・・・・・・・・・・・・・・・・・・・・・・・・・・・・・・・・・・・・・・・・・・・・・・・・・・・・・・・・・・・・・・・・・・・・・・・・・・・・・・・・・・・・・・・・・・・・・・・・・・・・・・・・・・・・・・・・・・・・・・・・・・・・・・・・・・・・・・・・・・・・・・・・・・・・・・・・・・・・・・・・・・・・・・・・・・・・・・・・・・・・・・・・・・・・・・・・・・・・・・・・・・・・・・・・・・・・・・・・・・・・・・・・・・・・・・・・・・・・・・・・・・・・・・・・・・・・・・・・・・・・・・・・・・・・・・・・・・・・・・・・・・・・・・・・・・・・・・・・・・・・・・・・・・・・・・・・・・・・・・・・・・・・・・・・・・・・・・・・・・・・・・・・・・・・・・・・・・・・・・・・・・・・・・・・・・・・・・・・・・・・・・・・・・・・・・・・・・・・・・・・・・・・・・・・・・・・・・・・・・・・・・・・・・・・・・・・・・・・・・・・・・・・・・・・・・・・・・・・・・・
16
Contact for enquiry on product ・・・・・・・・・・・・・・・・・・・・・・・・・・・・・・・・・・・・・・・・・・・・・・・・・・・・・・・・・・・・・・・・・・・・・・・・・・・・・・・・・・・・・・・・・・・・・・・・・・・・・・・・・・・・・・・・・・・・・・・・・・・・・・・・・・・・・・・・・・・・・・・・・・・・・・・・・・・・・・・・・・・・・・・・・・・・・・・・・・・・・・・・・・・・・・・・・・・・・・・・・・・・・・・・・・・・・・・・・・・・・・・・・・・・・・・・・・・・・・・・・・・・・・・・・・・・・・・・・・・・・・・・・・・・・・・・・・・・・・・・・・・・・・・・・・・・・・・・・・・・・・・・・・・・・・・・・・・・・・・・・・・・・・・・・・・・・・・・・・・・・・・・・・・・・・・・・・・・・・・・・・・・・・・・・・・・・・・・・・・・・・・・・・・・・・・・・・・・・・・・・・・・・・・・・・・・・・・・・・・・・・・・・・・・・・・・・・・・・・・・・・
16
Limitation of Liability ・・・・・・・・・・・・・・・・・・・・・・・・・・・・・・・・・・・・・・・・・・・・・・・・・・・・・・・・・・・・・・・・・・・・・・・・・・・・・・・・・・・・・・・・・・・・・・・・・・・・・・・・・・・・・・・・・・・・・・・・・・・・・・・・・・・・・・・・・・・・・・・・・・・・・・・・・・・・・・・・・・・・・・・・・・・・・・・・・・・・・・・・・・・・・・・・・・・・・・・・・・・・・・・・・・・・・・・・・・・・・・・・・・・・・・・・・・・・・・・・・・・・・・・・・・・・・・・・・・・・・・・・・・・・・・・・・・・・・・・・・・・・・・・・・・・・・・・・・・・・・・・・・・・・・・・・・・・・・・・・・・・・・・・・・・・・・・・・・・・・・・・・・・・・・・・・・・・・・・・・・・・・・・・・・・・・・・・・・・・・・・・・・・・・・・・・・・・・・・・・・・・・・・・・・・・・・・・・・・・・・・・・・・・・・・・・・・・・・・・・・・・・・・・・・・・
16

2 Contents
Name and function of each part
JointCan move vertically.
USB connectorConnect to the PC USB-A port.
Built-in MicrophonePicks up audio.
LEDBlinks white during video recording.
Camera lensCaptures images.
Infra-red light for face recognitionBlinks during face recognition.Infra-red light may or may not be visible depending on the individual.
MultistandAttaches to a display or place on a flat surface.

3 Contents
How to use the camera
Attaching the cameraStep
1Attach the camera and adjust the vertical angle.* Recommend attaching above the display.
When attaching to the display of a laptop
Front
When placing it on a flat surface or the table
Connecting the cameraStep
2
ⴺⴺ Insert the USB connector of the camera into the USB-A port of the PC.
• You can insert or remove the USB even when the PC is switched on.• Please ensure that the USB connector is the right side up and connect it correctly.
ⴺⴼ The driver will be installed automatically.This product can now be used.
Continue on to applications you want to use it with.
( Set up Windows Hello Face
( Use with other chat software

4 Contents
Set up Windows Hello Face
Before setting up• To use face recognition, you must update to the newest version of Windows 10 from Windows
Update. Manually carry out Windows Update if it is deactivated.* Please refer to the Microsoft support information for how to carry out Windows Update.
• To use face recognition with the following editions of Windows 10, you must download the driver installer from the ELECOM website.
Windows 10 Enterprise 2016 LTSBWindows 10 IoT Enterprise 2016 LTSBWindows 10 Enterprise 2015 LTSBWindows 10 IoT Enterprise 2015 LTSB
When using these editions, please install the drivers before setting up face recognition.
( Set up Windows Hello Face: Install the driver
* The following steps are for Windows version “20H2”. The display may be different for other versions, but the operation is the same.
Set up face recognition
• To set up Windows Hello face recognition, you must first set a PIN.• Please refer to the Microsoft support information for how to set a PIN.
ⴺⴺ Click on “Start” on the lower left of the screen and click on the “Settings” icon
.
5 Contents
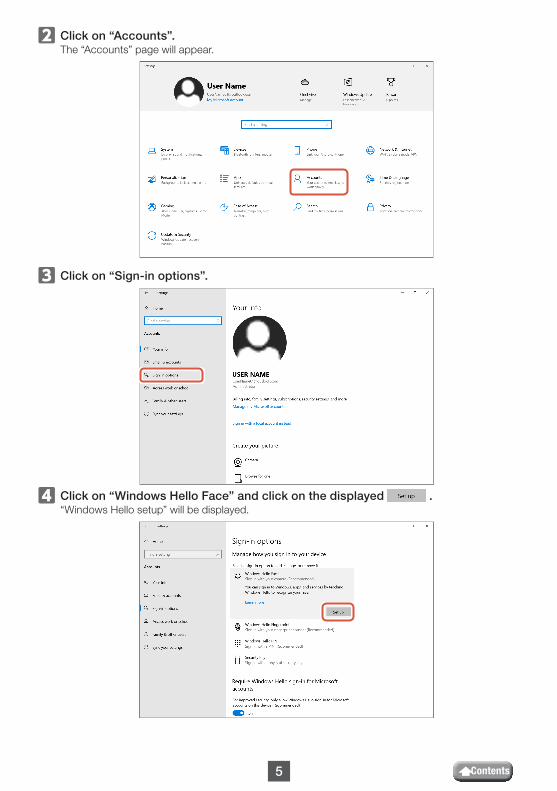
ⴺⴼ Click on “Accounts”.The “Accounts” page will appear.
ⴺⴾ Click on “Sign-in options”.
ⴺⵀ Click on “Windows Hello Face” and click on the displayed .
“Windows Hello setup” will be displayed.

6 Contents
ⴺⵂ Click on .
ⴺⵄ Key in your PIN.
ⴺⵆ The image captured by the camera will appear.Follow the instructions on the screen and keep looking directly at the screen.Wait until registration is done.

7 Contents
ⴺⵈ Face recognition is complete when “All set!” appears. Click on .
The image captured by the camera will be displayed again when “Improve recognition” is clicked.If you wear glasses, improving recognition will allow your PC to recognize you whether you are wearing them or not.
ⴺⵊ Click on “Windows Hello Face” and go through steps - .
Face recognition is correctly set up when “You’re all set up to sign in to Windows, apps, and services with your face.” appears.
8 Contents
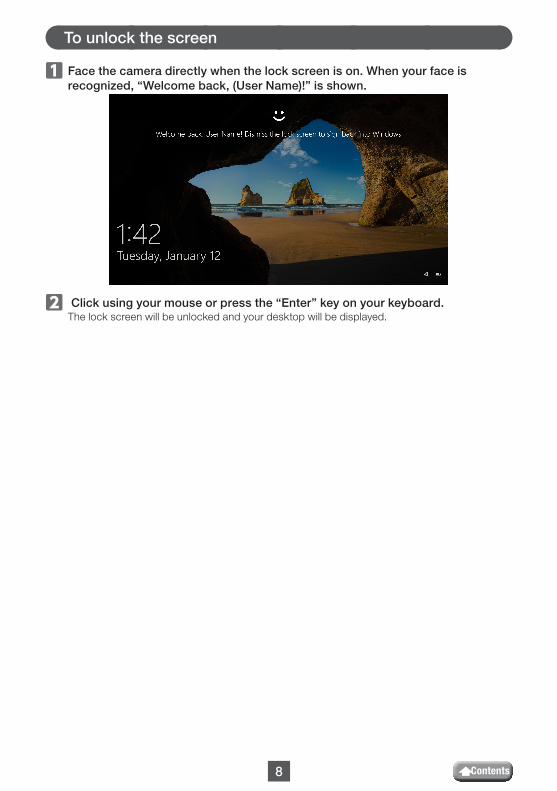
To unlock the screen
ⴺⴺ Face the camera directly when the lock screen is on. When your face is recognized, “Welcome back, (User Name)!” is shown.
ⴺⴼ Click using your mouse or press the “Enter” key on your keyboard.The lock screen will be unlocked and your desktop will be displayed.

9 Contents
Install the driver
* The driver is in Japanese only.
The driver is specifically for the following editions.For other editions, face recognition can be used without installing a driver.
• Windows 10 Enterprise 2016 LTSB• Windows 10 IoT Enterprise 2016 LTSB• Windows 10 Enterprise 2015 LTSB• Windows 10 IoT Enterprise 2015 LTSB
Download the driverDownload the installer program for the face recognition driver from the ELECOM website shown below.
https://www.elecom.co.jp/r/220
* The driver is in Japanese only.
Install the driver
Before reinstalling• Connect the camera to your PC and ensure that it can be used.• Please logon using a user account with administrative rights.• It is recommended to end all Windows programs (application software).
ⴺⴺ Unzip the downloaded “UCAM-CF20FB_Driver_vX.Xzip” onto your desktop.
ⴺⴼ Double click on “Setup(.exe)” found in the unzipped folder.The installer will start up.
Click on “Yes” when the “User Account Control” window appears.
ⴺⴾ Click on .
Driver installation will start.

10 Contents
ⴺⵀ Click on .
ⴺⵂ Check “今すぐ再起動する (Restart now)” and click on .
Restart may not be necessary depending on your PC. Installation will be completed without restarting in this case.
Preparation for face recognition set up is complete once Windows restarts.
Continue with face recognition set up.
( Set up Windows Hello Face: Set up face recognition

11 Contents
Use with other chat softwarePlease use the chat software camera settings.The set up instructions for a representative chat software is shown here as an example.
For other software, please refer to the manual for the software that you are using.
Use with Skype™The following images are the instructions for “Skype for Windows Desktop”. The display for the Microsoft Store application is different, but the steps are the same.
ⴺⴺ Check that the camera is connected to your PC before starting up Skype.
ⴺⴼ Click on “User profile”.
ⴺⴾ Click on “Settings”.

12 Contents
ⴺⵀ Set up “Audio & Video” as below.
ⴺⵂ If multiple cameras are connected, select “ELECOM 2MP Webcam” from “Camera” under “VIDEO”.
If you can see the image taken by the camera, this indicates that it is operating correctly.
ⴺⵄ Select the audio device from “Microphone” under “AUDIO”.
Select the following if you are using the camera built-in microphone.•Microphone (Webcam Internal Mic)
You can now use this product with Skype.

13 Contents
Use with Zoom
ⴺⴺ Check that the camera is connected to your PC before starting up Zoom.
ⴺⴼ Click on the (Settings) icon.
ⴺⴾ Select “Video”.
ⴺⵀ If multiple cameras are connected, select “ELECOM 2MP Webcam” from “Camera”.
If you can see the image taken by the camera, this indicates that it is operating correctly.

14 Contents
ⴺⵂ Select “Audio”.
ⴺⵄ Select the audio device from “Microphone”.
Select the following if you are using the camera built-in microphone.•Microphone (Webcam Internal Mic)
You can now use this product with Zoom.

15 Contents
Basic Specifications
Camera main bodyCamera parts
Image receiver 1/6" CMOS sensor
Effective pixel count Approx. 2.0 megapixels
Focus type Fixed focus
Recording pixel count Max 1920×1080 pixels
Max frame rate 30FPS
Number of colors 16.7 million colors (24bit)
Angle of view 80 degrees diagonally
Built-in Microphone
Type Digital silicon MEMS (Monaural)
Directionality Omnidirectional
Common
Interface USB2.0 (Type A male)
Cable length Approx. 1.5m
DimensionsApprox. Length 100.0 mm x Width 64.0 mm x Height 26.5 mm * Cable not included.
Supported OS
Windows 10* To use face recognition, you must update to the newest version of
Windows 10 from Windows Update.* To use face recognition with the following editions of Windows 10, you
must download the driver installer from the ELECOM website. (Support is only available in Japanese)
• Windows 10 Enterprise 2016 LTSB• Windows 10 IoT Enterprise 2016 LTSB• Windows 10 Enterprise 2015 LTSB• Windows 10 IoT Enterprise 2015 LTSB
* For the list of supported editions, please refer to our website for the most recent information not included in this manual. (Support is only available in Japanese)
* Compatibility information is retrieved during operation confirmation in our verification environment. There is no guarantee of full compatibility with all devices, OS versions and applications.
Hardware operating environmentThe following environment requirements must be met to use this product.
CPU Equivalent to Intel® Core™ i3 1.2GHz and above
Main memory More than 1GB
HDD free space More than 1GB
* In addition to the above, the environment requirements for each software should be met.

16 Contents
Regarding user support
Contact for enquiry on productA customer who purchases outside Japan should contact the local retailer in the country of purchase for enquiries. In “ELECOM CO., LTD. (Japan)”, no customer support is available for enquiries about purchases or usage in/from any countries other than Japan. Also, no foreign language other than Japanese is available. Replacements will be made under stipulation of the Elecom warranty, but are not available from outside of Japan.
Limitation of Liability• In no event will ELECOM Co., Ltd be liable for any lost profits or special, consequential, indirect,
punitive damages arising out of the use of this product.• ELECOM Co., Ltd will have no liability for any loss of data, damages, or any other problems that
may occur to any devices connected to this product.
Windows Hello Face supporting Web CameraUCAM-CF20FB
User Manual1st edition,
February 1, 2021
• Specifications and external appearance of the product may be changed without prior notice for the purpose of product improvements.
• All products and company names on the product and the package are trademarks or registered trademarks of their respective holders.
©2021 ELECOM Co., Ltd. All Rights Reserved. MSC-UCAM-CF20FB_JP_enus_ver.1


