Wi-Fi Direct Enablement Setup Instructions Activation de...
20
Wi-Fi Direct Enablement Setup Instructions Activation de Wi-Fi Direct Instructions d'installation
Transcript of Wi-Fi Direct Enablement Setup Instructions Activation de...
Wi-Fi Direct Enablement
Setup Instructions
Activation de Wi-Fi Direct
Instructions d'installation

1
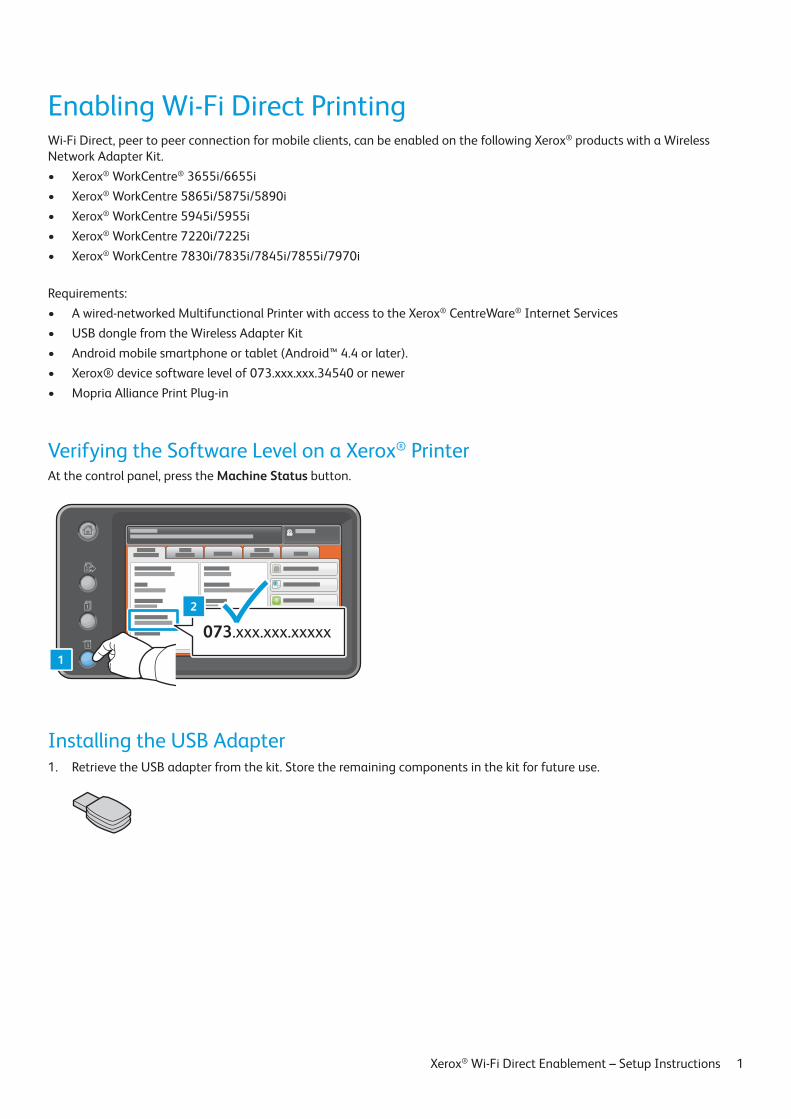
Enabling Wi-Fi Direct PrintingWi-Fi Direct, peer to peer connection for mobile clients, can be enabled on the following Xerox® products with a Wireless Network Adapter Kit.• Xerox® WorkCentre® 3655i/6655i• Xerox® WorkCentre 5865i/5875i/5890i• Xerox® WorkCentre 5945i/5955i• Xerox® WorkCentre 7220i/7225i• Xerox® WorkCentre 7830i/7835i/7845i/7855i/7970i
Requirements:• A wired-networked Multifunctional Printer with access to the Xerox® CentreWare® Internet Services• USB dongle from the Wireless Adapter Kit• Android mobile smartphone or tablet (Android™ 4.4 or later).• Xerox® device software level of 073.xxx.xxx.34540 or newer• Mopria Alliance Print Plug-in
Verifying the Software Level on a Xerox® Printer At the control panel, press the Machine Status button.
073.xxx.xxx.xxxxx1
2
Installing the USB Adapter1. Retrieve the USB adapter from the kit. Store the remaining components in the kit for future use.
Xerox® Wi-Fi Direct Enablement – Setup Instructions
2
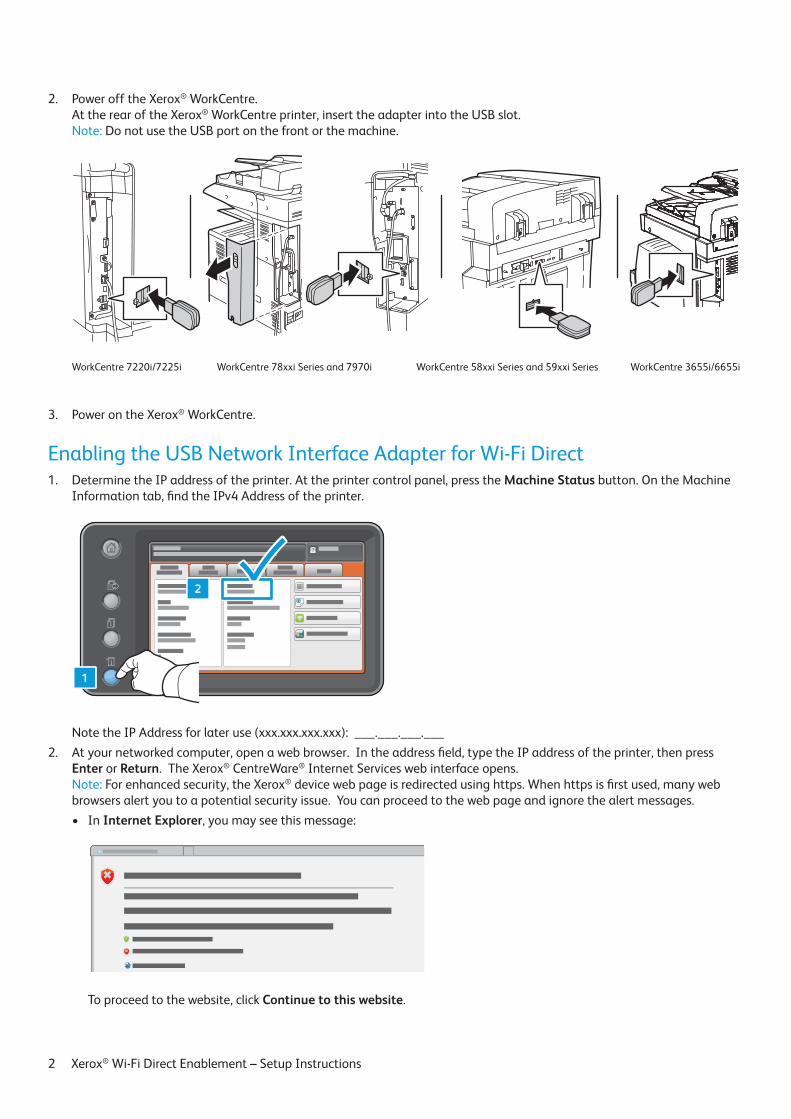
2. Power off the Xerox® WorkCentre. At the rear of the Xerox® WorkCentre printer, insert the adapter into the USB slot. Note: Do not use the USB port on the front or the machine.
WorkCentre 7220i/7225i WorkCentre 78xxi Series and 7970i WorkCentre 58xxi Series and 59xxi Series WorkCentre 3655i/6655i
3. Power on the Xerox® WorkCentre.
Enabling the USB Network Interface Adapter for Wi-Fi Direct1. Determine the IP address of the printer. At the printer control panel, press the Machine Status button. On the Machine
Information tab, find the IPv4 Address of the printer.
1
2
Note the IP Address for later use (xxx.xxx.xxx.xxx): ___.___.___.___
2. At your networked computer, open a web browser. In the address field, type the IP address of the printer, then press Enter or Return. The Xerox® CentreWare® Internet Services web interface opens. Note: For enhanced security, the Xerox® device web page is redirected using https. When https is first used, many web browsers alert you to a potential security issue. You can proceed to the web page and ignore the alert messages.• In Internet Explorer, you may see this message:
To proceed to the website, click Continue to this website.
Xerox® Wi-Fi Direct Enablement – Setup Instructions
3
• In Google Chrome, you may see this message:
To proceed to the website, click Proceed anyway.
• In Mozilla Firefox, you may see this message:
To proceed to the website, click I understand the risks.
• In Apple Safari, you may see this message:
Click Continue to proceed to the website.
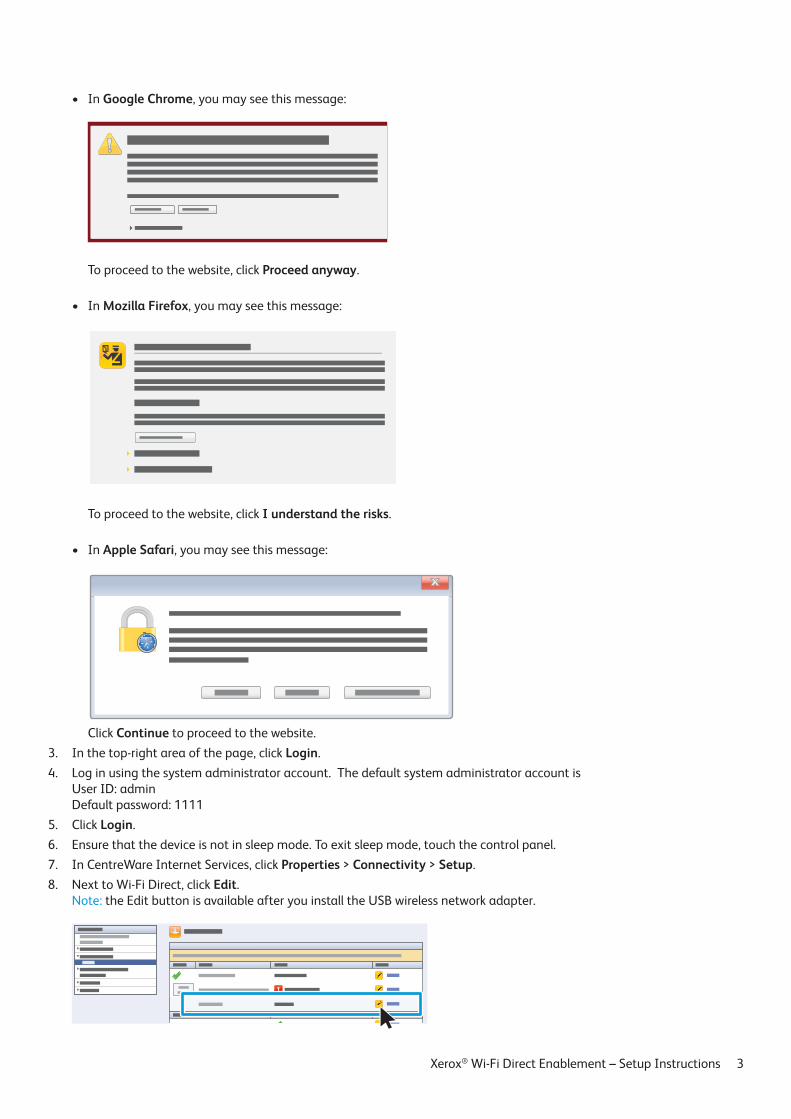
3. In the top-right area of the page, click Login.4. Log in using the system administrator account. The default system administrator account is
User ID: admin Default password: 1111
5. Click Login.6. Ensure that the device is not in sleep mode. To exit sleep mode, touch the control panel.7. In CentreWare Internet Services, click Properties > Connectivity > Setup.8. Next to Wi-Fi Direct, click Edit.
Note: the Edit button is available after you install the USB wireless network adapter.
Xerox® Wi-Fi Direct Enablement – Setup Instructions

4
9. You can change the Device Name in the Convenience Link section. To accept the default name or proceed to the next step to make a change, click Close.
10. To change the Device Name, click Edit.
11. Enter the desired information. Enter the device name, then click Apply.
12. Confirm the Device Name set in the previous step. To return to the Connectivity window, click Close.
1
2
Xerox®® Wi-Fi Direct Enablement – Setup Instructions
5
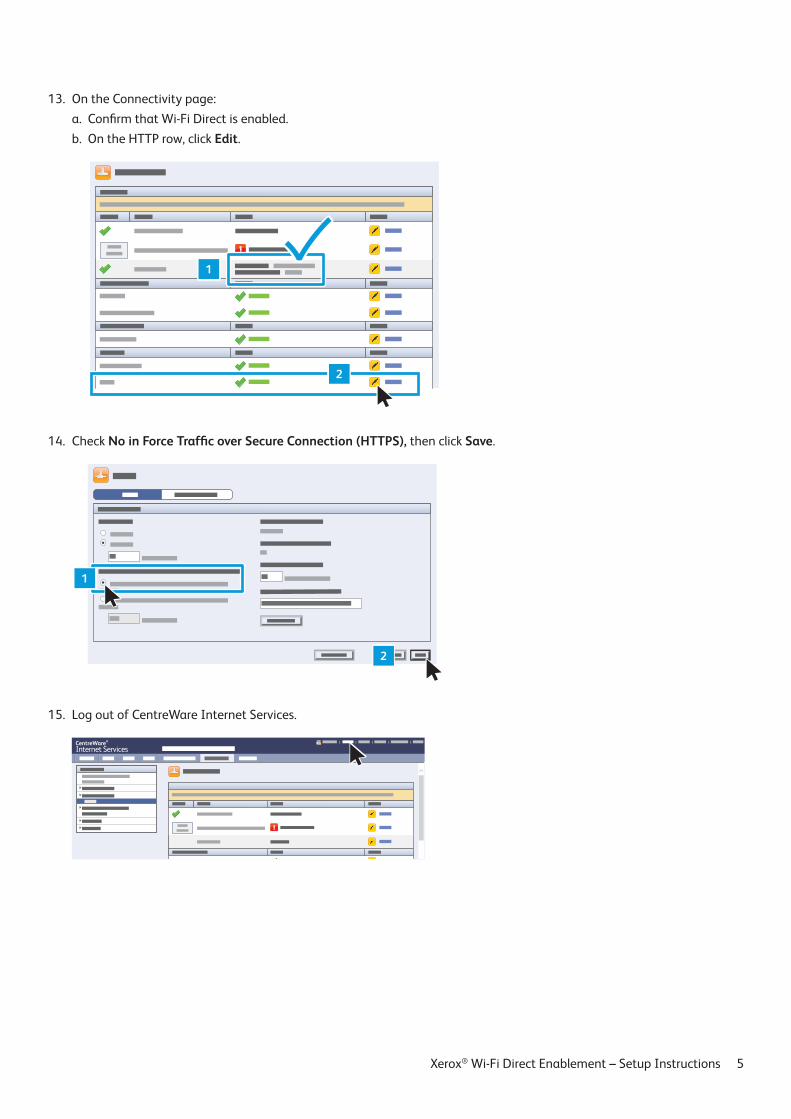
13. On the Connectivity page:a. Confirm that Wi-Fi Direct is enabled.b. On the HTTP row, click Edit.
1
2
14. Check No in Force Traffic over Secure Connection (HTTPS), then click Save.
1
2
15. Log out of CentreWare Internet Services.
CentreWare®
Internet Services
Xerox® Wi-Fi Direct Enablement – Setup Instructions
6
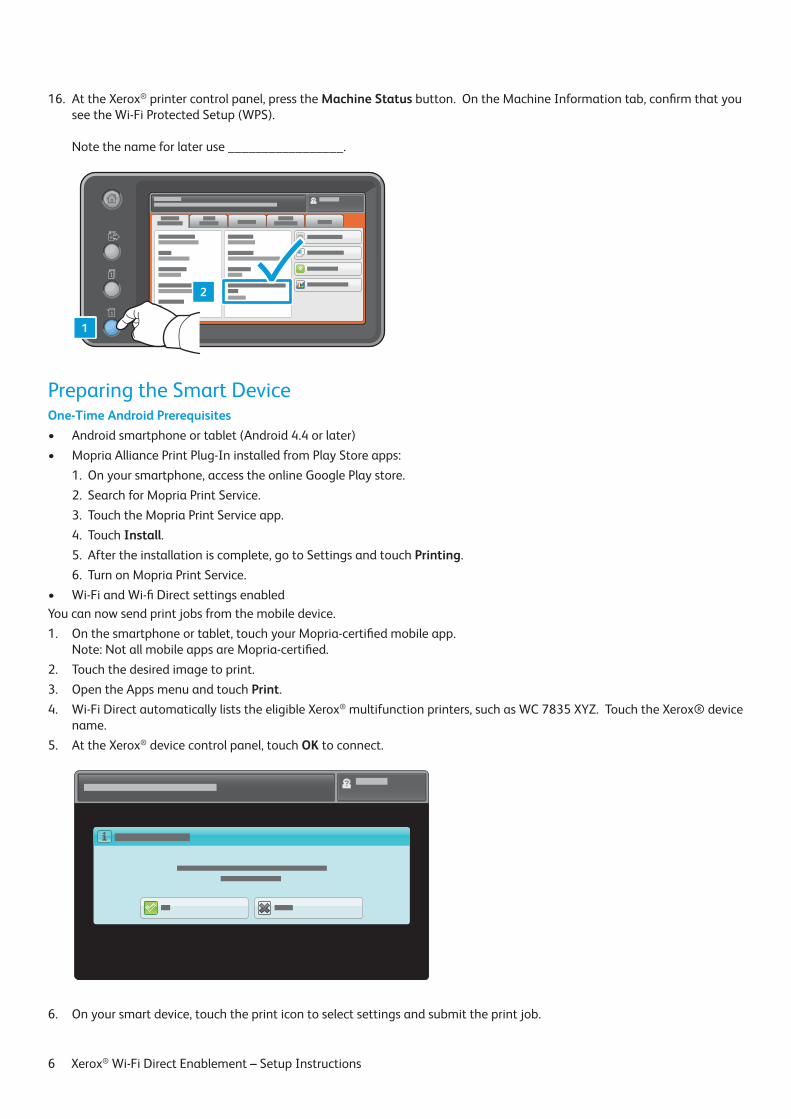
16. At the Xerox® printer control panel, press the Machine Status button. On the Machine Information tab, confirm that you see the Wi-Fi Protected Setup (WPS). Note the name for later use _________________.
1
2
Preparing the Smart DeviceOne-Time Android Prerequisites• Android smartphone or tablet (Android 4.4 or later)• Mopria Alliance Print Plug-In installed from Play Store apps:
1. On your smartphone, access the online Google Play store.2. Search for Mopria Print Service.3. Touch the Mopria Print Service app.4. Touch Install.5. After the installation is complete, go to Settings and touch Printing.6. Turn on Mopria Print Service.
• Wi-Fi and Wi-fi Direct settings enabledYou can now send print jobs from the mobile device.1. On the smartphone or tablet, touch your Mopria-certified mobile app.
Note: Not all mobile apps are Mopria-certified. 2. Touch the desired image to print.3. Open the Apps menu and touch Print.4. Wi-Fi Direct automatically lists the eligible Xerox® multifunction printers, such as WC 7835 XYZ. Touch the Xerox® device
name.5. At the Xerox® device control panel, touch OK to connect.
6. On your smart device, touch the print icon to select settings and submit the print job.
Xerox® Wi-Fi Direct Enablement – Setup Instructions

Activation de Wi-Fi Direct
Instructions d'installation
9
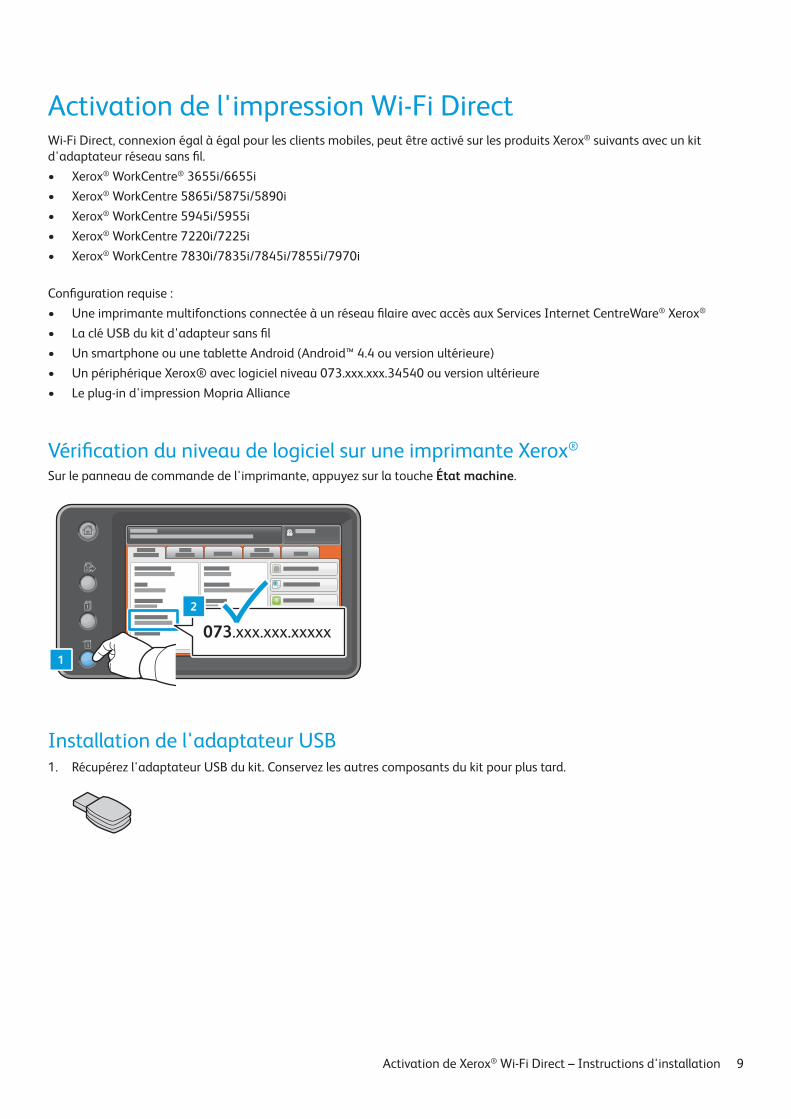
Activation de l'impression Wi-Fi DirectWi-Fi Direct, connexion égal à égal pour les clients mobiles, peut être activé sur les produits Xerox® suivants avec un kit d'adaptateur réseau sans fil.• Xerox® WorkCentre® 3655i/6655i• Xerox® WorkCentre 5865i/5875i/5890i• Xerox® WorkCentre 5945i/5955i• Xerox® WorkCentre 7220i/7225i• Xerox® WorkCentre 7830i/7835i/7845i/7855i/7970i
Configuration requise :• Une imprimante multifonctions connectée à un réseau filaire avec accès aux Services Internet CentreWare® Xerox®
• La clé USB du kit d'adapteur sans fil• Un smartphone ou une tablette Android (Android™ 4.4 ou version ultérieure)• Un périphérique Xerox® avec logiciel niveau 073.xxx.xxx.34540 ou version ultérieure• Le plug-in d'impression Mopria Alliance
Vérification du niveau de logiciel sur une imprimante Xerox® Sur le panneau de commande de l'imprimante, appuyez sur la touche État machine.
073.xxx.xxx.xxxxx1
2
Installation de l'adaptateur USB1. Récupérez l'adaptateur USB du kit. Conservez les autres composants du kit pour plus tard.
Activation de Xerox® Wi-Fi Direct – Instructions d'installation

10
2. Mettez hors tension l'imprimante Xerox® WorkCentre. À l'arrière de l'imprimante Xerox® WorkCentre, insérez l'adaptateur dans le logement USB. Remarque : n'utilisez pas le port USB à l'avant de la machine.
WorkCentre 7220i/7225i WorkCentre Série 78xxi et 7970i WorkCentre Série 58xxi et Série 59xxi WorkCentre 3655i/6655i
3. Mettez sous tension l'imprimante Xerox® WorkCentre.
Activation de l'adaptateur d'interface réseau USB pour Wi-Fi Direct1. Déterminez l'adresse IP de l'imprimante. Sur le panneau de commande, appuyez sur la touche État machine. Sur
l'onglet Informations machine, trouvez l'adresse IPv4 de l'imprimante.
1
2
Notez l'adresse IP (xxx.xxx.xxx.xxx) : ___.___.___.___
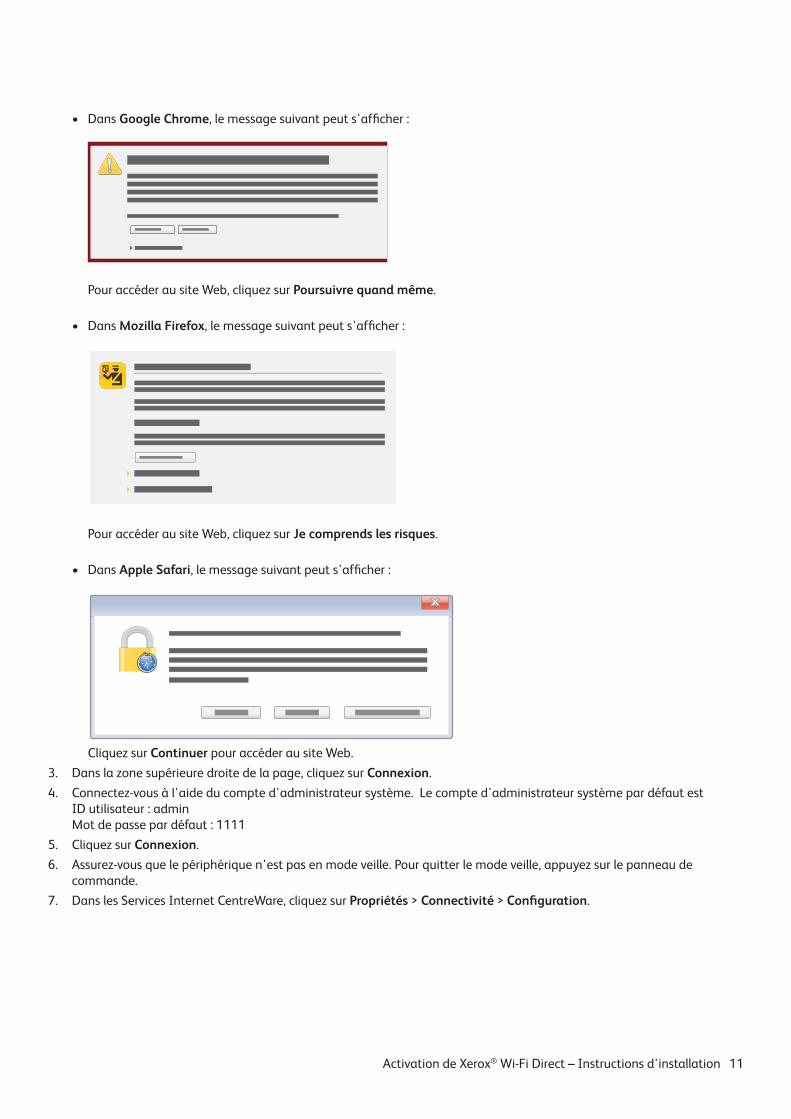
2. Sur votre ordinateur relié au réseau, ouvrez un navigateur Web. Dans le champ d'adresse, tapez l'adresse IP de l'imprimante, puis appuyez sur Entrée ou Retour. L'interface Web des Services Internet CentreWare® Xerox® s'ouvre. Remarque : à des fins de sécurité, la page Web du périphérique Xerox® est redirigée via https. Lorsque https est utilisé pour la première fois, de nombreux navigateurs Web vous avertissent d'un problème de sécurité potentiel. Vous pouvez ignorer les messages d'avertissement et accéder à la page Web.• Dans Internet Explorer, le message suivant peut s'afficher :
Pour accéder à ce site Web, cliquez sur Poursuivre sur ce site Web.
Activation de Xerox® Wi-Fi Direct – Instructions d'installation
11
• Dans Google Chrome, le message suivant peut s'afficher :
Pour accéder au site Web, cliquez sur Poursuivre quand même.
• Dans Mozilla Firefox, le message suivant peut s'afficher :
Pour accéder au site Web, cliquez sur Je comprends les risques.
• Dans Apple Safari, le message suivant peut s'afficher :
Cliquez sur Continuer pour accéder au site Web.
3. Dans la zone supérieure droite de la page, cliquez sur Connexion.4. Connectez-vous à l'aide du compte d'administrateur système. Le compte d'administrateur système par défaut est
ID utilisateur : admin Mot de passe par défaut : 1111
5. Cliquez sur Connexion.6. Assurez-vous que le périphérique n'est pas en mode veille. Pour quitter le mode veille, appuyez sur le panneau de
commande.7. Dans les Services Internet CentreWare, cliquez sur Propriétés > Connectivité > Configuration.
Activation de Xerox® Wi-Fi Direct – Instructions d'installation

12
8. En regard de Wi-Fi Direct, cliquez sur Modifier. Remarque : le bouton Modifier est disponible une fois que vous avez installé l'interface réseau sans fil USB.
9. Vous pouvez changer le nom du périphérique dans la section Lien. Pour accepter le nom par défaut ou passer à l'étape suivante pour apporter des modifications, cliquez sur Fermer.
10. Pour modifier le nom du périphérique, cliquez sur Modifier.
11. Entrez les informations requises. Entrez le nom du périphérique, puis cliquez sur Appliquer.
Activation de Xerox® Wi-Fi Direct – Instructions d'installation
13
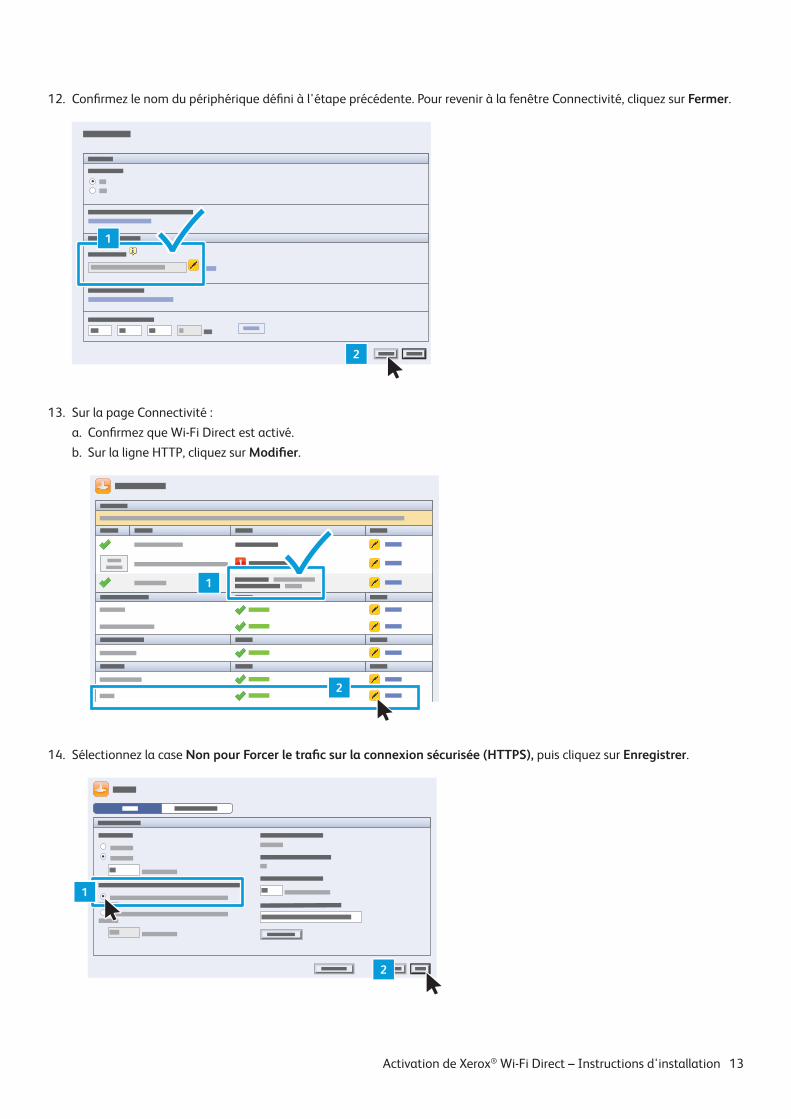
12. Confirmez le nom du périphérique défini à l'étape précédente. Pour revenir à la fenêtre Connectivité, cliquez sur Fermer.
1
2
13. Sur la page Connectivité :a. Confirmez que Wi-Fi Direct est activé.b. Sur la ligne HTTP, cliquez sur Modifier.
1
2
14. Sélectionnez la case Non pour Forcer le trafic sur la connexion sécurisée (HTTPS), puis cliquez sur Enregistrer.
1
2
Activation de Xerox® Wi-Fi Direct – Instructions d'installation
14
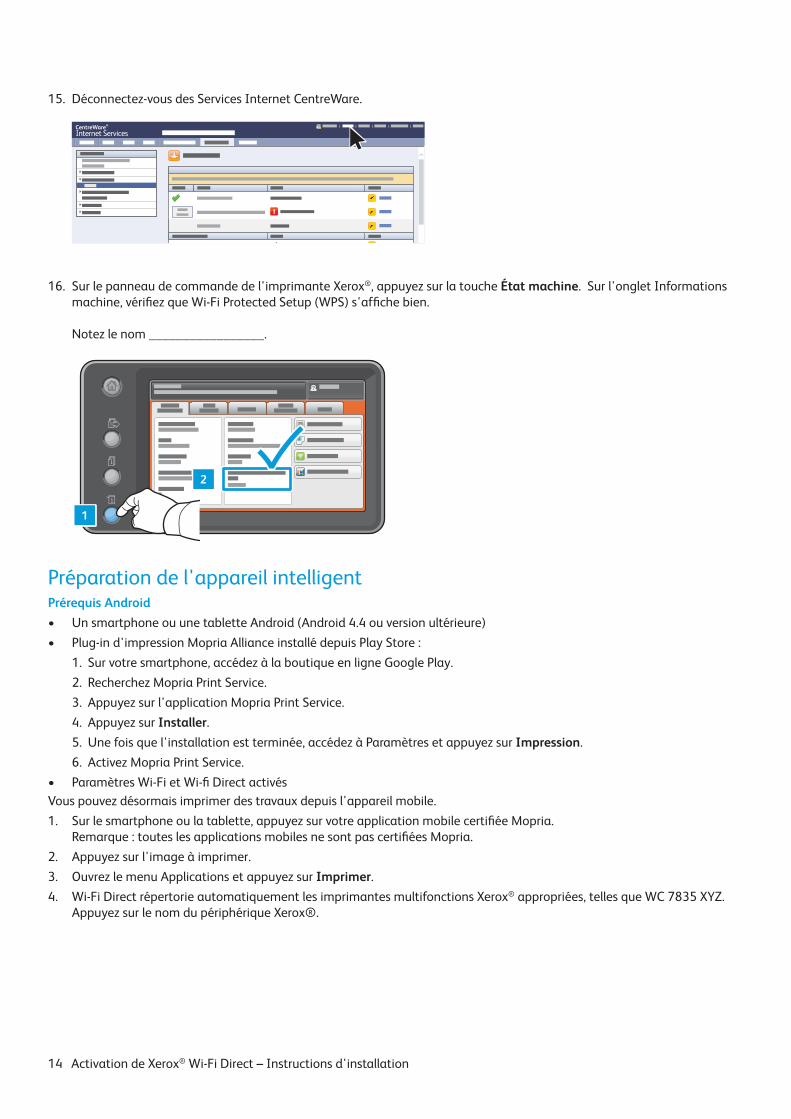
15. Déconnectez-vous des Services Internet CentreWare.
CentreWare®
Internet Services
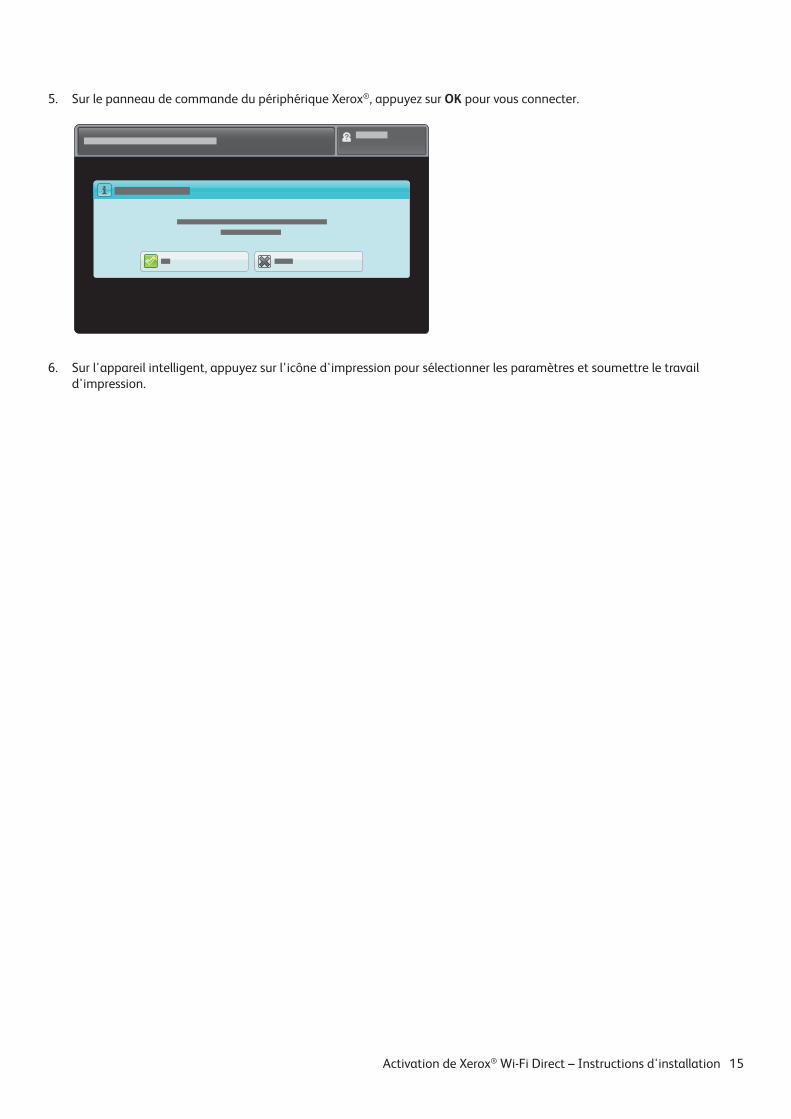
16. Sur le panneau de commande de l'imprimante Xerox®, appuyez sur la touche État machine. Sur l'onglet Informations machine, vérifiez que Wi-Fi Protected Setup (WPS) s'affiche bien. Notez le nom _________________.
1
2
Préparation de l'appareil intelligentPrérequis Android• Un smartphone ou une tablette Android (Android 4.4 ou version ultérieure)• Plug-in d'impression Mopria Alliance installé depuis Play Store :
1. Sur votre smartphone, accédez à la boutique en ligne Google Play.2. Recherchez Mopria Print Service.3. Appuyez sur l'application Mopria Print Service.4. Appuyez sur Installer.5. Une fois que l'installation est terminée, accédez à Paramètres et appuyez sur Impression.6. Activez Mopria Print Service.
• Paramètres Wi-Fi et Wi-fi Direct activésVous pouvez désormais imprimer des travaux depuis l'appareil mobile.1. Sur le smartphone ou la tablette, appuyez sur votre application mobile certifiée Mopria.
Remarque : toutes les applications mobiles ne sont pas certifiées Mopria. 2. Appuyez sur l'image à imprimer.3. Ouvrez le menu Applications et appuyez sur Imprimer.4. Wi-Fi Direct répertorie automatiquement les imprimantes multifonctions Xerox® appropriées, telles que WC 7835 XYZ.
Appuyez sur le nom du périphérique Xerox®.
Activation de Xerox® Wi-Fi Direct – Instructions d'installation
15
5. Sur le panneau de commande du périphérique Xerox®, appuyez sur OK pour vous connecter.
6. Sur l'appareil intelligent, appuyez sur l'icône d'impression pour sélectionner les paramètres et soumettre le travail d'impression.
Activation de Xerox® Wi-Fi Direct – Instructions d'installation


607E14340 Rev A BR18092 © 2016 Xerox® Corporation. All Rights Reserved. Xerox® and Xerox® and Design®, WorkCentre®, and CentreWare® are trademarks of Xerox® Corporation in the United States and/or other countries.© 2016 Xerox® Corporation. Tous droits réservés. Xerox® et Xerox® avec la marque figurative®, WorkCentre®, et CentreWare® sont des marques Xerox® Corporation aux États-Unis et/ou dans d’autres pays.

![2 Pilih [Wi-Fi function (Fungsi Wi-Fi)].](https://static.fdocuments.net/doc/165x107/587653b01a28ab135e8b9be3/2-pilih-wi-fi-function-fungsi-wi-fi.jpg)