2014 expressions of flowers essentials workroom manual 4 15 14

Wave® Curtain Workroom Guide
September 2011

Contents
Introduction
Which size Wave®?
Calculating the number of gliders.
Calculating the Heading Tape length
Making the curtain
Introduction
Silent Gliss Ltd understands that many
workrooms will have their own method of
manufacturing Wave curtains. This guide is
intended to give you a suggested make up
method so you get the best from the Silent Gliss
Wave system.
When using your own fabrics we suggest that
sample curtains are made to determine whether;
a) It is suitable for use with Wave, and,
b) If so, which size of Wave is most appropriate.
In general, stiffer fabrics tend not to lend
themselves to Wave since they struggle to hold
the soft curves for the drop of the curtain.
Once you have confirmed your fabric is suitable
for Wave you may want to consider using lead
weight tape and curtain side weights for an
improved finished appearance.
The maximum weight that the standard Wave
heading tape can carry is 10kg per metre of track.
However, individual track weight restrictions still
apply.
Wave with roller glider cord 6098W has much
higher weight limitations, consult the catalogue to
see individual system weight graphs.
This guide is based on using the recommended
Wave component parts detailed to the right (not to
scale).
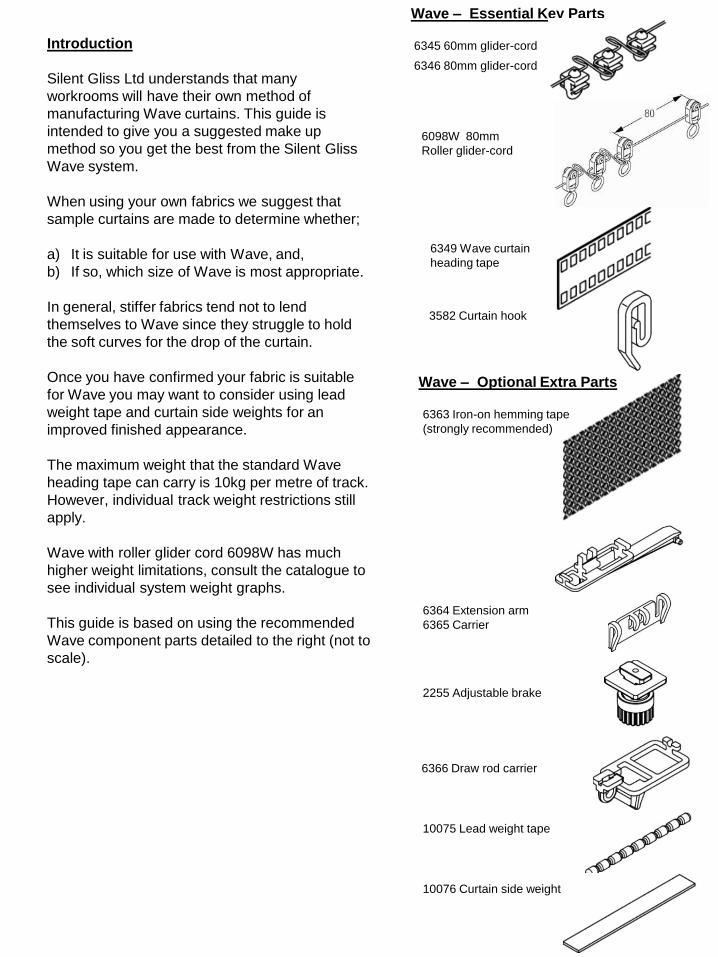
6345 60mm glider-cord
Wave – Essential Key Parts
6346 80mm glider-cord
6363 Iron-on hemming tape
(strongly recommended)
3582 Curtain hook
6349 Wave curtain
heading tape
Wave – Optional Extra Parts
6364 Extension arm
6365 Carrier
2255 Adjustable brake
6366 Draw rod carrier
10075 Lead weight tape
10076 Curtain side weight
6098W 80mm
Roller glider-cord
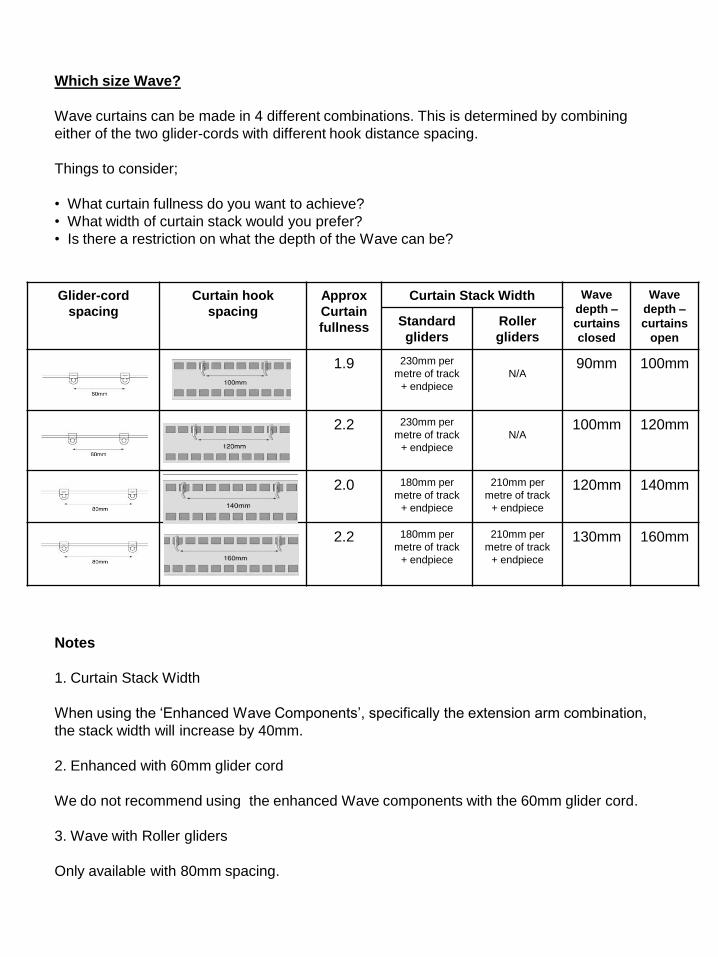
Which size Wave?
Wave curtains can be made in 4 different combinations. This is determined by combining
either of the two glider-cords with different hook distance spacing.
Things to consider;
• What curtain fullness do you want to achieve?
• What width of curtain stack would you prefer?
• Is there a restriction on what the depth of the Wave can be?
Notes
1. Curtain Stack Width
When using the ‘Enhanced Wave Components’, specifically the extension arm combination,
the stack width will increase by 40mm.
2. Enhanced with 60mm glider cord
We do not recommend using the enhanced Wave components with the 60mm glider cord.
3. Wave with Roller gliders
Only available with 80mm spacing.
Glider-cord
spacing
Curtain hook
spacing
Approx
Curtain
fullness
Curtain Stack Width Wave
depth –
curtains
closed
Wave
depth –
curtains
open
Standard
gliders
Roller
gliders
1.9 230mm per
metre of track
+ endpiece
N/A 90mm 100mm
2.2 230mm per
metre of track
+ endpiece
N/A 100mm 120mm
2.0 180mm per
metre of track
+ endpiece
210mm per
metre of track
+ endpiece
120mm 140mm
2.2 180mm per
metre of track
+ endpiece
210mm per
metre of track
+ endpiece
130mm 160mm
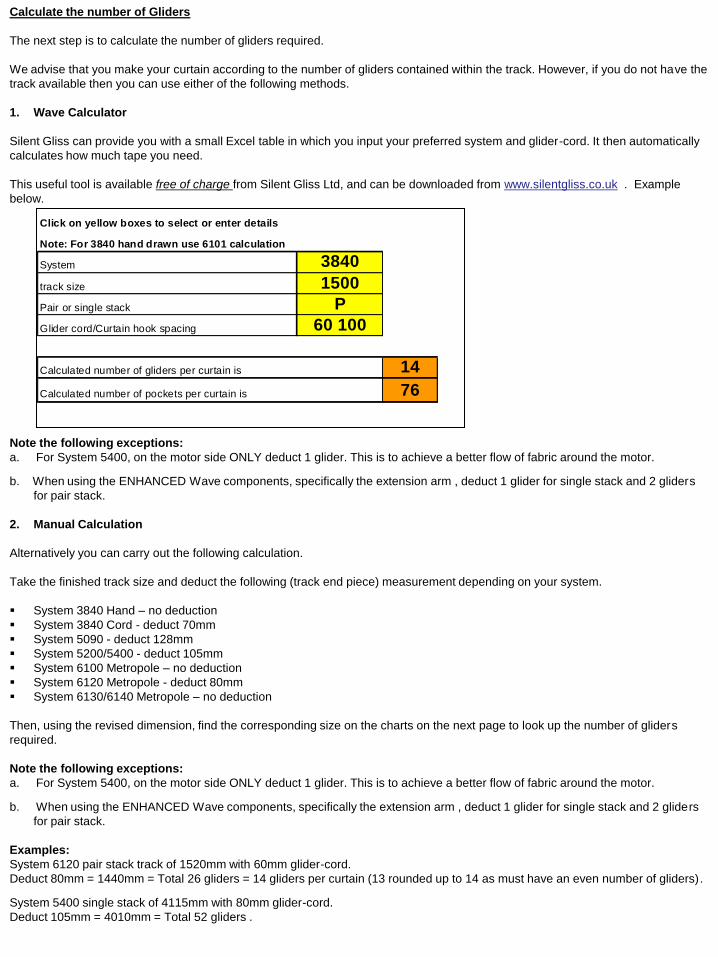
Calculate the number of Gliders
The next step is to calculate the number of gliders required.
We advise that you make your curtain according to the number of gliders contained within the track. However, if you do not have the
track available then you can use either of the following methods.
1. Wave Calculator
Silent Gliss can provide you with a small Excel table in which you input your preferred system and glider-cord. It then automatically
calculates how much tape you need.
This useful tool is available free of charge from Silent Gliss Ltd, and can be downloaded from www.silentgliss.co.uk . Example
below.
Note the following exceptions:
a. For System 5400, on the motor side ONLY deduct 1 glider. This is to achieve a better flow of fabric around the motor.
b. When using the ENHANCED Wave components, specifically the extension arm , deduct 1 glider for single stack and 2 gliders
for pair stack.
2. Manual Calculation
Alternatively you can carry out the following calculation.
Take the finished track size and deduct the following (track end piece) measurement depending on your system.
System 3840 Hand – no deduction
System 3840 Cord - deduct 70mm
System 5090 - deduct 128mm
System 5200/5400 - deduct 105mm
System 6100 Metropole – no deduction
System 6120 Metropole - deduct 80mm
System 6130/6140 Metropole – no deduction
Then, using the revised dimension, find the corresponding size on the charts on the next page to look up the number of gliders
required.
Note the following exceptions:
a. For System 5400, on the motor side ONLY deduct 1 glider. This is to achieve a better flow of fabric around the motor.
b. When using the ENHANCED Wave components, specifically the extension arm , deduct 1 glider for single stack and 2 gliders
for pair stack.
Examples:
System 6120 pair stack track of 1520mm with 60mm glider-cord.
Deduct 80mm = 1440mm = Total 26 gliders = 14 gliders per curtain (13 rounded up to 14 as must have an even number of gliders).
System 5400 single stack of 4115mm with 80mm glider-cord.
Deduct 105mm = 4010mm = Total 52 gliders .
Click on yellow boxes to select or enter details
Note: For 3840 hand drawn use 6101 calculation
System 3840
track size 1500
Pair or single stack P
Glider cord/Curtain hook spacing 60 100
Calculated number of gliders per curtain is 14
Calculated number of pockets per curtain is 76
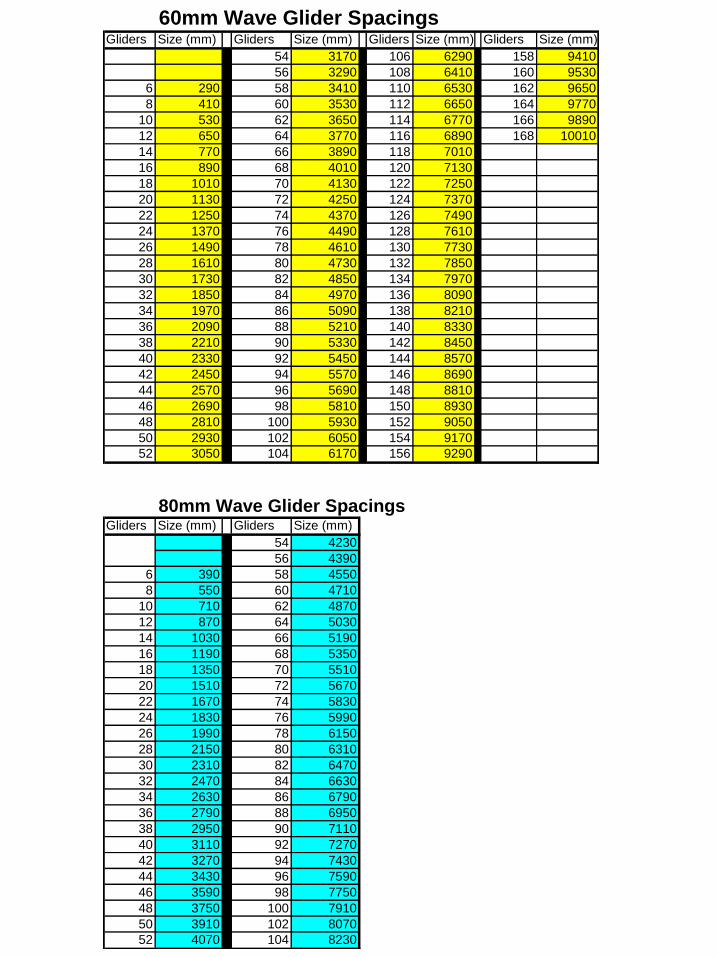
60mm Wave Glider SpacingsGliders Size (mm) Gliders Size (mm) Gliders Size (mm) Gliders Size (mm)
54 3170 106 6290 158 9410
56 3290 108 6410 160 9530
6 290 58 3410 110 6530 162 9650
8 410 60 3530 112 6650 164 9770
10 530 62 3650 114 6770 166 9890
12 650 64 3770 116 6890 168 10010
14 770 66 3890 118 7010
16 890 68 4010 120 7130
18 1010 70 4130 122 7250
20 1130 72 4250 124 7370
22 1250 74 4370 126 7490
24 1370 76 4490 128 7610
26 1490 78 4610 130 7730
28 1610 80 4730 132 7850
30 1730 82 4850 134 7970
32 1850 84 4970 136 8090
34 1970 86 5090 138 8210
36 2090 88 5210 140 8330
38 2210 90 5330 142 8450
40 2330 92 5450 144 8570
42 2450 94 5570 146 8690
44 2570 96 5690 148 8810
46 2690 98 5810 150 8930
48 2810 100 5930 152 9050
50 2930 102 6050 154 9170
52 3050 104 6170 156 9290
80mm Wave Glider SpacingsGliders Size (mm) Gliders Size (mm)
54 4230
56 4390
6 390 58 4550
8 550 60 4710
10 710 62 4870
12 870 64 5030
14 1030 66 5190
16 1190 68 5350
18 1350 70 5510
20 1510 72 5670
22 1670 74 5830
24 1830 76 5990
26 1990 78 6150
28 2150 80 6310
30 2310 82 6470
32 2470 84 6630
34 2630 86 6790
36 2790 88 6950
38 2950 90 7110
40 3110 92 7270
42 3270 94 7430
44 3430 96 7590
46 3590 98 7750
48 3750 100 7910
50 3910 102 8070
52 4070 104 8230
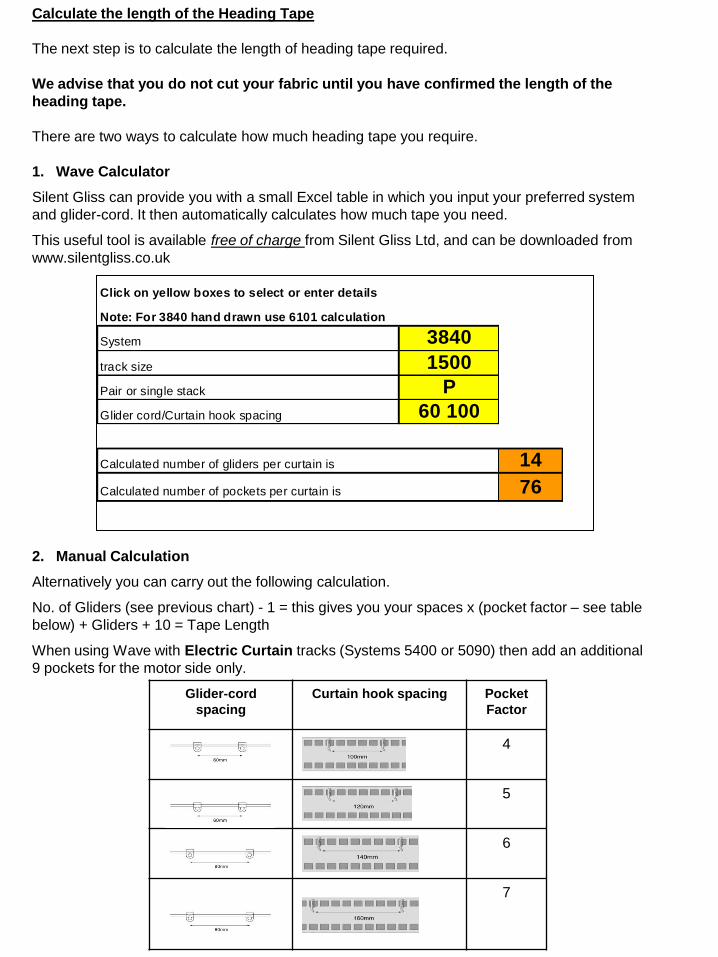
Calculate the length of the Heading Tape
The next step is to calculate the length of heading tape required.
We advise that you do not cut your fabric until you have confirmed the length of the
heading tape.
There are two ways to calculate how much heading tape you require.
1. Wave Calculator
Silent Gliss can provide you with a small Excel table in which you input your preferred system
and glider-cord. It then automatically calculates how much tape you need.
This useful tool is available free of charge from Silent Gliss Ltd, and can be downloaded from
www.silentgliss.co.uk
2. Manual Calculation
Alternatively you can carry out the following calculation.
No. of Gliders (see previous chart) - 1 = this gives you your spaces x (pocket factor – see table
below) + Gliders + 10 = Tape Length
When using Wave with Electric Curtain tracks (Systems 5400 or 5090) then add an additional
9 pockets for the motor side only.
Click on yellow boxes to select or enter details
Note: For 3840 hand drawn use 6101 calculation
System 3840
track size 1500
Pair or single stack P
Glider cord/Curtain hook spacing 60 100
Calculated number of gliders per curtain is 14
Calculated number of pockets per curtain is 76
Glider-cord
spacing
Curtain hook spacing Pocket
Factor
4
5
6
7
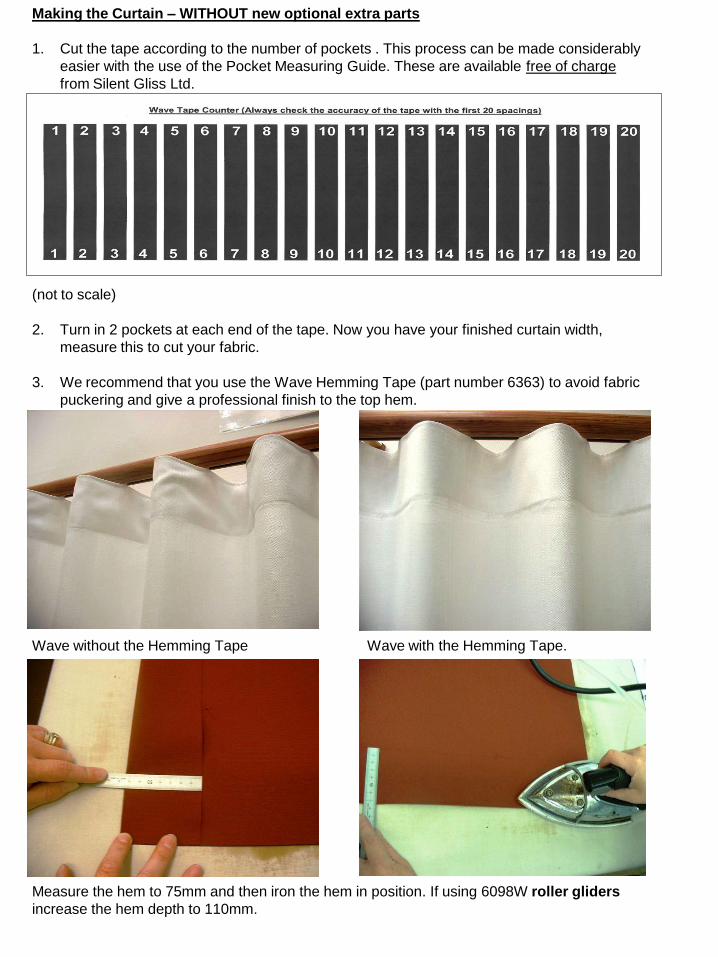
Making the Curtain – WITHOUT new optional extra parts
1. Cut the tape according to the number of pockets . This process can be made considerably
easier with the use of the Pocket Measuring Guide. These are available free of charge
from Silent Gliss Ltd.
(not to scale)
2. Turn in 2 pockets at each end of the tape. Now you have your finished curtain width,
measure this to cut your fabric.
3. We recommend that you use the Wave Hemming Tape (part number 6363) to avoid fabric
puckering and give a professional finish to the top hem.
Wave without the Hemming Tape Wave with the Hemming Tape.
Measure the hem to 75mm and then iron the hem in position. If using 6098W roller gliders
increase the hem depth to 110mm.
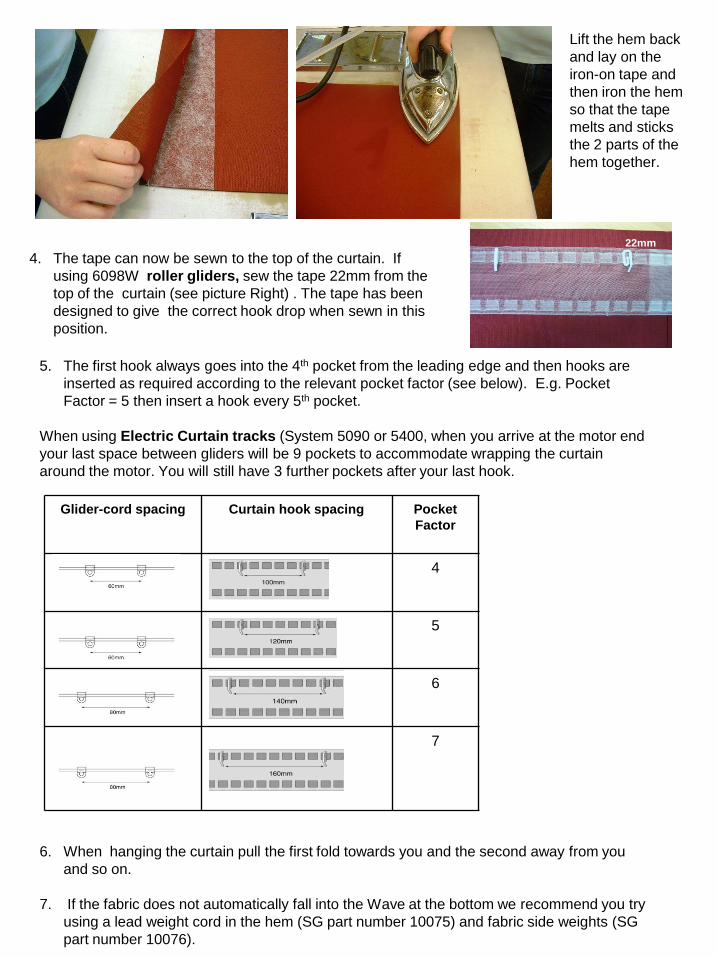
5. The first hook always goes into the 4th pocket from the leading edge and then hooks are
inserted as required according to the relevant pocket factor (see below). E.g. Pocket
Factor = 5 then insert a hook every 5th pocket.
When using Electric Curtain tracks (System 5090 or 5400, when you arrive at the motor end
your last space between gliders will be 9 pockets to accommodate wrapping the curtain
around the motor. You will still have 3 further pockets after your last hook.
Glider-cord spacing Curtain hook spacing Pocket
Factor
4
5
6
7
6. When hanging the curtain pull the first fold towards you and the second away from you
and so on.
7. If the fabric does not automatically fall into the Wave at the bottom we recommend you try
using a lead weight cord in the hem (SG part number 10075) and fabric side weights (SG
part number 10076).
Lift the hem back
and lay on the
iron-on tape and
then iron the hem
so that the tape
melts and sticks
the 2 parts of the
hem together.
4. The tape can now be sewn to the top of the curtain. If
using 6098W roller gliders, sew the tape 22mm from the
top of the curtain (see picture Right) . The tape has been
designed to give the correct hook drop when sewn in this
position.
22mm
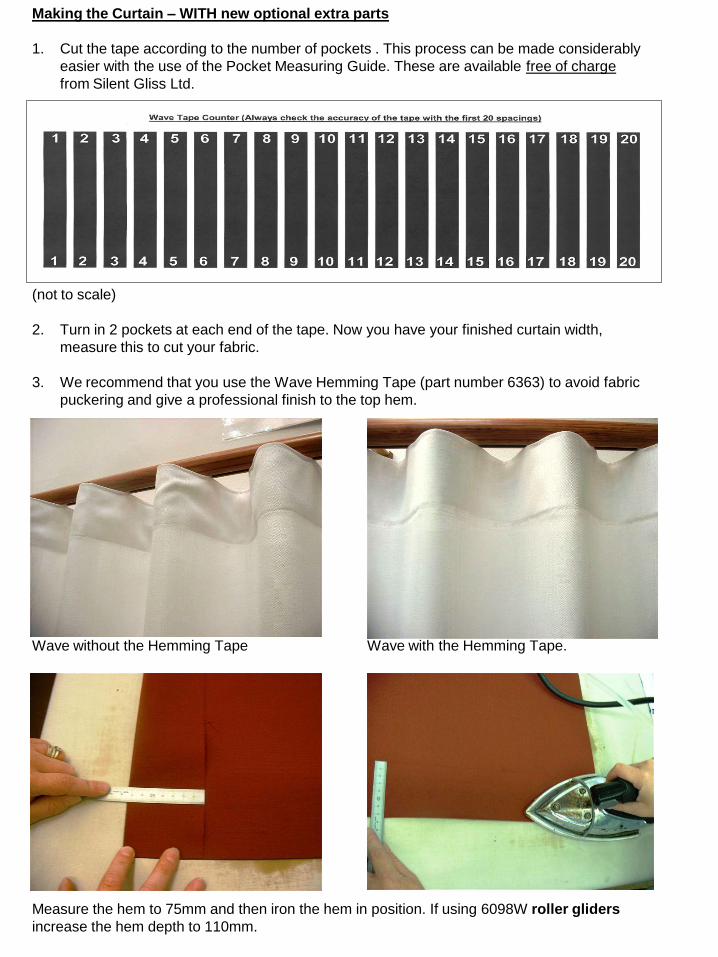
Making the Curtain – WITH new optional extra parts
1. Cut the tape according to the number of pockets . This process can be made considerably
easier with the use of the Pocket Measuring Guide. These are available free of charge
from Silent Gliss Ltd.
(not to scale)
2. Turn in 2 pockets at each end of the tape. Now you have your finished curtain width,
measure this to cut your fabric.
3. We recommend that you use the Wave Hemming Tape (part number 6363) to avoid fabric
puckering and give a professional finish to the top hem.
Wave without the Hemming Tape Wave with the Hemming Tape.
Measure the hem to 75mm and then iron the hem in position. If using 6098W roller gliders
increase the hem depth to 110mm.

5. Insert the first hook of the carrier for the new extension arm into the 3rd pocket of the tape,
(this will mean the second hook will attach in the 5th pocket).
6. Then your next hook will be your pocket factor less 1 – E.g. If you’re pocket factor would
normally be 7 then for this next hook only leave 6 from the end of the carrier.
7. Thereafter insert the curtain hooks as per your pocket factor in the following table. E.g.
Pocket Factor = 5 then leave 5 empty pockets and insert a hook every 6th pocket.
Glider-cord
spacing
Curtain hook spacing Pocket
Factor
4
5
6
7
Lift the hem back
and lay on the
iron-on tape and
then iron the hem
so that the tape
melts and sticks
the 2 parts of the
hem together.
4. The tape can now be sewn to the top of the curtain. If
using 6098W roller gliders, sew the tape 22mm from the
top of the curtain (see picture Right) . The tape has been
designed to give the correct hook drop when sewn in this
position.
22mm

8. When you reach the end of the curtain, the last hook is replaced by another carrier.
Therefore your last pocket factor will be one less.
9. When using Electric Curtain tracks (System 5090 or 5400). The curtain for the motor
side will not have a carrier on the motor side of the curtain, only on the leading edge.
Therefore when you arrive at the motor end your last space between gliders will be 9
pockets to accommodate wrapping the curtain around the motor, using a standard curtain
hook. You still have 3 further pockets after your last pocket.
10. When hanging the curtain pull the first fold towards you and the second away from you
and so on.