CaDD PC99 Suite - CaDD Electronics · CaDD PC99 Suite — Overview and installation. 2. CaDD PC99...
23
CaDD PC99 Suite Overview and installation Version 20161204THP
Transcript of CaDD PC99 Suite - CaDD Electronics · CaDD PC99 Suite — Overview and installation. 2. CaDD PC99...
CaDD PC99Suite
Overview and installation
Version 20161204THP
TEXAS INSTRUMENTSHOME COMPUTER
CaDD PC99 Suite —
Overview and installation
Copyright © 1999-2016 CaDD Electronics
2
CaDD PC99 Suite — Overview and installation
Table of Contents
1. Background. . . . . . . . . . . . . . . . . . . . . . . . . . . . . . . . . . . . . . . . . . . . . . . . . . . . . . . . . . . . . . . . . . . . . . . 1
2. CaDD PC99 Suite. . . . . . . . . . . . . . . . . . . . . . . . . . . . . . . . . . . . . . . . . . . . . . . . . . . . . . . . . . . . . . . . . . 3PC99W.. . . . . . . . . . . . . . . . . . . . . . . . . . . . . . . . . . . . . . . . . . . . . . . . . . . . . . . . . . . . . . . . . . . . . . . . . 3PC99WCFG.. . . . . . . . . . . . . . . . . . . . . . . . . . . . . . . . . . . . . . . . . . . . . . . . . . . . . . . . . . . . . . . . . . . . . 3PC99WDU. . . . . . . . . . . . . . . . . . . . . . . . . . . . . . . . . . . . . . . . . . . . . . . . . . . . . . . . . . . . . . . . . . . . . . . 3The Cyc. . . . . . . . . . . . . . . . . . . . . . . . . . . . . . . . . . . . . . . . . . . . . . . . . . . . . . . . . . . . . . . . . . . . . . . . . 3PC99 DOS. . . . . . . . . . . . . . . . . . . . . . . . . . . . . . . . . . . . . . . . . . . . . . . . . . . . . . . . . . . . . . . . . . . . . . . 3PC99 DOS utilities. . . . . . . . . . . . . . . . . . . . . . . . . . . . . . . . . . . . . . . . . . . . . . . . . . . . . . . . . . . . . . . . 3a99 Assembler. . . . . . . . . . . . . . . . . . . . . . . . . . . . . . . . . . . . . . . . . . . . . . . . . . . . . . . . . . . . . . . . . . . . 3CaDD Launcher. . . . . . . . . . . . . . . . . . . . . . . . . . . . . . . . . . . . . . . . . . . . . . . . . . . . . . . . . . . . . . . . . . 3
3. How to install CaDD PC99 Suite. . . . . . . . . . . . . . . . . . . . . . . . . . . . . . . . . . . . . . . . . . . . . . . . . . . . . . 43.1. Requirements. . . . . . . . . . . . . . . . . . . . . . . . . . . . . . . . . . . . . . . . . . . . . . . . . . . . . . . . . . . . . . . . . 43.2. Installation. . . . . . . . . . . . . . . . . . . . . . . . . . . . . . . . . . . . . . . . . . . . . . . . . . . . . . . . . . . . . . . . . . . 4
3.2.1. Copy files.. . . . . . . . . . . . . . . . . . . . . . . . . . . . . . . . . . . . . . . . . . . . . . . . . . . . . . . . . . . . . . . 53.2.1.1. DVD. . . . . . . . . . . . . . . . . . . . . . . . . . . . . . . . . . . . . . . . . . . . . . . . . . . . . . . . . . . . . . . 53.2.1.2. USB flash drive. . . . . . . . . . . . . . . . . . . . . . . . . . . . . . . . . . . . . . . . . . . . . . . . . . . . . . 5
3.2.2. Install Visual Basic support files. . . . . . . . . . . . . . . . . . . . . . . . . . . . . . . . . . . . . . . . . . . . . 63.2.3. Clean up the Windows Start menu. . . . . . . . . . . . . . . . . . . . . . . . . . . . . . . . . . . . . . . . . . . 73.2.4. Create the substitute drive Y:. . . . . . . . . . . . . . . . . . . . . . . . . . . . . . . . . . . . . . . . . . . . . . . 73.2.5. Install fonts for The Cyc. . . . . . . . . . . . . . . . . . . . . . . . . . . . . . . . . . . . . . . . . . . . . . . . . . . 83.2.6. Download DOSBox 0.74 for Windows. . . . . . . . . . . . . . . . . . . . . . . . . . . . . . . . . . . . . . . . . 8
3.3. Directory structure. . . . . . . . . . . . . . . . . . . . . . . . . . . . . . . . . . . . . . . . . . . . . . . . . . . . . . . . . . . . 93.3.1. \cadd. . . . . . . . . . . . . . . . . . . . . . . . . . . . . . . . . . . . . . . . . . . . . . . . . . . . . . . . . . . . . . . . . . 10
3.3.1.1. cadd.ini. . . . . . . . . . . . . . . . . . . . . . . . . . . . . . . . . . . . . . . . . . . . . . . . . . . . . . . . . . . 103.3.2. \cadd\doc. . . . . . . . . . . . . . . . . . . . . . . . . . . . . . . . . . . . . . . . . . . . . . . . . . . . . . . . . . . . . . . 11
4. Using CaDD PC99 Suite. . . . . . . . . . . . . . . . . . . . . . . . . . . . . . . . . . . . . . . . . . . . . . . . . . . . . . . . . . . . 124.1. PC99 DOS. . . . . . . . . . . . . . . . . . . . . . . . . . . . . . . . . . . . . . . . . . . . . . . . . . . . . . . . . . . . . . . . . . 124.2. PC99 DOS Utilities. . . . . . . . . . . . . . . . . . . . . . . . . . . . . . . . . . . . . . . . . . . . . . . . . . . . . . . . . . . 124.3. PC99W. . . . . . . . . . . . . . . . . . . . . . . . . . . . . . . . . . . . . . . . . . . . . . . . . . . . . . . . . . . . . . . . . . . . . 134.4. PC99WCFG. . . . . . . . . . . . . . . . . . . . . . . . . . . . . . . . . . . . . . . . . . . . . . . . . . . . . . . . . . . . . . . . . 14
4.4.1. pc99wcfg fails to start.. . . . . . . . . . . . . . . . . . . . . . . . . . . . . . . . . . . . . . . . . . . . . . . . . . . . 144.5. PC99WDU. . . . . . . . . . . . . . . . . . . . . . . . . . . . . . . . . . . . . . . . . . . . . . . . . . . . . . . . . . . . . . . . . . 154.6. CaDD Launcher. . . . . . . . . . . . . . . . . . . . . . . . . . . . . . . . . . . . . . . . . . . . . . . . . . . . . . . . . . . . . . 154.7. The Cyc.. . . . . . . . . . . . . . . . . . . . . . . . . . . . . . . . . . . . . . . . . . . . . . . . . . . . . . . . . . . . . . . . . . . . 164.8. a99 Cross-Assembler. . . . . . . . . . . . . . . . . . . . . . . . . . . . . . . . . . . . . . . . . . . . . . . . . . . . . . . . . . 16
5. How to uninstall CaDD PC99 Suite. . . . . . . . . . . . . . . . . . . . . . . . . . . . . . . . . . . . . . . . . . . . . . . . . . . 175.1. Erase all files. . . . . . . . . . . . . . . . . . . . . . . . . . . . . . . . . . . . . . . . . . . . . . . . . . . . . . . . . . . . . . . . 17
3
TEXAS INSTRUMENTSHOME COMPUTER
5.2. Remove the Y: drive.. . . . . . . . . . . . . . . . . . . . . . . . . . . . . . . . . . . . . . . . . . . . . . . . . . . . . . . . . . 17
6. Windows 10 and .hlp files. . . . . . . . . . . . . . . . . . . . . . . . . . . . . . . . . . . . . . . . . . . . . . . . . . . . . . . . . . . 18
7. Supported operating systems. . . . . . . . . . . . . . . . . . . . . . . . . . . . . . . . . . . . . . . . . . . . . . . . . . . . . . . . 19
4
CaDD PC99 Suite — Overview and installation
1. Background
On October 28, 1983 Texas Instruments announced that it was ceasing production of its TI-99/4A HomeComputer.
A one-man company called CaDD Electronics had been formed by Mark Van Coppenolle to develop andproduce The Gramulator — a GRAM-simulating device that plugged into the cartridge port of theTI-99/4A. He was assisted with testing and documentation for the device by Mike Wright. Ideas for a 99/4Aemulator running on a PC were developed, and a programming colleague, Greg Hill, thought the ideafeasible. In those days, the concept of sprites seemed insurmountable given the PC video system.
After some preliminary work perusing the TMS9900 and TMS9918A "orange" manuals, Greg produced thefirst iteration of the emulator running on a SCO Unix laptop with monochrome screen. The program waswritten in C for the Unix cc compiler.
A campaign requesting a $1 contribution for the development of the emulator was promoted throughMICROpendium. A base level of 1,000 customers was the target. Some people sent in $50. This missed thepoint of whether it was worth it to create the program for a sufficient number of people. Even though thetarget fell far short — maybe only 150 or so — it was decided to proceed.
The product was to be called PC99 (a TI-99/4A running on a PC). The projected price was $249. This wasto help cover the cost of various PC hardware, together with a PC C compiler, assembler, code libraries,an editor, and DOS, together with supporting books and manuals.
To lessen the impact it was decided to release the product in "stages". For example, Stage 1 did not havesprite emulation. Stage 4 did not have the Myarc disk controller. Each stage was to be $49 and a total offive stages were envisaged.
PC99 was to be DOS-based, even though Windows 3.1 had been announced. When Windows 98 wasreleased, it could be restarted in "MSDOS Mode" and PC99 could even be run in a window on the Windowsdesktop. The early development was done with the Microsoft C compilers versions 5 and 6. DOS imposeda practical limit of about 580K for code size. It was therefore decided to remove all setup and configurationcode from the emulator, and cfg.exe was born. The idea was based on the fact that if you had a real 99/4Ayou would have to power off the computer to say change from a TI Disk Controller to a Myarc DiskController. In PC99 you exit the emulator, change the configuration, e.g. the cartridge with cfg.exe, andre-start the emulator to have the change take effect.
A bug was found in MS C 6.0. This was reported to MS who said it was fixed, for another $149, in MS C6.1. This was purchased. Not only had the bug not been fixed, but there was now another that did nothandle the Break key correctly in the debugger. CaDD did some research and came up with the SymantecC compiler (on 30 1.44 MB floppies). This worked, until a bug was found in that compiler. When Symantecwas contacted we were told they had no interest in fixing it since CaDD was not a large corporation.
1
TEXAS INSTRUMENTSHOME COMPUTER
Another hunt. This time it was Watcom 10.0. Aside from a minor difference in the make file, the WatcomC compiler worked exceedingly well. More importantly, Watcom included the Tenberry DOS4G extenderas DOS4G/W which allowed, for the first time, true 32-bit code to be generated for an Intel 80486 CPU ina flat non-segmented memory space. In addition, the program memory size was permitted to be 4 MB.(One wonders why MS was unable to achieve something like this.)
The final iteration of Watcom was 11.0c, which is what CaDD uses to compile PC99. In addition, CaDDpurchased the Greenleaf COMM package, and Ted Gruber's FastGraph library and utilities which are usedin PC99. CaDD also purchased the Creative Labs Sound Blaster Development Kit. The last release of PC99was Stage 6.
It was then decided that it would be best to port PC99 to a Windows platform. Greg had little interest andleft to pursue other challenges. Mark went off on his own and wrote wpc99. On the one hand, this was aremarkable effort, although the "harder" parts of the code were copied from PC99. On the other hand,wpc99 bore little relation to PC99, except that the title screen came up and the music was much better.No attempt was made to emulate the RS232 card, and hence one of the strengths of PC99 was nullified,i.e. the ability to transfer TI disks in both directions between a PC and a 99/4A. Mark also did not emulatethe p-Code Card, and things like multiple GROM banks (REVIEW MODULE LIBRARY). It was also notpossible to "communicate" with wpc99 through the control menu, as this had not been implemented. Therewere other shortcomings, including loss of key-strokes, and not having any kind of debugger. Later,because of the way the timing code had been written, it proved impossible to run wpc99 on say a 3.2 GHzPentium 4 PC.
As a result, it was deemed not possible to release this as a product since it was unsupportable.
There was a short period where Mark did co-operate in some design requirements. The first was the name,and it was changed to pc99w (PC99 for Windows). It used an .ini file which was called pc99w.ini, and amodified copy of the pc99.mod file called pc99w.mod. There were also changes made so that the code couldrun at a selected speed (up to the capability of the processor), and not just at the 4A speed of 3.0 MHz.
Quite soon after that, Mark handed over all responsibilities of CaDD to Mike and abandoned the project.
Mike did not have the skills to write all the code he wanted. Instead, he introduced a series of additions,such as the program creating a log file to track its progress, the use of Hungarian notation for the code,and managed to implement the p-System. But he was unable to solve the timing problem, and the creationof a control menu. Instead, he concentrated on developing PC99W Disk Utilities (pc99wdu), and PC99WConfiguration (pc99wcfg) support programs for PC99W. These are written in Visual Basic 6.0 SP 6.
That is a rough summary of development up to July 2014.
And then, out of the blue, came Eric Firestone who expressed interest in developing PC99W. Eric wasgiven a copy of Mark's pc99w code, and added, as a first step: speech. But the quality was poor. There wasalso no support for the RS232 card. Since then, considerable development has been done by Eric. Theresult is that pc99w evolved to be a strong release candidate, which led to the creation of CaDD PC99Suite.
2
CaDD PC99 Suite — Overview and installation
2. CaDD PC99 Suite
CaDD PC99 Suite is a bundled package consisting of the following parts:
PC99W
This is a native 32-bit Windows program which emulates the TI-99/4A and peripherals.
PC99WCFG
PC99W Configuration program. Written in VB 6. Runs in Windows 98, XP, 7, and 10.
PC99WDU
PC99 Disk Utilities. Written in VB 6. Runs in Windows 98, XP, 7 and 10. It allows cataloging of disks,and operations such as extracting files.
The Cyc
This contains all known TI modules and disks, product manuals, books, publications, and many, manyother files.
PC99 DOS
This is based on PC99 Stage 6 Full. PC99 Stage 6 Light is no longer delivered or supported. PC99 DOScontains both pc99.exe and pc99a.exe (the TI-99/4A emulator), and cfg.exe (the PC99 DOSconfiguration program). PC99 DOS is offered for "legacy" users. To run pc99.exe | pc99a.exe inWindows 7 and higher requires DOSBox, a freeware program (or dosemu on Linux). PC99 DOScontains minor fixes to PC99 Stage 6 Full and its utilities.
PC99 DOS utilities
Some of these have minor fixes to those delivered with PC99 Stage 6 Full. Some have been convertedto run natively in Windows 7 and higher. Most require DOSBox.
a99 Assembler
A freeware TI-99/4A cross-assembler written by Alan L. Beard.
CaDD Launcher
A Windows program that allows quick selection of CaDD Suite programs.
3
TEXAS INSTRUMENTSHOME COMPUTER
3. How to install CaDD PC99 Suite
3.1. Requirements
■ Operating system. See "Supported operating systems".
■ You must be able to open and use a Windows Command Prompt with Administrator privileges or aWindows PowerShell with Administrator privileges..
■ If you ordered CaDD PC99 Suite on DVD, you must have a suitable optical drive on your system.
■ If you ordered CaDD PC99 Suite on a USB flash drive, you must have a USB port on your system.
Ensure these requirements are met before installing CaDD PC99 Suite.
3.2. Installation
There is no installation program. The following is a summary of the tasks that must be performed. Eachof the six sections is described in full below.
❶. Copying files from the CaDD PC99 Suite media to your hard drive. You will need 3.5 GB free.Depending on your order selection, the Suite media may be a DVD or a USB flash drive.
❷. Install Visual Basic 6 support files. Run \cadd\vb6suprt\setup.exe.❸. Clean up the Windows Start menu.❹. Create the substitute drive Y:.❺. Install fonts for The Cyc.❻. Download DOSBox 0.74 for Windows.
Note: In the following it is assumed that:
C: is your hard drive.G: is either a DVD (optical) drive, or a USB flashdrive.
If your drive letters are different, substitute accordingly. CaDD PC99 Suite can be installed on any drive,but C: is strongly recommended.
4
CaDD PC99 Suite — Overview and installation
3.2.1. Copy files ❶
The copy method depends on the media you ordered.
3.2.1.1. DVD
If you ordered CaDD PC99 Suite on DVD, insert the Suite DVD in your optical drive. In the example belowthe optical drive is assumed to be G:. Change the command to match your drive letter.
Open a command prompt.
> c: Change to C: drive.> cd \ Change to root directory.> mkdir cadd Make c:\cadd base directory for the suite.> cd \cadd Change to cadd base directory.> xcopy g:\*.* . /s /e /v Copy all suite files. g: assumed source.
and the files will be transferred. This will take some time.
Note: If you attempt to use Windows File Manager to copy the files, it is possible that Windows will set theRead-Only bit on all files since the DVD is a read-only device. This will prevent writing to files which needto be changed during normal operation of CaDD PC99 Suite.
3.2.1.2. USB flash drive
If your ordered CaDD PC99 Suite on a USB flash drive, insert the Suite flash drive in a USB port. In theexample below the flash drive is assumed to be G:. Change the command to match your drive letter.
Open a command prompt.
> c: Change to C: drive.> cd \ Change to root directory.> mkdir cadd Make c:\cadd base directory for the suite.> cd \cadd Change to cadd base directory.> xcopy g:\cadd\*.* . /s /e /v Copy all suite files. g: assumed source.
and the files will be transferred. This will take some time.
Note: The Suite is delivered in \cadd, not at the root level. This preserves any files placed on the flash driveby the manufacturer, e.g. Sandisk offers the "SecureAccess" utilities. CaDD does not use these, but leavesthem as delivered in case you wish to use them.
5
TEXAS INSTRUMENTSHOME COMPUTER
3.2.2. Install Visual Basic support files ❷
The programs pc99wcfg.exe (PC99W Configuration) and pc99wdu.exe (PC99W Disk Utilities) are writtenin MS Visual Basic 6. Microsoft's VB architecture lets a developer create an executable which is dependenton support files written by Microsoft. For example, if the program needs to select a file, MS provides a"Common Dialog" dynamic link library (DLL) which is accessed by the Visual Basic program. Suchlibraries, and other special files, must be "delivered" to the target PC and registered. MS's idea is to providea common look to Windows programs.
CaDD delivers these required files in:
\cadd\vb6suprt
They were copied to your hard drive when you performed "❶. Copy files".
This directory contains a "setup.exe" which must be run to install and register the necessary files for VB6support.
■ Use the Windows File Manager to navigate to the \cadd\vb6suprt directory (folder).■ Double click setup.exe.■ Agree to run the program.■ Tell the program to install to the empty folder c:\cadd\vbx, not the default c:\pc99w.■ Click the large icon at top left to begin installation.■ When asked to choose a program group, use "pc99w".
During the running of setup.exe you may be told that a file to be installed is older than one you alreadyhave.
☛ In all cases, tell setup to skip installation of that file.
i.e., Yes, I want to keep my existing file.
The message means that your version of Windows has a later version of that VB6 support file. Accordingto MS, newer support files are upwardly compatible with older ones.
Warning: Do not copy or move any of the files in \cadd\vb6suprt or \cadd\vbx.
6
CaDD PC99 Suite — Overview and installation
3.2.3. Clean up the Windows Start menu ❸
setup.exe creates a program group called pc99w in the Windows Start menu. Depending on your versionof Windows, click right on the entry in the Start menu and unpin it or delete it. If that does not work, thenopen a command prompt and do:
> c:> cd \> attrib .\pc99w.lnk /s
This will most likely return two paths, one for the current user, and one for all users. Delete all filesnames pc99w.lnk.
3.2.4. Create the substitute drive Y: ❹
The Cyc contains many external hyperlinks to files of the form:
Y:{path}
For these links to work, you need to create a Y: drive on your system using the subst command:
Open a command prompt:
> subst y: c:\cadd\cyc c: is your install drive. Change if necessary.
When an external hyperlink in any of The Cyc's files is clicked, it will replace y:{path} withc:\cadd\cyc\{path} to enable access to the file.
You will need to do this each time the PC is booted.
If you wish to have this done each time the PC boots, create a batch file called cadd.bat and put the abovesubst line in it. Store the file in:
\Users\All Users\Microsoft\Windows\Start Menu\Programs\Startup\cadd.bat
Depending on your version of Windows, the path may be:
C:\Users\{login name}\AppData\Roaming\Microsoft\Windows\ Start Menu\Programs\Startup\cadd.bat
The batch file method is not recommended by CaDD. For example, it has to be disabled and the PCrebooted to unlock the \cadd directory (folder) and allow an uninstall to take place.
Note: Windows 10 prefers .cmd for batch files, but still accepts .bat.
7
TEXAS INSTRUMENTSHOME COMPUTER
3.2.5. Install fonts for The Cyc ❺
Many of the files in The Cyc are in Adobe Acrobat .pdf format. If your PC does not have a font used byCaDD, a program such as Adobe Reader will substitute what it thinks is a near match. In many cases thesubstitute choice is poor. If you want to have The Cyc files rendered as designed, you should install thefonts used by CaDD to create these .pdf files.
See \cadd\cyc\fonts\fonts.pdf, "How to install fonts".
Note that this file also includes a "test page" that shows whether your pdf reader is using the installedfonts correctly. Depending on the pdf reader, even though the fonts are installed correctly, the wrong fontsmay be used when displaying the file. One known offender is the Sumatra pdf viewer. Another is MicrosoftEdge, which has the annoying habit of hijacking your reader.
3.2.6. Download DOSBox 0.74 for Windows ❻
You only need to do this if you intend to run PC99 DOS. This can be done at a later time if you wish. Therest of the CaDD PC99 Suite does not require DOSBox.
Use your browser and search the web for DOSBox. It is safest if you find:
DOSBox — Official site
Click Downloads at the top of the page to display a new page.
Download Windows 0.74, 32-bit installer.
Go to your downloads directory and install DOSBox.
It is best to configure DOSBox. See \cadd\doc\pc99.pdf, Configuring DOSBox.
Warning: Beware of web sites offering DOSBox and wanting to install a "download manager".
Installation is now complete.
8
CaDD PC99 Suite — Overview and installation
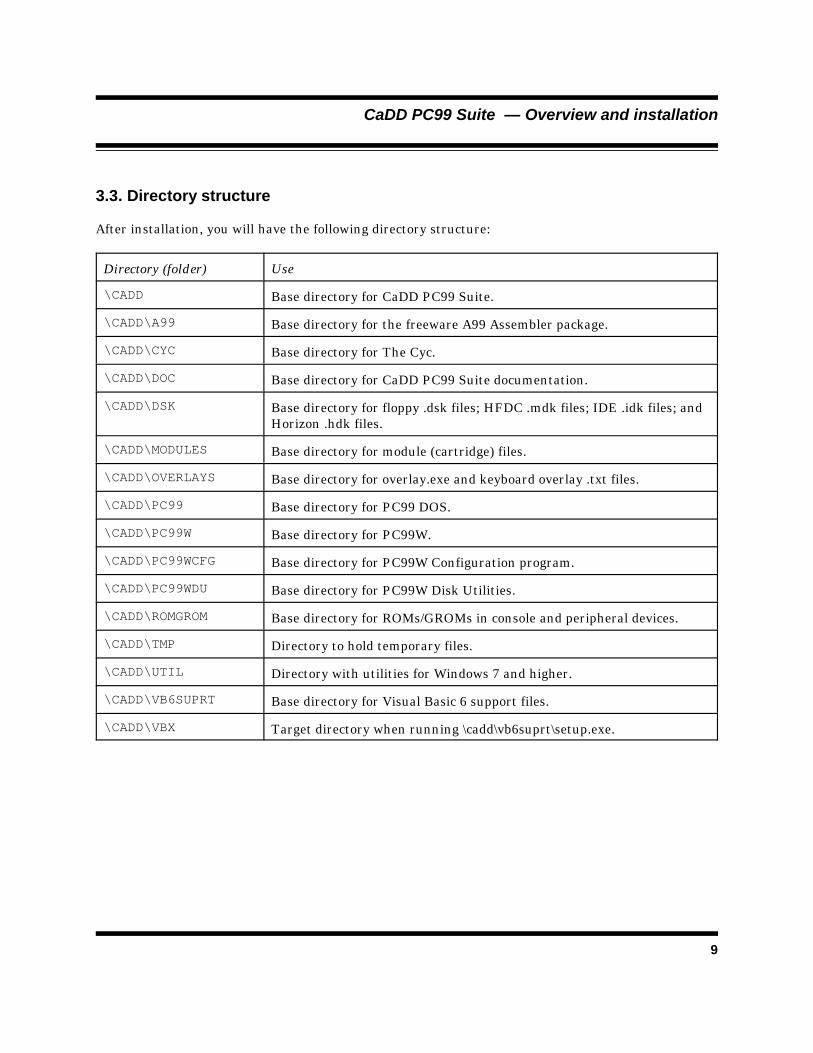
3.3. Directory structure
After installation, you will have the following directory structure:
Directory (folder) Use
\CADD Base directory for CaDD PC99 Suite.
\CADD\A99 Base directory for the freeware A99 Assembler package.
\CADD\CYC Base directory for The Cyc.
\CADD\DOC Base directory for CaDD PC99 Suite documentation.
\CADD\DSK Base directory for floppy .dsk files; HFDC .mdk files; IDE .idk files; andHorizon .hdk files.
\CADD\MODULES Base directory for module (cartridge) files.
\CADD\OVERLAYS Base directory for overlay.exe and keyboard overlay .txt files.
\CADD\PC99 Base directory for PC99 DOS.
\CADD\PC99W Base directory for PC99W.
\CADD\PC99WCFG Base directory for PC99W Configuration program.
\CADD\PC99WDU Base directory for PC99W Disk Utilities.
\CADD\ROMGROM Base directory for ROMs/GROMs in console and peripheral devices.
\CADD\TMP Directory to hold temporary files.
\CADD\UTIL Directory with utilities for Windows 7 and higher.
\CADD\VB6SUPRT Base directory for Visual Basic 6 support files.
\CADD\VBX Target directory when running \cadd\vb6suprt\setup.exe.
9
TEXAS INSTRUMENTSHOME COMPUTER
3.3.1. \cadd
The CaDD base directory, {drive-letter}:\cadd contains the following:
cadd.exe CaDD Launcher: Displays a small window on the desktop with three icons: pc99w,pc99wcfg, and pc99wdu. Click an icon to launch the corresponding program.
cadd.ini A file used by all CaDD executables to store preferences.
forth.ini In pc99wdu.exe you can analyze a Forth file. forth.ini contains TI Forth Words that willbe highlighted in the file being analyzed.
pc99.mod A file used by both pc99w and pc99 dos that contains module names and links tocorresponding files.
plato.ini A file containing links to Plato PHDnnnn.dsk files that allows selection in pc99wcfg byCurriculum, Subject, Package, Disk.
3.3.1.1. cadd.ini
It is essential that all parts of CaDD PC99 Suite relate to each other. The mechanism used is a single .inifile called cadd.ini. All CaDD executables requiring access to cadd.ini, must have a "local" .ini file matchingthe "local" executable name. This "local" .ini points to the main cadd.ini.
Ex: The executable for pc99wcfg is:
\cadd\pc99wcfg\pc99wcfg.exe
The corresponding "local" .ini file is:
\cadd\pc99wcfg\pc99wcfg.ini
Each of these "local" .ini files will have a single entry:
[cadd ini file]\cadd\cadd.ini
All necessary .ini files are installed. No action is required. The above is for information only.
10
CaDD PC99 Suite — Overview and installation
3.3.2. \cadd\doc
Contains the following files:
a99doc.pdf Describes how to use Al Beard's A99 Cross-Assembler.
pc99.pdf Describes how to use PC99 DOS in DOSBox.
pc99w.pdf Describes how to use the PC99W native Windows emulator.
pc99wcfg.pdf Describes how to use PC99W Configuration program.
pc99wdu.pdf Describes how to use PC99W Disk Utilities.
psystem.pdf Describes the use of the UCSD p-System in PC99 DOS.
suite.pdf This document.
11
TEXAS INSTRUMENTSHOME COMPUTER
4. Using CaDD PC99 Suite
These are brief instructions. See the appropriate program documentation for full details.
4.1. PC99 DOS
See \cadd\doc\pc99.pdf.
pc99.pdf describes all the features of PC99 DOS and cfg.exe, and how to run these programs in DOSBoxon Windows 7 and higher.
Example: Start DOSBox. Use the recommended settings documented in pc99.pdf. This will set up thevideo size and C: as the base drive, and change to c:\cadd\pc99 when DOSBox starts.
To configure PC99 DOS run: cfg.exe
To run PC99 DOS: pc99a.exe | pc99.exe (which has the mini-screen debugger).
To exit PC99 DOS and return to the DOSBox command prompt:
Esc. At the debugger prompt (?) press Shift Q.
To exit DOSBox, type:
> exit Enter
4.2. PC99 DOS Utilities
See \cadd\doc\pc99.pdf.
1. Start DOSBox.
2. cd \cadd\pc99\dskutildskdir \cadd\dsk\pc99.dsk
to display a catalog of pc99.dsk.
For all other utilities see the PC99 DOS documentation.
12
CaDD PC99 Suite — Overview and installation
4.3. PC99W
See \cadd\doc\pc99w.pdf.
This program is written in Pelles C, and is delivered as a 32-bit native Windows executable.
Open a command prompt.
> c:> cd \cadd\pc99w> .\pc99w.exe
The TI-99/4A emulator will start.
To exit, click File | Exit, or use the X button at the top right of the window.
To protect you from an accidental exit, pc99w will display a yes/no message box.
Click "yes" to exit.
13
TEXAS INSTRUMENTSHOME COMPUTER
4.4. PC99WCFG
See \cadd\doc\pc99wcfg.pdf.
pc99wcfg is written in VB6 and runs in Windows 7 and higher. This program requires a file calledaresize.ocx, which allows all forms to be "stretched". This .ocx file is installed during the running of\cadd\vb6suprt\setup.exe (❷). The code is written by VB Gold Software and is used under license.
Open a command prompt.
> c:> cd \cadd\pc99wcfg> .\pc99wcfg.exe
will start the PC99W Configuration program (pc99wcfg).
Example: Change a module. From the main menu:
Click Module | Select Single
Scroll the list box for a module name, then click. The module files will be found and displayed.
Optional: If the module has an associated manual, the Manual button will highlight. Click it to see themodule manual. Module manuals are in The Cyc and are in .pdf format. You must have a .pdf readerinstalled to see such files. One example is Adobe Acrobat Reader, which is available free from Adobe, onwww.adobe.com.
Click "Change cadd.ini". Return to the main form.
Click "Exit and launch pc99w" and the pc99w emulator will start with the new module.
Optional: You can click Exit without launching pc99w.
4.4.1. pc99wcfg fails to start
In most cases an error message will tell you that pc99wcfg failed to locate a required file specified incadd.ini or is missing a [section] or key in cadd.ini. You must fix this before the program will run.
You can also examine c:\cadd\pc99wcfg\pc99wcfg.log with an ASCII editor, e.g. Notepad. Look at thebottom of the file for the most recent event.
In rare cases you may see the "1-2-3" form. To use that, read the pc99wcfg documentation.
14
CaDD PC99 Suite — Overview and installation
4.5. PC99WDU
See \cadd\doc\pc99wdu.pdf.
pc99wdu is written in VB6 and runs in Windows 7 and higher. This program requires a file calledaresize.ocx, which allows all forms to be "stretched". This .ocx file is installed during the running of\cadd\vb6suprt\setup.exe (❷). The code is written by VB Gold Software and is used under license.
Open a command prompt.
> c:> cd \cadd\pc99wdu> .\pc99wdu.exe
will start the PC99W Disk Utilities program (pc99wdu).
Example: Catalog DSK1.
Double-click DSK1 in the selection list to see the catalog of DSK1.
To exit: Click File | Exit.
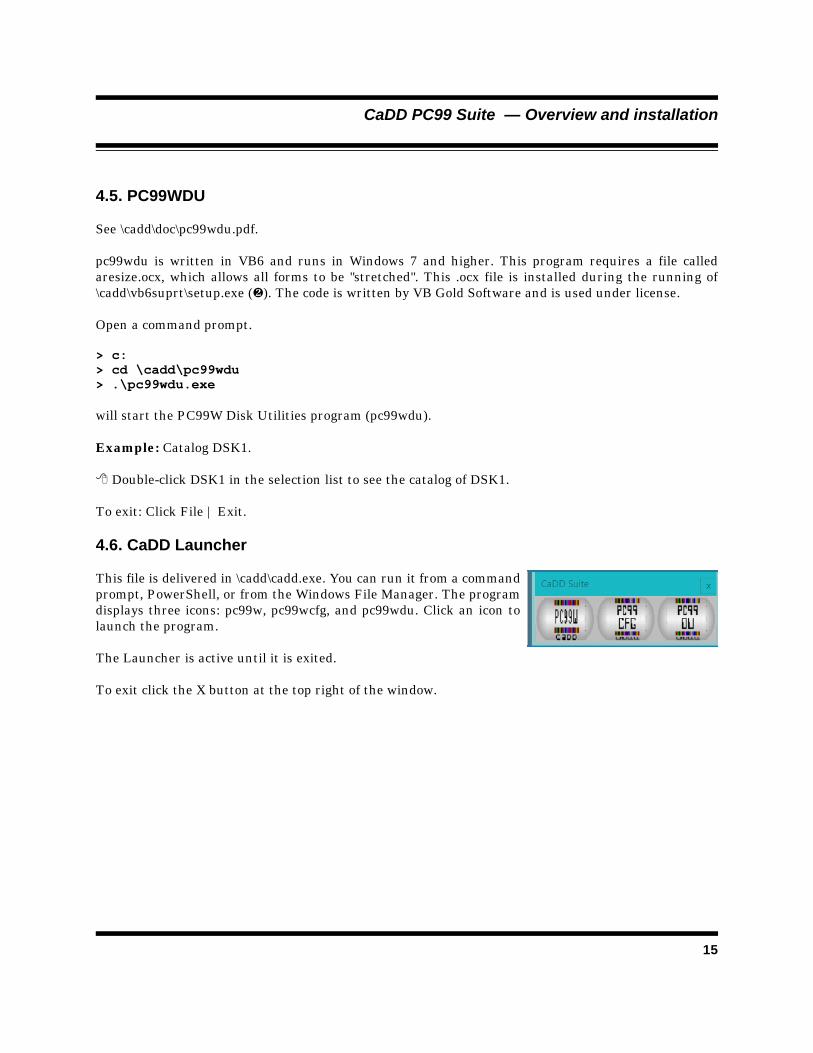
4.6. CaDD Launcher
This file is delivered in \cadd\cadd.exe. You can run it from a commandprompt, PowerShell, or from the Windows File Manager. The programdisplays three icons: pc99w, pc99wcfg, and pc99wdu. Click an icon tolaunch the program.
The Launcher is active until it is exited.
To exit click the X button at the top right of the window.
15
TEXAS INSTRUMENTSHOME COMPUTER
4.7. The Cyc
The Cyc is an encyclopedia of things TI, including all known modules, hundreds of manuals, user grouppublications, and books.
See \cadd\cyc\readme.txt and \cadd\cyc\intro.txt.
From the Windows desktop, find and select the drive on which you installed CaDD PC99 Suite.
Navigate to: \cadd\cyc\vendors\ti\phm\phm3026.
Double-click phm3026.pdf to see the Extended Basic manual.
4.8. a99 Cross-Assembler
See \cadd\doc\a99.pdf.
This freeware program by Al Beard is provided for Assembly Language programmers who want to developprograms outside the TI-99/4A environment.
Use your own editor to create 9900 source code. Assemble it with a99. Then use:
File | Load Image
from the pc99w menu to load the file.
Start the debugger and set the PC to your program's start address.
Then click the run icon to execute the program.
16
CaDD PC99 Suite — Overview and installation
5. How to uninstall CaDD PC99 Suite
1. Erase all files.2. Delete the Y: drive.
5.1. Erase all files
If you installed cadd.bat to set the subst command, then delete it from:
\Users\All Users\Microsoft\Windows\Start Menu\Programs\Startup\cadd.bat
or wherever it was installed. You then need to reboot your PC to unlock the \cadd folder.
Open a command prompt or PowerShell.
> c:> rmdir /s .\cadd
and answer yes.
5.2. Remove the Y: drive
Open a command prompt or PowerShell.
> c:> subst y:
The Y: drive is no longer available.
17
TEXAS INSTRUMENTSHOME COMPUTER
6. Windows 10 and .hlp files
[This information was found on the web. — Cyc Ed.]
Help files in .hlp format do not work in Windows 10. Microsoft now uses .chm help files (compiled HTMLformat). Both pc99wdu and pc99wcfg use .hlp files.
The following is a procedure to be able to read a .hlp file on Windows 10 (x86).
1. First, get the winhlp32.exe existing in the Windows directory of Windows XP (x86).
2. Make a temporary folder (for example D:\TEMP) on the HDD of Windows 10 (x86).
3. Copy the winhlp32.exe (obtained Step 1) into the temporary folder D:\TEMP.
4. Make a file, named h.cmd, by using a text editor. Add these contents:
@echo offset crtpth=%CD%takeown /f "%windir%\winhlp32.exe" >nulicacls "%windir%\winhlp32.exe" /grant *S-1-5-32-544:F >nulcopy /y "%crtpth%\winhlp32.exe" %windir%icacls "%windir%\winhlp32.exe" /setowner "NT Service\TrustedInstaller" >nulecho.echo Done.echo.echo Press any key to Exitpause >nulexit
5. Therefore, you can find two files (winhlp32.exe and h.cmd) in the D:\TEMP.
6. Open a Command Prompt by selecting "Run as administrator.”
7. Then, move the prompt to the D:\TEMP directory, by using Change Directory (CD)command.
8. Under this condition, execute the h.cmd command in the D:\TEMP directory.
9. After the completion of this execution, you can read a.hlp file on Windows 10 (x86).
Remarks: In the case of Windows 10 (x64), please use the winhlp32.exe existing in the Windows directoryof Windows XP (x64).
18
CaDD PC99 Suite — Overview and installation
7. Supported operating systems
A "hardware port" is a memory address on a PC. Using DOS, any application could access any port. Thiswas allowed through DOS 6.22, Windows 95, and Windows 98.
With Windows ME, Microsoft incorporated some of Windows NT features which prevented applicationsfrom direct access to the hardware ports. Instead, if you were a Windows application, you had to request Windows to do so for you. If you were a DOS application, such as PC99 DOS, you were shut out.
PC99 DOS directly accesses the sound ports (defined by AdLib as 0x388, 0x389), the joystick port, andCOM port(s). As a result from Windows ME you could only have one-channel sound using the PC speaker,and could not use a joystick, or COM port(s).
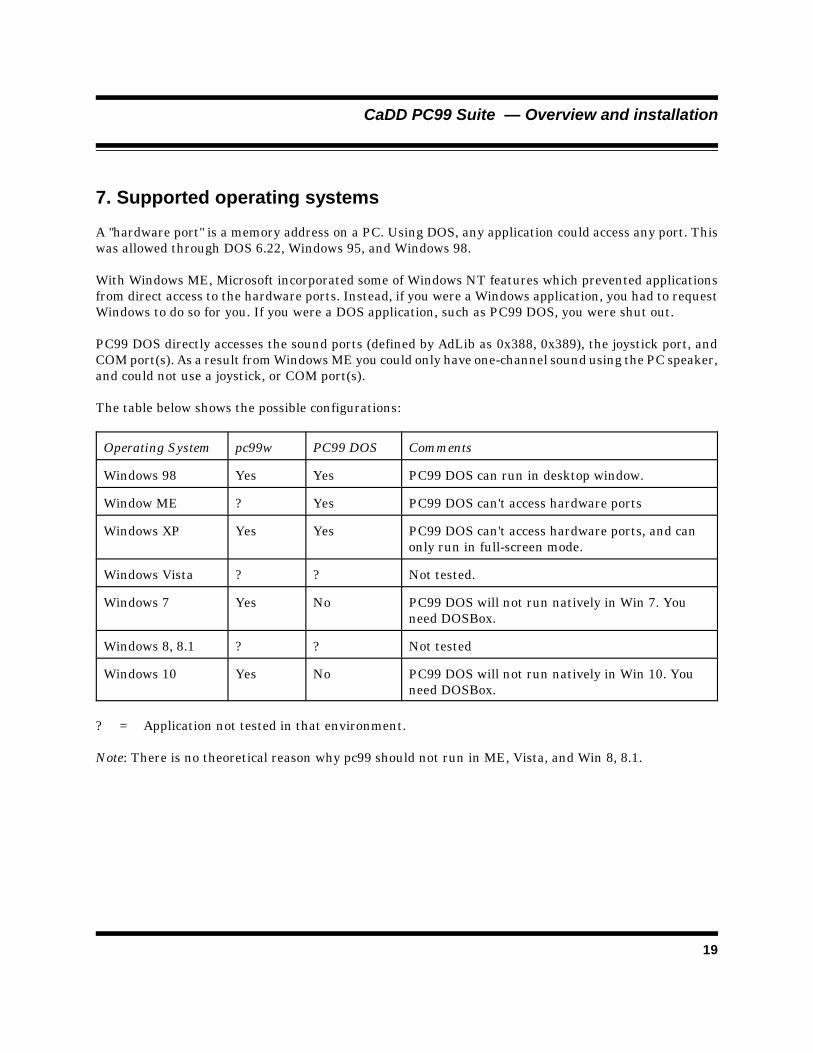
The table below shows the possible configurations:
Operating System pc99w PC99 DOS Comments
Windows 98 Yes Yes PC99 DOS can run in desktop window.
Window ME ? Yes PC99 DOS can't access hardware ports
Windows XP Yes Yes PC99 DOS can't access hardware ports, and canonly run in full-screen mode.
Windows Vista ? ? Not tested.
Windows 7 Yes No PC99 DOS will not run natively in Win 7. Youneed DOSBox.
Windows 8, 8.1 ? ? Not tested
Windows 10 Yes No PC99 DOS will not run natively in Win 10. Youneed DOSBox.
? = Application not tested in that environment.
Note: There is no theoretical reason why pc99 should not run in ME, Vista, and Win 8, 8.1.
19