
ADI Voice Platform User Manual V2 - wiki.analog.com · Microphone Array board confirm the good...
35
This document and the information contained herein is CONFIDENTIAL INFORMATION of eSoftThings, and shall not be published, disclosed, or disseminated to any third party, in whole or in part, without eSoftThings prior consent. Reverse engineering of any or all of the information in this document is prohibited. The copyright notice does not imply publication of this document. ADI Voice Platform User Manual V2.0
Transcript of ADI Voice Platform User Manual V2 - wiki.analog.com · Microphone Array board confirm the good...
This document and the information contained herein is CONFIDENTIAL
INFORMATION of eSoftThings, and shall not be published, disclosed, or
disseminated to any third party, in whole or in part, without eSoftThings
prior consent. Reverse engineering of any or all of the information in this
document is prohibited. The copyright notice does not imply publication of
this document.
ADI Voice Platform User Manual
V2.0
ADI Voice Platform User Manual V2.0 | Company Confidential
1 / 34
Change History
Version Date (dd/mm/yyyy) Author Description
2.0 10/12/2018 C.BARDOU Release version
ADI Voice Platform User Manual V2.0 | Company Confidential
2 / 34
1 Introduction
1.1 About eSoftThings
eSoftThings is an engineering and a professional services company focusing on next
generation connected wireless devices. At eSoftThings, we strongly believe successful next
generation connected wireless objects will require ultra-low power operation, natural voice
recognition and control solutions, privacy and security, and robust interoperability and
compatibility.
We know how important your customers are to you, and our eSoftThingsLab enables unique
and high value services to help you release your products to market on time and on budget.
The lab is fully equipped for low power systems, RF systems (WLAN, Bluetooth, GPS,
2G/3G/LTE, etc.) and audio systems.
1.2 Purpose of This Manual
This document describes how to setup and evaluate the Analog Devices far-field voice
interface demonstration system. The voice interface application executes on the ADADN8080
voice processor and integrates Voice Trigger wake function, 4-channel microphone processing
and beamforming, direction-of-arrival estimation, noise suppression, and acoustic echo
cancellation. A Dragonboard 410c board and linear or circular microphone array board are
used to demonstrate a complete system and to provide connectivity to the Amazon Alexa Voice
Service (AVS) for functional evaluation. For timing, electrical, and package specifications of
the ADADN8080 processor, refer to the ADADN8080 Processor Data Sheet.
1.3 Intended Audience
The primary audience for this manual is a systems engineers developing and evaluating voice-
controlled devices. The manual assumes the audience has a working knowledge of
Dragonboard 410c, embedded Linux operating system and the Amazon Alexa Voice Service.
1.4 References
Amazon AVS: https://developer.amazon.com/avs
ADI Voice Platform User Manual V2.0 | Company Confidential
3 / 34
1.5 Table of content
Change History...................................................................................................................... 1
1 Introduction .................................................................................................................... 2
1.1 About eSoftThings ................................................................................................... 2
1.2 Purpose of This Manual .......................................................................................... 2
1.3 Intended Audience .................................................................................................. 2
1.4 References .............................................................................................................. 2
1.5 Table of content ...................................................................................................... 3
1.6 List of figures ........................................................................................................... 6
2 EVALUATION PLATFORM ............................................................................................ 7
2.1 Features .................................................................................................................. 7
2.2 Evaluation kit contents ............................................................................................ 7
2.3 Additional equipment needed .................................................................................. 7
2.4 Hardware Versions .................................................................................................. 7
2.5 Software Versions ................................................................................................... 7
2.6 Hardware ................................................................................................................ 8
2.6.1 ADADN8080 Mezzanine Audio Evaluation board: ............................................ 8
2.6.2 Microphone array board: .................................................................................. 8
2.6.3 Dragonboard 410c ........................................................................................... 9
2.7 Circular microphone array board LED Indicators ..................................................... 9
2.7.1 Circular Array Top view ...................................................................................10
2.7.2 Circular Array Bottom view ..............................................................................10
2.8 Linear microphone array board LED Indicators ......................................................12
2.8.1 Linear Array Top view .....................................................................................12
2.8.2 Linear Array Bottom view ................................................................................12
2.9 Microphone array board Trigger Button ..................................................................13
2.10 USB-C ....................................................................................................................13
2.11 Microphone Placement ...........................................................................................13
3 Cable and board connection ..........................................................................................14
3.1 Analog speaker ......................................................................................................14
3.1.1 Class D amplifier .............................................................................................14
3.1.2 Speaker connection.........................................................................................14
3.2 Low Speed Connector signals description ..............................................................15
3.2.1 Low Speed Connector signals on DragonBoard-410c .....................................15
3.2.2 Low Speed Connector signals on VoicePlateform Board .................................15
3.2.3 Power supply input ..........................................................................................16
ADI Voice Platform User Manual V2.0 | Company Confidential
4 / 34
3.3 HDMI and USB connectors ....................................................................................16
4 Functionalities ...............................................................................................................17
4.1 Record data............................................................................................................17
4.2 Playback data .........................................................................................................17
5 Setup .............................................................................................................................18
5.1 Start the system .....................................................................................................18
5.2 Verify Setup............................................................................................................19
5.3 Setup volume .........................................................................................................19
5.4 Guide to evaluating the Voice UI performance .......................................................19
5.4.1 Test Scenario 1: Voice Trigger ........................................................................20
5.4.2 Test Scenario 2: Voice Trigger with Interferer..................................................20
5.4.3 Test scenario 3: Amazon AVS example system ..............................................20
6 Installing Debian and Alexa SampleApp ........................................................................22
6.1 Install Debian .........................................................................................................22
6.1.1 Download debian ............................................................................................22
6.1.2 Install Debian ..................................................................................................22
6.1.3 Update linux kernel .........................................................................................22
6.2 Install Alexa SampleApp (easy install) ....................................................................23
6.2.1 Install dependencies........................................................................................23
6.2.2 Update configuration file ..................................................................................23
6.3 Build Alexa SampleApp SDK ..................................................................................24
6.3.1 Install dependencies........................................................................................24
6.3.2 Get and patch SDK .........................................................................................24
6.3.3 Create memory swap on sdcard ......................................................................25
6.3.4 Build SDK ........................................................................................................26
6.3.5 Generate configuration file ..............................................................................26
6.4 Running SampleApp for the first time .....................................................................27
6.5 Starting SampleApp automatically at boot ..............................................................27
6.6 Useful linux commands ..........................................................................................28
6.6.1 Connect via SSH .............................................................................................28
6.6.2 Turn-off Alexa via command line .....................................................................28
6.6.3 Get Alexa SampleApp log ...............................................................................28
7 Upgrade STM32 ............................................................................................................29
7.1 Start the board in DFU mode ..................................................................................29
7.2 Upgrade Firmware STM32 .....................................................................................30
8 Appendices ...................................................................................................................32
8.1 Architecture block diagram .....................................................................................32
ADI Voice Platform User Manual V2.0 | Company Confidential
5 / 34
8.2 Bill of materials .......................................................................................................32
ADI Voice Platform User Manual V2.0 | Company Confidential
6 / 34
1.6 List of figures
Figure 1: ADADN8080 Mezzanine audio board ..................................................................... 8 Figure 2: Circular microphone arrays board ........................................................................... 8 Figure 3: Linear microphone arrays board ............................................................................. 9 Figure 4: Dragonboard 410c board ........................................................................................ 9 Figure 5: Circular Mic Array Top View ..................................................................................10 Figure 6: Circular Mic Array Bottom View .............................................................................10 Figure 7 : Trigger word detection and indication of signal arrival ..........................................11 Figure 8: Linear Mic Array Top View .....................................................................................12 Figure 9: Linear Mic Array Bottom View ...............................................................................12 Figure 10: Speaker interfaces ...............................................................................................14 Figure 11: Zone to press to insert cable in the Speaker connector .......................................14 Figure 12: Low Speed Connector Signals on DragonBoard-410c .........................................15 Figure 13: Low Speed Connector Signals on VoicePlateform Board ....................................15 Figure 14: Assembly Mezzanine and DragonBoards ............................................................16 Figure 15 : Record data ........................................................................................................17 Figure 16: Playback data ......................................................................................................17 Figure 17: Voice Platform Demo kit assembly ......................................................................18 Figure 18: Mezzanine board DFU pins .................................................................................29 Figure 19: The STM32 should be recognized by windows ....................................................29 Figure 20: Detect the STM32 ................................................................................................30 Figure 21: Upgrade STM32 firmware ....................................................................................30 Figure 22: Flashing running: erasing phase ..........................................................................31 Figure 23: Flashing successful .............................................................................................31 Figure 24: Architecture Block Diagram .................................................................................32

ADI Voice Platform User Manual V2.0 | Company Confidential
7 / 34
2 EVALUATION PLATFORM
2.1 Features
- 4 MEMS microphone inputs
- Stereo audio playback with Stereo Acoustic Echo Cancellation
- Far-field voice capture over multiple digital PDM microphones
- Low-power always on Voice detection with DSP core wake-up
- Low-Latency audio path for high-performance applications
- Integrated support for beamforming
- LED Voice Trigger indicator to identify direction of origin for voice stream and Voice
Trigger capture
- Example “Alexa” AVS client application
2.2 Evaluation kit contents
- Dragonboard 410c
- ADADN8080 Mezzanine audio board
- Circular Mic Array board
- Linear Mic Array board
- USB cable Type-C to Type-C to link microphone array board to Dragon board.
- USB cable 10cm to link Mezzanine board to Dragon board
2.3 Additional equipment needed
- AC/DC Adapter 12V 2A min
- Two Loudspeakers
2.4 Hardware Versions
- VoicePlateform Mezzanine board
o Hardware version => V02
o BOM version => 1.06
- Circular and Linear Mic Array board
o Hardware version => V01
o BOM version => 1.01
2.5 Software Versions
- Kernel version => 4.14.15
- Linaro Debian dragonboard-410c-359
- Alexa SDK => 1.10
Two versions of the software can be installed: sensory and no sensory.
The only difference between the 2 versions is the ADADN firmware:
- The sensory version implements sensory voice recognition algorithm in the ADADN.
- The no_sensory version implements the reTuneDSP voice recognition algorithm in the
ADADN.
ADI Voice Platform User Manual V2.0 | Company Confidential
8 / 34
2.6 Hardware
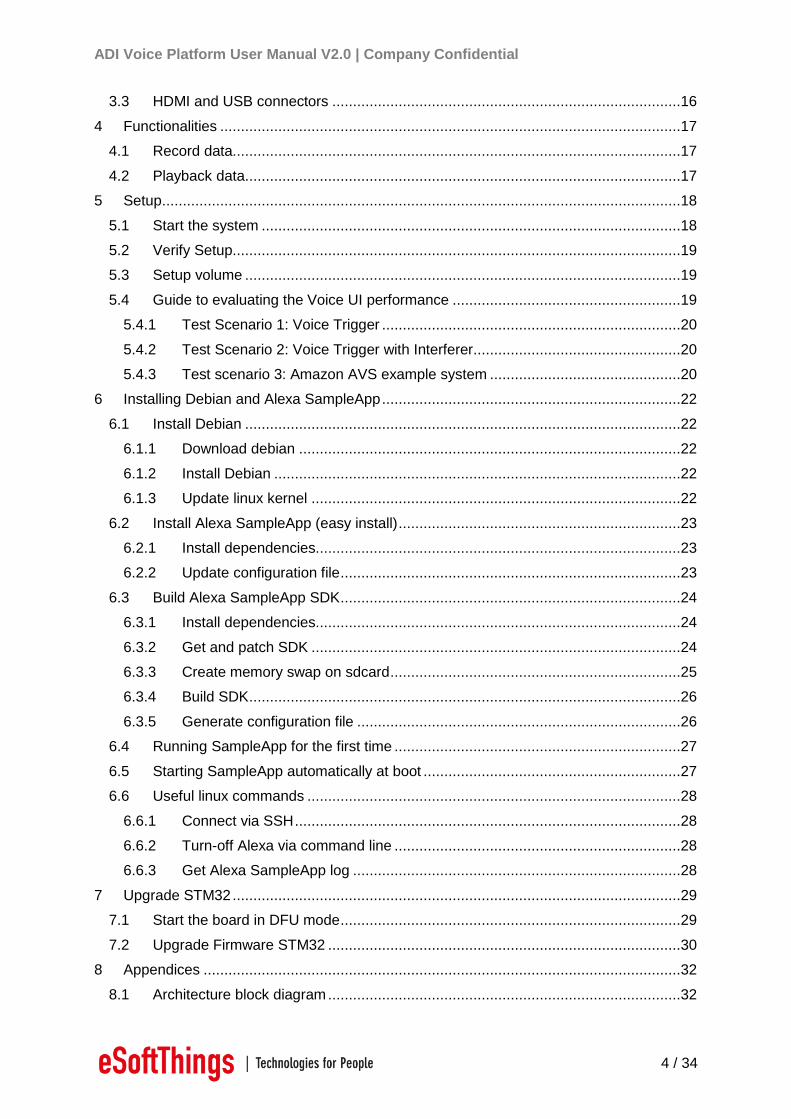
2.6.1 ADADN8080 Mezzanine Audio Evaluation board:
The board includes the ADADN8080 DSP processor, self-boot Flash memory, power regulator,
USB to I2S adapter and signal connectors. The block Diagram is present is the appendices at
the end of this document.
Figure 1: ADADN8080 Mezzanine audio board
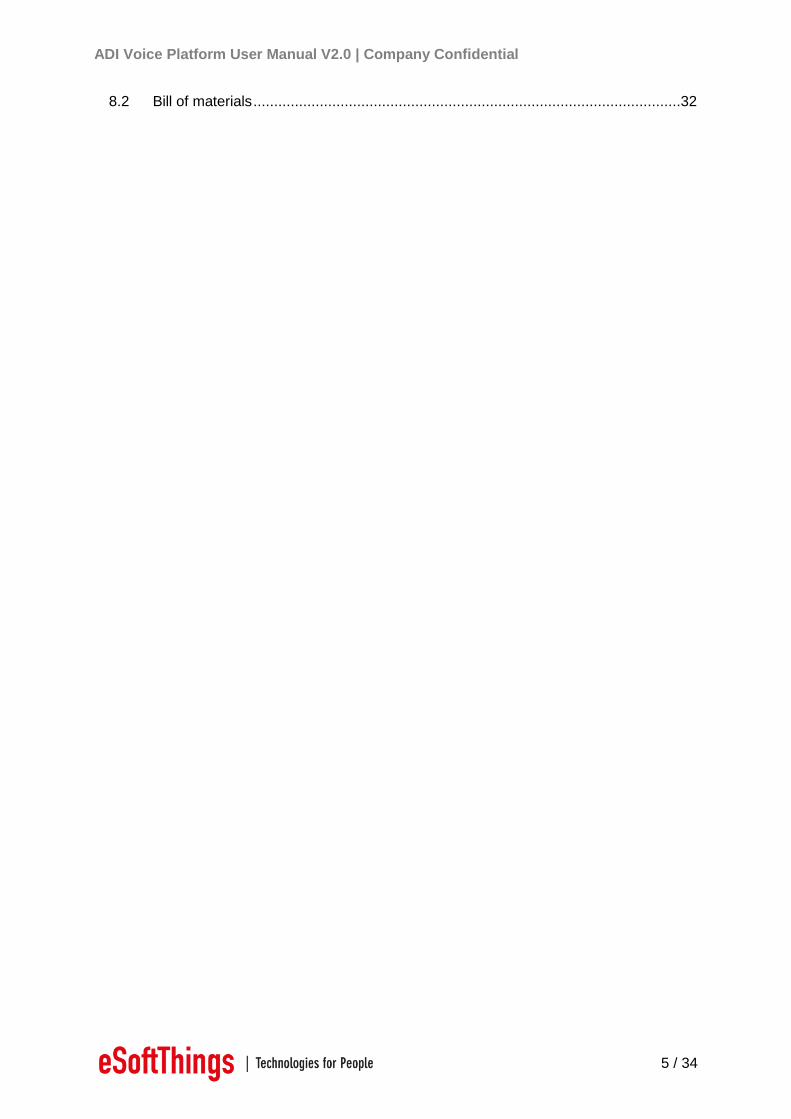
2.6.2 Microphone array board:
These 2 boards have 4 MEMS microphones.
- 3 microphones on a 25mm diameter circle and 1 centered microphone), an indicator
green LED, a pushbutton and 8 blue LEDSs for the Circular Microphone Array board.
Figure 2: Circular microphone arrays board
ADI Voice Platform User Manual V2.0 | Company Confidential
9 / 34
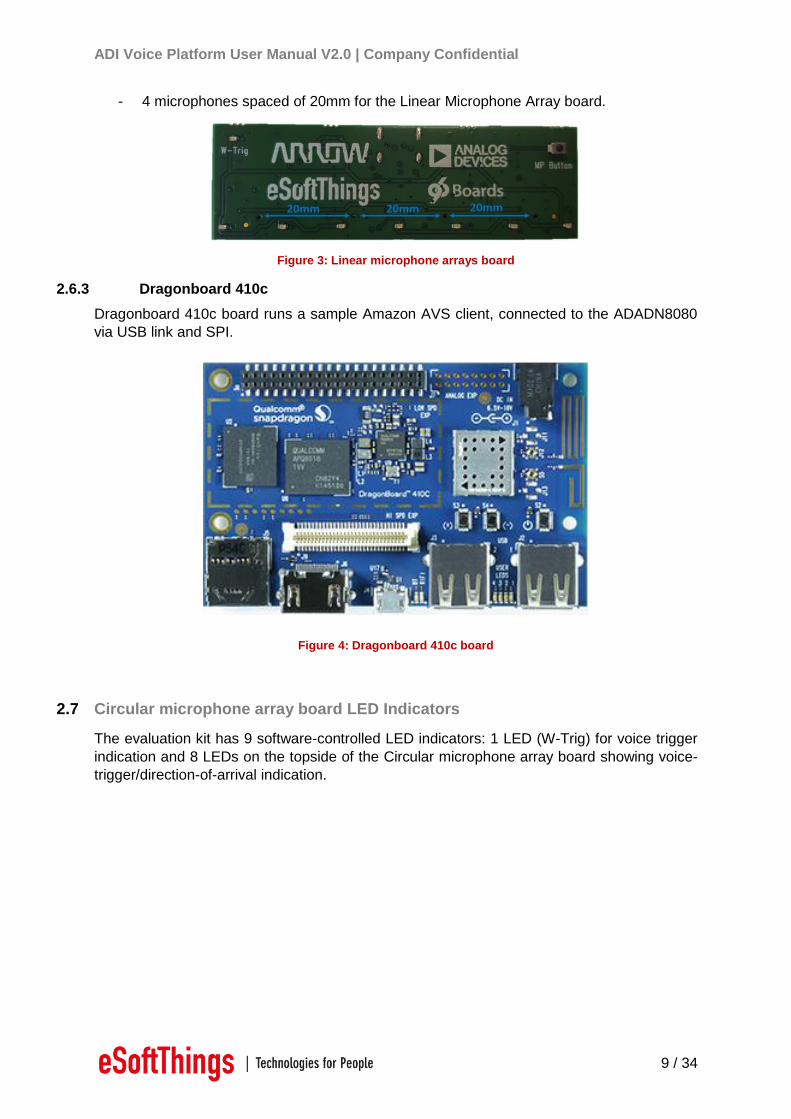
- 4 microphones spaced of 20mm for the Linear Microphone Array board.
Figure 3: Linear microphone arrays board
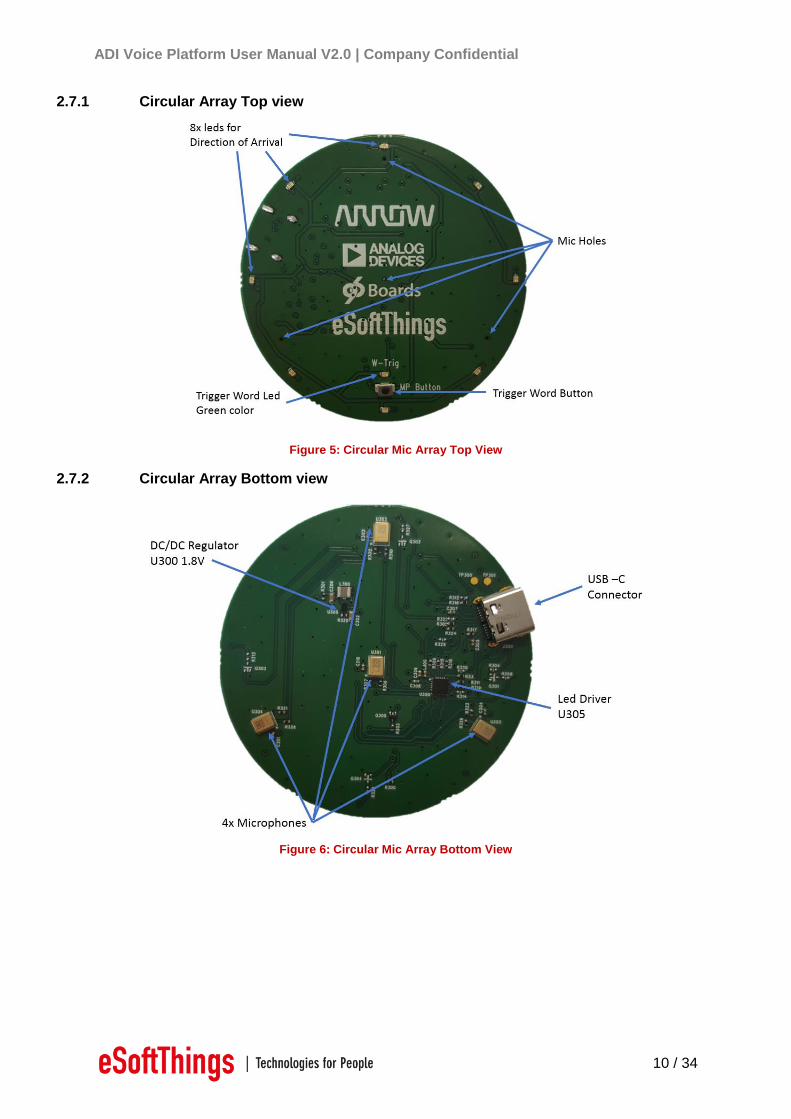
2.6.3 Dragonboard 410c
Dragonboard 410c board runs a sample Amazon AVS client, connected to the ADADN8080
via USB link and SPI.
Figure 4: Dragonboard 410c board
2.7 Circular microphone array board LED Indicators
The evaluation kit has 9 software-controlled LED indicators: 1 LED (W-Trig) for voice trigger
indication and 8 LEDs on the topside of the Circular microphone array board showing voice-
trigger/direction-of-arrival indication.
ADI Voice Platform User Manual V2.0 | Company Confidential
10 / 34
2.7.1 Circular Array Top view
Figure 5: Circular Mic Array Top View
2.7.2 Circular Array Bottom view
Figure 6: Circular Mic Array Bottom View

ADI Voice Platform User Manual V2.0 | Company Confidential
11 / 34
Figure 7 : Trigger word detection and indication of signal arrival
ADI Voice Platform User Manual V2.0 | Company Confidential
12 / 34
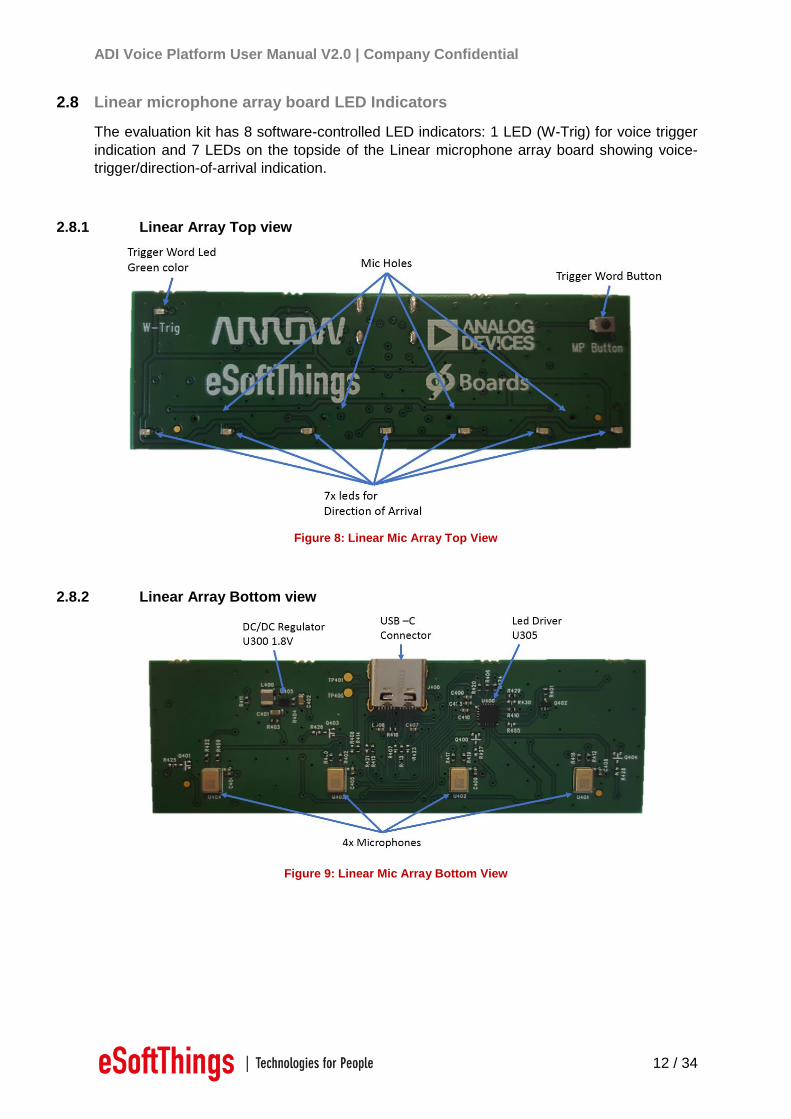
2.8 Linear microphone array board LED Indicators
The evaluation kit has 8 software-controlled LED indicators: 1 LED (W-Trig) for voice trigger
indication and 7 LEDs on the topside of the Linear microphone array board showing voice-
trigger/direction-of-arrival indication.
2.8.1 Linear Array Top view
Figure 8: Linear Mic Array Top View
2.8.2 Linear Array Bottom view
Figure 9: Linear Mic Array Bottom View
ADI Voice Platform User Manual V2.0 | Company Confidential
13 / 34
2.9 Microphone array board Trigger Button
Press the button (MP Button) on the microphone array board to manually trigger a voice
command.
In this case, the trigger led will switch on.
2.10 USB-C
USB-C receptacle is intended to provide connectivity with Microphones Arrays boards only,
meaning replace usual Flex connection. It is therefore not intended to support USB-C
specifications as typical USB-C connection.
When a Linear or a Circular Microphone Array board is plugged and detected, all its electrical
signals (audio, LED Driver commands, Button) are made available over USB Type-C cable.
The detection logic in place on VoicePlateform Board and Microphone Arrays Boards will
initiate a I2C communication to distinguish the Linear Array Board from the Circular Array
Board.
When the Microphone Array board is identified, the ADADN8080 is loaded with the
corresponding FW image and associated parameter settings, then the Mic Array Boards is
lightening the LEDs.
All connection with a Microphone Array board not allowed necessarily a communication. One
possibility of 2 on the USB-C plug authorize a good connection. A led indication on the
Microphone Array board confirm the good connection. By the way, a led animation is also
present after few seconds of connection.
2.11 Microphone Placement
If the microphones are located too close to the speaker, acoustic clipping may occur at high
playback levels which can significantly degrade voice performance.
ADI Voice Platform User Manual V2.0 | Company Confidential
14 / 34
3 Cable and board connection
3.1 Analog speaker
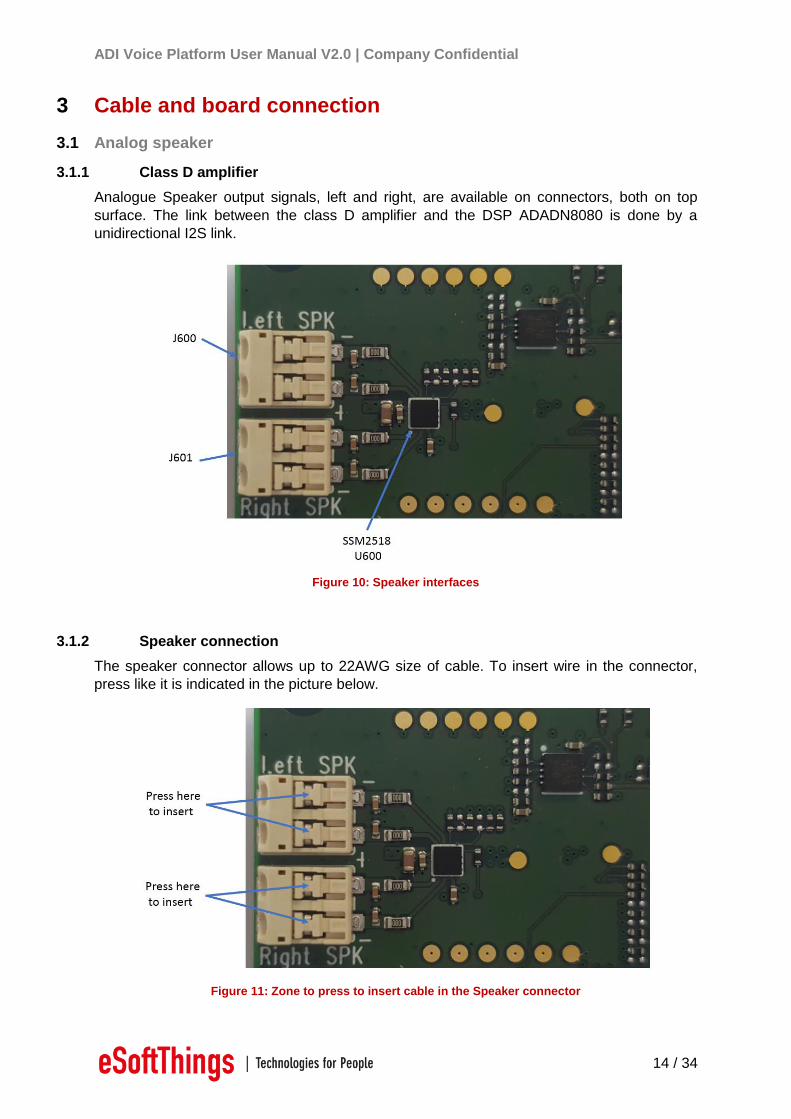
3.1.1 Class D amplifier
Analogue Speaker output signals, left and right, are available on connectors, both on top
surface. The link between the class D amplifier and the DSP ADADN8080 is done by a
unidirectional I2S link.
Figure 10: Speaker interfaces
3.1.2 Speaker connection
The speaker connector allows up to 22AWG size of cable. To insert wire in the connector,
press like it is indicated in the picture below.
Figure 11: Zone to press to insert cable in the Speaker connector
ADI Voice Platform User Manual V2.0 | Company Confidential
15 / 34
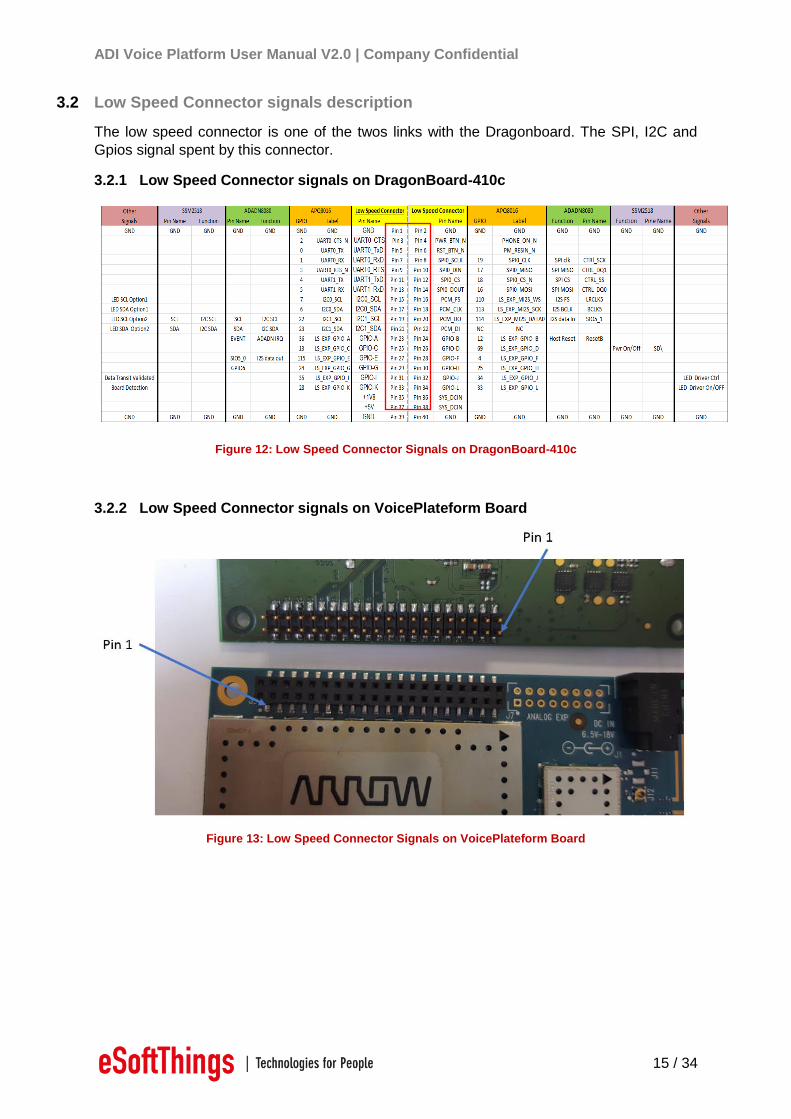
3.2 Low Speed Connector signals description
The low speed connector is one of the twos links with the Dragonboard. The SPI, I2C and
Gpios signal spent by this connector.
3.2.1 Low Speed Connector signals on DragonBoard-410c
Figure 12: Low Speed Connector Signals on DragonBoard-410c
3.2.2 Low Speed Connector signals on VoicePlateform Board
Figure 13: Low Speed Connector Signals on VoicePlateform Board
ADI Voice Platform User Manual V2.0 | Company Confidential
16 / 34
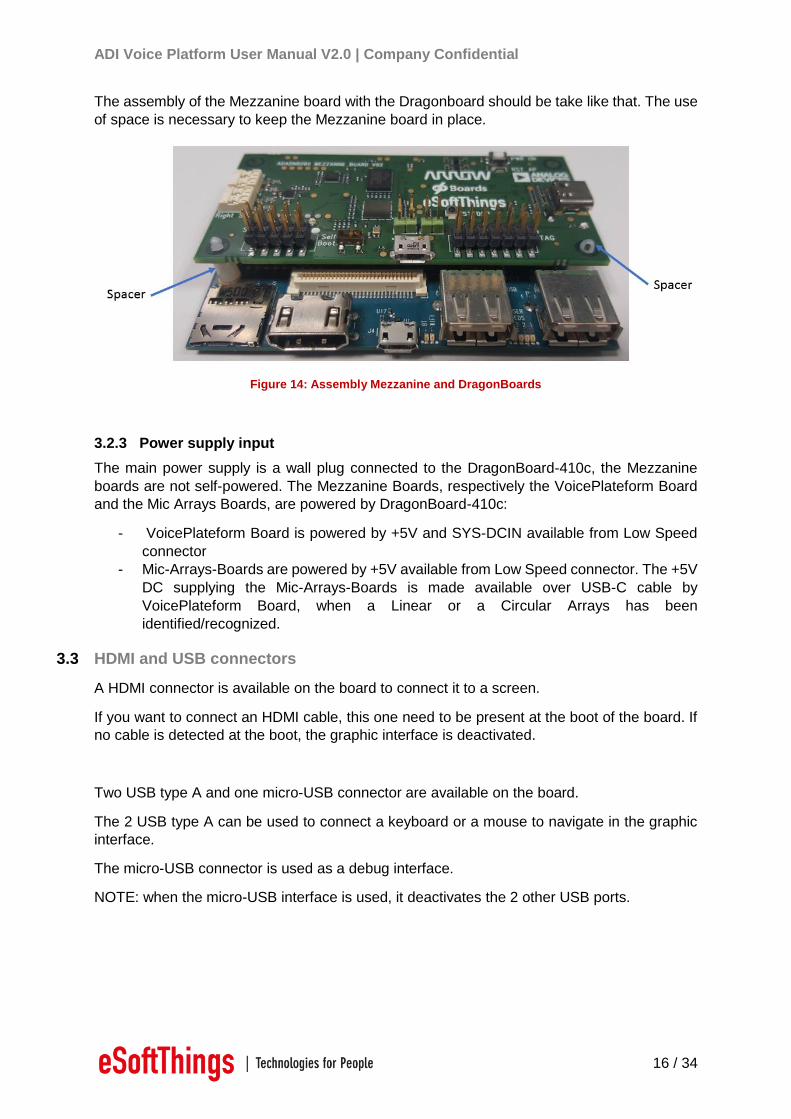
The assembly of the Mezzanine board with the Dragonboard should be take like that. The use
of space is necessary to keep the Mezzanine board in place.
Figure 14: Assembly Mezzanine and DragonBoards
3.2.3 Power supply input
The main power supply is a wall plug connected to the DragonBoard-410c, the Mezzanine
boards are not self-powered. The Mezzanine Boards, respectively the VoicePlateform Board
and the Mic Arrays Boards, are powered by DragonBoard-410c:
- VoicePlateform Board is powered by +5V and SYS-DCIN available from Low Speed
connector
- Mic-Arrays-Boards are powered by +5V available from Low Speed connector. The +5V
DC supplying the Mic-Arrays-Boards is made available over USB-C cable by
VoicePlateform Board, when a Linear or a Circular Arrays has been
identified/recognized.
3.3 HDMI and USB connectors
A HDMI connector is available on the board to connect it to a screen.
If you want to connect an HDMI cable, this one need to be present at the boot of the board. If
no cable is detected at the boot, the graphic interface is deactivated.
Two USB type A and one micro-USB connector are available on the board.
The 2 USB type A can be used to connect a keyboard or a mouse to navigate in the graphic
interface.
The micro-USB connector is used as a debug interface.
NOTE: when the micro-USB interface is used, it deactivates the 2 other USB ports.
ADI Voice Platform User Manual V2.0 | Company Confidential
17 / 34
4 Functionalities
4.1 Record data
The record is established by one the twos Mic Array boards connected to the Voiceplateform
Mezzanine board like the diagram below.
Figure 15 : Record data
4.2 Playback data
The link between Alexa Voice Service and the sound heard on the speaker is routed like that.
Figure 16: Playback data
The Ethernet link is defined by a USB to Ethernet external adapter. The other solution is to use
directly the WIFI natively present on the Dragonboard.
The audio link is maintained in 48KHz 16 bit in stereo.
ADI Voice Platform User Manual V2.0 | Company Confidential
18 / 34
5 Setup
5.1 Start the system
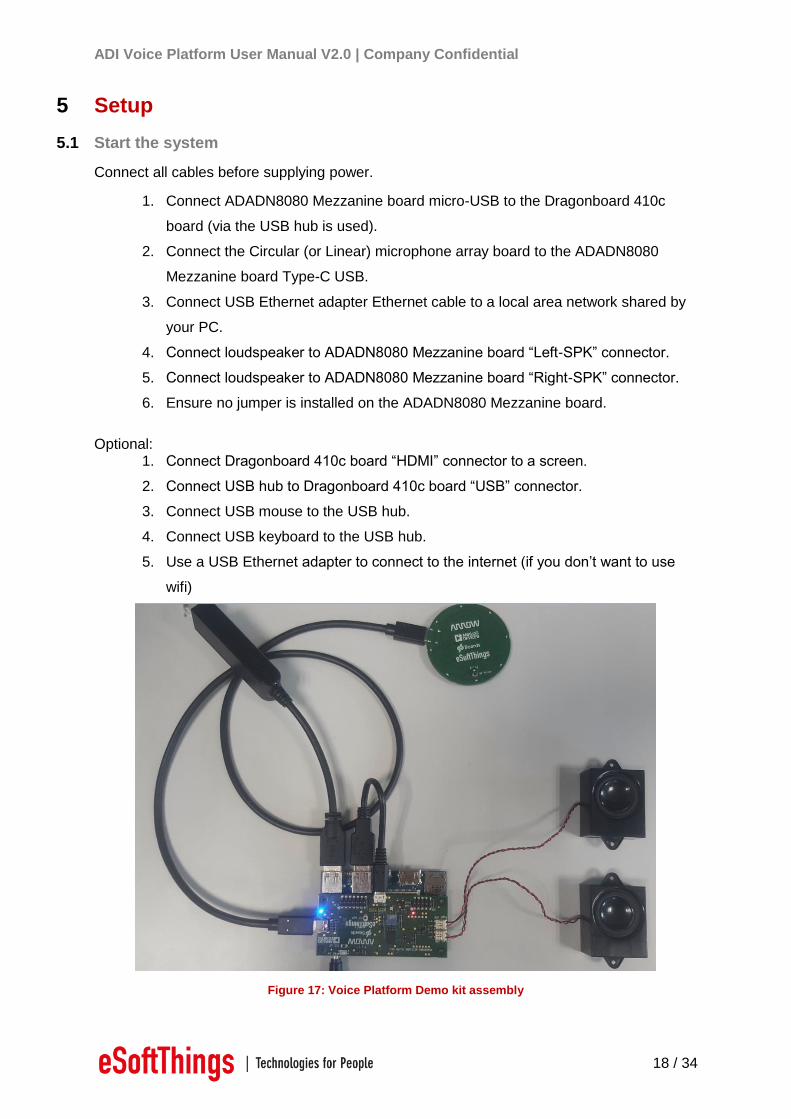
Connect all cables before supplying power.
1. Connect ADADN8080 Mezzanine board micro-USB to the Dragonboard 410c
board (via the USB hub is used).
2. Connect the Circular (or Linear) microphone array board to the ADADN8080
Mezzanine board Type-C USB.
3. Connect USB Ethernet adapter Ethernet cable to a local area network shared by
your PC.
4. Connect loudspeaker to ADADN8080 Mezzanine board “Left-SPK” connector.
5. Connect loudspeaker to ADADN8080 Mezzanine board “Right-SPK” connector.
6. Ensure no jumper is installed on the ADADN8080 Mezzanine board.
Optional: 1. Connect Dragonboard 410c board “HDMI” connector to a screen.
2. Connect USB hub to Dragonboard 410c board “USB” connector.
3. Connect USB mouse to the USB hub.
4. Connect USB keyboard to the USB hub.
5. Use a USB Ethernet adapter to connect to the internet (if you don’t want to use
wifi)
Figure 17: Voice Platform Demo kit assembly
ADI Voice Platform User Manual V2.0 | Company Confidential
19 / 34
5.2 Verify Setup
The Dragonboard 410c board will automatically load and run the demonstration voice interface
application, booting can take approximately 1 minute.
The Mezzanine board has two led on. the blue led close to the Type-C connector and the red
led close to speakers’ connectors.
After boot is complete, the microphone array board should display blue led animation one time.
If blue led animation is not displayed, invert the USB cable Type-C to Type-C inside the
microphone array board Type-C connector or inside the Mezzanine board.
To test the setup (depends of what version of the software you have):
Voice trigger version:
Say “Alexa” or press the trigger button (MP Button).
Manual trigger version:
Press the trigger button (MP Button).
When the trigger is active both the microphone array trigger LED, green LED, and one of the
DOA indictors blue LED on the topside of the ADADN8080 Mezzanine board should illuminate.
NOTE: the board must be connected to the internet. You can connect via wifi (in that
case the wifi need to be configured) or via a USB/Ethernet adapter.
5.3 Setup volume
The audio volume can be changed within the Linux Debian volume settings when Dragonboard
410c board is connected to an HDMI screen and an USB mouse is used to navigate into
settings.
5.4 Guide to evaluating the Voice UI performance
The demo is intended to be used in real-time, to demonstrate the ADADN8080 far-field voice
trigger and voice command functionality. We recommend breaking your evaluation into 3
different test scenarios:
- Test Scenario 1: Voice trigger word test.
- Test Scenario 2: Voice trigger word test with interferer.
- Test Scenario 3: Complete voice interface example using Amazon’s AVS client
NOTE: Test scenarios 3 requires configuring the Dragonboard 410c board client application
which is discussed in more detail in the next section.
ADI Voice Platform User Manual V2.0 | Company Confidential
20 / 34
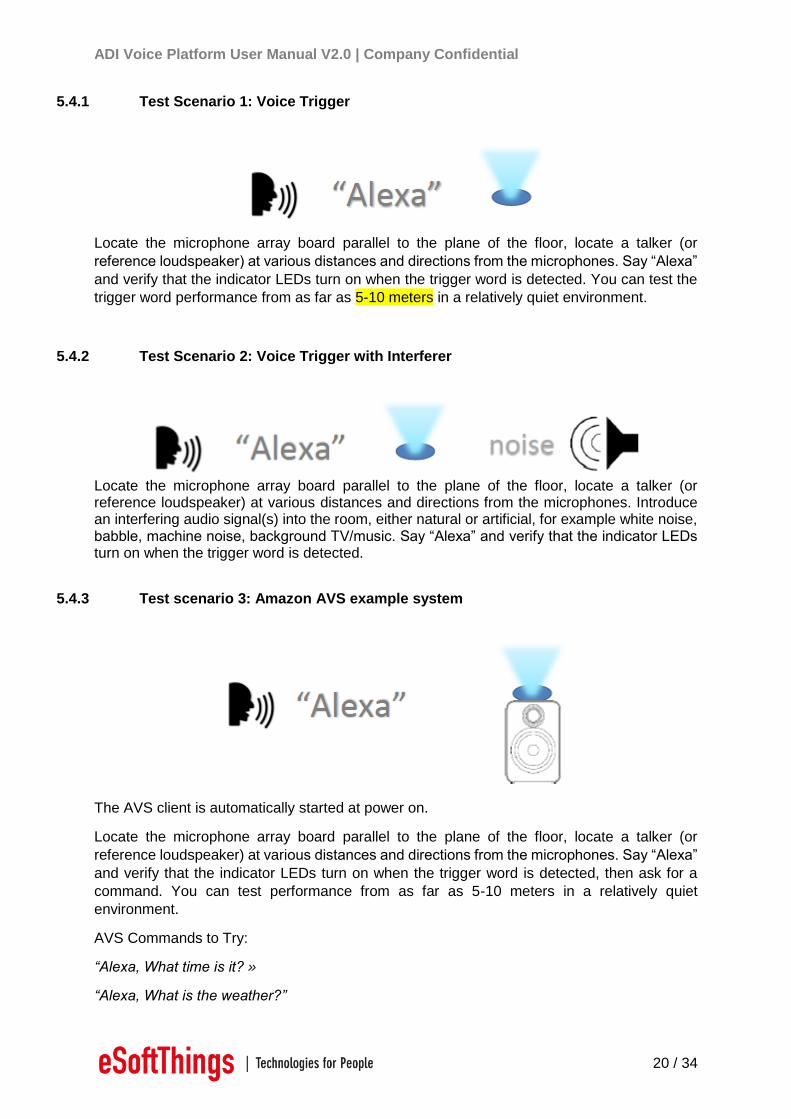
5.4.1 Test Scenario 1: Voice Trigger
Locate the microphone array board parallel to the plane of the floor, locate a talker (or
reference loudspeaker) at various distances and directions from the microphones. Say “Alexa”
and verify that the indicator LEDs turn on when the trigger word is detected. You can test the
trigger word performance from as far as 5-10 meters in a relatively quiet environment.
5.4.2 Test Scenario 2: Voice Trigger with Interferer
Locate the microphone array board parallel to the plane of the floor, locate a talker (or reference loudspeaker) at various distances and directions from the microphones. Introduce an interfering audio signal(s) into the room, either natural or artificial, for example white noise, babble, machine noise, background TV/music. Say “Alexa” and verify that the indicator LEDs turn on when the trigger word is detected.
5.4.3 Test scenario 3: Amazon AVS example system
The AVS client is automatically started at power on.
Locate the microphone array board parallel to the plane of the floor, locate a talker (or
reference loudspeaker) at various distances and directions from the microphones. Say “Alexa”
and verify that the indicator LEDs turn on when the trigger word is detected, then ask for a
command. You can test performance from as far as 5-10 meters in a relatively quiet
environment.
AVS Commands to Try:
“Alexa, What time is it? »
“Alexa, What is the weather?”

ADI Voice Platform User Manual V2.0 | Company Confidential
21 / 34
“Alexa, What is the weather in Boston?”
“Alexa, Tell me a joke”
“Alexa, Sing Happy Birthday”
…
ADI Voice Platform User Manual V2.0 | Company Confidential
22 / 34
6 Installing Debian and Alexa SampleApp
6.1 Install Debian
6.1.1 Download debian
We are using the the Debian Linux distribution provided by linaro.
We are using the version "dragonboard-410c-sdcard-installer-buster-359.zip" available on
this website:
http://releases.linaro.org/96boards/dragonboard410c/linaro/debian/latest/
In the archive you’ll find a sdcard image. Flash this image with command:
$ sudo dd if=dragonboard-410c-sdcard-installer-buster-359.img of=/dev/mmcblk0 bs=4M oflag=sync status=noxfer
Note: the sdcard path may differ (here /dev/mmcblk0).
6.1.2 Install Debian
Once the sdcard is ready, here is how you install it on the dragonboard:
- Power-off dragonboard and insert sdcard
- At the back on the dragonboard you’ll find a 4-position switch. Put switch n°2 “SD
BOOT” in position 1.
- Power-on dragonboard and follow the graphical interface installation process.
- Once installation is finished: take out sdcard, put the switch back in position 0 and
reboot the board.
- After reboot, the debian should start (connect an HDMI screen and mouse/keyboard
to use the Debian).
6.1.3 Update linux kernel
The Linux kernel of this Debian need to be updated to allow SPI to work.
We provide a new kernel image boot-db410c.img.
We use fastboot to reflash the new kernel. Fastboot is an android tool.
To use fastboot you need to:
- Connect the dragonboard to your PC via the micro-USB cable
- Start the dragonboard in fastboot mode
- Use the fastboot tool on your PC to communicate with the dragonboard and reflash
the new kernel
You can install fastboot on your PC with command:
$ sudo apt-get install android-tools-adb android-tools-fastboot
To start the board in fastboot mode:
- Power-off dragonboard
- Push button VOL- (on top of the dragonboard, unplug the mezzanine board to access
this volume button)
- Power-on dragonboard while keeping button pressed
- Release button after 5 seconds
ADI Voice Platform User Manual V2.0 | Company Confidential
23 / 34
To make sure your board is in fastboot mode use command:
$ fastboot devices
Once your board is recognized, flash the new kernel with command:
$ fastboot flash boot boot-db410c.img
Then reboot the board (unplug and replug power).
6.2 Install Alexa SampleApp (easy install)
The SampleApp easy install allow you to setup Alexa quickly on your board by using an already
compiled binary (no need to rebuild the whole SDK).
For this installation we use the provided archive “easy_install”. Copy this archive on the
dragonboard and unpack it on the desktop (use a USB drive to copy it from your PC to the
dragonboard). You should end up with a directory alexa on your Desktop :
/home /linaro/Desktop/alexa
In the archive you’ll find: - /startup_scripts: scripts needed to configure mezzanine board - SampleApp: alexa voice recognition application - /lib_alexa: folder containing libraries for the SampleApp - /database: empty folder that will be used by alexa to store future database - AlexaCLientSDKConfig.json: configuration file for alexa. - get_alexa_lib.sh: script to download dependencies NOTE; for the installation you will need an internet access (use wifi or USB/ethernet dongle).
6.2.1 Install dependencies
To use the SampleApp several dependencies are necessary. Download them with the script
“get_alexa_lib.sh:
$ cd /home/linaro/Desktop/alexa
$ ./get_alexa_lib.sh
6.2.2 Update configuration file
Before starting the application, you’ll have to modify the configuration file and replace the
clientID and productID fields by your own IDs.
To get these IDs you need to create an amazon developer account, register your product and
create a security profile. Once it’s done download the file config.json related to your security
profile. You will find a clientID and productID in this file, copy these IDs in the file
“AlexaCLientSDKConfig.json”.
Here are the instructions to create the security profile:
https://github.com/alexa/avs-device-sdk/wiki/Create-Security-Profile
Once the configuration is done, you can run the SampleApp for the first time (see section 6.4).
ADI Voice Platform User Manual V2.0 | Company Confidential
24 / 34
6.3 Build Alexa SampleApp SDK
For this installation we use the provided archive “sdk_build_install”. Copy this archive on the
dragonboard and unpack it on the desktop (use a USB drive to copy it from your PC to the
dragonboard).
In the archive you’ll find: - /startup_scripts: scripts needed to configure mezzanine board - /database: empty folder that will be used by alexa to store future database - /alexa_build: empty folder that will be used to build the SDK - get_alexa_lib.sh: script to download dependencies - get_portaudio.sh: script to download portaudio library
6.3.1 Install dependencies
To build the SampleApp several dependencies are necessary. Download them with the script
“get_alexa_lib.sh:
$ cd /home/linaro/Desktop/alexa
$ ./get_alexa_lib.sh
You will also need the library portaudio.
A script is provided to download, extract and build portaudio (get_portaudio.sh).
$ cd /home/linaro/Desktop/alexa
$ sudo ./get_portaudio.sh
In case the script fails, download the package “pa_stable_v190600_20161030.tgz” and build
it manually (a readme is provided in the package):
http://www.portaudio.com/download.html
6.3.2 Get and patch SDK
The first step is to clone the SDK with command:
$ git clone https://github.com/alexa/avs-device-sdk.git
NOTE: we are using the SDK v1.10.
Next step is to apply the provided sdk patch (to allow SDK to recognized the mezzanine board
keyword detection).
Copy the file “sdk_patch.patch” in directory /home/linaro/avs-device-sdk.
Apply patch with command:
$ cd /home/linaro/Desktop/alexa/avs-device-sdk $ git apply sdk_patch.patch
ADI Voice Platform User Manual V2.0 | Company Confidential
25 / 34
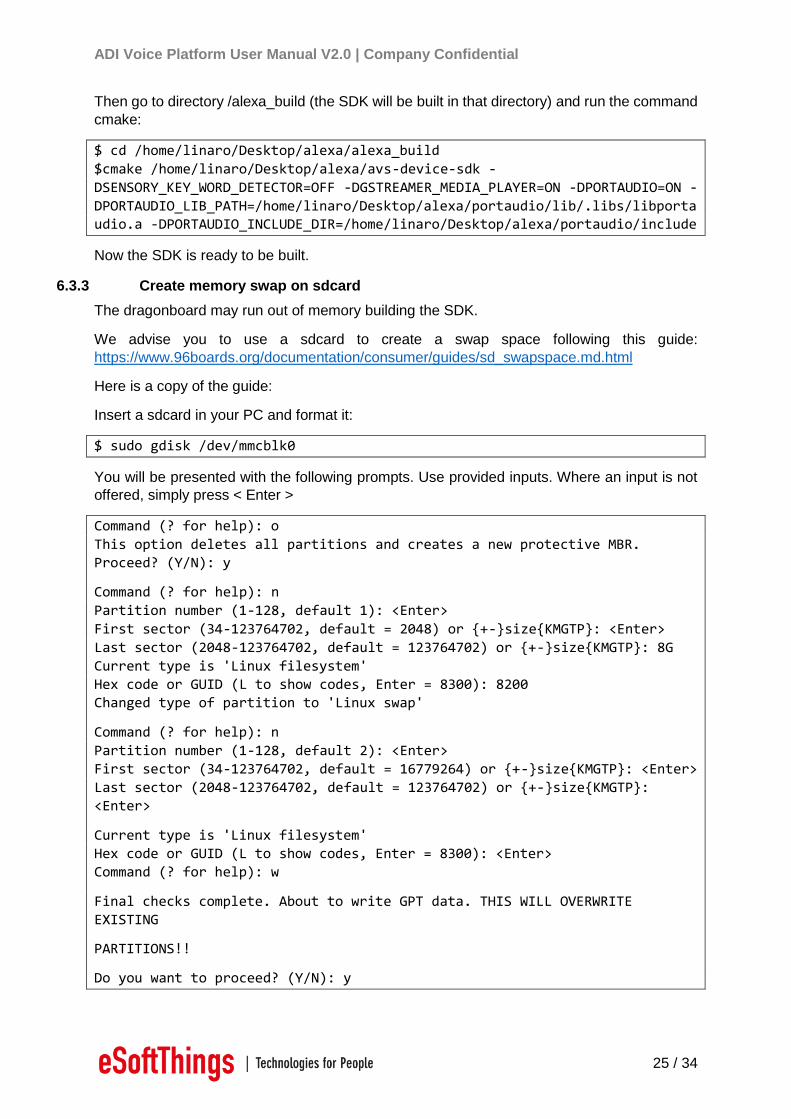
Then go to directory /alexa_build (the SDK will be built in that directory) and run the command
cmake:
$ cd /home/linaro/Desktop/alexa/alexa_build
$cmake /home/linaro/Desktop/alexa/avs-device-sdk -
DSENSORY_KEY_WORD_DETECTOR=OFF -DGSTREAMER_MEDIA_PLAYER=ON -DPORTAUDIO=ON -
DPORTAUDIO_LIB_PATH=/home/linaro/Desktop/alexa/portaudio/lib/.libs/libportaudio.a -DPORTAUDIO_INCLUDE_DIR=/home/linaro/Desktop/alexa/portaudio/include
Now the SDK is ready to be built.
6.3.3 Create memory swap on sdcard
The dragonboard may run out of memory building the SDK.
We advise you to use a sdcard to create a swap space following this guide:
https://www.96boards.org/documentation/consumer/guides/sd_swapspace.md.html
Here is a copy of the guide:
Insert a sdcard in your PC and format it:
$ sudo gdisk /dev/mmcblk0
You will be presented with the following prompts. Use provided inputs. Where an input is not
offered, simply press < Enter >
Command (? for help): o
This option deletes all partitions and creates a new protective MBR. Proceed? (Y/N): y
Command (? for help): n
Partition number (1-128, default 1): <Enter>
First sector (34-123764702, default = 2048) or {+-}size{KMGTP}: <Enter>
Last sector (2048-123764702, default = 123764702) or {+-}size{KMGTP}: 8G
Current type is 'Linux filesystem'
Hex code or GUID (L to show codes, Enter = 8300): 8200 Changed type of partition to 'Linux swap'
Command (? for help): n
Partition number (1-128, default 2): <Enter> First sector (34-123764702, default = 16779264) or {+-}size{KMGTP}: <Enter>
Last sector (2048-123764702, default = 123764702) or {+-}size{KMGTP}:
<Enter>
Current type is 'Linux filesystem'
Hex code or GUID (L to show codes, Enter = 8300): <Enter>
Command (? for help): w
Final checks complete. About to write GPT data. THIS WILL OVERWRITE EXISTING
PARTITIONS!!
Do you want to proceed? (Y/N): y
ADI Voice Platform User Manual V2.0 | Company Confidential
26 / 34
Then format the 2 partitions with commands:
$ sudo mkfs –t ext4 /dev/mmcblk0p2 $ sudo mkswap /dev/mmcblk0p1
You can now take out sdcard of PC and plug it in the dragonboard.
On the dragonboard, edit the file /etc/fstab and add the following line:
$ sudo vim /etc/fstab
## Add the following line: /dev/mmcblk1p1 none swap sw 0 0
## this will save and exit you out of vim <esc>:wq
You can now reboot the dragonboard410c: $ sudo reboot now
6.3.4 Build SDK
To build SDK run command make in your directory /alexa_build (this may take a few hours):
$ cd /home/linaro/Desktop/alexa/alexa_build $ make
The build may stop with an error message related to PortAudio (errorCode=-9985).
If it happens, try to rebuild entirely the portaudio library and then launch make once again for
alexa SDK:
$ cd /home/linaro/Desktop/alexa/portaudio
$ autoreconf -if
$ ./configure
$ make clean
$ make
$ cd /home/linaro/Desktop/alexa/alexa_build $ make
6.3.5 Generate configuration file
The last step is to generate the configuration file.
You need to create an amazon developer account, register your product and create a security
profile. Once it’s done download the file config.json related to your security profile.
Here are the instructions to create the security profile:
https://github.com/alexa/avs-device-sdk/wiki/Create-Security-Profile
Once you have your config.json file, copy it in directory /home/linaro/Desktop/alexa/avs-
device-sdk/tools/Install
Then run the script genscript with these parameters (parameters are the device serial number,
the database path, the SDK source code path and where to store the output file)
$ cd /home/linaro/Desktop/alexa/avs-device-sdk/tools/Install
ADI Voice Platform User Manual V2.0 | Company Confidential
27 / 34
$ bash genConfig.sh config.json 001 /home/linaro/Desktop/alexa/database
/home/linaro/Desktop/alexa/avs-device-sdk
/home/linaro/Desktop/alexa/alexa_build/Integration/AlexaClientSDKConfig.json
You are now ready to run the SampleApp for the first time.
6.4 Running SampleApp for the first time
Before running the SampleApp, make sure the mezzanine board is configured. To configure
it, run the script “init_adivp.sh”.
$ cd /home/linaro/Desktop/alexa/startup_scripts
$ ./init_adivp.sh
Once the mezzanine is configured, start SampleApp with command:
For the easy install:
cd /home/linaro/Desktop/alexa/
LD_LIBRARY_PATH=/home/linaro/Desktop/alexa/lib_alexa ./SampleApp ./AlexaClientSDKConfig.json
For the SDK build installation;
$ cd /home/linaro/Desktop/alexa/alexa_build/SampleApp/src
$ sudo ./SampleApp ../../Integration/AlexaClientSDKConfig.json
When running the SampleApp for the first time, the application will give you a code to enter in
your amazon developer account. After copying that code, the SampleApp should be able to
connect and you can start using Alexa.
Once your SampleApp is running successfully, you can launch it automatically at startup.
6.5 Starting SampleApp automatically at boot
First let’s edit the init script.
If you open the script “init_adivp.sh” you’ll find at the end of the file 2 commented lines.
These lines allow the script to start the SampleApp automatically.
Uncomment one of these line (depending of what installation mode you used).
Next step is to allow the init_script to be automatically started at the boot.
To do it, go to directory /startup_scripts/boot_config and launch the script “configure_boot.sh”.
The script is going to create a new systemctl service for the init_adivp script.
$ cd /home/linaro/Desktop/alexa/startup_scripts/boot_config
$ ./configure_boot.sh
You can now reboot, the SampleApp should start automatically at startup.
ADI Voice Platform User Manual V2.0 | Company Confidential
28 / 34
6.6 Useful linux commands
6.6.1 Connect via SSH
You can connect to the dragonboard via SSH (the ID is “linaro” and the password is “linaro”).
The dragonboard need to be connected to your network (via wifi or a USB/Ethernet dongle)
and you need to know the dragonboard IP address.
You can get the IP address with command (dragonboard need to be connected to a screen
and a keyboard to do it):
$ ip addr show
Once you have it you can connect via SSH with command (password is “linaro”):
$ ssh -x linaro@<IP_address>
6.6.2 Turn-off Alexa via command line
Alexa SampleApp is started at the boot via systemctl service (if you followed the Alexa
installation manual).
You can stop the service manually with command:
$ sudo systemctl stop alexa.service
6.6.3 Get Alexa SampleApp log
You can get the logs of the alexa SampleApp with command:
$ sudo systemctl status alexa.service
ADI Voice Platform User Manual V2.0 | Company Confidential
29 / 34
7 Upgrade STM32
This part explains how to flash the STM32 firmware “.dfu” for the mezzanine board with the
DFU mode.
To flash the board, you will need the software “dFuSe” provided by STMicroelectronics:
http://www.st.com/content/st_com/en/products/development-tools/software-development-
tools/stm32-software-development-tools/stm32-programmers/stsw-stm32080.html
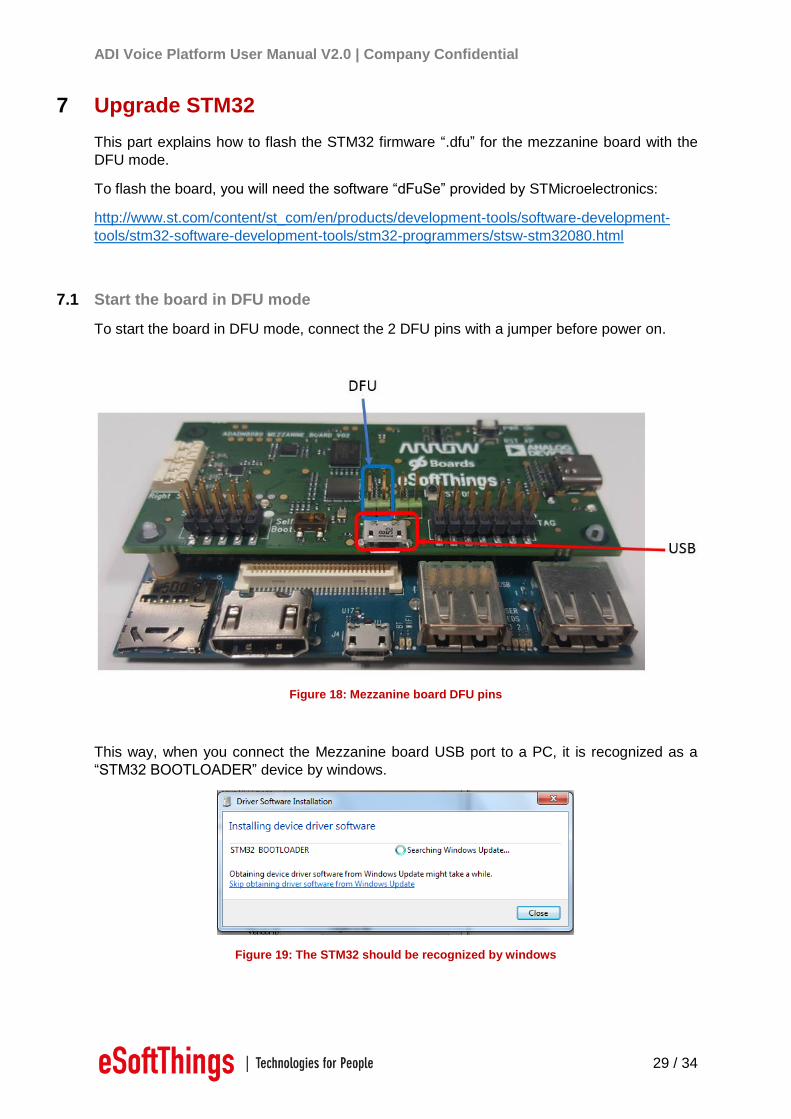
7.1 Start the board in DFU mode
To start the board in DFU mode, connect the 2 DFU pins with a jumper before power on.
Figure 18: Mezzanine board DFU pins
This way, when you connect the Mezzanine board USB port to a PC, it is recognized as a
“STM32 BOOTLOADER” device by windows.
Figure 19: The STM32 should be recognized by windows
ADI Voice Platform User Manual V2.0 | Company Confidential
30 / 34
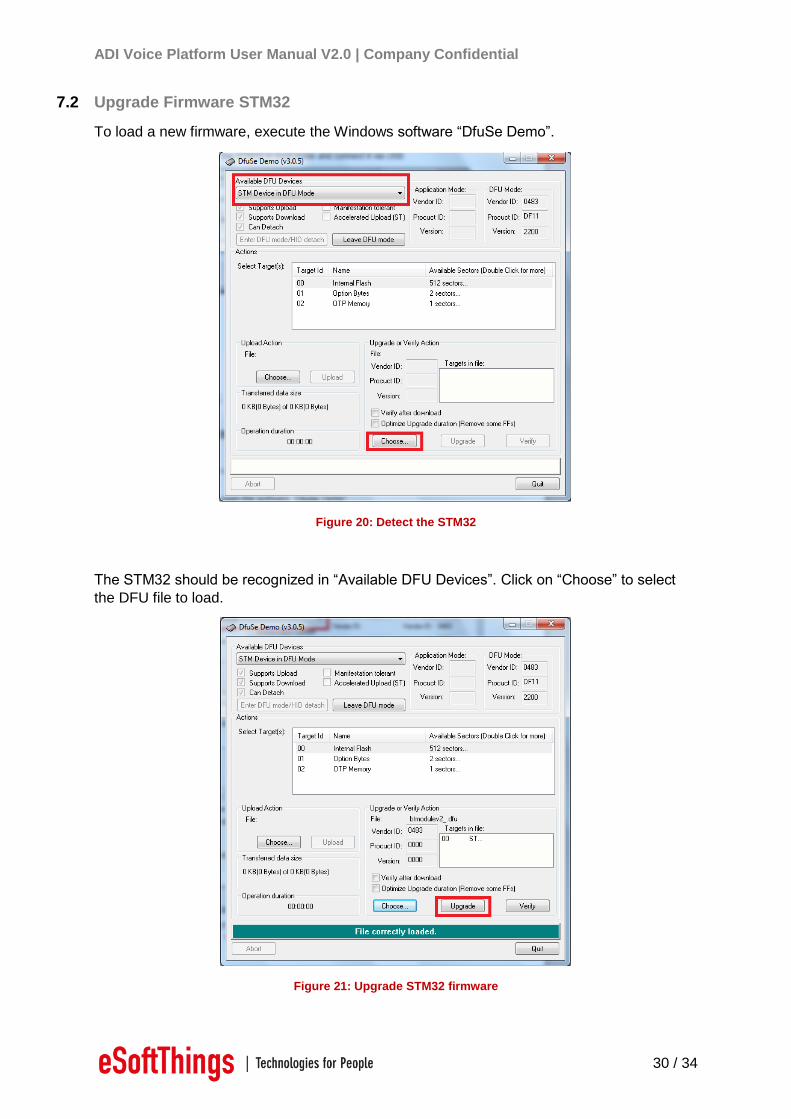
7.2 Upgrade Firmware STM32
To load a new firmware, execute the Windows software “DfuSe Demo”.
Figure 20: Detect the STM32
The STM32 should be recognized in “Available DFU Devices”. Click on “Choose” to select
the DFU file to load.
Figure 21: Upgrade STM32 firmware

ADI Voice Platform User Manual V2.0 | Company Confidential
31 / 34
Once you have selected your firmware you should get the blue message “File correctly
loaded”. Then you can click on “Upgrade”. The program is going to erase the STM32
memory and load the new firmware. This process may take several minutes.
Figure 22: Flashing running: erasing phase
Figure 23: Flashing successful
Now you can remove the DFU jumper and restart the board.
The board should be recognized as a sound card by the PC after reboot.
ADI Voice Platform User Manual V2.0 | Company Confidential
32 / 34
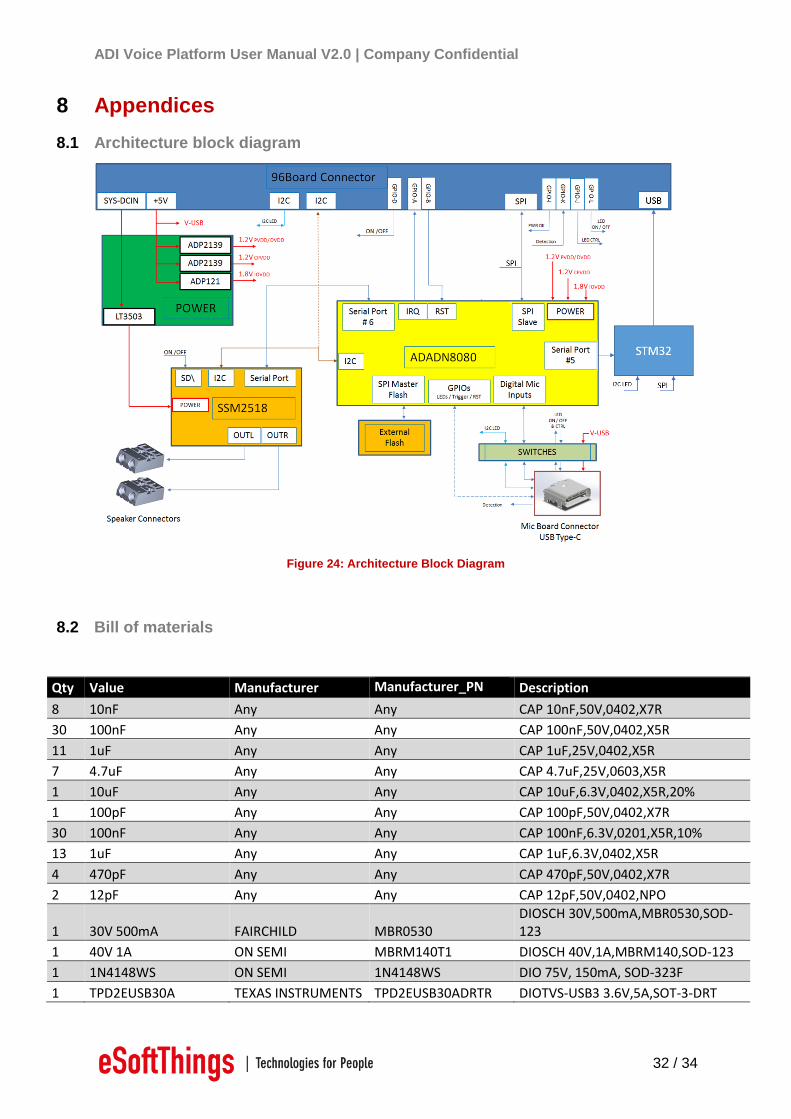
8 Appendices
8.1 Architecture block diagram
Figure 24: Architecture Block Diagram
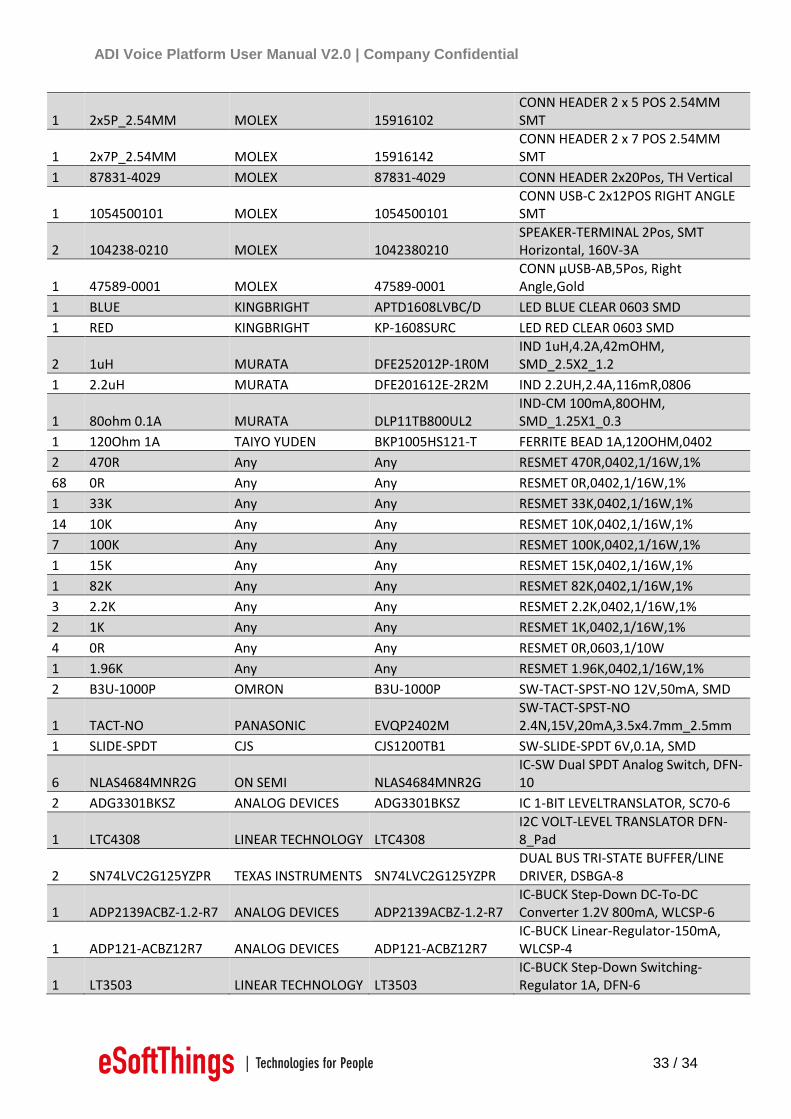
8.2 Bill of materials
Qty Value Manufacturer Manufacturer_PN Description
8 10nF Any Any CAP 10nF,50V,0402,X7R
30 100nF Any Any CAP 100nF,50V,0402,X5R
11 1uF Any Any CAP 1uF,25V,0402,X5R
7 4.7uF Any Any CAP 4.7uF,25V,0603,X5R
1 10uF Any Any CAP 10uF,6.3V,0402,X5R,20%
1 100pF Any Any CAP 100pF,50V,0402,X7R
30 100nF Any Any CAP 100nF,6.3V,0201,X5R,10%
13 1uF Any Any CAP 1uF,6.3V,0402,X5R
4 470pF Any Any CAP 470pF,50V,0402,X7R
2 12pF Any Any CAP 12pF,50V,0402,NPO
1 30V 500mA FAIRCHILD MBR0530 DIOSCH 30V,500mA,MBR0530,SOD-123
1 40V 1A ON SEMI MBRM140T1 DIOSCH 40V,1A,MBRM140,SOD-123
1 1N4148WS ON SEMI 1N4148WS DIO 75V, 150mA, SOD-323F
1 TPD2EUSB30A TEXAS INSTRUMENTS TPD2EUSB30ADRTR DIOTVS-USB3 3.6V,5A,SOT-3-DRT
ADI Voice Platform User Manual V2.0 | Company Confidential
33 / 34
1 2x5P_2.54MM MOLEX 15916102 CONN HEADER 2 x 5 POS 2.54MM SMT
1 2x7P_2.54MM MOLEX 15916142 CONN HEADER 2 x 7 POS 2.54MM SMT
1 87831-4029 MOLEX 87831-4029 CONN HEADER 2x20Pos, TH Vertical
1 1054500101 MOLEX 1054500101 CONN USB-C 2x12POS RIGHT ANGLE SMT
2 104238-0210 MOLEX 1042380210 SPEAKER-TERMINAL 2Pos, SMT Horizontal, 160V-3A
1 47589-0001 MOLEX 47589-0001 CONN µUSB-AB,5Pos, Right Angle,Gold
1 BLUE KINGBRIGHT APTD1608LVBC/D LED BLUE CLEAR 0603 SMD
1 RED KINGBRIGHT KP-1608SURC LED RED CLEAR 0603 SMD
2 1uH MURATA DFE252012P-1R0M IND 1uH,4.2A,42mOHM, SMD_2.5X2_1.2
1 2.2uH MURATA DFE201612E-2R2M IND 2.2UH,2.4A,116mR,0806
1 80ohm 0.1A MURATA DLP11TB800UL2 IND-CM 100mA,80OHM, SMD_1.25X1_0.3
1 120Ohm 1A TAIYO YUDEN BKP1005HS121-T FERRITE BEAD 1A,120OHM,0402
2 470R Any Any RESMET 470R,0402,1/16W,1%
68 0R Any Any RESMET 0R,0402,1/16W,1%
1 33K Any Any RESMET 33K,0402,1/16W,1%
14 10K Any Any RESMET 10K,0402,1/16W,1%
7 100K Any Any RESMET 100K,0402,1/16W,1%
1 15K Any Any RESMET 15K,0402,1/16W,1%
1 82K Any Any RESMET 82K,0402,1/16W,1%
3 2.2K Any Any RESMET 2.2K,0402,1/16W,1%
2 1K Any Any RESMET 1K,0402,1/16W,1%
4 0R Any Any RESMET 0R,0603,1/10W
1 1.96K Any Any RESMET 1.96K,0402,1/16W,1%
2 B3U-1000P OMRON B3U-1000P SW-TACT-SPST-NO 12V,50mA, SMD
1 TACT-NO PANASONIC EVQP2402M SW-TACT-SPST-NO 2.4N,15V,20mA,3.5x4.7mm_2.5mm
1 SLIDE-SPDT CJS CJS1200TB1 SW-SLIDE-SPDT 6V,0.1A, SMD
6 NLAS4684MNR2G ON SEMI NLAS4684MNR2G IC-SW Dual SPDT Analog Switch, DFN-10
2 ADG3301BKSZ ANALOG DEVICES ADG3301BKSZ IC 1-BIT LEVELTRANSLATOR, SC70-6
1 LTC4308 LINEAR TECHNOLOGY LTC4308 I2C VOLT-LEVEL TRANSLATOR DFN-8_Pad
2 SN74LVC2G125YZPR TEXAS INSTRUMENTS SN74LVC2G125YZPR DUAL BUS TRI-STATE BUFFER/LINE DRIVER, DSBGA-8
1 ADP2139ACBZ-1.2-R7 ANALOG DEVICES ADP2139ACBZ-1.2-R7 IC-BUCK Step-Down DC-To-DC Converter 1.2V 800mA, WLCSP-6
1 ADP121-ACBZ12R7 ANALOG DEVICES ADP121-ACBZ12R7 IC-BUCK Linear-Regulator-150mA, WLCSP-4
1 LT3503 LINEAR TECHNOLOGY LT3503 IC-BUCK Step-Down Switching-Regulator 1A, DFN-6

ADI Voice Platform User Manual V2.0 | Company Confidential
34 / 34
1 ADP2139ACBZ-1.8-R7 ANALOG DEVICES ADP2139ACBZ-1.8-R7 IC-BUCK Step-Down DC-To-DC Converter 1.8V 800mA, WLCSP-6
1 ADADN8080 ANALOG DEVICES ADADN8080BCBZRL
IC-DSP Cadence Tensilica HiFi 4 Voice Interface and Audio Processor for Machine Learning, WLCSP-144
1 CYPRES_S25FS512S CYPRESS S25FS512SDSBHV213 IC-MEM FLASH NOR 512Mbit-1.8V-SPI, BGA-24
1 SSM2518CBZ-R7 ANALOG DEVICES SSM2518CBZ-R7
IC-OPAMP Digital Input Stereo, 2 W, Class-D Audio Power Amplifier, WLCSP-16
1 STM32L476QGI ST STM32L476QGI6 ARM CORTEX-M4 32BIT MCU+FPU 1MB FLASH, UFBGA132
1 FC-135 EPSON FC-135 32.7680KA-A3 QTZ 32.768KHz,20PPM,12.5PF,3.2X1.5MM
1 24.576MHz IQD LFSPXO056217 OSC 24.576MHZ,50PPM,1.8V,2.X1.6MM


![RECOMMENDED SYSTEM REQUIREMENTS › hubfs › [One-Pagers] Virtual... · 2020-04-29 · Internet connection Speakers & microphone *for speakers/presenters Webcam *for speakers/presenters](https://static.fdocuments.net/doc/165x107/5f254a9921b45320d4541e66/recommended-system-requirements-a-hubfs-a-one-pagers-virtual-2020-04-29.jpg)


