2007 Cadillac XLR/XLR-V Owner Manual M - Dealer...
512
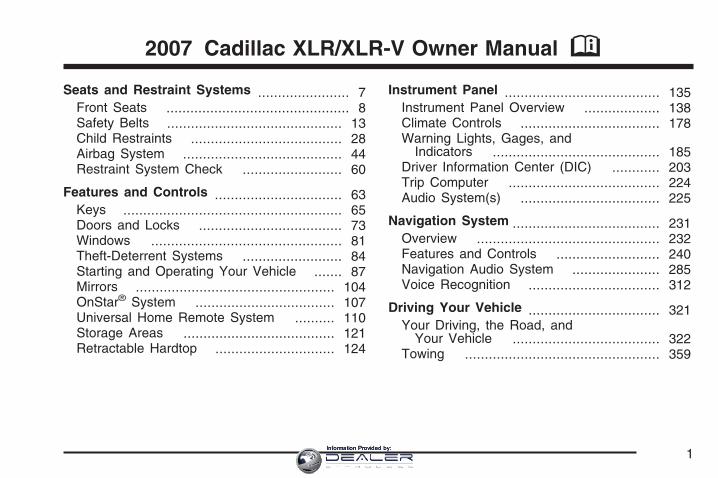
Seats and Restraint Systems ....................... 7 Front Seats .............................................. 8 Safety Belts ............................................ 13 Child Restraints ...................................... 28 Airbag System ........................................ 44 Restraint System Check ......................... 60 Features and Controls ................................ 63 Keys ....................................................... 65 Doors and Locks .................................... 73 Windows ................................................ 81 Theft-Deterrent Systems ......................... 84 Starting and Operating Your Vehicle ....... 87 Mirrors .................................................. 104 OnStar ® System ................................... 107 Universal Home Remote System .......... 110 Storage Areas ...................................... 121 Retractable Hardtop .............................. 124 Instrument Panel ....................................... 135 Instrument Panel Overview ................... 138 Climate Controls ................................... 178 Warning Lights, Gages, and Indicators .......................................... 185 Driver Information Center (DIC) ............ 203 Trip Computer ...................................... 224 Audio System(s) ................................... 225 Navigation System ..................................... 231 Overview .............................................. 232 Features and Controls .......................... 240 Navigation Audio System ...................... 285 Voice Recognition ................................. 312 Driving Your Vehicle ................................. 321 Your Driving, the Road, and Your Vehicle ..................................... 322 Towing ................................................. 359 2007 Cadillac XLR/XLR-V Owner Manual M 1
Transcript of 2007 Cadillac XLR/XLR-V Owner Manual M - Dealer...
Seats and Restraint Systems ....................... 7Front Seats .............................................. 8Safety Belts ............................................ 13Child Restraints ...................................... 28Airbag System ........................................ 44Restraint System Check ......................... 60
Features and Controls ................................ 63Keys ....................................................... 65Doors and Locks .................................... 73Windows ................................................ 81Theft-Deterrent Systems ......................... 84Starting and Operating Your Vehicle ....... 87Mirrors .................................................. 104OnStar® System ................................... 107Universal Home Remote System .......... 110Storage Areas ...................................... 121Retractable Hardtop .............................. 124
Instrument Panel ....................................... 135Instrument Panel Overview ................... 138Climate Controls ................................... 178Warning Lights, Gages, and
Indicators .......................................... 185Driver Information Center (DIC) ............ 203Trip Computer ...................................... 224Audio System(s) ................................... 225
Navigation System ..................................... 231Overview .............................................. 232Features and Controls .......................... 240Navigation Audio System ...................... 285Voice Recognition ................................. 312
Driving Your Vehicle ................................. 321Your Driving, the Road, and
Your Vehicle ..................................... 322Towing ................................................. 359
2007 Cadillac XLR/XLR-V Owner Manual M
1Information Provided by:
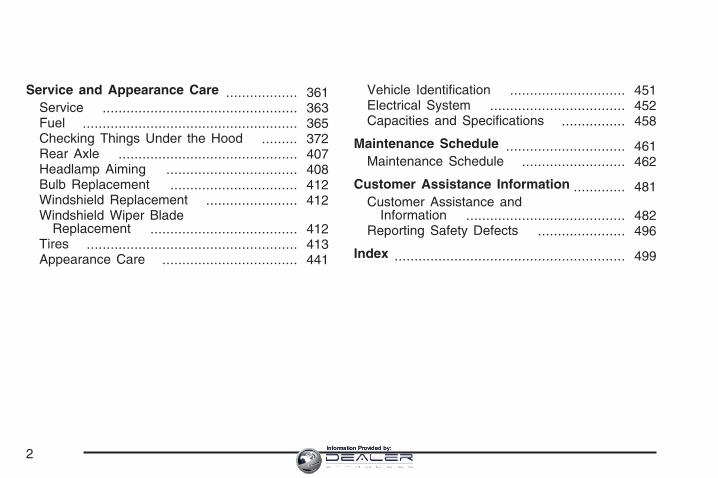
Service and Appearance Care .................. 361Service ................................................. 363Fuel ...................................................... 365Checking Things Under the Hood ......... 372Rear Axle ............................................. 407Headlamp Aiming ................................. 408Bulb Replacement ................................ 412Windshield Replacement ....................... 412Windshield Wiper Blade
Replacement ..................................... 412Tires ..................................................... 413Appearance Care .................................. 441
Vehicle Identification ............................. 451Electrical System .................................. 452Capacities and Specifications ................ 458
Maintenance Schedule .............................. 461Maintenance Schedule .......................... 462
Customer Assistance Information ............. 481Customer Assistance and
Information ........................................ 482Reporting Safety Defects ...................... 496
Index .......................................................... 499
2Information Provided by:
GENERAL MOTORS, GM, the GM Emblem,CADILLAC, the CADILLAC Crest & Wreath, andthe name XLR are registered trademarks ofGeneral Motors Corporation.
This manual includes the latest information at thetime it was printed. We reserve the right tomake changes after that time to the productwithout notice. For vehicles first sold in Canada,substitute the name “General Motors of CanadaLimited” for Cadillac Motor Car Division wheneverit appears in this manual.
This manual describes features that may beavailable in this model, but your vehicle may nothave all of them. For example, more than oneentertainment system may be offered or yourvehicle may have been ordered without a frontpassenger or rear seats.
Keep this manual in the vehicle, so it will be thereif it is needed while you are on the road. If thevehicle is sold, leave this manual in the vehicle.
Canadian OwnersA French language copy of this manual can beobtained from your dealer or from:
Helm, IncorporatedP.O. Box 07130Detroit, MI 48207
Litho in U.S.A.Part No. 15865979 A First Printing ©2006 General Motors Corporation. All Rights Reserved.
3Information Provided by:
How to Use This ManualMany people read the owner manual frombeginning to end when they first receive their newvehicle. If this is done, it can help you learnabout the features and controls for the vehicle.Pictures and words work together in theowner manual to explain things.
IndexA good place to quickly locate information aboutthe vehicle is the Index in the back of the manual.It is an alphabetical list of what is in the manualand the page number where it can be found.
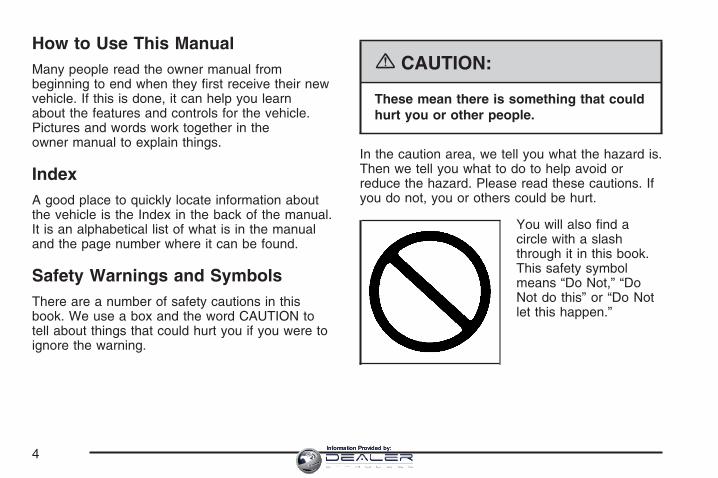
Safety Warnings and SymbolsThere are a number of safety cautions in thisbook. We use a box and the word CAUTION totell about things that could hurt you if you were toignore the warning.
{CAUTION:
These mean there is something that couldhurt you or other people.
In the caution area, we tell you what the hazard is.Then we tell you what to do to help avoid orreduce the hazard. Please read these cautions. Ifyou do not, you or others could be hurt.
You will also find acircle with a slashthrough it in this book.This safety symbolmeans “Do Not,” “DoNot do this” or “Do Notlet this happen.”
4Information Provided by:
Vehicle Damage WarningsAlso, in this manual you will find these notices:
Notice: These mean there is somethingthat could damage your vehicle.
A notice tells about something that can damagethe vehicle. Many times, this damage would not becovered by your vehicle’s warranty, and it couldbe costly. But the notice will tell what to do to helpavoid the damage.
When you read other manuals, you might seeCAUTION and NOTICE warnings in different colorsor in different words.
There are also warning labels on the vehicle. Theyuse the same words, CAUTION or NOTICE.
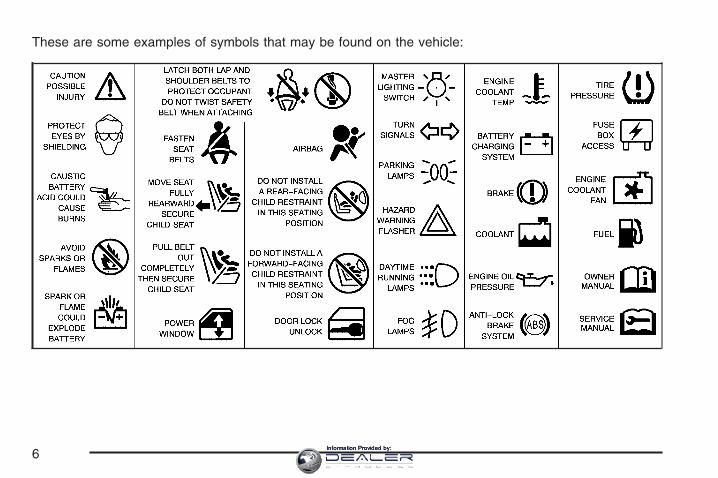
Vehicle SymbolsThe vehicle has components and labels that usesymbols instead of text. Symbols are shown alongwith the text describing the operation orinformation relating to a specific component,control, message, gage, or indicator.
If you need help figuring out a specific name of acomponent, gage, or indicator, reference thefollowing topics:
• Seats and Restraint Systems in Section 1
• Features and Controls in Section 2
• Instrument Panel Overview in Section 3
• Climate Controls in Section 3
• Warning Lights, Gages, and Indicators inSection 3
• Audio System(s) in Section 3
• Engine Compartment Overview in Section 5
5Information Provided by:
These are some examples of symbols that may be found on the vehicle:
6Information Provided by:
Front Seats ..................................................... 8Power Seats ................................................. 8Power Lumbar .............................................. 9Heated and Cooled Seats ............................. 9Memory Seat, Mirrors and
Steering Wheel ........................................ 10Power Reclining Seatbacks ......................... 11
Safety Belts .................................................. 13Safety Belts: They Are for Everyone ........... 13Questions and Answers About
Safety Belts ............................................. 17How to Wear Safety Belts Properly ............. 18Driver Position ............................................. 18Safety Belt Use During Pregnancy .............. 26Passenger Position ...................................... 27Safety Belt Pretensioners ............................ 27Safety Belt Extender ................................... 27
Child Restraints ............................................ 28Older Children ............................................. 28Infants and Young Children ......................... 31Child Restraint Systems .............................. 35
Lower Anchors and Tethers forChildren (LATCH) .................................... 39
Securing a Child Restraint in thePassenger Seat Position .......................... 40
Airbag System .............................................. 44Where Are the Airbags? .............................. 47When Should an Airbag Inflate? .................. 49What Makes an Airbag Inflate? ................... 51How Does an Airbag Restrain? ................... 51What Will You See After an Airbag
Inflates? ................................................... 52Passenger Sensing System ......................... 53Servicing Your Airbag-Equipped Vehicle ...... 58Adding Equipment to Your
Airbag-Equipped Vehicle .......................... 59Restraint System Check ............................... 60
Checking the Restraint Systems .................. 60Replacing Restraint System Parts
After a Crash ........................................... 61
Section 1 Seats and Restraint Systems
7Information Provided by:
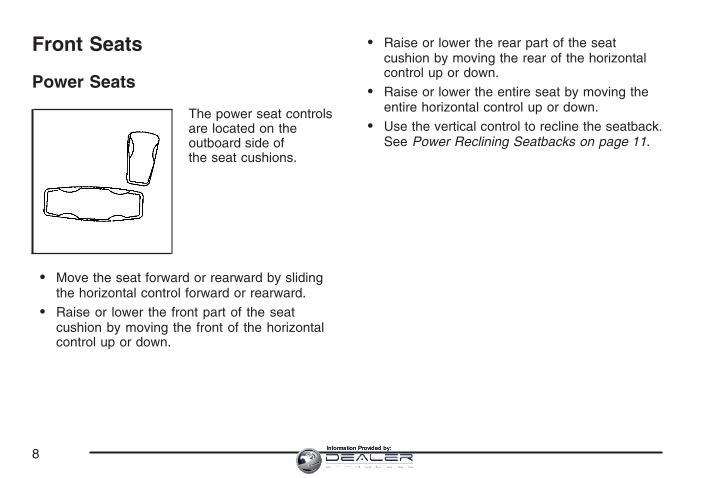
Front Seats
Power Seats
The power seat controlsare located on theoutboard side ofthe seat cushions.
• Move the seat forward or rearward by slidingthe horizontal control forward or rearward.
• Raise or lower the front part of the seatcushion by moving the front of the horizontalcontrol up or down.
• Raise or lower the rear part of the seatcushion by moving the rear of the horizontalcontrol up or down.
• Raise or lower the entire seat by moving theentire horizontal control up or down.
• Use the vertical control to recline the seatback.See Power Reclining Seatbacks on page 11.
8Information Provided by:
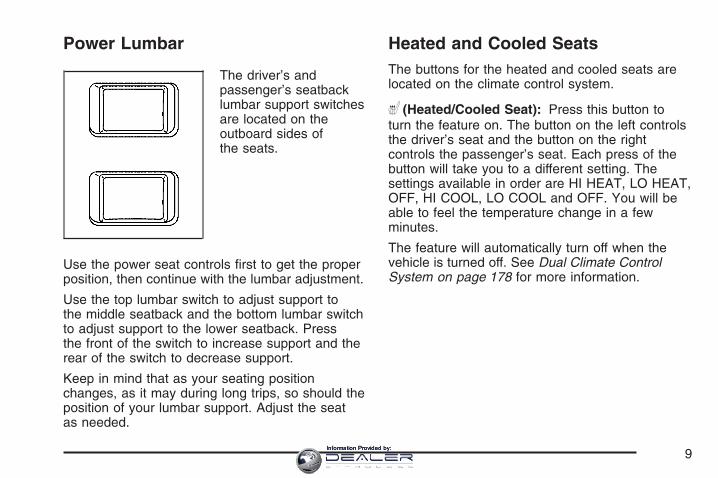
Power Lumbar
The driver’s andpassenger’s seatbacklumbar support switchesare located on theoutboard sides ofthe seats.
Use the power seat controls first to get the properposition, then continue with the lumbar adjustment.
Use the top lumbar switch to adjust support tothe middle seatback and the bottom lumbar switchto adjust support to the lower seatback. Pressthe front of the switch to increase support and therear of the switch to decrease support.
Keep in mind that as your seating positionchanges, as it may during long trips, so should theposition of your lumbar support. Adjust the seatas needed.
Heated and Cooled SeatsThe buttons for the heated and cooled seats arelocated on the climate control system.
( (Heated/Cooled Seat): Press this button toturn the feature on. The button on the left controlsthe driver’s seat and the button on the rightcontrols the passenger’s seat. Each press of thebutton will take you to a different setting. Thesettings available in order are HI HEAT, LO HEAT,OFF, HI COOL, LO COOL and OFF. You will beable to feel the temperature change in a fewminutes.
The feature will automatically turn off when thevehicle is turned off. See Dual Climate ControlSystem on page 178 for more information.
9Information Provided by:
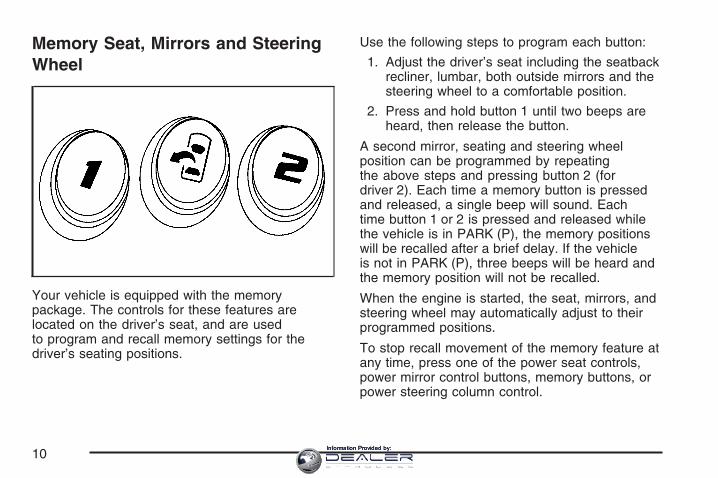
Memory Seat, Mirrors and SteeringWheel
Your vehicle is equipped with the memorypackage. The controls for these features arelocated on the driver’s seat, and are usedto program and recall memory settings for thedriver’s seating positions.
Use the following steps to program each button:
1. Adjust the driver’s seat including the seatbackrecliner, lumbar, both outside mirrors and thesteering wheel to a comfortable position.
2. Press and hold button 1 until two beeps areheard, then release the button.
A second mirror, seating and steering wheelposition can be programmed by repeatingthe above steps and pressing button 2 (fordriver 2). Each time a memory button is pressedand released, a single beep will sound. Eachtime button 1 or 2 is pressed and released whilethe vehicle is in PARK (P), the memory positionswill be recalled after a brief delay. If the vehicleis not in PARK (P), three beeps will be heard andthe memory position will not be recalled.
When the engine is started, the seat, mirrors, andsteering wheel may automatically adjust to theirprogrammed positions.
To stop recall movement of the memory feature atany time, press one of the power seat controls,power mirror control buttons, memory buttons, orpower steering column control.
10Information Provided by:
Two personalized exit positions can be set by firstrecalling the driving position (by pressing 1 or 2),then positioning the steering wheel and seat in thedesired exit positions and then pressing andholding the exit button until two beeps are heard.The exit button is located between buttons 1 and 2.With the vehicle in PARK (P), the exit positionfor the previously set driver can be recalledby pressing the exit button.
When you use the keyless access transmitter tounlock your vehicle, automatic seat and steeringwheel movement to the exit position mayoccur. The numbers on the back of thetransmitter, 1 and 2, corresponds to the numberson the memory buttons.
Further programming for automatic seat and mirrormovement can be done using the DriverInformation Center (DIC).
For programming information, see DIC VehiclePersonalization on page 220.
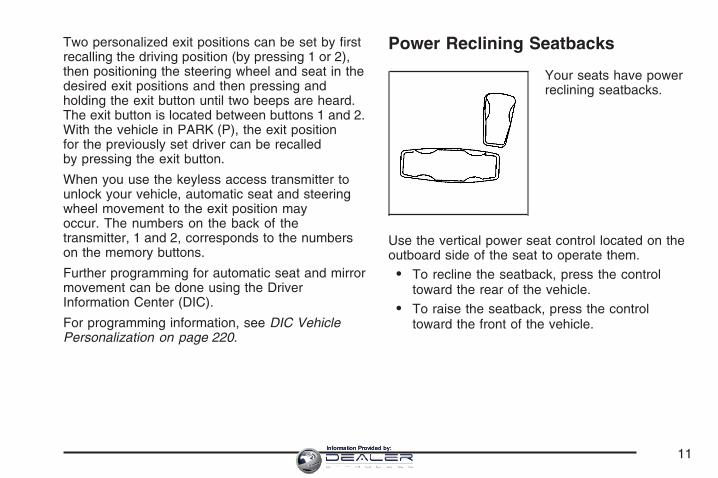
Power Reclining Seatbacks
Your seats have powerreclining seatbacks.
Use the vertical power seat control located on theoutboard side of the seat to operate them.
• To recline the seatback, press the controltoward the rear of the vehicle.
• To raise the seatback, press the controltoward the front of the vehicle.
11Information Provided by:
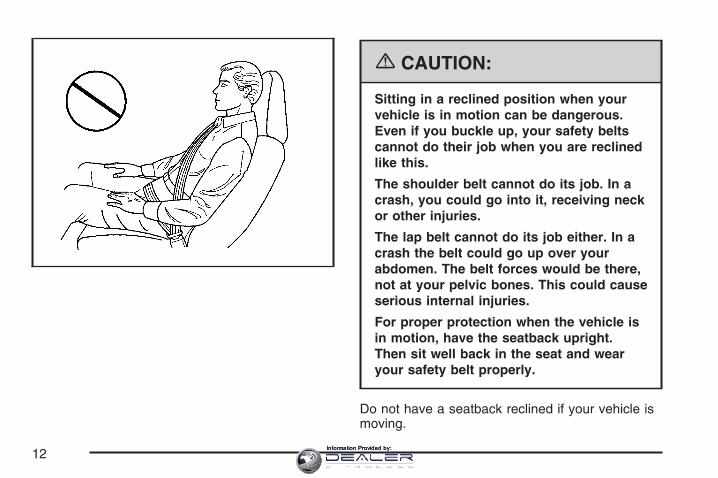
{CAUTION:
Sitting in a reclined position when yourvehicle is in motion can be dangerous.Even if you buckle up, your safety beltscannot do their job when you are reclinedlike this.
The shoulder belt cannot do its job. In acrash, you could go into it, receiving neckor other injuries.
The lap belt cannot do its job either. In acrash the belt could go up over yourabdomen. The belt forces would be there,not at your pelvic bones. This could causeserious internal injuries.
For proper protection when the vehicle isin motion, have the seatback upright.Then sit well back in the seat and wearyour safety belt properly.
Do not have a seatback reclined if your vehicle ismoving.
12Information Provided by:
Safety Belts
Safety Belts: They Are for EveryoneThis part of the manual tells you how to usesafety belts properly. It also tells you some thingsyou should not do with safety belts.
{CAUTION:
Do not let anyone ride where he or shecan not wear a safety belt properly. If youare in a crash and you are not wearing asafety belt, your injuries can be muchworse. You can hit things inside thevehicle or be ejected from it. You can beseriously injured or killed. In the samecrash, you might not be if you are buckledup. Always fasten your safety belt, andcheck that your passenger’s belt isfastened properly too.
{CAUTION:
It is extremely dangerous to ride in acargo area, inside or outside of a vehicle.In a collision, people riding in these areasare more likely to be seriously injured orkilled. Do not allow people to ride in anyarea of your vehicle that is not equippedwith seats and safety belts. Be sureeveryone in your vehicle is in a seat andusing a safety belt properly.
Your vehicle has a lightthat comes on as areminder to buckle up.See Safety BeltReminder Light onpage 187.
In most states and in all Canadian provinces, thelaw says to wear safety belts. Here is why:They work.
13Information Provided by:
You never know if you will be in a crash. If you dohave a crash, you do not know if it will be abad one.
A few crashes are mild, and some crashes can beso serious that even buckled up, a personwould not survive. But most crashes are inbetween. In many of them, people who buckle upcan survive and sometimes walk away. Withoutbelts they could have been badly hurt or killed.
After more than 40 years of safety belts invehicles, the facts are clear. In most crashesbuckling up does matter... a lot!
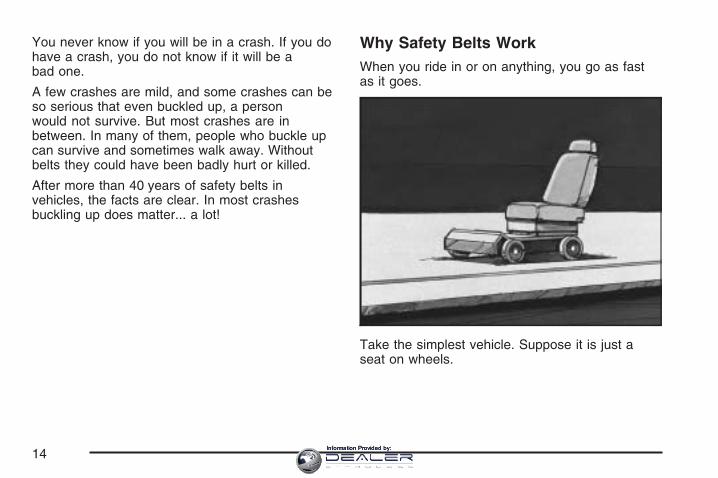
Why Safety Belts WorkWhen you ride in or on anything, you go as fastas it goes.
Take the simplest vehicle. Suppose it is just aseat on wheels.
14Information Provided by:
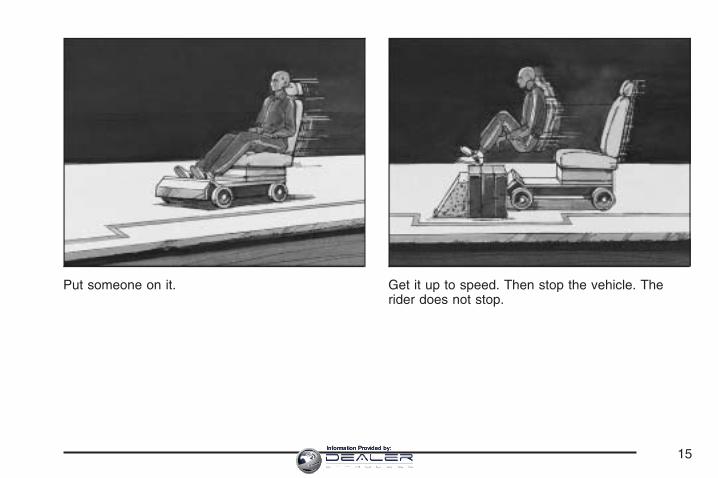
Put someone on it. Get it up to speed. Then stop the vehicle. Therider does not stop.
15Information Provided by:
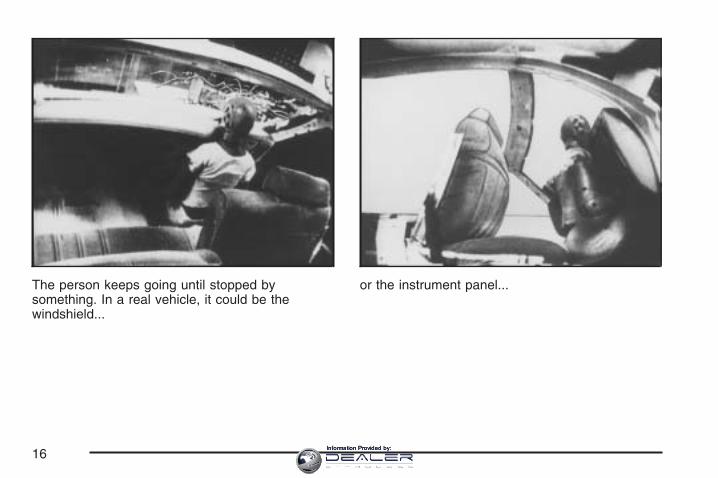
The person keeps going until stopped bysomething. In a real vehicle, it could be thewindshield...
or the instrument panel...
16Information Provided by:
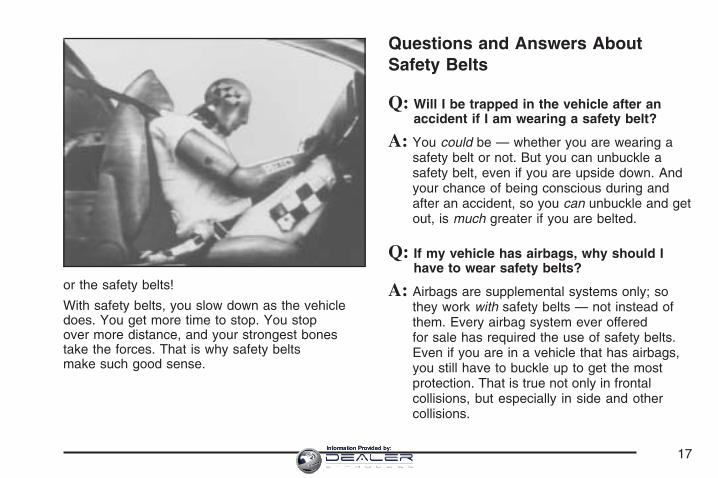
or the safety belts!
With safety belts, you slow down as the vehicledoes. You get more time to stop. You stopover more distance, and your strongest bonestake the forces. That is why safety beltsmake such good sense.
Questions and Answers AboutSafety Belts
Q: Will I be trapped in the vehicle after anaccident if I am wearing a safety belt?
A: You could be — whether you are wearing asafety belt or not. But you can unbuckle asafety belt, even if you are upside down. Andyour chance of being conscious during andafter an accident, so you can unbuckle and getout, is much greater if you are belted.
Q: If my vehicle has airbags, why should Ihave to wear safety belts?
A: Airbags are supplemental systems only; sothey work with safety belts — not instead ofthem. Every airbag system ever offeredfor sale has required the use of safety belts.Even if you are in a vehicle that has airbags,you still have to buckle up to get the mostprotection. That is true not only in frontalcollisions, but especially in side and othercollisions.
17Information Provided by:
Q: If I am a good driver, and I never drive farfrom home, why should I wear safetybelts?
A: You may be an excellent driver, but if you arein an accident — even one that is not yourfault — you and your passenger can be hurt.Being a good driver does not protect youfrom things beyond your control, such as baddrivers.
Most accidents occur within 25 miles (40 km)of home. And the greatest number ofserious injuries and deaths occur at speeds ofless than 40 mph (65 km/h).
Safety belts are for everyone.
How to Wear Safety Belts ProperlyThis part is only for people of adult size.
Be aware that there are special things to knowabout safety belts and children. And thereare different rules for smaller children and babies.If a child will be riding in your vehicle, seeOlder Children on page 28 or Infants and YoungChildren on page 31. Follow those rules foreveryone’s protection.
First, you will want to know which restraintsystems your vehicle has.
We will start with the driver position.
Driver Position
Lap-Shoulder BeltThe driver has a lap-shoulder belt. Here is how towear it properly.
1. Close and lock the door.
2. Adjust the seat so you can sit up straight. Tosee how, see “Seats” in the Index.
18Information Provided by:
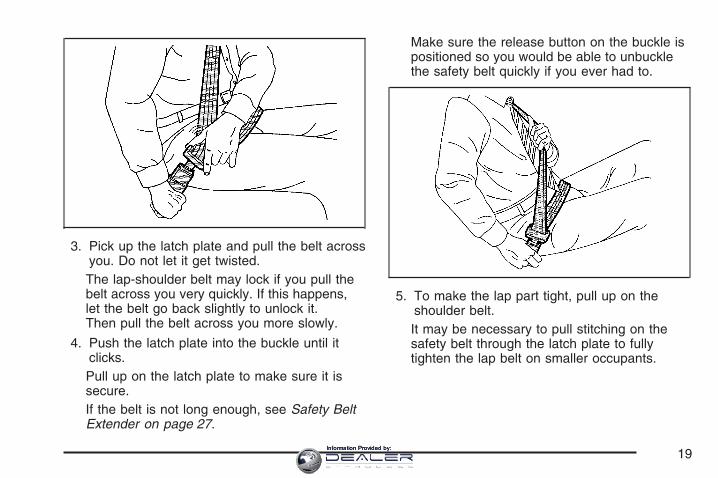
3. Pick up the latch plate and pull the belt acrossyou. Do not let it get twisted.The lap-shoulder belt may lock if you pull thebelt across you very quickly. If this happens,let the belt go back slightly to unlock it.Then pull the belt across you more slowly.
4. Push the latch plate into the buckle until itclicks.Pull up on the latch plate to make sure it issecure.If the belt is not long enough, see Safety BeltExtender on page 27.
Make sure the release button on the buckle ispositioned so you would be able to unbucklethe safety belt quickly if you ever had to.
5. To make the lap part tight, pull up on theshoulder belt.It may be necessary to pull stitching on thesafety belt through the latch plate to fullytighten the lap belt on smaller occupants.
19Information Provided by:
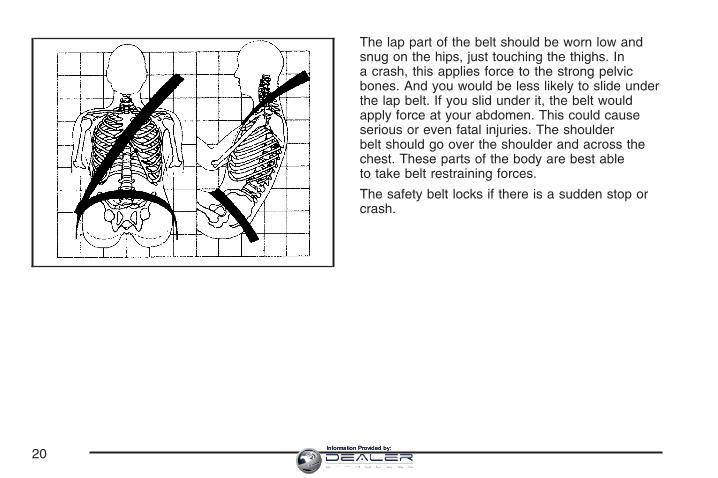
The lap part of the belt should be worn low andsnug on the hips, just touching the thighs. Ina crash, this applies force to the strong pelvicbones. And you would be less likely to slide underthe lap belt. If you slid under it, the belt wouldapply force at your abdomen. This could causeserious or even fatal injuries. The shoulderbelt should go over the shoulder and across thechest. These parts of the body are best ableto take belt restraining forces.
The safety belt locks if there is a sudden stop orcrash.
20Information Provided by:
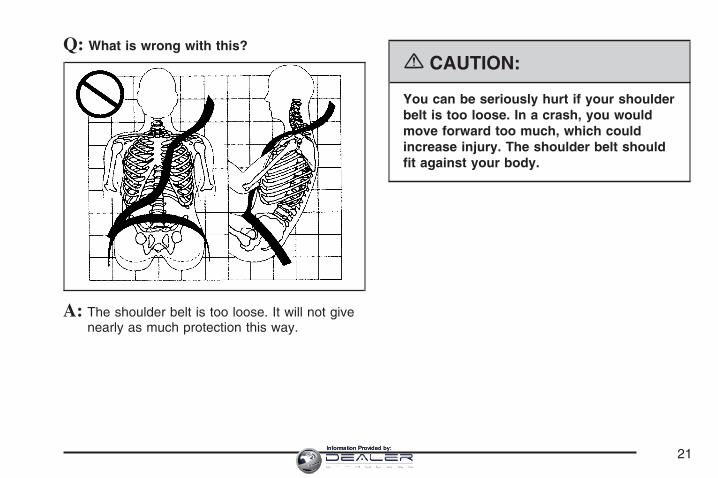
Q: What is wrong with this?
A: The shoulder belt is too loose. It will not givenearly as much protection this way.
{CAUTION:
You can be seriously hurt if your shoulderbelt is too loose. In a crash, you wouldmove forward too much, which couldincrease injury. The shoulder belt shouldfit against your body.
21Information Provided by:
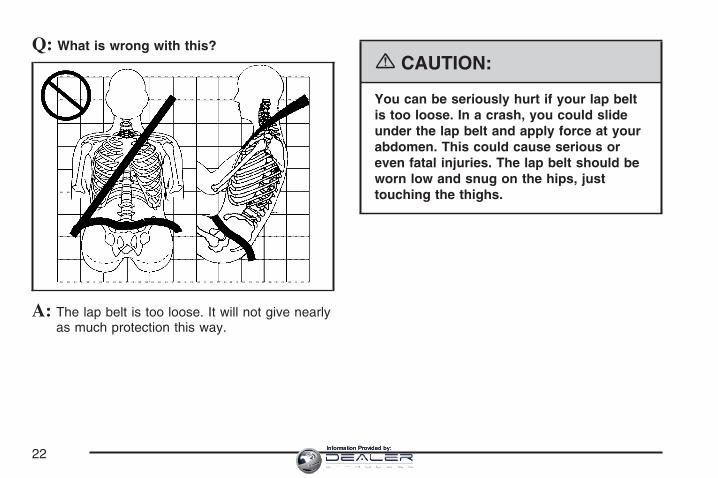
Q: What is wrong with this?
A: The lap belt is too loose. It will not give nearlyas much protection this way.
{CAUTION:
You can be seriously hurt if your lap beltis too loose. In a crash, you could slideunder the lap belt and apply force at yourabdomen. This could cause serious oreven fatal injuries. The lap belt should beworn low and snug on the hips, justtouching the thighs.
22Information Provided by:
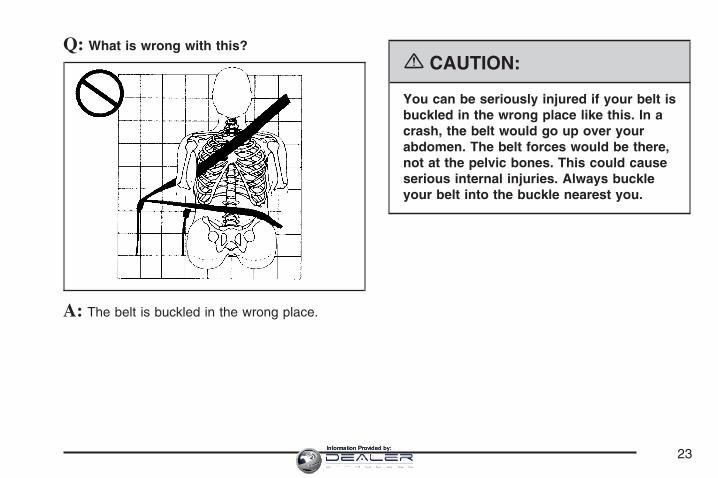
Q: What is wrong with this?
A: The belt is buckled in the wrong place.
{CAUTION:
You can be seriously injured if your belt isbuckled in the wrong place like this. In acrash, the belt would go up over yourabdomen. The belt forces would be there,not at the pelvic bones. This could causeserious internal injuries. Always buckleyour belt into the buckle nearest you.
23Information Provided by:
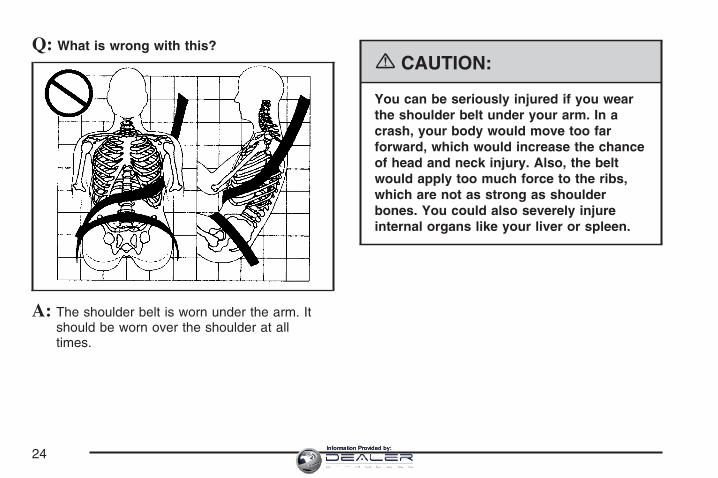
Q: What is wrong with this?
A: The shoulder belt is worn under the arm. Itshould be worn over the shoulder at alltimes.
{CAUTION:
You can be seriously injured if you wearthe shoulder belt under your arm. In acrash, your body would move too farforward, which would increase the chanceof head and neck injury. Also, the beltwould apply too much force to the ribs,which are not as strong as shoulderbones. You could also severely injureinternal organs like your liver or spleen.
24Information Provided by:
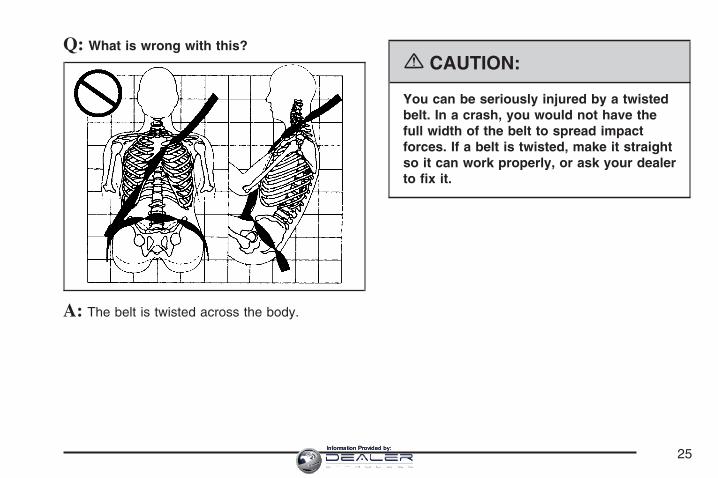
Q: What is wrong with this?
A: The belt is twisted across the body.
{CAUTION:
You can be seriously injured by a twistedbelt. In a crash, you would not have thefull width of the belt to spread impactforces. If a belt is twisted, make it straightso it can work properly, or ask your dealerto fix it.
25Information Provided by:

To unlatch the belt, push the button on the buckle.The belt should go back out of the way.
Before you close the door, be sure the belt is outof the way. If you slam the door on it, you candamage both the belt and your vehicle.
Safety Belt Use During PregnancySafety belts work for everyone, including pregnantwomen. Like all occupants, they are more likely tobe seriously injured if they do not wear safety belts.
A pregnant woman should wear a lap-shoulderbelt, and the lap portion should be worn as low aspossible, below the rounding, throughout thepregnancy.
The best way to protect the fetus is to protect themother. When a safety belt is worn properly, itis more likely that the fetus will not be hurtin a crash. For pregnant women, as for anyone,the key to making safety belts effective is wearingthem properly.
26Information Provided by:
Passenger PositionTo learn how to wear the passenger’s safety beltproperly, see Driver Position on page 18.
The passenger’s safety belt works the same wayas the driver’s safety belt — except for onething. If you ever pull the shoulder portion of thebelt out all the way, you will engage the childrestraint locking feature. If this happens, just letthe belt go back all the way and start again.
Safety Belt PretensionersYour vehicle has safety belt pretensioners for thedriver and right front passenger. Although youcannot see them, they are part of the safety beltassembly. They help tighten the safety belts duringthe early stages of a moderate to severe frontal andnear frontal crash if the threshold conditions forpretensioner activation are met. And, if your vehiclehas side impact airbags, safety belt pretensionerscan help tighten the safety belts in a side crash.
Pretensioners work only once. If they activate in acrash, you will need to get new ones, andprobably other new parts for your safety beltsystem. See Replacing Restraint System PartsAfter a Crash on page 61.
Safety Belt ExtenderIf the vehicle’s safety belt will fasten around you,you should use it.
But if a safety belt is not long enough, your dealerwill order you an extender. When you go in toorder it, take the heaviest coat you will wear, sothe extender will be long enough for you. Tohelp avoid personal injury, do not let someone elseuse it, and use it only for the seat it is made tofit. The extender has been designed for adults.Never use it for securing child seats. To wear it,just attach it to the regular safety belt. Formore information see the instruction sheet thatcomes with the extender.
27Information Provided by:
Child Restraints
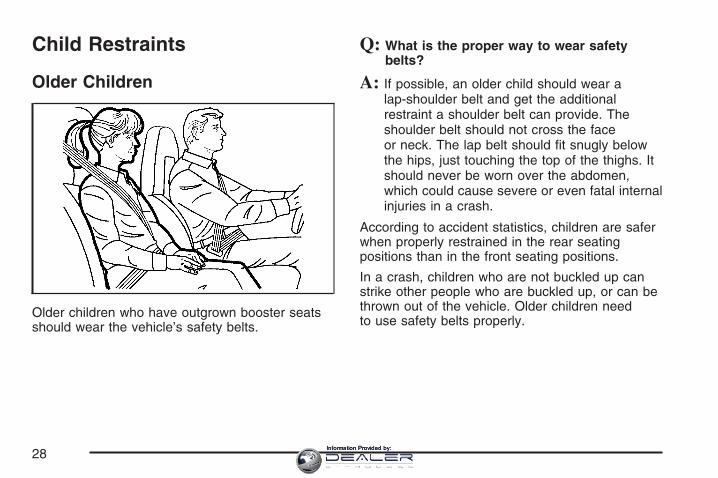
Older Children
Older children who have outgrown booster seatsshould wear the vehicle’s safety belts.
Q: What is the proper way to wear safetybelts?
A: If possible, an older child should wear alap-shoulder belt and get the additionalrestraint a shoulder belt can provide. Theshoulder belt should not cross the faceor neck. The lap belt should fit snugly belowthe hips, just touching the top of the thighs. Itshould never be worn over the abdomen,which could cause severe or even fatal internalinjuries in a crash.
According to accident statistics, children are saferwhen properly restrained in the rear seatingpositions than in the front seating positions.
In a crash, children who are not buckled up canstrike other people who are buckled up, or can bethrown out of the vehicle. Older children needto use safety belts properly.
28Information Provided by:
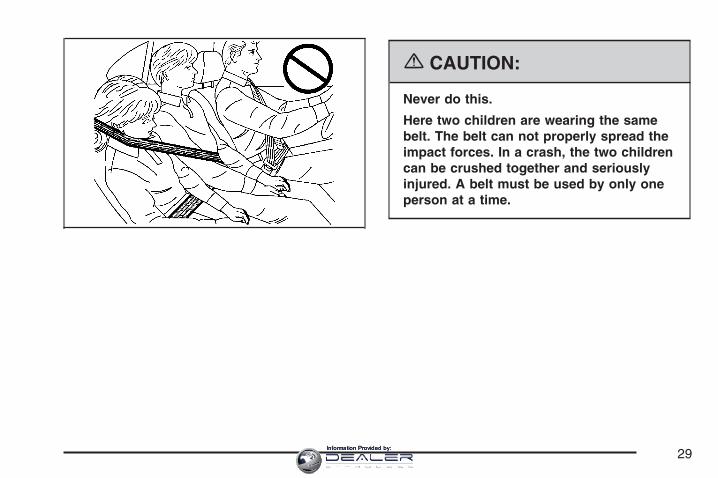
{CAUTION:
Never do this.
Here two children are wearing the samebelt. The belt can not properly spread theimpact forces. In a crash, the two childrencan be crushed together and seriouslyinjured. A belt must be used by only oneperson at a time.
29Information Provided by:
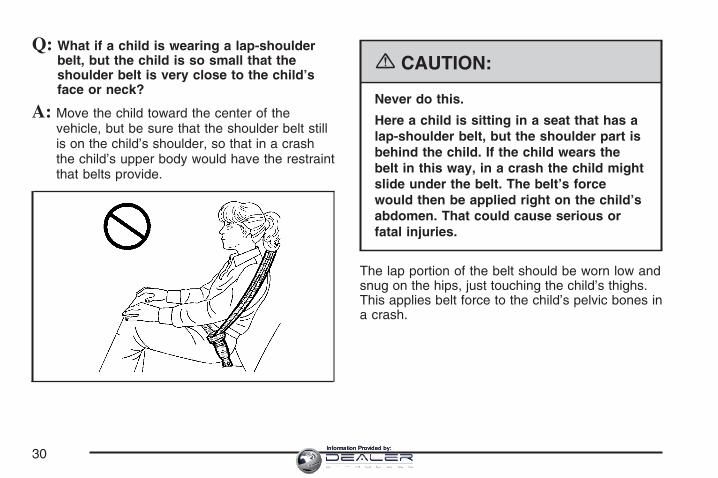
Q: What if a child is wearing a lap-shoulderbelt, but the child is so small that theshoulder belt is very close to the child’sface or neck?
A: Move the child toward the center of thevehicle, but be sure that the shoulder belt stillis on the child’s shoulder, so that in a crashthe child’s upper body would have the restraintthat belts provide.
{CAUTION:
Never do this.
Here a child is sitting in a seat that has alap-shoulder belt, but the shoulder part isbehind the child. If the child wears thebelt in this way, in a crash the child mightslide under the belt. The belt’s forcewould then be applied right on the child’sabdomen. That could cause serious orfatal injuries.
The lap portion of the belt should be worn low andsnug on the hips, just touching the child’s thighs.This applies belt force to the child’s pelvic bones ina crash.
30Information Provided by:
Infants and Young ChildrenEveryone in a vehicle needs protection! Thisincludes infants and all other children. Neither thedistance traveled nor the age and size of thetraveler changes the need, for everyone, to usesafety restraints. In fact, the law in every statein the United States and in every Canadianprovince says children up to some age must berestrained while in a vehicle.
{CAUTION:
Children can be seriously injured orstrangled if a shoulder belt is wrappedaround their neck and the safety beltcontinues to tighten. Never leave childrenunattended in a vehicle and never allowchildren to play with the safety belts.
Every time infants and young children ride invehicles, they should have the protection providedby appropriate restraints. Young children shouldnot use the vehicle’s adult safety belts alone,unless there is no other choice. Instead, they needto use a child restraint.
31Information Provided by:
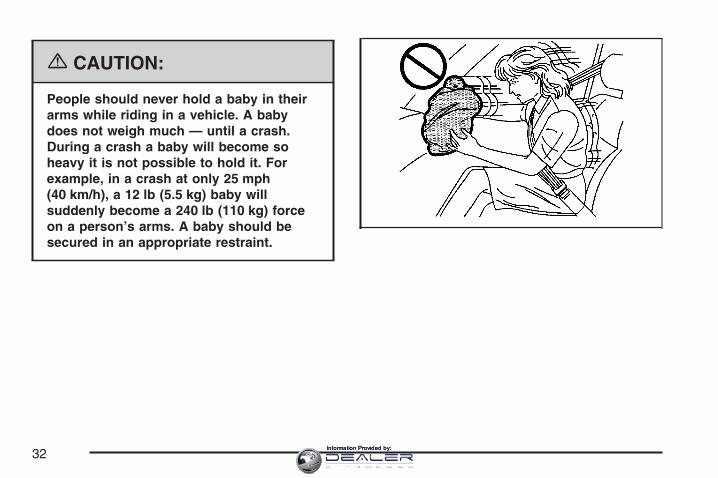
{CAUTION:
People should never hold a baby in theirarms while riding in a vehicle. A babydoes not weigh much — until a crash.During a crash a baby will become soheavy it is not possible to hold it. Forexample, in a crash at only 25 mph(40 km/h), a 12 lb (5.5 kg) baby willsuddenly become a 240 lb (110 kg) forceon a person’s arms. A baby should besecured in an appropriate restraint.
32Information Provided by:
{CAUTION:
Children who are up against, or very closeto, any airbag when it inflates can beseriously injured or killed. Airbags pluslap-shoulder belts offer protection foradults and older children, but not foryoung children and infants. Neither thevehicle’s safety belt system nor its airbagsystem is designed for them. Youngchildren and infants need the protectionthat a child restraint system can provide.
Q: What are the different types of add-onchild restraints?
A: Add-on child restraints, which are purchased bythe vehicle’s owner, are available in four basictypes. Selection of a particular restraint shouldtake into consideration not only the child’sweight, height, and age but also whether or notthe restraint will be compatible with the motorvehicle in which it will be used.
For most basic types of child restraints, thereare many different models available. Whenpurchasing a child restraint, be sure it isdesigned to be used in a motor vehicle. If it is,the restraint will have a label saying that itmeets federal motor vehicle safety standards.
33Information Provided by:
The restraint manufacturer’s instructions thatcome with the restraint state the weight andheight limitations for a particular child restraint.In addition, there are many kinds of restraintsavailable for children with special needs.
{CAUTION:
Newborn infants need complete support,including support for the head and neck.This is necessary because a newborninfant’s neck is weak and its head weighsso much compared with the rest of itsbody. In a crash, an infant in a rear-facingseat settles into the restraint, so the crashforces can be distributed across thestrongest part of an infant’s body, theback and shoulders. Infants alwaysshould be secured in appropriate infantrestraints.
{CAUTION:
The body structure of a young child isquite unlike that of an adult or older child,for whom the safety belts are designed. Ayoung child’s hip bones are still so smallthat the vehicle’s regular safety belt maynot remain low on the hip bones, as itshould. Instead, it may settle up aroundthe child’s abdomen. In a crash, the beltwould apply force on a body area that isunprotected by any bony structure. Thisalone could cause serious or fatal injuries.Young children always should be securedin appropriate child restraints.
34Information Provided by:

Child Restraint Systems
An infant car bed (A), a special bed made for usein a motor vehicle, is an infant restraint systemdesigned to restrain or position a child on acontinuous flat surface. Make sure that the infant’shead rests toward the center of the vehicle.
A rear-facing infant seat (B) provides restraint withthe seating surface against the back of theinfant. The harness system holds the infant inplace and, in a crash, acts to keep the infantpositioned in the restraint.
35Information Provided by:
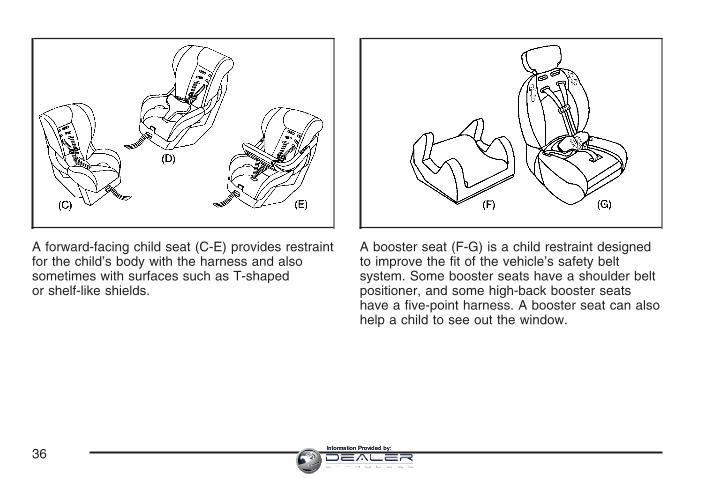
A forward-facing child seat (C-E) provides restraintfor the child’s body with the harness and alsosometimes with surfaces such as T-shapedor shelf-like shields.
A booster seat (F-G) is a child restraint designedto improve the fit of the vehicle’s safety beltsystem. Some booster seats have a shoulder beltpositioner, and some high-back booster seatshave a five-point harness. A booster seat can alsohelp a child to see out the window.
36Information Provided by:
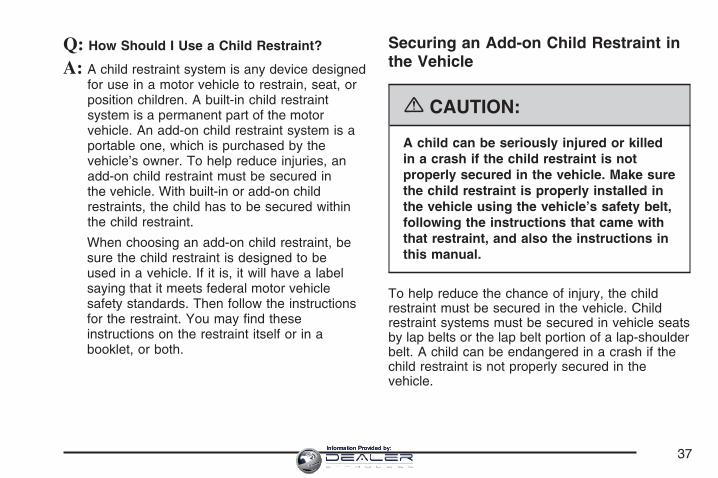
Q: How Should I Use a Child Restraint?
A: A child restraint system is any device designedfor use in a motor vehicle to restrain, seat, orposition children. A built-in child restraintsystem is a permanent part of the motorvehicle. An add-on child restraint system is aportable one, which is purchased by thevehicle’s owner. To help reduce injuries, anadd-on child restraint must be secured inthe vehicle. With built-in or add-on childrestraints, the child has to be secured withinthe child restraint.
When choosing an add-on child restraint, besure the child restraint is designed to beused in a vehicle. If it is, it will have a labelsaying that it meets federal motor vehiclesafety standards. Then follow the instructionsfor the restraint. You may find theseinstructions on the restraint itself or in abooklet, or both.
Securing an Add-on Child Restraint inthe Vehicle
{CAUTION:
A child can be seriously injured or killedin a crash if the child restraint is notproperly secured in the vehicle. Make surethe child restraint is properly installed inthe vehicle using the vehicle’s safety belt,following the instructions that came withthat restraint, and also the instructions inthis manual.
To help reduce the chance of injury, the childrestraint must be secured in the vehicle. Childrestraint systems must be secured in vehicle seatsby lap belts or the lap belt portion of a lap-shoulderbelt. A child can be endangered in a crash if thechild restraint is not properly secured in thevehicle.
37Information Provided by:
When securing an add-on child restraint, refer tothe instructions that come with the restraintwhich may be on the restraint itself or in a booklet,or both, and to this manual. The child restraintinstructions are important, so if they are notavailable, obtain a replacement copy from themanufacturer.
Keep in mind that an unsecured child restraint canmove around in a collision or sudden stop andinjure people in the vehicle. Be sure to properlysecure any child restraint in your vehicle — evenwhen no child is in it.
Securing the Child Within the ChildRestraintThere are several systems for securing the childwithin the child restraint. One system, thethree-point harness, has straps that come downover each of the infant’s shoulders and buckletogether at the crotch. The five-point harnesssystem has two shoulder straps, two hip straps, anda crotch strap. A shield may take the place of hipstraps. A T-shaped shield has shoulder straps thatare attached to a flat pad which rests low against
the child’s body. A shelf- or armrest-type shield hasstraps that are attached to a wide, shelf-like shieldthat swings up or to the side.
{CAUTION:
A child can be seriously injured or killedin a crash if the child is not properlysecured in the child restraint. Make surethe child is properly secured, followingthe instructions that came with thatrestraint.
Because there are different systems, it is importantto refer to the instructions that come with therestraint. A child can be endangered in a crash ifthe child is not properly secured in the childrestraint.
38Information Provided by:
Lower Anchors and Tethers forChildren (LATCH)Some child restraints have a LATCH system. Aspart of the LATCH system, your child restraint mayhave lower attachments and/or a top tether. TheLATCH system can help hold the child restraint inplace during driving or in a crash. Some vehicleshave lower and/or top tether anchors designedto secure a child restraint with lower attachmentsand/or a top tether.
Some child restraints with a top tether aredesigned to be used whether the top tether isanchored or not. Other child restraints require thatthe top tether be anchored. A national or locallaw may require that the top tether be anchored.
In Canada, the law requires that forward-facingchild restraints have a top tether, and thatthe tether be attached.
Your vehicle does not have lower anchors or toptether anchors to secure a child restraint withthe LATCH system. If a national or local lawrequires that your top tether be anchored, do notuse a child restraint in this vehicle because atop tether cannot be properly anchored. You mustuse the safety belts to secure your child restraintin this vehicle, unless a national or local lawrequires that the top tether be anchored. Refer toyour child restraint instructions and instructionsin this manual for securing a child restraint usingthe vehicle’s safety belts.
39Information Provided by:
Securing a Child Restraint in thePassenger Seat PositionYour vehicle has a right front passenger airbag.
In addition, your vehicle has the passengersensing system. The passenger sensing system isdesigned to turn off the right front passenger’sfrontal airbag and side impact airbag whenan infant in a rear-facing infant seat or a smallchild in a forward-facing child restraint or boosterseat is detected. See Passenger SensingSystem on page 53 and Passenger Airbag StatusIndicator on page 189 for more information onthis, including important safety information.
Your vehicle has a label on your sun visor thatsays, ″Never put a rear-facing child seat inthe front.″ This is because the risk to therear-facing child is so great, if the airbag deploys.
Never put a child in a rear-facing child restraint inthe passenger’s seat unless the passengerairbag status indicator shows off and the airbag isoff. Here is why:
{CAUTION:
A child in a rear-facing child restraint canbe seriously injured or killed if the rightfront passenger’s airbag inflates. This isbecause the back of the rear facing childrestraint would be very close to theinflating airbag. Be sure the airbag is offbefore using a rear-facing child restraintin the passenger’s position.
Even though the passenger sensingsystem is designed to turn off thepassenger’s frontal airbag and sideimpact airbag (if equipped) if the systemdetects a rear-facing child restraint,
CAUTION: (Continued)
40Information Provided by:

CAUTION: (Continued)
no system is fail-safe, and no one canguarantee that an airbag will not deployunder some unusual circumstance, eventhough it is turned off. We recommendthat rear-facing child restraints betransported in vehicles with a rear seatthat will accommodate a rear-facing childrestraint, whenever possible.
If you need to secure a forward-facing childrestraint in the passenger’s position, move theseat as far back as it will go before securing theforward-facing child restraint. See Power Seats onpage 8.
There is no top tether anchor at the passenger’sseating position. Do not secure a child seat in thisposition if a national or local law requires thatthe top tether be anchored or if the instructionsthat come with the child restraint say that the toptether must be anchored. See Lower Anchorsand Tethers for Children (LATCH) on page 39.
You will be using the lap-shoulder belt to securethe child restraint in this position. Be sure to followthe instructions that came with the child restraint.Secure the child in the child restraint when and asthe instructions say.
1. Your vehicle has a right front passenger’sfrontal airbag. See Passenger SensingSystem on page 53. We recommend thatrear-facing child restraints not be transportedin your vehicle, even if the airbags are off.If your child restraint is forward-facing, movethe seat as far back as it will go beforesecuring the child restraint in this seat. SeePower Seats on page 8.When the passenger sensing system hasturned off the right front passenger’s frontalairbag and side impact airbag, the off indicatorin the passenger airbag status indicatorshould light and stay lit when the vehicle isstarted. See Passenger Airbag Status Indicatoron page 189.
2. Put the child restraint on the seat.
41Information Provided by:
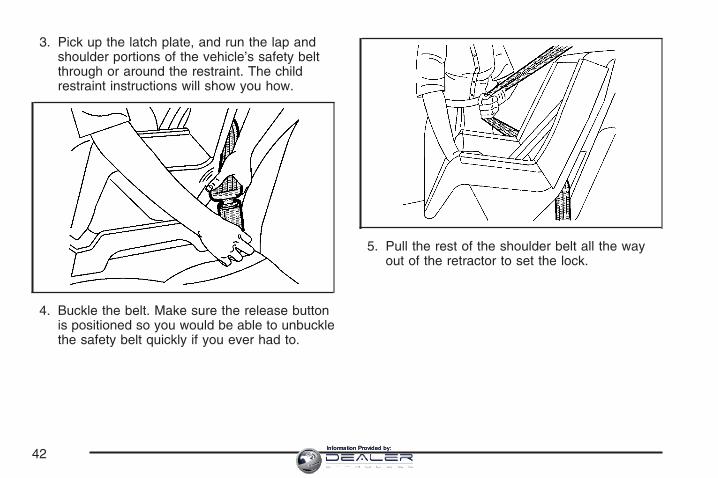
3. Pick up the latch plate, and run the lap andshoulder portions of the vehicle’s safety beltthrough or around the restraint. The childrestraint instructions will show you how.
4. Buckle the belt. Make sure the release buttonis positioned so you would be able to unbucklethe safety belt quickly if you ever had to.
5. Pull the rest of the shoulder belt all the wayout of the retractor to set the lock.
42Information Provided by:
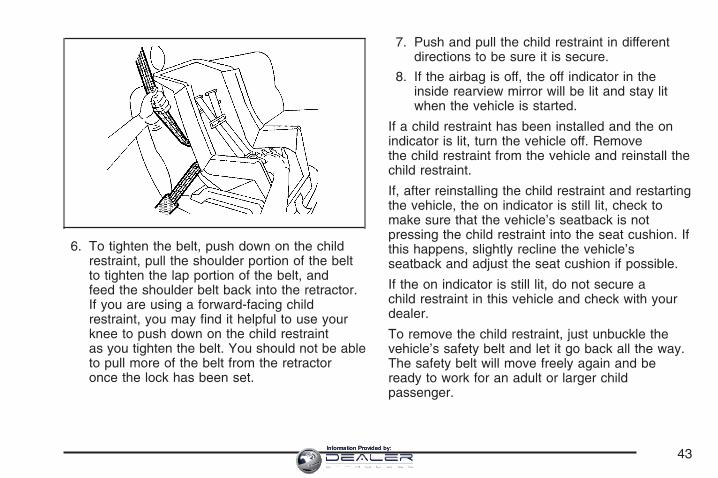
6. To tighten the belt, push down on the childrestraint, pull the shoulder portion of the beltto tighten the lap portion of the belt, andfeed the shoulder belt back into the retractor.If you are using a forward-facing childrestraint, you may find it helpful to use yourknee to push down on the child restraintas you tighten the belt. You should not be ableto pull more of the belt from the retractoronce the lock has been set.
7. Push and pull the child restraint in differentdirections to be sure it is secure.
8. If the airbag is off, the off indicator in theinside rearview mirror will be lit and stay litwhen the vehicle is started.
If a child restraint has been installed and the onindicator is lit, turn the vehicle off. Removethe child restraint from the vehicle and reinstall thechild restraint.
If, after reinstalling the child restraint and restartingthe vehicle, the on indicator is still lit, check tomake sure that the vehicle’s seatback is notpressing the child restraint into the seat cushion. Ifthis happens, slightly recline the vehicle’sseatback and adjust the seat cushion if possible.
If the on indicator is still lit, do not secure achild restraint in this vehicle and check with yourdealer.
To remove the child restraint, just unbuckle thevehicle’s safety belt and let it go back all the way.The safety belt will move freely again and beready to work for an adult or larger childpassenger.
43Information Provided by:
Airbag SystemYour vehicle has a frontal airbag for the driver, afrontal airbag for the passenger, a side impactairbag for the driver, and a side impact airbag forthe passenger.
Airbags are designed to supplement the protectionprovided by safety belts. Even though today’sairbags are also designed to help reduce the riskof injury from the force of an inflating bag, allairbags must inflate very quickly to do their job.
Here are the most important things to know aboutthe airbag system:
{CAUTION:
You can be severely injured or killed in acrash if you are not wearing your safetybelt — even if you have airbags. Wearingyour safety belt during a crash helpsreduce your chance of hitting thingsinside the vehicle or being ejected from it.Airbags are “supplemental restraints” tothe safety belts. All airbags are designedto work with safety belts, but do notreplace them.
44Information Provided by:

{CAUTION:
Frontal airbags for the driver andpassenger are designed to deploy inmoderate to severe frontal and nearfrontal crashes. They are not designed toinflate in rollover, rear crashes, or in manyside crashes. And, for some unrestrainedoccupants, frontal airbags may provideless protection in frontal crashes thanmore forceful airbags have provided inthe past.
Side impact airbags for the driver andpassenger are designed to inflate inmoderate to severe crashes wheresomething hits the side of your vehicle.They are not designed to inflate in frontal,in rollover, or in rear crashes.
Everyone in your vehicle should wear asafety belt properly — whether or notthere is an airbag for that person.
{CAUTION:
Both frontal and side impact airbagsinflate with great force, faster than theblink of an eye. If you are too close to aninflating airbag, as you would be if youwere leaning forward, it could seriouslyinjure you. Safety belts help keep you inposition for airbag inflation before andduring a crash. Always wear your safetybelt even with frontal airbags. The drivershould sit as far back as possible whilestill maintaining control of the vehicle.Occupants should not lean on or sleepagainst the door.
45Information Provided by:
{CAUTION:
Anyone who is up against, or very closeto, any airbag when it inflates can beseriously injured or killed. Airbags pluslap-shoulder belts offer the bestprotection for adults, but not for youngchildren and infants. Neither the vehicle’ssafety belt system nor its airbag system isdesigned for them. Young children andinfants need the protection that a childrestraint system can provide. Alwayssecure children properly in your vehicle.To read how, see Older Children onpage 28 or Infants and Young Children onpage 31.
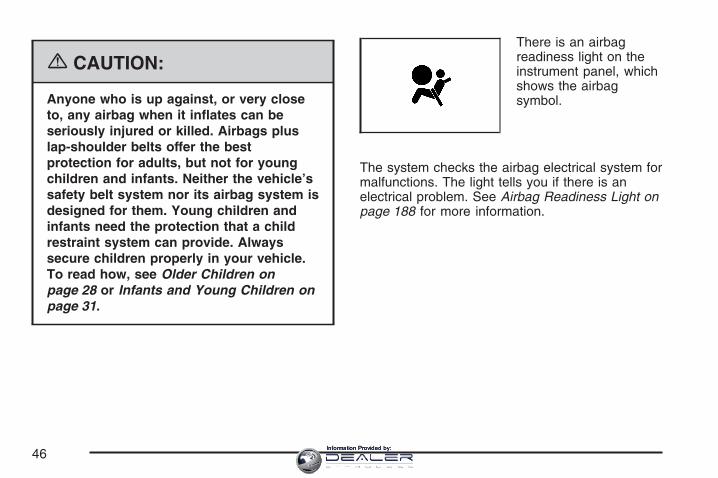
There is an airbagreadiness light on theinstrument panel, whichshows the airbagsymbol.
The system checks the airbag electrical system formalfunctions. The light tells you if there is anelectrical problem. See Airbag Readiness Light onpage 188 for more information.
46Information Provided by:
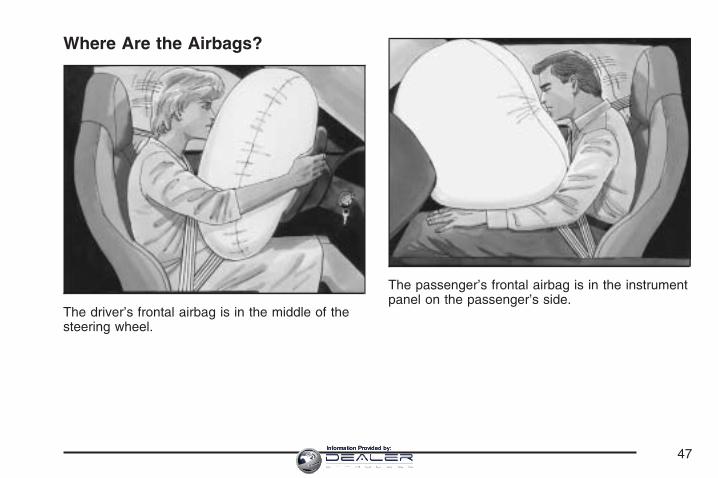
Where Are the Airbags?
The driver’s frontal airbag is in the middle of thesteering wheel.
The passenger’s frontal airbag is in the instrumentpanel on the passenger’s side.
47Information Provided by:
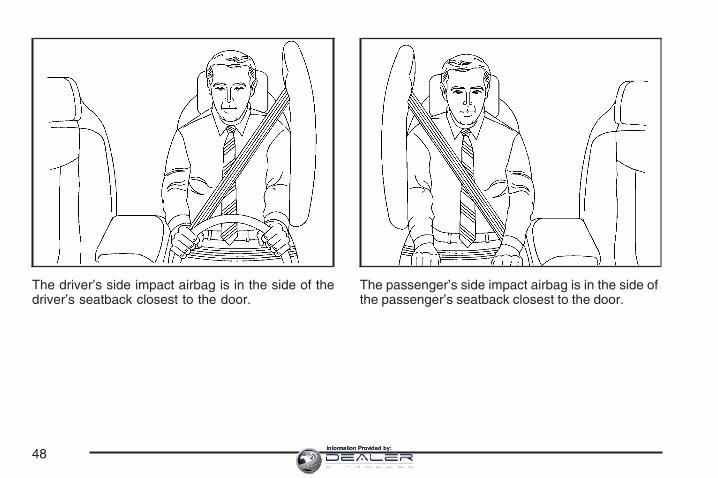
The driver’s side impact airbag is in the side of thedriver’s seatback closest to the door.
The passenger’s side impact airbag is in the side ofthe passenger’s seatback closest to the door.
48Information Provided by:
{CAUTION:
If something is between an occupant andan airbag, the airbag might not inflateproperly or it might force the object intothat person causing severe injury or evendeath. The path of an inflating airbag mustbe kept clear. Do not put anythingbetween an occupant and an airbag, anddo not attach or put anything on thesteering wheel hub or on or near anyother airbag covering. Do not let seatcovers block the inflation path of a sideimpact airbag.
When Should an Airbag Inflate?The driver’s and right front passenger’s frontalairbags are designed to inflate in moderate tosevere frontal or near-frontal crashes. But they aredesigned to inflate only if the impact exceeds apredetermined deployment threshold. Deployment
thresholds take into account a variety of desireddeployment and non-deployment events and areused to predict how severe a crash is likely to be intime for the airbags to inflate and help restrain theoccupants. Whether your frontal airbags will orshould deploy is not based on how fast your vehicleis traveling. It depends largely on what you hit, thedirection of the impact, and how quickly yourvehicle slows down.
In addition, your vehicle has “dual stage” frontalairbags, which adjust the restraint accordingto crash severity. Your vehicle has electronicfrontal sensors which help the sensing systemdistinguish between a moderate frontal impact anda more severe frontal impact. For moderatefrontal impacts, these airbags inflate at a level lessthan full deployment. For more severe frontalimpacts, full deployment occurs. If the front of yourvehicle goes straight into a wall that does notmove or deform, the threshold level for thereduced deployment is about 12 to 16 mph (19 to26 km/h), and the threshold level for a fulldeployment is about 18 to 24 mph (29 to38.5 km/h). The threshold level can vary, however,with specific vehicle design, so that it can besomewhat above or below this range.
49Information Provided by:
Frontal airbags may inflate at different crashspeeds. For example:
• If the vehicle hits a stationary object, theairbags could inflate at a different crash speedthan if the vehicle hits a moving object.
• If the vehicle hits an object that deforms, theairbags could inflate at a different crashspeed than if the vehicle hits an object thatdoes not deform.
• If the vehicle hits a narrow object (like a pole),the airbags could inflate at a different crashspeed than if the vehicle hits a wide object(like a wall).
• If the vehicle goes into an object at an angle,the airbags could inflate at a different crashspeed than if the vehicle goes straight into theobject.
Frontal airbags (driver and right front passenger)are not intended to inflate during vehiclerollovers, rear impacts, or in many side impacts.
The side impact airbags are intended to inflate inmoderate to severe side crashes. A side impactairbag will inflate if the crash severity is above thesystem’s designed “threshold level.” Thethreshold level can vary with specific vehicledesign. Side impact airbags are not intended toinflate in frontal or near-frontal impacts, rollovers orrear impacts. A side impact airbag is intended todeploy on the side of the vehicle that is struck.
Your vehicle also has seat position sensors whichenables the sensing system to monitor theposition of the driver’s and passenger’s seats. Theseat position sensor provides information whichis used to determine if the airbags should deploy ata reduced level or at full deployment.
In any particular crash, no one can say whetheran airbag should have inflated simply becauseof the damage to a vehicle or because of what therepair costs were. For frontal airbags, inflation isdetermined by what the vehicle hits, the angleof the impact, and how quickly the vehicle slowsdown. For side impact airbags, inflation isdetermined by the location and severity ofthe impact.
50Information Provided by:
What Makes an Airbag Inflate?In an impact of sufficient severity, the airbagsensing system detects that the vehicle isin a crash. The sensing system triggers a releaseof gas from the inflator, which inflates theairbag. The inflator, the airbag and relatedhardware are all part of the airbag modules.Frontal airbag modules are located insidethe steering wheel and instrument panel. Forseating positions with side impact airbags, thereare also airbag modules in the side of theseatbacks closest to the door.
How Does an Airbag Restrain?In moderate to severe frontal or near frontalcollisions, even belted occupants can contact thesteering wheel or the instrument panel. Inmoderate to severe side collisions, even beltedoccupants can contact the inside of the vehicle.Airbags supplement the protection providedby safety belts. Airbags distribute the force of theimpact more evenly over the occupant’s upperbody, stopping the occupant more gradually. Butthe frontal airbags would not help you in manytypes of collisions, including rollovers, rearimpacts, and many side impacts, primarily becausean occupant’s motion is not toward the airbag.Side impact airbags would not help you in manytypes of collisions, including many frontal ornear frontal collisions, rollovers, and rear impacts.
Airbags should never be regarded as anythingmore than a supplement to safety belts, and thenonly in moderate to severe frontal or near-frontalcollisions for the driver’s and right frontpassenger’s frontal airbags, and only in moderateto severe side collisions for vehicles with sideimpact airbags.
51Information Provided by:
What Will You See After an AirbagInflates?After an airbag inflates, it quickly deflates, soquickly that some people may not even realize theairbag inflated. Some components of the airbagmodule — the steering wheel hub for the driver’sfrontal airbag, the instrument panel for theright front passenger’s frontal airbag, and forseating positions with side impact airbags, the sideof the seatback closest to the door — may behot for a short time. The parts of the airbag thatcome into contact with you may be warm, butnot too hot to touch. There may be some smokeand dust coming from the vents in the deflatedairbags. Airbag inflation does not prevent the driverfrom seeing out of the windshield or being ableto steer the vehicle, nor does it prevent peoplefrom leaving the vehicle.
{CAUTION:
When an airbag inflates, there may bedust in the air. This dust could causebreathing problems for people with ahistory of asthma or other breathingtrouble. To avoid this, everyone in thevehicle should get out as soon as it issafe to do so. If you have breathingproblems but cannot get out of the vehicleafter an airbag inflates, then get fresh airby opening a window or a door. If youexperience breathing problems followingan airbag deployment, you should seekmedical attention.
Your vehicle has a feature that may automaticallyunlock the doors, turn the interior lamps on,and turn on the hazard warning flashers when theairbags inflate. You can lock the doors, turn theinterior lamps off, and turn the hazard warningflashers off by using the controls for thosefeatures.
52Information Provided by:
In many crashes severe enough to inflate anairbag, windshields are broken by vehicledeformation. Additional windshield breakage mayalso occur from the right front passengerairbag.
• Airbags are designed to inflate only once.After they inflate, you will need some newparts for the airbag system. If you do not getthem, the airbag system will not be thereto help protect you in another crash. A newsystem will include airbag modules andpossibly other parts. The service manual foryour vehicle covers the need to replaceother parts.
• Your vehicle has a crash sensing anddiagnostic module which records informationafter a crash. See Vehicle Data Collection andEvent Data Recorders on page 491.
• Let only qualified technicians work on yourairbag system. Improper service can meanthat an airbag system will not work properly.See your dealer for service.
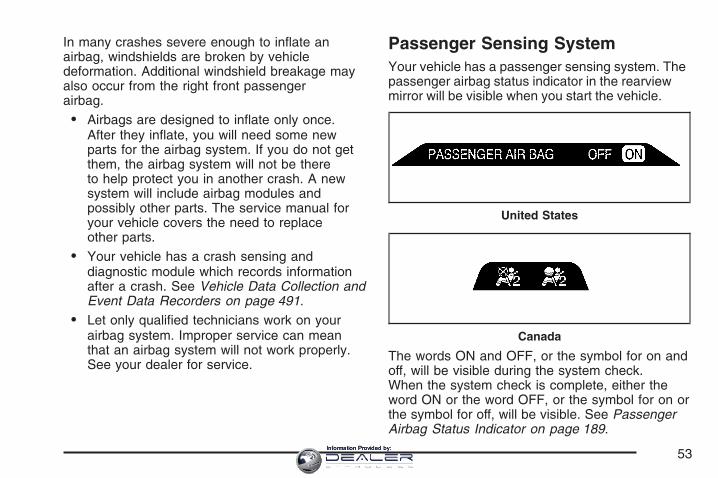
Passenger Sensing SystemYour vehicle has a passenger sensing system. Thepassenger airbag status indicator in the rearviewmirror will be visible when you start the vehicle.
The words ON and OFF, or the symbol for on andoff, will be visible during the system check.When the system check is complete, either theword ON or the word OFF, or the symbol for on orthe symbol for off, will be visible. See PassengerAirbag Status Indicator on page 189.
United States
Canada
53Information Provided by:
The passenger sensing system will turn off thepassenger’s frontal airbag and side impact airbagunder certain conditions. The driver’s airbagsare not part of the passenger sensing system.
The passenger sensing system works with sensorsthat are part of the passenger’s seat and safetybelt. The sensors are designed to detect thepresence of a properly seated occupant anddetermine if the passenger’s frontal airbag andside impact airbag should be enabled (may inflate)or not.
Accident statistics show that children are safer ifthey are restrained in the rear rather than the frontseat. We recommend that rear-facing childrestraints not be transported in your vehicle, evenif the airbags are off.
Your vehicle has a label on the sun visor thatsays, “Never put a rear-facing child seat inthe front.” This is because the risk to therear-facing child is so great if the airbag deploys.
Never put a child in a rear-facing child restraintin the passenger’s seat unless the passengerairbag status indicator shows off and the airbagsare off.
{CAUTION:
A child in a rear-facing child restraint canbe seriously injured or killed if thepassenger’s airbag inflates. This isbecause the back of the rear-facing childrestraint would be very close to theinflating airbag. Be sure the airbag is offbefore using a rear-facing child restraintin the passenger’s position.
Even though the passenger sensingsystem is designed to turn off thepassenger’s frontal airbag and sideimpact airbag (if equipped) if the systemdetects a rear-facing child restraint, nosystem is fail-safe, and no one canguarantee that an airbag will not deployunder some unusual circumstance, eventhough it is turned off. We recommend that
CAUTION: (Continued)
54Information Provided by:
CAUTION: (Continued)
rear-facing child restraints be transportedin vehicles with a rear seat that willaccommodate a rear-facing child restraint,whenever possible.
If you need to secure a forward-facingchild restraint in the passenger’s seat,always move the passenger’s seat as farback as it will go. It is better to secure thechild restraint in a rear seat.
The passenger sensing system is designed to turnoff the passenger’s frontal airbag and sideimpact airbag if:
• The passenger’s seat is unoccupied.
• The system determines that an infant ispresent in a rear-facing infant seat.
• The system determines that a small child ispresent in a forward-facing child restraint.
• The system determines that a small child ispresent in a booster seat.
• A passenger takes his/her weight off of theseat for a period of time.
• The passenger’s seat is occupied by a smallerperson, such as a child who has outgrownchild restraints.
• Or, if there is a critical problem with the airbagsystem or the passenger sensing system.
When the passenger’s frontal airbag and sideimpact airbag have been turned off by thepassenger sensing system, the off indicator will lightand stay lit to remind you that the airbags are off.
If a child restraint has been installed and the onindicator is lit, turn the vehicle off. Remove the childrestraint from the vehicle and reinstall the childrestraint following the child restraint manufacturer’sdirections and refer to Securing a Child Restraint inthe Passenger Seat Position on page 40.
If, after reinstalling the child restraint and restartingthe vehicle, the on indicator is still lit, check tomake sure that the vehicle’s seatback is notpressing the child restraint into the seat cushion.If this happens, slightly recline the vehicle’sseatback and adjust the seat cushion if possible.
If the on indicator is still lit, do not secure the childrestraint in this vehicle and check with your dealer.
55Information Provided by:
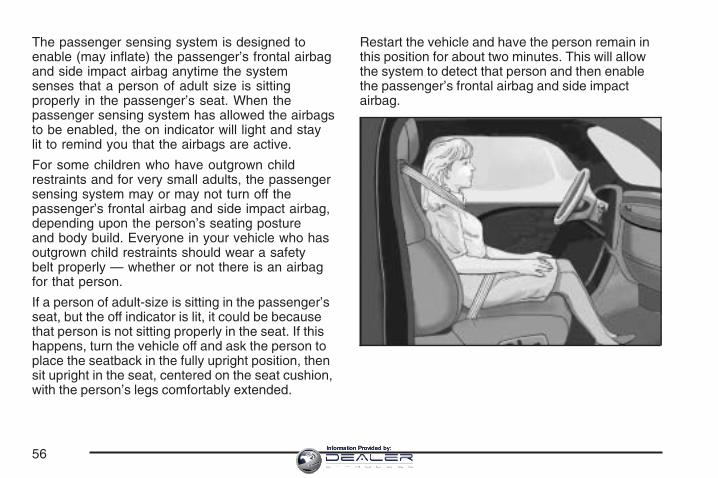
The passenger sensing system is designed toenable (may inflate) the passenger’s frontal airbagand side impact airbag anytime the systemsenses that a person of adult size is sittingproperly in the passenger’s seat. When thepassenger sensing system has allowed the airbagsto be enabled, the on indicator will light and staylit to remind you that the airbags are active.
For some children who have outgrown childrestraints and for very small adults, the passengersensing system may or may not turn off thepassenger’s frontal airbag and side impact airbag,depending upon the person’s seating postureand body build. Everyone in your vehicle who hasoutgrown child restraints should wear a safetybelt properly — whether or not there is an airbagfor that person.
If a person of adult-size is sitting in the passenger’sseat, but the off indicator is lit, it could be becausethat person is not sitting properly in the seat. If thishappens, turn the vehicle off and ask the person toplace the seatback in the fully upright position, thensit upright in the seat, centered on the seat cushion,with the person’s legs comfortably extended.
Restart the vehicle and have the person remain inthis position for about two minutes. This will allowthe system to detect that person and then enablethe passenger’s frontal airbag and side impactairbag.
56Information Provided by:
{CAUTION:
If the airbag readiness light in theinstrument panel cluster ever comes onand stays on, it means that somethingmay be wrong with the airbag system. Ifthis ever happens, have the vehicleserviced promptly, because an adult-sizeperson sitting in the right frontpassenger’s seat may not have theprotection of an airbag. See AirbagReadiness Light on page 188 for more onthis, including important safetyinformation.
Aftermarket equipment, such as seat covers, canaffect how well the passenger sensing systemoperates. You may want to consider not using seatcovers or other aftermarket equipment if yourvehicle has the passenger sensing system. SeeAdding Equipment to Your Airbag-EquippedVehicle on page 59 for more information aboutmodifications that can affect how the systemoperates.
{CAUTION:
Stowing of articles under the passenger’sseat or between the passenger’s seatcushion and seatback may interfere withthe proper operation of the passengersensing system.
57Information Provided by:
Servicing Your Airbag-EquippedVehicleAirbags affect how your vehicle should beserviced. There are parts of the airbag system inseveral places around your vehicle. You donot want the system to inflate while someone isworking on your vehicle. Your dealer and theservice manual have information about servicingyour vehicle and the airbag system. To purchase aservice manual, see Service PublicationsOrdering Information on page 497.
{CAUTION:
For up to 10 seconds, after the ignition isturned off and the battery is disconnected,an airbag can still inflate during improperservice. You can be injured if you areclose to an airbag when it inflates. Avoidyellow connectors. They are probably partof the airbag system. Be sure to followproper service procedures, and make surethe person performing work for you isqualified to do so.
The airbag system does not need regularmaintenance.
58Information Provided by:
Adding Equipment to YourAirbag-Equipped Vehicle
Q: Is there anything I might add to the frontor sides of the vehicle that could keep theairbags from working properly?
A: Yes. If you add things that change yourvehicle’s frame, bumper system, height,front end or side sheet metal, they may keepthe airbag system from working properly.Also, the airbag system may not work properlyif you relocate any of the airbag sensors. Ifyou have any questions about this, you shouldcontact Customer Assistance before youmodify your vehicle. The phone numbers andaddresses for Customer Assistance are inStep Two of the Customer SatisfactionProcedure in this manual. See CustomerSatisfaction Procedure on page 482.
Q: Because I have a disability, I have to getmy vehicle modified. How can I find outwhether this will affect my advanced airbagsystem?
A: Changing or moving any parts of the frontseats, safety belts, the airbag sensing anddiagnostic module, steering wheel, instrumentpanel, the inside review mirror, or airbagwiring can affect the operation of the airbagsystem. If you have questions, call CustomerAssistance. The phone numbers andaddresses for Customer Assistance are inStep Two of the Customer SatisfactionProcedure in this manual. See CustomerSatisfaction Procedure on page 482.
59Information Provided by:
Restraint System Check
Checking the Restraint SystemsNow and then, make sure the safety belt reminderlight and all your belts, buckles, latch plates,retractors and anchorages are working properly.Look for any other loose or damaged safetybelt system parts. If you see anything that mightkeep a safety belt system from doing its job, haveit repaired. See Care of Safety Belts on page 445for more information.
Torn or frayed safety belts may not protect you ina crash. They can rip apart under impact forces.If a belt is torn or frayed, get a new one right away.
Also look for any opened or broken airbagcovers, and have them repaired or replaced. Theairbag system does not need regular maintenance.
Notice: If you damage the covering for thedriver’s or the passenger’s airbag, or theairbag covering on the driver’s andpassenger’s seatback, the airbag may not workproperly. You may have to replace the airbagmodule in the steering wheel, both theairbag module and the instrument panel for thepassenger’s airbag, or both the airbagmodule and seatback for the driver’s andpassenger’s side impact airbag. Do not openor break the airbag coverings.
60Information Provided by:
Replacing Restraint System PartsAfter a Crash
{CAUTION:
A crash can damage the restraint systemsin your vehicle. A damaged restraintsystem may not properly protect theperson using it, resulting in serious injuryor even death in a crash. To help makesure your restraint systems are workingproperly after a crash, have theminspected and any necessaryreplacements made as soon as possible.
If you have had a crash, do you need new belts?
After a very minor collision, nothing may benecessary. But if the belts were stretched, as theywould be if worn during a more severe crash,then you need new parts.
If belts are cut or damaged, replace them.Collision damage also may mean you will need tohave safety belt or seat parts repaired orreplaced. New parts and repairs may be necessaryeven if the belt was not being used at the timeof the collision.
If an airbag inflates, you will need to replaceairbag system parts. See the part on the airbagsystem earlier in this section.
If the frontal airbags inflate, you will also need toreplace the driver’s and passenger’s safetybelt buckle assembly. Be sure to do so. Then thenew buckle assembly will be there to helpprotect you in a collision.
After a crash you may need to replace the driverand front passenger’s safety belt buckleassemblies, even if the frontal airbags have notdeployed. The driver and front passenger’s safetybelt buckle assemblies contain the safety beltpretensioners. Have your safety belt pretensionerschecked if your vehicle has been in a collision,or if your airbag readiness light stays on after youstart your vehicle or while you are driving. SeeAirbag Readiness Light on page 188.
61Information Provided by:

✍ NOTES
62Information Provided by:
Keys .............................................................. 65Keyless Access System .............................. 67Keyless Access System Operation .............. 68
Doors and Locks .......................................... 73Door Locks ................................................. 73Power Door Locks ....................................... 75Automatic Door Lock ................................... 76Programmable Automatic Door Unlock ........ 76Lockout Protection ....................................... 77Trunk .......................................................... 77
Windows ....................................................... 81Power Windows .......................................... 82Sun Visors .................................................. 84
Theft-Deterrent Systems ............................... 84Theft-Deterrent System ................................ 84Valet Lockout Switch ................................... 86
Starting and Operating Your Vehicle ........... 87New Vehicle Break-In .................................. 87Ignition Positions ......................................... 88Retained Accessory Power (RAP) ............... 89Starting the Engine ..................................... 89Automatic Transmission Operation ............... 92Parking Brake ............................................. 97
Shifting Into Park (P) ................................... 99Shifting Out of Park (P) ............................. 100Parking Over Things That Burn ................. 101Engine Exhaust ......................................... 102Running the Engine While Parked ............. 103
Mirrors ......................................................... 104Automatic Dimming Rearview Mirror with
OnStar® ................................................. 104Outside Power Heated Mirrors ................... 105Outside Automatic Dimming Mirror ............. 105Outside Curb View Assist Mirror ................ 106Outside Convex Mirror ............................... 106
OnStar® System .......................................... 107Universal Home Remote System ................ 110
Universal Home Remote System(With One Triangular LED) ..................... 110
Universal Home Remote System(With Three Round LED) ....................... 111
Universal Home Remote SystemOperation (With Three Round LED) ....... 112
Universal Home Remote System Operation(With One Triangular LED) ...................... 118
Section 2 Features and Controls
63Information Provided by:
Storage Areas ............................................. 121Glove Box ................................................. 121Cupholder(s) .............................................. 122Center Console Storage Area .................... 122Map Pocket ............................................... 122
Floor Mats ................................................. 122Rear Storage Area .................................... 123Convenience Net ....................................... 123
Retractable Hardtop .................................... 124Lowering the Retractable Hardtop .............. 124Raising the Retractable Hardtop ................ 125
Section 2 Features and Controls
64Information Provided by:
Keys
{CAUTION:
Leaving children unattended in a vehicleis dangerous, but it is even moredangerous if the keyless accesstransmitter is also left in the vehicle. Achild or others could be badly injured oreven killed.
They could operate the power windows orother controls or even make the vehiclemove. If they started the engine andmoved the shift lever out of PARK (P),that would release the parking brake.
Do not leave the keyless accesstransmitter in a vehicle with children.
65Information Provided by:
This key, located insidethe keyless accesstransmitter, can be usedfor the glove box andthe trunk, if vehiclepower is lost. See Trunkon page 77 for moreinformation.
To remove the key,press the button (A)near the bottom of thekeyless accesstransmitter, and pull thekey out. Never pullthe key out withoutpressing the button.
Your vehicle has a keyless access system withpushbutton start. See Ignition Positions on page 88for information on starting the vehicle.
Notice: If you ever lose your transmitter(s)and/or key, it could be difficult to get into yourvehicle. You may even have to damage yourvehicle to get in. Be sure you have a sparetransmitter and/or key.
In an emergency, contact Cadillac RoadsideAssistance. See Roadside Service on page 487.
66Information Provided by:
Keyless Access SystemYour vehicle has a Keyless Access System thatoperates on a radio frequency subject to FederalCommunications Commission (FCC) Rulesand with Industry Canada.
This device complies with Part 15 of the FCCRules. Operation is subject to the following twoconditions:
1. This device may not cause harmfulinterference.
2. This device must accept any interferencereceived, including interference that maycause undesired operation.
This device complies with RSS-210 of IndustryCanada. Operation is subject to the following twoconditions:
1. This device may not cause interference.
2. This device must accept any interferencereceived, including interference that maycause undesired operation of the device.
Changes or modifications to this system by otherthan an authorized service facility could voidauthorization to use this equipment.
67Information Provided by:
If you ever notice a decrease in the keylessaccess transmitter range, try doing one of thefollowing:
• Check the distance. You may be too far fromyour vehicle. You may need to stand closerduring rainy or snowy weather.
• Check the location. Other vehicles or objectsmay be blocking the signal. Take a few stepsto the left or right, hold the transmitterhigher, and try again.
• Check to determine if battery replacement isnecessary. See “Battery Replacement”under Keyless Access System Operation onpage 68.
• Check to make sure that an electronic devicesuch as a cellular phone or lap top computeris not causing interference.
• If you are still having trouble, see your dealeror a qualified technician for service.
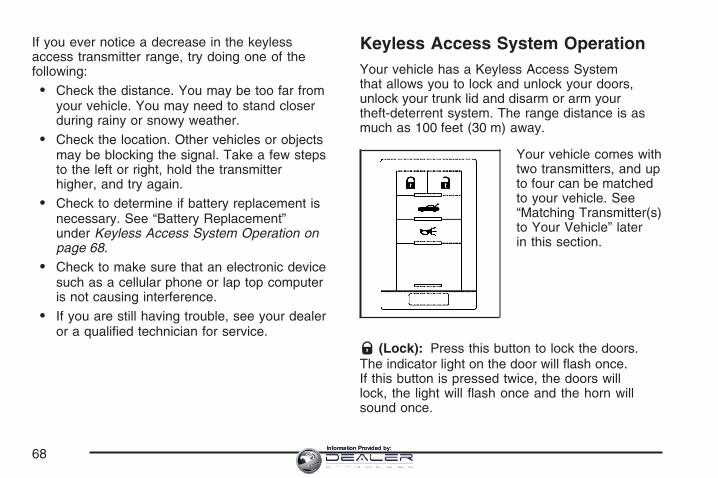
Keyless Access System OperationYour vehicle has a Keyless Access Systemthat allows you to lock and unlock your doors,unlock your trunk lid and disarm or arm yourtheft-deterrent system. The range distance is asmuch as 100 feet (30 m) away.
Your vehicle comes withtwo transmitters, and upto four can be matchedto your vehicle. See“Matching Transmitter(s)to Your Vehicle” laterin this section.
Q (Lock): Press this button to lock the doors.The indicator light on the door will flash once.If this button is pressed twice, the doors willlock, the light will flash once and the horn willsound once.
68Information Provided by:

K (Unlock): Press this button once to unlock thedriver’s door. The indicator light on the doorwill flash twice. Press the button twice within10 seconds to unlock both doors. If it is darkenough outside, your interior lamps will come on.
Your memory settings may also be recalled whenyou press the unlock button on the keyless accesstransmitter. See Memory Seat, Mirrors and SteeringWheel on page 10 for more information.
G (Trunk): Press and hold this button forabout one second to open the trunk whilethe engine is turned off or the shift lever is inPARK (P).
Matching Transmitter(s) to YourVehicleEach keyless access transmitter is coded toprevent another transmitter from working with yourvehicle. If a transmitter is lost or stolen, areplacement can be purchased through yourdealer. Remember to bring any remainingtransmitters with you when you go to your dealer.Once your dealer has coded the new transmitter,the lost transmitter will not work with yourvehicle. Each vehicle can have a maximum of fourtransmitters matched to it.
To match a new transmitter to your vehicle whenyou have a recognized transmitter, do thefollowing:
1. The vehicle must be off.
2. Have the recognized and new, unrecognizedtransmitters on your person.
3. Go to the rear of the vehicle and insert thevehicle key into the key cylinder located onthe lower rear fascia on the driver’s side of thevehicle. See Trunk on page 77 for moreinformation on the key cylinder.
4. Open the trunk.
69Information Provided by:
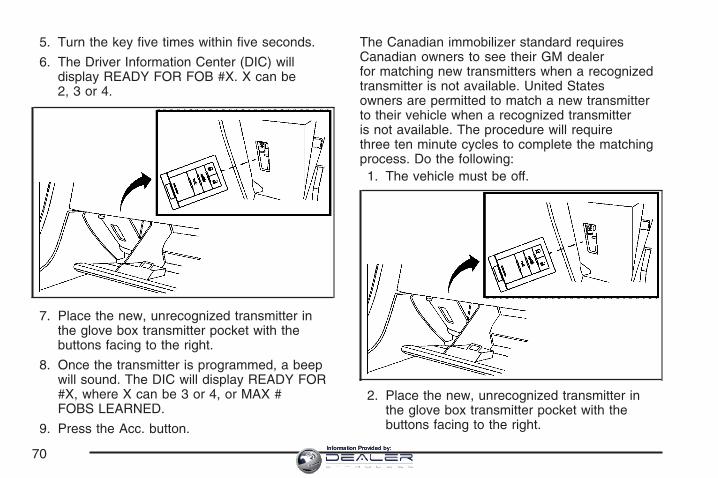
5. Turn the key five times within five seconds.
6. The Driver Information Center (DIC) willdisplay READY FOR FOB #X. X can be2, 3 or 4.
7. Place the new, unrecognized transmitter inthe glove box transmitter pocket with thebuttons facing to the right.
8. Once the transmitter is programmed, a beepwill sound. The DIC will display READY FOR#X, where X can be 3 or 4, or MAX #FOBS LEARNED.
9. Press the Acc. button.
The Canadian immobilizer standard requiresCanadian owners to see their GM dealerfor matching new transmitters when a recognizedtransmitter is not available. United Statesowners are permitted to match a new transmitterto their vehicle when a recognized transmitteris not available. The procedure will requirethree ten minute cycles to complete the matchingprocess. Do the following:1. The vehicle must be off.
2. Place the new, unrecognized transmitter inthe glove box transmitter pocket with thebuttons facing to the right.
70Information Provided by:
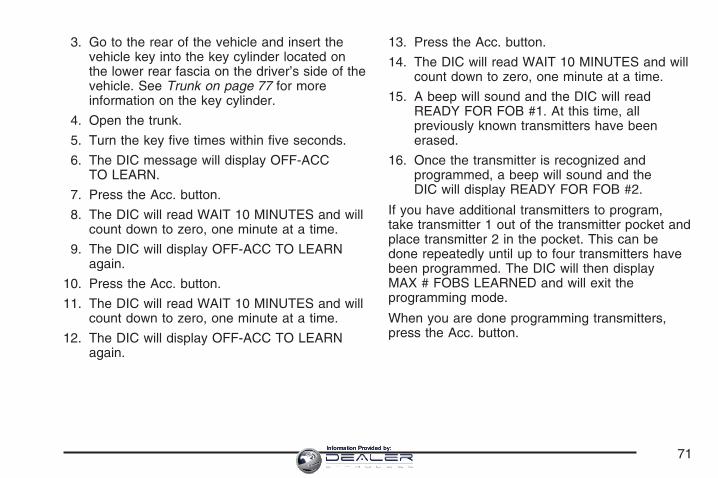
3. Go to the rear of the vehicle and insert thevehicle key into the key cylinder located onthe lower rear fascia on the driver’s side of thevehicle. See Trunk on page 77 for moreinformation on the key cylinder.
4. Open the trunk.
5. Turn the key five times within five seconds.
6. The DIC message will display OFF-ACCTO LEARN.
7. Press the Acc. button.
8. The DIC will read WAIT 10 MINUTES and willcount down to zero, one minute at a time.
9. The DIC will display OFF-ACC TO LEARNagain.
10. Press the Acc. button.
11. The DIC will read WAIT 10 MINUTES and willcount down to zero, one minute at a time.
12. The DIC will display OFF-ACC TO LEARNagain.
13. Press the Acc. button.
14. The DIC will read WAIT 10 MINUTES and willcount down to zero, one minute at a time.
15. A beep will sound and the DIC will readREADY FOR FOB #1. At this time, allpreviously known transmitters have beenerased.
16. Once the transmitter is recognized andprogrammed, a beep will sound and theDIC will display READY FOR FOB #2.
If you have additional transmitters to program,take transmitter 1 out of the transmitter pocket andplace transmitter 2 in the pocket. This can bedone repeatedly until up to four transmitters havebeen programmed. The DIC will then displayMAX # FOBS LEARNED and will exit theprogramming mode.
When you are done programming transmitters,press the Acc. button.
71Information Provided by:
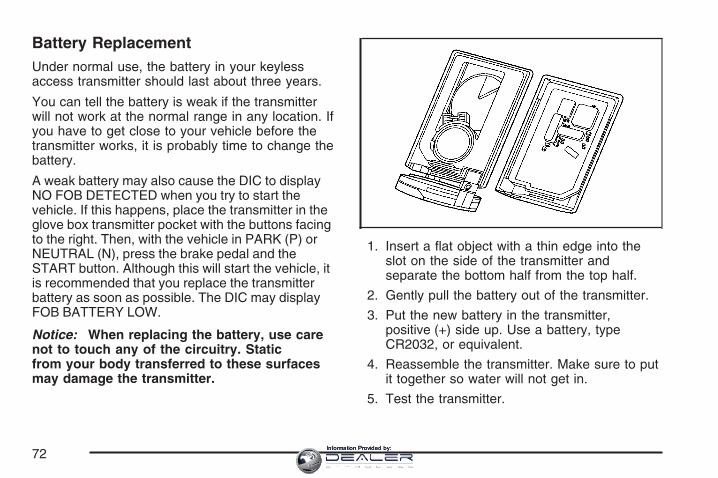
Battery ReplacementUnder normal use, the battery in your keylessaccess transmitter should last about three years.
You can tell the battery is weak if the transmitterwill not work at the normal range in any location. Ifyou have to get close to your vehicle before thetransmitter works, it is probably time to change thebattery.
A weak battery may also cause the DIC to displayNO FOB DETECTED when you try to start thevehicle. If this happens, place the transmitter in theglove box transmitter pocket with the buttons facingto the right. Then, with the vehicle in PARK (P) orNEUTRAL (N), press the brake pedal and theSTART button. Although this will start the vehicle, itis recommended that you replace the transmitterbattery as soon as possible. The DIC may displayFOB BATTERY LOW.
Notice: When replacing the battery, use carenot to touch any of the circuitry. Staticfrom your body transferred to these surfacesmay damage the transmitter.
1. Insert a flat object with a thin edge into theslot on the side of the transmitter andseparate the bottom half from the top half.
2. Gently pull the battery out of the transmitter.
3. Put the new battery in the transmitter,positive (+) side up. Use a battery, typeCR2032, or equivalent.
4. Reassemble the transmitter. Make sure to putit together so water will not get in.
5. Test the transmitter.
72Information Provided by:

Doors and Locks
Door Locks
{CAUTION:
Unlocked doors can be dangerous.• Passengers — especially
children — can easily open the doorsand fall out of a moving vehicle. Whena door is locked it will not open. Youincrease the chance of being thrownout of the vehicle in a crash if thedoors are not locked. So, wear safetybelts properly and lock the doorswhenever you drive.
• Young children who get into unlockedvehicles may be unable to get out. Achild can be overcome by extremeheat and can suffer permanent injuriesor even death from heat stroke.Always lock your vehicle wheneveryou leave it.
CAUTION: (Continued)
CAUTION: (Continued)
• Outsiders can easily enter through anunlocked door when you slow downor stop your vehicle. Locking yourdoors can help prevent this fromhappening.
To lock or unlock your vehicle from the outside,use the keyless access transmitter and pressthe appropriate lock or unlock button. You mayalso unlock and open the door passively when yousqueeze the door handle sensor, as long as youhave your transmitter with you. Passive entryoccurs when the door handle sensor is pressedand the vehicle recognizes your keylessaccess transmitter. When the passenger door isopened first, the driver’s door will also becomeunlocked.
73Information Provided by:
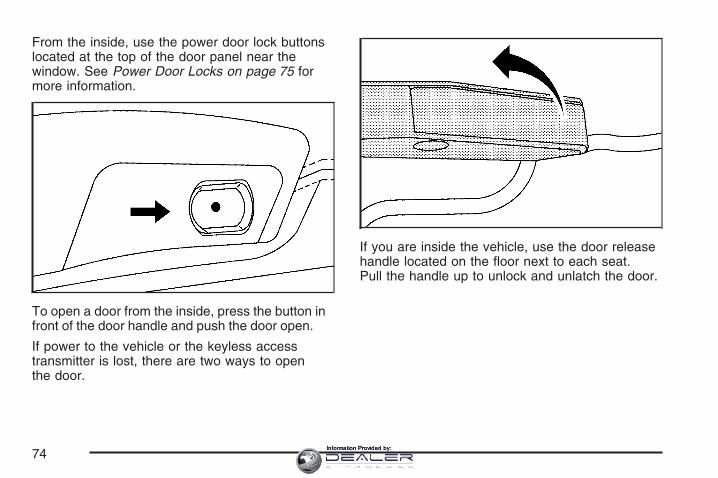
From the inside, use the power door lock buttonslocated at the top of the door panel near thewindow. See Power Door Locks on page 75 formore information.
To open a door from the inside, press the button infront of the door handle and push the door open.
If power to the vehicle or the keyless accesstransmitter is lost, there are two ways to openthe door.
If you are inside the vehicle, use the door releasehandle located on the floor next to each seat.Pull the handle up to unlock and unlatch the door.
74Information Provided by:
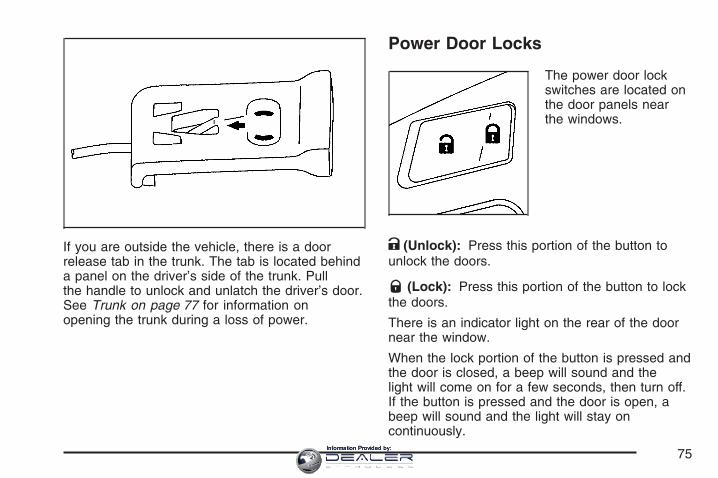
If you are outside the vehicle, there is a doorrelease tab in the trunk. The tab is located behinda panel on the driver’s side of the trunk. Pullthe handle to unlock and unlatch the driver’s door.See Trunk on page 77 for information onopening the trunk during a loss of power.
Power Door Locks
The power door lockswitches are located onthe door panels nearthe windows.
K (Unlock): Press this portion of the button tounlock the doors.
Q (Lock): Press this portion of the button to lockthe doors.
There is an indicator light on the rear of the doornear the window.
When the lock portion of the button is pressed andthe door is closed, a beep will sound and thelight will come on for a few seconds, then turn off.If the button is pressed and the door is open, abeep will sound and the light will stay oncontinuously.
75Information Provided by:
When the unlock portion of the button is pressedand the door is closed, a beep will sound andthe light will flash twice. When the button ispressed and the door is open, a beep will soundand the light will flash.
Automatic Door LockYour vehicle is programmed so that, when thedoors are closed, the ignition is on and theshift lever is moved out of PARK (P), all the doorswill lock.
If someone needs to get out while the vehicle isnot in PARK (P), have the person use thepower door unlock switch. When the door is closedagain, the doors will lock either when your footis removed from the brake or the vehiclespeed becomes faster than 8 mph (13 km/h).
Programmable Automatic DoorUnlockYour vehicle is programmed so that, when theshift lever is moved into PARK (P), both doors willunlock.
With the vehicle in PARK (P) and the enginerunning, door unlocking can be programmedthrough prompts displayed on the DriverInformation Center (DIC). These prompts allow thedriver to choose various unlock settings. Forprogramming information, see DIC VehiclePersonalization on page 220.
76Information Provided by:
Lockout ProtectionYour vehicle can be programmed to sound thehorn three times and unlock the driver’s door whenboth doors are closed and there is a keylessaccess transmitter inside the vehicle. When thedriver’s door is opened, a reminder chime willsound continuously. The vehicle will remain lockedonly when at least one transmitter has beenremoved from the vehicle and both doors areclosed. See DIC Vehicle Personalization onpage 220.
Trunk
{CAUTION:
It can be dangerous to drive with thetrunk lid open because carbon monoxide(CO) gas can come into your vehicle. Youcannot see or smell CO. It can causeunconsciousness and even death. If youmust drive with the trunk lid open or ifelectrical wiring or other cableconnections must pass through the sealbetween the body and the trunk lid:
• Make sure all other windows are shut.• Turn the fan on your heating or
cooling system to its highest speedand select the control setting that willforce outside air into your vehicle. SeeClimate Control System.
• If you have air outlets on or underthe instrument panel, open them allthe way.
See Engine Exhaust on page 102.
77Information Provided by:
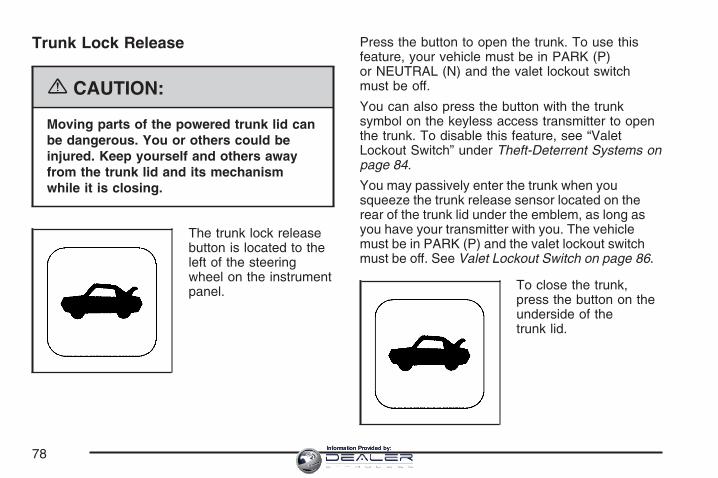
Trunk Lock Release
{CAUTION:
Moving parts of the powered trunk lid canbe dangerous. You or others could beinjured. Keep yourself and others awayfrom the trunk lid and its mechanismwhile it is closing.
The trunk lock releasebutton is located to theleft of the steeringwheel on the instrumentpanel.
Press the button to open the trunk. To use thisfeature, your vehicle must be in PARK (P)or NEUTRAL (N) and the valet lockout switchmust be off.
You can also press the button with the trunksymbol on the keyless access transmitter to openthe trunk. To disable this feature, see “ValetLockout Switch” under Theft-Deterrent Systems onpage 84.
You may passively enter the trunk when yousqueeze the trunk release sensor located on therear of the trunk lid under the emblem, as long asyou have your transmitter with you. The vehiclemust be in PARK (P) and the valet lockout switchmust be off. See Valet Lockout Switch on page 86.
To close the trunk,press the button on theunderside of thetrunk lid.
78Information Provided by:
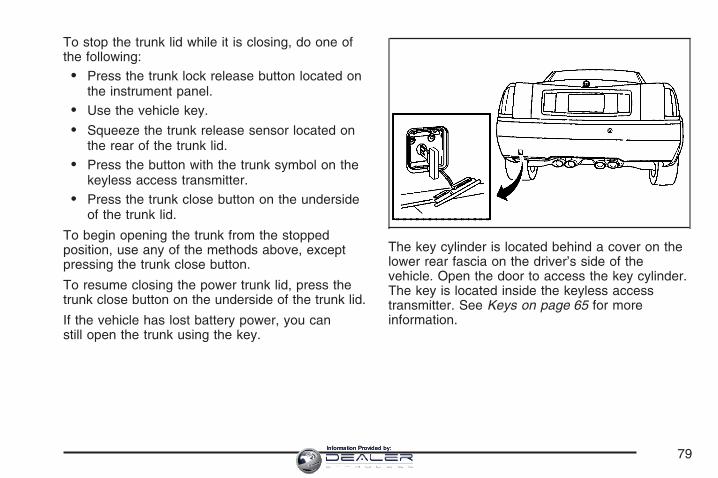
To stop the trunk lid while it is closing, do one ofthe following:
• Press the trunk lock release button located onthe instrument panel.
• Use the vehicle key.
• Squeeze the trunk release sensor located onthe rear of the trunk lid.
• Press the button with the trunk symbol on thekeyless access transmitter.
• Press the trunk close button on the undersideof the trunk lid.
To begin opening the trunk from the stoppedposition, use any of the methods above, exceptpressing the trunk close button.
To resume closing the power trunk lid, press thetrunk close button on the underside of the trunk lid.
If the vehicle has lost battery power, you canstill open the trunk using the key.
The key cylinder is located behind a cover on thelower rear fascia on the driver’s side of thevehicle. Open the door to access the key cylinder.The key is located inside the keyless accesstransmitter. See Keys on page 65 for moreinformation.
79Information Provided by:
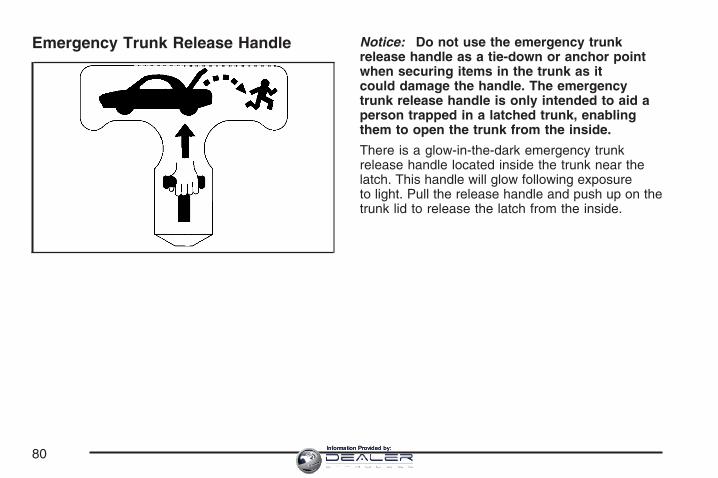
Emergency Trunk Release Handle Notice: Do not use the emergency trunkrelease handle as a tie-down or anchor pointwhen securing items in the trunk as itcould damage the handle. The emergencytrunk release handle is only intended to aid aperson trapped in a latched trunk, enablingthem to open the trunk from the inside.
There is a glow-in-the-dark emergency trunkrelease handle located inside the trunk near thelatch. This handle will glow following exposureto light. Pull the release handle and push up on thetrunk lid to release the latch from the inside.
80Information Provided by:
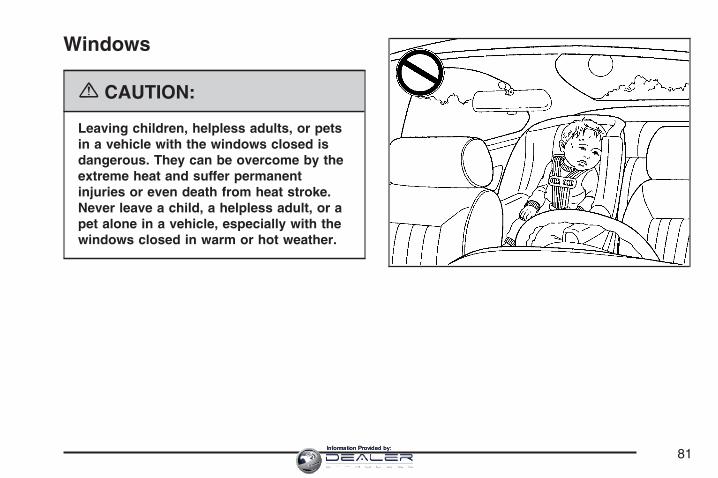
Windows
{CAUTION:
Leaving children, helpless adults, or petsin a vehicle with the windows closed isdangerous. They can be overcome by theextreme heat and suffer permanentinjuries or even death from heat stroke.Never leave a child, a helpless adult, or apet alone in a vehicle, especially with thewindows closed in warm or hot weather.
81Information Provided by:
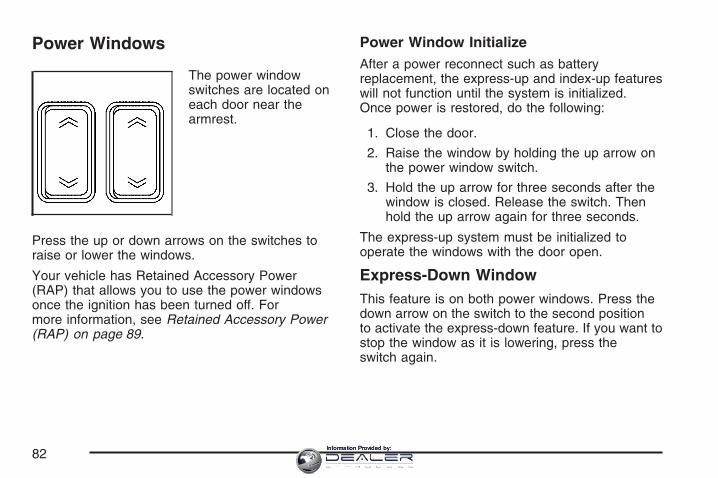
Power Windows
The power windowswitches are located oneach door near thearmrest.
Press the up or down arrows on the switches toraise or lower the windows.
Your vehicle has Retained Accessory Power(RAP) that allows you to use the power windowsonce the ignition has been turned off. Formore information, see Retained Accessory Power(RAP) on page 89.
Power Window InitializeAfter a power reconnect such as batteryreplacement, the express-up and index-up featureswill not function until the system is initialized.Once power is restored, do the following:
1. Close the door.
2. Raise the window by holding the up arrow onthe power window switch.
3. Hold the up arrow for three seconds after thewindow is closed. Release the switch. Thenhold the up arrow again for three seconds.
The express-up system must be initialized tooperate the windows with the door open.
Express-Down WindowThis feature is on both power windows. Press thedown arrow on the switch to the second positionto activate the express-down feature. If you want tostop the window as it is lowering, press theswitch again.
82Information Provided by:
Express-Up WindowThis feature is on both power windows. Press theup arrow on the switch to the second positionto activate the express-up feature. If you want tostop the window as it is raising, press theswitch again.
Express Window Anti-Pinch FeatureIf any object is in the path of the window when theexpress-up is active, the window will stop at theobstruction and auto-reverse to a presetfactory position. Weather conditions such assevere icing may also cause the window toauto-reverse. The window will return to normaloperation once the obstruction or conditionis removed.
{CAUTION:
If express override is activated, thewindow will not reverse automatically.You or others could be injured and thewindow could be damaged. Before youuse express override, make sure that allpeople and obstructions are clear of thewindow path.
Express Window Anti-Pinch OverrideIn an emergency, the anti-pinch feature canbe overridden in a supervised mode. Hold thewindow switch all the way down in the expressposition. The window will rise for as long asthe switch is held. Once the switch is released,the express mode is re-activated.
In this mode, the window can still close on anobject in its path. Use care when using theoverride mode.
83Information Provided by:
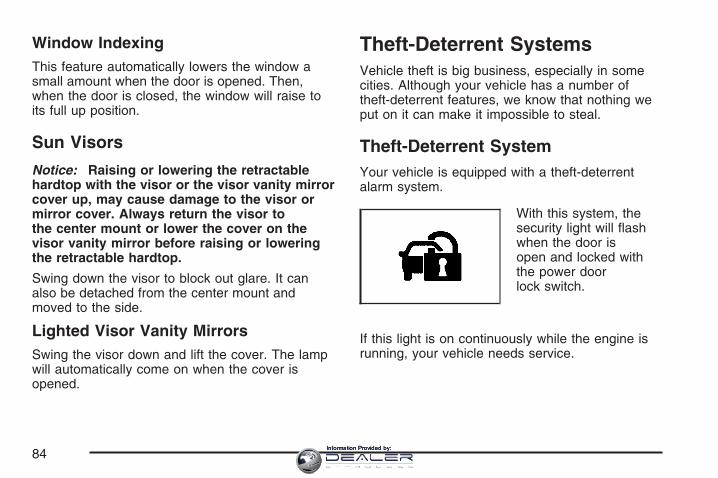
Window IndexingThis feature automatically lowers the window asmall amount when the door is opened. Then,when the door is closed, the window will raise toits full up position.
Sun Visors
Notice: Raising or lowering the retractablehardtop with the visor or the visor vanity mirrorcover up, may cause damage to the visor ormirror cover. Always return the visor tothe center mount or lower the cover on thevisor vanity mirror before raising or loweringthe retractable hardtop.
Swing down the visor to block out glare. It canalso be detached from the center mount andmoved to the side.
Lighted Visor Vanity MirrorsSwing the visor down and lift the cover. The lampwill automatically come on when the cover isopened.
Theft-Deterrent SystemsVehicle theft is big business, especially in somecities. Although your vehicle has a number oftheft-deterrent features, we know that nothing weput on it can make it impossible to steal.
Theft-Deterrent SystemYour vehicle is equipped with a theft-deterrentalarm system.
With this system, thesecurity light will flashwhen the door isopen and locked withthe power doorlock switch.
If this light is on continuously while the engine isrunning, your vehicle needs service.
84Information Provided by:

Arming the SystemUse one of the three following items listed here toarm the system:
• Press the lock button on the keyless accesstransmitter.
• Open the door. Lock the door with the powerdoor lock switch. The security light shouldflash. Remove the keyless access transmitterfrom the interior of the vehicle and closethe door. The security light will stop flashingand stay on. After 30 seconds, the light shouldturn off.
• The vehicle can be programmed toautomatically lock the doors and arm thesystem when you exit the vehicle. See DICVehicle Personalization on page 220.
Now, if a door or the trunk lid is opened withoutthe keyless access transmitter, the alarm willgo off. Your horn will sound for two minutes, thenit will go off to save battery power. And, yourvehicle will not start without a keyless transmitterpresent.
The theft-deterrent system will not arm if you lockthe driver’s door with the power door lockswitch after the doors are closed.
If your passenger stays in the vehicle when youleave with the keyless access transmitter, have thepassenger lock the vehicle after the doors areclosed. This way the alarm will not arm, and yourpassenger will not set it off.
85Information Provided by:
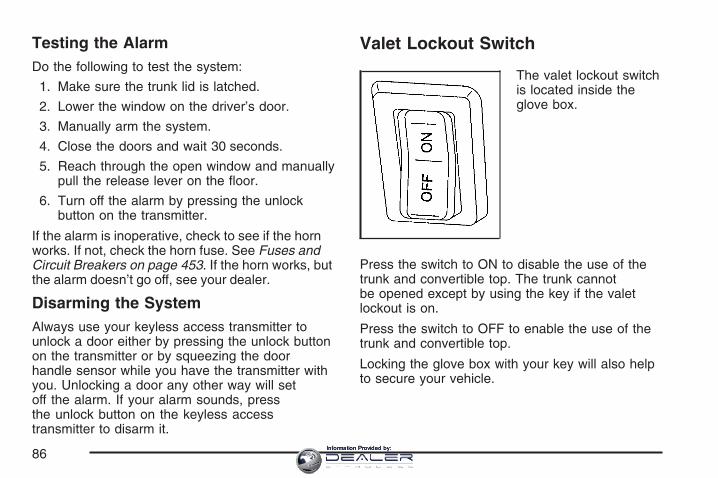
Testing the AlarmDo the following to test the system:
1. Make sure the trunk lid is latched.
2. Lower the window on the driver’s door.
3. Manually arm the system.
4. Close the doors and wait 30 seconds.
5. Reach through the open window and manuallypull the release lever on the floor.
6. Turn off the alarm by pressing the unlockbutton on the transmitter.
If the alarm is inoperative, check to see if the hornworks. If not, check the horn fuse. See Fuses andCircuit Breakers on page 453. If the horn works, butthe alarm doesn’t go off, see your dealer.
Disarming the SystemAlways use your keyless access transmitter tounlock a door either by pressing the unlock buttonon the transmitter or by squeezing the doorhandle sensor while you have the transmitter withyou. Unlocking a door any other way will setoff the alarm. If your alarm sounds, pressthe unlock button on the keyless accesstransmitter to disarm it.
Valet Lockout Switch
The valet lockout switchis located inside theglove box.
Press the switch to ON to disable the use of thetrunk and convertible top. The trunk cannotbe opened except by using the key if the valetlockout is on.
Press the switch to OFF to enable the use of thetrunk and convertible top.
Locking the glove box with your key will also helpto secure your vehicle.
86Information Provided by:
Starting and Operating YourVehicle
New Vehicle Break-In
Notice: Your vehicle does not need anelaborate break-in. But it will perform better inthe long run if you follow these guidelines:• Keep your speed at 55 mph (88 km/h)
or less for the first 500 miles (805 km).• Do not drive at any one constant speed,
fast or slow, for the first 500 miles(805 km). Do not make full-throttle starts.Avoid downshifting to brake, or slow,the vehicle.
• Avoid making hard stops for the first200 miles (322 km) or so. During this timeyour new brake linings are not yetbroken in. Hard stops with new linings canmean premature wear and earlierreplacement. Follow this breaking-inguideline every time you get new brakelinings.
Following break-in, engine speed and load canbe gradually increased.
87Information Provided by:
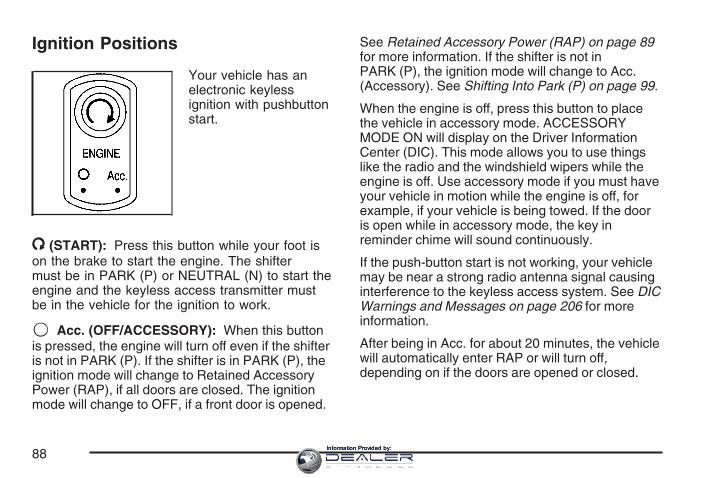
Ignition Positions
Your vehicle has anelectronic keylessignition with pushbuttonstart.
/ (START): Press this button while your foot ison the brake to start the engine. The shiftermust be in PARK (P) or NEUTRAL (N) to start theengine and the keyless access transmitter mustbe in the vehicle for the ignition to work.
9 Acc. (OFF/ACCESSORY): When this buttonis pressed, the engine will turn off even if the shifteris not in PARK (P). If the shifter is in PARK (P), theignition mode will change to Retained AccessoryPower (RAP), if all doors are closed. The ignitionmode will change to OFF, if a front door is opened.
See Retained Accessory Power (RAP) on page 89for more information. If the shifter is not inPARK (P), the ignition mode will change to Acc.(Accessory). See Shifting Into Park (P) on page 99.
When the engine is off, press this button to placethe vehicle in accessory mode. ACCESSORYMODE ON will display on the Driver InformationCenter (DIC). This mode allows you to use thingslike the radio and the windshield wipers while theengine is off. Use accessory mode if you must haveyour vehicle in motion while the engine is off, forexample, if your vehicle is being towed. If the dooris open while in accessory mode, the key inreminder chime will sound continuously.
If the push-button start is not working, your vehiclemay be near a strong radio antenna signal causinginterference to the keyless access system. See DICWarnings and Messages on page 206 for moreinformation.
After being in Acc. for about 20 minutes, the vehiclewill automatically enter RAP or will turn off,depending on if the doors are opened or closed.
88Information Provided by:
Retained Accessory Power (RAP)The following accessories on your vehicle may beused for up to 10 minutes after the engine isturned off:
• Radio
• Power Windows
• Audio Steering Wheel Controls
Power to these accessories stops after 10 minutesor if a door is opened. If you want power foranother 10 minutes, close all the doors and pressthe Acc. button to place the vehicle in accessorymode. Press the button again and the vehiclewill return to RAP.
Starting the EngineMove the shift lever to PARK (P) or NEUTRAL (N).To restart when you are already moving, useNEUTRAL (N).
Notice: Do not try to shift to PARK (P) if yourvehicle is moving. If you do, you coulddamage the transmission. Shift to PARK (P)only when your vehicle is stopped.
The keyless access transmitter must be inside thevehicle for the ignition to work.
Cell phone chargers can interfere with theoperation of the Keyless Access System. Batterychargers should not be plugged in when startingor turning off the engine.
89Information Provided by:
To start you vehicle, do the following:
1. With your foot on the brake pedal, press theSTART button located on the instrumentpanel.If there is not a keyless access transmitter inthe vehicle or if there is something causinginterference with it, the DIC will displayNO FOB DETECTED. See DIC Warnings andMessages on page 206 for more information.
2. When the engine begins cranking, let go ofthe button and the engine cranks automaticallyuntil it starts. If the battery in the keylessaccess transmitter is weak, the DIC displaysFOB BATTERY LOW. You can still drivethe vehicle.See “Battery Replacement” under KeylessAccess System Operation on page 68 for moreinformation. If the fob battery is dead, youneed to insert the fob into the fob slot to enableengine starting. See ″No Fobs Detected″under DIC Warnings and Messages onpage 206.
3. Do not race the engine immediately afterstarting it. Operate the engine andtransmission gently until the oil warms up andlubricates all moving parts.
4. If the engine does not start and no DICmessage is displayed, wait 15 secondsbefore trying again to let the cranking motorcool down.If the engine does not start after 5-10 seconds,especially in very cold weather (below 0°For −18°C), it could be flooded with too muchgasoline. Try pushing the accelerator pedal allthe way to the floor while cranking for up to15 seconds maximum. Wait at least15 seconds between each try, to allow thecranking motor to cool down. When the enginestarts, let go of the accelerator. If the vehiclestarts briefly but then stops again, do the samething. This clears the extra gasoline from theengine.
90Information Provided by:
Notice: Cranking the engine for long periodsof time, by pressing the START buttonimmediately after cranking has ended, canoverheat and damage the cranking motor, anddrain the battery. Wait at least 15 secondsbetween each try, to allow the cranking motorto cool down.
Your vehicle has a Computer-Controlled CrankingSystem. This feature assists in starting theengine and protects components. Once crankinghas been initiated, the engine continues crankingfor a few seconds or until the vehicle starts. Ifthe engine does not start, cranking automaticallybe stops after 15 seconds to prevent crankingmotor damage. To prevent gear damage,this system also prevents cranking if the engine isalready running.
Notice: Your engine is designed to work withthe electronics in your vehicle. If you addelectrical parts or accessories, you couldchange the way the engine operates. Beforeadding electrical equipment, check withyour dealer. If you do not, your engine mightnot perform properly. Any resulting damagewould not be covered by your vehicle’swarranty.
Stopping Your EngineMove the shift lever to PARK (P) and press theAcc. (Off/Accessory) button located on theinstrument panel. If the shifter is not in PARK (P),the engine shuts off and the vehicle goes intothe Accessory Mode. The DIC displays ″SHIFT TOPARK″. Once the shifter is moved to PARK (P),the vehicle turns off.
If the keyless access transmitter is not detectedinside the vehicle when it is turned to off, the DICdisplays NO FOB – OFF OR RUN?.
See DIC Warnings and Messages on page 206 formore information.
91Information Provided by:

Automatic Transmission Operation
There are several different positions for the shiftlever.
PARK (P): This position locks the rear wheels. Itis the best position to use when you startingthe engine because your vehicle cannot moveeasily.
{CAUTION:
It is dangerous to get out of your vehicleif the shift lever is not fully in PARK (P)with the parking brake firmly set. Yourvehicle can roll.
Do not leave your vehicle when the engineis running unless you have to. If you haveleft the engine running, the vehicle canmove suddenly. You or others could beinjured. To be sure your vehicle will notmove, even when you are on fairly levelground, always set your parking brakeand move the shift lever to PARK (P). SeeShifting Into Park (P) on page 99.
Be sure the shift lever is fully in PARK (P) beforestarting the engine. Your vehicle has anautomatic transmission shift lock control system.
You have to fully apply the regular brakes first andthen press the shift lever button before you canshift from PARK (P) when the vehicle is running.
92Information Provided by:

If you cannot shift out of PARK (P), ease pressureon the shift lever and push the shift lever all theway into PARK (P) as you maintain brakeapplication. Then press the shift lever button andmove the shift lever into another gear. SeeShifting Out of Park (P) on page 100.
REVERSE (R): Use this gear to back up.
Notice: Shifting to REVERSE (R) while yourvehicle is moving forward could damagethe transmission. The repairs would not becovered by your warranty. Shift toREVERSE (R) only after your vehicle isstopped.
To rock your vehicle back and forth to get out ofsnow, ice, or sand without damaging yourtransmission, see If Your Vehicle is Stuck in Sand,Mud, Ice, or Snow on page 353.
NEUTRAL (N): In this position, your engine doesnot connect with the wheels. To restart whenyou are already moving, use NEUTRAL (N) only.Also, use NEUTRAL (N) when your vehicle isbeing towed. Use Neutral (N) if the vehicle mustbe moved with the engine off for short distances.Please see Towing Your Vehicle on page 359.
{CAUTION:
Shifting into a drive gear while yourengine is running at high speed isdangerous. Unless your foot is firmly onthe brake pedal, your vehicle could movevery rapidly. You could lose control andhit people or objects. Do not shift into adrive gear while your engine is running athigh speed.
Notice: Shifting out of PARK (P) orNEUTRAL (N) with the engine running at highspeed may damage the transmission. Therepairs would not be covered by your warranty.Be sure the engine is not running at highspeed when shifting your vehicle.
93Information Provided by:

DRIVE (D): This position is for normal driving. Itprovides the best fuel economy for your vehicle. Ifyou need more power for passing and you are:
• Going less than about 35 mph (56 km/h), pushthe accelerator pedal about halfway down.
• Going about 35 mph (56km/h) or more, pushthe accelerator all the way down.
Downshifting the transmission in slippery roadconditions could result in skidding, see “Skidding”under Loss of Control on page 337.
Notice: Spinning the tires or holding thevehicle in one place on a hill using only theaccelerator pedal may damage thetransmission. The repair will not be covered byyour warranty. If you are stuck, do not spinthe tires. When stopping on a hill, use thebrakes to hold the vehicle in place.
Maximum engine speed is limited to protectdriveline components from improper operation.
Driver Shift Control (DSC)The Driver Shift Control (DSC) feature lets youmanually control over the operation of thetransmission.
To use this feature,move the shift lever fromthe DRIVE (D) positionto the left and into thedriver shift control gate.
94Information Provided by:
The Sport Automatic Mode is selected by movingthe shift lever into the DSC area without shiftingtowards the +(plus) or − (minus) symbols. While inthe Sport Automatic Mode, the transmissioncomputer determines when the vehicle is beingdriven in a competitive manner. It then selects andholds the transmission in lower gears givingmore noticeable upshifts for a sportier vehicleperformance. Once you shift to the + (plus)or − (minus) controls, the driver manual gearselection is activated. A + (plus) symbol appearson the shift console above the DRIVE (D) indicatorand minus symbol appears below the indicator.The Head-Up Display (HUD) also displaysthe requested gear, though the actual upshift ordownshift could be delayed until the engine speedis correct for that gear.
The requested gear displays on the HUD until thenext time you upshift or downshift. The gearselected and shown in the HUD is one of a numberof gears available. The vehicle does not upshiftbeyond the chosen gear. The actual gear that thevehicle shifts to depends on a combination ofthe driver-requested gear range, vehicle speed andthrottle position.
Notice: If you drive your vehicle at highRPMs without upshifting while using DriverShift Control (DSC), you could damageyour vehicle. Always upshift when necessarywhile using DSC.
If you do not upshift as the engine approachesthe red line on the engine RPM (RevolutionsPer Minute) gage, the engine speed is controlledto limit the engine RPM.
95Information Provided by:
Not all manual downshift requests will be allowedby the transmission. To prevent excessiveengine RPMs, each gear has a maximum vehiclespeed associated with it. Any downshift requestabove this speed is not allowed by thetransmission.
If shifting is prevented for any reason, the currentgear flashes multiple times in the DriverInformation Center (DIC), indicating that thetransmission has not shifted gears.
Some automatic downshifts can occur to maintainminimum engine speed. This only happens if thevehicle is left in too high of a gear for the vehicle’sspeed. For example, if you have been driving insixth gear range and come to a stop withoutmanually downshifting, the transmissionautomatically downshifts to first gear and displaysfirst gear on the HUD. As you begin to drive andaccelerate, the transmission remains in first gearuntil the driver selects a downshift.
DSC can be used while using cruise control, buttransmission shifting is different while thecruise control is on. This is not a malfunction andis necessary to let proper operation of thecruise control.
To return to fully automatic operation, move theshift lever to the right and back into DRIVE (D).
When accelerating your vehicle from a stopin snowy and icy conditions, you may want to shiftinto second gear. A higher gear lets you gainmore traction on slippery surfaces.
In higher gears, on the XLR only, an automaticdownshift occurs if you press the accelerator pedalto the floor. This feature provides adequateacceleration capabilities if you forget to downshiftmanually. Tap the shifter forward and thevehicle upshifts.
96Information Provided by:
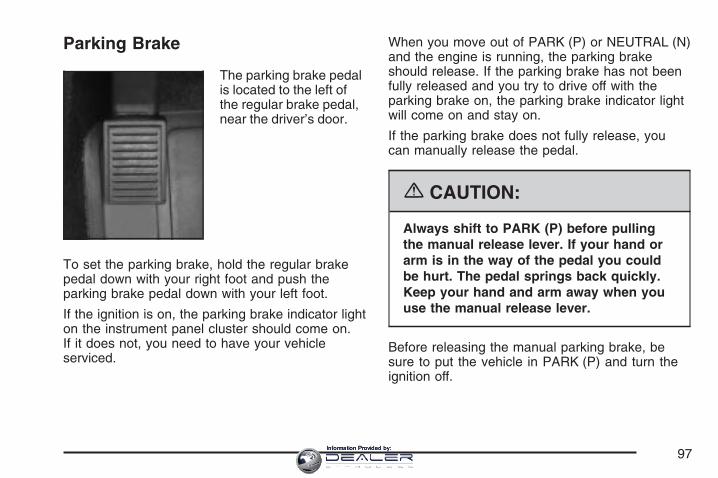
Parking Brake
The parking brake pedalis located to the left ofthe regular brake pedal,near the driver’s door.
To set the parking brake, hold the regular brakepedal down with your right foot and push theparking brake pedal down with your left foot.
If the ignition is on, the parking brake indicator lighton the instrument panel cluster should come on.If it does not, you need to have your vehicleserviced.
When you move out of PARK (P) or NEUTRAL (N)and the engine is running, the parking brakeshould release. If the parking brake has not beenfully released and you try to drive off with theparking brake on, the parking brake indicator lightwill come on and stay on.
If the parking brake does not fully release, youcan manually release the pedal.
{CAUTION:
Always shift to PARK (P) before pullingthe manual release lever. If your hand orarm is in the way of the pedal you couldbe hurt. The pedal springs back quickly.Keep your hand and arm away when youuse the manual release lever.
Before releasing the manual parking brake, besure to put the vehicle in PARK (P) and turn theignition off.
97Information Provided by:
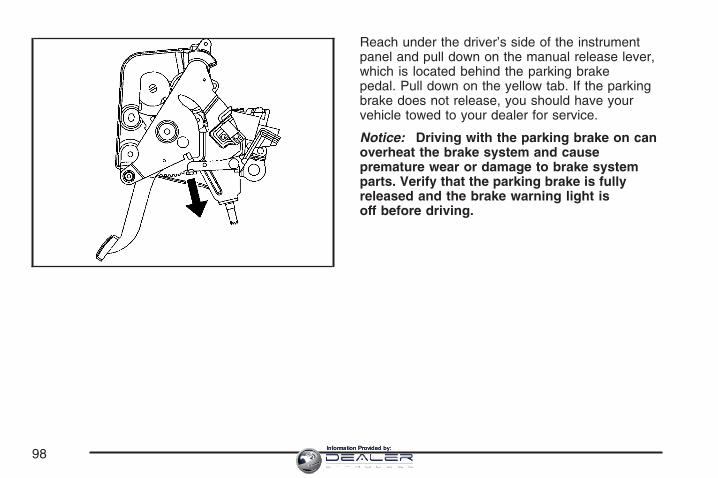
Reach under the driver’s side of the instrumentpanel and pull down on the manual release lever,which is located behind the parking brakepedal. Pull down on the yellow tab. If the parkingbrake does not release, you should have yourvehicle towed to your dealer for service.
Notice: Driving with the parking brake on canoverheat the brake system and causepremature wear or damage to brake systemparts. Verify that the parking brake is fullyreleased and the brake warning light isoff before driving.
98Information Provided by:
Shifting Into Park (P)
{CAUTION:
It can be dangerous to get out of yourvehicle if the shift lever is not fully inPARK (P) with the parking brake firmlyset. Your vehicle can roll. If you have leftthe engine running, the vehicle can movesuddenly. You or others could be injured.To be sure your vehicle will not move,even when you are on fairly level ground,use the steps that follow.
1. Hold the brake pedal down with your right footand set the parking brake.
2. Move the shift lever into PARK (P) by pushingthe lever all the way toward the front of thevehicle.
3. Turn the ignition off.
Leaving Your Vehicle With the EngineRunning
{CAUTION:
It can be dangerous to leave your vehiclewith the engine running. Your vehiclecould move suddenly if the shift lever isnot fully in PARK (P) with the parkingbrake firmly set. And, if you leave thevehicle with the engine running, it couldoverheat and even catch fire. You orothers could be injured. Do not leave yourvehicle with the engine running.
If you have to leave your vehicle with the enginerunning, be sure your vehicle is in PARK (P)and your parking brake is firmly set before youleave it. After you have moved the shift lever intoPARK (P), hold down the regular brake pedal.See if you can move the shift lever awayfrom PARK (P) without first pulling it toward you. Ifyou can, it means that the shift lever was notfully locked into PARK (P).
99Information Provided by:
Torque LockIf you are parking on a hill and you do not shiftyour transmission into PARK (P) properly,the weight of the vehicle may put too much forceon the parking pawl in the transmission. Youmay find it difficult to pull the shift lever outof PARK (P). This is called “torque lock.” Toprevent torque lock, set the parking brake and thenshift into PARK (P) properly before you leavethe driver’s seat. To find out how, see “Shifting IntoPARK (P)” listed previously in this section.
When you are ready to drive, move the shift leverout of PARK (P) before you release the parkingbrake.
If torque lock does occur, you may need to haveanother vehicle push yours a little uphill totake some of the pressure from the parking pawlin the transmission, so you can pull the shiftlever out of PARK (P).
Shifting Out of Park (P)Your vehicle has an automatic transmission shiftlock control system. You have to fully applyyour regular brake before you can shift fromPARK (P) when the vehicle is running. SeeAutomatic Transmission Operation on page 92.
If you cannot shift out of PARK (P), ease pressureon the shift lever – push the shift lever all theway into PARK (P) and release the shift leverbutton as you maintain brake application. Thenpress the shift lever button and move theshift lever into the gear desired.
If you ever hold the brake pedal down but stillcannot shift out of PARK (P), try this:
1. Press the regular bake.2. Press the Acc. button twice to place the
ignition in accessory mode.3. Apply and hold the brake until the end of
Step 4.4. Shift to NEUTRAL (N).5. Start the engine and then shift to the drive
gear you want.6. Have your vehicle inspected by your dealer as
soon as possible.
100Information Provided by:
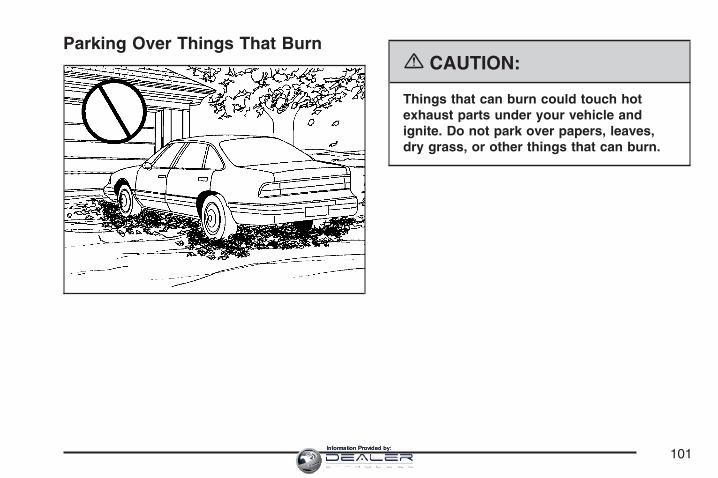
Parking Over Things That Burn{CAUTION:
Things that can burn could touch hotexhaust parts under your vehicle andignite. Do not park over papers, leaves,dry grass, or other things that can burn.
101Information Provided by:
Engine Exhaust
{CAUTION:
Engine exhaust can kill. It contains thegas carbon monoxide (CO), which youcannot see or smell. It can causeunconsciousness and death.
You might have exhaust coming in if:• Your exhaust system sounds strange
or different.• Your vehicle gets rusty underneath.• Your vehicle was damaged in a
collision.
CAUTION: (Continued)
CAUTION: (Continued)
• Your vehicle was damaged whendriving over high points on the roador over road debris.
• Repairs were not done correctly.• Your vehicle or exhaust system has
been modified improperly.
If you ever suspect exhaust is coming intoyour vehicle:
• Drive it only with all the windowsdown to blow out any CO; and
• Have your vehicle fixed immediately.
102Information Provided by:
Running the Engine While ParkedIt is better not to park with the engine running. But ifyou ever have to, here are some things to know.
{CAUTION:
Idling the engine with the climate controlsystem off could allow dangerous exhaustinto your vehicle. See the earlier cautionunder Engine Exhaust on page 102.
Also, idling in a closed-in place can letdeadly carbon monoxide (CO) into yourvehicle even if the climate control fan is atthe highest setting. One place this canhappen is a garage. Exhaust — withCO — can come in easily. NEVER park ina garage with the engine running.
Another closed-in place can be a blizzard.See Winter Driving on page 349.
{CAUTION:
It can be dangerous to get out of yourvehicle if the shift lever is not fully inPARK (P) with the parking brake firmlyset. Your vehicle can roll. Do not leaveyour vehicle when the engine is runningunless you have to. If you have left theengine running, the vehicle can movesuddenly. You or others could be injured.To be sure your vehicle will not move,even when you are on fairly level ground,always set your parking brake and movethe shift lever to PARK (P).
Follow the proper steps to be sure your vehiclewill not move. See Shifting Into Park (P) onpage 99.
103Information Provided by:
Mirrors
Automatic Dimming Rearview Mirrorwith OnStar®
Your vehicle has an automatic dimming insiderearview mirror. The mirror also contains OnStar®
controls. For more information about OnStar®,see OnStar® System on page 107.
O (On/Off): This button, located on the lower leftside of the mirror, is for the automatic dimmingfunctions.
Mirror OperationThe automatic dimming feature is active each timethe vehicle is started.
To turn the automatic dimming feature on or off,press and release the on/off button. The indicatorlight will illuminate when this feature is active.
Cleaning the MirrorWhen cleaning the mirror, use a paper towel orsimilar material dampened with glass cleaner. Donot spray glass cleaner directly on the mirroras that may cause the liquid cleaner to enter themirror housing.
104Information Provided by:
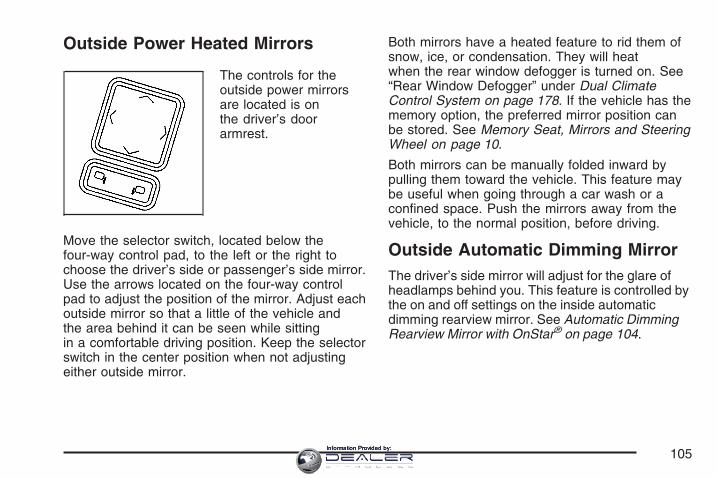
Outside Power Heated Mirrors
The controls for theoutside power mirrorsare located is onthe driver’s doorarmrest.
Move the selector switch, located below thefour-way control pad, to the left or the right tochoose the driver’s side or passenger’s side mirror.Use the arrows located on the four-way controlpad to adjust the position of the mirror. Adjust eachoutside mirror so that a little of the vehicle andthe area behind it can be seen while sittingin a comfortable driving position. Keep the selectorswitch in the center position when not adjustingeither outside mirror.
Both mirrors have a heated feature to rid them ofsnow, ice, or condensation. They will heatwhen the rear window defogger is turned on. See“Rear Window Defogger” under Dual ClimateControl System on page 178. If the vehicle has thememory option, the preferred mirror position canbe stored. See Memory Seat, Mirrors and SteeringWheel on page 10.
Both mirrors can be manually folded inward bypulling them toward the vehicle. This feature maybe useful when going through a car wash or aconfined space. Push the mirrors away from thevehicle, to the normal position, before driving.
Outside Automatic Dimming MirrorThe driver’s side mirror will adjust for the glare ofheadlamps behind you. This feature is controlled bythe on and off settings on the inside automaticdimming rearview mirror. See Automatic DimmingRearview Mirror with OnStar® on page 104.
105Information Provided by:
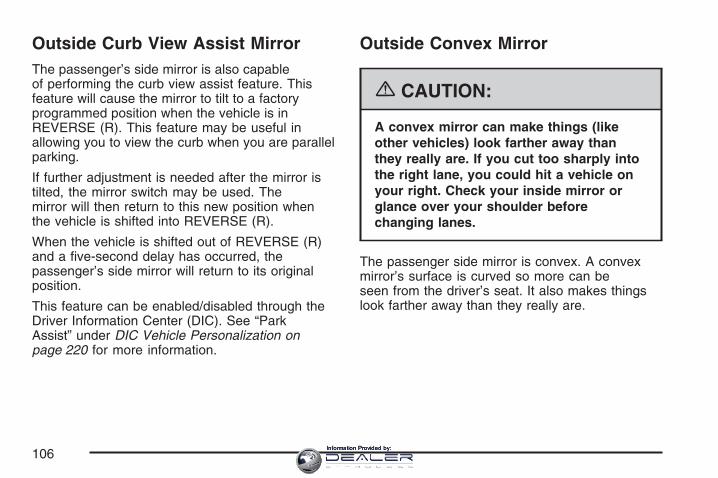
Outside Curb View Assist MirrorThe passenger’s side mirror is also capableof performing the curb view assist feature. Thisfeature will cause the mirror to tilt to a factoryprogrammed position when the vehicle is inREVERSE (R). This feature may be useful inallowing you to view the curb when you are parallelparking.
If further adjustment is needed after the mirror istilted, the mirror switch may be used. Themirror will then return to this new position whenthe vehicle is shifted into REVERSE (R).
When the vehicle is shifted out of REVERSE (R)and a five-second delay has occurred, thepassenger’s side mirror will return to its originalposition.
This feature can be enabled/disabled through theDriver Information Center (DIC). See “ParkAssist” under DIC Vehicle Personalization onpage 220 for more information.
Outside Convex Mirror
{CAUTION:
A convex mirror can make things (likeother vehicles) look farther away thanthey really are. If you cut too sharply intothe right lane, you could hit a vehicle onyour right. Check your inside mirror orglance over your shoulder beforechanging lanes.
The passenger side mirror is convex. A convexmirror’s surface is curved so more can beseen from the driver’s seat. It also makes thingslook farther away than they really are.
106Information Provided by:
OnStar® System
OnStar® uses several innovative technologies andlive advisors to provide you with a wide rangeof safety, security, information, and convenienceservices. If your airbags deploy, the system isdesigned to make an automatic call to OnStar®
Emergency advisors who can request emergencyservices be sent to your location. If you lockyour keys in the vehicle, call OnStar® at1-888-4-ONSTAR and they can send a signal tounlock your doors. If you need roadsideassistance, press the OnStar® button and theycan contact Roadside Service for you.
OnStar® service is provided to you subject to theOnStar® Terms and Conditions. You may cancelyour OnStar® service at any time by contactingOnStar® as provided below. A complete OnStar®
Owners Guide and the OnStar® Terms and
Conditions are included in the vehicle’s OnStar®
Subscriber glove box literature. For moreinformation, visit onstar.com or onstar.ca, contactOnStar® at 1–888–4–ONSTAR (1–888–466–7827)or TTY 1–877–248–2080, or press the OnStar®
button to speak with an OnStar® advisor 24 hours aday, 7 days a week.
Not all OnStar® features are available on allvehicles. To check if your vehicle is equipped toprovide the services described below, or for afull description of OnStar® services and systemlimitations, see the OnStar® Owner’s Guide in yourglove box or visit onstar.com.
OnStar® ServicesFor new vehicles with OnStar®, the Safe & SoundPlan, or the Directions & Connections® Plan isincluded for one year from the date of purchase.You can extend this plan beyond the first year,or upgrade to the Directions & Connections® Plan.For more information, press the OnStar® buttonto speak with an advisor. Some OnStar® services(such as Remote Door Unlock or Stolen VehicleLocation Assistance) may not be availableuntil you register with OnStar®.
107Information Provided by:
Available Services with Safe &Sound® Plan• Automatic Notification of Airbag Deployment
• Advanced Automatic Crash Notification(AACN) (If equipped)
• Link to Emergency Services
• Roadside Assistance
• Stolen Vehicle Location Assistance
• AccidentAssist
• Remote Door Unlock/Vehicle Alert
• OnStar® Vehicle Diagnostics
• GM® Goodwrench® On Demand Diagnostics
• OnStar® Hands-Free Calling with30 complimentary minutes
• OnStar® Virtual Advisor ( U.S. Only)
Available Services included withDirections & Connections® Plan• All Safe and Sound Plan Services
• Driving Directions - Advisor delivered orOnStar® Turn-by-Turn Navigation (If equipped)
• RideAssist
• Information and Convenience Services
OnStar® Hands-Free CallingOnStar® Hands-Free Calling allows eligibleOnStar® subscribers to make and receive callsusing voice commands. Hands-Free Calling is fullyintegrated into the vehicle, and can be usedwith OnStar® Pre-Paid Minute Packages.Hands-Free Calling may also be linked to aVerizon Wireless service plan in the U.S. or a BellMobility service plan in Canada, depending oneligibility. To find out more, refer to the OnStar®
Owners Guide in the vehicle’s glove box, visitwww.onstar.com or www.onstar.ca, or speak withan OnStar® advisor by pressing the OnStar®
button or calling 1-888-4-ONSTAR(1-888-466-7827).
108Information Provided by:
OnStar® Virtual AdvisorOnStar® Virtual Advisor is a feature of OnStar®
Hands-Free Calling that uses your minutes toaccess location-based weather, local traffic reports,and stock quotes. By pressing the phone buttonand giving a few simple voice commands, you canbrowse through the various topics. See the OnStar®
Owners Guide for more information (Only availablein the continental U.S.).
OnStar® Steering Wheel ControlsYour vehicle may have a Talk/Mute button thatcan be used to interact with OnStar® Hands-FreeCalling. See Audio Steering Wheel Controls onpage 227 for more information.
On some vehicles, you may have to hold thebutton for a few seconds and give the command“ONSTAR” in order to activate the OnStar®
Hands-Free Calling feature.
On some vehicles, the mute button can be used todial numbers into voicemail systems, or to dialphone extensions. See the OnStar® Owner’sGuide for more information.
How OnStar® Service WorksIn order to provide you with OnStar® services, yourvehicle’s OnStar® system has the capability ofrecording and transmitting vehicle information. Thisinformation is automatically sent to an OnStar® CallCenter at the time of an OnStar® button press,Emergency button press or if your airbags or AACNsystem deploys. The vehicle information usuallyincludes your GPS location and, in the event of acrash, additional information regarding the accidentthat your vehicle has been involved in (e.g. thedirection from which your vehicle was hit). Whenyou use the Virtual Advisor feature of OnStar®
Hands-Free Calling, your vehicle also sendsOnStar® your GPS location so that we can provideyou with location-based services.
109Information Provided by:

OnStar® service cannot work unless your vehicleis in a place where OnStar® has an agreementwith a wireless service provider for service in thatarea. OnStar® service also cannot work unlessyou are in a place where the wireless serviceprovider OnStar® has hired for that areahas coverage, network capacity and receptionwhen the service is needed, and technology thatis compatible with the OnStar® service. Not allservices are available everywhere, particularly inremote or enclosed areas, or at all times.
OnStar® service that involves location informationabout your vehicle cannot work unless GPSsatellite signals are unobstructed and available inthat place as well.
Your vehicle must have a working electricalsystem (including adequate battery power) for theOnStar® equipment to operate. There are otherproblems OnStar® cannot control that may preventOnStar® from providing OnStar® service to youat any particular time or place. Some examples aredamage to important parts of your vehicle in anaccident, hills, tall buildings, tunnels, weatheror wireless phone network congestion.
Your ResponsibilityYou may need to increase the volume of yourradio to hear the OnStar® advisor. If the light nextto the OnStar® buttons is red, this means thatyour system is not functioning properly and shouldbe checked by a dealer. If the light appearsclear (no light is appearing), your OnStar®
subscription has expired. You can always pressthe OnStar® button to confirm that your OnStar®
equipment is active.
Universal Home RemoteSystem
Universal Home Remote System(With One Triangular LED)The Universal Home Remote System provides away to replace up to three hand-heldradio-frequency (RF) transmitters used to activatedevices such as garage door openers, securitysystems, and home lighting.
110Information Provided by:
This device complies with Part 15 of the FCCRules. Operation is subject to the followingtwo conditions:
1. This device may not cause harmfulinterference.
2. This device must accept any interferencereceived, including interference that maycause undesired operation.
The FCC Grant of Equipment AuthorizationCertificate number is CB2SAHL3.
This device complies with RSS-210 of IndustryCanada. Operation is subject to the following twoconditions:
1. This device may not cause interference.
2. This device must accept any interferencereceived, including interference that maycause undesired operation of the device.
The Canadian Registration ID number is2791021849A.
Changes or modifications to this system by otherthan an authorized service facility could voidauthorization to use this equipment.
Universal Home Remote System(With Three Round LED)The Universal Home Remote System provides away to replace up to three hand-heldradio-frequency (RF) transmitters used to activatedevices such as garage door openers, securitysystems, and home lighting.
This device complies with Part 15 of the FCCRules. Operation is subject to the followingtwo conditions:
1. This device may not cause harmfulinterference.
2. This device must accept any interferencereceived, including interference that maycause undesired operation.
The FCC Grant of Equipment AuthorizationCertificate number is KOBGTV06A.
111Information Provided by:
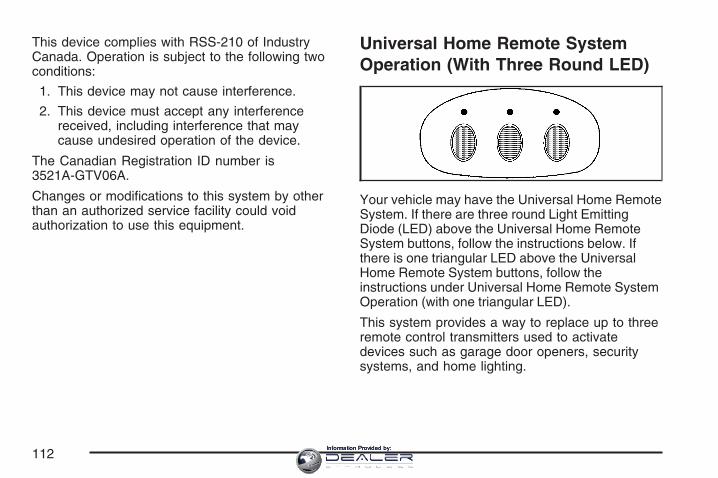
This device complies with RSS-210 of IndustryCanada. Operation is subject to the following twoconditions:
1. This device may not cause interference.
2. This device must accept any interferencereceived, including interference that maycause undesired operation of the device.
The Canadian Registration ID number is3521A-GTV06A.
Changes or modifications to this system by otherthan an authorized service facility could voidauthorization to use this equipment.
Universal Home Remote SystemOperation (With Three Round LED)
Your vehicle may have the Universal Home RemoteSystem. If there are three round Light EmittingDiode (LED) above the Universal Home RemoteSystem buttons, follow the instructions below. Ifthere is one triangular LED above the UniversalHome Remote System buttons, follow theinstructions under Universal Home Remote SystemOperation (with one triangular LED).
This system provides a way to replace up to threeremote control transmitters used to activatedevices such as garage door openers, securitysystems, and home lighting.
112Information Provided by:

Do not use the this system with any garage dooropener that does not have the stop and reversefeature. This includes any garage door openermodel manufactured before April 1, 1982.
Read the instructions completely before attemptingto program the transmitter. Because of the stepsinvolved, it may be helpful to have anotherperson available to assist you in programming thetransmitter.
Be sure to keep the original remote controltransmitter for use in other vehicles, as well as, forfuture programming. You only need the originalremote control transmitter for fixed codeprogramming. It is also recommended that uponthe sale or lease termination of the vehicle,the programmed buttons should be erased forsecurity purposes. See “Erasing your UniversalHome Remote Buttons” later in this section.
Be sure that people and objects are clear of thegarage door or security device you areprogramming. When programming a garage door,it is advised to park outside of the garage.
If you do not know if your garage door opener is afixed code or rolling code device, open yourgarage door opener’s remote control battery cover.Your garage door opener is a fixed code deviceif there is a panel of switches. If not, yourgarage door opener is a rolling code device.
113Information Provided by:
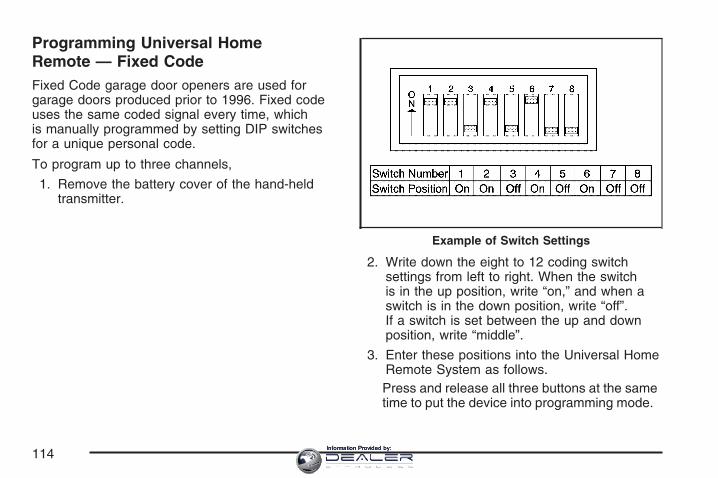
Programming Universal HomeRemote — Fixed CodeFixed Code garage door openers are used forgarage doors produced prior to 1996. Fixed codeuses the same coded signal every time, whichis manually programmed by setting DIP switchesfor a unique personal code.
To program up to three channels,
1. Remove the battery cover of the hand-heldtransmitter.
2. Write down the eight to 12 coding switchsettings from left to right. When the switchis in the up position, write “on,” and when aswitch is in the down position, write “off”.If a switch is set between the up and downposition, write “middle”.
3. Enter these positions into the Universal HomeRemote System as follows.Press and release all three buttons at the sametime to put the device into programming mode.
Example of Switch Settings
114Information Provided by:
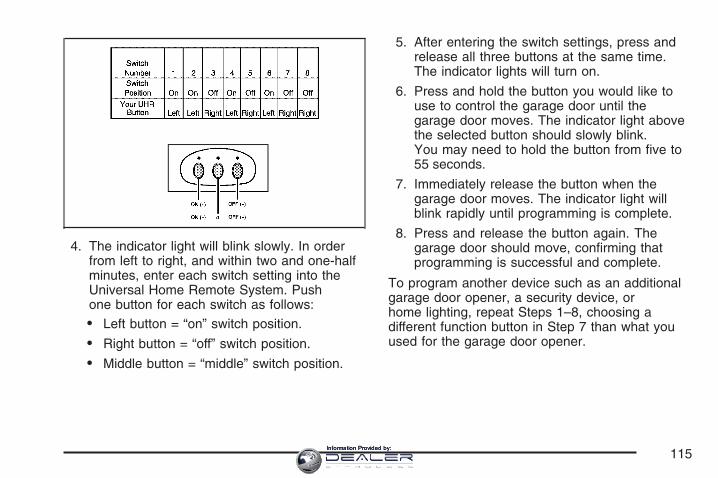
4. The indicator light will blink slowly. In orderfrom left to right, and within two and one-halfminutes, enter each switch setting into theUniversal Home Remote System. Pushone button for each switch as follows:
• Left button = “on” switch position.
• Right button = “off” switch position.
• Middle button = “middle” switch position.
5. After entering the switch settings, press andrelease all three buttons at the same time.The indicator lights will turn on.
6. Press and hold the button you would like touse to control the garage door until thegarage door moves. The indicator light abovethe selected button should slowly blink.You may need to hold the button from five to55 seconds.
7. Immediately release the button when thegarage door moves. The indicator light willblink rapidly until programming is complete.
8. Press and release the button again. Thegarage door should move, confirming thatprogramming is successful and complete.
To program another device such as an additionalgarage door opener, a security device, orhome lighting, repeat Steps 1–8, choosing adifferent function button in Step 7 than what youused for the garage door opener.
115Information Provided by:
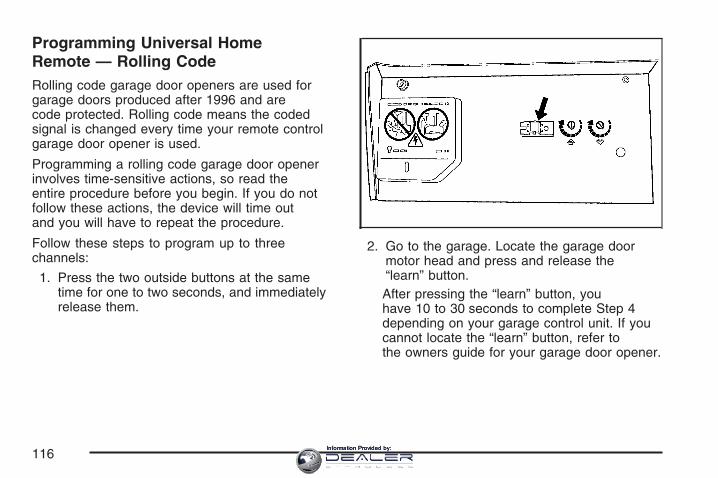
Programming Universal HomeRemote — Rolling CodeRolling code garage door openers are used forgarage doors produced after 1996 and arecode protected. Rolling code means the codedsignal is changed every time your remote controlgarage door opener is used.
Programming a rolling code garage door openerinvolves time-sensitive actions, so read theentire procedure before you begin. If you do notfollow these actions, the device will time outand you will have to repeat the procedure.
Follow these steps to program up to threechannels:
1. Press the two outside buttons at the sametime for one to two seconds, and immediatelyrelease them.
2. Go to the garage. Locate the garage doormotor head and press and release the“learn” button.After pressing the “learn” button, youhave 10 to 30 seconds to complete Step 4depending on your garage control unit. If youcannot locate the “learn” button, refer tothe owners guide for your garage door opener.
116Information Provided by:
3. Press and hold the button you would like touse to control the garage door until thegarage door moves. The indicator light, abovethe selected button, should slowly blink.You may need to hold the button from five to20 seconds.
4. Immediately release the button when thegarage door moves. The indicator light willblink rapidly until programming is complete.
5. Press and release the button again. Thegarage door should move, confirming thatprogramming is successful and complete.
To program another device such as an additionalgarage door opener, a security device, orhome lighting, repeat Steps 1–6, choosing adifferent function button in Step 4 than what youused for the garage door opener.
Using Universal Home RemotePress and hold the appropriate button for at leasthalf of a second. The indicator light will comeon while the signal is being transmitted.
Reprogramming Universal HomeRemote ButtonsYou can reprogram any of the three buttons byrepeating the instructions.
Erasing Universal Home RemoteButtonsYou should erase the programmed buttons whenyou sell the vehicle or terminate your lease.
To erase either rolling code or fixed code on theUniversal Home Remote device, do the following:
1. Press and hold the two outside buttons atthe same time for approximately 20 seconds,until the indicator lights, located directlyabove the buttons, begin to blink rapidly.
2. Once the indicator lights begin to blink,release both buttons. The codes from allbutton will be erased.
For additional information on Universal HomeRemote, see Customer Assistance Officeson page 485.
117Information Provided by:
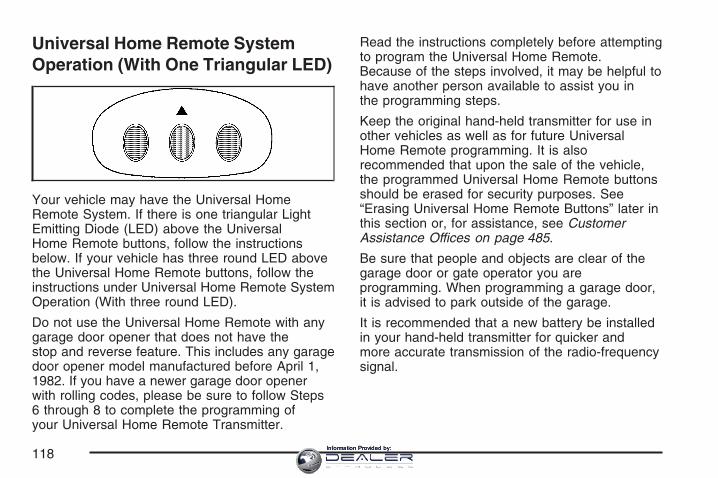
Universal Home Remote SystemOperation (With One Triangular LED)
Your vehicle may have the Universal HomeRemote System. If there is one triangular LightEmitting Diode (LED) above the UniversalHome Remote buttons, follow the instructionsbelow. If your vehicle has three round LED abovethe Universal Home Remote buttons, follow theinstructions under Universal Home Remote SystemOperation (With three round LED).
Do not use the Universal Home Remote with anygarage door opener that does not have thestop and reverse feature. This includes any garagedoor opener model manufactured before April 1,1982. If you have a newer garage door openerwith rolling codes, please be sure to follow Steps6 through 8 to complete the programming ofyour Universal Home Remote Transmitter.
Read the instructions completely before attemptingto program the Universal Home Remote.Because of the steps involved, it may be helpful tohave another person available to assist you inthe programming steps.
Keep the original hand-held transmitter for use inother vehicles as well as for future UniversalHome Remote programming. It is alsorecommended that upon the sale of the vehicle,the programmed Universal Home Remote buttonsshould be erased for security purposes. See“Erasing Universal Home Remote Buttons” later inthis section or, for assistance, see CustomerAssistance Offices on page 485.
Be sure that people and objects are clear of thegarage door or gate operator you areprogramming. When programming a garage door,it is advised to park outside of the garage.
It is recommended that a new battery be installedin your hand-held transmitter for quicker andmore accurate transmission of the radio-frequencysignal.
118Information Provided by:
Programming Universal Home RemoteFollow these steps to program up to threechannels:
1. Press and hold down the two outsideUniversal Home Remote buttons, releasingonly when the Universal Home Remoteindicator light begins to flash, after20 seconds. Do not hold down the buttons forlonger than 30 seconds and do not repeatthis step to program a second and/orthird hand-held transmitter to the remainingtwo Universal Home Remote buttons.
2. Position the end of your hand-held transmitterabout 1 to 3 inches (3 to 8 cm) away from theUniversal Home Remote buttons whilekeeping the indicator light in view.
3. Simultaneously press and hold both thedesired Universal Home Remote buttonand the hand-held transmitter button. Do notrelease the buttons until Step 4 has beencompleted.Some entry gates and garage door openersmay require you to substitute Step 3 withthe procedure noted in “Gate Operator andCanadian Programming” later in this section.
4. The indicator light will flash slowly at first andthen rapidly after Universal Home Remotesuccessfully receives the frequency signalfrom the hand-held transmitter. Release bothbuttons.
5. Press and hold the newly-trained UniversalHome Remote button and observe theindicator light.If the indicator light stays on continuously,programming is complete and your deviceshould activate when the Universal HomeRemote button is pressed and released.To program the remaining two Universal HomeRemote buttons, begin with Step 2 under“Programming Universal Home Remote.” Donot repeat Step 1 as this will erase all ofthe programmed channels.If the indicator light blinks rapidly for twoseconds and then turns to a constant light,continue with Steps 6 through 8 followingto complete the programming of a rolling-codeequipped device, most commonly, a garagedoor opener.
119Information Provided by:
6. Locate in the garage, the garage door openerreceiver (motor-head unit). Locate the “Learn”or “Smart” button. This can usually befound where the hanging antenna wire isattached to the motor-head unit.
7. Firmly press and release the “Learn” or“Smart” button. The name and color ofthe button may vary by manufacturer.You will have 30 seconds to start Step 8.
8. Return to the vehicle. Firmly press and holdthe programmed Universal Home Remotebutton for two seconds, then release it.Immediately press and hold the same buttona second time for two seconds, thenrelease it. Immediately, press and hold thesame button a third time for two seconds, thenrelease.The Universal Home Remote should nowactivate your rolling-code equipped device.
To program the remaining two Universal HomeRemote buttons, begin with Step 2 of“Programming Universal Home Remote.” You donot want to repeat Step 1, as this will eraseall previous programming from the Universal HomeRemote buttons.
Gate Operator and CanadianProgrammingCanadian radio-frequency laws require transmittersignals to time out or quit after several secondsof transmission. This may not be long enoughfor Universal Home Remote to pick up the signalduring programming. Similarly, some U.S. gateoperators are manufactured to time out inthe same manner.
If you live in Canada, or you are having difficultyprogramming a gate operator or garage dooropener by using the “Programming UniversalHome Remote” procedures, regardless of whereyou live, replace Step 3 under “ProgrammingUniversal Home Remote” with the following:
Continue to press and hold the Universal HomeRemote button while you press and release everytwo seconds (cycle) the hand-held transmitterbutton until the frequency signal has beensuccessfully accepted by the Universal HomeRemote. The Universal Home Remote indicatorlight will flash slowly at first and then rapidly.Proceed with Step 4 under “ProgrammingUniversal Home Remote” to complete.
120Information Provided by:

Using Universal Home RemotePress and hold the appropriate Universal HomeRemote button for at least half of a second.The indicator light will come on while the signal isbeing transmitted.
Erasing Universal Home RemoteButtonsTo erase programming from the three UniversalHome Remote buttons do the following:
1. Press and hold down the two outside buttonsuntil the indicator light begins to flash, after20 seconds. Do not hold the two outsidebuttons for longer than 30 seconds.
2. Release both buttons.
The Universal Home Remote is now in the training(learning) mode and can be programmed at anytime beginning with Step 2 under “ProgrammingUniversal Home Remote” shown earlier inthis section.
Individual buttons cannot be erased, but they canbe reprogrammed. See “Reprogramming aSingle Universal Home Remote Button” followingthis section.
Reprogramming a Single UniversalHome Remote ButtonTo program a device to Universal Home Remoteusing a Universal Home Remote buttonpreviously trained, follow these steps:
1. Press and hold the desired Universal HomeRemote button. Do not release the button.
2. The indicator light will begin to flash after20 seconds. While still holding the UniversalHome Remote button, proceed with Step2 under “Programming Universal HomeRemote” shown earlier in this section.
For additional information on Universal HomeRemote, see Customer Assistance Officeson page 485.
Storage Areas
Glove BoxTo open the glove box, lift up on the lever. Theglove box has a light inside. Use the key tolock and unlock.
121Information Provided by:

Cupholder(s)The cupholders are located under a lid in the frontconsole to the right of the shift lever. Press theleft side of the lid and it will open automatically.
Center Console Storage AreaThere is a center console storage area locatedbetween the seats. To open this storage area,push the latch button and lift the lid.
There is also an upright center console storagearea between the seatbacks. To open the storagearea, press and release the button near the topso it extends out. Then, turn the button ineither direction to unlatch the lid and pull theconsole lid down. After you close the lid, press therelease button back in.
Map PocketThe map/storage pockets are located on eachdoor behind a cover.
Floor MatsThe driver’s side floor mat is held in place bytwo snaps and the passenger’s side is heldin place by one.
Remove and Replace the Floor Mats
To remove the floormats, pull up on therear of the mat todisconnect from thesnaps.
To reinstall the floor mats, line up the openings inthe floor mat over the snaps and push downinto place.
Be sure that the driver’s side floor mat is properlyplaced on the floor so that it does not block themovement of the accelerator pedal.
122Information Provided by:
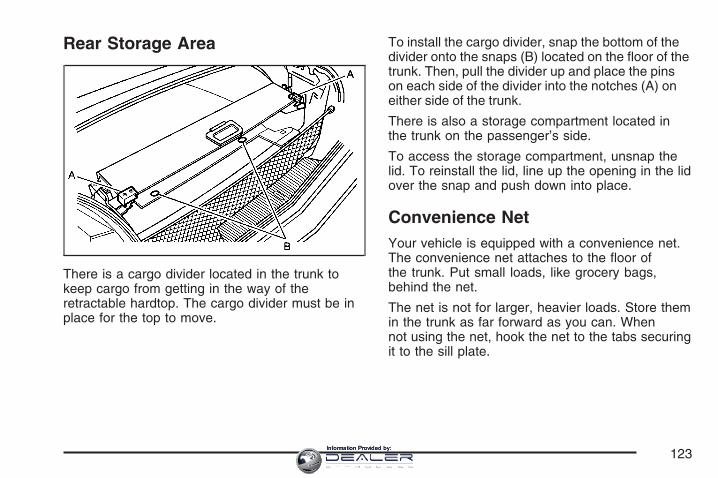
Rear Storage Area
There is a cargo divider located in the trunk tokeep cargo from getting in the way of theretractable hardtop. The cargo divider must be inplace for the top to move.
To install the cargo divider, snap the bottom of thedivider onto the snaps (B) located on the floor of thetrunk. Then, pull the divider up and place the pinson each side of the divider into the notches (A) oneither side of the trunk.
There is also a storage compartment located inthe trunk on the passenger’s side.
To access the storage compartment, unsnap thelid. To reinstall the lid, line up the opening in the lidover the snap and push down into place.
Convenience NetYour vehicle is equipped with a convenience net.The convenience net attaches to the floor ofthe trunk. Put small loads, like grocery bags,behind the net.
The net is not for larger, heavier loads. Store themin the trunk as far forward as you can. Whennot using the net, hook the net to the tabs securingit to the sill plate.
123Information Provided by:
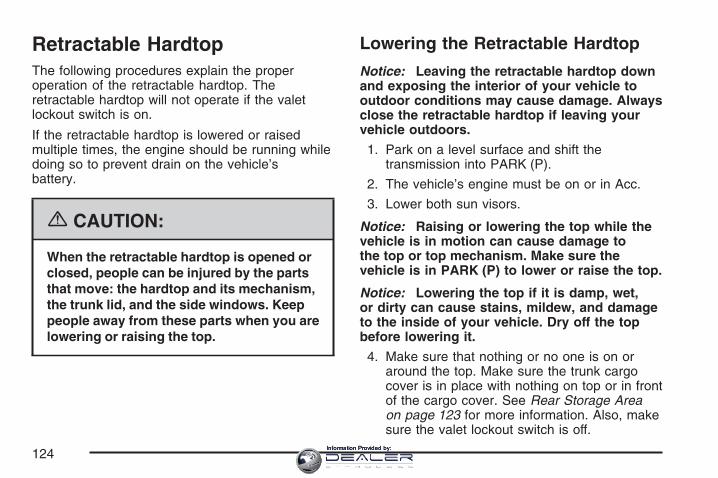
Retractable HardtopThe following procedures explain the properoperation of the retractable hardtop. Theretractable hardtop will not operate if the valetlockout switch is on.
If the retractable hardtop is lowered or raisedmultiple times, the engine should be running whiledoing so to prevent drain on the vehicle’sbattery.
{CAUTION:
When the retractable hardtop is opened orclosed, people can be injured by the partsthat move: the hardtop and its mechanism,the trunk lid, and the side windows. Keeppeople away from these parts when you arelowering or raising the top.
Lowering the Retractable Hardtop
Notice: Leaving the retractable hardtop downand exposing the interior of your vehicle tooutdoor conditions may cause damage. Alwaysclose the retractable hardtop if leaving yourvehicle outdoors.
1. Park on a level surface and shift thetransmission into PARK (P).
2. The vehicle’s engine must be on or in Acc.
3. Lower both sun visors.
Notice: Raising or lowering the top while thevehicle is in motion can cause damage tothe top or top mechanism. Make sure thevehicle is in PARK (P) to lower or raise the top.
Notice: Lowering the top if it is damp, wet,or dirty can cause stains, mildew, and damageto the inside of your vehicle. Dry off the topbefore lowering it.
4. Make sure that nothing or no one is on oraround the top. Make sure the trunk cargocover is in place with nothing on top or in frontof the cargo cover. See Rear Storage Areaon page 123 for more information. Also, makesure the valet lockout switch is off.
124Information Provided by:
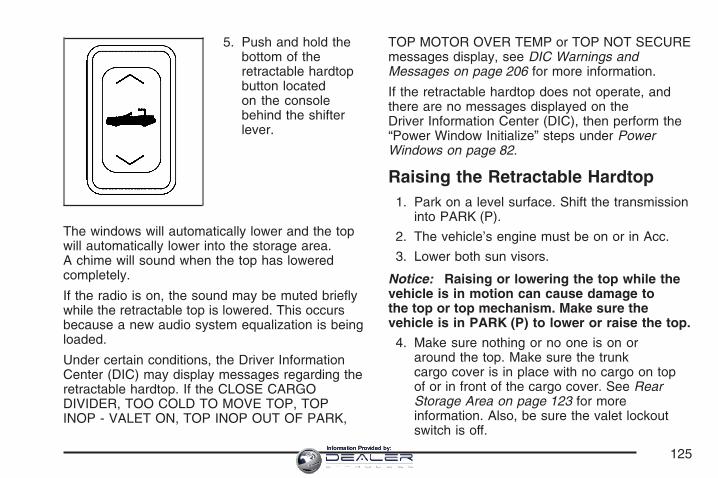
5. Push and hold thebottom of theretractable hardtopbutton locatedon the consolebehind the shifterlever.
The windows will automatically lower and the topwill automatically lower into the storage area.A chime will sound when the top has loweredcompletely.
If the radio is on, the sound may be muted brieflywhile the retractable top is lowered. This occursbecause a new audio system equalization is beingloaded.
Under certain conditions, the Driver InformationCenter (DIC) may display messages regarding theretractable hardtop. If the CLOSE CARGODIVIDER, TOO COLD TO MOVE TOP, TOPINOP - VALET ON, TOP INOP OUT OF PARK,
TOP MOTOR OVER TEMP or TOP NOT SECUREmessages display, see DIC Warnings andMessages on page 206 for more information.
If the retractable hardtop does not operate, andthere are no messages displayed on theDriver Information Center (DIC), then perform the“Power Window Initialize” steps under PowerWindows on page 82.
Raising the Retractable Hardtop1. Park on a level surface. Shift the transmission
into PARK (P).
2. The vehicle’s engine must be on or in Acc.
3. Lower both sun visors.
Notice: Raising or lowering the top while thevehicle is in motion can cause damage tothe top or top mechanism. Make sure thevehicle is in PARK (P) to lower or raise the top.
4. Make sure nothing or no one is on oraround the top. Make sure the trunkcargo cover is in place with no cargo on topof or in front of the cargo cover. See RearStorage Area on page 123 for moreinformation. Also, be sure the valet lockoutswitch is off.
125Information Provided by:
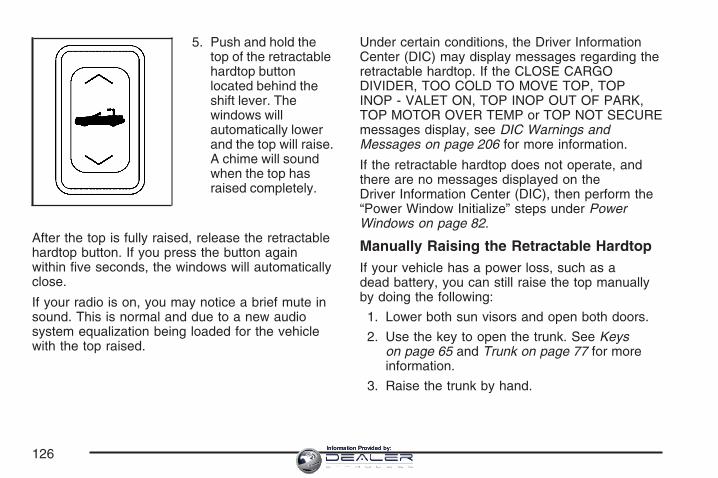
5. Push and hold thetop of the retractablehardtop buttonlocated behind theshift lever. Thewindows willautomatically lowerand the top will raise.A chime will soundwhen the top hasraised completely.
After the top is fully raised, release the retractablehardtop button. If you press the button againwithin five seconds, the windows will automaticallyclose.
If your radio is on, you may notice a brief mute insound. This is normal and due to a new audiosystem equalization being loaded for the vehiclewith the top raised.
Under certain conditions, the Driver InformationCenter (DIC) may display messages regarding theretractable hardtop. If the CLOSE CARGODIVIDER, TOO COLD TO MOVE TOP, TOPINOP - VALET ON, TOP INOP OUT OF PARK,TOP MOTOR OVER TEMP or TOP NOT SECUREmessages display, see DIC Warnings andMessages on page 206 for more information.
If the retractable hardtop does not operate, andthere are no messages displayed on theDriver Information Center (DIC), then perform the“Power Window Initialize” steps under PowerWindows on page 82.
Manually Raising the Retractable HardtopIf your vehicle has a power loss, such as adead battery, you can still raise the top manuallyby doing the following:
1. Lower both sun visors and open both doors.
2. Use the key to open the trunk. See Keyson page 65 and Trunk on page 77 for moreinformation.
3. Raise the trunk by hand.
126Information Provided by:
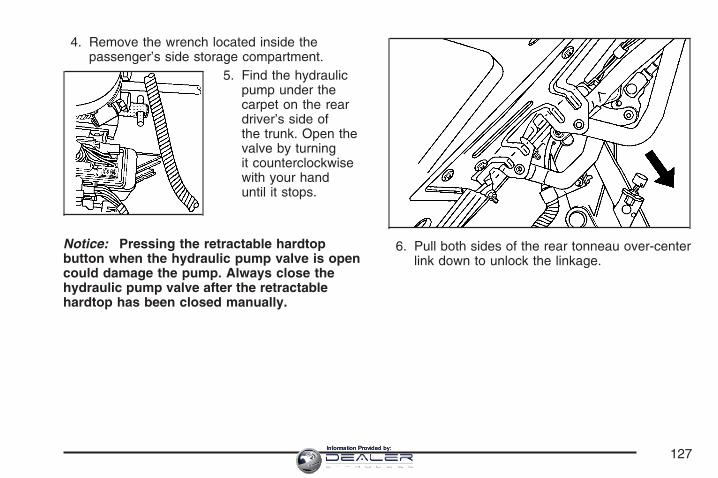
4. Remove the wrench located inside thepassenger’s side storage compartment.
5. Find the hydraulicpump under thecarpet on the reardriver’s side ofthe trunk. Open thevalve by turningit counterclockwisewith your handuntil it stops.
Notice: Pressing the retractable hardtopbutton when the hydraulic pump valve is opencould damage the pump. Always close thehydraulic pump valve after the retractablehardtop has been closed manually.
6. Pull both sides of the rear tonneau over-centerlink down to unlock the linkage.
127Information Provided by:
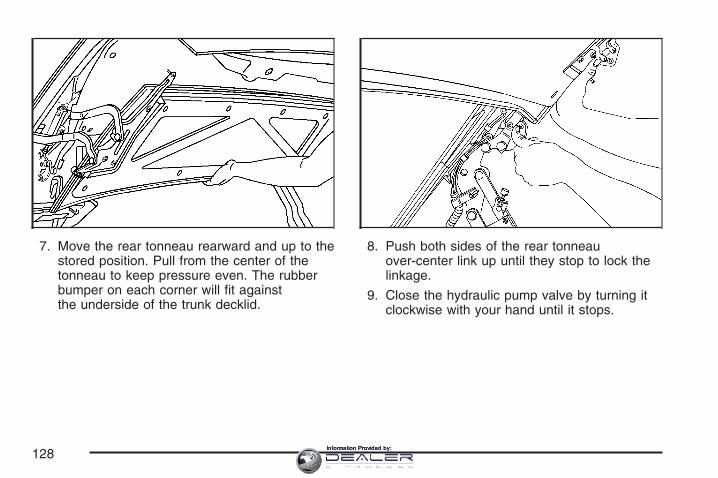
7. Move the rear tonneau rearward and up to thestored position. Pull from the center of thetonneau to keep pressure even. The rubberbumper on each corner will fit againstthe underside of the trunk decklid.
8. Push both sides of the rear tonneauover-center link up until they stop to lock thelinkage.
9. Close the hydraulic pump valve by turning itclockwise with your hand until it stops.
128Information Provided by:
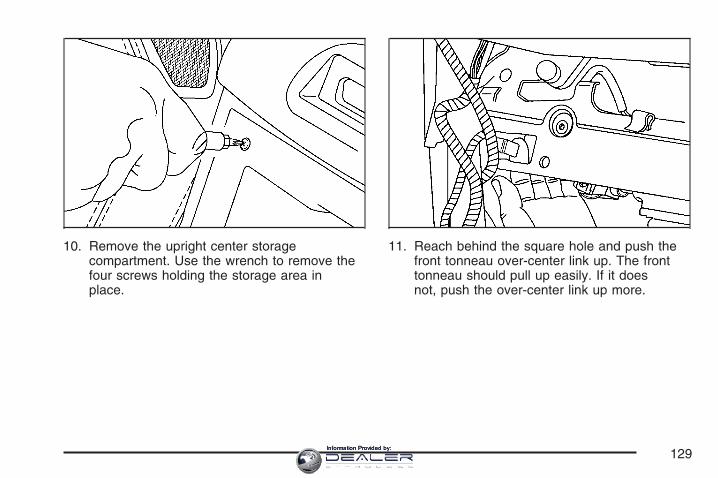
10. Remove the upright center storagecompartment. Use the wrench to remove thefour screws holding the storage area inplace.
11. Reach behind the square hole and push thefront tonneau over-center link up. The fronttonneau should pull up easily. If it doesnot, push the over-center link up more.
129Information Provided by:
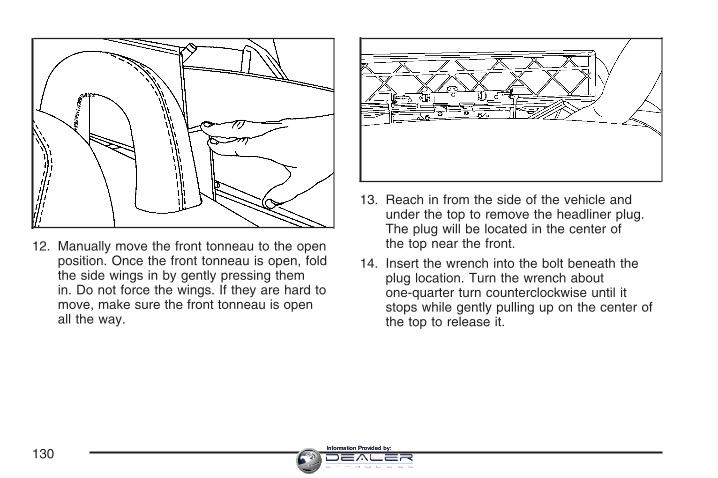
12. Manually move the front tonneau to the openposition. Once the front tonneau is open, foldthe side wings in by gently pressing themin. Do not force the wings. If they are hard tomove, make sure the front tonneau is openall the way.
13. Reach in from the side of the vehicle andunder the top to remove the headliner plug.The plug will be located in the center ofthe top near the front.
14. Insert the wrench into the bolt beneath theplug location. Turn the wrench aboutone-quarter turn counterclockwise until itstops while gently pulling up on the center ofthe top to release it.
130Information Provided by:
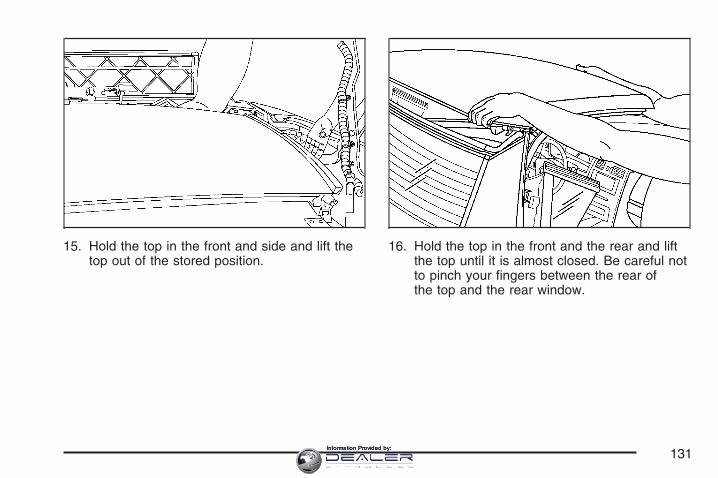
15. Hold the top in the front and side and lift thetop out of the stored position.
16. Hold the top in the front and the rear and liftthe top until it is almost closed. Be careful notto pinch your fingers between the rear ofthe top and the rear window.
131Information Provided by:
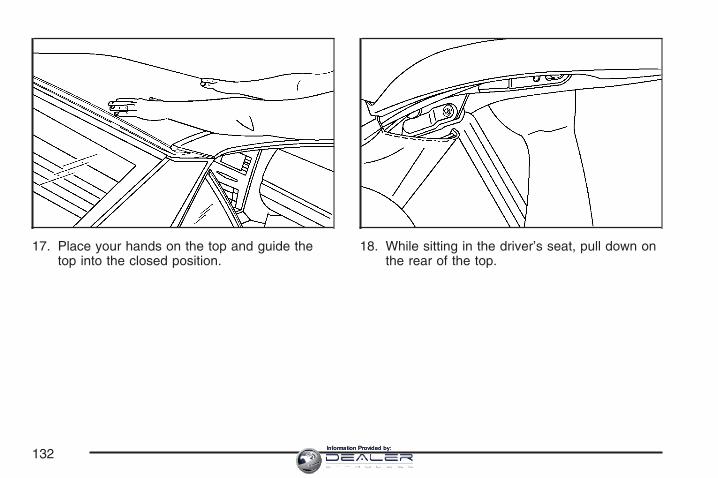
17. Place your hands on the top and guide thetop into the closed position.
18. While sitting in the driver’s seat, pull down onthe rear of the top.
132Information Provided by:
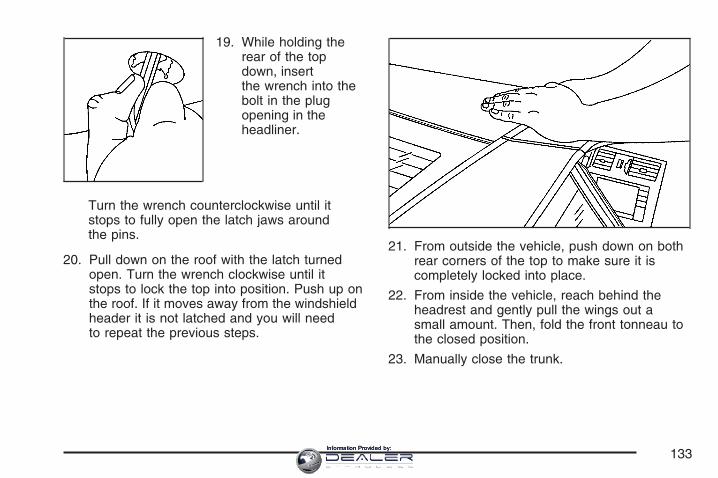
19. While holding therear of the topdown, insertthe wrench into thebolt in the plugopening in theheadliner.
Turn the wrench counterclockwise until itstops to fully open the latch jaws aroundthe pins.
20. Pull down on the roof with the latch turnedopen. Turn the wrench clockwise until itstops to lock the top into position. Push up onthe roof. If it moves away from the windshieldheader it is not latched and you will needto repeat the previous steps.
21. From outside the vehicle, push down on bothrear corners of the top to make sure it iscompletely locked into place.
22. From inside the vehicle, reach behind theheadrest and gently pull the wings out asmall amount. Then, fold the front tonneau tothe closed position.
23. Manually close the trunk.
133Information Provided by:

✍ NOTES
134Information Provided by:
Instrument Panel Overview ........................ 138Hazard Warning Flashers .......................... 140Other Warning Devices ............................. 140Horn .......................................................... 140Power Tilt Wheel and Telescopic
Steering Column .................................... 141Turn Signal/Multifunction Lever .................. 141Turn and Lane-Change Signals ................. 142Headlamp High/Low-Beam Changer .......... 143Flash-to-Pass ............................................ 143Windshield Wipers ..................................... 144Rainsense™ Wipers .................................. 145Windshield Washer .................................... 146Headlamp Washer ..................................... 146Cruise Control ........................................... 147Adaptive Cruise Control ............................. 150Exterior Lamps .......................................... 164Wiper Activated Headlamps ....................... 166Headlamps on Reminder ........................... 166Daytime Running Lamps (DRL) ................. 166Adaptive Forward Lighting System ............. 167Fog Lamps ................................................ 168Twilight Sentinel® ...................................... 168
Exterior Lighting Battery Saver .................. 169Instrument Panel Brightness ...................... 170Courtesy Lamps ........................................ 170Entry/Exit Lighting ...................................... 170Reading Lamps ......................................... 171Battery Run-Down Protection ..................... 171Head-Up Display (HUD) ............................ 171Ultrasonic Rear Parking
Assist (URPA) ........................................ 175Accessory Power Outlet(s) ........................ 177Ashtray(s) and Cigarette Lighter ................ 178
Climate Controls ......................................... 178Dual Climate Control System ..................... 178Outlet Adjustment ...................................... 184Passenger Compartment Air Filter ............. 184
Warning Lights, Gages, and Indicators ..... 185Instrument Panel Cluster ........................... 186Speedometer and Odometer ...................... 187Trip Odometer ........................................... 187Tachometer ............................................... 187Safety Belt Reminder Light ........................ 187Airbag Readiness Light ............................. 188
Section 3 Instrument Panel
135Information Provided by:
Passenger Airbag Status Indicator ............. 189Charging System Light .............................. 191Voltmeter Gage ......................................... 192Brake System Warning Light ..................... 192Anti-Lock Brake System Warning Light ...... 193Traction Control System (TCS)
Warning Light ........................................ 194Engine Coolant Temperature Gage ............ 195Tire Pressure Light .................................... 196Malfunction Indicator Lamp ........................ 196Engine Oil Pressure Gage ......................... 200Security Light ............................................ 201Fog Lamp Light ......................................... 201Lights On Reminder .................................. 202Highbeam On Light ................................... 202Fuel Gage ................................................. 202
Driver Information Center (DIC) .................. 203DIC Controls and Displays ........................ 204DIC Warnings and Messages .................... 206Other Messages ........................................ 219DIC Vehicle Personalization ....................... 220
Trip Computer ............................................. 224Oil Life Indicator ........................................ 224
Audio System(s) ......................................... 225Theft-Deterrent Feature ............................. 226Audio Steering Wheel Controls .................. 227Radio Reception ........................................ 228Care of Your CDs ..................................... 229Care of the CD Player .............................. 230Diversity Antenna System .......................... 230XM™ Satellite Radio Antenna System ....... 230
Section 3 Instrument Panel
136Information Provided by:

✍ NOTES
137Information Provided by:

Instrument Panel Overview
XLR shown, XLR-V similar
138Information Provided by:

The main components of the instrument panel are the following:
A. Head-Up Display (HUD) Controls/InstrumentPanel Brightness Controls. See Head-UpDisplay (HUD) on page 171 or Instrument PanelBrightness on page 170.
B. Turn Signal/Multifunction Lever. See TurnSignal/Multifunction Lever on page 141.CruiseControl. See Cruise Control on page 147.Exterior Lamps Control. See Exterior Lamps onpage 164. Fog Lamps. See Fog Lamps onpage 168.
C. Instrument Panel Cluster. See InstrumentPanel Cluster on page 186.
D. Windshield Wiper/Washer Lever. See“Windshield Wipers” under TurnSignal/Multifunction Lever on page 141.
E. Driver Information Center (DIC) Controls/InteriorLamps. See DIC Controls and Displays onpage 204.
F. Air Outlets. See Outlet Adjustment onpage 184.
G. Hazard Warning Flasher Button. See HazardWarning Flashers on page 140.
H. Voice Commands/Audio Controls. See OnStar®
System on page 107 or Audio SteeringWheel Controls on page 227.
I. Adaptive Cruise Controls (If Equipped). See“Adaptive Cruise Control (ACC)” underTurn Signal/Multifunction Lever on page 141.
J. Power Tilt Wheel and Telescopic SteeringButton. See Power Tilt Wheel and TelescopicSteering Column on page 141.
K. Horn. See Horn on page 140.L. Audio Steering Wheel Controls. See Audio
Steering Wheel Controls on page 227.M. Ignition Switch. See Ignition Positions on
page 88.N. Shift Lever. See Automatic Transmission
Operation on page 92.O. Traction Control Button. See Traction Control
System (TCS) on page 329.
139Information Provided by:
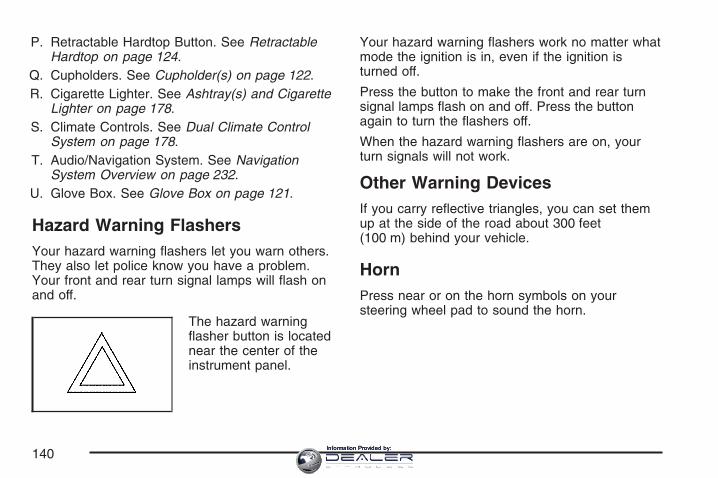
P. Retractable Hardtop Button. See RetractableHardtop on page 124.
Q. Cupholders. See Cupholder(s) on page 122.R. Cigarette Lighter. See Ashtray(s) and Cigarette
Lighter on page 178.S. Climate Controls. See Dual Climate Control
System on page 178.T. Audio/Navigation System. See Navigation
System Overview on page 232.U. Glove Box. See Glove Box on page 121.
Hazard Warning FlashersYour hazard warning flashers let you warn others.They also let police know you have a problem.Your front and rear turn signal lamps will flash onand off.
The hazard warningflasher button is locatednear the center of theinstrument panel.
Your hazard warning flashers work no matter whatmode the ignition is in, even if the ignition isturned off.
Press the button to make the front and rear turnsignal lamps flash on and off. Press the buttonagain to turn the flashers off.
When the hazard warning flashers are on, yourturn signals will not work.
Other Warning DevicesIf you carry reflective triangles, you can set themup at the side of the road about 300 feet(100 m) behind your vehicle.
HornPress near or on the horn symbols on yoursteering wheel pad to sound the horn.
140Information Provided by:
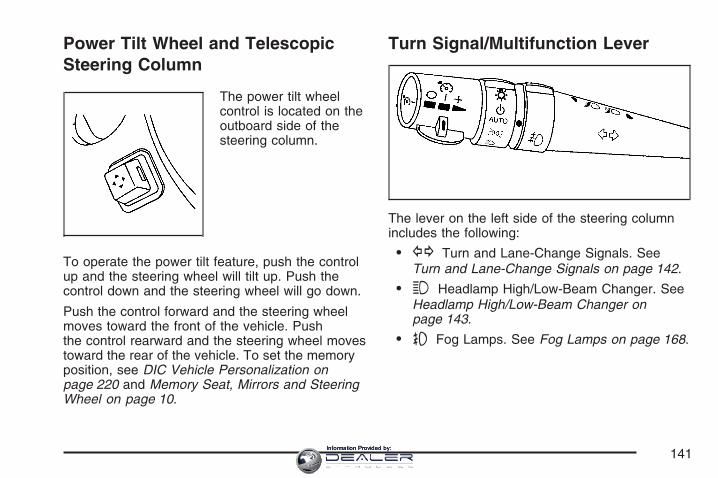
Power Tilt Wheel and TelescopicSteering Column
The power tilt wheelcontrol is located on theoutboard side of thesteering column.
To operate the power tilt feature, push the controlup and the steering wheel will tilt up. Push thecontrol down and the steering wheel will go down.
Push the control forward and the steering wheelmoves toward the front of the vehicle. Pushthe control rearward and the steering wheel movestoward the rear of the vehicle. To set the memoryposition, see DIC Vehicle Personalization onpage 220 and Memory Seat, Mirrors and SteeringWheel on page 10.
Turn Signal/Multifunction Lever
The lever on the left side of the steering columnincludes the following:
• G Turn and Lane-Change Signals. SeeTurn and Lane-Change Signals on page 142.
• 3 Headlamp High/Low-Beam Changer. SeeHeadlamp High/Low-Beam Changer onpage 143.
• - Fog Lamps. See Fog Lamps on page 168.
141Information Provided by:
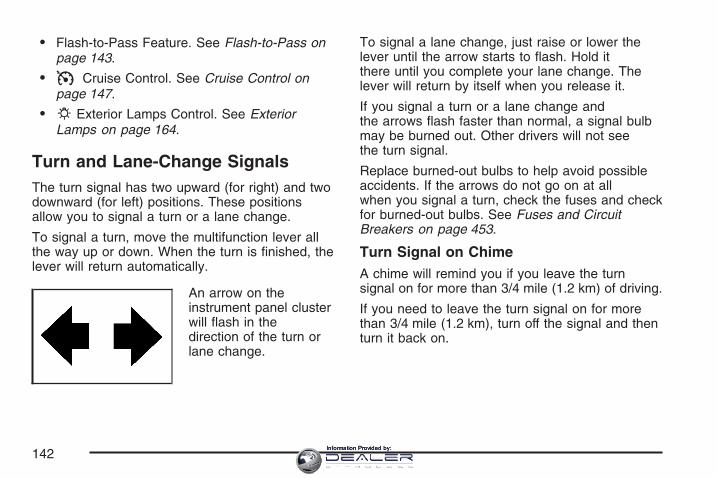
• Flash-to-Pass Feature. See Flash-to-Pass onpage 143.
• I Cruise Control. See Cruise Control onpage 147.
• P Exterior Lamps Control. See ExteriorLamps on page 164.
Turn and Lane-Change SignalsThe turn signal has two upward (for right) and twodownward (for left) positions. These positionsallow you to signal a turn or a lane change.
To signal a turn, move the multifunction lever allthe way up or down. When the turn is finished, thelever will return automatically.
An arrow on theinstrument panel clusterwill flash in thedirection of the turn orlane change.
To signal a lane change, just raise or lower thelever until the arrow starts to flash. Hold itthere until you complete your lane change. Thelever will return by itself when you release it.
If you signal a turn or a lane change andthe arrows flash faster than normal, a signal bulbmay be burned out. Other drivers will not seethe turn signal.
Replace burned-out bulbs to help avoid possibleaccidents. If the arrows do not go on at allwhen you signal a turn, check the fuses and checkfor burned-out bulbs. See Fuses and CircuitBreakers on page 453.
Turn Signal on ChimeA chime will remind you if you leave the turnsignal on for more than 3/4 mile (1.2 km) of driving.
If you need to leave the turn signal on for morethan 3/4 mile (1.2 km), turn off the signal and thenturn it back on.
142Information Provided by:
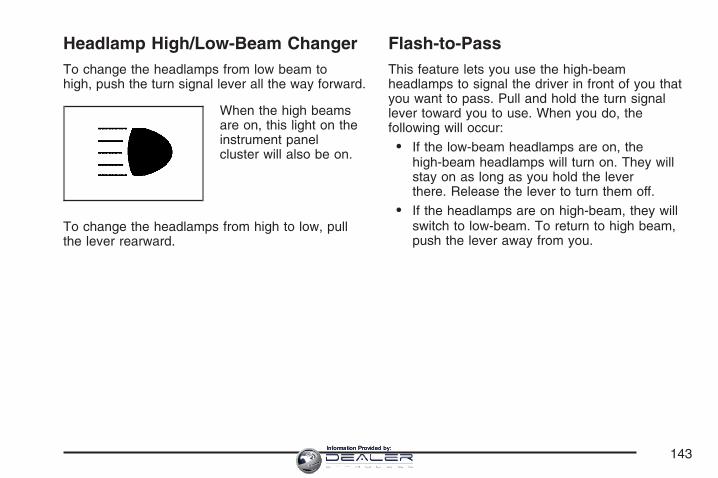
Headlamp High/Low-Beam ChangerTo change the headlamps from low beam tohigh, push the turn signal lever all the way forward.
When the high beamsare on, this light on theinstrument panelcluster will also be on.
To change the headlamps from high to low, pullthe lever rearward.
Flash-to-PassThis feature lets you use the high-beamheadlamps to signal the driver in front of you thatyou want to pass. Pull and hold the turn signallever toward you to use. When you do, thefollowing will occur:
• If the low-beam headlamps are on, thehigh-beam headlamps will turn on. They willstay on as long as you hold the leverthere. Release the lever to turn them off.
• If the headlamps are on high-beam, they willswitch to low-beam. To return to high beam,push the lever away from you.
143Information Provided by:
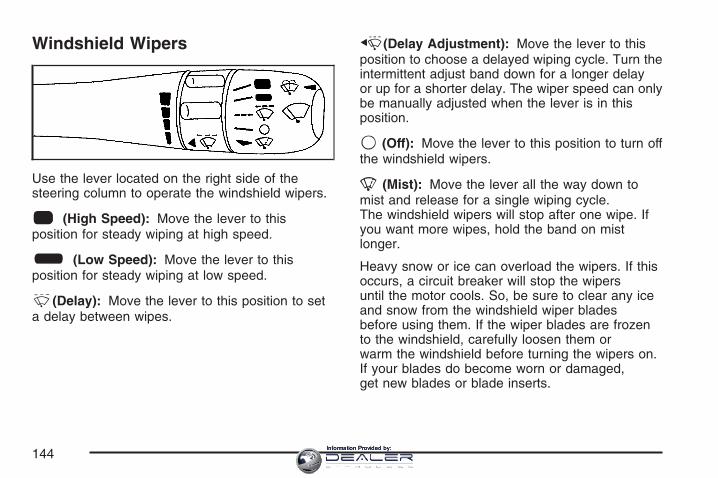
Windshield Wipers
Use the lever located on the right side of thesteering column to operate the windshield wipers.
1 (High Speed): Move the lever to thisposition for steady wiping at high speed.
6 (Low Speed): Move the lever to thisposition for steady wiping at low speed.
& (Delay): Move the lever to this position to seta delay between wipes.
x (Delay Adjustment): Move the lever to thisposition to choose a delayed wiping cycle. Turn theintermittent adjust band down for a longer delayor up for a shorter delay. The wiper speed can onlybe manually adjusted when the lever is in thisposition.
9 (Off): Move the lever to this position to turn offthe windshield wipers.
8 (Mist): Move the lever all the way down tomist and release for a single wiping cycle.The windshield wipers will stop after one wipe. Ifyou want more wipes, hold the band on mistlonger.
Heavy snow or ice can overload the wipers. If thisoccurs, a circuit breaker will stop the wipersuntil the motor cools. So, be sure to clear any iceand snow from the windshield wiper bladesbefore using them. If the wiper blades are frozento the windshield, carefully loosen them orwarm the windshield before turning the wipers on.If your blades do become worn or damaged,get new blades or blade inserts.
144Information Provided by:
Rainsense™ WipersYour vehicle has Rainsense™ wipers. Themoisture sensor for this feature is mounted on theinterior side of the windshield below the rearviewmirror and is used to automatically operatethe wipers by monitoring the amount of moisturebuild-up on the windshield. Wipes occur as neededto clear the windshield depending on drivingconditions and the sensitivity setting. In light rainor snow, fewer wipes will occur. In heavy rainor snow, wipes will occur more frequently.The Rainsense™ wipers operate in a delay modeas well as a continuous low or high speed asneeded. If the system is left on for long periods oftime, occasional wipes may occur without anymoisture on the windshield. This is normaland indicates that the Rainsense™ system isactivated.
The Rainsense™ system is also sensitive tovibration. The system may activate if somethinghits the windshield or if the vehicle hits a bump.
The Rainsense™ system can be activated bymoving the wiper lever up to the delay positionand turning the delay adjust band to one of thefive sensitivity levels. The bottom delay adjustposition is the lowest sensitivity setting, level one.This allows more rain or snow to collect on thewindshield between wipes. Turning the delayadjust band away from you to the higher sensitivitylevels allows less rain or snow to collect on thewindshield between wipes.
The top position is the highest sensitivity setting,level five. A single wipe will occur each timeyou turn the delay adjust band to a highersensitivity level to indicate that the sensitivity levelhas been increased.
Notice: Going through an automatic car washwith the wipers on can damage them. Turnthe wipers off when going through anautomatic car wash.
The mist and wash cycles operate as normal andare not affected by the Rainsense™ function.The Rainsense™ system can be overridden at anytime by manually changing the wiper control tolow or high speed.
145Information Provided by:
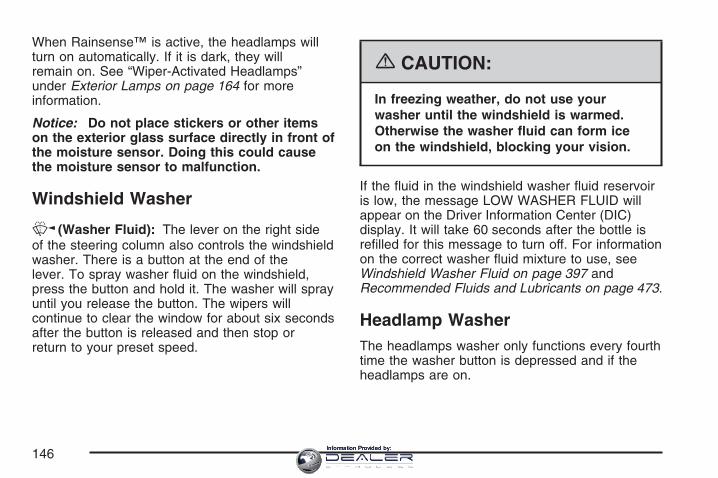
When Rainsense™ is active, the headlamps willturn on automatically. If it is dark, they willremain on. See “Wiper-Activated Headlamps”under Exterior Lamps on page 164 for moreinformation.
Notice: Do not place stickers or other itemson the exterior glass surface directly in front ofthe moisture sensor. Doing this could causethe moisture sensor to malfunction.
Windshield Washer
K (Washer Fluid): The lever on the right sideof the steering column also controls the windshieldwasher. There is a button at the end of thelever. To spray washer fluid on the windshield,press the button and hold it. The washer will sprayuntil you release the button. The wipers willcontinue to clear the window for about six secondsafter the button is released and then stop orreturn to your preset speed.
{CAUTION:
In freezing weather, do not use yourwasher until the windshield is warmed.Otherwise the washer fluid can form iceon the windshield, blocking your vision.
If the fluid in the windshield washer fluid reservoiris low, the message LOW WASHER FLUID willappear on the Driver Information Center (DIC)display. It will take 60 seconds after the bottle isrefilled for this message to turn off. For informationon the correct washer fluid mixture to use, seeWindshield Washer Fluid on page 397 andRecommended Fluids and Lubricants on page 473.
Headlamp WasherThe headlamps washer only functions every fourthtime the washer button is depressed and if theheadlamps are on.
146Information Provided by:
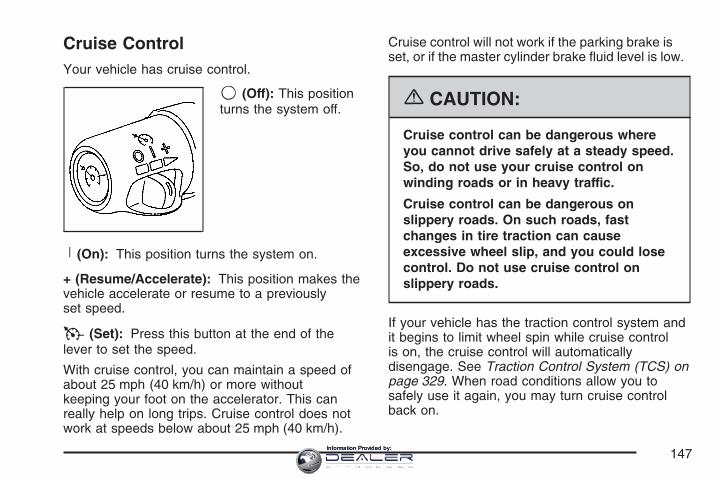
Cruise ControlYour vehicle has cruise control.
9 (Off): This positionturns the system off.
R (On): This position turns the system on.
+ (Resume/Accelerate): This position makes thevehicle accelerate or resume to a previouslyset speed.
T (Set): Press this button at the end of thelever to set the speed.
With cruise control, you can maintain a speed ofabout 25 mph (40 km/h) or more withoutkeeping your foot on the accelerator. This canreally help on long trips. Cruise control does notwork at speeds below about 25 mph (40 km/h).
Cruise control will not work if the parking brake isset, or if the master cylinder brake fluid level is low.
{CAUTION:
Cruise control can be dangerous whereyou cannot drive safely at a steady speed.So, do not use your cruise control onwinding roads or in heavy traffic.
Cruise control can be dangerous onslippery roads. On such roads, fastchanges in tire traction can causeexcessive wheel slip, and you could losecontrol. Do not use cruise control onslippery roads.
If your vehicle has the traction control system andit begins to limit wheel spin while cruise controlis on, the cruise control will automaticallydisengage. See Traction Control System (TCS) onpage 329. When road conditions allow you tosafely use it again, you may turn cruise controlback on.
147Information Provided by:
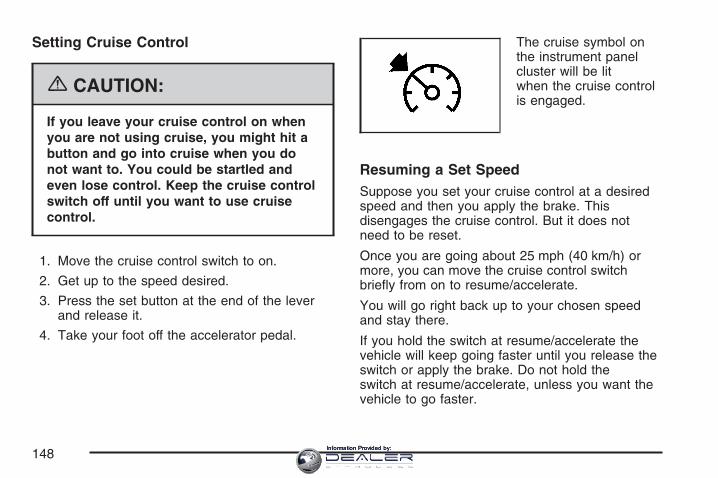
Setting Cruise Control
{CAUTION:
If you leave your cruise control on whenyou are not using cruise, you might hit abutton and go into cruise when you donot want to. You could be startled andeven lose control. Keep the cruise controlswitch off until you want to use cruisecontrol.
1. Move the cruise control switch to on.
2. Get up to the speed desired.
3. Press the set button at the end of the leverand release it.
4. Take your foot off the accelerator pedal.
The cruise symbol onthe instrument panelcluster will be litwhen the cruise controlis engaged.
Resuming a Set SpeedSuppose you set your cruise control at a desiredspeed and then you apply the brake. Thisdisengages the cruise control. But it does notneed to be reset.
Once you are going about 25 mph (40 km/h) ormore, you can move the cruise control switchbriefly from on to resume/accelerate.
You will go right back up to your chosen speedand stay there.
If you hold the switch at resume/accelerate thevehicle will keep going faster until you release theswitch or apply the brake. Do not hold theswitch at resume/accelerate, unless you want thevehicle to go faster.
148Information Provided by:
Increasing Speed While Using CruiseControlThere are two ways to go to a higher speed:
• Use the accelerator pedal to get to the higherspeed. Press the set button at the end of thelever, then release the button and theaccelerator pedal. You will now cruise at thehigher speed. If the accelerator pedal isheld longer than 60 seconds, cruise controlwill turn off.
• Move the cruise switch from on to resume/accelerate. Hold it there until you get up to thedesired speed, and then release the switch. Toincrease your speed in very small amounts,move the switch briefly to resume/accelerate.Each time you do this, your vehicle will goabout 1 mph (1.6 km/h) faster.
Reducing Speed While Using CruiseControl• Press and hold the set button until you reach
the lower speed desired, then release it.
• To slow down in very small amounts, brieflypress the set button. Each time you do this,your vehicle will go about 1 mph (1.6 km/h)slower.
Passing Another Vehicle While UsingCruise ControlUse the accelerator pedal to increase your speed.When you take your foot off the pedal, yourvehicle will slow down to the cruise control speedyou set earlier.
149Information Provided by:
Using Cruise Control on HillsHow well your cruise control works on hillsdepends upon your speed, load and the steepnessof the hills. When going up steep hills, youmight have to step on the accelerator pedal tomaintain your speed. When going downhill,you might have to brake or shift to a lower gear tokeep your vehicle’s speed down. Of course,applying the brake turns off the cruise control.Many drivers find this to be too much trouble anddo not use cruise control on steep hills.
Ending Cruise ControlThere are two ways to turn off the cruise control:
• Step lightly on the brake pedal
• Move the cruise control switch to off
Erasing Speed MemoryTurning off the cruise control or the ignition, willerase your cruise control set speed memory.
Adaptive Cruise ControlIf your vehicle has this feature, be sure to readthis entire section before using it.
The system operates on a radio frequency subjectto Federal Communications Commission (FCC)Rules and with Industry Canada.
This device complies with Part 15 of the FCCRules. Operation is subject to the followingtwo conditions:
1. This device may not cause interference.
2. This device must accept any interferencereceived, including interference that maycause undesired operation of the device.
This device complies with RSS-210 of IndustryCanada. Operation is subject to the following twoconditions:
1. This device may not cause interference.
2. This device must accept any interferencereceived, including interference that maycause undesired operation of the device.
Changes or modifications to this system by otherthan an authorized service facility could voidauthorization to use this equipment.
150Information Provided by:
Adaptive Cruise Control is an enhancement totraditional cruise control and is not a safetysystem. It allows you to keep cruise controlengaged in moderate traffic conditions withouthaving to constantly reset your cruise control.Adaptive Cruise Control uses radar to detect avehicle directly ahead in your path, within adistance of 328 ft (100 m), and operates at speedsabove 25 mph (40 km/h). When it is engaged bythe driver, the system can apply limited braking oracceleration of the vehicle, automatically, tomaintain a selected follow distance to the vehicleahead. Braking is limited to 0.3 g’s (2.95 m/sec2)of deceleration, which is comparable to moderateapplication of the vehicle’s brakes. To disengageAdaptive Cruise Control, apply the brake. If there isnot a vehicle in your path, your vehicle will reactlike traditional cruise control.
{CAUTION:
Adaptive Cruise Control will not applyhard braking or bring the vehicle to acomplete stop. It will not respond tostopped vehicles, pedestrians or animals.When you are approaching a vehicle orobject, Adaptive Cruise Control may nothave time to slow your vehicle enough toavoid a collision. Your complete attentionis always required while driving and youshould be ready to take action and applythe brakes. For more information, seeDefensive Driving on page 322.
151Information Provided by:
{CAUTION:
• On winding roads, Adaptive CruiseControl may not detect a vehicleahead. You could crash into a vehicleahead of you. Do not use AdaptiveCruise Control on winding roads.
• Adaptive Cruise Control may not havetime to slow your vehicle enough toavoid a crash when you are driving inconditions where vehicles maysuddenly slow or stop ahead of you,enter your lane, or cross your vehicle’spath. If you are driving in theseconditions, do not use Adaptive CruiseControl. The warning beep and alertsymbol may indicate that you aredriving in conditions where AdaptiveCruise Control should not be used. See“Alerting the Driver” in this section.
CAUTION: (Continued)
CAUTION: (Continued)
• On slippery roads, fast changes in tiretraction can cause needless wheelspinning, and you could lose control.Do not use cruise control on slipperyroads.
• When weather limits visibility, such aswhen in fog, rain, or snow conditions,Adaptive Cruise Control performanceis limited. There may not be enoughdistance to adapt to the changingtraffic conditions. Do not use cruisecontrol when visibility is low.
Some of the AdaptiveCruise controls arelocated on the end ofthe multifunction lever.
152Information Provided by:
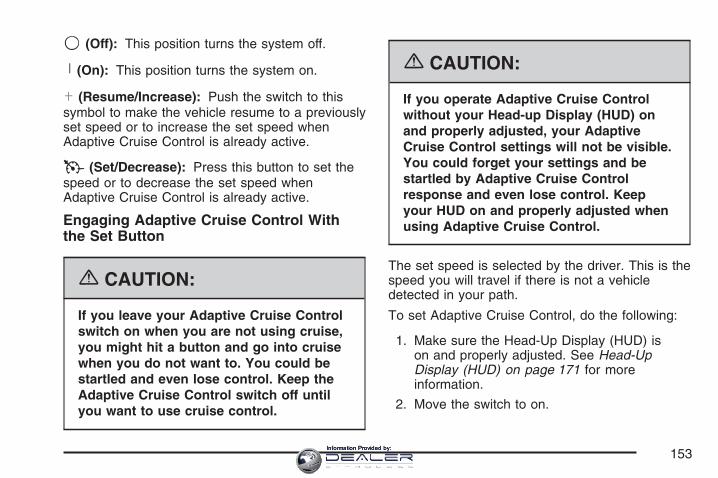
9 (Off): This position turns the system off.
R (On): This position turns the system on.
S (Resume/Increase): Push the switch to thissymbol to make the vehicle resume to a previouslyset speed or to increase the set speed whenAdaptive Cruise Control is already active.
T (Set/Decrease): Press this button to set thespeed or to decrease the set speed whenAdaptive Cruise Control is already active.
Engaging Adaptive Cruise Control Withthe Set Button
{CAUTION:
If you leave your Adaptive Cruise Controlswitch on when you are not using cruise,you might hit a button and go into cruisewhen you do not want to. You could bestartled and even lose control. Keep theAdaptive Cruise Control switch off untilyou want to use cruise control.
{CAUTION:
If you operate Adaptive Cruise Controlwithout your Head-up Display (HUD) onand properly adjusted, your AdaptiveCruise Control settings will not be visible.You could forget your settings and bestartled by Adaptive Cruise Controlresponse and even lose control. Keepyour HUD on and properly adjusted whenusing Adaptive Cruise Control.
The set speed is selected by the driver. This is thespeed you will travel if there is not a vehicledetected in your path.
To set Adaptive Cruise Control, do the following:
1. Make sure the Head-Up Display (HUD) ison and properly adjusted. See Head-UpDisplay (HUD) on page 171 for moreinformation.
2. Move the switch to on.
153Information Provided by:
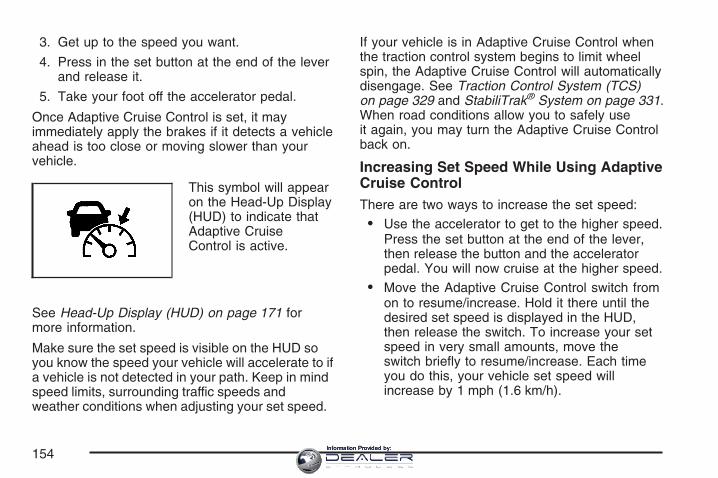
3. Get up to the speed you want.
4. Press in the set button at the end of the leverand release it.
5. Take your foot off the accelerator pedal.
Once Adaptive Cruise Control is set, it mayimmediately apply the brakes if it detects a vehicleahead is too close or moving slower than yourvehicle.
This symbol will appearon the Head-Up Display(HUD) to indicate thatAdaptive CruiseControl is active.
See Head-Up Display (HUD) on page 171 formore information.
Make sure the set speed is visible on the HUD soyou know the speed your vehicle will accelerate to ifa vehicle is not detected in your path. Keep in mindspeed limits, surrounding traffic speeds andweather conditions when adjusting your set speed.
If your vehicle is in Adaptive Cruise Control whenthe traction control system begins to limit wheelspin, the Adaptive Cruise Control will automaticallydisengage. See Traction Control System (TCS)on page 329 and StabiliTrak® System on page 331.When road conditions allow you to safely useit again, you may turn the Adaptive Cruise Controlback on.
Increasing Set Speed While Using AdaptiveCruise ControlThere are two ways to increase the set speed:
• Use the accelerator to get to the higher speed.Press the set button at the end of the lever,then release the button and the acceleratorpedal. You will now cruise at the higher speed.
• Move the Adaptive Cruise Control switch fromon to resume/increase. Hold it there until thedesired set speed is displayed in the HUD,then release the switch. To increase your setspeed in very small amounts, move theswitch briefly to resume/increase. Each timeyou do this, your vehicle set speed willincrease by 1 mph (1.6 km/h).
154Information Provided by:
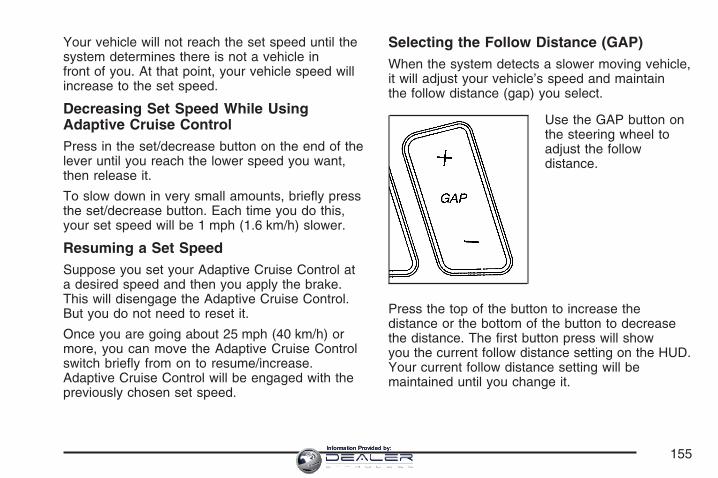
Your vehicle will not reach the set speed until thesystem determines there is not a vehicle infront of you. At that point, your vehicle speed willincrease to the set speed.
Decreasing Set Speed While UsingAdaptive Cruise ControlPress in the set/decrease button on the end of thelever until you reach the lower speed you want,then release it.
To slow down in very small amounts, briefly pressthe set/decrease button. Each time you do this,your set speed will be 1 mph (1.6 km/h) slower.
Resuming a Set SpeedSuppose you set your Adaptive Cruise Control ata desired speed and then you apply the brake.This will disengage the Adaptive Cruise Control.But you do not need to reset it.
Once you are going about 25 mph (40 km/h) ormore, you can move the Adaptive Cruise Controlswitch briefly from on to resume/increase.Adaptive Cruise Control will be engaged with thepreviously chosen set speed.
Selecting the Follow Distance (GAP)When the system detects a slower moving vehicle,it will adjust your vehicle’s speed and maintainthe follow distance (gap) you select.
Use the GAP button onthe steering wheel toadjust the followdistance.
Press the top of the button to increase thedistance or the bottom of the button to decreasethe distance. The first button press will showyou the current follow distance setting on the HUD.Your current follow distance setting will bemaintained until you change it.
155Information Provided by:
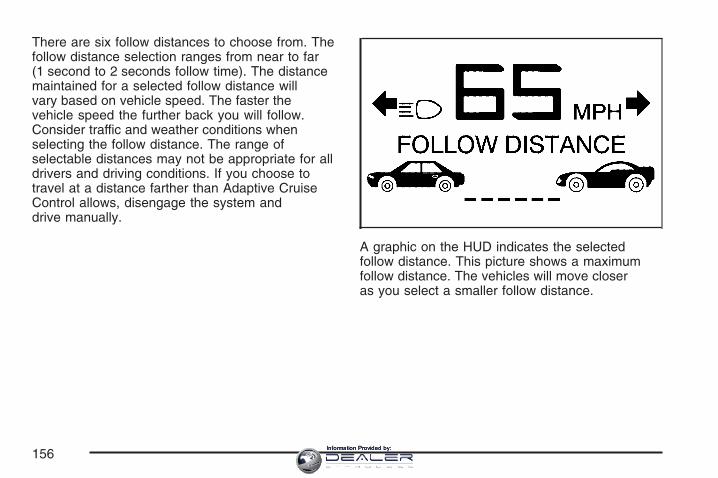
There are six follow distances to choose from. Thefollow distance selection ranges from near to far(1 second to 2 seconds follow time). The distancemaintained for a selected follow distance willvary based on vehicle speed. The faster thevehicle speed the further back you will follow.Consider traffic and weather conditions whenselecting the follow distance. The range ofselectable distances may not be appropriate for alldrivers and driving conditions. If you choose totravel at a distance farther than Adaptive CruiseControl allows, disengage the system anddrive manually.
A graphic on the HUD indicates the selectedfollow distance. This picture shows a maximumfollow distance. The vehicles will move closeras you select a smaller follow distance.
156Information Provided by:
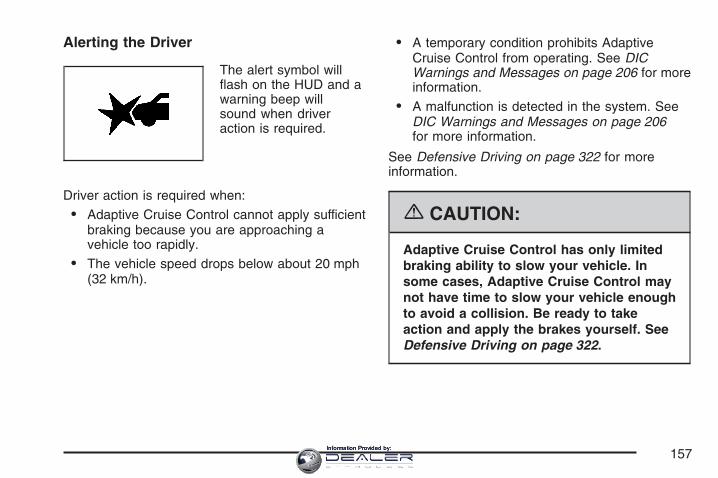
Alerting the Driver
The alert symbol willflash on the HUD and awarning beep willsound when driveraction is required.
Driver action is required when:
• Adaptive Cruise Control cannot apply sufficientbraking because you are approaching avehicle too rapidly.
• The vehicle speed drops below about 20 mph(32 km/h).
• A temporary condition prohibits AdaptiveCruise Control from operating. See DICWarnings and Messages on page 206 for moreinformation.
• A malfunction is detected in the system. SeeDIC Warnings and Messages on page 206for more information.
See Defensive Driving on page 322 for moreinformation.
{CAUTION:
Adaptive Cruise Control has only limitedbraking ability to slow your vehicle. Insome cases, Adaptive Cruise Control maynot have time to slow your vehicle enoughto avoid a collision. Be ready to takeaction and apply the brakes yourself. SeeDefensive Driving on page 322.
157Information Provided by:
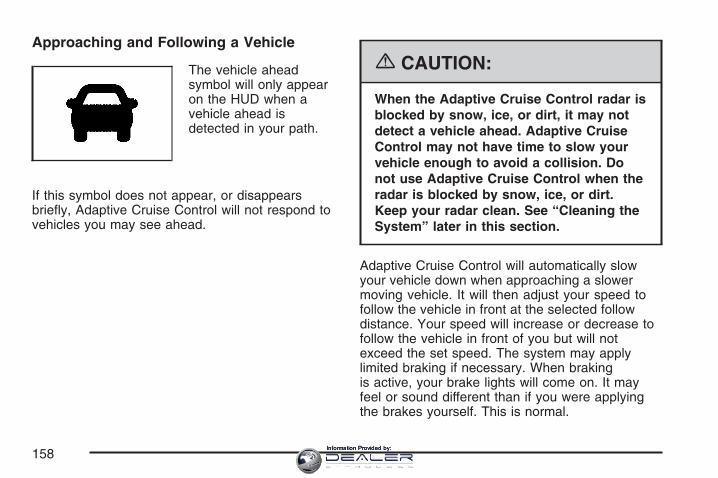
Approaching and Following a Vehicle
The vehicle aheadsymbol will only appearon the HUD when avehicle ahead isdetected in your path.
If this symbol does not appear, or disappearsbriefly, Adaptive Cruise Control will not respond tovehicles you may see ahead.
{CAUTION:
When the Adaptive Cruise Control radar isblocked by snow, ice, or dirt, it may notdetect a vehicle ahead. Adaptive CruiseControl may not have time to slow yourvehicle enough to avoid a collision. Donot use Adaptive Cruise Control when theradar is blocked by snow, ice, or dirt.Keep your radar clean. See “Cleaning theSystem” later in this section.
Adaptive Cruise Control will automatically slowyour vehicle down when approaching a slowermoving vehicle. It will then adjust your speed tofollow the vehicle in front at the selected followdistance. Your speed will increase or decrease tofollow the vehicle in front of you but will notexceed the set speed. The system may applylimited braking if necessary. When brakingis active, your brake lights will come on. It mayfeel or sound different than if you were applyingthe brakes yourself. This is normal.
158Information Provided by:
Stationary or Very Slow-Moving Objects
{CAUTION:
Adaptive Cruise Control may not detectand react to stationary or slow-movingvehicles or other objects ahead of you.You could crash into an object ahead ofyou. Do not use Adaptive Cruise Controlwhen approaching stationary orslow-moving vehicles or other objects.
{CAUTION:
Adaptive Cruise Control may not detectand react to stationary or slow-movingvehicles or other objects ahead of you.Your vehicle may accelerate towardobjects, such as a stopped vehicle thatsuddenly appears after the lead vehiclechanges lanes. Your complete attention isalways required while driving and youshould be ready to take action and applythe brakes.
Low-Speed DeactivationIf your speed falls below 20 mph (32 km/h) whilefollowing a vehicle ahead, Adaptive Cruise Controlwill begin to disengage. The driver alert symbolon the HUD will flash and the warning beepwill sound. The driver must take action sinceAdaptive Cruise Control will not slow the vehicle toa stop.
159Information Provided by:
Passing a VehicleIf you need to increase speed to pass a vehicle,use the accelerator pedal. While your foot is on theaccelerator pedal, the system will not automaticallyapply the brakes. Once you pass the vehicleand remove your foot from the accelerator pedal,Adaptive Cruise Control will return to normaloperation and be able to apply the brakes,if needed.
{CAUTION:
If you rest your foot on the acceleratorpedal, the system will not automaticallyapply the brakes. You could crash into avehicle ahead of you. Do not rest yourfoot on the accelerator pedal when usingAdaptive Cruise Control.
Curves in the Road
{CAUTION:
Due to Adaptive Cruise Control limitationsin curves, it may respond to a vehicle inanother lane, or may not have time toreact to a vehicle in your lane. You couldcrash into a vehicle ahead of you, or losecontrol of your vehicle. Give extraattention in curves and be ready to usethe brakes if necessary. Select anappropriate speed while driving in curves.
Adaptive Cruise Control may operate differently ina sharp curve.
The system may reduce your speed in a curve ifthe curve is too sharp. The TIGHT CURVEmessage will also display on the HUD. SeeHead-Up Display (HUD) on page 171 for moreinformation.
160Information Provided by:
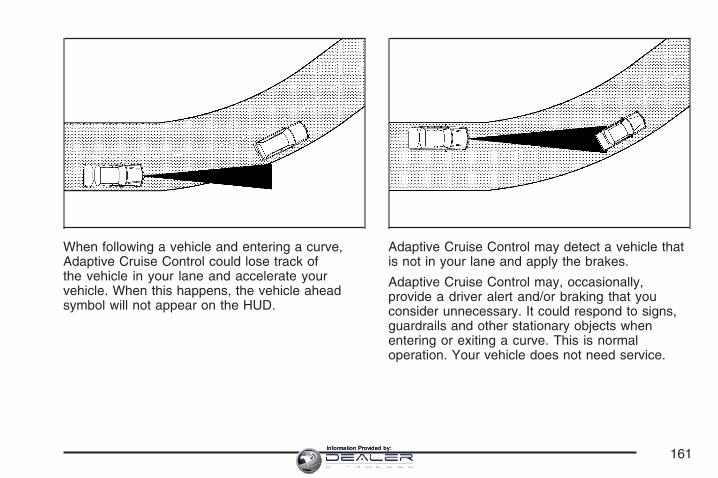
When following a vehicle and entering a curve,Adaptive Cruise Control could lose track ofthe vehicle in your lane and accelerate yourvehicle. When this happens, the vehicle aheadsymbol will not appear on the HUD.
Adaptive Cruise Control may detect a vehicle thatis not in your lane and apply the brakes.
Adaptive Cruise Control may, occasionally,provide a driver alert and/or braking that youconsider unnecessary. It could respond to signs,guardrails and other stationary objects whenentering or exiting a curve. This is normaloperation. Your vehicle does not need service.
161Information Provided by:
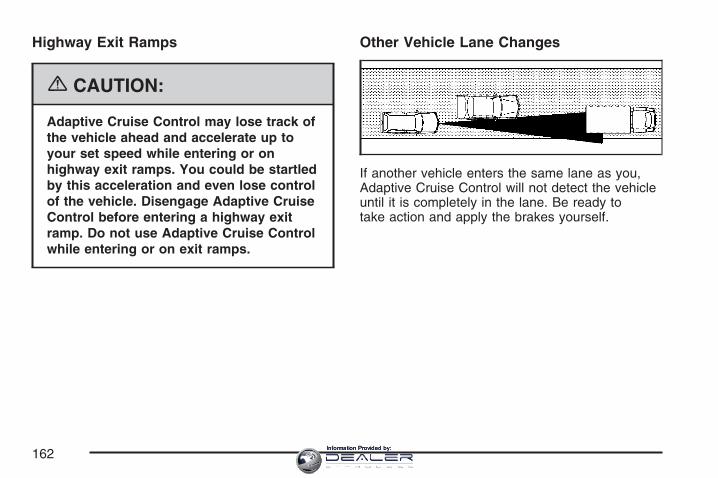
Highway Exit Ramps
{CAUTION:
Adaptive Cruise Control may lose track ofthe vehicle ahead and accelerate up toyour set speed while entering or onhighway exit ramps. You could be startledby this acceleration and even lose controlof the vehicle. Disengage Adaptive CruiseControl before entering a highway exitramp. Do not use Adaptive Cruise Controlwhile entering or on exit ramps.
Other Vehicle Lane Changes
If another vehicle enters the same lane as you,Adaptive Cruise Control will not detect the vehicleuntil it is completely in the lane. Be ready totake action and apply the brakes yourself.
162Information Provided by:

Using Adaptive Cruise Control on Hills
How well Adaptive Cruise Control will work on hillsdepends on your speed, vehicle load, trafficconditions and the steepness of the hills. It maynot detect a vehicle in your lane while drivingon hills. When going up steep hills, you may wantto use the accelerator pedal to maintain yourspeed. When going downhill, you may have tobrake to keep your speed down. Applyingthe brake disengages the system. You maychoose not to use Adaptive Cruise Control onsteep hills.
Disengaging Adaptive Cruise ControlTo disengage the system, apply the brake pedalor move the Adaptive Cruise Control switch tooff. Adaptive Cruise Control information willnot appear on the HUD when the system is notengaged.
Erasing Set Speed MemoryWhen you turn the Adaptive Cruise Control switchor the ignition off, the set speed memory iserased.
Other MessagesThere are three messages that may appear in theDriver Information Center (DIC). They areSERVICE RADAR CRUISE, CRUISE NOT READYand CLEAN RADAR CRUISE. These messageswill only appear to indicate a problem if AdaptiveCruise Control is active. See DIC Warningsand Messages on page 206 for more information.
You may also see CRUISE SPEED LIMITEDdisplayed in the HUD. See Head-Up Display(HUD) on page 171 for more information.
163Information Provided by:
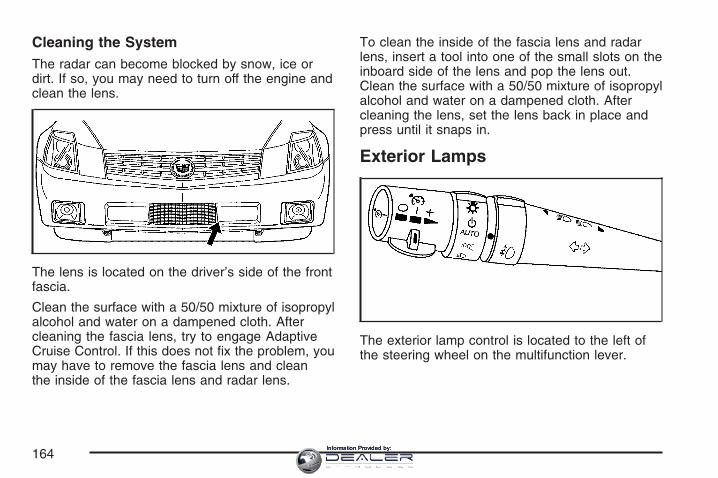
Cleaning the SystemThe radar can become blocked by snow, ice ordirt. If so, you may need to turn off the engine andclean the lens.
The lens is located on the driver’s side of the frontfascia.
Clean the surface with a 50/50 mixture of isopropylalcohol and water on a dampened cloth. Aftercleaning the fascia lens, try to engage AdaptiveCruise Control. If this does not fix the problem, youmay have to remove the fascia lens and cleanthe inside of the fascia lens and radar lens.
To clean the inside of the fascia lens and radarlens, insert a tool into one of the small slots on theinboard side of the lens and pop the lens out.Clean the surface with a 50/50 mixture of isopropylalcohol and water on a dampened cloth. Aftercleaning the lens, set the lens back in place andpress until it snaps in.
Exterior Lamps
The exterior lamp control is located to the left ofthe steering wheel on the multifunction lever.
164Information Provided by:
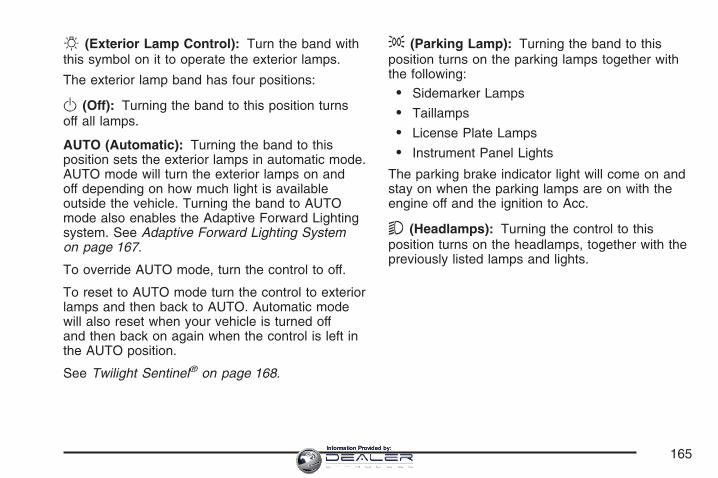
O (Exterior Lamp Control): Turn the band withthis symbol on it to operate the exterior lamps.
The exterior lamp band has four positions:
O (Off): Turning the band to this position turnsoff all lamps.
AUTO (Automatic): Turning the band to thisposition sets the exterior lamps in automatic mode.AUTO mode will turn the exterior lamps on andoff depending on how much light is availableoutside the vehicle. Turning the band to AUTOmode also enables the Adaptive Forward Lightingsystem. See Adaptive Forward Lighting Systemon page 167.
To override AUTO mode, turn the control to off.
To reset to AUTO mode turn the control to exteriorlamps and then back to AUTO. Automatic modewill also reset when your vehicle is turned offand then back on again when the control is left inthe AUTO position.
See Twilight Sentinel® on page 168.
; (Parking Lamp): Turning the band to thisposition turns on the parking lamps together withthe following:
• Sidemarker Lamps
• Taillamps
• License Plate Lamps
• Instrument Panel Lights
The parking brake indicator light will come on andstay on when the parking lamps are on with theengine off and the ignition to Acc.
5 (Headlamps): Turning the control to thisposition turns on the headlamps, together with thepreviously listed lamps and lights.
165Information Provided by:
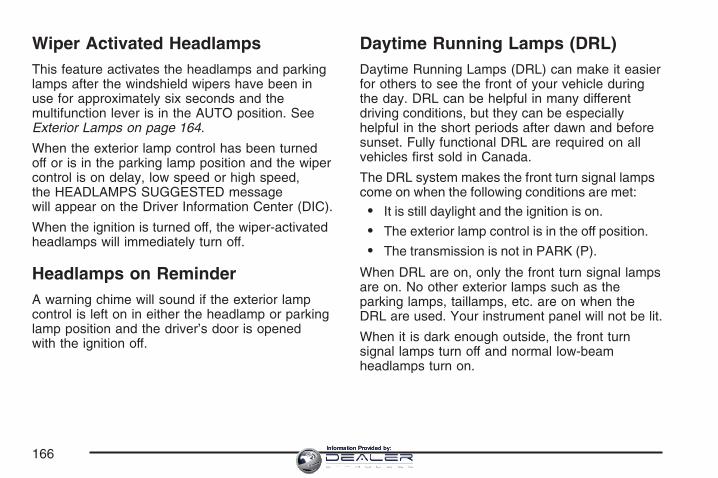
Wiper Activated HeadlampsThis feature activates the headlamps and parkinglamps after the windshield wipers have been inuse for approximately six seconds and themultifunction lever is in the AUTO position. SeeExterior Lamps on page 164.
When the exterior lamp control has been turnedoff or is in the parking lamp position and the wipercontrol is on delay, low speed or high speed,the HEADLAMPS SUGGESTED messagewill appear on the Driver Information Center (DIC).
When the ignition is turned off, the wiper-activatedheadlamps will immediately turn off.
Headlamps on ReminderA warning chime will sound if the exterior lampcontrol is left on in either the headlamp or parkinglamp position and the driver’s door is openedwith the ignition off.
Daytime Running Lamps (DRL)Daytime Running Lamps (DRL) can make it easierfor others to see the front of your vehicle duringthe day. DRL can be helpful in many differentdriving conditions, but they can be especiallyhelpful in the short periods after dawn and beforesunset. Fully functional DRL are required on allvehicles first sold in Canada.
The DRL system makes the front turn signal lampscome on when the following conditions are met:
• It is still daylight and the ignition is on.
• The exterior lamp control is in the off position.
• The transmission is not in PARK (P).
When DRL are on, only the front turn signal lampsare on. No other exterior lamps such as theparking lamps, taillamps, etc. are on when theDRL are used. Your instrument panel will not be lit.
When it is dark enough outside, the front turnsignal lamps turn off and normal low-beamheadlamps turn on.
166Information Provided by:
When it is bright enough outside, the regularlamps go off, and the front turn signal lamps takeover. If you start your vehicle in a dark garage,the automatic headlamp system comes onimmediately. Once you leave the garage, it takesabout one minute for the automatic headlampsystem to change to DRL if it is light outside.During that delay, the instrument panel clustermight not be as bright as usual. Make surethe instrument panel brightness knob is in the fullbright position. See Instrument Panel Brightnesson page 170 for more information.
If it is dark enough outside and the exterior lampcontrol is off, a HEADLAMPS SUGGESTEDmessage displays on the Driver’s InformationCenter (DIC). This message informs the driver thatturning on the exterior lamps is recommended.See DIC Warnings and Messages on page 206.
Turn the exterior lamp control off a second time,or turn on the headlamps to turn off theHEADLAMPS SUGGESTED message in the DIC.If the parking lamps or the fog lamps wereturned on instead, the HEADLAMPS SUGGESTEDmessage continues to display.
As with any vehicle, you should turn on theregular headlamp system when needed.
Adaptive Forward Lighting SystemThe Adaptive Forward Lighting System (AFS)swivels the headlamps horizontally to providegreater road illumination while turning. AFS willoperate when the vehicle speed is greater than2 mph (3 km/h). AFS will not operate whenthe transmission is in REVERSE (R). AFS is notimmediately operable after starting the vehicle;driving a short distance is required to calibrate theAFS. To enable AFS, set the exterior lampswitch on the multifunction lever to the AUTOposition. Moving the switch out of the AUTOposition will deactivate the system. See ExteriorLamps on page 164.
167Information Provided by:
Fog LampsUse fog lamps for better vision in foggy or mistyconditions.
The fog lamps control is located on themultifunction lever next to the exterior lampcontrol.
- (Fog Lamps): Turning the band to thisposition will turn the fog lamps on.
When you turn the fog lamps on, the fog lamplight will appear on the instrument panel cluster toindicate that the fog lamps and the parkinglamps are on.
If you turn the high-beam headlamps on, the foglamps will turn off. They will turn on againwhen you switch to low-beam headlamps.
The ignition must be on for the fog lamps tooperate. The fog lamps will turn off when theignition is turned off.
Some localities have laws that require theheadlamps to be on along with the fog lamps.
Twilight Sentinel®
Twilight Sentinel® can turn your lamps on and offfor you. A light sensor on top of the instrumentpanel makes the Twilight Sentinel® work, sobe sure it is not covered.
With Twilight Sentinel® you will see the followinghappen:
• When it is dark enough outside, the front turnsignal lamps (DRL) will go off, and theheadlamps and parking lamps will come on.The other lamps that come on with headlampswill also come on.
• When it is bright enough outside, theheadlamps will go off, and the front turn signallamps (DRL) will come on, as long as theexterior lamp switch is in the AUTO position.
If you start your vehicle in a dark garage,the automatic headlamp system will come onimmediately. Once you leave the garage, it willtake about one minute for the automatic headlampsystem to change to DRL if it is light outside.
168Information Provided by:
During that delay, your instrument panel clustermay not be as bright as usual. Make sureyour instrument panel brightness control is in fullbright position. See Instrument Panel Brightnesson page 170 for more information.
You can idle the vehicle with the lamps off, evenwhen it is dark outside. After starting thevehicle, turn the exterior lamp control band to off,then release it. The lamps will remain off untilyou turn the control band to off again.
Twilight Sentinel® also provides exteriorillumination as you leave the vehicle. If TwilightSentinel® has turned on the lamps when you turnoff the ignition, your lamps will remain on until:
• The exterior lamp switch is moved from OFF tothe parking lamp position, or
• a delay time that you select has elapsed.
See Driver Information Center (DIC) on page 203to select the delay time that you want. Youcan also select no delay time.
If you turn off the ignition with the exterior lampswitch in the parking lamp or headlamp position, theTwilight Sentinel® delay will not occur. The lampswill turn off as soon as the switch is turned off.
As with any vehicle, you should turn on the regularheadlamp system when you need it.
Exterior Lighting Battery SaverIf the manual parking lamps or headlamps havebeen left on, the exterior lamps will turn off as soonas the ignition is turned off or RAP is active.This protects against draining the battery in caseyou have accidentally left the headlamps orparking lamps on. The battery saver does not workif the headlamps are turned on after the ignitionswitch is turned to off.
If you need to leave the lamps on, use the exteriorlamp control to turn the lamps back on.
169Information Provided by:
Instrument Panel BrightnessThe button for this feature is located on theinstrument panel to the left of the steering column.
+!- (Brightness): Press this button to changethe brightness of the instrument panel lights.
Press the DIMMER button until PANEL DIMMINGappears on the Driver Information Center (DIC).Then use the brightness button to adjust theinstrument panel brightness. Press the top of thebutton to brighten the lights or the bottom ofthe button to dim the lights. See Head-Up Display(HUD) on page 171 for more information.
Be sure not to have the brightness turned all theway down with the lamps on during the day.Your DIC may not be visible.
Courtesy LampsWhen any door or the trunk lid is opened, theinterior lamps will go on unless it is bright outside.
Press the interior lamp button on the right sideof the instrument panel, to turn the courtesy lampson or off.
Entry/Exit LightingWith entry lighting, the interior lamps will come onwhen entering the vehicle. The interior lampswill come on for about 20 seconds when theengine is turned off.
You can turn exit and entry lighting off by quicklyturning the courtesy lamps on and off.
170Information Provided by:
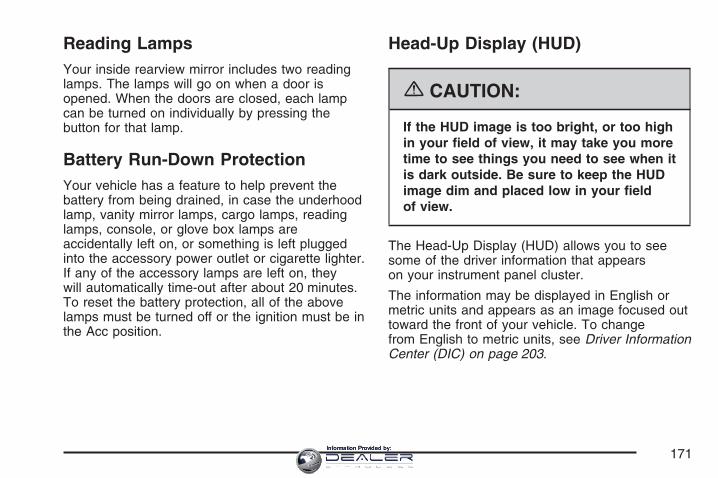
Reading LampsYour inside rearview mirror includes two readinglamps. The lamps will go on when a door isopened. When the doors are closed, each lampcan be turned on individually by pressing thebutton for that lamp.
Battery Run-Down ProtectionYour vehicle has a feature to help prevent thebattery from being drained, in case the underhoodlamp, vanity mirror lamps, cargo lamps, readinglamps, console, or glove box lamps areaccidentally left on, or something is left pluggedinto the accessory power outlet or cigarette lighter.If any of the accessory lamps are left on, theywill automatically time-out after about 20 minutes.To reset the battery protection, all of the abovelamps must be turned off or the ignition must be inthe Acc position.
Head-Up Display (HUD)
{CAUTION:
If the HUD image is too bright, or too highin your field of view, it may take you moretime to see things you need to see when itis dark outside. Be sure to keep the HUDimage dim and placed low in your fieldof view.
The Head-Up Display (HUD) allows you to seesome of the driver information that appearson your instrument panel cluster.
The information may be displayed in English ormetric units and appears as an image focused outtoward the front of your vehicle. To changefrom English to metric units, see Driver InformationCenter (DIC) on page 203.
171Information Provided by:

The HUD consists of the following information:
• Speedometer
• Turn Signal Indicators
• High-Beam Indicator Symbol
• Tap-Up/Tap-Down Transmission Feature
• Check Gages Icon
• Adaptive Cruise Control Features andIndicators
• Radio Features
Be sure to continue scanning your displays,controls and driving environment just as you wouldin a vehicle without HUD. If you never look atyour instrument panel cluster, you may notsee something important, such as a warning light.Under important warning conditions, the CHECKGAGES message will display in the HUD.View your Driver Information Center (DIC) formore information.
172Information Provided by:
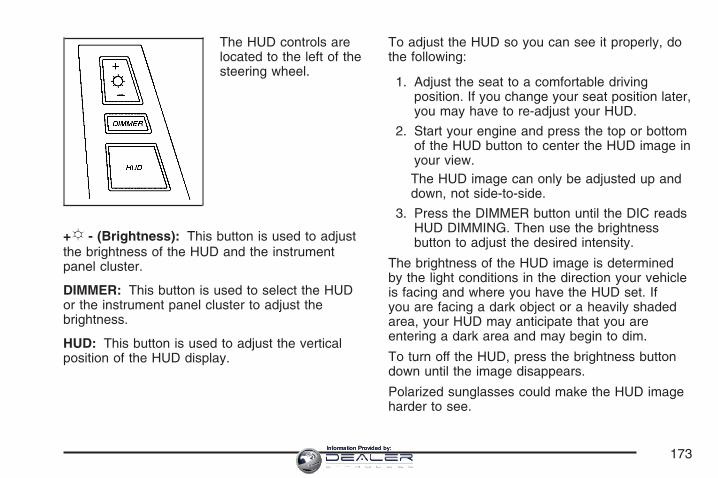
The HUD controls arelocated to the left of thesteering wheel.
+!- (Brightness): This button is used to adjustthe brightness of the HUD and the instrumentpanel cluster.
DIMMER: This button is used to select the HUDor the instrument panel cluster to adjust thebrightness.
HUD: This button is used to adjust the verticalposition of the HUD display.
To adjust the HUD so you can see it properly, dothe following:
1. Adjust the seat to a comfortable drivingposition. If you change your seat position later,you may have to re-adjust your HUD.
2. Start your engine and press the top or bottomof the HUD button to center the HUD image inyour view.The HUD image can only be adjusted up anddown, not side-to-side.
3. Press the DIMMER button until the DIC readsHUD DIMMING. Then use the brightnessbutton to adjust the desired intensity.
The brightness of the HUD image is determinedby the light conditions in the direction your vehicleis facing and where you have the HUD set. Ifyou are facing a dark object or a heavily shadedarea, your HUD may anticipate that you areentering a dark area and may begin to dim.
To turn off the HUD, press the brightness buttondown until the image disappears.
Polarized sunglasses could make the HUD imageharder to see.
173Information Provided by:
As light shines out from the HUD, it is possible forlight to shine back in. In rare occurrences,when the sun is at a specific angle and position,the sun’s rays can shine back into the HUD. Whenthis occurs, the display device within the HUDwill be temporarily illuminated. The event will endwhen the vehicle’s angle to the sun changes.
Clean the inside of the windshield as needed toremove any dirt or film that reduces the sharpnessor clarity of the HUD image.
To clean the HUD, spray household glass cleaneron a soft, clean cloth. Wipe the HUD lens gently,then dry it. Do not spray cleaner directly on the lensbecause the cleaner could leak into the unit.
If the ignition is on and you cannot see the HUDimage, check to see if:
• Something is covering the HUD unit.
• The brightness is adjusted properly.
• The HUD image is adjusted to the properheight.
• Ambient light in the direction your vehicle isfacing is low.
• A fuse is blown. See Fuses and CircuitBreakers on page 453.
Keep in mind that your windshield is part of theHUD system. See Windshield Replacementon page 412.
The following Adaptive Cruise Control (ACC)messages may appear in the HUD:
CRUISE SPEED LIMITED: This messageindicates that your vehicle speed has beenreduced below your set speed due to ACClimitations. Your set speed is too high and ACCcannot detect other vehicles at far enoughdistances for the system to operate properly.
TIGHT CURVE: This message indicates that ACChas reduced your vehicle speed due to a tightcurve in the road. Once the road straightens, ACCwill return to your selected set speed or followdistance setting. See “Adaptive Cruise Control(ACC)” under Turn Signal/Multifunction Lever onpage 141 for more information.
You may also see an ACC active symbol, alertsymbol or vehicle ahead symbol. See “AdaptiveCruise Control (ACC)” under TurnSignal/Multifunction Lever on page 141 for moreinformation.
174Information Provided by:
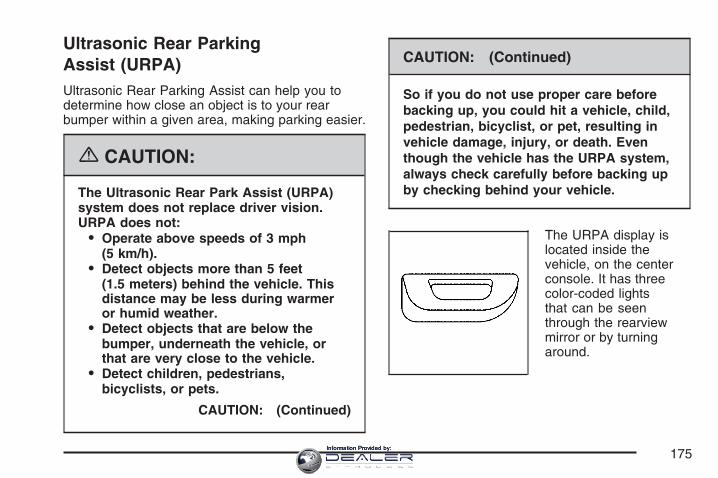
Ultrasonic Rear ParkingAssist (URPA)Ultrasonic Rear Parking Assist can help you todetermine how close an object is to your rearbumper within a given area, making parking easier.
{CAUTION:
The Ultrasonic Rear Park Assist (URPA)system does not replace driver vision.URPA does not:
• Operate above speeds of 3 mph(5 km/h).
• Detect objects more than 5 feet(1.5 meters) behind the vehicle. Thisdistance may be less during warmeror humid weather.
• Detect objects that are below thebumper, underneath the vehicle, orthat are very close to the vehicle.
• Detect children, pedestrians,bicyclists, or pets.
CAUTION: (Continued)
CAUTION: (Continued)
So if you do not use proper care beforebacking up, you could hit a vehicle, child,pedestrian, bicyclist, or pet, resulting invehicle damage, injury, or death. Eventhough the vehicle has the URPA system,always check carefully before backing upby checking behind your vehicle.
The URPA display islocated inside thevehicle, on the centerconsole. It has threecolor-coded lightsthat can be seenthrough the rearviewmirror or by turningaround.
175Information Provided by:
How the System WorksURPA comes on automatically when the shift leveris moved into REVERSE (R) and the vehiclespeed is less than 3 mph (5 km/h). Whenthe system comes on, the three lights on thedisplay will illuminate to let you know thatthe system is working. URPA senses how closeyour vehicle is to an object. The distance isdetermined by the four ultrasonic sensors locatedon the rear bumper. When you shift intoREVERSE (R) and an object is detected, thefollowing will occur in sequence depending on thedistance from the object:
• At 5 feet (1.5 m) a chime will sound andone amber light will be lit;
• at 40 inches (1.0 m) both amber lights will be lit;• at 20 inches (0.5 m) a continuous chime will
sound and all three lights (amber/amber/red)will be lit; and
• at 1 foot (0.3 m) a continuous chime will soundand all three lights (amber/amber/red) will flash.
URPA can detect objects 3 inches (7.6 cm) andwider, and at least 10 inches (25.4 cm) tall, but itcannot detect objects that are above trunk
level. In order for the rear sensors to recognize anobject, it must be within operating range.
If the URPA system is not functioning properly, thedisplay will flash red, indicating that there is aproblem. The light will also flash red while driving ifa trailer is attached to your vehicle, or a bicycle orobject is on the back of, or hanging out of yourtrunk. The light will continue to flash until the traileror the object is removed and your vehicle is drivenforward at least 15 mph (25 km/h).
It may also flash red if the ultrasonic sensors arenot kept clean. So be sure to keep your rearbumper free of mud, dirt, snow, ice and slush ormaterials such as paint or the system maynot work properly. If after cleaning the rear bumperand driving forward at least 15 mph (25 km/h),the display continues to flash red, see your dealer.For cleaning instructions, see Washing YourVehicle on page 446.
It may also flash red if your vehicle is moving inREVERSE (R) at a speed greater than 3 mph(5 km/h). Other conditions that may affect systemperformance include things like the vibrationsfrom a jackhammer or the compression ofair brakes on a very large truck.
176Information Provided by:
As always, drivers should use care when backingup a vehicle. Always look behind you, beingsure to check for other vehicles, obstructions andblind spots.
Accessory Power Outlet(s)The accessory power outlet can be used toconnect electrical equipment such as a cellularphone or CB radio.
The accessory power outlet is located inside thecenter console storage compartment, on theforward left side.
To use the outlet, remove the tethered cap. Whennot using it, always cover the outlet with theprotective cap.
Notice: When using an accessory poweroutlet, maximum electrical load must notexceed 20 amps. Always turn off any electricalequipment when not in use. Leaving electricalequipment on for extended periods willdrain your vehicle’s battery.
Certain electrical accessories may not becompatible with the accessory power outlet andcould result in blown vehicle or adapter fuses.If you experience a problem, see your dealer foradditional information on accessory power outlets.
Notice: Adding any electrical equipment toyour vehicle may damage it or keep othercomponents from working as they should. Therepairs would not be covered by yourwarranty. Do not use equipment exceedingmaximum amperage rating of 20 amperes.Check with your dealer before adding electricalequipment.
When adding electrical equipment, be sure tofollow the installation instructions included with theequipment.
We recommend that you see a qualified technicianor your dealer for the proper installation of yourequipment.
Notice: Improper use of the power outlet cancause damage not covered by your warranty.Do not hang any type of accessory oraccessory bracket from the plug because thepower outlets are designed for accessorypower plugs only.
177Information Provided by:
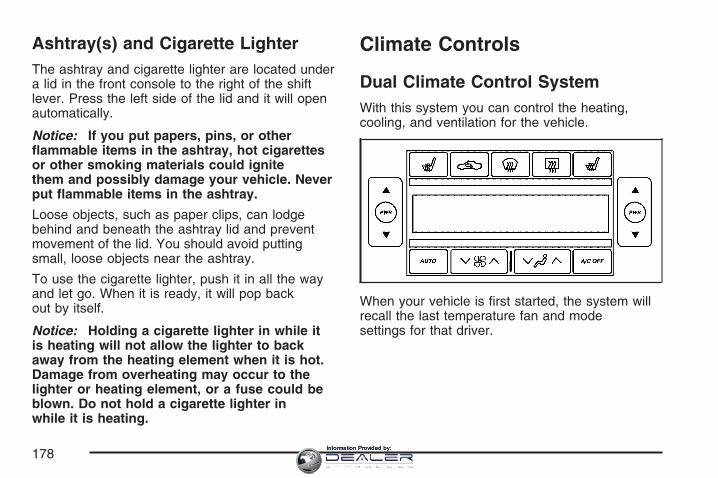
Ashtray(s) and Cigarette LighterThe ashtray and cigarette lighter are located undera lid in the front console to the right of the shiftlever. Press the left side of the lid and it will openautomatically.
Notice: If you put papers, pins, or otherflammable items in the ashtray, hot cigarettesor other smoking materials could ignitethem and possibly damage your vehicle. Neverput flammable items in the ashtray.
Loose objects, such as paper clips, can lodgebehind and beneath the ashtray lid and preventmovement of the lid. You should avoid puttingsmall, loose objects near the ashtray.
To use the cigarette lighter, push it in all the wayand let go. When it is ready, it will pop backout by itself.
Notice: Holding a cigarette lighter in while itis heating will not allow the lighter to backaway from the heating element when it is hot.Damage from overheating may occur to thelighter or heating element, or a fuse could beblown. Do not hold a cigarette lighter inwhile it is heating.
Climate Controls
Dual Climate Control SystemWith this system you can control the heating,cooling, and ventilation for the vehicle.
When your vehicle is first started, the system willrecall the last temperature fan and modesettings for that driver.
178Information Provided by:
Automatic Operation
AUTO (Automatic): When this button is pressedand the temperature is set, the system willautomatically control the inside temperature, theair delivery mode, the air conditioning compressorand the fan speed. AUTO will appear on thedisplay.
1. Press the AUTO button.
2. Adjust the temperature to a comfortablesetting between 70°F (21°C) and 80°F (27°C).An initial setting of 73°F (23°C) is suggested.Choosing the warmest or coldest temperaturesetting will not cause the system to heat or coolany faster. If you set the system at the warmestor coldest temperature setting, the system willremain in manual mode at that temperature andit will not go into automatic mode.In cold weather, the system will start atreduced fan speeds to avoid blowing cold airinto your vehicle until warmer air is available.The system will start out blowing air at the floorbut may change modes automatically as
the vehicle warms up to maintain the chosentemperature setting. The length of timeneeded for warm up will depend on the outsidetemperature and the length of time that haselapsed since your vehicle was last driven.
3. Wait for the system to regulate. This may takefrom 10 to 30 minutes. Then adjust thetemperature, if necessary.
You can switch from English to metric unitsthrough the Driver Information Center (DIC). SeeDIC Controls and Displays on page 204 formore information.
The air conditioning system removes moisturefrom the air, so you may sometimes notice a smallamount of water dripping underneath yourvehicle while idling or after turning off the engine.This is normal.
Do not cover the solar sensor located in thecenter of the instrument panel, near thewindshield. For more information on the solarsensor, see “Sensors” later in this section.
179Information Provided by:
Manual Operation
w PWR x (Power/Temperature): Press thePWR button on the left side of the climate controlpanel to turn the entire climate control systemon or off. Press the up or down arrow on the switchto manually increase or decrease the temperatureinside the vehicle.
Press the PWR button on the right side of theclimate control panel to turn the passenger’sclimate control system on or off. Press the up ordown arrow on the switch to manually increase ordecrease the temperature for the passenger.
If the passenger’s PWR button is off, the driver’stemperature switch controls the temperature for theentire vehicle.
«9ª (Fan): Press this switch to increase ordecrease the fan speed. Pressing this switchcancels automatic operation and places the systemin manual mode. Press AUTO to return toautomatic operation.
If the airflow seems low when the fan speed is atthe highest setting, the passenger compartmentair filter may need to be replaced. For more
information, see Passenger Compartment Air Filteron page 184 and Scheduled Maintenance onpage 465.
ªN« (Mode): Pressing the switch and changingthe mode cancels automatic operation andplaces the system in manual mode. Press theAUTO button to return to automatic operation.
To change the current mode, select one ofthe following:
H (Vent): This mode directs air to the instrumentpanel outlets.
% (Bi-Level): This mode directs about half of theair to the instrument panel outlets, and then directsmost of the remaining air to the floor outlets. Inautomatic operation, cooler air is directed to theupper outlets and warmer air to the floor outlets.
6 (Floor): This mode directs most of the air tothe floor outlets with some air directed to the sidewindow outlets, and some of the air directed tothe windshield.
The mode switch can also be used to select thedefog mode. Information on defogging anddefrosting can be found later in this section.
180Information Provided by:
A/C OFF (Air Conditioning): Press this button toturn off the air conditioning compressor. PressAUTO to return to automatic operation. Thecompressor cannot be turned off in either thedefrost or floor/defog mode.
( (Heated/Cooled Seat): Press this button toturn the feature on. The button on the left controlsthe driver’s seat and the button on the rightcontrols the passenger’s seat. Each press of thebutton will take you to a different setting. Thesettings available in order are HI HEAT, LO HEAT,OFF, HI COOL, LO COOL and OFF. You will beable to feel the temperature change in a fewminutes.
The feature will automatically turn off when thevehicle is turned off.
? (Recirculation): Press this button to turn therecirculation mode on or off. The air conditioningcompressor also comes on. This mode keepsoutside air from coming in the vehicle. It can beused to prevent outside air and odors fromentering your vehicle or to help cool the air insideyour vehicle more quickly.
Recirculation is not available in defrost orfloor/defog modes.
Using recirculation for long periods of time maycause the air inside your vehicle to becometoo dry. To prevent this from happening, after theair in your vehicle has cooled, turn therecirculation mode off.
SensorsThere are sensors to measure the temperatureand sun’s effect on passenger comfort.
The solar sensor on your vehicle monitors thesolar radiation then uses the information tomaintain the selected temperature when operatingin AUTO mode by initiating needed adjustmentsto the temperature, the fan speed and the airdelivery system. The system may also supplycooler air to the side of the vehicle facing the sun.The recirculation mode will also be activated,as necessary. Do not cover the solar sensorlocated on the top of the instrument panel nearthe windshield or the system will not work properly.
181Information Provided by:
There is also a sensor located behind the frontbumper. This sensor reads the outside airtemperature and helps maintain the temperatureinside the vehicle. The outside temperature will bedisplayed in the navigation system only whenthe engine is running. Any cover on the front of thevehicle could give a false reading of thetemperature.
If the outside temperature goes up, the displaytemperature will not change until:
• The vehicle’s speed is above 15 mph(24 km/h) for five minutes.
• The vehicle’s speed is above 32 mph(51 km/h) for two and one-half minutes.
These delays prevent false readings. If thetemperature goes down, the outside temperaturewill be shown when you start the vehicle. If ithas been turned off for less than three hours, thetemperature will be recalled from the previousvehicle operation.
There is also an inside temperature sensorlocated to the left of the ignition button. Theautomatic climate control system uses this sensorto receive information, so if you block or coverit, the system will not function properly.
Defogging and DefrostingFog on the inside of windows is a result of highhumidity (moisture) condensing on the cool windowglass. This can be minimized if the climate controlsystem is used properly. There are two modes toclear fog or frost from your windshield. Use thefloor/defog mode to clear the windows of fog ormoisture and warm the passengers. Use defrost toremove fog or frost from the windshield morequickly.
- (Floor/Defog): Press the mode button until thedefog mode appears on the display. This modedirects the air between the windshield, floor outletsand side windows. When you select this mode,the system turns off recirculation and runs the airconditioning compressor unless the outsidetemperature is near or below freezing.
1 (Defrost): Press this button to direct most ofthe air to the windshield, with some air directedto the side windows. In this mode, the system willautomatically turn off the recirculation and runthe air conditioning compressor, unless the outsidetemperature is near or below freezing. Do notdrive the vehicle until all the windows are clear.
182Information Provided by:
Rear Window DefoggerThe rear window defogger uses a warming grid toremove fog or frost from the rear window.
The rear window defogger will only work when theengine is running.
= (Rear Window Defogger): Press this buttonto turn the rear window defogger on or off. Besure to clear as much snow from the rear windowas possible.
The rear window defogger will turn off about10 minutes after the button is pressed whentraveling less than 30 mph (48 km/h). If turnedon again, the defogger will only run for aboutfive minutes before turning off. The defogger canalso be turned off by pressing the button againor by turning off the engine.
The heated outside rearview mirrors will heat tohelp clear fog or frost from the surface of themirrors when the rear window defogger is on.
The rear window defogger and heated mirrors areautomatically disabled when the retractablehardtop is moving or down.
Notice: Do not use anything sharp on theinside of the rear window. If you do, you couldcut or damage the warming grid, and therepairs would not be covered by your warranty.Do not attach a temporary vehicle license,tape, a decal or anything similar to thedefogger grid.
183Information Provided by:
Outlet AdjustmentUse the thumbwheel to open or close the outlets.
Operation Tips• Clear away any ice, snow or leaves from the
air inlets at the base of the windshield thatmay block the flow of air into your vehicle.
• Use of non-GM approved hood deflectors mayadversely affect the performance of thesystem.
• Keep the area around the base of theinstrument panel console and air path underthe seats clear of objects to help circulatethe air inside of your vehicle more effectively.
Passenger Compartment Air FilterThe passenger compartment air filter removescertain particles from the air, including pollen anddust particles. Reductions in airflow, whichmay occur more often in dusty areas, indicate thatthe filter may need to be replaced early.
The filter should be replaced as part of the routinescheduled maintenance. See ScheduledMaintenance on page 465 for more information.
To check or replace the air filter, do the following:
1. With the hood open, unlatch and removethe access panel.The passenger compartment air filter andaccess panel are located on the passenger’sside of the engine compartment near thebattery. See Engine Compartment Overviewon page 374 for more information on location.
2. Pull the old filter out of the housing.
3. Insert the new filter into the housing.
4. Reinstall the air filter access panel.
184Information Provided by:
Warning Lights, Gages, andIndicatorsThis part describes the warning lights and gagesthat may be on your vehicle. The pictures willhelp you locate them.
Warning lights and gages can signal thatsomething is wrong before it becomes seriousenough to cause an expensive repair orreplacement. Paying attention to your warninglights and gages could also save you or othersfrom injury.
Warning lights come on when there may be or is aproblem with one of your vehicle’s functions. Asyou will see in the details on the next fewpages, some warning lights come on briefly whenyou start the engine just to let you know theyare working. If you are familiar with this section,you should not be alarmed when this happens.
Gages can indicate when there may be or is aproblem with one of your vehicle’s functions. Oftengages and warning lights work together to letyou know when there is a problem with yourvehicle.
When one of the warning lights comes on andstays on when you are driving, or when one of thegages shows there may be a problem, checkthe section that tells you what to do aboutit. Please follow this manual’s advice. Waiting todo repairs can be costly — and even dangerous.So please get to know your warning lights andgages. They are a big help.
Your vehicle has a Driver Information Center thatworks along with the warning lights and gages.See Driver Information Center (DIC) on page 203for more information.
185Information Provided by:
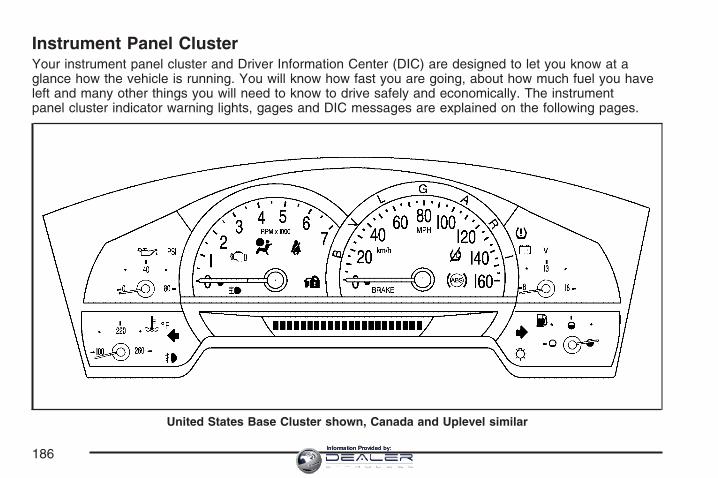
Instrument Panel ClusterYour instrument panel cluster and Driver Information Center (DIC) are designed to let you know at aglance how the vehicle is running. You will know how fast you are going, about how much fuel you haveleft and many other things you will need to know to drive safely and economically. The instrumentpanel cluster indicator warning lights, gages and DIC messages are explained on the following pages.
United States Base Cluster shown, Canada and Uplevel similar
186Information Provided by:
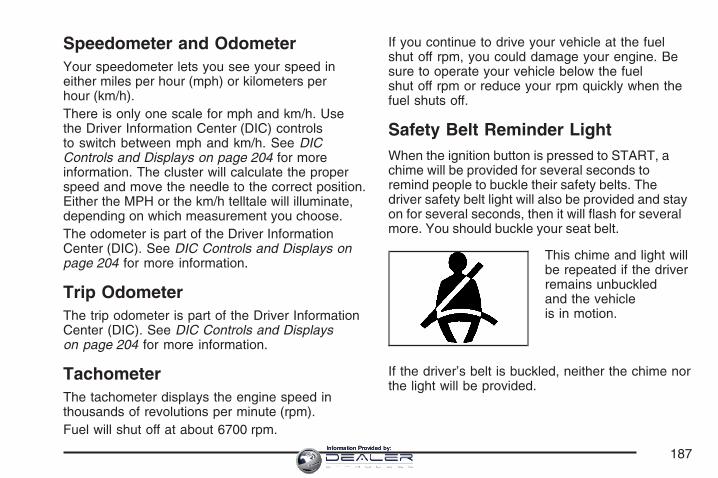
Speedometer and OdometerYour speedometer lets you see your speed ineither miles per hour (mph) or kilometers perhour (km/h).There is only one scale for mph and km/h. Usethe Driver Information Center (DIC) controlsto switch between mph and km/h. See DICControls and Displays on page 204 for moreinformation. The cluster will calculate the properspeed and move the needle to the correct position.Either the MPH or the km/h telltale will illuminate,depending on which measurement you choose.The odometer is part of the Driver InformationCenter (DIC). See DIC Controls and Displays onpage 204 for more information.
Trip OdometerThe trip odometer is part of the Driver InformationCenter (DIC). See DIC Controls and Displayson page 204 for more information.
TachometerThe tachometer displays the engine speed inthousands of revolutions per minute (rpm).Fuel will shut off at about 6700 rpm.
If you continue to drive your vehicle at the fuelshut off rpm, you could damage your engine. Besure to operate your vehicle below the fuelshut off rpm or reduce your rpm quickly when thefuel shuts off.
Safety Belt Reminder LightWhen the ignition button is pressed to START, achime will be provided for several seconds toremind people to buckle their safety belts. Thedriver safety belt light will also be provided and stayon for several seconds, then it will flash for severalmore. You should buckle your seat belt.
This chime and light willbe repeated if the driverremains unbuckledand the vehicleis in motion.
If the driver’s belt is buckled, neither the chime northe light will be provided.
187Information Provided by:
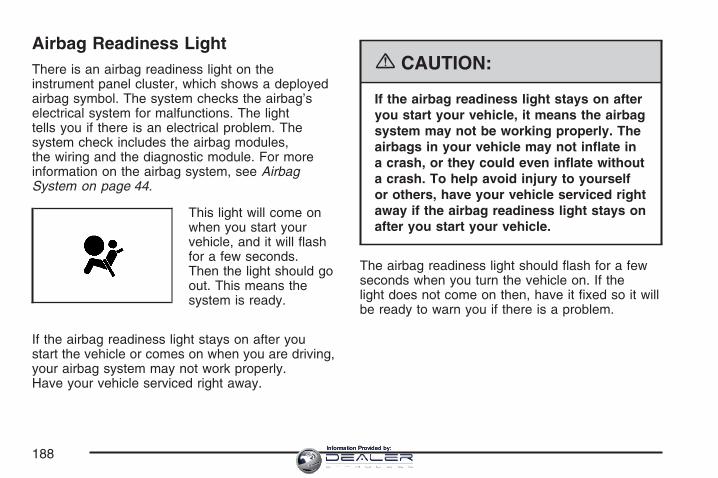
Airbag Readiness LightThere is an airbag readiness light on theinstrument panel cluster, which shows a deployedairbag symbol. The system checks the airbag’selectrical system for malfunctions. The lighttells you if there is an electrical problem. Thesystem check includes the airbag modules,the wiring and the diagnostic module. For moreinformation on the airbag system, see AirbagSystem on page 44.
This light will come onwhen you start yourvehicle, and it will flashfor a few seconds.Then the light should goout. This means thesystem is ready.
If the airbag readiness light stays on after youstart the vehicle or comes on when you are driving,your airbag system may not work properly.Have your vehicle serviced right away.
{CAUTION:
If the airbag readiness light stays on afteryou start your vehicle, it means the airbagsystem may not be working properly. Theairbags in your vehicle may not inflate ina crash, or they could even inflate withouta crash. To help avoid injury to yourselfor others, have your vehicle serviced rightaway if the airbag readiness light stays onafter you start your vehicle.
The airbag readiness light should flash for a fewseconds when you turn the vehicle on. If thelight does not come on then, have it fixed so it willbe ready to warn you if there is a problem.
188Information Provided by:

Passenger Airbag Status IndicatorYour rearview mirror has a passenger airbagstatus indicator.
When the vehicle is started, the passenger airbagstatus indicator will light ON and OFF, or thesymbol for on and off, for several seconds as asystem check. Then, after several more seconds,the status indicator will light either ON or OFF,or either the on or off symbol, to let you know thestatus of the passenger’s frontal airbag andside impact airbag.
Your vehicle has a label on the sun visor thatsays, “Never put a rear-facing child seat inthe front.” This is because the risk to therear-facing child is so great if the airbag deploys.United States
Canada
189Information Provided by:
Never put a child in a rear-facing child restraint inthe passenger’s seat unless the passengerairbag status indicator shows off and the airbagsare off. Here is why:
{CAUTION:
Even though the passenger sensingsystem is designed to turn off thepassenger’s frontal airbag and sideimpact airbag (if equipped) if the systemdetects a rear-facing child restraint, nosystem is fail-safe, and no one canguarantee that an airbag will not deployunder some unusual circumstance, eventhough it is turned off. We recommendthat rear-facing child restraints betransported in vehicles with a rear seatthat will accommodate a rear-facing childrestraint, whenever possible.
If the word ON or the on symbol is lit on thepassenger airbag status indicator, it means thatthe passenger’s frontal airbag and side impactairbag are enabled (may inflate).
{CAUTION:
If the on indicator comes on when you havea rear-facing child restraint installed in thepassenger’s seat, it means that thepassenger sensing system has not turnedoff the passenger’s frontal airbag and sideimpact airbag (if equipped). A child in arear-facing child restraint can be seriouslyinjured or killed if the passenger’s airbaginflates. This is because the back of therear-facing child restraint would be veryclose to the inflating airbag. Do not use arear-facing child restraint in thepassenger’s seat if the airbag is turned on.
190Information Provided by:

If the word OFF or the off symbol is lit on thepassenger airbag status indicator, it means thatthe passenger sensing system has turned offthe passenger’s airbags. See Passenger SensingSystem on page 53 for more on this, includingimportant safety information.
If, after several seconds, all status indicator lightsremain on, or if there are no lights at all, theremay be a problem with the lights or the passengersensing system. See your dealer for service.
{CAUTION:
If the airbag off indicator and the airbagreadiness light ever come on together, itmeans that something may be wrong withthe airbag system. If this ever happens,have the vehicle serviced promptly,because an adult-size person sitting in theright front passenger seat may not havethe protection of the airbag. See AirbagReadiness Light on page 188.
Charging System Light
When you turn theengine on, this light willcome on briefly toshow that the generatorand battery chargingsystems are workingproperly.
If this light stays on, your vehicle needs service.You should take your vehicle to the dealer at once.To save your battery until you get there, turn offall accessories. See DIC Controls and Displays onpage 204 for more information.
191Information Provided by:
Voltmeter Gage
When the vehicle is inaccessory mode, thevoltmeter showsthe voltage output ofyour battery. When theengine is running, itshows the voltageoutput of the chargingsystem.
The reading will change as the rate of chargechanges (with engine speed, for example), but ifthe voltmeter reads at 9 volts or below, yourinstrument panel cluster and other systems mayshut down. The Driver Information Center (DIC) willread LOW VOLTAGE when your vehicle is at10 volts or below. Have it checked right away.Driving with the voltmeter reading at 10 voltsor below could drain your battery and disable yourvehicle.
Brake System Warning LightYour vehicle’s hydraulic brake system is dividedinto two parts. If one part is not working, the otherpart can still work and stop you. For goodbraking, though, you need both parts working well.
This light should come on when you start theengine. If it does not come on then, have it fixedso it will be ready to warn you if there is a problem.
If this warning light stays on after you start theengine, the parking brake may still be set or therecould be a brake problem. Refer to ParkingBrake on page 97 to see if it is set. If the parkingbrake is not set, have your brake systeminspected right away.
United States Canada
192Information Provided by:
If the light comes on while you are driving and youhave a LOW BRAKE FLUID message showingon the DIC, pull off the road and stop carefully.You may notice that the pedal is harder topush. Or, the pedal may go closer to the floor. Itmay take longer to stop. If the light is still on, havethe vehicle towed for service. See Towing YourVehicle on page 359.
{CAUTION:
Your brake system may not be workingproperly if the brake system warning lightis on. Driving with the brake systemwarning light on can lead to an accident.If the light is still on after you have pulledoff the road and stopped carefully, havethe vehicle towed for service.
Anti-Lock Brake System WarningLight
With the Anti-LockBrake System (ABS),this light will comeon when your engine isstarted and may stayon for several seconds.That is normal.
If the light stays on, turn the ignition off or if the lightcomes on when you are driving, stop as soon aspossible and turn the ignition off. Then start theengine again to reset the system. If the light stillstays on, or comes on again while you are driving,your vehicle needs service. If the regular brakesystem warning light is not on, you still have brakes,but you do not have anti-lock brakes. If the regularbrake system warning light is also on, you do nothave anti-lock brakes and there is a problem withyour regular brakes. See “Service ABS” under DICWarnings and Messages on page 206.The ABS warning light will come on briefly whenyou turn the ignition on. This is normal. If thelight does not come on then, have it fixed so it willbe ready to warn you if there is a problem.
193Information Provided by:
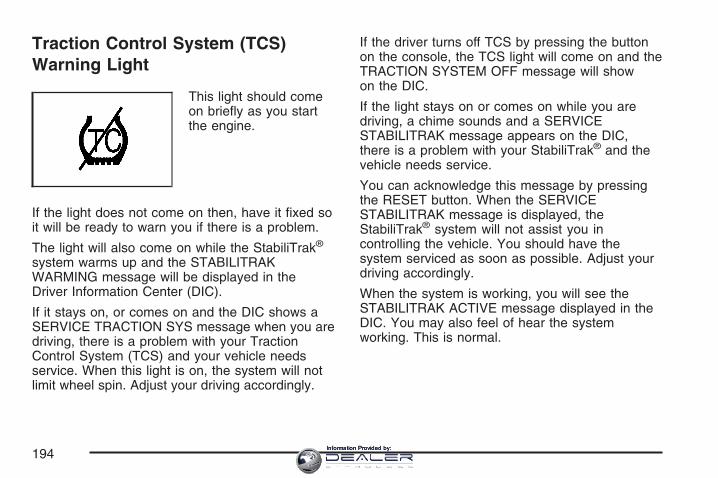
Traction Control System (TCS)Warning Light
This light should comeon briefly as you startthe engine.
If the light does not come on then, have it fixed soit will be ready to warn you if there is a problem.
The light will also come on while the StabiliTrak®
system warms up and the STABILITRAKWARMING message will be displayed in theDriver Information Center (DIC).
If it stays on, or comes on and the DIC shows aSERVICE TRACTION SYS message when you aredriving, there is a problem with your TractionControl System (TCS) and your vehicle needsservice. When this light is on, the system will notlimit wheel spin. Adjust your driving accordingly.
If the driver turns off TCS by pressing the buttonon the console, the TCS light will come on and theTRACTION SYSTEM OFF message will showon the DIC.
If the light stays on or comes on while you aredriving, a chime sounds and a SERVICESTABILITRAK message appears on the DIC,there is a problem with your StabiliTrak® and thevehicle needs service.
You can acknowledge this message by pressingthe RESET button. When the SERVICESTABILITRAK message is displayed, theStabiliTrak® system will not assist you incontrolling the vehicle. You should have thesystem serviced as soon as possible. Adjust yourdriving accordingly.
When the system is working, you will see theSTABILITRAK ACTIVE message displayed in theDIC. You may also feel of hear the systemworking. This is normal.
194Information Provided by:
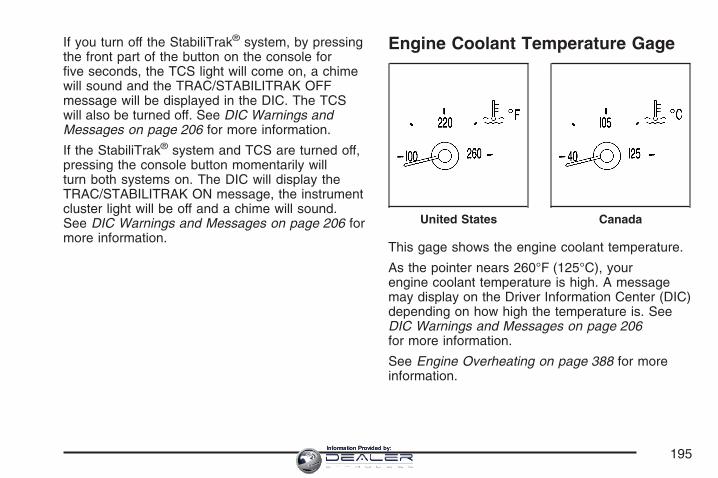
If you turn off the StabiliTrak® system, by pressingthe front part of the button on the console forfive seconds, the TCS light will come on, a chimewill sound and the TRAC/STABILITRAK OFFmessage will be displayed in the DIC. The TCSwill also be turned off. See DIC Warnings andMessages on page 206 for more information.
If the StabiliTrak® system and TCS are turned off,pressing the console button momentarily willturn both systems on. The DIC will display theTRAC/STABILITRAK ON message, the instrumentcluster light will be off and a chime will sound.See DIC Warnings and Messages on page 206 formore information.
Engine Coolant Temperature Gage
This gage shows the engine coolant temperature.
As the pointer nears 260°F (125°C), yourengine coolant temperature is high. A messagemay display on the Driver Information Center (DIC)depending on how high the temperature is. SeeDIC Warnings and Messages on page 206for more information.
See Engine Overheating on page 388 for moreinformation.
United States Canada
195Information Provided by:

Tire Pressure Light
This light will come onbriefly when you turnthe ignition on.
This light will also come on when one or more ofyour tires are significantly underinflated.
A LOW TIRE PRESS DIC message willaccompany the light, see Other Messages onpage 219 for more information.
Stop and check your tires as soon as it is safe to doso. If underinflated, inflate to the proper pressure.See Tires on page 413 for more information.
This light will flash for about 60 seconds and thenturn on solid if a problem is detected with theTire Pressure Monitor system.
See Tire Pressure Monitor System on page 423for more information.
Malfunction Indicator Lamp
Check Engine Light
Your vehicle has acomputer whichmonitors operation ofthe fuel, ignition,and emission controlsystems.
196Information Provided by:
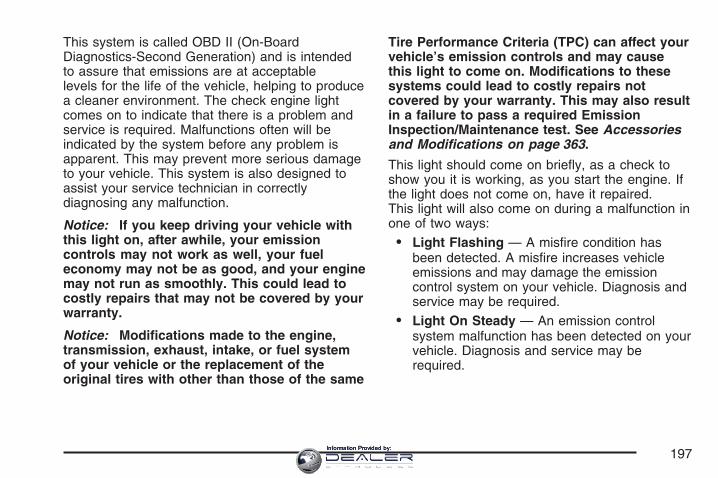
This system is called OBD II (On-BoardDiagnostics-Second Generation) and is intendedto assure that emissions are at acceptablelevels for the life of the vehicle, helping to producea cleaner environment. The check engine lightcomes on to indicate that there is a problem andservice is required. Malfunctions often will beindicated by the system before any problem isapparent. This may prevent more serious damageto your vehicle. This system is also designed toassist your service technician in correctlydiagnosing any malfunction.
Notice: If you keep driving your vehicle withthis light on, after awhile, your emissioncontrols may not work as well, your fueleconomy may not be as good, and your enginemay not run as smoothly. This could lead tocostly repairs that may not be covered by yourwarranty.
Notice: Modifications made to the engine,transmission, exhaust, intake, or fuel systemof your vehicle or the replacement of theoriginal tires with other than those of the same
Tire Performance Criteria (TPC) can affect yourvehicle’s emission controls and may causethis light to come on. Modifications to thesesystems could lead to costly repairs notcovered by your warranty. This may also resultin a failure to pass a required EmissionInspection/Maintenance test. See Accessoriesand Modifications on page 363.
This light should come on briefly, as a check toshow you it is working, as you start the engine. Ifthe light does not come on, have it repaired.This light will also come on during a malfunction inone of two ways:
• Light Flashing — A misfire condition hasbeen detected. A misfire increases vehicleemissions and may damage the emissioncontrol system on your vehicle. Diagnosis andservice may be required.
• Light On Steady — An emission controlsystem malfunction has been detected on yourvehicle. Diagnosis and service may berequired.
197Information Provided by:

If the Light Is FlashingThe following may prevent more serious damageto your vehicle:
• Reducing vehicle speed
• Avoiding hard accelerations
• Avoiding steep uphill grades
If the light stops flashing and remains on steady,see “If the Light Is On Steady” following.
If the light continues to flash, when it is safe to doso, stop the vehicle. Find a safe place to parkyour vehicle. Turn the engine off, wait atleast 10 seconds and restart the engine. If thelight remains on steady, see “If the Light IsOn Steady” following. If the light is still flashing,follow the previous steps, and see your dealer forservice as soon as possible.
If the Light Is On SteadyYou also may be able to correct the emissionsystem malfunction by considering the following:
Did you recently put fuel into your vehicle?
If so, reinstall the fuel cap, making sure to fullyinstall the cap. See Filling the Tank on page 369.The diagnostic system can determine if thefuel cap has been left off or improperly installed. Aloose or missing fuel cap will allow fuel toevaporate into the atmosphere. A few driving tripswith the cap properly installed should turn thelight off.
Did you just drive through a deep puddle ofwater?
If so, your vehicle’s electrical system may be wet.The condition will usually be corrected whenthe electrical system dries out. A few driving tripsshould turn the light off.
198Information Provided by:
Have you recently changed brands of fuel?
If so, be sure to fuel your vehicle with quality fuel.See Gasoline Octane on page 366. Poor fuelquality will cause the engine not to run asefficiently as designed. You may notice this asstalling after start-up, stalling when you putthe vehicle into gear, misfiring, hesitation onacceleration, or stumbling on acceleration. (Theseconditions may go away once the engine iswarmed up.) This will be detected by the systemand cause the light to turn on.
If you experience one or more of these conditions,change the fuel brand you use. It will require atleast one full tank of the proper fuel to turn thelight off.
If none of the above steps have made the lightturn off, your dealer can check the vehicle.Your dealer has the proper test equipment anddiagnostic tools to fix any mechanical or electricalproblems that may have developed.
Emissions Inspection and MaintenanceProgramsSome state/provincial and local governments haveor may begin programs to inspect the emissioncontrol equipment on your vehicle. Failure to passthis inspection could prevent you from getting avehicle registration.
Here are some things you need to know to helpyour vehicle pass an inspection:
Your vehicle will not pass this inspection if thecheck engine light is on or not working properly.
To perform a check engine light bulb check with thekeyless ignition, make sure the transmitter fob is inthe passenger compartment. See Ignition Positionson page 88. Press the bottom of the Acc. button onthe instrument panel and hold the button down forfive seconds. The instrument panel, including thecheck engine light, will light up and the ignition willbe on, but the engine will not start — if you pressthe bottom of the Acc. button only briefly, less thanfive seconds, the accessory power mode will beturned on, but not the ignition. After the bulb check,be sure to press and release the Acc. button againto turn the ignition off and avoid draining thevehicle’s battery.
199Information Provided by:
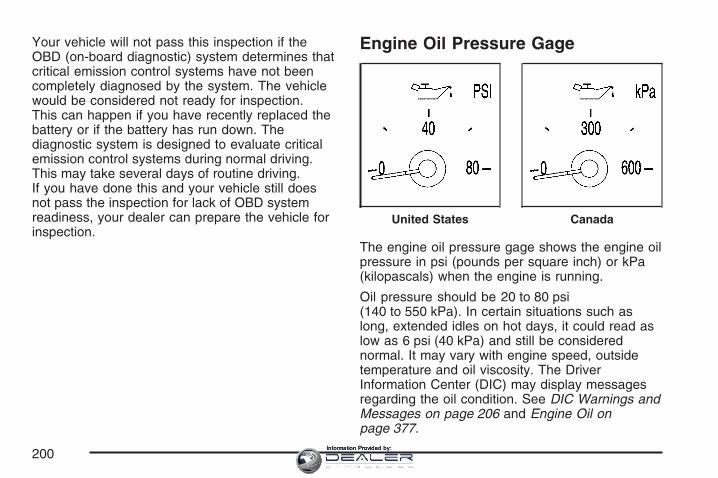
Your vehicle will not pass this inspection if theOBD (on-board diagnostic) system determines thatcritical emission control systems have not beencompletely diagnosed by the system. The vehiclewould be considered not ready for inspection.This can happen if you have recently replaced thebattery or if the battery has run down. Thediagnostic system is designed to evaluate criticalemission control systems during normal driving.This may take several days of routine driving.If you have done this and your vehicle still doesnot pass the inspection for lack of OBD systemreadiness, your dealer can prepare the vehicle forinspection.
Engine Oil Pressure Gage
The engine oil pressure gage shows the engine oilpressure in psi (pounds per square inch) or kPa(kilopascals) when the engine is running.
Oil pressure should be 20 to 80 psi(140 to 550 kPa). In certain situations such aslong, extended idles on hot days, it could read aslow as 6 psi (40 kPa) and still be considerednormal. It may vary with engine speed, outsidetemperature and oil viscosity. The DriverInformation Center (DIC) may display messagesregarding the oil condition. See DIC Warnings andMessages on page 206 and Engine Oil onpage 377.
United States Canada
200Information Provided by:
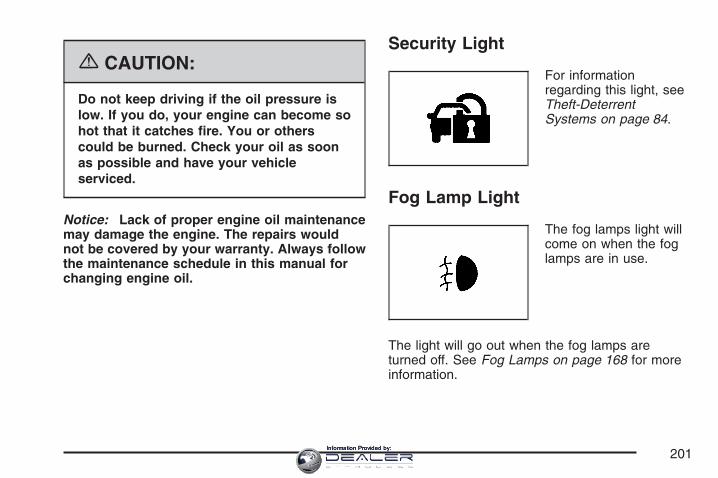
{CAUTION:
Do not keep driving if the oil pressure islow. If you do, your engine can become sohot that it catches fire. You or otherscould be burned. Check your oil as soonas possible and have your vehicleserviced.
Notice: Lack of proper engine oil maintenancemay damage the engine. The repairs wouldnot be covered by your warranty. Always followthe maintenance schedule in this manual forchanging engine oil.
Security Light
For informationregarding this light, seeTheft-DeterrentSystems on page 84.
Fog Lamp Light
The fog lamps light willcome on when the foglamps are in use.
The light will go out when the fog lamps areturned off. See Fog Lamps on page 168 for moreinformation.
201Information Provided by:
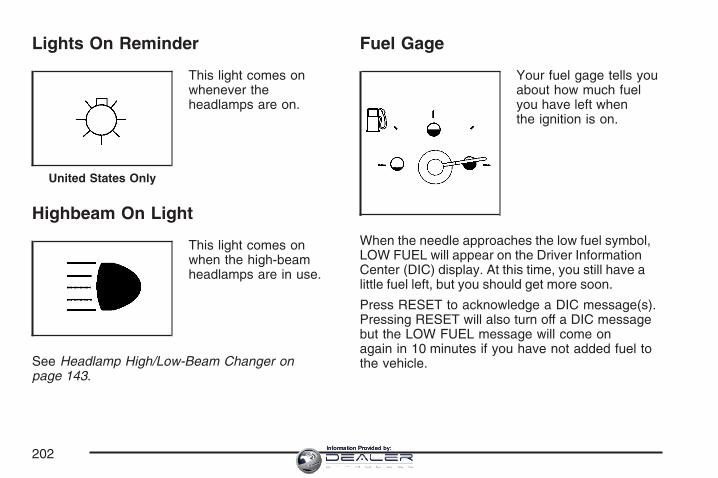
Lights On Reminder
This light comes onwhenever theheadlamps are on.
Highbeam On Light
This light comes onwhen the high-beamheadlamps are in use.
See Headlamp High/Low-Beam Changer onpage 143.
Fuel Gage
Your fuel gage tells youabout how much fuelyou have left whenthe ignition is on.
When the needle approaches the low fuel symbol,LOW FUEL will appear on the Driver InformationCenter (DIC) display. At this time, you still have alittle fuel left, but you should get more soon.
Press RESET to acknowledge a DIC message(s).Pressing RESET will also turn off a DIC messagebut the LOW FUEL message will come onagain in 10 minutes if you have not added fuel tothe vehicle.
United States Only
202Information Provided by:
Here are five things that some owners ask about.All these things are normal and do not indicatethat anything is wrong with the fuel gage.
• At the gas station, the gas pump shuts offbefore the gage reads the full symbol.
• It takes more (or less) fuel to fill up than thegage reads. For example, the gage readshalf full, but it took more (or less) than half ofthe tank’s capacity to fit it.
• The gage pointer may move while cornering,braking or speeding up.
• The gage may not indicate the tank is emptywhen the ignition is turned off.
• The gage reading may change slightly withinthe first several minutes after starting thevehicle.
You can use the Driver Information Center (DIC)to display more detailed fuel information. Whilescrolling through the DIC, you will also find:
• AVERAGE XX.X MPG (Average Miles PerGallon): The fuel economy calculated forthe last 20 gallons (76 L) of fuel used, or sinceyou last reset the display.
• INST XX.X MPG (Instantaneous Miles PerGallon): The fuel economy calculated foryour current driving conditions.
• RANGE XXX MI: The approximate distanceyou can drive before refueling.
See DIC Controls and Displays on page 204 formore information.
You should reset the fuel information display everytime you refuel. To reset AVERAGE, use theinformation up or down button to scroll to AVEFUEL ECON and hold the reset button. RANGEwill automatically reset.
Driver Information Center (DIC)This display gives you the status of many ofyour vehicle’s systems. The DIC is also used todisplay driver personalization features andwarning/status messages. All messages willappear in the DIC display, located at the bottom ofthe instrument panel cluster.
203Information Provided by:
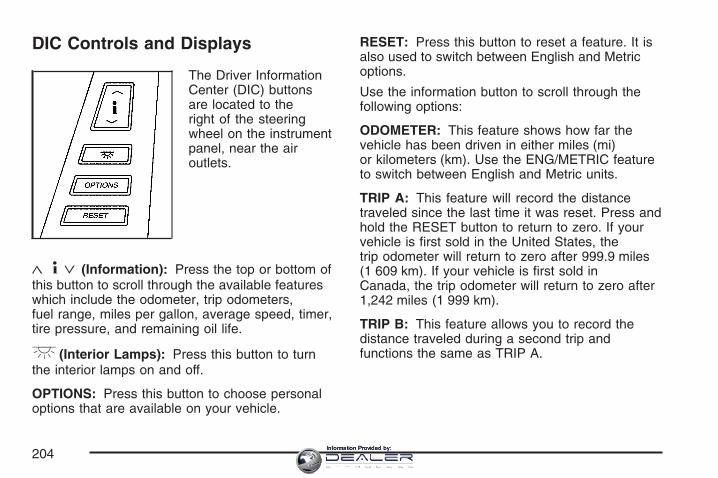
DIC Controls and Displays
The Driver InformationCenter (DIC) buttonsare located to theright of the steeringwheel on the instrumentpanel, near the airoutlets.
« 4 ª (Information): Press the top or bottom ofthis button to scroll through the available featureswhich include the odometer, trip odometers,fuel range, miles per gallon, average speed, timer,tire pressure, and remaining oil life.
+ (Interior Lamps): Press this button to turnthe interior lamps on and off.
OPTIONS: Press this button to choose personaloptions that are available on your vehicle.
RESET: Press this button to reset a feature. It isalso used to switch between English and Metricoptions.
Use the information button to scroll through thefollowing options:
ODOMETER: This feature shows how far thevehicle has been driven in either miles (mi)or kilometers (km). Use the ENG/METRIC featureto switch between English and Metric units.
TRIP A: This feature will record the distancetraveled since the last time it was reset. Press andhold the RESET button to return to zero. If yourvehicle is first sold in the United States, thetrip odometer will return to zero after 999.9 miles(1 609 km). If your vehicle is first sold inCanada, the trip odometer will return to zero after1,242 miles (1 999 km).
TRIP B: This feature allows you to record thedistance traveled during a second trip andfunctions the same as TRIP A.
204Information Provided by:
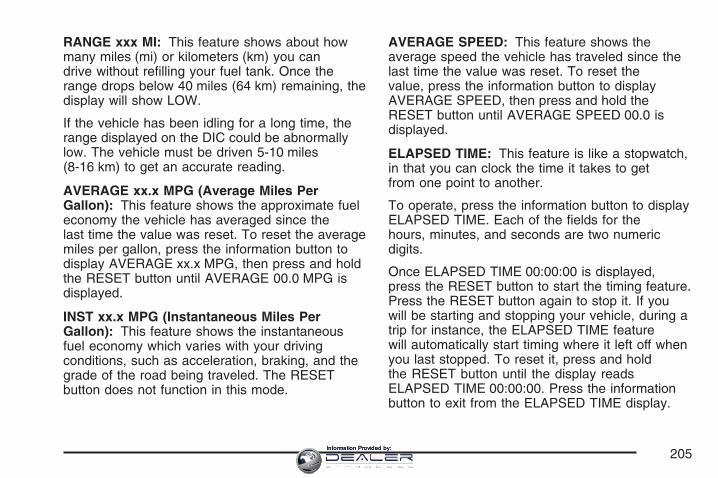
RANGE xxx MI: This feature shows about howmany miles (mi) or kilometers (km) you candrive without refilling your fuel tank. Once therange drops below 40 miles (64 km) remaining, thedisplay will show LOW.
If the vehicle has been idling for a long time, therange displayed on the DIC could be abnormallylow. The vehicle must be driven 5-10 miles(8-16 km) to get an accurate reading.
AVERAGE xx.x MPG (Average Miles PerGallon): This feature shows the approximate fueleconomy the vehicle has averaged since thelast time the value was reset. To reset the averagemiles per gallon, press the information button todisplay AVERAGE xx.x MPG, then press and holdthe RESET button until AVERAGE 00.0 MPG isdisplayed.
INST xx.x MPG (Instantaneous Miles PerGallon): This feature shows the instantaneousfuel economy which varies with your drivingconditions, such as acceleration, braking, and thegrade of the road being traveled. The RESETbutton does not function in this mode.
AVERAGE SPEED: This feature shows theaverage speed the vehicle has traveled since thelast time the value was reset. To reset thevalue, press the information button to displayAVERAGE SPEED, then press and hold theRESET button until AVERAGE SPEED 00.0 isdisplayed.
ELAPSED TIME: This feature is like a stopwatch,in that you can clock the time it takes to getfrom one point to another.
To operate, press the information button to displayELAPSED TIME. Each of the fields for thehours, minutes, and seconds are two numericdigits.
Once ELAPSED TIME 00:00:00 is displayed,press the RESET button to start the timing feature.Press the RESET button again to stop it. If youwill be starting and stopping your vehicle, during atrip for instance, the ELAPSED TIME featurewill automatically start timing where it left off whenyou last stopped. To reset it, press and holdthe RESET button until the display readsELAPSED TIME 00:00:00. Press the informationbutton to exit from the ELAPSED TIME display.
205Information Provided by:
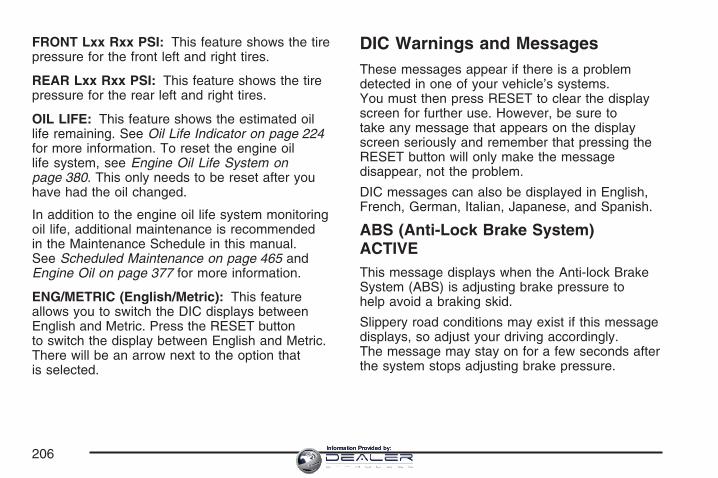
FRONT Lxx Rxx PSI: This feature shows the tirepressure for the front left and right tires.
REAR Lxx Rxx PSI: This feature shows the tirepressure for the rear left and right tires.
OIL LIFE: This feature shows the estimated oillife remaining. See Oil Life Indicator on page 224for more information. To reset the engine oillife system, see Engine Oil Life System onpage 380. This only needs to be reset after youhave had the oil changed.
In addition to the engine oil life system monitoringoil life, additional maintenance is recommendedin the Maintenance Schedule in this manual.See Scheduled Maintenance on page 465 andEngine Oil on page 377 for more information.
ENG/METRIC (English/Metric): This featureallows you to switch the DIC displays betweenEnglish and Metric. Press the RESET buttonto switch the display between English and Metric.There will be an arrow next to the option thatis selected.
DIC Warnings and MessagesThese messages appear if there is a problemdetected in one of your vehicle’s systems.You must then press RESET to clear the displayscreen for further use. However, be sure totake any message that appears on the displayscreen seriously and remember that pressing theRESET button will only make the messagedisappear, not the problem.
DIC messages can also be displayed in English,French, German, Italian, Japanese, and Spanish.
ABS (Anti-Lock Brake System)ACTIVEThis message displays when the Anti-lock BrakeSystem (ABS) is adjusting brake pressure tohelp avoid a braking skid.
Slippery road conditions may exist if this messagedisplays, so adjust your driving accordingly.The message may stay on for a few seconds afterthe system stops adjusting brake pressure.
206Information Provided by:
BUCKLE PASSENGERThis message reminds you to buckle thepassenger’s safety belt.
This message displays and a chime sounds whenthe ignition is on, the driver’s safety belt isbuckled, the passenger’s safety belt is unbuckledwith the passenger airbag enabled, and thevehicle is in motion. You should have thepassenger buckle their safety belt.
The reminder will be repeated if the ignition is on,the vehicle is in motion, the driver is buckledand the passenger is still unbuckled, andthe passenger airbag is enabled. If thepassenger’s safety belt is already buckled, thismessage and chime will not come on.
BUCKLE SEAT BELTThis message reminds you to buckle the driver’ssafety belt.
This message displays and a chime sounds whenthe ignition is on, the driver’s safety belt isunbuckled, and the vehicle is in motion. Youshould buckle your safety belt.
If the driver remains unbuckled when the ignitionis on and the vehicle is in motion, the reminderwill be repeated. If the driver’s safety belt isalready buckled, this message and chime will notcome on.
This message is an additional reminder to theSafety Belt Reminder Light in the instrument panelcluster. See Safety Belt Reminder Light onpage 187 for more information.
CHANGE OIL NOWThis message displays when the life of the engineoil has expired. See Scheduled Maintenance onpage 465. After an oil change, the Oil Life Indicatormust be reset. See Oil Life Indicator on page 224and Engine Oil Life System on page 380.
CHARGE SYSTEM FAULTThis message displays when a problem with thecharging system has been detected. Haveyour vehicle serviced by your dealer.
CHECK GAS CAPThis message displays if the fuel cap has notbeen fully tightened. Check the fuel cap to makesure that it is on properly.
207Information Provided by:
CLEAN RADAR CRUISEIf your vehicle has this feature, this messagedisplays when the Adaptive Cruise Control (ACC)system is disabled because the radar is blockedand cannot detect vehicles in your path. Itmay also activate during heavy rain or due to roadspray. To clean the system, see Adaptive CruiseControl on page 150.
CLOSE CARGO DIVIDERThis message displays if the cargo divider is not inplace. Open the trunk and make sure the cargodivider is secure and no objects are on the divider.See Rear Storage Area on page 123 for moreinformation.
COOLANT OVER TEMP (Temperature)This message displays when the engine coolanttemperature is too hot. Stop and allow your vehicleto idle in PARK (P) until it cools down and themessage is removed. Do not increase enginespeed above a normal idle. If it does notcool down, turn off the engine and have yourvehicle serviced by your dealer before driving it
again. Severe engine damage can result from anoverheated engine. See Engine Overheatingon page 388.
CRUISE NOT READYThis message indicates that the Adaptive CruiseControl (ACC) will not activate due to a temporarycondition. Your vehicle does not require service.If this message displays when you attempt toactivate the system, continue driving for severalminutes, then try to activate the system again.
DRIVER NO. X (1 OR 2)This message displays when the vehicle is startedor when there is a change of driver. Themessage shows which driver is activating thepersonalization feature. It will only stay on forfive seconds.
ENGINE HOT, STOP ENGINEThis message displays when the engine hasoverheated. Stop and turn the engine offimmediately to avoid severe engine damage. SeeEngine Overheating on page 388. A multiplechime also sounds when this message displays.
208Information Provided by:
ENGINE PROTECTION REDUCEENGINE RPMIf this message displays, the control system hasdetermined that continued operation at the existingengine speed may lead to engine overheating.Lower the engine speed by upshifting thetransmission or drive at a lower speed.
HEADLAMPS SUGGESTEDThis message displays if it is dark enough outsideand the headlamps and Twilight Sentinel®
controls are off. This message informs the driverthat turning on the exterior lamps is recommended.It has become dark enough outside to requirethe headlamps and/or other exterior lamps. Thismessage also displays if the optional Rainsense™wiping feature is on and the Twilight Sentinel®
is off.
HIGH TRANS (Transmission) TEMP(Temperature)This message displays when the transmission fluidin your vehicle is too hot. Stop and allow yourvehicle to idle until it cools down or until thismessage is removed.
HIGH VOLTAGEThis message displays when the electricalcharging system is overcharging. To avoid beingstranded, have the electrical system checkedby your dealer. You can reduce the chargingoverload by using the accessories. Turn on thelamps and radio, set the climate control on AUTOand the fan speed on HI, and turn the rearwindow defogger on. You can monitor batteryvoltage on the DIC by pressing the informationbutton. The normal range is 11.5 to 15.5 voltswhen the engine is running.
HOT ENGINE–A/C OFFThis message displays when the engine coolantbecomes hotter than the normal operatingtemperature. You can continue to drive yourvehicle. If this message continues to display, havethe system repaired by your dealer as soon aspossible to avoid compressor damage.
ICE POSSIBLEThis message displays when the outside airtemperature is cold enough to create icy roadconditions. Adjust your driving accordingly.
209Information Provided by:
LEFT DOOR AJARThis message displays anytime the engine isrunning, the transmission is not in PARK (P), andthe driver’s door is open or ajar. A chimesounds when the vehicle’s speed is greater than3 mph (5 km/h).
LOW BRAKE FLUIDThis message displays if the engine is running toinform the driver that the brake fluid level islow. Have the brake system serviced by yourdealer as soon as possible. See “Brake Fluid”under Brakes on page 399.
LOW COOLANTThis message displays when there is a low levelof engine coolant. Have the cooling systemserviced by your dealer as soon as possible. SeeEngine Coolant on page 385.
LOW FUELThis message displays when the fuel supply isless than 5 gallons (18.9 L) and the displayis turned off. A single chime also sounds whenthis message is displayed.
LOW OIL LEVELFor correct operation of the low oil sensingsystem, your vehicle should be on a level surface.A false LOW OIL LEVEL message may displayif the vehicle is parked on a grade. The oillevel sensing system does not check for actual oillevel if the engine has been off for a shortperiod of time, and the oil level is never checkedwhile the engine is running. If the LOW OILLEVEL message displays, and your vehicle hasbeen parked on level ground with the engine off forat least 30 minutes, the oil level should bechecked by observing the oil dipstick. Prior tochecking the oil level, make sure the engine hasbeen off for a few minutes and your vehicle is on alevel surface. Then check the dipstick and addoil if necessary. See Engine Oil on page 377.
LOW OIL PRESSUREIf this message displays while the engine isrunning, stop the engine and do not operate thevehicle until the cause of low oil pressure iscorrected. Severe damage to the engine canresult. A multiple chime sounds when thismessage is displayed.
210Information Provided by:
LOW VOLTAGEThis message displays when the electrical systemis charging less than 10 volts or if the batteryhas been drained. If this message displaysimmediately after starting, it is possible that thegenerator can still recharge the battery. Thebattery should recharge while driving, but maytake a few hours to do so. Consider usingan auxiliary charger to boost the battery afterreturning home or to a final destination. Make sureyou follow the manufacturer’s instructions. If thismessage displays while driving or after startingyour vehicle and stays on, have it checkedimmediately by your dealer to determine the causeof this problem. To help the generator rechargethe battery quickly, you can reduce the load on theelectrical system by turning off the accessories.You can monitor battery voltage on the DICby pressing the INFO button. The normal range is11.5 to 15.5 volts.
LOW WASHER FLUIDThis message displays when the windshieldwasher fluid is low. Fill the windshield washer fluidreservoir as soon as possible. See EngineCompartment Overview on page 374 for thelocation of the windshield washer fluid reservoir.Also, see Windshield Washer Fluid on page 397for more information.
MAX (Maximum) SPEED XX MPH(XX KM/H)This message displays when a failure in themagnetic ride control system has occurred. ThePowertrain Control Module (PCM) determinesthe speed to which your vehicle is limited. Haveyour vehicle serviced by your dealer if thismessage appears.
211Information Provided by:
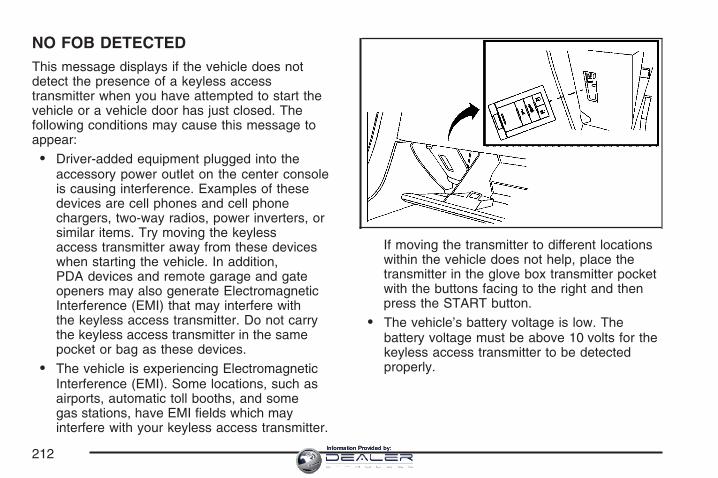
NO FOB DETECTEDThis message displays if the vehicle does notdetect the presence of a keyless accesstransmitter when you have attempted to start thevehicle or a vehicle door has just closed. Thefollowing conditions may cause this message toappear:
• Driver-added equipment plugged into theaccessory power outlet on the center consoleis causing interference. Examples of thesedevices are cell phones and cell phonechargers, two-way radios, power inverters, orsimilar items. Try moving the keylessaccess transmitter away from these deviceswhen starting the vehicle. In addition,PDA devices and remote garage and gateopeners may also generate ElectromagneticInterference (EMI) that may interfere withthe keyless access transmitter. Do not carrythe keyless access transmitter in the samepocket or bag as these devices.
• The vehicle is experiencing ElectromagneticInterference (EMI). Some locations, such asairports, automatic toll booths, and somegas stations, have EMI fields which mayinterfere with your keyless access transmitter.
If moving the transmitter to different locationswithin the vehicle does not help, place thetransmitter in the glove box transmitter pocketwith the buttons facing to the right and thenpress the START button.
• The vehicle’s battery voltage is low. Thebattery voltage must be above 10 volts for thekeyless access transmitter to be detectedproperly.
212Information Provided by:
NO FOB, OFF OR RUN?This message displays when a keyless accesstransmitter is not detected inside the vehicle whileyou are trying to turn the ignition off. Yourvehicle may be near a strong radio antenna signalcausing the keyless access system to bejammed. The vehicle will remain in Acc. until off orSTART has been pressed or five minutes hasexpired. If you turn the ignition off and you cannotfind the keyless access transmitter, you will notbe able to restart the vehicle. The keyless accesstransmitter needs to be inside of the vehicle inorder for the vehicle to start. See Startingthe Engine on page 89 for more information.
OVER SPEED WARNINGThis message displays when the vehicle speedexceeds a certain limit as required by some exportcountries. A chime sounds when this messageis displayed.
PRESS BRAKE TO STARTThis message displays to inform you that thebrake pedal must be applied to start the vehicle.Make sure you are pressing the brake pedal all theway down.
REDUCED ENGINE POWERThis message displays when the vehicle isreducing engine power because the transmissionis being placed in gear under conditions thatmay cause damage to the vehicle’s engine,transmission, or ability to accelerate. Reducedengine power can affect the vehicle’s abilityto accelerate. If this message is on, but there isno reduction in performance, proceed to yourdestination. The performance may be reduced thenext time the vehicle is driven. The vehicle maybe driven at a reduced speed while this messageis on, but acceleration and speed may bereduced. Anytime this message stays on, thevehicle should be taken to your dealer for serviceas soon as possible.
RIGHT DOOR AJARThis message displays anytime the engine isrunning, the transmission is not in PARK (P),and the passenger’s door is open or ajar. A chimesounds if the vehicle’s speed is greater than3 mph (5 km/h).
213Information Provided by:
SERVICE A/CThis message displays when the electronicsensors that control the air conditioning andheating systems are no longer working. Have theclimate control system serviced by your dealerif you notice a drop in heating and air conditioningefficiency.
SERVICE ABS (Anti-lock Brake System)If this message displays when you are driving,stop as soon as possible and turn the ignition off.Then start the engine again to reset the system.If the message stays on, or comes back on againwhile you are driving, your vehicle is in need ofservice. See your dealer.
If the SERVICE ABS message is being displayed,the Traction Control System (TCS) andStabiliTrak® System will also be disabled. TheDriver Information Center will scroll threemessages: SERVICE ABS, SERVICE TRACTIONSYS, and SERVICE STABILITRAK, and theanti-lock brake system and traction control warninglights on the instrument panel cluster will be
illuminated. See Anti-Lock Brake System WarningLight on page 193 and Traction Control System(TCS) Warning Light on page 194. The driver canacknowledge these messages by pressing theRESET button three times. When the servicemessage is displayed, the computer controlledsystems will not assist the driver and you shouldhave the system repaired by your dealer assoon as possible. Adjust your driving accordingly.
SERVICE AFS (Adaptive ForwardLighting System) LAMPSThis message displays when the AdaptiveForward Lighting System (AFS) is disabled andneeds service. See your dealer. See AdaptiveForward Lighting System on page 167 for moreinformation.
SERVICE ELECT (Electrical) SYSTEMThis message displays if an electrical problem hasoccurred within the Powertrain Control Module(PCM). Have your vehicle serviced by your dealer.
214Information Provided by:
SERVICE FUEL SYSTEMThis message displays when the PowertrainControl Module (PCM) has detected a problemwithin the fuel system. Have your vehicle servicedby your dealer. This message will also bedisplayed when the cluster is not getting fuelinformation from the PCM.
SERVICE RADAR CRUISEIf your vehicle has this feature, this messagedisplays when the Adaptive Cruise Control (ACC)system is disabled and needs service. Seeyour dealer.
SERVICE RIDE CONTROLThis message displays when there is a problemwith the Magnetic Ride Control System. Have yourvehicle serviced by your dealer.
SERVICE TRACTION SYS (System)This message displays when there is a problemwith the Traction Control System (TCS). Have yourvehicle serviced by your dealer.
SERVICE STABILITRAKIf this message displays, it means there may be aproblem with the stability enhancement system.If you see this message, try to reset the system.Stop, turn off the engine, then start the engineagain. If this message still comes on, it meansthere is a problem. You should see your dealer forservice. Reduce your speed and drive accordingly.A single chime also sounds when this messageis displayed.
SERVICE TRANSMISSIONThis message displays when there is a problemwith the transmission. Have your vehicle servicedby your dealer.
SERVICE VEHICLE SOONThis message displays when a non-emissionsrelated powertrain malfunction occurs. Have yourvehicle serviced by your dealer as soon aspossible.
215Information Provided by:
SHIFT TO PARKThis message displays if the vehicle is not inPARK (P) when the engine is being turned off. Thevehicle will be in accessory mode. Once theshift lever is moved to PARK (P), the vehicle willturn off.
STABILITRAK ACTIVEYou may see this message on the DIC. It meansthat an advanced, computer-controlled systemhas come on to help your vehicle continue to go inthe direction in which you are steering. Thisstability enhancement system activates when thecomputer senses that your vehicle is juststarting to spin, as it might if you hit a patch of iceor other slippery spot on the road. When thesystem is on, you may hear a noise or feela vibration in the brake pedal. This is normal.
When this message is on, continue to steer in thedirection you want to go. The system is designedto help you in bad weather or other difficult drivingsituations by making the most of whatever road
conditions will permit. If this message comes on,you will know that something has caused yourvehicle to start to spin, so consider slowing down.A single chime also sounds when this messageis displayed.
STABILITRAK READYIf this message displays and a chime sounds, thesystem has completed the functional check ofthe StabiliTrak® System.
STABILITRAK WARMINGWhen you first start your vehicle and drive away,especially during cold winter weather, thismessage may display along with a chime and thetraction control warning light. This is normal.You can acknowledge this message by pressingthe RESET button. The StabiliTrak® Systemperformance is affected until the STABILITRAKREADY message is displayed in the DIC,which can take up to 15 minutes.
216Information Provided by:
SVC (Service) TIRE MONITORThis message displays if a part on the TirePressure Monitor (TPM) is not working properly.If you drive your vehicle while any of the foursensors are missing or inoperable, the warningcomes on in about 30 minutes. A sensor would bemissing, for example, if you put different wheelson your vehicle without transferring the sensors.If the warning comes on and stays on, theremay be a problem with the TPM. See your dealer.
TOO COLD TO MOVE TOPThis message displays when the retractablehardtop button is pressed and the hardtop pumpmotor temperature is below −4°F (−20°C). Wait forthe hardtop pump motor to warm up beforeusing the retractable hardtop.
TOP INOP (Inoperative) – VALET ONThis message displays when the retractablehardtop button is pressed and the valet switch ison. Turn off the valet switch before using theretractable hardtop.
TOP INOP (Inoperative) OUT OF PARKThis message displays if the retractable hardtopbutton is pressed while the vehicle is not inPARK (P).
TOP MOTOR OVER TEMP(Temperature)This message displays when the retractablehardtop button is pressed and the hardtop pumpmotor temperature is over 221°F (105°C). Wait forthe hardtop pump motor to cool down beforeusing the retractable hardtop.
TOP NOT SECUREThis message displays when the retractablehardtop button is released before the top open orclose operation is complete. Press and holdthe retractable hardtop button to fully open or closethe top.
217Information Provided by:
TRAC (Traction) SYSTEM ACTIVEThis message displays when the Traction ControlSystem (TCS) is limiting wheel spin. Slipperyroad conditions may exist if this messageis displayed, so adjust your driving accordingly.This message stays on for a few seconds after theTCS stops limited wheel spin.
TRAC (Traction)/STABILITRAK OFFThis message displays when both the TractionControl System (TCS) and the StabiliTrak® Systemare off. This message will remain until thesystems are turned on again.
TRAC (Traction)/STABILITRAK ONThis message displays when both the TractionControl System (TCS) and the StabiliTrak® Systemare on.
TRACTION SYSTEM OFFThis message displays when the Traction ControlSystem (TCS) is off, but the StabiliTrak® Systemremains on.
TRACTION SYSTEM ONThis message displays when the Traction ControlSystem (TCS) is on.
TRUNK AJARThis message displays when the trunk is openwhile the vehicle is running and is not in PARK (P).
WAIT FOR STABILITRAKThis message displays after driving 19 mph(30 km/h) for 10 seconds if the steering is notcentered. The StabiliTrak® System is not availableuntil the steering centers itself and theSTABILITRAK READY message is displayed inthe DIC.
218Information Provided by:
Other MessagesHere are more messages that you can receive onyour Driver Information Center (DIC). Toacknowledge a message and read anothermessage that may have come on at the sametime, press the RESET button.
• ACCESSORY MODE ON
• CHANGE OIL SOON
(See Engine Oil on page 377 and Engine OilLife System on page 380.)
• FOB BATTERY LOW
• HIGH TIRE PRESS LF
• HIGH TIRE PRESS RF
• HIGH TIRE PRESS LR
• HIGH TIRE PRESS RR
• INTRUSION SENSOR OFF
• INTRUSION SENSOR ON
• KNOWN FOB
• LEFT FRONT TIRE FLAT MAX SPD 55,REDUCED HNDLG
• LEFT REAR TIRE FLAT MAX SPD 55,REDUCED HNDLG
• LOW TIRE PRESS LF
• LOW TIRE PRESS RF
• LOW TIRE PRESS LR
• LOW TIRE PRESS RR
• MAX # FOBS LEARNED
• OFF-ACC TO LEARN
• READY FOR FOB #X
• RIGHT FRT TIRE FLAT MAX SPD 55,REDUCED HNDLG
• RIGHT REAR TIRE FLAT MAX SPD 55,REDUCED HNDLG
• WAIT XX MINUTES
219Information Provided by:
DIC Vehicle PersonalizationYour vehicle has personalization capabilities thatallow you to program certain features to apreferred setting for up to two drivers. The back ofthe keyless access transmitters are labelled 1 or 2.
The current driver’s preferences are recalledwhen one of the following occurs:
• The lock or unlock button on the keylessaccess transmitter, programmed as 1 or 2, ispressed.
• The appropriate memory button, 1 or 2,located on the driver’s seat is pressed.See Memory Seat, Mirrors and Steering Wheelon page 10 for more information.
• A valid keyless access transmitter is detectedupon opening the driver’s door.
If more than one valid keyless access transmitteris detected upon opening the driver’s door, thedriver preferences for the lowest driver number willbe recalled.
If a keyless access transmitter is programmedas #3 or #4, the personalization system willnot recognize the transmitter. The DriverInformation Center (DIC) will not display a current
driver number and the features that are normallyprogrammed through the DIC will be set tothe default states. Also, if the OPTIONS button ispressed, the DIC does not display the menusused to set personalizations, but instead displaysOPTIONS UNAVAILABLE for a few seconds.
Feature ProgrammingTo change feature preferences, make sure thevehicle is running and in PARK (P). To avoidexcessive drain on the battery, it is recommendedthat the headlamps are turned off. Press theOPTIONS button and the Driver Information Center(DIC) will display the current driver for a fewseconds, then display the first personalizationmenu item. You can now use the OPTIONS buttonto change the setting of the displayed feature.Press the top or bottom of the information buttonto scroll up or down the list of features. Whenyou get to a feature you want to change, press theOPTIONS button again. When you are finished,press the RESET button to exit the personalizationmenu. If no button is pressed within 45 seconds,the DIC will exit the personalization menu.
The following are DIC options that will be availablein the personalization menu.
220Information Provided by:
Auto RecallThis feature allows the steering column, outsidemirrors and the driver’s seat to automatically moveto the current driver’s set position when theengine starts. The DIC will display AUTO RECALLOFF or AUTO RECALL ON. Press the OPTIONSbutton to change the setting.
Auto Exit RecallThis feature allows the steering column anddriver’s seat to automatically move to the currentdriver’s exit position when one of the followingoccurs:
• The vehicle is turned off or in RAP oraccessory mode and the driver’s dooris opened.
• The vehicle is turned off or in RAP and theunlock button on the keyless accesstransmitter is pressed.
The DIC will display AUTO EXIT RECALL OFF orAUTO EXIT RECALL ON. Press the OPTIONSbutton to change the setting.
Approach LightsThis feature activates the parking lamps, front foglamps and back-up lamps during low light periodswhen the unlock button on the keyless accesstransmitter is pressed, both doors are closed andthe vehicle is off or in RAP. The lamps remain on for20 seconds or until a door is opened, the lockbutton on the keyless access transmitter is pressedor the vehicle is no longer off or in RAP.The DIC will display APPROACH LIGHTS OFF orAPPROACH LIGHTS ON. Press the OPTIONSbutton to change the setting.
Exit LightsThis feature activates the parking lamps and frontfog lamps for 15, 30 or 90 seconds. This willoccur when the vehicle is off or in RAP and theheadlamps are on due to the automatic headlampsystem. The parking lamps and front fog lampswill remain on until the driver selected time periodexpires, the exterior lamp control is activated orthe vehicle is no longer off or in RAP.The DIC will display EXIT LIGHTS OFF, EXITLIGHTS - 15 SEC, EXIT LIGHTS - 30 SEC,or EXIT LIGHTS - 90 SEC. Press the OPTIONSbutton to change the setting.
221Information Provided by:
Flash at UnlockThis feature activates the front and rear turn signalsfor two short flashes when the unlock or trunkbutton on the keyless access transmitter is pressed.This will only occur when the vehicle is off.
The DIC will display NO FLASH AT UNLOCK orFLASH AT UNLOCK. Press the OPTIONSbutton to change the setting.
Flash at LockThis feature activates the front and rear turnsignals for one long flash when the lock button onthe keyless access transmitter is pressed. Thiswill only occur when the vehicle is off. If the lockbutton is pressed again within five seconds,the horn will sound regardless of which setting youhave selected.
The DIC will display NO FLASH AT LOCK orFLASH AT LOCK. Press the OPTIONS button tochange the setting.
FOB ReminderThis feature sounds the horn three times when thedriver door is closed and there is a keylessaccess transmitter inside the interior of the vehicle.This will only occur when the vehicle is off.
The DIC will display FOB REMINDER OFF orFOB REMINDER HORN. Press the OPTIONSbutton to change the setting.
Passive LockingThis feature allows you to select whether the doorsautomatically lock during normal vehicle exit. Whenthe ignition is turned off and all doors becomeclosed, the vehicle will determine how manykeyless access transmitters remain in the vehicleinterior. If at least one keyless access transmitterhas been removed from the interior of the vehicle,the doors will lock after eight seconds.
For example, if there are two keyless accesstransmitters in the vehicle and one is removed, theother will be locked in. The keyless accesstransmitter locked in the vehicle can still be used tostart the vehicle or unlock the doors, if needed.
222Information Provided by:
A person approaching the outside of the lockedvehicle without an authorized keyless accesstransmitter, however, will not be able to open thedoor, even with a transmitter in the vehicle.
You may temporarily disable the passive doorlocking feature by pressing the door unlock switchfor three seconds on an open door. Passivedoor locking will then remain disabled until a doorlock switch is pressed or until the power modetransitions from the off power mode.
You can select to not have the horn sound whenthe passive lock occurs. If you choose thissetting, the doors will automatically lock eightseconds after you turn the ignition off, remove akeyless access transmitter from the interior ofthe vehicle, and close both doors.
You can also select to have the horn sound oncewhen the passive lock occurs. If you choosethis setting, the doors will automatically lock andthe horn will chirp eight seconds after you turn theignition off, remove a keyless access transmitterfrom the interior of the vehicle, and closeboth doors.
If you are parking in a quiet area and do not wantthe horn to sound when the doors lock, pressthe lock button on the keyless access transmitterimmediately after removing it from the interiorand closing the doors. This will lock the doors andcancel the passive locking for this ignition cycle.
The DIC will display PASSIVE LOCKING OFF,SILENT PASSIVE LOCK, or HORN AT PASSIVELOCK. Press the OPTIONS button to changethe setting.
Passive UnlockingThis feature allows you to select which doors willautomatically unlock when you approach andopen the driver’s door with your keyless accesstransmitter. You can choose to have the driver’sdoor unlock or both doors unlock. See Door Lockson page 73 for more information.
The DIC will display PASSIVE UNLK DRIVER orPASSIVE UNLK BOTH. Press the OPTIONSbutton to change this setting.
223Information Provided by:
Auto UnlockThis feature automatically unlocks either thedriver’s door or both doors, depending on thesetting, when the shift lever is moved to PARK (P).
The DIC will display AUTO UNLOCK OFF, AUTOUNLOCK DRIVER, or AUTO UNLOCK BOTH.Press the OPTIONS button to change the setting.
Park AssistThis feature tilts the passenger’s side mirrordownward when the shifter is moved toREVERSE (R). This can help you to see the curbwhile backing up. If you adjust the mirror whilein REVERSE (R), the new position will be saved asthe park assist position.
The DIC will display PARK ASSIST OFF or PARKASSIST ON.
LanguageThis feature allows you to select the language theDIC and Head-Up Display (HUD), uses todisplay messages.
The DIC will display ENGLISH, FRENCH,GERMAN, ITALIAN, JAPANESE, or SPANISH.Press the OPTIONS button to change the setting.
If you become stuck in a language that you do notunderstand, hold the OPTIONS and RESETbuttons for five seconds. The DIC will scrollthrough all available languages for as long as thebuttons are held. Each language option willdisplay in its own language. For example, Englishwill be displayed as ENGLISH, Spanish asESPANOL, etc. When the desired language isavailable, release the buttons and the DIC will setto this language.
Trip Computer
Oil Life IndicatorThis feature lets you know when to change theengine oil. It is based on the engine oiltemperatures and your driving patterns.
To see the display, press the information buttonseveral times until OIL LIFE appears. If yousee 99% OIL LIFE, 99 percent of your current oillife remains.
224Information Provided by:

The DIC may display a CHANGE OIL NOWmessage. If you see CHANGE OIL NOW, it meansthe oil life is gone. For more information, seeScheduled Maintenance on page 465 and EngineOil on page 377.
When the oil is changed, you will need to resetthe system. See Engine Oil Life System onpage 380. Always keep a written record of themileage and date when you changed your oil.
Audio System(s)Determine which radio your vehicle has and thenread the pages following to familiarize yourselfwith its features.
Driving without distraction is a necessity for asafer driving experience. See Defensive Driving onpage 322. By taking a few moments to read thismanual and get familiar with your vehicle’s audiosystem, you can use it with less effort, as wellas take advantage of its features. While yourvehicle is parked, set up your audio system bypresetting your favorite radio stations, setting thetone and adjusting the speakers. Then, when
driving conditions permit, you can tune to yourfavorite stations using the presets and steeringwheel controls if the vehicle has them.
{CAUTION:
This system provides you with a far greateraccess to audio stations and song listings.Giving extended attention to entertainmenttasks while driving can cause a crash andyou or others can be injured or killed.Always keep your eyes on the road andyour mind on the drive — avoid engagingin extended searching while driving.
Keeping your mind on the drive is important forsafe driving. For more information, see DefensiveDriving on page 322.
225Information Provided by:
Here are some ways in which you can help avoiddistraction while driving.
While your vehicle is parked:
• Familiarize yourself with all of its controls.
• Familiarize yourself with its operation.
• Set up your audio system by presetting yourfavorite radio stations, setting the tone, andadjusting the speakers. Then, when drivingconditions permit, you can tune to your favoriteradio stations using the presets and steeringwheel controls if the vehicle has them.
Notice: Before adding any sound equipmentto your vehicle, such as an audio system,CD player, CB radio, mobile telephone,or two-way radio, make sure that it can beadded by checking with your dealer. Also,check federal rules covering mobile radio andtelephone units. If sound equipment can beadded, it is very important to do it properly.Added sound equipment may interfere with theoperation of your vehicle’s engine, radio, orother systems, and even damage them.Your vehicle’s systems may interfere with theoperation of sound equipment that hasbeen added.
Your vehicle has a feature called RetainedAccessory Power (RAP). With RAP, the audiosystem can be played even after the ignitionis turned off. See Retained Accessory Power(RAP) on page 89 for more information.
Theft-Deterrent FeatureTHEFTLOCK® is designed to discourage theft ofyour vehicle’s radio. The feature worksautomatically by learning a portion of the VehicleIdentification Number (VIN). If the radio ismoved to a different vehicle, it will not operate. Ifthe radio is removed from your vehicle, theoriginal VIN in the radio can be used to trace theradio back to your vehicle.
With THEFTLOCK® activated, the radio will notoperate if stolen.
226Information Provided by:
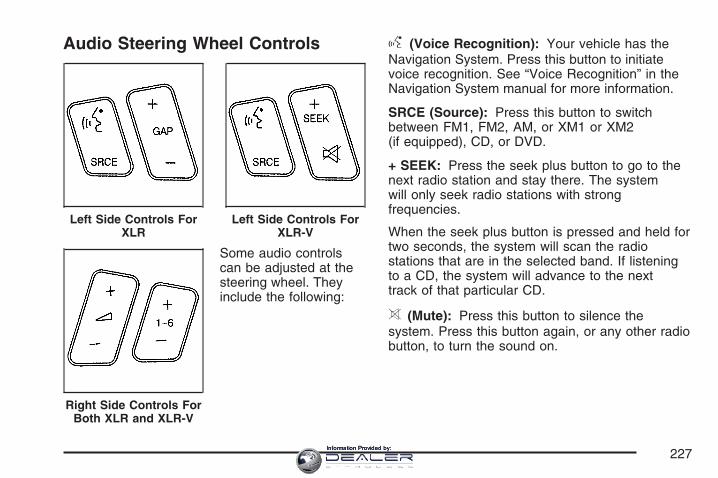
Audio Steering Wheel Controls
Some audio controlscan be adjusted at thesteering wheel. Theyinclude the following:
g (Voice Recognition): Your vehicle has theNavigation System. Press this button to initiatevoice recognition. See “Voice Recognition” in theNavigation System manual for more information.
SRCE (Source): Press this button to switchbetween FM1, FM2, AM, or XM1 or XM2(if equipped), CD, or DVD.
+ SEEK: Press the seek plus button to go to thenext radio station and stay there. The systemwill only seek radio stations with strongfrequencies.
When the seek plus button is pressed and held fortwo seconds, the system will scan the radiostations that are in the selected band. If listeningto a CD, the system will advance to the nexttrack of that particular CD.
> (Mute): Press this button to silence thesystem. Press this button again, or any other radiobutton, to turn the sound on.
Left Side Controls ForXLR
Left Side Controls ForXLR-V
Right Side Controls ForBoth XLR and XLR-V
227Information Provided by:
+u− (Volume): Press this button to increase orto decrease the volume.
+ 1-6 − (Preset Stations): Press this button toplay stations that are programmed on theradio preset pushbuttons. The radio will only seekpreset stations with a strong signal that are inthe selected band.
When a CD is playing, press this button to go tothe next track.
Radio ReceptionYou may experience frequency interference andstatic during normal radio reception if itemssuch as cellphone chargers, vehicle convenienceaccessories, and external electronic devicesare plugged into the accessory power outlet. Ifthere is interference or static, unplug the item fromthe accessory power outlet.
AMThe range for most AM stations is greater than forFM, especially at night. The longer range cancause station frequencies to interfere with eachother. For better radio reception, most AMradio stations will boost the power levels duringthe day, and then reduce these levels duringthe night. Static can also occur when things likestorms and power lines interfere with radioreception. When this happens, try reducing thetreble on your radio.
FM StereoFM stereo will give the best sound, but FM signalswill reach only about 10 to 40 miles (16 to 65 km).Tall buildings or hills can interfere with FMsignals, causing the sound to fade in and out.
228Information Provided by:
XM™ Satellite Radio ServiceXM™ Satellite Radio Service gives digital radioreception from coast-to-coast in the 48 contiguousUnited States, and in Canada. Just as with FM,tall buildings or hills can interfere with satelliteradio signals, causing the sound to fade in and out.In addition, traveling or standing under heavyfoliage, bridges, garages, or tunnels may causeloss of XM signal for a period of time. Theradio may display NO XM SIGNAL to indicateinterference.
Cellular Phone UsageCellular phone usage may cause interference withyour vehicle’s radio. This interference mayoccur when making or receiving phone calls,charging the phone’s battery, or simply having thephone on. This interference is an increasedlevel of static while listening to the radio. If staticis received while listening to the radio, unplugthe cellular phone and turn it off.
Care of Your CDsHandle CDs carefully. Store them in their originalcases or other protective cases and away fromdirect sunlight and dust. The CD player scans thebottom surface of the disc. If the surface of aCD is damaged, such as cracked, broken,or scratched, the CD will not play properly or notat all. If the surface of a CD is soiled, take asoft, lint free cloth or dampen a clean, soft cloth ina mild, neutral detergent solution mixed withwater, and clean it. Make sure the wiping processstarts from the center to the edge.
Do not touch the bottom side of a CD whilehandling it; this could damage the surface. Pick upCDs by grasping the outer edges or the edge ofthe hole and the outer edge.
229Information Provided by:
Care of the CD PlayerDo not use CD lens cleaners for CD playersbecause the lens of the CD optics can becomecontaminated by lubricants.
Diversity Antenna SystemThe AM-FM antennas are located under thedecklid surface in the trunk compartment. Theantennas are hidden from view and are notaccessible.
If adding an aftermarket cellular telephone to yourvehicle, do not attach the antenna to the rearglass. This would interfere with the convertible topretraction operation and could cause damage tothe finished/painted surfaces.
XM™ Satellite Radio AntennaSystemYour vehicle may have the XM™ Satellite Radioantennas that are located in the outside rearview mirrors. These antennas are hidden fromview and are not accessible.
230Information Provided by:
Overview ..................................................... 232Navigation System Overview ..................... 232Getting Started .......................................... 234
Features and Controls ................................ 240Using the Navigation System ..................... 240Setup Menu .............................................. 243Plan Route ................................................ 249Edit Memory Point ..................................... 250Edit Waypoint ............................................ 254Edit Avoid Point/Area ................................ 257Enter Destination ....................................... 259Route Preference ...................................... 269Maps ......................................................... 271Symbols .................................................... 275Keyless Access System ............................. 280
OnStar® System ........................................ 281Global Positioning System (GPS) .............. 281Vehicle Positioning .................................... 282Problems with Route Guidance .................. 283If the System Needs Service ..................... 283Ordering Map DVDs .................................. 284Database Coverage Explanations .............. 284
Navigation Audio System ........................... 285Six-Disc CD Changer ................................ 302CD/DVD Player ......................................... 305Radio Personalization with Home and
Away Feature ........................................ 311Voice Recognition ....................................... 312
Section 4 Navigation System
231Information Provided by:
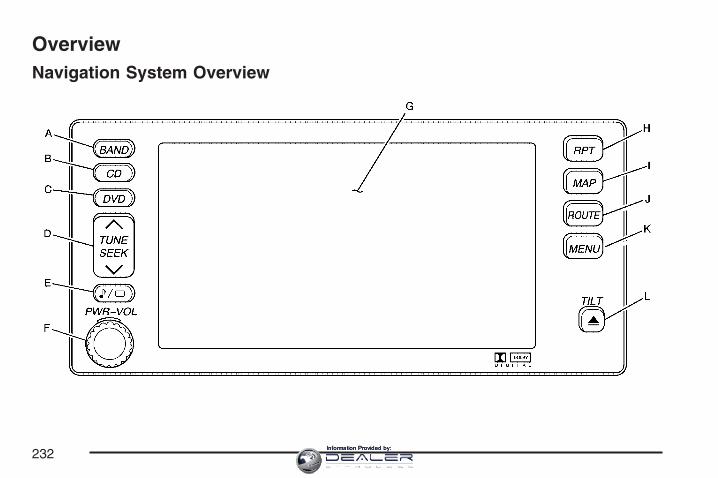
OverviewNavigation System Overview
232Information Provided by:
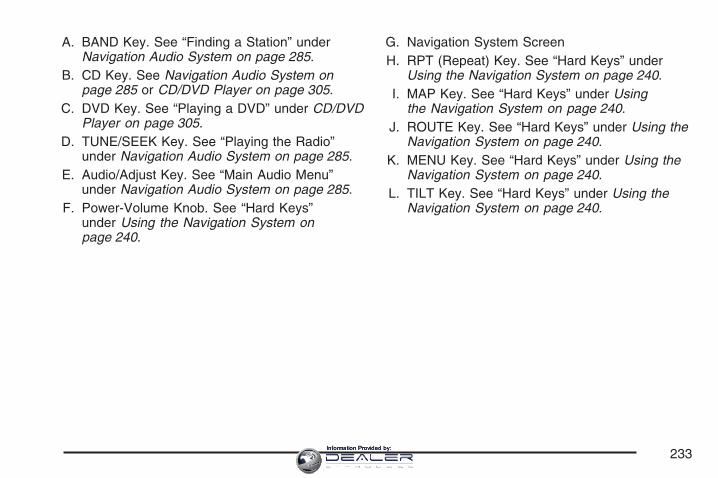
A. BAND Key. See “Finding a Station” underNavigation Audio System on page 285.
B. CD Key. See Navigation Audio System onpage 285 or CD/DVD Player on page 305.
C. DVD Key. See “Playing a DVD” under CD/DVDPlayer on page 305.
D. TUNE/SEEK Key. See “Playing the Radio”under Navigation Audio System on page 285.
E. Audio/Adjust Key. See “Main Audio Menu”under Navigation Audio System on page 285.
F. Power-Volume Knob. See “Hard Keys”under Using the Navigation System onpage 240.
G. Navigation System ScreenH. RPT (Repeat) Key. See “Hard Keys” under
Using the Navigation System on page 240.I. MAP Key. See “Hard Keys” under Using
the Navigation System on page 240.J. ROUTE Key. See “Hard Keys” under Using the
Navigation System on page 240.K. MENU Key. See “Hard Keys” under Using the
Navigation System on page 240.L. TILT Key. See “Hard Keys” under Using the
Navigation System on page 240.
233Information Provided by:
Getting StartedBefore you begin to operate the navigation system,read this manual thoroughly to become familiar withit and to understand how the system works.
Keeping your mind on the drive is important for safedriving. See Defensive Driving on page 322 for moreinformation. Get familiar with your vehicle’snavigation system so you can use it with less effortand take full advantage of its features. Yournavigation system includes not only navigation, butalso audio functions. While your vehicle is parked:
• Familiarize yourself with all of its controls: hardkeys on the faceplate and touch-sensitivescreen buttons.
• Familiarize yourself with its operation.
• Set up your audio by presetting your favoritestations, setting the tone, and adjusting thespeakers. Then, when driving conditionspermit, you can tune to your favorite stationsusing the presets and steering wheel controls(if equipped).
• Set up the navigation features that can only bedone before you begin driving, such as enteringan address or a preset destination.
Entering a destination or alphanumeric textrequires many steps, so you can only performthese operations when the vehicle is in PARK (P).You will notice that touch-sensitive screenbuttons leading to the alphanumeric keyboard aredimmed out while driving.
Other functions may also be locked out whiledriving and they too will appear grayed out on thescreen — but all functions are available whenparked. Some functions can be performed whiledriving, as long as you can do so without divertingtoo much of your attention from your driving.
{CAUTION:
This system provides you with a far greateraccess to audio stations and song listings.Giving extended attention to entertainmenttasks while driving can cause a crash andyou or others can be injured or killed.Always keep your eyes on the road andyour mind on the drive — avoid engagingin extended searching while driving.
234Information Provided by:
{CAUTION:
Looking at the moving map on thenavigation screen frequently or for toolong while driving can cause a crash andyou or others can be injured or killed.Keep your eyes and mind on the road andavoid looking too long or too often at themoving map on the navigation screen.Use the voice guidance directionswhenever possible.
The navigation system allows you to do thefollowing:
• Plan a route with provided turn-by-turn routeand map guidance with voice prompts. SeePlan Route on page 249 for more information.
• Select a destination using various methodsand choices.
• Receive broadcast announcements on trafficand emergency alert communications.
The information in the system may not always becomplete. Road conditions such as prohibitedturns, detours, and construction zones, changefrequently. It is important to consider whether youcan follow the directions given by the systemfor the current conditions.
When getting started, you may set the navigationsystem to your preference using various options.You will also need to know how to perform variousfunctions to begin route guidance. Referencethe following topics for further information:
• To adjust screen appearance, language, clock,English/metric measurements, or otheroptions, see “Main Audio Menu” underNavigation Audio System on page 285.
• To adjust voice guidance volume or othernavigation settings, see Setup Menu onpage 243.
235Information Provided by:

Setting Radio Station PresetsTo set preset radio stations, do the following:
1. Press the PWR/VOL knob to turn thesystem on.
2. Press the audio source screen button (AM,FM1, FM2, etc.) and select the desired band(AM, FM1, FM2, XM1, or XM2 (if equipped),or WX (weather) (if equipped)).
3. Use the TUNE/SEEK arrows to tune to thedesired station.
4. Press and hold one of the six preset screenbuttons, at the bottom of the screen, until youhear a beep or see the station displayedon the selected preset button.
5. Repeat the steps for each preset.
See “Preset Station Menu” under Navigation AudioSystem on page 285 for more information.
Setting the TimeTo set the time, do the following:
1. Press the PWR/VOL knob to turn thesystem on.
2. Press thee / z (Audio/Adjust) hard key.
3. Press the 8 clock symbol screen button.
4. Select the 12H or 24H screen button to displaythe time in standard or military time.
5. Press and hold the HOUR and MIN. (minute)arrow buttons to increase or to decreasethe time.
6. Select the appropriate time zone screenbutton.
7. Select the Daylight Saving Time screenbutton, if necessary.
The radio will use the GPS satellite to set thetime. The vehicle needs to be in an open area toreceive the signal. See “Clock Adjust Menu”under Navigation Audio System on page 285 formore information.
236Information Provided by:
Setting the Search Area, Entering anAddress and Point of Interest, Storing aHome Destination, and Using YourHome or Previous DestinationsBefore entering an Address, Point of Interest,Home, or Preset Destination, select theappropriate region that contains the finaldestination. Your vehicle must be stopped toperform this operation.
Setting the Search AreaTo set the search area, do the following:
1. Press the PWR/VOL knob to turn thesystem on.
2. Insert the DVD map disc. See “RegionalMaps” under Maps on page 271 for moreinformation.
3. A notice may appear. Touch the I AGREEscreen button to proceed.If the radio is already on with a map discinserted, press the ROUTE hard key.
4. Press the Enter Destination screen button.
5. Press the Change screen button.
6. Select the appropriate region numberedscreen button that contains your finaldestination.
The system will return to the Destination menu.See Enter Destination on page 259 for moreinformation.
Entering an AddressTo set a destination by entering a street address,do the following:
1. Press the PWR/VOL knob to turn thesystem on.
2. Insert the DVD map disc. See “RegionalMaps” under Maps on page 271 for moreinformation.
3. A notice may appear. Touch the I AGREEscreen button to proceed.If the radio is already on with a map discinserted, press the ROUTE hard key.
4. Press the Enter Destination screen button.Verify that the selected Search Area iscorrect.
5. Press the Address screen button.
237Information Provided by:

6. Press the Street screen button, then enter thestreet name using the alpha keypad on thescreen.Do not enter directional information or streettype, and use the space screen button betweenstreet or city names. For example, the streetname N. Royal Oak Rd. should be entered asroyal oak. Use the backspace ( V ) screenbutton if an incorrect character has beenentered.
7. Select the desired street name with the correctdesignation (Dr., Ln., St., etc.) from the list.
8. If there is more than one city, the system willdisplay the list of cities that have that streetname. Select a city from the list or selectthe City screen button to input the city name.
9. Enter the house number using the numerickeypad on the screen and touch the Enterscreen button. The system will list the housenumber range that is available for the street.
10. Press the Enter screen button to plan yourroute.
See “Address” under Enter Destination onpage 259 for more information.
Entering a Point of Interest (POI)To set a destination by entering a Point of Interest(POI), do the following:1. Press the power/volume knob to turn the
system on.2. Insert the DVD map disc. See “Regional Maps”
under Maps on page 271 for more information.3. A notice may appear. Touch the I AGREE
screen button to proceed.If the radio is already on with a map discinserted, press the ROUTE hard key.
4. Press the Enter Destination screen button.Verify that the selected Search Area is correct.
5. Press the All Points of Interest screen button.6. Enter the specific title of the POI in the
Name space (i.e. Washington Monument)using the alpha keypad on the screen.
7. Select the POI from the list.8. Press the Enter screen button to plan your
route.Using the Category or City selections will aidthe system in finding your POI by limitingthe search options.
See “All Points of Interest” under Enter Destinationon page 259 for more information.
238Information Provided by:
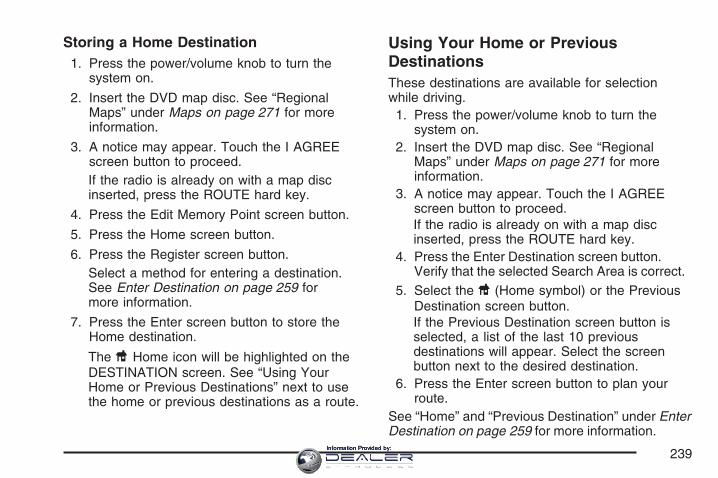
Storing a Home Destination1. Press the power/volume knob to turn the
system on.
2. Insert the DVD map disc. See “RegionalMaps” under Maps on page 271 for moreinformation.
3. A notice may appear. Touch the I AGREEscreen button to proceed.If the radio is already on with a map discinserted, press the ROUTE hard key.
4. Press the Edit Memory Point screen button.
5. Press the Home screen button.
6. Press the Register screen button.Select a method for entering a destination.See Enter Destination on page 259 formore information.
7. Press the Enter screen button to store theHome destination.
The L Home icon will be highlighted on theDESTINATION screen. See “Using YourHome or Previous Destinations” next to usethe home or previous destinations as a route.
Using Your Home or PreviousDestinationsThese destinations are available for selectionwhile driving.1. Press the power/volume knob to turn the
system on.2. Insert the DVD map disc. See “Regional
Maps” under Maps on page 271 for moreinformation.
3. A notice may appear. Touch the I AGREEscreen button to proceed.If the radio is already on with a map discinserted, press the ROUTE hard key.
4. Press the Enter Destination screen button.Verify that the selected Search Area is correct.
5. Select the L (Home symbol) or the PreviousDestination screen button.If the Previous Destination screen button isselected, a list of the last 10 previousdestinations will appear. Select the screenbutton next to the desired destination.
6. Press the Enter screen button to plan yourroute.
See “Home” and “Previous Destination” under EnterDestination on page 259 for more information.
239Information Provided by:

Canceling Your Current RouteGuidance will be canceled once you arrive at yourfinal destination. To cancel the current route prior toarrival at the final destination, do the following:
1. Press the ROUTE hard key.
2. Press the Route Preference screen button.
3. Press the Cancel Route screen button.
4. Press the Yes screen button to confirmcancellation.
Guidance VolumeTo adjust the volume of voice guidance prompts,do the following:1. Press the MENU hard key.2. Press the ON screen button to turn voice
volume on.3. Select the desired volume or select the OFF
screen button. The system will play back thenew volume level.
See “Voice Guidance Volume Settings” underSetup Menu on page 243 for more information.
Features and Controls
Using the Navigation SystemThis section presents basic information you willneed to know to operate the navigation system.Use the keys located on each side of thenavigation screen, as well as the availabletouch-sensitive screen buttons, to operate thesystem. See Navigation System Overviewon page 232 for more information on location.
Once the vehicle is moving, various functions willbe disabled to reduce driver distraction.
Hard KeysThe following hard keys are located to the left ofthe navigation screen:
BAND: Press the BAND key to access the bandscreen and switch between AM, FM1, FM2,XM1, XM2, and WX, if equipped. See “Finding aStation” under Navigation Audio System onpage 285.
CD: Press the CD key to play a CD. The CDscreen will be displayed. See Six-Disc CD Changeron page 302 or CD/DVD Player on page 305.
240Information Provided by:

DVD: Press the DVD key to play a DVD. TheDVD screen will be displayed. See CD/DVD Playeron page 305.
yTUNE/SEEK z: Press the TUNE/SEEK up ordown arrows to go to the next or previous radiostation and stay there. See “Finding a Station”under Navigation Audio System on page 285.
e/ z: Press the audio/adjust key to viewthe main audio menu. See “Main Audio Menu”under Navigation Audio System on page 285.
PWR-VOL (Power/Volume Knob): Press thepower/volume knob to turn the audio and navigationsystems on and off. Turn the knob to increase ordecrease the volume to the audio system.
The following hard keys are located to the right ofthe navigation screen:
RPT: Press the repeat key to repeat the currentvoice guidance navigation prompt.
MAP: Press the MAP key to view the map screenshowing current vehicle position.
The map screen can also display the followinginformation:
• North or Heading Up symbol. See Symbols onpage 275.
• Map scale. See Maps on page 271.
• Distance to destination.
• GPS symbol if GPS signal is not beingreceived. See Global Positioning System(GPS) on page 281.
• Options you have selected for reaching yourcurrent destination.
• Driver Information.
• Radio band and presets.
ROUTE: Press the ROUTE key to display thePLAN ROUTE menu. See Plan Route onpage 249.
MENU: Press the MENU key to display theSETUP MENU. See Setup Menu on page 243.
TILTX: Press the TILT key to open the navigationsystem faceplate for loading or removing the mapDVD, a video DVD, or an audio CD. This key canonly be used while the vehicle is in PARK (P).
241Information Provided by:

Alpha-Numeric KeypadLetters of the alphabet, symbols, punctuation, andnumbers, when available to you, will be displayedon the navigation screen as an alpha or numerickeypad. The alpha keypad will be displayed whenthe system needs you to input a city or streetname. You can also touch Char at the bottom ofthe alpha keypad to access the numeric keypadwhen inputting a house address, punctuation mark,or other character. Touch A - Z to return to thealpha keypad.
All characters are touch-sensitive screen buttons.Touch a character to select it.
Select the space symbol to enter a space betweencharacters or the words of a name.
V: Select the backspace symbol if you haveselected an incorrect character.
To make your name selections easier, the systemwill only allow you to select a character whichcan follow the last one entered. For example, ifyou enter Z, you would not be allowed to follow itwith T. The system will highlight the availablecharacters and darken the unavailable characters.
If you are unsuccessful when inputting a name, itmay need to be selected differently. It is alsopossible that the map DVD database maynot contain that information or the correct searcharea has not been selected. See DatabaseCoverage Explanations on page 284 for moreinformation.
Touch Sensitive ButtonsTouch-sensitive buttons, or screen buttons, arelocated on the screen. When you havesuccessfully selected a screen button, a beep willbe heard. These buttons will be highlightedwhen a feature is available and dim when they areunavailable. There are some toggle screenbuttons that will be light blue when active and darkblue when inactive.
242Information Provided by:
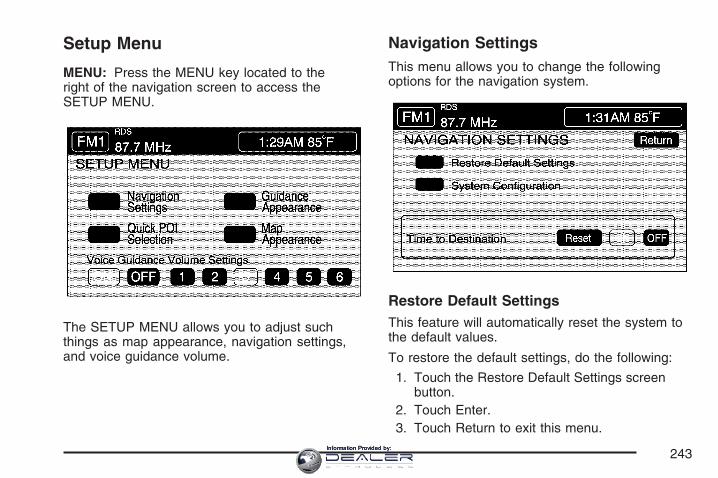
Setup Menu
MENU: Press the MENU key located to theright of the navigation screen to access theSETUP MENU.
The SETUP MENU allows you to adjust suchthings as map appearance, navigation settings,and voice guidance volume.
Navigation SettingsThis menu allows you to change the followingoptions for the navigation system.
Restore Default SettingsThis feature will automatically reset the system tothe default values.
To restore the default settings, do the following:
1. Touch the Restore Default Settings screenbutton.
2. Touch Enter.3. Touch Return to exit this menu.
243Information Provided by:
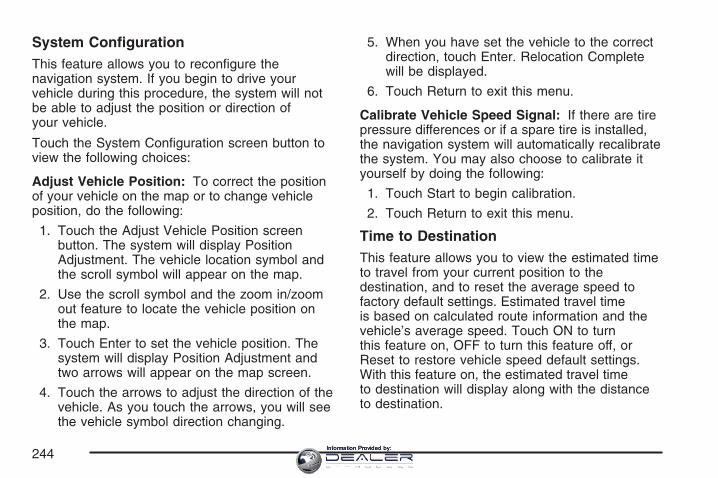
System ConfigurationThis feature allows you to reconfigure thenavigation system. If you begin to drive yourvehicle during this procedure, the system will notbe able to adjust the position or direction ofyour vehicle.
Touch the System Configuration screen button toview the following choices:
Adjust Vehicle Position: To correct the positionof your vehicle on the map or to change vehicleposition, do the following:
1. Touch the Adjust Vehicle Position screenbutton. The system will display PositionAdjustment. The vehicle location symbol andthe scroll symbol will appear on the map.
2. Use the scroll symbol and the zoom in/zoomout feature to locate the vehicle position onthe map.
3. Touch Enter to set the vehicle position. Thesystem will display Position Adjustment andtwo arrows will appear on the map screen.
4. Touch the arrows to adjust the direction of thevehicle. As you touch the arrows, you will seethe vehicle symbol direction changing.
5. When you have set the vehicle to the correctdirection, touch Enter. Relocation Completewill be displayed.
6. Touch Return to exit this menu.
Calibrate Vehicle Speed Signal: If there are tirepressure differences or if a spare tire is installed,the navigation system will automatically recalibratethe system. You may also choose to calibrate ityourself by doing the following:
1. Touch Start to begin calibration.
2. Touch Return to exit this menu.
Time to DestinationThis feature allows you to view the estimated timeto travel from your current position to thedestination, and to reset the average speed tofactory default settings. Estimated travel timeis based on calculated route information and thevehicle’s average speed. Touch ON to turnthis feature on, OFF to turn this feature off, orReset to restore vehicle speed default settings.With this feature on, the estimated travel timeto destination will display along with the distanceto destination.
244Information Provided by:
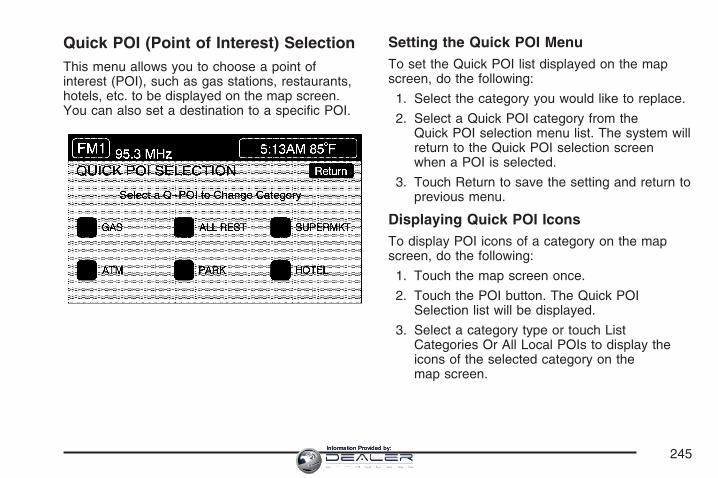
Quick POI (Point of Interest) SelectionThis menu allows you to choose a point ofinterest (POI), such as gas stations, restaurants,hotels, etc. to be displayed on the map screen.You can also set a destination to a specific POI.
Setting the Quick POI MenuTo set the Quick POI list displayed on the mapscreen, do the following:
1. Select the category you would like to replace.
2. Select a Quick POI category from theQuick POI selection menu list. The system willreturn to the Quick POI selection screenwhen a POI is selected.
3. Touch Return to save the setting and return toprevious menu.
Displaying Quick POI IconsTo display POI icons of a category on the mapscreen, do the following:
1. Touch the map screen once.
2. Touch the POI button. The Quick POISelection list will be displayed.
3. Select a category type or touch ListCategories Or All Local POIs to display theicons of the selected category on themap screen.
245Information Provided by:
Removing Quick POI IconsTo remove POI icons from the map screen, do thefollowing:
1. Touch the map screen once.
2. Touch the POI OFF screen button. Thecurrent POI icons will be removed fromthe map screen.
Setting a Destination Using Quick POIThis feature will allow you to choose a POI as yourdestination. To set a destination using a POI, dothe following:
1. Touch the POI icon on the map screen thatyou wish to set as a destination.The selected icon will be surrounded by ablinking box, and the name of the icon will bedisplayed. You may also touch INFO toview the POI name, address, city, and phonenumber, if available.
2. Touch the ENT DEST screen button.If a final destination has already been entered,you can add the POI as a waypoint. SeeEdit Waypoint on page 254 for moreinformation.
3. Touch Enter to start planning your route.
4. To start route guidance, touch Start or begindriving the vehicle. Route guidance willautomatically begin after a short distance.
If you wish to cancel the route you have just set,do the following:
1. Press the ROUTE hard key.
2. Touch the Route Preference screen button.
3. Touch the Cancel Route screen button.
4. Select YES to cancel or NO to continue.
246Information Provided by:

Guidance AppearanceThis menu allows you to set the guidanceappearance screen options. This screen isdisplayed on the map while on a planned route.The current settings will appear as light blue.
Split Map: Select this feature to display theguidance screen on the map at all times.
Full Screen: Select this feature to display theguidance screen on the map when approaching amaneuver.
Turn List: Select this feature to have theguidance screen display several upcoming turns.Directional arrows, street name, and distanceto the next turn will be displayed. As you approachthe next turn, the system will display a closerview of the upcoming maneuver.
Arrow: Select this feature to have the guidancescreen display the next turn. A directionalarrow, street name, and distance to the turn willbe displayed. As you approach the turn, thesystem will display a closer view of the upcomingmaneuver.
2D: Select this feature to display the guidancescreen as a two-dimensional view.
3D: Select this feature to display the guidancescreen as a three-dimensional view.
247Information Provided by:
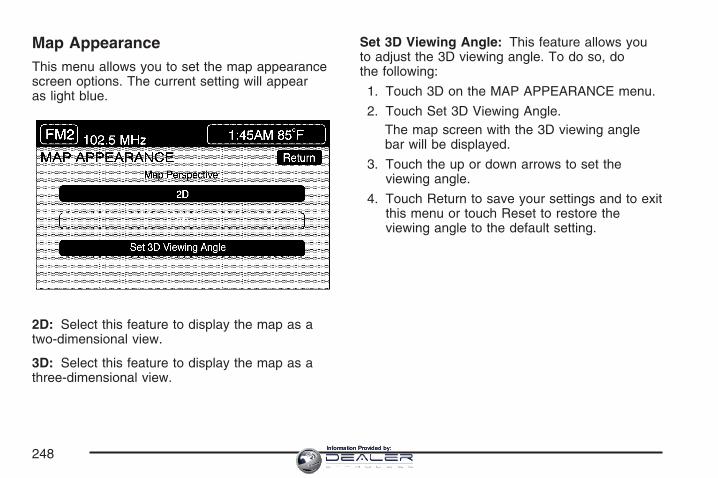
Map AppearanceThis menu allows you to set the map appearancescreen options. The current setting will appearas light blue.
2D: Select this feature to display the map as atwo-dimensional view.
3D: Select this feature to display the map as athree-dimensional view.
Set 3D Viewing Angle: This feature allows youto adjust the 3D viewing angle. To do so, dothe following:
1. Touch 3D on the MAP APPEARANCE menu.
2. Touch Set 3D Viewing Angle.The map screen with the 3D viewing anglebar will be displayed.
3. Touch the up or down arrows to set theviewing angle.
4. Touch Return to save your settings and to exitthis menu or touch Reset to restore theviewing angle to the default setting.
248Information Provided by:
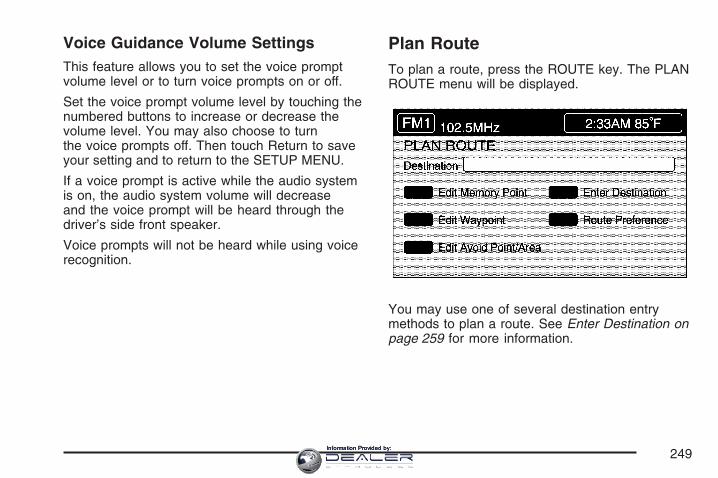
Voice Guidance Volume SettingsThis feature allows you to set the voice promptvolume level or to turn voice prompts on or off.
Set the voice prompt volume level by touching thenumbered buttons to increase or decrease thevolume level. You may also choose to turnthe voice prompts off. Then touch Return to saveyour setting and to return to the SETUP MENU.
If a voice prompt is active while the audio systemis on, the audio system volume will decreaseand the voice prompt will be heard through thedriver’s side front speaker.
Voice prompts will not be heard while using voicerecognition.
Plan RouteTo plan a route, press the ROUTE key. The PLANROUTE menu will be displayed.
You may use one of several destination entrymethods to plan a route. See Enter Destination onpage 259 for more information.
249Information Provided by:
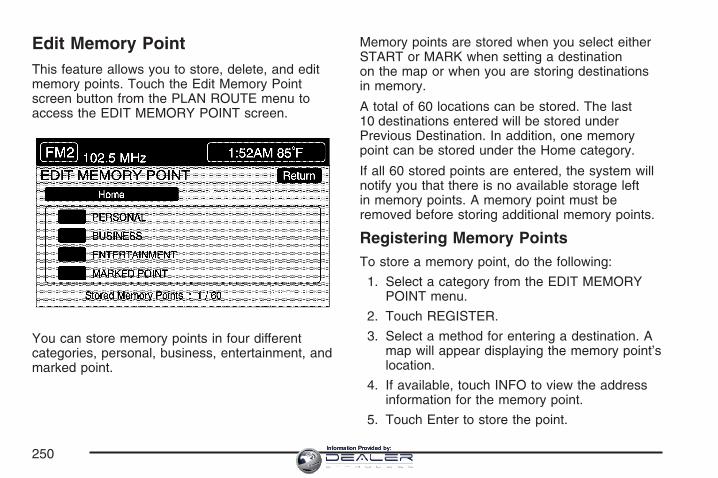
Edit Memory PointThis feature allows you to store, delete, and editmemory points. Touch the Edit Memory Pointscreen button from the PLAN ROUTE menu toaccess the EDIT MEMORY POINT screen.
You can store memory points in four differentcategories, personal, business, entertainment, andmarked point.
Memory points are stored when you select eitherSTART or MARK when setting a destinationon the map or when you are storing destinationsin memory.
A total of 60 locations can be stored. The last10 destinations entered will be stored underPrevious Destination. In addition, one memorypoint can be stored under the Home category.
If all 60 stored points are entered, the system willnotify you that there is no available storage leftin memory points. A memory point must beremoved before storing additional memory points.
Registering Memory PointsTo store a memory point, do the following:
1. Select a category from the EDIT MEMORYPOINT menu.
2. Touch REGISTER.
3. Select a method for entering a destination. Amap will appear displaying the memory point’slocation.
4. If available, touch INFO to view the addressinformation for the memory point.
5. Touch Enter to store the point.
250Information Provided by:
Editing Memory PointsThis feature allows you to edit the contents storedin memory. The following options are available:
Icon Editing of a Memory PointEach memory point is displayed with a defaulticon. To edit an icon, do the following:
1. Select the category of the memory point.
2. Select the item you want to edit.
3. Touch the icon. The EDIT MEMORY POINTicon screen will appear.
4. Touch the icon you would like to use. Thesystem will then return to the EDIT MEMORYPOINT menu.
5. Touch Return to go back to the previousscreen.
You will see the new memory point icon onthe map.
When selecting an icon, you can choose from18 different icons, three of which are sound icons.The same icon may be used for other memorypoints as well.
Name Editing of a Memory PointTo modify the name of a stored memory point, dothe following:
1. Select the category of the memory point.2. Select the item you want to edit.3. Touch the NAME screen button and use the
alpha keypad to edit the name. Names maycontain up to 15 alpha and/or numericcharacters.
4. Touch Return to go to the previous screen.
Moving Memory PointsTo move a memory point from one category toanother, do the following:
1. Select the category of the memory point.2. Select the memory point you want to edit.3. Touch CATEGORY. A list of categories will
appear. The current category for the item willbe highlighted and cannot be selected.
4. Touch the screen button for the category youwant the memory point placed in. A pop-upwindow will appear displaying the changein category.
5. Touch Return to go back to the previousscreen.
251Information Provided by:
Adjusting a Memory PointTo relocate a memory point’s location, do thefollowing:
1. Select the category of the memory point.
2. Select the memory point you want to edit.
3. Touch POSITION. A map screen withthe position of this memory point will appear.
4. Touch anywhere on the screen to activate thescroll feature and relocate the memory point.See Maps on page 271.
5. Touch Enter to save the memory point’s newlocation.
6. Touch Return to go back to the previousscreen.
Changing the Phone Number of a MemoryPointTo edit or add the phone number of a memorypoint, do the following:
1. Select the category of the memory point.
2. Select the memory point you want to edit.
3. Touch PHONE and use the numeric keypadto edit or add the number.
4. Touch the RETURN button to take you backto the previous screen when you havefinished.
Deleting Single Memory PointsTo delete a single memory point, do the following:
1. Press the ROUTE key.
2. Touch EDIT MEMORY POINT.
3. Select the category of the memory point.
4. Touch DELETE.
5. Select the memory point you want to delete. Aconfirmation window will appear.
6. Touch YES to delete the memory point or NOto return to the previous menu.
7. Touch Return to go back to the previousscreen.
252Information Provided by:
Deleting All Memory PointsTo delete all of the memory points in a category,do the following:
1. Press the ROUTE key.
2. Touch EDIT MEMORY POINT.
3. Select the desired category.
4. Touch the DELETE ALL screen button. Aconfirmation window will appear.
5. Touch YES to delete the memory points orNO to return to the previous menu.
6. Touch Return to go back to the previousscreen.
Edit CategoryTo edit the name of a category, do the following:
1. Press the ROUTE key.
2. Touch EDIT MEMORY POINT.
3. Select the category you want to edit.
4. Touch the EDIT CATEGORY screen buttonand use the alpha keypad to edit thecategory name.The name can consist of up to 15 alphaand/or numeric characters.
5. Touch Return to go back to the previousscreen.
Marked PointA marked point is a memory point which has beenstored by selecting the MARK screen buttonwhile traveling on a planned route. You can alsouse the scroll feature to plan a destination onthe map after reaching the destination, orby moving a memory point to a marked pointcategory. See “Editing Memory Points” earlier inthis section for more information.
253Information Provided by:
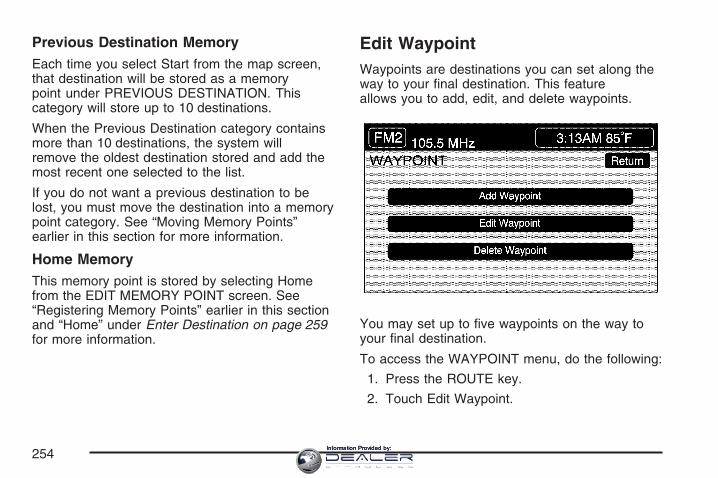
Previous Destination MemoryEach time you select Start from the map screen,that destination will be stored as a memorypoint under PREVIOUS DESTINATION. Thiscategory will store up to 10 destinations.
When the Previous Destination category containsmore than 10 destinations, the system willremove the oldest destination stored and add themost recent one selected to the list.
If you do not want a previous destination to belost, you must move the destination into a memorypoint category. See “Moving Memory Points”earlier in this section for more information.
Home MemoryThis memory point is stored by selecting Homefrom the EDIT MEMORY POINT screen. See“Registering Memory Points” earlier in this sectionand “Home” under Enter Destination on page 259for more information.
Edit WaypointWaypoints are destinations you can set along theway to your final destination. This featureallows you to add, edit, and delete waypoints.
You may set up to five waypoints on the way toyour final destination.
To access the WAYPOINT menu, do the following:
1. Press the ROUTE key.
2. Touch Edit Waypoint.
254Information Provided by:
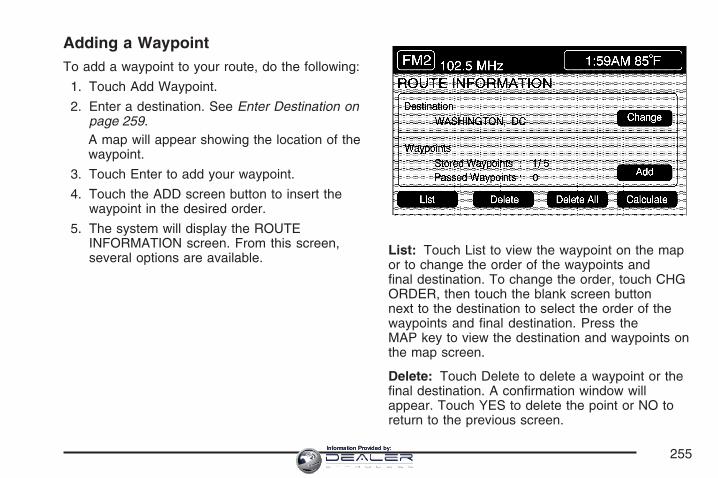
Adding a WaypointTo add a waypoint to your route, do the following:
1. Touch Add Waypoint.
2. Enter a destination. See Enter Destination onpage 259.A map will appear showing the location of thewaypoint.
3. Touch Enter to add your waypoint.
4. Touch the ADD screen button to insert thewaypoint in the desired order.
5. The system will display the ROUTEINFORMATION screen. From this screen,several options are available. List: Touch List to view the waypoint on the map
or to change the order of the waypoints andfinal destination. To change the order, touch CHGORDER, then touch the blank screen buttonnext to the destination to select the order of thewaypoints and final destination. Press theMAP key to view the destination and waypoints onthe map screen.
Delete: Touch Delete to delete a waypoint or thefinal destination. A confirmation window willappear. Touch YES to delete the point or NO toreturn to the previous screen.
255Information Provided by:
Delete All: Touch Delete All to delete all of thewaypoints and the final destination. A confirmationwindow will appear. Touch YES to delete allwaypoints or NO to return to the previous screen.
Change: Touch Change to change the finaldestination. Enter a destination. See EnterDestination on page 259.
Add: Touch Add to add additional waypoints.Refer to the steps for adding a waypointlisted previously in this section.
Calculate: Touch Calculate to begin routecalculation. This feature will only be available ifthe final destination has been set.
Editing a WaypointThis feature allows you to edit waypoints that havealready been set. To edit a waypoint, do thefollowing:
1. Touch Edit Waypoint.
2. Touch the MAP key to view the destinationlocation on the map screen.
3. Touch CHANGE ORDER to change the orderof the waypoints and the final destination.You can also use the map scroll to change awaypoint from one location to another.
Deleting a WaypointTo delete a waypoint from your route, do thefollowing:
1. Touch Delete Waypoint.
2. Select the waypoint you want to delete. Aconfirmation window will appear.
3. Touch YES to delete the waypoint or NO toreturn to the previous menu.
256Information Provided by:
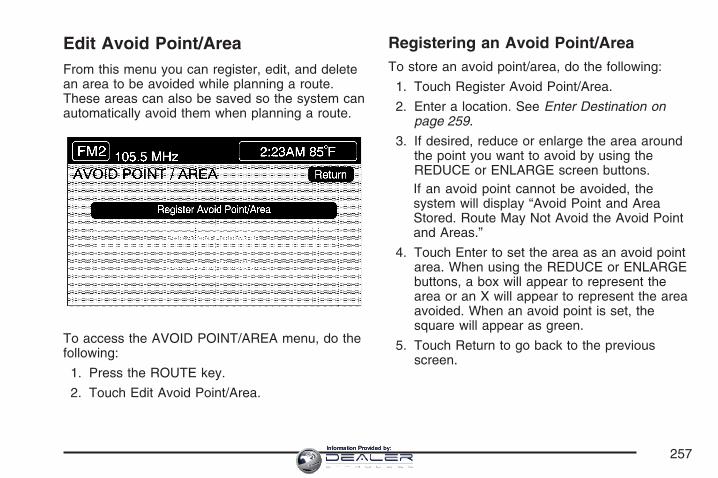
Edit Avoid Point/AreaFrom this menu you can register, edit, and deletean area to be avoided while planning a route.These areas can also be saved so the system canautomatically avoid them when planning a route.
To access the AVOID POINT/AREA menu, do thefollowing:
1. Press the ROUTE key.
2. Touch Edit Avoid Point/Area.
Registering an Avoid Point/AreaTo store an avoid point/area, do the following:
1. Touch Register Avoid Point/Area.
2. Enter a location. See Enter Destination onpage 259.
3. If desired, reduce or enlarge the area aroundthe point you want to avoid by using theREDUCE or ENLARGE screen buttons.If an avoid point cannot be avoided, thesystem will display “Avoid Point and AreaStored. Route May Not Avoid the Avoid Pointand Areas.”
4. Touch Enter to set the area as an avoid pointarea. When using the REDUCE or ENLARGEbuttons, a box will appear to represent thearea or an X will appear to represent the areaavoided. When an avoid point is set, thesquare will appear as green.
5. Touch Return to go back to the previousscreen.
257Information Provided by:
Editing an Avoid Point/AreaTo edit an avoid point/area, do the following:
1. Touch Edit Avoid Point/Area. A list of avoidedpoints will appear.
2. Select the avoided point/area you want tochange. A map of the avoided area willappear.
3. Use REDUCE or ENLARGE to edit theavoided point.
4. Touch Enter to set your new avoided area.The system will display “Area Adjusted.”
5. Touch Return to go back to the previousscreen.
Deleting an Avoid Point/AreaTo delete an avoid point/area, do the following:
1. Touch Delete Avoid Point/Area. A list ofavoided points will appear.
2. Select the avoided point/area you want todelete.
3. The system will ask you to confirm yourselection. Touch Yes to delete the avoidpoint/area or No to cancel.If Yes is selected, the area will no longer beavoided when traveling on a planned route.
4. Touch Return to go back to the previousscreen.
258Information Provided by:
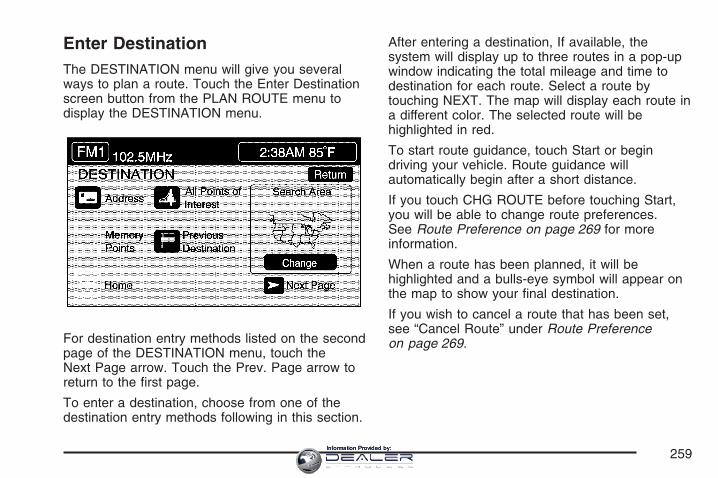
Enter DestinationThe DESTINATION menu will give you severalways to plan a route. Touch the Enter Destinationscreen button from the PLAN ROUTE menu todisplay the DESTINATION menu.
For destination entry methods listed on the secondpage of the DESTINATION menu, touch theNext Page arrow. Touch the Prev. Page arrow toreturn to the first page.
To enter a destination, choose from one of thedestination entry methods following in this section.
After entering a destination, If available, thesystem will display up to three routes in a pop-upwindow indicating the total mileage and time todestination for each route. Select a route bytouching NEXT. The map will display each route ina different color. The selected route will behighlighted in red.
To start route guidance, touch Start or begindriving your vehicle. Route guidance willautomatically begin after a short distance.
If you touch CHG ROUTE before touching Start,you will be able to change route preferences.See Route Preference on page 269 for moreinformation.
When a route has been planned, it will behighlighted and a bulls-eye symbol will appear onthe map to show your final destination.
If you wish to cancel a route that has been set,see “Cancel Route” under Route Preferenceon page 269.
259Information Provided by:
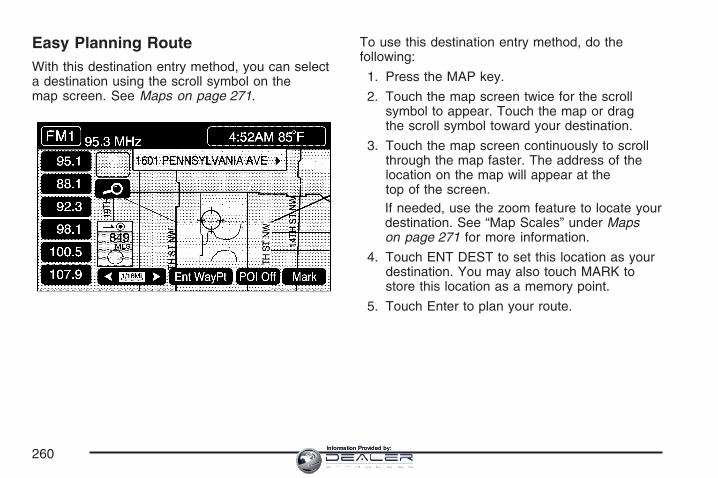
Easy Planning RouteWith this destination entry method, you can selecta destination using the scroll symbol on themap screen. See Maps on page 271.
To use this destination entry method, do thefollowing:
1. Press the MAP key.
2. Touch the map screen twice for the scrollsymbol to appear. Touch the map or dragthe scroll symbol toward your destination.
3. Touch the map screen continuously to scrollthrough the map faster. The address of thelocation on the map will appear at thetop of the screen.If needed, use the zoom feature to locate yourdestination. See “Map Scales” under Mapson page 271 for more information.
4. Touch ENT DEST to set this location as yourdestination. You may also touch MARK tostore this location as a memory point.
5. Touch Enter to plan your route.
260Information Provided by:
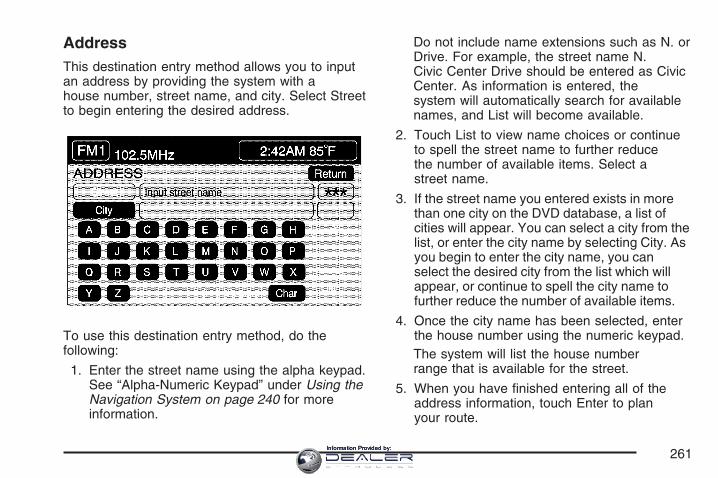
AddressThis destination entry method allows you to inputan address by providing the system with ahouse number, street name, and city. Select Streetto begin entering the desired address.
To use this destination entry method, do thefollowing:
1. Enter the street name using the alpha keypad.See “Alpha-Numeric Keypad” under Using theNavigation System on page 240 for moreinformation.
Do not include name extensions such as N. orDrive. For example, the street name N.Civic Center Drive should be entered as CivicCenter. As information is entered, thesystem will automatically search for availablenames, and List will become available.
2. Touch List to view name choices or continueto spell the street name to further reducethe number of available items. Select astreet name.
3. If the street name you entered exists in morethan one city on the DVD database, a list ofcities will appear. You can select a city from thelist, or enter the city name by selecting City. Asyou begin to enter the city name, you canselect the desired city from the list which willappear, or continue to spell the city name tofurther reduce the number of available items.
4. Once the city name has been selected, enterthe house number using the numeric keypad.The system will list the house numberrange that is available for the street.
5. When you have finished entering all of theaddress information, touch Enter to planyour route.
261Information Provided by:
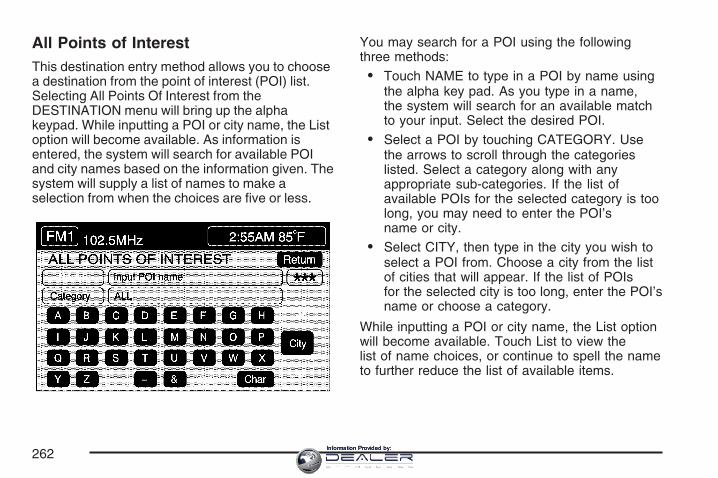
All Points of InterestThis destination entry method allows you to choosea destination from the point of interest (POI) list.Selecting All Points Of Interest from theDESTINATION menu will bring up the alphakeypad. While inputting a POI or city name, the Listoption will become available. As information isentered, the system will search for available POIand city names based on the information given. Thesystem will supply a list of names to make aselection from when the choices are five or less.
You may search for a POI using the followingthree methods:
• Touch NAME to type in a POI by name usingthe alpha key pad. As you type in a name,the system will search for an available matchto your input. Select the desired POI.
• Select a POI by touching CATEGORY. Usethe arrows to scroll through the categorieslisted. Select a category along with anyappropriate sub-categories. If the list ofavailable POIs for the selected category is toolong, you may need to enter the POI’sname or city.
• Select CITY, then type in the city you wish toselect a POI from. Choose a city from the listof cities that will appear. If the list of POIsfor the selected city is too long, enter the POI’sname or choose a category.
While inputting a POI or city name, the List optionwill become available. Touch List to view thelist of name choices, or continue to spell the nameto further reduce the list of available items.
262Information Provided by:
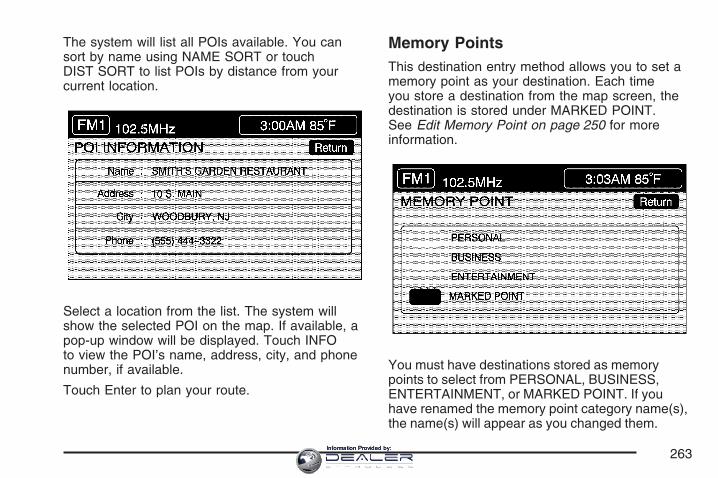
The system will list all POIs available. You cansort by name using NAME SORT or touchDIST SORT to list POIs by distance from yourcurrent location.
Select a location from the list. The system willshow the selected POI on the map. If available, apop-up window will be displayed. Touch INFOto view the POI’s name, address, city, and phonenumber, if available.
Touch Enter to plan your route.
Memory PointsThis destination entry method allows you to set amemory point as your destination. Each timeyou store a destination from the map screen, thedestination is stored under MARKED POINT.See Edit Memory Point on page 250 for moreinformation.
You must have destinations stored as memorypoints to select from PERSONAL, BUSINESS,ENTERTAINMENT, or MARKED POINT. If youhave renamed the memory point category name(s),the name(s) will appear as you changed them.
263Information Provided by:
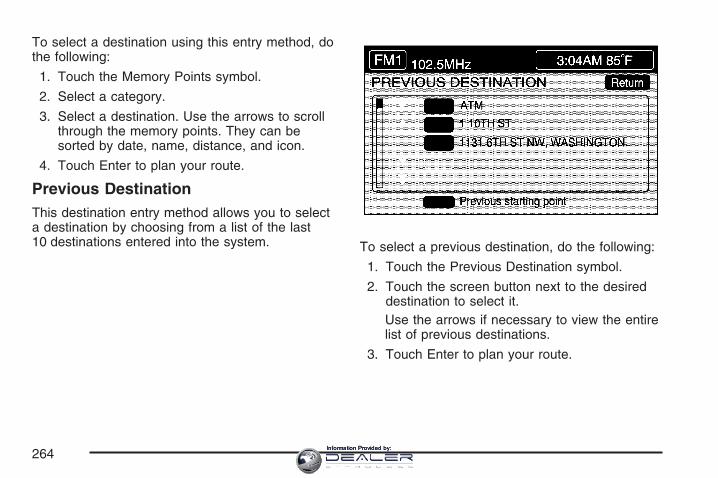
To select a destination using this entry method, dothe following:
1. Touch the Memory Points symbol.
2. Select a category.
3. Select a destination. Use the arrows to scrollthrough the memory points. They can besorted by date, name, distance, and icon.
4. Touch Enter to plan your route.
Previous DestinationThis destination entry method allows you to selecta destination by choosing from a list of the last10 destinations entered into the system. To select a previous destination, do the following:
1. Touch the Previous Destination symbol.
2. Touch the screen button next to the desireddestination to select it.Use the arrows if necessary to view the entirelist of previous destinations.
3. Touch Enter to plan your route.
264Information Provided by:
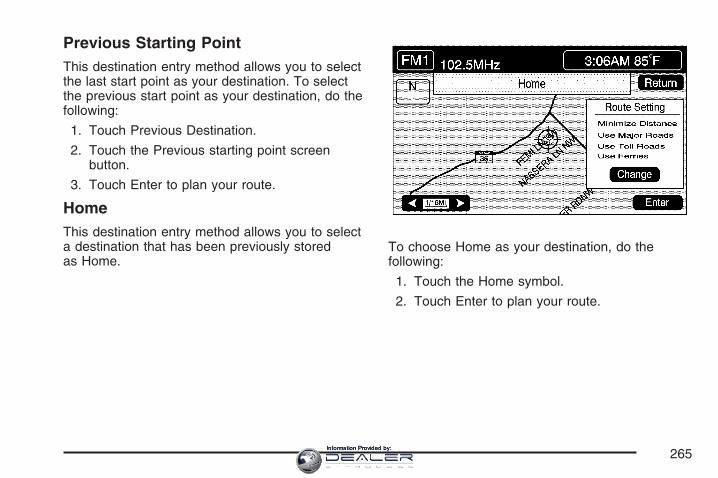
Previous Starting PointThis destination entry method allows you to selectthe last start point as your destination. To selectthe previous start point as your destination, do thefollowing:
1. Touch Previous Destination.
2. Touch the Previous starting point screenbutton.
3. Touch Enter to plan your route.
HomeThis destination entry method allows you to selecta destination that has been previously storedas Home.
To choose Home as your destination, do thefollowing:
1. Touch the Home symbol.
2. Touch Enter to plan your route.
265Information Provided by:
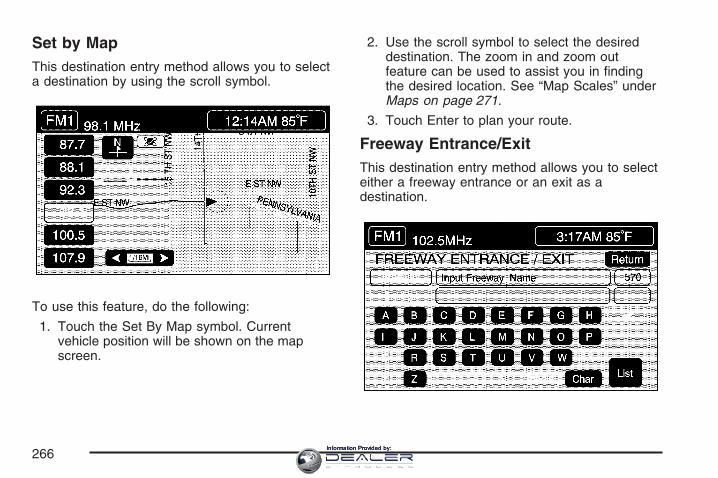
Set by MapThis destination entry method allows you to selecta destination by using the scroll symbol.
To use this feature, do the following:
1. Touch the Set By Map symbol. Currentvehicle position will be shown on the mapscreen.
2. Use the scroll symbol to select the desireddestination. The zoom in and zoom outfeature can be used to assist you in findingthe desired location. See “Map Scales” underMaps on page 271.
3. Touch Enter to plan your route.
Freeway Entrance/ExitThis destination entry method allows you to selecteither a freeway entrance or an exit as adestination.
266Information Provided by:
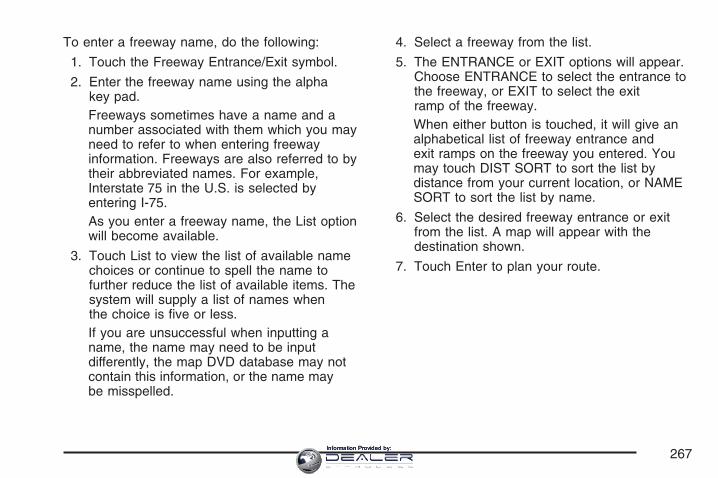
To enter a freeway name, do the following:
1. Touch the Freeway Entrance/Exit symbol.
2. Enter the freeway name using the alphakey pad.Freeways sometimes have a name and anumber associated with them which you mayneed to refer to when entering freewayinformation. Freeways are also referred to bytheir abbreviated names. For example,Interstate 75 in the U.S. is selected byentering I-75.As you enter a freeway name, the List optionwill become available.
3. Touch List to view the list of available namechoices or continue to spell the name tofurther reduce the list of available items. Thesystem will supply a list of names whenthe choice is five or less.If you are unsuccessful when inputting aname, the name may need to be inputdifferently, the map DVD database may notcontain this information, or the name maybe misspelled.
4. Select a freeway from the list.
5. The ENTRANCE or EXIT options will appear.Choose ENTRANCE to select the entrance tothe freeway, or EXIT to select the exitramp of the freeway.When either button is touched, it will give analphabetical list of freeway entrance andexit ramps on the freeway you entered. Youmay touch DIST SORT to sort the list bydistance from your current location, or NAMESORT to sort the list by name.
6. Select the desired freeway entrance or exitfrom the list. A map will appear with thedestination shown.
7. Touch Enter to plan your route.
267Information Provided by:
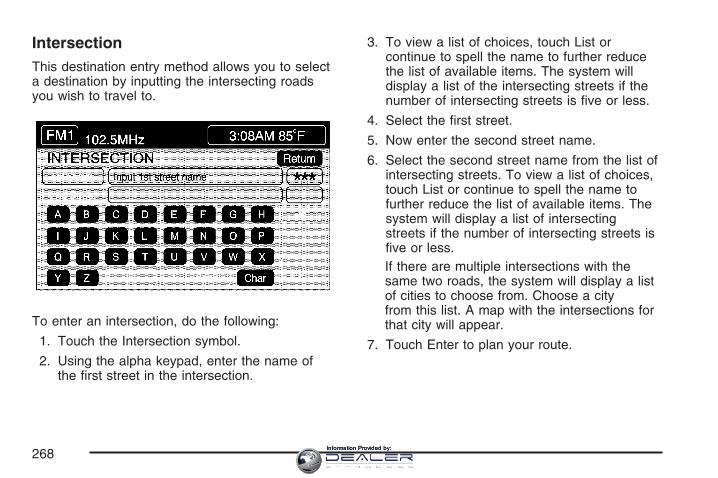
IntersectionThis destination entry method allows you to selecta destination by inputting the intersecting roadsyou wish to travel to.
To enter an intersection, do the following:
1. Touch the Intersection symbol.
2. Using the alpha keypad, enter the name ofthe first street in the intersection.
3. To view a list of choices, touch List orcontinue to spell the name to further reducethe list of available items. The system willdisplay a list of the intersecting streets if thenumber of intersecting streets is five or less.
4. Select the first street.
5. Now enter the second street name.
6. Select the second street name from the list ofintersecting streets. To view a list of choices,touch List or continue to spell the name tofurther reduce the list of available items. Thesystem will display a list of intersectingstreets if the number of intersecting streets isfive or less.If there are multiple intersections with thesame two roads, the system will display a listof cities to choose from. Choose a cityfrom this list. A map with the intersections forthat city will appear.
7. Touch Enter to plan your route.
268Information Provided by:
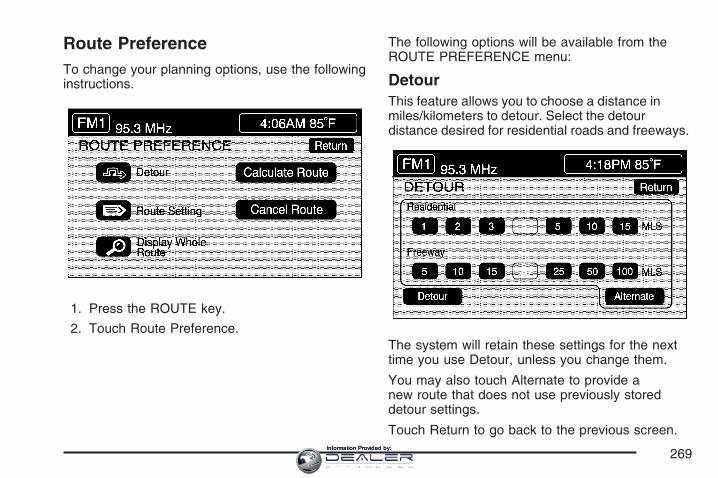
Route PreferenceTo change your planning options, use the followinginstructions.
1. Press the ROUTE key.
2. Touch Route Preference.
The following options will be available from theROUTE PREFERENCE menu:
DetourThis feature allows you to choose a distance inmiles/kilometers to detour. Select the detourdistance desired for residential roads and freeways.
The system will retain these settings for the nexttime you use Detour, unless you change them.
You may also touch Alternate to provide anew route that does not use previously storeddetour settings.
Touch Return to go back to the previous screen.
269Information Provided by:
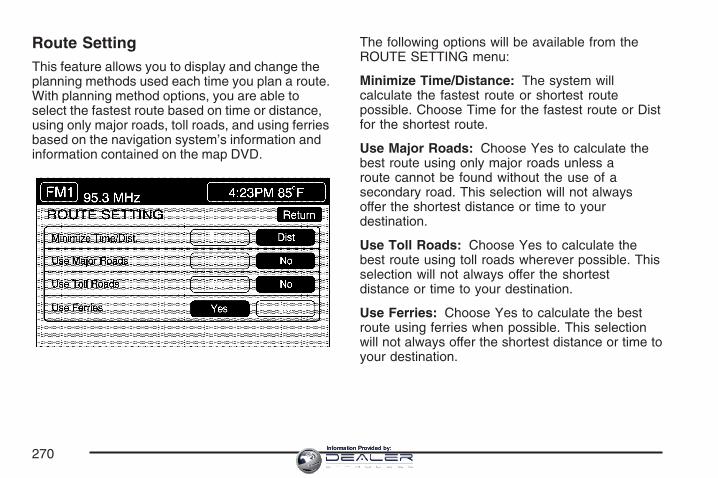
Route SettingThis feature allows you to display and change theplanning methods used each time you plan a route.With planning method options, you are able toselect the fastest route based on time or distance,using only major roads, toll roads, and using ferriesbased on the navigation system’s information andinformation contained on the map DVD.
The following options will be available from theROUTE SETTING menu:
Minimize Time/Distance: The system willcalculate the fastest route or shortest routepossible. Choose Time for the fastest route or Distfor the shortest route.
Use Major Roads: Choose Yes to calculate thebest route using only major roads unless aroute cannot be found without the use of asecondary road. This selection will not alwaysoffer the shortest distance or time to yourdestination.
Use Toll Roads: Choose Yes to calculate thebest route using toll roads wherever possible. Thisselection will not always offer the shortestdistance or time to your destination.
Use Ferries: Choose Yes to calculate the bestroute using ferries when possible. This selectionwill not always offer the shortest distance or time toyour destination.
270Information Provided by:
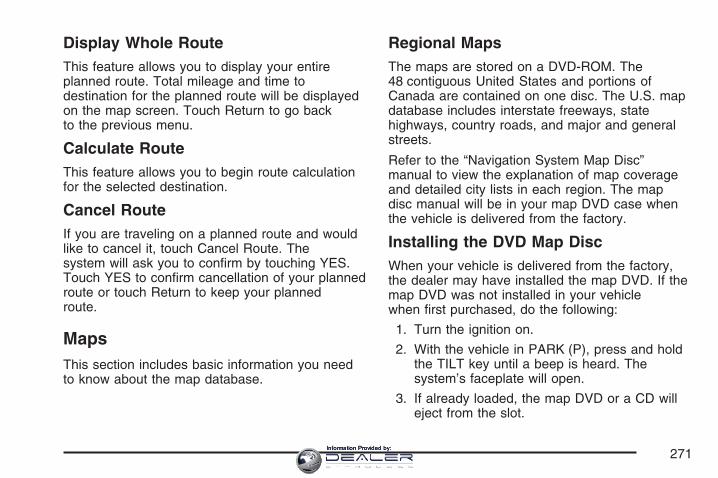
Display Whole RouteThis feature allows you to display your entireplanned route. Total mileage and time todestination for the planned route will be displayedon the map screen. Touch Return to go backto the previous menu.
Calculate RouteThis feature allows you to begin route calculationfor the selected destination.
Cancel RouteIf you are traveling on a planned route and wouldlike to cancel it, touch Cancel Route. Thesystem will ask you to confirm by touching YES.Touch YES to confirm cancellation of your plannedroute or touch Return to keep your plannedroute.
MapsThis section includes basic information you needto know about the map database.
Regional MapsThe maps are stored on a DVD-ROM. The48 contiguous United States and portions ofCanada are contained on one disc. The U.S. mapdatabase includes interstate freeways, statehighways, country roads, and major and generalstreets.
Refer to the “Navigation System Map Disc”manual to view the explanation of map coverageand detailed city lists in each region. The mapdisc manual will be in your map DVD case whenthe vehicle is delivered from the factory.
Installing the DVD Map DiscWhen your vehicle is delivered from the factory,the dealer may have installed the map DVD. If themap DVD was not installed in your vehiclewhen first purchased, do the following:
1. Turn the ignition on.
2. With the vehicle in PARK (P), press and holdthe TILT key until a beep is heard. Thesystem’s faceplate will open.
3. If already loaded, the map DVD or a CD willeject from the slot.
271Information Provided by:
4. Load the map DVD into the slot by inserting itpartway. The system will pull it in.
5. Press and release the TILT key to close thefaceplate.
Notice: Shifting out of PARK (P) with thesystem’s faceplate open will cause thefaceplate to close automatically. This couldcause damage to a CD, DVD or the system if itis partially loaded. Before shifting out ofPARK (P), make sure that the DVD or CD isloaded properly. The vehicle must be shiftedback into PARK (P) to close the faceplate.
Once the map DVD is inserted correctly, you willhave the following two choices:
• LANGUAGE
• I AGREE
You can change the language at this time. See“Language” under Navigation Audio Systemon page 285 for more information on choosing alanguage. Once a language has been selected,touch I AGREE to plan a route. The map willappear showing your current vehicle position.
Ejecting the DVD Map DiscWhen the DVD map disc is not loaded, you willnot be able to use the navigation portion ofthe system.
1. Turn the ignition on.
2. With the vehicle in PARK (P), press and holdthe TILT key until a beep is heard. Thesystem’s faceplate will open.
3. The map DVD will eject from the slot. Pull thedisc out.
4. Press and release the TILT key to close thefaceplate.
Notice: Shifting out of PARK (P) with thesystem’s faceplate open will cause thefaceplate to close automatically. This couldcause damage to a CD, DVD or the system if itis partially loaded. Before shifting out ofPARK (P), make sure that the DVD or CD isloaded properly. The vehicle must be shiftedback into PARK (P) to close the faceplate.
272Information Provided by:
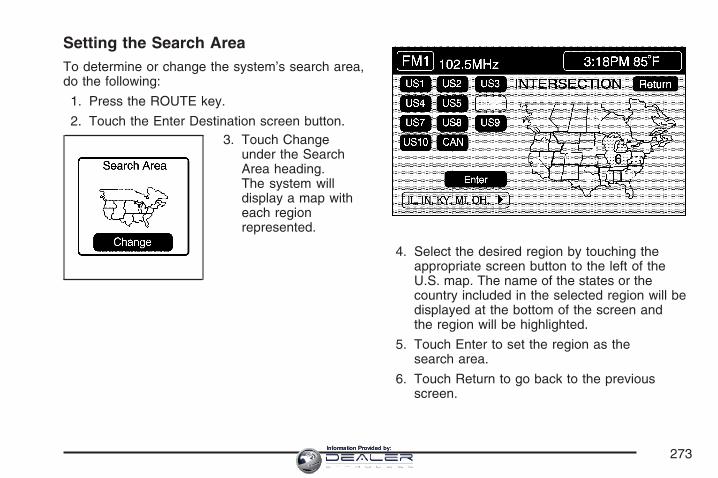
Setting the Search AreaTo determine or change the system’s search area,do the following:
1. Press the ROUTE key.
2. Touch the Enter Destination screen button.3. Touch Change
under the SearchArea heading.The system willdisplay a map witheach regionrepresented.
4. Select the desired region by touching theappropriate screen button to the left of theU.S. map. The name of the states or thecountry included in the selected region will bedisplayed at the bottom of the screen andthe region will be highlighted.
5. Touch Enter to set the region as thesearch area.
6. Touch Return to go back to the previousscreen.
273Information Provided by:
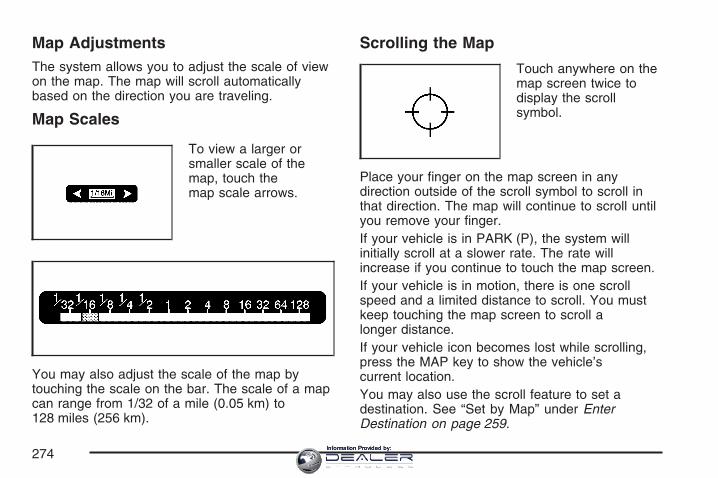
Map AdjustmentsThe system allows you to adjust the scale of viewon the map. The map will scroll automaticallybased on the direction you are traveling.
Map Scales
To view a larger orsmaller scale of themap, touch themap scale arrows.
You may also adjust the scale of the map bytouching the scale on the bar. The scale of a mapcan range from 1/32 of a mile (0.05 km) to128 miles (256 km).
Scrolling the Map
Touch anywhere on themap screen twice todisplay the scrollsymbol.
Place your finger on the map screen in anydirection outside of the scroll symbol to scroll inthat direction. The map will continue to scroll untilyou remove your finger.If your vehicle is in PARK (P), the system willinitially scroll at a slower rate. The rate willincrease if you continue to touch the map screen.If your vehicle is in motion, there is one scrollspeed and a limited distance to scroll. You mustkeep touching the map screen to scroll alonger distance.If your vehicle icon becomes lost while scrolling,press the MAP key to show the vehicle’scurrent location.You may also use the scroll feature to set adestination. See “Set by Map” under EnterDestination on page 259.
274Information Provided by:
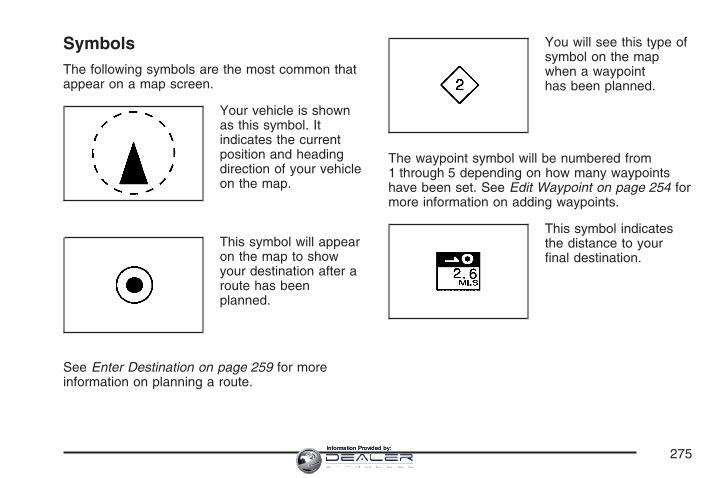
SymbolsThe following symbols are the most common thatappear on a map screen.
Your vehicle is shownas this symbol. Itindicates the currentposition and headingdirection of your vehicleon the map.
This symbol will appearon the map to showyour destination after aroute has beenplanned.
See Enter Destination on page 259 for moreinformation on planning a route.
You will see this type ofsymbol on the mapwhen a waypointhas been planned.
The waypoint symbol will be numbered from1 through 5 depending on how many waypointshave been set. See Edit Waypoint on page 254 formore information on adding waypoints.
This symbol indicatesthe distance to yourfinal destination.
275Information Provided by:
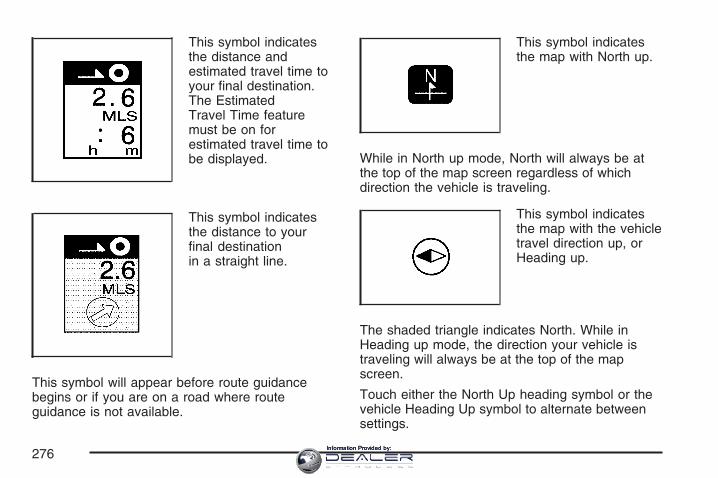
This symbol indicatesthe distance andestimated travel time toyour final destination.The EstimatedTravel Time featuremust be on forestimated travel time tobe displayed.
This symbol indicatesthe distance to yourfinal destinationin a straight line.
This symbol will appear before route guidancebegins or if you are on a road where routeguidance is not available.
This symbol indicatesthe map with North up.
While in North up mode, North will always be atthe top of the map screen regardless of whichdirection the vehicle is traveling.
This symbol indicatesthe map with the vehicletravel direction up, orHeading up.
The shaded triangle indicates North. While inHeading up mode, the direction your vehicle istraveling will always be at the top of the mapscreen.
Touch either the North Up heading symbol or thevehicle Heading Up symbol to alternate betweensettings.
276Information Provided by:
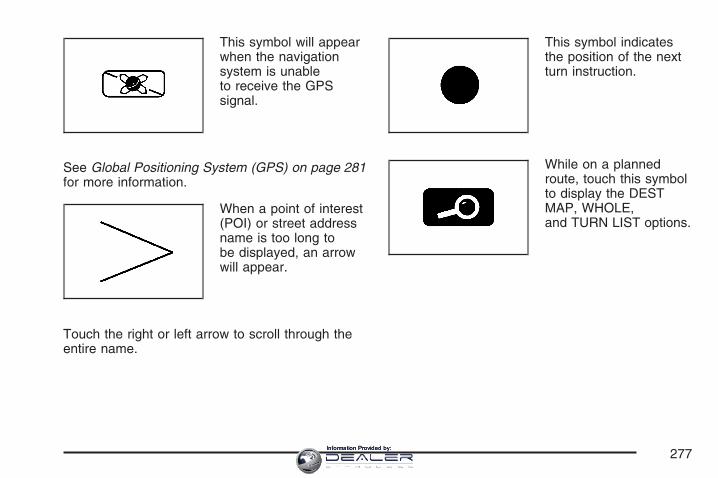
This symbol will appearwhen the navigationsystem is unableto receive the GPSsignal.
See Global Positioning System (GPS) on page 281for more information.
When a point of interest(POI) or street addressname is too long tobe displayed, an arrowwill appear.
Touch the right or left arrow to scroll through theentire name.
This symbol indicatesthe position of the nextturn instruction.
While on a plannedroute, touch this symbolto display the DESTMAP, WHOLE,and TURN LIST options.
277Information Provided by:
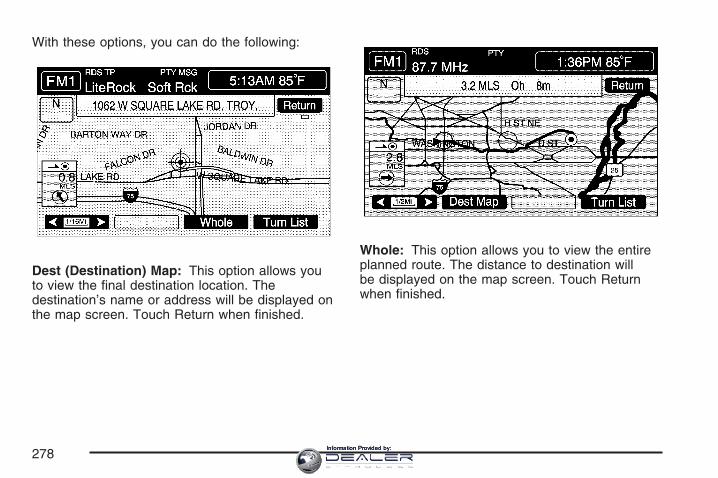
With these options, you can do the following:
Dest (Destination) Map: This option allows youto view the final destination location. Thedestination’s name or address will be displayed onthe map screen. Touch Return when finished.
Whole: This option allows you to view the entireplanned route. The distance to destination willbe displayed on the map screen. Touch Returnwhen finished.
278Information Provided by:
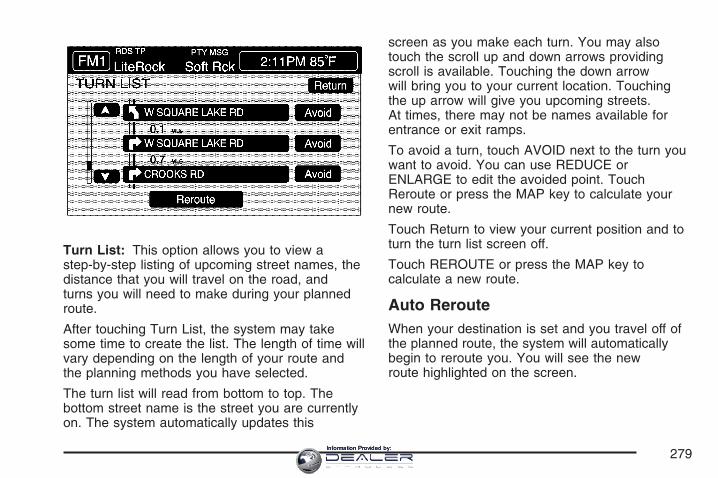
Turn List: This option allows you to view astep-by-step listing of upcoming street names, thedistance that you will travel on the road, andturns you will need to make during your plannedroute.
After touching Turn List, the system may takesome time to create the list. The length of time willvary depending on the length of your route andthe planning methods you have selected.
The turn list will read from bottom to top. Thebottom street name is the street you are currentlyon. The system automatically updates this
screen as you make each turn. You may alsotouch the scroll up and down arrows providingscroll is available. Touching the down arrowwill bring you to your current location. Touchingthe up arrow will give you upcoming streets.At times, there may not be names available forentrance or exit ramps.
To avoid a turn, touch AVOID next to the turn youwant to avoid. You can use REDUCE orENLARGE to edit the avoided point. TouchReroute or press the MAP key to calculate yournew route.
Touch Return to view your current position and toturn the turn list screen off.
Touch REROUTE or press the MAP key tocalculate a new route.
Auto RerouteWhen your destination is set and you travel off ofthe planned route, the system will automaticallybegin to reroute you. You will see the newroute highlighted on the screen.
279Information Provided by:
Traveling Across RegionsIf you plan to drive across several states, you mayhave to change the selected region to representthe area you are traveling to.
There are two ways you can plan a destinationwhen traveling across regions.
The following method is suggested and providesthe most route guidance and map displayfunctions:
1. Change the selected search area region whenyou get closer to the area you are traveling to.See “Setting the Search Area” under Mapson page 271.
2. Enter your destination and route settings. SeeEnter Destination on page 259 for moreinformation.
If you do not want to use the first method, keepyour currently selected search area regionand enter your destination. This method allowsyou only to select a destination from the easyplanning route method or from the All Points ofInterest (POI) categories with the “All SearchAreas” comment for US Only. For example, Tourist
is a category that features this comment. SeeEnter Destination on page 259 for moreinformation.
If you are traveling in or to Canada and you crossthe regional border, the only map scale viewsavailable are 4 mi, 8 mi, 31 mi, and 128 mi (8 km,16 km, 64 km and 256 km). Change the selectedsearch area region when you get closer to the areayou are traveling to. See “Setting the SearchArea” under Maps on page 271 for moreinformation.
Keyless Access SystemWhen the engine is started, Driver 1 or Driver 2will display on the screen. A message will notappear on the screen if the driver is unknown. Thenumber on the back of the transmitter correspondsto driver 1 or driver 2. The navigation systemcan store memory points for drivers 1 and2 individually. See Keyless Access System onpage 67 for more information.
280Information Provided by:
OnStar® SystemWhen using the OnStar® system, the audiosystem will be muted and the navigation voiceprompts will be disabled during the call. Thevolume of the OnStar® call can be adjusted byusing the steering wheel volume controls.See OnStar® System on page 107 for moreinformation.
Global Positioning System (GPS)The Navigation System determines the position ofyour vehicle by using satellite signals, variousvehicle signals, and map data.
At times, other interferences such as the satellitecondition, road configuration, the condition ofthe vehicle and/or other circumstances caninterfere with the Navigation’s ability to determinethe accurate position of the vehicle.
The GPS shows the current position of yourvehicle using signals sent by the GPS Satellites ofthe United States Department of Defense.When your vehicle is not receiving signals fromthe satellites, a symbol will appear on themap screen. Refer to Symbols on page 275.
This system may not be available or interferencemay occur if the following happens:
• Signal obstructions caused by tall buildings,large trucks, tunnels,
• objects located on top of the instrument panel,
• satellites will not send signals if they arebeing repaired or improved,
• after-market glass tinting has been applied tothe vehicle’s windows.
Notice: Do not apply after-market glass tintingto the vehicle’s windows. Glass tinting willinterfere with the system’s ability to receiveGPS signals and cause the system tomalfunction. You might have to replace thewindow to correct the problem. This would notbe covered by your warranty.
For more information if you are experiencing aproblem, see If the System Needs Serviceon page 283 and Problems with Route Guidanceon page 283.
281Information Provided by:

Vehicle PositioningAt times, the position of the vehicle on the mapmay be inaccurate due to one or more of thefollowing reasons:
• The road system has changed.
• The vehicle is driving on slippery roadsurfaces such as in sand, gravel, and/or snow.
• The vehicle is traveling on winding roads.
• The vehicle is on a long straight road.
• The vehicle is approaching a tall building or alarge vehicle.
• The surface streets run parallel to a freeway.
• The vehicle has just been transferred by avehicle carrier or a ferry.
• The current position calibration is setincorrectly.
• The vehicle is traveling at high speed.
• The vehicle changes directions more thanonce, or when the vehicle is turning on aturn table in a parking lot.
• The vehicle is entering and/or exiting aparking lot, garage, or a lot with a roof.
• The GPS signal is not received.
• A roof carrier is installed on your vehicle.
• The vehicle is being driven with tire chains.
• The tires are replaced.
• The tire pressure for your tires is incorrect.
• The tires are worn.
• The first time the map DVD is inserted.
• The battery is disconnected for several days.
• The vehicle is driving in heavy traffic wheredriving is at low speeds, and the vehicle isstopped and started repeatedly.
If you experience problems with your system, seeyour dealer.
282Information Provided by:
Problems with Route GuidanceInappropriate route guidance may occur under oneor more of the following conditions:
• You have not turned onto the road indicated.
• Route guidance may not be availablewhen using automatic rerouting for the nextright or left turn.
• The route may not be changed when usingautomatic rerouting.
• There is no route guidance when turning at anintersection.
• Plural names of places may be announcedoccasionally.
• It may take a long time to operate automaticrerouting during high-speed driving.
• Automatic rerouting may display a routereturning to the set waypoint if you are headingfor a destination without passing through aset waypoint.
• The route prohibits the entry of a vehicle dueto a regulation by time or season or anyother regulation which may be given.
• Some routes may not be searched.
• The route to the destination may not beshown if there are new roads, if roadshave recently changed, or if certain roads arenot listed on the map DVD. See OrderingMap DVDs on page 284.
To recalibrate the vehicle’s position on the map,see your dealer.
If the System Needs ServiceIf your system needs service and you havefollowed the steps listed here and still areexperiencing problems, see your dealer forassistance.
283Information Provided by:
Ordering Map DVDsYou will receive two free DVD map disc updateswith the purchase of your new vehicle. Updatesare necessary to make sure that your vehicle’snavigation system has the most accurateinformation available about streets/roads, points ofinterest, and business locations.
The updates are provided by the GM Nav DiscCenter at the first and second anniversary dates ofyour vehicle’s delivery date. About four to six weeksbefore those anniversary dates, you will receive apost card from the GM Nav Disc Center remindingyou that a free update is available. The center willrequest confirmation of your mailing address eitherby having you contact the toll-free number,1–877–NAV–DISC (1–877–628–3472), or thecenter’s website, www.gmnavdisc.com. Afterverifying your address you should receive theupdated disc in about two weeks. After receivingthe updated disc, replace the old disc in thenavigation system. See “Installing the DVD MapDisc” and “Ejecting the DVD Map Disc” under Mapson page 271. Dispose of the old disc to avoidconfusion about which disc is the most current.
If you have any questions about the operation ofthe navigation system or the update process,call the GM Nav Disc Center or go to the center’swebsite. If you need any future updates or areplacement disc, because the current disc is lost,damaged, or needs to be updated, call the GMNav Disc Center or order a new disc online.To order a disc, have your Vehicle IdentificationNumber (VIN) available. This helps the centermake sure you receive the correct and most up todate DVD map disc for your vehicle. SeeVehicle Identification Number (VIN) on page 451for more information.
Database Coverage ExplanationsCoverage areas vary with respect to the level ofmap detail available for any given area. Someareas will feature greater levels of detail thanothers. If this happens, it does not mean there is aproblem with the system. As the map DVD isupdated, more detail may become available forareas which previously had limited detail. SeeOrdering Map DVDs on page 284.
284Information Provided by:
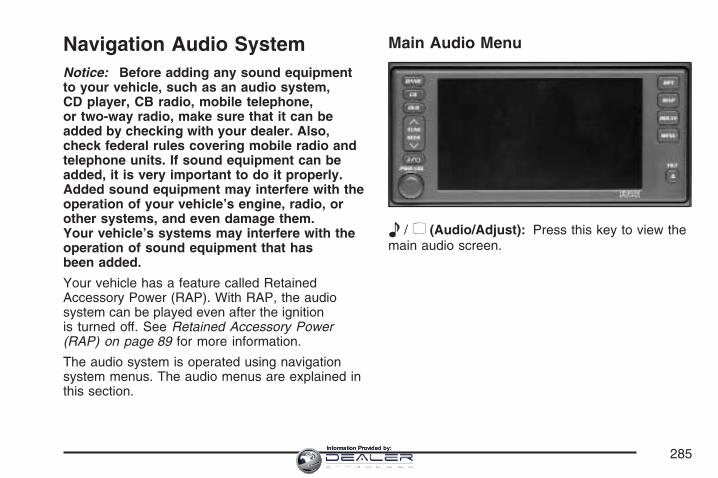
Navigation Audio SystemNotice: Before adding any sound equipmentto your vehicle, such as an audio system,CD player, CB radio, mobile telephone,or two-way radio, make sure that it can beadded by checking with your dealer. Also,check federal rules covering mobile radio andtelephone units. If sound equipment can beadded, it is very important to do it properly.Added sound equipment may interfere with theoperation of your vehicle’s engine, radio, orother systems, and even damage them.Your vehicle’s systems may interfere with theoperation of sound equipment that hasbeen added.
Your vehicle has a feature called RetainedAccessory Power (RAP). With RAP, the audiosystem can be played even after the ignitionis turned off. See Retained Accessory Power(RAP) on page 89 for more information.
The audio system is operated using navigationsystem menus. The audio menus are explained inthis section.
Main Audio Menu
e/ z (Audio/Adjust): Press this key to view themain audio screen.
285Information Provided by:
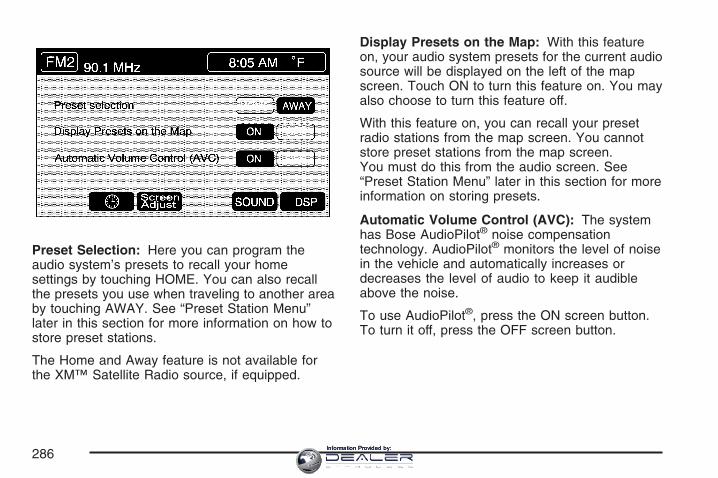
Preset Selection: Here you can program theaudio system’s presets to recall your homesettings by touching HOME. You can also recallthe presets you use when traveling to another areaby touching AWAY. See “Preset Station Menu”later in this section for more information on how tostore preset stations.
The Home and Away feature is not available forthe XM™ Satellite Radio source, if equipped.
Display Presets on the Map: With this featureon, your audio system presets for the current audiosource will be displayed on the left of the mapscreen. Touch ON to turn this feature on. You mayalso choose to turn this feature off.
With this feature on, you can recall your presetradio stations from the map screen. You cannotstore preset stations from the map screen.You must do this from the audio screen. See“Preset Station Menu” later in this section for moreinformation on storing presets.
Automatic Volume Control (AVC): The systemhas Bose AudioPilot® noise compensationtechnology. AudioPilot® monitors the level of noisein the vehicle and automatically increases ordecreases the level of audio to keep it audibleabove the noise.
To use AudioPilot®, press the ON screen button.To turn it off, press the OFF screen button.
286Information Provided by:

This feature is most effective at lower volumesettings where background noise can affect howwell you hear the music being played through yourvehicle’s audio system. At higher volumesettings, where the music is much louder than thebackground noise, there may be little or noadjustments by AudioPilot®. For additionalinformation on AudioPilot®, please visitwww.bose.com.
8 (Clock): Touch this screen button to get to theCLOCK ADJUST menu. See “Clock AdjustMenu” later in this section for more information.
SCREEN ADJUST: To adjust the brightnessor contrast of the screen, touch SCREEN ADJUSTto display the screen adjust menu. See “ScreenAdjust Menu” later in this section for moreinformation.
SOUND: Touch this screen button to access theSound menu. See “Sound Menu” later in thissection for more information.
DSP (Digital Signal Processing): Touch thisscreen button to access the DSP menu. See“Adjusting the Speakers” later in this section formore information.
Clock Adjust Menu
The following options are available fromthis menu:
HOUR/MIN.: Touch the up or down arrows toincrease or decrease the hour or minutes. If youtouch and hold one of the arrows, the numbers willadvance quickly.
12H/24H: Touch 12H to set the clock in standardtime or 24H to set the clock in military time.
287Information Provided by:
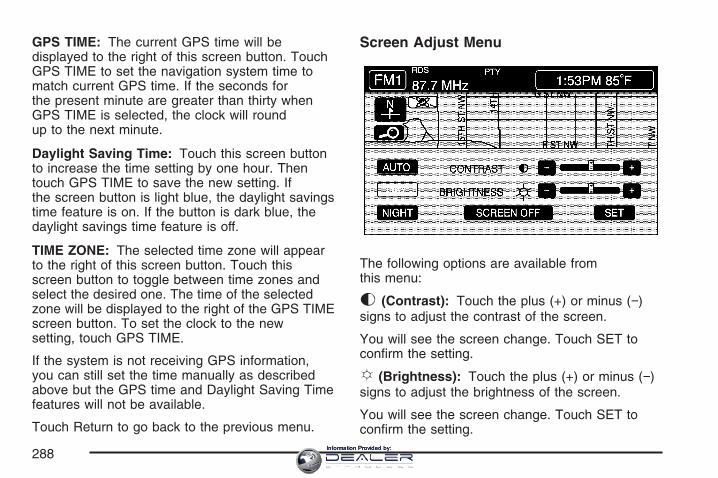
GPS TIME: The current GPS time will bedisplayed to the right of this screen button. TouchGPS TIME to set the navigation system time tomatch current GPS time. If the seconds forthe present minute are greater than thirty whenGPS TIME is selected, the clock will roundup to the next minute.
Daylight Saving Time: Touch this screen buttonto increase the time setting by one hour. Thentouch GPS TIME to save the new setting. Ifthe screen button is light blue, the daylight savingstime feature is on. If the button is dark blue, thedaylight savings time feature is off.
TIME ZONE: The selected time zone will appearto the right of this screen button. Touch thisscreen button to toggle between time zones andselect the desired one. The time of the selectedzone will be displayed to the right of the GPS TIMEscreen button. To set the clock to the newsetting, touch GPS TIME.
If the system is not receiving GPS information,you can still set the time manually as describedabove but the GPS time and Daylight Saving Timefeatures will not be available.
Touch Return to go back to the previous menu.
Screen Adjust Menu
The following options are available fromthis menu:
K (Contrast): Touch the plus (+) or minus (−)signs to adjust the contrast of the screen.
You will see the screen change. Touch SET toconfirm the setting.
! (Brightness): Touch the plus (+) or minus (−)signs to adjust the brightness of the screen.
You will see the screen change. Touch SET toconfirm the setting.
288Information Provided by:
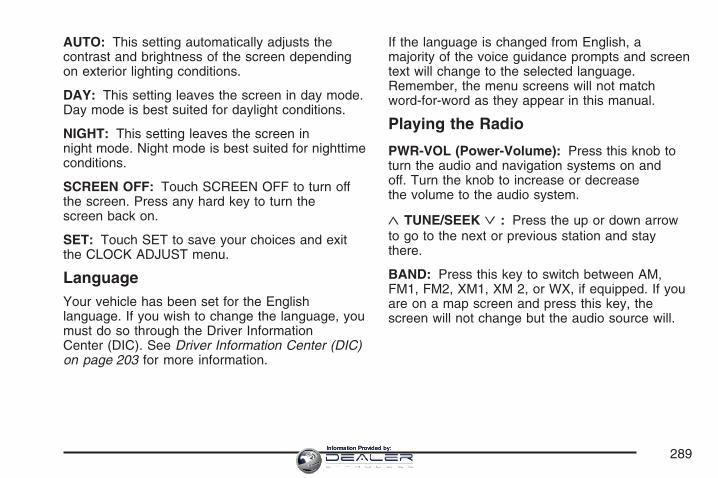
AUTO: This setting automatically adjusts thecontrast and brightness of the screen dependingon exterior lighting conditions.
DAY: This setting leaves the screen in day mode.Day mode is best suited for daylight conditions.
NIGHT: This setting leaves the screen innight mode. Night mode is best suited for nighttimeconditions.
SCREEN OFF: Touch SCREEN OFF to turn offthe screen. Press any hard key to turn thescreen back on.
SET: Touch SET to save your choices and exitthe CLOCK ADJUST menu.
LanguageYour vehicle has been set for the Englishlanguage. If you wish to change the language, youmust do so through the Driver InformationCenter (DIC). See Driver Information Center (DIC)on page 203 for more information.
If the language is changed from English, amajority of the voice guidance prompts and screentext will change to the selected language.Remember, the menu screens will not matchword-for-word as they appear in this manual.
Playing the Radio
PWR-VOL (Power-Volume): Press this knob toturn the audio and navigation systems on andoff. Turn the knob to increase or decreasethe volume to the audio system.
«TUNE/SEEK ª: Press the up or down arrowto go to the next or previous station and staythere.
BAND: Press this key to switch between AM,FM1, FM2, XM1, XM 2, or WX, if equipped. If youare on a map screen and press this key, thescreen will not change but the audio source will.
289Information Provided by:
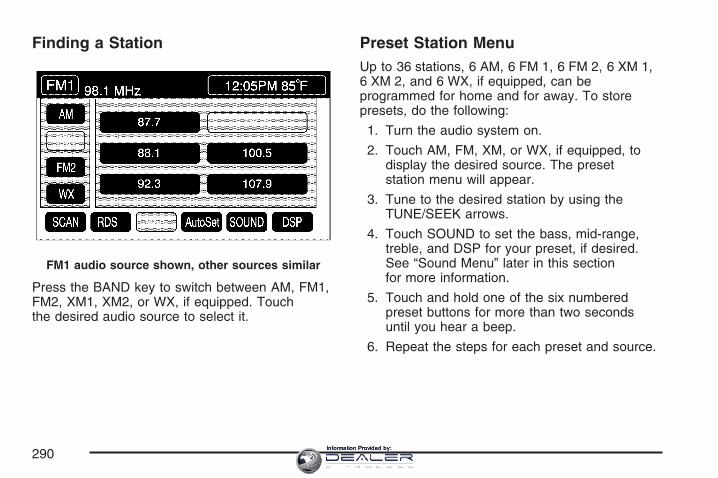
Finding a Station
Press the BAND key to switch between AM, FM1,FM2, XM1, XM2, or WX, if equipped. Touchthe desired audio source to select it.
Preset Station MenuUp to 36 stations, 6 AM, 6 FM 1, 6 FM 2, 6 XM 1,6 XM 2, and 6 WX, if equipped, can beprogrammed for home and for away. To storepresets, do the following:
1. Turn the audio system on.
2. Touch AM, FM, XM, or WX, if equipped, todisplay the desired source. The presetstation menu will appear.
3. Tune to the desired station by using theTUNE/SEEK arrows.
4. Touch SOUND to set the bass, mid-range,treble, and DSP for your preset, if desired.See “Sound Menu” later in this sectionfor more information.
5. Touch and hold one of the six numberedpreset buttons for more than two secondsuntil you hear a beep.
6. Repeat the steps for each preset and source.
FM1 audio source shown, other sources similar
290Information Provided by:
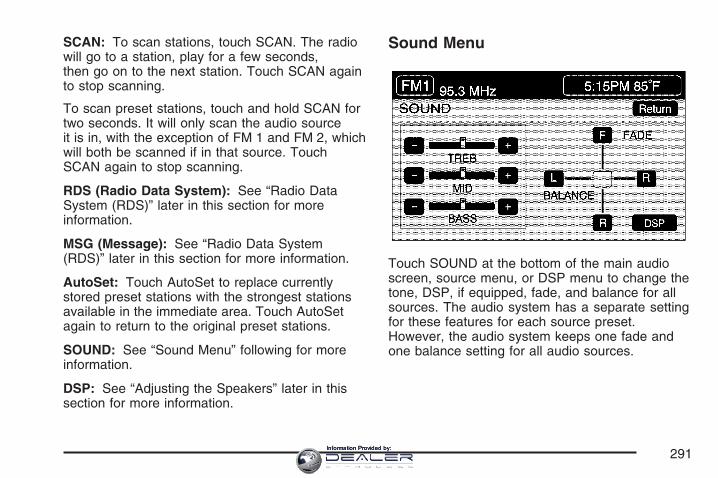
SCAN: To scan stations, touch SCAN. The radiowill go to a station, play for a few seconds,then go on to the next station. Touch SCAN againto stop scanning.
To scan preset stations, touch and hold SCAN fortwo seconds. It will only scan the audio sourceit is in, with the exception of FM 1 and FM 2, whichwill both be scanned if in that source. TouchSCAN again to stop scanning.
RDS (Radio Data System): See “Radio DataSystem (RDS)” later in this section for moreinformation.
MSG (Message): See “Radio Data System(RDS)” later in this section for more information.
AutoSet: Touch AutoSet to replace currentlystored preset stations with the strongest stationsavailable in the immediate area. Touch AutoSetagain to return to the original preset stations.
SOUND: See “Sound Menu” following for moreinformation.
DSP: See “Adjusting the Speakers” later in thissection for more information.
Sound Menu
Touch SOUND at the bottom of the main audioscreen, source menu, or DSP menu to change thetone, DSP, if equipped, fade, and balance for allsources. The audio system has a separate settingfor these features for each source preset.However, the audio system keeps one fade andone balance setting for all audio sources.
291Information Provided by:
To adjust sound settings, do the following:
1. Touch the plus (+) or minus (−) signs to adjusttreble, mid-range, and bass.
2. Touch the L for left or R for right to adjust thebalance of the speakers.
3. Touch the F for front or R for rear to adjustthe fade of the speakers.
4. Touch DSP to adjust your DSP, if equipped.See “Adjusting the Speakers” later in thissection for more information.
After adjustments are made, touch any sourcescreen button. This will take you back to the presetstation menu. Whenever you touch that screenbutton, the previously stored information you haveentered for each preset station will be recalled.
To adjust the tone for each preset, do thefollowing:
1. Press the BAND key.
2. Touch AM, FM1, FM2, XM1, XM2, or WX, ifequipped, to access the desired presetscreen.
3. Touch SOUND.
4. Touch the plus (+) or minus (−) signs to adjusttreble, mid-range, and bass.
5. Touch Return to exit. This will take you to thepreset station menu.
6. Touch and hold one of the six preset screenbuttons for more than two seconds until youhear a beep.Whenever you touch that preset for less thantwo seconds, the station and previouslystored information you have entered for eachpreset station will be recalled.
7. Repeat the steps for additional presets.
292Information Provided by:
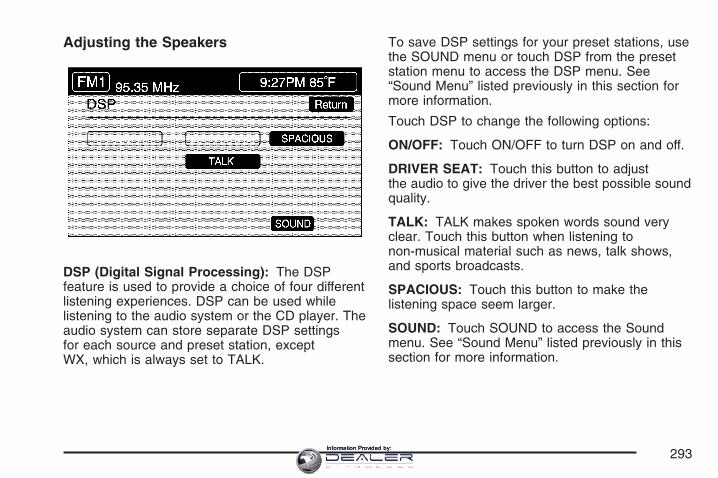
Adjusting the Speakers
DSP (Digital Signal Processing): The DSPfeature is used to provide a choice of four differentlistening experiences. DSP can be used whilelistening to the audio system or the CD player. Theaudio system can store separate DSP settingsfor each source and preset station, exceptWX, which is always set to TALK.
To save DSP settings for your preset stations, usethe SOUND menu or touch DSP from the presetstation menu to access the DSP menu. See“Sound Menu” listed previously in this section formore information.
Touch DSP to change the following options:
ON/OFF: Touch ON/OFF to turn DSP on and off.
DRIVER SEAT: Touch this button to adjustthe audio to give the driver the best possible soundquality.
TALK: TALK makes spoken words sound veryclear. Touch this button when listening tonon-musical material such as news, talk shows,and sports broadcasts.
SPACIOUS: Touch this button to make thelistening space seem larger.
SOUND: Touch SOUND to access the Soundmenu. See “Sound Menu” listed previously in thissection for more information.
293Information Provided by:
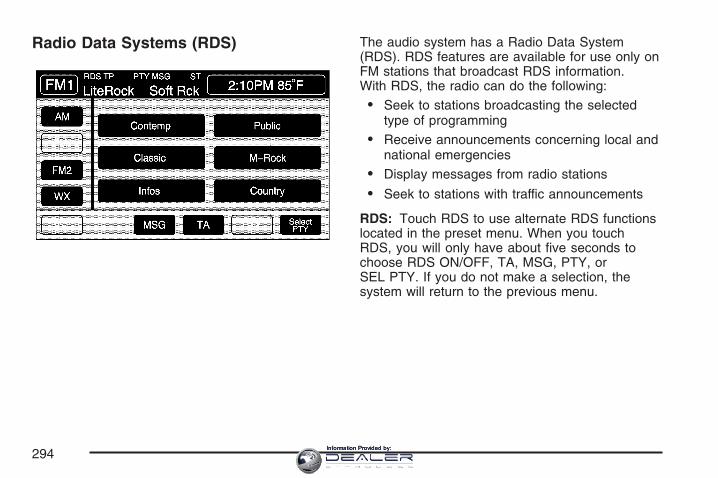
Radio Data Systems (RDS) The audio system has a Radio Data System(RDS). RDS features are available for use only onFM stations that broadcast RDS information.With RDS, the radio can do the following:
• Seek to stations broadcasting the selectedtype of programming
• Receive announcements concerning local andnational emergencies
• Display messages from radio stations
• Seek to stations with traffic announcements
RDS: Touch RDS to use alternate RDS functionslocated in the preset menu. When you touchRDS, you will only have about five seconds tochoose RDS ON/OFF, TA, MSG, PTY, orSEL PTY. If you do not make a selection, thesystem will return to the previous menu.
294Information Provided by:
If you are tuned to a station broadcasting RDSinformation, the station’s Program Service (PS)and Program Type (PTY) will replace the station’sfrequency on the status line at the top of thedisplay. After about five seconds, if available, thePTY will be replaced on the display by the station’sPTY name. The PTY and PTY name may be thesame or different.
If the audio system is tuned to a station that is notbroadcasting RDS information, the station’sfrequency will remain on the display. While RDS ison, the audio system will search for a strongerstation in the network if a station gets too weak forlistening.
The RDS feature relies upon receiving specificinformation from RDS stations. These features willonly work when RDS information is available.
TA (Traffic): Touch TA to receive trafficannouncements. The audio system will turn on theTA display. TA will appear on the display if thecurrent station broadcasts traffic announcements.You may also receive traffic announcementsfrom stations in the network related to the currentstation. If the current station does not broadcasttraffic announcements, the audio system will seekto a station which will. When the audio systemfinds a station which broadcasts trafficannouncements, it will stop. If no station is found,TA will turn off.
While a traffic announcement plays, the audiosystem uses TA volume. To increase TA volume,touch the VOL button on your steering wheelor use the VOL up or down buttons duringthe announcement. See “Voice Guidance VolumeSettings” under Setup Menu on page 243 formore information.
295Information Provided by:
When a traffic announcement comes on thecurrent radio station or a related network station,you will hear it even if the volume is muted ora CD is playing. If the audio system tunesto a related network station for a trafficannouncement, it will return to the original stationwhen the announcement is finished. If the CDplayer was being used, the CD will stay inthe player and resume play at the point where itstopped.
Touch RDS followed by TA again to turn TA off.
MSG (Message): When RDS is on, if thecurrent station has a message, MSG will appearon the display. Touch MSG from the presetmenu to view the message. If the whole messagedoes not appear on the display, parts of themessage will appear every three seconds until themessage is completed. Once the completemessage has been displayed, MSG will disappearfrom the display until another new message isreceived. MSG will remain available to allow youto display the entire message again.
PTY: PTY allows you to seek only stations withtypes of programs you want to listen to. Thisbutton is used to turn on and off Program Type(PTY) features.
With RDS on, touch RDS, followed by PTY. ThePTY display will turn on. Touch RDS followedby this button again to turn the PTY display off.
Select PTY (Select Program Type): WithRDS and PTY on, touch RDS, then SEL PTY. ThePTY menu will appear. Use the up and downarrows to select a PTY. Touch your PTY selectionand the system will return you to the screenwith the preset stations shown. See Steps 1through 7 under “Preset Station Menu” to store theselected PTYs. The selected PTY is then storedon the preset. You can now touch the PTY presetto recall your settings.
When the PTY display is on, press TUNE/SEEKand SCAN to find radio stations of the PTYselected. The last PTY selected will be used forseek and scan modes. If a station with theselected PTY is not found, NONE FOUND willappear on the display. If both PTY and TA are on,the audio system will search for stations withtraffic announcements and the selected PTY.
296Information Provided by:

PTY (Program Type) Presets: The six presetslet you return to your favorite PTYs. These presetshave factory PTY preset stations. See “RDSProgram Type (PTY) Selections” later inthis section. You can set up to 12 PTYs, 6 FM 1and 6 FM2. To save a PTY preset, do thefollowing:
1. Touch FM1 or FM2.
2. Touch RDS to enter the RDS menu.
3. Touch RDS ON/OFF to turn RDS on.
4. Touch PTY.
5. Touch SEL PTY and select the desired PTYfrom the list.
6. Touch and hold one of the six presets formore than two seconds until you hear abeep. Whenever you touch that numberedpreset for less than two seconds, the PTY youset will return.
7. Repeat the steps for each preset.
Once you have stored a PTY for each of yourpreset stations, you can recall a PTY presetby touching the preset station for less thantwo seconds. Then use TUNE/SEEK or SCANto locate a station for that PTY selection.
ALERT: This type of announcement warns ofnational or local emergencies. You will not be ableto turn off alert announcements. Alertannouncements will come on even if RDS mode isturned off. ALERT appears on the display whenan alert announcement plays. The audiosystem uses TA volume during theseannouncements. To increase volume, touch theVOL button on your steering wheel or use the VOLup and down buttons during the announcement.See “Voice Guidance Volume Settings” underSetup Menu on page 243 for more information.When an alert announcement comes on the tunedradio station or a related network station, youwill hear it even if the volume is muted or a CD isplaying. If the audio system tunes to a relatednetwork station for an alert announcement, it willreturn to the original station when theannouncement is finished. If the CD player isplaying, the player will stop for the announcementand resume when the announcement is finished.
297Information Provided by:
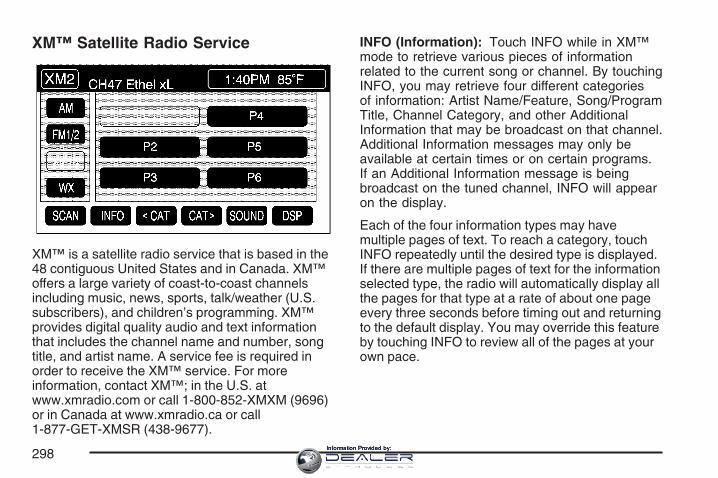
XM™ Satellite Radio Service
XM™ is a satellite radio service that is based in the48 contiguous United States and in Canada. XM™offers a large variety of coast-to-coast channelsincluding music, news, sports, talk/weather (U.S.subscribers), and children’s programming. XM™provides digital quality audio and text informationthat includes the channel name and number, songtitle, and artist name. A service fee is required inorder to receive the XM™ service. For moreinformation, contact XM™; in the U.S. atwww.xmradio.com or call 1-800-852-XMXM (9696)or in Canada at www.xmradio.ca or call1-877-GET-XMSR (438-9677).
INFO (Information): Touch INFO while in XM™mode to retrieve various pieces of informationrelated to the current song or channel. By touchingINFO, you may retrieve four different categoriesof information: Artist Name/Feature, Song/ProgramTitle, Channel Category, and other AdditionalInformation that may be broadcast on that channel.Additional Information messages may only beavailable at certain times or on certain programs.If an Additional Information message is beingbroadcast on the tuned channel, INFO will appearon the display.
Each of the four information types may havemultiple pages of text. To reach a category, touchINFO repeatedly until the desired type is displayed.If there are multiple pages of text for the informationselected type, the radio will automatically display allthe pages for that type at a rate of about one pageevery three seconds before timing out and returningto the default display. You may override this featureby touching INFO to review all of the pages at yourown pace.
298Information Provided by:
XL (Explicit Language Channels): XL on theradio display, after the channel name, indicatescontent with explicit language. These channels, orany others, can be blocked at a customer’s request,by calling; in the U.S. 1-800-852-XMXM (9696) or inCanada 1-877-GET-XMSR (438-9677).
Setting Program Type (PTY) PresetStations
SCATT (Category): Press the arrows to selecta category.
Once the desired category is displayed, pressTUNE/SEEK to select the category and take youto the category’s first station. If you want to goto another station within that category, pressTUNE/SEEK once.
Touch and hold one of the desired P1-P6 presetsto store the selected station as a preset. IfPTY times out and is no longer on the display,start again.
SCAN: Use this button to scan through thechannels within a category or scan through thepreset stations. To scan through the channels in acategory, do the following:
1. Select a category by using the categoryarrows.
2. Once the desired category is displayed, touchSCAN. The radio will begin scanning withinthe chosen category.
3. Touch SCAN again to stop scanning.
To scan through your preset stations, touch andhold SCAN. Touch SCAN again to stop scanning.
299Information Provided by:
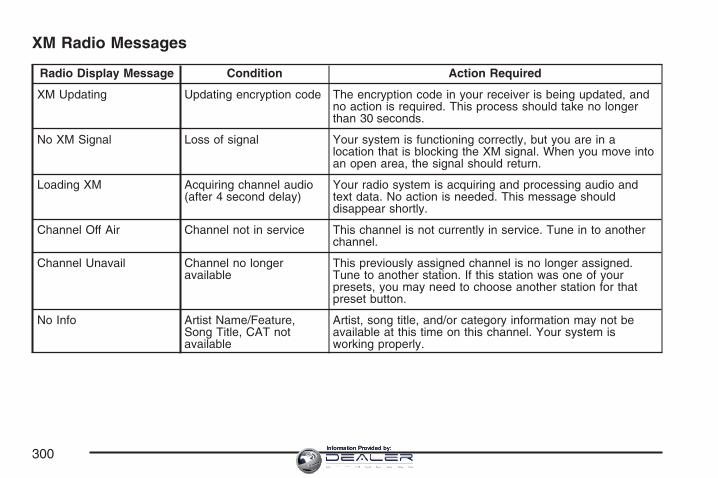
XM Radio Messages
Radio Display Message Condition Action Required
XM Updating Updating encryption code The encryption code in your receiver is being updated, andno action is required. This process should take no longerthan 30 seconds.
No XM Signal Loss of signal Your system is functioning correctly, but you are in alocation that is blocking the XM signal. When you move intoan open area, the signal should return.
Loading XM Acquiring channel audio(after 4 second delay)
Your radio system is acquiring and processing audio andtext data. No action is needed. This message shoulddisappear shortly.
Channel Off Air Channel not in service This channel is not currently in service. Tune in to anotherchannel.
Channel Unavail Channel no longeravailable
This previously assigned channel is no longer assigned.Tune to another station. If this station was one of yourpresets, you may need to choose another station for thatpreset button.
No Info Artist Name/Feature,Song Title, CAT notavailable
Artist, song title, and/or category information may not beavailable at this time on this channel. Your system isworking properly.
300Information Provided by:
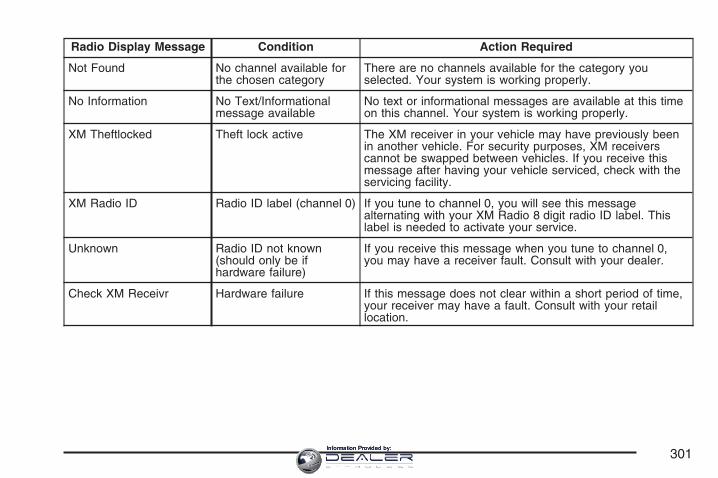
Radio Display Message Condition Action Required
Not Found No channel available forthe chosen category
There are no channels available for the category youselected. Your system is working properly.
No Information No Text/Informationalmessage available
No text or informational messages are available at this timeon this channel. Your system is working properly.
XM Theftlocked Theft lock active The XM receiver in your vehicle may have previously beenin another vehicle. For security purposes, XM receiverscannot be swapped between vehicles. If you receive thismessage after having your vehicle serviced, check with theservicing facility.
XM Radio ID Radio ID label (channel 0) If you tune to channel 0, you will see this messagealternating with your XM Radio 8 digit radio ID label. Thislabel is needed to activate your service.
Unknown Radio ID not known(should only be ifhardware failure)
If you receive this message when you tune to channel 0,you may have a receiver fault. Consult with your dealer.
Check XM Receivr Hardware failure If this message does not clear within a short period of time,your receiver may have a fault. Consult with your retaillocation.
301Information Provided by:
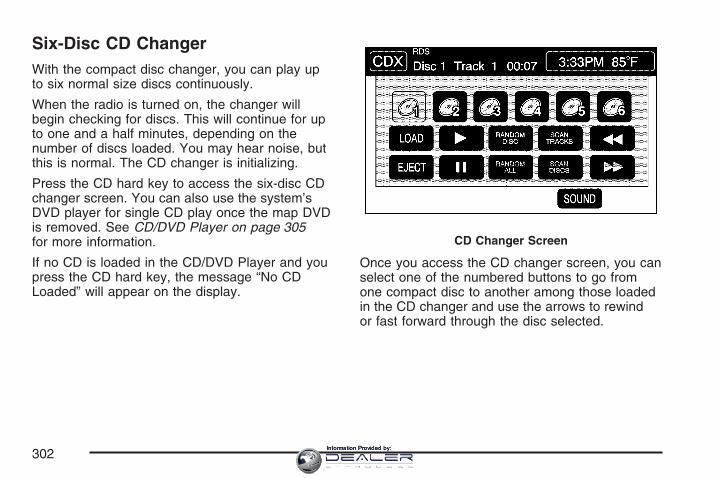
Six-Disc CD ChangerWith the compact disc changer, you can play upto six normal size discs continuously.
When the radio is turned on, the changer willbegin checking for discs. This will continue for upto one and a half minutes, depending on thenumber of discs loaded. You may hear noise, butthis is normal. The CD changer is initializing.
Press the CD hard key to access the six-disc CDchanger screen. You can also use the system’sDVD player for single CD play once the map DVDis removed. See CD/DVD Player on page 305for more information.
If no CD is loaded in the CD/DVD Player and youpress the CD hard key, the message “No CDLoaded” will appear on the display.
Once you access the CD changer screen, you canselect one of the numbered buttons to go fromone compact disc to another among those loadedin the CD changer and use the arrows to rewindor fast forward through the disc selected.
CD Changer Screen
302Information Provided by:
The following features are also available from thisscreen:
• LOAD
• EJECT
• SCAN THE DISCS or SCAN THE TRACKS
• and RANDOM ALL or RANDOM DISC.
The numbered buttons (1 through 6) represent theorder of the discs loaded in the changer. Ifthere are only two CDs loaded, buttons 1 and 2will only be available to choose from.
LOAD: Touch this button once each time youwish to load a CD into the changer. It may take upto 10 seconds for the changer to accept the CDinto the slot depending on the changer initializing.Repeat this procedure for loading up to sixdiscs. Press and hold the LOAD button until abeep is heard to put the changer in LOADALL mode. Once the Insert CD message isdisplayed, you can load all six discs, one after theother.
r (Play): Touch this button to begin playinga CD.
RANDOM DISC: Touch this button to hear thetracks in random, rather than sequential, order onthe disc selected. Press the TUNE/SEEK hardkey to randomly seek through the tracks onthis disc. Touch RANDOM DISC again to turn offrandom play mode.
SCAN TRACKS: Touch this button to hear thefirst 10 seconds of each track on the selected disc.Touch this button again to stop scanning. TheCD will mute while scanning.
r (Rewind): Touch this button to rewind quicklythrough a track selection.
EJECT: Touch this button once to eject thechosen CD. The chosen CD may be selected byfirst touching one of the numbered buttonsfrom 1 to 6. Repeat this procedure for ejecting upto six discs from the changer. If you press andhold the EJECT button until a beep is heard, Thesystem will begin to eject all of the discs fromthe player. Once the CD is removed the next willcome out until they are all ejected.
303Information Provided by:
j (Pause): Touch this button to pause CD play.Touch it again to resume play or touch theplay button.
RANDOM ALL: Touch this button to hear thetracks on all of the discs in the CD changerin random, rather than sequential, order. Press theTUNE/SEEK hard key while RANDOM ALL ison to randomly seek within that disc. TouchRANDOM ALL again to turn off random mode.
SCAN DISCS: Touch this button to hear the first10 seconds of first track on each disc. Touchthis button again to stop scanning. The CD willmute while scanning.
[ (Forward): Touch this button to fast forwardquickly through a track selection.
«TUNE SEEK ª: Press the up arrow on theTUNE/SEEK switch to seek to the next selectionon the compact disc. If playing last track ofdisc, pressing the up arrow will seek to the firsttrack of the next disc. Press the down arrowto seek to the previous selection on the compactdisc. If playing the first track of disc, pressingthe down arrow will seek to the last track on theselected disc. The sound will mute while seeking.
RDS (Radio Data Systems): See “Radio DataSystems (RDS)” listed previously for information onthis button.
SOUND: See “Sound Menu (Tone, DSP, Fadeand Balance)” for information on this button.
DSP (Digital Signal Processing): See “Adjustingthe Speakers” listed previously for informationon this button.
304Information Provided by:
CD Changer ErrorsCDX ERROR could be displayed for the following:
• The road is too rough. The disc should playwhen the road is smoother.
• The disc is dirty, scratched, wet or not loadedlabel side up.
• The air is very humid. If so, wait about anhour and try again.
If any error occurs repeatedly or if an error cannotbe corrected, please contact your GM dealer. Ifyour audio system displays an error number, writeit down and provide this information to yourdealer when reporting the error.
CD/DVD PlayerThe player that is used for the navigation mapDVD can also be used as a single music CDplayer or a video DVD player.
CD PlayerTo use the player as a single music CD player,you must first remove the navigation mapDVD. While playing a CD in the CD/DVD Player,the navigation system is not available. Themessage “The disc installed is not a map DVD”will appear on the display if any of the navigationhard keys are pressed.
To remove the navigation map DVD and load amusic CD, use the following steps:
1. Start the vehicle.
2. Press the TILT hard key until you hear abeep. This will open the faceplate of thesystem.
3. If one is loaded, the navigation map DVD willeject from the slot.
4. Gently remove the navigation map DVD fromthe slot and return it to its case.
305Information Provided by:
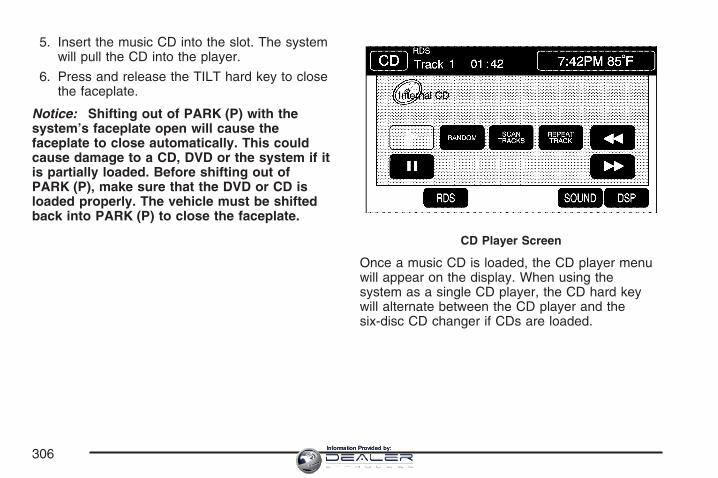
5. Insert the music CD into the slot. The systemwill pull the CD into the player.
6. Press and release the TILT hard key to closethe faceplate.
Notice: Shifting out of PARK (P) with thesystem’s faceplate open will cause thefaceplate to close automatically. This couldcause damage to a CD, DVD or the system if itis partially loaded. Before shifting out ofPARK (P), make sure that the DVD or CD isloaded properly. The vehicle must be shiftedback into PARK (P) to close the faceplate.
Once a music CD is loaded, the CD player menuwill appear on the display. When using thesystem as a single CD player, the CD hard keywill alternate between the CD player and thesix-disc CD changer if CDs are loaded.
CD Player Screen
306Information Provided by:
r (Play): Touch this button to begin playinga CD.
RANDOM: Touch this button to hear the tracks inrandom, rather than sequential, order on the disc.Touch RANDOM again to turn off random mode.
SCAN TRACKS: Touch this button to hear thefirst 10 seconds of each track on the disc. Touchthis button again to stop scanning. The CD willmute while scanning.
REPEAT TRACK: Touch this button to repeat theselected track.
r (Rewind): Touch this button to rewind quicklythrough a track selection.
j (Pause): Touch this button to pause CD play.Touch it again to resume play or touch theplay button.
[ (Forward): Touch this button to fast forwardquickly through a track selection.
«TUNE SEEK ª: Touch the up arrow on theTUNE/SEEK hard key to seek to the next selectionon the compact disc. If playing the last track ofthe disc, touching the up arrow will seek to the firsttrack of the disc. Touch the down arrow to seekto the previous selection on the compact disc.If playing the first track of the disc, touching thedown arrow will seek to the last track of thedisc. The sound will mute while seeking.
DVD PlayerTo use the player as a video DVD player, youmust first remove the navigation map DVDor music CD. While playing a video DVD, thenavigation system is not available. The message“The disc installed is not a map DVD” willappear on the display if any of the navigation hardkeys are pressed.
This feature will not operate unless the vehicle isin PARK (P).
307Information Provided by:
To remove the navigation map DVD and load avideo DVD, use the following steps:
1. With the vehicle in PARK (P) and the vehiclerunning, press the TILT hard key until a beep isheard. The faceplate of the system will open.
2. If a map DVD or a music CD is loaded, thesystem will automatically eject it. Gentlyremove it from the slot and return it to its case.
3. Load the video DVD into the slot. The systemwill pull the DVD into the player.
4. Press and release the TILT hard key to closethe faceplate.
Notice: Shifting out of PARK (P) with thesystem’s faceplate open will cause thefaceplate to close automatically. This couldcause damage to a CD, DVD or the system if itis partially loaded. Before shifting out ofPARK (P), make sure that the DVD or CD isloaded properly. The vehicle must be shiftedback into PARK (P) to close the faceplate.
Once the faceplate is closed and a video DVD isloaded, the system will automatically play the DVD.
Playing a DVDThere are three ways to play a DVD depending onwhich screen you are on. They are the following:
• Once a DVD is inserted, the system willautomatically play the DVD.
• If you are on a map screen, touch the DVDsource button.
• From the audio screen, press the DVDhard key.
308Information Provided by:
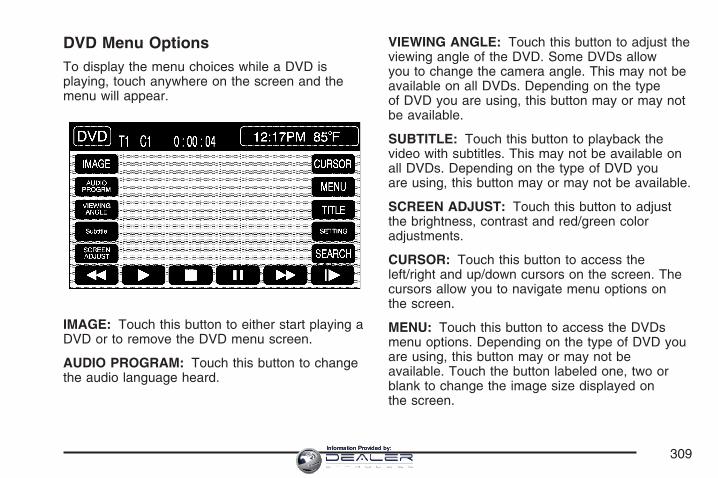
DVD Menu OptionsTo display the menu choices while a DVD isplaying, touch anywhere on the screen and themenu will appear.
IMAGE: Touch this button to either start playing aDVD or to remove the DVD menu screen.
AUDIO PROGRAM: Touch this button to changethe audio language heard.
VIEWING ANGLE: Touch this button to adjust theviewing angle of the DVD. Some DVDs allowyou to change the camera angle. This may not beavailable on all DVDs. Depending on the typeof DVD you are using, this button may or may notbe available.
SUBTITLE: Touch this button to playback thevideo with subtitles. This may not be available onall DVDs. Depending on the type of DVD youare using, this button may or may not be available.
SCREEN ADJUST: Touch this button to adjustthe brightness, contrast and red/green coloradjustments.
CURSOR: Touch this button to access theleft/right and up/down cursors on the screen. Thecursors allow you to navigate menu options onthe screen.
MENU: Touch this button to access the DVDsmenu options. Depending on the type of DVD youare using, this button may or may not beavailable. Touch the button labeled one, two orblank to change the image size displayed onthe screen.
309Information Provided by:
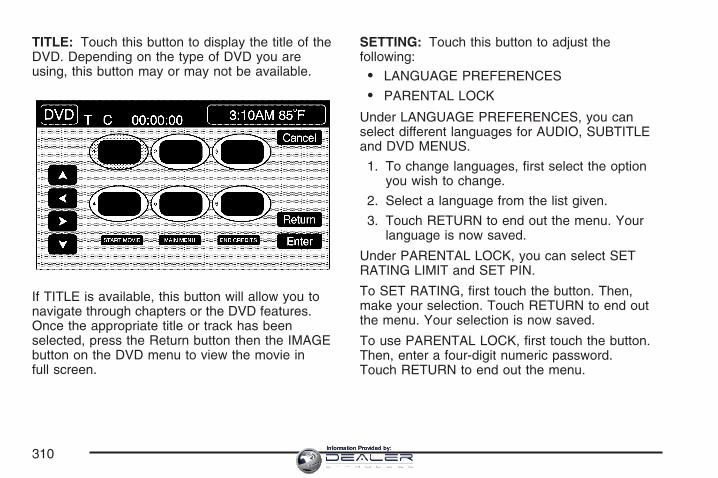
TITLE: Touch this button to display the title of theDVD. Depending on the type of DVD you areusing, this button may or may not be available.
If TITLE is available, this button will allow you tonavigate through chapters or the DVD features.Once the appropriate title or track has beenselected, press the Return button then the IMAGEbutton on the DVD menu to view the movie infull screen.
SETTING: Touch this button to adjust thefollowing:
• LANGUAGE PREFERENCES
• PARENTAL LOCK
Under LANGUAGE PREFERENCES, you canselect different languages for AUDIO, SUBTITLEand DVD MENUS.
1. To change languages, first select the optionyou wish to change.
2. Select a language from the list given.
3. Touch RETURN to end out the menu. Yourlanguage is now saved.
Under PARENTAL LOCK, you can select SETRATING LIMIT and SET PIN.
To SET RATING, first touch the button. Then,make your selection. Touch RETURN to end outthe menu. Your selection is now saved.
To use PARENTAL LOCK, first touch the button.Then, enter a four-digit numeric password.Touch RETURN to end out the menu.
310Information Provided by:
SEARCH: Touch this button to search to a certainscene on the DVD. Depending on the type ofDVD you are using, this button may or may not beavailable.
r (Rewind): Touch this button to rewind througha scene during playback.
r (Resume): Touch this button to resumeplaying a DVD.
c (Stop): Touch this button to stop the DVD.
j (Pause): Touch this button to pause the DVD.
[ (Forward): Touch this button to advancerapidly during playback.
L (Frame Advance): Touch this button toadvance by chapter during playback.
Radio Personalization with Homeand Away FeatureWith this feature, you can recall the latest audiosystem settings as adjusted the last time yourvehicle was operated. This feature allowstwo different drivers to store and recall their ownaudio system settings. The settings recalled by theaudio system are determined by which transmitter(1 or 2) was used to enter the vehicle. Thenumber on the back of the transmitter correspondsto driver 1 or to driver 2. The audio systemsettings will automatically adjust to where theywere last set by the identified driver. The settingscan also be recalled by briefly pressing theMEMORY seat switches 1 or 2 located on thedriver’s door.
Your audio system can store HOME and AWAYpreset stations. HOME and AWAY preset stationsallow you to use one set of preset radio settingsin the area where you live, and another setwhen you go out of town. That way, you will notneed to reprogram your preset stations every timeyou travel.
311Information Provided by:
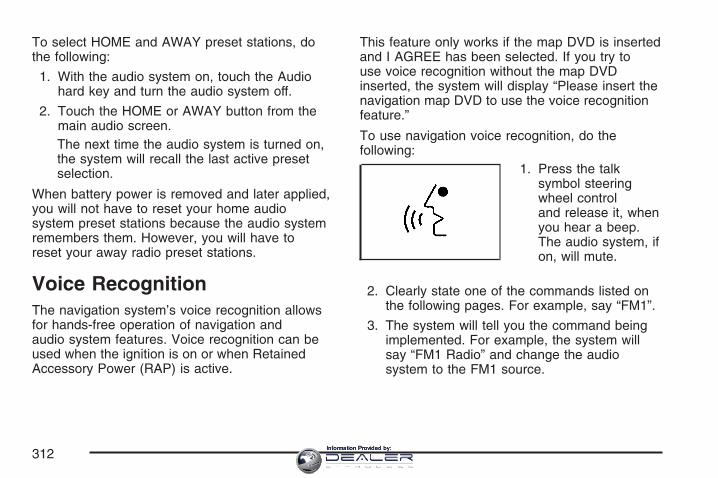
To select HOME and AWAY preset stations, dothe following:
1. With the audio system on, touch the Audiohard key and turn the audio system off.
2. Touch the HOME or AWAY button from themain audio screen.The next time the audio system is turned on,the system will recall the last active presetselection.
When battery power is removed and later applied,you will not have to reset your home audiosystem preset stations because the audio systemremembers them. However, you will have toreset your away radio preset stations.
Voice RecognitionThe navigation system’s voice recognition allowsfor hands-free operation of navigation andaudio system features. Voice recognition can beused when the ignition is on or when RetainedAccessory Power (RAP) is active.
This feature only works if the map DVD is insertedand I AGREE has been selected. If you try touse voice recognition without the map DVDinserted, the system will display “Please insert thenavigation map DVD to use the voice recognitionfeature.”
To use navigation voice recognition, do thefollowing:
1. Press the talksymbol steeringwheel controland release it, whenyou hear a beep.The audio system, ifon, will mute.
2. Clearly state one of the commands listed onthe following pages. For example, say “FM1”.
3. The system will tell you the command beingimplemented. For example, the system willsay “FM1 Radio” and change the audiosystem to the FM1 source.
312Information Provided by:
You can end voice recognition by not speakingany commands. After about five seconds ofsilence, the system will automatically cancel voicerecognition.
At times, the system may not understand aspoken command. If this happens, try saying thecommand again. If a spoken command is notavailable, the system will provide feedback basedon availability.
While using voice recognition, make sure to keepinterior noise levels to a minimum. Otherwise,the system might not recognize voice commands.
The system will only recognize commandsspoken in English.
Voice Recognition CommandsThe following list shows all of the voice commandsavailable for the navigation system with a briefdescription of each. To use the voice commands,refer to the instructions listed previously.
Help CommandsThese commands are universal and will enableyou to use the help prompts available fromthe system.
Map Help: This command will enable the systemto provide the available commands for the mapscreen.
Destination Help: This command will enable thesystem to provide the available commands forentering a destination.
Guidance Help: This command will enable thesystem to provide the available commands for theguidance method.
Radio Help: This command will enable thesystem to provide the available commands forthe radio.
Disc Help: This command will enable the systemto provide the available commands for the CDchanger.
313Information Provided by:
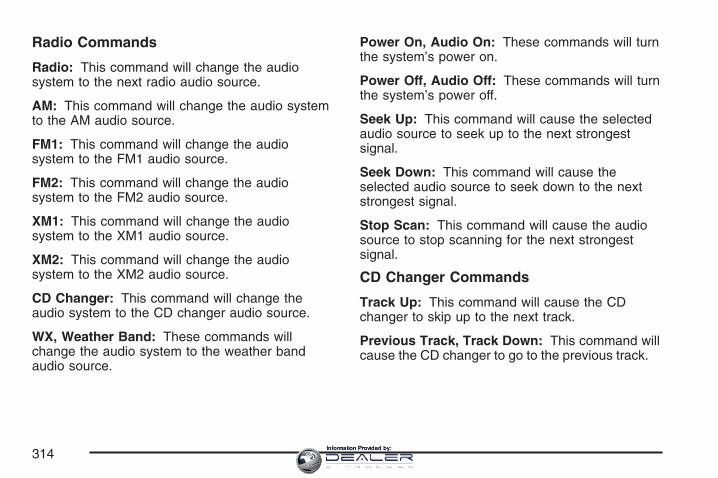
Radio Commands
Radio: This command will change the audiosystem to the next radio audio source.
AM: This command will change the audio systemto the AM audio source.
FM1: This command will change the audiosystem to the FM1 audio source.
FM2: This command will change the audiosystem to the FM2 audio source.
XM1: This command will change the audiosystem to the XM1 audio source.
XM2: This command will change the audiosystem to the XM2 audio source.
CD Changer: This command will change theaudio system to the CD changer audio source.
WX, Weather Band: These commands willchange the audio system to the weather bandaudio source.
Power On, Audio On: These commands will turnthe system’s power on.
Power Off, Audio Off: These commands will turnthe system’s power off.
Seek Up: This command will cause the selectedaudio source to seek up to the next strongestsignal.
Seek Down: This command will cause theselected audio source to seek down to the nextstrongest signal.
Stop Scan: This command will cause the audiosource to stop scanning for the next strongestsignal.
CD Changer Commands
Track Up: This command will cause the CDchanger to skip up to the next track.
Previous Track, Track Down: This command willcause the CD changer to go to the previous track.
314Information Provided by:
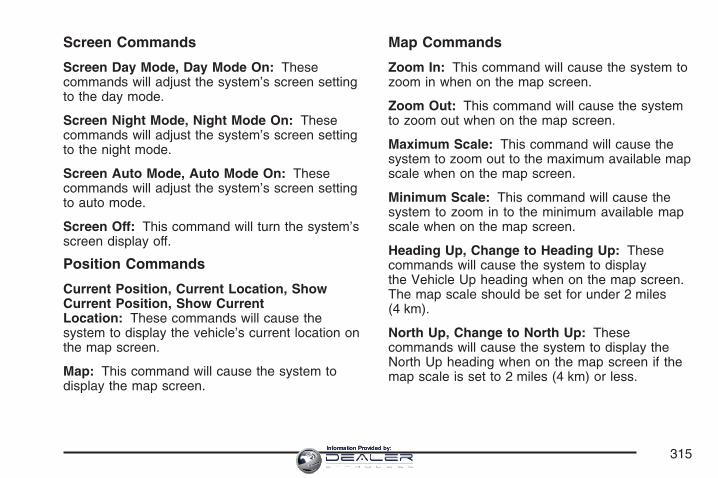
Screen Commands
Screen Day Mode, Day Mode On: Thesecommands will adjust the system’s screen settingto the day mode.
Screen Night Mode, Night Mode On: Thesecommands will adjust the system’s screen settingto the night mode.
Screen Auto Mode, Auto Mode On: Thesecommands will adjust the system’s screen settingto auto mode.
Screen Off: This command will turn the system’sscreen display off.
Position Commands
Current Position, Current Location, ShowCurrent Position, Show CurrentLocation: These commands will cause thesystem to display the vehicle’s current location onthe map screen.
Map: This command will cause the system todisplay the map screen.
Map Commands
Zoom In: This command will cause the system tozoom in when on the map screen.
Zoom Out: This command will cause the systemto zoom out when on the map screen.
Maximum Scale: This command will cause thesystem to zoom out to the maximum available mapscale when on the map screen.
Minimum Scale: This command will cause thesystem to zoom in to the minimum available mapscale when on the map screen.
Heading Up, Change to Heading Up: Thesecommands will cause the system to displaythe Vehicle Up heading when on the map screen.The map scale should be set for under 2 miles(4 km).
North Up, Change to North Up: Thesecommands will cause the system to display theNorth Up heading when on the map screen if themap scale is set to 2 miles (4 km) or less.
315Information Provided by:
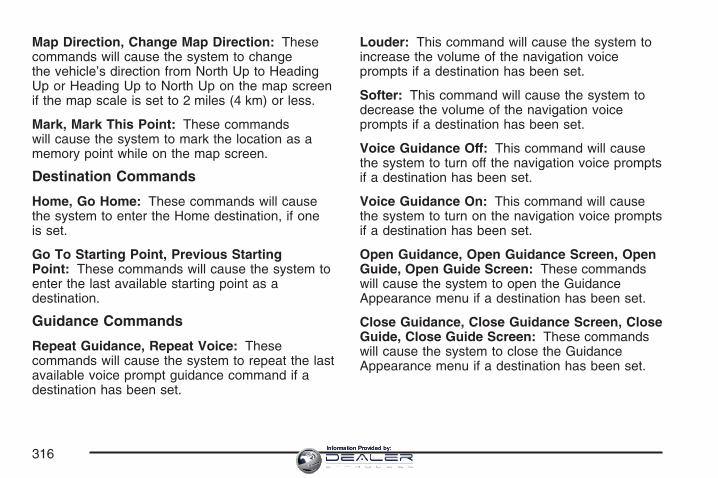
Map Direction, Change Map Direction: Thesecommands will cause the system to changethe vehicle’s direction from North Up to HeadingUp or Heading Up to North Up on the map screenif the map scale is set to 2 miles (4 km) or less.
Mark, Mark This Point: These commandswill cause the system to mark the location as amemory point while on the map screen.
Destination Commands
Home, Go Home: These commands will causethe system to enter the Home destination, if oneis set.
Go To Starting Point, Previous StartingPoint: These commands will cause the system toenter the last available starting point as adestination.
Guidance Commands
Repeat Guidance, Repeat Voice: Thesecommands will cause the system to repeat the lastavailable voice prompt guidance command if adestination has been set.
Louder: This command will cause the system toincrease the volume of the navigation voiceprompts if a destination has been set.
Softer: This command will cause the system todecrease the volume of the navigation voiceprompts if a destination has been set.
Voice Guidance Off: This command will causethe system to turn off the navigation voice promptsif a destination has been set.
Voice Guidance On: This command will causethe system to turn on the navigation voice promptsif a destination has been set.
Open Guidance, Open Guidance Screen, OpenGuide, Open Guide Screen: These commandswill cause the system to open the GuidanceAppearance menu if a destination has been set.
Close Guidance, Close Guidance Screen, CloseGuide, Close Guide Screen: These commandswill cause the system to close the GuidanceAppearance menu if a destination has been set.
316Information Provided by:
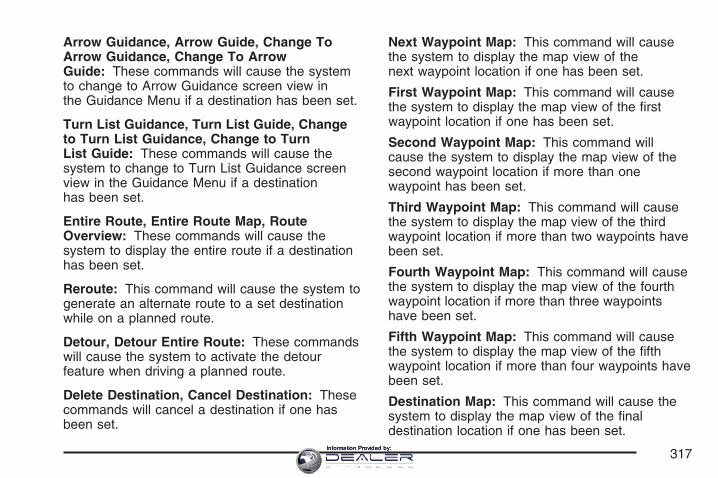
Arrow Guidance, Arrow Guide, Change ToArrow Guidance, Change To ArrowGuide: These commands will cause the systemto change to Arrow Guidance screen view inthe Guidance Menu if a destination has been set.
Turn List Guidance, Turn List Guide, Changeto Turn List Guidance, Change to TurnList Guide: These commands will cause thesystem to change to Turn List Guidance screenview in the Guidance Menu if a destinationhas been set.
Entire Route, Entire Route Map, RouteOverview: These commands will cause thesystem to display the entire route if a destinationhas been set.
Reroute: This command will cause the system togenerate an alternate route to a set destinationwhile on a planned route.
Detour, Detour Entire Route: These commandswill cause the system to activate the detourfeature when driving a planned route.
Delete Destination, Cancel Destination: Thesecommands will cancel a destination if one hasbeen set.
Next Waypoint Map: This command will causethe system to display the map view of thenext waypoint location if one has been set.
First Waypoint Map: This command will causethe system to display the map view of the firstwaypoint location if one has been set.
Second Waypoint Map: This command willcause the system to display the map view of thesecond waypoint location if more than onewaypoint has been set.
Third Waypoint Map: This command will causethe system to display the map view of the thirdwaypoint location if more than two waypoints havebeen set.
Fourth Waypoint Map: This command will causethe system to display the map view of the fourthwaypoint location if more than three waypointshave been set.
Fifth Waypoint Map: This command will causethe system to display the map view of the fifthwaypoint location if more than four waypoints havebeen set.
Destination Map: This command will cause thesystem to display the map view of the finaldestination location if one has been set.
317Information Provided by:
Point of Interest (POI) CommandsThe following commands will cause the system todisplay icons if they are available on the mapscreen when the map scale is set to a half mile(eight-tenths km) or less.
Restaurant, I’m Hungry: These commands willcause the system to display restaurant POI icons.
American Restaurant, American Food: Thesecommands will cause the system to displayAmerican restaurant POI icons.
Chinese Restaurant, Chinese Food: Thesecommands will cause the system to displayChinese restaurant POI icons.
Continental Restaurant, Continental Food:These commands will cause the system to displayContinental restaurant POI icons.
French Restaurant, French Food: Thesecommands will cause the system to display Frenchrestaurant POI icons.
Italian Restaurant, Italian Food: Thesecommands will cause the system to display Italianrestaurant POI icons.
Japanese Restaurant, Japanese Food: Thesecommands will cause the system to displayJapanese restaurant POI icons.
Mexican Restaurant, Mexican Food: Thesecommands will cause the system to displayMexican restaurant POI icons.
Seafood Restaurant, Seafood: Thesecommands will cause the system to displaySeafood restaurant POI icons.
Other Restaurant, Other Food: Thesecommands will cause the system to display othertypes of restaurant POI icons.
Shopping, Shopping Mall: These commands willcause the system to display mall POI icons.
Grocery Store: This command will cause thesystem to display grocery store POI icons.
Gas Station, Gas: These commands will causethe system to display gas station POI icons.
Parking Garage: This command will cause thesystem to display parking garage POI icons.
Parking Lot: This command will cause the systemto display parking lot POI icons.
318Information Provided by:
Rental Car Agency: This command will causethe system to display rental car POI icons.
Automobile Club, Triple A: These commandswill cause the system to display auto clubPOI icons.
Auto Service And Maintenance, Auto Service,Maintenance: These commands will causethe system to display auto service POI icons.
Hotel: This command will cause the system todisplay hotel POI icons.
Golf Course: This command will cause thesystem to display golf course POI icons.
Ski Resort, Skiing: These commands will causethe system to display ski resort POI icons.
Amusement Park: This command will cause thesystem to display amusement park POI icons.
Sport Complex, Stadium: These commands willcause the system to display sports complexPOI icons.
Casino: This command will cause the system todisplay casino POI icons.
Marina: This command will cause the system todisplay marina POI icons.
Tourist Attraction: This command will cause thesystem to display tourist attraction POI icons.
Winery: This command will cause the system todisplay winery POI icons.
City Hall: This command will cause the system todisplay city hall POI icons.
Police Station: This command will cause thesystem to display police station POI icons.
Library: This command will cause the system todisplay library POI icons.
Hospital: This command will cause the system todisplay hospital POI icons.
Park & Recreation, Parks & Recreation: Thesecommands will cause the system to displayparks and recreation POI icons.
Civic Center, Community Center: Thesecommands will cause the system to displaycommunity center POI icons.
Convention Center, Exhibition Center: Thesecommands will cause the system to displayconvention center POI icons.
319Information Provided by:
Court House: This command will cause thesystem to display court house POI icons.
Train Station: This command will cause thesystem to display train station POI icons.
Airport: This command will cause the system todisplay airport POI icons.
Bus Station: This command will cause thesystem to display bus station POI icons.
Commuter Rail Station: This command willcause the system to display commuter rail stationPOI icons.
Ferry Terminal: This command will cause thesystem to display ferry terminal POI icons.
Park & Ride: This command will cause thesystem to display park & ride POI icons.
Rest Area, Rest Stop: These commands willcause the system to display rest area POI icons.
Tourist Information: This command willcause the system to display tourist informationPOI icons.
Historical Monument: This command willcause the system to display historical monumentPOI icons.
Performing Arts: This command will cause thesystem to display performing arts POI icons.
Museum: This command will cause the system todisplay museum POI icons.
Bank: This command will cause the system todisplay bank POI icons.
School: This command will cause the system todisplay school POI icons.
ATM: This command will cause the system todisplay ATM POI icons.
Higher Education, University, College: Thesecommands will cause the system to display highereducation POI icons.
Business Facility: This command will cause thesystem to display business facility POI icons.
City Center: This command will cause the systemto display city center POI icons.
POI Off: This command will cause the system toturn off POIs so they do not appear on themap screen.
320Information Provided by:
Your Driving, the Road, andYour Vehicle ............................................ 322Defensive Driving ...................................... 322Drunken Driving ........................................ 323Control of a Vehicle .................................. 326Braking ...................................................... 326Anti-Lock Brake System (ABS) .................. 327Braking in Emergencies ............................. 329Traction Control System (TCS) .................. 329Magnetic Ride Control ............................... 331Limited-Slip Rear Axle ............................... 331StabiliTrak® System ................................... 331Steering .................................................... 333Off-Road Recovery .................................... 335Passing ..................................................... 335Loss of Control .......................................... 337Racing or Other Competitive
Driving (XLR-V) ...................................... 338
Driving at Night ......................................... 339Driving in Rain and on Wet Roads ............ 340City Driving ............................................... 343Freeway Driving ........................................ 344Before Leaving on a Long Trip .................. 345Highway Hypnosis ..................................... 346Hill and Mountain Roads ........................... 347Winter Driving ........................................... 349If Your Vehicle is Stuck in Sand, Mud,
Ice, or Snow .......................................... 353Rocking Your Vehicle to Get It Out ........... 354Loading Your Vehicle ................................ 354
Towing ........................................................ 359Towing Your Vehicle ................................. 359Recreational Vehicle Towing ...................... 359Towing a Trailer ........................................ 359
Section 5 Driving Your Vehicle
321Information Provided by:
Your Driving, the Road, andYour Vehicle
Defensive DrivingThe best advice anyone can give about driving is:Drive defensively.
Please start with a very important safety device inyour vehicle: Buckle up. See Safety Belts: TheyAre for Everyone on page 13.
{CAUTION:
Defensive driving really means “Be readyfor anything.” On city streets, rural roads,or expressways, it means “Always expectthe unexpected.” Assume that pedestriansor other drivers are going to be carelessand make mistakes. Anticipate what theymight do and be ready. Rear-endcollisions are about the most preventableof accidents. Yet they are common. Allowenough following distance. Defensivedriving requires that a driver concentrateon the driving task. Anything thatdistracts from the driving task makesproper defensive driving more difficultand can even cause a collision, withresulting injury. Ask a passenger to helpdo these things, or pull off the road in asafe place to do them. These simpledefensive driving techniques could saveyour life.
322Information Provided by:
Drunken DrivingDeath and injury associated with drinking anddriving is a national tragedy. It is the number onecontributor to the highway death toll, claimingthousands of victims every year.
Alcohol affects four things that anyone needs todrive a vehicle:
• Judgment
• Muscular Coordination
• Vision
• Attentiveness
Police records show that almost half of all motorvehicle-related deaths involve alcohol. In mostcases, these deaths are the result of someone whowas drinking and driving. In recent years, morethan 16,000 annual motor vehicle-related deathshave been associated with the use of alcohol, withmore than 300,000 people injured.
Many adults — by some estimates, nearly half theadult population — choose never to drinkalcohol, so they never drive after drinking. Forpersons under 21, it is against the law inevery U.S. state to drink alcohol. There are goodmedical, psychological, and developmentalreasons for these laws.
The obvious way to eliminate the leading highwaysafety problem is for people never to drinkalcohol and then drive. But what if people do?How much is “too much” if someone plansto drive? It is a lot less than many might think.Although it depends on each person and situation,here is some general information on the problem.
The Blood Alcohol Concentration (BAC) ofsomeone who is drinking depends upon fourthings:
• The amount of alcohol consumed
• The drinker’s body weight
• The amount of food that is consumed beforeand during drinking
• The length of time it has taken the drinker toconsume the alcohol
323Information Provided by:
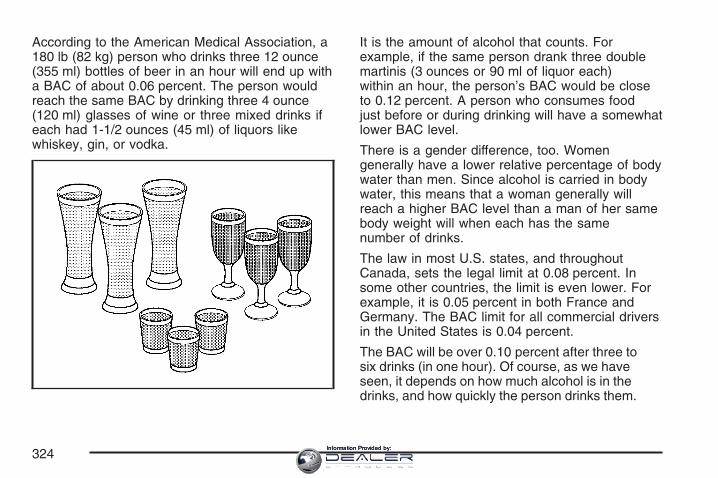
According to the American Medical Association, a180 lb (82 kg) person who drinks three 12 ounce(355 ml) bottles of beer in an hour will end up witha BAC of about 0.06 percent. The person wouldreach the same BAC by drinking three 4 ounce(120 ml) glasses of wine or three mixed drinks ifeach had 1-1/2 ounces (45 ml) of liquors likewhiskey, gin, or vodka.
It is the amount of alcohol that counts. Forexample, if the same person drank three doublemartinis (3 ounces or 90 ml of liquor each)within an hour, the person’s BAC would be closeto 0.12 percent. A person who consumes foodjust before or during drinking will have a somewhatlower BAC level.
There is a gender difference, too. Womengenerally have a lower relative percentage of bodywater than men. Since alcohol is carried in bodywater, this means that a woman generally willreach a higher BAC level than a man of her samebody weight will when each has the samenumber of drinks.
The law in most U.S. states, and throughoutCanada, sets the legal limit at 0.08 percent. Insome other countries, the limit is even lower. Forexample, it is 0.05 percent in both France andGermany. The BAC limit for all commercial driversin the United States is 0.04 percent.
The BAC will be over 0.10 percent after three tosix drinks (in one hour). Of course, as we haveseen, it depends on how much alcohol is in thedrinks, and how quickly the person drinks them.
324Information Provided by:
But the ability to drive is affected well below aBAC of 0.10 percent. Research shows thatthe driving skills of many people are impaired at aBAC approaching 0.05 percent, and that theeffects are worse at night. All drivers are impairedat BAC levels above 0.05 percent. Statisticsshow that the chance of being in a collisionincreases sharply for drivers who have a BAC of0.05 percent or above. A driver with a BAC level of0.06 percent has doubled his or her chance ofhaving a collision. At a BAC level of 0.10 percent,the chance of this driver having a collision is12 times greater; at a level of 0.15 percent, thechance is 25 times greater!
The body takes about an hour to rid itself of thealcohol in one drink. No amount of coffee or numberof cold showers will speed that up. “I will be careful”is not the right answer. What if there is anemergency, a need to take sudden action, as whena child darts into the street? A person with even amoderate BAC might not be able to react quicklyenough to avoid the collision.
There is something else about drinking and drivingthat many people do not know. Medical researchshows that alcohol in a person’s system can makecrash injuries worse, especially injuries to thebrain, spinal cord, or heart. This means that whenanyone who has been drinking — driver orpassenger — is in a crash, that person’s chanceof being killed or permanently disabled ishigher than if the person had not been drinking.
{CAUTION:
Drinking and then driving is verydangerous. Your reflexes, perceptions,attentiveness, and judgment can beaffected by even a small amount ofalcohol. You can have a serious — oreven fatal — collision if you drive afterdrinking. Please do not drink and drive orride with a driver who has been drinking.Ride home in a cab; or if you are with agroup, designate a driver who will notdrink.
325Information Provided by:
Control of a VehicleYou have three systems that make your vehiclego where you want it to go. They are the brakes,the steering, and the accelerator. All threesystems have to do their work at the places wherethe tires meet the road.
Sometimes, as when you are driving on snow orice, it is easy to ask more of those control systemsthan the tires and road can provide. That meansyou can lose control of your vehicle. See TractionControl System (TCS) on page 329 andStabiliTrak® System on page 331.
Adding non-GM accessories can affect yourvehicle’s performance. See Accessories andModifications on page 363.
BrakingSee Brake System Warning Light on page 192.
Braking action involves perception time andreaction time.
First, you have to decide to push on the brakepedal. That is perception time. Then you have tobring up your foot and do it. That is reaction time.
Average reaction time is about three-fourths of asecond. But that is only an average. It mightbe less with one driver and as long as two orthree seconds or more with another. Age, physicalcondition, alertness, coordination, and eyesightall play a part. So do alcohol, drugs, andfrustration. But even in three-fourths of a second,a vehicle moving at 60 mph (100 km/h) travels66 feet (20 m). That could be a lot of distance in anemergency, so keeping enough space betweenyour vehicle and others is important.
And, of course, actual stopping distances varygreatly with the surface of the road, whether it ispavement or gravel; the condition of the road,whether it is wet, dry, or icy; tire tread; thecondition of the brakes; the weight of the vehicle;and the amount of brake force applied.
326Information Provided by:

Avoid needless heavy braking. Some people drivein spurts — heavy acceleration followed byheavy braking — rather than keeping pace withtraffic. This is a mistake. The brakes may not havetime to cool between hard stops. The brakeswill wear out much faster if you do a lot of heavybraking. If you keep pace with the traffic andallow realistic following distances, you willeliminate a lot of unnecessary braking. That meansbetter braking and longer brake life.
If your vehicle’s engine ever stops while you aredriving, brake normally but do not pump thebrakes. If you do, the pedal may get harder topush down. If the engine stops, you will still havesome power brake assist. But you will use itwhen you brake. Once the power assist is usedup, it may take longer to stop and the brake pedalwill be harder to push.
Adding non-GM accessories can affect yourvehicle’s performance. See Accessories andModifications on page 363.
Anti-Lock Brake System (ABS)Your vehicle has the Anti-Lock Brake System(ABS), an advanced electronic braking system thatwill help prevent a braking skid.
When you start your engine and begin to driveaway, ABS will check itself. You may hear amomentary motor or clicking noise while this testis going on, and you may even notice thatyour brake pedal moves a little. This is normal.
If there is a problemwith ABS, this warninglight will stay on.See Anti-Lock BrakeSystem WarningLight on page 193.
327Information Provided by:
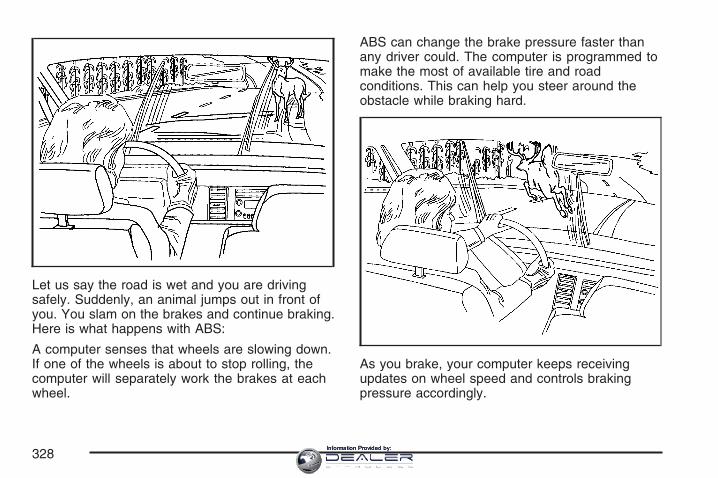
Let us say the road is wet and you are drivingsafely. Suddenly, an animal jumps out in front ofyou. You slam on the brakes and continue braking.Here is what happens with ABS:
A computer senses that wheels are slowing down.If one of the wheels is about to stop rolling, thecomputer will separately work the brakes at eachwheel.
ABS can change the brake pressure faster thanany driver could. The computer is programmed tomake the most of available tire and roadconditions. This can help you steer around theobstacle while braking hard.
As you brake, your computer keeps receivingupdates on wheel speed and controls brakingpressure accordingly.
328Information Provided by:
Remember: ABS does not change the time youneed to get your foot up to the brake pedalor always decrease stopping distance. If you gettoo close to the vehicle in front of you, you will nothave time to apply your brakes if that vehiclesuddenly slows or stops. Always leave enoughroom up ahead to stop, even though youhave ABS.
Using ABSDo not pump the brakes. Just hold the brakepedal down firmly and let anti-lock work for you.You may hear a motor or clicking noise andfeel the brake pedal move a little during a stop,but this is normal.
Braking in EmergenciesWith ABS, you can steer and brake at the sametime. In many emergencies, steering can help youmore than even the very best braking.
Traction Control System (TCS)Your vehicle has a traction control system thatlimits wheel spin. This is especially useful inslippery road conditions. The system operates onlyif it senses that one or both of the rear wheelsare spinning or beginning to lose traction. Whenthis happens, the system works the rear brakesand reduces engine power to limit wheel spin.
The TRAC SYSTEM ACTIVE message will displayon the Driver Information Center (DIC) when thetraction control system is limiting wheel spin.See DIC Warnings and Messages on page 206.You may feel or hear the system working, but thisis normal.
If your vehicle is in cruise control when thetraction control system begins to limit wheel spin,the cruise control will automatically disengage.When road conditions allow you to safelyuse it again, you may reengage the cruise control.See Adaptive Cruise Control on page 150 orCruise Control on page 147 for more information.
329Information Provided by:

This warning light willcome on to let youknow if there isa problem with yourtraction control system.
See Traction Control System (TCS) Warning Lighton page 194. When this warning light is on, thesystem will not limit wheel spin. Adjust your drivingaccordingly.
The traction control system automatically comeson whenever you start your vehicle. To limit wheelspin, especially in slippery road conditions, youshould always leave the system on. But youcan turn the traction control system off if you everneed to. You should turn the system off if yourvehicle ever gets stuck in sand, mud or snow androcking the vehicle is required. See RockingYour Vehicle to Get It Out on page 354 and If YourVehicle is Stuck in Sand, Mud, Ice, or Snow onpage 353 for more information.
To turn the system off,press the front part ofthe traction controlbutton located on thecenter console.
The TRACTION SYSTEM OFF message willdisplay on the DIC and the traction control systemwarning light will come on. If the system islimiting wheel spin when you press the button,the TRACTION SYSTEM OFF message willdisplay – but the system will not turn off right away.It will wait until there is no longer a current needto limit wheel spin.
You can turn the system back on at any time bypressing the button again. The TRACTIONSYSTEM ON message should display briefly onthe Driver Information Center. See DIC Warningsand Messages on page 206 for more information.
Adding non-GM accessories can affect yourvehicle’s performance. See Accessories andModifications on page 363 for more information.
330Information Provided by:
Magnetic Ride ControlMagnetic Ride Control automatically adjusts theride of your vehicle. Automatic ride control isachieved through a computer used to control andmonitor the suspension system. The controllerreceives input from various sensors to determinethe proper system response. If the controllerdetects a problem within the system, the DIC willdisplay a SERVICE RIDE CONTROL message.See DIC Warnings and Messages on page 206 formore information. See your dealer for service.
Limited-Slip Rear AxleYour limited-slip rear axle can give you additionaltraction on snow, mud, ice, sand or gravel. Itworks like a standard axle most of the time, butwhen one of the rear wheels has no tractionand the other does, this feature will allowthe wheel with traction to move the vehicle.
StabiliTrak® SystemThe StabiliTrak® System is a computer controlledsystem that helps the driver maintain directionalcontrol of the vehicle in difficult driving conditions.This is accomplished by selectively applyingany one of the vehicle’s brakes.
When you first start your vehicle and begin todrive away (6 mph (10 km/h)), especially duringcold weather, the message STABILITRAKWARMING may be displayed in the DriverInformation Center (DIC), the instrument panelcluster light will be on, and a chime will sound.This is normal. You can acknowledge thismessage by pressing the RESET button. TheStabiliTrak® System performance is affected untilthe message, STABILITRAK READY, isdisplayed in the DIC. This can take up to15 minutes.
The WAIT FOR STABILITRAK message may bedisplayed in the DIC after exceeding 19 mph(30 km/h) for 10 seconds if the steering isnot centered. The system is off until theSTABILITRAK ACTIVE message is displayed.
331Information Provided by:
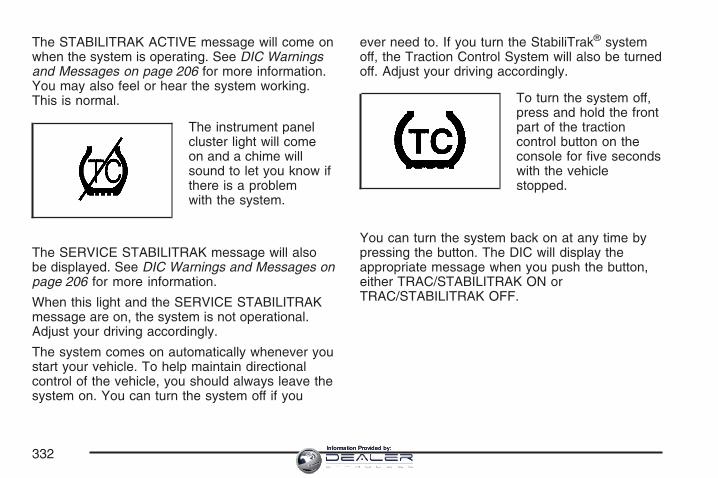
The STABILITRAK ACTIVE message will come onwhen the system is operating. See DIC Warningsand Messages on page 206 for more information.You may also feel or hear the system working.This is normal.
The instrument panelcluster light will comeon and a chime willsound to let you know ifthere is a problemwith the system.
The SERVICE STABILITRAK message will alsobe displayed. See DIC Warnings and Messages onpage 206 for more information.
When this light and the SERVICE STABILITRAKmessage are on, the system is not operational.Adjust your driving accordingly.
The system comes on automatically whenever youstart your vehicle. To help maintain directionalcontrol of the vehicle, you should always leave thesystem on. You can turn the system off if you
ever need to. If you turn the StabiliTrak® systemoff, the Traction Control System will also be turnedoff. Adjust your driving accordingly.
To turn the system off,press and hold the frontpart of the tractioncontrol button on theconsole for five secondswith the vehiclestopped.
You can turn the system back on at any time bypressing the button. The DIC will display theappropriate message when you push the button,either TRAC/STABILITRAK ON orTRAC/STABILITRAK OFF.
332Information Provided by:
Steering
Power SteeringIf you lose power steering assist because theengine stops or the system is not functioning, youcan steer but it will take much more effort.
Magnetic Speed Variable AssistSteeringYour vehicle has a steering system thatcontinuously adjusts the effort you feel whensteering at all vehicle speeds. It provides easewhen parking, yet a firm, solid feel at highwayspeeds.
Steering TipsIt is important to take curves at a reasonablespeed.
A lot of the “driver lost control” accidents mentionedon the news happen on curves. Here is why:
Experienced driver or beginner, each of us issubject to the same laws of physics when drivingon curves. The traction of the tires against theroad surface makes it possible for the vehicle tochange its path when you turn the front wheels.
If there is no traction, inertia will keep the vehiclegoing in the same direction. If you have evertried to steer a vehicle on wet ice, you willunderstand this.
The traction you can get in a curve depends onthe condition of the tires and the road surface, theangle at which the curve is banked, and yourspeed. While you are in a curve, speed is the onefactor you can control.
Suppose you are steering through a sharp curve.Then you suddenly accelerate. Both controlsystems — steering and acceleration — have todo their work where the tires meet the road.Adding the sudden acceleration can demand toomuch of those places. You can lose control.See Traction Control System (TCS) on page 329.
What should you do if this ever happens? Easeup on the accelerator pedal, steer the vehicle theway you want it to go, and slow down.
Speed limit signs near curves warn that youshould adjust your speed. Of course, the postedspeeds are based on good weather and roadconditions. Under less favorable conditions you willwant to go slower.
333Information Provided by:

If you need to reduce your speed as you approacha curve, do it before you enter the curve, whilethe front wheels are straight ahead.
Try to adjust your speed so you can “drive”through the curve. Maintain a reasonable, steadyspeed. Wait to accelerate until you are out ofthe curve, and then accelerate gently intothe straightaway.
Adding non-GM accessories can affect yourvehicle’s performance. See Accessories andModifications on page 363.
Steering in EmergenciesThere are times when steering can be moreeffective than braking. For example, you comeover a hill and find a truck stopped in your lane, ora car suddenly pulls out from nowhere, or achild darts out from between parked cars andstops right in front of you. You can avoid theseproblems by braking — if you can stop in time. Butsometimes you cannot; there is not room. Thatis the time for evasive action — steering aroundthe problem.
Your vehicle can perform very well in emergencieslike these. First apply your brakes.
See Braking on page 326. It is better to remove asmuch speed as you can from a possible collision.Then steer around the problem, to the left orright depending on the space available.
An emergency like this requires close attentionand a quick decision. If you are holding thesteering wheel at the recommended 9 and3 o’clock positions, you can turn it a full180 degrees very quickly without removing eitherhand. But you have to act fast, steer quickly,and just as quickly straighten the wheel once youhave avoided the object.
334Information Provided by:

The fact that such emergency situations arealways possible is a good reason to practicedefensive driving at all times and wear safety beltsproperly.
Off-Road RecoveryYou may find that your right wheels have droppedoff the edge of a road onto the shoulder whileyou are driving.
If the level of the shoulder is only slightly below thepavement, recovery should be fairly easy. Ease offthe accelerator and then, if there is nothing in theway, steer so that your vehicle straddles the edgeof the pavement. You can turn the steering wheelup to one-quarter turn until the right front tirecontacts the pavement edge. Then turn yoursteering wheel to go straight down the roadway.
PassingThe driver of a vehicle about to pass another on atwo-lane highway waits for just the right moment,accelerates, moves around the vehicle ahead, thengoes back into the right lane again. A simplemaneuver?
Not necessarily! Passing another vehicle on atwo-lane highway is a potentially dangerous move,since the passing vehicle occupies the samelane as oncoming traffic for several seconds. Amiscalculation, an error in judgment, or abrief surrender to frustration or anger can suddenlyput the passing driver face to face with theworst of all traffic accidents — the head-oncollision.
335Information Provided by:
So here are some tips for passing:
• Drive ahead. Look down the road, to thesides, and to crossroads for situationsthat might affect your passing patterns. If youhave any doubt whatsoever about makinga successful pass, wait for a better time.
• Watch for traffic signs, pavement markings,and lines. If you can see a sign up aheadthat might indicate a turn or an intersection,delay your pass. A broken center lineusually indicates it is all right to pass, providingthe road ahead is clear. Never cross a solidline on your side of the lane or a double solidline, even if the road seems empty ofapproaching traffic.
• Do not get too close to the vehicle you wantto pass while you are awaiting an opportunity.For one thing, following too closely reducesyour area of vision, especially if you arefollowing a larger vehicle. Also, you will nothave adequate space if the vehicle aheadsuddenly slows or stops. Keep back areasonable distance.
• When it looks like a chance to pass is comingup, start to accelerate but stay in the rightlane and do not get too close. Time your move
so you will be increasing speed as the timecomes to move into the other lane. If the wayis clear to pass, you will have a runningstart that more than makes up for the distanceyou would lose by dropping back. And ifsomething happens to cause you to cancelyour pass, you need only slow down and dropback again and wait for another opportunity.
• If other vehicles are lined up to pass a slowvehicle, wait your turn. But take care thatsomeone is not trying to pass you as you pullout to pass the slow vehicle. Remember toglance over your shoulder and check theblind spot.
• Check your vehicle’s mirrors, glance over yourshoulder, and start your left lane changesignal before moving out of the right lane topass. When you are far enough ahead ofthe passed vehicle to see its front inyour vehicle’s inside mirror, activate the rightlane change signal and move back intothe right lane. Remember that your vehicle’spassenger side outside mirror is convex.The vehicle you just passed may seem to befarther away from you than it really is.
336Information Provided by:
• Try not to pass more than one vehicle at atime on two-lane roads. Reconsider beforepassing the next vehicle.
• Do not overtake a slowly moving vehicle toorapidly. Even though the brake lamps arenot flashing, it may be slowing down or startingto turn.
• If you are being passed, make it easy for thefollowing driver to get ahead of you. Perhapsyou can ease a little to the right.
Loss of ControlLet us review what driving experts say about whathappens when the three control systems — brakes,steering, and acceleration — do not have enoughfriction where the tires meet the road to do what thedriver has asked.
In any emergency, do not give up. Keep trying tosteer and constantly seek an escape route orarea of less danger.
SkiddingIn a skid, a driver can lose control of the vehicle.Defensive drivers avoid most skids by takingreasonable care suited to existing conditions, andby not overdriving those conditions. But skidsare always possible.
The three types of skids correspond to yourvehicle’s three control systems. In the braking skid,your wheels are not rolling. In the steering orcornering skid, too much speed or steering in acurve causes tires to slip and lose cornering force.And in the acceleration skid, too much throttlecauses the driving wheels to spin.
A cornering skid is best handled by easing yourfoot off the accelerator pedal.
Remember: Any traction control system helpsavoid only the acceleration skid. If your tractioncontrol system is off, then an accelerationskid is also best handled by easing your foot offthe accelerator pedal.
337Information Provided by:
If your vehicle starts to slide, ease your foot offthe accelerator pedal and quickly steer theway you want the vehicle to go. If you startsteering quickly enough, your vehicle maystraighten out. Always be ready for a second skidif it occurs.
Of course, traction is reduced when water, snow,ice, gravel, or other material is on the road.For safety, you will want to slow down and adjustyour driving to these conditions. It is importantto slow down on slippery surfaces becausestopping distance will be longer and vehicle controlmore limited.
While driving on a surface with reduced traction, tryyour best to avoid sudden steering, acceleration, orbraking, including reducing vehicle speed byshifting to a lower gear. Any sudden changes couldcause the tires to slide. You may not realize thesurface is slippery until your vehicle is skidding.Learn to recognize warning clues — such asenough water, ice, or packed snow on the road tomake a mirrored surface — and slow down whenyou have any doubt.
Remember: Any Anti-Lock Brake System (ABS)helps avoid only the braking skid.
Racing or Other CompetitiveDriving (XLR-V)See your warranty book before using your vehiclefor racing or other competitive driving.
Notice: If you use your vehicle for racing orother competitive driving, the engine mayuse more oil than it would with normal use.Low oil levels can damage the engine. Be sureto check the oil level often during racing orother competitive driving and keep the level ator near 2 quarts (2 L) above the upper markthat shows the proper operating range on theengine oil dipstick. For information on howto add oil, see Engine Oil on page 377.After the competitive driving, remove excessoil so that the level on the dipstick is not abovethe upper mark that shows the properoperating range.
338Information Provided by:
Driving at NightNight driving is more dangerous than day driving.One reason is that some drivers are likely tobe impaired — by alcohol or drugs, with nightvision problems, or by fatigue.
Here are some tips on night driving.
• Drive defensively.
• Do not drink and drive.
• Adjust the inside rearview mirror to reduce theglare from headlamps behind you.
• Since you cannot see as well, you may needto slow down and keep more space betweenyou and other vehicles.
• Slow down, especially on higher speed roads.Your vehicle’s headlamps can light up only somuch road ahead.
• In remote areas, watch for animals.
• If you are tired, pull off the road in a safeplace and rest.
No one can see as well at night as in the daytime.But as we get older these differences increase.A 50-year-old driver may require at least twice asmuch light to see the same thing at night as a20-year-old.
What you do in the daytime can also affect yournight vision. For example, if you spend theday in bright sunshine you are wise to wearsunglasses. Your eyes will have less troubleadjusting to night. But if you are driving, do notwear sunglasses at night. They may cut down onglare from headlamps, but they also make alot of things invisible.
You can be temporarily blinded by approachingheadlamps. It can take a second or two, oreven several seconds, for your eyes to re-adjustto the dark. When you are faced with severe glare,as from a driver who does not lower the highbeams, or a vehicle with misaimed headlamps,slow down a little. Avoid staring directly intothe approaching headlamps.
339Information Provided by:
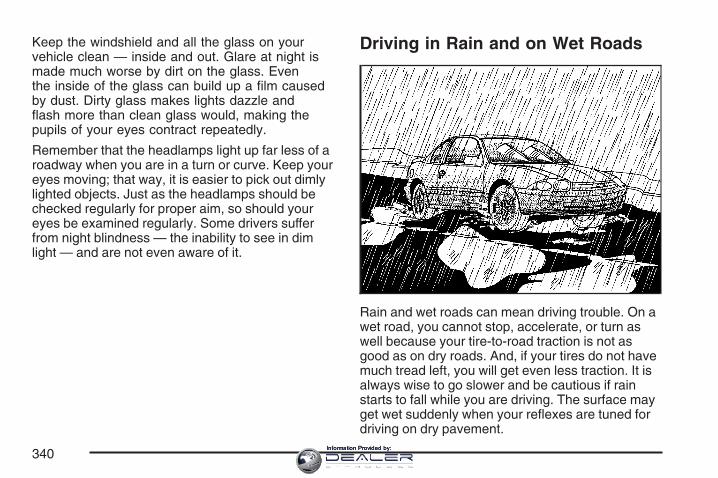
Keep the windshield and all the glass on yourvehicle clean — inside and out. Glare at night ismade much worse by dirt on the glass. Eventhe inside of the glass can build up a film causedby dust. Dirty glass makes lights dazzle andflash more than clean glass would, making thepupils of your eyes contract repeatedly.
Remember that the headlamps light up far less of aroadway when you are in a turn or curve. Keep youreyes moving; that way, it is easier to pick out dimlylighted objects. Just as the headlamps should bechecked regularly for proper aim, so should youreyes be examined regularly. Some drivers sufferfrom night blindness — the inability to see in dimlight — and are not even aware of it.
Driving in Rain and on Wet Roads
Rain and wet roads can mean driving trouble. On awet road, you cannot stop, accelerate, or turn aswell because your tire-to-road traction is not asgood as on dry roads. And, if your tires do not havemuch tread left, you will get even less traction. It isalways wise to go slower and be cautious if rainstarts to fall while you are driving. The surface mayget wet suddenly when your reflexes are tuned fordriving on dry pavement.
340Information Provided by:
The heavier the rain, the harder it is to see. Evenif your windshield wiper blades are in goodshape, a heavy rain can make it harder to seeroad signs and traffic signals, pavement markings,the edge of the road, and even people walking.
It is wise to keep your windshield wiping equipmentin good shape and keep your windshield washerfluid reservoir filled with washer fluid. Replace yourwindshield wiper inserts when they show signsof streaking or missing areas on the windshield, orwhen strips of rubber start to separate from theinserts.
{CAUTION:
Wet brakes can cause accidents. Theymay not work as well in a quick stop andmay cause pulling to one side. You couldlose control of the vehicle.
After driving through a large puddle ofwater or a car wash, apply your brakepedal lightly until your brakes worknormally.
Driving too fast through large water puddles oreven going through some car washes can causeproblems, too. The water may affect yourbrakes. Try to avoid puddles. But if you cannot, tryto slow down before you hit them.
HydroplaningHydroplaning is dangerous. So much water canbuild up under your tires that they can actually rideon the water. This can happen if the road is wetenough and you are going fast enough. When yourvehicle is hydroplaning, it has little or no contactwith the road.
Hydroplaning does not happen often. But it can ifyour tires do not have much tread or if thepressure in one or more is low. It can happen if alot of water is standing on the road. If you cansee reflections from trees, telephone poles,or other vehicles, and raindrops dimple the water’ssurface, there could be hydroplaning.
Hydroplaning usually happens at higher speeds.There just is not a hard and fast rule abouthydroplaning. The best advice is to slow downwhen it is raining.
341Information Provided by:
Driving Through Deep Standing Water
Notice: If you drive too quickly throughdeep puddles or standing water, water cancome in through your engine’s air intake andbadly damage your engine. Never drive throughwater that is slightly lower than the underbodyof your vehicle. If you cannot avoid deeppuddles or standing water, drive through themvery slowly.
Driving Through Flowing Water
{CAUTION:
Flowing or rushing water creates strongforces. If you try to drive through flowingwater, as you might at a low watercrossing, your vehicle can be carriedaway. As little as six inches of flowingwater can carry away a smaller vehicle.
CAUTION: (Continued)
CAUTION: (Continued)
If this happens, you and other vehicleoccupants could drown. Do not ignorepolice warning signs, and otherwise bevery cautious about trying to drivethrough flowing water.
Some Other Rainy Weather Tips• Besides slowing down, allow some extra
following distance. And be especially carefulwhen you pass another vehicle. Allow yourselfmore clear room ahead, and be prepared tohave your view restricted by road spray.
• Have good tires with proper tread depth. SeeTires on page 413.
342Information Provided by:
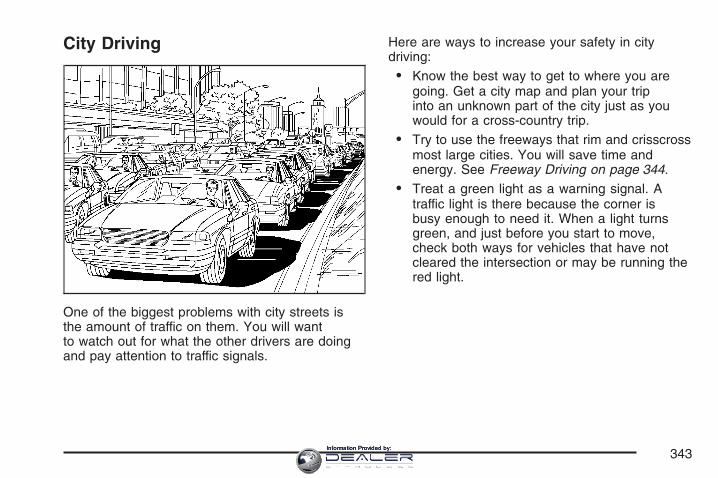
City Driving
One of the biggest problems with city streets isthe amount of traffic on them. You will wantto watch out for what the other drivers are doingand pay attention to traffic signals.
Here are ways to increase your safety in citydriving:
• Know the best way to get to where you aregoing. Get a city map and plan your tripinto an unknown part of the city just as youwould for a cross-country trip.
• Try to use the freeways that rim and crisscrossmost large cities. You will save time andenergy. See Freeway Driving on page 344.
• Treat a green light as a warning signal. Atraffic light is there because the corner isbusy enough to need it. When a light turnsgreen, and just before you start to move,check both ways for vehicles that have notcleared the intersection or may be running thered light.
343Information Provided by:
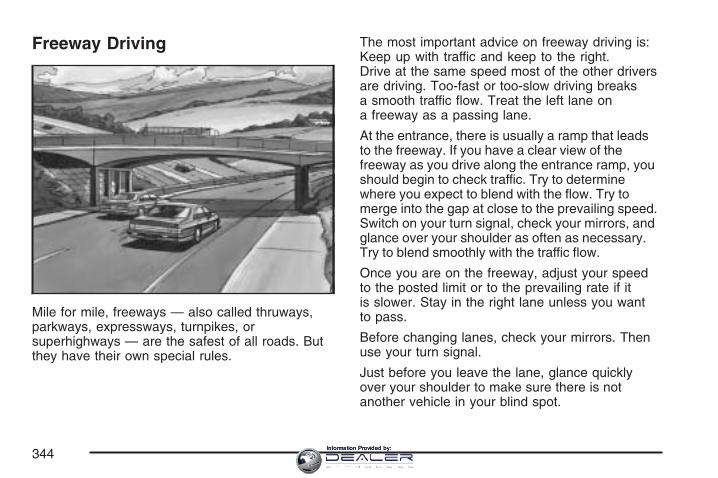
Freeway Driving
Mile for mile, freeways — also called thruways,parkways, expressways, turnpikes, orsuperhighways — are the safest of all roads. Butthey have their own special rules.
The most important advice on freeway driving is:Keep up with traffic and keep to the right.Drive at the same speed most of the other driversare driving. Too-fast or too-slow driving breaksa smooth traffic flow. Treat the left lane ona freeway as a passing lane.
At the entrance, there is usually a ramp that leadsto the freeway. If you have a clear view of thefreeway as you drive along the entrance ramp, youshould begin to check traffic. Try to determinewhere you expect to blend with the flow. Try tomerge into the gap at close to the prevailing speed.Switch on your turn signal, check your mirrors, andglance over your shoulder as often as necessary.Try to blend smoothly with the traffic flow.
Once you are on the freeway, adjust your speedto the posted limit or to the prevailing rate if itis slower. Stay in the right lane unless you wantto pass.
Before changing lanes, check your mirrors. Thenuse your turn signal.
Just before you leave the lane, glance quicklyover your shoulder to make sure there is notanother vehicle in your blind spot.
344Information Provided by:
Once you are moving on the freeway, makecertain you allow a reasonable following distance.
Expect to move slightly slower at night.
When you want to leave the freeway, move to theproper lane well in advance. If you miss yourexit, do not, under any circumstances, stop andback up. Drive on to the next exit.
The exit ramp can be curved, sometimes quitesharply. The exit speed is usually posted. Reduceyour speed according to your speedometer, notto your sense of motion. After driving for anydistance at higher speeds, you may tend to thinkyou are going slower than you actually are.
Before Leaving on a Long TripMake sure you are ready. Try to be well rested. Ifyou must start when you are not fresh — suchas after a day’s work — do not plan to make toomany miles that first part of the journey. Wearcomfortable clothing and shoes you can easilydrive in.
Is your vehicle ready for a long trip? If you keep itserviced and maintained, it is ready to go. If itneeds service, have it done before starting out. Ofcourse, you will find experienced and ableservice experts in GM dealerships all across NorthAmerica. They will be ready and willing to helpif you need it.
Here are some things you can check before a trip:
• Windshield Washer Fluid: Is the reservoirfull? Are all windows clean inside and outside?
• Wiper Blades: Are they in good shape?
• Fuel, Engine Oil, Other Fluids: Have youchecked all levels?
• Lamps: Are they all working? Are the lensesclean?
345Information Provided by:
• Tires: They are vitally important to a safe,trouble-free trip. Is the tread good enoughfor long-distance driving? Are the tiresall inflated to the recommended pressure?
• Weather Forecasts: What is the weatheroutlook along your route? Should youdelay your trip a short time to avoid a majorstorm system?
• Maps: Do you have up-to-date maps?
Highway HypnosisIs there actually such a condition as highwayhypnosis? Or is it just plain falling asleep at thewheel? Call it highway hypnosis, lack ofawareness, or whatever.
There is something about an easy stretch of roadwith the same scenery, along with the hum of thetires on the road, the drone of the engine, and therush of the wind against the vehicle that can make
you sleepy. Do not let it happen to you! If it does,your vehicle can leave the road in less than asecond, and you could crash and be injured.
What can you do about highway hypnosis? First,be aware that it can happen.
Then here are some tips:
• Make sure your vehicle is well ventilated, witha comfortably cool interior.
• Keep your eyes moving. Scan the road aheadand to the sides. Check your rearview mirrorsand your instruments frequently.
• If you get sleepy, pull off the road into a rest,service, or parking area and take a nap, getsome exercise, or both. For safety, treatdrowsiness on the highway as an emergency.
346Information Provided by:
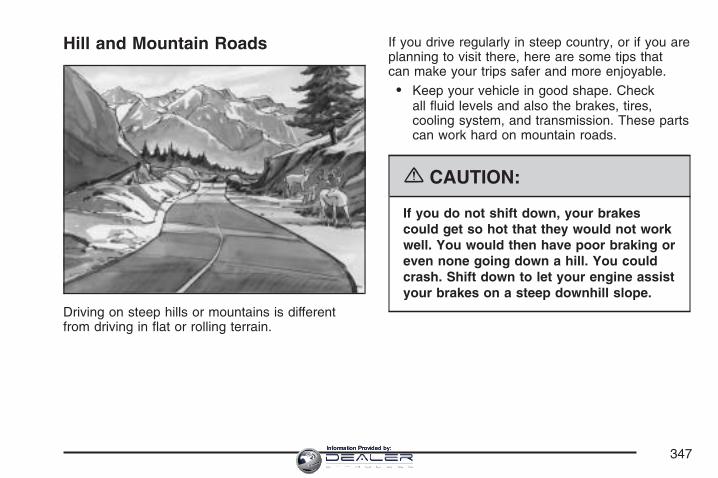
Hill and Mountain Roads
Driving on steep hills or mountains is differentfrom driving in flat or rolling terrain.
If you drive regularly in steep country, or if you areplanning to visit there, here are some tips thatcan make your trips safer and more enjoyable.
• Keep your vehicle in good shape. Checkall fluid levels and also the brakes, tires,cooling system, and transmission. These partscan work hard on mountain roads.
{CAUTION:
If you do not shift down, your brakescould get so hot that they would not workwell. You would then have poor braking oreven none going down a hill. You couldcrash. Shift down to let your engine assistyour brakes on a steep downhill slope.
347Information Provided by:
{CAUTION:
Coasting downhill in NEUTRAL (N) or withthe ignition off is dangerous. Your brakeswill have to do all the work of slowingdown. They could get so hot that theywould not work well. You would then havepoor braking or even none going down ahill. You could crash. Always have yourengine running and your vehicle in gearwhen you go downhill.
• Know how to go down hills. The most importantthing to know is this: let your engine do some ofthe slowing down. Shift to a lower gear whenyou go down a steep or long hill.
• Know how to go uphill. You may want to shiftdown to a lower gear. The lower gears helpcool your engine and transmission, and you canclimb the hill better.
• Stay in your own lane when driving on two-laneroads in hills or mountains. Do not swing wideor cut across the center of the road. Drive atspeeds that let you stay in your own lane.
• As you go over the top of a hill, be alert. Therecould be something in your lane, like a stalledcar or an accident.
• You may see highway signs on mountains thatwarn of special problems. Examples are longgrades, passing or no-passing zones, a fallingrocks area, or winding roads. Be alert to theseand take appropriate action.
348Information Provided by:
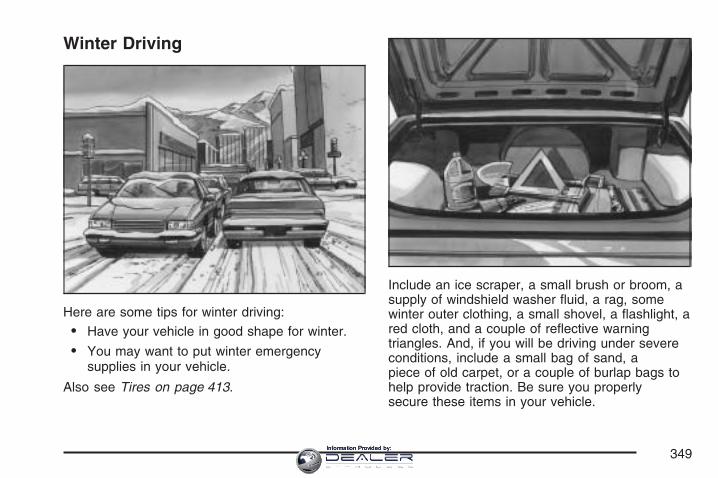
Winter Driving
Here are some tips for winter driving:
• Have your vehicle in good shape for winter.
• You may want to put winter emergencysupplies in your vehicle.
Also see Tires on page 413.
Include an ice scraper, a small brush or broom, asupply of windshield washer fluid, a rag, somewinter outer clothing, a small shovel, a flashlight, ared cloth, and a couple of reflective warningtriangles. And, if you will be driving under severeconditions, include a small bag of sand, apiece of old carpet, or a couple of burlap bags tohelp provide traction. Be sure you properlysecure these items in your vehicle.
349Information Provided by:
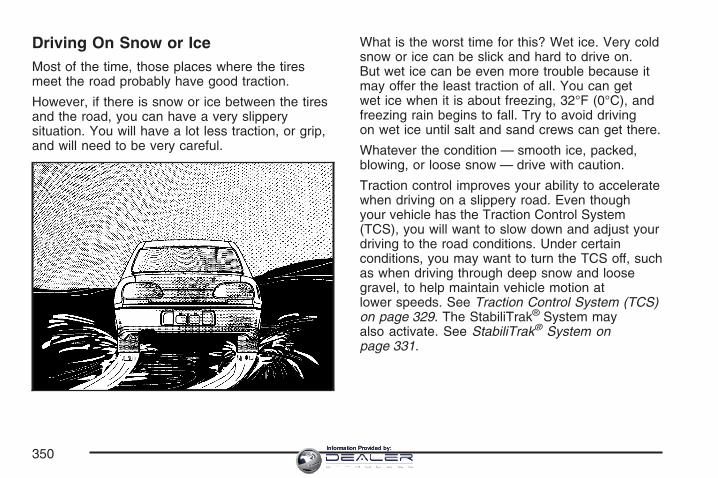
Driving On Snow or IceMost of the time, those places where the tiresmeet the road probably have good traction.
However, if there is snow or ice between the tiresand the road, you can have a very slipperysituation. You will have a lot less traction, or grip,and will need to be very careful.
What is the worst time for this? Wet ice. Very coldsnow or ice can be slick and hard to drive on.But wet ice can be even more trouble because itmay offer the least traction of all. You can getwet ice when it is about freezing, 32°F (0°C), andfreezing rain begins to fall. Try to avoid drivingon wet ice until salt and sand crews can get there.
Whatever the condition — smooth ice, packed,blowing, or loose snow — drive with caution.
Traction control improves your ability to acceleratewhen driving on a slippery road. Even thoughyour vehicle has the Traction Control System(TCS), you will want to slow down and adjust yourdriving to the road conditions. Under certainconditions, you may want to turn the TCS off, suchas when driving through deep snow and loosegravel, to help maintain vehicle motion atlower speeds. See Traction Control System (TCS)on page 329. The StabiliTrak® System mayalso activate. See StabiliTrak® System onpage 331.
350Information Provided by:
The Anti-Lock Brake System (ABS) improves yourvehicle’s stability when you make a hard stopon a slippery road. Even though you have ABS,you will want to begin stopping sooner thanyou would on dry pavement. See Anti-Lock BrakeSystem (ABS) on page 327.
• Allow greater following distance on anyslippery road.
• Watch for slippery spots. The road might befine until you hit a spot that is covered withice. On an otherwise clear road, ice patchesmay appear in shaded areas where thesun cannot reach, such as around clumps oftrees, behind buildings, or under bridges.Sometimes the surface of a curve or anoverpass may remain icy when thesurrounding roads are clear. If you see apatch of ice ahead of you, brake before youare on it. Try not to brake while you areactually on the ice, and avoid sudden steeringmaneuvers.
If You Are Caught in a BlizzardIf you are stopped by heavy snow, you could be ina serious situation. You should probably staywith your vehicle unless you know for sure that youare near help and you can hike through thesnow. Here are some things to do to summonhelp and keep yourself and your passengers safe:
• Turn on your hazard flashers.
• Tie a red cloth to your vehicle to alert policethat you have been stopped by the snow.
• Put on extra clothing or wrap a blanketaround you. If you do not have blankets orextra clothing, make body insulators fromnewspapers, burlap bags, rags, floormats — anything you can wrap aroundyourself or tuck under your clothing tokeep warm.
351Information Provided by:
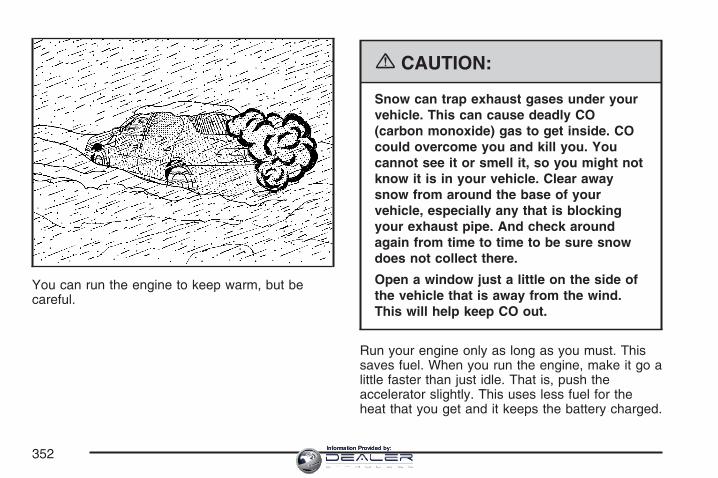
You can run the engine to keep warm, but becareful.
{CAUTION:
Snow can trap exhaust gases under yourvehicle. This can cause deadly CO(carbon monoxide) gas to get inside. COcould overcome you and kill you. Youcannot see it or smell it, so you might notknow it is in your vehicle. Clear awaysnow from around the base of yourvehicle, especially any that is blockingyour exhaust pipe. And check aroundagain from time to time to be sure snowdoes not collect there.
Open a window just a little on the side ofthe vehicle that is away from the wind.This will help keep CO out.
Run your engine only as long as you must. Thissaves fuel. When you run the engine, make it go alittle faster than just idle. That is, push theaccelerator slightly. This uses less fuel for theheat that you get and it keeps the battery charged.
352Information Provided by:

You will need a well-charged battery to restart thevehicle, and possibly for signaling later on withyour headlamps. Let the heater run for a while.
Then, shut the engine off and close the windowalmost all the way to preserve the heat. Startthe engine again and repeat this only when youfeel really uncomfortable from the cold. But do it aslittle as possible. Preserve the fuel as long asyou can. To help keep warm, you can get out ofthe vehicle and do some fairly vigorous exercisesevery half hour or so until help comes.
If Your Vehicle is Stuck in Sand,Mud, Ice, or SnowIn order to free your vehicle when it is stuck, youwill need to spin the wheels, but you do notwant to spin your wheels too fast. The methodknown as rocking can help you get out when youare stuck, but you must use caution.
{CAUTION:
If you let your vehicle’s tires spin at highspeed, they can explode, and you orothers could be injured. And, thetransmission or other parts of the vehiclecan overheat. That could cause an enginecompartment fire or other damage. Whenyou are stuck, spin the wheels as little aspossible. Do not spin the wheels above35 mph (55 km/h) as shown on thespeedometer.
Notice: Spinning the wheels can destroy partsof your vehicle as well as the tires. If youspin the wheels too fast while shiftingthe transmission back and forth, you candestroy the transmission.
For information about using tire chains on yourvehicle, see Tire Chains on page 435.
353Information Provided by:
Rocking Your Vehicle to Get It OutFirst, turn the steering wheel left and right.That will clear the area around the front wheels.You should turn the traction control systemoff. See Traction Control System (TCS) onpage 329. Then shift back and forth betweenREVERSE (R) and a forward gear, spinning thewheels as little as possible. Release theaccelerator pedal while you shift, and press lightlyon the accelerator pedal when the transmissionis in gear. By slowly spinning the wheels inthe forward and reverse directions, you will causea rocking motion that may free your vehicle. Ifthat does not get your vehicle out after a few tries,it may need to be towed out. If your vehicledoes need to be towed out, see Towing YourVehicle on page 359.
Loading Your VehicleIt is very important to know how much weight yourvehicle can carry. This weight is called the vehiclecapacity weight and includes the weight of alloccupants, cargo, and all nonfactory-installedoptions. Two labels on your vehicle show how muchweight it may properly carry, the Tire and LoadingInformation label and the Certification label.
{CAUTION:
Do not load your vehicle any heavier thanthe Gross Vehicle Weight Rating (GVWR),or either the maximum front or rear GrossAxle Weight Rating (GAWR). If you do,parts on your vehicle can break, and itcan change the way your vehicle handles.These could cause you to lose controland crash. Also, overloading can shortenthe life of your vehicle.
354Information Provided by:

Tire and Loading Information Label
A vehicle specific Tire and Loading Informationlabel is attached to the center pillar (B-pillar)of your vehicle. With the driver’s door open, youwill find the label attached below the doorlatch. This label shows the number of occupantseating positions (A), and the maximum vehiclecapacity weight (B) in kilograms and pounds.
The Tire and Loading Information label also showsthe size of the original equipment tires (C) andthe recommended cold tire inflation pressures (D).For more information on tires and inflation seeTires on page 413 and Inflation - Tire Pressure onpage 422.
There is also important loading information on thevehicle Certification label. It tells you the GrossVehicle Weight Rating (GVWR) and the GrossAxle Weight Rating (GAWR) for the front and rearaxle. See “Certification Label” later in thissection.
Steps for Determining Correct Load Limit1. Locate the statement “The combined
weight of occupants and cargo should neverexceed XXX kg or XXX lbs” on yourvehicle’s placard.
2. Determine the combined weight of the driverand passengers that will be riding in yourvehicle.
3. Subtract the combined weight of the driverand passengers from XXX kg or XXX lbs.
Label Example
355Information Provided by:
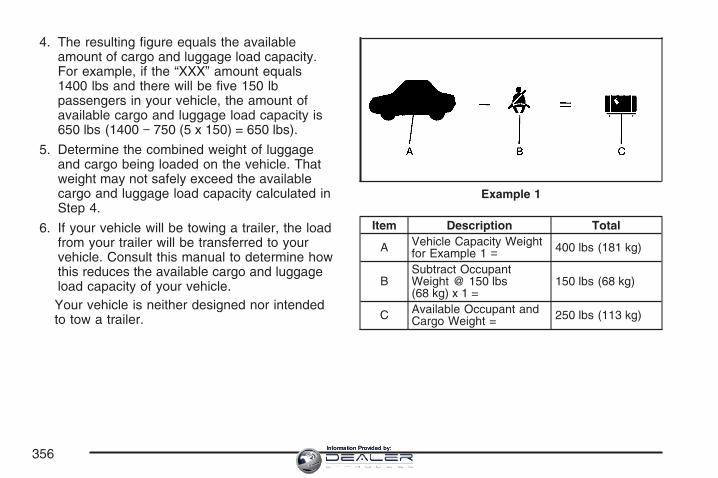
4. The resulting figure equals the availableamount of cargo and luggage load capacity.For example, if the “XXX” amount equals1400 lbs and there will be five 150 lbpassengers in your vehicle, the amount ofavailable cargo and luggage load capacity is650 lbs (1400 − 750 (5 x 150) = 650 lbs).
5. Determine the combined weight of luggageand cargo being loaded on the vehicle. Thatweight may not safely exceed the availablecargo and luggage load capacity calculated inStep 4.
6. If your vehicle will be towing a trailer, the loadfrom your trailer will be transferred to yourvehicle. Consult this manual to determine howthis reduces the available cargo and luggageload capacity of your vehicle.Your vehicle is neither designed nor intendedto tow a trailer.
Item Description Total
A Vehicle Capacity Weightfor Example 1 = 400 lbs (181 kg)
BSubtract OccupantWeight @ 150 lbs(68 kg) x 1 =
150 lbs (68 kg)
C Available Occupant andCargo Weight = 250 lbs (113 kg)
Example 1
356Information Provided by:
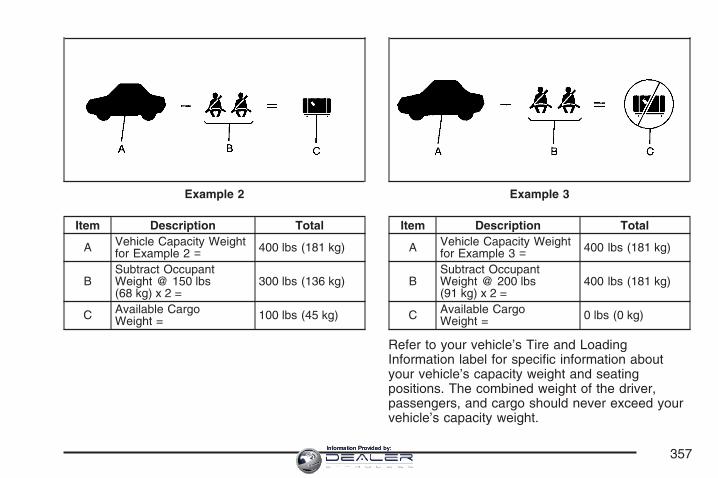
Item Description Total
A Vehicle Capacity Weightfor Example 2 = 400 lbs (181 kg)
BSubtract OccupantWeight @ 150 lbs(68 kg) x 2 =
300 lbs (136 kg)
C Available CargoWeight = 100 lbs (45 kg)
Item Description Total
A Vehicle Capacity Weightfor Example 3 = 400 lbs (181 kg)
BSubtract OccupantWeight @ 200 lbs(91 kg) x 2 =
400 lbs (181 kg)
C Available CargoWeight = 0 lbs (0 kg)
Refer to your vehicle’s Tire and LoadingInformation label for specific information aboutyour vehicle’s capacity weight and seatingpositions. The combined weight of the driver,passengers, and cargo should never exceed yourvehicle’s capacity weight.
Example 2 Example 3
357Information Provided by:
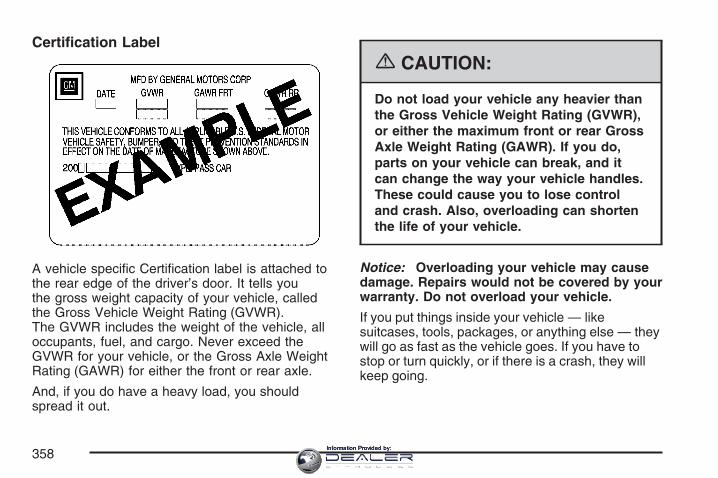
Certification Label
A vehicle specific Certification label is attached tothe rear edge of the driver’s door. It tells youthe gross weight capacity of your vehicle, calledthe Gross Vehicle Weight Rating (GVWR).The GVWR includes the weight of the vehicle, alloccupants, fuel, and cargo. Never exceed theGVWR for your vehicle, or the Gross Axle WeightRating (GAWR) for either the front or rear axle.
And, if you do have a heavy load, you shouldspread it out.
{CAUTION:
Do not load your vehicle any heavier thanthe Gross Vehicle Weight Rating (GVWR),or either the maximum front or rear GrossAxle Weight Rating (GAWR). If you do,parts on your vehicle can break, and itcan change the way your vehicle handles.These could cause you to lose controland crash. Also, overloading can shortenthe life of your vehicle.
Notice: Overloading your vehicle may causedamage. Repairs would not be covered by yourwarranty. Do not overload your vehicle.
If you put things inside your vehicle — likesuitcases, tools, packages, or anything else — theywill go as fast as the vehicle goes. If you have tostop or turn quickly, or if there is a crash, they willkeep going.
358Information Provided by:

{CAUTION:
Things you put inside your vehicle canstrike and injure people in a sudden stopor turn, or in a crash.
• Put things in the rear area of yourvehicle. Try to spread the weightevenly.
• Never stack heavier things, likesuitcases, inside the vehicle so thatsome of them are above the tops ofthe seats.
• Do not leave an unsecured childrestraint in your vehicle.
• When you carry something inside thevehicle, secure it whenever you can.
Towing
Towing Your VehicleConsult your dealer or a professional towingservice if you need to have your disabled vehicletowed. See Roadside Service on page 487.
Recreational Vehicle TowingRecreational vehicle towing means towing yourvehicle behind another vehicle — such as behinda motorhome. The two most common types ofrecreational vehicle towing are known as “dinghytowing”, towing your vehicle with all four wheelson the ground, and “dolly towing”, towing yourvehicle with two wheels on the ground andtwo wheels up on a device known as a “dolly”.Your vehicle was not designed to be towedwith any of its wheels on the ground. If yourvehicle must be towed, see “Towing Your Vehicle”earlier in this section.
Towing a TrailerYour XLR is neither designed nor intended to towa trailer.
359Information Provided by:

✍ NOTES
360Information Provided by:
Service ........................................................ 363Accessories and Modifications ................... 363California Proposition 65 Warning .............. 364Doing Your Own Service Work .................. 364Adding Equipment to the Outside of Your
Vehicle ................................................... 365Fuel ............................................................. 365
Gasoline Octane ........................................ 366Gasoline Specifications .............................. 366California Fuel ........................................... 367Additives ................................................... 367Fuels in Foreign Countries ........................ 368Filling the Tank ......................................... 369Filling a Portable Fuel Container ............... 371
Checking Things Under the Hood .............. 372Hood Release ........................................... 373Engine Compartment Overview .................. 374Engine Oil ................................................. 377Engine Oil Life System .............................. 380Supercharger Oil ....................................... 382Engine Air Cleaner/Filter ............................ 382Automatic Transmission Fluid .................... 384Engine Coolant .......................................... 385Coolant Surge Tank Pressure Cap .............. 388
Engine Overheating ................................... 388Overheated Engine Protection
Operating Mode ..................................... 390Cooling System ......................................... 391Power Steering Fluid ................................. 396Windshield Washer Fluid ........................... 397Brakes ...................................................... 399Battery ...................................................... 402Jump Starting ............................................ 403
Rear Axle .................................................... 407Headlamp Aiming ........................................ 408
Headlamp Vertical Aiming .......................... 410Bulb Replacement ....................................... 412Windshield Replacement ............................ 412Windshield Wiper Blade Replacement ....... 412Tires ............................................................ 413
Winter Tires (XLR-V) ................................. 414Tire Sidewall Labeling ............................... 415Tire Terminology and Definitions ............... 417Run-Flat Tires ........................................... 420Inflation - Tire Pressure ............................. 422Tire Pressure Monitor System ................... 423Tire Inspection and Rotation ...................... 426
Section 6 Service and Appearance Care
361Information Provided by:
When It Is Time for New Tires .................. 428Buying New Tires ...................................... 428Different Size Tires and Wheels ................ 430Uniform Tire Quality Grading ..................... 431Wheel Alignment and Tire Balance ............ 432Wheel Replacement .................................. 432Tire Chains ............................................... 435Lifting Your Vehicle ................................... 435If a Tire Goes Flat .................................... 440
Appearance Care ........................................ 441Cleaning the Inside of Your Vehicle .......... 441Fabric/Carpet ............................................. 443Leather ...................................................... 444Instrument Panel, Vinyl, and Other
Plastic Surfaces ..................................... 444Wood Panels ............................................. 445Speaker Covers ........................................ 445Care of Safety Belts .................................. 445Weatherstrips ............................................ 445Washing Your Vehicle ............................... 446Cleaning Exterior Lamps/Lenses ................ 446Finish Care ............................................... 447
Windshield and Wiper Blades .................... 447Aluminum or Chrome-Plated Wheels ......... 448Tires ......................................................... 449Sheet Metal Damage ................................. 449Finish Damage .......................................... 449Underbody Maintenance ............................ 449Chemical Paint Spotting ............................ 450Vehicle Care/Appearance Materials ............ 450
Vehicle Identification .................................. 451Vehicle Identification Number (VIN) ........... 451Service Parts Identification Label ............... 451
Electrical System ........................................ 452Add-On Electrical Equipment ..................... 452Windshield Wiper Fuses ............................ 452Power Windows and Other Power
Options .................................................. 452Fuses and Circuit Breakers ....................... 453Instrument Panel Fuse Block ..................... 453Underhood Fuse Block .............................. 455
Capacities and Specifications .................... 458
Section 6 Service and Appearance Care
362Information Provided by:
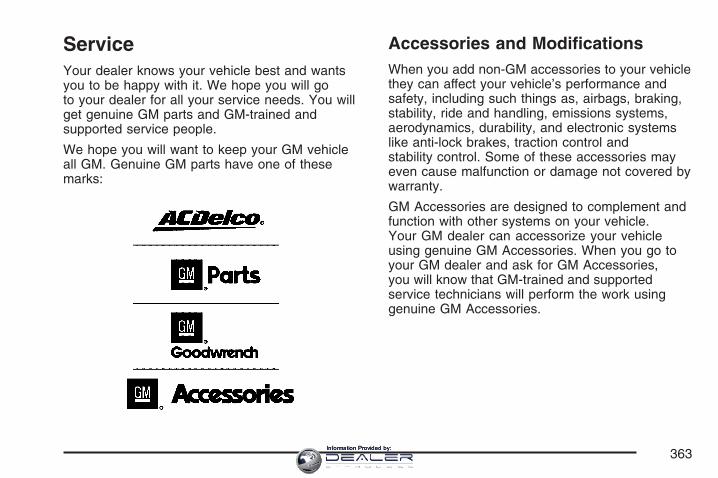
ServiceYour dealer knows your vehicle best and wantsyou to be happy with it. We hope you will goto your dealer for all your service needs. You willget genuine GM parts and GM-trained andsupported service people.
We hope you will want to keep your GM vehicleall GM. Genuine GM parts have one of thesemarks:
Accessories and ModificationsWhen you add non-GM accessories to your vehiclethey can affect your vehicle’s performance andsafety, including such things as, airbags, braking,stability, ride and handling, emissions systems,aerodynamics, durability, and electronic systemslike anti-lock brakes, traction control andstability control. Some of these accessories mayeven cause malfunction or damage not covered bywarranty.
GM Accessories are designed to complement andfunction with other systems on your vehicle.Your GM dealer can accessorize your vehicleusing genuine GM Accessories. When you go toyour GM dealer and ask for GM Accessories,you will know that GM-trained and supportedservice technicians will perform the work usinggenuine GM Accessories.
363Information Provided by:
California Proposition 65 WarningMost motor vehicles, including this one, containand/or emit chemicals known to the State ofCalifornia to cause cancer and birth defects orother reproductive harm. Engine exhaust,many parts and systems (including some insidethe vehicle), many fluids, and some componentwear by-products contain and/or emit thesechemicals.
Doing Your Own Service Work
{CAUTION:
You can be injured and your vehicle couldbe damaged if you try to do service workon a vehicle without knowing enoughabout it.
• Be sure you have sufficient knowledge,experience, the proper replacementparts, and tools before you attempt anyvehicle maintenance task.
• Be sure to use the proper nuts, bolts,and other fasteners. English and metricfasteners can be easily confused. If youuse the wrong fasteners, parts can laterbreak or fall off. You could be hurt.
If you want to do some of your own service work,you will want to use the proper service manual.It tells you much more about how to service yourvehicle than this manual can. To order theproper service manual, see Service PublicationsOrdering Information on page 497.
364Information Provided by:
Your vehicle has an airbag system. Beforeattempting to do your own service work, seeServicing Your Airbag-Equipped Vehicle onpage 58.
You should keep a record with all parts receiptsand list the mileage and the date of any servicework you perform. See Maintenance Recordon page 477.
Adding Equipment to the Outside ofYour VehicleThings you might add to the outside of yourvehicle can affect the airflow around it. This maycause wind noise and affect windshield washerperformance. Check with your dealer beforeadding equipment to the outside of your vehicle.
FuelUse of the recommended fuel is an important partof the proper maintenance of your vehicle. Tohelp keep your engine clean and maintain optimumvehicle performance, GM recommends the useof gasoline advertised as TOP TIER DetergentGasoline.
The 8th digit of your Vehicle Identification Number(VIN) shows the code letter or number thatidentifies your engine. You will find the VIN at thetop left of the instrument panel. See VehicleIdentification Number (VIN) on page 451.
365Information Provided by:
Gasoline OctaneIf your vehicle has the 4.6L V8 engine (VINCode A), use premium unleaded gasoline with aposted octane rating of 91 or higher. You may alsouse regular unleaded gasoline rated at 87octane or higher, but your vehicle’s accelerationmay be slightly reduced, and you may noticea slight audible knocking noise, commonly referredto as spark knock. If the octane is less than 87,you may notice a heavy knocking noise when youdrive. If this occurs, use a gasoline rated at 87octane or higher as soon as possible. Otherwise,you might damage your engine. If you areusing gasoline rated at 87 octane or higher andyou hear heavy knocking, your engine needsservice.
If your vehicle has the 4.4L V8 engine (VINCode D), use premium unleaded gasoline with aposted octane rating of 91 or higher. For bestperformance, use premium unleaded gasoline witha posted octane rating of 93. In an emergency,
you can use regular unleaded gasoline with anoctane rating of 87 or higher. If 87 octane fuel isused, do not perform any aggressive drivingmaneuvers such as wide open throttle applications.You may also hear audible spark knock duringacceleration. Refill your tank with premium fuel assoon as possible to avoid damaging yourengine. If you are using gasoline rated at 91octane or higher and you hear heavy knocking,your engine needs service.
Gasoline SpecificationsAt a minimum, gasoline should meet ASTMspecification D 4814 in the United States orCAN/CGSB-3.5 in Canada. Some gasolines maycontain an octane-enhancing additive calledmethylcyclopentadienyl manganese tricarbonyl(MMT). General Motors recommends against theuse of gasolines containing MMT. See Additiveson page 367 for additional information.
366Information Provided by:
California FuelIf your vehicle is certified to meet CaliforniaEmissions Standards, it is designed to operate onfuels that meet California specifications. Seethe underhood emission control label. If this fuel isnot available in states adopting Californiaemissions standards, your vehicle will operatesatisfactorily on fuels meeting federalspecifications, but emission control systemperformance may be affected. The malfunctionindicator lamp may turn on and your vehicle mayfail a smog-check test. See Malfunction IndicatorLamp on page 196. If this occurs, return toyour authorized GM dealer for diagnosis. If it isdetermined that the condition is caused by the typeof fuel used, repairs may not be covered byyour warranty.
AdditivesTo provide cleaner air, all gasolines in the UnitedStates are now required to contain additivesthat will help prevent engine and fuel systemdeposits from forming, allowing your emissioncontrol system to work properly. In most cases,you should not have to add anything to your fuel.However, some gasolines contain only theminimum amount of additive required to meet U.S.Environmental Protection Agency regulations.To help keep fuel injectors and intake valves clean,or if your vehicle experiences problems due todirty injectors or valves, look for gasoline that isadvertised as TOP TIER Detergent Gasoline. Also,your dealer has additives that will help correctand prevent most deposit-related problems.
367Information Provided by:
Gasolines containing oxygenates, such as ethersand ethanol, and reformulated gasolines maybe available in your area. General Motorsrecommends that you use these gasolines if theycomply with the specifications described earlier.However, E85 (85% ethanol) and other fuelscontaining more than 10% ethanol must not beused in vehicles that were not designed forthose fuels.
Notice: Your vehicle was not designed forfuel that contains methanol. Do not usefuel containing methanol. It can corrode metalparts in your fuel system and also damagethe plastic and rubber parts. That damagewould not be covered under your warranty.
Some gasolines that are not reformulated for lowemissions may contain an octane-enhancingadditive called methylcyclopentadienyl manganesetricarbonyl (MMT); ask the attendant where youbuy gasoline whether the fuel contains MMT.General Motors recommends against the use ofsuch gasolines. Fuels containing MMT can reducethe life of spark plugs and the performance ofthe emission control system may be affected. Themalfunction indicator lamp may turn on. If thisoccurs, return to your dealer for service.
Fuels in Foreign CountriesIf you plan on driving in another country outsidethe United States or Canada, the proper fuel maybe hard to find. Never use leaded gasoline orany other fuel not recommended in the previoustext on fuel. Costly repairs caused by use ofimproper fuel would not be covered by yourwarranty.
To check the fuel availability, ask an auto club, orcontact a major oil company that does businessin the country where you will be driving.
368Information Provided by:
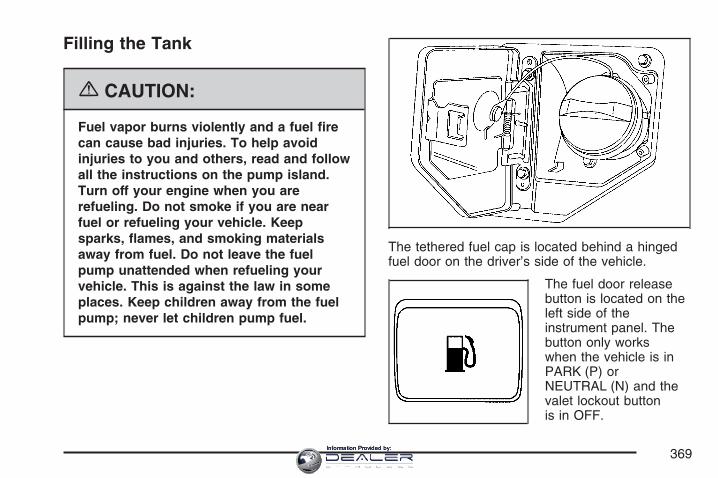
Filling the Tank
{CAUTION:
Fuel vapor burns violently and a fuel firecan cause bad injuries. To help avoidinjuries to you and others, read and followall the instructions on the pump island.Turn off your engine when you arerefueling. Do not smoke if you are nearfuel or refueling your vehicle. Keepsparks, flames, and smoking materialsaway from fuel. Do not leave the fuelpump unattended when refueling yourvehicle. This is against the law in someplaces. Keep children away from the fuelpump; never let children pump fuel.
The tethered fuel cap is located behind a hingedfuel door on the driver’s side of the vehicle.
The fuel door releasebutton is located on theleft side of theinstrument panel. Thebutton only workswhen the vehicle is inPARK (P) orNEUTRAL (N) and thevalet lockout buttonis in OFF.
369Information Provided by:
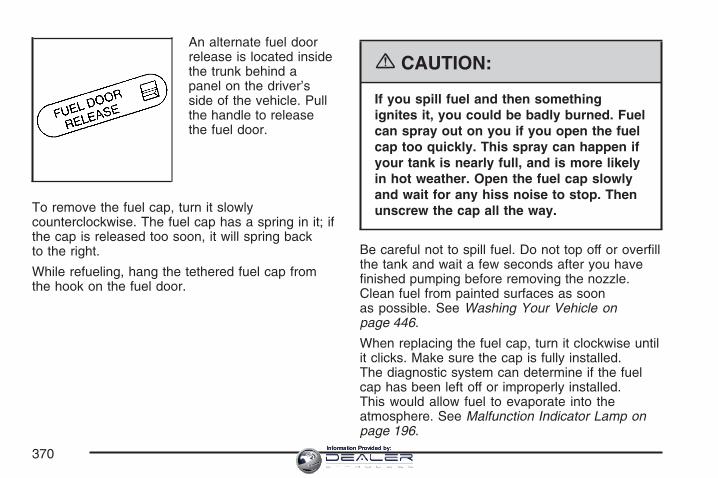
An alternate fuel doorrelease is located insidethe trunk behind apanel on the driver’sside of the vehicle. Pullthe handle to releasethe fuel door.
To remove the fuel cap, turn it slowlycounterclockwise. The fuel cap has a spring in it; ifthe cap is released too soon, it will spring backto the right.
While refueling, hang the tethered fuel cap fromthe hook on the fuel door.
{CAUTION:
If you spill fuel and then somethingignites it, you could be badly burned. Fuelcan spray out on you if you open the fuelcap too quickly. This spray can happen ifyour tank is nearly full, and is more likelyin hot weather. Open the fuel cap slowlyand wait for any hiss noise to stop. Thenunscrew the cap all the way.
Be careful not to spill fuel. Do not top off or overfillthe tank and wait a few seconds after you havefinished pumping before removing the nozzle.Clean fuel from painted surfaces as soonas possible. See Washing Your Vehicle onpage 446.
When replacing the fuel cap, turn it clockwise untilit clicks. Make sure the cap is fully installed.The diagnostic system can determine if the fuelcap has been left off or improperly installed.This would allow fuel to evaporate into theatmosphere. See Malfunction Indicator Lamp onpage 196.
370Information Provided by:

The CHECK GAS CAP message in the DriverInformation Center (DIC) will be displayed ifthe fuel cap is not properly installed.
{CAUTION:
If a fire starts while you are refueling, donot remove the nozzle. Shut off the flow offuel by shutting off the pump or bynotifying the station attendant. Leave thearea immediately.
Notice: If you need a new fuel cap, be sure toget the right type. Your dealer can get onefor you. If you get the wrong type, it may notfit properly. This may cause your malfunctionindicator lamp to light and may damageyour fuel tank and emissions system. SeeMalfunction Indicator Lamp on page 196.
Filling a Portable Fuel Container
{CAUTION:
Never fill a portable fuel container while itis in your vehicle. Static electricitydischarge from the container can ignite thegasoline vapor. You can be badly burnedand your vehicle damaged if this occurs.To help avoid injury to you and others:
• Dispense gasoline only into approvedcontainers.
• Do not fill a container while it is inside avehicle, in a vehicle’s trunk, pickupbed, or on any surface other than theground.
• Bring the fill nozzle in contact with theinside of the fill opening beforeoperating the nozzle. Contact shouldbe maintained until the filling iscomplete.
• Do not smoke while pumping gasoline.
371Information Provided by:
Checking Things Underthe Hood
{CAUTION:
An electric fan under the hood can start upand injure you even when the engine is notrunning. Keep hands, clothing, and toolsaway from any underhood electric fan.
{CAUTION:
Things that burn can get on hot engineparts and start a fire. These includeliquids like fuel, oil, coolant, brake fluid,windshield washer and other fluids, andplastic or rubber. You or others could beburned. Be careful not to drop or spillthings that will burn onto a hot engine.
372Information Provided by:

Hood ReleaseTo lift the hood, use the following steps:
1. Pull the lever withthis symbol on it. Itis located on thelower left side of theinstrument panel.
2. Then go to the front of the vehicle and findthe secondary hood release lever. The leveris located under the hood near the centerof the vehicle. Move the release lever to theright and raise the hood.
Before closing the hood, be sure all filler caps areon properly. Then pull the hood down andclose it firmly.
373Information Provided by:
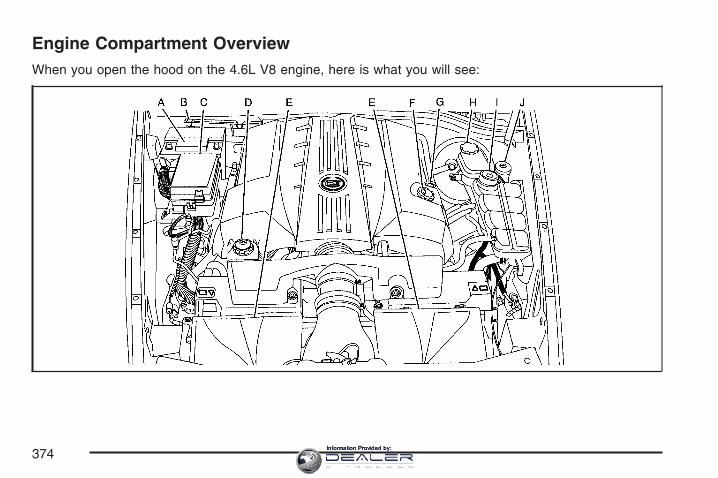
Engine Compartment OverviewWhen you open the hood on the 4.6L V8 engine, here is what you will see:
374Information Provided by:
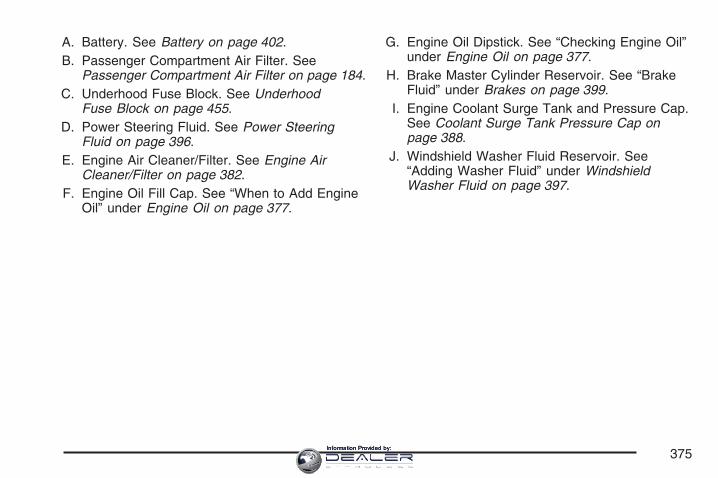
A. Battery. See Battery on page 402.B. Passenger Compartment Air Filter. See
Passenger Compartment Air Filter on page 184.C. Underhood Fuse Block. See Underhood
Fuse Block on page 455.D. Power Steering Fluid. See Power Steering
Fluid on page 396.E. Engine Air Cleaner/Filter. See Engine Air
Cleaner/Filter on page 382.F. Engine Oil Fill Cap. See “When to Add Engine
Oil” under Engine Oil on page 377.
G. Engine Oil Dipstick. See “Checking Engine Oil”under Engine Oil on page 377.
H. Brake Master Cylinder Reservoir. See “BrakeFluid” under Brakes on page 399.
I. Engine Coolant Surge Tank and Pressure Cap.See Coolant Surge Tank Pressure Cap onpage 388.
J. Windshield Washer Fluid Reservoir. See“Adding Washer Fluid” under WindshieldWasher Fluid on page 397.
375Information Provided by:
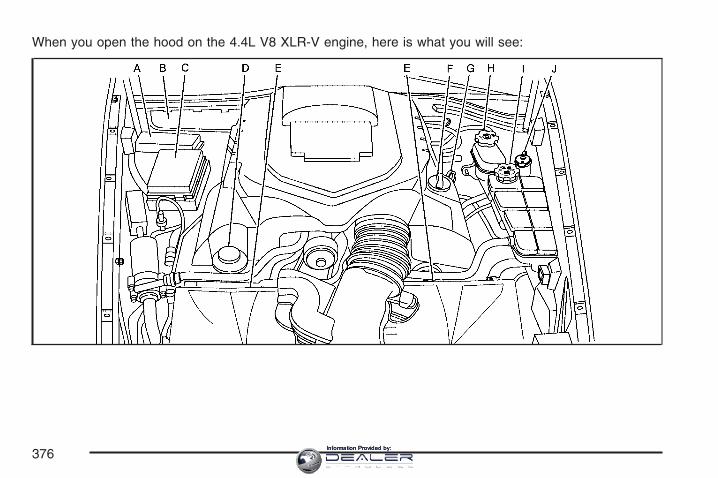
When you open the hood on the 4.4L V8 XLR-V engine, here is what you will see:
376Information Provided by:
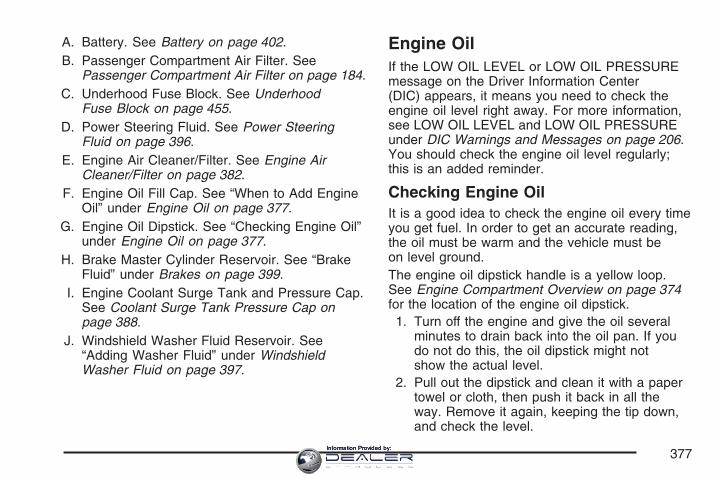
A. Battery. See Battery on page 402.B. Passenger Compartment Air Filter. See
Passenger Compartment Air Filter on page 184.C. Underhood Fuse Block. See Underhood
Fuse Block on page 455.D. Power Steering Fluid. See Power Steering
Fluid on page 396.E. Engine Air Cleaner/Filter. See Engine Air
Cleaner/Filter on page 382.F. Engine Oil Fill Cap. See “When to Add Engine
Oil” under Engine Oil on page 377.G. Engine Oil Dipstick. See “Checking Engine Oil”
under Engine Oil on page 377.H. Brake Master Cylinder Reservoir. See “Brake
Fluid” under Brakes on page 399.I. Engine Coolant Surge Tank and Pressure Cap.
See Coolant Surge Tank Pressure Cap onpage 388.
J. Windshield Washer Fluid Reservoir. See“Adding Washer Fluid” under WindshieldWasher Fluid on page 397.
Engine OilIf the LOW OIL LEVEL or LOW OIL PRESSUREmessage on the Driver Information Center(DIC) appears, it means you need to check theengine oil level right away. For more information,see LOW OIL LEVEL and LOW OIL PRESSUREunder DIC Warnings and Messages on page 206.You should check the engine oil level regularly;this is an added reminder.
Checking Engine OilIt is a good idea to check the engine oil every timeyou get fuel. In order to get an accurate reading,the oil must be warm and the vehicle must beon level ground.The engine oil dipstick handle is a yellow loop.See Engine Compartment Overview on page 374for the location of the engine oil dipstick.1. Turn off the engine and give the oil several
minutes to drain back into the oil pan. If youdo not do this, the oil dipstick might notshow the actual level.
2. Pull out the dipstick and clean it with a papertowel or cloth, then push it back in all theway. Remove it again, keeping the tip down,and check the level.
377Information Provided by:
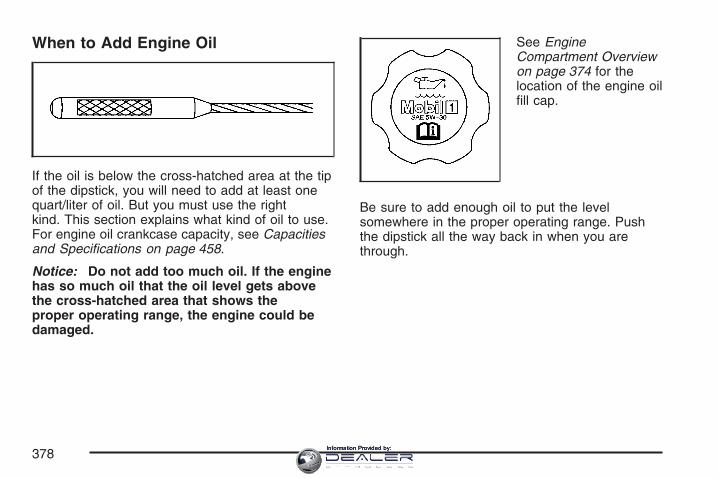
When to Add Engine Oil
If the oil is below the cross-hatched area at the tipof the dipstick, you will need to add at least onequart/liter of oil. But you must use the rightkind. This section explains what kind of oil to use.For engine oil crankcase capacity, see Capacitiesand Specifications on page 458.
Notice: Do not add too much oil. If the enginehas so much oil that the oil level gets abovethe cross-hatched area that shows theproper operating range, the engine could bedamaged.
See EngineCompartment Overviewon page 374 for thelocation of the engine oilfill cap.
Be sure to add enough oil to put the levelsomewhere in the proper operating range. Pushthe dipstick all the way back in when you arethrough.
378Information Provided by:
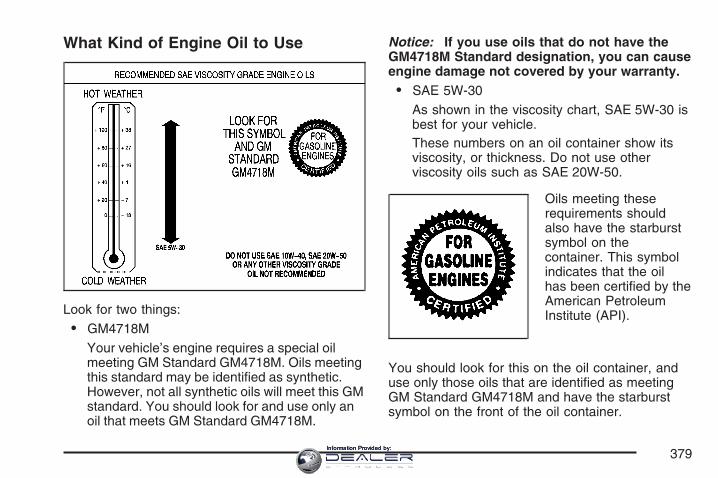
What Kind of Engine Oil to Use
Look for two things:
• GM4718M
Your vehicle’s engine requires a special oilmeeting GM Standard GM4718M. Oils meetingthis standard may be identified as synthetic.However, not all synthetic oils will meet this GMstandard. You should look for and use only anoil that meets GM Standard GM4718M.
Notice: If you use oils that do not have theGM4718M Standard designation, you can causeengine damage not covered by your warranty.• SAE 5W-30
As shown in the viscosity chart, SAE 5W-30 isbest for your vehicle.These numbers on an oil container show itsviscosity, or thickness. Do not use otherviscosity oils such as SAE 20W-50.
Oils meeting theserequirements shouldalso have the starburstsymbol on thecontainer. This symbolindicates that the oilhas been certified by theAmerican PetroleumInstitute (API).
You should look for this on the oil container, anduse only those oils that are identified as meetingGM Standard GM4718M and have the starburstsymbol on the front of the oil container.
379Information Provided by:
Your vehicle’s engine is filled at the factory with aMobil 1® synthetic oil, which meets allrequirements for your vehicle.
Substitute Engine Oil: When adding oil to maintainengine oil level, oil meeting GM StandardGM4718M may not be available. You can addsubstitute oil designated SAE 5W-30 withthe starburst symbol at all temperatures. Substituteoil not meeting GM Standard GM4718M shouldnot be used for an oil change.
Engine Oil AdditivesDo not add anything to the oil. The recommendedoils with the starburst symbol that meet GMStandard GM4718M are all you will need for goodperformance and engine protection.
Engine Oil Life System
When to Change Engine OilYour vehicle has a computer system that lets youknow when to change the engine oil and filter.This is based on engine revolutions and enginetemperature, and not on mileage. Based on drivingconditions, the mileage at which an oil changewill be indicated can vary considerably. For the oillife system to work properly, you must reset thesystem every time the oil is changed.
Notice: If your vehicle is an XLR-V model, theengine uses a special oil filter. The use ofany other engine oil filter could lead to filterfailure and result in severe engine damage.Damage caused by use of the wrong engine oilfilter would not be covered by your newvehicle warranty.
380Information Provided by:
When the system has calculated that oil life hasbeen diminished, it will indicate that an oil changeis necessary. A CHANGE OIL NOW messagein the DIC will come on. See DIC Warnings andMessages on page 206. Change your oil assoon as possible within the next 600 miles(1 000 km). It is possible that, if you are drivingunder the best conditions, the oil life system maynot indicate that an oil change is necessary forover a year. However, your engine oil andfilter must be changed at least once a year and atthis time the system must be reset. Your dealerhas GM-trained service people who will performthis work using genuine GM parts and resetthe system. It is also important to check your oilregularly and keep it at the proper level.
If the system is ever reset accidentally, you mustchange your oil at 3,000 miles (5 000 km)since your last oil change. Remember to reset theoil life system whenever the oil is changed.
How to Reset the Engine Oil LifeSystem and the Oil Life IndicatorThe Engine Oil Life System calculates when tochange your engine oil and filter based on vehicleuse. Anytime your oil is changed, reset thesystem so it can calculate when the next oilchange is required. If a situation occurs where youchange your oil prior to a CHANGE OIL NOWmessage in the DIC being turned on, resetthe system.
After the oil has been changed, the CHANGE OILNOW message and the oil life indicator mustbe reset. To reset the message use the followingprocedure:
1. Press the up or down arrow to scroll the DICto show OIL LIFE.
2. Once the XXX% ENGINE OIL LIFE menu itemis highlighted, press and hold the RESETbutton until the percentage shows 100%.If the percentage does not return to 100% or ifthe CHANGE OIL NOW message comesback on when you start your vehicle,the engine oil life system has not reset.Repeat the procedure.
381Information Provided by:
What to Do with Used OilUsed engine oil contains certain elements that maybe unhealthy for your skin and could even causecancer. Do not let used oil stay on your skin for verylong. Clean your skin and nails with soap andwater, or a good hand cleaner. Wash or properlydispose of clothing or rags containing used engineoil. See the manufacturer’s warnings about the useand disposal of oil products.
Used oil can be a threat to the environment. If youchange your own oil, be sure to drain all the oilfrom the filter before disposal. Never dispose of oilby putting it in the trash, pouring it on theground, into sewers, or into streams or bodies ofwater. Instead, recycle it by taking it to a placethat collects used oil. If you have a problemproperly disposing of your used oil, ask yourdealer, a service station, or a local recycling centerfor help.
Supercharger OilBecause they are technically qualified and havethe proper tools, you should have your dealerperform this maintenance.
When to CheckSee Additional Required Services on page 467 forwhen the oil level should be checked.
What Kind of Oil to UseUse only the recommended supercharger oil. SeeRecommended Fluids and Lubricants onpage 473.
Engine Air Cleaner/FilterSee Engine Compartment Overview on page 374for the location of the engine air cleaner/filters.
When to Inspect the Engine AirCleaner/FiltersInspect the air cleaner/filters at the Maintenance IIintervals and replace them at the first oil changeafter each 50,000 mile (83 000 km) interval.See Scheduled Maintenance on page 465 for moreinformation. If you are driving in dusty/dirtyconditions, inspect the filters at each engine oilchange.
382Information Provided by:
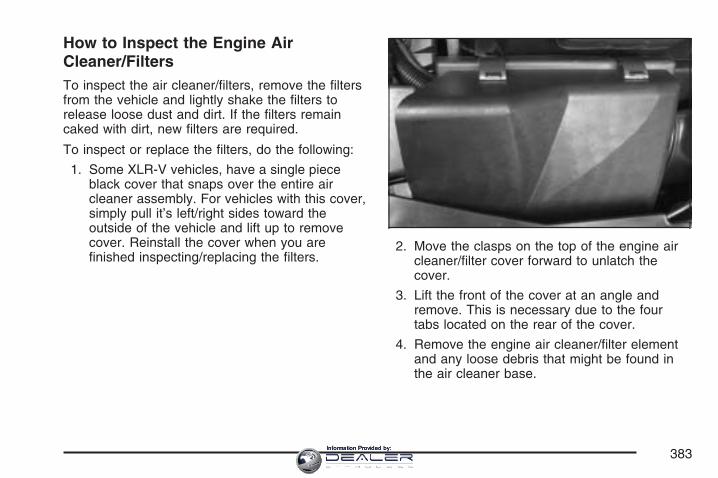
How to Inspect the Engine AirCleaner/FiltersTo inspect the air cleaner/filters, remove the filtersfrom the vehicle and lightly shake the filters torelease loose dust and dirt. If the filters remaincaked with dirt, new filters are required.
To inspect or replace the filters, do the following:
1. Some XLR-V vehicles, have a single pieceblack cover that snaps over the entire aircleaner assembly. For vehicles with this cover,simply pull it’s left/right sides toward theoutside of the vehicle and lift up to removecover. Reinstall the cover when you arefinished inspecting/replacing the filters.
2. Move the clasps on the top of the engine aircleaner/filter cover forward to unlatch thecover.
3. Lift the front of the cover at an angle andremove. This is necessary due to the fourtabs located on the rear of the cover.
4. Remove the engine air cleaner/filter elementand any loose debris that might be found inthe air cleaner base.
383Information Provided by:
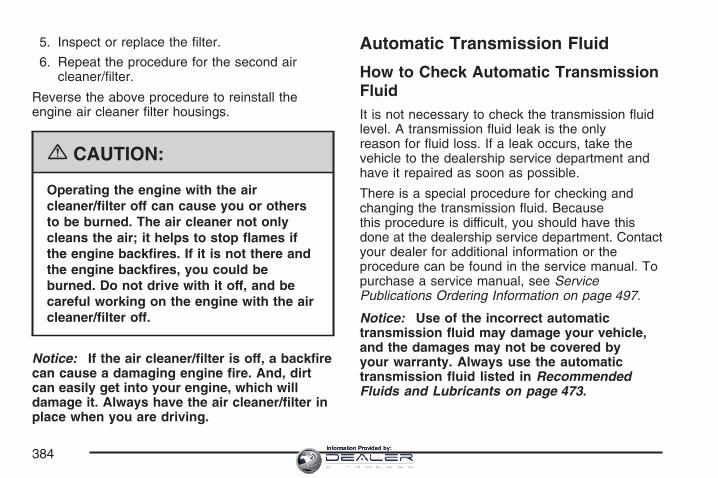
5. Inspect or replace the filter.
6. Repeat the procedure for the second aircleaner/filter.
Reverse the above procedure to reinstall theengine air cleaner filter housings.
{CAUTION:
Operating the engine with the aircleaner/filter off can cause you or othersto be burned. The air cleaner not onlycleans the air; it helps to stop flames ifthe engine backfires. If it is not there andthe engine backfires, you could beburned. Do not drive with it off, and becareful working on the engine with the aircleaner/filter off.
Notice: If the air cleaner/filter is off, a backfirecan cause a damaging engine fire. And, dirtcan easily get into your engine, which willdamage it. Always have the air cleaner/filter inplace when you are driving.
Automatic Transmission Fluid
How to Check Automatic TransmissionFluidIt is not necessary to check the transmission fluidlevel. A transmission fluid leak is the onlyreason for fluid loss. If a leak occurs, take thevehicle to the dealership service department andhave it repaired as soon as possible.
There is a special procedure for checking andchanging the transmission fluid. Becausethis procedure is difficult, you should have thisdone at the dealership service department. Contactyour dealer for additional information or theprocedure can be found in the service manual. Topurchase a service manual, see ServicePublications Ordering Information on page 497.
Notice: Use of the incorrect automatictransmission fluid may damage your vehicle,and the damages may not be covered byyour warranty. Always use the automatictransmission fluid listed in RecommendedFluids and Lubricants on page 473.
384Information Provided by:
Change the fluid and filter at the intervals listed inAdditional Required Services on page 467, andbe sure to use the fluid listed in RecommendedFluids and Lubricants on page 473.
Engine CoolantThe cooling system in your vehicle is filled withDEX-COOL® engine coolant. This coolant isdesigned to remain in your vehicle for five years or150,000 miles (240 000 km), whichever occursfirst, if you add only DEX-COOL® extendedlife coolant.
The following explains your cooling system andhow to add coolant when it is low. If you havea problem with engine overheating, see EngineOverheating on page 388.
A 50/50 mixture of clean, drinkable water andDEX-COOL® coolant will:
• Giving freezing protection down to −34°F(−37°C).
• Give boiling protection up to 265°F (129°C).
• Protect against rust and corrosion.
• Help keep the proper engine temperature.
• Let the warning lights and gages work as theyshould.
Notice: Using coolant other than DEX-COOL®
may cause premature engine, heater core,or radiator corrosion. In addition, the enginecoolant may require changing sooner, atthe first maintenance service after each30,000 miles (50 000 km) or 24 months,whichever occurs first. Any repairs would notbe covered by your warranty. Always useDEX-COOL® (silicate-free) coolant in yourvehicle.
385Information Provided by:
What to UseUse a mixture of one-half clean, drinkable waterand one-half DEX-COOL® coolant which willnot damage aluminum parts. If you use this coolantmixture, you do not need to add anything else.
{CAUTION:
Adding only plain water to your coolingsystem can be dangerous. Plain water, orsome other liquid such as alcohol, canboil before the proper coolant mixture will.Your vehicle’s coolant warning system isset for the proper coolant mixture. Withplain water or the wrong mixture, yourengine could get too hot but you wouldnot get the overheat warning. Your enginecould catch fire and you or others couldbe burned. Use a 50/50 mixture of clean,drinkable water and DEX-COOL® coolant.
Notice: If you use an improper coolantmixture, your engine could overheat and bebadly damaged. The repair cost would not becovered by your warranty. Too much waterin the mixture can freeze and crack the engine,radiator, heater core, and other parts.
If you have to add coolant more than four times ayear, have your dealer check your coolingsystem.
Notice: If you use extra inhibitors and/oradditives in your vehicle’s cooling system, youcould damage your vehicle. Use only theproper mixture of the engine coolant listed inthis manual for the cooling system. SeeRecommended Fluids and Lubricants onpage 473 for more information.
386Information Provided by:
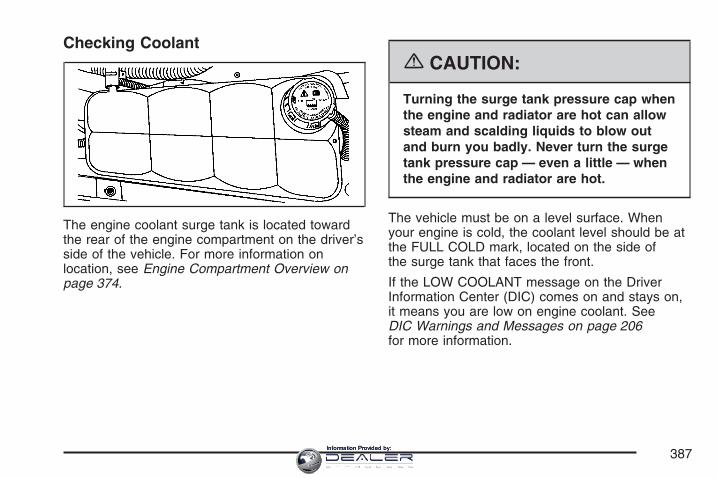
Checking Coolant
The engine coolant surge tank is located towardthe rear of the engine compartment on the driver’sside of the vehicle. For more information onlocation, see Engine Compartment Overview onpage 374.
{CAUTION:
Turning the surge tank pressure cap whenthe engine and radiator are hot can allowsteam and scalding liquids to blow outand burn you badly. Never turn the surgetank pressure cap — even a little — whenthe engine and radiator are hot.
The vehicle must be on a level surface. Whenyour engine is cold, the coolant level should be atthe FULL COLD mark, located on the side ofthe surge tank that faces the front.
If the LOW COOLANT message on the DriverInformation Center (DIC) comes on and stays on,it means you are low on engine coolant. SeeDIC Warnings and Messages on page 206for more information.
387Information Provided by:
Adding CoolantIf you need more coolant, add the properDEX-COOL® coolant mixture at the surge tank,but only when the engine is cool.
{CAUTION:
You can be burned if you spill coolant onhot engine parts. Coolant containsethylene glycol, and it will burn if theengine parts are hot enough. Do not spillcoolant on a hot engine.
When replacing the pressure cap, press down andturn it clockwise until you hear a clicking sound.Make sure the cap is hand-tight and fully seated.
Coolant Surge Tank Pressure Cap
Notice: If the pressure cap is not tightlyinstalled, coolant loss and possible enginedamage may occur. Be sure the cap is properlyand tightly secured.
The coolant surge tank pressure cap must be fullyinstalled on the coolant surge tank. See EngineCompartment Overview on page 374 for moreinformation on location.
Engine OverheatingYou will find a COOLANT OVER TEMP messageor an ENGINE HOT, STOP ENGINE messagedisplayed in the Driver Information Center (DIC).See DIC Warnings and Messages on page 206.You will also hear a chime.
There is also an engine coolant temperature gageon the instrument panel cluster. See EngineCoolant Temperature Gage on page 195.
388Information Provided by:
If Steam Is Coming From Your Engine
{CAUTION:
Steam from an overheated engine canburn you badly, even if you just open thehood. Stay away from the engine if yousee or hear steam coming from it. Turn itoff and get everyone away from thevehicle until it cools down. Wait untilthere is no sign of steam or coolantbefore you open the hood.
If you keep driving when the vehiclesengine is overheated, the liquids in it cancatch fire. You or others could be badlyburned. Stop your engine if it overheats,and get out of the vehicle until the engineis cool.
See Overheated Engine ProtectionOperating Mode on page 390 forinformation on driving to a safe place inan emergency.
Notice: If your engine catches fire becauseyou keep driving with no coolant, your vehiclecan be badly damaged. The costly repairswould not be covered by your warranty. SeeOverheated Engine Protection Operating Modeon page 390 for information on driving to asafe place in an emergency.
If No Steam Is Coming From YourEngineAn overheat warning, along with a low coolantmessage, can indicate a serious problem.
If you get an engine overheat warning with no lowcoolant message, but see or hear no steam,the problem may not be too serious. Sometimesthe engine can get a little too hot when you:
• Climb a long hill on a hot day.
• Stop after high-speed driving.
• Idle for long periods in traffic.
• Tow a trailer.
389Information Provided by:
If you get the overheat warning with no sign ofsteam, try this for a minute or so:
1. In heavy traffic, let the engine idle inNEUTRAL (N) while stopped. If it is safe to doso, pull off the road, shift to PARK (P) orNEUTRAL (N) and let the engine idle.
2. Set the climate controls to the highest heatsetting and fan speed and open the windowsas necessary.
If you no longer have the overheat warning, youcan drive. Just to be safe, drive slower forabout 10 minutes. If the warning does not comeback on, you can drive normally.
If the warning continues, pull over, stop, and parkyour vehicle right away.
If there is still no sign of steam, idle the engine forthree minutes while you are parked. If you stillhave the warning, turn off the engine andget everyone out of the vehicle until it cools down.Also, see “Overheated Engine ProtectionOperating Mode” later in this section.
You may decide not to lift the hood but to getservice help right away.
Overheated Engine ProtectionOperating ModeThis operating mode allows your vehicle to bedriven to a safe place in an emergency situation. Ifan overheated engine condition exists and theDIC message ENGINE HOT, STOP ENGINE isdisplayed, an overheat protection mode whichalternates firing groups of cylinders helps preventengine damage. In this mode, you will notice asignificant loss in power and engine performance.Driving extended miles (km) in the overheatprotection mode should be avoided.
Notice: After driving in the overheated engineprotection operating mode, to avoid enginedamage, allow the engine to cool beforeattempting any repair. The engine oil will beseverely degraded. Repair the cause of coolantloss, change the oil and reset the oil lifesystem. See Engine Oil on page 377.
390Information Provided by:
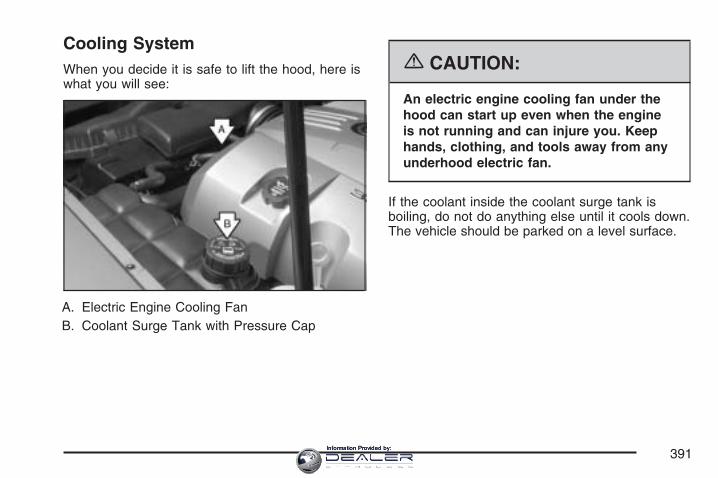
Cooling SystemWhen you decide it is safe to lift the hood, here iswhat you will see:
A. Electric Engine Cooling FanB. Coolant Surge Tank with Pressure Cap
{CAUTION:
An electric engine cooling fan under thehood can start up even when the engineis not running and can injure you. Keephands, clothing, and tools away from anyunderhood electric fan.
If the coolant inside the coolant surge tank isboiling, do not do anything else until it cools down.The vehicle should be parked on a level surface.
391Information Provided by:
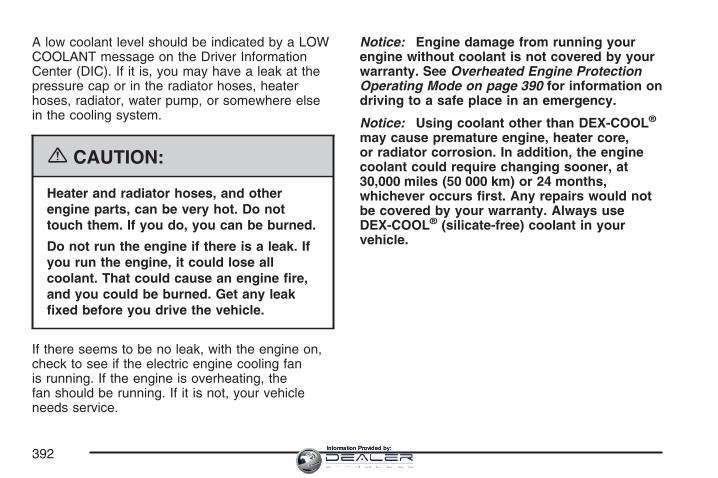
A low coolant level should be indicated by a LOWCOOLANT message on the Driver InformationCenter (DIC). If it is, you may have a leak at thepressure cap or in the radiator hoses, heaterhoses, radiator, water pump, or somewhere elsein the cooling system.
{CAUTION:
Heater and radiator hoses, and otherengine parts, can be very hot. Do nottouch them. If you do, you can be burned.
Do not run the engine if there is a leak. Ifyou run the engine, it could lose allcoolant. That could cause an engine fire,and you could be burned. Get any leakfixed before you drive the vehicle.
If there seems to be no leak, with the engine on,check to see if the electric engine cooling fanis running. If the engine is overheating, thefan should be running. If it is not, your vehicleneeds service.
Notice: Engine damage from running yourengine without coolant is not covered by yourwarranty. See Overheated Engine ProtectionOperating Mode on page 390 for information ondriving to a safe place in an emergency.
Notice: Using coolant other than DEX-COOL®
may cause premature engine, heater core,or radiator corrosion. In addition, the enginecoolant could require changing sooner, at30,000 miles (50 000 km) or 24 months,whichever occurs first. Any repairs would notbe covered by your warranty. Always useDEX-COOL® (silicate-free) coolant in yourvehicle.
392Information Provided by:

How to Add Coolant to the CoolantSurge TankIf you have not found a problem yet, check to seeif coolant is visible in the surge tank. If coolantis visible but the coolant level is not at the FULLCOLD mark on the front of the coolant surgetank, add a 50/50 mixture of clean, drinkable waterand DEX-COOL® coolant at the coolant surgetank, but be sure the cooling system, including thecoolant surge tank pressure cap, is cool beforeyou do it. See Engine Coolant on page 385for more information.
If no coolant is visible in the surge tank, addcoolant as follows:
{CAUTION:
Steam and scalding liquids from a hotcooling system can blow out and burnyou badly. They are under pressure, and ifyou turn the coolant surge tank pressurecap — even a little — they can come out athigh speed. Never turn the cap when thecooling system, including the coolantsurge tank pressure cap, is hot. Wait forthe cooling system and coolant surgetank pressure cap to cool if you ever haveto turn the pressure cap.
393Information Provided by:
{CAUTION:
Adding only plain water to your coolingsystem can be dangerous. Plain water, orsome other liquid such as alcohol, canboil before the proper coolant mixture will.Your vehicle’s coolant warning system isset for the proper coolant mixture. Withplain water or the wrong mixture, yourengine could get too hot but you wouldnot get the overheat warning. Your enginecould catch fire and you or others couldbe burned. Use a 50/50 mixture of clean,drinkable water and DEX-COOL® coolant.
Notice: In cold weather, water can freeze andcrack the engine, radiator, heater core andother parts. Use the recommended coolant andthe proper coolant mixture.
{CAUTION:
You can be burned if you spill coolant onhot engine parts. Coolant containsethylene glycol and it will burn if theengine parts are hot enough. Do not spillcoolant on a hot engine.
394Information Provided by:
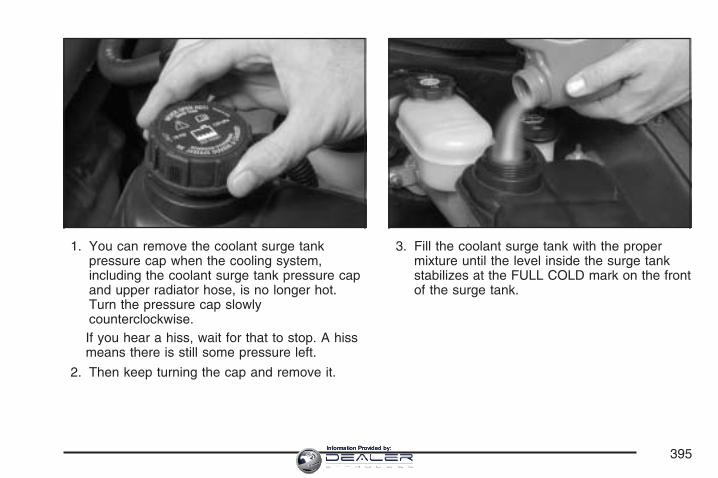
1. You can remove the coolant surge tankpressure cap when the cooling system,including the coolant surge tank pressure capand upper radiator hose, is no longer hot.Turn the pressure cap slowlycounterclockwise.If you hear a hiss, wait for that to stop. A hissmeans there is still some pressure left.
2. Then keep turning the cap and remove it.
3. Fill the coolant surge tank with the propermixture until the level inside the surge tankstabilizes at the FULL COLD mark on the frontof the surge tank.
395Information Provided by:
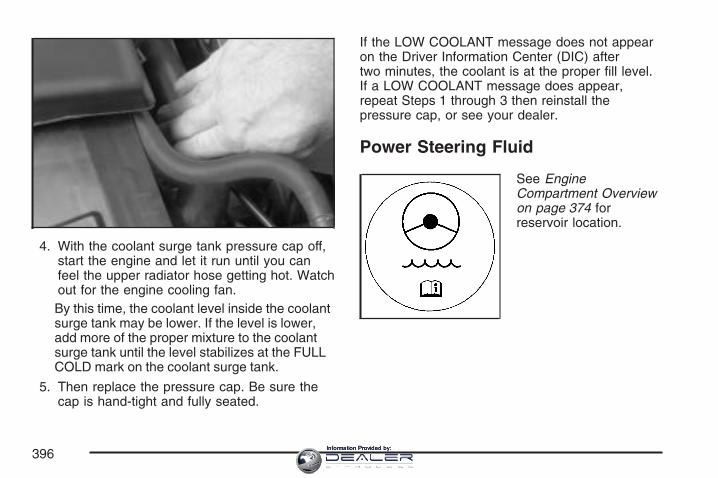
4. With the coolant surge tank pressure cap off,start the engine and let it run until you canfeel the upper radiator hose getting hot. Watchout for the engine cooling fan.By this time, the coolant level inside the coolantsurge tank may be lower. If the level is lower,add more of the proper mixture to the coolantsurge tank until the level stabilizes at the FULLCOLD mark on the coolant surge tank.
5. Then replace the pressure cap. Be sure thecap is hand-tight and fully seated.
If the LOW COOLANT message does not appearon the Driver Information Center (DIC) aftertwo minutes, the coolant is at the proper fill level.If a LOW COOLANT message does appear,repeat Steps 1 through 3 then reinstall thepressure cap, or see your dealer.
Power Steering Fluid
See EngineCompartment Overviewon page 374 forreservoir location.
396Information Provided by:
When to Check Power Steering FluidIt is not necessary to regularly check powersteering fluid unless you suspect there is a leak inthe system or you hear an unusual noise. Afluid loss in this system could indicate a problem.Have the system inspected and repaired.
How to Check Power Steering FluidTo check the power steering fluid, do the following:
1. Turn the ignition off and let the enginecompartment cool down.
2. Wipe the cap and the top of the reservoirclean.
3. Unscrew the cap and wipe the dipstick with aclean rag.
4. Replace the cap and completely tighten it.
5. Remove the cap again and look at thefluid level on the dipstick.
The level should be at the FULL COLD mark. Ifnecessary, add only enough fluid to bring the levelup to the mark.
What to UseTo determine what kind of fluid to use, seeRecommended Fluids and Lubricants on page 473.Always use the proper fluid. Failure to use theproper fluid can cause leaks and damage hosesand seals.
Windshield Washer Fluid
What to UseWhen you need windshield washer fluid, be sureto read the manufacturer’s instructions beforeuse. If you will be operating your vehicle in an areawhere the temperature may fall below freezing,use a fluid that has sufficient protection againstfreezing.
397Information Provided by:
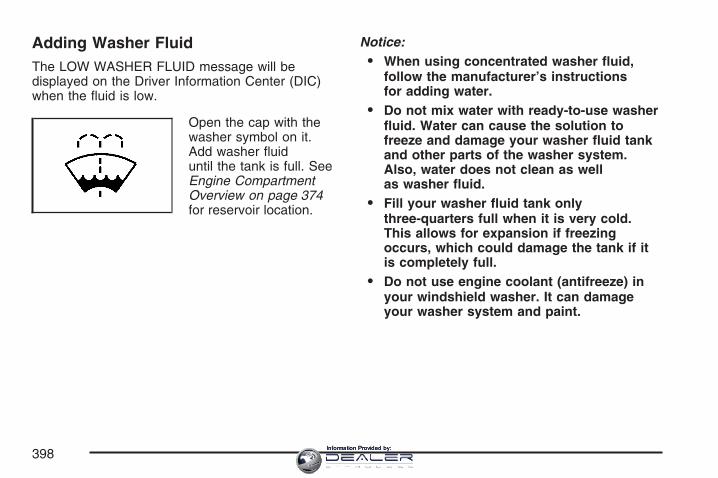
Adding Washer FluidThe LOW WASHER FLUID message will bedisplayed on the Driver Information Center (DIC)when the fluid is low.
Open the cap with thewasher symbol on it.Add washer fluiduntil the tank is full. SeeEngine CompartmentOverview on page 374for reservoir location.
Notice:• When using concentrated washer fluid,
follow the manufacturer’s instructionsfor adding water.
• Do not mix water with ready-to-use washerfluid. Water can cause the solution tofreeze and damage your washer fluid tankand other parts of the washer system.Also, water does not clean as wellas washer fluid.
• Fill your washer fluid tank onlythree-quarters full when it is very cold.This allows for expansion if freezingoccurs, which could damage the tank if itis completely full.
• Do not use engine coolant (antifreeze) inyour windshield washer. It can damageyour washer system and paint.
398Information Provided by:

Brakes
Brake Fluid
Your brake mastercylinder reservoir isfilled with DOT-3 brakefluid. See EngineCompartment Overviewon page 374 for thelocation of the reservoir.
There are only two reasons why the brake fluidlevel in the reservoir might go down. The firstis that the brake fluid goes down to an acceptablelevel during normal brake lining wear. Whennew linings are put in, the fluid level goes backup. The other reason is that fluid is leaking out ofthe brake system. If it is, you should have yourbrake system fixed, since a leak means thatsooner or later your brakes will not work well, orwill not work at all.
So, it is not a good idea to top off your brake fluid.Adding brake fluid will not correct a leak. If youadd fluid when your linings are worn, then you willhave too much fluid when you get new brakelinings. You should add or remove brake fluid, asnecessary, only when work is done on thebrake hydraulic system.
{CAUTION:
If you have too much brake fluid, it canspill on the engine. The fluid will burn ifthe engine is hot enough. You or otherscould be burned, and your vehicle couldbe damaged. Add brake fluid only whenwork is done on the brake hydraulicsystem. See “Checking Brake Fluid” inthis section.
Refer to the Maintenance Schedule to determinewhen to check your brake fluid. See ScheduledMaintenance on page 465.
399Information Provided by:

Checking Brake FluidYou can check the brake fluid without taking offthe cap. Look at the brake fluid reservoir. The fluidlevel should be above the MIN mark on thereservoir. If it is not, have your brake systemchecked to see if there is a leak.
After work is done on the brake hydraulic system,make sure the level is between the MIN andMAX marks.
What to AddWhen you do need brake fluid, use only DOT-3brake fluid. Refer to Recommended Fluidsand Lubricants on page 473. Use new brake fluidfrom a sealed container only.
Always clean the brake fluid reservoir cap and thearea around the cap before removing it. Thiswill help keep dirt from entering the reservoir.
{CAUTION:
With the wrong kind of fluid in the brakesystem, the brakes may not work well, orthey may not even work at all. This couldcause a crash. Always use the properbrake fluid.
Notice:• Using the wrong fluid can badly damage
brake system parts. For example, just afew drops of mineral-based oil, suchas engine oil, in the brake system candamage brake system parts so badly thatthey will have to be replaced. Do notlet someone put in the wrong kind of fluid.
• If you spill brake fluid on your vehicle’spainted surfaces, the paint finish canbe damaged. Be careful not to spill brakefluid on your vehicle. If you do, wash itoff immediately. See Washing Your Vehicleon page 446.
400Information Provided by:
Brake WearYour vehicle has four-wheel disc brakes.Disc brake pads have built-in wear indicators thatmake a high-pitched warning sound when thebrake pads are worn and new pads are needed.The sound may come and go or be heard allthe time your vehicle is moving, except when youare pushing on the brake pedal firmly.
{CAUTION:
The brake wear warning sound means thatsoon the brakes will not work well. Thatcould lead to an accident. When you hearthe brake wear warning sound, have yourvehicle serviced.
Notice: Continuing to drive with worn-outbrake pads could result in costly brake repair.Some driving conditions or climates may causea brake squeal when the brakes are first applied orlightly applied. This does not mean something iswrong with your brakes.Brake linings should always be replaced ascomplete axle sets.
Brake Pedal TravelSee your dealer if the brake pedal does not returnto normal height, or if there is a rapid increase inpedal travel. This could be a sign of brake trouble.
Brake AdjustmentAs you make brake stops, your disc brakesautomatically adjust for wear.
Replacing Brake System PartsThe braking system on a vehicle is complex. Itsmany parts have to be of top quality and work welltogether if the vehicle is to have really goodbraking. Your vehicle was designed and tested withtop-quality GM brake parts. When you replace partsof your braking system — for example, when yourbrake linings wear down and you need new onesput in — be sure you get new approved GMreplacement parts. If you do not, your brakes mayno longer work properly. For example, if someoneputs in brake linings that are wrong for your vehicle,the balance between your front and rear brakes canchange — for the worse. The braking performanceyou have come to expect can change in many otherways if someone puts in the wrong replacementbrake parts.
401Information Provided by:
BatteryYour vehicle has a maintenance free battery.When it is time for a new battery, get one that hasthe replacement number shown on the originalbattery’s label. We recommend an ACDelco®
replacement battery.
For battery replacement, see your dealer or theservice manual. To purchase a service manual,see Service and Owner Publications in ServicePublications Ordering Information on page 497.Warning: Battery posts, terminals, and relatedaccessories contain lead and lead compounds,chemicals known to the State of Californiato cause cancer and reproductive harm. Washhands after handling.
Vehicle StorageIf you are not going to drive your vehicle for 25 daysor more, remove the black, negative (−) cable fromthe battery. This will help keep your battery fromrunning down.
{CAUTION:
Batteries have acid that can burn you andgas that can explode. You can be badlyhurt if you are not careful. See JumpStarting on page 403 for tips on workingaround a battery without getting hurt.
You must close all doors and the trunk beforereconnecting the battery. After reconnectingthe battery, you must press the unlock button onthe keyless access transmitter. Failure tofollow this procedure may result in the alarmsounding. Pressing unlock on the keyless accesstransmitter would stop the alarm.
402Information Provided by:
Jump StartingIf your vehicle’s battery has run down, you maywant to use another vehicle and some jumpercables to start your vehicle. Be sure to usethe following steps to do it safely.
{CAUTION:
Batteries can hurt you. They can bedangerous because:
• They contain acid that can burn you.• They contain gas that can explode or
ignite.• They contain enough electricity to
burn you.
If you do not follow these steps exactly,some or all of these things can hurt you.
Notice: If you try to start your vehicle bypushing or pulling it, you could damage yourvehicle. Do not push or pull your vehicle
to start it; instead, use the jump startingprocedure in this manual to start your vehiclewhen the battery has run down.
1. Check the other vehicle. It must have a12-volt battery with a negative ground system.
Notice: If the other vehicle’s system is not a12-volt system with a negative ground,both vehicles can be damaged. Only usevehicles with 12-volt systems with negativegrounds to jump start your vehicle.
2. Get the vehicles close enough so the jumpercables can reach, but be sure the vehicles arenot touching each other. If they are, it couldcause a ground connection you do notwant. You would not be able to start yourvehicle, and the bad grounding could damagethe electrical systems.To avoid the possibility of the vehicles rolling,set the parking brake firmly on both vehiclesinvolved in the jump start procedure. Putan automatic transmission in PARK (P) or amanual transmission in NEUTRAL beforesetting the parking brake.
403Information Provided by:
Notice: If you leave your radio or otheraccessories on during the jump startingprocedure, they could be damaged. The repairswould not be covered by your warranty.Always turn off your radio and otheraccessories when jump starting your vehicle.
3. Turn off the ignition on both vehicles. Unplugunnecessary accessories plugged into thecigarette lighter or the accessory power outlet.Turn off the radio and all lamps that are notneeded. This will avoid sparks and help saveboth batteries. And it could save the radio!
4. Open the hoods and locate the batteries. Findthe positive (+) and negative (−) terminallocations on each vehicle. See EngineCompartment Overview on page 374 for moreinformation on location.
{CAUTION:
An electric fan can start up even when theengine is not running and can injure you.Keep hands, clothing and tools away fromany underhood electric fan.
{CAUTION:
Using a match near a battery can causebattery gas to explode. People have beenhurt doing this, and some have beenblinded. Use a flashlight if you need morelight.
Be sure the battery has enough water.You do not need to add water to thebattery installed in your new vehicle. Butif a battery has filler caps, be sure theright amount of fluid is there. If it is low,add water to take care of that first. If youdo not, explosive gas could be present.
Battery fluid contains acid that can burnyou. Do not get it on you. If youaccidentally get it in your eyes or on yourskin, flush the place with water and getmedical help immediately.
404Information Provided by:
{CAUTION:
Fans or other moving engine parts caninjure you badly. Keep your hands awayfrom moving parts once the engine isrunning.
5. Check that the jumper cables do not haveloose or missing insulation. If they do, youcould get a shock. The vehicles couldbe damaged too.Before you connect the cables, here are somebasic things you should know. Positive (+)will go to positive (+) or to a remote positive (+)terminal if the vehicle has one. Negative (−)will go to a heavy, unpainted metal engine partor to a remote negative (−) terminal if thevehicle has one.Do not connect positive (+) to negative (−) oryou will get a short that would damagethe battery and maybe other parts too. And donot connect the negative (−) cable to thenegative (−) terminal on the dead batterybecause this can cause sparks.
6. Connect the red positive (+) cable to thepositive (+) terminal of the dead battery.Use a remote positive (+) terminal ifthe vehicle has one.
7. Do not let the other end touch metal. Connectit to the positive (+) terminal of the goodbattery. Use a remote positive (+) terminal ifthe vehicle has one.
405Information Provided by:
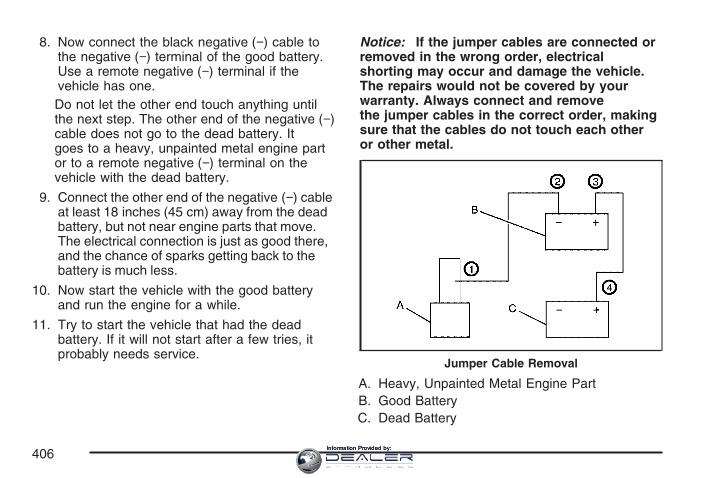
8. Now connect the black negative (−) cable tothe negative (−) terminal of the good battery.Use a remote negative (−) terminal if thevehicle has one.Do not let the other end touch anything untilthe next step. The other end of the negative (−)cable does not go to the dead battery. Itgoes to a heavy, unpainted metal engine partor to a remote negative (−) terminal on thevehicle with the dead battery.
9. Connect the other end of the negative (−) cableat least 18 inches (45 cm) away from the deadbattery, but not near engine parts that move.The electrical connection is just as good there,and the chance of sparks getting back to thebattery is much less.
10. Now start the vehicle with the good batteryand run the engine for a while.
11. Try to start the vehicle that had the deadbattery. If it will not start after a few tries, itprobably needs service.
Notice: If the jumper cables are connected orremoved in the wrong order, electricalshorting may occur and damage the vehicle.The repairs would not be covered by yourwarranty. Always connect and removethe jumper cables in the correct order, makingsure that the cables do not touch each otheror other metal.
A. Heavy, Unpainted Metal Engine PartB. Good BatteryC. Dead Battery
Jumper Cable Removal
406Information Provided by:
To disconnect the jumper cables from bothvehicles, do the following:
1. Disconnect the black negative (−) cable fromthe vehicle that had the dead battery.
2. Disconnect the black negative (−) cable fromthe vehicle with the good battery.
3. Disconnect the red positive (+) cable from thevehicle with the good battery.
4. Disconnect the red positive (+) cable from theother vehicle.
Perform ″Power Window Initialize″ steps underPower Windows on page 82, if the vehiclehas experienced power loss.
Rear AxleWhen to Check LubricantIt is not necessary to regularly check rear axlefluid unless you suspect there is a leak or you hearan unusual noise. A fluid loss could indicate aproblem. Have it inspected and repaired.
How to Check Lubricant
To get an accurate reading, the vehicle should beon a level surface.
If the level is below the bottom of the filler plughole, you will need to add some lubricant.Add enough lubricant to raise the level to thebottom of the filler plug hole.
407Information Provided by:
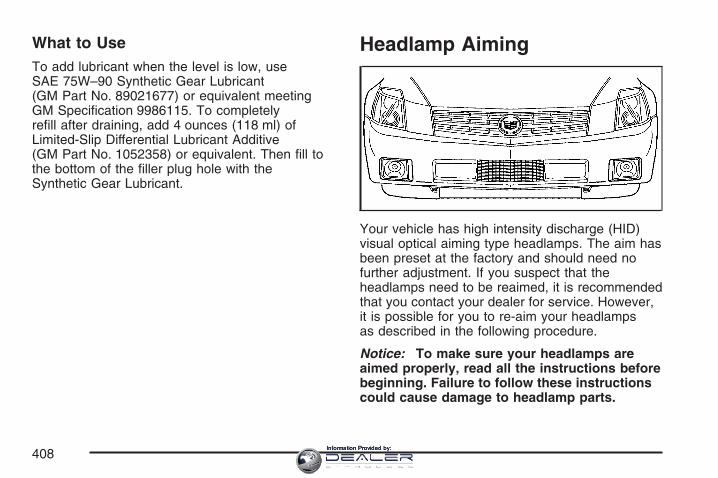
What to UseTo add lubricant when the level is low, useSAE 75W–90 Synthetic Gear Lubricant(GM Part No. 89021677) or equivalent meetingGM Specification 9986115. To completelyrefill after draining, add 4 ounces (118 ml) ofLimited-Slip Differential Lubricant Additive(GM Part No. 1052358) or equivalent. Then fill tothe bottom of the filler plug hole with theSynthetic Gear Lubricant.
Headlamp Aiming
Your vehicle has high intensity discharge (HID)visual optical aiming type headlamps. The aim hasbeen preset at the factory and should need nofurther adjustment. If you suspect that theheadlamps need to be reaimed, it is recommendedthat you contact your dealer for service. However,it is possible for you to re-aim your headlampsas described in the following procedure.
Notice: To make sure your headlamps areaimed properly, read all the instructions beforebeginning. Failure to follow these instructionscould cause damage to headlamp parts.
408Information Provided by:

The vehicle should be properly prepared asfollows:
• The vehicle should be placed so theheadlamps are 25 ft (7.6 m) from a lightcolored wall.
• The vehicle must have all four tires on aperfectly level surface which is level allthe way to the wall.
• The vehicle should be placed so it isperpendicular to the wall.
• The vehicle should not have any snow, ice ormud attached to it.
• The vehicle should be fully assembled and allother work stopped while headlamp aiming isbeing done.
• The vehicle should be normally loaded with afull tank of fuel and one person or 160 lbs(75 kg) on the driver’s seat.
• Tires should be properly inflated.
• Start the vehicle and rock it to level thesuspension.
Headlamp aiming is done with the low-beamheadlamps. The high-beam headlamps arecorrectly aimed if the low-beam headlamps areaimed properly.
The headlamp aimingdevice is under thehood near theheadlamps.
Adjustment screws can be turned with anE8 Torx® socket or T15 Torx screwdriver.
409Information Provided by:

Headlamp Vertical AimingTo properly prepare the vehicle for verticalheadlamp aiming see Headlamp Aiming onpage 408 for more information.
To adjust the vertical aim, do the following:
Notice: Horizontal aiming must be performedbefore making any adjustments to thevertical aim. Adjusting the vertical aim first willresult in an incorrect headlamp aim.
1. Open the hood. See Hood Release onpage 373 for more information.
2. Locate the aim dot on the inner projector lensof the low-beam headlamp.
3. Measure the distance from the ground to theaim dot on each low-beam headlamp. Recordthis distance.
4. At the wall or other flat surface, measure fromthe ground upward (A) to the recordeddistance from Step 3 and mark it.
Notice: Do not cover a headlamp to improvebeam cut-off when aiming. Covering aheadlamp may cause excessive heat build-upwhich may cause damage to the headlamp.
5. Draw or tape a horizontal line (B) on the wallor flat surface the width of the vehicle at theheight of the mark in Step 4.
6. Turn on the low-beam headlamps and place apiece of cardboard in front of the headlampnot being aimed. This should allow onlythe beam of light from the headlamp beingaimed to be seen on the flat surface.
410Information Provided by:
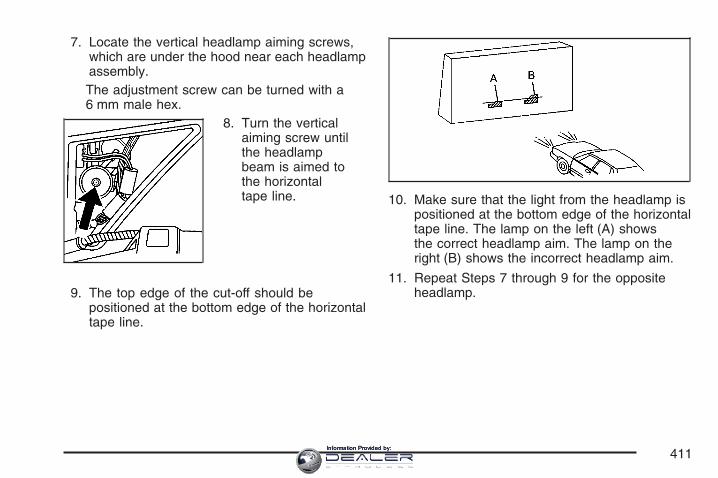
7. Locate the vertical headlamp aiming screws,which are under the hood near each headlampassembly.The adjustment screw can be turned with a6 mm male hex.
8. Turn the verticalaiming screw untilthe headlampbeam is aimed tothe horizontaltape line.
9. The top edge of the cut-off should bepositioned at the bottom edge of the horizontaltape line.
10. Make sure that the light from the headlamp ispositioned at the bottom edge of the horizontaltape line. The lamp on the left (A) showsthe correct headlamp aim. The lamp on theright (B) shows the incorrect headlamp aim.
11. Repeat Steps 7 through 9 for the oppositeheadlamp.
411Information Provided by:
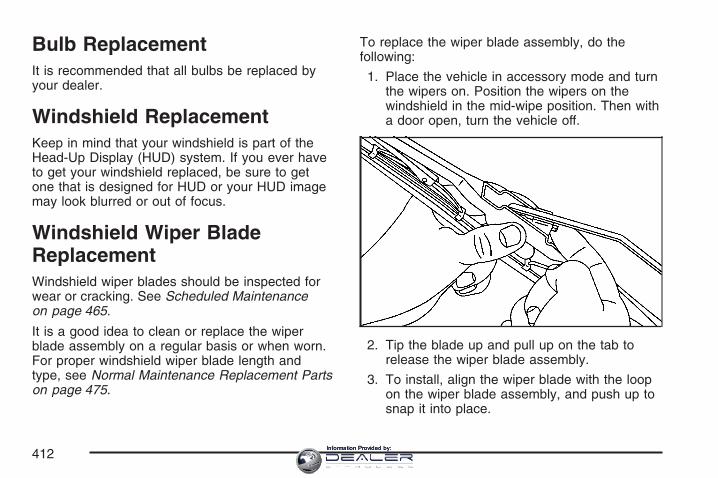
Bulb ReplacementIt is recommended that all bulbs be replaced byyour dealer.
Windshield ReplacementKeep in mind that your windshield is part of theHead-Up Display (HUD) system. If you ever haveto get your windshield replaced, be sure to getone that is designed for HUD or your HUD imagemay look blurred or out of focus.
Windshield Wiper BladeReplacementWindshield wiper blades should be inspected forwear or cracking. See Scheduled Maintenanceon page 465.
It is a good idea to clean or replace the wiperblade assembly on a regular basis or when worn.For proper windshield wiper blade length andtype, see Normal Maintenance Replacement Partson page 475.
To replace the wiper blade assembly, do thefollowing:
1. Place the vehicle in accessory mode and turnthe wipers on. Position the wipers on thewindshield in the mid-wipe position. Then witha door open, turn the vehicle off.
2. Tip the blade up and pull up on the tab torelease the wiper blade assembly.
3. To install, align the wiper blade with the loopon the wiper blade assembly, and push up tosnap it into place.
412Information Provided by:
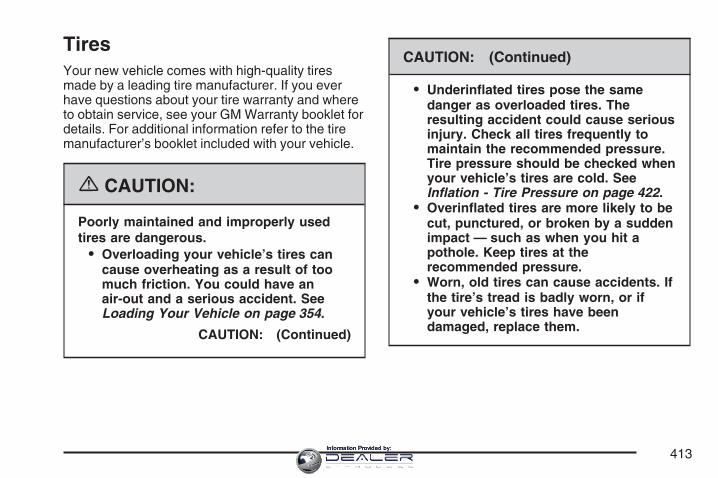
TiresYour new vehicle comes with high-quality tiresmade by a leading tire manufacturer. If you everhave questions about your tire warranty and whereto obtain service, see your GM Warranty booklet fordetails. For additional information refer to the tiremanufacturer’s booklet included with your vehicle.
{CAUTION:
Poorly maintained and improperly usedtires are dangerous.
• Overloading your vehicle’s tires cancause overheating as a result of toomuch friction. You could have anair-out and a serious accident. SeeLoading Your Vehicle on page 354.
CAUTION: (Continued)
CAUTION: (Continued)
• Underinflated tires pose the samedanger as overloaded tires. Theresulting accident could cause seriousinjury. Check all tires frequently tomaintain the recommended pressure.Tire pressure should be checked whenyour vehicle’s tires are cold. SeeInflation - Tire Pressure on page 422.
• Overinflated tires are more likely to becut, punctured, or broken by a suddenimpact — such as when you hit apothole. Keep tires at therecommended pressure.
• Worn, old tires can cause accidents. Ifthe tire’s tread is badly worn, or ifyour vehicle’s tires have beendamaged, replace them.
413Information Provided by:
Low-Profile Tires (XLR-V)
Notice: If your vehicle has P235/45R19 orP255/40R19 size tires, they are classified aslow-profile tires. Low-profile tires are moresusceptible to damage from road hazards orcurb impact than standard profile tires.Tire and or wheel assembly damage can occurwhen coming into contact with road hazardslike potholes or sharp edged objects, orwhen sliding into a curb. Your GM warrantydoes not cover this type of damage. Keep tiresset to the correct inflation pressure andwhen possible avoid contact with curbs,potholes, and other road hazards.
Winter Tires (XLR-V)If you expect to drive on snow or ice coveredroads often, you may want to get winter tires foryour vehicle. All season tires provide good overallperformance on most surfaces but they maynot offer the traction you would like or the samelevel of performance as winter tires on snow or icecovered roads.
Winter tires, in general, are designed for increasedtraction on snow and ice covered roads. Withwinter tires, there may be decreased dryroad traction, increased road noise, and shortertread life. After switching to winter tires, be alert forchanges in vehicle handling and braking.
See your dealer for details regarding winter tireavailability and proper tire selection. Also,see Buying New Tires on page 428.
If you choose to use winter tires:
• Use tires of the same brand and tread type onall four wheel positions.
• Use only radial ply tires of the same size, loadrange, and speed rating as the originalequipment tires.
Winter tires with the same speed rating as youroriginal equipment tires may not be available for H,V, W, Y, and ZR speed rated tires. If you choosewinter tires with a lower speed rating, neverexceed the tire’s maximum speed capability.
414Information Provided by:
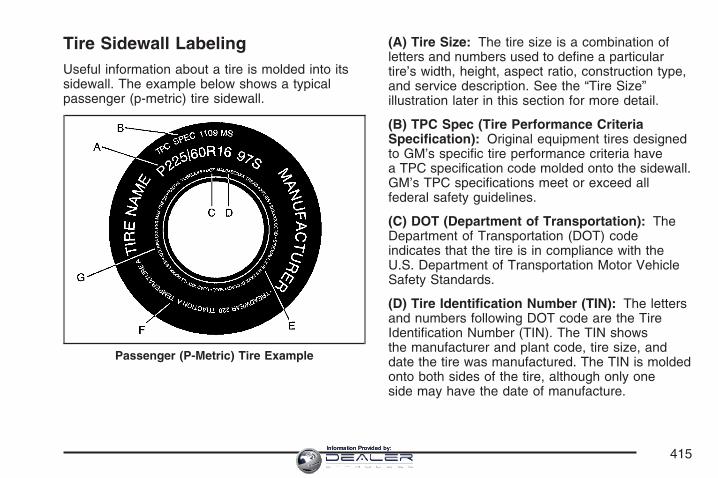
Tire Sidewall LabelingUseful information about a tire is molded into itssidewall. The example below shows a typicalpassenger (p-metric) tire sidewall.
(A) Tire Size: The tire size is a combination ofletters and numbers used to define a particulartire’s width, height, aspect ratio, construction type,and service description. See the “Tire Size”illustration later in this section for more detail.
(B) TPC Spec (Tire Performance CriteriaSpecification): Original equipment tires designedto GM’s specific tire performance criteria havea TPC specification code molded onto the sidewall.GM’s TPC specifications meet or exceed allfederal safety guidelines.
(C) DOT (Department of Transportation): TheDepartment of Transportation (DOT) codeindicates that the tire is in compliance with theU.S. Department of Transportation Motor VehicleSafety Standards.
(D) Tire Identification Number (TIN): The lettersand numbers following DOT code are the TireIdentification Number (TIN). The TIN showsthe manufacturer and plant code, tire size, anddate the tire was manufactured. The TIN is moldedonto both sides of the tire, although only oneside may have the date of manufacture.
Passenger (P-Metric) Tire Example
415Information Provided by:
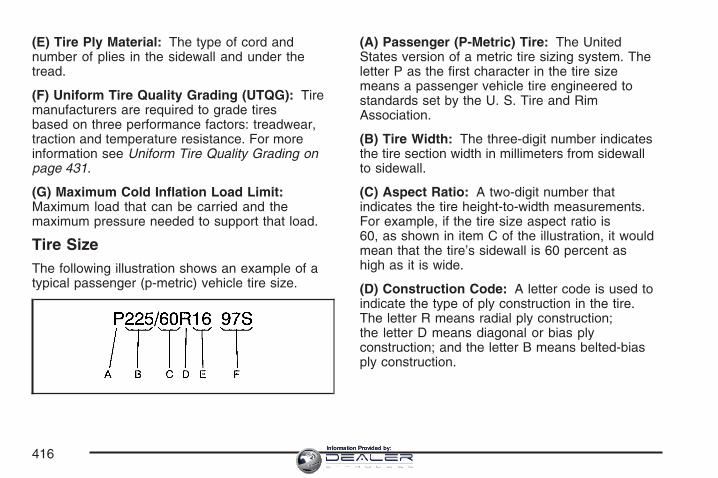
(E) Tire Ply Material: The type of cord andnumber of plies in the sidewall and under thetread.
(F) Uniform Tire Quality Grading (UTQG): Tiremanufacturers are required to grade tiresbased on three performance factors: treadwear,traction and temperature resistance. For moreinformation see Uniform Tire Quality Grading onpage 431.
(G) Maximum Cold Inflation Load Limit:Maximum load that can be carried and themaximum pressure needed to support that load.
Tire SizeThe following illustration shows an example of atypical passenger (p-metric) vehicle tire size.
(A) Passenger (P-Metric) Tire: The UnitedStates version of a metric tire sizing system. Theletter P as the first character in the tire sizemeans a passenger vehicle tire engineered tostandards set by the U. S. Tire and RimAssociation.
(B) Tire Width: The three-digit number indicatesthe tire section width in millimeters from sidewallto sidewall.
(C) Aspect Ratio: A two-digit number thatindicates the tire height-to-width measurements.For example, if the tire size aspect ratio is60, as shown in item C of the illustration, it wouldmean that the tire’s sidewall is 60 percent ashigh as it is wide.
(D) Construction Code: A letter code is used toindicate the type of ply construction in the tire.The letter R means radial ply construction;the letter D means diagonal or bias plyconstruction; and the letter B means belted-biasply construction.
416Information Provided by:
(E) Rim Diameter: Diameter of the wheel ininches.
(F) Service Description: These charactersrepresent the load range and speed rating of thetire. The load index represents the load carrycapacity a tire is certified to carry. The load indexcan range from 1 to 279. The speed rating isthe maximum speed a tire is certified to carry aload. Speed ratings range from A to Z.
Tire Terminology and Definitions
Air Pressure: The amount of air inside the tirepressing outward on each square inch of thetire. Air pressure is expressed in poundsper square inch (psi) or kilopascal (kPa).
Accessory Weight: This means the combinedweight of optional accessories. Some examples ofoptional accessories are, automatictransmission/transaxle, power steering, powerbrakes, power windows, power seats, andair conditioning.
Aspect Ratio: The relationship of a tire’s heightto its width.
Belt: A rubber coated layer of cords that is locatedbetween the plies and the tread. Cords may bemade from steel or other reinforcing materials.
Bead: The tire bead contains steel wires wrappedby steel cords that hold the tire onto the rim.
Bias Ply Tire: A pneumatic tire in which the pliesare laid at alternate angles less than 90 degreesto the centerline of the tread.
Cold Tire Pressure: The amount of air pressurein a tire, measured in pounds per square inch(psi) or kilopascals (kPa) before a tire has built upheat from driving. See Inflation - Tire Pressureon page 422.
Curb Weight: This means the weight of a motorvehicle with standard and optional equipmentincluding the maximum capacity of fuel, oil, andcoolant, but without passengers and cargo.
417Information Provided by:

DOT Markings: A code molded into the sidewallof a tire signifying that the tire is in compliancewith the U.S. Department of Transportation (DOT)motor vehicle safety standards. The DOT codeincludes the Tire Identification Number (TIN),an alphanumeric designator which can also identifythe tire manufacturer, production plant, brand,and date of production.
GVWR: Gross Vehicle Weight Rating. SeeLoading Your Vehicle on page 354.
GAWR FRT: Gross Axle Weight Rating for thefront axle. See Loading Your Vehicle on page 354.
GAWR RR: Gross Axle Weight Rating for therear axle. See Loading Your Vehicle on page 354.
Intended Outboard Sidewall: The side of anasymmetrical tire, that must always face outwardwhen mounted on a vehicle.
Kilopascal (kPa): The metric unit for air pressure.
Light Truck (LT-Metric) Tire: A tire used on lightduty trucks and some multipurpose passengervehicles.
Load Index: An assigned number ranging from 1to 279 that corresponds to the load carryingcapacity of a tire.
Maximum Inflation Pressure: The maximum airpressure to which a cold tire may be inflated.The maximum air pressure is molded ontothe sidewall.
Maximum Load Rating: The load rating for a tireat the maximum permissible inflation pressurefor that tire.
Maximum Loaded Vehicle Weight: The sum ofcurb weight, accessory weight, vehicle capacityweight, and production options weight.
Normal Occupant Weight: The number ofoccupants a vehicle is designed to seat multipliedby 150 lbs (68 kg). See Loading Your Vehicleon page 354.
418Information Provided by:
Occupant Distribution: Designated seatingpositions.
Outward Facing Sidewall: The side of anasymmetrical tire that has a particular side thatfaces outward when mounted on a vehicle.The side of the tire that contains a whitewall, bearswhite lettering, or bears manufacturer, brand,and/or model name molding that is higheror deeper than the same moldings on the othersidewall of the tire.
Passenger (P-Metric) Tire: A tire used onpassenger cars and some light duty trucks andmultipurpose vehicles.
Recommended Inflation Pressure: Vehiclemanufacturer’s recommended tire inflationpressure as shown on the tire placard. SeeInflation - Tire Pressure on page 422 and LoadingYour Vehicle on page 354.
Radial Ply Tire: A pneumatic tire in which theply cords that extend to the beads are laid at90 degrees to the centerline of the tread.
Rim: A metal support for a tire and upon whichthe tire beads are seated.
Sidewall: The portion of a tire between the treadand the bead.
Speed Rating: An alphanumeric code assignedto a tire indicating the maximum speed atwhich a tire can operate.
Traction: The friction between the tire and theroad surface. The amount of grip provided.
Tread: The portion of a tire that comes intocontact with the road.
Treadwear Indicators: Narrow bands, sometimescalled wear bars, that show across the tread of atire when only 1/16 inch (1.6 mm) of tread remains.See When It Is Time for New Tires on page 428.
UTQGS (Uniform Tire Quality GradingStandards): A tire information system thatprovides consumers with ratings for a tire’straction, temperature, and treadwear. Ratings aredetermined by tire manufacturers usinggovernment testing procedures. The ratings aremolded into the sidewall of the tire. See UniformTire Quality Grading on page 431.
419Information Provided by:
Vehicle Capacity Weight: The number ofdesignated seating positions multiplied by 150 lbs(68 kg) plus the rated cargo load. See LoadingYour Vehicle on page 354.
Vehicle Maximum Load on the Tire: Load on anindividual tire due to curb weight, accessoryweight, occupant weight, and cargo weight.
Vehicle Placard: A label permanently attached toa vehicle showing the vehicle’s capacity weightand the original equipment tire size andrecommended inflation pressure. See “Tire andLoading Information Label” under LoadingYour Vehicle on page 354.
Run-Flat TiresYour vehicle, when new, had run-flat tires. Thereis no spare tire, no tire changing equipment,and no place to store a tire in the vehicle. Run-flattires perform so well without any air that a TirePressure Monitor (TPM) is used to alert youif a tire has lost pressure.
If a tire goes flat, you will not need to stop on theside of the road to change the tire. You canjust keep on driving. The shorter the distance youdrive and the slower the speed, the greater thechance that the tire will not have to be replaced. Ifyou drive on a deflated run-flat tire for 50 miles(80 km) or less and at speeds of 55 mph (90 km/h)or less, there is a good chance that the tire canbe repaired. The tire can operate effectivelywith no air pressure for up to 100 miles (160 km)at speeds up to 55 mph (90 km/h), but the tirewould then have to be replaced. When a tireis filled with air, it provides a cushion between theroad and the wheel. Because you will not havethis cushion when driving on a deflated tire, try toavoid potholes that could damage your wheeland require replacement of it.
420Information Provided by:

Some road hazards can damage a tire beyondrepair. This damage could occur even before youhave driven on the tire in a deflated condition.When a tire has been damaged, or if youhave driven any distance on a run-flat tire, checkwith an authorized run-flat tire service centerto determine whether the tire can be repaired orshould be replaced. To maintain your vehicle’srun-flat feature, all replacement tires mustbe self-supporting tires. As soon as possible,contact the nearest authorized GM or run-flatservicing facility for inspection and repair orreplacement. To locate the nearest GM or run-flatservicing facility, call Roadside Assistance. Forphone numbers and Roadside Service details seeRoadside Service on page 487.
{CAUTION:
Run-flat tires are constructed differentlythan other tires and could explode duringimproper service. You or others could beinjured or killed if you attempt to repair,replace, dismount, or mount a run-flat tire.Let only an authorized run-flat servicecenter repair, replace, dismount, andmount run-flat tires.
The valve stems on your run-flat tires havesensors that are part of the Tire Pressure MonitorSystem (TPMS). See Tire Pressure MonitorSystem on page 423. These sensors containbatteries which are designed to last for 10 yearsunder normal driving conditions. See your dealer ifyou ever need to have a wheel replaced, or ifthe sensors ever need replacement.
Notice: Using liquid sealants can damage thetire valves and tire pressure monitor sensors inyour vehicle’s run-flat tires. This damage wouldnot be covered by warranty. Do not use liquidsealants in your vehicle’s run-flat tires.
421Information Provided by:
Inflation - Tire PressureTires need the correct amount of air pressure tooperate effectively.
Notice: Do not let anyone tell you thatunder-inflation or over-inflation is all right. It isnot. If your tires do not have enough air(under-inflation), you can get the following:• Too much flexing
• Too much heat
• Tire overloading
• Premature or irregular wear
• Poor handling
• Reduced fuel economy
If your tires have too much air (over-inflation),you can get the following:• Unusual wear
• Poor handling
• Rough ride
• Needless damage from road hazards
A Tire and Loading Information label is attached tothe center pillar, below the driver’s door latch. Thislabel shows your vehicle’s original equipment tiresand the correct inflation pressures for your tireswhen they are cold. The recommended cold tireinflation pressure, shown on the label, is theminimum amount of air pressure needed to supportyour vehicle’s maximum load carrying capacity.
For additional information regarding how muchweight your vehicle can carry, and an example ofthe tire and loading information label, seeLoading Your Vehicle on page 354. How you loadyour vehicle affects vehicle handling and ridecomfort, never load your vehicle with more weightthan it was designed to carry.
When to CheckCheck your tires once a month or more.
422Information Provided by:
How to CheckUse a good quality pocket-type gage to check tirepressure. You cannot tell if your tires areproperly inflated simply by looking at them. Radialtires may look properly inflated even when theyare underinflated. Check the tire’s inflationpressure when the tires are cold. Cold means yourvehicle has been sitting for at least three hoursor driven no more than 1 mile (1.6 km).
Remove the valve cap from the tire valve stem.Press the tire gage firmly onto the valve toget a pressure measurement. If the cold tireinflation pressure matches the recommendedpressure on the Tire and Loading Informationlabel, no further adjustment is necessary. If theinflation pressure is low, add air until you reach therecommended amount.
If you overfill the tire, release air by pushing onthe metal stem in the center of the tire valve.Recheck the tire pressure with the tire gage.
Be sure to put the valve caps back on the valvestems. They help prevent leaks by keeping out dirtand moisture.
Tire Pressure Monitor (TPM)Your vehicle has a Tire Pressure Monitor (TPM)that sends tire pressure information to theDriver Information Center (DIC). Using the DICcontrol buttons, the driver is able to checktire pressure levels in all four road tires. See TirePressure Monitor System on page 423 andDIC Controls and Displays on page 204 foradditional information.
Tire Pressure Monitor SystemYour vehicle has a Tire Pressure Monitor System(TPMS). This system uses radio and sensortechnology to check tire pressure levels. TPMSsensors are mounted onto each tire and wheelassembly on your vehicle. The TPMS sensorsmonitor the air pressure in your vehicle’s tires andtransmit the tire pressure readings to a receiverlocated in the vehicle.
423Information Provided by:
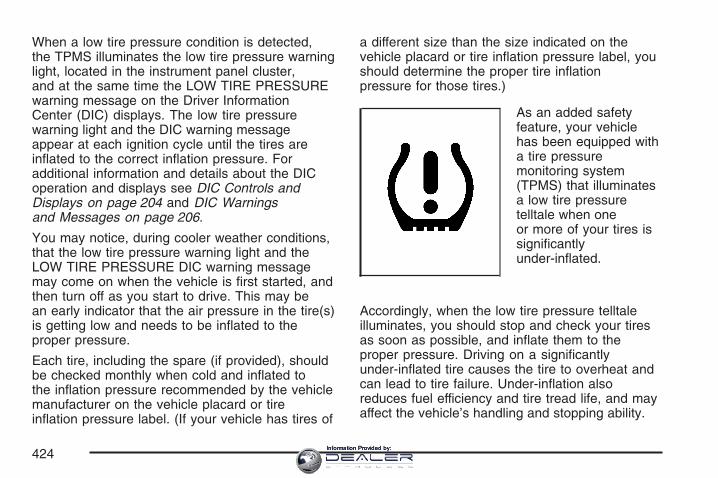
When a low tire pressure condition is detected,the TPMS illuminates the low tire pressure warninglight, located in the instrument panel cluster,and at the same time the LOW TIRE PRESSUREwarning message on the Driver InformationCenter (DIC) displays. The low tire pressurewarning light and the DIC warning messageappear at each ignition cycle until the tires areinflated to the correct inflation pressure. Foradditional information and details about the DICoperation and displays see DIC Controls andDisplays on page 204 and DIC Warningsand Messages on page 206.
You may notice, during cooler weather conditions,that the low tire pressure warning light and theLOW TIRE PRESSURE DIC warning messagemay come on when the vehicle is first started, andthen turn off as you start to drive. This may bean early indicator that the air pressure in the tire(s)is getting low and needs to be inflated to theproper pressure.
Each tire, including the spare (if provided), shouldbe checked monthly when cold and inflated tothe inflation pressure recommended by the vehiclemanufacturer on the vehicle placard or tireinflation pressure label. (If your vehicle has tires of
a different size than the size indicated on thevehicle placard or tire inflation pressure label, youshould determine the proper tire inflationpressure for those tires.)
As an added safetyfeature, your vehiclehas been equipped witha tire pressuremonitoring system(TPMS) that illuminatesa low tire pressuretelltale when oneor more of your tires issignificantlyunder-inflated.
Accordingly, when the low tire pressure telltaleilluminates, you should stop and check your tiresas soon as possible, and inflate them to theproper pressure. Driving on a significantlyunder-inflated tire causes the tire to overheat andcan lead to tire failure. Under-inflation alsoreduces fuel efficiency and tire tread life, and mayaffect the vehicle’s handling and stopping ability.
424Information Provided by:
Please note that the TPMS is not a substitute forproper tire maintenance, and it is the driver’sresponsibility to maintain correct tire pressure,even if under-inflation has not reached the level totrigger illumination of the TPMS low tire pressuretelltale.
Your vehicle has also been equipped with a TPMSmalfunction indicator to indicate when thesystem is not operating properly. The TPMSmalfunction indicator is combined with the low tirepressure telltale. When the system detects amalfunction, the telltale will flash for approximatelyone minute and then remain continuouslyilluminated. This sequence will continue uponsubsequent vehicle start-ups as long as themalfunction exists.
When the malfunction indicator is illuminated, thesystem may not be able to detect or signal lowtire pressure as intended. TPMS malfunctions mayoccur for a variety of reasons, including theinstallation of replacement or alternate tires orwheels on the vehicle that prevent the TPMS fromfunctioning properly. Always check the TPMSmalfunction telltale after replacing one or more
tires or wheels on your vehicle to ensure that thereplacement or alternate tires and wheels allowthe TPMS to continue to function properly.
A Tire and Loading Information label, attached toyour vehicle, shows the size of your vehicle’soriginal equipment tires and the correct inflationpressure for your vehicle’s tires when theyare cold. See Loading Your Vehicle on page 354,for an example of the Tire and LoadingInformation label and its location on your vehicle.Also see Inflation - Tire Pressure on page 422for additional information.
Your vehicle’s TPMS can warn you about a lowtire pressure condition but it does not replacenormal tire maintenance. See Tire Inspection andRotation on page 426, When It Is Time forNew Tires on page 428, and Tires on page 413.
Notice: Do not use a tire sealant if yourvehicle has Tire Pressure Monitors. The liquidsealant can damage the tire pressure monitorsensors.
425Information Provided by:
TPMS Sensor Identification CodesEach TPMS sensor has a unique identificationcode. Any time you replace one or more ofthe TPMS sensors or rotate your vehicle’s tires,the identification codes will need to be matched tothe new tire/wheel position. The sensors arematched to the tire/wheel positions in the followingorder: driver’s side front tire, passenger’s sidefront tire, passenger’s side rear tire, and driver’sside rear tire using a TPMS diagnostic tool.See your dealer for service.
Federal Communications Commission(FCC) and Industry and ScienceCanadaThe Tire Pressure Monitor System (TPMS)operates on a radio frequency and complies withPart 15 of the FCC Rules. Operation is subjectto the following two conditions:
1. This device may not cause harmfulinterference.
2. This device must accept any interferencereceived, including interference that maycause undesired operation.
The Tire Pressure Monitor System (TPMS)operates on a radio frequency and complies withRSS-210 of Industry and Science Canada.Operation is subject to the following twoconditions:
1. This device may not cause interference.
2. This device must accept any interferencereceived, including interference that maycause undesired operation of the device.
Changes or modifications to this system by otherthan an authorized service facility could voidauthorization to use this equipment.
Tire Inspection and RotationThe tires on your vehicle should be inspectedregularly for wear. Also check for damaged tires orwheels. See When It Is Time for New Tires onpage 428 and Wheel Replacement on page 432 foradditional information.
If your vehicle has P235/50R18 size tires theyshould be rotated any time you noticeunusual wear.
426Information Provided by:
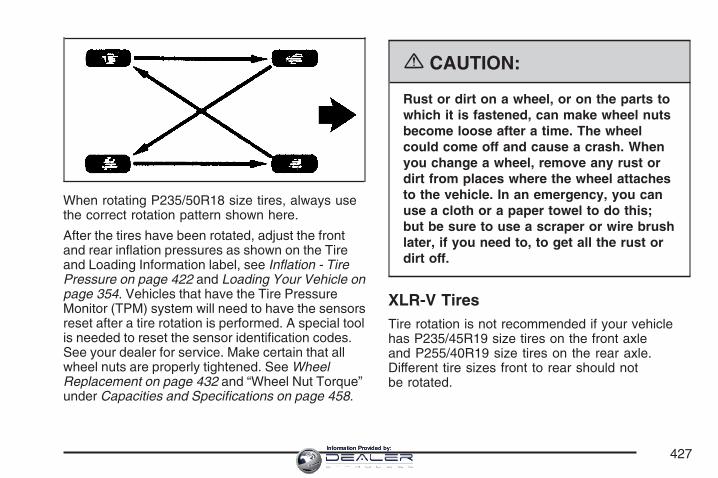
When rotating P235/50R18 size tires, always usethe correct rotation pattern shown here.
After the tires have been rotated, adjust the frontand rear inflation pressures as shown on the Tireand Loading Information label, see Inflation - TirePressure on page 422 and Loading Your Vehicle onpage 354. Vehicles that have the Tire PressureMonitor (TPM) system will need to have the sensorsreset after a tire rotation is performed. A special toolis needed to reset the sensor identification codes.See your dealer for service. Make certain that allwheel nuts are properly tightened. See WheelReplacement on page 432 and “Wheel Nut Torque”under Capacities and Specifications on page 458.
{CAUTION:
Rust or dirt on a wheel, or on the parts towhich it is fastened, can make wheel nutsbecome loose after a time. The wheelcould come off and cause a crash. Whenyou change a wheel, remove any rust ordirt from places where the wheel attachesto the vehicle. In an emergency, you canuse a cloth or a paper towel to do this;but be sure to use a scraper or wire brushlater, if you need to, to get all the rust ordirt off.
XLR-V TiresTire rotation is not recommended if your vehiclehas P235/45R19 size tires on the front axleand P255/40R19 size tires on the rear axle.Different tire sizes front to rear should notbe rotated.
427Information Provided by:
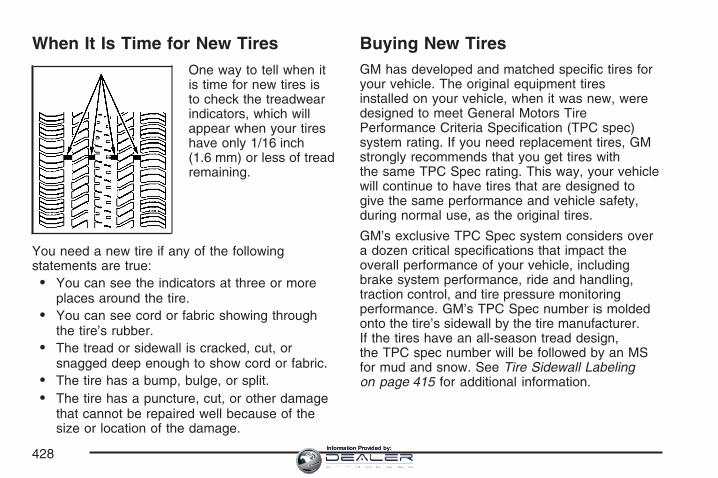
When It Is Time for New TiresOne way to tell when itis time for new tires isto check the treadwearindicators, which willappear when your tireshave only 1/16 inch(1.6 mm) or less of treadremaining.
You need a new tire if any of the followingstatements are true:• You can see the indicators at three or more
places around the tire.• You can see cord or fabric showing through
the tire’s rubber.• The tread or sidewall is cracked, cut, or
snagged deep enough to show cord or fabric.• The tire has a bump, bulge, or split.• The tire has a puncture, cut, or other damage
that cannot be repaired well because of thesize or location of the damage.
Buying New TiresGM has developed and matched specific tires foryour vehicle. The original equipment tiresinstalled on your vehicle, when it was new, weredesigned to meet General Motors TirePerformance Criteria Specification (TPC spec)system rating. If you need replacement tires, GMstrongly recommends that you get tires withthe same TPC Spec rating. This way, your vehiclewill continue to have tires that are designed togive the same performance and vehicle safety,during normal use, as the original tires.
GM’s exclusive TPC Spec system considers overa dozen critical specifications that impact theoverall performance of your vehicle, includingbrake system performance, ride and handling,traction control, and tire pressure monitoringperformance. GM’s TPC Spec number is moldedonto the tire’s sidewall by the tire manufacturer.If the tires have an all-season tread design,the TPC spec number will be followed by an MSfor mud and snow. See Tire Sidewall Labelingon page 415 for additional information.
428Information Provided by:

Winter tires with the same speed rating as youroriginal equipment tires may not be available for H,V, W, Y, and ZR speed rated tires. If you choosesnow tires with a lower speed rating, neverexceed the tire’s maximum speed capability.
{CAUTION:
Mixing tires could cause you to losecontrol while driving. If you mix tires ofdifferent sizes (other than those originallyinstalled on your vehicle), brands, ortypes (radial and bias-belted tires), thevehicle may not handle properly, and youcould have a crash. Using tires ofdifferent sizes (other than those originallyinstalled on your vehicle), brands ortypes, may also cause damage to yourvehicle. Be sure to use the correct size,brand, and type tires on all four wheels.
{CAUTION:
If you use bias-ply tires on your vehicle,the wheel rim flanges could developcracks after many miles of driving. A tireand/or wheel could fail suddenly, causinga crash. Use only radial-ply tires with thewheels on your vehicle.
If you must replace your vehicle’s tires with thosethat do not have a TPC Spec number, makesure they are the same size, load range, speedrating, and construction type (radial andbias-belted tires) as your vehicle’s original tires.
Vehicles that have a tire pressure monitoringsystem may give an inaccurate low-pressurewarning if non-TPC spec rated tires are installedon your vehicle. Non-TPC Spec rated tiresmay give a low-pressure warning that is higher orlower than the proper warning level you wouldget with TPC Spec rated tires. See Tire PressureMonitor System on page 423.
429Information Provided by:
Your vehicle’s original equipment tires are listedon the Tire and Loading Information label.This label is attached to the vehicle’s center pillar(B-pillar). See Loading Your Vehicle on page 354for more information about the Tire and LoadingInformation label and its location on your vehicle.
Different Size Tires and WheelsIf you add wheels or tires that are a different sizethan your original equipment wheels and tires,this may affect the way your vehicle performs,including its braking, ride and handlingcharacteristics, stability, and resistance to rollover.Additionally, if your vehicle has electronicsystems such as, anti-lock brakes, traction control,and electronic stability control, the performanceof these systems can be affected.
{CAUTION:
If you add different sized wheels, yourvehicle may not provide an acceptablelevel of performance and safety if tires notrecommended for those wheels areselected. You may increase the chancethat you will crash and suffer seriousinjury. Only use GM specific wheel andtire systems developed for your vehicle,and have them properly installed by a GMcertified technician.
See Buying New Tires on page 428 andAccessories and Modifications on page 363 foradditional information.
430Information Provided by:
Uniform Tire Quality GradingQuality grades can be found where applicable onthe tire sidewall between tread shoulder andmaximum section width. For example:
Treadwear 200 Traction AA Temperature AThe following information relates to the systemdeveloped by the United States National HighwayTraffic Safety Administration (NHTSA), whichgrades tires by treadwear, traction, andtemperature performance. This applies only tovehicles sold in the United States. The grades aremolded on the sidewalls of most passenger cartires. The Uniform Tire Quality Grading (UTQG)system does not apply to deep tread, winter-typesnow tires, space-saver, or temporary usespare tires, tires with nominal rim diameters of10 to 12 inches (25 to 30 cm), or to somelimited-production tires.
While the tires available on General Motorspassenger cars and light trucks may vary withrespect to these grades, they must also conformto federal safety requirements and additionalGeneral Motors Tire Performance Criteria (TPC)standards.
TreadwearThe treadwear grade is a comparative ratingbased on the wear rate of the tire when testedunder controlled conditions on a specifiedgovernment test course. For example, a tiregraded 150 would wear one and a half (1.5) timesas well on the government course as a tiregraded 100. The relative performance of tiresdepends upon the actual conditions of their use,however, and may depart significantly fromthe norm due to variations in driving habits, servicepractices, and differences in road characteristicsand climate.
Traction – AA, A, B, CThe traction grades, from highest to lowest, areAA, A, B, and C. Those grades represent the tire’sability to stop on wet pavement as measuredunder controlled conditions on specifiedgovernment test surfaces of asphalt and concrete.A tire marked C may have poor tractionperformance.
Warning: The traction grade assigned to this tireis based on straight-ahead braking tractiontests, and does not include acceleration, cornering,hydroplaning, or peak traction characteristics.
431Information Provided by:
Temperature – A, B, CThe temperature grades are A (the highest), B,and C, representing the tire’s resistance tothe generation of heat and its ability to dissipateheat when tested under controlled conditions on aspecified indoor laboratory test wheel. Sustainedhigh temperature can cause the material of the tireto degenerate and reduce tire life, and excessivetemperature can lead to sudden tire failure.The grade C corresponds to a level of performancewhich all passenger car tires must meet underthe Federal Motor Vehicle Safety StandardNo. 109. Grades B and A represent higher levelsof performance on the laboratory test wheelthan the minimum required by law.
Warning: The temperature grade for this tire isestablished for a tire that is properly inflatedand not overloaded. Excessive speed,underinflation, or excessive loading, eitherseparately or in combination, can cause heatbuildup and possible tire failure.
Wheel Alignment and Tire BalanceThe tires and wheels on your vehicle were alignedand balanced carefully at the factory to give youthe longest tire life and best overall performance.Adjustments to wheel alignment and tirebalancing will not be necessary on a regular basis.However, if you notice unusual tire wear or yourvehicle pulling to one side or the other, thealignment may need to be checked. If you noticeyour vehicle vibrating when driving on a smoothroad, your tires and wheels may need to berebalanced. See your dealer for proper diagnosis.
Wheel ReplacementReplace any wheel that is bent, cracked, or badlyrusted or corroded. If wheel nuts keep comingloose, the wheel, wheel bolts, and wheelnuts should be replaced. If the wheel leaks air,replace it (except some aluminum wheels,which can sometimes be repaired). See yourdealer if any of these conditions exist.
Your dealer will know the kind of wheel you need.
Each new wheel should have the sameload-carrying capacity, diameter, width, offset, andbe mounted the same way as the one it replaces.
432Information Provided by:
If you need to replace any of your wheels, wheelbolts or wheel nuts, replace them only withnew GM original equipment parts. This way, youwill be sure to have the right wheel, wheelbolts, and wheel nuts for your vehicle.
{CAUTION:
Using the wrong replacement wheels,wheel bolts, or wheel nuts on your vehiclecan be dangerous. It could affect thebraking and handling of your vehicle,make your tires lose air and make youlose control. You could have a collision inwhich you or others could be injured.Always use the correct wheel, wheel bolts,and wheel nuts for replacement.
Notice: The wrong wheel can also causeproblems with bearing life, brake cooling,speedometer or odometer calibration,headlamp aim, bumper height, vehicle groundclearance, and tire clearance to the bodyand chassis.
{CAUTION:
Rust or dirt on a wheel, or on the parts towhich it is fastened, can make wheel nutsbecome loose after a time. The wheelcould come off and cause a crash. Whenyou change a wheel, remove any rust ordirt from places where the wheel attachesto the vehicle. In an emergency, you canuse a cloth or a paper towel to do this;but be sure to use a scraper or wire brushlater, if you need to, to get all the rust ordirt off.
{CAUTION:
Never use oil or grease on studs or thethreads of the wheel nuts. If you do, thewheel nuts might come loose and thewheel could fall off, causing a crash.
433Information Provided by:
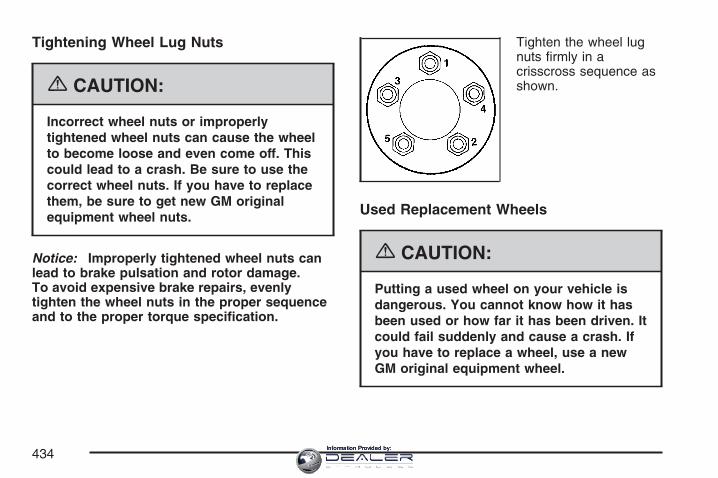
Tightening Wheel Lug Nuts
{CAUTION:
Incorrect wheel nuts or improperlytightened wheel nuts can cause the wheelto become loose and even come off. Thiscould lead to a crash. Be sure to use thecorrect wheel nuts. If you have to replacethem, be sure to get new GM originalequipment wheel nuts.
Notice: Improperly tightened wheel nuts canlead to brake pulsation and rotor damage.To avoid expensive brake repairs, evenlytighten the wheel nuts in the proper sequenceand to the proper torque specification.
Tighten the wheel lugnuts firmly in acrisscross sequence asshown.
Used Replacement Wheels
{CAUTION:
Putting a used wheel on your vehicle isdangerous. You cannot know how it hasbeen used or how far it has been driven. Itcould fail suddenly and cause a crash. Ifyou have to replace a wheel, use a newGM original equipment wheel.
434Information Provided by:

Tire Chains
{CAUTION:
Do not use tire chains. There is notenough clearance. Tire chains used on avehicle without the proper amount ofclearance can cause damage to thebrakes, suspension, or other vehicleparts. The area damaged by the tirechains could cause you to lose control ofyour vehicle and you or others may beinjured in a crash. Use another type oftraction device only if its manufacturerrecommends it for use on your vehicleand tire size combination and roadconditions. Follow that manufacturer’sinstructions. To help avoid damage toyour vehicle, drive slowly, re-adjust orremove the device if it is contacting yourvehicle, and do not spin your wheels. Ifyou do find traction devices that will fit,install them on the rear tires.
Lifting Your Vehicle
{CAUTION:
Lifting a vehicle can cause an injury. Thevehicle can slip off the jack and roll overyou or other people. You and they couldbe badly injured. Find a level place to liftyour vehicle. To help prevent the vehiclefrom moving:
1. Set the parking brake firmly.
2. Put an automatic transmission shiftlever in PARK (P).
3. Turn off the engine.
To be even more certain the vehicle won’tmove, you can put blocks in front of andbehind the wheels.
435Information Provided by:

{CAUTION:
Getting under a vehicle when it is jackedup is dangerous. If the vehicle slips offthe jack, you could be badly injured orkilled. Never get under a vehicle when it issupported only by a jack.
{CAUTION:
Raising your vehicle with the jackimproperly positioned can damage thevehicle and even make the vehicle fall. Tohelp avoid personal injury and vehicledamage, be sure to place the jack in theproper location before raising the vehicle.
If you ever use a jack to lift your vehicle, followthe instructions that came with the jack, andbe sure to use the correct lifting points to avoiddamaging your vehicle.
Notice: Lifting your vehicle improperly candamage your vehicle and result in costlyrepairs not covered by your warranty. To liftyour vehicle properly, follow the advice inthis part.
To help prevent vehicle damage:• Be sure to place a block or pad between
the jack and the vehicle.• Make sure the jack you are using spans at
least two crossmember ribs.• Lift only in the areas shown in the following
pictures.
For additional information, see your GM dealerand the Cadillac XLR service manual.
436Information Provided by:
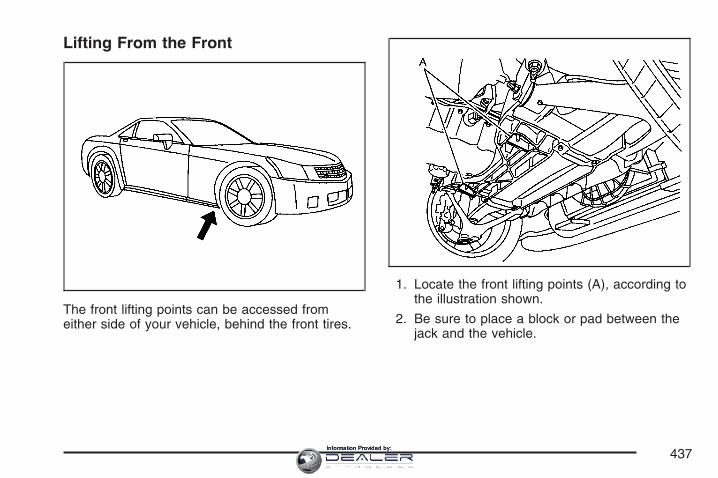
Lifting From the Front
The front lifting points can be accessed fromeither side of your vehicle, behind the front tires.
1. Locate the front lifting points (A), according tothe illustration shown.
2. Be sure to place a block or pad between thejack and the vehicle.
437Information Provided by:
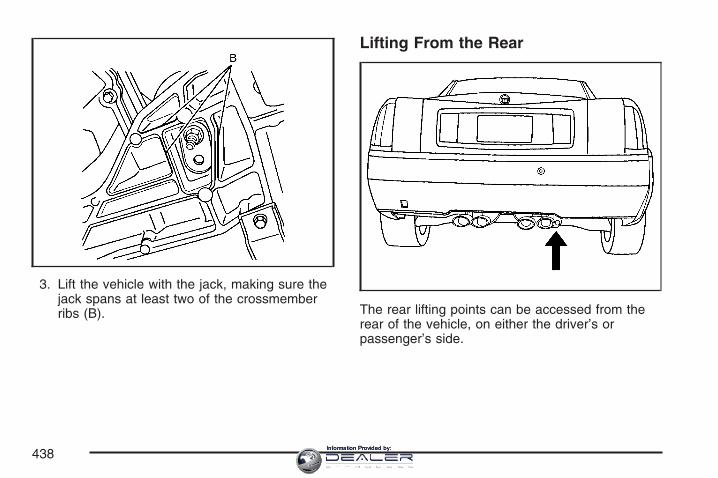
3. Lift the vehicle with the jack, making sure thejack spans at least two of the crossmemberribs (B).
Lifting From the Rear
The rear lifting points can be accessed from therear of the vehicle, on either the driver’s orpassenger’s side.
438Information Provided by:
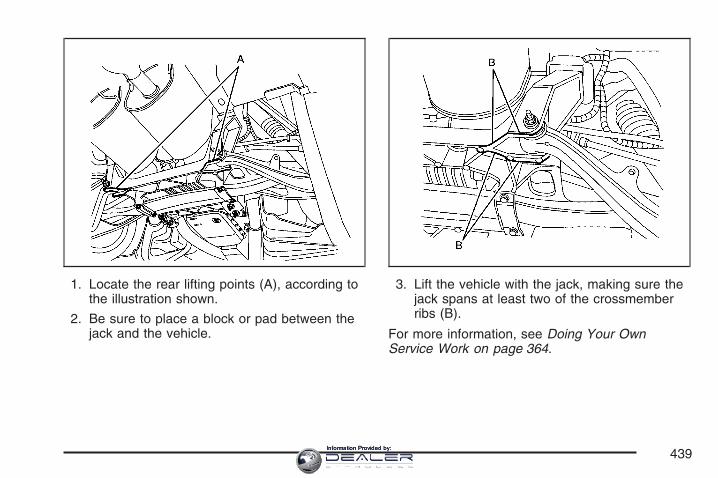
1. Locate the rear lifting points (A), according tothe illustration shown.
2. Be sure to place a block or pad between thejack and the vehicle.
3. Lift the vehicle with the jack, making sure thejack spans at least two of the crossmemberribs (B).
For more information, see Doing Your OwnService Work on page 364.
439Information Provided by:
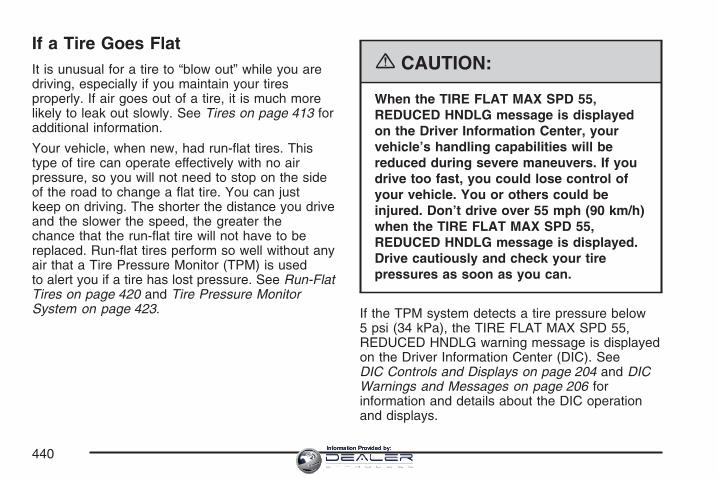
If a Tire Goes FlatIt is unusual for a tire to “blow out” while you aredriving, especially if you maintain your tiresproperly. If air goes out of a tire, it is much morelikely to leak out slowly. See Tires on page 413 foradditional information.
Your vehicle, when new, had run-flat tires. Thistype of tire can operate effectively with no airpressure, so you will not need to stop on the sideof the road to change a flat tire. You can justkeep on driving. The shorter the distance you driveand the slower the speed, the greater thechance that the run-flat tire will not have to bereplaced. Run-flat tires perform so well without anyair that a Tire Pressure Monitor (TPM) is usedto alert you if a tire has lost pressure. See Run-FlatTires on page 420 and Tire Pressure MonitorSystem on page 423.
{CAUTION:
When the TIRE FLAT MAX SPD 55,REDUCED HNDLG message is displayedon the Driver Information Center, yourvehicle’s handling capabilities will bereduced during severe maneuvers. If youdrive too fast, you could lose control ofyour vehicle. You or others could beinjured. Don’t drive over 55 mph (90 km/h)when the TIRE FLAT MAX SPD 55,REDUCED HNDLG message is displayed.Drive cautiously and check your tirepressures as soon as you can.
If the TPM system detects a tire pressure below5 psi (34 kPa), the TIRE FLAT MAX SPD 55,REDUCED HNDLG warning message is displayedon the Driver Information Center (DIC). SeeDIC Controls and Displays on page 204 and DICWarnings and Messages on page 206 forinformation and details about the DIC operationand displays.
440Information Provided by:
{CAUTION:
Special tools and procedures are requiredto service a run-flat tire. If these specialtools and procedures are not used you orothers could be injured and your vehiclecould be damaged. Always be sure theproper tools and procedures, as describedin the service manual, are used.
Notice: Using liquid sealants can damage thetire valves and tire pressure monitor sensors inyour vehicle’s run-flat tires. This damage wouldnot be covered by warranty. Do not use liquidsealants in your vehicle’s run-flat tires.
To order a service manual, see ServicePublications Ordering Information on page 497.
If a tire goes flat, the stability control systemwill turn on automatically even if it was disabled bythe driver. When a flat tire condition exists theStabiliTrak® system cannot be turned off.See StabiliTrak® System on page 331.
Appearance Care
Cleaning the Inside of Your VehicleYour vehicle’s interior will continue to look itsbest if it is cleaned often. Although not alwaysvisible, dust and dirt can accumulate on yourupholstery. Dirt can damage carpet, fabric, leather,and plastic surfaces. Regular vacuuming isrecommended to remove particles from yourupholstery. It is important to keep your upholsteryfrom becoming and remaining heavily soiled.Soils should be removed as quickly as possible.Your vehicle’s interior may experience extremes ofheat that could cause stains to set rapidly.
Lighter colored interiors may require more frequentcleaning. Use care because newspapers andgarments that transfer color to your homefurnishings may also transfer color to yourvehicle’s interior.
441Information Provided by:
When cleaning your vehicle’s interior, only usecleaners specifically designed for the surfacesbeing cleaned. Permanent damage may resultfrom using cleaners on surfaces for whichthey were not intended. Use glass cleaner only onglass. Remove any accidental over-spray fromother surfaces immediately. To prevent over-spray,apply cleaner directly to the cleaning cloth.
Notice: If you use abrasive cleaners whencleaning glass surfaces on your vehicle, youcould scratch the glass and/or cause damageto the integrated radio antenna and therear window defogger. When cleaning theglass on your vehicle, use only a soft cloth andglass cleaner.
Many cleaners contain solvents that may becomeconcentrated in your vehicle’s breathing space.Before using cleaners, read and adhere to all safetyinstructions on the label. While cleaning yourvehicle’s interior, maintain adequate ventilation byopening your vehicle’s doors and windows.
Dust may be removed from small buttons andknobs using a small brush with soft bristles.
Your dealer has a product for cleaning yourvehicle’s glass. Should it become necessary, youcan also obtain a product from your dealer toremove odors from your vehicle’s upholstery.
Do not clean your vehicle using the followingcleaners or techniques:
• Never use a knife or any other sharp object toremove a soil from any interior surface.
• Never use a stiff brush. It can cause damageto your vehicle’s interior surfaces.
• Never apply heavy pressure or rubaggressively with a cleaning cloth. Use ofheavy pressure can damage your interior anddoes not improve the effectiveness of soilremoval.
• Use only mild, neutral-pH soaps. Avoidlaundry detergents or dishwashing soaps withdegreasers. Using too much soap will leavea residue that leaves streaks and attracts dirt.For liquid cleaners, about 20 drops pergallon (3.78 L) of water is a good guide.
442Information Provided by:
• Do not heavily saturate your upholstery whilecleaning.
• Damage to your vehicle’s interior may resultfrom the use of many organic solvents suchas naptha, alcohol, etc.
Fabric/CarpetUse a vacuum cleaner with a soft brushattachment frequently to remove dust and loosedirt. A canister vacuum with a beater bar inthe nozzle may only be used on floor carpet andcarpeted floor mats. For soils, always try to removethem first with plain water or club soda. Beforecleaning, gently remove as much of the soilas possible using one of the following techniques:
• For liquids: gently blot the remaining soilwith a paper towel. Allow the soil to absorb intothe paper towel until no more can beremoved.
• For solid dry soils: remove as much aspossible and then vacuum.
To clean, use the following instructions:
1. Saturate a lint-free, clean white cloth withwater or club soda.
2. Wring the cloth to remove excess moisture.
3. Start on the outside edge of the soil and gentlyrub toward the center. Continue cleaning,using a clean area of the cloth each time itbecomes soiled.
4. Continue to gently rub the soiled area until thecleaning cloth remains clean.
5. If the soil is not completely removed, use amild soap solution and repeat the cleaningprocess that was used with plain water.
If any of the soil remains, a commercial fabriccleaner or spot lifter may be necessary. When acommercial upholstery cleaner or spot lifter is to beused, test a small hidden area for colorfastnessfirst. If the locally cleaned area gives anyimpression that a ring formation may result, cleanthe entire surface.
After the cleaning process has been completed, apaper towel can be used to blot excess moisturefrom the fabric or carpet.
443Information Provided by:
LeatherA soft cloth dampened with water may be used toremove dust. If a more thorough cleaning isnecessary, a soft cloth dampened with a mild soapsolution can be used. Allow the leather to drynaturally. Do not use heat to dry. Never use steamto clean leather. Never use spot lifters or spotremovers on leather. Many commercial leathercleaners and coatings that are sold to preserveand protect leather may permanently changethe appearance and feel of your leather and arenot recommended. Do not use silicone orwax-based products, or those containing organicsolvents to clean your vehicle’s interior becausethey can alter the appearance by increasingthe gloss in a non-uniform manner. Never useshoe polish on your leather.
Instrument Panel, Vinyl, and OtherPlastic SurfacesA soft cloth dampened with water may be used toremove dust. If a more thorough cleaning isnecessary, a clean soft cloth dampened with amild soap solution can be used to gently removedust and dirt. Never use spot lifters or removerson plastic surfaces. Many commercial cleaners andcoatings that are sold to preserve and protectsoft plastic surfaces may permanently change theappearance and feel of your interior and arenot recommended. Do not use silicone orwax-based products, or those containing organicsolvents to clean your vehicle’s interior becausethey can alter the appearance by increasingthe gloss in a non-uniform manner.
Some commercial products may increase gloss onyour instrument panel. The increase in glossmay cause annoying reflections in the windshieldand even make it difficult to see through thewindshield under certain conditions.
444Information Provided by:
Wood PanelsUse a clean cloth moistened in warm, soapy water(use mild dish washing soap). Dry the woodimmediately with a clean cloth.
Speaker CoversVacuum around a speaker cover gently, so thatthe speaker will not be damaged. Clean spots withjust water and mild soap.
Care of Safety BeltsKeep belts clean and dry.
{CAUTION:
Do not bleach or dye safety belts. If youdo, it may severely weaken them. In acrash, they might not be able to provideadequate protection. Clean safety beltsonly with mild soap and lukewarm water.
WeatherstripsSilicone grease on weatherstrips will make themlast longer, seal better, and not stick or squeak.Apply silicone grease with a clean cloth. Duringvery cold, damp weather frequent application maybe required. See Recommended Fluids andLubricants on page 473.
445Information Provided by:
Washing Your VehicleThe paint finish on the vehicle provides beauty,depth of color, gloss retention, and durability.
The best way to preserve the vehicle’s finish is tokeep it clean by washing it often with lukewarmor cold water.
Do not wash the vehicle in the direct rays of thesun. Use a car washing soap. Do not usestrong soaps or chemical detergents. Be sure torinse the vehicle well, removing all soapresidue completely. GM-approved cleaningproducts can be obtained from your dealer. SeeVehicle Care/Appearance Materials on page 450.Do not use cleaning agents that are petroleumbased, or that contain acid or abrasives. Allcleaning agents should be flushed promptly andnot allowed to dry on the surface, or theycould stain. Dry the finish with a soft, cleanchamois or an all-cotton towel to avoid surfacescratches and water spotting.
Notice: If you drive your vehicle through anautomatic car wash that does not have enoughclearance for the wide rear tires and wheels,you could damage your vehicle. Verify with themanager of the car wash that your vehiclewill fit before entering the car wash or use atouchless car wash.
High pressure car washes may cause water toenter the vehicle.
Cleaning Exterior Lamps/LensesUse only lukewarm or cold water, a soft cloth anda car washing soap to clean exterior lampsand lenses. Follow instructions under WashingYour Vehicle on page 446.
446Information Provided by:
Finish CareOccasional waxing or mild polishing of the vehicleby hand may be necessary to remove residuefrom the paint finish. Approved cleaning productscan be obtained from your dealer. See VehicleCare/Appearance Materials on page 450.
Notice: Machine compounding or aggressivepolishing on a basecoat/clearcoat paintfinish may damage it. Use only non-abrasivewaxes and polishes that are made for abasecoat/clearcoat paint finish on your vehicle.
The vehicle has a basecoat/clearcoat paintfinish. The clearcoat gives more depth and glossto the colored basecoat. Always use waxesand polishes that are non-abrasive and made for abasecoat/clearcoat paint finish.
Foreign materials such as calcium chloride andother salts, ice melting agents, road oil andtar, tree sap, bird droppings, chemicals fromindustrial chimneys, etc., can damage the vehicle’sfinish if they remain on painted surfaces. Washthe vehicle as soon as possible. If necessary, usenon-abrasive cleaners that are marked safe forpainted surfaces to remove foreign matter.
Exterior painted surfaces are subject to aging,weather, and chemical fallout that can take theirtoll over a period of years. To help keep thepaint finish looking new, keep the vehicle in agarage or covered whenever possible.
Windshield and Wiper BladesIf the windshield is not clear after using thewindshield washer, or if the wiper blade chatterswhen running, wax, sap, or other material maybe on the blade or windshield.
Clean the outside of the windshield with a glasscleaning liquid or powder and water solution.The windshield is clean if beads do not form whenit is rinsed with water.
Grime from the windshield will stick to the wiperblades and affect their performance. Cleanthe blade by wiping vigorously with a cloth soakedin full-strength windshield washer solvent. Thenrinse the blade with water.
Check the wiper blades and clean them asnecessary; replace blades that look worn.
447Information Provided by:

Aluminum or Chrome-Plated WheelsYour vehicle may have either aluminum orchrome-plated wheels.
Keep the wheels clean using a soft clean clothwith mild soap and water. Rinse with clean water.After rinsing thoroughly, dry with a soft cleantowel. A wax may then be applied.
Notice: If you use strong soaps, chemicals,abrasive polishes, cleaners, brushes, orcleaners that contain acid on aluminum orchrome-plated wheels, you could damage thesurface of the wheel(s). The repairs wouldnot be covered by your warranty. Useonly GM-approved cleaners on aluminum orchrome-plated wheels.
The surface of these wheels is similar to thepainted surface of your vehicle. Do not use strongsoaps, chemicals, abrasive polishes, abrasivecleaners, cleaners with acid, or abrasive cleaningbrushes on them because you could damagethe surface. Do not use chrome polish onaluminum wheels.
Notice: Using chrome polish on aluminumwheels could damage the wheels. The repairswould not be covered by your warranty.Use chrome polish on chrome wheels only.
Use chrome polish only on chrome-plated wheels,but avoid any painted surface of the wheel, andbuff off immediately after application.
Notice: If you drive your vehicle through anautomatic car wash that has silicone carbidetire cleaning brushes, you could damagethe aluminum or chrome-plated wheels. Therepairs would not be covered by your warranty.Never drive a vehicle equipped with aluminumor chrome-plated wheels through anautomatic car wash that uses silicone carbidetire cleaning brushes.
Do not take your vehicle through an automatic carwash that has silicone carbide tire cleaningbrushes. These brushes can also damage thesurface of these wheels.
448Information Provided by:
TiresTo clean the tires, use a stiff brush with tirecleaner.
Notice: Using petroleum-based tire dressingproducts on your vehicle may damage thepaint finish and/or tires. When applying a tiredressing, always wipe off any oversprayfrom all painted surfaces on your vehicle.
Sheet Metal DamageIf the vehicle is damaged and requires sheet metalrepair or replacement, make sure the bodyrepair shop applies anti-corrosion material to partsrepaired or replaced to restore corrosionprotection.
Original manufacturer replacement parts willprovide the corrosion protection while maintainingthe warranty.
Finish DamageAny stone chips, fractures or deep scratches inthe finish should be repaired right away.
Minor chips and scratches can be repaired withtouch-up materials available from your dealeror other service outlets. Larger areas of finishdamage can be corrected in your dealer’s bodyand paint shop.
Underbody MaintenanceChemicals used for ice and snow removal anddust control can collect on the underbody. If theseare not removed, corrosion and rust can developon the underbody parts such as fuel lines,frame, floor pan, and exhaust system even thoughthey have corrosion protection.
At least every spring, flush these materials from theunderbody with plain water. Clean any areas wheremud and debris can collect. Dirt packed in closeareas of the frame should be loosened before beingflushed. Your dealer or an underbody car washingsystem can do this for you.
449Information Provided by:
Chemical Paint SpottingSome weather and atmospheric conditions cancreate a chemical fallout. Airborne pollutants canfall upon and attack painted surfaces on thevehicle. This damage can take two forms: blotchy,ring-shaped discolorations, and small, irregulardark spots etched into the paint surface.Although no defect in the paint job causes this, GMwill repair, at no charge to the owner, the surfacesof new vehicles damaged by this fallout conditionwithin 12 months or 12,000 miles (20 000 km) ofpurchase, whichever occurs first.
Vehicle Care/Appearance MaterialsDescription Usage
Polishing ClothWax-Treated
Interior and exteriorpolishing cloth.
Tar and Road OilRemover
Removes tar, road oil,and asphalt.
Chrome Cleaner andPolish
Use on chrome orstainless steel.
White Sidewall TireCleaner
Removes soil and blackmarks from whitewalls.
Vinyl Cleaner Cleans vinyl.
Glass Cleaner Removes dirt, grime,smoke and fingerprints.
Description Usage
Chrome and Wire WheelCleaner
Removes dirt and grimefrom chrome wheels andwire wheel covers.
Finish Enhancer
Removes dust,fingerprints, and surfacecontaminants. Spray onand wipe off.
Swirl Remover PolishRemoves swirl marks, finescratches, and other lightsurface contamination.
Cleaner Wax Removes light scratchesand protects finish.
Foaming Tire ShineLow Gloss
Cleans, shines, andprotects in one step. Nowiping necessary.
Wash Wax Concentrate
Medium foamingshampoo. Cleans andlightly waxes.Biodegradable andphosphate free.
Spot Lifter
Quickly removes spotsand stains from carpets,vinyl, and clothupholstery.
Odor EliminatorOdorless spray odoreliminator used on fabrics,vinyl, leather and carpet.
450Information Provided by:
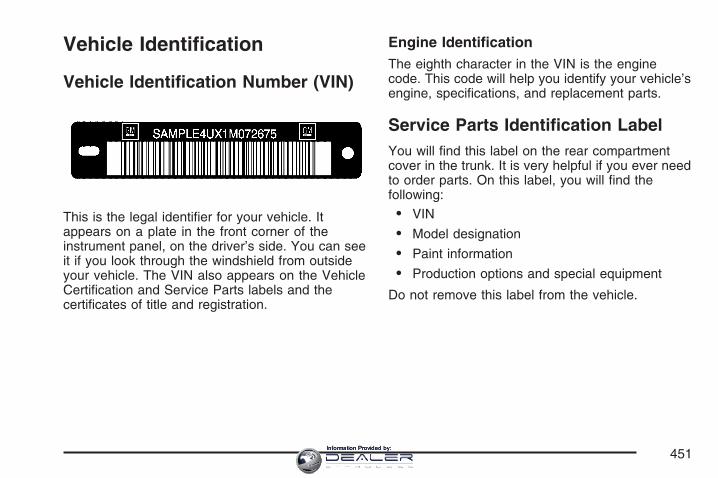
Vehicle Identification
Vehicle Identification Number (VIN)
This is the legal identifier for your vehicle. Itappears on a plate in the front corner of theinstrument panel, on the driver’s side. You can seeit if you look through the windshield from outsideyour vehicle. The VIN also appears on the VehicleCertification and Service Parts labels and thecertificates of title and registration.
Engine IdentificationThe eighth character in the VIN is the enginecode. This code will help you identify your vehicle’sengine, specifications, and replacement parts.
Service Parts Identification LabelYou will find this label on the rear compartmentcover in the trunk. It is very helpful if you ever needto order parts. On this label, you will find thefollowing:
• VIN
• Model designation
• Paint information
• Production options and special equipment
Do not remove this label from the vehicle.
451Information Provided by:
Electrical System
Add-On Electrical Equipment
Notice: Do not add anything electrical to yourvehicle unless you check with your dealerfirst. Some electrical equipment can damageyour vehicle and the damage would notbe covered by your warranty. Some add-onelectrical equipment can keep othercomponents from working as they should.
Add-on equipment can drain your vehicle’s battery,even if your vehicle is not operating.
Your vehicle has an airbag system. Beforeattempting to add anything electrical to yourvehicle, see Servicing Your Airbag-EquippedVehicle on page 58.
Windshield Wiper FusesThe windshield wiper motor is protected by aninternal circuit breaker. If the wiper motoroverheats due to heavy snow, the wipers will stopuntil the motor cools and will then restart.
A fuse powers the wiper motor. If the fuse blows,there is an electrical problem. Be sure to haveit fixed.
Power Windows and Other PowerOptionsCircuit breakers protect the power windows andpower seats. When the current load is tooheavy, the circuit breaker opens and closes,protecting the circuit until the problem is fixed orgoes away.
452Information Provided by:
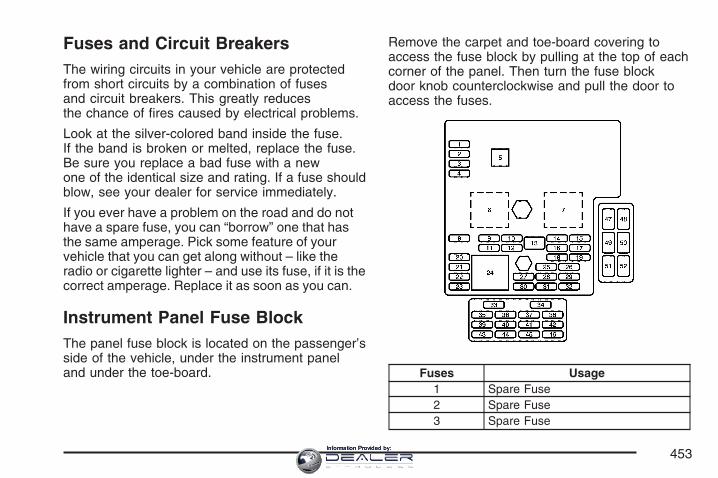
Fuses and Circuit BreakersThe wiring circuits in your vehicle are protectedfrom short circuits by a combination of fusesand circuit breakers. This greatly reducesthe chance of fires caused by electrical problems.
Look at the silver-colored band inside the fuse.If the band is broken or melted, replace the fuse.Be sure you replace a bad fuse with a newone of the identical size and rating. If a fuse shouldblow, see your dealer for service immediately.
If you ever have a problem on the road and do nothave a spare fuse, you can “borrow” one that hasthe same amperage. Pick some feature of yourvehicle that you can get along without – like theradio or cigarette lighter – and use its fuse, if it is thecorrect amperage. Replace it as soon as you can.
Instrument Panel Fuse BlockThe panel fuse block is located on the passenger’sside of the vehicle, under the instrument paneland under the toe-board.
Remove the carpet and toe-board covering toaccess the fuse block by pulling at the top of eachcorner of the panel. Then turn the fuse blockdoor knob counterclockwise and pull the door toaccess the fuses.
Fuses Usage1 Spare Fuse2 Spare Fuse3 Spare Fuse
453Information Provided by:
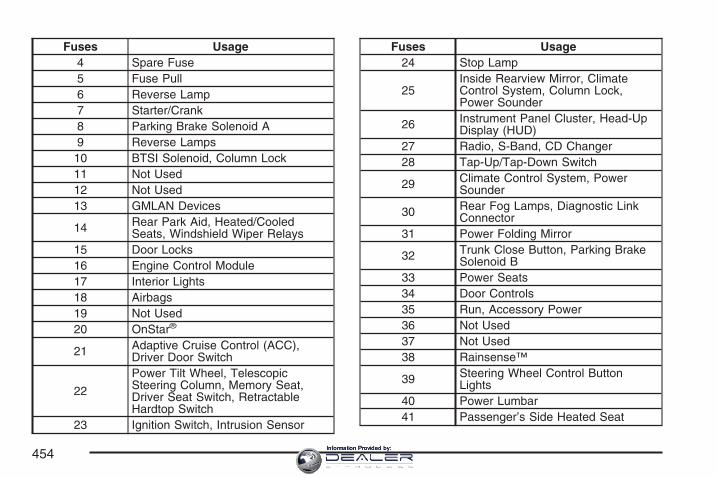
Fuses Usage4 Spare Fuse5 Fuse Pull6 Reverse Lamp7 Starter/Crank8 Parking Brake Solenoid A9 Reverse Lamps10 BTSI Solenoid, Column Lock11 Not Used12 Not Used13 GMLAN Devices
14 Rear Park Aid, Heated/CooledSeats, Windshield Wiper Relays
15 Door Locks16 Engine Control Module17 Interior Lights18 Airbags19 Not Used20 OnStar®
21 Adaptive Cruise Control (ACC),Driver Door Switch
22
Power Tilt Wheel, TelescopicSteering Column, Memory Seat,Driver Seat Switch, RetractableHardtop Switch
23 Ignition Switch, Intrusion Sensor
Fuses Usage24 Stop Lamp
25Inside Rearview Mirror, ClimateControl System, Column Lock,Power Sounder
26 Instrument Panel Cluster, Head-UpDisplay (HUD)
27 Radio, S-Band, CD Changer28 Tap-Up/Tap-Down Switch
29 Climate Control System, PowerSounder
30 Rear Fog Lamps, Diagnostic LinkConnector
31 Power Folding Mirror
32 Trunk Close Button, Parking BrakeSolenoid B
33 Power Seats34 Door Controls35 Run, Accessory Power36 Not Used37 Not Used38 Rainsense™
39 Steering Wheel Control ButtonLights
40 Power Lumbar41 Passenger’s Side Heated Seat
454Information Provided by:
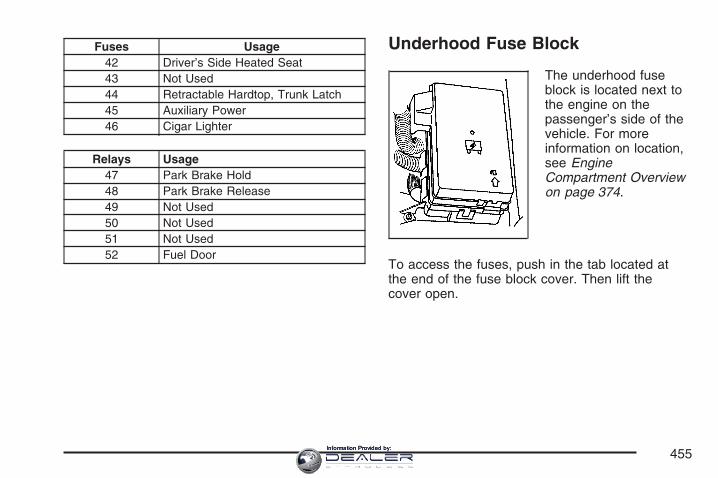
Fuses Usage42 Driver’s Side Heated Seat43 Not Used44 Retractable Hardtop, Trunk Latch45 Auxiliary Power46 Cigar Lighter
Relays Usage47 Park Brake Hold48 Park Brake Release49 Not Used50 Not Used51 Not Used52 Fuel Door
Underhood Fuse Block
The underhood fuseblock is located next tothe engine on thepassenger’s side of thevehicle. For moreinformation on location,see EngineCompartment Overviewon page 374.
To access the fuses, push in the tab located atthe end of the fuse block cover. Then lift thecover open.
455Information Provided by:
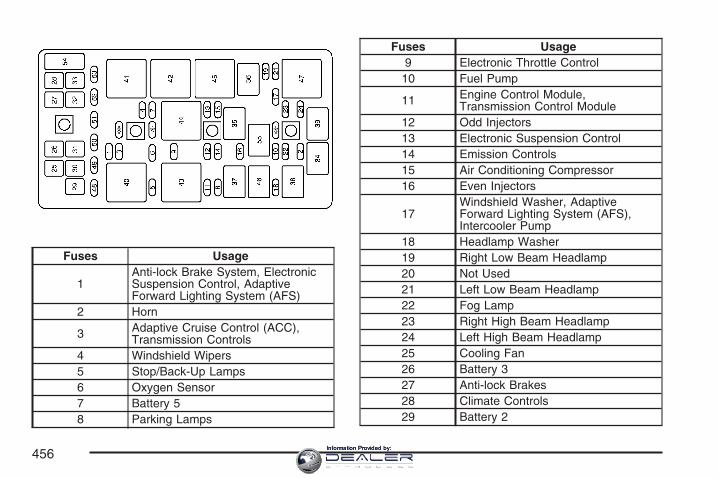
Fuses Usage
1Anti-lock Brake System, ElectronicSuspension Control, AdaptiveForward Lighting System (AFS)
2 Horn
3 Adaptive Cruise Control (ACC),Transmission Controls
4 Windshield Wipers5 Stop/Back-Up Lamps6 Oxygen Sensor7 Battery 58 Parking Lamps
Fuses Usage9 Electronic Throttle Control10 Fuel Pump
11 Engine Control Module,Transmission Control Module
12 Odd Injectors13 Electronic Suspension Control14 Emission Controls15 Air Conditioning Compressor16 Even Injectors
17Windshield Washer, AdaptiveForward Lighting System (AFS),Intercooler Pump
18 Headlamp Washer19 Right Low Beam Headlamp20 Not Used21 Left Low Beam Headlamp22 Fog Lamp23 Right High Beam Headlamp24 Left High Beam Headlamp25 Cooling Fan26 Battery 327 Anti-lock Brakes28 Climate Controls29 Battery 2
456Information Provided by:
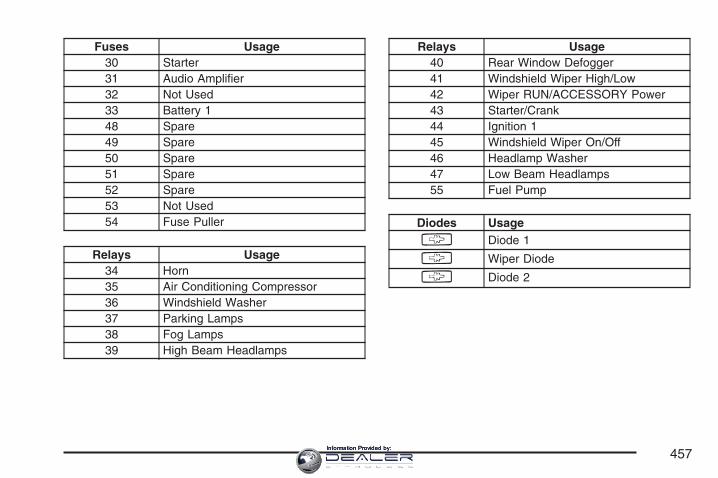
Fuses Usage30 Starter31 Audio Amplifier32 Not Used33 Battery 148 Spare49 Spare50 Spare51 Spare52 Spare53 Not Used54 Fuse Puller
Relays Usage34 Horn35 Air Conditioning Compressor36 Windshield Washer37 Parking Lamps38 Fog Lamps39 High Beam Headlamps
Relays Usage40 Rear Window Defogger41 Windshield Wiper High/Low42 Wiper RUN/ACCESSORY Power43 Starter/Crank44 Ignition 145 Windshield Wiper On/Off46 Headlamp Washer47 Low Beam Headlamps55 Fuel Pump
Diodes Usage
§ Diode 1
§ Wiper Diode
§ Diode 2
457Information Provided by:
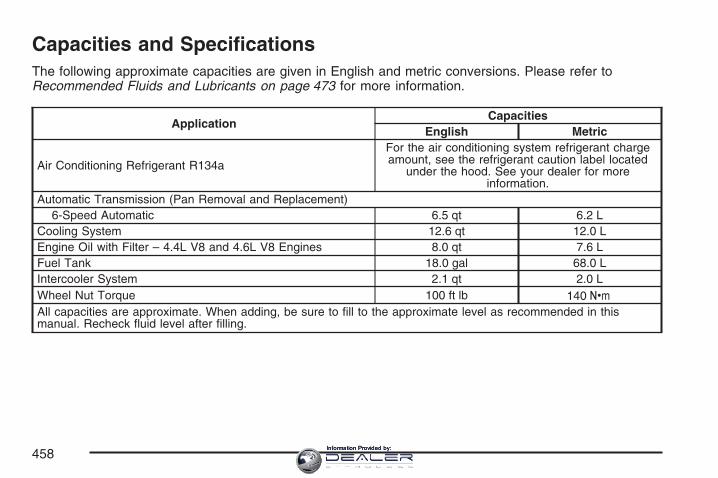
Capacities and SpecificationsThe following approximate capacities are given in English and metric conversions. Please refer toRecommended Fluids and Lubricants on page 473 for more information.
ApplicationCapacities
English Metric
Air Conditioning Refrigerant R134a
For the air conditioning system refrigerant chargeamount, see the refrigerant caution label located
under the hood. See your dealer for moreinformation.
Automatic Transmission (Pan Removal and Replacement)6-Speed Automatic 6.5 qt 6.2 L
Cooling System 12.6 qt 12.0 LEngine Oil with Filter – 4.4L V8 and 4.6L V8 Engines 8.0 qt 7.6 LFuel Tank 18.0 gal 68.0 LIntercooler System 2.1 qt 2.0 LWheel Nut Torque 100 ft lb 140 YAll capacities are approximate. When adding, be sure to fill to the approximate level as recommended in thismanual. Recheck fluid level after filling.
458Information Provided by:

Engine SpecificationsEngine VIN Code Transmission Spark Plug Gap
4.4L V8 D Automatic 0.040 inches (1.02 mm)
4.6L V8 A Automatic 0.050 inches (1.27 mm)
XLR-V Engine DataEngine Horsepower Torque Displacement Compression Ratio
4.4L V8 (V-Series) 443 hp (330 kW) @6400 rpm
414 lb ft (561 N.m) @3900 rpm 4.4L 9.0:1
459Information Provided by:

✍ NOTES
460Information Provided by:
Maintenance Schedule ................................ 462Introduction ............................................... 462Maintenance Requirements ........................ 462Your Vehicle and the Environment ............ 462Using the Maintenance Schedule ............... 463Scheduled Maintenance ............................. 465Additional Required Services ..................... 467Maintenance Footnotes .............................. 469
Owner Checks and Services ..................... 470At Each Fuel Fill ....................................... 470At Least Once a Month ............................. 471At Least Once a Year ............................... 471Recommended Fluids and Lubricants ........ 473Normal Maintenance Replacement Parts ... 475Engine Drive Belt Routing ......................... 476Maintenance Record .................................. 477
Section 7 Maintenance Schedule
461Information Provided by:
Maintenance Schedule
IntroductionImportant: Keep engine oil at the proper leveland change as recommended.
Have you purchased the GM Protection Plan? ThePlan supplements your new vehicle warranties.See your Warranty and Owner Assistance bookletor your dealer for details.
Maintenance Requirements
Notice: Maintenance intervals, checks,inspections, replacement parts, andrecommended fluids and lubricants asprescribed in this manual are necessary tokeep your vehicle in good working condition.Any damage caused by failure to followscheduled maintenance may not be covered bywarranty.
Your Vehicle and the EnvironmentProper vehicle maintenance not only helps to keepyour vehicle in good working condition, but alsohelps the environment. All recommendedmaintenance is important. Improper vehiclemaintenance can even affect the quality of the airwe breathe. Improper fluid levels or the wrongtire inflation can increase the level of emissionsfrom your vehicle. To help protect our environment,and to keep your vehicle in good condition, besure to maintain your vehicle properly.
462Information Provided by:
Using the Maintenance ScheduleWe at General Motors want to help you keep yourvehicle in good working condition. But we donot know exactly how you will drive it. You maydrive very short distances only a few times a week.Or you may drive long distances all the time invery hot, dusty weather. You may use your vehiclein making deliveries. Or you may drive it towork, to do errands, or in many other ways.
Because of all the different ways people use theirvehicles, maintenance needs vary. You mayneed more frequent checks and replacements. Soplease read the following and note how youdrive. If you have any questions on how to keepyour vehicle in good condition, see your GMGoodwrench® dealer.
This schedule is for vehicles that:
• carry passengers and cargo withinrecommended limits. You will find these limitson the Tire and Loading Information label.See Loading Your Vehicle on page 354.
• are driven on reasonable road surfaces withinlegal driving limits.
• use the recommended fuel. See GasolineOctane on page 366.
The services in Scheduled Maintenance onpage 465 should be performed when indicated.See Additional Required Services on page 467 andMaintenance Footnotes on page 469 for furtherinformation.
463Information Provided by:
{CAUTION:
Performing maintenance work on avehicle can be dangerous. In trying to dosome jobs, you can be seriously injured.Do your own maintenance work only ifyou have the required know-how and theproper tools and equipment for the job. Ifyou have any doubt, see your GMGoodwrench® dealer to have a qualifiedtechnician do the work.
Some maintenance services can be complex. So,unless you are technically qualified and havethe necessary equipment, you should have yourGM Goodwrench® dealer do these jobs.
When you go to your GM Goodwrench® dealer foryour service needs, you will know that GM-trainedand supported service technicians will performthe work using genuine GM parts.
If you want to purchase service information, seeService Publications Ordering Information onpage 497.
Owner Checks and Services on page 470 tells youwhat should be checked, when to check it, andwhat you can easily do to help keep your vehicle ingood condition.
The proper replacement parts, fluids, andlubricants to use are listed in RecommendedFluids and Lubricants on page 473 and NormalMaintenance Replacement Parts on page 475.When your vehicle is serviced, make sure theseare used. All parts should be replaced and allnecessary repairs done before you or anyone elsedrives the vehicle. We recommend the use ofgenuine GM parts.
464Information Provided by:
Scheduled MaintenanceWhen the CHANGE OIL NOW message in theDriver Information Center (DIC) comes on, itmeans that service is required for your vehicle.Have your vehicle serviced as soon as possiblewithin the next 600 miles (1 000 km). It is possiblethat, if you are driving under the best conditions,the engine oil life system may not indicatethat vehicle service is necessary for over a year.However, your engine oil and filter must bechanged at least once a year and at this time thesystem must be reset. Your GM Goodwrench®
dealer has GM-trained service technicians who willperform this work using genuine GM parts andreset the system.
If the engine oil life system is ever resetaccidentally, you must service your vehicle within3,000 miles (5 000 km) since your last service.Remember to reset the oil life system wheneverthe oil is changed. See Engine Oil Life System onpage 380 for information on the Engine Oil LifeSystem and resetting the system.
When the CHANGE OIL NOW message appears,certain services, checks, and inspections arerequired. Required services are described in thefollowing for “Maintenance I” and “Maintenance II.”Generally, it is recommended that your firstservice be Maintenance I, your second service beMaintenance II, and that you alternateMaintenance I and Maintenance II thereafter.However, in some cases, Maintenance II may berequired more often.
465Information Provided by:
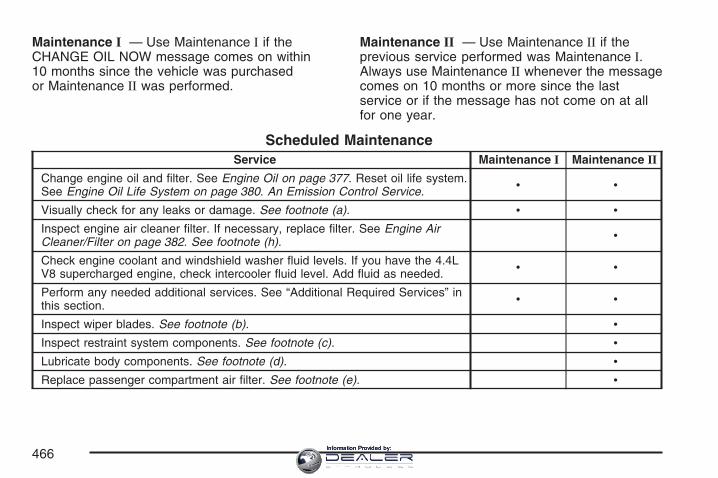
Maintenance I — Use Maintenance I if theCHANGE OIL NOW message comes on within10 months since the vehicle was purchasedor Maintenance II was performed.
Maintenance II — Use Maintenance II if theprevious service performed was Maintenance I.Always use Maintenance II whenever the messagecomes on 10 months or more since the lastservice or if the message has not come on at allfor one year.
Scheduled MaintenanceService Maintenance I Maintenance II
Change engine oil and filter. See Engine Oil on page 377. Reset oil life system.See Engine Oil Life System on page 380. An Emission Control Service. • •
Visually check for any leaks or damage. See footnote (a). • •Inspect engine air cleaner filter. If necessary, replace filter. See Engine AirCleaner/Filter on page 382. See footnote (h). •
Check engine coolant and windshield washer fluid levels. If you have the 4.4LV8 supercharged engine, check intercooler fluid level. Add fluid as needed. • •
Perform any needed additional services. See “Additional Required Services” inthis section. • •
Inspect wiper blades. See footnote (b). •Inspect restraint system components. See footnote (c). •Lubricate body components. See footnote (d). •Replace passenger compartment air filter. See footnote (e). •
466Information Provided by:

Additional Required ServicesThe following services should be performed at the first maintenance service (I or II) after the indicatedmiles (kilometers) shown for each item.
Additional Required Services
Service and Miles (Kilometers) 25,000(40 000)
50,000(80 000)
75,000(120 000)
100,000(160 000)
125,000(200 000)
150,000(240 000)
Inspect fuel system for damageor leaks. • • •
Inspect exhaust system for loose ordamaged components. •
Replace engine air cleaner filter. SeeEngine Air Cleaner/Filter on page 382. • • •
4.4L Supercharged Engine:Supercharger service. See footnote (l). • • • • • •
Change automatic transmission fluidand filter (severe service).See footnote (f).
• • •
Change automatic transmission fluidand filter (normal service). •
467Information Provided by:
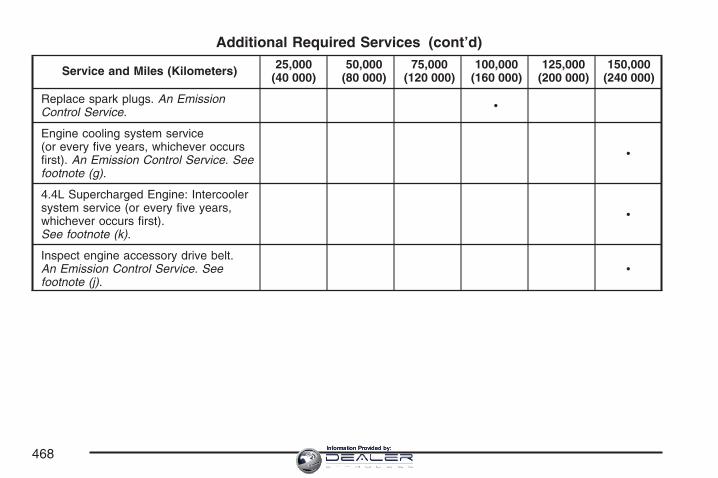
Additional Required Services (cont’d)
Service and Miles (Kilometers) 25,000(40 000)
50,000(80 000)
75,000(120 000)
100,000(160 000)
125,000(200 000)
150,000(240 000)
Replace spark plugs. An EmissionControl Service. •
Engine cooling system service(or every five years, whichever occursfirst). An Emission Control Service. Seefootnote (g).
•
4.4L Supercharged Engine: Intercoolersystem service (or every five years,whichever occurs first).See footnote (k).
•
Inspect engine accessory drive belt.An Emission Control Service. Seefootnote (j).
•
468Information Provided by:
Maintenance Footnotes(a) A fluid loss in any vehicle system couldindicate a problem. Have the system inspectedand repaired and the fluid level checked. Add fluidif needed.
(b) Visually inspect wiper blades for wear orcracking. Replace wiper blades that appear wornor damaged or that streak or miss areas ofthe windshield.
(c) Make sure the safety belt reminder light and allyour belts, buckles, latch plates, retractors, andanchorages are working properly. Look forany other loose or damaged safety belt systemparts. If you see anything that might keep a safetybelt system from doing its job, have it repaired.Have any torn or frayed safety belts replaced. Alsolook for any opened or broken airbag coverings,and have them repaired or replaced. Theairbag system does not need regular maintenance.
(d) Lubricate the trunk key lock cylinder. Lubricateall body door hinges. Lubricate all hinges andlatches, including those for the hood, trunk,console door, and any folding seat hardware. Morefrequent lubrication may be required whenexposed to a corrosive environment. Applying
silicone grease on weatherstrips with a clean clothwill make them last longer, seal better, and notstick or squeak.
(e) If you drive regularly under dusty conditions,the filter may require replacement more often.
(f) Change automatic transmission fluid and filter ifthe vehicle is mainly driven under one or moreof these conditions:
− In heavy city traffic where the outsidetemperature regularly reaches 90°F (32°C) orhigher.
− In hilly or mountainous terrain.− Uses such as high performance operation.
(g) Drain, flush, and refill cooling system.This service can be complex; you should haveyour dealer perform this service. See EngineCoolant on page 385 for what to use. Inspecthoses. Clean radiator, condenser, pressure cap,and filler neck. Pressure test the coolingsystem and pressure cap.
469Information Provided by:
(h) If you drive regularly under dusty conditions,inspect the filter at each engine oil change.
(j) Visually inspect belt for fraying, excessivecracks, or obvious damage. Replace belt ifnecessary.
(k) Drain, flush, and refill intercooler system. Thisservice can be complex; you should have yourdealer perform this service. See Engine Coolant onpage 385 for what to use. Inspect hoses. Cleanpressure cap and filler neck. Pressure testthe system and pressure cap.
(l) For supercharged engines only: Have yourdealer check the supercharger oil level and addthe proper supercharger oil as needed (or every36 months, whichever occurs first). SeeRecommended Fluids and Lubricants on page 473.
Owner Checks and ServicesThese owner checks and services should beperformed at the intervals specified to help ensurethe safety, dependability, and emission controlperformance of your vehicle. Your GMGoodwrench® dealer can assist you with thesechecks and services.
Be sure any necessary repairs are completed atonce. Whenever any fluids or lubricants are addedto your vehicle, make sure they are the properones, as shown in Recommended Fluids andLubricants on page 473.
At Each Fuel FillIt is important to perform these underhood checksat each fuel fill.
Engine Oil Level CheckCheck the engine oil level and add the proper oil ifnecessary. See Engine Oil on page 377 forfurther details.
Notice: It is important to check your oilregularly and keep it at the proper level. Failureto keep your engine oil at the proper levelcan cause damage to your engine not coveredby your warranty.
Engine Coolant Level CheckCheck the engine coolant level and addDEX-COOL® coolant mixture if necessary. SeeEngine Coolant on page 385 for further details.
470Information Provided by:
Intercooler Coolant Level Check(4.4L Supercharged Engine)Check the coolant level and add DEX-COOL®
coolant mixture if necessary. See Engine Coolanton page 385 for further details.
Windshield Washer Fluid Level CheckCheck the windshield washer fluid level inthe windshield washer fluid reservoir and add theproper fluid if necessary.
At Least Once a Month
Tire Inspection and Inflation CheckVisually inspect your vehicle’s tires for wear andmake sure they are inflated to the correctpressures. See Inflation - Tire Pressure onpage 422.
At Least Once a Year
Starter Switch Check
{CAUTION:
When you are doing this inspection, thevehicle could move suddenly. If thevehicle moves, you or others could beinjured.
1. Before you start, be sure you have enoughroom around the vehicle.
2. Firmly apply both the parking brake and theregular brake. See Parking Brake on page 97.Do not use the accelerator pedal, and beready to turn off the engine immediately if itstarts.
3. Try to start the engine in each gear. Thevehicle should start only in PARK (P) orNEUTRAL (N). If the vehicle starts in anyother position, contact your GM Goodwrench®
dealer for service.
471Information Provided by:
Transmission Shift Lock Control SystemCheck
{CAUTION:
When you are doing this inspection, thevehicle could move suddenly. If thevehicle moves, you or others could beinjured.
1. Before you start, be sure you have enoughroom around the vehicle. It should be parkedon a level surface.
2. Firmly apply the parking brake. See ParkingBrake on page 97.Be ready to apply the regular brakeimmediately if the vehicle begins to move.
3. With the engine off and without applying theregular brake, try to move the shift lever outof PARK (P) with normal effort. If the shiftlever moves out of PARK (P), contact your GMGoodwrench® dealer for service.
Parking Brake and Transmission Park (P)Mechanism Check
{CAUTION:
When you are doing this check, yourvehicle could begin to move. You orothers could be injured and propertycould be damaged. Make sure there isroom in front of your vehicle in case itbegins to roll. Be ready to apply theregular brake at once should the vehiclebegin to move.
472Information Provided by:
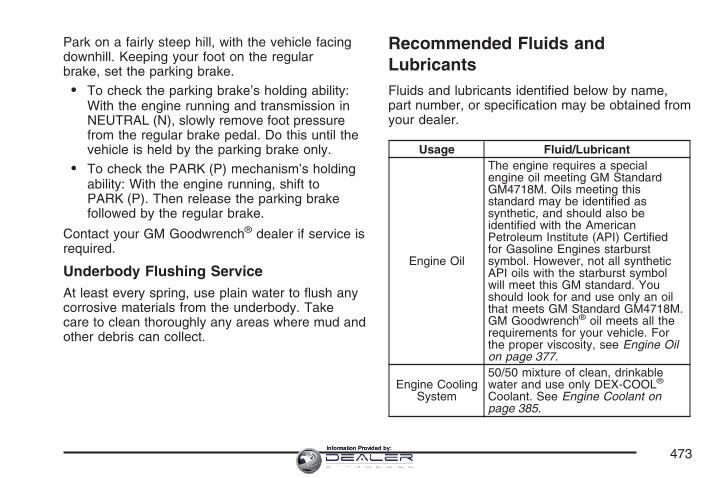
Park on a fairly steep hill, with the vehicle facingdownhill. Keeping your foot on the regularbrake, set the parking brake.
• To check the parking brake’s holding ability:With the engine running and transmission inNEUTRAL (N), slowly remove foot pressurefrom the regular brake pedal. Do this until thevehicle is held by the parking brake only.
• To check the PARK (P) mechanism’s holdingability: With the engine running, shift toPARK (P). Then release the parking brakefollowed by the regular brake.
Contact your GM Goodwrench® dealer if service isrequired.
Underbody Flushing ServiceAt least every spring, use plain water to flush anycorrosive materials from the underbody. Takecare to clean thoroughly any areas where mud andother debris can collect.
Recommended Fluids andLubricantsFluids and lubricants identified below by name,part number, or specification may be obtained fromyour dealer.
Usage Fluid/Lubricant
Engine Oil
The engine requires a specialengine oil meeting GM StandardGM4718M. Oils meeting thisstandard may be identified assynthetic, and should also beidentified with the AmericanPetroleum Institute (API) Certifiedfor Gasoline Engines starburstsymbol. However, not all syntheticAPI oils with the starburst symbolwill meet this GM standard. Youshould look for and use only an oilthat meets GM Standard GM4718M.GM Goodwrench® oil meets all therequirements for your vehicle. Forthe proper viscosity, see Engine Oilon page 377.
Engine CoolingSystem
50/50 mixture of clean, drinkablewater and use only DEX-COOL®
Coolant. See Engine Coolant onpage 385.
473Information Provided by:
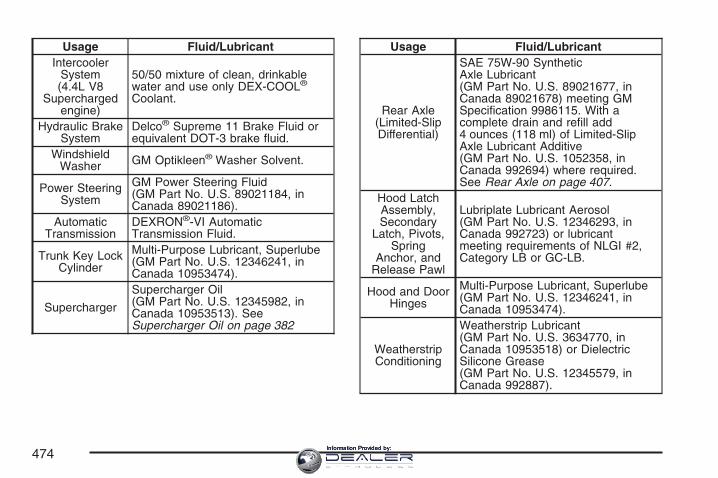
Usage Fluid/LubricantIntercooler
System(4.4L V8
Superchargedengine)
50/50 mixture of clean, drinkablewater and use only DEX-COOL®
Coolant.
Hydraulic BrakeSystem
Delco® Supreme 11 Brake Fluid orequivalent DOT-3 brake fluid.
WindshieldWasher GM Optikleen® Washer Solvent.
Power SteeringSystem
GM Power Steering Fluid(GM Part No. U.S. 89021184, inCanada 89021186).
AutomaticTransmission
DEXRON®-VI AutomaticTransmission Fluid.
Trunk Key LockCylinder
Multi-Purpose Lubricant, Superlube(GM Part No. U.S. 12346241, inCanada 10953474).
Supercharger
Supercharger Oil(GM Part No. U.S. 12345982, inCanada 10953513). SeeSupercharger Oil on page 382
Usage Fluid/Lubricant
Rear Axle(Limited-SlipDifferential)
SAE 75W-90 SyntheticAxle Lubricant(GM Part No. U.S. 89021677, inCanada 89021678) meeting GMSpecification 9986115. With acomplete drain and refill add4 ounces (118 ml) of Limited-SlipAxle Lubricant Additive(GM Part No. U.S. 1052358, inCanada 992694) where required.See Rear Axle on page 407.
Hood LatchAssembly,Secondary
Latch, Pivots,Spring
Anchor, andRelease Pawl
Lubriplate Lubricant Aerosol(GM Part No. U.S. 12346293, inCanada 992723) or lubricantmeeting requirements of NLGI #2,Category LB or GC-LB.
Hood and DoorHinges
Multi-Purpose Lubricant, Superlube(GM Part No. U.S. 12346241, inCanada 10953474).
WeatherstripConditioning
Weatherstrip Lubricant(GM Part No. U.S. 3634770, inCanada 10953518) or DielectricSilicone Grease(GM Part No. U.S. 12345579, inCanada 992887).
474Information Provided by:
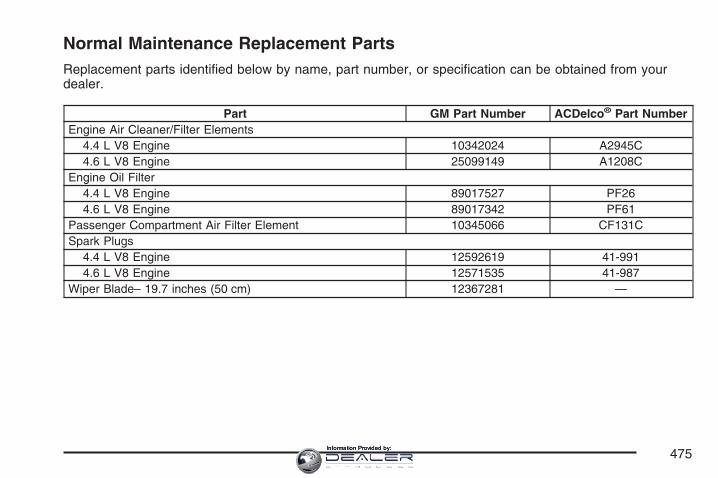
Normal Maintenance Replacement PartsReplacement parts identified below by name, part number, or specification can be obtained from yourdealer.
Part GM Part Number ACDelco® Part NumberEngine Air Cleaner/Filter Elements
4.4 L V8 Engine 10342024 A2945C4.6 L V8 Engine 25099149 A1208C
Engine Oil Filter4.4 L V8 Engine 89017527 PF264.6 L V8 Engine 89017342 PF61
Passenger Compartment Air Filter Element 10345066 CF131CSpark Plugs
4.4 L V8 Engine 12592619 41-9914.6 L V8 Engine 12571535 41-987
Wiper Blade– 19.7 inches (50 cm) 12367281 —
475Information Provided by:
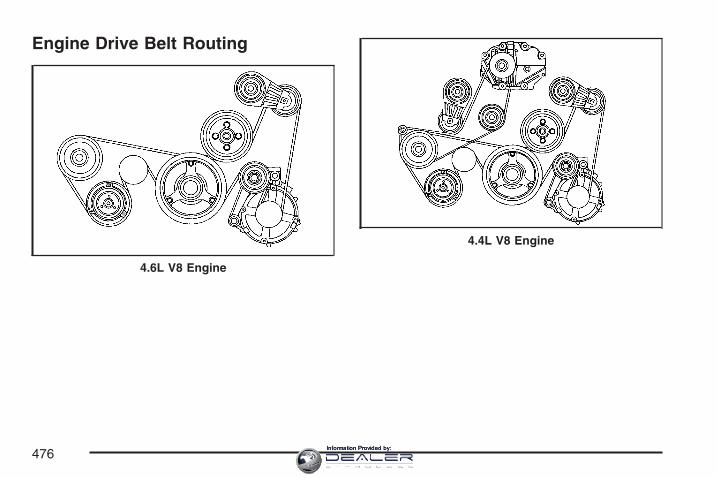
Engine Drive Belt Routing
4.6L V8 Engine
4.4L V8 Engine
476Information Provided by:
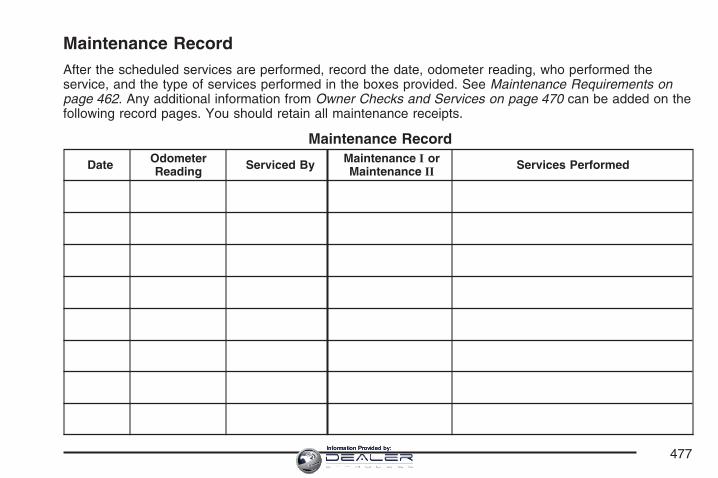
Maintenance RecordAfter the scheduled services are performed, record the date, odometer reading, who performed theservice, and the type of services performed in the boxes provided. See Maintenance Requirements onpage 462. Any additional information from Owner Checks and Services on page 470 can be added on thefollowing record pages. You should retain all maintenance receipts.
Maintenance Record
Date OdometerReading Serviced By Maintenance I or
Maintenance II Services Performed
477Information Provided by:
Maintenance Record (cont’d)
Date OdometerReading Serviced By Maintenance I or
Maintenance II Services Performed
478Information Provided by:
Maintenance Record (cont’d)
Date OdometerReading Serviced By Maintenance I or
Maintenance II Services Performed
479Information Provided by:
Maintenance Record (cont’d)
Date OdometerReading Serviced By Maintenance I or
Maintenance II Services Performed
480Information Provided by:
Customer Assistance and Information ....... 482Customer Satisfaction Procedure ............... 482Online Owner Center ................................. 484Customer Assistance for Text
Telephone (TTY) Users .......................... 485Customer Assistance Offices ..................... 485GM Mobility Reimbursement Program ........ 486Roadside Service ...................................... 487Courtesy Transportation ............................. 488Vehicle Data Collection and Event Data
Recorders .............................................. 491Collision Damage Repair ........................... 492
Reporting Safety Defects ............................ 496Reporting Safety Defects to the
United States Government ..................... 496Reporting Safety Defects to the
Canadian Government ............................ 496Reporting Safety Defects to
General Motors ...................................... 497Service Publications Ordering
Information ............................................. 497
Section 8 Customer Assistance Information
481Information Provided by:
Customer Assistance andInformation
Customer Satisfaction ProcedureYour satisfaction and goodwill are importantto your dealer and to Cadillac. Normally, anyconcerns with the sales transaction or theoperation of your vehicle will be resolved by yourdealer’s sales or service departments. Sometimes,however, despite the best intentions of allconcerned, misunderstandings can occur. If yourconcern has not been resolved to yoursatisfaction, the following steps should be taken:
STEP ONE: Discuss your concern with a memberof dealership management. Normally, concernscan be quickly resolved at that level. If the matterhas already been reviewed with the sales,service or parts manager, contact the owner of thedealership or the general manager.
STEP TWO: If after contacting a member ofdealership management, it appears your concerncannot be resolved by the dealership withoutfurther help, contact the Cadillac CustomerAssistance Center, 24 hours a day, by calling1-800-458-8006. In Canada, contact the CanadianCadillac Customer Communication Centre bycalling 1-888-446-2000.
We encourage you to call the toll-free number inorder to give your inquiry prompt attention. Pleasehave the following information available to givethe Customer Assistance Representative:
• Vehicle Identification Number (VIN). This isavailable from the vehicle registration ortitle, or the plate at the top left of theinstrument panel and visible through thewindshield.
• Dealership name and location.
• Vehicle delivery date and present mileage.
When contacting Cadillac, please remember thatyour concern will likely be resolved at a dealer’sfacility. That is why we suggest you followStep One first if you have a concern.
482Information Provided by:
STEP THREE: Both General Motors and yourdealer are committed to making sure you arecompletely satisfied with your new vehicle.However, if you continue to remain unsatisfiedafter following the procedure outlined in Steps Oneand Two, you should file with the BBB Auto LineProgram to enforce any additional rights youmay have. Canadian owners refer to yourWarranty and Owner Assistance Informationbooklet for information on the Canadian MotorVehicle Arbitration Plan (CAMVAP).
The BBB Auto Line Program is an out of courtprogram administered by the Council of BetterBusiness Bureaus to settle automotive disputesregarding vehicle repairs or the interpretationof the New Vehicle Limited Warranty. Although youmay be required to resort to this informal disputeresolution program prior to filing a court action,use of the program is free of charge and your casewill generally be heard within 40 days. If you donot agree with the decision given in your case, youmay reject it and proceed with any other venuefor relief available to you.
You may contact the BBB Auto Line Programusing the toll-free telephone number or write themat the following address:
BBB Auto Line ProgramCouncil of Better Business Bureaus, Inc.4200 Wilson BoulevardSuite 800Arlington, VA 22203-1838
Telephone: 1-800-955-5100
This program is available in all 50 states and theDistrict of Columbia. Eligibility is limited byvehicle age, mileage and other factors. GeneralMotors reserves the right to change eligibilitylimitations and/or discontinue its participation inthis program.
483Information Provided by:
Online Owner Center
Online Owner Center(United States only)The Owner Center is a resource for your GMownership needs. Specific vehicle information canbe found in one place.
The Online Owner Center allows you to:• Get e-mail service reminders.
• Access information about your specificvehicle, including tips and videos andan electronic version of this owner manual.
• Keep track of your vehicle’s service historyand maintenance schedule.
• Find GM dealers for service nationwide.
• Receive special promotions and privilegesonly available to members.
Refer to www.MyGMLink.com on the web forupdated information and to register your vehicle.
My GM Canada (Canada only)My GM Canada is a password-protected sectionof gmcanada.com where you can save informationon GM vehicles, get personalized offers, anduse handy tools and forms with greater ease.
Here are a few of the valuable tools and servicesyou will have access to:
− My Showroom: Find and save information onvehicles and current offers in your area.
− My Dealers/Retailers: Save details such asaddress and phone number for each ofyour preferred GM Dealers or Retailers.
− My Driveway: Receive service reminders andhelpful advice on owning and maintainingyour vehicle.
− My Preferences: Manage your profile,subscribe to E-News and use tools and formswith greater ease.
To sign up to My GM Canada, visit the My GMCanada section within www.gmcanada.com.
484Information Provided by:
Customer Assistance for TextTelephone (TTY) UsersTo assist customers who are deaf, hard ofhearing, or speech-impaired and who use TextTelephones (TTYs), Cadillac has TTY equipmentavailable at its Customer Assistance Center.Any TTY user can communicate with Cadillac bydialing: 1-800-833-CMCC (2622). (TTY usersin Canada can dial 1-800-263-3830.)
Customer Assistance OfficesCadillac encourages customers to call the toll-freenumber for assistance. However, if a customerwishes to write or e-mail Cadillac, refer tothe addresses below.
United States — Customer AssistanceCadillac Customer Assistance CenterCadillac Motor Car DivisionP.O. Box 33169Detroit, MI 48232-5169
www.Cadillac.com1-800-458-80061-800-833-2622 (For Text Telephonedevices (TTYs))Roadside Assistance: 1-800-882-1112Fax Number: 313-381-0022
From Puerto Rico:1-800-496-9992 (English)1-800-496-9993 (Spanish)Fax Number: 313-381-0022
From U.S. Virgin Islands:1-800-496-9994Fax Number: 313-381-0022
485Information Provided by:
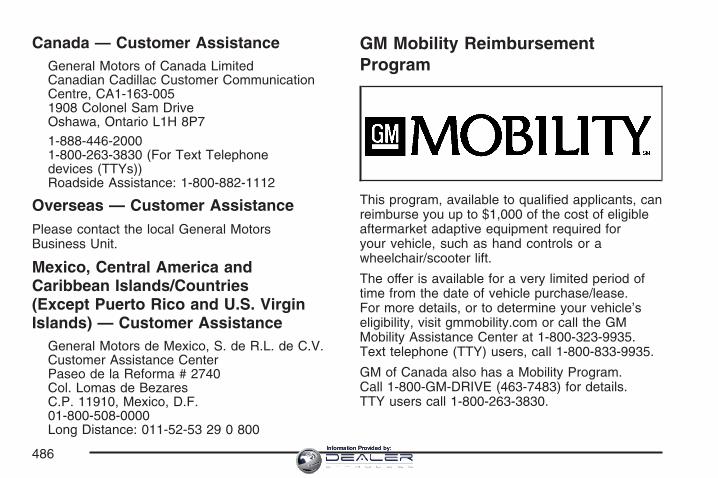
Canada — Customer AssistanceGeneral Motors of Canada LimitedCanadian Cadillac Customer CommunicationCentre, CA1-163-0051908 Colonel Sam DriveOshawa, Ontario L1H 8P7
1-888-446-20001-800-263-3830 (For Text Telephonedevices (TTYs))Roadside Assistance: 1-800-882-1112
Overseas — Customer AssistancePlease contact the local General MotorsBusiness Unit.
Mexico, Central America andCaribbean Islands/Countries(Except Puerto Rico and U.S. VirginIslands) — Customer Assistance
General Motors de Mexico, S. de R.L. de C.V.Customer Assistance CenterPaseo de la Reforma # 2740Col. Lomas de BezaresC.P. 11910, Mexico, D.F.01-800-508-0000Long Distance: 011-52-53 29 0 800
GM Mobility ReimbursementProgram
This program, available to qualified applicants, canreimburse you up to $1,000 of the cost of eligibleaftermarket adaptive equipment required foryour vehicle, such as hand controls or awheelchair/scooter lift.
The offer is available for a very limited period oftime from the date of vehicle purchase/lease.For more details, or to determine your vehicle’seligibility, visit gmmobility.com or call the GMMobility Assistance Center at 1-800-323-9935.Text telephone (TTY) users, call 1-800-833-9935.
GM of Canada also has a Mobility Program.Call 1-800-GM-DRIVE (463-7483) for details.TTY users call 1-800-263-3830.
486Information Provided by:
Roadside ServiceCadillac’s exceptional Roadside Service is morethan an auto club or towing service. It providesevery Cadillac owner with the advantage ofcontacting a Cadillac advisor and, where available,a Cadillac trained dealer technician who canprovide on-site service.
Each technician travels with a specially equippedservice vehicle complete with the necessaryCadillac parts and tools required to handle mostroadside repairs.
Cadillac Roadside Service® can be reached bydialing 1-800-882-1112, 24 hours a day, 365 daysa year. This service is provided at no chargefor any situation covered by the base warrantycoverage and at a nominal charge if the Cadillac isno longer covered by the base warranty.Roadside Service is available only in the UnitedStates and Canada.
Cadillac Owner Privileges™Roadside Service provides several CadillacOwner Privileges™ at “no charge,” throughoutyour Cadillac Warranty Period — 48 months/50,000 miles (80 000 km).
Emergency Road Service is performed on site forthe following situations:
• Towing Service
• Battery Jump Starting
• Lock Out Assistance
• Fuel Delivery
• Flat Tire Change (Covers change only)
• Trip Interruption — If your trip is interrupteddue to a warranty failure, incidental expensesmay be reimbursed during the48 months/50,000 miles (80 000 km) warrantyperiod. Items covered are hotel, meals,and rental car.
487Information Provided by:
Roadside Service AvailabilityWherever you drive in the United States orCanada, an advisor is available to assist you overthe phone. A dealer technician, if available, cantravel to your location within a 30 mile (50 km)radius of a participating Cadillac dealership.If beyond this radius, we will arrange to have yourcar towed to the nearest Cadillac dealership.
Reaching Roadside ServiceDial the toll-free Roadside Service number:1-800-882-1112. A Roadside Service Advisor willassist you and request the following information:
• A description of the problem
• Name, home address, home telephonenumber
• Location of your Cadillac and number you arecalling from
• The model year, Vehicle Identification Number(VIN), mileage, and date of delivery
Roadside Service for the Hearing orSpeech ImpairedRoadside Service is prepared to assist ownerswho have hearing difficulties or are speechimpaired. Cadillac has installed specialtelecommunication devices called Text Telephone(TTY) in the Roadside Service Center.
Any customer who has access to a (TTY) or aconventional teletypewriter can communicate withCadillac by dialing from the United States orCanada 1-888-889-2438 — daily, 24 hours.
Courtesy TransportationTo enhance your ownership experience, we andour participating dealers are proud to offerCourtesy Transportation, a customer supportprogram for new vehicles.
The Courtesy Transportation program is offered tocustomers in conjunction with theBumper-to-Bumper coverage provided by the NewVehicle Limited Warranty. Several transportationoptions are available when warranty repairsare required. This will reduce your inconvenienceduring warranty repairs.
488Information Provided by:
Scheduling Service AppointmentsWhen your vehicle requires warranty service, youshould contact your dealer and request anappointment. By scheduling a service appointmentand advising your service consultant of yourtransportation needs, your dealer can helpminimize your inconvenience.
If your vehicle cannot be scheduled into theservice department immediately, keep driving ituntil it can be scheduled for service, unless,of course, the problem is safety-related. If it is,please call your dealership, let them know this, andask for instructions.
If the dealer requests that you simply drop thevehicle off for service, you are urged to do so asearly in the work day as possible to allow forthe same day repair.
Transportation OptionsWarranty service can generally be completedwhile you wait. However, if you are unable to wait,GM helps to minimize your inconvenience byproviding several transportation options.Depending on the circumstances, your dealer canoffer you one of the following:
Shuttle ServiceParticipating dealers can provide you with shuttleservice to get you to your destination withminimal interruption of your daily schedule. Thisincludes one-way or round trip shuttle service to adestination up to 10 miles (16 km) from thedealership.
Public Transportation or FuelReimbursementIf your vehicle requires warranty repairs,reimbursement of public transportation expensesmay be available, for up to a maximum of five days.In addition, should you arrange transportationthrough a friend or relative, reimbursement forreasonable fuel expenses may be available, up to afive-day maximum. Claim amounts should reflectactual costs and be supported by original receipts.
489Information Provided by:
Courtesy Rental VehicleYour dealer may arrange to provide you with acourtesy rental vehicle or reimburse you fora rental vehicle that you obtain if your vehicle iskept for a warranty repair. Reimbursementwill be limited to a maximum amount per day andmust be supported by receipts. This requiresthat you sign and complete a rental agreement andmeet state, local and rental vehicle providerrequirements. Requirements vary and may includeminimum age requirements, insurance coverage,credit card, etc. You are responsible for fuel usagecharges and may also be responsible for taxes,levies, usage fees, excessive mileage or rentalusage beyond the completion of the repair.
Generally it is not possible to provide a like-vehicleas a courtesy rental.
Additional Program InformationCourtesy Transportation is available during theBumper-to-Bumper warranty coverage period, butit is not part of the New Vehicle LimitedWarranty. A separate booklet entitled Warrantyand Owner Assistance Information furnished witheach new vehicle provides detailed warrantycoverage information.
Courtesy Transportation is available only atparticipating dealers and all program options, suchas shuttle service, may not be available atevery dealer. Please contact your dealer forspecific information about availability. All CourtesyTransportation arrangements will be administeredby appropriate dealer personnel.
Canadian Vehicles: For warranty repairs duringthe Complete Vehicle Coverage period of theGeneral Motors of Canada New Vehicle LimitedWarranty, alternative transportation may beavailable under the Courtesy TransportationProgram. Please consult your dealer for details.
General Motors reserves the right to unilaterallymodify, change or discontinue CourtesyTransportation at any time and to resolve allquestions of claim eligibility pursuant to the termsand conditions described herein at its solediscretion.
490Information Provided by:
Vehicle Data Collection and EventData RecordersYour vehicle, like other modern motor vehicles, hasa number of sophisticated computer systems thatmonitor and control several aspects of the vehicle’sperformance. Your vehicle uses on-board vehiclecomputers to monitor emission control componentsto optimize fuel economy, to monitor conditions forairbag deployment and, if so equipped, to provideanti-lock braking and to help the driver control thevehicle in difficult driving situations. Someinformation may be stored during regular operationsto facilitate repair of detected malfunctions; otherinformation is stored only in a crash event bycomputer systems, such as those commonly calledEvent Data Recorders (EDR).
In a crash event, computer systems, such as theairbag Sensing and Diagnostic Module (SDM)in your vehicle may record information about thecondition of the vehicle and how it was operated,such as data related to engine speed, brakeapplication, throttle position, vehicle speed, safetybelt usage, airbag readiness, airbag performance,and the severity of a collision. If your vehicle isequipped with StabiliTrak®, steering performance,
including yaw rate, steering wheel angle, andlateral acceleration, is also recorded. Thisinformation has been used to improve vehiclecrash performance and may be used to improvecrash performance of future vehicles anddriving safety. Unlike the data recorders on manyairplanes, these on-board systems do notrecord sounds, such as conversation of vehicleoccupants.
To read this information, special equipment isneeded and access to the vehicle or the devicethat stores the data is required. GM will not accessinformation about a crash event or share it withothers other than:
• with the consent of the vehicle owner or, if thevehicle is leased, with the consent of thelessee,
• in response to an official request of police orsimilar government office,
• as part of GM’s defense of litigation throughthe discovery process, or
• as required by law.
491Information Provided by:
In addition, once GM collects or receives data,GM may:
• use the data for GM research needs,
• make it available for research whereappropriate confidentiality is to be maintainedand need is shown, or
• share summary data which is not tied to aspecific vehicle with non-GM organizationsfor research purposes.
Others, such as law enforcement, may haveaccess to the special equipment that can read theinformation if they have access to the vehicleor the device that stores the data.
If your vehicle has OnStar®, please check theOnStar® subscription service agreement or manualfor information on its operations and datacollection.
Collision Damage RepairIf your vehicle is involved in a collision and it isdamaged, have the damage repaired by a qualifiedtechnician using the proper equipment andquality replacement parts. Poorly performedcollision repairs will diminish your vehicle’s resalevalue, and safety performance can becompromised in subsequent collisions.
Collision PartsGenuine GM Collision parts are new parts madewith the same materials and construction methodsas the parts with which your vehicle wasoriginally built. Genuine GM Collision parts areyour best choice to assure that your vehicle’sdesigned appearance, durability and safety arepreserved. The use of Genuine GM parts can helpmaintain your GM New Vehicle Warranty.
Recycled original equipment parts may also beused for repair. These parts are typically removedfrom vehicles that were total losses in prioraccidents. In most cases, the parts being recycledare from undamaged sections of the vehicle.
492Information Provided by:
A recycled original equipment GM part, may be anacceptable choice to maintain your vehicle’soriginally designed appearance and safetyperformance, however, the history of these partsis not known. Such parts are not covered byyour GM New Vehicle Limited Warranty, and anyrelated failures are not covered by that warranty.
Aftermarket collision parts are also available. Theseare made by companies other than GM and maynot have been tested for your vehicle. As a result,these parts may fit poorly, exhibit prematuredurability/corrosion problems, and may not performproperly in subsequent collisions. Aftermarket partsare not covered by your GM New Vehicle LimitedWarranty, and any vehicle failure related to suchparts are not covered by that warranty.
Repair FacilityGM also recommends that you choose a collisionrepair facility that meets your needs before youever need collision repairs. Your GM dealermay have a collision repair center with GM-trainedtechnicians and state of the art equipment, orbe able to recommend a collision repair center thathas GM-trained technicians and comparableequipment.
Insuring Your VehicleProtect your investment in your GM vehicle withcomprehensive and collision insurance coverage.There are significant differences in the qualityof coverage afforded by various insurance policyterms. Many insurance policies provide reducedprotection to your GM vehicle by limitingcompensation for damage repairs by usingaftermarket collision parts. Some insurancecompanies will not specify aftermarket collisionparts. When purchasing insurance, we recommendthat you assure your vehicle will be repairedwith GM original equipment collision parts. If suchinsurance coverage is not available from yourcurrent insurance carrier, consider switchingto another insurance carrier.
If your vehicle is leased, the leasing company mayrequire you to have insurance that assuresrepairs with Genuine GM Original EquipmentManufacturer (OEM) parts or GenuineManufacturer replacement parts. Read your leasecarefully, as you may be charged at the end ofyour lease for poor quality repairs.
493Information Provided by:
If an Accident OccursHere is what to do if you are involved in anaccident.
• Try to relax and then check to make sure youare all right. If you are uninjured, make surethat no one else in your vehicle, or theother vehicle, is injured.
• If there has been an injury, call 911 for help. Donot leave the scene of an accident until allmatters have been taken care of. Move yourvehicle only if its position puts you in danger oryou are instructed to move it by a police officer.
• Give only the necessary and requestedinformation to police and other parties involvedin the accident. Do not discuss your personalcondition, mental frame of mind, or anythingunrelated to the accident. This will help guardagainst post-accident legal action.
• If you need roadside assistance, call GMRoadside Assistance. See Roadside Serviceon page 487 for more information.
• If your vehicle cannot be driven, know wherethe towing service will be taking it. Get a cardfrom the tow truck operator or write down thedriver’s name, the service’s name, and thephone number.
• Remove any valuables from your vehicle beforeit is towed away. Make sure this includes yourinsurance information and registration if youkeep these items in your vehicle.
• Gather the important information you will needfrom the other driver. Things like name,address, phone number, driver’s licensenumber, vehicle license plate, vehicle make,model and model year, Vehicle IdentificationNumber (VIN), insurance company and policynumber, and a general description of thedamage to the other vehicle.
• If possible, call your insurance company fromthe scene of the accident. They will walk youthrough the information they will need. If theyask for a police report, phone or go to the policedepartment headquarters the next day and youcan get a copy of the report for a nominal fee. Insome states/provinces with “no fault” insurancelaws, a report may not be necessary. This isespecially true if there are no injuries and bothvehicles are driveable.
494Information Provided by:
• Choose a reputable collision repair facility foryour vehicle. Whether you select a GM dealeror a private collision repair facility to fix thedamage, make sure you are comfortable withthem. Remember, you will have to feelcomfortable with their work for a long time.
• Once you have an estimate, read it carefullyand make sure you understand what work willbe performed on your vehicle. If you have aquestion, ask for an explanation. Reputableshops welcome this opportunity.
Managing the Vehicle Damage RepairProcessIn the event that your vehicle requires damagerepairs, GM recommends that you take an activerole in its repair. If you have a pre-determined repairfacility of choice, take your vehicle there, or have ittowed there. Specify to the facility that any requiredreplacement collision parts be original equipmentparts, either new Genuine GM parts or recycledoriginal GM parts. Remember, recycled parts willnot be covered by your GM vehicle warranty.
Insurance pays the bill for the repair, but you mustlive with the repair. Depending on your policylimits, your insurance company may initially valuethe repair using aftermarket parts. Discuss thiswith your repair professional, and insist onGenuine GM parts. Remember if your vehicle isleased you may be obligated to have thevehicle repaired with Genuine GM parts, even ifyour insurance coverage does not pay the full cost.
If another party’s insurance company is payingfor the repairs, you are not obligated to accept arepair valuation based on that insurancecompany’s collision policy repair limits, as youhave no contractual limits with that company. Insuch cases, you can have control of the repair andparts choices as long as cost stays withinreasonable limits.
495Information Provided by:
Reporting Safety Defects
Reporting Safety Defects to theUnited States GovernmentIf you believe that your vehicle has a defect whichcould cause a crash or could cause injury ordeath, you should immediately inform the NationalHighway Traffic Safety Administration (NHTSA),in addition to notifying General Motors.
If NHTSA receives similar complaints, it may openan investigation, and if it finds that a safetydefect exists in a group of vehicles, it may order arecall and remedy campaign. However, NHTSAcannot become involved in individual problemsbetween you, your dealer, or General Motors.
To contact NHTSA, you may call the VehicleSafety Hotline toll-free at 1-888-327-4236 (TTY:1-800-424-9153); go to http://www.safercar.gov; orwrite to:
Administrator, NHTSA400 Seventh Street, SW.Washington, D.C. 20590
You can also obtain other information about motorvehicle safety from http://www.safercar.gov.
Reporting Safety Defects tothe Canadian GovernmentIf you live in Canada, and you believe that yourvehicle has a safety defect, you shouldimmediately notify Transport Canada, in additionto notifying General Motors of Canada Limited.You may call them at 1-800-333-0510 or write to:
Transport CanadaRoad Safety Branch2780 Sheffield RoadOttawa, Ontario K1B 3V9
496Information Provided by:
Reporting Safety Defects to GeneralMotorsIn addition to notifying NHTSA (or TransportCanada) in a situation like this, we certainly hopeyou will notify us. Please call us at1-800-458-8006, or write:
Cadillac Customer Assistance CenterCadillac Motor Car DivisionP.O. Box 33169Detroit, MI 48232-5169
In Canada, please call us at 1-888-446-2000.Or, write:
Canadian Cadillac Customer CommunicationCentre, CA1-163-005General Motors of Canada Limited1908 Colonel Sam DriveOshawa, Ontario L1H 8P7
Service Publications OrderingInformation
Service ManualsService Manuals have the diagnosis and repairinformation on engines, transmission, axlesuspension, brakes, electrical, steering, body, etc.
Transmission, Transaxle, TransferCase Unit Repair ManualThis manual provides information on unit repairservice procedures, adjustments, andspecifications for GM transmissions, transaxles,and transfer cases.
Service BulletinsService Bulletins give technical service informationneeded to knowledgeably service GeneralMotors cars and trucks. Each bulletin containsinstructions to assist in the diagnosis and serviceof your vehicle.
In Canada, information pertaining to ProductService Bulletins can be obtained by contactingyour General Motors dealer or by calling1-800-GM-DRIVE (1-800-463-7483).
497Information Provided by:
Owner’s InformationOwner publications are written specifically forowners and intended to provide basic operationalinformation about the vehicle. The owner’smanual will include the Maintenance Schedule forall models.
In-Portfolio: Includes a Portfolio, Owner’s Manual,and Warranty Booklet.
RETAIL SELL PRICE: $35.00
Without Portfolio: Owner’s Manual only.
RETAIL SELL PRICE: $25.00
Current and Past Model Order FormsTechnical Service Bulletins and Manuals areavailable for current and past model GM vehicles.To request an order form, please specify yearand model name of the vehicle.
ORDER TOLL FREE: 1-800-551-4123Monday-Friday 8:00 AM - 6:00 PMEastern TimeFor Credit Card Orders Only(VISA-MasterCard-Discover), visit Helm, Inc. onthe World Wide Web at: www.helminc.com
Or you can write to:
Helm, IncorporatedP.O. Box 07130Detroit, MI 48207
Prices are subject to change without notice andwithout incurring obligation. Allow ample timefor delivery.
Note to Canadian Customers: All listed prices arequoted in U.S. funds. Canadian residents areto make checks payable in U.S. funds.
498Information Provided by:
AAccessories and Modifications ..................... 363Accessory Power Outlet(s) .......................... 177Adaptive Cruise Control ............................... 150Adaptive Forward Lighting System ............... 167Adding Equipment to Your Airbag-Equipped
Vehicle ....................................................... 59Additives, Fuel ............................................ 367Add-On Electrical Equipment ....................... 452Air Cleaner/Filter, Engine ............................. 382Air Conditioning ........................................... 178Airbag
Passenger Status Indicator ....................... 189Readiness Light ....................................... 188
Airbag Sensing and DiagnosticModule (SDM) .......................................... 491
Airbag System ............................................... 44Adding Equipment to Your
Airbag-Equipped Vehicle ......................... 59How Does an Airbag Restrain? .................. 51Passenger Sensing System ....................... 53Servicing Your Airbag-Equipped Vehicle ..... 58What Makes an Airbag Inflate? .................. 51What Will You See After an Airbag
Inflates? ................................................. 52
Airbag System (cont.)When Should an Airbag Inflate? ................. 49Where Are the Airbags? ............................. 47
Antenna, Diversity Antenna System ............. 230Antenna, XM™ Satellite Radio Antenna
System .................................................... 230Anti-Lock Brake System (ABS) .................... 327Anti-Lock Brake, System Warning Light ....... 193Appearance Care
Aluminum or Chrome-Plated Wheels ........ 448Care of Safety Belts ................................ 445Chemical Paint Spotting ........................... 450Cleaning Exterior Lamps/Lenses .............. 446Cleaning the Inside of Your Vehicle .......... 441Fabric/Carpet ........................................... 443Finish Care .............................................. 447Finish Damage ......................................... 449Instrument Panel, Vinyl, and Other
Plastic Surfaces .................................... 444Leather .................................................... 444Sheet Metal Damage ............................... 449Speaker Covers ....................................... 445Tires ........................................................ 449Underbody Maintenance ........................... 449Vehicle Care/Appearance Materials .......... 450Washing Your Vehicle .............................. 446
499Information Provided by:
Appearance Care (cont.)Weatherstrips ........................................... 445Windshield and Wiper Blades ................... 447Wood Panels ........................................... 445
Ashtray(s) .................................................... 178Audio System .............................................. 285Audio System(s) .......................................... 225
Audio Steering Wheel Controls ................. 227Care of Your CD Player ........................... 230Care of Your CDs .................................... 229Diversity Antenna System ......................... 230Theft-Deterrent Feature ............................ 226Understanding Radio Reception ............... 228XM™ Satellite Radio Antenna System ...... 230
Automatic Door Lock ..................................... 76Automatic Transmission
Fluid ........................................................ 384Operation ................................................... 92
Avoid Point/Area, Edit .................................. 257
BBattery ........................................................ 402
Exterior Lighting Battery Saver ................. 169Run-Down Protection ............................... 171
Before Leaving on a Long Trip .................... 345
BrakeAnti-Lock Brake System (ABS) ................. 327Emergencies ............................................ 329Parking ...................................................... 97System Warning Light .............................. 192
Brakes ........................................................ 399Braking ....................................................... 326Braking in Emergencies ............................... 329Break-In, New Vehicle ................................... 87Bulb Replacement ....................................... 412
Headlamp Aiming ..................................... 408Buying New Tires ........................................ 428
CCalifornia Fuel ............................................. 367California Proposition 65 Warning ................ 364Canadian Owners ........................................... 3Capacities and Specifications ...................... 458Carbon Monoxide ............... 77, 102, 349, 359Care of
Safety Belts ............................................. 445Your CD Player ........................................ 230Your CDs ................................................. 229
CDSix-Disc Changer ..................................... 302
CD/DVD Player ........................................... 305
500Information Provided by:
Center Console Storage Area ...................... 122Chains, Tire ................................................. 435Charging System Light ................................ 191Check
Engine Light ............................................ 196Checking Things Under the Hood ................ 372Chemical Paint Spotting .............................. 450Child Restraints
Child Restraint Systems ............................. 35Infants and Young Children ........................ 31Lower Anchors and Tethers for Children ..... 39Older Children ........................................... 28Securing a Child Restraint in the
Passenger Seat Position ......................... 40Cigarette Lighter .......................................... 178Cleaning
Aluminum or Chrome-Plated Wheels ........ 448Exterior Lamps/Lenses ............................. 446Fabric/Carpet ........................................... 443Finish Care .............................................. 447Inside of Your Vehicle .............................. 441Instrument Panel, Vinyl, and Other Plastic
Surfaces ............................................... 444Leather .................................................... 444Speaker Covers ....................................... 445Tires ........................................................ 449Underbody Maintenance ........................... 449
Cleaning (cont.)Washing Your Vehicle .............................. 446Weatherstrips ........................................... 445Windshield and Wiper Blades ................... 447Wood Panels ........................................... 445
Climate Control SystemAir Filter, Passenger Compartment ........... 184Dual ......................................................... 178Outlet Adjustment ..................................... 184
Collision Damage Repair ............................. 492Competitive Driving, Racing or Other ........... 338Control of a Vehicle ..................................... 326Convenience Net ......................................... 123Coolant
Engine Temperature Gage ........................ 195Surge Tank Pressure Cap ........................ 388
Cooled Seats .................................................. 9Cooling System ........................................... 391Courtesy Lamps .......................................... 170Cruise Control ............................................. 147Cruise Control, Adaptive .............................. 150Cupholder(s) ................................................ 122Customer Assistance Information
Courtesy Transportation ........................... 488Customer Assistance for Text Telephone
(TTY) Users .......................................... 485Customer Assistance Offices .................... 485
501Information Provided by:

Customer Assistance Information (cont.)Customer Satisfaction Procedure .............. 482GM Mobility Reimbursement Program ...... 486Reporting Safety Defects to
General Motors ..................................... 497Reporting Safety Defects to the
Canadian Government .......................... 496Reporting Safety Defects to the
United States Government .................... 496Roadside Service ..................................... 487Service Publications Ordering
Information ........................................... 497
DDatabase Coverage Explanations ................ 284Daytime Running Lamps ............................. 166Defensive Driving ........................................ 322Diversity Antenna System ............................ 230Doing Your Own Service Work .................... 364Door
Automatic Door Lock ................................. 76Locks ......................................................... 73Power Door Locks ..................................... 75Programmable Automatic Door Unlock ....... 76
DriverPosition, Safety Belt ................................... 18
Driver Information Center (DIC) ................... 203DIC Controls and Displays ....................... 204DIC Vehicle Personalization ..................... 220DIC Warnings and Messages ................... 206Other Messages ....................................... 219
DrivingAt Night ................................................... 339City .......................................................... 343Defensive ................................................. 322Drunken ................................................... 323Freeway ................................................... 344Hill and Mountain Roads .......................... 347In Rain and on Wet Roads ...................... 340Rocking Your Vehicle to Get it Out .......... 354Winter ...................................................... 349
Dual Climate Control System ....................... 178DVD, CD Player .......................................... 305
502Information Provided by:
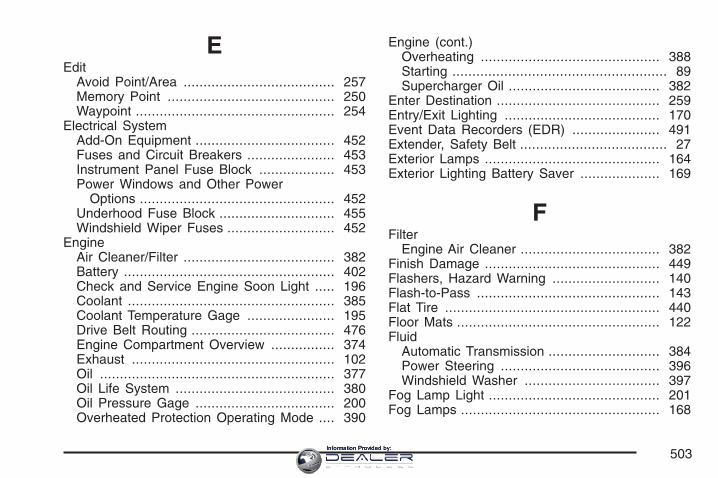
EEdit
Avoid Point/Area ...................................... 257Memory Point .......................................... 250Waypoint .................................................. 254
Electrical SystemAdd-On Equipment ................................... 452Fuses and Circuit Breakers ...................... 453Instrument Panel Fuse Block ................... 453Power Windows and Other Power
Options ................................................. 452Underhood Fuse Block ............................. 455Windshield Wiper Fuses ........................... 452
EngineAir Cleaner/Filter ...................................... 382Battery ..................................................... 402Check and Service Engine Soon Light ..... 196Coolant .................................................... 385Coolant Temperature Gage ...................... 195Drive Belt Routing .................................... 476Engine Compartment Overview ................ 374Exhaust ................................................... 102Oil ........................................................... 377Oil Life System ........................................ 380Oil Pressure Gage ................................... 200Overheated Protection Operating Mode .... 390
Engine (cont.)Overheating ............................................. 388Starting ...................................................... 89Supercharger Oil ...................................... 382
Enter Destination ......................................... 259Entry/Exit Lighting ....................................... 170Event Data Recorders (EDR) ...................... 491Extender, Safety Belt ..................................... 27Exterior Lamps ............................................ 164Exterior Lighting Battery Saver .................... 169
FFilter
Engine Air Cleaner ................................... 382Finish Damage ............................................ 449Flashers, Hazard Warning ........................... 140Flash-to-Pass .............................................. 143Flat Tire ...................................................... 440Floor Mats ................................................... 122Fluid
Automatic Transmission ............................ 384Power Steering ........................................ 396Windshield Washer .................................. 397
Fog Lamp Light ........................................... 201Fog Lamps .................................................. 168
503Information Provided by:
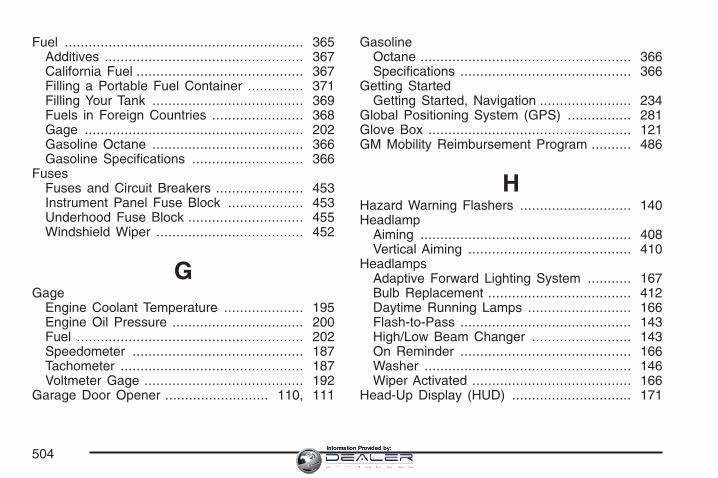
Fuel ............................................................ 365Additives .................................................. 367California Fuel .......................................... 367Filling a Portable Fuel Container .............. 371Filling Your Tank ...................................... 369Fuels in Foreign Countries ....................... 368Gage ....................................................... 202Gasoline Octane ...................................... 366Gasoline Specifications ............................ 366
FusesFuses and Circuit Breakers ...................... 453Instrument Panel Fuse Block ................... 453Underhood Fuse Block ............................. 455Windshield Wiper ..................................... 452
GGage
Engine Coolant Temperature .................... 195Engine Oil Pressure ................................. 200Fuel ......................................................... 202Speedometer ........................................... 187Tachometer .............................................. 187Voltmeter Gage ........................................ 192
Garage Door Opener .......................... 110, 111
GasolineOctane ..................................................... 366Specifications ........................................... 366
Getting StartedGetting Started, Navigation ....................... 234
Global Positioning System (GPS) ................ 281Glove Box ................................................... 121GM Mobility Reimbursement Program .......... 486
HHazard Warning Flashers ............................ 140Headlamp
Aiming ..................................................... 408Vertical Aiming ......................................... 410
HeadlampsAdaptive Forward Lighting System ........... 167Bulb Replacement .................................... 412Daytime Running Lamps .......................... 166Flash-to-Pass ........................................... 143High/Low Beam Changer ......................... 143On Reminder ........................................... 166Washer .................................................... 146Wiper Activated ........................................ 166
Head-Up Display (HUD) .............................. 171
504Information Provided by:
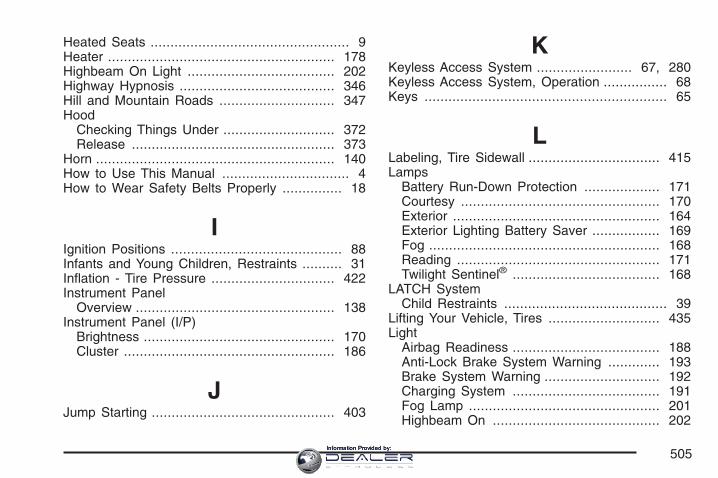
Heated Seats .................................................. 9Heater ......................................................... 178Highbeam On Light ..................................... 202Highway Hypnosis ....................................... 346Hill and Mountain Roads ............................. 347Hood
Checking Things Under ............................ 372Release ................................................... 373
Horn ............................................................ 140How to Use This Manual ................................ 4How to Wear Safety Belts Properly ............... 18
IIgnition Positions ........................................... 88Infants and Young Children, Restraints .......... 31Inflation - Tire Pressure ............................... 422Instrument Panel
Overview .................................................. 138Instrument Panel (I/P)
Brightness ................................................ 170Cluster ..................................................... 186
JJump Starting .............................................. 403
KKeyless Access System ........................ 67, 280Keyless Access System, Operation ................ 68Keys ............................................................. 65
LLabeling, Tire Sidewall ................................. 415Lamps
Battery Run-Down Protection ................... 171Courtesy .................................................. 170Exterior .................................................... 164Exterior Lighting Battery Saver ................. 169Fog .......................................................... 168Reading ................................................... 171Twilight Sentinel® ..................................... 168
LATCH SystemChild Restraints ......................................... 39
Lifting Your Vehicle, Tires ............................ 435Light
Airbag Readiness ..................................... 188Anti-Lock Brake System Warning ............. 193Brake System Warning ............................. 192Charging System ..................................... 191Fog Lamp ................................................ 201Highbeam On .......................................... 202
505Information Provided by:
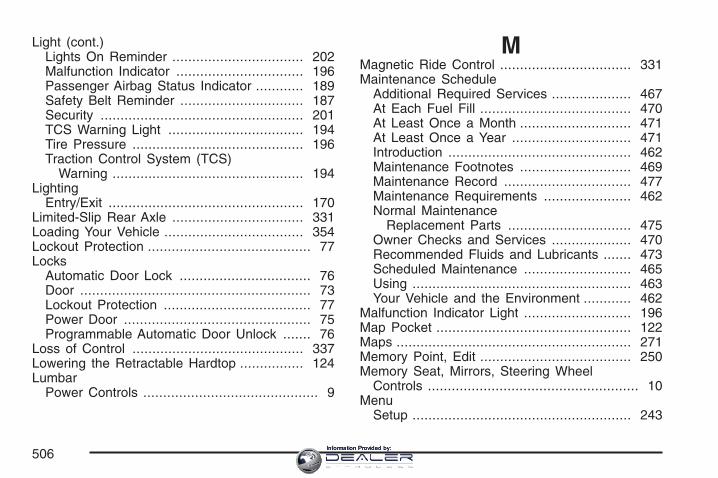
Light (cont.)Lights On Reminder ................................. 202Malfunction Indicator ................................ 196Passenger Airbag Status Indicator ............ 189Safety Belt Reminder ............................... 187Security ................................................... 201TCS Warning Light .................................. 194Tire Pressure ........................................... 196Traction Control System (TCS)
Warning ................................................ 194Lighting
Entry/Exit ................................................. 170Limited-Slip Rear Axle ................................. 331Loading Your Vehicle ................................... 354Lockout Protection ......................................... 77Locks
Automatic Door Lock ................................. 76Door .......................................................... 73Lockout Protection ..................................... 77Power Door ............................................... 75Programmable Automatic Door Unlock ....... 76
Loss of Control ........................................... 337Lowering the Retractable Hardtop ................ 124Lumbar
Power Controls ............................................ 9
MMagnetic Ride Control ................................. 331Maintenance Schedule
Additional Required Services .................... 467At Each Fuel Fill ...................................... 470At Least Once a Month ............................ 471At Least Once a Year .............................. 471Introduction .............................................. 462Maintenance Footnotes ............................ 469Maintenance Record ................................ 477Maintenance Requirements ...................... 462Normal Maintenance
Replacement Parts ............................... 475Owner Checks and Services .................... 470Recommended Fluids and Lubricants ....... 473Scheduled Maintenance ........................... 465Using ....................................................... 463Your Vehicle and the Environment ............ 462
Malfunction Indicator Light ........................... 196Map Pocket ................................................. 122Maps ........................................................... 271Memory Point, Edit ...................................... 250Memory Seat, Mirrors, Steering Wheel
Controls ..................................................... 10Menu
Setup ....................................................... 243
506Information Provided by:
MessageDIC Warnings and Messages ................... 206
MirrorsAutomatic Dimming Rearview with
OnStar® ................................................ 104Outside Automatic Dimming Mirror ........... 105Outside Convex Mirror ............................. 106Outside Curb View Assist Mirror ............... 106Outside Power Heated Mirrors ................. 105
MyGMLink.com ............................................ 484
NNavigation .......................................... 232, 234
Using the System .................................... 240New Vehicle Break-In .................................... 87Normal Maintenance Replacement Parts ..... 475
OOdometer .................................................... 187Odometer, Trip ............................................ 187Off-Road Recovery ...................................... 335
OilEngine ..................................................... 377Engine Oil Pressure Gage ....................... 200Life Indicator ............................................ 224Supercharger, Engine ............................... 382
Oil, Engine Oil Life System ......................... 380Older Children, Restraints ............................. 28Online Owner Center ................................... 484OnStar® System .......................................... 281OnStar® System, see OnStar® Manual ........ 107Ordering
Map DVDs ............................................... 284Other Warning Devices ................................ 140Outlet Adjustment ........................................ 184Outlet(s), Accessory Power .......................... 177Outside
Automatic Dimming Mirror ........................ 105Convex Mirror .......................................... 106Curb View Assist Mirror ........................... 106Power Heated Mirrors .............................. 105
Overheated Engine ProtectionOperating Mode ....................................... 390
Owner Checks and Services ....................... 470Owners, Canadian .......................................... 3
507Information Provided by:
PPaint, Damage ............................................ 449Park Aid ...................................................... 175Park (P)
Shifting Into ............................................... 99Shifting Out of ......................................... 100
ParkingAssist ....................................................... 175Brake ......................................................... 97Over Things That Burn ............................ 101
Passenger Airbag Status Indicator ............... 189Passenger Compartment Air Filter ............... 184Passenger Position, Safety Belts ................... 27Passenger Sensing System ........................... 53Passing ....................................................... 335Plan Route .................................................. 249Power
Accessory Outlet(s) .................................. 177Door Locks ................................................ 75Electrical System ..................................... 452Lumbar Controls .......................................... 9Reclining Seatbacks ................................... 11Retained Accessory (RAP) ......................... 89Seat ............................................................ 8Steering Fluid .......................................... 396
Power (cont.)Tilt Wheel and Telescopic Steering
Column ................................................. 141Windows .................................................... 82
Pretensioners, Safety Belt ............................. 27Problems with Route Guidance ................... 283Programmable Automatic Door Unlock ........... 76
QQuestions and Answers About Safety Belts ... 17
RRacing or Other Competitive Driving ............ 338Radio .......................................................... 285
Personalization with Home and AwayFeature ................................................. 311
Radios ........................................................ 225Care of Your CD Player ........................... 230Care of Your CDs .................................... 229Theft-Deterrent ......................................... 226Understanding Reception ......................... 228
Rainsense™ Wipers .................................... 145Raising the Retractable Hardtop .................. 125Reading Lamps ........................................... 171Rear Axle .................................................... 407
Limited-Slip .............................................. 331
508Information Provided by:

Rear Storage Area ...................................... 123Rearview Mirror, Automatic Dimming with
OnStar® ................................................... 104Reclining Seatbacks, Power .......................... 11Recommended Fluids and Lubricants .......... 473Recreational Vehicle Towing ........................ 359Replacement, Windshield ............................. 412Reporting Safety Defects
Canadian Government ............................. 496General Motors ........................................ 497United States Government ....................... 496
Restraint System CheckChecking the Restraint Systems ................. 60Replacing Restraint System Parts After a
Crash ..................................................... 61Retained Accessory Power (RAP) ................. 89Retractable Hardtop ..................................... 124
Lowering .................................................. 124Raising .................................................... 125
RoadsideService .................................................... 487
Rocking Your Vehicle to Get it Out .............. 354Route Preference ........................................ 269Routing, Engine Drive Belt .......................... 476Run-Flat Tires ............................................. 420Running the Engine While Parked ............... 103
SSafety Belt
Pretensioners ............................................. 27Reminder Light ........................................ 187
Safety BeltsCare of .................................................... 445Driver Position ........................................... 18How to Wear Safety Belts Properly ............ 18Passenger Position .................................... 27Questions and Answers About Safety
Belts ....................................................... 17Safety Belt Extender .................................. 27Safety Belt Use During Pregnancy ............. 26Safety Belts Are for Everyone .................... 13
Safety Warnings and Symbols ......................... 4Scheduled Maintenance ............................... 465Seats
Heated and Cooled Seats ............................ 9Memory, Mirrors ......................................... 10Power Lumbar ............................................. 9Power Reclining Seatbacks ........................ 11Power Seats ................................................ 8
Securing a Child RestraintPassenger Seat Position ............................ 40
Security Light .............................................. 201
509Information Provided by:
Service ........................................................ 363Accessories and Modifications .................. 363Adding Equipment to the Outside of Your
Vehicle ................................................. 365California Proposition 65 Warning ............. 364Doing Your Own Work ............................. 364Engine Soon Light ................................... 196Publications Ordering Information ............. 497
Servicing Your Airbag-Equipped Vehicle ......... 58Setup Menu ................................................ 243Sheet Metal Damage ................................... 449Shifting Into Park (P) ..................................... 99Shifting Out of Park (P) ............................... 100Signals, Turn and Lane-Change .................. 142Six-Disc CD Changer .................................. 302Specifications, Capacities ............................ 458Speedometer ............................................... 187StabiliTrak® System ..................................... 331Starting Your Engine ..................................... 89Steering ...................................................... 333Steering Wheel Controls, Audio ................... 227Steering Wheel Controls, Memory ................. 10Steering Wheel, Power Tilt Wheel and
Telescopic Steering Column ..................... 141Storage Areas
Center Console Storage Area ................... 122Convenience Net ..................................... 123
Storage Areas (cont.)Cupholder(s) ............................................ 122Glove Box ................................................ 121Map Pocket ............................................. 122Rear Storage Area ................................... 123
Stuck in Sand, Mud, Ice, or Snow ............... 353Sun Visors .................................................... 84Symbols ...................................................... 275System Needs Service, If ............................ 283System Overview
Overview, Navigation System ................... 232
TTachometer ................................................. 187TCS Warning Light ...................................... 194Telescopic Steering Column, Power Tilt
Wheel ...................................................... 141Theft-Deterrent, Radio ................................. 226Theft-Deterrent System .................................. 84Theft-Deterrent Systems ................................ 84Tire
Pressure Light .......................................... 196Tires ........................................................... 413
Aluminum or Chrome-Plated Wheels,Cleaning ............................................... 448
Buying New Tires ..................................... 428Chains ..................................................... 435
510Information Provided by:
Tires (cont.)Cleaning .................................................. 449Different Size ........................................... 430If a Tire Goes Flat ................................... 440Inflation - Tire Pressure ............................ 422Inspection and Rotation ............................ 426Lifting Your Vehicle .................................. 435Pressure Monitor System ......................... 423Run-Flat ................................................... 420Tire Sidewall Labeling .............................. 415Tire Terminology and Definitions ............... 417Uniform Tire Quality Grading .................... 431Wheel Alignment and Tire Balance ........... 432Wheel Replacement ................................. 432When It Is Time for New Tires ................. 428Winter Tires ............................................. 414
TowingRecreational Vehicle ................................. 359Towing a Trailer ....................................... 359Your Vehicle ............................................. 359
TractionControl System (TCS) .............................. 329Control System Warning Light .................. 194Limited-Slip Rear Axle .............................. 331Magnetic Ride Control .............................. 331StabiliTrak® System ................................. 331
TransmissionFluid, Automatic ....................................... 384
Transmission Operation, Automatic ................ 92Trip Computer
Oil Life Indicator ...................................... 224Trip Odometer ............................................. 187Trunk ............................................................ 77Turn and Lane-Change Signals ................... 142Turn Signal/Multifunction Lever .................... 141Twilight Sentinel® ........................................ 168
UUltrasonic Rear Parking Assist (URPA) ........ 175Understanding Radio Reception ................... 228Uniform Tire Quality Grading ....................... 431Universal Home Remote System ........ 110, 111
Operation ........................................ 112, 118
VValet Lockout Switch ..................................... 86Vehicle
Control ..................................................... 326Damage Warnings ....................................... 5Loading .................................................... 354Symbols ...................................................... 5
511Information Provided by:
Vehicle Data Collection and Event DataRecorders ................................................ 491
Vehicle IdentificationNumber (VIN) .......................................... 451Service Parts Identification Label .............. 451
Vehicle PersonalizationDIC .......................................................... 220
Vehicle Positioning ...................................... 282Ventilation Adjustment .................................. 184Visors ........................................................... 84Voice Recognition ........................................ 312Voltmeter Gage ........................................... 192
WWarning Lights, Gages and Indicators ......... 185Warnings
DIC Warnings and Messages ................... 206Hazard Warning Flashers ......................... 140Other Warning Devices ............................ 140Safety and Symbols ..................................... 4Vehicle Damage .......................................... 5
Waypoint, Edit ............................................. 254Wheels
Alignment and Tire Balance ..................... 432Different Size ........................................... 430Replacement ............................................ 432
Windows ....................................................... 81Power ........................................................ 82
WindshieldRainsense™ Wipers ................................. 145Replacement ............................................ 412Washer .................................................... 146Washer Fluid ........................................... 397Wiper Blade Replacement ........................ 412Wiper Blades, Cleaning ............................ 447Wiper Fuses ............................................ 452Wipers ..................................................... 144
Winter Driving ............................................. 349Winter Tires ................................................. 414Wiper Activated Headlamps ......................... 166
XXM™ Satellite Radio Antenna System ......... 230
YYour Vehicle and the Environment ............... 462
512Information Provided by: