


Languages
Pages
Legal


Web Portal User Guide

Page | 1
Table of Contents
I. Introduction
2
II. User Account
3
III. Accessing Web Portal
5
IV. Eligibility
6
V. Authorization
1. Create Authorization
2. View Authorization
9
20
VI. Claim
View Claim
24
VII. Report Issue 26

Page | 2
I. Introduction
Network Medical Management’s Provider Web Portal is a web based application that enables
provider offices to conveniently verify member eligibility, submit/view authorization requests,
and submit1/view claim data from any location with internet access.
This user guide is intended to educate providers on the different features and capabilities of the
web portal. Should you have any questions, comments, or require assistance, please do not
hesitate to contact us at:
[email protected] – technical issues and questions
[email protected] – new user setup and login assistance
Eligibility
Claim Authorization
1Claim submission feature is not currently available for LaSalle providers.

Page | 3
II. User Accounts
In most cases, provider offices will be assigned up to two web portal user accounts. One will be
designated for billing purposes and the other for general office use.
Obtaining an Username / New Users
To obtain a web portal username and password, please contact Web Portal Support at
(626) 943-6046 or email [email protected]. When emailing, please include requestor
name, vendor/company name, phone number, best time to call, email address, and provider(s)
name. Alternatively, you can click on the [User Registration Form] link at
https://www.nmm.cc/Portal_LSMA.

Page | 4
Password Policy
All user passwords must meet the following minimum requirements:
1. Cannot be the same as the current password
2. Cannot contain the User ID
3. Must be at least 6 characters
4. Must contain characters that meet at least 3 categories
a. Uppercase characters [ A through Z ]
b. Lowercase letters [ a through z ]
c. Numbers [ 0 through 9 ]
d. Special characters [ ~!@#$%^&*(\) ]
In addition, the Web Portal will prompt users to change their passwords every ninety (90) days.
Your new password cannot be the same as your current one. The portal will begin reminding
you that your password will expire 15 days prior to the actual expiration date.

Page | 5
III. Access Web Portal
The URL for the web portal is: https://www.nmm.cc/Portal_LSMA
It is recommended that you add this URL to your bookmarks for easy access.
Minimum Requirements
Currently the web portal only supports Microsoft Internet Explorer 7 and above. Other browsers
such as Firefox, Google Chrome, and Safari are not supported.
Logging In
1. Open Internet Explorer and go to:
https://www.nmm.cc/Portal_LSMA
2. Enter your username
3. Enter your password (case sensitive)
4. Click [Log In]
Note: If this is your first time logging in, you may be prompted to change your password. Please
refer to the Password Policy in section II of this guide for reference.

Page | 6
IV. Eligiblity
To search member’s eligiblity status:
Select [Eligibility] located in the blue bar at the top of the page
Click [Eligibility Search]
“Member Eligibility” page will appear.
Choose the provider from the drop down list
To select a member, please enter either
o partial “Member ID” and complete DOB (mm/dd/yyyy) or
o partial “Last Name” + partial “First Name” + complete DOB (mm/dd/yyyy).
Then, click “Search”.

Page | 7
Once the member is found, you can click on high-lighted “Member ID” link to view
member’s detail. Notice both the current membership and previously terminated membership
are both shown.
A new page for member information will pop up. You can click on “Authorization History”
for more information about this patient.
1234567 Jane
Jane
John
n
1234567 Doe
Doe
Page | 8
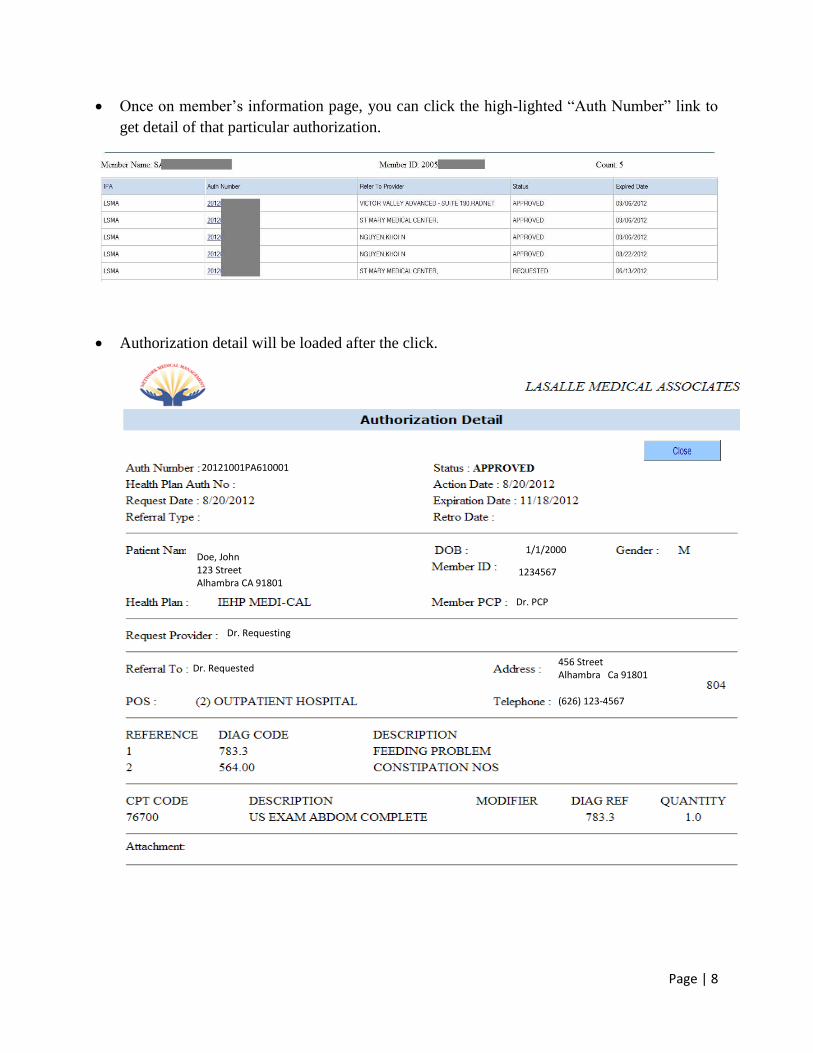
Once on member’s information page, you can click the high-lighted “Auth Number” link to
get detail of that particular authorization.
Authorization detail will be loaded after the click.
20121001PA610001
Doe, John 123 Street Alhambra CA 91801
1/1/2000
1234567
Dr. PCP
Dr. Requesting
Dr. Requested 456 Street Alhambra Ca 91801 (626) 123-4567

Page | 9
V. Authorization
V.1. To create new authorization:
Click [Authorization] located in the blue bar at the top of the page.
Then select [Create Authorization].
This will bring you to the “Create Authorization – Select a Member” page.
Choose a requesting provider from the drop down list.
LSMA – (C) Dr. A LSMA – (S) Dr. B LSMA – (S) Dr. C LSMA – (C) Dr. D LSMA – (S) Dr. E LSMA – (S) Dr. F LSMA – (C) Dr. G LSMA – (C) Dr. H LSMA – (C) Dr. I

Page | 10
To select a member, please enter either
o partial “Member ID” and complete DOB(mm/dd/yyyy) or
o partial “Last Name” + partial “First Name” + complete DOB(mm/dd/yyyy).
For regular authorization, leave “RETRO DOS” blank
For retro-authorization, you can enter a date up to 30 days before today’s date.
Click “Search” afterward.
Once the member is found, click on the high-lighted “Member ID” link.
Doe John 01/01/2000
Doe John 01/01/2000
0000
1234567 Doe John 1/1/2000
Dr. Requesting

Page | 11
This will take you to the authorization request form for this particular member.
Doe, John 1234567 1/1/2000
1
3
2
4
5.1
1
6
7
5.2 5.3

Page | 12
(1) On the top left corner is the authorization information box, please select the “Refer
Type”.
(2) Select place of service from a drop down list.
o If place of service is 21,22, or 24, the facility information is required
o You can choose facility from the drop down list
o If the facility is not on the drop down list, choose “OTHER HOSPITAL” on the
bottom of the list and type in the name of the facility

Page | 13
(3) Enter Diagnosis by either
o complete ICD-9 code or
o partial ICD-9 code or partial description, press tab, and make selection from drop
down list.
Then, click “Add”.

Page | 14
(4) Enter CPT codes by either
o complete CPT code or
o partial CPT code or partial description, press tab, and make selection from drop
down list.
Select “Modifier” and “Diag Ref” if necessary.
Then, click “Add”.

Page | 15
(5.1) Under “Select Specialty” section, please select the specialty of the provider.
(5.2) Then choose a provider from the list in the middle column.
o Alternaltively, you may select [IPA help Choose Provider]. IPA will then choose
the provider for you
Dr. A Dr. A’s Address Dr. B Dr. B’s Address
Dr. A Dr. A’s Address Dr. B Dr. B’s Address

Page | 16
(5.3) Another option in selecting a provider is by location, “Specialty by Location”,
which is located at the far right of the screen in the “Select Specialty” section.
o After you have chosen the provider, the provider’s information will be shown in
the “Refer to Provider” section
(6) Type Symptoms and Treatments in the text box
Dr. A Dr. A’s Address Dr. B Dr. B’s Address
Dr. A Dr. A’s Address

Page | 17
(7) To attach additional files, click “Browse…” to select files
Then click “Upload Attachment” to attach the file
Once you have entered all the required information (marked with an *) click [Submit] at
the bottom of the page
Then, click “OK” to confirm submission

Page | 18
After submitting authorization request successfully, an authorization confirmation page
will appear. You can print the page for your reference then click “Done”.
20121001PA610001
Doe, John 123 Street Alhambra CA 91801
1/1/2000 1234567
Dr. PCP
Dr. Requesting

Page | 19
Then, you will have an option to create another authorization with the same or a different
member

Page | 20
V.2. To search authorization:
Click [Authorization] located in the blue bar at the top of the page
Select [Search Authorization]
“Authorization Search” page will appear.
Choose the provider from the drop down list
You can search authorization by “Auth No”, “Member ID”, “Last Name”, “First Name”,
“DOB”, “Status”, or any combination of the fields.
Then, click “Search”.
LSMA – (C) Dr. A LSMA – (S) Dr. B LSMA – (S) Dr. C LSMA – (C) Dr. D LSMA – (S) Dr. E LSMA – (S) Dr. F LSMA – (C) Dr. G LSMA – (C) Dr. H LSMA – (C) Dr. I

Page | 21
Once the authorization is found, you can either view authorization details or add attachment
to the claim.
To view authorization details, click the high-lighted Auth Number.
This will take you to the authorization detail.
2012100199900001
20121001PA610001 1234567 Doe, John
20121001PA610001
Doe, John 123 Street Alhambra CA 91801
1/1/2000
1234567
Dr. Requesting
Dr. Requested 456 Street Alhambra Ca 91801 (626) 123-4567
Dr. PCP

Page | 22
Once inside authorization detail, you can either
o Extend authorization by clicking “Extend Auth” or
o Print by clicking “Print.
o Authorization which can be extended on the web portal must meet all of the following
criteria:
POS is 11.
Status is “APPROVED” or “MODIFIED”.
Today’s date must be within 15 days before and 30 days after expiration date.
Authorization can be extended at most 2 times, including online and fax
request.
2012100199900001

Page | 23
To attach additional file to the particular authorization, click “Add Attachment” after you
found the authorization.
o In order to add attachment, authorization must have status “REQUESTED” or
“SYSTEM HOLD”
Authorization Attachment page will appear. You can attach your attachment at the end of the
page
20121001PA610001
20121001PA610001
1234567
1234567
Doe, John
Doe, John
Doe John
20121001PA610001
Doe, Jane 1/1/2000
1234567
Dr. PCP
Dr. Requesting Dr. Requested

Page | 24
VI. Claim
To search claim:
After a claim has been loaded into our system, it will no longer be listed in “Submitted Claims”
or “Submitted Batch Claims” (usually after 24 hours). If a claim is no longer listed, you can still
search for the claim using the “Search Claims” function.
All functions besides “Search Claim” are not currently available.
Click on [Search Claims]
You can search for a claim by Provider, Claim Number, Claim Reference Number, Member
ID, Last Name, First Name, Date of Birth, or any combination of fields.
11/15/2010

Page | 25
Click on a Claim Number to view the claim details.

Page | 26
VII. Report Issue
For any portal issue, including forgotten password, please contact us at:
Email: [email protected]
Phone: (626) 943-6046
At the bottom right of each Portal page, there will be a “Report Issue” link. This link will
go directly to our “Report Issue” page for users to submit their issues through the portal.
The Report Issue form will directly send your report to [email protected]
Our technician will contact as soon as possible and provide the necessary support.
Top Related