


Languages
Pages
Legal


Gessi SpA - Parco Gessi 13037 Serravalle Sesia (Vercelli) - Italy
Phone +39 0163 454111 - Facsimile +39 0163 459273
www.gessi.com - [email protected]
Art. 34306TRASPARENZE
PROGRAMMA MISCELAZIONE BAGNOBATH MIXING PROGRAM
PROGRAMME DU MITIGEUR POUR LA SALLE DE BAINBAD-MISCHUNGSPROGRAMM
PROGRAMA MEZCLADORES BAÑOПРОГРАММА СМЕСИТЕЛЕЙ ДЛЯ ВАННОЙ
2
dimensioni in mm - measures in mm - dimensions en mm - Maß im mm - medidas en mm
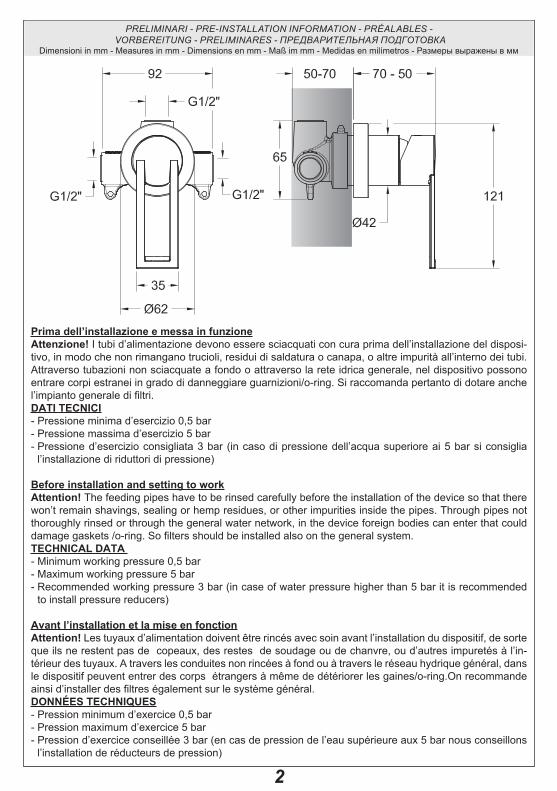
Prima dell’installazione e messa in funzioneAttenzione! I tubi d’alimentazione devono essere sciacquati con cura prima dell’installazione del disposi-tivo, in modo che non rimangano trucioli, residui di saldatura o canapa, o altre impurità all’interno dei tubi. Attraverso tubazioni non sciacquate a fondo o attraverso la rete idrica generale, nel dispositivo possono entrare corpi estranei in grado di danneggiare guarnizioni/o-ring. Si raccomanda pertanto di dotare anche l’impianto generale di filtri.DATI TECNICI- Pressione minima d’esercizio 0,5 bar- Pressione massima d’esercizio 5 bar- Pressione d’esercizio consigliata 3 bar (in caso di pressione dell’acqua superiore ai 5 bar si consiglia
l’installazione di riduttori di pressione)
Before installation and setting to workAttention! The feeding pipes have to be rinsed carefully before the installation of the device so that there won’t remain shavings, sealing or hemp residues, or other impurities inside the pipes. Through pipes not thoroughly rinsed or through the general water network, in the device foreign bodies can enter that could damage gaskets /o-ring. So filters should be installed also on the general system.TECHNICAL DATA - Minimum working pressure 0,5 bar- Maximum working pressure 5 bar- Recommended working pressure 3 bar (in case of water pressure higher than 5 bar it is recommended
to install pressure reducers)
Avant l’installation et la mise en fonctionAttention! Les tuyaux d’alimentation doivent être rincés avec soin avant l’installation du dispositif, de sorte que ils ne restent pas de copeaux, des restes de soudage ou de chanvre, ou d’autres impuretés à l’in-térieur des tuyaux. A travers les conduites non rincées à fond ou à travers le réseau hydrique général, dans le dispositif peuvent entrer des corps étrangers à même de détériorer les gaines/o-ring.On recommande ainsi d’installer des filtres également sur le système général.DONNÉES TECHNIQUES- Pression minimum d’exercice 0,5 bar- Pression maximum d’exercice 5 bar- Pression d’exercice conseillée 3 bar (en cas de pression de l’eau supérieure aux 5 bar nous conseillons
l’installation de réducteurs de pression)
PRELIMINARI - PRE-INSTALLATION INFORMATION - PRÉALABLES - VORBEREITUNG - PRELIMINARES - ПРЕДВАРИТЕЛЬНАЯ ПОДГОТОВКА
Dimensioni in mm - Measures in mm - Dimensions en mm - Maß im mm - Medidas en milímetros - Размеры выражены в мм
3
Vor der Installation und InbetriebnahmeAchtung! Bevor die Vorrichtung zu installieren, bitte spülen Sie die Zuleitungsröhre sorgfältig aus, um alle Spannen, Schweiß- und. Hanfrückstände bzw. alle Verunreinigungen vom Inneren der Röhre zu entfernen. Durch nicht sorgfältig gespülte Rohrleitungen bzw. durch das allgemeine Wassernetz können Fremdkörper in den Korpen eintreten, die die Dichtungen bzw. die O-Ringe beschädigen können. Es ist dann empfe-hlenswert, die allgemeine Anlage mit Filtern auszustatten.TECHNISCHE DATEN - Minimaler Betriebsdruck 0,5 bar- Maximaler Betriebsdruck 5 bar- Empfohlener Betriebsdruck 3 bar (sollte der Wasserdruck einen Wert von 5 bar überschreiten, empfiehlt
es sich Druckminderventile zu installieren)
Antes de la instalación y la puesta en función¡Cuidado! Los tubos de alimentación tienen que ser enjuagados escrupulosamente antes de instalar el dispositivo de manera que no haya virutas, residuos de soldadura o cáñamo u otras impurezas al interior de los tubos. A través de los tubos no perfectamente enjuagados o de la red hídrica general pueden entrar en el dispositivo unos cuerpos extraños que pueden dañar guarniciones/o-rings. Les recomendamos por lo tanto que instalen los filtros en la planta general también.DATOS TÉCNICOS- Presión mínima de ejercicio 0,5 bar- Presión máxima de ejercicio 5 bar- Presión de ejercicio aconsejada 3 bar (en caso de presión del agua superior a los 5 bar, les aconsejamos
instalar unos reductores de presión)
Перед установкой и началом использованияВнимание! Перед установкой смесителя необходимо тщательно промыть водопроводные трубы, чтобы в них не оставались стружка, шлак от сварки, лен или другие посторонние тела. Через плохо промытые водопроводные трубы или через общую водопроводную сеть в смеситель могут попасть посторонние тела, способные повредить уплотнения и уплотнительные кольца. Поэтому, рекомендуется оснастить фильтрами также и общую систему.ТЕХНИЧЕСКИЕ ДАННЫЕ- Минимальное рабочее давление: 0,5 бар- Максимальное рабочее давление: 5 бар- Рекомендованное рабочее давление 3 бар (в случае давления воды, превышающего 5 бар,
рекомендуется установка редукторов давления).
PRELIMINARI - PRE-INSTALLATION INFORMATION - PRÉALABLES - VORBEREITUNG - PRELIMINARES - ПРЕДВАРИТЕЛЬНАЯ ПОДГОТОВКА
4
OK
NO!
cold
max.ok
min.
Posi
zion
e co
nsig
liata
a
pare
te
finita
e
pias
trel
lata
Posi
zion
e co
nsig
liata
a
pare
te
finita
e
pias
trel
lata
Posi
zion
e co
nsig
liata
a
pare
te
finita
e
pias
trel
lata
Posi
zion
e co
nsig
liata
a
pare
te
finita
e
pias
trel
lata
Posi
zion
e co
nsig
liata
a
pare
te
finita
e
pias
trel
lata
Posi
zion
e co
nsig
liata
a
pare
te
finita
e
pias
trel
lata
A
OK NO!B
hot
mix
INSTALLAZIONE - INSTALLATION - INSTALLATION - INSTALLATION - INSTALACIÓN - УСТАНОВКА
Dimensioni in mm - Measures in mm - Dimensions en mm - Maß im mm - Medidas en milímetros - Размеры выражены в мм
5
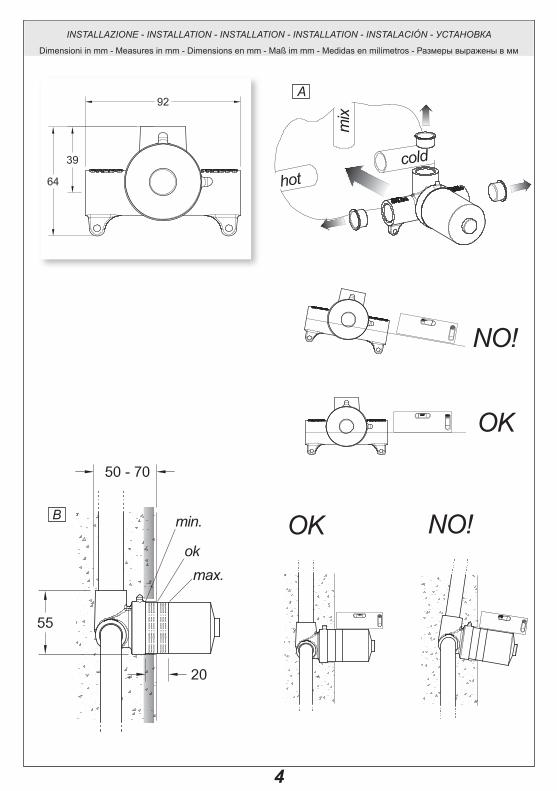
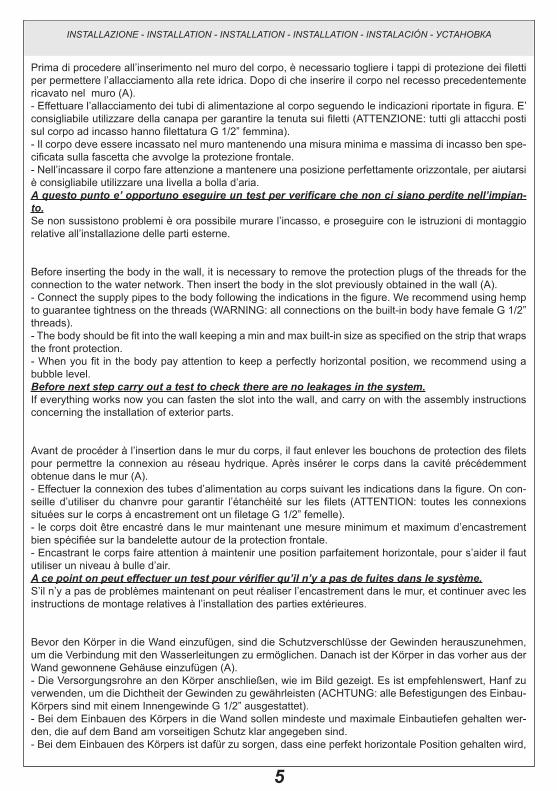
Prima di procedere all’inserimento nel muro del corpo, è necessario togliere i tappi di protezione dei filetti per permettere l’allacciamento alla rete idrica. Dopo di che inserire il corpo nel recesso precedentemente ricavato nel muro (A).- Effettuare l’allacciamento dei tubi di alimentazione al corpo seguendo le indicazioni riportate in figura. E’ consigliabile utilizzare della canapa per garantire la tenuta sui filetti (ATTENZIONE: tutti gli attacchi posti sul corpo ad incasso hanno filettatura G 1/2” femmina).- Il corpo deve essere incassato nel muro mantenendo una misura minima e massima di incasso ben spe-cificata sulla fascetta che avvolge la protezione frontale.- Nell’incassare il corpo fare attenzione a mantenere una posizione perfettamente orizzontale, per aiutarsi è consigliabile utilizzare una livella a bolla d’aria.A questo punto e’ opportuno eseguire un test per verificare che non ci siano perdite nell’impian-to.Se non sussistono problemi è ora possibile murare l’incasso, e proseguire con le istruzioni di montaggio relative all’installazione delle parti esterne.
Before inserting the body in the wall, it is necessary to remove the protection plugs of the threads for the connection to the water network. Then insert the body in the slot previously obtained in the wall (A).- Connect the supply pipes to the body following the indications in the figure. We recommend using hemp to guarantee tightness on the threads (WARNING: all connections on the built-in body have female G 1/2” threads).- The body should be fit into the wall keeping a min and max built-in size as specified on the strip that wraps the front protection.- When you fit in the body pay attention to keep a perfectly horizontal position, we recommend using a bubble level.Before next step carry out a test to check there are no leakages in the system.If everything works now you can fasten the slot into the wall, and carry on with the assembly instructions concerning the installation of exterior parts.
Avant de procéder à l’insertion dans le mur du corps, il faut enlever les bouchons de protection des filets pour permettre la connexion au réseau hydrique. Après insérer le corps dans la cavité précédemment obtenue dans le mur (A).- Effectuer la connexion des tubes d’alimentation au corps suivant les indications dans la figure. On con-seille d’utiliser du chanvre pour garantir l’étanchéité sur les filets (ATTENTION: toutes les connexions situées sur le corps à encastrement ont un filetage G 1/2” femelle).- le corps doit être encastré dans le mur maintenant une mesure minimum et maximum d’encastrement bien spécifiée sur la bandelette autour de la protection frontale.- Encastrant le corps faire attention à maintenir une position parfaitement horizontale, pour s’aider il faut utiliser un niveau à bulle d’air.A ce point on peut effectuer un test pour vérifier qu’il n’y a pas de fuites dans le système.S’il n’y a pas de problèmes maintenant on peut réaliser l’encastrement dans le mur, et continuer avec les instructions de montage relatives à l’installation des parties extérieures.
Bevor den Körper in die Wand einzufügen, sind die Schutzverschlüsse der Gewinden herauszunehmen, um die Verbindung mit den Wasserleitungen zu ermöglichen. Danach ist der Körper in das vorher aus der Wand gewonnene Gehäuse einzufügen (A).- Die Versorgungsrohre an den Körper anschließen, wie im Bild gezeigt. Es ist empfehlenswert, Hanf zu verwenden, um die Dichtheit der Gewinden zu gewährleisten (ACHTUNG: alle Befestigungen des Einbau-Körpers sind mit einem Innengewinde G 1/2” ausgestattet).- Bei dem Einbauen des Körpers in die Wand sollen mindeste und maximale Einbautiefen gehalten wer-den, die auf dem Band am vorseitigen Schutz klar angegeben sind.- Bei dem Einbauen des Körpers ist dafür zu sorgen, dass eine perfekt horizontale Position gehalten wird,
INSTALLAZIONE - INSTALLATION - INSTALLATION - INSTALLATION - INSTALACIÓN - УСТАНОВКА
6
INSTALLAZIONE - INSTALLATION - INSTALLATION - INSTALLATION - INSTALACIÓN - УСТАНОВКА
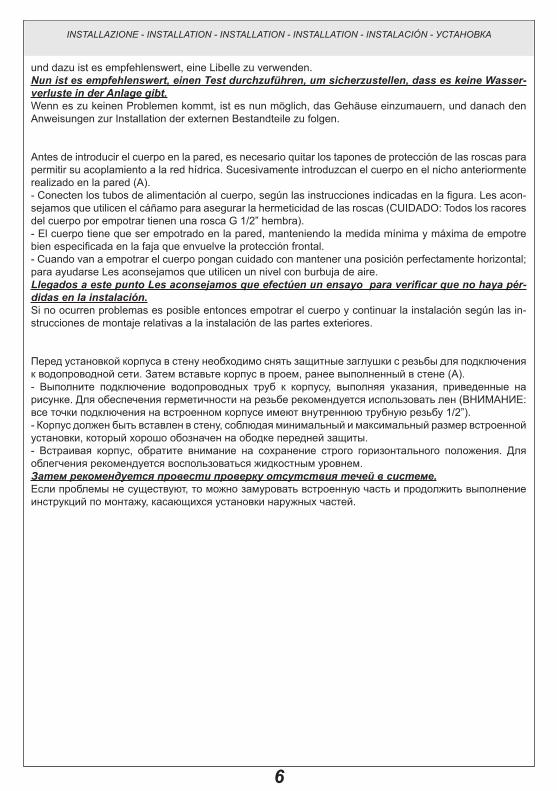
und dazu ist es empfehlenswert, eine Libelle zu verwenden.Nun ist es empfehlenswert, einen Test durchzuführen, um sicherzustellen, dass es keine Wasser-verluste in der Anlage gibt.Wenn es zu keinen Problemen kommt, ist es nun möglich, das Gehäuse einzumauern, und danach den Anweisungen zur Installation der externen Bestandteile zu folgen.
Antes de introducir el cuerpo en la pared, es necesario quitar los tapones de protección de las roscas para permitir su acoplamiento a la red hídrica. Sucesivamente introduzcan el cuerpo en el nicho anteriormente realizado en la pared (A).- Conecten los tubos de alimentación al cuerpo, según las instrucciones indicadas en la figura. Les acon-sejamos que utilicen el cáñamo para asegurar la hermeticidad de las roscas (CUIDADO: Todos los racores del cuerpo por empotrar tienen una rosca G 1/2” hembra).- El cuerpo tiene que ser empotrado en la pared, manteniendo la medida mínima y máxima de empotre bien especificada en la faja que envuelve la protección frontal.- Cuando van a empotrar el cuerpo pongan cuidado con mantener una posición perfectamente horizontal; para ayudarse Les aconsejamos que utilicen un nivel con burbuja de aire.Llegados a este punto Les aconsejamos que efectúen un ensayo para verificar que no haya pér-didas en la instalación.Si no ocurren problemas es posible entonces empotrar el cuerpo y continuar la instalación según las in-strucciones de montaje relativas a la instalación de las partes exteriores.
Перед установкой корпуса в стену необходимо снять защитные заглушки с резьбы для подключения к водопроводной сети. Затем вставьте корпус в проем, ранее выполненный в стене (А).- Выполните подключение водопроводных труб к корпусу, выполняя указания, приведенные на рисунке. Для обеспечения герметичности на резьбе рекомендуется использовать лен (ВНИМАНИЕ: все точки подключения на встроенном корпусе имеют внутреннюю трубную резьбу 1/2”).- Корпус должен быть вставлен в стену, соблюдая минимальный и максимальный размер встроенной установки, который хорошо обозначен на ободке передней защиты.- Встраивая корпус, обратите внимание на сохранение строго горизонтального положения. Для облегчения рекомендуется воспользоваться жидкостным уровнем.Затем рекомендуется провести проверку отсутствия течей в системе.Если проблемы не существуют, то можно замуровать встроенную часть и продолжить выполнение инструкций по монтажу, касающихся установки наружных частей.
7
C
2.5 mmE
D
INSTALLAZIONE - INSTALLATION - INSTALLATION - INSTALLATION - INSTALACIÓN - УСТАНОВКА

8
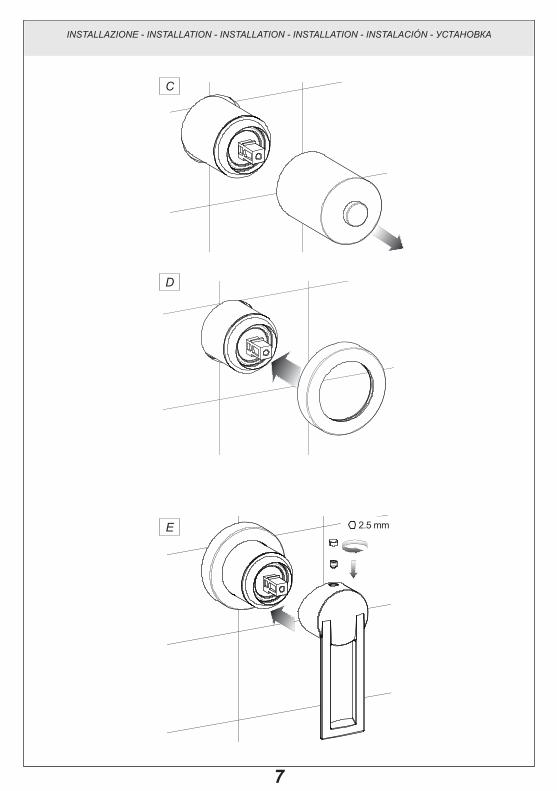
INSTALLAZIONE A MURO - (articoli in finitura CROMO)Togliere la protezione (C). Introdurre a pressione il rosone di finitura sul corpo (D). Inserire la maniglia sulla cartuccia fino ad arresto meccanico, e fissarla con il grano in dotazione (E).
WALL INSTALLATION - (CHROME finishing items)Remove protection (C). Insert pressing the finish washer on the body (D). Insert the handle on the cartridge down to the mechanical stop, and fasten it with the pin supplied (E).
INSTALLATION MURALE - (articles en finition CHROME)Enlever la protection (C). Introduire à pression la rondelle de finition sur le corps (D). Insérer la poignée sur la cartouche jusqu’à l’arrêt mécanique, et la fixer avec le goujon fourni (E).
WANDINSTALLATION - (articoli in finitura CROMO)Den Schutz (C) herausnehmen. Die Endbearbeitungsrosette auf den Körper einpressen (D). Den Handgriff auf die Kartusche bis mechanischem Anschlag einfügen und ihn mittels des serienmäβigen Stifts (E) befestigen.
INSTALACIÓN DE PARED - (artículos en acabado CROMO)Quiten la protección (C). Introduzcan por presión el florón de acabado en el cuerpo (D). Introduzcan la maneta sobre el cartucho hasta su tope mecánico y bloquéenla utilizando la clavija de fijación (E).
НАСТЕННАЯ УСТАНОВКА - (артикулы с ХРОМИРОВАННОЙ отделкой)Снимите защиту (С). Установите с нажимом декоративную розетку на корпус (D). Наденьте ручку на картридж до упора и закрепите ее стопорным винтом в комплекте (Е).
INSTALLAZIONE - INSTALLATION - INSTALLATION - INSTALLATION - INSTALACIÓN - УСТАНОВКА
9
C
2.5 mmFE
D1 D2 D3
CromoChrome
Non cromoNon chrome
Non cromoNon chrome
INSTALLAZIONE - INSTALLATION - INSTALLATION - INSTALLATION - INSTALACIÓN - УСТАНОВКА
10
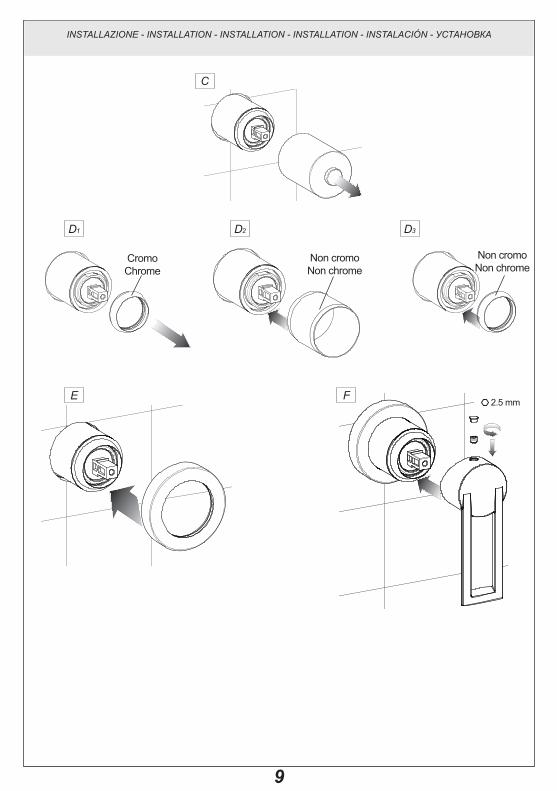
INSTALLAZIONE A MURO - (articoli in finitura diversa da CROMO)Togliere la protezione (C). Smontare l’anello corpighiera in finitura dal corpo incassato (D1). Introdurre a pressione l’anello di finitura (D2) ed installare a pressione la nuova ghiera copricartuccia in finitura (D3). Introdurre a pressione il rosone di finitura sul corpo (E). Inserire la maniglia sulla cartuccia fino ad arresto meccanico, e fissarla con il grano in dotazione (F).
WALL INSTALLATION - (items in different finishings from CHROME)Remove protection (C). Disassemble the ring nut cover ring in finish from the built-in body (D1). Insert pressing the finish ring (D2) and insert pressing the new cartridge cover ring nut in finish (D3). Insert pressing the finish washer on the body (E). Insert the handle on the cartridge down to the mechanical stop, and fasten it with the pin supplied (F).
INSTALLATION MURALE - (articles en finitions différentes du CHROME)Enlever la protection (C). Démonter la bague couvre-virole en finition du corps encastré (D1). Introduire à pression la bague de finition (D2) et installer à pression la nouvelle virole couvre-cartouche en finition (D3). Introduire à pression la rondelle de finition sur le corps (E). Insérer la poignée sur la cartouche jusqu’à l’arrêt mécanique, et la fixer avec le goujon fourni (F).
WANDINSTALLATION - (Artikel in Ausführung anders als CHROM)Den Schutz (C) herausnehmen. Prüfen nach der guten Schmierung des Anschlusses. Der Abdeckring in aus dem Gründkörper (D1) entfernen. Die Endkappe mit Druck einstecken (D2) und die Hutmutter der Kartusche mit Druck installieren (D3). Die Endbearbeitungsrosette auf den Körper einpressen (E). Den Handgriff auf die Kartusche bis mechanischem Anschlag einfügen und ihn mittels des serienmäβigen Stifts (F) befestigen.
INSTALACIÓN DE PARED - (artículos en acabado diferente del CROMO)Quiten la protección (C). Desmonten al anillo cubre-virola con acabado del cuerpo empotrado (D1). Introduzcan por presión el anillo de acabado (D2) e instalen por presión la nueva virola que cubre el cartucho con acabado (D3). Introduzcan por presión el florón de acabado en el cuerpo (E). Introduzcan la maneta sobre el cartucho hasta su tope mecánico y bloquéenla utilizando la clavija de fijación (F).
НАСТЕННАЯ УСТАНОВКА - (артикулы с отличающейся от ХРОМИРОВАННОЙ отделкой)Снимите защиту (С). Снимите декоративное кольцо круглой гайки с встроенного корпуса (D1). Установите с нажимом декоративное кольцо (D2) и установите с нажимом новое декоративное кольцо картриджа (D3). Установите с нажимом декоративную розетку на корпус (Е). Наденьте ручку на картридж до упора и закрепите ее стопорным винтом в комплекте (F).
INSTALLAZIONE - INSTALLATION - INSTALLATION - INSTALLATION - INSTALACIÓN - УСТАНОВКА
11
X
B
DE
A 2.5 mm
Ch. 28 mm
F
C
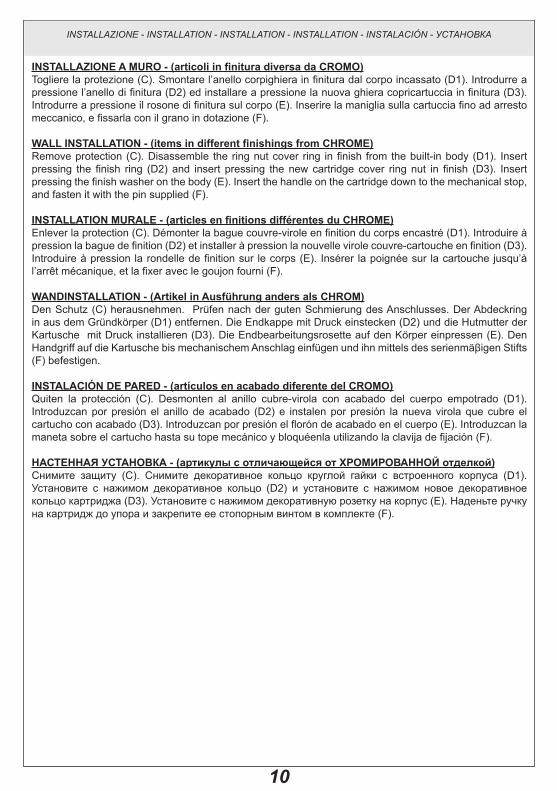
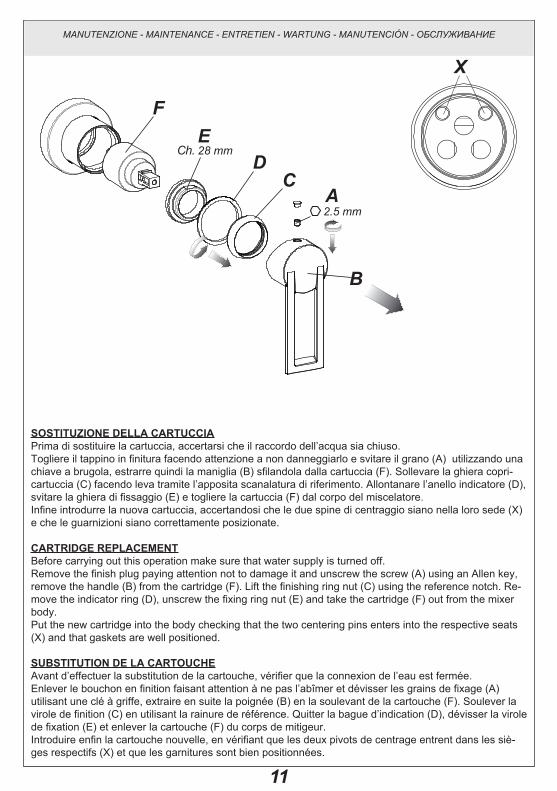
SOSTITUzIONE DELLA CArTUCCIAPrima di sostituire la cartuccia, accertarsi che il raccordo dell’acqua sia chiuso. Togliere il tappino in finitura facendo attenzione a non danneggiarlo e svitare il grano (A) utilizzando una chiave a brugola, estrarre quindi la maniglia (B) sfilandola dalla cartuccia (F). Sollevare la ghiera copri-cartuccia (C) facendo leva tramite l’apposita scanalatura di riferimento. Allontanare l’anello indicatore (D), svitare la ghiera di fissaggio (E) e togliere la cartuccia (F) dal corpo del miscelatore. Infine introdurre la nuova cartuccia, accertandosi che le due spine di centraggio siano nella loro sede (X) e che le guarnizioni siano correttamente posizionate.
CArTrIDgE rEPLACEmENTBefore carrying out this operation make sure that water supply is turned off. Remove the finish plug paying attention not to damage it and unscrew the screw (A) using an Allen key, remove the handle (B) from the cartridge (F). Lift the finishing ring nut (C) using the reference notch. Re-move the indicator ring (D), unscrew the fixing ring nut (E) and take the cartridge (F) out from the mixer body. Put the new cartridge into the body checking that the two centering pins enters into the respective seats (X) and that gaskets are well positioned.
SUBSTITUTION DE LA CArTOUCHEAvant d’effectuer la substitution de la cartouche, vérifier que la connexion de l’eau est fermée. Enlever le bouchon en finition faisant attention à ne pas l’abîmer et dévisser les grains de fixage (A) utilisant une clé à griffe, extraire en suite la poignée (B) en la soulevant de la cartouche (F). Soulever la virole de finition (C) en utilisant la rainure de référence. Quitter la bague d’indication (D), dévisser la virole de fixation (E) et enlever la cartouche (F) du corps de mitigeur. Introduire enfin la cartouche nouvelle, en vérifiant que les deux pivots de centrage entrent dans les siè-ges respectifs (X) et que les garnitures sont bien positionnées.
MANUTENZIONE - MAINTENANCE - ENTRETIEN - WARTUNG - MANUTENCIÓN - ОБСЛУЖИВАНИЕ
12
AUSTAUSCHEN DEr kArTUSCHEBevor man die Kartusche austauscht muß man sich vergewissern, dass das Wasserversorgungsnetz geschlossen ist. Den Endverschluss herausnehmen, ohne ihn zu beschädigen, und den Bolzen (A) unter Einsatz eines Sechskantschlüssel losschrauben, dann den Griff (B) herausziehen, indem man ihn von der Kartusche (F) abzieht. Die Nutmutter, welche die Kartusche (C) abdeckt, entfernen, wobei man Druck auf die eigens dafür vorgesehene Bezugsrille ausübt. Den Anzeigering (D) entfernen, die Befestigungsnutmutter (E) losschrauben und die neue Kartusche (F) vom Körper der Mischbatterie entfernen. Schließlich eine neue Kartusche einsetzen, wobei man sich vergewissert, dass sich die beiden Zentrierstifte in ihrem Sitz (X) befinden und das die Dichtungen korrekt positioniert sind.
SUSTITUCIóN DEL CArTUCHOAntes de sustituir el cartucho, asegúrense que la conexión del agua esté cerrada. Quiten el taponcito de acabado cuidando con no dañarlo y destornillen la clavija de fijación (A) utilizando una llave de allén, extraigan la maneta (B) sacándola del cartucho (F). Levanten la virola cubre-cartucho (C) utilizando la ranura de referencia. Quiten el anillo indicador (D), destornillen la virola de fijación (E) y extraigan el cartucho (F) del cuerpo del mezclador. Finalmente introduzcan el cartucho nuevo, asegurándose que las dos clavijas de centraje (X) se encuen-tren en su asiento y que las juntas estén posicionadas correctamente.
ЗАМЕНА КАРТРИДжАПеред заменой картриджа убедитесь, что подача воды перекрыта.Снимите декоративную накладку, обращая внимание на то, чтобы не повредить ее, и отвинтите стопорный винт (А) шестигранным ключом, после чего снимите ручку (В) с картриджа (F). Поднимите кольцо картриджа (С), поддевая его при помощи специальной прорези. Отодвиньте указательное кольцо (D), отвинтите крепежное резьбовое кольцо (Е) и выньте картридж (F) из корпуса смесителя. Вставьте новый картридж, проверяя, чтобы два центровочных штифта вошли в соответствующие гнезда (Х), и чтобы уплотнения были правильно установлены.
MANUTENZIONE - MAINTENANCE - ENTRETIEN - WARTUNG - MANUTENCIÓN - ОБСЛУЖИВАНИЕ
ET 40001 - R1
Top Related