


Languages
Pages
Legal


ThingWorx 8 High Availability Administrator’s Guide
Version 1.2

ThingWorx 8 High Availability Administrator’s Guide
1
Document Revision History ........................................................................................................................... 4
Definitions ..................................................................................................................................................... 6
Overview ....................................................................................................................................................... 7
Requirements ................................................................................................................................................ 7
Supported Operating Systems .................................................................................................................. 7
Application Key Decryption ....................................................................................................................... 7
Prerequisites ................................................................................................................................................. 8
Example Architecture .................................................................................................................................... 9
Configuring ThingWorx in an HA Landscape ................................................................................................. 9
Platform Settings ...................................................................................................................................... 9
Configuring a Custom File Repository ..................................................................................................... 10
Configuring the Location ..................................................................................................................... 10
Persistent Properties............................................................................................................................... 11
Installing PostgreSQL for High Availability .................................................................................................. 11
Installing and Configuring PostgreSQL for Windows .............................................................................. 11
Installing PostgreSQL and Creating a New User Role in PostgreSQL (Windows) ................................ 11
Configuring and Executing the PostgreSQL Database Script (Windows) ............................................ 11
Configuring and Executing the Model/Data Provider Schema Script (Windows)............................... 13
Configuring Platform Settings (Windows) .......................................................................................... 14
Encrypting the PostgreSQL Password (Windows) ............................................................................... 20
Installing ThingWorx ........................................................................................................................... 20
Installing and Configuring PostgreSQL DB Host Servers (Windows) ................................................... 20
Installing and Configuring a PostgreSQL Client Host Package and PostgreSQL User (Windows) ....... 24
Installing PostgreSQL Client Package and PostgreSQL User (Windows) ............................................. 24
Installing and Configuring PostgreSQL for Ubuntu ................................................................................. 25
Installing PostgreSQL and Creating a New User Role in PostgreSQL (Ubuntu) .................................. 25
Configuring and Executing the PostgreSQL Database Script (Ubuntu) ............................................... 26
Configuring and Executing the Model/Data Provider Schema Script (Ubuntu) ................................. 27
Configuring Platform Settings (Ubuntu) ............................................................................................. 28
Encrypting the PostgreSQL Password (Ubuntu) .................................................................................. 28
Installing ThingWorx ........................................................................................................................... 28
Installing and Configuring PostgreSQL DB Host Servers (Ubuntu)...................................................... 28
Installing and Configuring a PostgreSQL Client Host Package and PostgreSQL User (Ubuntu) .......... 30
Installing PostgreSQL Client Package and PostgreSQL User (Ubuntu) ................................................ 31
Installing and Configuring PostgreSQL for Red Hat Enterprise Linux (RHEL) .......................................... 31
Installing PostgreSQL and Creating a New User Role in PostgreSQL (RHEL) ...................................... 31

ThingWorx 8 High Availability Administrator’s Guide
2
Configuring and Executing the PostgreSQL Database Script (RHEL) ................................................... 31
Configuring and Executing the Model/Data Provider Schema Script (RHEL) ..................................... 33
Configuring Platform Settings (RHEL) ................................................................................................. 33
Encrypting the PostgreSQL Password (RHEL) ...................................................................................... 34
Installing ThingWorx ........................................................................................................................... 34
Installing and Configuring PostgreSQL DB Host Servers (RHEL).......................................................... 34
Installing and Configuring a PostgreSQL Client Host Package and PostgreSQL User (RHEL) .............. 36
Installing PostgreSQL Client Package and PostgreSQL User (RHEL) .................................................... 36
PostgreSQL HA Deployment Architecture and Configuration Example .................................................. 37
Recommended Amazon EC2 Environment for PostgreSQL HA .......................................................... 37
Installing and Configuring pgpool-II .................................................................................................... 38
failover_command .............................................................................................................................. 40
Running pgpool-II ................................................................................................................................ 41
Configuring Pgpool-II for ThingWorx HA ..................................................................................................... 42
Configuring ZooKeeper for ThingWorx HA ................................................................................................. 47
Configuring the Load Balancer .................................................................................................................... 47
Monitoring Your HA Landscape .................................................................................................................. 48
ZooKeeper ............................................................................................................................................... 48
Pgpool-II .................................................................................................................................................. 48
PostgreSQL .............................................................................................................................................. 49
HAProxy ................................................................................................................................................... 49
Expected Behaviors with Failures ............................................................................................................... 49
ThingWorx Server Failure........................................................................................................................ 50
Load Balancer Failure .............................................................................................................................. 51
HAProxy Server Failure ....................................................................................................................... 51
ZooKeeper Node Failure ......................................................................................................................... 51
ThingWorx and ZooKeeper Failure ..................................................................................................... 51
Pgpool-II and ZooKeeper Failure ......................................................................................................... 52
Mutual Exclusion ................................................................................................................................. 52
Pgpool-II Node Failure ............................................................................................................................ 53
ThingWorx and Pgpool-II Failure ......................................................................................................... 53
HAProxy and Pgpool-II Failure ............................................................................................................ 54
PostgreSQL Node Failure ........................................................................................................................ 54
ThingWorx and PostgreSQL Failure .................................................................................................... 55
Pgpool-II and PostgreSQL Failure ........................................................................................................ 55
HAProxy and PostgreSQL Failure ........................................................................................................ 55
ZooKeeper and PostgreSQL Failure ..................................................................................................... 55
Extensions in the HA Landscape ................................................................................................................. 56
Process Flow ........................................................................................................................................... 56

ThingWorx 8 High Availability Administrator’s Guide
3
Appendix A: Sample platform-settings.json ............................................................................................... 57
Appendix B: Recovery Job ........................................................................................................................... 58
Appendix C: HAProxy Example with SSL ..................................................................................................... 59
Appendix D: Multiple HAProxy Setup ......................................................................................................... 60
Appendix E: Sample Scripts ......................................................................................................................... 61
start_replication.sh ................................................................................................................................. 61
recovery.conf .......................................................................................................................................... 61
failover.sh ................................................................................................................................................ 62
retargetMaster_001.sh ........................................................................................................................... 63
retargetMaster_002.sh ........................................................................................................................... 64
retargetMaster_003.sh ........................................................................................................................... 64

ThingWorx 8 High Availability Administrator’s Guide
4
Document Revision History
Revision Date Version Description of Change
February 2018 1.2 Updated the Application Key Encryption section under Requirements
November 2017 1.1 Added the CoordinatorZNode setting to HA Settings in the platform-settings.json Options table.
June 2017 1.0 Initial version

ThingWorx 8 High Availability Administrator’s Guide
5
Copyright © 2017 PTC Inc. and/or Its Subsidiary Companies. All Rights Reserved.
User and training guides and related documentation from PTC Inc. and its subsidiary companies (collectively "PTC")
are subject to the copyright laws of the United States and other countries and are provided under a license
agreement that restricts copying, disclosure, and use of such documentation. PTC hereby grants to the licensed
software user the right to make copies in printed form of this documentation if provided on software media, but only
for internal/personal use and in accordance with the license agreement under which the applicable software is
licensed. Any copy made shall include the PTC copyright notice and any other proprietary notice provided by PTC.
Training materials may not be copied without the express written consent of PTC. This documentation may not be
disclosed, transferred, modified, or reduced to any form, including electronic media, or transmitted or made publicly
available by any means without the prior written consent of PTC and no authorization is granted to make copies for
such purposes. Information described herein is furnished for general information only, is subject to change without
notice, and should not be construed as a warranty or commitment by PTC. PTC assumes no responsibility or liability
for any errors or inaccuracies that may appear in this document.
The software described in this document is provided under written license agreement, contains valuable trade secrets
and proprietary information, and is protected by the copyright laws of the United States and other countries. It may
not be copied or distributed in any form or medium, disclosed to third parties, or used in any manner not provided for
in the software licenses agreement except with written prior approval from PTC.
UNAUTHORIZED USE OF SOFTWARE OR ITS DOCUMENTATION CAN RESULT IN CIVIL DAMAGES AND
CRIMINAL PROSECUTION.
PTC regards software piracy as the crime it is, and we view offenders accordingly. We do not tolerate the piracy of
PTC software products, and we pursue (both civilly and criminally) those who do so using all legal means available,
including public and private surveillance resources. As part of these efforts, PTC uses data monitoring and scouring
technologies to obtain and transmit data on users of illegal copies of our software. This data collection is not
performed on users of legally licensed software from PTC and its authorized distributors. If you are using an illegal
copy of our software and do not consent to the collection and transmission of such data (including to the United
States), cease using the illegal version, and contact PTC to obtain a legally licensed copy.
Important Copyright, Trademark, Patent, and Licensing Information: See the About Box, or copyright notice, of
your PTC software.
UNITED STATES GOVERNMENT RIGHTS
PTC software products and software documentation are “commercial items” as that term is defined at 48 C.F.R.
2.101. Pursuant to Federal Acquisition Regulation (FAR) 12.212 (a)-(b) (Computer Software) (MAY 2014) for civilian
agencies or the Defense Federal Acquisition Regulation Supplement (DFARS) at 227.7202-1(a) (Policy) and
227.7202-3 (a) (Rights in commercial computer software or commercial computer software documentation) (FEB
2014) for the Department of Defense, PTC software products and software documentation are provided to the U.S.
Government under the PTC commercial license agreement. Use, duplication or disclosure by the U.S. Government is
subject solely to the terms and conditions set forth in the applicable PTC software license agreement.
PTC Inc., 140 Kendrick Street, Needham, MA 02494 USA

ThingWorx 8 High Availability Administrator’s Guide
6
Definitions • high availability
A system or component that is continuously operational for a desirably long amount of time.
• leader
The active ThingWorx instance where the model is loaded and all traffic is routed.
• standby
A ThingWorx instance that is available to be elected leader if the current leader fails. A standby
instance is started in Apache Tomcat but is not initialized with the model data.
• load balancer
A device that acts as a reverse proxy and distributes network or application traffic across
servers. In our example configuration, we use HAProxy as the load balancer for failovers.
• failover
A backup operational mode in which the functions of a system component (such as a processor,
server, network, or database) are assumed by secondary system components when the primary
component becomes unavailable due to failure or scheduled down time.

ThingWorx 8 High Availability Administrator’s Guide
7
Overview To decrease the duration of outages for critical Internet of Things (IoT) systems, you can configure
ThingWorx for high availability (HA). This guide explains how to configure the component architecture
for ThingWorx HA.
The ThingWorx High Availability (HA) configuration requires more servers in the application and
database tiers, including supporting Apache ZooKeeper and pgpool-II nodes. The additional servers
ensure that the system can manage the failure of any server (and even multiple failures, based on
remaining capacity for each component type) with minimal or no disruption for users and connected
devices.
We recommend that you use PostgreSQL HA as part of your overall HA solution. PostgreSQL HA allows
you to set up separate servers to capture reads and writes for data if a failure occurs on the primary
server. For more information, see the Installing PostgreSQL section.
Requirements Supported Operating Systems See the ThingWorx 8.0 System Requirements guide or higher.
ThingWorx High Availability also requires the following:
• ThingWorx 8.0 or higher
• ZooKeeper 3.4.5
• Pgpool-II 3.3.4
NOTE: The following ThingWorx HA example configuration runs on Linux. Some components may not
run on Windows. For operating system support details, see each component’s Web site.
Application Key Decryption The ApplicationKey "keyId" that is used for authentication is encrypted on disk. By default, the required
files are located in the following directories:
/ThingworxPlatform/keystore-password
/ThingworxStorage/keystore.jks
In a high availability environment where several platforms are pointing to the same database, these files
must exist on all of the servers. Otherwise, certain servers cannot decrypt the application keys.
Allowing all servers access differs based on the release:
• For the 7.4 and 8.0 releases, copy the license.bin file from the master server to the standby
servers.
• For 8.1 and later releases, what you do depends on whether you are connected to the internet.
o If you are disconnected, copy your license_capability_bin file from the master server to
the standby servers’ ThingWorxPlatform directory. In addition, an administrator must

ThingWorx 8 High Availability Administrator’s Guide
8
copy the keystore-password and keystore.jks files from the master server to their
locations on the standby servers.
o If you are connected, copy the platform-settings.json file from the master server to the
standyby servers’ ThingWorx directory. In addition, an administrator must copy the
keystore-password and keystore.jks files from the master server to their locations on
the standby servers.
Prerequisites This guide should be used by a database administrator (DBA) who is familiar with configuring relational
databases.
NOTE: The steps in this guide are intended for a QA/sandbox environment only. You may need to tune
settings for optimal performance in a production environment.

ThingWorx 8 High Availability Administrator’s Guide
9
Example Architecture The following image shows an example architecture for ThingWorx HA, which includes new components
ZooKeeper and ThingWorx standby servers. ZooKeeper is used for ThingWorx leader election during a
failure. A load balancer is used to route requests to the ThingWorx leader. The load balancer does not
route requests to the standby servers when the leader reaches a performance threshold but ensures all
requests are directed to the leader. You can use DataStax Enterprise (DSE) in an HA environment, but it
is optional. You can use any load balancer; our example architecture in this guide uses HAProxy.
Configuring ThingWorx in an HA Landscape At least two ThingWorx instances are required for HA configuration. A single instance is started, which
becomes leader and fully connects to the database. Standby servers boot up and can become the leader
if needed, but they do not fully connect to the database or load information like the leader does.
All ThingWorx servers have a service that is called by the load balancer, which indicates their availability.
Different codes identify the leader, which receives traffic, and standby nodes, which do not receive
traffic but may become leader.
NOTE: Each server must be installed on its own instance to ensure that underlying hardware or virtual
image failure will only affect that server.
Platform Settings For the latest ThingWorx release, the modelproviderconfig.json files were merged into the
platform-settings.json file. Data shape definitions were removed. The settings merged from the
modelproviderconfig.json files reside in the PersistenceProviderPackageConfigs section
of the file, which includes sub-sections that contain the configuration settings for a particular
persistence provider (such as PostgreSQL). The settings from the old platform-settings.json file
reside in the PlatformSettingsConfig section. This consolidated file reduces the number of
configuration files and simplifies its format.

ThingWorx 8 High Availability Administrator’s Guide
10
Except for the jdbcUrl parameter for the PostgreSQL database, settings in the platform-
settings.json file are optional. If a setting is not specified in the file, ThingWorx will set a default
value at runtime.
Configuring a Custom File Repository In ThingWorx, the default location for the file repository directory is relative to \ThingworxStorage
location. By default, the repository is located in the \ThingworxStorage folder in the following location:
• Windows environment: <drive>:\\ThingworxStorage\repository where <drive>
is the drive Tomcat is installed on
• Linux environment: /ThingworxStorage/repository
We recommend that you configure this repository in an HA environment in which files will be stored;
otherwise, it is optional.
In ThingWorx 8.0 and higher, the information that you store using the FileRepository thing can be stored
in any defined location. This can be helpful in a High Availability (HA) environment. ThingWorx is
backward compatible, so that if a FileRepositoryRoot (shown below) is not specified in the platform-
settings.json file, the default repository location will default relative to the ThingworxStorage path.
NOTE: ThingWorx will not auto-mount network folders. They must be pre-mounted on the OS and local
path should be used in the specified configuration. See the Configuring the Location section below.
Read/write permissions must be granted for the specified FileRepositoryRoot folder and external folder.
Configuring the Location To configure a custom file repository location, perform the following steps:
NOTE: Some steps may not be necessary, as they depend on your existing environment.
1. Create a folder called ThingworxPlatform at the root of your ThingWorx installation.
2. Place the platform-settings.json file in the ThingworxPlatform folder.
3. Specify the path to your desired location below PlatformSettingsConfig. For example, "FileRepositoryRoot":"/Volumes/ShareFolder"
ThingWorx will create a repository folder under the configured path, and that will be the new location
for all FileRepository things.
NOTE: If the location defined in the FileRepositoryRoot is not available for any reason, ThingWorx will
abort at startup.
NOTE: If you do not use /ThingworxPlatform and /ThingworxStorage, these servers cannot decrypt
application keys. To use custom file directories and still allow decryption, run the following command:
com.thingworx.platform.security.keystore.ThingworxKeyStore <key_to_add_to_keystore>
<value_to_add_to_keystore> [thingworx_platform_location]
[thingworx_storage_location]

ThingWorx 8 High Availability Administrator’s Guide
11
Persistent Properties You should set your ThingWorx properties to be persistent so that when a failure occurs, property
values can be retrieved. If they are not persistent, a failure clears the in-memory values.
Installing PostgreSQL for High Availability The PostgreSQL servers store and deliver data to the active ThingWorx server. Each server acts as a
standalone database, with sessions and replication managed across all the servers by the active pgpool-
II node. The database tier remains active as long as two PostgreSQL servers remain in service.
To install and configure PostgreSQL High Availability (HA), complete the following sections based on
your operating system.
Installing and Configuring PostgreSQL for Windows The instructions provided below are intended for the PostgreSQL administrator.
Installing PostgreSQL and Creating a New User Role in PostgreSQL (Windows)
1. Download and install the appropriate version of PostgreSQL from the following site: http://www.postgresql.org/download/
• pgAdmin III Tool o PgAdmin III is an open source management tool
for your databases that is included in the PostgreSQL download. The tool features full Unicode support, fast, multithreaded query, and data editing tools and support for all PostgreSQL object types.
2. Open PostgreSQL using pgAdmin III.
3. Create a new user role (in this example, it is twadmin):
a. Right click PostgreSQL9.4 (localhost:5432).
b. Select New Object > New Login Role. On the Properties tab, in the Role name field, type twadmin.
c. On the Definition tab, in the Password field, type password (must type twice).
4. Click OK. NOTE: Remember the user role name created in this step for later use.
Configuring and Executing the PostgreSQL Database Script (Windows) To set up the PostgreSQL database and tablespace, the thingworxPostgresDBSetup.bat script must be
configured and executed.

ThingWorx 8 High Availability Administrator’s Guide
12
1. Add the <postgres-installation>/bin folder to your system path variable. 2. Obtain and open thingworxPostgresDBSetup.bat from the ThingWorx software download
package. 3. Configure the script. Reference the configuration options in the table below.
Various parameters such as server, port, database, tablespace, tablespace location and thingworxusername can be configured in the script, depending on the requirements. Execute this script with the --help option for usage information. As an example, to set up the database and tablespace with a default Postgres installation that has a postgres database as well as a postgres user name and assuming the user created above is twadmin, enter: thingworxpostgresDBSetup –a postgres –u twadmin –l C:\ThingworxPostgresqlStorage where twadmin is the user name NOTE: If you create with the -d<databasename>, you do not have to use the postgres user. You must specify the -l option to a path that exists. For example, -l D:\ThingworxPostgresqlStorage. The script does not create the folder for you. The folder needs to be created and have appropriate ownership and access rights. It should be owned by the same user who runs the PostgreSQL service, and have Full Control assigned to that user - this user is generally NETWORK_SERVICE, but may differ in your environment.
4. Execute the script. Once executed, this creates a new database and tablespace with a default PostgreSQL installation in the PostgreSQL instance installed on the localhost. NOTE: You may need to run the command prompt as admin.
thingworxPostgresDBSetup.bat Script Options
Option Parameter Default Description Example
-t or -T server localhost Tablespace name -t thingworx
-p or -P port 5432 Port number of PostgreSQL
-p 5432
-d or -D database thingworx PostgreSQL Database name to create
-d thingworx
-h or -H tablespace thingworx Name of the PostgreSQL tablespace.
-h localhost

ThingWorx 8 High Availability Administrator’s Guide
13
Option Parameter Default Description Example
-l or -L tablespace_location /ThingworxPostgresqlStorage Required. Location in the file system where the files representing database objects are stored. *
-l or -L
-a or -A adminusername postgres Administrator Name
-a postgres
-u or -U thingworxusername twadmin User name that has permissions to write to the database.
-u twadmin
Configuring and Executing the Model/Data Provider Schema Script (Windows) To set up the PostgreSQL model/data provider schema, the thingworxPostgresSchemaSetup.bat script
must be configured and executed. This will set up the public schema under your database on the
PostgreSQL instance installed on the localhost.
1. Obtain and open the thingworxPostgresSchemaSetup.bat from the ThingWorx software
download package. 2. Configure the script. Reference the configuration options in the table below.
Various parameters such as server, port, database, username, schema, and option can be configured in the script depending on the requirements. Execute this script with --help option for usage information.
3. Execute the script.
thingworxPostgresSchemaSetup.bat Script Options
Option Parameter Default Description Example
-h or -H server localhost IP or host name of the database
-h localhost
-p or -P port 5432 Port number of PostgreSQL
-p 5432
-d or -D database thingworx Database name to use
-d thingworx
-s or -S schema public Schema name to use
-s mySchema
-u or -U username twadmin Username to update the database schema
-u twadmin
-o or -O option all There are three options: all: Sets up the model and data
-o data

ThingWorx 8 High Availability Administrator’s Guide
14
Option Parameter Default Description Example
provider schemas into the specified database. model: Sets up the model provider schema into the specified database. data: Sets up the data provider schema into the specified database.
Configuring Platform Settings (Windows) 1. To use the default ThingworxPlatform configuration directory, create a folder called
ThingworxPlatform at the root of the drive where Tomcat was installed. Alternatively, if you want to
specify the location where ThingWorx stores its settings, you can set the
THINGWORX_PLATFORM_SETTINGS environment variable to the desired location.
Ensure that the folder referenced by THINGWORX_PLATFORM_SETTINGS exists and is writable by
the Tomcat user. This environment variable should be configured as part of the system environment
variables.
2. Create a file named platform-settings.json and place the file into the ThingworxPlatform folder.
3. Open platform-settings.json and configure as necessary. Refer to the configuration options in the
table below. Also, see Appendix A: Sample platform-settings.json.
NOTE: If your PostgreSQL server is not the same as your ThingWorx server, and you are having issues
with your ThingWorx installation, review your Tomcat logs and platform-settings.json file. The default
installation assumes both servers are on the same machine.

ThingWorx 8 High Availability Administrator’s Guide
15
platform-settings.json Options Setting Default Description Platform Settings
BackupStorage /ThingworxBackupStorage
The directory name where all backups are written to.
DatabaseLogRetentionPolicy 7 The number of days that database logs are retained.
EnableBackup true Determines whether backups are retained.
EnableHA false Determines whether ThingWorx can be configured for a highly available landscape.
EnableSystemLogging false Determines whether system logging is enabled. NOTE: DO NOT TURN THIS ON UNLESS INSTRUCTED BY THINGWORX SUPPORT.
HTTPRequestHeaderMaxLength 2000 The maximum allowable length for HTTP Request Headers values.
HTTPRequestParameterMaxLength 2000 The maximum allowable length for HTTP Request Parameter values.
InternalAesCryptographicKeyLength 128 Key length used when generating a symmetric AES key. Supported values are 128, 192, and 256. Note: Encryption and decryption will fail if the key length is higher than 128 and the Java policies are not configured to use that key size.
Storage /ThingworxStorage The directory where all storage directories are created/located (excluding Backup Storage).
HA Settings Settings specific to a PostgreSQL HA landscape configuration. All are optional and are ignored if the EnableHA setting above is set to false.
CoordinatorConnectionTimeout 15000 How long to wait (in milliseconds) for a connection to be established with process/server used to coordinate ThingWorx leadership.
CoordinatorHosts 127.0.0.1:2181 A comma-delimited list of server IP addresses on which the processes used to coordinate ThingWorx leadership exist (e.g. "127.0.0.1:2181, 127.0.0.2:2181").

ThingWorx 8 High Availability Administrator’s Guide
16
CoordinatorZNode /HALeadershipCoordinator
When a ZooKeeper cluster is shared by multiple ThingWorx clusters, this setting must be configured for each ThingWorx instance that is part of a cluster of leader/standby instances. This setting’s value is arbitrary but must follow the format /<anyTextHere>. For example, you have four ThingWorx instances: TWX1, TWX2, TWX3, and TWX4. CoordinatorZNode is set to /Cluster1 for TWX1 and TWX2. It is set to /Cluster2 for TWX3 and TWX4. Therefore, TWX1 and TWX2 fail over to each other but not to TWX3 or TWX4 since they are configured as a separate cluster.
CoordinatorMaxRetries 3 The maximum allowable number of retries that will be made to establish a connection with the process/server used to coordinate ThingWorx leadership.
CoordinatorRetryTimeout 1000 How long to wait (in milliseconds) for each retry attempt.
CoordinatorSessionTimeout 90000 How long the ThingWorx session is to wait (in milliseconds) without receiving a "heartbeat" from the process/server used to coordinate ThingWorx leadership.
LoadBalancerBase64EncodedCredentials
QWRtaW5pc3RyYXRvcjphZG1pbg==
The Base64-encoded credentials for the HA load balancer, in the format of "<user>:<password>". When configuring this parameter in the platform-settings.json file, you can use any utility that Base64 encodes the matching “<user>:<password>” string used in your load balancer setup.
PersistenceProviderPackageConfigs Settings for the persistence provider (PostgreSQL or Neo4j)
PostgresPersistenceProviderPackage PostgreSQL-specific persistence provider settings. If PostgreSQL is not the persistence provider, then this entire section should be ignored.
acquireIncrement 5 Determines how many connections ThingWorx will try to acquire at one time when the pool is exhausted.
acquireRetryAttempts 3 Defines how many times ThingWorx will try to acquire a new Connection from the database before giving up.
acquireRetryDelay 10000 The time (in milliseconds) ThingWorx will wait between acquire attempts.

ThingWorx 8 High Availability Administrator’s Guide
17
checkoutTimeout 10000000 The number of milliseconds a client calling getConnection() will wait for a Connection to be checked-in or acquired when the pool is exhausted.
driverClass org.postgresql.Driver The fully-qualified class name of the JDBC driverClass that is expected to provide Connections.
fetchSize 5000 The count of rows to be fetched in batches instead of caching all rows on the client side.
idleConnectionTestPeriod 60 If this is a number greater than 0, ThingWorx will test all idle, pooled but unchecked-out connections, every x number of seconds.
initialPoolSize 5 Initial number of database connections created and maintained within a pool upon startup. Should be between minPoolSize and maxPoolSize.
jdbcUrl jdbc:postgresql://localhost:5432/thingworx
The jdbc url used to connect to PostgreSQL. NOTE: If the default schema name is changed (from public), you must add <databasename>?currentSchema=<name of schema> For example, if the schema name is mySchema, it would be: jdbc:postgresql://<DBServer>:<DBPort>/<databasename>?currentSchema=mySchema NOTE: If you are configuring an HA solution, this should reflect the server IP that the pgPool process is running on. Change the port to the port that pgPool is serving.
maxConnectionAge 0 Seconds, effectively a time to live. A Connection older than maxConnectionAge will be destroyed and purged from the pool.
maxIdleTime 0 Seconds a connection can remain pooled but unused before being discarded. Zero means idle connections never expire.

ThingWorx 8 High Availability Administrator’s Guide
18
maxIdleTimeExcessConnections 300 The number of seconds that connections in excess of minPoolSize are permitted to remain in idle in the pool before being culled. Intended for applications that wish to aggressively minimize the number of open connections, shrinking the pool back towards minPoolSize if, following a spike, the load level diminishes and Connections acquired are no longer needed. If maxIdleTime is set, maxIdleTimeExcessConnections should be smaller to have any effect. Setting this to zero means no enforcement and excess connections are not idled out.
maxPoolSize 100 Maximum number of Connections a pool will maintain at any given time.
maxStatements 100 The size of the ThingWorx global PreparedStatement cache.
minPoolSize 5 Minimum number of Connections a pool will maintain at any given time.
numHelperThreads 8 The number of helper threads to spawn. Slow JDBC operations are generally performed by helper threads that don't hold contended locks. Spreading these operations over multiple threads can significantly improve performance by allowing multiple operations to be performed simultaneously.
password password The password used to log into the database.
testConnectionOnCheckout false If true, an operation will be performed at every connection checkout to verify that the connection is valid.
unreturnedConnectionTimeout 0 The number of seconds to wait for a response from an unresponsive connection before discarding it. If set, if an application checks out but then fails to check-in a connection within the specified period of time, the pool will discard the connection. This permits applications with occasional connection leaks to survive, rather than eventually exhausting the Connection pool. Zero means no timeout, and applications are expected to close their own connections.
username twadmin The user that has the privilege to modify tables. This is the user created on the database for the ThingWorx server.
Stream Processor Settings

ThingWorx 8 High Availability Administrator’s Guide
19
maximumBlockSize 2500 The maximum number of stream writes to process in one block.
maximumQueueSize 250000 The maximum number of stream entries to queue (will be rejected after that)
maximumWaitTime 10000 Number of milliseconds the system waits before flushing the stream buffer.
numberOfProcessingThreads 5 The number of processing threads (cannot change for Neo4j).
scanRate 5 The buffer status is checked at the specified rate value in milliseconds.
sizeThreshold 1000 Maximum number of items to accumulate before flushing the stream buffer.
Value Stream Processor Settings
maximumBlockSize 2500 Maximum number of value stream writes to process in one block.
maximumQueueSize 500000 Maximum number of value stream entries to queue (will be rejected after that).
maximumWaitTime 10000 Number of milliseconds the system waits before flushing the value stream buffer.
numberofProcessingThreads 5 The number of processing threads (cannot change for Neo4j).
scanRate 5 The rate (in milliseconds) before flushing the stream buffer.
sizeThreshold 1000 Maximum number of items to accumulate before flushing the value stream buffer.

ThingWorx 8 High Availability Administrator’s Guide
20
Encrypting the PostgreSQL Password (Windows) If you want to provide added security encryption for the PostgreSQL database settings in the platform-
settings.json file, you can do the following.
Note: This encryption process is optional.
Prerequisites • You must have Java installed and on your path.
• You must have PostgreSQL installed and know the password.
1. Create a working directory such as C:\password_setup (windows), and copy the Thingworx.war
there.
2. Unzip the Thingworx.war.
3. Open a command prompt, cd to your working directory, and set your CLASSPATH by doing the
following:
a. Go to Control Panel > System Properties > Environment Variables.
b. Create a new environment variable: PG_PW_UTIL
C:\password_setup\WEB-INF\lib\thingworx-platform-common-<release-
version>.jar;C:\password_setup\WEB-INF\lib\slf4j-api-
1.7.12.jar;C:\password_setup\WEB-INF\lib\logback-core-
1.0.13.jar;C:\password_setup\WEB-INF\lib\logback-classic-
1.0.13.jar;C:\password_setup\WEB-INF\lib\thingworx-common-
<release-version>.jar )
c. Add the variable to the CLASSPATH. CLASSPATH
<don’t touch existing CLASSPATH>; %PG_PW_UTIL%
d. In your command shell, enter 'java -version'.
It should respond with a Java version.
4. Open /ThingworxPlatform/platform-settings.json and change the password value to
'db.encrypt.password'.
For example, "password": "encrypt.db.password",
5. To create a key store with the PostgreSQL password encrypted inside, run the following command: java com.thingworx.platform.security.keystore.ThingworxKeyStore
encrypt.db.password <postgres_password>
The second argument must be your PostgreSQL password.
6. Once you have created the encrypted password, remove the updates to the CLASSPATH.
Installing ThingWorx See the ThingWorx 8.0 Installation Guide or higher.
Installing and Configuring PostgreSQL DB Host Servers (Windows) Each DB host server should have a PostgreSQL 9.4 server installed and configured. Your particular Linux
distribution and configuration may vary. Refer to
https://wiki.postgresql.org/wiki/Detailed_installation_guides for additional information (except for
RDS).

ThingWorx 8 High Availability Administrator’s Guide
21
NOTE: Set up your database master as described in the PostgreSQL installation instructions above.
1. Install the PostgreSQL server on each DB host server. If Ubuntu, use
sudo apt-get install postgresql-9.4.
2. For each DB host server, configure the settings in /etc/postgresql/9.4/main/postgresql.conf as described in the table below. NOTE: The values listed in the Configuration column reflect the example deployment in the reference architecture, but can be modified for your environment. For many of the settings in the table below, links are provided to help you determine the configuration values for your environment.
Setting Configuration Description
listen_addresses ‘*’ Listen on all network interfaces. In some situations, if there are multiple network interface, it is best to restrict this to specific network interfaces.
port 5432 This is the default port number.
max_connections 150 The default in PostgreSQL is 100. The default setting in ThingWorx is 100 as well (maxpoolsize). Increase this number based on total number of concurrent connections expected in the database. This should always be higher than that of the maxpoolsize setting in the platform-settings.json file for the ThingWorx.
shared_buffers 1024MB Optional performance tuning. Sets the amount of memory the database server uses for shared memory buffers. It is recommended to set this at 1/4 of the memory available on the machine. Refer to http://www.postgresql.org/docs/current/static/runtime-config-resource.html#GUC-SHARED-BUFFERS
work_mem 32MB Optional performance tuning. Specifies the amount of memory to be used by internal sort operations and hash tables before writing to temporary disk files. Refer to http://www.postgresql.org/docs/current/static/runtime-config-resource.html#GUC-WORK-MEM
maintenance_work_mem 512MB Optional performance tuning. Specifies the maximum amount of memory to be used by maintenance operations. Refer to

ThingWorx 8 High Availability Administrator’s Guide
22
http://www.postgresql.org/docs/current/static/runtime-config-resource.html#GUC-MAINTENANCE-WORK-MEM
wal_level hot_standby http://www.postgresql.org/docs/9.4/static/runtime-config-wal.html#RUNTIME-CONFIG-WAL-SETTINGS
synchronous_commit on http://www.postgresql.org/docs/9.3/static/runtime-config-wal.html#GUC-SYNCHRONOUS-COMMIT
archive_mode on • https://wiki.postgresql.org/wiki/Binary_Replication_Tutorial#Setting_Up_Archiving_On_The_Master
• http://www.postgresql.org/docs/9.4/static/runtime-config-wal.html#RUNTIME-CONFIG-WAL-ARCHIVING
archive_command ‘cd .’ http://www.postgresql.org/docs/9.4/static/runtime-config-wal.html#RUNTIME-CONFIG-WAL-ARCHIVING
max_wal_senders 10 http://www.postgresql.org/docs/9.4/static/runtime-config-replication.html#RUNTIME-CONFIG-REPLICATION-SENDER
wal_keep_segments 500 http://www.postgresql.org/docs/9.4/static/runtime-config-replication.html#RUNTIME-CONFIG-REPLICATION-SENDER
max_replication_slots 10 http://www.postgresql.org/docs/9.4/static/runtime-config-replication.html#RUNTIME-CONFIG-REPLICATION-SENDER
synchronous_standby_names node1, node2 or node2, node0, or node0, node1
As a comma separated list, add the other node's "application_name"s as specified in their recovery.conf files.
hot_standby on http://www.postgresql.org/docs/9.4/static/runtime-config-wal.html#RUNTIME-CONFIG-WAL-SETTINGS
effective_cache_size
Should be set to an estimate of how much memory is available for disk caching by the OS and within the database. It is recommended to set this to half the memory available on the machine.
checkpoint_segments Depends on the size of the PostgreSQL box. Should set to 32/64/128/256, depending upon machine size.
checkpoint_completion_target
If the checkpoint_segments is changed from the default value of 3, change this to 0.9.

ThingWorx 8 High Availability Administrator’s Guide
23
ssl_renegotiation_limit If PostgreSQL is deployed Ubuntu, set this value to 0 (never) or increase the default (512MB) to something larger, e.g. 2GB to avoid ssl renegotiation from happening too often between master and synchronous slave.
3. Configure /etc/postgresql/9.4/main/pg_hba.conf to allow the user and database you created to
store the ThingWorx data to be accessed from the IP that will connect to the database. NOTE: If connecting from pgpool-II, verify that the authentication access abides by the pgpool-II documentation (md5 or trust) documented here.
For additional information on the pg_hba.conf file, reference the PostgreSQL documentation.
4. Create a user that has replication permissions on the master DB Host Server. This user will be copied to the other standby DB Host Server if a pg_basebackup is completed in the next step when running the start_replication.sh script. After creating this user, it must be added to the pg_hba.conf file for it be allowed to issue replication procedures. Use a combination of IP address/mask and/or authentication method for your security requirements. An example that trusts the replication user is specified as: host replication <replication user> <ip/mask> trust
Additionally, if you haven’t done so already, add an entry for the user that is connecting from the ThingWorx application if they reside on different host servers. You want to secure that user as well via specifying specific database, ip address/mask. An example of trusting the thingworx user for the thingworx database and a specific I” address is:
host thingworx <ip/mask> trust”
NOTE: Make note of this user for later use in your scripts.
5. On the two standby nodes, create a start_replication.sh script (see Appendix E: Sample Scripts: start_replication.sh) that can be invoked at DB Host server startup to copy the master's database. NOTE: This may not be practical or desired in all situations or deployments; and some manual standby database construction may be necessary. If this example script is used, edit the <path to pg data directory>, <ip of master>, and <replication user> with your specific setup information for your specific environment (Red Hat or Ubuntu). Ensure that the user running the start_replication.sh script has write permissions to the specified <path to pg data directory>. This script must be run after installation and configuration of all the DB Host Servers has been completed (the two standbys must be stopped). At that time, start the master and run this script on each of the standby DB Host Servers.
NOTE: The order of configuration and startup is very important in ensuring a successful initial backup from the master to the standbys.

ThingWorx 8 High Availability Administrator’s Guide
24
On the two standby nodes, create a recovery.conf script (see Appendix E: Sample Scripts: recovery.conf) and place it at the base directory of the PostgreSQL DB Host server's databases. For Ubuntu using PostgreSQL 9.4, this would be /var/lib/postgresql/9.4/main. Edit the <ip of master> and <replication user> with your specific setup.
6. To verify your synchronous streaming replication configuration, issue a command to psql when connected to the master as an administrator/superuser like postgres. For example,
select * from pg_stat_replication;
NOTE: The result should display rows that lists each standby with some valuable replication data. Verify all of the following:
• Both nodes’ state is streaming
• Both nodes’ application_name values match what was configured in the recovery.conf file.
• One node's sync_state is set as sync and the other as potential.
7. Install the OpenSSH server. ssh is used by the failover scripts/commands written for pgpool-II with the postgres user. An ssh server needs to be installed on each PostgreSQL DB Host server in order to issue commands via ssh from the pgpool-II node. Using a generated ssh public key and associated identity file during remote logins or issuing commands is beyond the scope of this document. However, you should enable the postgres user for login capability on the PostgreSQL server. To do so, change to root, then issue the passwd postgres command. An example of how to install SSH on Ubuntu are described in the steps below.
• On Ubuntu, use the following command to install the OpenSSH server: sudo apt-get install openssh-server
Installing and Configuring a PostgreSQL Client Host Package and PostgreSQL User (Windows) The Client Host Server contains the ThingWorx application and the application server it is running, as
well as PostgreSQL connection handling applications, such as pgpool-II.
Installing PostgreSQL Client Package and PostgreSQL User (Windows) 1. In order to issue PostgreSQL commands from the client machine to the PostgreSQL server, do so
from a PostgreSQL user. To do so, the postgresql-client-9.4 package can be installed on the client machine, refer to your distributions documentation on how to install it. For example, if installing it on Ubuntu is:
sudo apt-get install postgresql-client-9.4 2. This package provides some administration tools such as psql that are discussed later in the
monitoring/administration section.

ThingWorx 8 High Availability Administrator’s Guide
25
3. Once this user is installed, it is useful to create ssh public keys and publish them to the PostgreSQL servers in order to ease the use of the commands that will be sent from the client server to the PostgreSQL servers by pgpool-II. Refer to standard documentation for ssh and ssh public keys and copying them to remote servers. NOTE: You may need to enable the postgres user or other users in order to allow them to login via ssh on the PostgreSQL servers, for instance the /etc/shadow file on Ubuntu may have the postgres user disabled via * as the second parameter for that user in that file.
Installing and Configuring PostgreSQL for Ubuntu
Installing PostgreSQL and Creating a New User Role in PostgreSQL (Ubuntu)
1. Download and install the appropriate
version of PostgreSQL. In a Ubuntu environment, this can be installed directly from the package manager: sudo apt-get install postgresql-9.4
• pgAdmin III Tool o PgAdmin III is an open source management tool
for your databases that is included in the PostgreSQL download. The tool features full Unicode support, fast, multithreaded query, and data editing tools and support for all PostgreSQL object types.
2. Open PostgreSQL using pgAdmin III. In an Ubuntu 14.04 LTS environment, it can be installed directly from the package manager: sudo apt-get install pgadmin3
3. Create a new user role (in this example, it is twadmin): a. Right click PostgreSQL9.4
(localhost:5432). b. Select NewObject>New Login
Role. On the Properties tab, in the Role name field, type twadmin.
c. On the Definition tab, in the Password field, type password (must type twice).
4. Click OK. NOTE: Remember the user role name created in this step for later use.

ThingWorx 8 High Availability Administrator’s Guide
26
Configuring and Executing the PostgreSQL Database Script (Ubuntu) To set up the PostgreSQL database and tablespace, the thingworxPostgresDBSetup.sh script must be
configured and executed.
1. Add the <postgres-installation>/bin folder to your system path variable. 2. Obtain and open thingworxPostgresDBSetup.sh from the ThingWorx software download
package. 3. Configure the script. Reference the configuration options in the table below.
Various parameters such as server, port, database, tablespace, tablespace location and thingworxusername can be configured in the script, depending on the requirements. Execute this script with the --help option for usage information. As an example, to set up the database and tablespace with a default Postgres installation that has a postgres database as well as a postgres user name and assuming the user created above is twadmin, enter: ./thingworxPostgresDBSetup.sh –a postgres –u twadmin –l \ThingworxPostgresqlStorage where twadmin is the user name NOTE: If you create with the -d<databasename>, you do not have to use the postgres user. You must specify the -l option to a path that exists. For example, -l \ThingworxPostgresqlStorage. The script does not create the folder for you. The folder needs to be created and have appropriate ownership and access rights. The folder must be created and have appropriate ownership and access rights. It should be owned by the postgres user and have the read, write and execute assigned to the owner.
4. Execute the script. Once executed, this creates a new database and tablespace with a default PostgreSQL installation in the PostgreSQL instance installed on the localhost.
thingworxPostgresDBSetup.sh Script Options
Option Parameter Default Description Example
-t or -T server localhost Tablespace name
-t thingworx
-p or -P port 5432 Port number of PostgreSQL
-p 5432
-d or -D database thingworx PostgreSQL Database name to create
-d thingworx
-h or -H tablespace thingworx Name of the PostgreSQL tablespace.
-h localhost

ThingWorx 8 High Availability Administrator’s Guide
27
Option Parameter Default Description Example
-l or -L tablespace_location /ThingworxPostgresqlStorage Required. Location in the file system where the files representing database objects are stored. *
-l or -L
-a or -A adminusername postgres Administrator Name
-a postgres
-u or -U thingworxusername twadmin User name that has permissions to write to the database.
-u twadmin
Configuring and Executing the Model/Data Provider Schema Script (Ubuntu) To set up the PostgreSQL model/data provider schema, the thingworxPostgresSchemaSetup.sh script
must be configured and executed. This will set up the public schema under your database on the
PostgreSQL instance installed on the localhost.
1. Obtain and open the thingworxPostgresSchemaSetup.sh from the ThingWorx software download
package. 2. Configure the script. Reference the configuration options in the table below.
Various parameters such as server, port, database, username, schema, and option can be configured in the script depending on the requirements. Execute this script with --help option for usage information.
3. Execute the script.
thingworxPostgresSchemaSetup.sh Script Options
Option Parameter Default Description Example
-h or -H server localhost IP or host name of the database -h localhost
-p or -P port 5432 Port number of PostgreSQL -p 5432
-d or -D database thingworx Database name to use -d thingworx
-s or -S schema public Schema name to use -s mySchema
-u or -U username twadmin Username to update the database schema -u twadmin
-o or -O option all There are three options: all: Sets up the model and data provider schemas into the specified database. model: Sets up the model provider schema into the specified database. data: Sets up the data provider schema into the specified database.
-o data

ThingWorx 8 High Availability Administrator’s Guide
28
Configuring Platform Settings (Ubuntu) 1. Create a folder called ThingworxPlatform at the root (for example, \ThingworxPlatform or as a
system variable (for example, THINGWORX_PLATFORM_SETTINGS=/data/ThingworxPlatform).
2. Create a file named platform-settings.json and place the file into the ThingworxPlatform
folder.
3. Open platform-settings.json and configure as necessary. See the configuration options in the
Platform Settings Table. Also, see Appendix A: Sample platform-settings.json.
NOTE: If your PostgreSQL server is not the same as your ThingWorx server, and you are having issues
with your ThingWorx installation, review your Tomcat logs and platform-settings.json file. The default
installation assumes both servers are on the same machine.
Encrypting the PostgreSQL Password (Ubuntu) If you want to provide added security encryption for the PostgreSQL database settings in the platform-
settings.json file, you can do the following.
Note: This encryption process is optional.
Prerequisites • You must have Java installed and on your path.
• You must have PostgreSQL installed and know the password.
1. Create a working directory such as ~/password_setup, and copy the Thingworx.war there.
2. Unzip the Thingworx.war.
3. Open a command prompt, cd to your working directory, and set your CLASSPATH to the
following: export CLASSPATH=WEB-INF/lib/thingworx-platform-common-<release-
version>.jar:WEB-INF/lib/slf4j-api-1.7.12.jar:WEB-
INF/lib/logback-core-1.0.13.jar:WEB-INF/lib/logback-classic-
1.0.13.jar:./WEB-INF/lib/thingworx-common-<release-version>.jar
4. Open /ThingworxPlatform/platform-settings.json and change the password value to
'db.encrypt.password'.
For example, "password": "encrypt.db.password",
5. To create a key store with the PostgreSQL password encrypted inside, run the following
command: java com.thingworx.platform.security.keystore.ThingworxKeyStore
encrypt.db.password <postgres_password>
The second argument must be your PostgreSQL password.
Installing ThingWorx See the ThingWorx 8.0 Installation Guide or higher.
Installing and Configuring PostgreSQL DB Host Servers (Ubuntu) The DB host server should have a PostgreSQL 9.4 server installed and configured. Refer to
https://wiki.postgresql.org/wiki/Detailed_installation_guides for additional information (except for
RDS).

ThingWorx 8 High Availability Administrator’s Guide
29
NOTE: Set up your database master as described in the PostgreSQL installation instructions above.
1. Install the PostgreSQL server on the DB host server.
2. For the DB host server, configure the settings in /etc/postgresql/9.4/main/postgresql.conf as
described in the table below. NOTE: The values listed in the Configuration column reflect the example deployment in the reference architecture, but can be modified for your environment. For many of the settings in the table below, links are provided to help you determine the configuration values for your environment.
Setting Configuration Description
listen_addresses ‘*’ Listen on all network interfaces. In some situations, if there are multiple network interface, it is best to restrict this to specific network interfaces.
port 5432 This is the default port number.
max_connections 150 The default in PostgreSQL is 100. The default setting in ThingWorx is 100 as well (maxpoolsize). Increase this number based on total number of concurrent connections expected in the database. This should always be higher than that of the maxpoolsize setting in the modelproviderconfig.json for the ThingWorx.
shared_buffers 1024MB Optional performance tuning. Sets the amount of memory the database server uses for shared memory buffers. It is recommended to set this at 1/4 of the memory available on the machine. Refer to http://www.postgresql.org/docs/current/static/runtime-config-resource.html#GUC-SHARED-BUFFERS
work_mem 32MB Optional performance tuning. Specifies the amount of memory to be used by internal sort operations and hash tables before writing to temporary disk files. Refer to http://www.postgresql.org/docs/current/static/runtime-config-resource.html#GUC-WORK-MEM
maintenance_work_mem 512MB Optional performance tuning. Specifies the maximum amount of memory to be used by maintenance operations. Refer to http://www.postgresql.org/docs/current/static

ThingWorx 8 High Availability Administrator’s Guide
30
/runtime-config-resource.html#GUC-MAINTENANCE-WORK-MEM
archive_mode on • https://wiki.postgresql.org/wiki/Binary_Replication_Tutorial#Setting_Up_Archiving_On_The_Master
• http://www.postgresql.org/docs/9.4/static/runtime-config-wal.html#RUNTIME-CONFIG-WAL-ARCHIVING
effective_cache_size
Should be set to an estimate of how much memory is available for disk caching by the OS and within the database. It is recommended to set this to half the memory available on the machine.
checkpoint_segments Depends on the size of the PostgreSQL box. Should set to 32/64/128/256, depending upon machine size.
checkpoint_completion_target
If the checkpoint_segments is changed from the default value of 3, change this to 0.9.
ssl_renegotiation_limit If PostgreSQL is deployed Ubuntu, set this value to 0 (never) or increase the default (512MB) to something larger, e.g. 2GB to avoid ssl renegotiation from happening too often between master and synchronous slave.
3. Configure /etc/postgresql/9.4/main/pg_hba.conf to allow the user and database you created to
store the ThingWorx data to be accessed from the IP that will connect to the database. NOTE: If connecting from pgPool, verify that the authentication access abides by the pgPool documentation (md5 or trust) documented here.
For additional information on the pg_hba.conf file, reference the PostgreSQL documentation.
4. Additionally, if you haven’t done so already, add an entry for the user that is connecting from the
ThingWorx application if they reside on different host servers. You want to secure that user as well via specifying specific database, ip address/mask. An example of trusting the thingworx user for the thingworx database and a specific I” address is:
host thingworx thingworx <ip/mask> trust”
NOTE: Make note of this user for later use in your scripts.
Installing and Configuring a PostgreSQL Client Host Package and PostgreSQL User (Ubuntu) The Client Host Server contains the ThingWorx application and the application server it is running, as
well as PostgreSQL connection handling applications. You can set this up for debugging purposes.

ThingWorx 8 High Availability Administrator’s Guide
31
Installing PostgreSQL Client Package and PostgreSQL User (Ubuntu) In order to issue PostgreSQL commands from the client machine to the PostgreSQL server, do so from a
PostgreSQL user. To do so, the postgresql-client-9.4 package can be installed on the client machine,
refer to your distributions documentation on how to install it. For example:
sudo apt-get install postgresql-client-9.4
Installing and Configuring PostgreSQL for Red Hat Enterprise Linux (RHEL)
Installing PostgreSQL and Creating a New User Role in PostgreSQL (RHEL)
1. Download and install the appropriate version of PostgreSQL.
$ rpm –Uvh http://yum.postgresql.org/9.4/redhat/rhel-7-x86_64/pgdg-redhat94-9.4-1.noarch.rpm $ yum install postgresql94 postgresql94-server $ yum update
2. Initialize PostgreSQL. $ /usr/pgsql-9.4/bin/postgresql94-setup initdb
3. Start PostgreSQL and configure to start at boot time. $ systemctl enable postgresql-9.4 $ systemctl start postgresql-9.4
4. Create a new user role (in this example, it is twadmin): psql> create user twadmin with password 'password'; psql> alter role twadmin with createdb; NOTE: Note the user role name created in this step for later use.
Configuring and Executing the PostgreSQL Database Script (RHEL) To set up the PostgreSQL database and tablespace, the thingworxPostgresDBSetup.sh script must be
configured and executed.
1. Add the <postgres-installation>/bin folder to your system path variable. 2. Obtain and open thingworxPostgresDBSetup.sh from the ThingWorx software download
package. 3. Configure the script. Reference the configuration options in the table below.

ThingWorx 8 High Availability Administrator’s Guide
32
Various parameters such as server, port, database, tablespace, tablespace location and thingworxusername can be configured in the script, depending on the requirements. Execute this script with the --help option for usage information. As an example, to set up the database and tablespace with a default Postgres installation that has a postgres database as well as a postgres user name and assuming the user created above is twadmin, enter: ./thingworxPostgresDBSetup.sh –a postgres –u twadmin –l \ThingworxPostgresqlStorage
where twadmin is the user name NOTE: If you create with the -d<databasename>, you do not have to use the postgres user. You must specify the -l option to a path that exists. For example, -l \ThingworxPostgresqlStorage. The script does not create the folder for you. The folder needs to be created and have appropriate ownership and access rights. The folder must be created and have appropriate ownership and access rights. It should be owned by the postgres user and have the read, write and execute assigned to the owner.
4. Execute the script. Once executed, this creates a new database and tablespace with a default PostgreSQL installation in the PostgreSQL instance installed on the localhost.
5. You can now grant privileges to your new user role (in this example, it is twadmin): psql> grant all privileges on database thingworx to twadmin;
thingworxPostgresDBSetup.sh Script Options
Option Parameter Default Description Example
-t or -T server localhost Tablespace name -t thingworx
-p or -P port 5432 Port number of PostgreSQL
-p 5432
-d or -D database thingworx PostgreSQL Database name to create
-d thingworx
-h or -H tablespace thingworx Name of the PostgreSQL tablespace.
-h localhost
-l or -L tablespace_location /ThingworxPostgresqlStorage Required. Location in the file system where the files representing database objects are stored. *
-l or -L
-a or -A adminusername postgres Administrator Name
-a postgres
-u or -U thingworxusername twadmin User name that has permissions to
-u twadmin

ThingWorx 8 High Availability Administrator’s Guide
33
Option Parameter Default Description Example
write to the database.
Configuring and Executing the Model/Data Provider Schema Script (RHEL) To set up the PostgreSQL model/data provider schema, the thingworxPostgresSchemaSetup.sh script
must be configured and executed. This will set up the public schema under your database on the
PostgreSQL instance installed on the localhost.
1. Obtain and open the thingworxPostgresSchemaSetup.sh from the ThingWorx software download
package. 2. Configure the script. Reference the configuration options in the table below.
Various parameters such as server, port, database, username, schema, and option can be configured in the script depending on the requirements. Execute this script with --help option for usage information.
3. Execute the script.
thingworxPostgresSchemaSetup.sh Script Options
Option Parameter Default Description Example
-h or -H server localhost IP or host name of the database -h localhost
-p or -P port 5432 Port number of PostgreSQL -p 5432
-d or -D database thingworx Database name to use -d thingworx
-s or -S schema public Schema name to use -s mySchema
-u or -U username twadmin Username to update the database schema
-u twadmin
-o or -O option all There are three options: all: Sets up the model and data provider schemas into the specified database. model: Sets up the model provider schema into the specified database. data: Sets up the data provider schema into the specified database.
-o data
Configuring Platform Settings (RHEL) 1. Create a file named platform-settings.json.
2. Configure as necessary. See the Platform Settings Table.
sudo cp ~/Thingworx/platform-settings.json /ThingworxPlatform/.

ThingWorx 8 High Availability Administrator’s Guide
34
NOTE: If your PostgreSQL server is not the same as your ThingWorx server, and you are having issues
with your ThingWorx installation, review your Tomcat logs and platform-settings.json file. The default
installation assumes both servers are on the same machine.
Encrypting the PostgreSQL Password (RHEL) If you want to provide added security encryption for the PostgreSQL database settings in the platform-
settings.json file, you can do the following.
Note: This encryption process is optional.
Prerequisites • You must have Java installed and on your path.
• You must have PostgreSQL installed and know the password.
1. Create a working directory such as ~/password_setup, and copy the Thingworx.war there.
2. Unzip the Thingworx.war.
3. Open a command prompt, cd to your working directory, and set your CLASSPATH to the following:
export CLASSPATH=WEB-INF/lib/thingworx-platform-common-<release-
version>.jar:WEB-INF/lib/slf4j-api-1.7.12.jar:WEB-INF/lib/logback-
core-1.0.13.jar:WEB-INF/lib/logback-classic-1.0.13.jar:./WEB-
INF/lib/thingworx-common-<release-version>.jar
4. Open /ThingworxPlatform/platform-settings.json and change the password value to
'db.encrypt.password'.
For example, "password": "encrypt.db.password",
5. To create a key store with the PostgreSQL password encrypted inside, run the following command: java com.thingworx.platform.security.keystore.ThingworxKeyStore
encrypt.db.password <postgres_password>
The second argument must be your PostgreSQL password.
Installing ThingWorx See the ThingWorx 8.0 Installation Guide or higher.
Installing and Configuring PostgreSQL DB Host Servers (RHEL) The DB host server should have a PostgreSQL 9.4 server installed and configured. Refer to
https://wiki.postgresql.org/wiki/Detailed_installation_guides for additional information (except for
RDS).
NOTE: Set up your database master as described in the PostgreSQL installation instructions above.
1. Install the PostgreSQL server on the DB host server.
2. For the DB host server, configure the settings in /etc/postgresql/9.4/main/postgresql.conf as
described in the table below.

ThingWorx 8 High Availability Administrator’s Guide
35
NOTE: The values listed in the Configuration column reflect the example deployment in the reference architecture, but can be modified for your environment. For many of the settings in the table below, links are provided to help you determine the configuration values for your environment.
Setting Configuration Description
listen_addresses ‘*’ Listen on all network interfaces. In some situations, if there are multiple network interface, it is best to restrict this to specific network interfaces.
port 5432 This is the default port number.
max_connections 150 The default in PostgreSQL is 100. The default setting in ThingWorx is 100 as well (maxpoolsize). Increase this number based on total number of concurrent connections expected in the database. This should always be higher than that of the maxpoolsize setting in the modelproviderconfig.json for ThingWorx .
shared_buffers 1024MB Optional performance tuning. Sets the amount of memory the database server uses for shared memory buffers. It is recommended to set this at 1/4 of the memory available on the machine. Refer to http://www.postgresql.org/docs/current/static/runtime-config-resource.html#GUC-SHARED-BUFFERS
work_mem 32MB Optional performance tuning. Specifies the amount of memory to be used by internal sort operations and hash tables before writing to temporary disk files. Refer to http://www.postgresql.org/docs/current/static/runtime-config-resource.html#GUC-WORK-MEM
maintenance_work_mem 512MB Optional performance tuning. Specifies the maximum amount of memory to be used by maintenance operations. Refer to http://www.postgresql.org/docs/current/static/runtime-config-resource.html#GUC-MAINTENANCE-WORK-MEM
archive_mode on • https://wiki.postgresql.org/wiki/Binary_Replication_Tutorial#Setting_Up_Archiving_On_The_Master
• http://www.postgresql.org/docs/9.4/static/runtime-config-wal.html#RUNTIME-CONFIG-WAL-ARCHIVING

ThingWorx 8 High Availability Administrator’s Guide
36
effective_cache_size
Should be set to an estimate of how much memory is available for disk caching by the OS and within the database. It is recommended to set this to half the memory available on the machine.
checkpoint_segments Depends on the size of the PostgreSQL box. Should set to 32/64/128/256, depending upon machine size.
checkpoint_completion_target
If the checkpoint_segments is changed from the default value of 3, change this to 0.9.
ssl_renegotiation_limit If PostgreSQL is deployed Ubuntu, set this value to 0 (never) or increase the default (512MB) to something larger, e.g. 2GB to avoid ssl renegotiation from happening too often between master and synchronous slave.
3. Configure /etc/postgresql/9.4/main/pg_hba.conf to allow the user and database you created to
store the ThingWorx data to be accessed from the IP that will connect to the database.
For additional information on the pg_hba.conf file, reference the PostgreSQL documentation.
4. Additionally, if you haven’t done so already, add an entry for the user that is connecting from the
ThingWorx application if they reside on different host servers. You want to secure that user as well via specifying specific database, ip address/mask. An example of trusting the thingworx user for the thingworx database and a specific I” address is:
host thingworx thingworx <ip/mask> trust”
NOTE: Make note of this user for later use in your scripts.
Installing and Configuring a PostgreSQL Client Host Package and PostgreSQL User (RHEL) The Client Host Server contains the ThingWorx application and the application server it is running, as
well as PostgreSQL connection handling applications. You can set this up for debugging purposes.
In order to issue PostgreSQL commands from the client machine to the PostgreSQL server, do so from a
PostgreSQL user. To do so, the postgresql-client-9.4 package can be installed on the client machine,
refer to your distributions documentation on how to install it.
Installing PostgreSQL Client Package and PostgreSQL User (RHEL) In order to issue PostgreSQL commands from the client machine to the PostgreSQL server, do so from a
PostgreSQL user. To do so, the postgresql-client-9.4 package can be installed on the client machine,
refer to your distributions documentation on how to install it. For example:
sudo apt-get install postgresql-client-9.4

ThingWorx 8 High Availability Administrator’s Guide
37
PostgreSQL HA Deployment Architecture and Configuration Example To add an HA layer to your deployment, additional configuration steps are necessary. The example
deployment architecture provided below is based on the Amazon EC2 environment and highlights an HA
deployment. You can use it as a starting point for defining a ThingWorx and PostgreSQL HA landscape.
Recommended Amazon EC2 Environment for PostgreSQL HA
Instance Type Virtualization Purpose
m3.2xlarge hvm Client host server. Host for the Tomcat 8 / Java 8 with ThingWorx as well as pgpool-II in a single ThingWorx Server environment.
m3.2xlarge hvm DB host server 1. Host for the initial master PostgreSQL server/cluster node.
m3.2xlarge hvm DB host server 2. Host for the first synchronous standby PostgreSQL server/cluster node.
m3.2xlarge hvm DB host server 3. Host for the second synchronous standby master PostgreSQL server/cluster node.
PostgreSQL Database Host Servers At a minimum, three PostgreSQL server nodes using synchronous streaming replication are required for
an HA landscape. If a fourth node is used for disaster recovery, i.e. DB host server 4, then it can match
the specs for DB Host Servers 2 and 3. The drivers for this recommendation include the following:
• Streaming replication is the standard out-of-the-box PostgreSQL replication mechanism.
Synchronous streaming replication is recommended to maintain a redundant exact replica of
the database for HA; minimally of the ThingWorx model data, and potentially for the runtime
data as well. While asynchronous streaming replication may achieve better performance, there
is also a slight chance of inconsistent data. For additional details, refer to
http://www.postgresql.org/docs/9.4/static/warm-standby.html#SYNCHRONOUS-REPLICATION.
• When using synchronous streaming replication, two synchronous standbys are required. The
reason for this is if only one standby is used and it becomes unreachable, then the master server
will wait until commit acknowledgement occurs. Thus adding a second synchronous standby
allows the master to receive a commit acknowledgement if the primary standby is no longer
reachable. Only one response from a standby is required for the synchronous standby commit
verification.
• If the master node goes offline, and failover is configured, then the primary standby can be
promoted as the writable master. The second standby can be retargeted to the primary standby
(now the master). This provides better durability than would be provided in a two node
landscape. If only two nodes were used, then in the case of one node failure, only one node
would be left and there would be no standby to fall back to if the now single node fails.
• In a three node landscape, the master node will be used for application writes, and two standby
nodes can be used for load balanced reads.
• In a four node landscape, the fourth node can be used as an asynchronous geographically
remote disaster recovery instance. The asynchronous write will not guarantee consistency or
durability (unless it is provided standbys) but will provide a near latest standby without
impeding performance on the geographically local three node cluster.

ThingWorx 8 High Availability Administrator’s Guide
38
Installing and Configuring pgpool-II The ThingWorx application can be configured to connect through pgpool-II directly, and pgpool-II will
then connect to the master and standby PostgreSQL DB Host Servers. PgPool-II is a useful tool that can
be used to complete your HA solution. It is middleware that communicates between PostgreSQL servers
and a PostgreSQL database client.
For overall ThingWorx HA pgpool-II information, see Configuring Pgpool-II for ThingWorx HA.
pgpool-II Recommendations In a single ThingWorx server environment, we recommend running the pgpool-II process on the same
server as the ThingWorx application to reduce the total number of servers needed in your HA
environment.
We recommend following the standard configuration settings, supported platforms, and installation for
the failover, connection pooling, and load balancing features as described in the links listed above.
We DO NOT recommend using pgpool-II for replication (i.e. replication_mode). Instead, use
PostgreSQL's standard streaming replication with pgpool-II's master/slave mode. We mention the most
important settings to get started below for pgpool.conf and pool_hba.conf.
Additional information on pgpool-II can be found at the following locations:
• http://pgpool.net/mediawiki/index.php/Main_Page
• http://pgpool.net/mediawiki/index.php/Documentation
1. Install pgpool-II. pgpool-II can be
downloaded HERE.
• To install on Ubuntu, use:
sudo sh -c 'echo
"deb http://apt.postgresql.org/pub/repos/apt/
$(lsb_release -cs)-pgdg main" >
/etc/apt/sources.list.d/pgdg.list'
sudo apt-get install wget ca-certificates
wget --quiet -O -
https://www.postgresql.org/media/keys/ACCC4CF8
.asc | sudo apt-key add -
sudo apt-get update
sudo apt-get upgrade
pgpool --version // verify it says 3.3.4
2. Configure /etc/pgpool2/pgpool.conf and

ThingWorx 8 High Availability Administrator’s Guide
39
pool_hba.conf with the options described in the table below:
pgpool.conf Configuration
Setting Value Description
listen_addresses ‘*’ Choose values that allow the ThingWorx application's Model Provider to connect to pgpool-II whether it is on the same or different server.
port 5432
backend_hostname backend_port backend_weight backend_data_directory backend_flag
<ip of backend#> <port of backend#> 1 /var/lib/postgresql/9.4/main ALLOW_TO_FAILOVER
Set these backend configuration values for each of your three nodes (master and two standbys). For example, backend_hostname0 is your master, backend_hostname1 is standby 1 and so on. Refer to the PostgreSQL online documentation for further details.
master_slave_mode on This tells Postgres that you are using master/standby replication.
load_balance_mode off NOTE: We do not recommend load balancing for ThingWorx.
master_slave_sub_mode stream This tells pgpool-II to use the out-of-the-box PostgreSQL streaming replication.
replication_mode off Do not use pgpool-II's replication, instead use the out-of-the-box PostgreSQL streaming replication.

ThingWorx 8 High Availability Administrator’s Guide
40
failover_command '/etc/pgpool2/failover.sh %d %h %D %m %H %R %M %P'
See the failover_command section below for more information on this setting. failover.sh retargetMaster_001.sh retargetMaster_002.sh retargetMaster_003.sh Refer to online documentation for specifics of the failover_command and settings in the recovery.conf file. Refer to the failover.sh script for deployment location.
num_init_children max_pool max_child_connections superuser_reserved_connections
These settings are related to pgpool-II's connection pooling features. Care must be taken to provide enough connections at startup needed for your specific highest volume traffic throughput needs as well as not to exceed max connections setting of the PostgreSQL DB nodes. Refer to the Pools section of the manual (see link above) for suggestions as well as formulas for calculating values. NOTE: Ensure that num_init_children is greater than the maxpoolsize in modelproviderconfig.json and max_connections in postgresql.conf is greater than the num_init_children setting.
failover_command The failover feature allows an application to refer to the pgpool-II server IP address and port rather than directly to a particular PostgreSQL server IP address (master, standby, etc). This server IP abstraction/proxy during runtime will remain the same during a failover from a master server to a standby node. Refer to the documentation for more details, but essentially, create a script that will be executed when the node fails. For example, if the primary/master fails and a standby needs to become the new master, this script could check for a trigger file on the standby, or could use a command to promote the standby to the new master. An example on Ubuntu, would be to run the

ThingWorx 8 High Availability Administrator’s Guide
41
script as the command such as: '/etc/pgpool2/failover.sh %d %h %D %m %H %R %M %P' An example of the failover.sh script and the retargetMaster.sh scripts for each node are listed in the appendices. Note that the retargetMaster_###.sh files must be renamed to retargetMaster.sh on each host. When using pgpool-II with the failover.sh script, a standby becomes the new master. If the old master starts up automatically, it will not be converted to a standby by pgpool-II. It will still be in a writable mode, but it will not be accessible or used by pgpool-II in a master writable capacity; but rather in a read only capacity that would not be syncing data from the new master and thus could have stale data. Special care must be taken in this situation, and is not recommended for it to be restarted automatically. The old master should be analyzed to determine why it went down, its issues should be manually resolved, and then it can be brought up as a new standby. To have the old master come back as a new standby, place the recovery.conf file with the correct settings of standby_mode, primary_conninfo, recovery_target_timeline. Sample values of these settings can be seen in any of the retargetMaster_###.sh sample scripts. This approach completes a full backup from the new master to the old master by calling the start_replication.sh script. However, depending on characteristics of your database, such as its size, this may not be the most optimal approach. Note that the sample failover.sh script provides a commented out command and comment for that command that would automatically bring up the old master as a standby. While this is not recommended, it is provided only as an example during development and research into understanding pgpool-II failover execution. Refer to online documentation for specifics of the failover_command and settings in the recovery.conf file. 3. Make configuration changes on the Client Host Server using the following as a sample of
configuration changes needed beyond the default settings of /etc/pgpool2/pool_hba.conf include: For ease of use, initial configuration, you can change md5 to trust when running pgpool-II on the same host that the ThingWorx application instance server is connecting from when in streaming replication, master/slave mode in the pool_hba.conf and pg_hba.conf for the combination of IP/Database/User you are using to connect pgpool-II to PostgreSQL server. Make sure the appropriate auth is set on all the backends being used.
Reference the information in this link and search for trust and configurations between pool_hba.conf and pg_hba.conf that cause authentication errors versus the authentication requirements (i.e. md5 auth, no auth, etc).
Running pgpool-II We do not recommend disabling active pgpool-II as a service. Instead, run it as a process command as seen below. Refer to the pgpool-II manual for details on the optional arguments.
sudo pgpool -n -D -d -f pgpool.conf >> pgpool.out2 2>&1

ThingWorx 8 High Availability Administrator’s Guide
42
Configuring Pgpool-II for ThingWorx HA Pgpool-II is an open source middleware that works between the active ThingWorx server and the
PostgreSQL server nodes. It proxies queries to the current master PostgreSQL node and ensures that the
active ThingWorx server has a database connection while a PostgreSQL node remains in service.
You should have one active pgpool-II node and at least one standby node. Pgpool-II nodes run a
watchdog process to monitor the nodes, which ensures that a standby node will become active if the
primary pgpool-II node fails.
1. Set up the Amazon Web Services (AWS) client as follows:
a. Install the AWS client: sudo apt-get install awscli
b. Run the following: ec2 describe-regions
You should see the following error: “Unable to locate credentials. You can configure
credentials by running "aws configure".”
c. Run the AWS configure tool and enter the following:
• AWS access key ID
• AWS secret access key
• Default region name
• Default output format
d. Run ec2 describe-regions again.
You should see a text output of AWS regions in the console.
2. Run the installation with the following command: sudo apt-get install iputils-arping
3. Set up pgpool-II.
a. Edit the following settings in pgpool.conf.
The values below are for an example with two pgpool-II nodes with IP addresses of 10.0.1.22
and 10.0.1.99.
The following table lists the configuration for the 10.0.1.22 pgpool-II instance:
Setting Value Description
use_watchdog on Turns on watchdog within pgpool-II
wd_hostname '10.0.1.22' Host name or IP address of this watchdog
wd_port 9000 Port number of this watchdog
delegate_IP '10.0.1.13' The IP address of the virtual IP that will be
created by the current pgpool-II master
determined by watchdog
ifconfig_path '/etc/pgpool2' The absolute path of the directory that contains
the if_up_cmd andif_down_cmd commands or
scripts

ThingWorx 8 High Availability Administrator’s Guide
43
Setting Value Description
if_up_cmd 'ifup.sh $_IP_$
<eni id of
pgpool node>'
The command issued when pgpool-II attempts to bring up the virtual IP interface with the delegate_IP address. You can retrieve the eni ID of the pgpool-II node by logging into the EC2 administration console and going to your pgpool-II instance. In its description in the console, locate the Network interfaces entry, click eth0, and locate the interface ID. Use it for the $<eni id of pgpool node>.
if_down_cmd 'ifdown.sh
$_IP_$ <eni id
of pgpool
node>'
The command issued when pgpool-II attempts
to bring down the virtual IP interface with the
delegate_IP address. See if_up_cmd to obtain
the eni ID of the pgpool-II node.
arping_path '/usr/bin' Path of the install iputils-arping package
arping_cmd 'arping -U
$_IP_$ -w 1'
The arping command used to verify the IPs.
heartbeat_destination0 '10.0.1.99' The IP address against which the heartbeat
check is made; the value of the
other_pgpool_hostname0 setting
heartbeat_destination_port0 9694 Use the default value.
heartbeat_device 'eth0' The NIC device for the IP address for heartbeat
communication
other_pgpool_hostname0 '10.0.1.99' The IP address of the other pgpool-II server
instance
other_pgpool_port0 5432 The port to which the other pgpool-II node
listens
other_wd_port0 9000 The port to which the other pgpool-II watchdog
feature listens
For the 10.0.1.99 pgpool-II instance, configure the settings in the table above with the following values
that are specific to the 10.0.1.99 pgpool-II instance:
Setting Value Description
wd_hostname '10.0.1.99' Host name or IP of this watchdog
heartbeat_destination0 '10.0.1.22' The IP address against which the heartbeat check is
made; the value of the other_pgpool_hostname0 setting

ThingWorx 8 High Availability Administrator’s Guide
44
Setting Value Description
other_pgpool_hostname0 '10.0.1.22' The IP address of the other pgpool-II server instance
b. If a third pgpool-II node (with an IP address of 10.0.1.14) is preferred in the HA cluster, additional
settings are needed for the 10.0.1.22 and 10.0.1.99 pgpool-II configurations. Settings for
heartbeat and other that have a numeric zero-based index suffix, starting with 0, 1, 2, and so on
will need to be added as follows.
The following table lists the additional third node configuration needed for the 10.0.1.22 and 10.0.1.99
pgpool-II instances:
Setting Value Description
heartbeat_destination1 '10.0.1.14' The IP address against which the heartbeat check is
made; the value of the other_pgpool_hostname1
setting
heartbeat_destination_port1 9694 Use the default value.
heartbeat_device1 'eth0' The NIC device for the IP address for heartbeat
communication
other_pgpool_hostname1 '10.0.1.14' The IP of the other pgpool-II 1 server instance
other_pgpool_port1 5432 The port to which the other pgpool-II node listens
other_wd_port1 9000 The port to which the other pgpool-II watchdog
feature listens
The following table lists the additional third node configuration needed for the 10.0.1.14 pgpool-II
instance:
Setting Value Description
wd_hostname '10.0.1.14' Host name or IP address of this watchdog
heartbeat_destination0 '10.0.1.22' The IP address against which the heartbeat check is
made for node0; the value of the
other_pgpool_hostname0 setting
other_pgpool_hostname0 '10.0.1.22' The IP address of the other pgpool-II node0 server
instance
other_pgpool_port0 5432 The port to which the other pgpool-II node0 node
listens
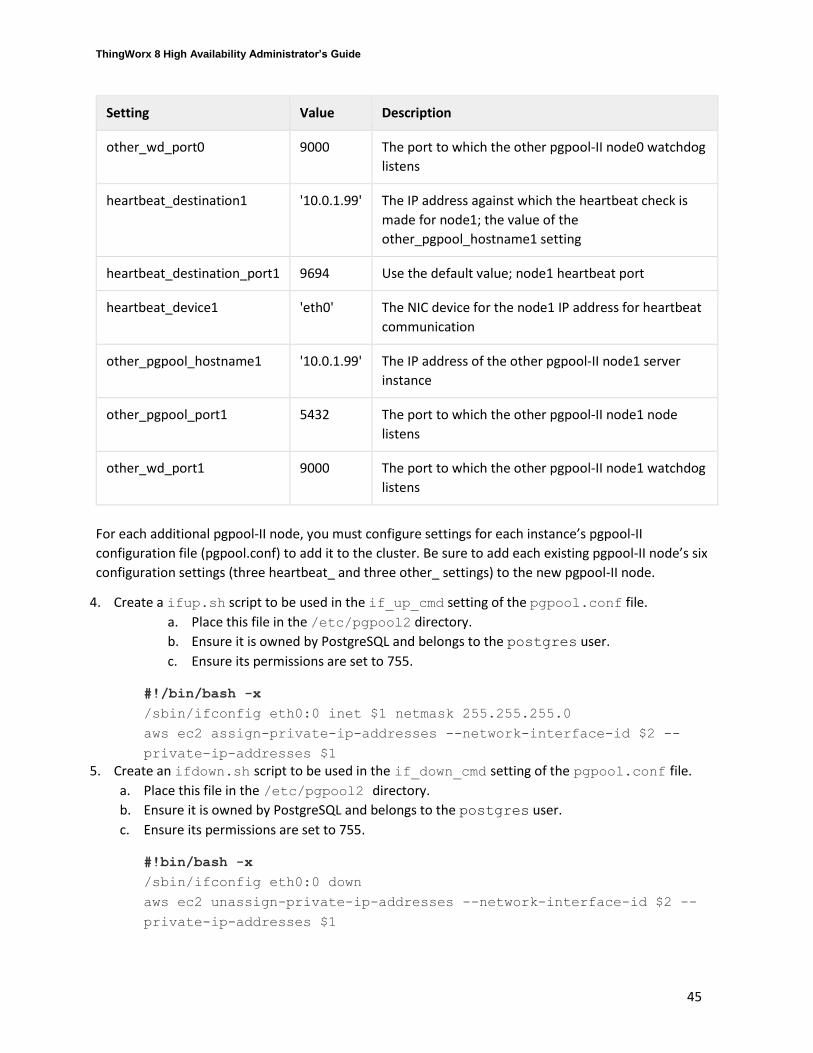
ThingWorx 8 High Availability Administrator’s Guide
45
Setting Value Description
other_wd_port0 9000 The port to which the other pgpool-II node0 watchdog
listens
heartbeat_destination1 '10.0.1.99' The IP address against which the heartbeat check is
made for node1; the value of the
other_pgpool_hostname1 setting
heartbeat_destination_port1 9694 Use the default value; node1 heartbeat port
heartbeat_device1 'eth0' The NIC device for the node1 IP address for heartbeat
communication
other_pgpool_hostname1 '10.0.1.99' The IP address of the other pgpool-II node1 server
instance
other_pgpool_port1 5432 The port to which the other pgpool-II node1 node
listens
other_wd_port1 9000 The port to which the other pgpool-II node1 watchdog
listens
For each additional pgpool-II node, you must configure settings for each instance’s pgpool-II
configuration file (pgpool.conf) to add it to the cluster. Be sure to add each existing pgpool-II node’s six
configuration settings (three heartbeat_ and three other_ settings) to the new pgpool-II node.
4. Create a ifup.sh script to be used in the if_up_cmd setting of the pgpool.conf file.
a. Place this file in the /etc/pgpool2 directory.
b. Ensure it is owned by PostgreSQL and belongs to the postgres user.
c. Ensure its permissions are set to 755.
#!/bin/bash -x
/sbin/ifconfig eth0:0 inet $1 netmask 255.255.255.0
aws ec2 assign-private-ip-addresses --network-interface-id $2 --
private-ip-addresses $1
5. Create an ifdown.sh script to be used in the if_down_cmd setting of the pgpool.conf file.
a. Place this file in the /etc/pgpool2 directory.
b. Ensure it is owned by PostgreSQL and belongs to the postgres user.
c. Ensure its permissions are set to 755.
#!bin/bash -x
/sbin/ifconfig eth0:0 down
aws ec2 unassign-private-ip-addresses --network-interface-id $2 --
private-ip-addresses $1

ThingWorx 8 High Availability Administrator’s Guide
46
6. Set the ssh public keys that correspond to a PostgreSQL user's .ssh/authorized_keys entry on
each of the PostgreSQL database servers in the /root/.ssh directory.
The root user runs the HA (with watchdog) pgpool-II processes, and in the case of failover of
PostgreSQL database servers, is responsible for executing the /etc/pgpool2/failover.sh
script.
NOTE: Permission Denied messages related to keys will occur during failover.
7. Start up pgpool-II nodes.
a. If you are performing a fresh startup of pgpool-II nodes, we recommend that you clean up or
discard the pgpool_status file in the /var/log/postgresql directory. This will cause
pgpool-II to use the node0 configured postgres db in the pgpool.conf file at startup.
If a failover has occurred and the master node does not match the node0 entry in the
pgpool.conf file, you should keep the pgpool_status file since it keeps track of the current
master between start and stop of the pgpool-II process.
b. Start the pgpool process as the root user on the first pgpool-II instance.
Do not start it as a service. Run the following commands:
sudo su
/usr/sbin/pgpool -n -f /etc/pgpool2/pgpool.conf > ~postgres/pgpool.log
2>&1 &
c. View the pgpool-II entries in the syslog to verify that the watchdog feature has been initialized
properly.
more /var/log/syslog | grep pgpool
You should see output that states that the watchdog and pgpool-II have been initialized and
started successfully.
d. To clear this log before running a new process of pgpool-II, we recommend that you back up the existing syslog for historical reference and then invoke the following command:
> /var/log/syslog
e. Verify that there are no error entries in the ~postgres/pgpool.log file.
f. Verify that the pgpool-II processes have started.
If you are using the default configuration specified in the PostgreSQL HA section, which sets the a
value of 125 for the num_init_children setting in the pgpool.conf file, there should be 125
processes with the status wait for connection request, including one prefixed with PCP:. There
are several other processes that pgpool-II and watchdog create.
g. Check the interface config (ifconfig) to ensure that the virtual IP has been created. Verify that
a new network interface has been created with the IP address you assigned to the delegate_IP setting
in the pgpool.conf file. It should be called eth0:0.
h. Start a pgpool-II process as the root user on the second pgpool-II server instance. Do not start it as a
service. The logs should now show that one instance has been promoted to master and the other has
successfully started. The master should report that it has accepted a registration request from the
non-master pgpool-II instance (via its IP address).

ThingWorx 8 High Availability Administrator’s Guide
47
i. To stop the pgpool-II processes, use the following commands as root:
sudo su
/usr/sbin/pgpool --mode=immediate stop
Configuring ZooKeeper for ThingWorx HA Apache ZooKeeper is an open source solution for managing synchronization of distributed applications.
It provides monitoring and leader election services for ThingWorx nodes. You must have at least two
ThingWorx nodes and three or more ZooKeeper nodes.
The ThingWorx nodes connect to ZooKeeper for leader election. Once a ThingWorx node gains
leadership, it maintains a session with ZooKeeper. You can set the amount of time for which the session
is valid. If the session expires because the active ThingWorx node fails to respond, a ThingWorx standby
node will gain leadership and receive notification that it is now the leader. It fully connects to the
database and starts handling traffic.
ZooKeeper nodes monitor each other’s status and if the active node fails, they elect a new ZooKeeper
leader. This provides high availability for the ZooKeeper service through an internal mechanism for these
nodes. The ThingWorx servers are configured with the addresses of all ZooKeeper nodes, which allows
them to find the ZooKeeper leader.
The ThingWorx server does not need to talk to the ZooKeeper leader node. When a ThingWorx server
issues a write request, the connected server passes the request to the leader. This leader then issues the
same write request to all of the ZooKeeper nodes. If a majority of the nodes respond successfully to the
write request, the write request is considered successful.
To install ZooKeeper, do the following:
1. Download ZooKeeper at http://zookeeper.apache.org/releases.html.
2. Follow the instructions for the stand-alone operation, which is documented at
http://zookeeper.apache.org/doc/r3.1.2/zookeeperStarted.html.
If you want to use multiple nodes, see
http://zookeeper.apache.org/doc/r3.1.2/zookeeperStarted.html > Running Replicated ZooKeeper.
For Windows, follow the instructions at https://support.lucidworks.com/hc/en-us/articles/203187153-
Install-and-start-Zookeeper-server-on-Windows.
Configuring the Load Balancer The load balancer routes incoming user and device sessions to the active ThingWorx server. It monitors
the active ThingWorx server and the standby nodes. If the active ThingWorx server fails, the load
balancer redirects traffic to a new leader. You can use any load balancer that can be configured to query
the ThingWorx servers for this purpose.
NOTE: Your solution should have its own mechanism for high availability to ensure the overall
solution continues to operate even if failure occurs in the load balancing solution itself.
Our example architecture uses HAProxy.
To determine how to install HAProxy, see http://haproxy.debian.net/.
ThingWorx 8 High Availability Administrator’s Guide
48
1. Run sudo apt-get install haproxy.
It is installed to /etc/haproxy where a /etc/haproxy/haproxy.cfg file exists.
2. Follow directions for the configuration file.
For more information about HAProxy, see the following:
• http://www.haproxy.org/download/1.5/doc/configuration.txt
• http://serverfault.com/questions/239749/possible-to-add-basic-http-access-authentication-via-
haproxy
• http://stackoverflow.com/questions/13325882/haproxy-solr-healthcheck-with-authentication
• https://www.digitalocean.com/community/tutorials/how-to-use-haproxy-to-set-up-http-load-
balancing-on-an-ubuntu-vps
For an HAProxy example with SSL, see Appendix C: HAProxy Example with SSL.
Monitoring Your HA Landscape The ThingWorx HA landscape is complex; therefore, you should have a monitoring tool to make
administrative tasks easier.
We recommend that you monitor the following:
• CPU utilization of each machine or process
• Memory usage
• Hard disk space
• Open ports
Each component within the landscape has additional metrics to monitor. For more information on
component metrics, see the following sections.
ZooKeeper ZooKeeper supports monitoring by providing access to its status through its command port or JMX. For
more information about options for monitoring and applications that connect to ZooKeeper for
monitoring, see https://zookeeper.apache.org/doc/r3.3.2/zookeeperAdmin.html#sc_monitoring.
By default, ZooKeeper communicates on the following ports:
• Port 2181 for client connections
• Port 2888 for follower heartbeat messages
• Port 3888 for communication with other ZooKeeper nodes during leader election
In an Ubuntu environment, ZooKeeper runs on a service called zookeeper. ZooKeeper uses Log4j as
its logging solution. For more information, see
https://zookeeper.apache.org/doc/r3.3.2/zookeeperAdmin.html#sc_logging.
Pgpool-II By default, pgpool-II communicates watchdog messages on port 9000 and heartbeats on port 9694.
Pgpool-II with watchdog runs as a process called pgpool at the file location /usr/sbin/pgpool.
You can check the status of the processes using the following command:

ThingWorx 8 High Availability Administrator’s Guide
49
ps -elf | grep pgpool
A list of processes should be running, which indicates that pgpool-II is running.
Any events or errors that occur are logged in the syslog, which in Ubuntu is located at
/var/log/syslog. To check messages logged by the pgpool-II process, you can use the following
command:
more /var/log/syslog | grep pgpool
The following messages indicate that pgpool-II with watchdog has started successfully:
... wd_init: start watchdog pgpool-II successfully started. version x.x.x (...)
find_primary_node: primary node id is 0 ...
PostgreSQL PostgreSQL can be configured and monitored manually. PostgreSQL includes a subsystem for monitoring
called the Statistics Collector, which is configured in the postgresql.conf file. For more
information, see http://www.postgresql.org/docs/current/static/monitoring-stats.html. For details about
PostgreSQL monitoring options, see https://wiki.postgresql.org/wiki/Monitoring.
By default, PostgreSQL accepts database connections on port 5432.
In an Ubuntu environment, PostgreSQL runs on a service called postgresql.
PostgreSQL stores its logs in the /var/log/postgresql/postgresql-9.4-main.log file. To
confirm that the system is running, the following log message is written:
... (...) LOG: database system is ready to accept connections ...
HAProxy HAProxy has a built-in status Web page that you can access by adding configuration settings to the
haproxy.cfg file and navigating to a configured port in a browser. The default configuration enables
navigation to the HAProxy status page on port 1936.
HAProxy port usage depends on the configuration in your environment, but the example configuration
of HAProxy and ThingWorx uses port 8080. In an environment with SSL, it should be configured to pass
port 8443. When using the configuration file in the default setup, the HAProxy status page
communicates on port 1936.
HAProxy runs on a service called haproxy.
HAProxy logs service details to /var/log/syslog. It also has its own logs at
/var/log/haproxy.log to which errors are written if issues occur for HAProxy at startup or during
runtime.
Expected Behaviors with Failures The High Availability architecture is designed to allow operations to continue despite failure of a node.
This section describes how the system responds to a failure in each major component or a combination
of components.

ThingWorx 8 High Availability Administrator’s Guide
50
NOTE: Each server must be installed on its own instance to ensure that underlying hardware or
virtual image failure will only affect that server.
ThingWorx Server Failure A leader or standby node could fail. ZooKeeper chooses a new leader from the standby nodes, which
causes that server to fully connect to the database and become available for user and device
connections. The new leader will make its status known to the load balancer and receive incoming
sessions. Existing sessions are not replicated across the ThingWorx servers, so user sessions would not
operate properly and require the user to log into the system once the standby server becomes available.
Similarly, device sessions would not function properly and would time out, causing the devices to re-
initiate connections and route to the standby server.
If a standby node fails, it is removed from the list of candidates to become leader if the active node fails.
You could configure a cron job to restart the node. For more information, see the bulleted list below.
This does not cause interruptions in user or device sessions.
When the existing ThingWorx leader node fails, the following occurs:
1. ZooKeeper gets no response from the leader; therefore, it sends a request to the standby node to
become the leader.
2. The new leader sends confirmation to the load balancer (HAProxy in this guide) to have requests
routed to it.
The following applies:
• Import and export will not be available.
• Data written during the time ThingWorx is down will be lost.
For example, a stream that is subscribed to a timer to write an entry every 30 seconds will not add
entries while ThingWorx is down. Writes will be resumed once ThingWorx recovers from the
failover; however, it will not add entries that were lost during failover.
• Dynamic subscriptions created during failure will be lost.
• Connected things will be disconnected.
If connected things are configured to retry connection, they will automatically reconnect after the
standby becomes the leader.
• You cannot browse to entities in ThingWorx Composer since the Spotlight Search Service will fail
(the 503 Service Unavailable error will be displayed). When the standby node becomes the leader,
you can then browse to entities.
• If widgets depend on services to update their data or load other entities, mashups will have limited
functionality.
o Widgets with static or user input values may still work (for example, sliders, shapes, LEDs, and
gauges).
o Widgets that depends on loading another entity (such as the Menu widget for loading another
mashup) will not work.
o Widgets that load data from services will not work (such as charts, grids, and blogs).
o Services that are based on monitoring ThingWorx may still work (such as services from the
Platform Subsystem). Widgets bound to those services may still display data.
• Logs may still be accessible, but the mashup used to view the logs may not be rendered correctly
(that is, style definitions for the widgets will not be loaded).

ThingWorx 8 High Availability Administrator’s Guide
51
• You can create a cron job on each ThingWorx server to restart the Web server (Tomcat) when the
Web server process stops.
The cron job should attempt to restart the Web server via the service of the Web server. For more
information, see Appendix B: Recovery Job.
Load Balancer Failure If the active load balancing solution fails, sessions to the active ThingWorx server are not interrupted.
Depending on your load balancing solution, backup capacity is used for sessions during failover.
HAProxy Server Failure If your only HAProxy node fails or all of your HAProxy nodes fail, the following occurs:
• The ThingWorx leader will still be accessible through its IP address but not through the HAProxy IP
address.
• Requests to ThingWorx through HAProxy will not reach ThingWorx.
If one of two HAProxy nodes fail, the following occurs:
• The session will be recognized in ThingWorx Composer once the backup HAProxy becomes the new
master. You are not prompted to log on once the new master HAProxy is up.
• Mashups will not be loaded until the backup HAProxy becomes the master.
• You cannot browse to entities in Composer until the backup HAProxy becomes the master.
• Requests will not reach ThingWorx until the backup HAProxy becomes the master.
ZooKeeper Node Failure If one ZooKeeper node fails, the other nodes detect the failure and elect a new leader (if the active node
failed) or remove the failed node from the list of standby nodes. There should be no interruption of user
or device sessions.
If one of three ZooKeeper nodes fails, the following occurs:
• A new ZooKeeper leader is elected.
• ThingWorx remains active and accessible (for example, you can see entities in Composer).
When two ZooKeeper nodes fail, the following occurs:
• Leader election for ZooKeeper cannot take place.
• The remaining ZooKeeper instance is neither a leader nor a standby.
• The ThingWorx leader will be shut down since it cannot talk to ZooKeeper for leader election.
• The ThingWorx standby server will keep retrying to talk to ZooKeeper until at least one other
ZooKeeper node comes back up.
• Once one or both ZooKeeper nodes are back online, ZooKeeper leader election will occur. The
ThingWorx standby node will reconnect to ZooKeeper and come back as the new leader.
• The previous ThingWorx leader must be restarted in order to become the standby. You can manually
restart it or use a cron job.
ThingWorx and ZooKeeper Failure When the leaders for both ZooKeeper and the ThingWorx fail, the following occurs:

ThingWorx 8 High Availability Administrator’s Guide
52
• When the ThingWorx server comes up as the leader, you must log in.
• Leader election begins for both ZooKeeper and ThingWorx.
• Depending on abrupt versus graceful shutdown, ThingWorx should be accessible when it gains
leadership. It will take some time since it must first initialize the model.
Pgpool-II and ZooKeeper Failure When both ZooKeeper and pgpool-II masters fail, the following occurs:
• Services are briefly unavailable during failover and return to normal after failover is complete.
• The virtual IP address is transferred to the pgpool-II standby node, which becomes the master node.
• The ZooKeeper cluster runs with the remaining ZooKeeper nodes.
• A new ZooKeeper master is elected.
Mutual Exclusion A slow connection from the ThingWorx leader to the ZooKeeper leader may cause a brief time period
where two ThingWorx instances act as the leader. To avoid this scenario (called split brain), we mutually
exclude access to system resources for persistence. ThingWorx accomplishes mutually exclusive access
to system resources (such as file systems, shared network drives, and databases) to maintain system and
data integrity through system ownership. It prevents two or more separate ThingWorx instances in a
landscape from concurrently accessing system resources. For example, only one ThingWorx instance
should modify the database if a split brain scenario occurs.
Acquiring System Ownership A ThingWorx instance acquires system ownership as soon as possible during its startup process by
inserting a row into a dedicated system ownership database table. The primary key of this inserted row
is returned to the ThingWorx instance and becomes that instance's system ownership ID. ThingWorx
stores the ID in memory so it can be referenced at runtime. A ThingWorx instance will retain system
ownership as long as its system ownership ID matches the primary key of the most recently added row
in that database table. If a ThingWorx instance detects that it lost system ownership, it assumes it is in a
split-brain scenario and will self-terminate.
NOTE: A ThingWorx instance should never modify its acquired system ownership ID because
unpredictable, potentially corruptive, behavior could result.
System Ownership Authorization
Acquiring a System Ownership ID is essentially meaningless without using it at runtime to continuously
verify that ThingWorx still possesses System Ownership when performing operations that access and/or
modify the system resources being protected. That is, any operation that can access and/or modify the
system resources being protected by System Ownership must be successfully authorized before being
allowed to execute. This authorization is accomplished by comparing the ThingWorx instance’s acquired
System Ownership ID with the most recent System Ownership ID stored within the database. If the two
System Ownership IDs exactly match, then the authorization is considered successful (i.e. the Platform is
still considered the System Owner), and the current operation is allowed to execute. However, if the two
System Ownership IDs do not match, then the authorization is considered unsuccessful (ThingWorx is no
longer considered the System Owner), and not only is the current operation to be prohibited, but
ThingWorx is to also self-terminate.

ThingWorx 8 High Availability Administrator’s Guide
53
System Resources Currently Protected By System Ownership
System ownership authorization is currently only performed on operations that can/will modify the
ThingWorx model-specific (vs. data-specific) database. From an implementation standpoint, a System
Ownership Authorization check is performed before every "commit", thus prohibiting any data
modification from occurring if ThingWorx has lost System Ownership.
Pgpool-II Node Failure If the active pgpool-II node fails, the backup will detect it and take over the handling of all requests to
the PostgreSQL servers. Users logged onto the active ThingWorx server may experience delays in their
applications, and there could be loss of user or device data that is being saved when the pgpool-II node
failure occurred.
If you have an environment with one pgpool-II instance that fails, ThingWorx will have limited
functionality in the following areas:
• Logging
The Application log may still be updated with error messages.
• System monitoring (such as MonitoringPlatformStats mashup)
• Mashups
Widgets that do not rely on services and/or data from the database will still work.
• Property values (such as set or get on non-persistent properties)
• Services (actions that do not involve the database)
The aspects that should not work include any action that contacts the database, such as the following:
• Create, read, update, or delete an entity
• Create, read, update, or delete data using BDWS entities
• Browsing entities in Composer
Composer calls Spotlight Search, which contacts the database; therefore, the service fails.
• Persistent properties
Property values will not be updated if the property is set to be persistent.
When one or two nodes of pgpool-II fail in an environment with three pgpool-II instances (with
Watchdog), ThingWorx will have limited functionality until the next pgpool-II node becomes the master
(see the limited functionality described above for the single pgpool-II environment).
When three of three pgpool-II nodes fail, ThingWorx will have no access to the PostgreSQL database.
Therefore, ThingWorx will have limited functionality until a pgpool-II instance is brought back as a
master.
ThingWorx and Pgpool-II Failure When the ThingWorx leader and pgpool-II master instances fail simultaneously, the following occurs:
• The ThingWorx leader loses leadership, so one of the standby nodes become leader.
• The pgpool-II master loses its virtual IP address. One of the pgpool-II standby nodes becomes master
and this IP address is reassigned to it.
• Errors related to searching for and creating entities in ThingWorx Composer may occur during the
failover.

ThingWorx 8 High Availability Administrator’s Guide
54
• When ThingWorx acquires leadership and starts up, the login prompt appears in Composer. You can
then search for and create entities.
HAProxy and Pgpool-II Failure When pgpool-II and HAProxy fail simultaneously, the following occurs:
• The HAProxy master loses its elastic IP address and reassigns it to the standby node.
• The pgpool-II master loses its virtual IP address. One of the pgpool-II standby nodes is escalated to
master and is assigned the virtual IP address.
• Composer is temporarily unavailable during failover (for example, you cannot search for entities
and the application log cannot be loaded).
o When both the HAProxy and pgpool-II standby nodes become master (and the appropriate IP
addresses are reassigned), Composer is accessible again. The login prompt is not displayed
since the HAProxy session was maintained.
PostgreSQL Node Failure If a PostgreSQL server fails, the active pgpool-II node detects the failure and stops routing requests to
that server. User or device data being saved at the time of the failure could be lost if the information
had not been committed and replicated to other nodes before the failure.
When the master PostgreSQL node fails (assuming the sync and potential nodes are up and running), the
following occurs:
• Failover to the sync node occurs through pgpool-II. The potential node now becomes the sync node
to the new master node. Writes to the database are still possible (such as creating new entities and
writing data to BDWS).
• If the original master comes back up, you need to manually clean up and configure your
environment to use the original master.
When one of the standby PostgreSQL nodes fails (assuming a master node and standby node are both
up and running), the following occurs:
• If the sync standby node fails, the potential node becomes the sync node.
Writes to the database are possible.
• If the standby node fails, the original sync node should still be operational.
Writes to the database are possible.
When both standby nodes fail (assuming the master node is still up and running), the following occurs:
• No failover occurs and the master node should have zero nodes for replication.
• Composer will still be accessible.
Entities will be loaded and can be viewed but not saved. Logs can be viewed.
• Actions that require writes to the database (such as creating and saving an entity, setting values to
persistent properties, and adding a stream entry) will not be successful since PostgreSQL must
replicate the data to a standby node.
When the master node and the sync standby node fail, the following occurs:

ThingWorx 8 High Availability Administrator’s Guide
55
• Failover to the potential node occurs. The potential node is now the master node with zero nodes
for replication.
• Composer will be accessible.
Entities will be loaded and can be viewed but not saved. Logs can be viewed.
• Actions that require writes to the database (such as creating and saving an entity, setting values to
persistent properties, and adding a stream entry) will not be successful since the writes will hang
and eventually fail.
When all three nodes fail, the following occurs:
• Failover will not occur since there are no available nodes.
• Composer has no access to the database. Therefore, entities should not be loaded, most services
will not work (subsystem services like Platform Subsystem may still work), and system functionality
is limited (logs, system monitoring, and mashups may work).
• Writes to and reads from the database will not be possible.
ThingWorx and PostgreSQL Failure When the ThingWorx leader and PostgreSQL master both fail, the following occurs:
• The standby ThingWorx instance becomes the leader after the ThingWorx leader goes down and
the sync node of the PostgreSQL database becomes the PostgreSQL master node.
o The potential node of the PostgreSQL database becomes the new sync node.
o ThingWorx Composer is available and writes to the PostgreSQL database can be made
(entities can be created, edited, and deleted, and data can be added).
• If the original PostgreSQL master node must be reset as the master node, you must manually clean
up the PostgreSQL nodes and pgpool-II.
Pgpool-II and PostgreSQL Failure When PostgreSQL and pgpool-II fail, the following occurs:
• The PostgreSQL standby node becomes the master node.
• The pgpool-II standby node becomes the master node, and the virtual IP address is transferred to
it.
• Services are briefly unavailable during failover.
HAProxy and PostgreSQL Failure When PostgreSQL and HAProxy fail, the following occurs:
• The elastic IP address is transferred to the HAProxy standby node and it becomes the master node.
• The PostgreSQL standby node becomes the master node.
• Services are briefly unavailable during failover.
ZooKeeper and PostgreSQL Failure When PostgreSQL and ZooKeeper both fail, the following occurs:
• The PostgreSQL standby node becomes the master node.
• The ZooKeeper cluster runs with the remaining ZooKeeper instances, and a new master is elected
for ZooKeeper.

ThingWorx 8 High Availability Administrator’s Guide
56
• Services are briefly unavailable during failover.
Extensions in the HA Landscape In an HA environment, extensions are stored in the database. Therefore, in the event of a failover or a
change in leadership, any new leader can resume operations using the same extensions. On startup, a
leader checks the database for updates to extensions and applies them locally. If there is a discrepancy
between the database and the local ThingworxStorage/extensions directory, the system treats
the database as having the current settings and treats the ThingworxStorage/extensions
directory as a local cache and not the state of the system. When model HA leadership is gained,
additional connections to the database are made to verify that extensions are current and correct.
Process Flow When extensions are imported, the system does the following:
1. Performs a checksum on the extension zip file and saves it to the
ThingworxStorage/extensions/<extension name> directory as a <extension
name>.chk file.
2. Unzips the zip to the ThingworxStorage/extensions/<extension name> directory.
3. Creates, deploys, and persists an ExtensionPackage entity (and any other entities) to the database.
4. Persists the zip file and the checksum to the database.
If the system fails during these steps, it will attempt to back out of the import.
The zip is persisted last so that if the extension fails to deploy, the extension will not be deployed to the
database for other standby nodes to pick up and cause corruption.
When ThingWorx starts, the following steps are performed for each extension:
1. The extension is undeployed.
2. Its checksum value is read from the checksum file named ThingworxStorage/extensions/<extension name>/<extension name>.chk.
3. The extension's checksum value is read from the persistence layer.
4. These two checksum values are compared.
If the checksum values are the same, do not complete the following steps.
5. The copy of the extension's zip is read from the persistence layer. Extract it into a temporary
directory, such as ThingworxStorage/extensions/temp/<extension name><random>.
6. The old version of the extension is deleted from
(ThingworxStorage/extensions/<extension name>).
7. The copy of the extracted zip is copied into the old extension directory
(ThingworxStorage/extensions/<extension name>).
8. A new checksum file is created in the extension directory
ThingworxStorage/extensions/<extension name>/<extension name>.chk.
9. The extension is deployed.
If the system fails during any of the above steps, it will attempt to clean up what it can. If the old copy of
the extension cannot be replaced with the copy from the persistence layer, the old copy will be loaded.

ThingWorx 8 High Availability Administrator’s Guide
57
When extensions are deleted, the following occurs:
1. The extension is undeployed.
2. The zip is deleted from the database.
3. The ExtensionPackage entity is deleted from the database.
4. The ThingworxStorage/extensions/<extension name> directory is deleted, including the
checksum.
Appendix A: Sample platform-settings.json {
"PlatformSettingsConfig": {
"BasicSettings": {
"BackupStorage": "/ThingworxBackupStorage",
"DatabaseLogRetentionPolicy": 7,
"EnableBackup": true,
"EnableHA": false,
"EnableSystemLogging": false,
"HTTPRequestHeaderMaxLength": 2000,
"HTTPRequestParameterMaxLength": 2000,
"Storage": "/ThingworxStorage"
},
"HASettings": {
"CoordinatorConnectionTimeout": 15000,
"CoordinatorHosts": "127.0.0.1:2181",
"CoordinatorMaxRetries": 3,
"CoordinatorRetryTimeout": 1000,
"CoordinatorSessionTimeout": 90000,
"LoadBalancerBase64EncodedCredentials":
"QWRtaW5pc3RyYXRvcjphZG1pbg=="
}
},
"PersistenceProviderPackageConfigs": {
"PostgresPersistenceProviderPackage": {
"ConnectionInformation": {
"acquireIncrement": 5,
"acquireRetryAttempts": 3,
"acquireRetryDelay": 10000,
"checkoutTimeout": 1000000,
"driverClass": "org.postgresql.Driver",
"fetchSize": 5000,
"idleConnectionTestPeriod": 60,

ThingWorx 8 High Availability Administrator’s Guide
58
"initialPoolSize": 5,
"jdbcUrl": "jdbc:postgresql://localhost:5432/thingworx",
"maxConnectionAge": 0,
"maxIdleTime": 0,
"maxIdleTimeExcessConnections": 300,
"maxPoolSize": 100,
"maxStatements": 100,
"minPoolSize": 5,
"numHelperThreads": 8,
"password": "password",
"testConnectionOnCheckout": false,
"unreturnedConnectionTimeout": 0,
"username": "twadmin"
},
"StreamProcessorSettings": {
"maximumBlockSize": 2500,
"maximumQueueSize": 250000,
"maximumWaitTime": 10000,
"numberOfProcessingThreads": 5,
"scanRate": 5,
"sizeThreshold": 1000
},
"ValueStreamProcessorSettings": {
"maximumBlockSize": 2500,
"maximumQueueSize": 500000,
"maximumWaitTime": 10000,
"numberOfProcessingThreads": 5,
"scanRate": 5,
"sizeThreshold": 1000
}
}
}
}
Appendix B: Recovery Job We recommend creating a cron job to restart Tomcat using crontab -e with the following definition: * * * * * service tomcat start > /dev/null
where tomcat is the name of the Tomcat service.
This job will run every minute. The start command checks the status of Tomcat and does nothing if
Tomcat is running.

ThingWorx 8 High Availability Administrator’s Guide
59
Appendix C: HAProxy Example with SSL global
log /dev/log local0
log /dev/log local1 notice
chroot /var/lib/haproxy
stats socket /run/haproxy/admin.sock mode 660 level admin
stats timeout 30s
user haproxy
group haproxy
daemon
# Default SSL material locations
ca-base /etc/ssl/certs
crt-base /etc/ssl/private
# Default ciphers to use on SSL-enabled listening sockets.
# For more information, see ciphers(1SSL). This list is from:
# https://hynek.me/articles/hardening-your-web-servers-ssl-ciphers/
ssl-default-bind-ciphers
ECDH+AESGCM:DH+AESGCM:ECDH+AES256:DH+AES256:ECDH+AES128:DH+AES:ECDH+3DES:DH+3DES:RSA+A
ESGCM:RSA+AES:RSA+3DES:!aNULL:!MD5:!DSS
ssl-default-bind-options no-sslv3
defaults
log global
mode http
option httplog
option dontlognull
option http-server-close
option forwardfor
timeout connect 4s
timeout client 20s
timeout server 20s
timeout client-fin 20s
timeout tunnel 1h
errorfile 400 /etc/haproxy/errors/400.http
errorfile 403 /etc/haproxy/errors/403.http
errorfile 408 /etc/haproxy/errors/408.http
errorfile 500 /etc/haproxy/errors/500.http
errorfile 502 /etc/haproxy/errors/502.http
errorfile 503 /etc/haproxy/errors/503.http
errorfile 504 /etc/haproxy/errors/504.http
frontend ft_app
bind *:80 name app
reqadd X-Forwarded-Proto:\ http
default_backend bk_app
frontend www-https
bind *:443 ssl crt /etc/ssl/thingworx/thingworx.pem
reqadd X-Forwarded-Proto:\ https
default_backend bk_app
backend bk_app
stick-table type ip size 1
stick on dst
# Server s1 and server s2 are ThingWorx server nodes 1 and 2.
server s1 10.68.75.208:8080 check

ThingWorx 8 High Availability Administrator’s Guide
60
server s2 10.68.75.208:8081 check backup
option httpchk GET /Thingworx/ Admin/HA/LeaderCheck HTTP/1.0\r\nAuthorization:\ Basic\ QWRtaW5pc3RyYXRvcjphZG1pbg==
Appendix D: Multiple HAProxy Setup For multiple HAProxy setup, do the following:
1. Install HAProxy on two servers.
2. Install Keepalived on the same two servers.
sudo apt-get install keepalived
sudo vi /etc/sysctl.conf
3. Add the following line to the end of the file:
net.ipv4.ip_nonlocal_bind=1
4. Save and close.
sudo sysctl -p
sudo vi /etc/keepalived/keepalived.conf
5. Add the following to keepalived.conf:
# Settings for notifications
global_defs {
}
# Define the script used to check if haproxy is still working
vrrp_script chk_haproxy {
script "killall -0 haproxy"
interval 2
fall 2
rise 2
}
# Configuation for the virtual interface
vrrp_instance VI_1 {
interface eth0
state MASTER # set this to BACKUP on the other machine
priority 101 # set this to 100 on the other machine
virtual_router_id 51
advert_int 1
lvs_sync_daemon_interface eth0
authentication {
auth_type AH
auth_pass myPassw0rd # Set this to some secret phrase
}
# The virtual ip address shared between the two loadbalancers
virtual_ipaddress {
192.168.234.200
}

ThingWorx 8 High Availability Administrator’s Guide
61
# Use the script above to check if we should fail over
track_script {
chk_haproxy
}
}
6. Save and exit.
sudo service keepalived start
7. Go to the other server, and set up Keepalived as described above with the only difference in
keepalived.conf:
set
state MASTER # set this to BACKUP on the other machine
priority 101 # set this to 100 on the other machine
to
state BACKUP
priority 100
8. Start ThingWorx, HAProxy, and the other Keepalived process, and go to 192.168.234.200/Thingworx in a browser to verify you have HAProxy.
Appendix E: Sample Scripts start_replication.sh The start_replication.sh script is used during the DB host server startup to copy the leader’s database to
the standby DB host servers.
NOTE: All the sample scripts provided in this document are examples only and need to be configured for
your environment. Verify that your script has the following permissions:
• Execute permissions for the user running the script
• Permissions to create and delete directories and files
• Permissions to run processes that are utilized within the scripts
When using this script, edit the following fields per your setup:
• <path to pg data directory>
• <ip of master>
• <replication user>
rm -rf <path to pg data directory>
pg_basebackup -h <ip of master> -D <path to pg data directory> -U
<replication user> --xlog-method=stream -v -P
recovery.conf The recovery.conf script can be used on the standby nodes. Configure and place in the base directory of
the standby PostgreSQL DB host server’s databases.
When using the script, edit the following fields per your setup:

ThingWorx 8 High Availability Administrator’s Guide
62
• <ip of master>
• <replication user>
standby_mode = 'on'
primary_conninfo = 'port=5432 host=<ip of master> user=<replication user>
application_name=node1'
recovery_target_timeline = 'latest'
failover.sh This script can be used when configuring pgpool-II. #!/bin/bash -x
echo ------------------------Begin failover------------------------
#------------------------------------
# Inputs
#------------------------------------
FAILED_NODEID=$1 # %d = node id
FAILED_HOSTNAME=$2 # %h = hostname
FAILED_DBPATH=$3 # %D = database cluster path
NEW_MASTER_NODEID=$4 # %m = new master node id
NEW_MASTER_HOSTNAME=$5 # %H = new master host name
NEW_MASTER_DBPATH=$6 # %R = new master database cluster path
OLD_MASTER_NODEID=$7 # %M = old master node id
OLD_PRIMARY_NODEID=$8 # %P = old primary node id
#------------------------
# Nodes
#------------------------
NODE0_HOSTNAME=10.1.0.244
NODE1_HOSTNAME=10.1.0.245
NODE2_HOSTNAME=10.1.0.246
if [ $FAILED_NODEID = $OLD_PRIMARY_NODEID ]; then
STANDBY1_HOSTNAME_TO_RETARGET=0.0.0.0
STANDBY2_HOSTNAME_TO_RETARGET=0.0.0.0
if [ $NEW_MASTER_HOSTNAME = $NODE0_HOSTNAME ]; then
STANDBY1_HOSTNAME_TO_RETARGET=$NODE1_HOSTNAME
STANDBY2_HOSTNAME_TO_RETARGET=$NODE2_HOSTNAME
fi;
if [ $NEW_MASTER_HOSTNAME = $NODE1_HOSTNAME ]; then
STANDBY1_HOSTNAME_TO_RETARGET=$NODE2_HOSTNAME
STANDBY2_HOSTNAME_TO_RETARGET=$NODE0_HOSTNAME
fi;
if [ $NEW_MASTER_HOSTNAME = $NODE2_HOSTNAME ]; then
STANDBY1_HOSTNAME_TO_RETARGET=$NODE0_HOSTNAME
STANDBY2_HOSTNAME_TO_RETARGET=$NODE1_HOSTNAME
fi;
if [ $UID -eq 0 ]

ThingWorx 8 High Availability Administrator’s Guide
63
then
su postgres -c "ssh -T postgres@$NEW_MASTER_HOSTNAME
/usr/bin/pg_ctlcluster 9.4 main promote"
su postgres -c "ssh -T postgres@$STANDBY1_HOSTNAME_TO_RETARGET
/var/lib/postgresql/bin/retargetMaster.sh $NEW_MASTER_HOSTNAME"
# NOTE: The STANDBY2_HOSTNAME_TO_RETARGET is the old master. One
could try to automatically recover it by changing it to a
# standby and starting it back up with the command below.
However, this is typically probably not the best strategy as the
# analysis for the failure should be completed first and likely
manually recovered.
#su postgres -c "ssh -T postgres@$STANDBY2_HOSTNAME_TO_RETARGET
/var/lib/postgresql/bin/retargetMaster.sh $NEW_MASTER_HOSTNAME"
else
ssh -T postgres@$NEW_MASTER_HOSTNAME /usr/bin/pg_ctlcluster 9.4
main promote
ssh -T postgres@$STANDBY1_HOSTNAME_TO_RETARGET
/var/lib/postgresql/bin/retargetMaster.sh $NEW_MASTER_HOSTNAME
# NOTE: The STANDBY2_HOSTNAME_TO_RETARGET is the old master. One
could try to automatically recover it by changing it to a
# standby and starting it back up with the command below.
However, this is typically probably not the best strategy as the
# analysis for the failure should be completed first and likely
manually recovered.
#ssh -T postgres@$STANDBY2_HOSTNAME_TO_RETARGET
/var/lib/postgresql/bin/retargetMaster.sh $NEW_MASTER_HOSTNAME
fi
exit 0;
fi;
echo 'Did not complete failover'
echo -------------------End failover---------------
exit 0;
retargetMaster_001.sh This script can be used when configuring pgpool-II on each DB host server. The retargetMaster_###.sh
files must be renamed to retargetMaster.sh on each host.
NOTE: The value of application_name=node0 below should be listed in the
synchronous_standby_names value in postgresql.conf of the other two nodes. The user must have
‘initiating replication’ permissions within PostgreSQL which is documented on the following page.
http://www.postgresql.org/docs/9.4/static/role-attributes.html
#!/bin/bash -x
NEW_MASTER_HOSTNAME=$1
service postgresql stop

ThingWorx 8 High Availability Administrator’s Guide
64
# Run a backup from the new master
/var/lib/postgresql/bin/start_replication.sh $NEW_MASTER_HOSTNAME
# Write out new recovery.conf file
rm <path to pg data directory>/recovery.conf
echo "standby_mode = 'on'" >> <path to pg data directory>/recovery.conf
echo "primary_conninfo = 'port=5432 host=$NEW_MASTER_HOSTNAME
user=<replication user> application_name=node0'" >> <path to pg data
directory>/recovery.conf
echo "recovery_target_timeline = 'latest'" >> <path to pg data
directory>/recovery.conf
service postgresql start
retargetMaster_002.sh This script can be used when configuring pgpool-II on each DB host server. The retargetMaster_###.sh
files must be renamed to retargetMaster.sh on each host.
NOTE: The value of application_name=node1 should be listed in the synchronous_standby_names
value in postgresql.conf of the other two nodes. The user must have ‘initiating replication’ permissions
within PostgreSQL which is documented on the following page.
http://www.postgresql.org/docs/9.4/static/role-attributes.html
#!/bin/bash -x
NEW_MASTER_HOSTNAME=$1
service postgresql stop
# Run a backup from the new master
/var/lib/postgresql/bin/start_replication.sh $NEW_MASTER_HOSTNAME
# Write out new recovery.conf file
rm <path to pg data directory>/recovery.conf
echo "standby_mode = 'on'" >> <path to pg data directory>/recovery.conf
echo "primary_conninfo = 'port=5432 host=$NEW_MASTER_HOSTNAME
user=<replication user> application_name=node1'" >> <path to pg data
directory>/recovery.conf
echo "recovery_target_timeline = 'latest'" >> <path to pg data
directory>/recovery.conf
service postgresql start
retargetMaster_003.sh This script can be used when configuring pgpool-II on each DB host server. The retargetMaster_###.sh
files must be renamed to retargetMaster.sh on each host.

ThingWorx 8 High Availability Administrator’s Guide
65
NOTE: Change this to be value of application_name=node2 should be listed in the
synchronous_standby_names value in postgresql.conf of the other two nodes. The user must have
‘initiating replication’ permissions within PostgreSQL which is documented on the following page.
http://www.postgresql.org/docs/9.4/static/role-attributes.html
#!/bin/bash -x
NEW_MASTER_HOSTNAME=$1
service postgresql stop
# Run a backup from the new master
/var/lib/postgresql/bin/start_replication.sh $NEW_MASTER_HOSTNAME
# Write out new recovery.conf file
rm <path to pg data directory>/recovery.conf
echo "standby_mode = 'on'" >> <path to pg data directory>/recovery.conf
echo "primary_conninfo = 'port=5432 host=$NEW_MASTER_HOSTNAME
user=<replication user> application_name=node2'" >> <path to pg data
directory>/recovery.conf
echo "recovery_target_timeline = 'latest'" >> <path to pg data
directory>/recovery.conf
service postgresql start
Top Related