


![o µ } } } } v t r ] l } v d Z u } u Á ] Z d u µ r v v u ... · P U í î X ì u u } o v u Z Ç o ï U ñ r ] r r µ Ç o v Ì } ~ í X ò ñ P U ò X ó u u } o Á } Z u ] Æ µ](https://static.fdocuments.net/doc/165x107/5f6c53a57d759449117c4206/o-v-t-r-l-v-d-z-u-u-z-d-u-r-v-v-u-p-u-x-u.jpg)
Languages
Pages
Legal

User Manual
Sierra - 3, 4Thank you for choosing our InfraNature Original Series!The Infrared sauna
Congratulations on the purchase of your brand new infrared sauna. Pleasecarefully review and read through this material. Keep this manual and yourproof of purchase for future reference and service calls.

WELCOME FRIENDS!We are so delighted that you have decided to take control of your life and invest in the mostimportant thing – your health. Soon you will discover there is more to a sauna than just “sweating”.But first, allow us to introduce our company, what we do, why we do it and what you can expect fromus.
We began our journey a decade ago with one goal in mind… To create an Optimal Health Product. Weknew that general surface health treatments combined with inner cleansing could benefit many andprovide many positive health results.However, through the thorough cleansing methods we have tested, many of us have experiencedheadaches during a detox diet as well as lacking the ability to properly detoxify our system. There ithit us…What if we can increase our ability to sweat to detoxify the system faster and more efficientlywithout the unwelcome side effects? And how can we go about it?
Saunas have been in wide use for centuries, but the true breakthrough happened when the power ofInfrared Light was introduced into the unique health industry, specializing in detoxification andcleansing. After much research and testing, we realized the benefits of infrared light are far morereaching than just on the surface, or slightly underneath the skin. This was truly an extraordinarydiscovery for us and we have devoted our primal business focus on exclusive manufacturing ofinfrared sauna that would maximize healing potential and maintain an optimal healthy physique. Theunderstanding became a connection of dot – to- dot and we fell in love with our product so much, ourteam uses infrared saunas daily.
We wish to share this technology and to show our passion for what we sell and believe in. It is trulypart of our personal journey, healing and inner belief that infrared saunas are safe and incrediblyeffective sources for personal detoxification and more.Please let us know if there is anything you need. We are here to help.
Happy Detox!
Enlighten Sauna Team
2
What You Need to Prepare Before Installing the Sauna
1. Choose the right Outdoor space and clear it out for the sauna.
2. When determining a location for your sauna, please keep in mind the following:
● The main power cord on the sauna must be easily accessible.
○ When facing the sauna, the cord is located behind the back wall in the lower left
hand side corner.
● The location must be dry and leveled.
3. You will need a solid and leveled base. The sauna cannot sit straight on the ground.
4. Check the Electrical requirements for your specific unit and make sure you have it available.
Please contact an electrician if you require assistance with this.
5. For a traditional heating system: Hardwire is recommended. Plug can be sent separately if
preferred. For Infrared: it is a plug.
6. Prepare a Sealant to seal the sauna during the Installation of the sauna.
7. Tools: Phillips screwdriver, flat screwdriver, sealant gun. An Electric screwdriver will speed up
the process.
8. Print or have your manual available during the installation.
9. Tech support for installation is available only at a pre-scheduled time. Submit a ticket online to
schedule a time prior to 72 hours of installation.
10. If you plan to have an electrician on site before the sauna arrives, schedule a phone call with
our technician at least 72 hours in advance for a pre-installation process questions.
Electrical Components/RequirementsPlease Read Carefully!
Infrared
Each sauna will require a dedicated circuit when plugged into an outlet according to the chart below.A “dedicated circuit” requires that no other appliance should share the outlet/circuit with the sauna.Failure to comply with this requirement may cause an electrical interruption and/or a diminishedperformance. To avoid any potential electrical hazards, it is recommended that only a qualifiedelectrician installs your dedicated electrical wiring for a proper sauna functionality. Please make sure
3
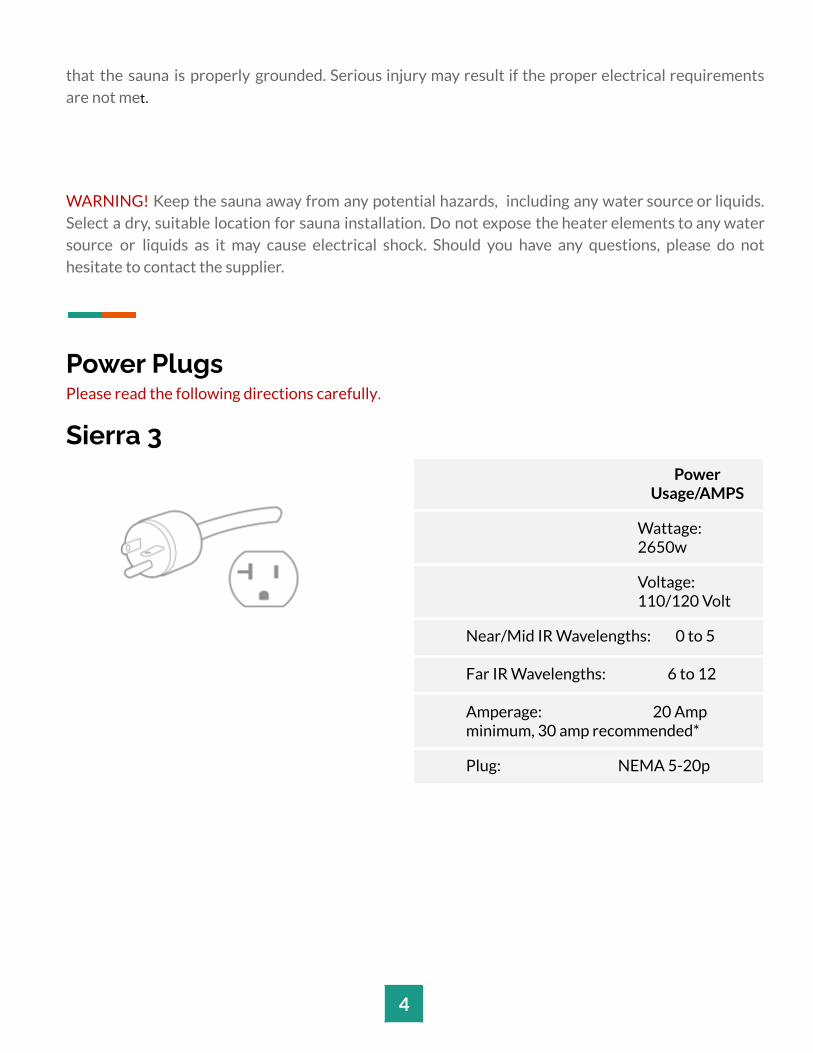
that the sauna is properly grounded. Serious injury may result if the proper electrical requirementsare not met.
WARNING! Keep the sauna away from any potential hazards, including any water source or liquids.Select a dry, suitable location for sauna installation. Do not expose the heater elements to any watersource or liquids as it may cause electrical shock. Should you have any questions, please do nothesitate to contact the supplier.
Power PlugsPlease read the following directions carefully.
Sierra 3Power
Usage/AMPS
Wattage:2650w
Voltage:110/120 Volt
Near/Mid IR Wavelengths: 0 to 5
Far IR Wavelengths: 6 to 12
Amperage: 20 Ampminimum, 30 amp recommended*
Plug: NEMA 5-20p
4
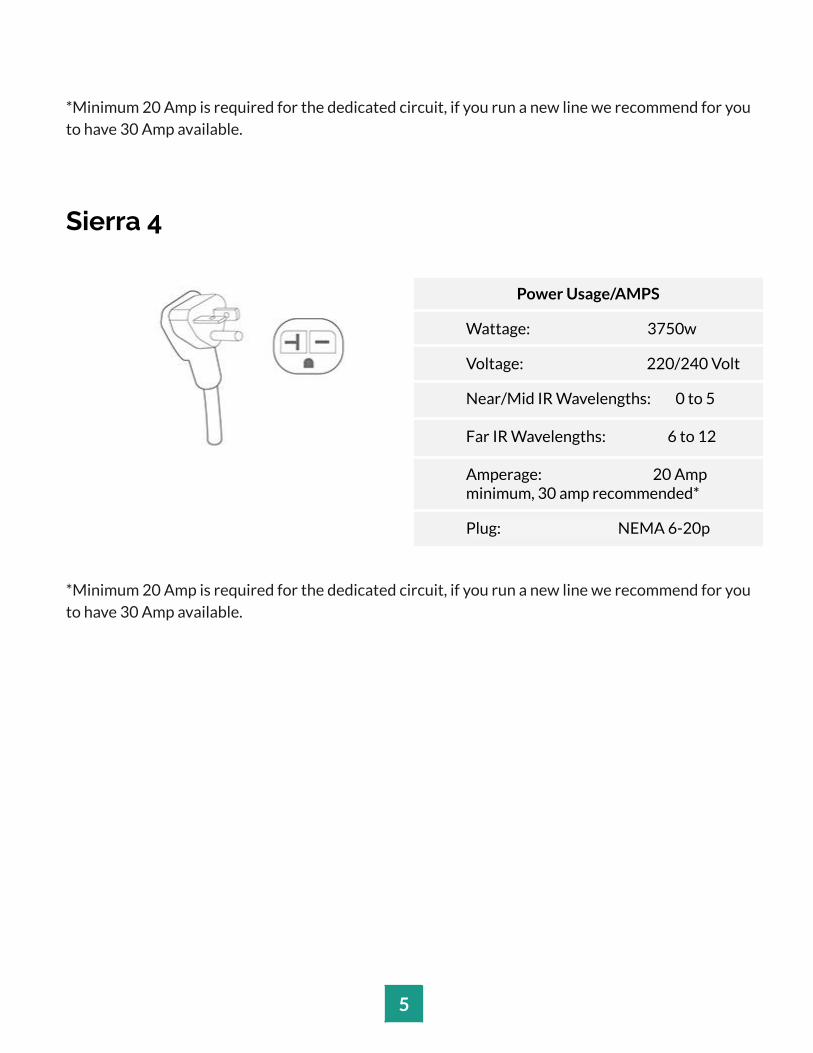
*Minimum 20 Amp is required for the dedicated circuit, if you run a new line we recommend for youto have 30 Amp available.
Sierra 4
Power Usage/AMPS
Wattage: 3750w
Voltage: 220/240 Volt
Near/Mid IR Wavelengths: 0 to 5
Far IR Wavelengths: 6 to 12
Amperage: 20 Ampminimum, 30 amp recommended*
Plug: NEMA 6-20p
*Minimum 20 Amp is required for the dedicated circuit, if you run a new line we recommend for youto have 30 Amp available.
5
Choosing Sauna’s Location
Your Enlighten outdoor sauna can stand outside without any cover or protection. The sauna requires
a solid and level surface that will not flood. The saunas are very heavy so a solid foundation is highly
recommended.
While Enlighten Outdoor saunas are specifically designed to be placed outdoors, choosing a location
without excessive rain and wind is recommended.
Installation requirements for your sauna are as follows:
1. Your Enlighten sauna is a self-contained and freestanding unit. It should not be built into any
structure without prior authorization.
2. Any modifications made to the sauna can waive the warranty, please get authorization before
proceeding.
3. Please maintain a minimum of 4-inch clearance on all sides of the unit to allow air to circulate while
giving access for the power cord.
Sealant ApplicationVERY IMPORTANT: Please follow these steps during installation as they are veryimportant to ensure the sauna is properly installed.
1. Prepare before the installation and use similar sealant to prevent any leaks from
happening:
6
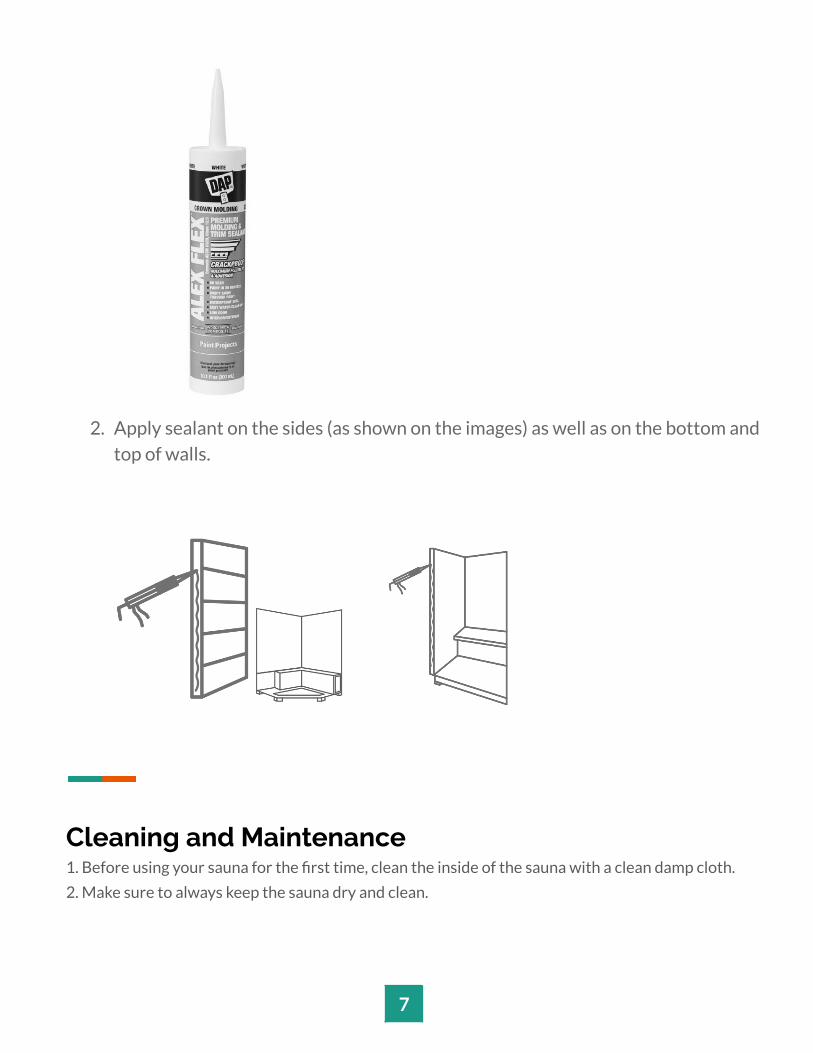
2. Apply sealant on the sides (as shown on the images) as well as on the bottom and
top of walls.
Cleaning and Maintenance1. Before using your sauna for the first time, clean the inside of the sauna with a clean damp cloth.
2. Make sure to always keep the sauna dry and clean.
7
3. Use a clean damp towel. DO NOT use a towel that is too wet and can drip water inside the sauna
and DO NOT use cleaning agents inside the sauna.
4. DO NOT leave towels, water glasses or bottles inside the sauna after use. Wipe the exterior
surface of the sauna with a towel and clean the glass at least once a month.
5. Place a towel on the bench to absorb any perspiration. Wash these often to maintain a clean and
pleasant environment inside your sauna.
6. Perspiration may darken the wood over time. This can be removed by a light sanding with fine grit
sandpaper.
Wood Care
If the sauna exterior body has become scratched or scuffed, it could be concealed by using a small
amount of furniture polish, oil or other furniture treatment. The interior blemishes, scratches, or
scuffs can be either left alone, sanded or a combination of gluing plus sanding. Avoid any treatment
containing benzene or a high concentration of alcohol.
Outdoor models' bodies need to be maintained on a regular basis (between 6 months to a year) by
polishing or resealing the body as needed. If the varnish is cracked or worn off, sand the surface and
re-varnish the affected area. Consult your local handyman or furniture repair professional for more
details on how to maintain the wood in an outdoor environment. You can use any outdoor exterior
clear wood sealer.
Sauna Installation Instructions
Please read the following directions carefully.
The sauna installation requires a minimum of 2 people, 5 person model sizes require at least 3 peopleto install. You should not try to install the sauna on your own as damage may easily occur. Please readthe instructions thoroughly before and during assembly to ensure proper installation of the unit. Ifyou encounter any problems or have questions during assembly, please feel free to call our CustomerSupport department at 1-888-877-2862.
Caution!
1. Install the sauna on a completely leveled surface.
8
2. Keep all liquids away from the Infrared heating panels.3. Flammable objects and corrosive chemical substances should be kept far away from the sauna.
Your Infrared sauna will come packaged in five boxes if you choose a SLOPE roof (seven boxes forPEAK roof saunas). Please make sure that you open the boxes FACE-UP. Please be very careful whenopening the boxes!
BOXES CONTAIN FRAGILE PARTS AND GLASS!
Please be careful when carrying and installing the glass pieces to avoid breakage.
PackagingCONTENTS OF BOXES
1. Floor Panel.
2. Ceiling Panel
3. Accessories
4. Left Side Wall
5. Right Side Wall
6. Front Wall
7. Back Wall
8. Bench and Bench Support
9. Outdoor Roof ( SLOPE OR PEAK)
Location of Sauna & Installation Order
When determining a location for your sauna, please keep in mind the following:
1. The main power cord on the sauna must be easily accessible.
2. The location must be dry and level.
3. Panels should be installed in the following order:
9
1) Floor
2) Back Wall
3) Left Side Wall
4) Right Side Wall
5) Under Bench Support
6) Bench
7) Front Wall
8) Ceiling
9) Outdoor Roof
Connecting the Panels:
Each sauna offers two types of panel-locking systems to connect the different sides of the sauna.Please use the instructions below as a reference guide on how to connect the sauna panels.
Inner-Locking System:
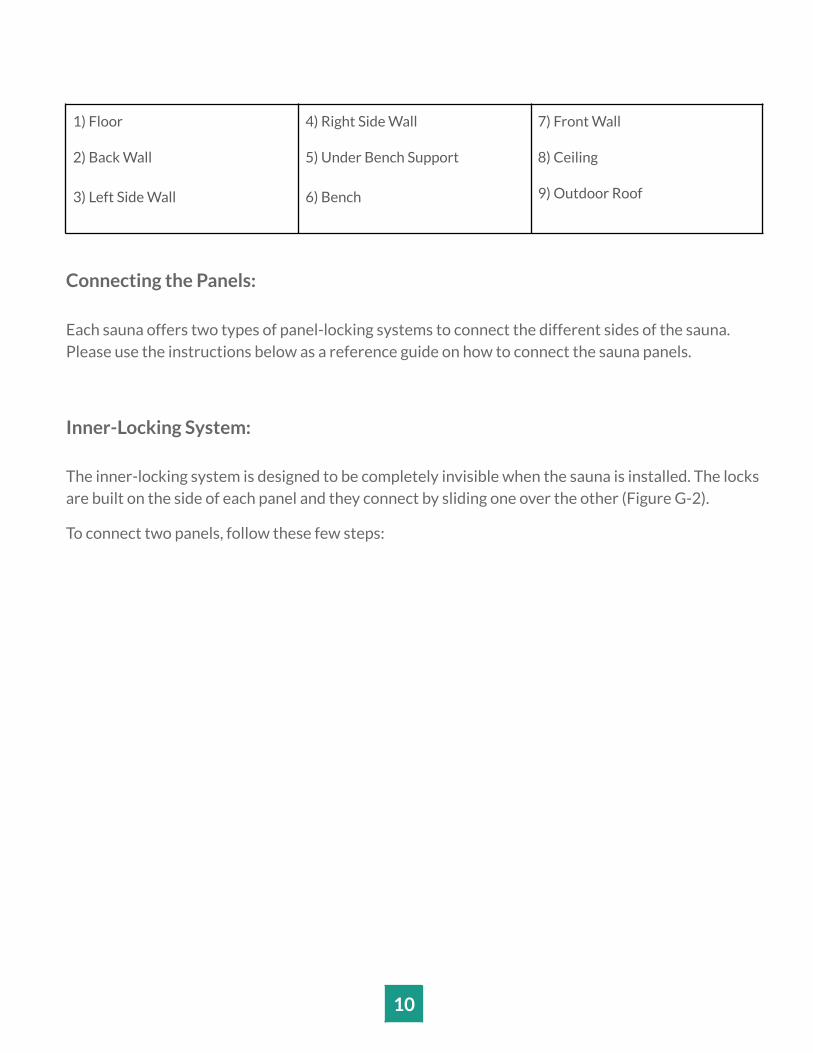
The inner-locking system is designed to be completely invisible when the sauna is installed. The locksare built on the side of each panel and they connect by sliding one over the other (Figure G-2).
To connect two panels, follow these few steps:
10
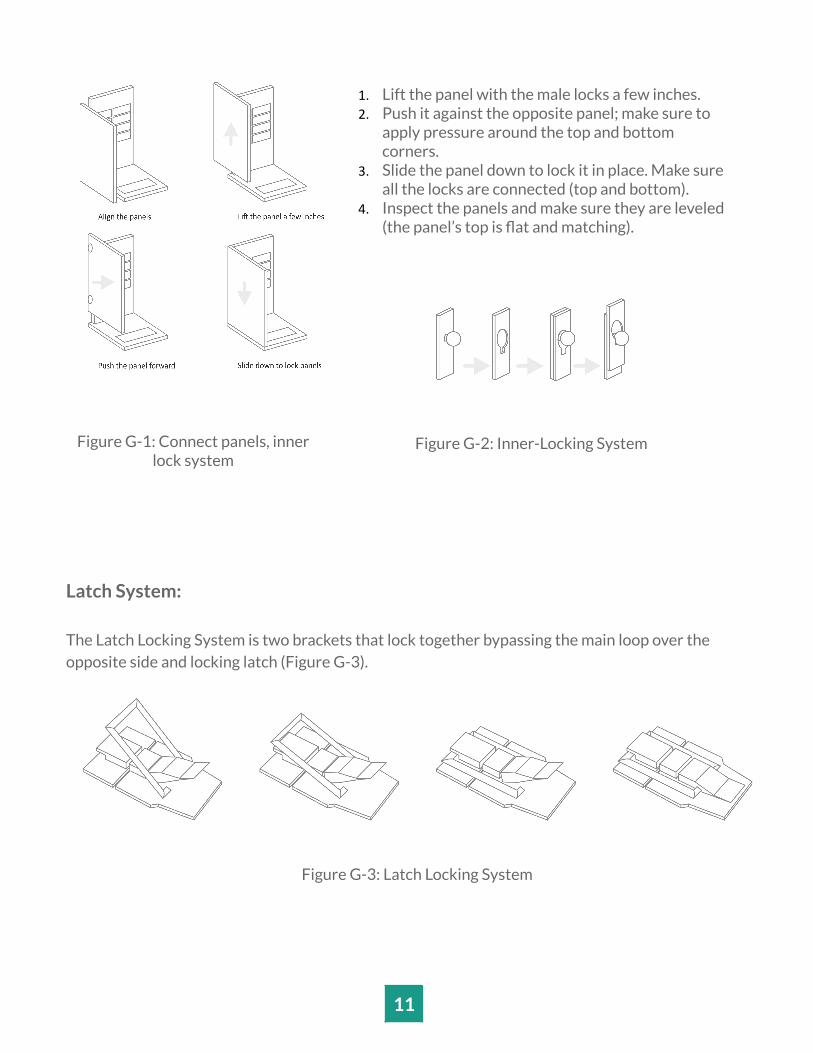
Figure G-1: Connect panels, innerlock system
1. Lift the panel with the male locks a few inches.2. Push it against the opposite panel; make sure to
apply pressure around the top and bottomcorners.
3. Slide the panel down to lock it in place. Make sureall the locks are connected (top and bottom).
4. Inspect the panels and make sure they are leveled(the panel’s top is flat and matching).
Figure G-2: Inner-Locking System
Latch System:
The Latch Locking System is two brackets that lock together bypassing the main loop over theopposite side and locking latch (Figure G-3).
Figure G-3: Latch Locking System
11
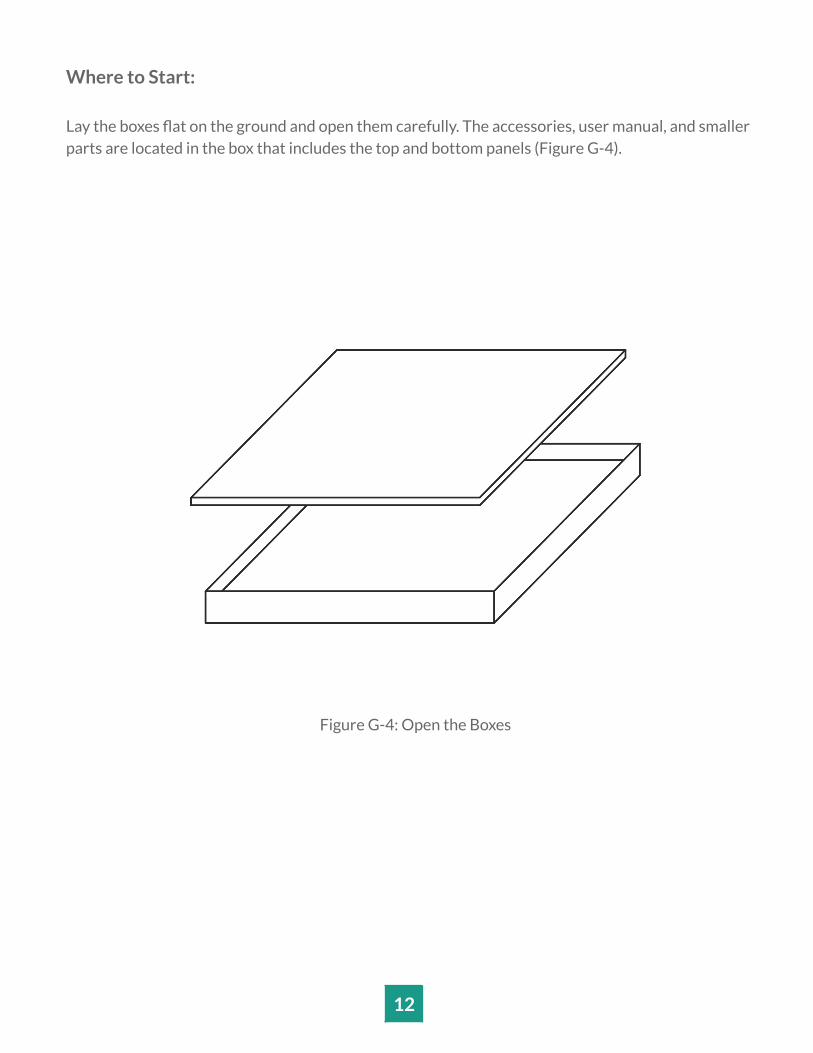
Where to Start:
Lay the boxes flat on the ground and open them carefully. The accessories, user manual, and smallerparts are located in the box that includes the top and bottom panels (Figure G-4).
Figure G-4: Open the Boxes
12
ASSEMBLY INSTRUCTIONS – General Guide for:
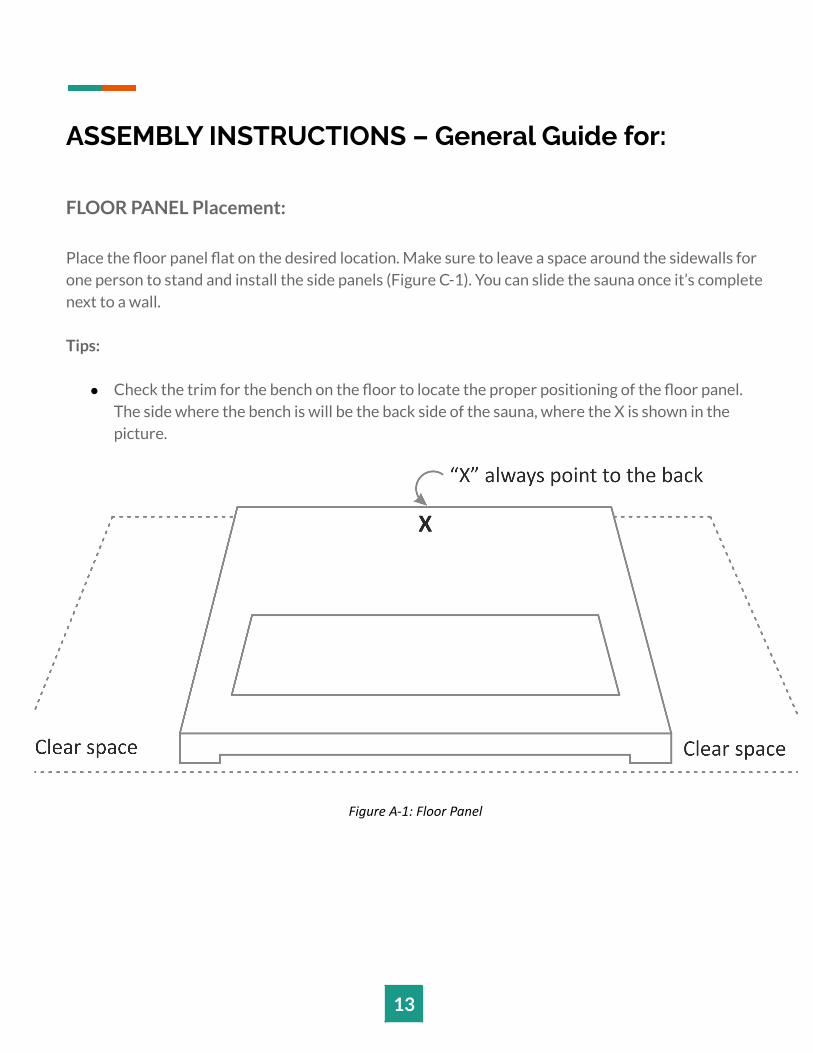
FLOOR PANEL Placement:
Place the floor panel flat on the desired location. Make sure to leave a space around the sidewalls forone person to stand and install the side panels (Figure C-1). You can slide the sauna once it’s completenext to a wall.
Tips:
● Check the trim for the bench on the floor to locate the proper positioning of the floor panel.The side where the bench is will be the back side of the sauna, where the X is shown in thepicture.
Figure A-1: Floor Panel
13
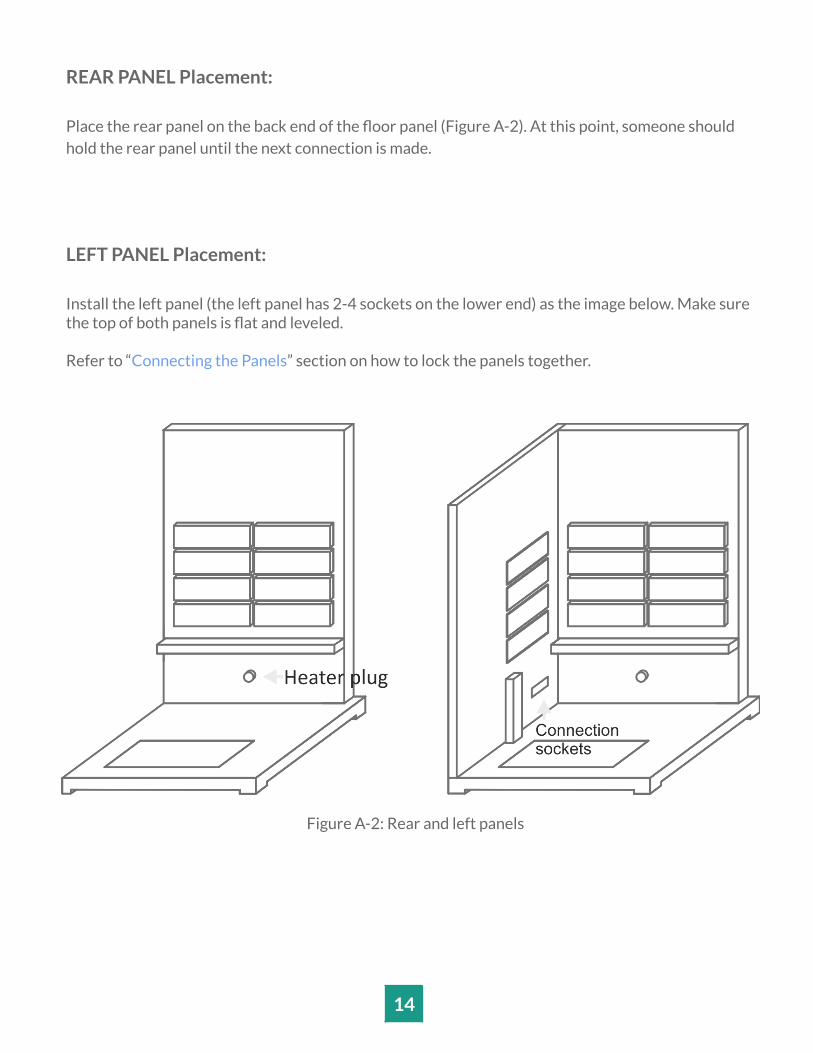
REAR PANEL Placement:
Place the rear panel on the back end of the floor panel (Figure A-2). At this point, someone shouldhold the rear panel until the next connection is made.
LEFT PANEL Placement:
Install the left panel (the left panel has 2-4 sockets on the lower end) as the image below. Make surethe top of both panels is flat and leveled.
Refer to “Connecting the Panels” section on how to lock the panels together.
Figure A-2: Rear and left panels
14
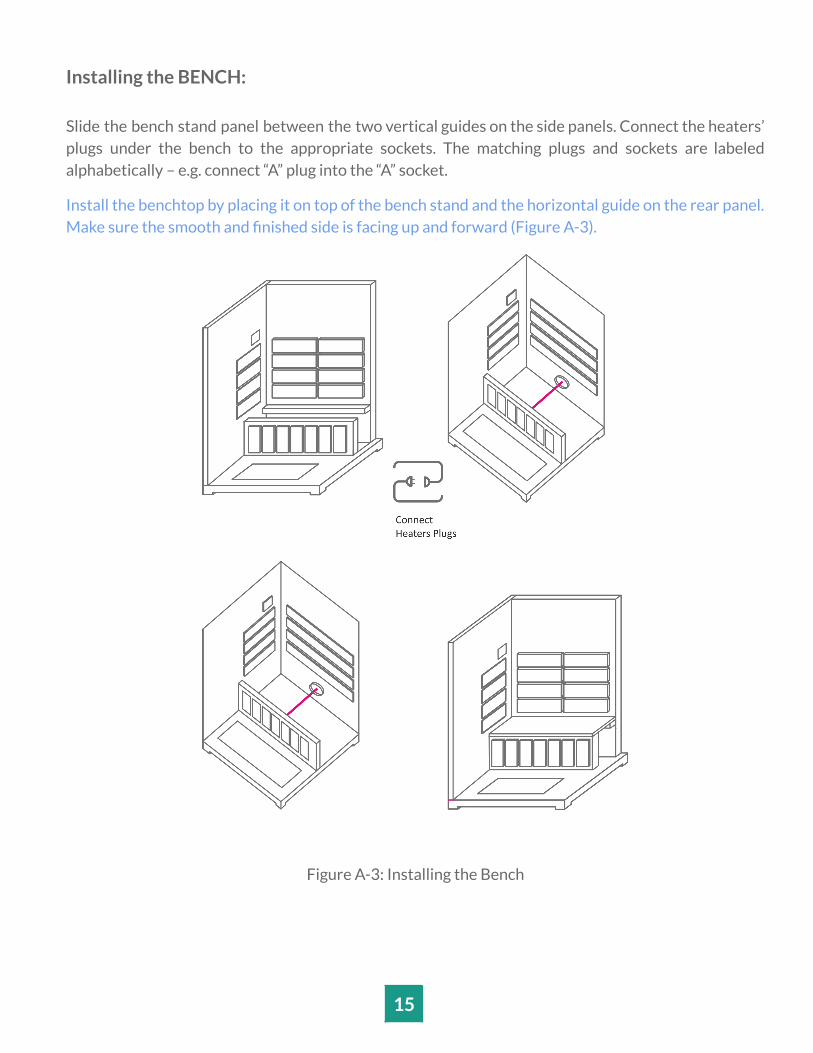
Installing the BENCH:
Slide the bench stand panel between the two vertical guides on the side panels. Connect the heaters’plugs under the bench to the appropriate sockets. The matching plugs and sockets are labeledalphabetically – e.g. connect “A” plug into the “A” socket.
Install the benchtop by placing it on top of the bench stand and the horizontal guide on the rear panel.Make sure the smooth and finished side is facing up and forward (Figure A-3).
Figure A-3: Installing the Bench
15
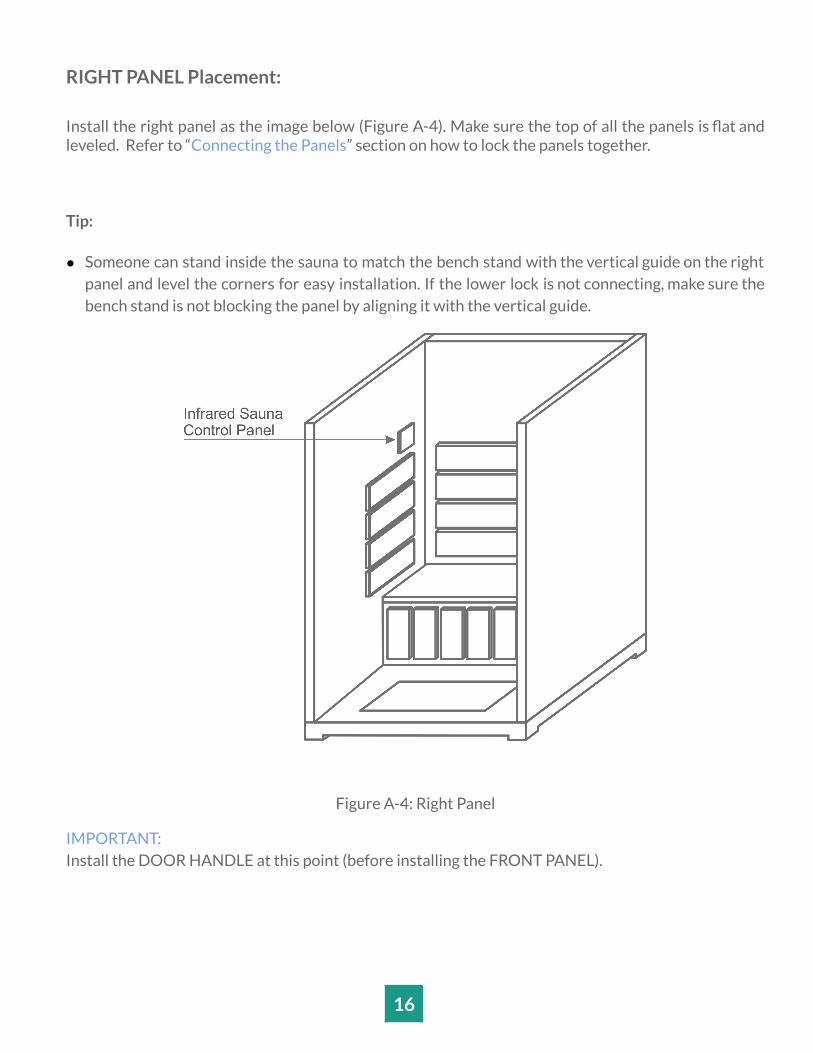
RIGHT PANEL Placement:
Install the right panel as the image below (Figure A-4). Make sure the top of all the panels is flat andleveled. Refer to “Connecting the Panels” section on how to lock the panels together.
Tip:
● Someone can stand inside the sauna to match the bench stand with the vertical guide on the rightpanel and level the corners for easy installation. If the lower lock is not connecting, make sure thebench stand is not blocking the panel by aligning it with the vertical guide.
Figure A-4: Right Panel
IMPORTANT:Install the DOOR HANDLE at this point (before installing the FRONT PANEL).
16
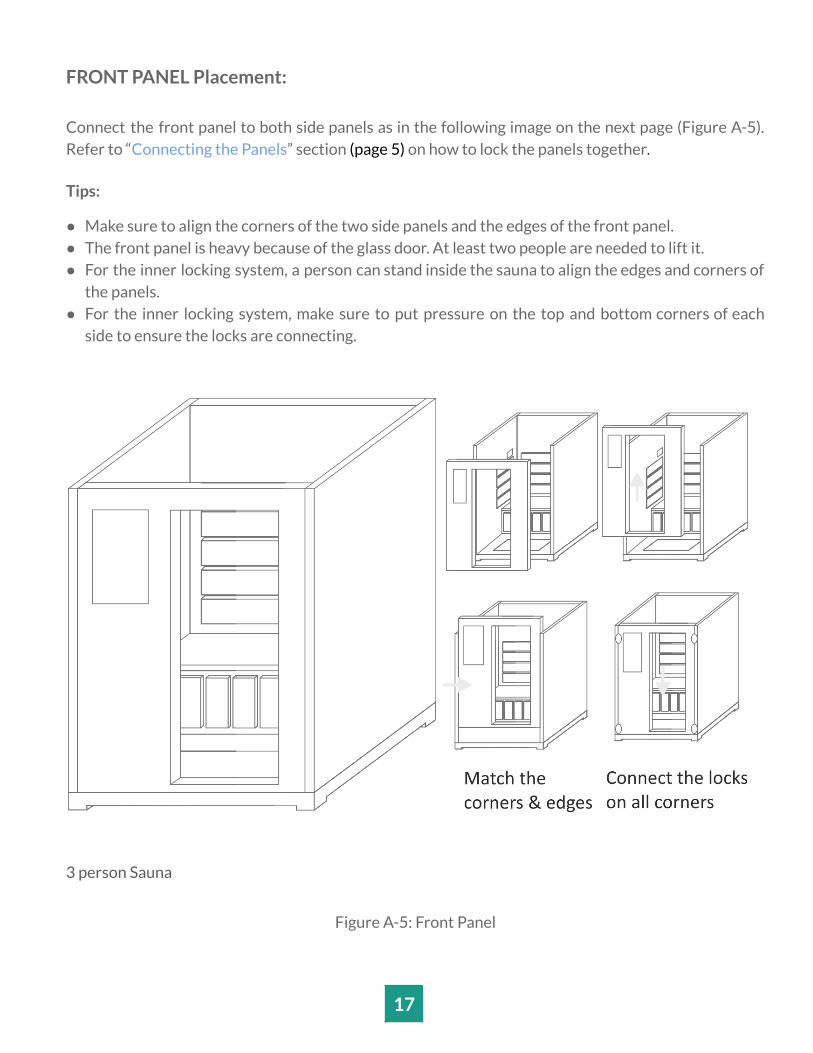
FRONT PANEL Placement:
Connect the front panel to both side panels as in the following image on the next page (Figure A-5).Refer to “Connecting the Panels” section (page 5) on how to lock the panels together.
Tips:
● Make sure to align the corners of the two side panels and the edges of the front panel.● The front panel is heavy because of the glass door. At least two people are needed to lift it.● For the inner locking system, a person can stand inside the sauna to align the edges and corners of
the panels.● For the inner locking system, make sure to put pressure on the top and bottom corners of each
side to ensure the locks are connecting.
3 person Sauna
Figure A-5: Front Panel
17
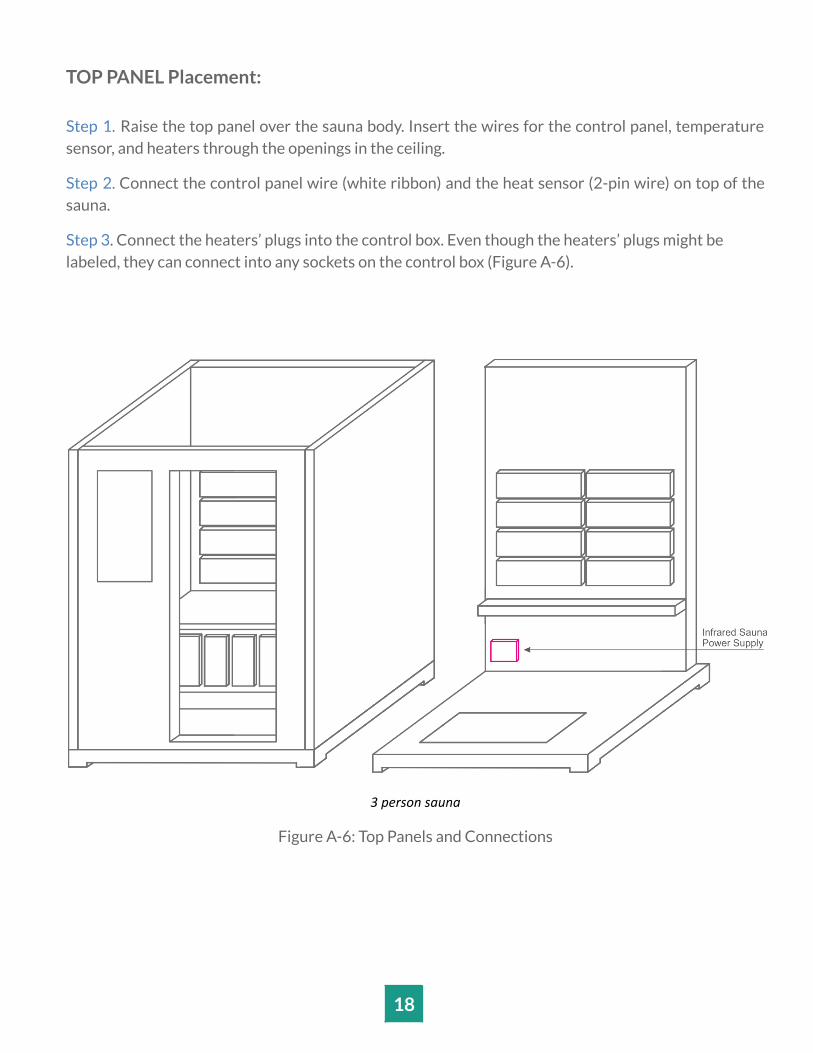
TOP PANEL Placement:
Step 1. Raise the top panel over the sauna body. Insert the wires for the control panel, temperaturesensor, and heaters through the openings in the ceiling.
Step 2. Connect the control panel wire (white ribbon) and the heat sensor (2-pin wire) on top of thesauna.
Step 3. Connect the heaters’ plugs into the control box. Even though the heaters’ plugs might belabeled, they can connect into any sockets on the control box (Figure A-6).
3 person sauna
Figure A-6: Top Panels and Connections
18
Note: Accessories installation instructions continue below the outdoor models.
If you bought an Indoor Version, the Top Panel is your Indoor Roof. Skip OUTDOOR ROOFASSEMBLY INSTRUCTIONS.
If you bought an Outdoor Version, please proceed with the OUTDOOR ROOF ASSEMBLYINSTRUCTIONS.
OUTDOOR SAUNAS ASSEMBLY INSTRUCTIONS:
Installation steps start at the section “Assembly Instructions – General Guide”. Then continueafter placing the top panel.
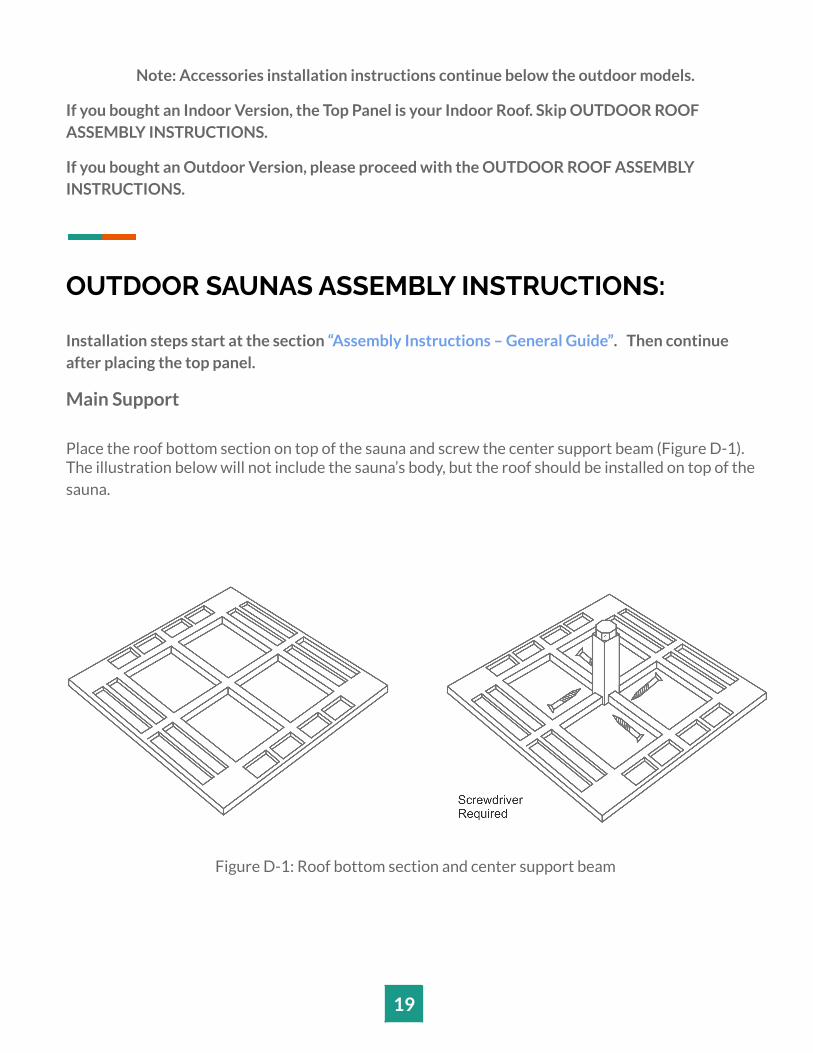
Main Support
Place the roof bottom section on top of the sauna and screw the center support beam (Figure D-1).The illustration below will not include the sauna’s body, but the roof should be installed on top of thesauna.
Figure D-1: Roof bottom section and center support beam
19
Roofing Shingles Support
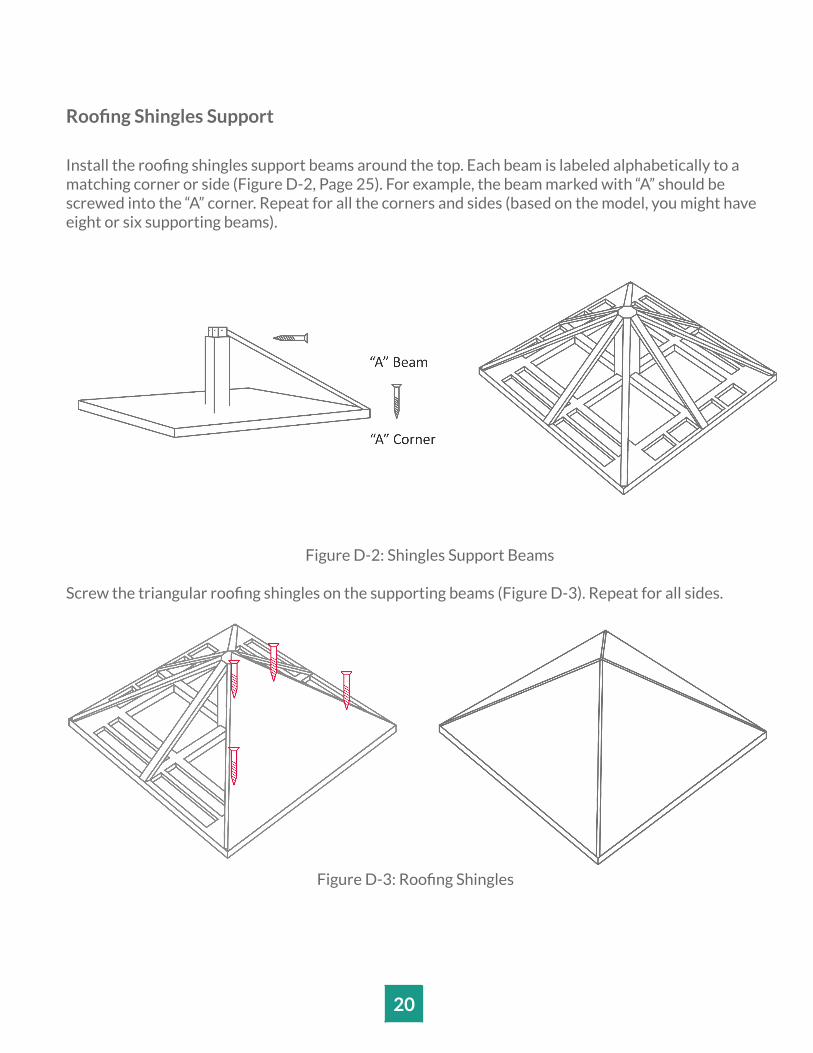
Install the roofing shingles support beams around the top. Each beam is labeled alphabetically to amatching corner or side (Figure D-2, Page 25). For example, the beam marked with “A” should bescrewed into the “A” corner. Repeat for all the corners and sides (based on the model, you might haveeight or six supporting beams).
Figure D-2: Shingles Support Beams
Screw the triangular roofing shingles on the supporting beams (Figure D-3). Repeat for all sides.
Figure D-3: Roofing Shingles
20
Roof Sealing
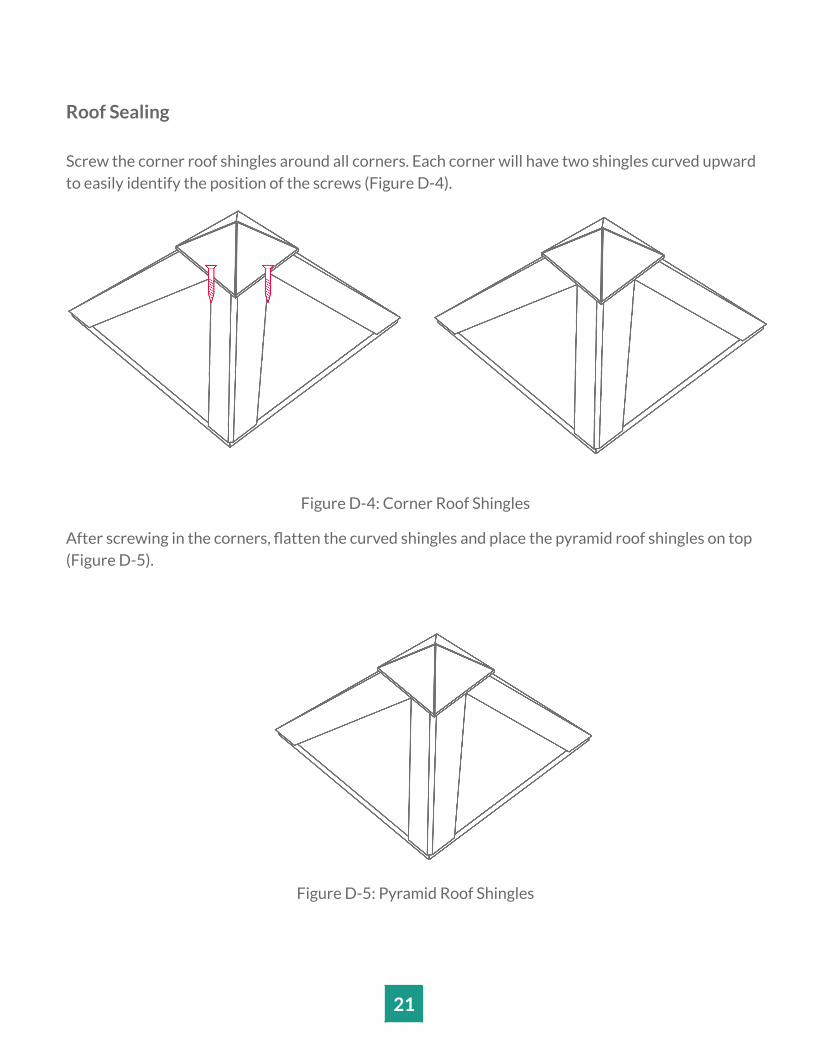
Screw the corner roof shingles around all corners. Each corner will have two shingles curved upwardto easily identify the position of the screws (Figure D-4).
Figure D-4: Corner Roof Shingles
After screwing in the corners, flatten the curved shingles and place the pyramid roof shingles on top(Figure D-5).
Figure D-5: Pyramid Roof Shingles
21
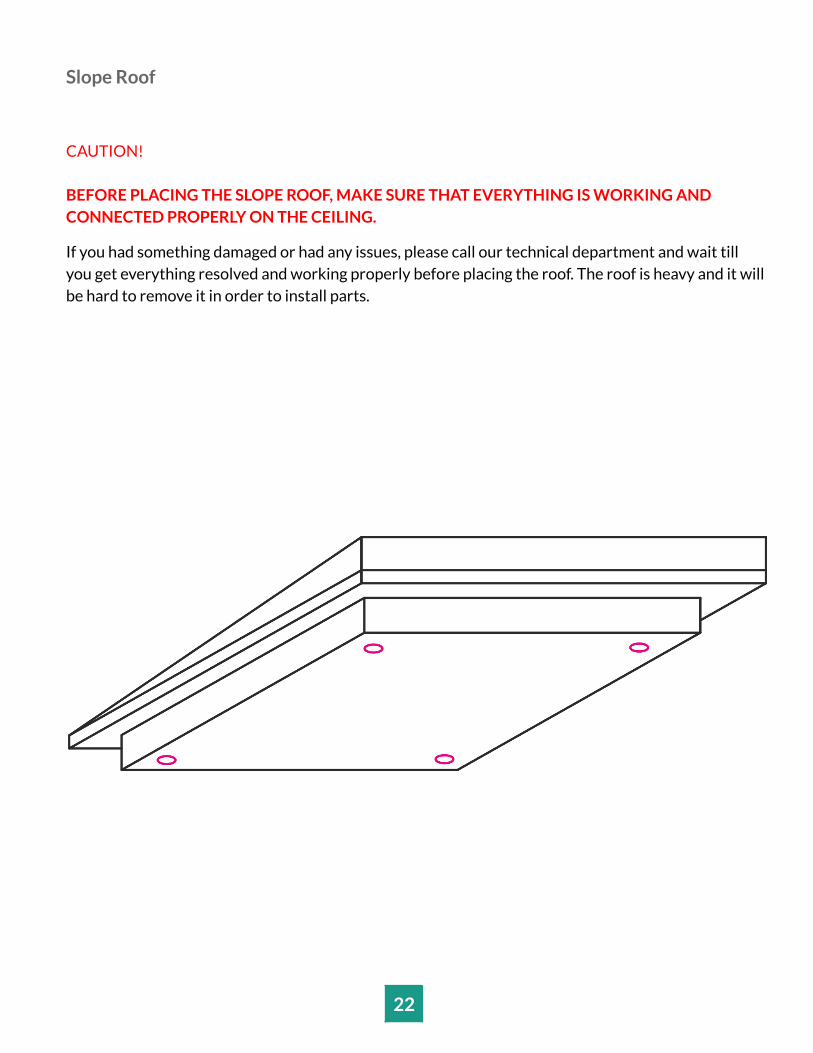
Slope Roof
CAUTION!
BEFORE PLACING THE SLOPE ROOF, MAKE SURE THAT EVERYTHING IS WORKING ANDCONNECTED PROPERLY ON THE CEILING.
If you had something damaged or had any issues, please call our technical department and wait tillyou get everything resolved and working properly before placing the roof. The roof is heavy and it willbe hard to remove it in order to install parts.
22
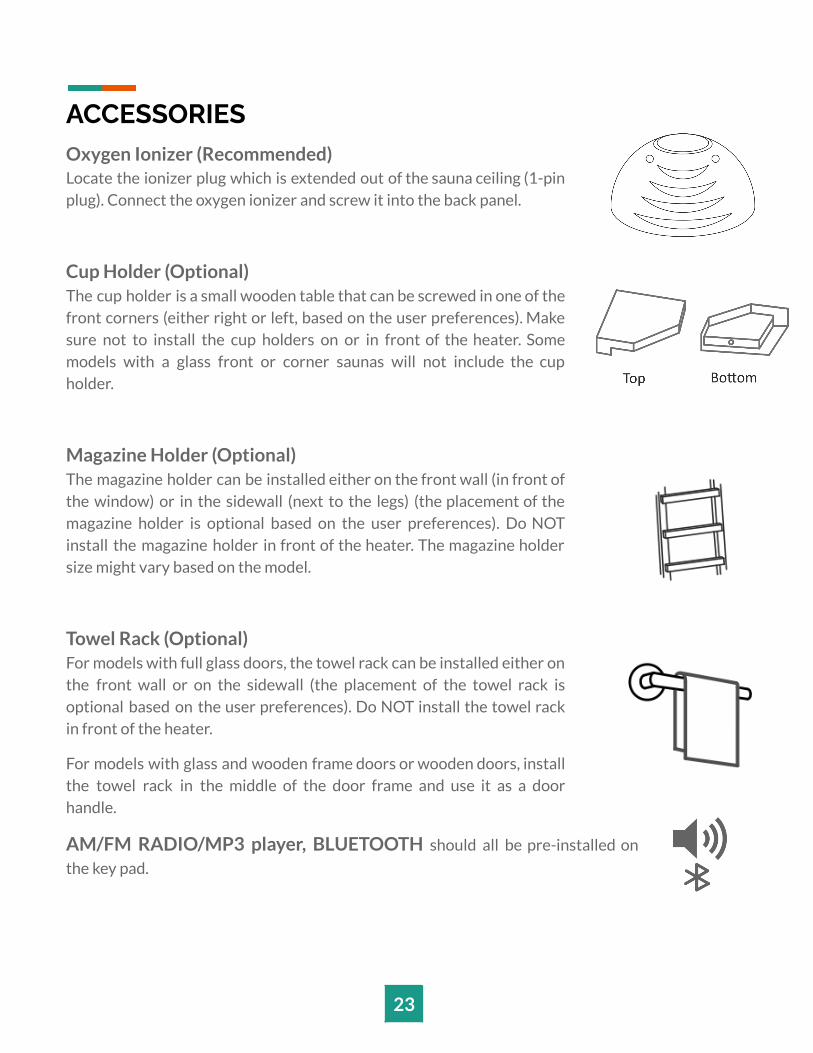
ACCESSORIESOxygen Ionizer (Recommended)Locate the ionizer plug which is extended out of the sauna ceiling (1-pinplug). Connect the oxygen ionizer and screw it into the back panel.
Cup Holder (Optional)The cup holder is a small wooden table that can be screwed in one of thefront corners (either right or left, based on the user preferences). Makesure not to install the cup holders on or in front of the heater. Somemodels with a glass front or corner saunas will not include the cupholder.
Magazine Holder (Optional)The magazine holder can be installed either on the front wall (in front ofthe window) or in the sidewall (next to the legs) (the placement of themagazine holder is optional based on the user preferences). Do NOTinstall the magazine holder in front of the heater. The magazine holdersize might vary based on the model.
Towel Rack (Optional)For models with full glass doors, the towel rack can be installed either onthe front wall or on the sidewall (the placement of the towel rack isoptional based on the user preferences). Do NOT install the towel rackin front of the heater.
For models with glass and wooden frame doors or wooden doors, installthe towel rack in the middle of the door frame and use it as a doorhandle.
AM/FM RADIO/MP3 player, BLUETOOTH should all be pre-installed on
the key pad.
23

Color Therapy Lights (Recommended)Some models will include color therapy lights (or chromo lights akachromotherapy). Color therapy lights function as light therapy forphysical and mental health. Scientists have determined that each coloremits a frequency.
Our body consists of Seven Layers of the Auric Field and the SevenChakras (energy centers of the body). Each layer looks different andeach has its own particular function. Each layer of our Aura is associatedwith a chakra (1st layer with 1st chakra, and so on). See a chart below:
Chakra – Root Chakra (RED)Location: The end of the spine, between the anusand the sexual organsFunction/Qualities: Security/Safety, StabilityFunction when disturbed/unhealthy: Fear, insecurity. Life feels like a burden. Feeling of not belonging.Physical Health: Weak constitution, elimination problems. Reducedphysical and mental resistance.
2nd Chakra – Sacral Chakra (ORANGE)Location: The Sexual OrgansFunction: patience, Healthy/Positive Emotions towards Sexuality, Creativity, Responsible RelationsFunction when disturbed/unhealthy: Rigid emotions, frigidity, guilt, no boundaries.Physical Health: Problems with reproductive organs, kidneys.
3rd Chakra – Navel (YELLOW)Location: Navel Point – Solar PlexusFunction/Qualities: Center of personal power and commitment;Self-esteem, dignity, identity, judgment.Place of inner balance and inspiration. Function when disturbed/unhealthy: Anger, greed, shame,despair;
No strength or spontaneity. Conforming in order to be recognized;Suppressing one's own wishes/emotions to please others.Physical Health: Problems with digestion, the liver, gallbladder, the pancreas.
4th Chakra – Heart Chakra (GREEN)Location: The middle of the chest on the breast bone. Function/Qualities: Compassion, kindness,forgiveness, service, loveFunction when disturbed/unhealthy: Grief, Attachment, Easily Hurt. Emotional dependence onothers. Heartlessness.Physical Health: Heart problems, lung problems, blood pressure problems.
24
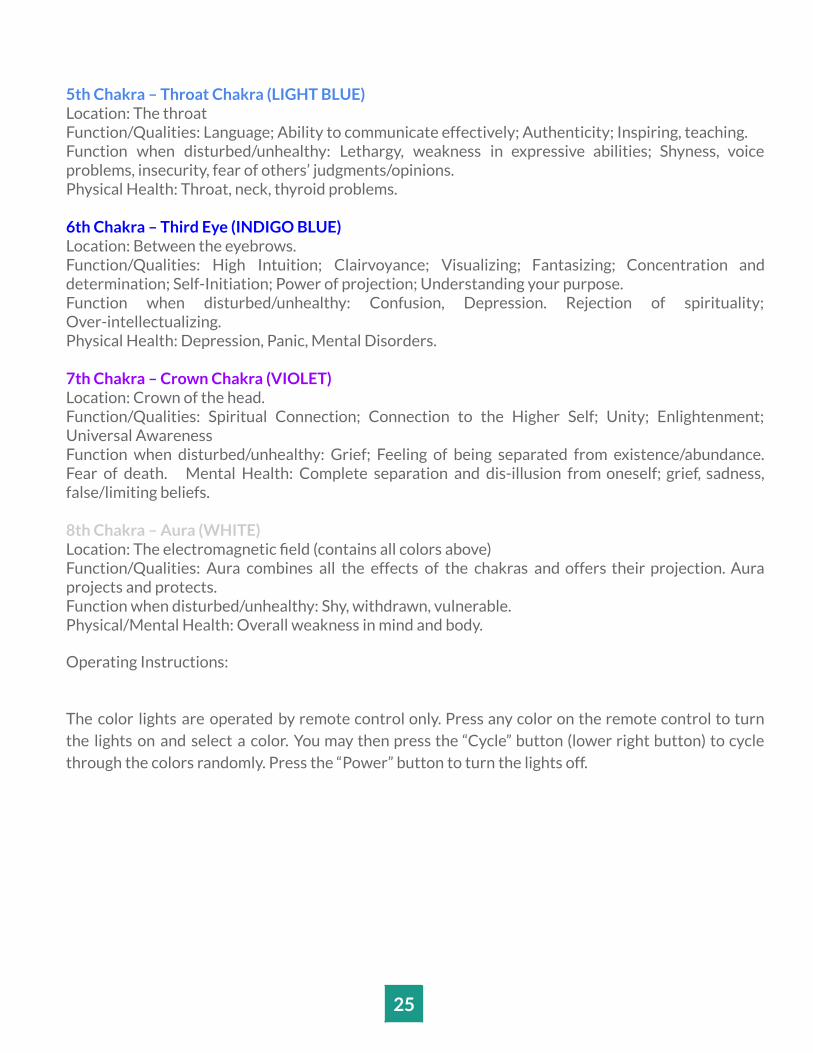
5th Chakra – Throat Chakra (LIGHT BLUE)Location: The throatFunction/Qualities: Language; Ability to communicate effectively; Authenticity; Inspiring, teaching.Function when disturbed/unhealthy: Lethargy, weakness in expressive abilities; Shyness, voiceproblems, insecurity, fear of others’ judgments/opinions.Physical Health: Throat, neck, thyroid problems.
6th Chakra – Third Eye (INDIGO BLUE)Location: Between the eyebrows.Function/Qualities: High Intuition; Clairvoyance; Visualizing; Fantasizing; Concentration anddetermination; Self-Initiation; Power of projection; Understanding your purpose.Function when disturbed/unhealthy: Confusion, Depression. Rejection of spirituality;Over-intellectualizing.Physical Health: Depression, Panic, Mental Disorders.
7th Chakra – Crown Chakra (VIOLET)Location: Crown of the head.Function/Qualities: Spiritual Connection; Connection to the Higher Self; Unity; Enlightenment;Universal AwarenessFunction when disturbed/unhealthy: Grief; Feeling of being separated from existence/abundance.Fear of death. Mental Health: Complete separation and dis-illusion from oneself; grief, sadness,false/limiting beliefs.
8th Chakra – Aura (WHITE)Location: The electromagnetic field (contains all colors above)Function/Qualities: Aura combines all the effects of the chakras and offers their projection. Auraprojects and protects.Function when disturbed/unhealthy: Shy, withdrawn, vulnerable.Physical/Mental Health: Overall weakness in mind and body.
Operating Instructions:
The color lights are operated by remote control only. Press any color on the remote control to turnthe lights on and select a color. You may then press the “Cycle” button (lower right button) to cyclethrough the colors randomly. Press the “Power” button to turn the lights off.
25
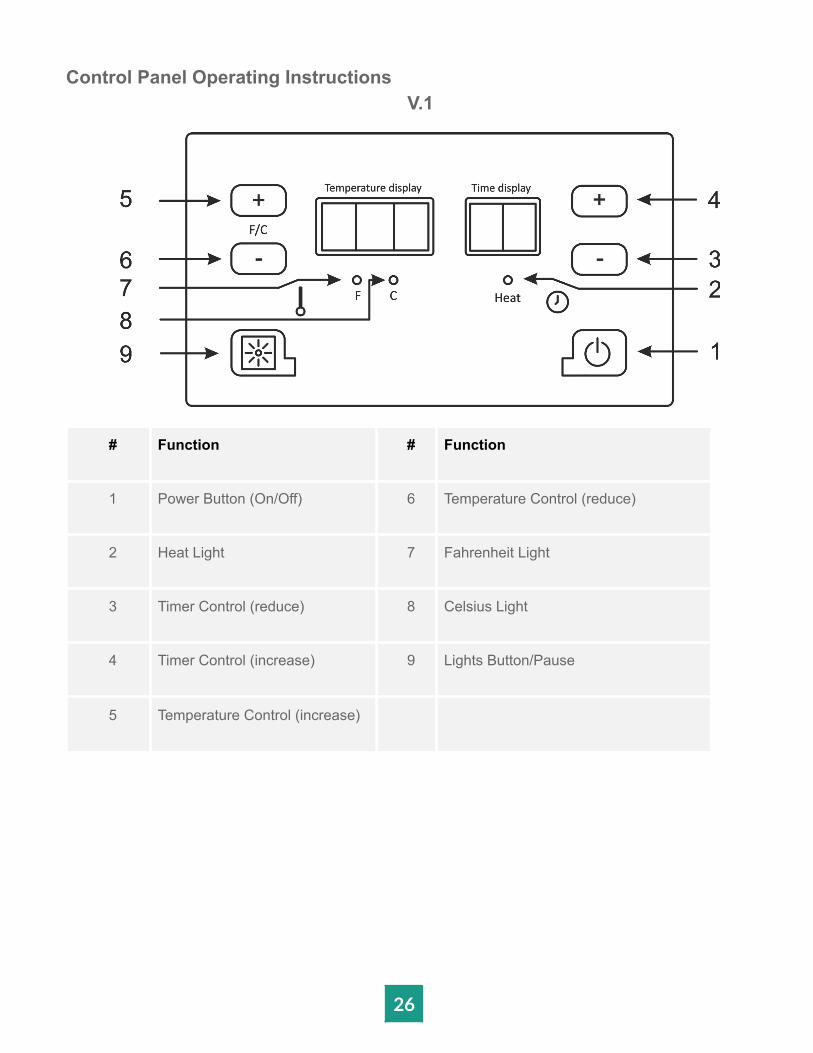
Control Panel Operating InstructionsV.1
# Function # Function
1 Power Button (On/Off) 6 Temperature Control (reduce)
2 Heat Light 7 Fahrenheit Light
3 Timer Control (reduce) 8 Celsius Light
4 Timer Control (increase) 9 Lights Button/Pause
5 Temperature Control (increase)
26
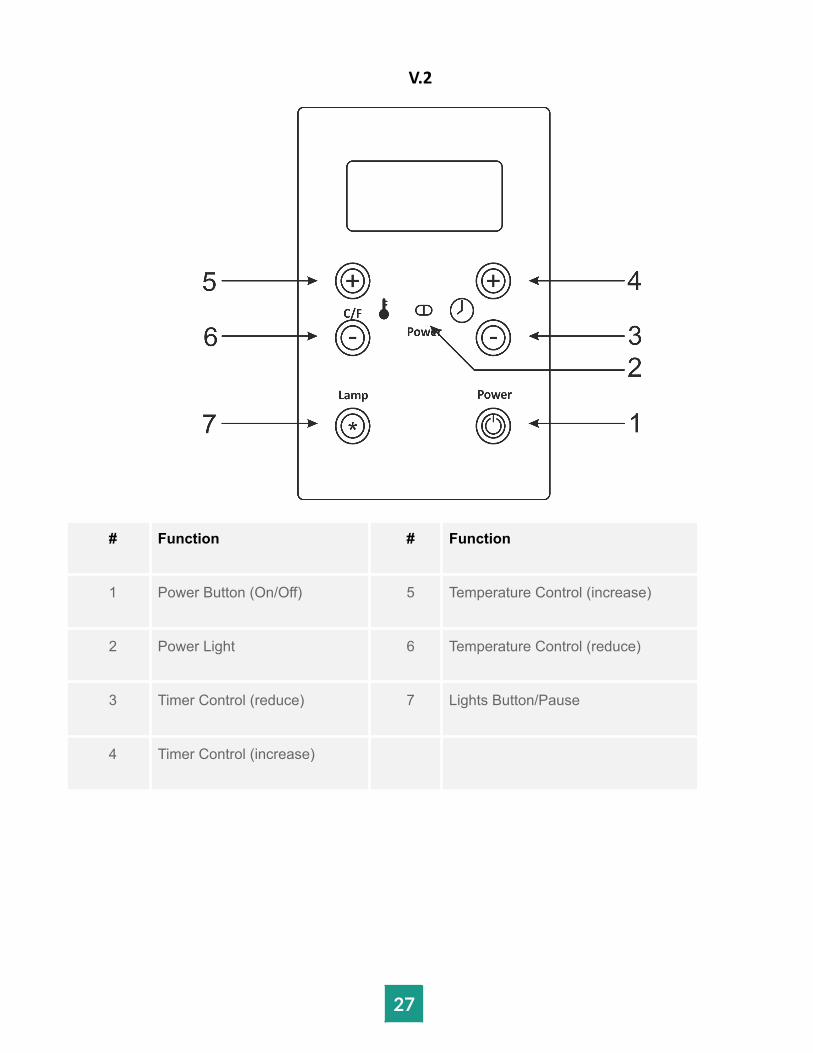
V.2
# Function # Function
1 Power Button (On/Off) 5 Temperature Control (increase)
2 Power Light 6 Temperature Control (reduce)
3 Timer Control (reduce) 7 Lights Button/Pause
4 Timer Control (increase)
27
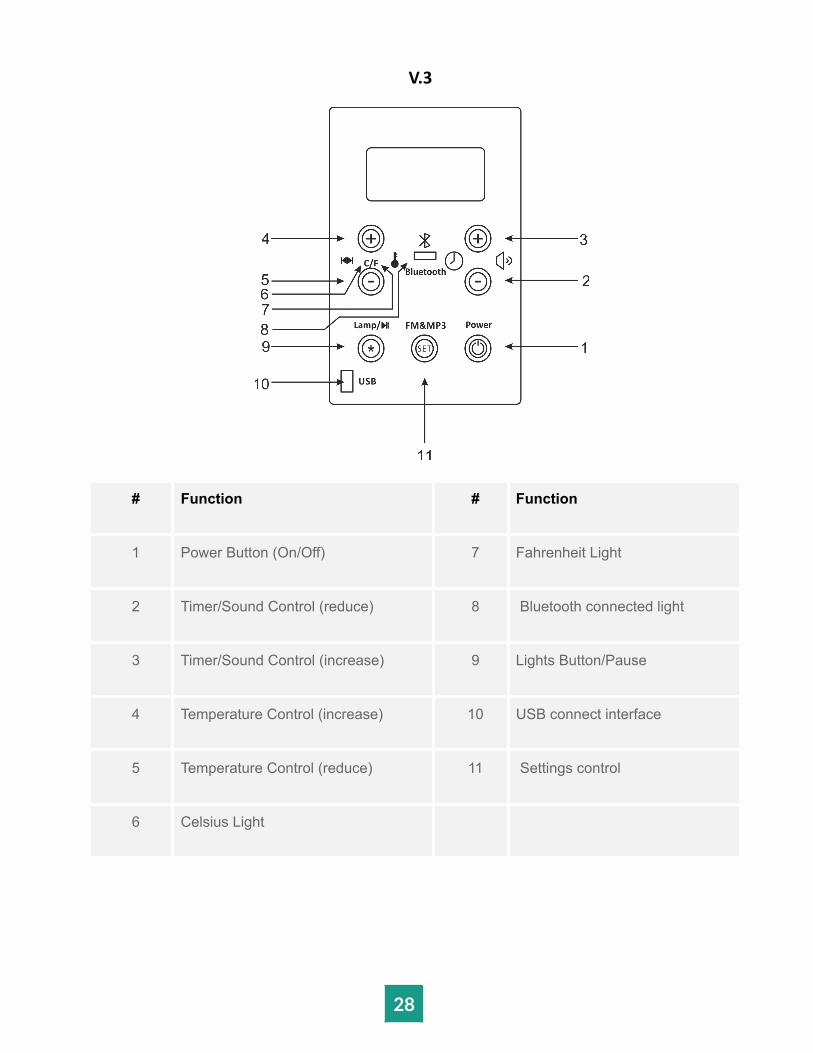
V.3
# Function # Function
1 Power Button (On/Off) 7 Fahrenheit Light
2 Timer/Sound Control (reduce) 8 Bluetooth connected light
3 Timer/Sound Control (increase) 9 Lights Button/Pause
4 Temperature Control (increase) 10 USB connect interface
5 Temperature Control (reduce) 11 Settings control
6 Celsius Light
28
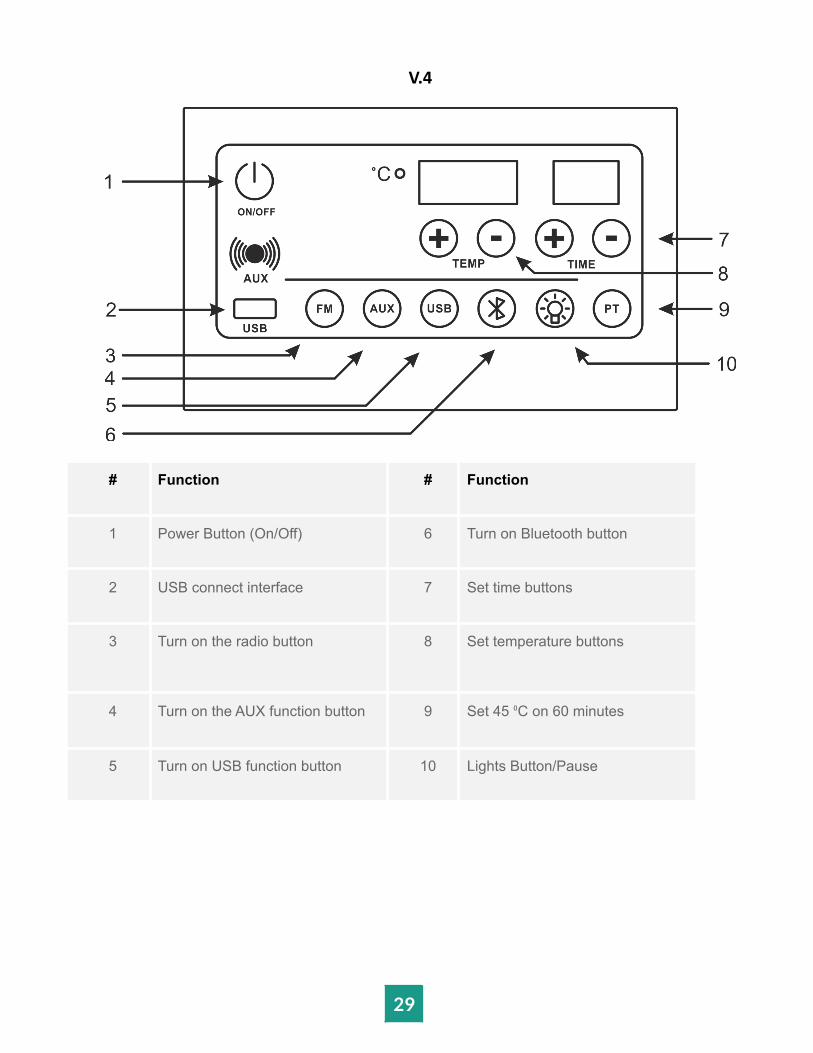
V.4
# Function # Function
1 Power Button (On/Off) 6 Turn on Bluetooth button
2 USB connect interface 7 Set time buttons
3 Turn on the radio button 8 Set temperature buttons
4 Turn on the AUX function button 9 Set 45 ⁰C on 60 minutes
5 Turn on USB function button 10 Lights Button/Pause
29
V.5
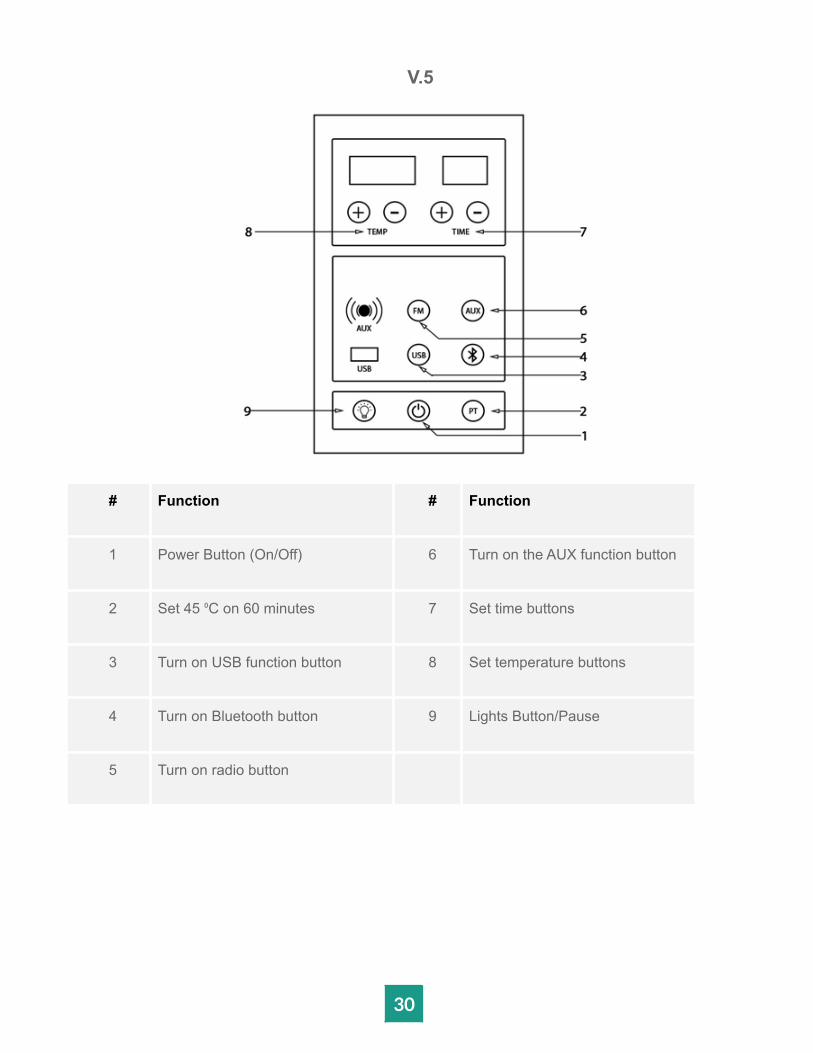
# Function # Function
1 Power Button (On/Off) 6 Turn on the AUX function button
2 Set 45 ⁰C on 60 minutes 7 Set time buttons
3 Turn on USB function button 8 Set temperature buttons
4 Turn on Bluetooth button 9 Lights Button/Pause
5 Turn on radio button
30
1.Turn on the light wave.Click the "On/Off"(1) button to turn the light wave on or off. In the power-on state, The first
click is to turn on the light wave, and the second click is to turn off the light wave. After setting thetemperature (30-65), the system temperature has a memory function, and the last set temperature isthe value. Time defaults to a maximum of 60 minutes
2.Temperature settingAfter turning on the light wave, click the temperature + and temperature - to adjust the
temperature of the light wave, the temperature adjustment range is 30-65℃, Click once to increaseor decrease by 1℃; when the temperature is lower than 30 degrees, the display is --
Fahrenheit and Celsius conversion: long press TEMP + button for 10 seconds, you can convertFahrenheit and Celsius
3.Time settingThe time can be adjusted from 5 to 60 minutes, click once to increase or decrease by 1 minute.
When the countdown reaches 0 minutes, the buzzer will sound 3 times, each interval is 1.5S.
4.Lamp function1. When the light wave is turned on, click the "Lights"(9) button to switch the light. The light
parameters are: AC220V 50W (if you need to use the DC12V lamp, please connect the externalswitching power supply)
2. When the light wave is turned on, click the "Lights"(9) button, when the clock area shows‘2n’, the temperature area displays “LX”. Press the "Lights"(9) button to change the color of the LEDlight. Press once to convert one color, can cycle and remember (L1 full bright L2 red blue L3 blue L4blue-green L5 green L6 green red L7 red L8 jump L9 gradient)
3. Do not press the "Lights"(9) button within 8 seconds, the time window exits 2n, thetemperature window exits Lx, the color of the LED light retains the current state and exits the lightcontrol logic lock function.
4. In the 2n state, LED lights and high-voltage spotlights can be individually switched: taptime-and time+ can independently control switch LED lights and spotlights
5.Audio function (can be controlled independently):1. Press the “FM”(5) button to turn on the radio function, the temperature zone displays the
frequency, the clock zone displays “XX”, the time +/- adjusts the volume, the temperature +/- adjuststhe frequency, and the button has no button response for 8 seconds, the display switches totemperature and time.
2. Press the “AUX”(6) key to turn on the AUX function, the temperature zone displays AUX, theclock zone displays “XX”, the time +/- adjusts the volume, and the button has no button response for 8seconds, the display switches to temperature and time.
31
3. Press the “USB”(3) button to open the USB function, the temperature zone displays USB,the temperature +/- adjusts the previous one, the next one, the clock area displays “XX”, the time +/-adjusts the volume, and the button has no button response for 8 seconds. , the display switches totemperature and time.
Note: The U disk read time is 2-3 seconds.
4. Click the “Bluetooth”(4) button, the backlight is on, and the Bluetooth is turned on. At thispoint, open Bluetooth on mobile devices, and search, complete Bluetooth matching, ready forsuccess. After the pairing is successful, the song can be played. The pairing time is 6-7 seconds, thetemperature zone displays “TB”, the clock zone displays “XXdb”, tap the time +/- to adjust the volume,8 seconds without button response, the display switches to temperature and time.
Note: During the Bluetooth pairing process, Bluetooth, USB, and radio can't be switchedimmediately. The switching time should be 6-7 seconds. If you switch immediately, you can switchafter 6-7 seconds.
6.Physiotherapy function:In the boot state, press the "PT"(2) button, the sauna temperature is 45 degrees, the time is 60
minutes.
7. High-temperature protection function:When the temperature of the sensor exceeds 75 degrees, the two digital tubes display HH at
the same time, alarm and flicker, all functions stop, even if the temperature drops below 65 degrees,the function can not be restored, and must be power-off before normal use.
8. Sensor fault detection:Open circuit: Two digital tubes display 00 and flicker, buzzer alarm, the function can not be
turned on normally, after troubleshooting can be used normally.
Short circuit: Two digital tubes display 11 and flicker, buzzer alarm, the function can not beturned on normally, after troubleshooting can be used normally.
Usage Guide
Allow your sauna to warm up for 15-20 minutes or until it reaches 110 F° (43 ° C). You may close thevent on the ceiling to speed up the preheating process. Drink plenty of water to avoid dehydrationbefore and after the sauna session. It is recommended not to exceed 40 minutes per session.
32
If the sauna becomes stuffy, open the vent on the ceiling to allow fresh air into the sauna.
Tip:
● Start using the sauna within 10 degrees before it reaches the set temperature, in order to receivethe most benefit out of the infrared heaters. For example, if you set the sauna to 125 F° (52 ° C),you should start using the sauna when it reaches 115 F° (46 ° C).
● Customers reported an average use temperature of 125 F° (52 ° C).
Precautions and Warnings!● If the temperature becomes unbearable, decrease the temperature or shut off the sauna
immediately.● Do not use it if pregnant or have serious inflammation, fever, a communicable disease, acute
bleeding, or are intoxicated.● Do not consume alcohol or drugs when using the sauna.● Do not splash water on the heaters or any electrical component inside the sauna.● Do not bring wet towels into your sauna or any substances that could harm the interior of your
sauna.● Do not install a lock on your sauna.● All repairs need to be authorized by the supplier ‘s representative; otherwise, the product
warranty may be voided.
Sauna and ContraindicationsSauna and MedicationsIndividuals who are using prescription drugs should seek the advice of their personal physician orpharmacist for possible changes in the drug’s effect when the body is exposed to far-infrared wavesor elevated body temperature. Diuretics, barbiturates, and beta-blockers may impair the body'snatural heat loss mechanisms. Some over the counter drugs such as antihistamines may also causethe body to be more prone to heatstroke.
Sauna and ChildrenThe core body temperature of children rises much faster than adults. This occurs due to a highermetabolic rate per body mass, limited circulatory adaptation to increased cardiac demands and theinability to regulate body temperature by sweating. Consult with the child's Pediatrician before usingthe sauna. Sauna is NOT recommended for small children!
33
Sauna and the ElderlyThe ability to maintain core body temperature decreases with age. This is primarily due to circulatoryconditions and decreased sweat gland function. The body must be able to activate its natural coolingprocesses in order to maintain core body temperature. Please consult with your physician prior touse.
Sauna and Cardiovascular ConditionsIndividuals with cardiovascular conditions or problems (hypertension/hypotension), congestive heartfailure, impaired coronary circulation or those who are taking medications, which might affect bloodpressure, should exercise extreme caution when exposed to prolonged heat. Heat stress increasescardiac output, blood flow, in an effort to transfer internal body heat to the outside environment viathe skin (perspiration) and respiratory system. This takes place primarily due to major changes in theheart rate, which has the potential to increase by thirty (30) beats per minute for each degreeincrease in core body temperature.
Sauna and AlcoholContrary to popular belief, it is not advisable to attempt to "Sweat Out" a hangover. Alcoholintoxication decreases a person's judgment; therefore they may not realize it when the body has anegative reaction to high heat. Alcohol also increases the heart rate, which may be further increasedby heat stress.
Sauna and Chronic Conditions / Diseases Associated With a Reduced Ability toSweat or PerspireParkinson's, Multiple Sclerosis, Central Nervous System Tumors and Diabetes with Neuropathy areconditions that are associated with impaired sweating.
Sauna and Hemophiliacs / Individuals Prone To BleedingThe use of Infrared saunas should be avoided by anyone who is predisposed to bleeding.
Sauna and FeverAn individual that has a fever should not use any type of sauna.
Sauna and Insensitivity to HeatAn individual that has an insensitivity to heat should not use any type of sauna.
Sauna and PregnancyPregnant women should consult a physician before using any type of sauna because fetal damage canoccur with certain elevated body temperature. Therefore, the sauna is NOT RECOMMENDED foruse by pregnant women.
34
Sauna and MenstruationThe heating of the low back area of women during the menstrual period may temporarily increasetheir menstrual flow. Some women endure this process to gain pain relief commonly associated withtheir cycle whereas others simply choose to avoid saunas use during that time of the month.
Sauna and Joint InjuryIf you have a recent (acute) joint injury, it should not be heated for the first 48 hours after an injury oruntil hot and swollen symptoms subside. If you have a joint or joints that are chronically hot andswollen, these joints may respond poorly to vigorous heating of any kind. Vigorous heating is strictlycontraindicated in cases of enclosed infections, be they dental, in joints or in any other tissues.
Saunas and ImplantsMetal pins, rods, artificial joints or any other surgical implants generally reflect far infrared waves andthus are not heated by this system; nevertheless, you should consult your surgeon prior to using anInfrared Sauna. Certainly, the usage of an Infrared Sauna must be discontinued if you experience painnear any such implants. Silicone does absorb far infrared energy. Implanted silicone or siliconeprostheses for nose or ear replacement may be warmed by the far-infrared waves. Since siliconemelts at over 200°C (392°F), it should not be adversely affected by the usage of Infrared saunas. It isstill advised that you check with your surgeon and possibly a representative from the implantmanufacturer to be certain.
In the rare event, you experience pain and/or discomfort, immediately discontinue sauna use.
TroubleshootingThe sauna doesn’t power on:● Make sure the power cord is securely connected to the power socket and the control box (on top
of the sauna).● Make sure the breaker did not turn off.● Make sure the control panel white ribbon wire is securely connected.● Make sure the power socket is working by trying a different device on the same socket.
Light is not working:● Replace the light bulb.
Color therapy light does not work:● Make sure the battery is inserted correctly.● Make sure to point the remote directly at the remote receiver (small rounded tip next to the color
lights).
35
● Try a new battery.
All heaters are not working:● Make sure to connect the heater plugs securely to the control box (on top of the sauna).● Make sure to connect the heaters’ plugs under the bench are connected securely.● Floor heater and under bench heater are not as hot as other heaters (by design).● Make sure the plug behind the heater is connected (you would need to unscrew the heater).
Control panel display is unusual:● If the control panel temperature display is over 150 or 230, make sure to connect the heat sensor
securely.● If the control panel time display is -- (two dashes), the sauna is on continuous working mode. Press
the timer button to return to the timed working mode.
FM/USB/AUX/MP3/BLUETOOTH PLAYER WITH SPEAKERS is not working:● If the radio has a bad reception, extend the antenna outside the sauna roof.● If the USB cannot read an MP3 player, use an Aux-In plug and play the music from the MP3 player.
For more troubleshooting advice or to report a problem, please contact the supplier.
Warranty InformationEnlighten Saunas warrants its products to be free of defects in material and workmanship.
This warranty extends only to:1. a retail purchaser of a sauna or parts directly from the supplier;2. the authorized wholesale purchaser of a sauna or parts directly from the supplier; or3. a retail purchaser of a sauna or parts from an authorized wholesaler.
However, in the event of a sale, transfer or conveyance of a sauna or parts from any of the three (3)proceeding persons or entities, any rights, duties, and obligations associated with this warranty shallbe null and void and of no further force and effect. The sauna or parts must be purchased and usedwithin one year of the manufactured date.
The controls, heaters, electrical parts and wiring must be kept dry at all times and not exposed to anywater or liquids.
Under no circumstances will the manufacturer be liable for any special or consequential damagesarising from the use of the product, its components and/or parts installed with or attached to it. Themanufacturer is not liable for any injury to any persons or any claims of such that may be arisingfrom the use, installation, and/or the service (repair) of the product.
36
The purchaser must establish the date of purchase, by dated sales slip, invoice or delivery receipt.
Outdoor-Residential Use:A warranty shall not apply to any product or a component used for any industrial, rental,professional or neglect, accident, abuse, improper installation and/or reckless operation by thepurchaser, including but not limited to: exposure to a fire or excessive heat, and other hazardouselements/activities. (Please refer to an instruction manual on proper usage).
Standard Warranty
The standard 3-year warranty covers the following:
• Factory-Installed Heater Components - 3 years• Factory-Installed Sauna Controls and Wiring- 3 years• Factory-Installed Audio Components - 3 years• Enlighten Saunas® Brand Cabin (Wood / Construction) - 3 Years
Extended Warranty5 years optional
You can extend for an additional 5% of the MSRP price of the sauna. This amount must bepaid within 90 days of the date of delivery
● Factory-Installed Heater Components - 5 years● Factory-Installed Sauna Controls and Wiring - 5 years● Factory-Installed Audio Components - 5 years● Enlighten Saunas® Brand Cabin (Wood / Construction) - 5 years
Extended Warranty10 years optional
You can extend for an additional 10% of the purchase price of the sauna. This amountmust be paid within 90 days of the date of delivery
• Factory-Installed Heater Components - 10 years• Factory-Installed Sauna Controls and Wiring - 10 years
37

• Factory-Installed Audio Components - 10 years• Enlighten Saunas® Brand Cabin (Wood / Construction) - 10 years
Lifetime Optional
You can extend to a lifetime warranty for an additional 20% of the purchase price of thesauna. This amount must be paid within 90 days of the date of delivery
• Infrared Heaters - Lifetime• Factory-Installed Sauna Controls and Wiring - Lifetime• Factory-Installed Audio Components - Lifetime• Enlighten Saunas® Brand Cabin (Wood / Construction) - 10 years
For the coverage period specified (“warranty period”), Company agrees to replace, at its soleoption, the products listed above, subject to and solely in accordance with the terms, conditions,exclusions, and limitations set forth herein. The warranty covers parts only, labor is not included.
Indoor-Residential Use:The sauna or parts must be placed in an indoor environment unless the sauna or parts are specificallybought for outdoor/indoor use. If an indoor sauna or parts are placed in an outdoor environment, thewarranty shall be null and void and of no further force and effect.
A warranty shall not apply to any product or a component used for any industrial, rental,professional or neglect, accident, abuse, improper installation and/or reckless operation by thepurchaser, including but not limited to: exposure to a fire or excessive heat, and other hazardouselements/activities. (Please refer to an instruction manual on proper usage).
Standard Warranty
The standard Lifetime warranty covers the following:
• Factory-Installed Heater Components - 7 years• Factory-Installed Sauna Controls and Wiring- 7 years• Factory-Installed Audio Components - 7 years• Enlighten Saunas® Brand Cabin (Wood / Construction) - 7 years
38
Lifetime Optional
You can extend to a lifetime warranty for an additional 10% of the purchase price of thesauna. This amount must be paid within 90 days of the date of delivery
• Infrared Heaters - Lifetime• Factory-Installed Sauna Controls and Wiring - Lifetime• Factory-Installed Audio Components - Lifetime• Enlighten Saunas® Brand Cabin (Wood / Construction) - 10 years
For the coverage period specified (“warranty period”), Company agrees to replace, at its soleoption, the products listed above, subject to and solely in accordance with the terms, conditions,exclusions, and limitations set forth herein. The warranty covers parts only, labor is not included.
Commercial Use:
Standard Warranty
The standard 3-year warranty covers the following:
• Factory-Installed Heater Components - 3 years• Factory-Installed Sauna Controls and Wiring- 3 years• Factory-Installed Audio Components - 3 years• Enlighten Saunas® Brand Cabin (Wood / Construction) - 3 Years
Extended Optional6 years Optional
You can extend for an additional 20% of the purchase price of the sauna. This amountmust be paid within 90 days of the date of delivery
• Factory-Installed Heater Components - 6 years• Factory-Installed Sauna Controls and Wiring - 6 years• Factory-Installed Audio Components - 6 years• Enlighten Saunas® Brand Cabin (Wood / Construction) - 6 years
39
For the coverage period specified (“warranty period”), Company agrees to replace, at its soleoption, the products listed above, subject to and solely in accordance with the terms, conditions,exclusions, and limitations set forth herein. The warranty covers parts only, labor is not included.
The warranty covers manufacturing defects in materials and workmanship encountered in normaluse of this product, and shall not apply to the following, including, but not limited to: damage whichoccurs in shipment; delivery and installation; applications and uses for which this product was notintended; altered product or serial numbers; cosmetic damage or exterior finish; accidents, abuse,neglect, fire, water, lightning or other acts of nature; use of products, equipment, systems, utilities,services, parts, supplies, accessories, applications, installations, repairs, external plumbing andleaks, external wiring, circuit breakers, fuses or connectors not supplied and authorized by thesupplier, or which damage this product or result in service problems; incorrect electrical linevoltage, fluctuations, and surges; customer adjustments and failure to follow operating instructions,cleaning, maintenance and environmental instructions that are covered and prescribed in theinstruction book; consumable items including light bulbs.
Enlighten Saunas® shall not be liable for the loss of use of the sauna or other incidental orconsequential damages. Under no circumstances shall the supplier or any of its representatives beheld liable for injury to any persons or damages to any properties. Specifications are subject tochange without notice.
Enlighten Saunas® uses the highest quality wood in our product lines. All structures using woodare susceptible to minor dents, scratches, and scuffing. This is normal and will not affect theintegrity or operation of your sauna.
Wood is a living material that continues to respond to climate conditions, even after beingmanufactured into a sauna. Variations in color or grain, and irregularities such as fine cracks arepart of the natural beauty of the wood and in no way should be considered defects. During normaloperation, wood may crack slightly due to the changes in moisture level. This will not affect thestructural integrity of the sauna.
Prior to shipping, the wood is inspected for consistency, color, and quality. Our saunas are shippedaround the globe and can experience slight blemishes, scratches or scuffs in transit. In mostcases, these blemishes on the exterior of the sauna can be concealed by using a small amount offurniture polish, oil or other furniture treatment. The interior blemishes, scratches, or scuffs can beeither left alone, sanded or a combination of gluing plus sanding. Please avoid any treatmentcontaining benzene or a high concentration of alcohol.
40
ATTENTION:Shipping damage must be notated on the Bill of Lading (BOL). The Supplier must be notified of anydamage to your sauna within three (3) business days of signing the BOL. Failure to notify the supplierwithin the established time frame will result in the owner taking full responsibility for the cost of ALLREPLACEMENT PARTS including shipping and handling fees.
Sauna’s Health Benefits
Detoxification and Body CleansingDetoxification is a bodily process that removes health-threatening toxic waste that is accumulated byour body from our environment, day-to-day stress, diet, and chemicals. Sweating is the body's naturalway of getting rid of harmful toxins and cleansing our bodies by extracting poisons out through theskin. The infrared sauna waves penetrate deep below the skin and heat up the body’s coretemperature which naturally supports detoxification.
Weight LossInfrared Sauna is an effective way to support any weight loss program. According to the Journal ofthe American Medical Association, a sauna session can burn between 300-700 calories. Also, Dr. Oz.explained in the Oprah show that an infrared sauna session can burn up to 700 calories. A 20-minutesauna session is equal to a 20-minute long jog run. However effective, please keep in mind that ahealthy diet and exercise are recommended whether you use an infrared sauna or not. Sauna simplyenhances weight loss results and may speed up the weight loss process. Note: Following a healthydiet and exercise is highly recommended. Please always consult with your physician beforeattempting to begin any type of weight loss program.
Pain and Arthritis ReliefInfrared waves penetrate deep into the muscles for long-lasting pain relief. Moreover, patients withrheumatoid arthritis, using an infrared sauna results in a short-term improvement regarding pain andstiffness, reduction in fatigue, and a trend towards long-term beneficial effects.
Skin PurificationInfrared sauna purifies and rejuvenates the skin. It may assist in acne reduction, toning, anddetoxification of skin cells. Sauna heat also relaxes facial tension, thus improving the skin's elasticity.Sweating rinses bacteria out of the epidermal layer and sweat ducts.
41
Cardiovascular WorkoutScientific research has proven that regular use of infrared sauna dilates blood vessels, therefore, mayprevent blood clots, while maintaining healthy circulation and blood pressure. Vessels become moreelastic and pliable longer due to the regular dilation and contraction from the process of heating andcooling the body repeatedly.
Lower Blood Pressure and Improved CirculationBlood vessel dilation brings blood closer to the surface of the skin and, as blood vessels expand toaccommodate increased blood flow, circulation in the extremities improves, and the blood pressuregets lower. The effect on blood pressure is temporary, but medical research shows that frequentsauna bathing can make a person's blood pressure level also stay lower. Please note: a healthy dietand exercise are highly recommended. Always consult with your physician.
DISCLAIMER:The Sauna and its affiliates do not provide medical advice, education or treatment. The informationcontained in this manual is for general information purposes only and does not address individualcircumstances or medical conditions. It may not be right for you and should not be relied upon inmaking decisions about your health. Always consult your doctor for medical advice.
42
Top Related