


Languages
Pages
Legal

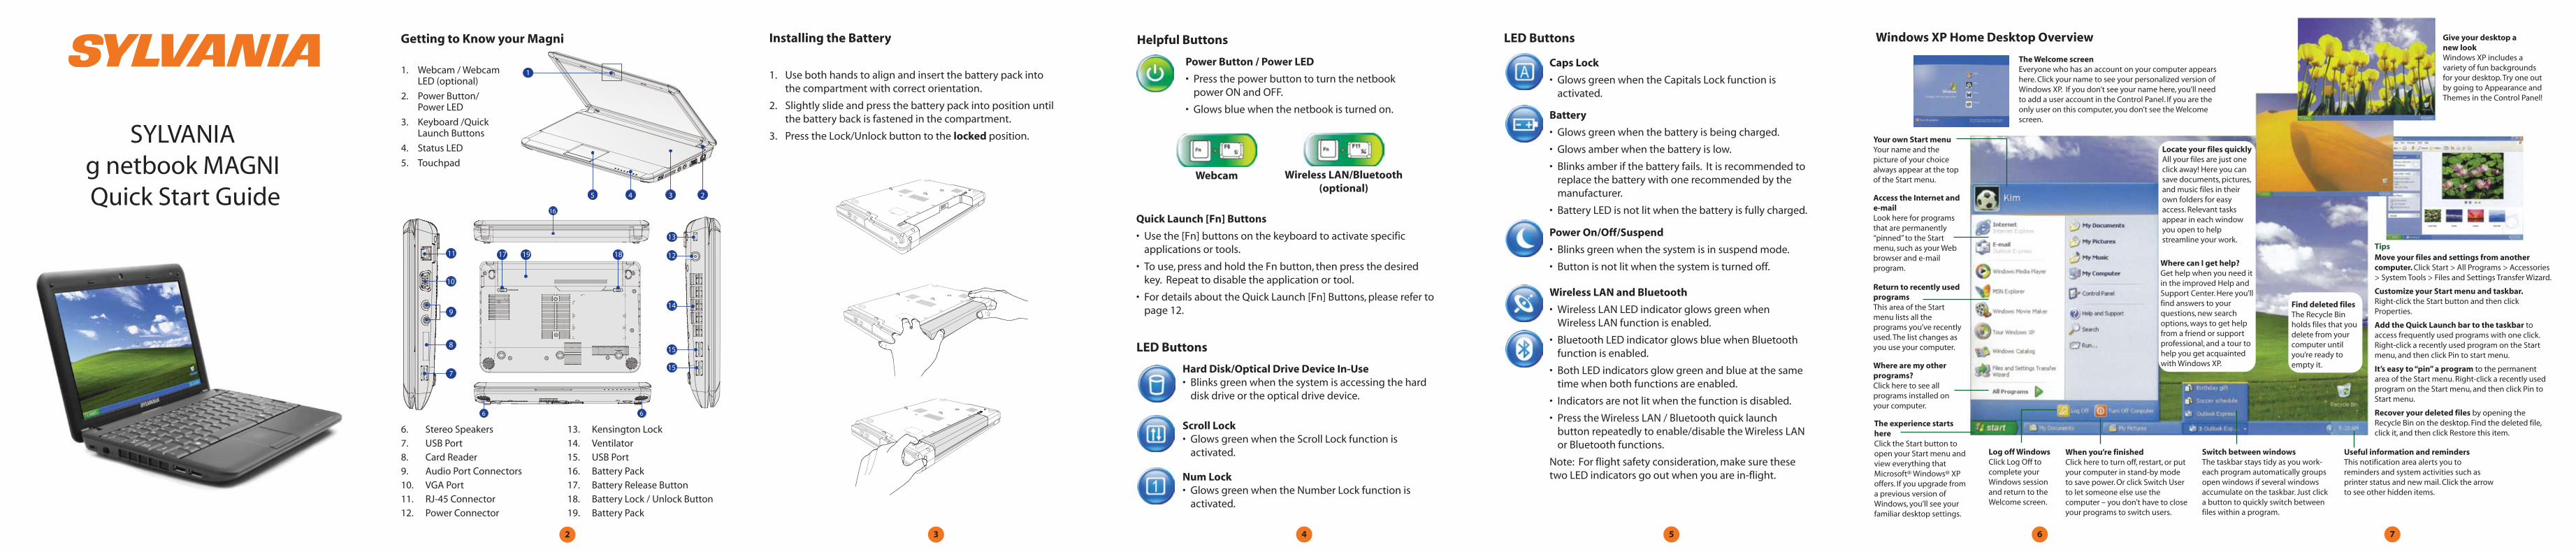
Getting to Know your Magni Installing the Battery
1. Use both hands to align and insert the battery pack into the compartment with correct orientation.
2. Slightly slide and press the battery pack into position until the battery back is fastened in the compartment.
3. Press the Lock/Unlock button to the locked position.
Helpful Buttons Windows XP Home Desktop Overview
Power Button / Power LED
• Press the power button to turn the netbook power ON and OFF.
• Glows blue when the netbook is turned on.
Quick Launch [Fn] Buttons
• Use the [Fn] buttons on the keyboard to activate specific applications or tools.
• To use, press and hold the Fn button, then press the desired key. Repeat to disable the application or tool.
• For details about the Quick Launch [Fn] Buttons, please refer to page 12.
LED Buttons
Caps Lock
• Glows green when the Capitals Lock function is activated.
Battery
• Glows green when the battery is being charged.
• Glows amber when the battery is low.
• Blinks amber if the battery fails. It is recommended to replace the battery with one recommended by the manufacturer.
• Battery LED is not lit when the battery is fully charged.
Power On/Off/Suspend
• Blinks green when the system is in suspend mode.
• Button is not lit when the system is turned off.
Wireless LAN and Bluetooth
• Wireless LAN LED indicator glows green when Wireless LAN function is enabled.
• Bluetooth LED indicator glows blue when Bluetooth function is enabled.
• Both LED indicators glow green and blue at the same time when both functions are enabled.
• Indicators are not lit when the function is disabled.
• Press the Wireless LAN / Bluetooth quick launch button repeatedly to enable/disable the Wireless LAN or Bluetooth functions.
Note: For flight safety consideration, make sure these two LED indicators go out when you are in-flight.
LED Buttons
Hard Disk/Optical Drive Device In-Use• Blinks green when the system is accessing the hard disk drive or the optical drive device.
Scroll Lock• Glows green when the Scroll Lock function is activated.
Num Lock• Glows green when the Number Lock function is activated.
1. Webcam / Webcam LED (optional)
2. Power Button/ Power LED
3. Keyboard /Quick Launch Buttons
4. Status LED
5. Touchpad
6. Stereo Speakers
7. USB Port
8. Card Reader
9. Audio Port Connectors
10. VGA Port
11. RJ-45 Connector
12. Power Connector
13. Kensington Lock
14. Ventilator
15. USB Port
16. Battery Pack
17. Battery Release Button
18. Battery Lock / Unlock Button
19. Battery Pack
Webcam Wireless LAN/Bluetooth(optional)
Your own Start menuYour name and the picture of your choice always appear at the top of the Start menu.
Access the Internet and e-mailLook here for programs that are permanently “pinned” to the Start menu, such as your Web browser and e-mail program.
Return to recently used programsThis area of the Start menu lists all the programs you’ve recently used. The list changes as you use your computer.
Where are my other programs?Click here to see all programs installed on your computer.
The experience starts hereClick the Start button to open your Start menu and view everything that Microsoft® Windows® XP offers. If you upgrade from a previous version of Windows, you’ll see your familiar desktop settings.
Switch between windowsThe taskbar stays tidy as you work- each program automatically groups open windows if several windows accumulate on the taskbar. Just click a button to quickly switch between files within a program.
Give your desktop a new lookWindows XP includes a variety of fun backgrounds for your desktop. Try one out by going to Appearance and Themes in the Control Panel!
Useful information and remindersThis notification area alerts you to reminders and system activities such as printer status and new mail. Click the arrow to see other hidden items.
Log off WindowsClick Log Off to complete your Windows session and return to the Welcome screen.
When you’re finishedClick here to turn off, restart, or put your computer in stand-by mode to save power. Or click Switch User to let someone else use the computer – you don’t have to close your programs to switch users.
TipsMove your files and settings from another computer. Click Start > All Programs > Accessories > System Tools > Files and Settings Transfer Wizard.
Customize your Start menu and taskbar. Right-click the Start button and then click Properties.
Add the Quick Launch bar to the taskbar to access frequently used programs with one click. Right-click a recently used program on the Start menu, and then click Pin to start menu.
It’s easy to “pin” a program to the permanent area of the Start menu. Right-click a recently used program on the Start menu, and then click Pin to Start menu.
Recover your deleted files by opening the Recycle Bin on the desktop. Find the deleted file, click it, and then click Restore this item.
Find deleted filesThe Recycle Bin holds files that you delete from your computer until you’re ready to empty it.
Locate your files quicklyAll your files are just one click away! Here you can save documents, pictures, and music files in their own folders for easy access. Relevant tasks appear in each window you open to help streamline your work.
Where can I get help?Get help when you need it in the improved Help and Support Center. Here you’ll find answers to your questions, new search options, ways to get help from a friend or support professional, and a tour to help you get acquainted with Windows XP.
SYLVANIA g netbook MAGNI Quick Start Guide
2 3 4 5 6 7
The Welcome screenEveryone who has an account on your computer appears here. Click your name to see your personalized version of Windows XP. If you don’t see your name here, you’ll need to add a user account in the Control Panel. If you are the only user on this computer, you don’t see the Welcome screen.
2345
1
6 6
11
10
9
8
7
16
17 19 18
13
12
14
15
15
Top Related