


Languages
Pages
Legal


1
Remedial Physical Education
/Chapters from Physical Education for People with Health Impairment/
Doc. PhDr. Pavel strnad, CSc.
2020

2
CONTENT:
1. Introduction … 3
2. Organizational forms of the physical training process … 3
3. Instructions for physical training process … 7
4. Basic compensatory means … 11
4.1 Basic exercise positions … 11
4.2 Exercises which help to correct posture … 16
4.2.1 Examples of exercises for good posture … 17
4.3 Breathing exercises … 42
4.3.1 Division of breathing exercises … 44
4.3.2 Conditions for breathing exercises … 45
4.3.3 Breathing exercises without accompanying
movements of the body parts … 46
4.3.4 Breathing exercises with accompanying
movements of the body parts … 55
4.3.5 Appendix – remarks to breathing exercises … 73
4.4 Relaxation exercises … 74
4.4.1 Methodology of relaxation exercises and their division … 76
4.4.2 Relaxation in remedial physical education … 77

3
1. Introduction The physical training process for those who belong to the third health group is
conducted in compliance with learning principles as general pedagogy textbooks teach us.
The principles are following: evidence-based knowledge, consciousness and activity,
appropriateness, methodology, progressiveness, illustration and permanency (exercise
adherence).
We emphasize that it is a learning process, during which we provide pupils with
conditions for pleasant and thorough learning of movement. J. A. Komenský uses the word
“pleasant” to stress the importance of the phenomenon of emotion, emotional experience,
which creates conditions for good storage of knowledge in minds through learning. With the
adequate amount of knowledge, we teach pupils with impairment to be able to do proper
movements (exercise) in appropriate organizational forms of the physical training process.
The aim is to increase motor competencies and improve physical and mental health.
2. Organizational forms of the physical training process
TRAINING /EXERCISE/ UNIT
A basic organizational form, where the movement content of the health-enhancing
physical training takes place, is a training unit. The length of a training unit can range from an
established 45 min lesson at school to about 90 min carried out in dependence on the
possibilities or pedagogical purposes in athletic facilities or in summer camps for youth with
health impairment during given part of a day, e.g. morning. It does not matter what length of a
unit you have at your disposal, because in any unit you should respect its division into three
parts:
opening, main and closing part.
Assume that our training unit lasts 60 min. In the opening part our pupils are briefly
acquainted with the programme of the lesson. A simple movement game around a gym
follows so that pupils’ organism is warmed up and becomes ready to perform movement
activities in the next part of the lesson. The opening part lasts from 10 to 15 minutes.
We divide the main part of a training unit into compensatory and developing parts.
The compensatory part represents essential and basic movement activities that are
chosen by a teacher regarding to a category, type and degree of pupils’ impairment. These
exercises are chosen from the introductory exercises and are considered particularly in terms
of their functional effect on the weak organism. Especially in the initial lessons, it is necessary
to think in terms of kinesiological analysis of the compensatory exercises. By doing so, a
teacher makes himself clear about what major muscle groups will be involved in the chosen
movement structure and how they will carry out the movement to reach the highest possible
quality of the practice.
The compensatory part makes methodological and didactic part of a training unit in
the health-enhancing physical training. Its preparation and the mentioned movement analysis
is a continuation, to a needed extent, of analytical exercises in the remedial physical training.
The preparation also helps you to realise all possible movement activities that pupils would be

4
able to perform. You can continue these movement activities with applied exercises in the
developing part of a unit. Practice the compensatory exercises for 20 minutes. These exercises
are for each training unit chosen, from the basic means of the health-enhancing physical
training with respect to a certain type of impairment. They are:
a) exercises that help to form the correct posture, which is evaluated not only in its static
position, but also in all kinds of movement activities as a dynamic stereotype. (It is
important for a pupil to be able to both perform and evaluate a movement in terms of
the correct mutual position of the individual body parts).
b) breathing exercises, which support the development of the respiratory function during
physical exercises and are a part of exercises that are suitable for the correct posture
and relaxation exercises.
c) relaxation exercises that lead a pupil to a conscious ability to relax certain muscle
groups and regulate, if possible, his mental stress.
Since physical training activities should be performed in an appropriate environment,
make sure that your pupils are adequately dressed based on the surrounding temperature and
even the physical load that they are going to be exposed to. By keeping the rules of adequate
dressing during practice you train thermoregulation and hardening, which have a preventive
effect on the organism of person with health impairment.
Not many compensatory exercises are chosen for a lesson. Seven to ten exercises are
enough, because in this part learning the compensatory exercises is what is stressed here. The
content of this part is a serious and concentrated activity for pupils to master the performance
of an exercise element perfectly and to be able to do the exercise without a supervision of
their teacher or instructor, i.e. at home or in other voluntary form of physical training. They
are also taught to check their movements themselves. Do the exercises slowly for each
person to be able to attentively watch the course of a movement, perceive it correctly,
experience and perform it in as big range as possible. You can sometimes include faster
exercises in the compensatory part on condition that the incorrect performance of the exercise
is pre-excluded. Minor mistakes during a repeated exercise can be excused in the developing
part of a lesson, however, in the compensatory part do your best to avoid, if possible, making
any mistakes at all. Through the compensatory exercises you create basic preconditions for a
correct three-dimensional orientation of the individual body parts, learn kinaesthetic
perception, or you support the neuro-muscular coordination of the individual physical
systems, e.g. motor and cardio-pulmonary.
Among the basic goals of the health physical training, besides health and educational
goals, is to educate pupils to enjoy movement activities that make them healthy either in a
gym or outside a gym. It is a joy, which we evoke in pupils through exercises that may
guarantee that a pupil, after he leaves school, will look for the movement activities he likes.
Therefore, in the developing part of a lesson we try to use all other accessible
physical training activities that may develop motor skills of pupils with health impairment
through their specific movements. It is important to note that inappropriate
(contraindicated exercise or a body position) exercises are excluded.
This part of a training unit is based on a curriculum for healthy pupils at schools, as
well as in athletic facilities or other social organizations, which organize physical training
activities for the pupils with health impairment. If possible, we try to use training programmes
for the healthy people to the people with health impairment. This way a teacher or instructor
develops motor abilities and skills in pupils and allows them to experience a joy of success
and overcome failures, which are significant factors of socialization. The developing part
takes approximately 20 minutes.

5
In the closing part, which is very often stereotypically focused on physical and mental
relaxation through undemanding physical activities, it is necessary to focus even on such
exercises that would strengthen the muscle groups tending to hypotonia or decrease the
muscle tension. For example, it is possible to include pole or rope climbing to strengthen the
arm and trunk muscles, raising legs forward and sideways in different modifications to
strengthen the abdominal and gluteal muscles, practice jumps from knee bend positions “frog”
for an overall dynamic strengthening of the lower limb muscles etc.
The closing part takes from 10 to 15 minutes. This part also serves pupils as a revision of
correct movement stereotypes, which make a content of basic locomotion, e.g. walking and
running, and it reminds them of correct breathing etc. Lead your pupils to keep these correct
movement habits acquired in a gym during daily activities or at least lead them to remind
themselves of the movement habits by doing them actively during a given part of a day.
To summarise, the time schedule of our training unit is as follows:
1. Opening part 10 minutes
2. Main part 40 minutes: a) compensatory part 20 minutes
b) developing part 20 minutes
3. Closing part 10 minutes.
In the conclusion, it is necessary to say that this theory model is not a dogma that
would have to be strictly followed according to the time schedule as shown above. It always
depends on an instructor’s learning intention, the length of a lesson, equipment, place, e.g.
gym, school playground, on a trip or in a summer camp etc. One important thing is also a
pupil’s subjective feeling and instructor’s experience. It is necessary to show the pupil with
health impairment that the health-enhancing physical training is a joyful form of physical
training and we must admit ourselves that it is only up to us how to draw near the joy of
physical training to pupils.
SWIMMING
Other very suitable form of the pedagogical process, which is necessary to be
recommended in the health-enhancing physical training, is swimming. Swimming and its
practice have generally curative effect on the organism. Swimming movements can be
performed symmetrically along the longitudinal body axis, which has a corrective importance
on the movement system. For example, crawl movements are suitable for scoliotic posture,
backstroke movements for the kyphosis, breaststroke for a pupil whose thoracic and lumbar
part of the spine is insufficiently curved (so called “flat back”) etc. Correct breathing in water
has a character of resistance breathing exercises within breathing exercises during a load. In
connection with breathing, there is also a significant possibility of the load exercise for the
cardiopulmonary system, without a risk of overloading the movement system, particularly in
the regions of the articular capsules. It is also necessary to mention an important influence of
swimming on the nervous system and thermoregulation training.
PHYSICAL TRAINING ACTIVITIES IN WINTER
Among physical training activities used in the health-enhancing physical training
belong especially skiing, ice-skating and sledging. All these activities can be organized
immediately, even near school, if there are good weather conditions. Ski training trips into the

6
mountains are ideal. Only the change of environment itself, which is usually more favourable
in terms of climate and topography and thereby, of course, even health, encourages the person
with health impairment both physically and mentally. The influence of the mountain
environment, sometimes solar radiation, emotiveness of ski activities in a team, are all
eminently important arguments for including ski trips in the movement regime of the pupils
with health impairment.
HOME EXERCISE
Influencing muscles, in order to reach a tonic balance and other vital physiological
functions, such as respiratory, circulatory and nervous activities, cannot lead to a success if a
weak organism does not receive enough movement impulses. Therefore, it is necessary for
pupils to do individual home exercises set by instructors. This form of the health-enhancing
physical training is very important and any of our pedagogical efforts will be ineffective
unless a person with health impairment practices alone or under his parents’ supervision.
Regular home exercises should be an inseparable part of a regime of the person with health
impairment, similarly as other hygienic routines that people got used to during their lives due
to a sensible social education, e.g. morning and evening washing, teeth brushing… It is
necessary to get used to a daily routine. The soundness and advantages that this acting brings
to people will, in an individual recognition, show later, as it, after all, happens with
recognition in general.
Do not set a lot of home exercises for the next lessons. Be reasonable in this respect,
because “quantity is at the expense of quality”. Three or four exercise elements will do. Put
stress on the precision and concentration during practicing. They are the most important
attributes of practicing! Increase the number of home compensatory exercises slowly. Home
exercise should be present in the daily routine two or three times ranging from 10-15 minutes.
SUMMARY
The above-mentioned organizational forms are referred to as basic and should be in an
appropriate way included in a yearly work plan for any type of impairment. The synthesis of
physical training forms should constitute compensatory movement routine that is a part of a
way of living. A question arises, how to permanently ensure compensatory movement routine.
In principle, this routine should be based on the learning rhythm of school and a pupil’s spare
time. An individual compensatory movement routine should ideally contain units constituted
into a week:
1. daily morning exercise, 10 – 15 min., containing selected and targeted movement
activities according to a type and degree of the impairment;
2. afternoon or evening exercises should have the same character (practicing 1.5 to 2
hours after meal) for at least 10 – 15 minutes – so the pupil receives an adequate
number of compensatory impulses;
3. during the day, a pupil should do other “short” exercises in form of physical training,
particularly between lessons or other activities that are done while sitting;
4. in the compensatory movement routine, it is necessary to include regular lessons,
training units of physical training for the person with health impairment;
5. we cannot leave aside a question of hobbies of movement activities that are always
chosen with respect to the type and degree of impairment;
6. on free days, Saturdays and Sundays, individual seasonal hobbies prevail, e.g. winter –
skiing, winter tourism, summer – swimming, water tourism etc.

7
3. Instructions for physical training process
The health-enhancing physical training is a physical training process that a teacher or
instructor enters with a preparation, based on pupils’ indications given by a medical doctor.
In this part we are going to point out general, basic pedagogical instructions that a
teacher should master regardless of impairment category. These instructions directly influence
the methodology and didactics of a training process. They are used to either smaller or bigger
extent in all forms of the pedagogical process, in which the health-enhancing physical training
takes place.
ATTENTION
A very important characteristic is attention. It is an essential precondition for a
successful pedagogical work. A teacher, therefore, must always keep in mind that he should
not only raise their attention by his acting, but also maintain it, if possible, in every pupil
throughout the whole training unit.
The health-enhancing physical training does not only deal with attention paid to the
outside environment through the sight and hearing analysers. It also deals with attention
directed inside the organism, on the motor analyser or inner organs. The basic teaching of
kinaesthesia, which significantly participates in acquiring and maintaining movement skills, is
to lead pupils to a concentrated attention, directed to the proprioceptors that are situated in the
muscles, tendons and articular capsules. And it is not only that. Practicing attention is
generally of a big importance, for it can be transferred into any other useful human activity.
We assume that if doing exercise raises positive emotions, then conscious practicing of
attention during physical training belongs to the most suitable ways. This is because the
movement is phylogenetically the oldest through which even people acquire first experience.
INTERPRETATION OF THE SUBJECT MATTER
A good interpretation of the subject matter by a teacher plays in the health-enhancing
physical training an important role not only from the technical, methodological and other
views, but also from the motivational one. A teacher explains every new exercise according to
pupils’ age and clearly so that, if possible, each of them get a perfect idea of the execution and
function of the required movements. The best is, if a teacher himself demonstrates the
movements. If he explored an exercise with his own body, he would perfectly understand its
function. Setting an example for his pupils is definitely important in educational work.
PRECISION OF PRACTICE
Pupils’ attention must be repeatedly concentrated on the precision of their movements.
Incorrectly executed movements lead to formation of incorrect movement dynamic
stereotypes, mostly accompanied with the increase of muscle imbalance. To remove them
often requires much bigger effort than to learn correct stereotypes. So-called symmetrical
exercises, which take place along the longitudinal body axis, closely relate to the precision of
practice. They are of a big compensatory importance to the weak movement system, but also

8
to the prevention of the muscle imbalance caused particularly by its static overloading.
Precise symmetrical exercises are practised in the basic starting positions; back-lying position,
front lying, side lying, sitting bending legs across, sitting, kneeling sitting, kneeling support,
kneeling and standing.
CONCENTRATION OF THE MOVEMENT EFFORT
By the precise execution of an exercise we lead pupils to the ability of concentrating
their movement effort into certain muscles or body regions. For example, we concentrate on
the stretching of shortened pectoral muscles or strengthening the shoulderblade stabilizers in
pupils with the thoracic hyperkyphosis. During breathing exercises, for the same impairment,
we concentrate on strengthening the erector spinae in the thoracic region of the spine during
expiration etc. In these and number of other examples, we speak about “the centre of the
movement effort”, where our attention should be precisely directed to a certain spot.
SYNCHRONOUS COMPENSATION
For combined deviations, such as the combination of the thoracic hyperkyphosis
together with the lumbar hyperlordosis, we look for such exercises, where the effort centre is
not only in the interscapular region, but also in the lumbar region. Then you choose such a
movement so that both deviations are balanced simultaneously. This can be ensured by an
appropriate body position or movement exercise, during which the effort centre is in several
body regions at the same time. Big synthetical movements conform to this principle and then
we speak of synchronous compensation.
SUBSEQUENT COMPENSATION
Based on the above example, the combination of the thoracic hyperkyphosis together
with the lumbar hyperlordosis, we must admit that we often use exercises that affect
positively the balancing of just one movement impairment, e.g. the lumbar hyperlordosis. It
affects the other impairment, the thoracic hyperkyphosis, rather negatively. In this case we
must change an exercise that balances the lumbar hyperlordosis (e.g. bending round trunk
forward downward) for an exercise that balances the thoracic hyperkyphosis (e.g. straighten
up position and stretching arms sideways backward upper). In this case we speak about
subsequent compensation.
If possible, we choose synchronous compensation exercises, which practise the muscle
groups in big movement range and all muscle fascicles. But even subsequent compensation
exercises, if methodologically well conducted, are suitable and necessary to educate a pupil to
the feeling of harmonic and symmetrical muscle tension. This conception of the compensation
is very closely related to the effort of balancing the muscle tension by precise practise.
GENERAL CONCEPT OF COMPENSATION
We also face a question of compensation in general concept in the physical training for
the people with health impairment. There is a principle that each more strenuous exercise
should be followed by loosening, relaxation movement, if possible, a movement that would

9
stretch the soft tissues. We must also concentrate not only on the muscle relaxation, but also
on the relaxing the mental stress, which often occurs in beginners during a concentrated effort
to perform the movements precisely.
EXERCISE TEMPO
When working with the pupil with health impairment in physical training, we must
keep the exercise speed lower at the beginning of the exercise period than in the physical
training for healthy pupils. Especially in the first stages of the training we cannot overload the
pupil with health impairment by an excessive increase of speed of the performed movements.
For that we find arguments in the experience of Mensendieck (1929), Vojáčková (1961) etc.,
but also in contemporary neurophysiological findings that a partial movement, if we are to
control it and correct it in its course, must take approximately two seconds. This fact is surely
of a general importance for the theory of the movement learning.
Among quickly performed movements belong swinging exercises. We include these
exercises in the compensatory part of a lesson very rarely. Besides an unfavourable quick
movement, they require a considerable tonus of the muscle stabilisers, i.e. muscles, whose
function is to stabilise a certain body part (e.g. trunk in back-lying position) so that you can
perform a certain movement (e.g. raising legs forward). Premature reflexive protective
contractions of the antagonistic muscles occur along with a quick movement. They inhibit the
movement before possible microtraumas happen due to unphysiological stretching of the
tensed muscles and ligaments, particularly in the regions of the articular capsules.
Therefore, we work more slowly, put emphasis on the precision, and between more
demanding exercises we insert energetically less demanding activities containing breathing or
relaxation exercises, which are attention-intensive.
REPETITION, EXERCISE FREQUENCY
The number of repetitions of individual exercises must be adequate to the difficulty of
an exercise element. The point is not to cause an excessive physiological and mental tiredness
on the one hand, but on the other hand we try to adequately stimulate the certain degree of the
impairment to balance.
RHYTHM
Rhythm is also important for the course of a movement and its affect. If we teach a
pupil with health impairment a new movement, during which we must require a precise
execution from the very beginning, it must be based on his individual rhythm. Individual
rhythm enables him to understand a movement perfectly, perform it and gradually master and
feel it. As late as the movement becomes precise enough by individual practise, we may
require the whole group of pupils to follow one rhythm. Collective rhythm comes after the
individual one. Next, we would like to point out that it is suitable to coordinate the movement
rhythm with the breathing one and so reflexively work upon their unison with the heart
rhythm.

10
CHECKING PUPILS AND THEIR PERFORMANCE
If we want to achieve satisfying results in the compensatory work, we must
continuously check our pupils. We carry out the check by sight, feeling and assistance.
We watch the overall movement behaviour and individual body parts as well. We
particularly watch the part of the body that a pupil tries to influence by his movement (the
centre of the movement effort). We also observe pupils’ reactions to a certain movement load
in their faces. The result of the observation may become an impulse for a change or
termination of an exercise, or for motivation; how to make an exercise more pleasant and
varied, how to attract their attention, how to reward them etc.
Feeling represents a better way to make sure that tensing and stretching the muscles in
the centre of the movement effort is correct. If we want to find out, e.g. if the centre of the
movement effort is in the inter-scapular region of a pupil with hyperkyphosis poise, we check
the course of the movement by placing our hand or fingers on the very inter-scapular region.
Especially in the initial stages of the movement learning, the placing our hands works as a
stimulation to a pupil, which enables him to perceive the movement in this spot better.
Assistance relates to the check by feeling. An instructor provides pupils with
assistance only when they did not understand the interpretation or demonstration of an
exercise or they are not able to perform the exercise element themselves due to the amplitude
of the movement or other lack.
We always provide the assistance carefully, never by force, not to damage the
muscles, ligaments or tissue.

11
4. Basic compensatory means In our form of physical training we always work with individuals who suffer from
certain temporary or permanent impairment. Therefore, the aim of the remedial (i.e. health-
enhancing) physical education is to remove, alleviate or prevent the deterioration of the
functional deficiencies of the organism so that the organism becomes a reliable basis for any
possible – physical and mental – harmonic development of an individual.
The compensatory exercises are:
a) exercises for the correct posture
b) breathing exercises
c) relaxation exercises
As we have already mentioned, we prepare the compensatory part of a training unit
from these means.
Our long-time pedagogic experience shows that the use of basic starting positions
facilitates acquiring motor skills contained in these means. In other words, the practise of
these means is closely related to starting positions. Therefore, their description will precede
specific compensatory means.
4.1 BASIC EXERCISE POSITIONS
Based on experience, during practising the correct posture, breathing and relaxation
exercises, it is inappropriate to begin the practise in standing position, which is a starting point
for majority of our everyday activities. The main reason is that in training lessons and during
breathing and relaxation exercises, from the very beginning, we try to start from the correct
postural relations of the individual body parts. For example, the correct position of the head,
pelvis and lower limbs requires a complex conscious concentration, which you cannot expect
in “movement beginners”. This fact leads to the choice of the way, where you look for such a
working process that would enable a pupil to gradually concentrate on practising his
individual body parts. A working process, during which a person can concentrate only on a
certain exercise activity and other body parts, which are not practised, maintain the correct
postural relations without a pupil’s conscious concentration and endeavour. They are the
chosen exercise positions thanks to which the correct postural relations are maintained.
We can therefore say that an exercise arranged according to starting exercise positions
meets a condition, where you concentrate on one body part and other body parts are in the
correct postural relations.
We usually use these nine positions: back-lying, front lying, side lying, sitting bending
legs across, close sitting, kneeling sitting, kneeling support, kneeling and standing.
A methodical set of starting exercise positions enables:
- a gradual development of the correct postural stereotype (for we start from lying
positions and proceed to exercises in standing positions),
- a practise of consciously controlled breathing during the correct position of the
individual body parts,
- relaxation practise during a gradual realising of relations to the breathing and postural
functions.

12
The exercise positions, basically, erect the body and so a pupil gradually learns to
control the correct position of the pelvis, head and other body parts in relation with correct
breathing within an appropriate and mutually efficient tension of the muscle groups.
BACK-LYING POSITION
In this position, the body is slightly stretched, slightly tensed by isometric contraction
along the longitudinal axis (Figure 1). You try to perceive this axis carefully. Next, you
perceive a contact of a mat with the back of the neck, thoracic curve, gluteal muscles, calves
and heels. You can control the body axis and the correct position of the individual body parts
by sight concentrated between the tips of your feet. The feet are slightly stretched in the
plantar flexion, the ankles and knees are, if possible, close to each other. Your arms are
slightly stretched, and they tend to pull in the direction of the fingers, causing the shoulder
girdles to be pulled downward as well, palms rest flat on a mat. Your shoulders are spread in
their width. Try to somewhat pull your head out from your shoulders in the direction of the
longitudinal axis.
Back-lying position Figure 1
FRONT LYING POSITION
The body is stretched, feet are in plantar flexion, knees and ankles are side by side. The arms
are stretched in close the body lower position tending to pull in the direction of the stretched
fingers, palms are flat on the floor. Even the elbow joint is stabilised. The trunk is spread in its
width, head is in the continuation of the longitudinal body axis, chin, forehead, possibly
temple rest on a mat (Figure 2a, 2b, 2c).
Front lying position, the chin rests on a mat Figure 2a

13
Front lying position, the forehead rests on a mat Figure 2b
Front lying position, the temple rests on a mat Figure 2c
SIDE LYING POSITION
The body is stretched similarly as in the previous two examples. If you lie on the left
side, your left arm is in raising elbow forward upper position and your head rests in the palm
of your left hand. The right arm is bent in front of the trunk, hand leans against a mat with the
palm, fingers point in the direction parallel with the longitudinal body axis and are situated
before the armpit.
SITTING BENDING LEGS ACROSS
In this position, concentrate on the active position of the pelvis, trunk and head. This
position imposes demands also on a conscious holding the shoulder axis, which is here
situated free in space. The pelvis axis is stabilised by a mat. In the region of the lumbar and
abdominal muscles create a feeling as if someone wants to pull you out from the pelvis, from
the coccyx upward. In the opposite direction of this feeling pull your upper limb girdles
downward on the outer side of your trunk (Figure 3). This kinaesthetic perception is
characteristic for any exercises in sitting positions and is further transferred to exercises in
kneeling and standing positions.

14
Sitting bending legs across Figure 3
CLOSE SITTING
In our practice, we also use straddle sitting position or crook sitting position. Always
choose such a sitting position to enable a pupil to hold consciously his pelvis, trunk and head
in a proper upright position. Hold your arms sideways downward, as in sitting bending legs
across position and stretch them in the elbows and wrists.
KNEELING SITTING
Kneeling sitting is an important position between sitting and kneeling. It enables a
very good control over the pelvis position by stabilising the pelvis against a raised mat - heels
(Figure 4). In exercises, where you move to kneeling position, it is necessary, during the
movement, to consciously ensure a proper position of the pelvis, for the pelvis axis is free in
space, similarly as the shoulder axis. You learn a conscious mutual holding of the pelvis,
trunk and head during movements and in the starting position as well.
Kneeling sitting Figure 4

15
KNEELING SUPPORT
In this position, make sure that your thighs make approximately right angle with a mat.
The axis of the lumbar, thoracic and cervical spine is relatively parallel with a mat; that is
why you lay your hands on a mat a little forward. The shoulder axis is not relaxed. The
shoulder axis is stabilised by a slight pull of the arms from the shoulders in the direction of
protraction. In the frontal plane the upper limb girdles are in a sort of middle position between
elevation and depression. Your head is in a continuation of the spine axis; it means that you
neither bend it forward nor backward (Figure 5).
Kneeling support Figure 5
KNEELING
In kneeling position, your attention is drawn especially to the position of the shoulder
axis, pelvis axis and pelvis tilt. During kneeling, their position is influenced only by muscle
tonus. This fact plays an important role in rotary exercises, where you can purposefully
stabilise the pelvis axis and rotate the shoulder axis and vice versa. You regulate the correct
tilt of the pelvis by increasing the tonus of the gluteus maximus and rectus abdominis. We
would like to highlight an active feeling of a pull in the spine from the coccyx as far as the top
of your head. The lower limbs are close to each other, you feel a contact of your knees and
ankles.
STANDING POSITION
Practising in standing position requires completely conscious control over the
individual body parts. It is assumed that the movement habits that respect the correct postural
relations between the individual body parts that were acquired in lower positions will show in
their unification during practise in standing position.
We have introduced a description of the basic starting positions that are most often
used in the compensatory part of a training unit with all kinds of impairments. They are used
both for the practise of the correct posture and practise of breathing and relaxation exercises.
We would like to point out that to assume a starting position correctly is the main
precondition of effective compensatory work. You must understand each starting position as a
separate exercise element with compensatory effects that you must learn.

16
4.2 EXERCISES WHICH HELP TO CORRECT POSTURE
We base our physical training activities on a presumption that the correct posture is a
result of the muscle and nervous coordination complying with the theory of the correct
posture. Therefore, during an exercise, we try to lead our pupils to a conscious coordination of
their own movements. It means that the explanation and demonstration of an exercise is
followed by a pupil’s conscious performance with possible feedback from his instructor.
The correct posture meets not only our external, aesthetic requirements, but also, from
the point of view the organism, the requirements for saving our energy. The correct posture is
significantly determined by the position of the pelvis, head and lower limbs. The position of
the pelvis has a key importance not only for the correct posture in the standing position.
The centre of gravity is situated in the pelvis, so a thorough practise and perception of
this region is an essential precondition to a practise of more difficult exercises in terms of
coordination, e.g. acrobatics. An overall curvature of the spine depends largely on the position
of the pelvis, for the pelvis is a base for the spine. Movements of great range come from the
pelvis, e.g. trunk bending forward, backward and sideways, trunk circling, raising legs
forward, backward sideways etc.
Leading and controlling a direction of movements is ascribed to the head. On the other
hand, we do not have to highlight the importance of the position of the lower limbs in the
overall posture, for their importance is put on them naturally by their function in the basic
locomotive movement of a human being, walking.
The position of the pelvis, head and lower limbs is affected by the muscle groups that
surround them. Thus, the correct erect posture is, to a certain extent, influenced by their
harmonic tension. During practise of good functional posture, the point is to actively work on
harmonic development of the muscle tension of the mentioned parts of the body or others
through a chosen movement.
Based on an electromyographic examination, it is possible, from functional view, to
differentiate between two systems of the muscles that behave in different ways during life or
during reactions to various situations. First, there are muscles with largely tonic postural
function that tend to activate themselves considerably more within a certain movement
stereotype. Consequently, these hyperactive postural muscles are characterised by a tendency
to shorten the length of the muscle fibres, stiffness and increased muscle tension. They are
following: triceps surae, rectus femoris, iliopsoas, tensor fasciae latae, knee flexors, thigh
adductors, quadratus lumborum, sternal and clavicular part of pectoralis major, upper part of
trapezius and levator scapulae. On the upper limbs they are largely flexors: the biceps brachii,
brachialis and brachioradialis.
Secondly, there are muscles with a tendency to inhibition, decrease of muscle strength,
and hypotony, so called phasic muscles. These are: gluteus muscles, abdominal muscles,
rhomboideus, middle and lower part of trapezius, front deep neck flexors, middle part
(thoracic) of trunk erector.
The above-mentioned division of the muscle groups we do for practical needs. It
shows what main muscle groups we should focus on. With the correct posture, both systems
of the postural muscles are in a tonic balance. An imbalance in the muscle tension, on the
contrary, results in deviations from the correct posture. There is, e.g. the anteversion of the
pelvis due to hypotony of the gluteal and abdominal muscles, which consequently leads to
hyperlordosis; round shoulders together with sticking out shoulder blades are caused by
shortened pectoral muscles and loosened shoulder blade stabilizers etc.

17
4.2.1 Examples of exercises for good posture
The introduced exercises must be understood as exercise examples. Our effort was to
choose an exercise in every basic starting position that, when performed correctly, improves
the postural relations between the muscle groups that secure the correct posture and lead an
individual person to the perception of the correct posture.
For the didactic reasons, we provide basic information with every exercise containing
instructions for learning an exercise and muscle groups that a pupil must focus on during a
theoretic preparation and during practise. We assume that, through this approach, it is possible
to create a very exact idea of the way to perform exercises correctly and realise its
dependence on the coordinated muscle cooperation.
The exercise examples can be further implemented into other modified exercises that
will have similar kinesiological affect on the postural function.
In all starting positions, during partial movements of the head and trunk, we try to
practise muscles, ligaments and articular capsules by bending, circling and circling bends
while we try to maintain the movement symmetry. Similarly, during the practise of the lower
and upper limbs we use, if possible, all movements and positions of the arms and legs.
The first two exercises highlight the importance of the correct practising of the head
and cervical spine.
EXERCISE 1a
BACK-LYING POSITION – bring your arms close the body, place your palms flat on a mat
(Figure 6):
1. – 3.) bend your head slightly forward together with bending your
upper part of the trunk so the lower edge of the shoulder
blade stays fixed against a mat. At the same time with
moving your palms forward on a mat, towards your
feet (Figure 7 and 8)
4. – 6.) straighten up – your head is straight
Exercise 1a: Starting position Figure 6

18
Exercise 1a: Capturing of the movement in the second count Figure 7
Exercise 1a: Third count Figure 8
An essential thing is to assume a correct starting position in the back-lying position. Perform
these exercises, similarly as all others, slowly, smoothly and attentively. Concentrate on a
simultaneous movement of your shoulders downward, head and cervical spine upward, as if
you wanted to pull it from the shoulder axis. The feeling of the pull progresses as far as the
top of your head and is maintained throughout the entire exercise until you finish the exercise
in its starting position.
Lead the movement of your head into the head bending forward position by lifting
your head and cervical spine at the same time; an ultimate head bending forward stops the
movement of your head forward. Start the fourth to six count by straightening up, a thoracic
vertebra by vertebra, then by a slight stretch of the cervical spine towards a mat and then by
moving your head backward finish the exercise in its starting position.
One of the reasons that we start with this exercise is that when a pupil looks between
his big toes, and because he practices barefooted, he can check the longitudinal axis of his
body.
During the exercise a pupil stretches the deep nuchal muscles and paravertebral
muscles that bridge the spine.
At the same time a pupil strengthens, increases the tension of the phasic muscle group
on the front side of the neck. They are the muscles in the front of the spine – the longus colli
and longus capitis, next there are the scalene muscles and sternocleidomastoideus.
If you take into account the usual position of the head in the gravitation field and, as a
consequence, the predominant tendency to the hyperlordosis of the cervical region of the
spine, we could say that, with regard to this fact, our exercise simultaneously compensates the

19
imbalance of the muscle tension between the tonic and phasic muscle groups in the cervical
region of the spine.
EXERCISE 1b
BACK-LYING POSITION – bring your arms close the body, place your palms flat on a mat
1. – 3.) bend your head forward and keep the occipital bone fixed against a mat (Fig 9)
4. – 6.) hold your head straight (Figure 10)
Exercise 1b: 1. – 3. count Figure 9
Exercise 1b: 4. – 6. count Figure 10
During practice, try to bring the cervical spine as close as possible to the mat; your
chin points to the throat pit. Gradually increase the tension of the flexors of the head and
cervical spine. Step by step, try to eliminate the twitch that you perceive in the muscles. These
twitches or jerks indicate an uncoordinated movement. Approximately after fifth repetition,
relax the working muscles by smooth turning your head on a mat to the left and right.
The involvement of the muscle groups in the exercise is similar to that in exercise 1a.
With regard to the fact that you start the movement, if possible, as high on the cervical spine
as possible, i.e. from the atlanto-occipital articulation, due to the stabilisation of the occipital
bone, there are better conditions for the perception of the stretch of the deep nuchal muscles.

20
In the back-lying position you can practise the muscles of the head and cervical spine
by bending your head sideways, bending your head sideways with your head slightly bent
forward and other modified exercises. Do not forget that the feeling of the cervical spine
being pulled reflects into the top of your head region that leads the movement.
EXERCISE 1c
BACK-LYING POSITION – bring your arms close the body, place your palms flat on a mat
(Figure 11)
1. – 4.) flatten your lower back, bring it to the retroversion position (Figure 12)
5. – 8.) lift the pelvis slightly up, bring it to a slight anteversion
Exercise 1c: Starting position Figure 11
Exercise 1c: 1. – 4. count Figure 12
This exercise represents a basic practise of the pelvis around an axis that passes
through the centres of the hip joints. Try to bring your lumbar spine as close to a mat as
possible by contracting your abdominal muscles. There is an auto-traction in the lumbar and
lower thoracic spine from the stabilised top of the thoracic part of the spine against a mat.
During the exercise, similarly as during warming up exercises, slowly and consciously
increase the contraction of the abdominal muscles. As late as the end of the exercise stage,
when the lumbar part of the spine is already on a mat, it is possible to involve also the gluteal
muscles.
Again, make an attempt at a coordinated movement without muscle twitches. The
movement must be smooth without an accelerated stage.

21
In case you are not able to get your lumbar part of the spine close to a mat while your
lower limbs are stretched, you are allowed to flex your knees slightly and assume a semi-
flexion position of your hip joints. But allow yourself only such bending that is necessary.
The slight flexion in the joints of the lower limbs decreases the tension especially of the hip
flexors, which enables the abdominal muscles to stretch the lumbar spine by laying it down on
a mat. After several repetitions, relax the abdominal wall in the back-lying position with your
legs slightly apart and concentrate on your breathing.
During the exercise, you stretch the quadratus lumborum, from long spinal muscles
especially those of the sacrospinal system in the lumbar and lower thoracic region of the
spine, the serratus posterior inferior and in the superficial layer the latissimus dorsi.
Next, when your lower limbs are stretched, mildly stretch the iliopsoas muscle, rectus
femoris, tensor fascie latae and sartorius. When the front edge of the symphysis moves
forward and upward, there is also a slight stretch in the pectineus, adductor longus and gracilis
muscles.
EXERCISE 1d
BACK-LYING POSITION – raise your arms upward outward:
1.) flatten your lower back (Figure 13)
2.) raise your right leg forward (Figure 14)
3.) close your right leg
4.) your pelvis assumes normal position
Note: Practise each movement stage for 3 – 4 counts, change your legs regularly.
Exercise 1d: First movement stage Figure 13
Exercise 1d: Second movement stage Figure 14

22
If your pectoral muscles are shortened, the position of your arms, while you hold them
upward outward, may become an obstacle to perform the retroversion of the pelvis. Therefore,
you must choose such position of your arms to be able to perform the retroversion of the
pelvis before you raise your leg forward, e.g. stretching arms sideways or stretching arms
sideways lower. Perform the backward movement to feet closing position while you press
your lumbar region of the spine against a mat. As late as your entire leg rests on a mat, you
can bring your pelvis to its normal position, which is, to some extent, relaxing for the muscles
that were involved in the previous movement. During the following repetition, slowly
increase the movement amplitude in the hip joint by raising your leg forward. During
repeating the movements, you can also concentrate on the increased contraction of, e.g. the
abdominal muscles or hip joint flexors.
When practising, you should not disturb the basic position of the individual parts of
the body in the starting position, e.g. bend your knees, bend your head backward etc.
Involving the muscles in the movement activity is, in terms of flattening the lower
back, the same, as described in exercise 1c. When you raise your leg forward and bring it
back to close feet position, you activate the hip joint flexors. Owing to the fact that the
involvement of the hip joint flexors in the movement follows the retroversion of the pelvis,
they start raising the leg forward from a slight stretch and because the lumbar region of the
spine is stabilized against a mat by the abdominal muscles throughout the whole exercise,
there is not an increased muscle tension of the flexors at the expense of needed strengthening
of the phasic abdominal muscles. By performing this exercise, you also work on the reduction
of so frequent imbalance between the tonic and phasic muscle groups that affect the pelvis tilt.
From the same starting position, you can continue with number of analogical
movement activities, connected with raising legs forward, that will have the same importance
for the correct position of the pelvis. Also, practise bending trunk forward from back-lying
position in the same way as raising legs forward. That is, after the pelvis assumes its position
as you can see in exercise 1e.
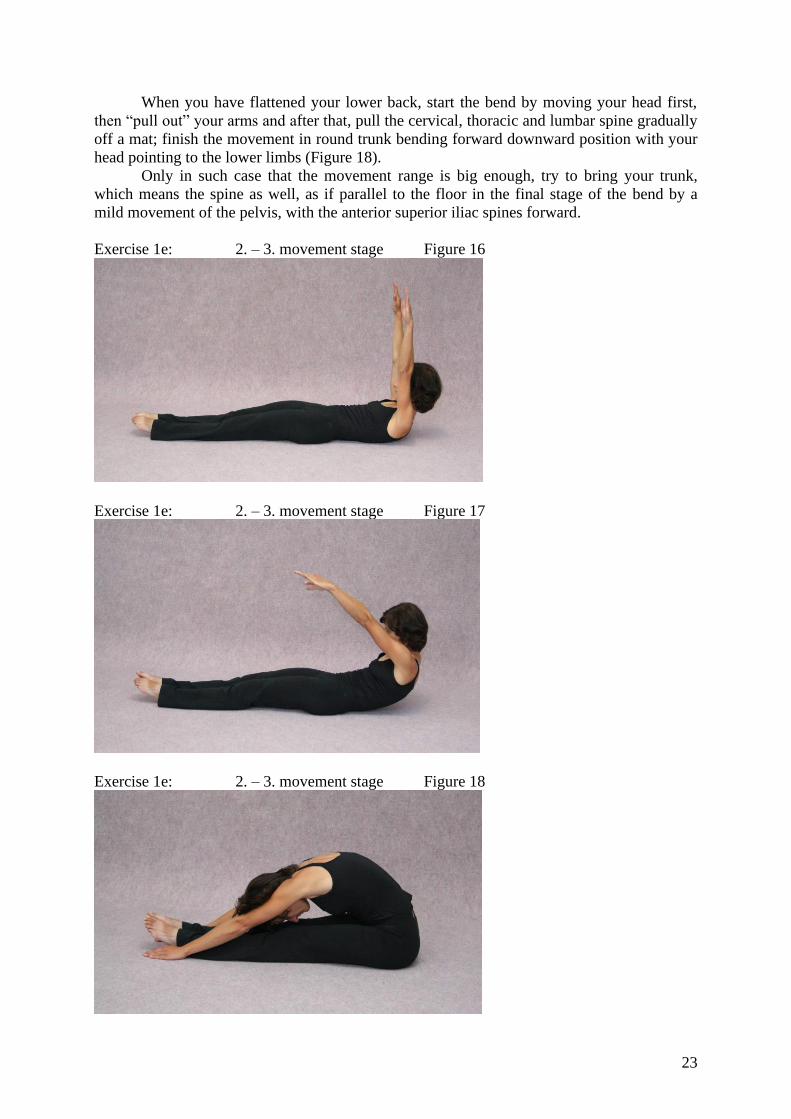
EXERCISE 1e
BACK-LYING POSITION – raise your arms upward and turn your palms up:
1.) flatten your lower back (Figure 15)
2. – 3.) gradually bend your round trunk forward downward (Figure 16, 17, 18)
4. – 5.) gradually straighten up
6.) bring your pelvis to its normal position
Note: Practise each movement stage for four counts.
Exercise 1e: First movement stage Figure 15
23
When you have flattened your lower back, start the bend by moving your head first,
then “pull out” your arms and after that, pull the cervical, thoracic and lumbar spine gradually
off a mat; finish the movement in round trunk bending forward downward position with your
head pointing to the lower limbs (Figure 18).
Only in such case that the movement range is big enough, try to bring your trunk,
which means the spine as well, as if parallel to the floor in the final stage of the bend by a
mild movement of the pelvis, with the anterior superior iliac spines forward.
Exercise 1e: 2. – 3. movement stage Figure 16
Exercise 1e: 2. – 3. movement stage Figure 17
Exercise 1e: 2. – 3. movement stage Figure 18

24
When you start to straighten up, first make an effort at an increase of the pelvis
retroversion and then gradually lay the lumbar, thoracic and cervical spine down on a mat.
Finish the movement in the craniovertebral articulation by the correct position of your head
and cervical spine in the longitudinal body axis.
In this exercise you should concentrate on the correct activity of the muscles
surrounding the pelvis that, with a correct stabilisation of the lumbar spine against a mat,
create preconditions for the correct sitting without an early involvement of the flexors in the
movement. In this respect, this exercise is similar to the previous one.
In case you are not able to start the bend after the pelvis retroversion, you are allowed
to bend slightly your lower limbs. Bend your knees as little as possible, just as much as to
meet the requirements for the correct performance of the movement, i.e. to flatten the lower
back before you start flexing your head, cervical and thoracic spine. If your knees are bent
and still you are not able to pull your thoracic spine off a mat yourself in the direction of the
bend, then you can be assisted. When giving assistance, lay your palms right above the
calcaneus, at the place of Achilles tendons, and stabilise the position of the feet. When the
abdominal muscles can´t finish the bend, you can use the flexion in your knees, thereby you
press with your heels at the instructor’s or your fellow pupil’s palms. When doing so, you
increase the muscle tension of the gastrocnaemius, biceps femoris, semitendinosus and
semimembranosus. They, with their beginning on the ischial tuberosity, flatten your lower
back and so they help the abdominal muscles to be functionally involved in sitting; by their
tension they prevent the hip flexors from an early involvement in the movement.
If necessary, you can arrange the stabilisation of your feet yourself. For example, if
you do the exercise on the vaulting box, you can fix your feet against the edge of the box or if
you do the exercise on a higher and solid mat, you can stabilise your feet against its edge etc.
Never assist a pupil by pressing his lower limbs against a mat at the back of his feet.
The reason is, when a pupil is not able to lift the thoracic region of the spine by the strength of
his abdominal muscles, he starts to prop his feet against an instructor’s palms and he causes
extension in his knees against the resistance. This extension produces higher muscle tension
of the tibialis anterior and hip joint flexors. It results in an early involvement of the flexors in
the movement, they turn the pelvis slightly forward to the anteversion position and the
abdominal muscle are, from the very beginning, involved in the flexion movement after they
have been slightly stretched. The iliopsoas is strengthened here in a disadvantageous position,
because it is shortened, which would later contribute to lumbar hyperlordosis in the posture.
EXERCISE 2a
FRONT LYING POSITION – put your arms next to the body, place your hands on a mat:
1.) tense both of your lower limbs by isometric contraction (Figure 19)
2.) raise your right leg backward lower (Figure 20)
3.) close the right leg
4.) raise your left leg backward lower
5.) close the left leg
6.) relax the muscles
Note: Practise each movement stage slowly for three counts.

25
Exercise 2a: First movement stage Figure 19
Exercise 2a: Second movement stage Figure 20
Before you start practising, check the starting position in the longitudinal body axis.
As we have already mentioned, you have a choice of your head position. Your head can either
rest on its forehead, chin or on the left or right cheek.
In the following exercises, you will devote time to the subsequent compensation for
the stretched muscles on the dorsal side of the cervical spine and, with respect to better
conditions for breathing, you will rest your head with your chin on a mat. Direct your
attention to the region of your gluteal muscles and while your lower limbs are relaxed contract
alternately the gluteus maximus on the left and right lower limb. Notice that during the
muscle contraction the axis of the entire lower limb rotates slightly outward.
After that, tense both your lower limbs and press them against each other. The
contraction of the gluteal and abdominal muscles will end the tension in the pelvic region.
You feel the stretch in your lower limbs from the hip joints in the distal direction. When you
practise raising leg backward, bear in mind this knowledge and try to feel your pelvis propped
against a mat with both anterior superior iliac spines and symphysis touching a mat.
The aim of this and other similar exercises is to make a pupil to realise how important
it is to involve the gluteus maximus in raising leg backward movement. Your pelvis must be
stabilised at these 3 points not to increase the activity of the sacrospinal system of the erector
spinae at the site of its beginning. The gluteus maximus, as a phasic muscle, must be tensed
before you start to raise your leg backward to prevent it from being completely substituted by
the activity of the knee flexors, with the exception of the short head of the biceps femoris.

26
EXERCISE 2b
FRONT LYING POSITION – raise your arms upward outward, place your palms flat on a
mat:
1.) tense both your lower limbs by isometric contraction (from the tips of your feet
as far as the gluteal muscles) – rest your head on your forehead (Figure 21)
2.) bend your trunk slightly backward – raise your arms upward outward (Fig. 22)
3.) hold in bending your trunk slightly backward position – raise your elbows
upward outward, place your hands on the back of your neck (Figure 23)
4.) hold in bending your trunk slightly backward position – raise your arms
upward outward
5.) straighten up (bring your trunk slowly on a mat) – raise your arms upward
outward
6.) relax your lower limbs – rest your head on the left (right) temple (Figure 24)
7. – 8.) hold in overall relaxation
Note: Practise each movement stage for three to four counts.
Exercise 2b: First movement stage Figure 21
Start to tense your lower limb muscles by the plantar flexion, pressing your feet and
medial malleolus against each other, flexing your feet and pressing them against each other,
which is usually not enabled until a voluntary adduction in the hip joints. Finish the muscle
tension by contracting the gluteal and abdominal muscles.
Exercise 2b: Second movement stage Figure 22

27
Exercise 2b: Third movement stage Figure 23
Exercise 2b: Sixth movement stage Figure 24
Such stabilising the lower limbs and pelvis create preconditions for the correct
performance in trunk bending backward position. The stabilised gluteal muscles rotate the
pelvis to a slight flatten lower back position before bending trunk backward alone, and so they
are fully involved in the activity at the start of bending trunk backward caused by the erector
spinae. The erector spinae, as a tonic muscle system in the lumbar spine region, would,
without previous stabilisation of the pelvis by the gluteal muscles on a mat, easily slightly
rotate the pelvis to anteversion and increase, the physiological curvature of the lumbar
lordosis into hyperlordosis.
If it is possible from the view of attention, a pupil retains a feeling of a pull in the
longitudinal body axis from the coccyx to the top of his head; the lower limbs try, as if to pull
out from the hip joints towards the toes, distally.
EXERCISE 3
LEFT SIDE LYING POSITION – raise your left elbow forward upper, place your head in
your palm; raise your right arm upward inward (Figure 25):
1. – 4.) stretch your right leg sideways – stretch your right arm
sideways lower (Figure 26)
5. – 8.) close your right leg – raise your right arm upward inward by
first stretching it sideways

28
Note: After a certain number of repetitions, perform the exercise on the
right side as many times as on the left side.
Exercise 3: Starting position Figure 25
Exercise 3: 1. – 4. movement stage Figure 26
It is essential to check the pelvis position. The axis passing through the hip joints is
perpendicular to a mat or it is better if the anterior superior iliac spine, in our case the right
one, is pushed slightly forward.
Start to stretch your leg sideways after stabilising the muscles of your lower limbs.
Perceive a pull coming from the hip joint of the limb, which is being practised. Lead the
movement of the accompanied stretched arm strictly in the frontal plane. Your palm rotates
during raising arm upward together with the axis of the whole arm from the position of
holding arm upward inward to that of holding arm sideways inward. Your fingers touch the
external side of the lower limb.
The aim of this exercise is to strengthen the gluteus medius and minimus, because
these important muscles, which cause stretching leg sideways in the hip joint, tend to muscle
hypotonia.
The movement of the arm to holding arm upward position facilitates stretching of
pectoral muscles, particularly when you slightly swing your arm backward in the holding arm
upward position.
As a partial modification of this exercise, we want our pupil to perceive the difference
in the range of stretching leg sideways during a parallel increase in the effort at stretching

29
both lower limbs sideways; one leg is stretched freely in the space and the second one tries to
stretch sideways against the resistance of a mat.
EXERCISE 4a
SITTING BENDING LEGS ACROSS – stretch your arms sideways downward lower, turn
your thumbs forward (Figure 27):
1.) raise your arms upward by first stretching them sideways, turn your palms
forward (Figure 28)
2.) stretch your elbows sideways downward lower, hold your hands above your
shoulders
3.) raise your arms upward, turn your palms forward
4.) stretch your arms sideways downward lower by first stretching them sideways,
turn your thumbs forward
Note: Practise each movement for three to four counts.
The starting position is very favourable to maintain good mobility of the hip joint. The
assumption of sitting bending legs across position is generally preceded by slow rotary
exercises or other warming up of the hip joints in sitting or forearm support back lying
positions, possibly in other positions as well.
The position of bent lower limbs must be symmetrical with the medial plane. The
thighs are flexed, abducted and rotated outward; the crura are flexed and rotated outward.
When you have checked the symmetrical position of your lower limbs, check the
correct mutual position of the pelvis and lumbar spine, trunk and shoulder axis, cervical spine
and head. Not only an instructor is the one to check the position, but also it is especially a
pupil himself who systematically learns to do so. The movement is checked equally.
A mat stabilises the pelvis axis in the correct position; you can feel the ischial
tuberosity. That is why you can practise only the retroversion and anteversion of the pelvis.
Exercise 4a: Starting position Figure 27 Exercise 4a: 1st movement stage Fig. 28

30
The shoulder axis is free in the space during sitting and so you can bend it forward,
backward, sideways and rotate at the level of your waist. Your head, during rotary movement
in this and other higher positions, can be stabilised by muscles and so it does not leave its
position in the starting position. However, it can follow the movement of the shoulder axis or
perform counter-rotation.
Exercise 4a: 2nd movement stage Figure 29
A teacher or instructor should be always aware of these possible head movements
during rotary movements coming from the shoulder axis, because they, together with head
bends performed at random, allow considerable individual inaccurateness during practise. In
this case, after you raise your hand upward, concentrate particularly on stretching your elbows
sideways downward lower and holding your hands above your shoulders.
From holding arms upward position, lead your arms in the frontal plane and when
your hands touch your shoulders, your upper arms continue as close to the trunk as possible.
By this effort you reach the feeling of your shoulders as if being pulled downward against the
tractive force running from the coccyx as far as the top of your head. In the second stage of
the movement (Figure 29), it is good to perform hold for the pupil to have enough time to
realise these events.
Even when using myographic equipment, it is difficult to characterise exactly the
mutual cooperation of the muscles of the shoulder girdle during movement stages. We
manage with approximate characteristics, which, from the general view, comply with logical
consideration based on an anatomic deduction and practical experience. We assume that it is
sufficient for the practical use in physical training. *)
*) After all, this note applies to all exercise examples, where muscle mutual cooperation during a certain
movement is highlighted. We assume that an instructor should himself figure out what main muscle groups
cooperate in a movement and how. In other words it means that it is necessary to evaluate a movement not only
from outside, e.g. where a ball, discus, shot put ball … lands, but also evaluate the cooperation of muscles during
this performance inside the organism and teach a pupil to perceive this cooperation. This way, you, in fact,
strengthen the self-control and not only the movement one.

31
By raising your arms upward, you stretch the pectoralis major, particularly its
abdominal and thoraco-costal part. Next, the pectoralis minor, latissimus dorsi, ascending
fascicles of trapezius that are inserted to the inner half of the acromion of the scapula, levator
scapulae and rhomboideus.
By raising arms upward, you increase the muscle tension of the upper and middle part
of trapezius, lower part of the serratus anterior that is inserted to the lower border of the
shoulder blade, deltoideus and supraspinatus.
In the second movement stage of the ninth exercise, in the position of stretching
elbows sideways downward lower and holding hands above the shoulders, there is a tonus of
the rhombic muscles during an effort to bring the inner borders of the shoulder blades as close
to the spine as possible. Also, other muscles increase their tension, e.g. the pectoralis major,
latissimus dorsi, the ascending and partly also the transverse fascicles of the trapezius.
Proportionally to the activity of the rhombic muscles and the ascending fascicles of the
trapezius – which we increase even more by active expiration, as we show in the chapter
about breathing exercises – there is a slight stretch of the pectoralis minor, levator scapulae,
upper part of trapezius and lower part of serratus anterior.
At the end of this exercise, we would like to add that the big muscle groups that were
stretched or strengthened in the first stage would change their roles in the second stage. From
this point of view that is focused on the muscle groups, it is an example of the subsequently
compensating exercise.
EXERCISE 4b
SITTING BENDING LEGS ACROSS – raise your arms upward and turn your palms
forward:
1. – 2.) elevate your shoulders (Figure 30)
3. – 4.) hold
5. – 6.) hold your shoulders straight (Figure 31)
7. – 8.) hold
Exercise 4b: Second count Figure 30 Exercise 4b: Sixth count Figure 31

32
When holding arms upward, pupils often forget to consciously practise the position of
straight shoulders. The reason to do so is to prevent the shoulders from elevating in erect
position and during walking, running or working activities. Perform the movement stage,
during which you elevate your shoulders with inspiration. Perceive the pull alongside the
entire spine from the sacroiliac articulation or possibly from the coccyx as far as the top of
your head. A maximum shoulder elevation follows accompanied with the feeling of a pull
coming from the shoulder joints along the upper limbs’ axis as far as the fingers.
When the shoulders descend, breathe out to facilitate the effort to keep them straight.
The feeling of a pull coming from the sacrolumbar articulation to the top of your head
remains even during the movement of your arms downward. By moving your arms downward
and contracting the muscles on the dorsal side of the trunk you make an effort at the shoulder
depression. The movement takes place only in the region of the upper limb girdles. The spine
is stabilised and its anterodorsal movements are a mistake; these movements often occur in
pupils, particularly in the lumbar region of the spine. The abdominal wall is in the expiratory
position throughout the entire exercise.
The position of the elevated shoulders during holding arms upward is secured by the
deltoideus, supraspinatus, upper part of trapezius, levator scapulae, lower part of serratus
anterior and rhomboideus minor. A slight downward movement of the upper limb girdles
is enabled by a concentrated effort to increase the muscle tension of, especially, the ascending
and partly also horizontal fascicles of the trapezius, pectoralis minor and latissimus dorsi.
During this effort you can also perceive an increased tension in the thoracic part of the erector
spinae. As you practise on, perform the exercise for four counts between the ultimate
positions of the shoulders without a hold.
EXERCISE 5
ASTRIDE SITTING POSITION – stretch your arms sideways downward lower (Figure 32):
1. – 2.) raise your arms upward by first raising them forward (Fig 33)
3.) raise your right arm upward backward, raise your left arm upward (Fig 34)
4.) raise your left arm upward backward, raise your right arm upward (Fig 35)
5.) raise your right arm upward backward, raise your left arm upward
6.) raise your left arm upward backward
7. – 8.) stretch your arms sideways downward lower by first raising them upward backward
9. – 10.) bend your round trunk forward downward – raise your arms upward (Figure 36)
11. – 12.) straighten up – stretch your arms sideways downward lower
13. – 14.) hold in the starting position
Exercise 5: Starting position Fig. 32 Exercise 5: 2nd movement stage Fig. 33

33
Exercise 5: 3rd movement stage Fig. 34 Exercise 5: 4th movement stage Fig. 35
Note: Practise each movement stage for three counts.
The starting position often imposes demands on the main knee flexors (and on the hip
joint extensors at the same time). These are: the biceps femoris, semimembranosus and
semitendinosus. Their potential shortening does not allow the correct position of the pelvis,
thereby the position of the entire spine. The upright position of the spine is in the sitting
position crucial and so it must be secured. Therefore, the choice of the position of the lower
limbs must be subordinated to this fact. If necessary, bend your lower limbs. Bend them as
little as possible, just to assume the upright position of the pelvis, trunk and head.
Exerc. 5: Movement course in 7. – 8. stage Fig. 36 Exerc. 5: 10th stage Figure 37

34
This exercise requires a careful performance of raising arms upward. During the
movement, arms should reach the frontal plane without the substitution of the trunk
movement. Raising arms upward backward is enabled by the increased tension of the upper
and middle part of the trapezius, serratus anterior and not to a lesser extent of the deltoideus.
It is enabled also by the stretch of the pectoralis major and minor.
The activity of, e.g. the middle part of trapezius and pectoralis major represents an
example of a simultaneous compensation of the muscle tension regarding correct position of
the upper limb girdles, thereby the correct position of the trunk as a whole.
At the same moment, a muscle that tends to loosen is strongly tensed – the middle part
of the trapezius – and the pectoralis major, a muscle that tends to muscle hypertonia, is
stretched.
Round trunk bending forward downward is included in the compensatory exercises as
a movement change for the erector spinae. A slight stretch occurs in this muscle during this
movement. You perceive more distinct stretch in the knee joint flexors, which vanishes as
soon as you return to the basic starting position. By stretching you have just created good
preconditions for assuming this starting position correctly.
EXERCISE 6
KNEELING SITTING – raise your arms upward inward, lock your fingers together and turn
your palms upward (Figure 38):
1. – 4.) move your trunk round a slight amount to the right (Figure 39)
5. – 8.) move your trunk round a slight amount to the left (Figure 40)
Exercise 6: Starting position Fig. 38 Exercise 6: 1. – 4. count Fig. 39

35
Exercise 6: 5. – 8. count Figure 40
Start from the position where the shoulder axis is in the frontal plane. The position of
the upper limbs requires the same accuracy as the one we try to highlight in exercise 4 and 5.
The muscle coordination is in the position of raising arms upward similar as well. We could
say that the previous exercises, to some extent, prepared and warmed up the muscles of the
upper limb girdles for this exercise so that your attention can be concentrated on the rotation
of the free shoulder axis in space against the stabilised pelvis axis while you sit on your heels.
Through the rotary movement you practise the back muscles (short and long back
muscles) and the transverse abdominal muscles. When rotating to the right you contract
especially the right obliquus internus abdominis and left obliquus externus abdominis. When
rotating the shoulder axis, thereby the trunk, to the left, you activate the opposite muscles.
Regarding the lower limbs, you stretch the feet extensors, tibialis anterior, extensor
digitorum longus and extensor hallucis longus.
EXERCISE 7
KNEELING SUPPORT (Figure 41):
1.) smoothly round your spine (Figure 42, 43)
2.) smoothly arch your spine (Figure 44, 45)
Note: Practise each movement stage for 8 counts.
The aim of this exercise, or other exercises modified from this starting position, is to
teach a pupil to move his spine backward smoothly and assume simultaneously the biggest
head bending forward position and the biggest head bending backward when moving his spine
forward. This exercise is one of the exercises for maintaining the mobility of the spine in its
individual articulations.

36
Exercise 7: Starting position Figure 41
Exercise 7: Beginning of the 1st stage Figure 42
Start to bend your spine by flattening your lower back. Then gradually bend your lumbar,
thoracic and cervical spine. The movement finishes when your head is bent forward and arms
pulled out from the shoulders. Consequently, the shoulders are brought forward to the
protraction position. The subsequent arching your back starts again from the pelvis, by its
anteversion (Fig 44), followed by the successive arching of the lumbar, thoracic and cervical
spine. The movement finishes when head is bent backward and shoulders pulled backward
downward.
Exercise 7: Rounding the spine Figure 43

37
Exercise 7: Beginning of the 2nd stage Figure 44
It is necessary to add that you should hold your head in the ultimate head bending
forward position as long as possible, even though the pelvis already reached the anteversion
and lumbar spine is arched. It means that your head does not necessarily respond to the pelvis
movement, but, on the contrary, it moves independently of it. As mentioned above, the head
finishes every movement stage. To round and arch your back correctly depends on this.
Owing to the fact that you perform the movement slowly and in a relaxed manner, the
increased activity in the muscle fibres of the trunk and head extensors occur only in the
ultimate positions during arching your back. They are especially the deep nuchal muscles,
semispinalis capitis and splenius capitis. A stretch occurs in the neck flexors – the anterior
side of the neck (longus colli, longus capitis) and scalenus muscles; relaxation occurs in the
abdominal muscles and gluteus maximus.
During rounding the back, there is an opposite muscle coordination. The abdominal
muscles, gluteus maximus and neck flexors increase their muscle tension and thereby they
stretch the trunk and nuchal extensors.
The stretching of the wrist flexors in the starting position has also its significance.
EXERCISE 8a
KNEELING – extend your feet (Figure 45).
Circle your shoulders upward and forward. In the description of the basic starting
positions we have emphasised that in the kneeling position you must partly concentrate on the
shoulder axis position as well as on the pelvis axis and its tilt at the same time. The reason is
that even the pelvis is now relatively free in space.
In this exercise try to perform the movement, if possible, by involving the upper limb
girdles only. It means that you do not unnecessarily tense the forearm, upper arm or other
muscles that are not directly connected with the movement.
Start the shoulder circling by moving them upward (Figure 46). The rhomboideus,
levator scapulae and upper descending part of trapezius are actively involved in this
movement stage.

38
Exercise 8a: Starting position Fig. 45 Exercise 8a: Shoulders up Fig.46
Exercise 8a: Shoulders are in front Fig. 47 Exercise 8a: Shoulders are back Fig. 48
The muscles that move the shoulders forward (Figure 47) are: the upper and middle
part of the serratus anterior, and pectoralis major and minor.
The movement of the shoulders downward activates the pectoralis minor, pectoralis
major - especially its abdominal part, subclavius, lower part of serratus anterior, ascending
fascicles of trapezius and also latissimus dorsi.
The backward shoulder position, enabled by a higher tension particularly in the middle
part of trapezius and rhomboideus, ends the circle (Figure 48).
It is necessary to complete this analysis of the muscle activation by the fact that along
with a tension increase in the muscle fascicles, which elevates the shoulders, the muscle
groups that are involved in the shoulder position downward in depression and vice versa, are
stretched.
The activation of the muscle groups during the shoulder position forward
simultaneously stretches the muscle groups that secure the conscious shoulder position
backward and vice versa.

39
This mechanism simultaneously balances the muscle tension of the above-mentioned
muscle groups that significantly affect the position of the shoulder girdles, thereby the trunk
development and the overall posture.
The exercise is not easy, as it could seem at first sight, because you must try to
perceive individual muscles in the process of slow practising. At the same time, it is necessary
to keep the upright and firm position of the spine. Also, keep the wrist joint muscles and
elbow joint muscles relaxed during the exercise.
Only through this practise you, as a teacher, can have a guarantee that pupils will learn
to consciously affect the position of the shoulder girdles also in other, not only exercise,
positions. This exercise, as well as all other exercise examples, can be performed in a number
of modifications.
EXERCISE 8b
KNEELING, STRETCHING RIGHT LEG SIDEWAYS – stretch your arms sideways, turn
your little fingers forward (Figure 49):
1.) bend your trunk sideways to the right – raise your arms upward, turn
your palms inward (Figure 50)
2.) straighten up – stretch your arms sideways, turn your little fingers
forward (Figure 49)
3.) move your trunk round a slight amount to the left – stretch your
arms sideways, turn your little fingers forward (Figure 51)
4.) straighten up – stretch your arms sideways, turn your little fingers
forward (Figure 49)
5.) close your arms the body lower by first stretching them sideways
backward downward – kneel sitting on the left leg – bend your round trunk
forward downward and raise your arms upward by first raising them forward,
turn your palms forward (Figure 52)
6.) close your arms the body lower by first raising them forward –
kneel on the left leg and straighten up – stretch your arms sideways, turn your
little fingers forward (Figure 49)
Note: Practise each movement stage for 3 – 4 counts.
Exercise 8b: Starting position Figure 49
This exercise is more complicated, because throughout the movement it is necessary to
have under control a continuously changing position of the pelvis, shoulders, trunk and arms.
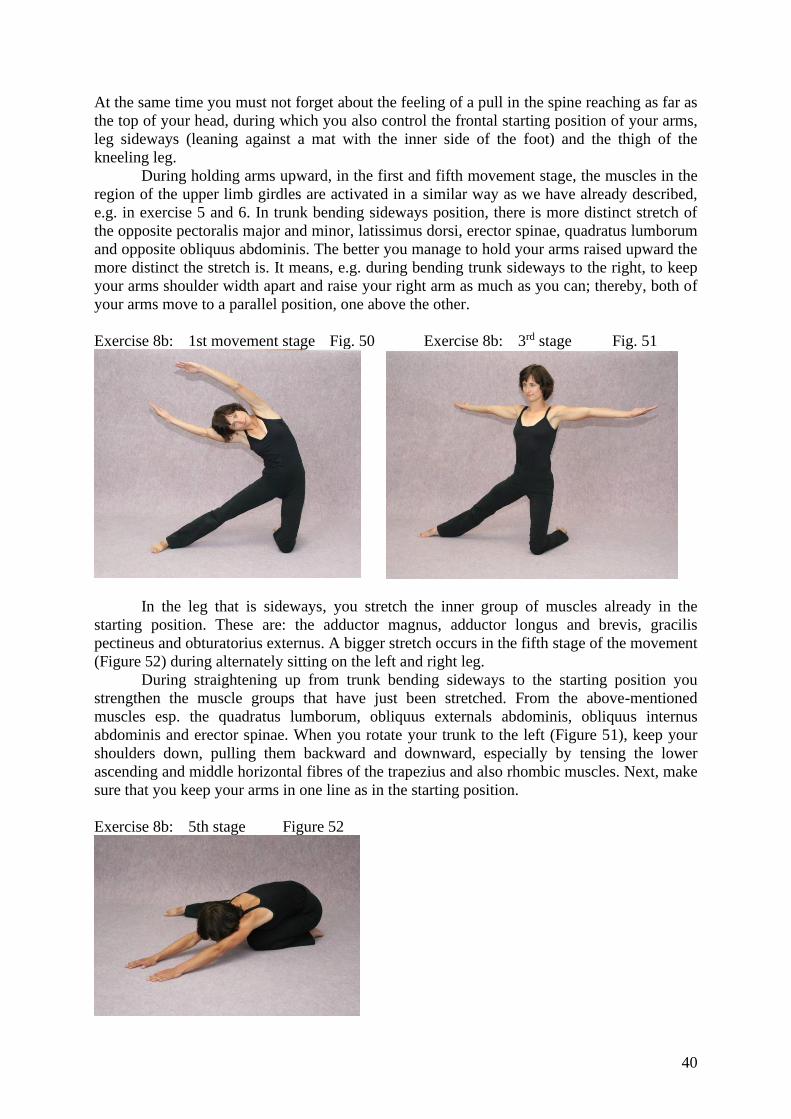
40
At the same time you must not forget about the feeling of a pull in the spine reaching as far as
the top of your head, during which you also control the frontal starting position of your arms,
leg sideways (leaning against a mat with the inner side of the foot) and the thigh of the
kneeling leg.
During holding arms upward, in the first and fifth movement stage, the muscles in the
region of the upper limb girdles are activated in a similar way as we have already described,
e.g. in exercise 5 and 6. In trunk bending sideways position, there is more distinct stretch of
the opposite pectoralis major and minor, latissimus dorsi, erector spinae, quadratus lumborum
and opposite obliquus abdominis. The better you manage to hold your arms raised upward the
more distinct the stretch is. It means, e.g. during bending trunk sideways to the right, to keep
your arms shoulder width apart and raise your right arm as much as you can; thereby, both of
your arms move to a parallel position, one above the other.
Exercise 8b: 1st movement stage Fig. 50 Exercise 8b: 3rd stage Fig. 51
In the leg that is sideways, you stretch the inner group of muscles already in the
starting position. These are: the adductor magnus, adductor longus and brevis, gracilis
pectineus and obturatorius externus. A bigger stretch occurs in the fifth stage of the movement
(Figure 52) during alternately sitting on the left and right leg.
During straightening up from trunk bending sideways to the starting position you
strengthen the muscle groups that have just been stretched. From the above-mentioned
muscles esp. the quadratus lumborum, obliquus externals abdominis, obliquus internus
abdominis and erector spinae. When you rotate your trunk to the left (Figure 51), keep your
shoulders down, pulling them backward and downward, especially by tensing the lower
ascending and middle horizontal fibres of the trapezius and also rhombic muscles. Next, make
sure that you keep your arms in one line as in the starting position.
Exercise 8b: 5th stage Figure 52

41
When your trunk reaches an ultimate rotation, you can perceive more distinct activity
in the erector spinae and obliquus abdominis.
When you move your trunk round to the right you can perceive an increased muscle
tension of the right rhombic muscle, right middle and ascending part of the trapezius and
bigger stretch of the pectoral muscles on the same, right side. Notice that, if you practise
slowly, the increased tension of the shoulder blade fixators on the dorsal side of your trunk
helps to stretch the pectoral muscles. There is again a simultaneous balancing of the muscle
tension between the phasic and tonic muscle groups.
EXERCISE 9
CLOSE STAND – raise your arms upward, turn your palms forward (Figure 53):
1.) assume close knee bend, feet flat on the floor – stretch
your arms sideways downward lower, turn your palms backward (Figure 54)
2.) close stand – raise your arms upward, turn your palms forward (Fig 53)
3.) assume kneeling support and stretch your right leg backward – left
foot is flat on the floor (Figure 54)
4.) = 2.)
5.) assume kneeling support and stretch your left leg backward – right
foot is flat on the floor (Figure 54)
6.) = 2.)
Note: Practise each movement stage for 3 – 4 counts.
Exercise 9: Starting position Fig. 53 Exercise 9: 1st stage Fig. 54

42
Exercise 9: 3rd movement stage Figure 55
We have gradually got through the examples of exercises in basic starting positions to
the last, final position, to which, basically, should all exercises lead – standing position and
movements originating from standing position.
4.3 BREATHING EXERCISES
Other basic compensatory means in the health-enhancing physical training of people
with health impairment are breathing exercises. Basically, it is not necessary to explain the
importance of breathing. However, to get more detailed information, it is necessary to consult
physiology textbooks and specialised publications dealing with respiratory problems. All of
them identically refer to breathing as one of the most important physiological processes,
whose activities are very delicately controlled by the respiratory centre in the oblongata in
accordance with the actual needs of the organism.
In pedagogical literature we meet different approaches how to explain the importance
of breathing exercises. However, the aim of the authors is mostly to encourage instructors and
their pupils to practise breathing consciously. We would like to stress that it is necessary to
view breathing in more detailed way. Here we preferably use a complex approach to the
compensatory exercises in remedial physical education. We can view the importance of
breathing from the following points: 1. metabolic, 2. mechanical, 3. formative, and 4.
regulatory.
METABOLIC IMPORTANCE OF BREATHING
The life of tissues is possible only when oxygen from the external environment is
delivered. Oxygen is necessary for oxidoreduction processes, during which the transformation
of substances and energy takes place. The final product of the complex oxidative degradation
of nutritive substances is carbon dioxide and water. The release of CO2 when expiring is one
of the important mechanisms to retain the acidobasic balance, the stability of the internal
environment (homoeostasis). A constant exchange of gases (O2 and CO2) taking place
between the external environment and tissues is called breathing.

43
MECHANICAL IMPORTANCE OF BREATHING
Pressure changes in the thoracic and abdominal cavity, caused by the movement of the
diaphragm during breathing, affect the blood circulation. The diaphragm works on the
boundary between the thoracic and abdominal cavity as a piston. During inspiration the
contracted and flattened diaphragm moves towards the abdominal cavity. During expiration it
is relaxed and so it is pushed up by the abdominal viscera towards the thoracic cavity.
When the diaphragm moves downward during inspiration, under-pressure occurs in
the thoracic cavity and so air is drawn through the air passageways into the lungs. The flexible
thoracic organs expand. Besides lungs it is especially heart; big vessels and their contents are
increased by blood, which is supplied from the peripheries.
At the same time during inspiration, overpressure occurs in the abdominal cavity that
pushes the venous blood to the lower vena cava.
When the diaphragm moves upward during expiration, under-pressure occurs in the
abdominal cavity. The under-pressure causes drawing of blood from the lower limbs to the
abdominal veins. Pressure changes, however, do not only affect the blood vessels and the
heart. It affects also the lymphatic circulation, peristalsis of the small and large intestines,
liver, and emptying the gallbladder, vegetative abdominal plexus, pancreas etc.
FORMATIVE IMPORTANCE OF BREATHING
It is important to realise that through breathing exercises you learn to involve the trunk
and abdomen in the overall coordination of the kinetic system. By consciously influencing the
rhythm, depth and dynamic of breathing you affect muscle tension of the skeletal muscles
that, as you know, affect the postural functions. By rhythmical activation of specific muscle
groups you can reach even shape changes of the trunk and so it can also be used to influence
poor posture. We want to emphasise here the mentioned thought, similarly as other authors
have already done, that to correct deviations from the good posture is an important partial task
of breathing exercises in remedial physical education. Formative importance of breathing
exercises is proved on the muscles of the trunk, including the muscles of the abdomen and
pelvic floor.
REGULATORY IMPORTANCE OF BREATHING
Regulatory importance of breathing is shown by the changes of muscle excitability
that rhythmically fluctuates depending on breathing. The skeletal muscles are more excitable
during inspiration (breathing in) and less excitable during expiration (breathing out). Because
there is a close relationship between the muscle and nerve tension, it is possible to say that
along with the increasing muscle tension, during inspiration, an increasing activity in the
nervous system also occurs. During expiration it is other way round. In other words, during
even breathing a parallel excitation of the nervous system and muscles occurs in the
inspiration stage and there is an inhibition in the expiration stage. This mechanism, which
helps to maintain the balance of both muscle and nervous tension, is also used, as shown
further in the text, for practising relaxation exercises. This mechanism, which a pupil tries to
perceive carefully during practice, serves as a mental auto-regulator leading to a happy
psychosomatic disposal, which is a part of mental health.
44
4.3.1 Division of breathing exercises
For the needs of the teaching practice, breathing exercises are divided into:
1. breathing exercises without accompanying movements of body parts;
2. breathing exercises with accompanying movements of body parts;
3. breathing exercises with periodical locomotive movements.
1. Breathing exercises without accompanying movements of the body parts, i.e. without
the movements of the head, neck, trunk, pelvis and limbs, are focused on the
development of the basic ways of breathing: diaphragm breathing, lower and upper
thoracic breathing. They are also focused on the development of bronchovesicular and
costo-abdominal way of breathing, and practising “breathing wave” that joins
abdominal, lower and upper thoracic breathing in one harmonic whole. In practice, we
use starting exercise positions, preferably relaxed, but also correct mutual position of
the individual parts of the body. This enables a pupil to concentrate his attention on the
muscle activity during breathing movements and overall feelings brought about by
ventilation. We start to use these exercises to consciously influence the neuro-
muscular mechanism of breathing in order to influence the rhythm, depth and strength
of breathing. We include them in the compensatory part of a physical training lesson.
2. Breathing exercises with accompanying movements of the body parts serve us to
practise the coordination of breathing movements with the movements of the head,
neck, trunk, pelvis, lower and upper limbs. The movements of the parts of the body are
performed consciously and a pupil must respect their correct mutual postural relations.
These exercises combine exercises for the correct posture with breathing exercises in
one whole. The inspiration and expiration stage, however, significantly affects the
selection of accompanying consciously controlled movements that make up an
exercise element. We try to synchronize inspiration with an activity, where the
inspiratory muscle groups are involved and expiration with an activity, where the
expiratory muscle groups are involved. We include these exercises also in the
compensatory part of a physical training lesson and practise them in the basic starting
positions.
3. Breathing exercises with periodical locomotive movements are included in the
developing part of a physical training lesson, because there are increased functional
demands on the motor system, thereby on the circulatory and respiratory system.
Breathing exercises during walking, running, swimming, biking, rowing, paddling etc.
belong here. In these exercises, similarly as in breathing exercises with movements of
parts of the body, we subordinate movement to breathing. These exercises also make a
content of individual training lessons depending on the possibilities of the pupil with
health impairment and gym conditions.
Next part of the text is devoted to the first two groups of breathing exercises. They
represent the very content of the compensatory part of a training lesson; they are the basic
subject matter. We are not going to further specify the breathing exercises with periodical
locomotive movements. Pupils will be sufficiently acquainted with the movements of
recommended activities during their studies at different school departments and learn them.
For these reasons we do not include them even in physical training.

45
We assume that to choose correctly an exercise load and didactic conduct of certain
parts of a lesson, where breathing exercises with periodical locomotive movements are used,
it is necessary for us to:
a) study thoroughly the specific impairment
b) have a precise idea of the movement stress that can be acquired after a long-term
movement experience in the movement activities, in which the periodical locomotive
movements are included
c) have a theoretical and practical knowledge of basic compensatory means.
4.3.2 Conditions for breathing exercises
Any human conscious activity should take place in an appropriate environment.
People working in the physical training field also have their ideas of what gymnasiums, sports
facilities or sports halls and swimming pools, where physical training processes take place,
should look like. It is not only the architecture and equipment that is concerned here. It is
cleanness and coziness that we strive for in the objects or rooms designated for physical
training.
A pleasant and clean environment is very necessary for practicing breathing exercises.
Generally, it is a gymnasium that is clean, warm and well ventilated. Its floor is covered with
felt or similarly strong and flexible carpet. Similarly, as we learnt to perceive cleanness,
purposefulness etc. of the external environment and we are more or less capable of it, during
breathing exercises we learn to perceive what relates to the internal environment, internal
personal feelings and experiences. Therefore, we are going to point out some conditions,
which, in these terms of perceiving different feelings, improve the quality of breathing
exercises. They are e.g.:
A. Wear an appropriate gym-dress
In order to perceive individual movements during breathing, we assume to wear loose
and not tight clothes. Loose clothes also affect the circulatory system.
B. Clean the sinus nasal
To feel air flowing through the system of the nasal vents, it is necessary to remove
mucus with particles of dust from the sinus nasal mucosa. A pupil is minimally
required to blow his nose thoroughly. Doing so, he actually makes the sinus nasal free
of the biggest impurities by an increased air pressure. Some medical doctors
recommend cleaning the nasal vents by very mildly salted water. Salted water (0,9%
solution of NaCl) has the same value of osmotic pressure as blood plasma and does not
cause an unpleasant irritation of the nasal mucosa in comparison with H2O.
C. Do not eat before exercise
Due to the fact that during the breathing exercise you work with your diaphragm,
abdominal muscles and pelvic floor, it is better not to eat before exercise. You should
not eat less than half an hour before exercise. If there was a bigger quantity of food
and it was worse digestible, it is better to wait a little longer before you practise. If
there is an appropriate place for doing exercise and the above-mentioned conditions
are fulfilled and there is no hurry, you are ready to do the exercise.

46
A suitable physical training environment, for the purposes of breathing exercises, is
also necessary to look for in the countryside. There is a good occasion to do so in summer
camps. It is good to look for such opportunities also outside holidays.
4.3.3 Breathing exercises without accompanying movements of body
parts
As we did during practising the correct posture, during practising the breathing
exercises we also teach pupils to perceive movement during breathing in an appropriate
starting position first. We teach them to perceive that some starting positions cause certain
restrictions for trunk mobility that is so needed for correct breathing. It is a certain
disadvantage, especially in back lying position, front lying position and side lying position,
where the movement is restricted in the longitudinal axis, especially on the side that is in
contact with the floor. However, the indisputable advantage of these positions from the point
of view of the practise alone is that a pupil, with his relatively relaxed body, can concentrate
solely on the movements during breathing without disturbing the postural relations between
the individual parts of his body. That is an essential reason why we start teaching breathing
exercises in horizontal positions and we choose back lying position as the main one.
In this position we start teaching basic ways of breathing:
1. diaphragm and abdominal breathing
2. lower costal and thoracic breathing
3. upper costal and thoracic breathing
1. Abdominal breathing
EXERCISE 10
BACK LYING POSITION, BENT KNEES – arms close the body, palms are flat on the floor
(Fig 56):
1. – 4. expiration
5. – 8. inspiration
Exercise 10: Starting position Figure 56

47
Start to practise abdominal breathing in back-lying position. In order to perceive the
movement of the abdominal wall better, bend your lower limbs in the knees and hip joints.
The ends and the tentacles, especially of the rectus abdominis, get slightly closer to each
other; its tension decreases and conditions for bigger movement excursion of the abdominal
wall are created. By bending the lower limbs, you decrease the activity of the hip joint flexors
that affect the position of the pelvis and lumbar spine. Arms remain along your body in the
arms close the body position. Focus on the relaxation of your pectoral muscles so that your
trunk does not move to the inspiratory position too much. It is fitting to have a look in the
anatomy textbook before the exercise for you to remember the exact location of the
diaphragm on the boundary of the abdominal and thoracic cavity. Many of you will
surprisingly find out that medial fascicles of the lumbar part of the diaphragm come on the
right side of the spine from the first bodies of the lumbar vertebrae and on the left side from
the first three bodies of the lumbar vertebrae. Therefore, it is possible to say that even this part
of the diaphragm, among others, participates in the functional state of the lumbar spine.
a) Start the exercise by a concentrated attention on the movement of the diaphragm (since
it is the diaphragm breathing) and watch its movement during inspiration and
expiration. Try to become an “unbiased” observer of this act without deepening or
accelerating your breathing.
b) After that, place both your hands on the abdominal wall, slightly stretch your fingers
so that your thumbs and forefingers are above the navel and other fingers below the
navel. Gradually exert bigger effort during inspiration (deepen your inspiration) and
you find out that the organs that are pushed downward (caudally) in the abdominal
cavity arch and stretch the abdominal muscles. During expiration, the pressure in the
abdominal cavity decreases and the abdominal wall relaxes.
c) Deepen your breathing also in the expiration stage by contracting your abdominal
muscles after the relaxation of the abdominal wall, so the entire abdominal wall heads
towards the lumbar spine.
All organs in the abdominal cavity are delicately self-massaged by regularly repeating
the movements of variations a), b), or c). Practise very carefully, slowly, deepen
breathing according to your subjective feelings and be aware of the correct
coordination of inspiration and expiration stages with the abdominal wall movement.
Exercise 10: Arched abdominal wall after deepened inspiration Figure 57

48
Exercise 10: Abdominal wall after expiration Figure 58
Exercise 10: Abdominal wall after deepened expiration Figure 59
After you master the exercise, practise it with your tensed lower limbs.
2. Lower thoracic breathing
After you have practised the abdominal breathing, proceed to the practise of the lower
thoracic breathing (Figure 60). During the practise, concentrate on the sideway movements of
your lower ribs, approximately 6. – 12. rib. To perceive the movements better, lay your hands
with your palms on the lower part of your trunk. Your forefingers are pointing towards the
xiphoid process of the sternum, the distal phalanxes of the middle fingers, ring fingers and
little fingers lie on the lower cartilaginous edge of the thoracic cage that is made up of the
seventh to eleventh ribs. After doing this exercise several times, it is necessary to do a
different exercise in the starting position to prevent from hyperventilation. *)
Then return to the original practise and this time try to contract your transverse
abdominal muscles during expiration and at the same time try to perceive them; your hands
can more and more press your trunk synchronously with expiration. On the contrary, during
inspiration perceive the muscles as if they were “making room” for the ribs moving primarily
sideways; also the hands pressure weakens to zero along with the growing quantity of air in
your lungs (Figure 60).
*) This note generally relates to all breathing exercises without accompanying movements of parts of the
body!

49
EXERCISE 11
BACK-LYING POSITION – bend your elbows sideways lower and lay your palms on the
lower edge of your trunk (Figure 60):
1. – 4.) breathe out
5. – 8.) breathe in
Exercise 11: Lower thoracic breathing Figure 60
To perceive the inspiration and expiration stages better do a short inspiratory and
expiratory apnoeic pause for two counts.
3. Upper thoracic breathing
When practising the upper thoracic breathing, concentrate on the movements of your
trunk that occur in the region of 2. – 5. ribs. To perceive the movements better, especially
forward and upward movements, lay your hands with the palms right under the collarbones so
that the distal phalanxes of the fingers reach as far as your breastbone. Then you attempt to
breathe in under your hands (see Figure 61 and 62).
EXERCISE 12
BACK-LYING POSITION - bend your elbows sideways lower, raise your forearms upward
inward, lay your palms on the upper part of your trunk right under the breastbone (Figure 61,
62):
1. – 4.) breathe out (Figure 61)
5. – 8.) breathe in (Figure 62)
Exercise 12: Upper thoracic breathing, expiration Figure 61

50
Exercise 12: Upper thoracic breathing, inspiration Figure 62
We continue in a similar way in front lying position. We teach pupils to first perceive
inspiration in the abdominal part of the body. A mat will take over the role of hands that lie on
the abdomen in the back-lying position. During inspiration the diaphragm descends, a pupil
observes it attentively and tries to press against a mat with his stomach.
Another task for our attention in this exercise is in the lumbar region. To perceive
better the movements in this part of the body place your palms along the lumbar spine so that
the little finger edges lie along the spines of the vertebra bodies and your fingers point in the
caudal direction (Figure 63, 64).
EXERCISE 13
FRONT LYING POSITION - raise your elbows backward, lay your palms along the lumbar
spine, fingers pointing to your heels – your head is bending backward resting with your chin
on the mat:
1. – 4.) breathe out (Figure 63)
5. – 8.) breathe in (Figure 64)
Exercise 13: Abdominal breathing, expiration Figure 63
Exercise 13: Abdominal breathing, inspiration Figure 64

51
During inspiration, observe carefully the movement of the lumbar spine backward and
upward and the movement of the abdominal wall sideways. This exercise helps you to realise
that the abdominal breathing influences mobility in the whole abdominal cavity in the
forward, backward and sideways directions; also, however, slightly upward during inspiration
and downward during expiration, which can be distinctly perceived in the lumbar region of
the spine. The sacrospinal muscle system is in this region of the spine mildly stretched as well
as the psoas muscles.
When you have finished exercise 13, stay in the same position and practise lower
thoracic breathing. Only move your palms along the spine to the lower part of the trunk so
that your fingers lie approximately perpendicular to the spine axis, if possible, keep your
fingers closed and thumbs apart.
EXERCISE 14
FRONT LYING POSITION - stretch your elbows sideways downward, lay your palms on the
lower dorsal part of your trunk – bend your head backward resting it with your chin on a mat:
1. – 4.) breathe out (Figure 65)
5. – 8.) breathe in (Figure 66).
Exercise 14: Lower thoracic breathing, expiration Figure 65
Exercise 14: Lower thoracic breathing, inspiration Figure 66

52
When practising upper thoracic breathing in the front lying position, it is more suitable
if you are in this position with your arms akimbo (see Figure 67, 68). The reason is that your
own control of the movements by your hands in the upper part of your trunk is difficult. With
your hands akimbo the shoulder girdles remain relaxed so you can easily perceive the
inspiration and expiration stage in the continuation of the previous exercises.
During inspiration you can perceive particularly front upper part of your trunk that
presses against a mat, a bit less – but also – sideways movements, backward and upward, and
in the direction of the top of your head. During expiration, you perceive an overall
concentrated movement along the periphery of the upper part of your trunk while you make
the effort to increase the tonus of the back and intercostal muscles.
EXERCISE 15
FRONT LYING POSITION - stretch your elbows sideways lower, place your fists on the
hips:
1. – 4.) breathe out (Figure 67)
5. – 8.) breathe in (Figure 68)
Exercise 15: Upper thoracic breathing, expiration Figure 67
Exercise 15: Upper thoracic breathing, inspiration Figure 68

53
The above-mentioned exercises of the basic ways of breathing can be performed in
other positions. Particularly sitting and standing positions are suitable. In comparison with the
lying positions their advantage is that there is not such a big stabilisation of the body against a
mat that makes it impossible for the side of the body that is in contact with a mat to move
freely. However, practising in higher positions is more demanding, because, besides the
correct practise of breathing, it further requires your concentration and you must keep your
body in the starting position. This way you practise breathing and postural functions at once.
Other important objective of the breathing exercises without accompanying
movements of the body is a practise of so-called “breath wave”. This name has come to stay
in the health-enhancing physical training and it is nothing else but the ancient full or complete
yoga breath. It is in fact a connection of above-mentioned three basic ways of breathing in one
smooth and harmonic whole. To practise the “breath wave” in the back-lying position breathe
in and out a few times within the scope of the tidal volume during normal quiet breathing.
Then exhale smoothly, relatively forcibly and then slowly inhale, e.g. for six counts. During
the first two counts concentrate simultaneously on the descend of the diaphragm into the
abdominal cavity and the relaxed abdominal wall arching upward. During the third and fourth
count draw your attention from the area of the abdominal wall to the lower part of your trunk
that is expanding. In the last two counts concentrate only on the finishing of inspiration into
the upper part of your trunk. Practise the expiration part also for six counts and put the ways
of breathing in the same order as during inspiration. Start with the concentration of your
attention on the diaphragm and notice how the abdominal wall descends after it. Then the
lower part of your trunk starts narrowing and eventually in the fifth and sixth count finish
expiration in the upper part of your trunk with the feeling of your breastbone descending the
lowest inward and downward.
Mistakes usually occur during the first attempts – in the inspiration stage – after the
inspiration in the abdominal part is finished and at the start of the inspiration in the lower
thoracic part, a pupil usually draws his abdominal wall to the lumbar spine and so he prohibits
the diaphragm in moving the lowest in the abdominal cavity. A pupil must understand and
particularly learn in the course of time that after the inspiration in the abdomen, the top of the
abdomen stays at rest and then it is followed by a smooth inspiration in the lower and upper
part of the thoracic part. During a complete inspiration, the entire abdomen wall and trunk
move forward in successive steps.
Another big mistake is, that during finishing the inspiration in the upper trunk, both
shoulder girdles help to elevate the trunk. That’s why you must bear in mind that both
shoulder girdles must stay completely relaxed and their slight elevation is only a result of an
overall slight movement of the trunk upward, caused, as if by lungs expansion at the end of
inspiration in the upper trunk.
We include the breath wave in the compensatory part of a training lesson almost
always. According to your own consideration it can be practised in other starting positions.
The breathing exercises without accompanying movements of individual parts of the
body should teach us how to consciously affect the neuro-muscular mechanism. This
mechanism is affected particularly by breathing rhythm. The breathing rhythm is affected by
the depth and force of breathing. Although you practise attentively, learn to literally play with
your breathing. For your “play” with breathing you can choose number of exercise
modifications that can precede the practise of the breath wave especially in children. The
stress on the rhythm, depth and force is different according to your exercise programme;
breathe in and out always through your nose.
54
Examples:
a) Breathe in slowly (it must not be heard) for 4, 5, 6 and more counts. Breathe out also
slowly for 4, 5, 6 and more counts.
b) Breathe in intermittently, in two long and forced breaths, for the duration of two counts.
Breathe out slowly, quietly for 4, 5, 6 and more counts.
c) Breathe in slowly for 4 and more counts. Breathe out intermittently, in two long and forced
breaths, for the duration of two counts.
d) Breathe in intermittently, in two long and forced breaths. Breathe out in short and forced
breaths (staccato) for six counts.
At the beginning of these a) – d) examples you do not have to set other objectives but
one: be particular about the breath rhythm to be in dependence on its force. The same
exercises can be later performed in the full scope of the vital capacity, that is, breathing
should be deepened.
In the mentioned type of breathing exercises, it is also possible, in a partial time
segment, to respect a pupil’s shape of his trunk. As you know, these exercises can very
significantly influence the muscle tension and thereby also the morphology of the trunk. For
instance, if the trunk is in inspiration position, as it is common in asthmatic people, we can lay
emphasis on a slow, however, the biggest expiration from the expiratory reserve volume. The
subsequent inspiration is just a relaxation of the abdominal muscles, without voluntary efforts,
just as it moves “by itself”.
Example
For six counts, or more, breathe out slowly and smoothly. In this stage, the abdominal
wall slowly, but forcefully contracts and nears the lumbar spine. Breathe in by relaxing the
abdominal wall.
For asthenia, expiratory thorax, occurring, e.g. in children who suffer from different
temporal or chronic obstructions of the upper respiratory passageways, we can, on the
contrary, emphasize slow and the biggest inspiration; to fill the inspiratory reserve volume as
much as possible. The subsequent expiration is by itself, without a conscious muscle
contraction in the expiratory stage; expiration is not forced. The trunk returns to its original
position due to the flexibility and elasticity of pulmonary tissue and trunk muscles, and the
pressure of the viscera on the diaphragm.
Example
For the period of six counts breathe in slowly, smoothly and as much as you can. For
another six counts, or more, breathe out. In the first two to three counts the expiration is
carried out by itself; for the remaining counts stay in the expiratory apnoeic pause; do not
continue to exhale from the expiratory reserve volume.
In all these exercises breathe in and out only through your nose. To make the exercises
more diverse, but also to increase the load of the expiratory muscles, you can simultaneously
pronounce sounds sssss, zzzzz, iiiii, aaaaa, eeeee, etc.
During the breath wave, in the expiratory stage, you can appropriately make use of
these sounds aaaaa – uuuuu – mmmmm, that smoothly link to one another. This voice
accompaniment is also important as an acoustic control of the regulation of the smooth force
of expiration.

55
Similarly, as the previous breathing exercises without accompanying movements of
the body parts, also these exercises are performed mainly in lying, sitting, kneeling sitting and
standing positions.
To conclude this part, we must remind that it is necessary to respect possible muscle
tiredness in some of the starting positions. For instance, during a long-lasting bending head
backward position etc. In such case, insert an exercise that would relax the relevant muscles.
4.3.4 Breathing exercises with accompanying movements of the body parts
Breathing exercises accompanied with the movements of the head and neck, trunk,
pelvis and limbs significantly affect the functional development of the secondary respiratory
muscles. Their objective is to improve the ventilation function; it also means to harmonise the
muscle tension, which cooperates in this function, and retain joint mobility relating to an
overall mobility of the trunk.
As we have already mentioned, in these exercises you must concentrate on a careful
coordination of the movement rhythm with inspiration and expiration or, if it is suitable, hold
your breath.
EXERCISE 16
BACK LYING POSITION, BENT KNEES (Figure 69)
1.) flatten your lower back and elevate it slightly above a mat; breath out (Fig 70, 71)
2.) lie on your shoulder blades and arch your trunk, knees are bent; breath in (Fig 72)
3.) slowly lie down on your back, flatten the lower back; breathe out
4.) back lying position, the pelvis takes up its normal position; breathe in
Note: Perform each movement stage for four counts.
Exercise 16: Starting position Figure 69
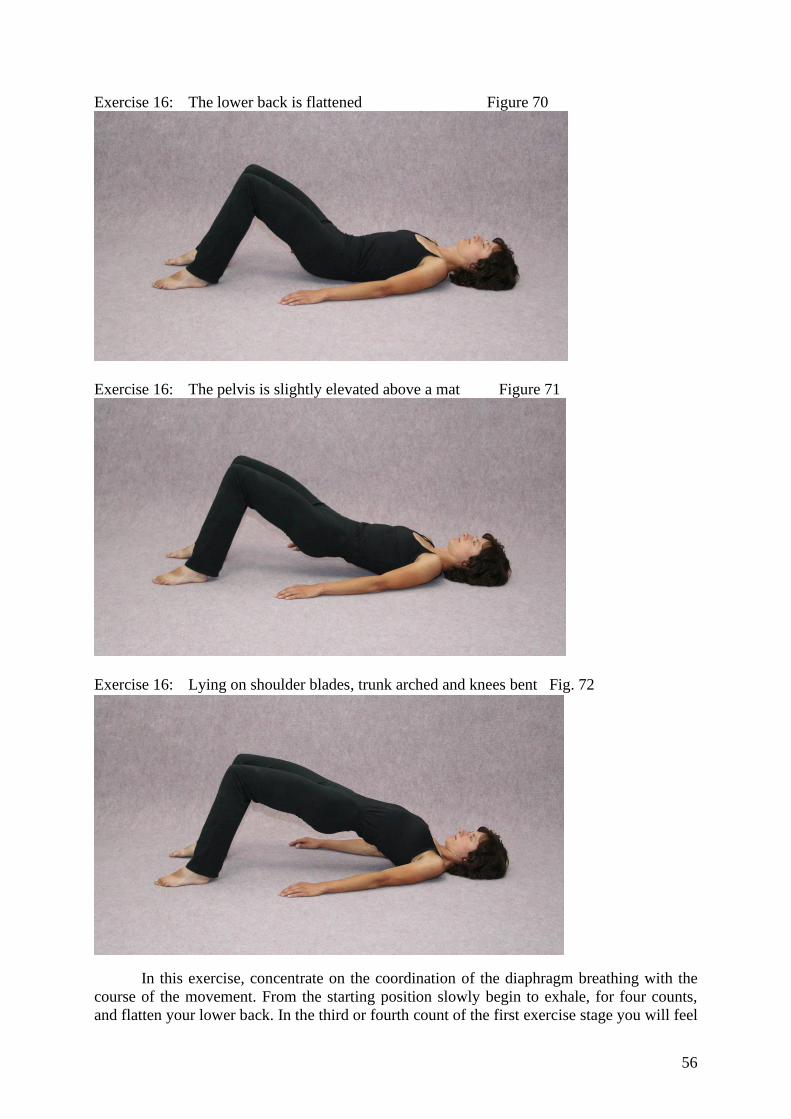
56
Exercise 16: The lower back is flattened Figure 70
Exercise 16: The pelvis is slightly elevated above a mat Figure 71
Exercise 16: Lying on shoulder blades, trunk arched and knees bent Fig. 72
In this exercise, concentrate on the coordination of the diaphragm breathing with the
course of the movement. From the starting position slowly begin to exhale, for four counts,
and flatten your lower back. In the third or fourth count of the first exercise stage you will feel

57
pressure against a mat approximately in the boundary of the lumbar and thoracic regions
(Figure 71). Besides the contraction of the abdominal muscles you feel also the contraction of
the gluteal muscles. Then the inspiratory stage follows, during which you slowly pull off the
thoracic spine from a mat, a vertebra by vertebra, until you reach the lying position on your
shoulder blades. Due to the fact that the movement of the trunk and pelvis upward activates
the gluteus maximus and knee flexors, there is not (with the stretched abdominal muscles by
inspiration), an excessive increase of the lumbar flexion (Figure 72).
As for your feet, try to press them against a mat. In the area of your knee joints try to
widen the angle between your crura and thighs without changing the position of your feet.
When breathing out and returning your trunk to the floor, it is necessary to lay down
on a mat, step by step, not only the thoracic spine but also the lumbar spine. In the fourth
count of the third exercise stage the whole lumbar spine is on a mat and the abdominal wall is
contracted by the active expiration. By returning the pelvis to its normal position you practise
inspiration.
EXERCISE 17
BACK LYING POSITION (Figure 73)
1.) flatten your lower back and simultaneously bend your head forward with your
occipital bone stabilised on a mat, then slightly bend your trunk forward – raise
your arms forward; breathe out (Fig 74, 75)
2.) sitting position – raise your arms upward backward outward; breathe in (Figure 76)
3.) bend your round trunk forward downward – raise your arms upward; breathe out
(Figure 77)
4.) sitting position - raise your arms upward backward outward; breathe in
5.) back lying position – flatten your lower back and simultaneously bend your head
forward with your occipital bone stabilised on a mat; breathe out
6.) keep the head straight, your pelvis is in its normal position; breathe in.
Note: Each stage is practised for four counts.
Exercise 17: Starting position Figure 73
The exercise is divided into six stages, each of which should be performed as long as
possible. Some stages can be practised separately as an exercise element, e.g. second and third
stage, fourth and fifth stage. Sixth or first stage are also worth practising separately.

58
Exercise 17: Flattening the lower back, simultaneously bending head forward Fig. 74
Exercise 17: Bending trunk mildly forward, raising arms forward Figure 75
After a few repetitions, concentrate, if possible, also on the muscle tension in the final
positions of the exercise stages and gently increase the contraction of the muscles that cause
the movement; e.g. in the fourth stage increase holding arms upward backward outward and
perceive the tension in the deltoid muscles, interscapular muscles and the stretch of the
pectoral muscles etc. In the fourth count of the third stage you can gradually make an attempt
at the biggest tension of the abdominal muscles during expiration that get close to the lumbar
spine or you can set different partial objectives in the suggested sense.
Exercise 17: Sitting position, raising arms upward backward outward Figure 76

59
After finishing some movement stages, when you have already mastered the exercise,
it is possible to insert a short apnoeic pause. In our example it is possible to insert an
inspiratory apnoeic pause after the second movement stage, and an expiratory apnoeic pause
after the third movement stage, approximately for the period of two counts. By doing so, you
will also, among others, perceive more attentively the position of individual parts of the body
in every final position of an exercise stage.
EXERCISE 18
BACK LYING POSITION, BENT KNEES (Figure 77):
1. – 4.) stretch your legs – raise your arms upward by first stretching
them sideways – breathe in (Figure 78,79)
5. – 8.) bend your knees, raise your legs forward upward – bring your
arms close the body lower by first stretching them sideways –
breathe out (Figure 80).
Breathe out in the starting position before you start practicing. During inspiration slide
your feet on a mat without lifting them at any stage of the movement; your hip joint flexors
are, if possible, relaxed. Breathe out in the fifth count and bring your pelvis into the
retroversion position at the same time. As soon as the lumbar spine rests on a mat start
bending and bringing your knees toward your chest as much as the joint mobility and the
strength of the hip flexors allow so that your thighs get as close to your trunk as possible.
Exercise 18: Starting position Figure 77
Exercise 18: Approx. 2nd count of the exercise Figure 78

60
Exercise 18: The 4th count of the exercise Figure 79
Exercise 18: The 8th count of the exercise Fig. 80
EXERCISE 19
FRONT LYING POSITION – rest your head with your forehead on a mat (Figure 81)
1.) bend your trunk slightly backward – bend your head backward – by swinging your
arms down-ward-backward raise your arms upward backward outward; breathe in
(Figure 82)
2.) straighten up – rest your head on the forehead – raise your arms upward; breathe
out (Figure 83)
3.) bend your trunk slightly backward – bend your head backward – by raising your
arms upward backward outward swing your arms down-ward-backward; breathe in
(Figure 84)
4.) straighten up - rest your head on the forehead – bring your arms close the body
lower; breathe out.
Note: Perform each movement stage for four counts.
After a quiet expiration begin the first stage of the movement along with firming your
lower limbs from the feet to the gluteal muscles. Do not firm your muscles rapidly and stiffly,
but slowly in coordination with inspiration. Next, make sure that your arms are stretched, and
the fingertips follow the longest trajectory backward and then, in dependence on inspiration,
to the position of holding arms upward backward outward by swinging them down-ward-
backward (Figure 89).

61
Exercise 19: Starting position Figure 81
Exercise 19: First stage Figure 82
Exercise 19: Second stage Figure 83
Exercise 19: Third stage Figure 84

62
Breathe out also slowly and concentrate on the natural relaxation that accompanies expiration.
This comment applies to both the 2nd and 4th movement stage. Practice the 3rd stage similarly
as the 1st one; coordinate the movement and the muscle tension with inspiration.
EXERCISE 20
FRONT LYING POSITION – lay your head with your left temple on a mat (Figure 85):
1.) raise your legs backward – bend your trunk backward – bend your head backward
- by swinging your arms down-ward-backward raise your arms upward backward
outward; breathe in (Figure 86)
2.) drop your legs back on the floor – straighten up – lay your head on the right
temple – raise your arms upward; breathe out (Figure 87)
3.) raise your legs backward – bend your trunk backward – bend your head backward
– by raising your arms upward backward outward swing your arms down-ward-
backward-outward; breathe in (Figure 88)
4.) drop your legs back on a mat – straighten up – lay your head on the left temple –
close your arms the body lower; breathe out.
Note: Practise each movement stage for four or more counts.
Exercise 20: Starting position Figure 85
Exercise 20: First stage Figure 86

63
Exercise 20: Second stage Figure 87
Exercise 20: Third stage Figure 88
Breathe in and out slowly a few times before you start practising. After expiration,
from relatively relaxed starting position, start practising the first movement stage. Perceive
the tension and stretch in the muscles and breathe in at the same time. Do not forget about the
effort to somewhat pull from the sacral bone in the direction of the top of the head and from
the hip joints towards your heels.
During expiration, in the second and fourth stage, perceive also the relaxation in the
muscles. Due to the fact that the exercise is relatively demanding for the activity of the back
and other muscles, we recommend, after the second and fourth movement stage, that you
should include one more breathing cycle (inspiration and expiration), during which you
observe besides breathing also the relaxation state.
EXERCISE 21
LEFT SIDE LYING POSITION – raise your left elbow forward upward – rest your head in
the left palm (Figure 89):
1.) rotate your right palm upward and by swinging your right arm down-
ward-backward raise your right arm upward; breathe in (Figure 90)
2.) raise your right arm upward inward; breathe out (Figure 91)
3.) raise your right arm upward; breathe in
4.) close your right arm the body lower by stretching it sideways; breathe out.

64
Note: Practise each movement stage for four counts.
Exercise 21: Starting position Figure 89
Exercise 21: First stage Figure 90
Exercise 21: Second stage Figure 91
During the movement of the right arm to holding arm upward position, you can
concentrate on a mild stretching of the free, not contacting, side of the body during
inspiration. A slight firming of the body remains in the second movement stage. During
inspiration, the right stretched arm gets closer to the head and leans against it with the upper
arm. During this stage, concentrate a lot on the gradual and active expiration connected in the
beginning with slightly increased and later more increased activation of the muscles in the
interscapular and abdominal region.

65
The third exercise stage is connected with inspiration and simultaneous pull of the
right arm towards the top of the head and the right lower limb towards the heels. After
stretching in the longitudinal axis, breathe out and at the same time bring your right arm to
close the body lower position and draw your attention on the contraction of the muscles that
participate in expiration, similarly as in the second exercise stage.
EXERCISE 22
SITTING BENDING LEGS ACROSS – stretch your arms sideways lower, thumbs forward
(Figure 92):
1.) by first swinging your arms down-ward-backward raise your arms upward outward;
breathe in (Figure 93)
2.) bend your head forward – raise your arms upward; breathe out (Figure 94)
3.) hold your head straight – raise your arms upward outward; breathe in
4.) stretch your arms sideways downward lower; breathe out.
Note: Practise each movement stage for four counts.
Exercise 22: Starting position Figure 92
In the first movement stage, be particular about a correct mutual position of the pelvis,
trunk and head. In the individual spine segments, you should perceive a pull in the direction
of the top of your head. The movement of your arms is precise; your arms are stretched, but
do not lift your shoulders when raising your arms upward outward and also when you raise
them upward. We could rather say that with your stretched arms you must try to keep the
shoulder joints still on the same level. In the second movement stage, when the cervical spine
stretches during expiration, it is necessary to push your arms backward and downward to keep
the shoulder girdles sort of in depression. At the same time try to consciously contract the
interscapular, intercostals and abdominal muscles. During this effort a slight concentric
movement in the thoracic part of the spine occurs, the breastbone moves inward and
downward, the abdominal wall moves backward and you have a feeling as if it moves upward
from the symphysis pubic.
The third and fourth exercise stages require that you follow similar instructions as
those mentioned above.

66
Exercise 22: Raising arms Fig. 93 Exercise 22: Second stage Fig. 94
EXERCISE 24
KNEELING SITTING – stretch your arms sideways downward lower, your thumbs forward
(Figure 95):
1.) kneel – turn your trunk to the left – bend your trunk slightly backward and bend your
head backward – by raising your arms forward to the left raise your arms upward
backward outward, palms forward; breathe in (Fig. 96)
2.) kneeling sitting sideways, legs are bent on the left side – by raising your arms forward
to the left swing your arms down-ward-backward and bend your trunk forward to the
left – bend your head forward; breathe out (Figure 97)
3.) raise your arms forward upward to the left – kneel – turn your trunk to the right –
bend your trunk slightly backward and bend your head backward – raise your arms
upward backward outward, your palms forward; breathe in (Figure 98)
4.) kneeling sitting sideways, legs are bent on the right side – by closing your arms the
body lower to the right swing your arms down-ward-backward and bend your trunk
forward to the right – bend your head forward; breathe out (Figure 99)
5.) raise your arms forward-upward to the right – kneel – turn your trunk to the left –
bend your trunk slightly backward and bend your head backward – raise your arms
upward backward outward, your palms forward; breathe in
6.) = 2.) etc.
Exercise 24: Starting position Figure 95 Exercise 24: First stage Figure 96

67
Exercise 24: Second stage Figure 97 Exercise 24: Third stage Fig. 98
Simultaneously with the movement from the starting to the kneeling position in the first stage,
the angels between the trunk and thighs, and the crura and thighs are open. A mistake is if you
bend your trunk forward in the initial stage.
Turn the shoulder axis crossways forward to the right or left to such an extent not to
disturb the position of your arms in holding arms upward backward outward position.
Exercise 24: Fourth stage Figure 99
Very often happens – and it is a mistake – that a pupil’s right arm, during turning his
trunk to the right, assumes a correct position of holding arms upward backward outward, but
his left arm assumes a position of holding arms upward outward, which is incorrect. With his
trunk turned to the left it is other way round. Make sure that your shoulder girdles are slightly
pushed downward when you hold your arms upward backward outward as in exercise 22.
In the kneeling sitting sideways position try to bend your spine as much as you can by
bending your trunk and head forward and swinging your arms down-ward-backward. When
bending your spine, breathe out; your abdominal muscles reaches the maximum contraction,
so the pelvis gets to the ultimate retroversion.

68
EXERCISE 25
KNEELING SUPPORT (Figure 100):
1.) gradually arch your back – raise your left leg backward – bend your head
backward; breathe in (Fig. 101)
2.) gradually round your spine – raise your knee forward-upward – bend your head
forward; breathe out (Figure 102)
3.) = 1.)
4.) assume kneeling sitting position by closing your feet; breathe out.
Note: Practise each movement stage for four and more counts.
Begin the first movement stage after a quiet expiration in the starting position. Make
sure that you finish raising your leg backward at the same time with finishing bending your
head backward.
When you raise your knee forward, during the second stage, it is necessary that your
leg, if possible, does not touch the floor and in the fourth stage your forehead touches the
knee.
We do not consider this movement very difficult and so you should, from the very
beginning, precisely coordinate the movement of your head with the trunk and the working
lower limb with breathing.
Exercise 25: Starting position Figure 100
Exercise 25: First stage Figure 101

69
Exercise 25: Second stage Figure 102
EXERCISE 26
KNEELING POSITION, feet are extended (Figure 103):
1.) turn your trunk to the left – bend your trunk slightly backward and bend your head
backward – by stretching your arms sideways raise them upward outward; breathe
in (Figure 104)
2.) bring your elbows close the body lower, keep your hands above your shoulders –
bend your head forward; breathe out (Figure 105)
3.) turn your trunk forward – raise your arms upward outward – keep your head
straight; breathe in (Figure 106)
4.) close your arms the body lower by first stretching them sideways; breathe out
5.) – 8.) practise the same but turn your trunk to the left.
Note: Practise each movement stage for four to six counts.
Exercise 26: Starting position Fig. 103 Exercise 26: First stage Fig. 104

70
Turn your trunk to the left or right to such an extent to keep the position of holding
arms upward outward under your control or, if possible, to control also holding arms upward
outward slightly backward position in your shoulder girdles. Similarly, as we already pointed
out in exercise 24, also here we would like to point out the fact that during turning a pupil’s
trunk to the right his left arm very often gets incorrectly to the holding arms upward outward
forward position and when turning his trunk to the left his right arm assumes the same
incorrect position.
Next, it is important that your shoulders do not elevate when you raise your arms
upward outward. Throughout the whole exercise your shoulders are straight, and they tend to
pull backward and downward. The straight position of your shoulders sets preconditions on
which rests the stretching of the cervical spine muscles on the dorsal side during bending your
head forward, when the top of your head follows the longest trajectory on the way up, forward
and down; your chin points to the throat pit.
Exercise 26: Figure 105 Exercise 26: Figure 106
EXERCISE 27
HEEL STAND – arms close the body lower (Figure 107):
1.) stretch your left leg sideways downward – raise your arms upward by first
stretching them sideways; breathe in
2.) close your left feet – close your arms the body lower by first stretching them
sideways; breathe out.
Note: Practise each movement stage for four and more counts.
In the starting position concentrate on the feet position on a mat and distribute the
weight of your body equally on their entire area. Slightly press your ankles, knees and thighs
against each other. Bring your arms at your sides and stretch them slightly – they tend to pull
towards the heels (distally). Concentrate on assuming the correct position of your shoulder

71
girdles, cervical spine and head; you feel a gentle pull in your spine from the coccyx towards
the top of your head.
During stretching your leg sideways, make sure the movement takes place in the
frontal plane and the spine does not bend sideways too much. When moving your arms, your
shoulders remain straight and do not elevate.
Exercise 27: Starting position Figure 107
There is a precise and smooth succession of the movement stages, one by one,
coordinated with breathing. At the end of the second stage breathe out actively and smoothly
so that the abdominal wall moves backward. When you have mastered the exercise, add an
inspiratory apnoeic pause after inspiration and an expiratory apnoeic pause after expiration,
always for the period of two counts.
You can also replace heel stand by close stand. The exercise, seemingly easy, will be
more demanding for the concentration with your eyes closed.
EXERCISE 28
STRADDLE STAND – arms close the body lower:
1.) bend your trunk forward to the right – raise your arms forward upward – bend your
head forward; breathe out (Figure 108)
2.) straighten up and bend your trunk slightly backward along with turning it to the
right – raise your arms upward backward outward – bend your head backward;
breathe in (Figure 109)

72
3.) bend your trunk forward to the left – raise your arms forward upward – bend your
head forward; breathe out (Figure 110)
4.) straighten up and bend your trunk slightly backward along with turning it to the
left - raise your arms upward backward outward – bend your head backward;
breathe in (Figure 111).
Note: Practise each movement stage for six counts.
Exercise 28: First stage Figure 108 Exercise 28: Second stage Figure 109
Exercise 28: Third stage Figure 110 Exercise 28: Fourth stage Figure 111

73
For exercises in standing positions we could give the same instructions that we have
already given for the exercises in the lower starting positions. It is obvious that correct control
over individual parts of the body in connection with breathing in lower positions will prove its
quality in an overall performance in standing positions.
In this exercise a pupil practises slowly and, similarly as in the previous exercises,
synchronises movement stages with inspiration and expiration.
In the position of bending trunk forward, tense your abdominal muscles and perceive
the movement of the abdominal wall backward toward the lumbar spine; increase its tension
with every repetition. Since the muscles of the abdominal wall were thoroughly worked upon
in the previous exercises, now you can much better perceive its contraction and regulate it
when you breathe out. It often happens that after this contraction breath – roughly speaking –
outruns the movement of the arms from the moment the abdominal muscles are relaxed. It is
natural and it conforms to the respiratory automatic process. Take this phenomenon into
account and during next practising, in connection with practising consciously controlled
movement, somewhat slow down the automatic inspiration and adjust it to the movement of
your arms.
With every repetition, bring your trunk a little closer to the appropriate lower limb
when you bend your trunk forward. At the same time make sure that the weight of your body
is distributed equally on the whole area of the feet and your pelvis does not move too much
backward.
When you bend your trunk backward, make sure that the movement of the spine from
the lumbar region as far as the craniovertebral connection is smooth. Keep the weight of your
body equally on the soles in the symmetrical straddle stand or during turning your trunk to the
right transfer the weight to the right lower limb; do not either lift the foot of the unweighted
leg from the floor or pull it off the floor to the balls of the feet as in stepping stance. Your
shoulders remain straight and when you bend your trunk backward you should feel a pull in
the spine running toward the top of your head.
4.3.5 Appendix – remarks to breathing exercises
1. If somebody asks a question, how many times it is appropriate to repeat exercises, we must
admit that we can never answer a definite and exact number. The frequency of the exercise is
different, e.g. depending on how well the exercise is mastered. Generally, you perform a
smaller number of repetitions in the beginning, you split exercises into smaller units and later
you gradually increase the number of repetitions. We have already said that the body must
somewhat “grow” into an exercise element. The growth will be facilitated and enabled by
attentive and long-lasting individual practise either under an instructor’s supervision or
outside the training process. Within supervised physical training of people with health
impairment, the number of repetitions depends on an instructor’s or teacher’s intention of
what objectives he wants to reach and by means of what exercises in a pupil on a certain level
of the movement development.
Individual practise at home also depends on what attitude you develop towards a particular
exercise, what exercise to choose and prefer in connection with your actual health state and
how much time you are able to spare for the practise.
If somebody would not be satisfied, in spite of the above detailed explanation, let him repeat
every exercise 4-6 times in the beginning until he acquires his own experience. Some part of
our questions is always answered by a continuous personal practise of the exercises.
We are again reminding that it is not necessary to perform large number of different exercises,
but an adequate number of exercises in which are involved such muscle groups that influence

74
the respiratory function. Let a well-judged number of targeted exercises become a part of your
everyday practise.
2. As for breathing exercises accompanied with movements of the body parts, there is always
the last count of a certain exercise stage included in their description. It is obvious that you
must practise slowly, smoothly without any interruption during movement stages.
Interruptions occur only where it is recommended by the text. By the words of “breathe out”
and “breathe in” we want to emphasise the smoothness of breathing stages in coordination
with movements.
3. The exercises are accompanied, in our view, with the most important instructions to
facilitate a correct performance. Owing to the fact that breathing exercises are connected with
the exercises for the correct posture, which are included in the previous part, it is necessary to
return and again read through the instructions, because they are similar in many respects to
those for breathing exercises. You can make your own choice, based on your study,
knowledge and experience in adding other exercises that we have not mentioned and you
consider important and leave out those that you consider useless for your personal needs.
4. Always bear in mind that you must select such exercises that allow a pupil to breathe
smoothly and really allow him to learn to coordinate movement with breathing. Of course,
you can choose raising stretched legs forward in the back-lying position as a breathing
exercise, but you can practise it only with the pupils who are able to practise it. Pupils, whose
muscle strength, movement coordination etc. does not conform to the given difficulty level of
an exercise, must practise easier exercise modification that involves the same muscle groups.
5. In conclusion, we would like to point out that in the exercises where we try to draw your
attention to a certain body part during a movement, it is necessary to continuously focus on
breathing and movements during breathing; particularly the movements of the trunk, spine,
abdomen and pelvic floor.
4.4 RELAXATION EXERCISES
Today's world, being continuously developed by science and technology, brings a lot of
benefits to the humankind. Though there are some drawbacks as well. For instance, it is very
likely that the nervous system has not been adapted enough to all the changes in people's lives
that the civilisation has been bringing for decades. It is known that there is an increase in
neuropsychic disorders and number of illnesses whose origin is in overloaded nervous system.
To keep the civilisation standard and its further development, however, requires relatively
high brain-fag from their creators, which often results in mental imbalance and even in
nervous overstress. If an excessive nervous overstress is accompanied with sins in the way of
living - in the form of smoking, alcohol consumption, overeating, insufficient rest etc. - and
the absence of active regime, then it can give rise to functional ailment of the viscera, motor
and nervous system.
Even children's world can be affected by excessive work efforts and rush. Adults,
when dealing with children, influence their development by their attitudes ranging from
kindness to the lack of understanding. A shift to the latter goes proportionally with
exaltedness, edginess and unrest.

75
Relaxation exercises, based on proved experience of generations, should serve to
eliminate unfavourable mental states that are referred to as mental resentment, negative
emotive tension, tiredness, stress, anxiety, lack of energy etc.
We include relaxation exercises in the basic balancing means, because they are
inseparable from the muscle tension balancing exercises and breathing exercises. As we have
already indicated, the theoretical reasons for balancing the muscle tension, breathing and
relaxation all meet in the movement element. In this theoretical part about relaxation exercises
we would like to emphasize that there are the relaxation exercises that we use to lead our
pupils to a conscious ability to relax their muscle groups and through this training to be able
to consciously influence their mental stress.
An excessive mental stress increases the muscle tension. So, if you try to decrease the
muscle tension consciously, you will reflexively decrease the activity of the cortex and
centres controlling motion. This way the mental relaxation occurs. We must patiently learn to
perceive the state that we reach during this activity and which is called relaxation. We can
define relaxation as conscious, concentrated, yet very delicate effort to relax both physical
tension and mental stress. In our case, the tools for obtaining feelings of relief and relaxation
are our body and particularly the information that comes to the central nervous system (CNS)
from the proprioceptors of the muscles, skin, tendons, articular capsules and vestibular
receptors.
However, learning to relax is not easy. Generally, lots of works say that learning to
relax is more difficult than learning to feel the muscle contraction. We assume that there are
two mutually related reasons that cause marginalizing the relaxation in general physical
training for healthy pupils and that many of gym instructors, teachers and physiotherapists do
not know what relaxation really represents.
1. Firstly, there are neurophysiological reasons. Any joint position is signalled to the
central nervous system (CNS). Any change of joint position causes a change of a
relevant signalisation - afferent conveyance. In this sense, a research of the articular
nerves of the knee joints was carried out proving the fact that the level of their
activation depends on the basic joint positions. Most centripetal impulses arose in the
knee joint when it was completely extended. Fewer impulses arose when the knee was
completely flexed and the fewest impulses arose with a knee bent at an angle
somewhere between flexion and extension, i.e. middle joint position when the articular
capsule is also most loosened.
Based on this theory, we can draw a conclusion for practice that the effort to relax
muscles goes hand in hand with the middle joint position. It invokes only small
afferent activation of nerves and nerve impulses and so there is only a little
conveyance of the sensory information from the joints to the CNS. This is what pupils
should realise and so they must learn to concentrate on this small inner signalisation,
which is a slow and long-lasting process.
2. From early childhood, our attention is activated mainly by outer objects and events.
Children draw pictures, read, count, play musical instruments ... They are activated
and encouraged by parents, school and other educational facilities to learn bigger
volumes and sometimes also in better quality. It is similar to a manual work. Children
learn to feel the weight of burden, tools and how to use them. In its complexity, they
experience the advisability of activities connected with manual training. Also, here
they are taught, to a reasonable extent, to concentrate on speed and especially
precision of performed work.

76
During relaxation exercises, we are suddenly taken by surprise that we are to
concentrate gently and not anxiously on the relaxation of the muscle groups. That we
are to concentrate on the state of mind when "nothing is being done" – because this
activity does not bring any visible benefit – concentrate on a state that can be evoked
for instance by our determination to sleep, a state that cannot be precisely verbally
defined.
Relaxation exercises create the preconditions for a precise perception of the mentation,
because in the strict sense of the word they relate to the problem of controlling the
organism by the nervous system and thus they contribute to the self-awareness and
self-education.
4.4.1 Methodology of relaxation exercises and their divisioning
As partly indicated before, the relaxation methods are based on the knowledge of
mutual relationship between the three factors: mental stress, functional state of the vegetative
nervous system and muscle tension. In the literature, we can find various approaches that
divide relaxation exercises. The points of these divisions matter-of-factly overlap, which
suggests the difficulty of their division into categories.
1. Involuntary relaxation
The state of the organism during sleep can be called involuntary or subconscious and
unintentional relaxation. We ourselves know that sleep is not a method, but as we mentioned
before, a state that we can also reach by means of voluntary relaxation. Nevertheless, sleep
has a vital position in human lives and thus cannot be ignored in this respect. During sleeping,
there is a deep inhibition of the preponderance of the central nerves. Only basic life functions
are kept on a necessarily needed activation level, e.g. cardio-respiratory functions and others.
It is assumed that sleep comes only when any further work of the cells of the cortex would
endanger normal existence of these functions. Sleep is, in fact, a protective inhibition enabling
the nervous system to rest. Due to sleeping, the organism’s ability to work is renewed.
2. Voluntary relaxation
For the organism, voluntary relaxation should have the same functional importance as
sleep. It should enable the nervous system to rest, but unlike during sleep, the human
consciousness must be - somewhat turned on - must be vigilant at the moment of relaxation: it
must, if possible, precisely record the state of relaxation at any segment of time.
Yoganidra belongs to one of the oldest voluntary relaxation methods. The reason why
we draw your attention to this method is that number of authors, who dealt with relaxation,
based their works on it and adapted it to their specific needs. Let us take the autogenic
training as an example. This training is often publicized as suitable for quick strength
recovery and elimination of the symptoms of stress and unrest. Its author was the Berlin’s
professor of neurology J. H. Schultze in 1930’s. Based on his professional knowledge and
experience, and the knowledge of the system of yoga exercises he made a relaxation method,
which was accessible to the European mentality. So, it served the Europeans to strengthen
their physical and mental health. In Germany, his method is one of the most frequently used
methods in psychotherapy.
Progressive relaxation by Edmund Jacobson belongs among other voluntary
relaxation methods. He taught people to feel relaxation after muscle contraction. This
relaxation method is based on the principle of mutual induction of nervous processes.

77
According to this principle of nervous processes, excitation and inhibition, evoke or intensify
the opposite process. In both school and out-of-school health-enhancing physical education
we usually base the practice of relaxation exercises on Jacobson’s thoughts. We want our
pupils to realise the inhibition coming after the muscle contraction (caused by a flow of
nervous impulses), the opposite process in muscle groups, loosening or loosened muscles –
relaxation.
4.4.2 Relaxation in remedial (health-enhancing) physical education
For the needs of the relaxation practice we use a method of Škvára which contains 5
parts that are complementary and mutually interconnected. In fact, they form a unity. They are
set apart only for didactic reasons so that both instructor’s and pupil’s attention is, as
necessary, paid alternately to the theoretic and practical content of the individual parts:
1. Preparing for relaxation exercises
2. Relaxation practice after stretching muscle groups
3. Local relaxation practice
4. Overall relaxation practice
5. Differentiated relaxation practice
1. Preparing for relaxation exercises
It is necessary to create a comfortable environment for the practice. By the
comfortable environment we understand not only the external environment, consisting of
warm room, cleanliness, instructor’s understanding and kindness etc., but also mental
environment of every pupil.
In this initial part, it is mainly an instructor who acts. Through his interpretation he
tries to direct pupils’ mental activity to the mutual co-operation. For instance, he explains that
the relaxation exercises have an essential hygienic importance in terms of the elimination of
physical fatigue and excessive mental stress. He also draws pupils’ attention to the important
role of relaxation during coordinated movements, thereby during work and sport endurance
activities etc. If such an explanation would seem inadequate to pupils’ age or experience, it is
possible to start in a different way. In that case it is not possible to set precise instructions.
Suppose we explain relaxation as a state during which we are very actively involved in
a certain activity that we co-create. Or we could compare it to an action being shown on the
cinema screen or taking place on the theatre stage etc. In both cases we experience a very nice
feeling. We are active because we are aware of a lot of details, essential links and because we
have developed a positive attitude towards the activity it lacks a negative tension. We have a
feeling of inner balance, well being, we could say even happiness.
We can reach such a feeling, for example, when listening to nice music at a concert,
when listening to a recitation from a favourite book of poetry or reading it ourselves, when
looking at paintings, at a flower-show, during a walk in the countryside, after finishing some
challenging tasks etc.
In these terms, we can set our pupils a task to carefully observe their behaviour and try
to self-assess to what extent they are affected by negative and positive events. They may
admit that they take joyful moments for granted and that is why these moments soon leave
their minds, whereas unpleasant moments are allowed more time to affect them. In this
respect, it is necessary to explain that it is the joy that is connected to the relaxation.
In human life the point is, among others, to learn to work with concentration, carefully
and with sincere emotional attitude within our potential. We should use the relaxation

78
exercises to prevent the organism from the physical and mental overload. By protecting your
organism against the overload, you do not oppress your close surrounding with your
uncontrolled problems and so you contribute to the mutual respect and understanding.
2. Relaxation practice after stretching muscle groups
As you welcome a new day after waking up, you may happen to stretch your bodies
spontaneously while still in bed. By stretching the sensitive organs in the muscles and muscle
spindles, you are at the same time informed about pleasure. A spontaneous muscle relaxation
follows. You can repeat the two actions, stretching and relaxation, a few times more and this
time pay more attention to them. Stretching takes place in the longitudinal axis usually with
arms raised upward and lower limbs as if being pulled from the hip joints. During this
exercise, which may be difficult to describe precisely, the following muscles are stretched: the
pectoral muscles (pectoralis major, pectoralis minor), back muscles (latissimus dorsi), with
your stretched feet (tibialis anterior), (extensor digitorum longus), (extensor hallucis longus),
with your feet in upright position (triceps surae) etc. Of course, number of muscle groups
increase their tension, for example muscles of the lower limbs or erector spinae, as we tend to
bend backward. Although the body bends backward, a strong inspiration occurs, and the
erector spinae is stretched. Everyone who performs this "exercise" in the mornings calls it
stretching. We turn this example into an exercise form to serve us as an exercise element for
practicing relaxation (figure 112 and 113).
EXERCISE 29
BACK-LYING POSITION – raise your arms upward
1. - 6.) lift your shoulders; breathe in (figure 124)
6. – 12.) keep your shoulders straight; breathe out (figure 125).
Exercise 29: first to sixth count Figure 112
Exercise 29: seventh to twelfth count Figure 113

79
In the initial part of the exercise, try to reach as far as you can with your fingers; lift
your shoulders smoothly (shoulder elevation). The arms remain, if possible, flat on a mat -
forearms and upper arms. Pull your lower limbs as if from the hip joints and slowly practice
the plantar flexion in your ankle joints.
During the first six counts, concentrate on the body that is stretched in the longitudinal
axis and on the muscles in which you feel stretch. Practice this part attentively together with
inspiration for 6 and later even more counts. During the other six counts breathe out, without
your conscious intervention, as if you let go of a spring that was thoroughly extended before.
As unbiased observers try to perceive this expiration stage during simultaneous muscle
relaxation. Just as Jacobson did, we also try, during relaxation exercises of this kind, to
coordinate muscle relaxation with automatic relaxation of the breathing muscles that occurs
during expiration.
EXERCISE 30
BACK-LYING POSITION – raise your arms upward, practise each stage for 6 counts
1.) do half turn to the right to side lying position; breathe in (Figure 114)
2.) do half turn to the left to back-lying position; breathe out (Figure 115)
3.) do half turn to the left to side-lying position; breathe in (Figure 116)
4.) do half turn to the right to back-lying position; breathe out (Figure 117).
Exercise 30: First stage Figure 114
Exercise 30: Second stage Figure 115

80
Exercise 30: Third stage Figure 116
Exercise 30: Fourth stage Figure 117
In this exercise, some pupils may perceive the stretch in the longitudinal axis better
than in the previous one, since a mat does not stabilise the back part of the body during
stretching. Concentrate on smooth inspiration along with half turn to the right (left). Learn the
half turn slowly so the speed of the body movement is the same at any time segment. "Pull"
the right arm from the shoulder joint, lower limb from the hip joint along with simultaneous
flexion in ankle joints. Focus your attention on stretching the muscles in the part of the body
that is not stabilised, particularly the pectoralis major, pectoralis minor, latissimus dorsi and
erector spinae. Concerning the lower limbs, concentrate on the stretched ankle joint extensors.
In the second and fourth movement stage, learn to relax through the feeling of contrast
as in the previous exercise. First drop your relaxed body back on a mat and relax your arms
and lower limbs to semi flexion during automatic expiration.
The reason why we mention these examples is that it is possible to perform them on
bed right after awakening and during the attempts at relaxation learn to perceive the state of
muscles and mind that preceded the awakening.
EXERCISE 31
BACK-LYING POSITION – stretch your arms sideways downward:
1. – 6.) erect your feet; breathe in (Figure 118)
7. – 12.) relax your feet; breathe out (Figure 119)

81
Exercise 31: First to sixth stage Figure 118
Exercise 31: Seventh to twelfth stage Figure 119
In the initial position your trunk, head and lower limbs remain, if possible, relaxed.
With the feet upright concentrate your attention on stretching the muscles on the back side of
the crura and ankle joint flexors. From these muscles you most perceive the triceps surae.
Your lower limbs are side by side from the first to sixth stage, but do not increase the
muscular tonus of the hip joint adductors. The tarsometatarsal toe joints, as well as the inside
feet touch each other.
As indicated in the description, coordinate inspiration with the erection of the fee and
expiration with your feet relaxation. Relaxation from the seventh to twelfth count should be
the only subject of our conscious attention.
EXERCISE 32
FRONT LYING POSITION:
1.) flex your left knee while keeping your legs together, the crus slopes up – swing
your arms backward, right hand grasps the foot in the place of the ankle joint, left
hand grasps the instep; breathe out (Figure 120)
2.) raise your right leg backward with the knee flexed; breathe in (Figure121)
3.) bring your legs together – close your arms the body lower; breathe out (Fig 122)
4.) hold in the starting position; breathe in (Figure 123).
Note: Repeat with the other leg. Practise each stage for 4 and more counts.

82
Exercise 32: First stage Figure 120
Exercise 32: Second stage Figure 121
Exercise 32: Third stage Figure 122
Exercise 32: Fourth stage Figure 123

83
In front lying position the hip joint flexors are stretched the most when your knee is
ultimately flexed and the leg is in backward position. From the exercises that are commonly
used we have chosen exercise 32.
The mentioned execution of this exercise is relatively difficult. The difficulty increases
as you perform it with both your lower limbs at once. This example may be, as it happens in
practice, preceded with easier alternatives, which you deduce yourselves.
In the first part of the movement, in the first and second count, concentrate on the
active flexion of the left knee, its flexors; in the third count, grasp the instep with the left hand
and in the fourth count grasp the left ankle with your right hand. Coordinate the movement
with expiration. In the second stage, concentrate on the extension in the left hip join. It should
be performed, if possible, with relaxed muscles of the lower limb. The lower limb should get
into the position of leg backward with the flexed knee by active flexing the arm muscles in the
direction of the bent crus. The heel constantly touches the gluteal muscles; the right hand also
stops the left knee from deviating from the sagittal plane. Coordinate this stage with
inspiration directed to the abdomen region. After inspiration, it is possible to hold in the
inspiration apnoeic pause for four counts or you can continue the hold during expiration and
after the next inspiration you can practised the third stage.
In the third stage, the point is to perceive relaxation of the muscles that we have
stretched before. When practising relaxation of the muscle groups, there is not necessarily
always to expire. As we are going to mention further, and before we only indicated without a
description, both breathing stages, inspiration and expiration, are a part of relaxation in such
exercises, where we hold longer in order to achieve relaxation. It is natural. Inspiration and
expiration accompany our entire lives. And the reason why we teach relaxation exercises is to
be used as long as possible in every ordinary day and not to affect our organism only in a
gym, although even this is, of course, significant.
Nevertheless, the fact is that expiration intensifies relaxation and that is why the initial
learning of relaxation is easier and methodologically preferable.
In our next exercise, you will, however, try to practise relaxation with inspiration. You
already know most of the exercises from the chapters about the correct posture. It will be
primarily about relaxation of the lumbar part of the erector spinae that was stretched before.
In back-lying position close your arms the body lower and place your palms flat on the
floor: slowly, simultaneously with slow expiration, flatten your lower back and contract the
abdominal muscles, press as hard as possible the lumbar part of the spine down against a mat.
During inspiration, relax the stretched lumbar part of the erector spinae, the abdominal and
other muscles. To perceive the muscle groups that were involved in the previous stage of the
movement, hold in the starting relaxed position for the period of another expiration and
inspiration. Repeat the exercise as late as during the following expiration.
When stretching and relaxing the lumbar part of the erector spinae, the contraction and
relaxation of the abdominal muscles will likely have a disturbing effect on the attention, since,
as it is evident from the functional view, you coordinate contraction of the abdominal muscles
with expiration. The abdominal muscles, which tend to hypotonia, take a substantial part in
stretching such strong postural muscles as the erector spinae certainly is. Through practise,
you will acquire more precise differentiation in perceiving the muscle groups while they are
stretched and relaxed.
The cervical spine region is not less important. In our example, concentrate on it when
stretching and relaxing the muscle groups on the dorsal side. As in the previous example, use
the same exercise - back-lying position, arms close the body lower, palms flat on the floor.
In this position, slowly bend the head forward and stabilise the back of your neck on a
mat; coordinate this movement with expiration. Relax the muscles that were stretched before
during inspiration. If you want to increase the effect of stretching, hold your head bending

84
forward for a few breaths and then, again with inspiration and slightly more slowly, relax the
stretched muscles. In the following two examples, you will learn to perceive the inhibitory
effect of expiration on the stretched muscles.
EXERCISE 33
SITTING BENDING LEGS ACROSS – raise your elbows forward downward outward, lay
your forearms on the knees (Figure 124):
1.) bend your head slightly sideways to the left; breathe out (Figure 125)
2.) hold; breathe in
3.) bend your head sideways to the left; breathe out (Figure 126)
4.) head upright; breathe in.
Note: Head bending sideways is performed on both sides alternately. Practise each stage for
four and more counts.
Exercise 33: Starting position Figure 124
Exercise 33: First stage Figure 125

85
Head bending sideways stretches, for example, the scalene muscles, descending
fascicles of trapezius, semispinalis capitis, splenius capitis, longissimus, levator scapulae,
sternocleidomastoideus etc. From the point of view of the involved muscles, we understand
that this is not an unimportant exercise in this spinal region.
Exercise 33: Third stage Figure 126
In this exercise, it is necessary to start from the correctly adopted starting position. The
shoulders are upright and relaxed throughout the whole exercise. The arms are relaxed as
well. Bend your head sideways in the frontal plane, free of any rotation. Concentrate on the
region of the seventh cervical vertebra, where you want the head bending sideways to start
from. When stretching the muscles on the right side of the cervical spine, the weight of the
head bent leftward and the muscles in the direction of the bend help you to do so. The scalene
muscles and levator scapulae are stretched in this exercise. When performing this exercise, it
is important lo learn to differentiate head bending sideways caused solely by the weight of the
head from head bending sideways increased due to the contraction of the lateral flexors. As
the description indicates, along with the second expiration, you should try to slightly increase
the amplitude of head bending sideways.
During head bending sideways, you can concentrate, as noted previously, on the
increasing muscular tension of the lateral flexors, due to which head bending sideway is
increased or on the stretched muscles that you consciously try to relax.
In the fourth stage observe the resting tension in the muscles that were stretched
before. This stage can be also, as necessary, prolonged.
You can also make some modifications to the fourth stage by, after relatively the
biggest head bending sideways, slowly dropping your head in a loose manner to head bending
forward position during expiration. The cervical spine is as if hung approximately in the place
of the seventh cervical vertebra. The trunk does not change its stabilised position. Perceive the
weight of your head and the tension of the working muscles. Bring your head to the upright
position, both from head bending sideways or head bending forward, very attentively.
EXERCISE 34
BACK-LYING POSITION:
1.) bend your round trunk forward downward; breathe out (Figure 127)
2.) hold; breathe in

86
3.) hold; breathe out
4.) hold; breathe in
5.) smoothly move your trunk to upright sitting position and then to back-lying
position; breathe out (Figure 128)
Note: Practise each stage for four and more counts.
Exercise 34: First stage Figure 127
Exercise 34: Fifth stage Figure 128
In this exercise, you stretch mainly the erector spinae and knee flexors; the biceps
femoris, semitendinosus, semimembanosus. Practise the first stage after you flatten your
lower back. In the fourth stage finish expiration and perceive the position of your trunk and
head in bend trunk forward position.
In the second stage the entire body remains "still". Observe only the movement of your
trunk when inspiring. Inspire as if along the bend forward spine, to the back, like into an
inflatable ball; you will undoubtedly feel the stretch of the erector spinae and its effort to erect
your trunk, but prevent from happening so by holding in the bend forward position.
During the next expiration, in the third stage, you will feel relaxation in the muscles
that were stretched before caused by muscle inhibition. Try to increase the bend only a little
by moving your head down towards the knees. In the beginning you can bring your trunk to

87
the thighs with the help of your arms that pull at the legs. Later, try to bring your head near
the knees only by relaxing the muscles; perceive the weight of your trunk.
After the next inspiration in the fourth stage, which you perform with as concentrated
attention as in the second stage, slowly, during expiration, unfold the round spine back to the
starting position, in which you basically perform the general relaxation for a few breaths.
However, the attention is at the same time drawn to the muscles that were stretched, the
erector spinae and knee flexors.
If you got accustomed to a slow and precise performance of these exercises, it is
possible to add that you can remain longer in both the previous and this exercise or more
precisely in their hold stages. A longer hold leads to an increased influence on the stretch of
the supporting substrate of the muscles, their tissue and the organism's sensitivity to stretch
and relaxation.
After you have studied and practised this part that deals with learning relaxation after
stretching of, basically, the most important muscle groups with the prevailing tonic postural
functions, you will yourself come to a conclusion that the included exercises are very
important not only for the movement system, but also for its controlling nervous system and
through it for the organism as a whole. To prove the previous words are true, it will do if you
correctly perform one or two stretching exercises followed by relaxation after a long-lasting
overload, especially at work positions that lack movement; you are refreshed by exercise.
And why we include these exercises, so significant for practising the correct posture
and breathing, among relaxation exercises? For learning reasons. There would definitely be
more reasons, but we will describe at least two that we consider as the most important:
a) It is quite difficult to train muscle relaxation. Apart from what we have already
mentioned, it requires willingness to a close co-operation between a pupil and
instructor. Moreover, a pupil already needs to posses certain movement experience, a
developed flair for his moving system to be able to accept an instructor’s instructions
etc. It is not simply possible to overwhelm a pupil with a disproportionate amount of
instructions or instructions that he cannot realize due to his movement immaturity.
b) In order to teach the movement perception, we place stretching and relaxation against
each other, as two opposite phenomena. After some longer time, we let pupils discover
the fact that quality stretching cannot be achieved without a simultaneous effort to
relax muscles. In order to stretch muscle tissue, we must consciously try to decrease
the tension of stretched muscles. Quality stretching goes hand in hand with slight and
not forceful relaxation and that is why there is this connection with learning
relaxation.
3. Practicing local relaxation
Through the previous exercises we led pupils’ attention to a concentrated attention
especially on the state that occurs after stretching muscles – relaxation.
In the next step, when practising local relaxation, you will perceive the relaxation state
after muscle contraction. You will again base on the feeling of contrast, when the feeling of
relaxation arrives after the transition from relatively high tension in the muscle groups of a
certain part of the body, e.g. the muscles of hand, arm, lower limbs etc.
In the exercises that are designated for the practise of local relaxation, it is assumed
that it is easier to concentrate your attention on muscle activity in a smaller region of the
body. In the following exercise, you will focus on the relaxation of the hand muscles after
isometric contraction.

88
EXERCISE 35
BACK-LYING POSITION: bend your right elbow, the right forearm assumes upright
position in right arm close the body lower position, drop the right hand
(Figure 129):
1.- 4.) open the hand, spread and stretch your fingers; breathe in (Fig 130)
5.- 8.) drop the hand; breathe out (Figure 131).
Exercise 35: Starting position Figure 129
It is convenient to start practising local relaxation with this exercise, because people
have the biggest kinaesthetic experience with hand muscles from the very childhood. People
use hands to do a number of careful operations. On the basis of attempts and errors as well,
people refine their delicate motor coordination.
Exercise 35: First and fourth count Figure 130
Exercise 35: Fifth to eighth count Figure 131

89
Perform the exercise a few times according to the description. Then, in the first to
fourth count, combine the muscle stretching with smooth controlled inspiration and in the
fifth to eighth count, relaxation stage, with a completely relaxed expiration. "Along with
expiration, loosen the hand from the wrist so it freely drops and hangs – like a faded twig".
To perceive better the tension in the fingers and hand muscles, it is possible to hold for two
counts after the fourth count in the apnoeic pause. Similarly, to perceive the relaxed muscles
better it is possible to hold after the eighth count for two counts in relaxation and expiration
apnoeic pause.
Next, you can modify this exercise by performing smooth extension in the wrist joints
after opening the hand and spreading the fingers. Observe the changes in the tension of the
forearm muscles. Perform the relaxation stage by dropping the hand or drop your forearm
onto a mat.
EXERCISE 36
BACK-LYING POSITION: - stretch arms sideways (Figure 132)
1. – 6.) raise your arms forward; breathe in (Figure 133)
7. – 12.) relax your arms – by stretching elbows sideways
lower, forearms are upright – stretch your arms sideways;
breathe out (Figure 134-136).
Exercise 36: Starting position Figure 132
Figure 133 Exercise 36: First to sixth count

90
Instruct pupils to focus their attention on the arm muscles. In the first movement stage
(from the first to sixth count) coordinate a gradual increase of tension in the upper limb
muscles with inspiration. Firming arms and extending them in the longitudinal axis in the
direction of the fingers precede stretching arms forward. By moving the fingers along the
longest motion trajectory to the position of holding arms forward, the shoulder girdles are, in
the position of holding arms forward, in protraction. In the seventh count, attentively and
immediately relax the tensed arm muscles and let them drop down on a mat (Figure 134 and
135). Let the expiration take its own course. Considering the fact that the second movement
stage is for six counts and the arms drop on a mat faster, you have enough time to perceive
muscle relaxation and learn to perceive the weight of the relaxed segments.
Exercise 36: Figure 134
Exercise 36: Figure 135
In this exercise, when practising local relaxation, you will do with the instructions
relating to the careful perception of tension prior to relaxation of the arm muscles. A pupil
may happen to, at the moment of tensing the arms muscles, automatically tense the lower limb
muscles, too, depending on his already acquired movement habits. Do not consider it a
mistake at this stage of the practise. In the course of time, encourage him to perceive and
eliminate possible tension of the lower limb muscles. You want him to exercise only his arms
and keep other parts of his body relaxed, as we further indicate in differentiated relaxation.

91
EXERCISE 37
BACK-LYING POSITION RAISING KNEES FORWARD – stretch your arms sideways
(Fig 136):
1. – 4.) raise your right leg forward; breathe in (Figure 137)
5. – 8.) relax the tension in the right lower limb – back-lying position,
raise your knees forward; breathe out (Figure 138)
Note: Change the lower limbs after 2 – 4 repetitions or change them regularly
after each exercise cycle.
Exercise 37: Starting position Figure 136
Exercise 37: First stage Figure 137
After you check the starting position – the position of your head, shoulder etc. – start
exercise by a slowly raising your leg forward. During the movement breathe in and increase
muscle tension in the raising leg. In the fourth count, when the muscle tension is the highest,
try to pull the working limb in the longitudinal axis. According to the exercise intention,
change the feet position to plantar or dorsal flexion in turns.
In every following repetition of the exercise, also try to increase raising leg forward
without the pelvis leaving its original place. The raised leg forward does not have to make an

92
angle of 90° or broader, as pupils often try to make. Make only as broad an angle as it is
possible without bending your knee and while attempting at its broadening, during which you
overcome just a slight pain.
From the fifth to eighth count you perceive relaxation during completely relaxed
expiration. You can make other modification of the exercise by hold for the duration of one
breathing stage – controlled expiration and inspiration – in leg raising forward position and do
not relax the working limb muscles until the next expiration.
Exercise 37: Figure 138
EXERCISE 38
BACK-LYING POSITION – stretch your arms sideways (Figure 139):
1.) raise your legs forward; breathe out (Figure 140)
2.) hold in holding legs forward position; breathe in
3.) by bending knees forward assume back-lying position; breathe out (Fig 141-142)
4.) hold; breathe in (Figure 143)
5.) hold; breathe out
6.) = 4.)
Note: Practise each stage is for 4 counts.
Start raising legs forward by flattening your lower back, after the lumbar region lies
thoroughly flat on a mat. During the movement increase muscle tension in the lower limbs.
Muscle tension, however, will increase a bit more in the second stage of the movement:
a) due to the effort to increase holding leg forward position only by movement in hip joints
b) due to an increased effort to keep feet close together by symmetrical adduction.
Exercise 38: Starting position Figure 139

93
Exercise 38: First stage Figure 140 Exercise 38: 1st count of the 3rd stage Fig. 141
Exercise 38: Third count of the third stage Figure 142
Exercise 38: Stage 4. – 6. Figure 143
When practising the relaxed and expiratory third movement stage, we recommend that
you completely relax the crura by bending your knees in the first two counts of expiration.
Stop the movement here for a short time and then, by opening the angle between your thighs
and trunk, in the third and fourth count, continue until you assume relaxed leg closing position

94
(Figure 142, 143). There is only one task to fulfil while you are in back lying position;
perceive muscle relaxation during calm and even breathing in the remaining 12 counts.
In the fourth stage you can, for example, concentrate on the relaxed legs, in the fifth
one on the relaxed crura and in the sixth one on the relaxed thighs. After another repetition
you can concentrate in the mentioned relaxation stages on both or just one lower limb, as on a
relaxed and heavy whole. Next time it is possible to focus just on the parts of the leg that are
in contact with a mat.
EXERCISE 39
Exercise 39: Figure 144
Exercise 39: Figure 145
Exercise 39: Figure 146

95
Exercise 39: Figure 147
EXERCISE 40
KNEELING SUPPORT (Figure 148):
1.) bend your head backward; breathe in (Figure 149)
2.) bend your head forward; breathe out (Figure 150)
3.) relax the muscles in head bending forward position; loosely finish expiration
(Figure 151)
4.) hold in the relaxation; breathe in
5.) hold in the relaxation; breathe out.
Note: Practise each stage for four counts.
This exercise is focused on the cervical vertebrae region, its muscles and head
muscles. A precondition for correct performance of the exercise is to, while in kneeling
support position, concentrate on the firm middle shoulder position, between protraction and
retraction.
Exercise 40: Starting position Figure 148
In the first movement stage, bend your head backward slowly and perceive concentric
contraction of the cervical vertebrae and head extensors. Be also aware of the top of your
head, which moves along the longest trajectory in the medial plane. Stretch the cervical
vertebrae as if you wanted to disburden it.

96
Exercise 40: First stage Figure 149
While you move your head to head bending forward position, the top of the head again
follows the longest trajectory. Be aware of excentric contraction of the cervical vertebrae and
head extensors. In the third stage finish the expiration loosely and at the same time completely
relax the muscles that were involved in the previous movement and hold longer in relaxation
for the period of one or more breaths, as has been described.
In the relaxation stage you feel the weight of the hanging head and cervical vertebrae
from a relatively stable "hinge", shoulder axis.
After you have practised this for a longer time you can concentrate on tension in the
masseter muscles, mimic muscles and others during the exercise or relaxation itself.
Among the local relaxation exercises we can include such exercises during which
pupils shake certain muscle groups by faster movements and try to perceive their relaxation.
We are inspired here by exercises that are often used in sports trainings, in our case in back-
lying position.
Exercise 40: Second stage Figure 150

97
Exercise 40: Third stage Figure 151
EXERCISE 41
BACK-LYING POSITION – raise your arms forward:
Shaking arm muscles (Figure 152).
The pupil in Figure 152 is trying to perceive relaxation in his arm muscle groups by
shaking them. Start the movement slowly and gradually, accelerate it by slight flexion in the
elbow joints and finish it by stretching your arms completely. Perceive the shake in the
muscle groups of your arm, where relatively most relaxed muscles are the short muscles of
hands. The other muscle groups ensure holding arms forward position and the movements in
the elbow joints.
Exercise 41: Shaking the upper limb muscles Figure 152
After you have practised for a certain period of time, you start to perceive the shake
that travels through the arms and shoulder girdles further to the entire trunk and head muscles.
We can say that this kind of vibration auto-massage affects not only the arm muscles, but also
the muscles and organs of the head, trunk and abdomen.

98
Exercise 41: Shaking the low limb muscles Figure 153
It is convenient to practise it first with the left and right arm individually and later with
both arms turned inwards, as if you wanted to practise in under grip position. Although you
relax the muscles by shaking them as in, e.g. sports massage, it is convenient, for example
after doing the exercise for 20 – 30 s, to assume the starting back-lying position. In this
position you can feel deeper relaxation gradually of the individual fingers, palms, wrists,
forearms, upper arms, entire arms etc., because, as we have already mentioned, a number of
muscle groups ensured the posture and movement during the exercise. Similarly, as you
practised shaking the arm muscles, you can shake the lower limb muscles (Figure 153).
EXERCISE 42
BACK-LYING POSITION – raise your legs forward
Shake the muscles of your lower limbs. First practise each limb separately.
Concentrate especially on the movements of small amplitude in the knee joints that vibrate the
entire lower limb and as if they subsequently affected also the movement in the hip and ankle
joints. Next, concentrate on the relatively most relaxed muscle groups, feet and crura muscles.
Gradually transfer your attention to the abdominal region, trunk and head, and try to
perceive a delicate vibration not only in the muscles, but also in the abdominal and thoracic
organs, similarly as in the previous exercise. Again, after 20-30s assume relaxing, back-lying
position and feel deeper relaxation of both lower limbs or, depending on the exercise purpose,
only their parts.
EXERCISE 43
BACK-LYING POSITION – raise your arms and legs forward:
Shake your upper and lower limb muscles. If you combine the two previous exercise
elements in one whole, you are already on the way from a local to overall relaxation. The aim
of practising local relaxation is to get acquainted with kinaesthetic sensation in individual

99
parts of the body. It is a sensation evoked by conscious attempts at a controlled muscle
contraction followed by an attempt at conscious relaxation that is controlled by pupils
themselves. It is assumed that the experience gained in this stage of the practice will reflect in
the practise of overall relaxation.
Exercise 43: Figure 154
4. Practise of overall relaxation
When practising overall relaxation, in the first stage, try to consciously involve the
largest number of muscles and in the second, relaxation stage, to feel them heavy and
completely relaxed. Since you involve a large number of muscles in the first stage of the
practise, mainly after inspiration in the inspiration apnoeic pause, the exercises are quite
suitable for younger pupils, who do not have any disorder of the respiratory and circulatory
system. However, if you have a look at the exercises in detail, you will find out that some of
them can be made into easier modifications suitable even for older pupils. It is important,
through the choice of the first stage of the exercise element, to enable a pupil to perceive the
involvement of a large number of muscle groups, when the intensity of the muscle contraction
is regulated by his own conscious effort before the relaxation stage.
EXERCISE 44
BACK-LYING POSITION – raise your arms upward outward:
1.) simultaneously: - bend your head forward with the back of your
neck stabilised against a mat
- flatten the lower back
- raise your legs forward lower along with the activation of
your hip joint adductors, move your
feet upright
- attempt at raising your arms upward backward,
open your hands and spread the fingers
(Figure 156)
2. – 3.) bring your legs back on a mat and relax the muscles (Figure
157).

100
Note: Practise each stage of the exercise for 4-6 counts.
Exercise 44: First stage Figure 156
Exercise 44: Second and third stage Figure 157
Start the first stage:
a) by expiration and according to the other stages of breathing count down the time of the
exercise. Try to breathe evenly;
b) after inspiration while directing your concentration into the abdomen, flatten the lower
back etc. in the inspiration apnoeic pause. The inspiration activates the skeletal muscles,
which means that better conditions to maintain the body position and to perceive it while it is
in tension are created.
Start the second stage of the exercise by expiration simultaneously with muscle
relaxation.
EXERCISE 45
BACK-LYING POSITION – stretch your arms sideways lower (Figure 158):
1.) move to support seat position, place your hands outside the lower half of your
crura; breath out (Figure 159)
2.) hold; breathe in
3.) raise your legs forward; breathe out (Figure 160)
4.) hold in legs forward position; breathe in
5.) bring your legs down on the floor by relaxing them (Figure 161) - lie down to the
back-lying position; breathe out (Figure 162)
6. – 8.) hold; breathe in – breathe out – breathe in.
Note: Practise each stage in 3-4 counts.

101
Exercise 45: Starting position Figure 158
This exercise is only seemingly easier. Start the exercise by flattening your lower back, breath
out smoothly while you gradually sit up. While raising your legs forward – in the third stage –
bring your shoulders to protraction and do, as if you tried to close your arms the body lower.
Increase the tension in the lower limbs by conscious two-sided adduction. In the third and
fourth stage (Figure 160) perceive a big tension in the arm, abdomen, thigh muscles etc. In the
sixth to eighth stage do the overall relaxation along with smooth breathing.
Exercise 45: First and second stage Figure 159
It is also possible, in the second stage, to perform the exercise by breathing into the
abdomen and somewhat along the spine further into the chest. In the first count of the third
stage raise your legs forward and hold in the apnoeic pause till the end of the fourth stage.
Other stages are identical with the original description.
Exercise 45: Third and fourth stage Figure 160

102
Exercise 45: First count of the 5th stage Figure 161
EXERCISE 46
Exercise 46: Figure 162
Exercise 46: Figure 163
103
Exercise 46: Figure 164
Exercise 46: Figure 165
:
Exercise 46: Figure 166

104
Exercise 46: Figure 167
Exercise 46: Figure 168
EXERCISE 47
FRONT LYING POSITION – raise your elbows upward outward and place your forearms
upward inward (Figure 169):
1.) do half turn to the right to the position of the left forearm support lying
on the left side – stretch your legs sideways to the right – stretch your
right arm sideways; breathe in (Figure 170)
4. – 5.) hold
6.) relax the muscles (Figure 171) and move back to the starting position with the
right temple lying on a mat; breathe out. When you do the turn to the left, lay your
head, in this stage, on the left temple (Figure 172)
7. – 10.) hold.
Note: Practise both sides in turn and allow yourself three counts for each stage. In each count
triplet breathe out and in without interruption.

105
Exercise 47: Starting position Figure 169
Exercise 47: First to fifth stage Figure 170
Exercise 47: 6th stage, muscle relaxation Figure 171
Exercise 47: Sixth to tenth stage Figure 172

106
Exercise 47: First to fifth stage, turning head to the right Figure 173
Start the movement by bending your head backward and rotating it together with the
cervical vertebrae to the right. Stretching the right arm facilitates the rotation. Your left
forearm is during the first stage continuously and evenly burdened on its whole area. It keeps
the balance of your body in the hold during the following stages.
In the second to fifth stage make sure all the parts of your body are in the frontal plane.
Keeping your legs close together, carefully continue stretching your legs sideways and
bending your trunk sideways. Doing so, you disburden your left forearm. The position of legs
and trunk sideways is correct when you feel the main part of the support approximately
between the anterior superior iliac spine and greater trochanter.
In the sixth stage concentrate on the feeling of the relaxed muscles, which is
accompanied with expiration. Turn your head to touch your right temple to the floor so it is
ready for the direction in which the exercise will continue.
After managing doing the exercise at a slow pace, you can try to do it faster. In that
case, the part of the exercise when the muscles are stretched is practised for four counts after
inspiration in the inspiration apnoeic pause. Coordinate the expiration, which could be also
done for 4 - 6 counts, with muscle relaxation. You can make any other possible modifications
yourself. For example, turn your head and cervical vertebrae in the direction of the stretched
arm sideways and watch the back of your hand.
EXERCISE 48
Exercise 48: Figure 174

107
Exercise 48: Figure 175
Exercise 48: Figure 176
Exercise 48: Figure 177
Exercise 48: Figure 178

108
Exercise 48: Figure 179
Exercise 48: Figure 180
EXERCISE 49
STRADDLE FRONT LYING POSITION – raise your arms upward outward (Figure 181):
1.) raise your legs backward – bend your arched trunk backward; breathe in (Fig 182)
2. – 5.) hold
6.) relax your muscles – return to the starting position – keep your head lying on the
right (left) temple; breathe out (Figure 183)
7. – 10.) hold.
Note: Divide each exercise stage into three counts. Inspire in each odd stage and
expire in the even ones.
Exercise 49: Starting position Figure 181
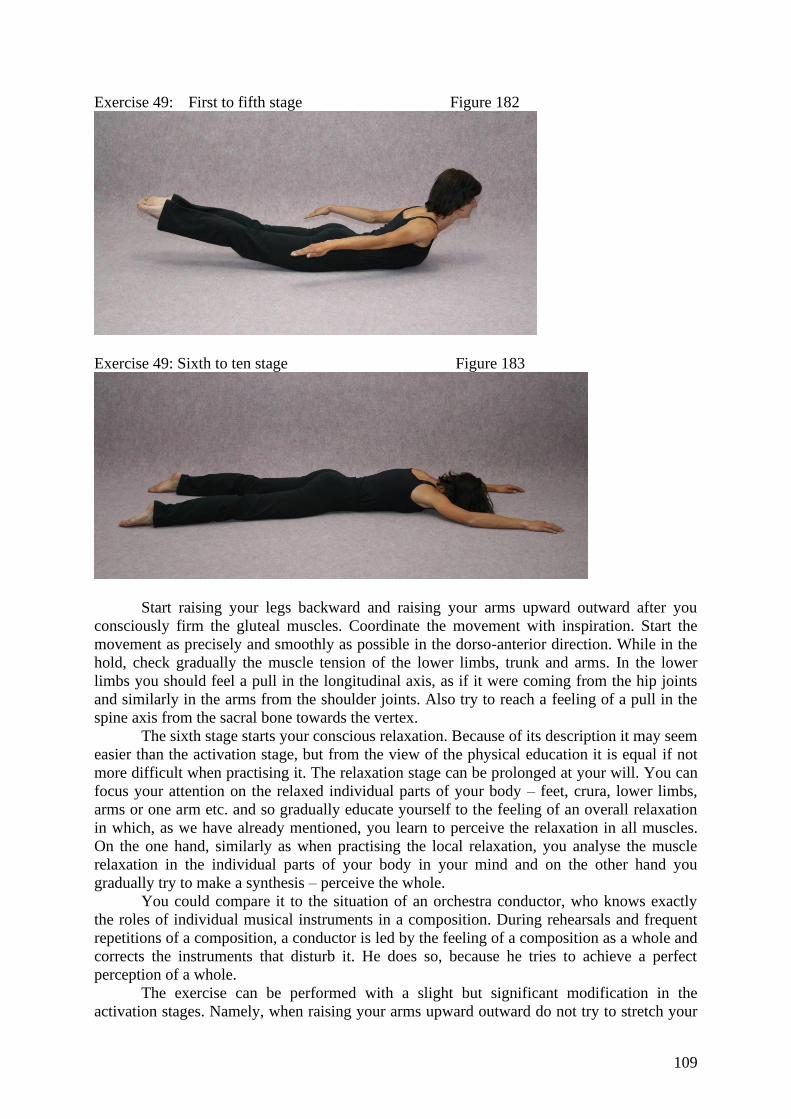
109
Exercise 49: First to fifth stage Figure 182
Exercise 49: Sixth to ten stage Figure 183
Start raising your legs backward and raising your arms upward outward after you
consciously firm the gluteal muscles. Coordinate the movement with inspiration. Start the
movement as precisely and smoothly as possible in the dorso-anterior direction. While in the
hold, check gradually the muscle tension of the lower limbs, trunk and arms. In the lower
limbs you should feel a pull in the longitudinal axis, as if it were coming from the hip joints
and similarly in the arms from the shoulder joints. Also try to reach a feeling of a pull in the
spine axis from the sacral bone towards the vertex.
The sixth stage starts your conscious relaxation. Because of its description it may seem
easier than the activation stage, but from the view of the physical education it is equal if not
more difficult when practising it. The relaxation stage can be prolonged at your will. You can
focus your attention on the relaxed individual parts of your body – feet, crura, lower limbs,
arms or one arm etc. and so gradually educate yourself to the feeling of an overall relaxation
in which, as we have already mentioned, you learn to perceive the relaxation in all muscles.
On the one hand, similarly as when practising the local relaxation, you analyse the muscle
relaxation in the individual parts of your body in your mind and on the other hand you
gradually try to make a synthesis – perceive the whole.
You could compare it to the situation of an orchestra conductor, who knows exactly
the roles of individual musical instruments in a composition. During rehearsals and frequent
repetitions of a composition, a conductor is led by the feeling of a composition as a whole and
corrects the instruments that disturb it. He does so, because he tries to achieve a perfect
perception of a whole.
The exercise can be performed with a slight but significant modification in the
activation stages. Namely, when raising your arms upward outward do not try to stretch your

110
arms in the longitudinal axis in the direction of fingers but do the opposite as if you pushed a
little harder the heads of the humerus into the glenoid cavities and made an attempt at an
overall depression of your shoulders. The movement will be of a small amplitude and arms
must not be bent. If you assume that the first part of the exercise is too long in the hold, start
relaxation as early as in the fourth stage.
You can practise the activation part of this exercise after inspiration and concentrate
on the abdominal part of your body. Remain in the hold for the duration of 4-6 counts and
hold your breath in the inspiration apnoeic pause. A relaxation stage follows that is either the
same long or longer depending on the relaxed expiration.
The described exercises help us to show you that practising relaxation is more
advantageous when it is preceded by tensing muscles in the hold. You feel symmetrical
tension in both halves of your body and then you relax.
EXERCISE 50
BACK-LYING POSITION, RAISING BENT KNEES FORWARD – raise your arms upward
inward, lock your fingers and your palms are facing up (Figure 184): circle your arms
in the frontal plane, circle your bent legs in the opposite direction and stretch them in
the lying position (Figure 185).
Note: Perform the whole exercise cycle for 8 counts.
Exercise 50: Starting position Figure 184
Exercise 50: Starting to exercise Figure 185

111
Move your arms as low as possible above the floor and bend them as little as possible
in the elbow joints. Hands are moving as far from the body as possible. Your shoulder blades
are still touching the floor and with an ideal execution of the exercise they should not move
about the floor during the exercise. Rotate your head on a mat in the direction of your arms
alternately to the left and right (always in the opposite direction than the pelvis), watch your
hands with your eyes even if the eyelids should be closed. Do not bend your head backward
markedly at any point of the movement. Instead, be particular in keeping the cervical region
the closest to a mat.
Exercise 50: Figure 186
In our example you start moving your lower limbs to the left and try to rotate the
pelvis axis in the same direction. The pelvis returns to the frontal plane at the point when you
stretch your legs that are in a slight leg forward position. At this moment your cervical and
lumbar regions are the closest to the floor.
After that, you practise the second half of the exercise. Gradually bend your knees,
rotate your pelvis axis to the right and when returning to the starting position your legs are
bent and pulled the closest to your trunk by flexors of the hip joints.
Exercise 50: Poor coordination between movement of the arms and legs Fig. 187
You can divide the exercise cycle, which is divided into eight counts, as follows:
breathe out for four counts from starting position to back lying position, where your legs are
stretched in slight leg forward position and your arms are close the body lower forward and
inward. In the second half of the exercise, when the arms and legs are returning to the starting
position, breathe in. After you do this exercise fourth to sixth times, relax your arms, lower
limbs and in fact the whole body in the starting, back lying position. Then do the same
exercise but start the movement in the other direction.

112
After practising it long enough, you can breathe in in the starting position so the
abdominal wall arches – as we say in our exercise practice “breathe into the stomach” – and in
the inspiration apnoeic pause practise slowly exercise cycles 2, 3, 4. Then again relax in the
back lying position.
We are reminding once again that these exercises for overall relaxation are not put in a
methodical order as to the growing demandingness. The exercises here serve as examples
accompanying the theory about relaxation.
5. Differentiated relaxation
In this part, our task is to teach pupils to perceive muscle contraction, relaxation and
extension at the same time while doing exercises. This could be rated as the highest level of
the movement cultivation. The reason why is that a pupil is able to perceive not only a nice
feeling of a perfectly executed movement and be happy about it, but at the same time he is
able – or is learning the ability – to perceive the degree of the muscle tension, relaxation,
extension and change them based on different situations and conditions.
These abilities need to be intentionally improved in all pupils with an impairment not
only through compensatory exercises but also, if possible, during the training of light
athletics, sports gymnastic elements, swimming styles etc.
EXERCISE 51
CLOSE STAND – bring your arms close the body lower:
1) contract your right arm muscles by bending your elbow, make a fist
and at the same time shake your left arm muscles (Figure 188)
2) relax the muscles
Note: Hold in the exercise stages for 10-15 s or longer.
Start the exercise from close stand or heel stand. Firm your gluteal muscles and other
muscles of your lower limbs by a slight adduction in the hip joints and extension in the knee
joints. Make sure that your body weight is distributed evenly on the area of your both feet.
After that, practise tensing the muscles of your left and right arm in turns. Simultaneously try
to perceive muscle extension on the dorsal side of one arm when, at the same time, you shake
muscles of your second arm.
Practise the muscle contraction gradually and, if possible, to the highest tension. Keep
your fist the closest to your shoulder and the upper arm the closest to your chest, closer then
shown in Figure 188. Important is to keep upright position of the spine and shoulders straight
in the frontal plane.
You can shake muscles of your arm that is close the body lower in two ways:
a) Rotate your hand so your palm is facing forward and start the movement –
first slowly and then gradually accelerate – by a slight bending and stretching your
arm in the elbow joint. Try to perceive the other segments of the arm as completely
relaxed and being subjected to the movements coming from the elbow.
b) Concentrate on the relaxed movement in your wrist, when the hand rotates
with the palm facing forward and backward in turns. All other segments of the arm are
subjected to firstly slow and then quicker movements coming from the wrist.

113
Exercise 51: First stage of the exercise Figure 188
During the exercise breathe slowly and smoothly, somewhat independently of the
movement. But start the second stage with expiration. Drop your right arm close the body
lower and stop the movement even in your left arm. Similarly relax the tension in the lower
limbs without changing the position of your feet. You feel relaxation especially in the arm
muscles and you feel their weight due to the earth’s attraction.
Compared to this relaxation you perceive a sort of pull coming from the coccyx in the
direction of the vertex. An upright and firm position of the spine and head remains, the arms
and shoulder girdles, if possible, are relaxed, however, without any tendency to move
forward. Observe calm, slow breathing and notice slight firming up of the thoracic part of the
erector spinae, the shoulder blades shifting backward to the spine etc.
Owing to the fact that an effort to relax muscles by shaking them ends, by rule, in
failure, it is fitting to try to shake both upper limbs in the same position or in the position of
round trunk bending forward downward and gradually moving to an upright position.
EXERCISE 52
Exercise 52: Figure 189, 190

114
EXERCISE 53
STRADDLE STAND – bring your arms close the body lower (Figure 191):
1) raise your arms upward outward by first stretching them sideways,
palms facing forward and spread your fingers; breathe in (Figure 192)
2) drop your hands; breathe out (Figure 193)
3) hold; breathe in
4) drop your forearms; breathe out (Figure 194)
5) hold; breathe in
6) drop your arms to close the body lower; breathe out (Figure 195)
7. – 10.) slowly breathe in and out in the basic starting position.
Note: Practise each stage for 4 – 6 counts.
Exercise 53: Starting position Fig. 191 Exercise 53: First stage Fig. 192
Assume a firm, though somewhat relaxed, posture in the starting position. It is a
posture in which you eliminate any redundant muscle tension.
The first stage starts with inspiration. Coordinate the inspiration with the increase of
the tension in the muscles of your arms and lower limbs. Firming up of the muscles of the
lower limbs is only slight; depending on the circumstances (condition of the structure of the
lower limbs), adduction in the hip joints, extension in the knee joints and the active
participation of the gluteal muscles in the posture. Do not bring your shoulders up, but on the
contrary keep them in the lowest position.
In the second stage, relax hand muscles and breathe out at the same time. The
dropping hand will stop hanging on the wrist joints, for it is possible to say that the muscles of
the forearm, upper arm and shoulder girdles still insure a firm position of the remaining
segments of the arms in raising arms upward outward position.

115
Exercise 53: Figure 193 Exercise 53: Figure 194
Relax the forearm muscles more in the fourth stage and again breathe out at the same
time. Perceive the weight of the hand and forearm and the relaxed mentioned segments
compared to almost unchanging tension of the muscles of the shoulder girdles, inter-scapular
region, lower limbs etc.
In the sixth stage relax all the muscles of your arms. As late as this sixth stage, relax
also the gluteal muscles, muscles slightly burdened by adduction in the hip joints and
extension in the knee joints.
In the seventh to tenth stage perceive a firm posture, however the muscles of the lower
and upper limbs are much more relaxed than in the previous stages. Attentively observe the
muscle activity as it changes during breathing, without our intentional interference.
In the next exercise you will learn, in one and the same moment, to differentiate
between the muscles in high tension and those in low tension or those that are relaxed.
EXERCISE 54
Note: You can practise each stage separately 5 – 15s.
Exercise 54: Raising legs forward by activating as many muscles of legs as possible Fig 195

116
a) When you flatten your lower back and the lumbar vertebrae lays down on a mat, tense
also the gluteal muscles as much as possible. Smoothly raise your legs forward and
tense them as if you pulled the lower limbs from the hip joints. Along with that there is
an increase in the tension of the adductors of the hip joints. Raising legs forward is
practised individually but the angle between the lower limbs and the floor must not
increase at the expense of incorrect exercise with the other parts of the body; it is
always a general rule.
After a short holding legs forward bring them slowly back to the starting
position. During the movement you perceive especially the gluteus maximus as its
length changes and how it actively helps the abdominal muscles to keep the lower
back flattened until your heels touches a mat again.
Stay in the starting position for the period of a few breaths and perceive the
relaxed muscles that were actively involved in the previous stage of the exercise.
b) In the starting position, bend your lower limbs so you flatten your lower limbs and lay
the lumbar vertebrae on a mat without involving the muscles in the movement.
Perceive the relaxation of the separate parts of your body – lower limbs, pelvis, trunk,
upper limbs, head – breathe in a calm and relaxed manner.
Exer. 54: By contracting abdominal muscles lumbar spine is pressed harder to a mat Fig 196
Exercise 54: Raising legs forward by contracting as smallest number of muscles of bent lower
limbs as possible Figure 197

117
Then, by concentric contraction of the abdominal muscles – especially the rectus
abdominis – you increase the flattened lower back, thereby the lumbar vertebra is pressed
harder against a mat; as if you wanted to bring the upper edge of the pubic symphysis as close
to the gladiolus as possible. Next, focus your attention on the contraction of the hip joints
flexors. Slowly raise your bent legs forward and stretch them with as small effort as possible
in the last stage. Practise the movement back to the starting position in the opposite
succession, concentrate on the lumbar region so the pressure of the lumbar vertebrae against a
mat is, if possible, still the same until your heels touch the floor. After that, relax the flexors
of the hip joints, the abdominal and lumbar muscles.
During raising legs forward and bringing them back on a mat try to differentiate the
contracted muscles from the gluteal muscles, posterior thigh muscles, crura and adductors of
the hip joints that should be most relaxed. Other body muscles – arms, trunk etc. – should be
relaxed as well.
Exercise 54: Figure 198
c) In the starting position perceive the relaxed lower limbs. Although they are close to each
other they should be, together with the adductors of the hip joints, most relaxed.
Practise as attentively as described under b) only with one difference. Stretch your legs
in the knee joints with as small effort as possible during the whole exercise.
In all three cases – a, b, c – keep the starting position. We especially point out the fact
that head bending backward is a big mistake. Particularly in examples b and c you involve
only the muscles necessarily needed to perform the exercise. Try to have the other muscles
under your control and keep them intentionally relaxed. Always hold in the starting position
for a moment to make sure the muscles are relaxed after the previous contraction.
Change inspiration and expiration regularly and do not hold your breath in any stage
of the movement. Try to coordinate the highest demands on the strength of the abdominal
muscles with expiration. This always occurs when the lower limbs are just about to leave a
mat, or they are right above it.
EXERCISE 55
BACK LYING POSITION – raise your arms upward
1.) bring your arms close the body lower by first raising them forward
2.) raise your arms upward by first raising them forward.
You are going to practise a similar exercise with your arms. You are going to learn to
perceive attentively the contracted and relaxed muscles at once.

118
Exercise 55: Starting position for a) variation. Figure 199
Exercise 55: Relaxation in the starting position, b) variation Figure 200
a) From a relatively firm position of the individual body parts in the starting position you
are going to slowly practise both movement stages according to the description of the
exercise. Fingers follow the longest trajectory. After you perform the exercise several
times – in which you coordinated arms close the body lower with expiration and
raising arms upward with inspiration – relax all the muscles in the starting position.
Breathe calmly and check the relaxation of the individual body parts.
b) After this check of the relaxed muscles, once again concentrate on the relaxation of
your upper limbs. Try to raise them above a mat – they are stretched only in the elbow
joints – activating the muscles of your upper limbs as little as possible. You feel the
activity of the pectoralis major, latissimus dorsi, triceps brachii and also other muscles.
Exercise 55: Figure 201

119
Exercise 55: Figure 202
Exercise 55: Figure 203
As soon as your arms pass the position of holding arms forward and move towards
arms close the body lower, you can perceive the activation of the shoulder joints flexors.
Quite perceptible is, e.g. the activity of the clavicular part of the deltoideus etc. You can
discern the shift from tension to relaxation in the long head of the triceps brachii.
Pay the same attention to the changes of the muscle tension even in the second
movement stage. The hand muscles remain throughout the whole exercise relaxed.
Practise very slowly in this b) variation. The exercise stages may last 5 – 15 s. Breathe
smoothly, casually as if independently of the arms movement.
Through the practise you will realise that when you attempt to exclude the muscle
groups – that are not necessarily needed to be involved in a certain movement – you will get
more exact information about the weight of an exercised segment, in our case it is the arm.
After you finish the first or second movement stage, always remain with your arms relaxed
and feel their overall relaxation. In this relaxation stage also pay attention to the muscles that
you perceived when they were involved in the movement.
As you can see, a pupil’s attention is divided in these exercises. He concentrates on the
intentional perception of the muscle contraction, relaxation and extension at the same time.
Generally speaking, any basically mastered coordination of a movement can serve as an
exercise for practising differentiated relaxation. We say “at least basically mastered
movement” so that a pupil is able to perceive it, besides the external movement performance
that is visible, also contraction, relaxation and muscle extension.
In the chapter about relaxation we introduced some exercises that are accompanied
with the most necessary theory. After studying this text, you will understand that it is not
possible, in an exhaustive manner, to introduce examples with modifications for pupils of
different age groups and their movement level affected by some kind of impairment.
Top Related