


Languages
Pages
Legal

โครงการจดอบรมพฒนาความรทกษะดานInternet of Things
ไดรบการสนบสนนจากงบประมาณแผนดน ป 2561ตามแผนบรณาการการพฒนาคนตลอดชวงวย
Raspberry Pi
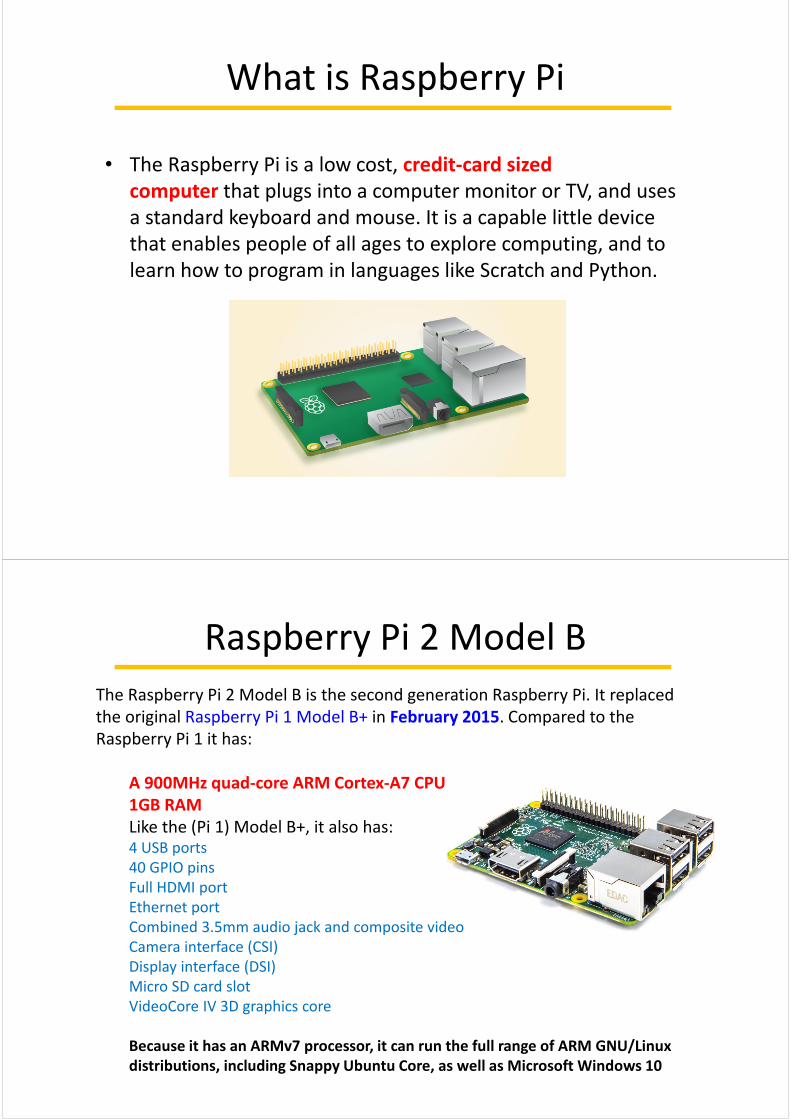
What is Raspberry Pi
• The Raspberry Pi is a low cost, credit-card sized
computer that plugs into a computer monitor or TV, and uses
a standard keyboard and mouse. It is a capable little device
that enables people of all ages to explore computing, and to
learn how to program in languages like Scratch and Python.
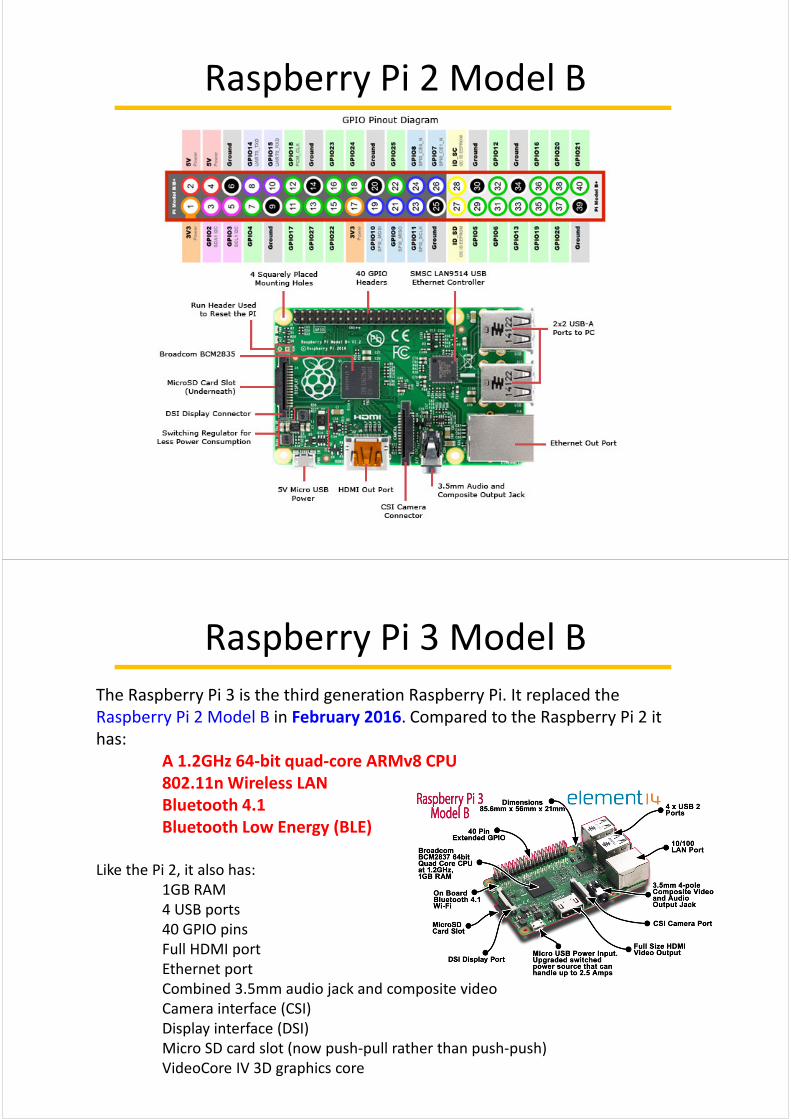
Raspberry Pi 2 Model B
The Raspberry Pi 2 Model B is the second generation Raspberry Pi. It replaced
the original Raspberry Pi 1 Model B+ in February 2015. Compared to the
Raspberry Pi 1 it has:
A 900MHz quad-core ARM Cortex-A7 CPU
1GB RAM
Like the (Pi 1) Model B+, it also has:4 USB ports
40 GPIO pins
Full HDMI port
Ethernet port
Combined 3.5mm audio jack and composite video
Camera interface (CSI)
Display interface (DSI)
Micro SD card slot
VideoCore IV 3D graphics core
Because it has an ARMv7 processor, it can run the full range of ARM GNU/Linux
distributions, including Snappy Ubuntu Core, as well as Microsoft Windows 10
Raspberry Pi 2 Model B
Raspberry Pi 3 Model B
The Raspberry Pi 3 is the third generation Raspberry Pi. It replaced the
Raspberry Pi 2 Model B in February 2016. Compared to the Raspberry Pi 2 it
has:
A 1.2GHz 64-bit quad-core ARMv8 CPU
802.11n Wireless LAN
Bluetooth 4.1
Bluetooth Low Energy (BLE)
Like the Pi 2, it also has:
1GB RAM
4 USB ports
40 GPIO pins
Full HDMI port
Ethernet port
Combined 3.5mm audio jack and composite video
Camera interface (CSI)
Display interface (DSI)
Micro SD card slot (now push-pull rather than push-push)
VideoCore IV 3D graphics core
Raspberry Pi 3 Model B
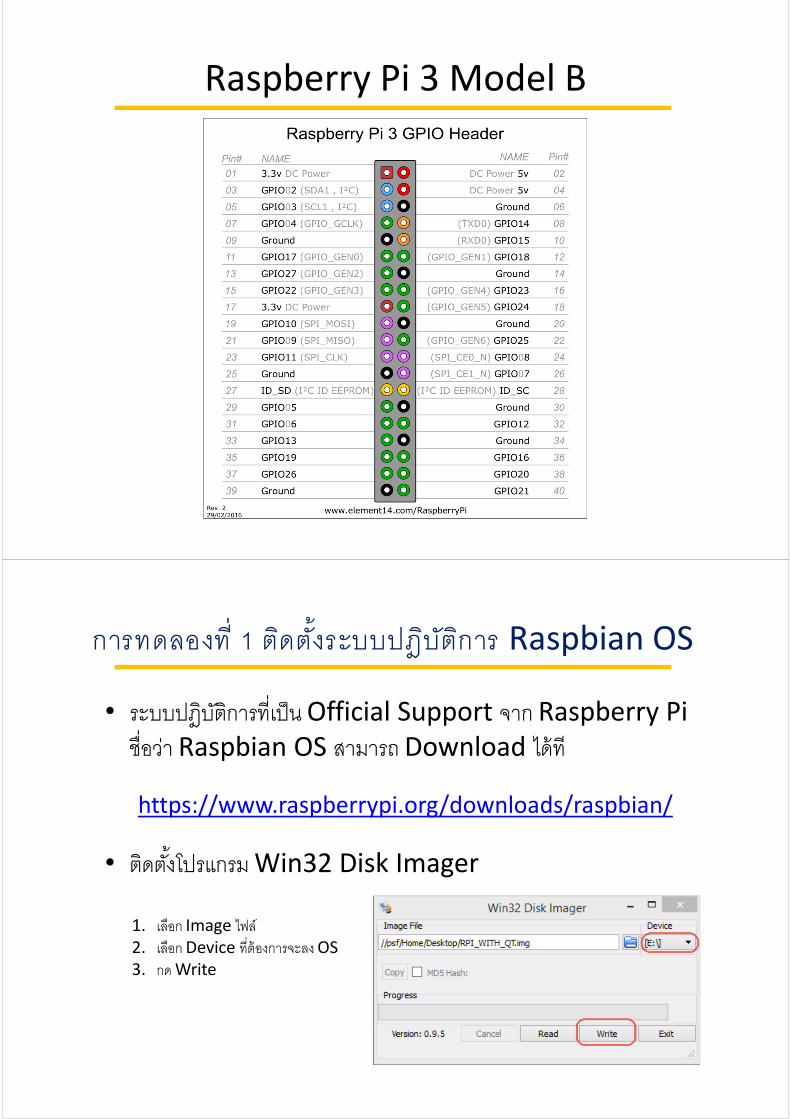
การทดลองท 1 ตดต �งระบบปฎบตการ Raspbian OS
• ระบบปฎบตการท เปน Official Support จาก Raspberry Pi
ช อวา Raspbian OS สามารถ Download ไดท
https://www.raspberrypi.org/downloads/raspbian/
• ตดต �งโปรแกรม Win32 Disk Imager
1. เลอก Image ไฟล2. เลอก Device ท ตองการจะลง OS
3. กด Write
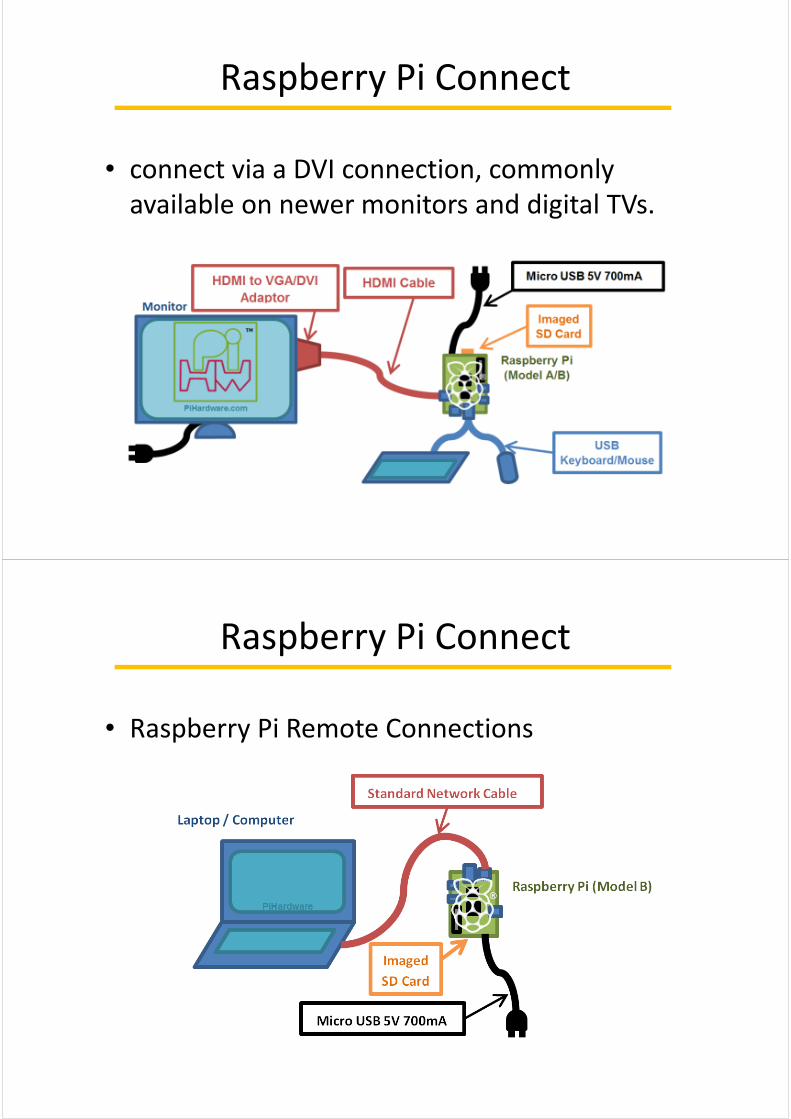
Raspberry Pi Connect
• connect via a DVI connection, commonly
available on newer monitors and digital TVs.
Raspberry Pi Connect
• Raspberry Pi Remote Connections
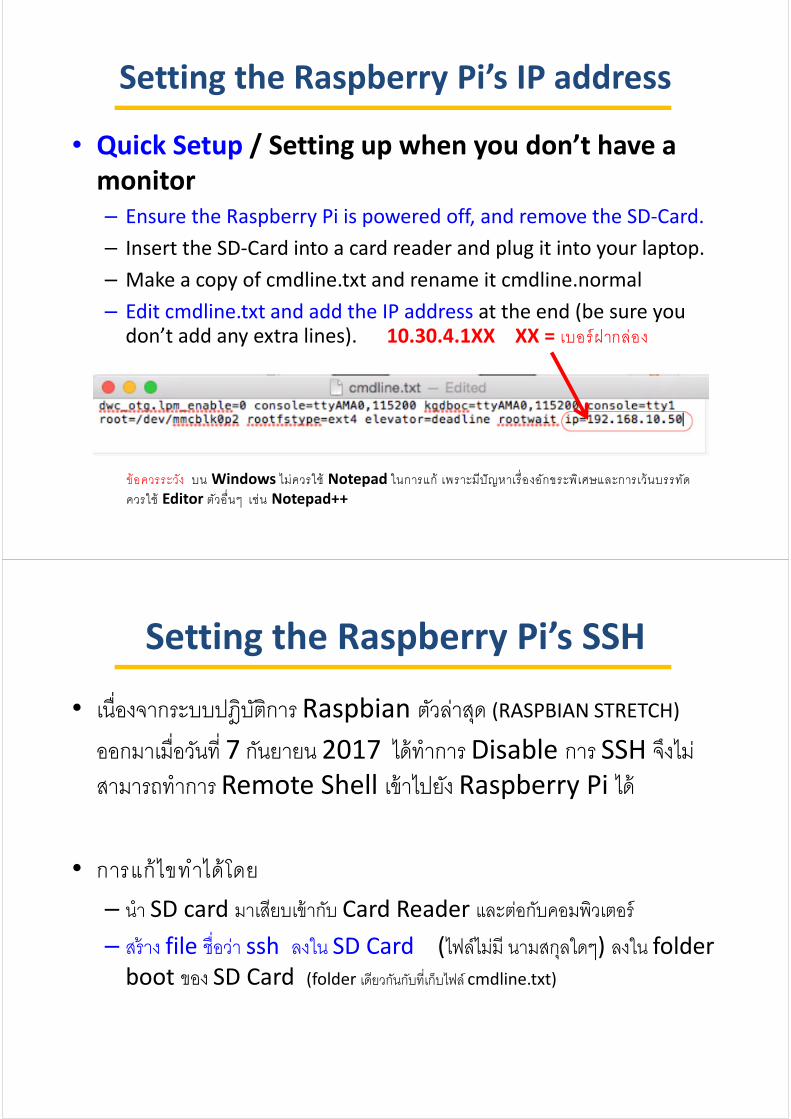
Setting the Raspberry Pi’s IP address
• Quick Setup / Setting up when you don’t have a
monitor– Ensure the Raspberry Pi is powered off, and remove the SD-Card.
– Insert the SD-Card into a card reader and plug it into your laptop.
– Make a copy of cmdline.txt and rename it cmdline.normal
– Edit cmdline.txt and add the IP address at the end (be sure you don’t add any extra lines). 10.30.4.1XX XX = เบอรฝากลอง
ขอควรระวง บน Windows ไมควรใช Notepad ในการแก เพราะมปญหาเร องอ กขระพเศษและการเวนบรรทด ควรใช Editor ตวอ นๆ เชน Notepad++
Setting the Raspberry Pi’s SSH
• เน องจากระบบปฎบตการ Raspbian ตวลาสด (RASPBIAN STRETCH) ออกมาเม อวนท 7 กนยายน 2017 ไดทาการ Disable การ SSH จงไมสามารถทาการ Remote Shell เขาไปยง Raspberry Pi ได
• การแกไขทาไดโดย – นา SD card มาเสยบเขากบ Card Reader และตอกบคอมพวเตอร
– สราง file ช อวา ssh ลงใน SD Card (ไฟลไมม นามสกลใดๆ) ลงใน folder
boot ของ SD Card (folder เดยวกนกบท เกบไฟล cmdline.txt)
การทดลองท 2 เรมตนใชงาน Raspberry Pi
• นา SD Card ท ตดต �ง OS เสรจแลว และแกไข IP Address และสรางไฟล ssh
เรยบรอยแลว ไปตดต �งท Rasp Pi โดยเสยบเขาท ชอง SD card ของ Rasp Pi
• เสยบสาย LAN เขาท Rasp Pi
• เสยบ Adapter เพ อจายกาลงงานไฟฟา ใหกบ Rasp Pi
• ทดลองใชคาส ง ping ท เคร อง PC ไปยง IP Address ท กาหนดไวตอนตน วาสามารถตดตอกบ Rasp Pi ไดหรอไม
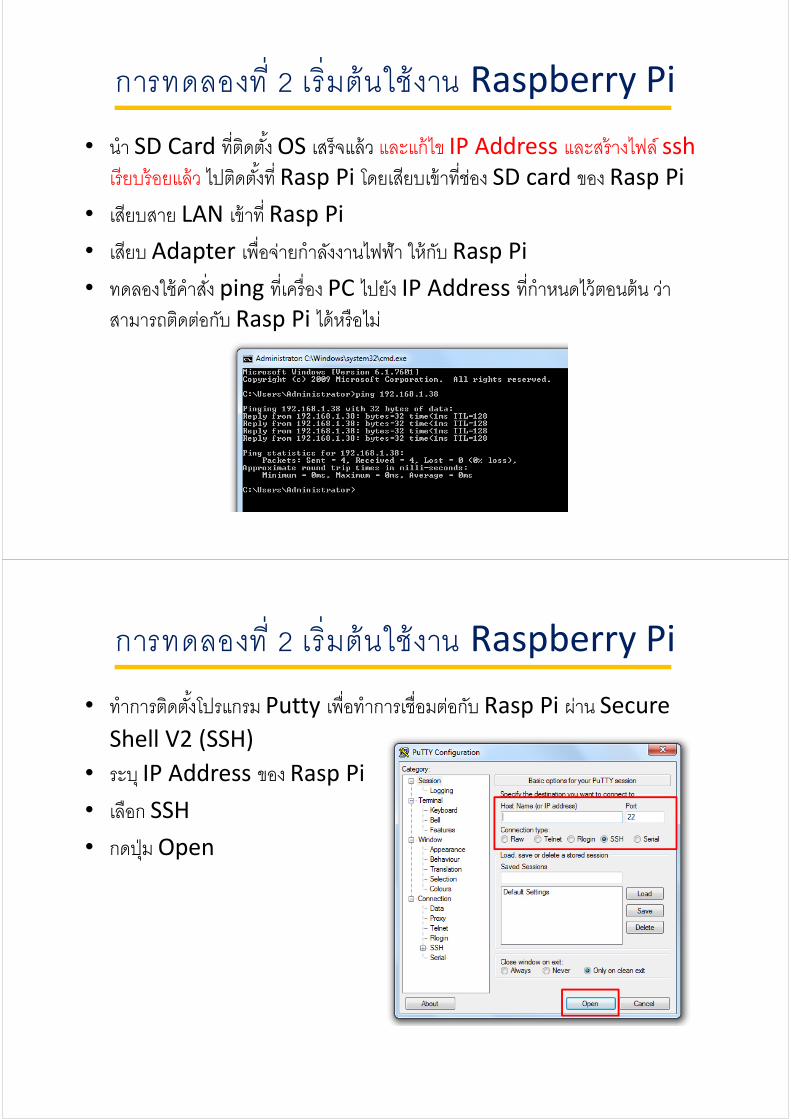
การทดลองท 2 เรมตนใชงาน Raspberry Pi
• ทาการตดต �งโปรแกรม Putty เพ อทาการเช อมตอกบ Rasp Pi ผาน Secure
Shell V2 (SSH)
• ระบ IP Address ของ Rasp Pi
• เลอก SSH
• กดป ม Open
การทดลองท 2 เรมตนใชงาน Raspberry Pi
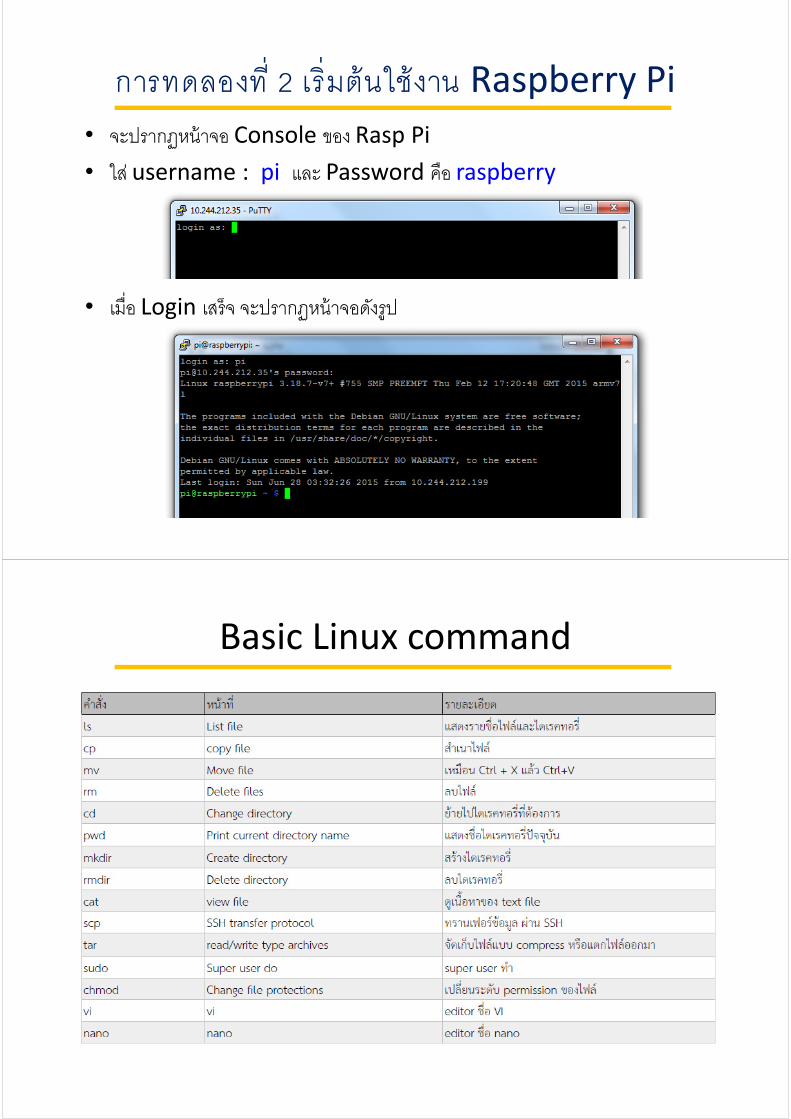
• จะปรากฏหนาจอ Console ของ Rasp Pi
• ใส username : pi และ Password คอ raspberry
• เม อ Login เสรจ จะปรากฏหนาจอดงรป
Basic Linux command
การทดลองท 2 เรมตนใชงาน Raspberry Pi
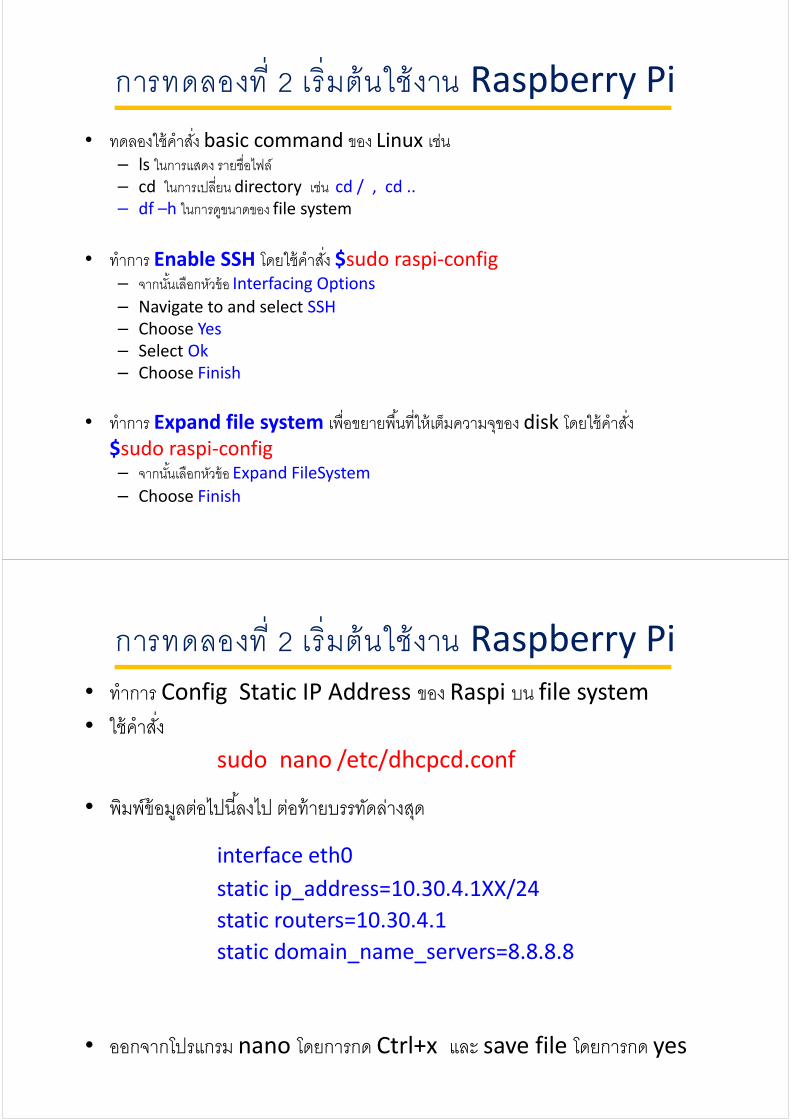
• ทดลองใชคาส ง basic command ของ Linux เชน – ls ในการแสดง รายช อไฟล– cd ในการเปล ยน directory เชน cd / , cd ..
– df –h ในการดขนาดของ file system
• ทาการ Enable SSH โดยใชคาส ง $sudo raspi-config – จากน �นเลอกหวขอ Interfacing Options
– Navigate to and select SSH
– Choose Yes
– Select Ok
– Choose Finish
• ทาการ Expand file system เพ อขยายพ �นท ใหเตมความจของ disk โดยใชคาส ง $sudo raspi-config – จากน �นเลอกหวขอ Expand FileSystem
– Choose Finish
การทดลองท 2 เรมตนใชงาน Raspberry Pi
• ทาการ Config Static IP Address ของ Raspi บน file system
• ใชคาส ง sudo nano /etc/dhcpcd.conf
• พมพขอมลตอไปน �ลงไป ตอทายบรรทดลางสด
interface eth0
static ip_address=10.30.4.1XX/24
static routers=10.30.4.1
static domain_name_servers=8.8.8.8
• ออกจากโปรแกรม nano โดยการกด Ctrl+x และ save file โดยการกด yes
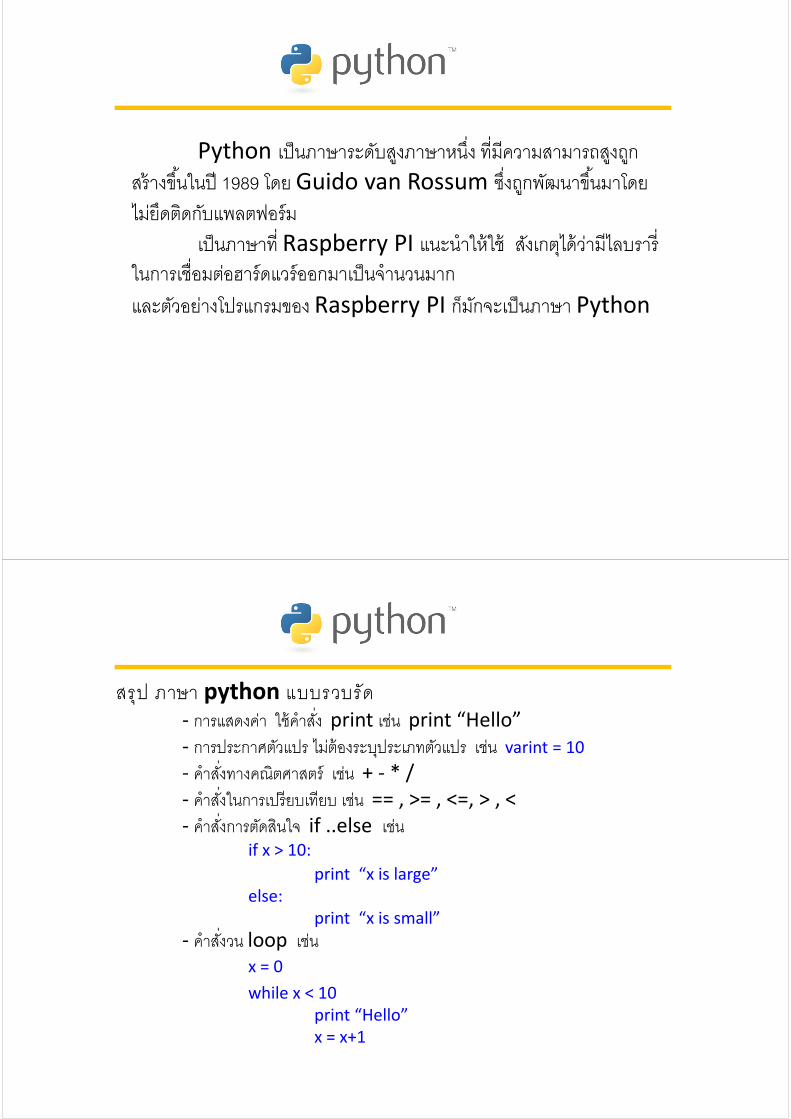
Python เปนภาษาระดบสงภาษาหน ง ท มความสามารถสงถกสรางข �นในป 1989 โดย Guido van Rossum ซ งถกพฒนาข �นมาโดยไมยดตดกบแพลตฟอรม
เปนภาษาท Raspberry PI แนะนาใหใช สงเกตไดวามไลบราร ในการเช อมตอฮารดแวรออกมาเปนจานวนมากและตวอยางโปรแกรมของ Raspberry PI กมกจะเปนภาษา Python
สรป ภาษา python แบบรวบรด- การแสดงคา ใชคาส ง print เชน print “Hello”
- การประกาศตวแปร ไมตองระบประเภทตวแปร เชน varint = 10
- คาส งทางคณตศาสตร เชน + - * /
- คาส งในการเปรยบเทยบ เชน == , >= , <=, > , <
- คาส งการตดสนใจ if ..else เชนif x > 10:
print “x is large”
else:
print “x is small”
- คาส งวน loop เชนx = 0
while x < 10
print “Hello”
x = x+1
ข �นตอนการเขยนโปรแกรม python
• เปดไฟลเพ อเขยนโปรแกรม ใชคาส ง nano เชน
$nano helloworld.py
• Run ไฟลโปรแกรมท เขยน ดวย python interpreter โดยใชคาส ง python เชน
$python helloworld.py หรอ
$sudo python helloworld.py
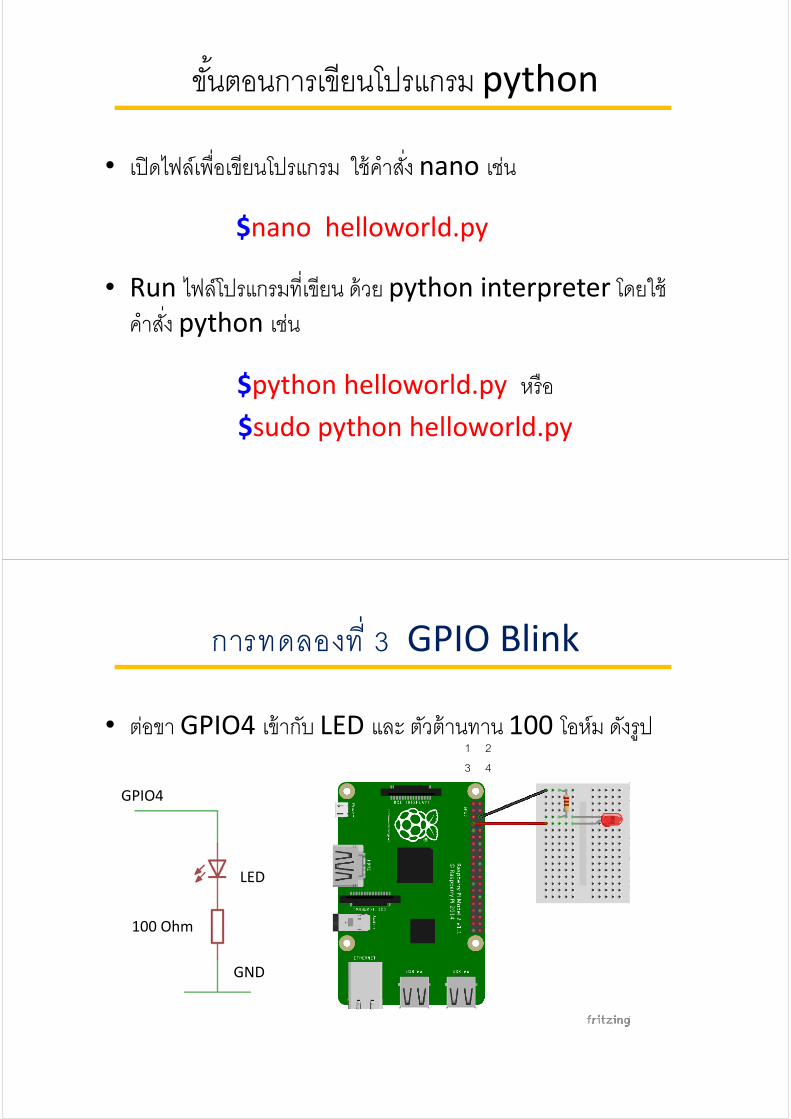
การทดลองท 3 GPIO Blink
• ตอขา GPIO4 เขากบ LED และ ตวตานทาน 100 โอหม ดงรป
GPIO4
GND
LED
100 Ohm
1 23 4
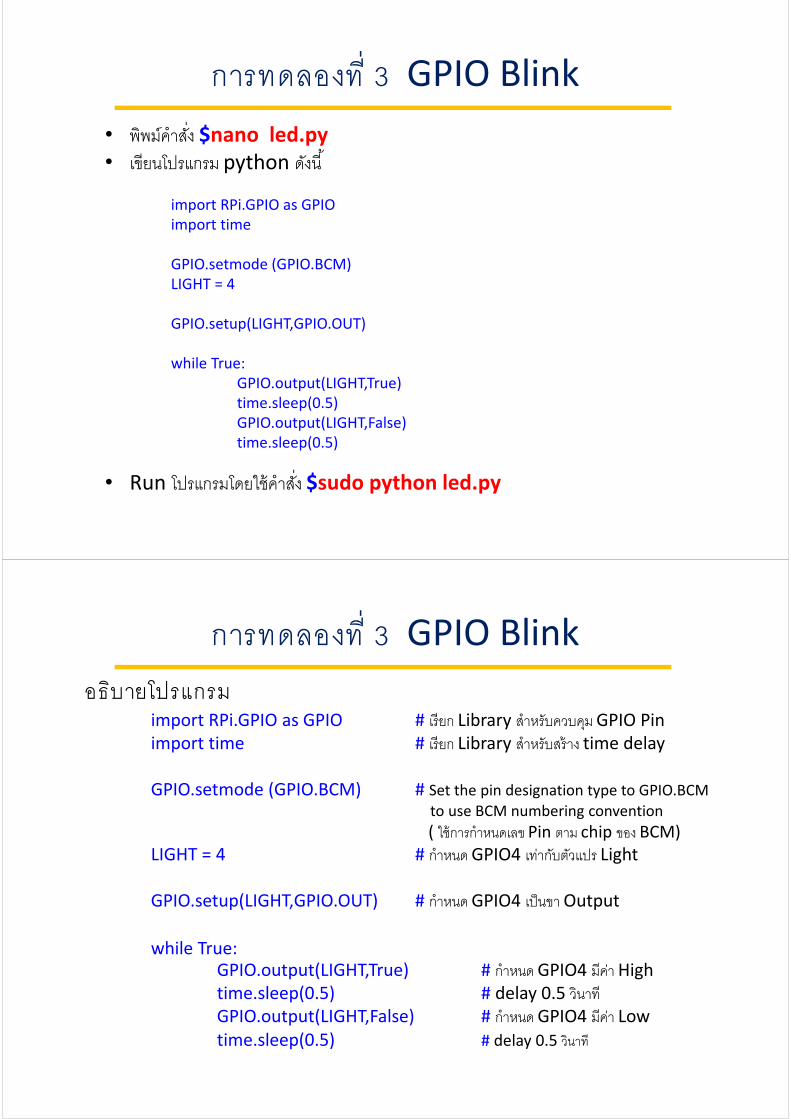
การทดลองท 3 GPIO Blink
• พพมคาส ง $nano led.py
• เขยนโปรแกรม python ดงน �
import RPi.GPIO as GPIO
import time
GPIO.setmode (GPIO.BCM)
LIGHT = 4
GPIO.setup(LIGHT,GPIO.OUT)
while True:
GPIO.output(LIGHT,True)
time.sleep(0.5)
GPIO.output(LIGHT,False)
time.sleep(0.5)
• Run โปรแกรมโดยใชคาส ง $sudo python led.py
การทดลองท 3 GPIO Blink
อธบายโปรแกรมimport RPi.GPIO as GPIO # เรยก Library สาหรบควบคม GPIO Pin
import time # เรยก Library สาหรบสราง time delay
GPIO.setmode (GPIO.BCM) # Set the pin designation type to GPIO.BCM
to use BCM numbering convention
( ใชการกาหนดเลข Pin ตาม chip ของ BCM)
LIGHT = 4 # กาหนด GPIO4 เทากบตวแปร Light
GPIO.setup(LIGHT,GPIO.OUT) # กาหนด GPIO4 เปนขา Output
while True:
GPIO.output(LIGHT,True) # กาหนด GPIO4 มคา High
time.sleep(0.5) # delay 0.5 วนาทGPIO.output(LIGHT,False) # กาหนด GPIO4 มคา Low
time.sleep(0.5) # delay 0.5 วนาท
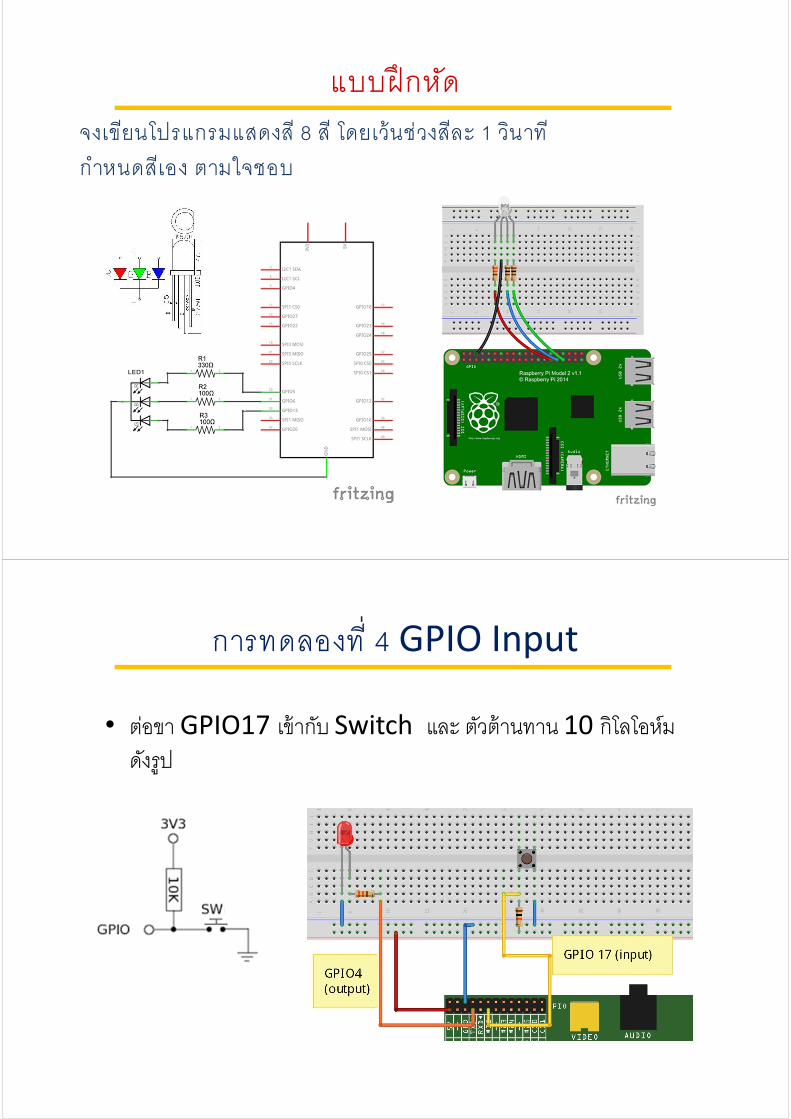
แบบฝกหดจงเข ยนโปรแกรมแสดงส 8 ส โดยเวนชวงสละ 1 วนาท กาหนดสเอง ตามใจชอบ
การทดลองท 4 GPIO Input
• ตอขา GPIO17 เขากบ Switch และ ตวตานทาน 10 กโลโอหม ดงรป
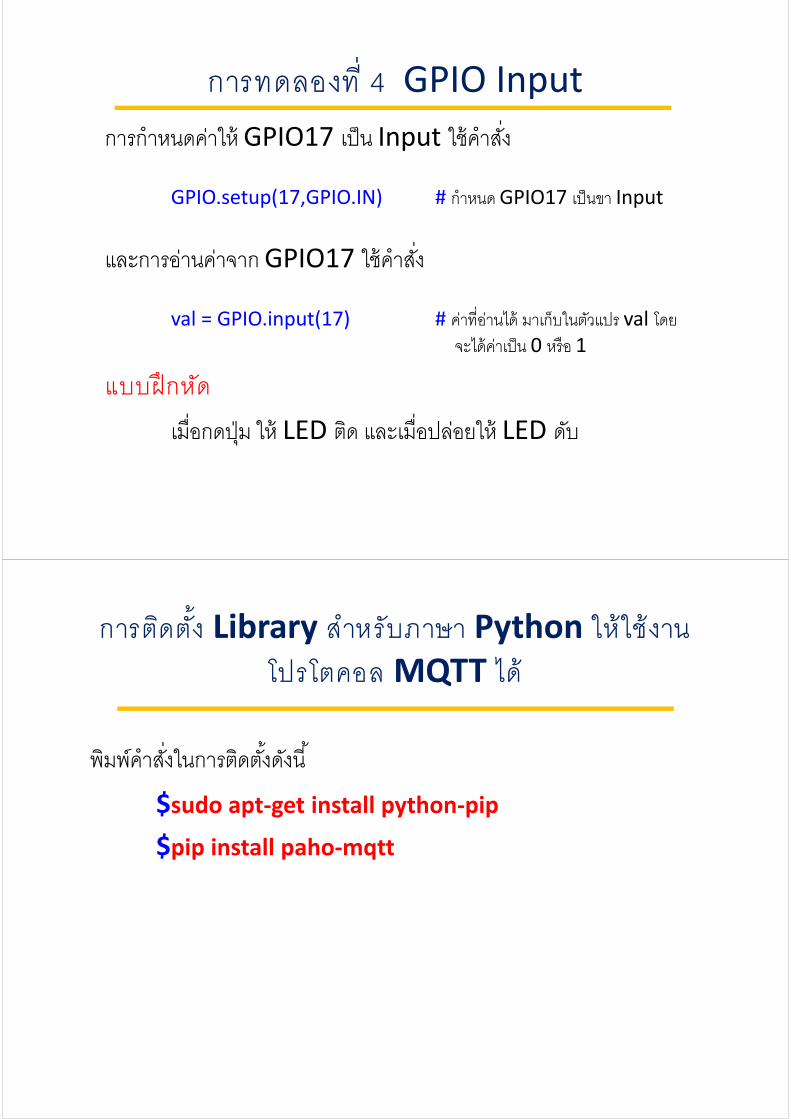
การทดลองท 4 GPIO Input
การกาหนดคาให GPIO17 เปน Input ใชคาส ง
GPIO.setup(17,GPIO.IN) # กาหนด GPIO17 เปนขา Input
และการอานคาจาก GPIO17 ใชคาส ง
val = GPIO.input(17) # คาท อานได มาเกบในตวแปร val โดยจะไดคาเปน 0 หรอ 1
แบบฝกหดเม อกดป ม ให LED ตด และเม อปลอยให LED ดบ
การตดต �ง Library สาหรบภาษา Python ใหใชงานโปรโตคอล MQTT ได
พมพคาส งในการตดต �งดงน �
$sudo apt-get install python-pip
$pip install paho-mqtt
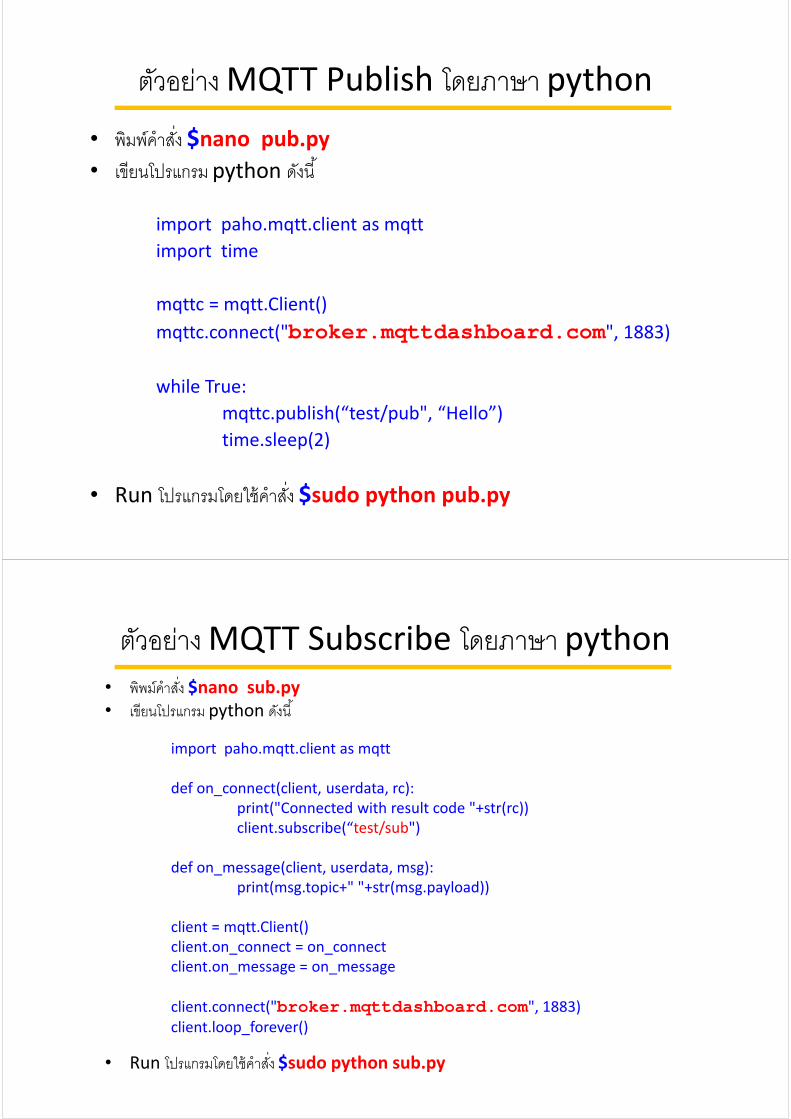
ตวอยาง MQTT Publish โดยภาษา python
• พมพคาส ง $nano pub.py
• เขยนโปรแกรม python ดงน �
import paho.mqtt.client as mqtt
import time
mqttc = mqtt.Client()
mqttc.connect("broker.mqttdashboard.com", 1883)
while True:
mqttc.publish(“test/pub", “Hello”)
time.sleep(2)
• Run โปรแกรมโดยใชคาส ง $sudo python pub.py
ตวอยาง MQTT Subscribe โดยภาษา python
• พพมคาส ง $nano sub.py
• เขยนโปรแกรม python ดงน �
import paho.mqtt.client as mqtt
def on_connect(client, userdata, rc):
print("Connected with result code "+str(rc))
client.subscribe(“test/sub")
def on_message(client, userdata, msg):
print(msg.topic+" "+str(msg.payload))
client = mqtt.Client()
client.on_connect = on_connect
client.on_message = on_message
client.connect("broker.mqttdashboard.com", 1883)
client.loop_forever()
• Run โปรแกรมโดยใชคาส ง $sudo python sub.py
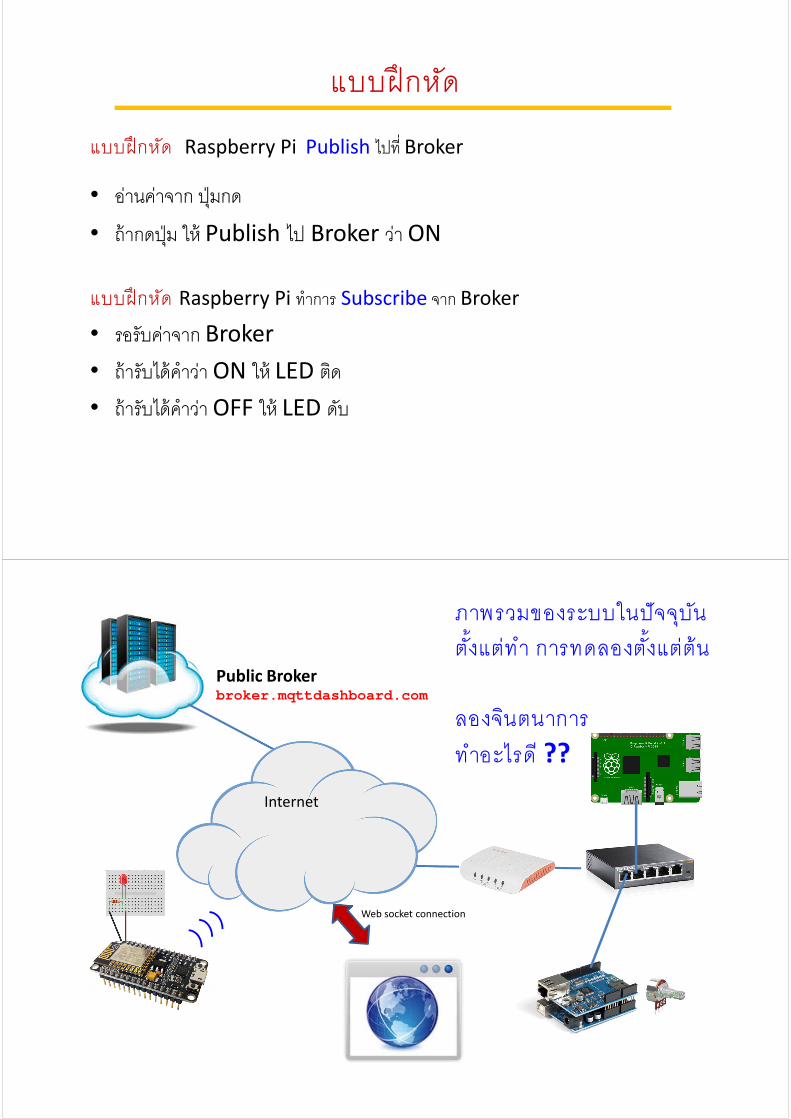
แบบฝกหด
แบบฝกหด Raspberry Pi Publish ไปท Broker
• อานคาจาก ป มกด
• ถากดป ม ให Publish ไป Broker วา ON
แบบฝกหด Raspberry Pi ทาการ Subscribe จาก Broker
• รอรบคาจาก Broker
• ถารบไดคาวา ON ให LED ตด
• ถารบไดคาวา OFF ให LED ดบ
Public Brokerbroker.mqttdashboard.com
Internet
ภาพรวมของระบบในปจจบนต �งแตทา การทดลองต �งแตตน
ลองจนตนาการทาอะไรด ??
Web socket connection
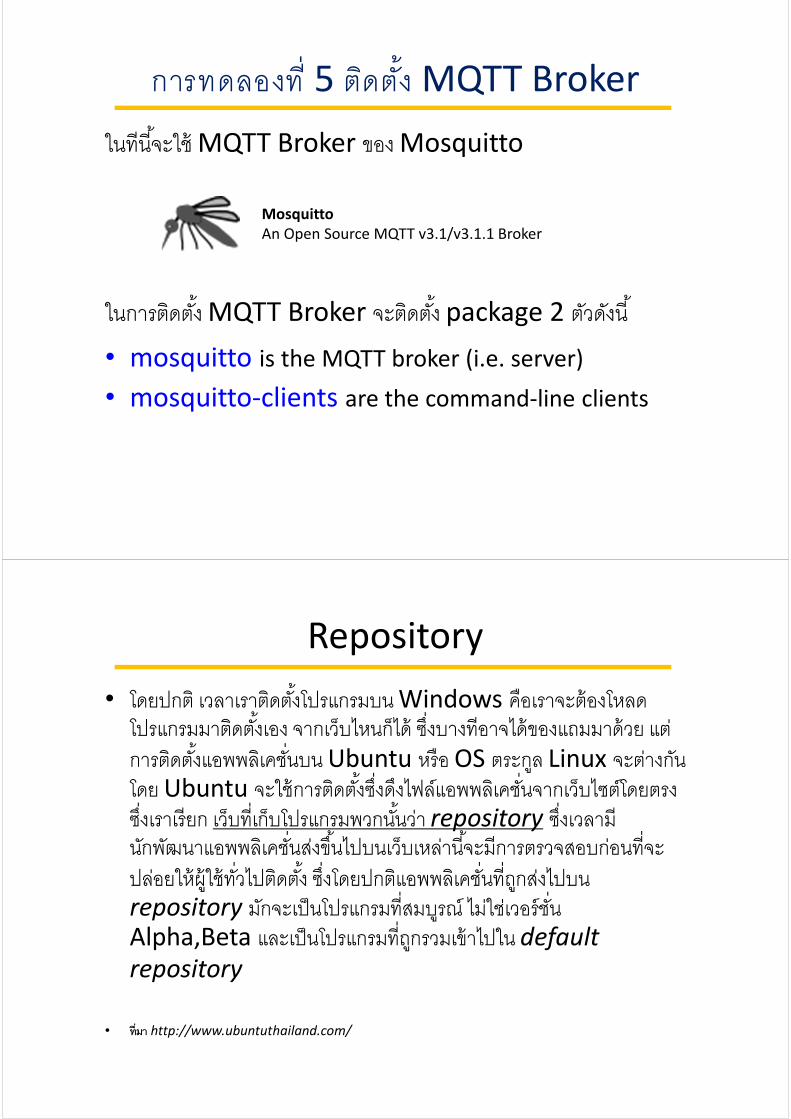
การทดลองท 5 ตดต �ง MQTT Broker
ในทน �จะใช MQTT Broker ของ Mosquitto
ในการตดต �ง MQTT Broker จะตดต �ง package 2 ตวดงน �
• mosquitto is the MQTT broker (i.e. server)
• mosquitto-clients are the command-line clients
Mosquitto
An Open Source MQTT v3.1/v3.1.1 Broker
Repository
• โดยปกต เวลาเราตดต �งโปรแกรมบน Windows คอเราจะตองโหลดโปรแกรมมาตดต �งเอง จากเวบไหนกได ซ งบางทอาจไดของแถมมาดวย แตการตดต �งแอพพลเคช นบน Ubuntu หรอ OS ตระกล Linux จะตางกน โดย Ubuntu จะใชการตดต �งซ งดงไฟลแอพพลเคช นจากเวบไซตโดยตรง ซ งเราเรยก เวบท เกบโปรแกรมพวกน �นวา repository ซ งเวลามนกพฒนาแอพพลเคช นสงข �นไปบนเวบเหลาน �จะมการตรวจสอบกอนท จะปลอยใหผใชท วไปตดต �ง ซ งโดยปกตแอพพลเคช นท ถกสงไปบนrepository มกจะเปนโปรแกรมท สมบรณ ไมใชเวอรช น Alpha,Beta และเปนโปรแกรมท ถกรวมเขาไปใน default
repository
• ท�มา http://www.ubuntuthailand.com/
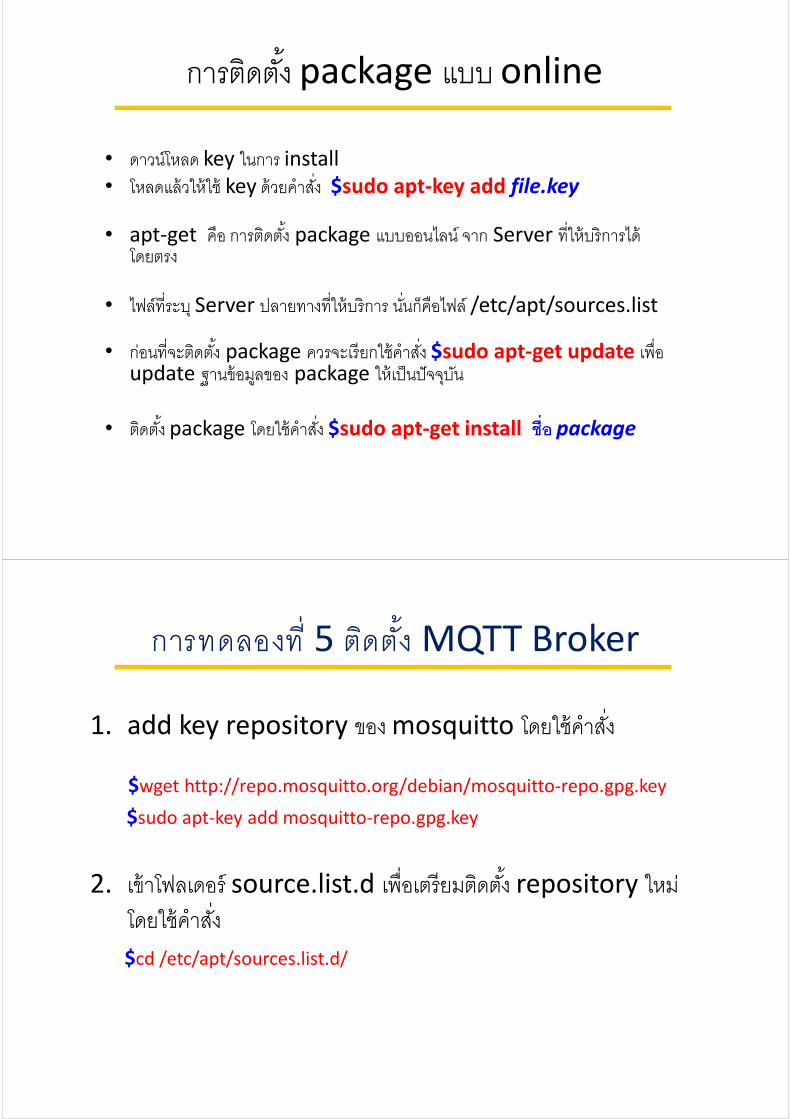
การตดต �ง package แบบ online
• ดาวนโหลด key ในการ install
• โหลดแลวใหใช key ดวยคาส ง $sudo apt-key add file.key
• apt-get คอ การตดต �ง package แบบออนไลน จาก Server ท ใหบรการไดโดยตรง
• ไฟลท ระบ Server ปลายทางท ใหบรการ น นกคอไฟล /etc/apt/sources.list
• กอนท จะตดต �ง package ควรจะเรยกใชคาส ง $sudo apt-get update เพ อupdate ฐานขอมลของ package ใหเปนปจจบน
• ตดต �ง package โดยใชคาส ง $sudo apt-get install ช�อ package
การทดลองท 5 ตดต �ง MQTT Broker
1. add key repository ของ mosquitto โดยใชคาส ง
$wget http://repo.mosquitto.org/debian/mosquitto-repo.gpg.key
$sudo apt-key add mosquitto-repo.gpg.key
2. เขาโฟลเดอร source.list.d เพ อเตรยมตดต �ง repository ใหมโดยใชคาส ง$cd /etc/apt/sources.list.d/

การทดลองท 5 ตดต �ง MQTT Broker
3. ส ง update apt information โดยใชคาส ง$sudo apt-get update
4. ตดต �ง package mosquitto โดยใชคาส ง$sudo apt-get install mosquitto
5. ตดต �ง package mosquitto-clients โดยใชคาส ง$sudo apt-get install mosquitto-clients
การทดลองท 6 ทดสอบการทางานของ MQTT Broker
• เปด Terminal หน งเพ อทาการ Subscribe โดยใชคาส ง
$mosquitto_sub -h 127.0.0.1 -t topic
• และเปดอก Terminal หน ง เพ อทาการ Publish
$mosquitto_pub -h 127.0.0.1 -t topic -m "Hello world“
• เม อทาการ Publish แลว ใหสงเกตผลลพธท หนาจอ Subscribe
Note:- h คอ host
- t คอ topic
- m คอ message

การทดลองท 7 การให Raspberry Pi เปน Client
ทาการทดลองให Raspberry Pi ทาการ Subscribe และ publish
ไปท Broker broker.mqttdashboard.com, 1883
โดยใช command mosquitto_pub , mosquitto_sub
broker.mqttdashboard.com, 1883
MQTT broker gets Websockets support
มองคประกอบคอ- Web Server ทาหนาท เกบไฟล html ท มโคด javascript
- Web Browser หรอ Web application ทาหนาท เรยกไฟล html จาก Web Server มาแสดงผล- MQTT Broker ท เปด Web Socket เพ อให Javascript ไปดงขอมล มาแสดงผล
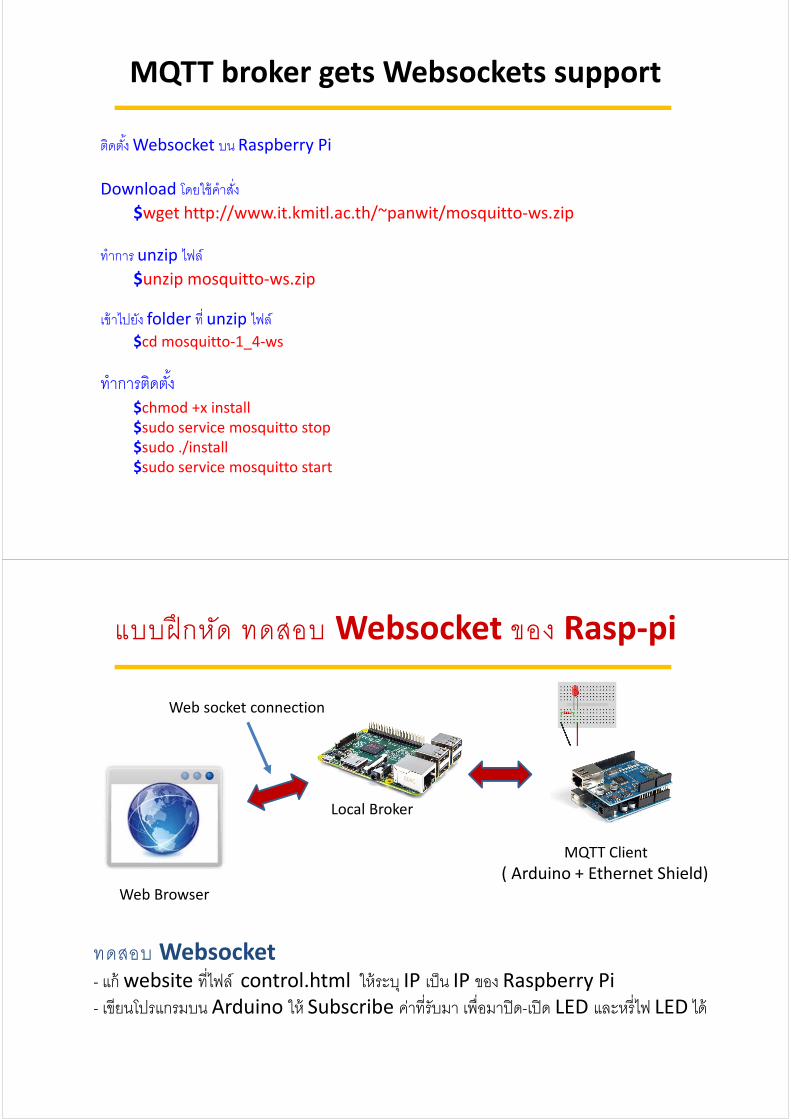
MQTT broker gets Websockets support
ตดต �ง Websocket บน Raspberry Pi
Download โดยใชคาส ง$wget http://www.it.kmitl.ac.th/~panwit/mosquitto-ws.zip
ทาการ unzip ไฟล $unzip mosquitto-ws.zip
เขาไปยง folder ท unzip ไฟล$cd mosquitto-1_4-ws
ทาการตดต �ง $chmod +x install
$sudo service mosquitto stop
$sudo ./install
$sudo service mosquitto start
แบบฝกหด ทดสอบ Websocket ของ Rasp-pi
Web Browser
Local Broker
MQTT Client
( Arduino + Ethernet Shield)
ทดสอบ Websocket- แก website ท ไฟล control.html ใหระบ IP เปน IP ของ Raspberry Pi
- เขยนโปรแกรมบน Arduino ให Subscribe คาท รบมา เพ อมาปด-เปด LED และหร ไฟ LED ได
Web socket connection
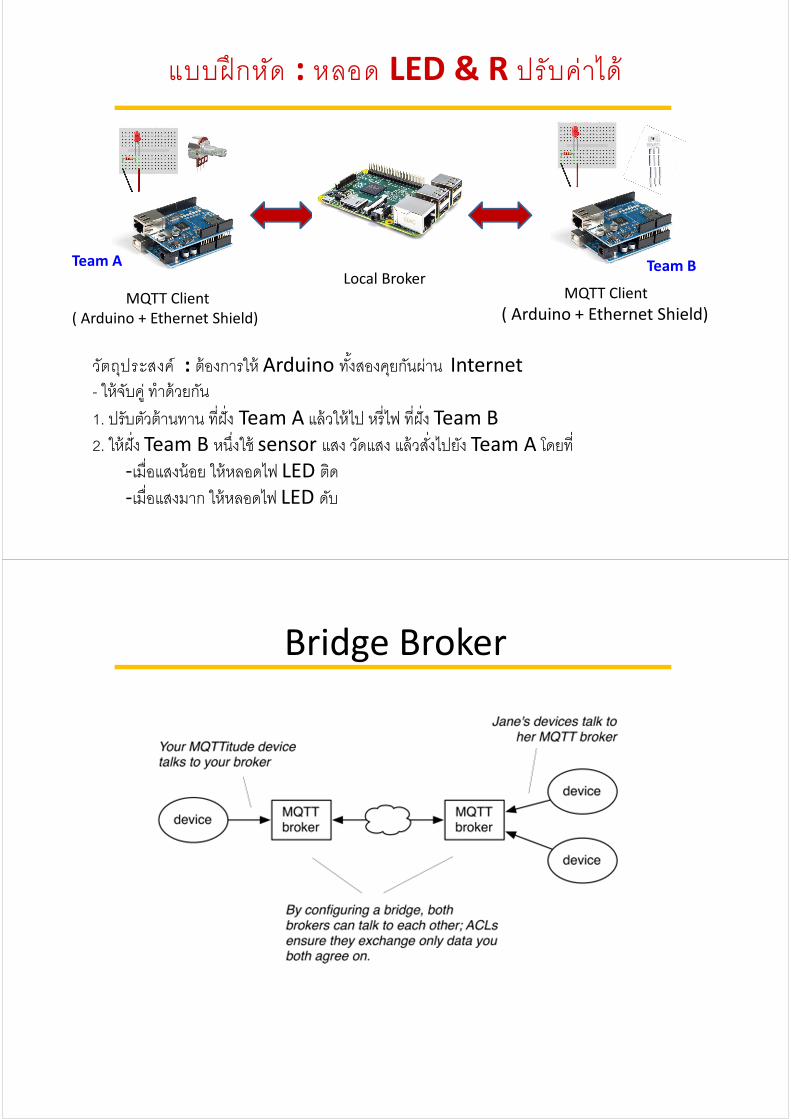
แบบฝกหด : หลอด LED & R ปรบคาได
Local BrokerMQTT Client
( Arduino + Ethernet Shield)
วตถประสงค : ตองการให Arduino ท �งสองคยกนผาน Internet
- ใหจบค ทาดวยกน1. ปรบตวตานทาน ท ฝ ง Team A แลวใหไป หร ไฟ ท ฝ ง Team B 2. ใหฝ ง Team B หน งใช sensor แสง วดแสง แลวส งไปยง Team A โดยท
-เม อแสงนอย ใหหลอดไฟ LED ตด -เม อแสงมาก ใหหลอดไฟ LED ดบ
MQTT Client
( Arduino + Ethernet Shield)
Team A Team B
Bridge Broker

Configuring Bridges
• connection name
This variable marks the start of a new bridge connection. It is also used to give the
bridge a name which is used as the client id on the remote broker.
• address address[:port] [address[:port]], addresses address[:port] [address[:port]]
– Specify the address and optionally the port of the bridge to connect to. This must be given for
each bridge connection. If the port is not specified, the default of 1883 is used. Multiple host
addresses can be specified on the address config.
Configuring Bridges
• topic pattern [[[ out | in | both ] qos-level] local-prefix remote-prefix]– Define a topic pattern to be shared between the two brokers. Any topics matching the pattern
(which may include wildcards) are shared. The second parameter defines the direction that the messages will be shared in, so it is possible to import messages from a remote broker using in, export messages to a remote broker using out or share messages in both directions. If this parameter is not defined, the default of out is used. The QoS level defines the publish/subscribe QoS level used for this topic and defaults to 0.
– The local-prefix and remote-prefix options allow topics to be remapped when publishing to and receiving from remote brokers. This allows a topic tree from the local broker to be inserted into the topic tree of the remote broker at an appropriate place.
– For incoming topics, the bridge will prepend the pattern with the remote prefix and subscribe to the resulting topic on the remote broker. When a matching incoming message is received, the remote prefix will be removed from the topic and then the local prefix added.
– For outgoing topics, the bridge will prepend the pattern with the local prefix and subscribe to the resulting topic on the local broker. When an outgoing message is processed, the local prefix will be removed from the topic then the remote prefix added.
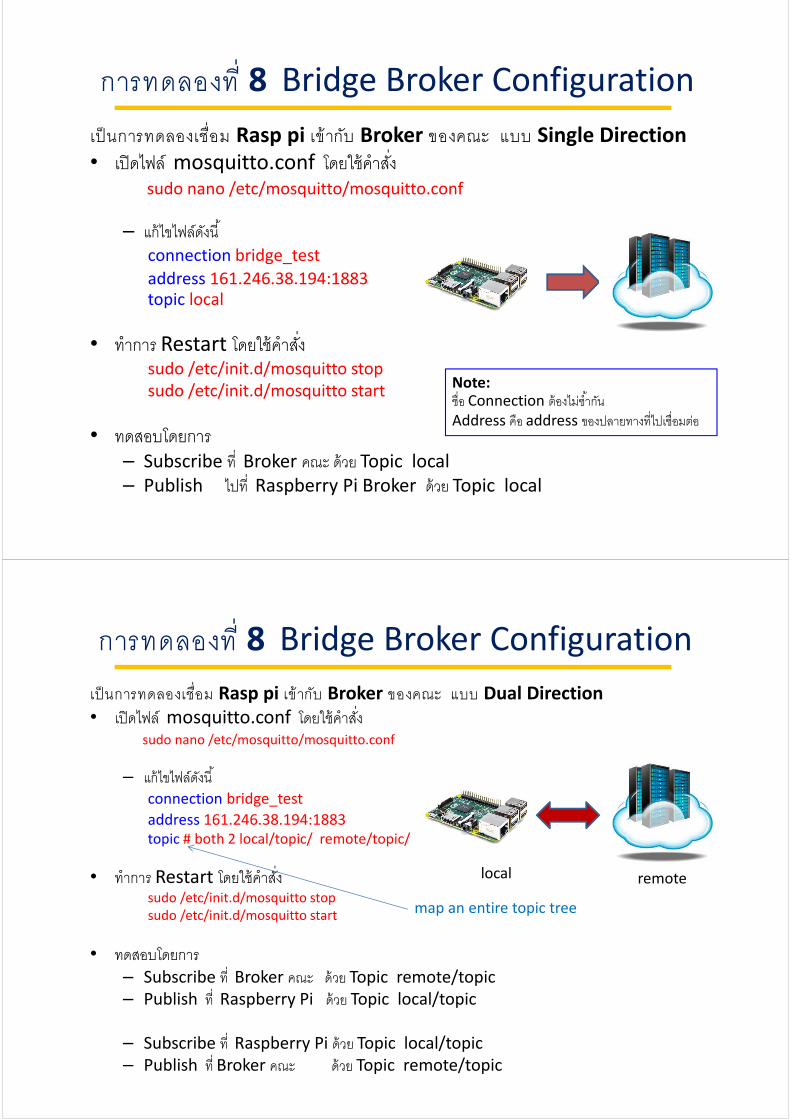
การทดลองท 8 Bridge Broker Configuration
เปนการทดลองเชอม Rasp pi เขากบ Broker ของคณะ แบบ Single Direction
• เปดไฟล mosquitto.conf โดยใชคาส ง sudo nano /etc/mosquitto/mosquitto.conf
– แกไขไฟลดงน � connection bridge_test address 161.246.38.194:1883
topic local
• ทาการ Restart โดยใชคาส งsudo /etc/init.d/mosquitto stop
sudo /etc/init.d/mosquitto start
• ทดสอบโดยการ – Subscribe ท Broker คณะ ดวย Topic local
– Publish ไปท Raspberry Pi Broker ดวย Topic local
Note:ช อ Connection ตองไมซ �ากนAddress คอ address ของปลายทางท ไปเช อมตอ
การทดลองท 8 Bridge Broker Configuration
เปนการทดลองเชอม Rasp pi เขากบ Broker ของคณะ แบบ Dual Direction
• เปดไฟล mosquitto.conf โดยใชคาส ง sudo nano /etc/mosquitto/mosquitto.conf
– แกไขไฟลดงน � connection bridge_test address 161.246.38.194:1883
topic # both 2 local/topic/ remote/topic/
• ทาการ Restart โดยใชคาส งsudo /etc/init.d/mosquitto stop
sudo /etc/init.d/mosquitto start
• ทดสอบโดยการ – Subscribe ท Broker คณะ ดวย Topic remote/topic
– Publish ท Raspberry Pi ดวย Topic local/topic
– Subscribe ท Raspberry Pi ดวย Topic local/topic
– Publish ท Broker คณะ ดวย Topic remote/topic
local remote
map an entire topic tree
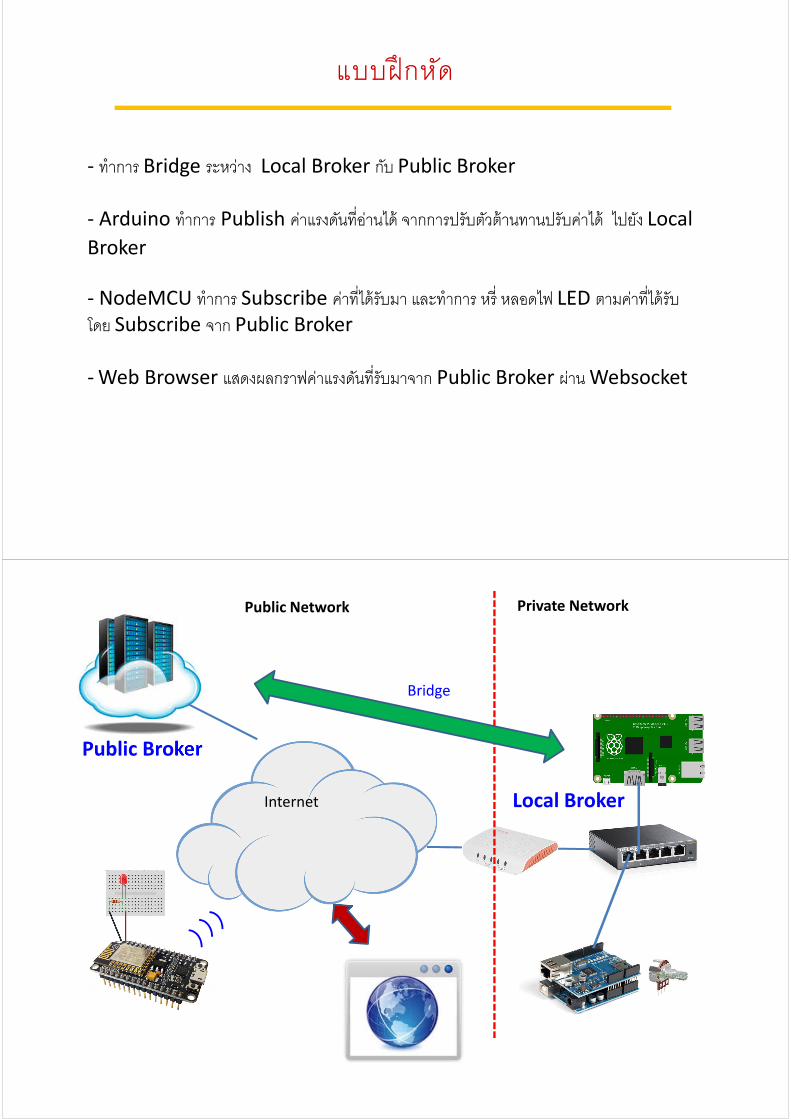
แบบฝกหด
- ทาการ Bridge ระหวาง Local Broker กบ Public Broker
- Arduino ทาการ Publish คาแรงดนท อานได จากการปรบตวตานทานปรบคาได ไปยง Local
Broker
- NodeMCU ทาการ Subscribe คาท ไดรบมา และทาการ หร หลอดไฟ LED ตามคาท ไดรบ โดย Subscribe จาก Public Broker
- Web Browser แสดงผลกราฟคาแรงดนท รบมาจาก Public Broker ผาน Websocket
Public Broker
Local Broker
Private Network
Bridge
Public Network
Internet
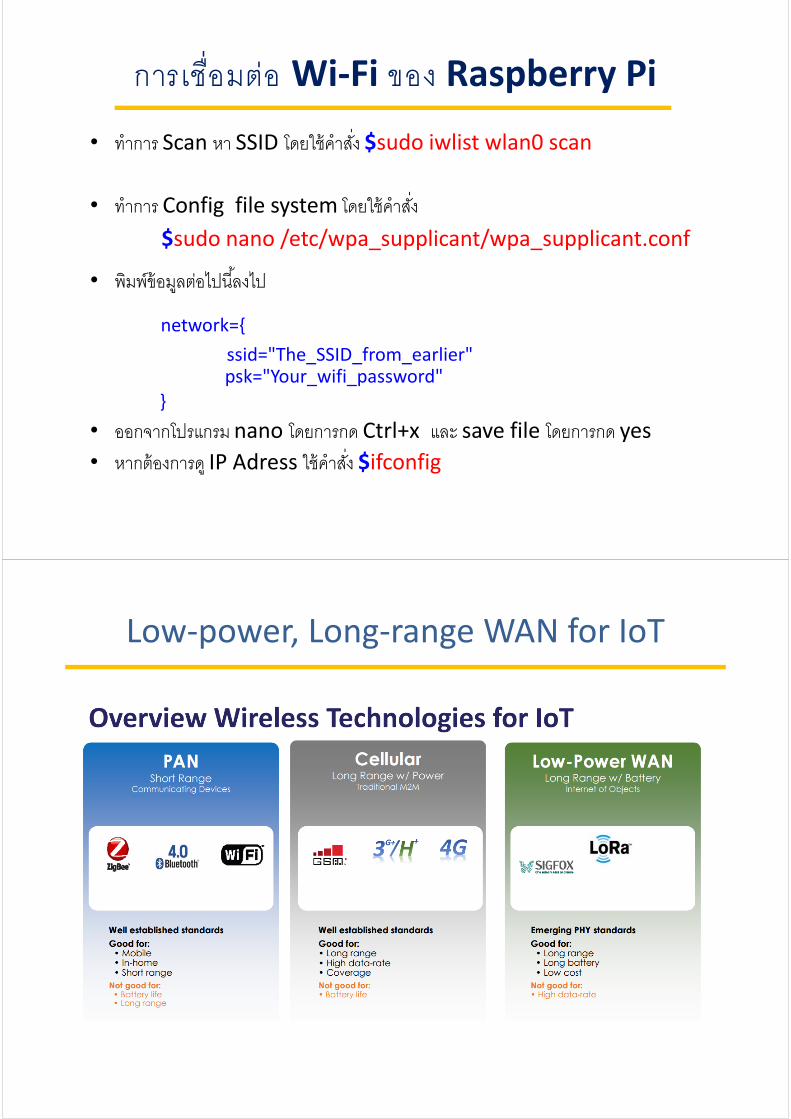
การเชอมตอ Wi-Fi ของ Raspberry Pi
• ทาการ Scan หา SSID โดยใชคาส ง $sudo iwlist wlan0 scan
• ทาการ Config file system โดยใชคาส ง $sudo nano /etc/wpa_supplicant/wpa_supplicant.conf
• พมพขอมลตอไปน �ลงไป
network={
ssid="The_SSID_from_earlier" psk="Your_wifi_password"
}
• ออกจากโปรแกรม nano โดยการกด Ctrl+x และ save file โดยการกด yes
• หากตองการด IP Adress ใชคาส ง $ifconfig
Low-power, Long-range WAN for IoT
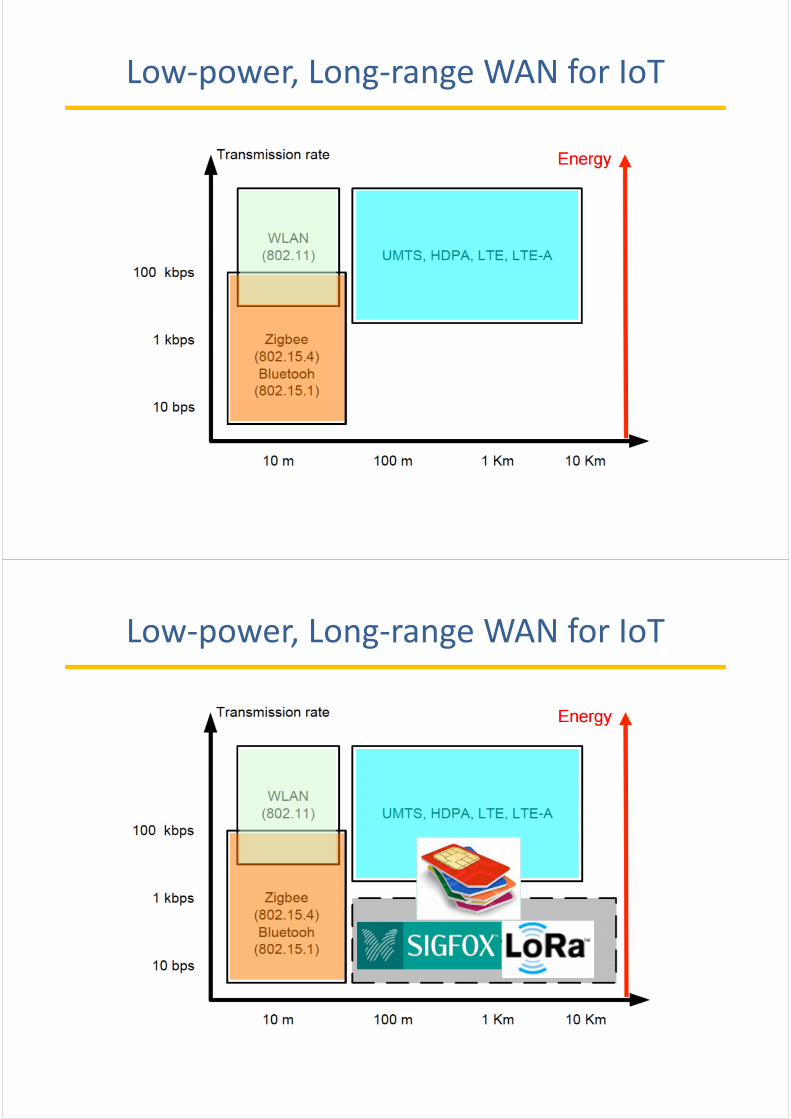
Low-power, Long-range WAN for IoT
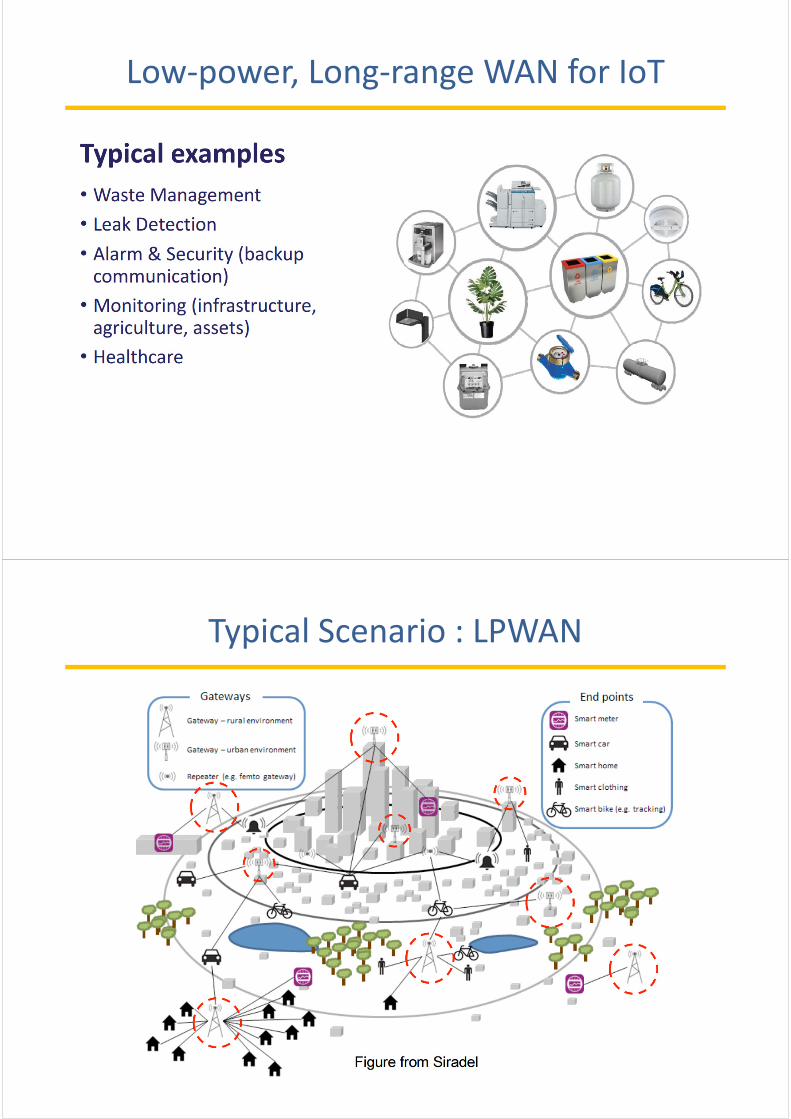
Low-power, Long-range WAN for IoT
Low-power, Long-range WAN for IoT
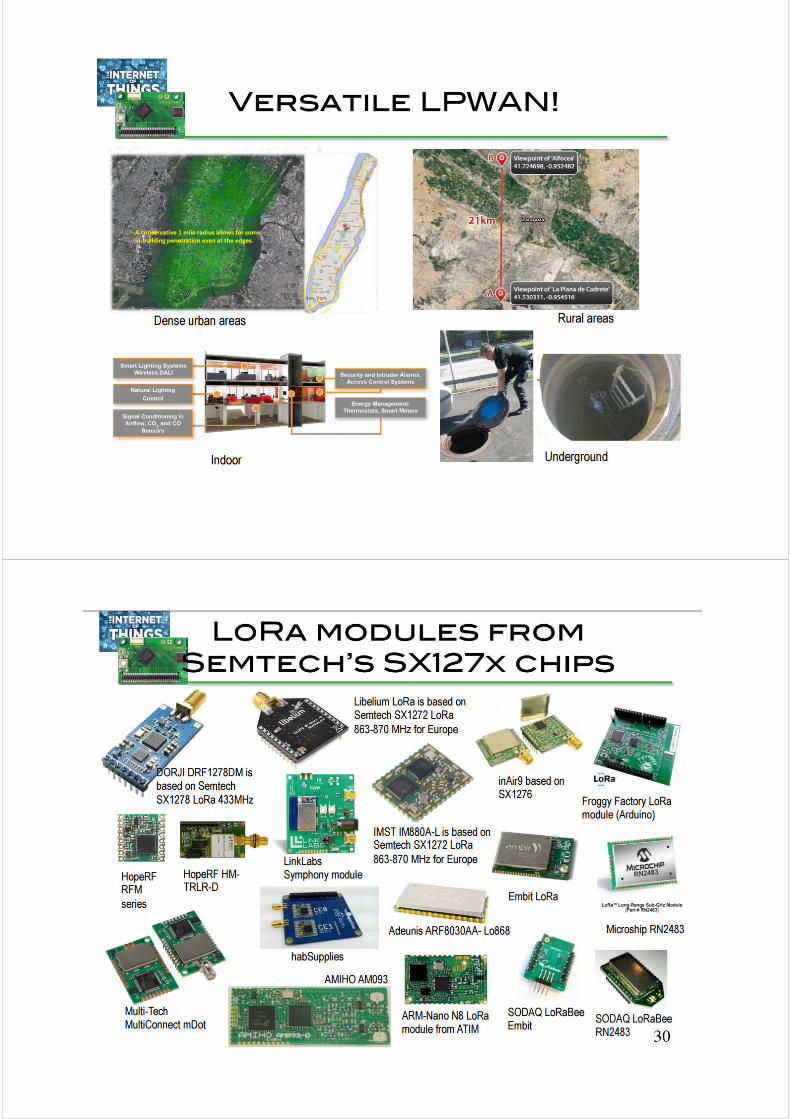
Typical Scenario : LPWAN

usecase ของ IoT
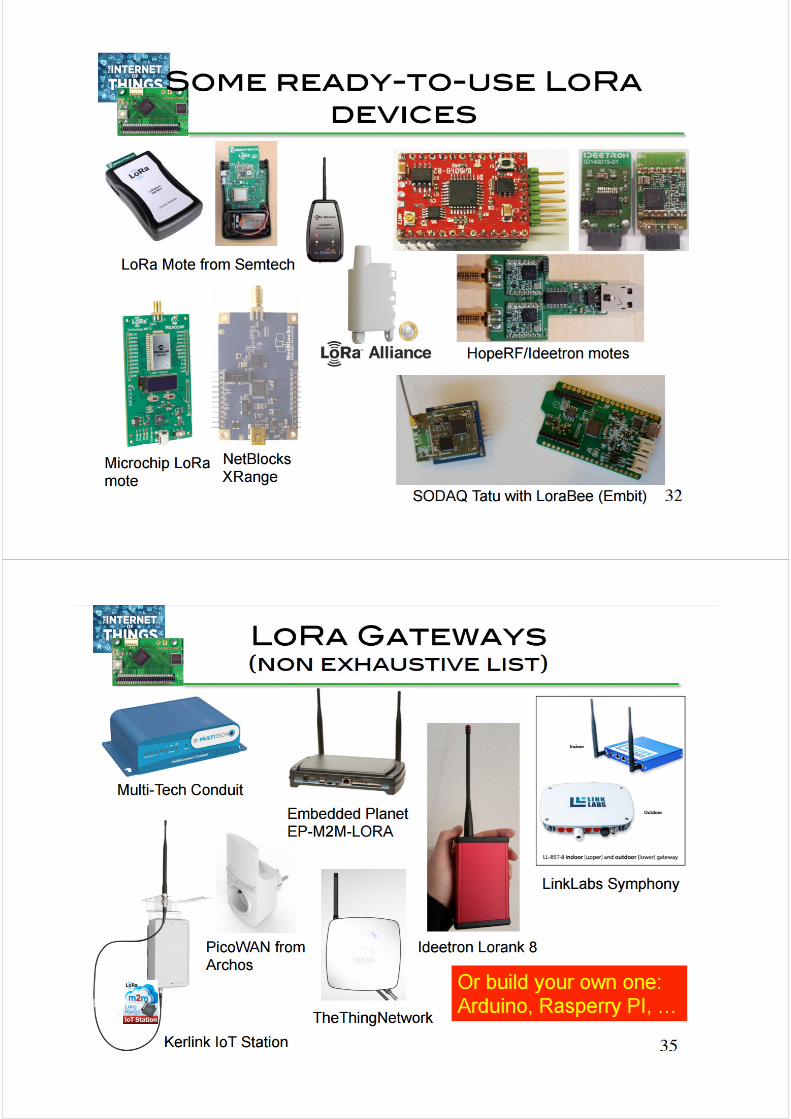
Introduction to LoRaWAN


LoRaWAN ในประเทศไทย

โครงการ Smart Parking อานวยความสะดวกในการจอดรถ โครงการ Smart Pollution ตรวจสอบมลภาวะทางอากาศ โดยจะมเซนเซอรตดท รถซต �บส จานวน 10 คน เพ อจะเกบรวบรวมขอมลในขณะรถว ง วาพ �นท ใดของเมองมคาฝ นละอองสง และ
โครงการแกไขปองกนน �าทวม โดยจะใชมเซนเซอรตดต �งภายในทอระบายน �า เพ อบอกสถานะพ �นท เส ยงประสบปญหาน �าทวมซ �าซาก เม อระดบน �าสงข �น เซนเซอรจะสงขอมลเพ อเตรยมการปองกนน �าทวม
LoRaWAN ในประเทศไทย
อจฉรยะท มเซนเซอรตรวจวดปรมาณขยะแบบเรยลไทม โดยปลอยคล นอลตราโซนคสะทอนกบขยะ
อกท �งสามารถตรวจวดกล นและคณภาพอากาศในพ �นท
LoRaWAN ในประเทศไทย
Top Related