


Languages
Pages
Legal

The philosophy of transparency
Man’s thirst for knowledge is a real, primary, spontaneous need. A need that we of Valcucine have always met with the precise aim to inform and share all the information in our possession, the result of years of research and collaboration with architects and designers, with anyone and straight away. It is an acknowledged fact that the quality of the single components of a kitchen, as excellent as it may be, cannot guarantee overall quality by itself. Any programme also needs a suitably studied and planned space that takes into account all the architectural and technical
aspects concerned and that is capable of sati-sfying the aesthetic and functional requirements of the customer. This guide is the result of the careful assessment and analyses of the most common questions asked and of the comments we recieve from retailers and planners. It is a “treasure box” of ideas and suggestions to help you clearly and schematically remember the aspects that must be weighed up and the steps that must be fol-lowed when planning both the architectural spa-ce of a kitchen and its furniture.
NB: The advice found in this guide complied with the Italian laws in force when it was drawn up. For other countries and for
subsequent modifi cations, we suggest you examine the local Laws in force as well as any amendments made to them.
70517 VALCUCINE guida.indd 170517 VALCUCINE guida.indd 1 1-02-2008 18:10:221-02-2008 18:10:22

Summary6 Types of kitchens10 Planning the kitchen12 A kitchen with a central island20 A corner kitchen28 An open space kitchen with a peninsular unit 36 A kitchen with an island and an equipped back section
46 Ergonomics in the kitchen48 Heights and depths of base units50 80cm depth: Logica System55 Equipped back section60 Wall units62 Wall-hung base units
66 Sizes and dimensions68 Measuring the wall70 Problems at the end of an arrangement72 Kitchen corners74 Height of the window sill76 Water drainage and connections80 Plastering82 Flooring and tiles
86 Aeration holes88 Check valve90 Hoods: types and dimensions92 Remote motor93 Extraction pipes94 Existing hole95 Useful measurements for Valcucine hoods
70517 VALCUCINE guida.indd 270517 VALCUCINE guida.indd 2 1-02-2008 18:10:221-02-2008 18:10:22
104 Electric sockets106 Artifi cial kitchen lighting 107 Natural kitchen lighting
110 Child safety
116 The Valcucine “home system”
134 The kitchens
70517 VALCUCINE guida.indd 370517 VALCUCINE guida.indd 3 1-02-2008 18:10:381-02-2008 18:10:38

70517 VALCUCINE guida.indd 470517 VALCUCINE guida.indd 4 1-02-2008 18:10:491-02-2008 18:10:49

70517 VALCUCINE guida.indd 570517 VALCUCINE guida.indd 5 1-02-2008 18:10:511-02-2008 18:10:51
planning guide6
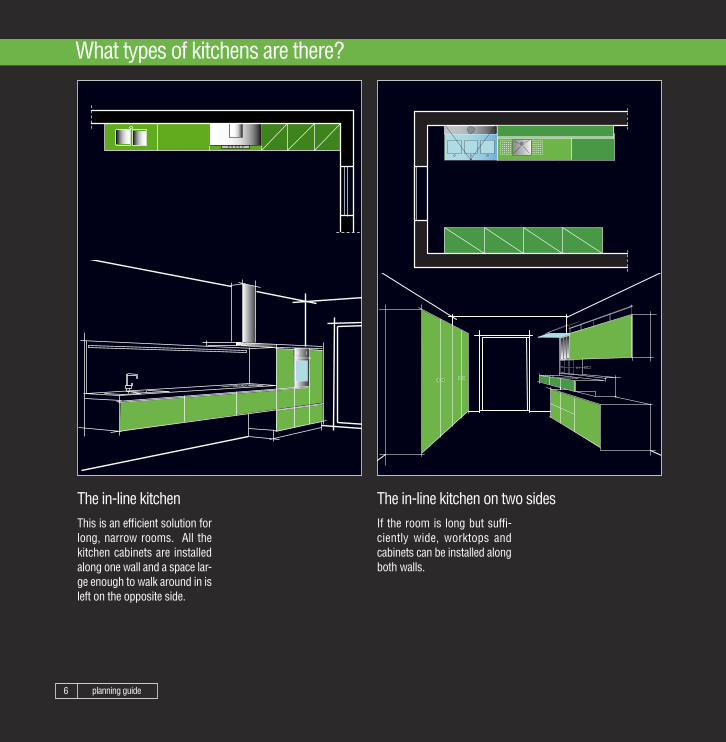
What types of kitchens are there?
The in-line kitchenThis is an effi cient solution for long, narrow rooms. All the kitchen cabinets are installed along one wall and a space lar-ge enough to walk around in is left on the opposite side.
If the room is long but suffi -ciently wide, worktops and cabinets can be installed along both walls.
The in-line kitchen on two sides
70517 VALCUCINE guida.indd 670517 VALCUCINE guida.indd 6 1-02-2008 18:10:551-02-2008 18:10:55

planning guide 7
C-shaped kitchenAllows you to optimise move-ments within the space marked off by the worktops. Sliding doors conceal the work area and make it possible to create an exclusive dining room.
It allows you to have a large work area in a compact spa-ce. The elements are installed on three sides. Contrarily to the C-shaped kitchen, there is not enough space inside the U-shaped arrangement for a table.
U-shaped kitchen
70517 VALCUCINE guida.indd 770517 VALCUCINE guida.indd 7 1-02-2008 18:10:561-02-2008 18:10:56

planning guide8
Kitchen with an islandIt requires a lot of space and, if a sink and a hob are fi tted as well as the worktop, it re-quires very detailed planning of the electric and plumbing systems.
The peninsular unit is a han-dy additional unit that articu-lates the space in a kitchen. The projecting element can give you extra worktop space, can house a sink and/or hob and can also be fi tted with a breakfast bar.
Kitchen with a peninsular unit
70517 VALCUCINE guida.indd 870517 VALCUCINE guida.indd 8 1-02-2008 18:10:561-02-2008 18:10:56

planning guide 9
The corner kitchenThe elements are installed along two adjoining kitchen walls. The sink, the hob and the fridge must be relatively near to each other so as to reduce distances and make it easier to carry out various kitchen chores.
All the kitchens described up to now can be divided into sepa-rate functional parts. The fl exi-bility of the system composed of separate units allows you to create a kitchen that, not being tied to a set drawing, is able to adapt to various architectural shapes.
A kitchen composed of separate units
70517 VALCUCINE guida.indd 970517 VALCUCINE guida.indd 9 1-02-2008 18:10:571-02-2008 18:10:57

planning guide10
You can’t always change the architectural shape of a kitchen, but many arrangements are possi-ble in the same room. It is a matter of fi nding the most suitable solution from an aesthetical and functional point of view. Four projects showing different types of kitchens can be seen in the following pages:
1 a kitchen with a central island2 a corner kitchen3 a kitchen with a peninsular unit in an open
space4 a kitchen with an island and an equipped
back section.
The following information is given for each type of kitchen: - the aesthetic project rendering shows the kitchen with its colours, materials and sha-pes; - the architectural project with its top and side view drawing that defi nes all the mason-ry and architectural features of the kitchen and that is required by the builder to build walls, windows, aeration holes and the hood
fumes outlet as well as by the plasterboard worker to build plassterboard parts. It is also useful to the window and door fi tter to know where to install door and window frames and also to the tiler to know up to what height he must tile the wall and what type of decorative tiling he can apply; - a top view and cross-section drawing of the plumbing system who will install water and gas pipes and radiators, if any; - a top view and cross-section drawing of the electric system that is indispensable for the electrician so that he knows where he can run cables, where sockets and switches can be fi tted, where to arrange connections for intercom systems, thermostats, telephones, tv sets, the hood and under wall unit lights.
NB: we do not use specific technical sym-bols for electric and hydraulic systems in our projects, rather an indicative set of symbols that have the aim of guiding the technicians in their work.
How can I plan my kitchen?
70517 VALCUCINE guida.indd 1070517 VALCUCINE guida.indd 10 1-02-2008 18:10:571-02-2008 18:10:57

planning guide 11
Kitchen with a central islandPages: 12 - 19
Corner kitchenPages: 20 - 27
Open space kitchen with a peninsular unit Pages: 28 - 35
Kitchen with an island and an equipped back section Pages: 36 - 43
70517 VALCUCINE guida.indd 1170517 VALCUCINE guida.indd 11 1-02-2008 18:10:571-02-2008 18:10:57

planning guide12
If the room is large enough, the kitchen with an island is the best possible solution in terms of functionality and ae-sthetics. It gives you lots of freedom of movement and the pleasure of working looking over the dining area. The island beco-mes the heart of the kitchen and, together with the celing-hung hood and other elemen-ts, creates a stunning setting.The rendering offers a realistic view of the arrangement and allows you to ponder choices in terms of volumes, colours and fi nishes.
The aesthetic project
A kitchen with a central island
70517 VALCUCINE guida.indd 1270517 VALCUCINE guida.indd 12 1-02-2008 18:11:031-02-2008 18:11:03

planning guide 13
70517 VALCUCINE guida.indd 1370517 VALCUCINE guida.indd 13 1-02-2008 18:11:041-02-2008 18:11:04
planning guide14
Hood fumes outlet Ø 15
CENTERLINE OF SYMMETRY
A
B 735
420
130
640
B
A
X
Y
J
K
120
Aeration hole Ø 12
hob
cent
erlin
e
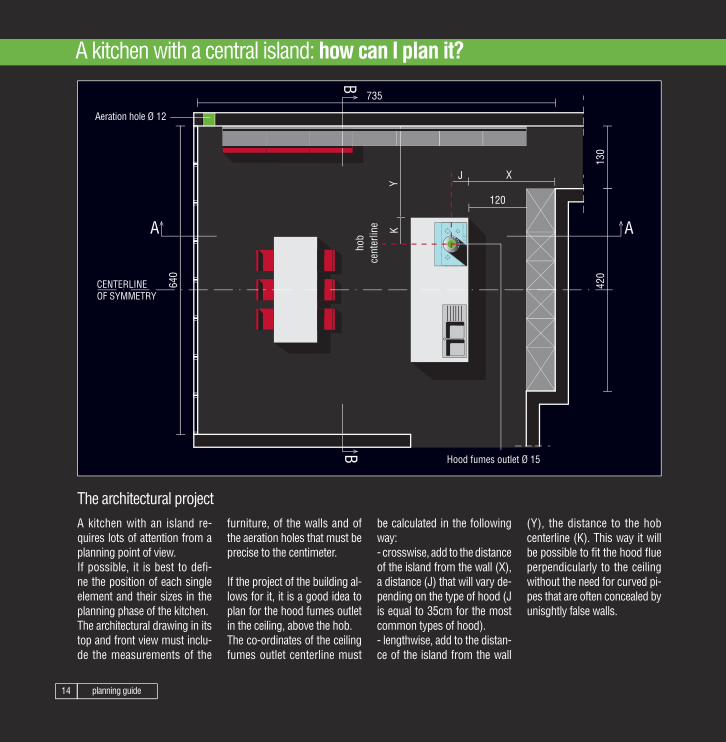
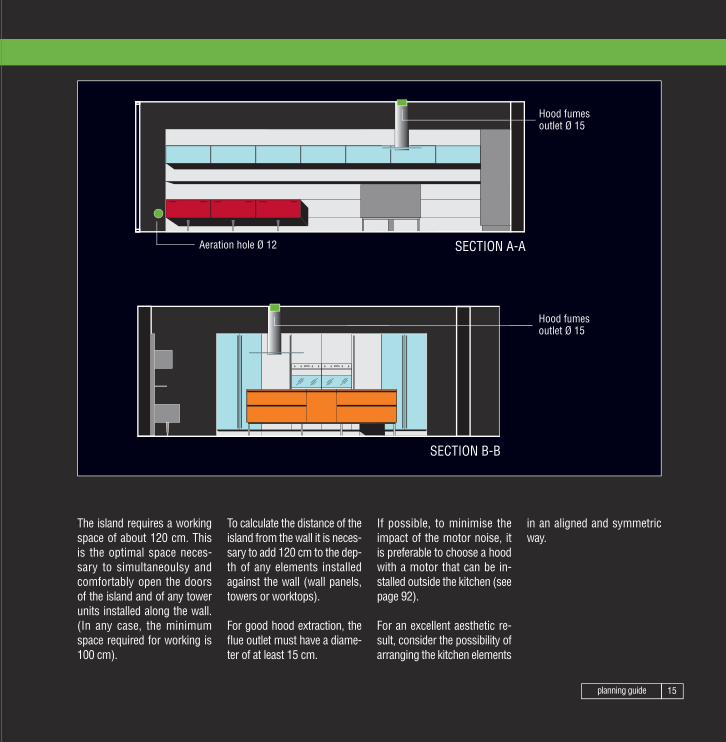
The architectural projectA kitchen with an island re-quires lots of attention from a planning point of view.If possible, it is best to defi-ne the position of each single element and their sizes in the planning phase of the kitchen. The architectural drawing in its top and front view must inclu-de the measurements of the
furniture, of the walls and of the aeration holes that must be precise to the centimeter.
If the project of the building al-lows for it, it is a good idea to plan for the hood fumes outlet in the ceiling, above the hob. The co-ordinates of the ceiling fumes outlet centerline must
be calculated in the following way: - crosswise, add to the distance of the island from the wall (X), a distance (J) that will vary de-pending on the type of hood (J is equal to 35cm for the most common types of hood).- lengthwise, add to the distan-ce of the island from the wall
(Y), the distance to the hob centerline (K). This way it will be possible to fi t the hood fl ue perpendicularly to the ceiling without the need for curved pi-pes that are often concealed by unisghtly false walls.
A kitchen with a central island: how can I plan it?
70517 VALCUCINE guida.indd 1470517 VALCUCINE guida.indd 14 1-02-2008 18:11:061-02-2008 18:11:06
planning guide 15
SECTION A-A
SECTION B-B
Hood fumesoutlet Ø 15
Hood fumes outlet Ø 15
Aeration hole Ø 12
The island requires a working space of about 120 cm. This is the optimal space neces-sary to simultaneoulsy and comfortably open the doors of the island and of any tower units installed along the wall. (In any case, the minimum space required for working is 100 cm).
To calculate the distance of the island from the wall it is neces-sary to add 120 cm to the dep-th of any elements installed against the wall (wall panels, towers or worktops).
For good hood extraction, the fl ue outlet must have a diame-ter of at least 15 cm.
If possible, to minimise the impact of the motor noise, it is preferable to choose a hood with a motor that can be in-stalled outside the kitchen (see page 92).
For an excellent aesthetic re-sult, consider the possibility of arranging the kitchen elements
in an aligned and symmetric way.
70517 VALCUCINE guida.indd 1570517 VALCUCINE guida.indd 15 1-02-2008 18:11:071-02-2008 18:11:07
planning guide16
Electric socket
Wall panels
A
B B
A
Y
X J
K
Hood power supply
Power supply for:- refrigerator- ovens
Electric board for:- hob- dishwasher
hob
cent
erlin
e
Electric board for:- TV set power supply- TV antenna- electric socket- spotlight switch
Power supply to ceiling lights
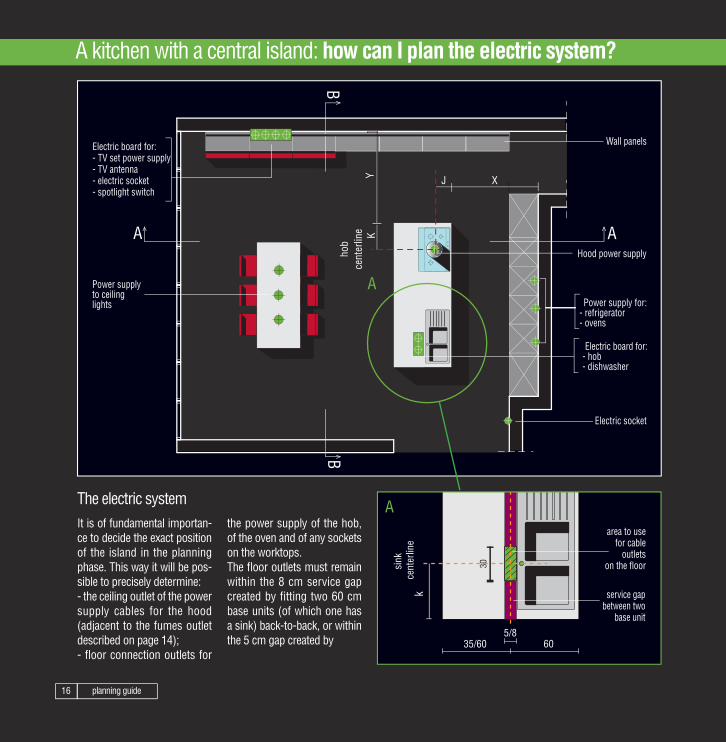
The electric systemIt is of fundamental importan-ce to decide the exact position of the island in the planning phase. This way it will be pos-sible to precisely determine:- the ceiling outlet of the power supply cables for the hood (adjacent to the fumes outlet described on page 14);- fl oor connection outlets for
the power supply of the hob, of the oven and of any sockets on the worktops. The fl oor outlets must remain within the 8 cm service gap created by fi tting two 60 cm base units (of which one has a sink) back-to-back, or within the 5 cm gap created by 35/60 60
5/8
30
k
sink
cen
terli
ne
area to use for cable
outlets on the floor
service gap between two
base unit
A kitchen with a central island: how can I plan the electric system?
A
A
70517 VALCUCINE guida.indd 1670517 VALCUCINE guida.indd 16 1-02-2008 18:11:071-02-2008 18:11:07
planning guide 17
SECTION B-B
SECTION A-A
80
25
115
Boiserie Hood power supply
Electric board for:- TV set power supply- TV antenna- electric socket- spotlight switch
Electric board for:- hob- dishwasher
Hood power supply
Power supply for:- refrigerator- ovens
Electric board for:- hob- dishwasher
Electric socket
Aluminium cable guard (on request)
Floor cable outlet
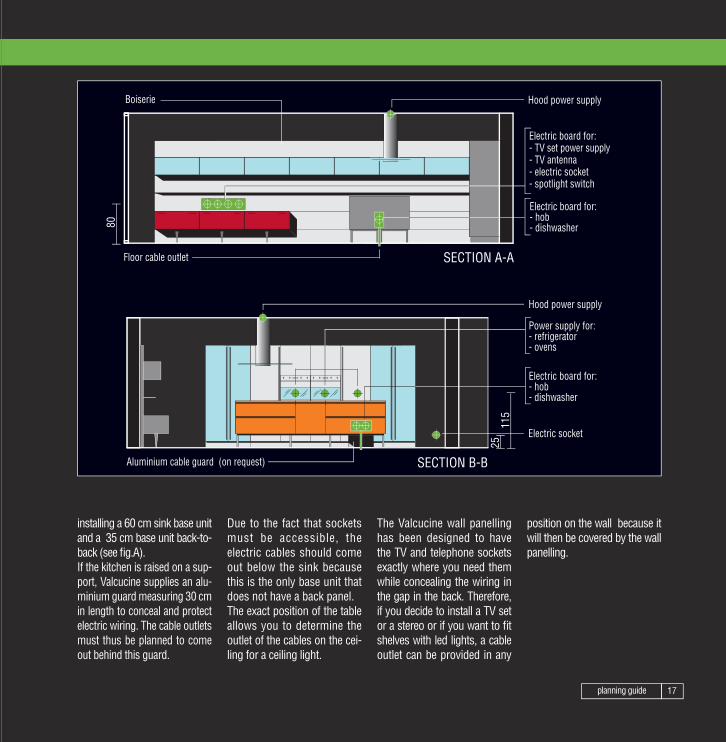
installing a 60 cm sink base unit and a 35 cm base unit back-to-back (see fi g.A).If the kitchen is raised on a sup-port, Valcucine supplies an alu-minium guard measuring 30 cm in length to conceal and protect electric wiring. The cable outlets must thus be planned to come out behind this guard.
Due to the fact that sockets must be accessible, the electric cables should come out below the sink because this is the only base unit that does not have a back panel. The exact position of the table allows you to determine the outlet of the cables on the cei-ling for a ceiling light.
The Valcucine wall panelling has been designed to have the TV and telephone sockets exactly where you need them while concealing the wiring in the gap in the back. Therefore, if you decide to install a TV set or a stereo or if you want to fi t shelves with led lights, a cable outlet can be provided in any
position on the wall because it will then be covered by the wall panelling.
70517 VALCUCINE guida.indd 1770517 VALCUCINE guida.indd 17 1-02-2008 18:11:071-02-2008 18:11:07
planning guide18
Hood fumes outlet Ø 15
A
B
B
A
X Y J
K
hob
cent
erlin
e
Aeration hole Ø 12
Gas supplyWater supplyDishwasher supplyDrain
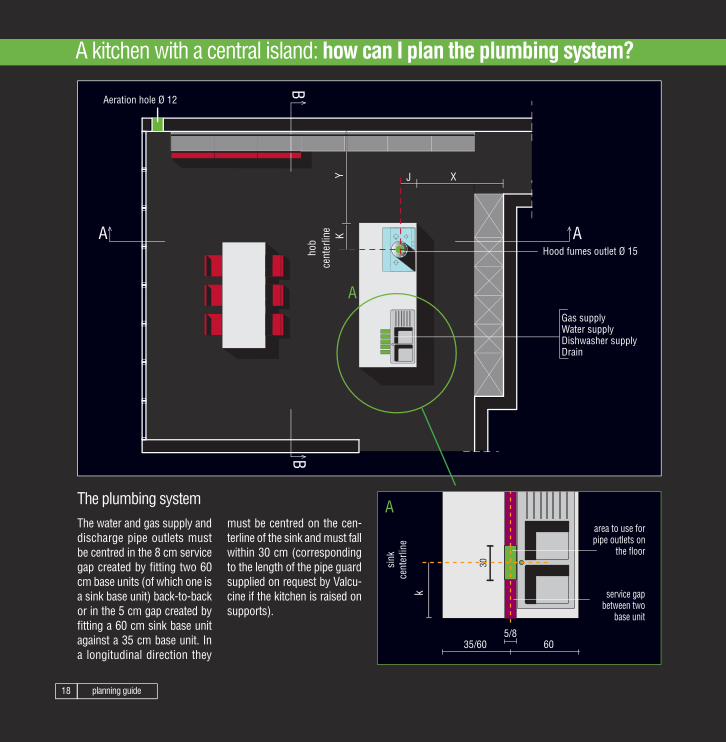
The plumbing systemThe water and gas supply and discharge pipe outlets must be centred in the 8 cm service gap created by fi tting two 60 cm base units (of which one is a sink base unit) back-to-back or in the 5 cm gap created by fi tting a 60 cm sink base unit against a 35 cm base unit. In a longitudinal direction they
must be centred on the cen-terline of the sink and must fall within 30 cm (corresponding to the length of the pipe guard supplied on request by Valcu-cine if the kitchen is raised on supports).
area to use for pipe outlets on
the floor
30
k
35/60 60 5/8
sink
ce
nter
line
service gap between two
base unit
A kitchen with a central island: how can I plan the plumbing system?
A
A
70517 VALCUCINE guida.indd 1870517 VALCUCINE guida.indd 18 1-02-2008 18:11:081-02-2008 18:11:08

planning guide 19
Hood fumes outlet Ø 15
Hood fumes outlet Ø 15
SECTION B-B
SECTION A-A
Aeration hole Ø12
Floor pipe outlet
Gas supplyWater supplyDishwasher supplyDrain
Gas supplyWater supplyDishwasher supplyDrain
For excellent hood extraction it is necessary to provide a 15 cm diameter fl ue pipe whose centerline must be calculated as described on page 14.
It is very important to consi-der the correct aeration of the kitchen through the aeration holes in the wall that must be
sized according to the laws in force (see page 86).
70517 VALCUCINE guida.indd 1970517 VALCUCINE guida.indd 19 1-02-2008 18:11:081-02-2008 18:11:08
planning guide20
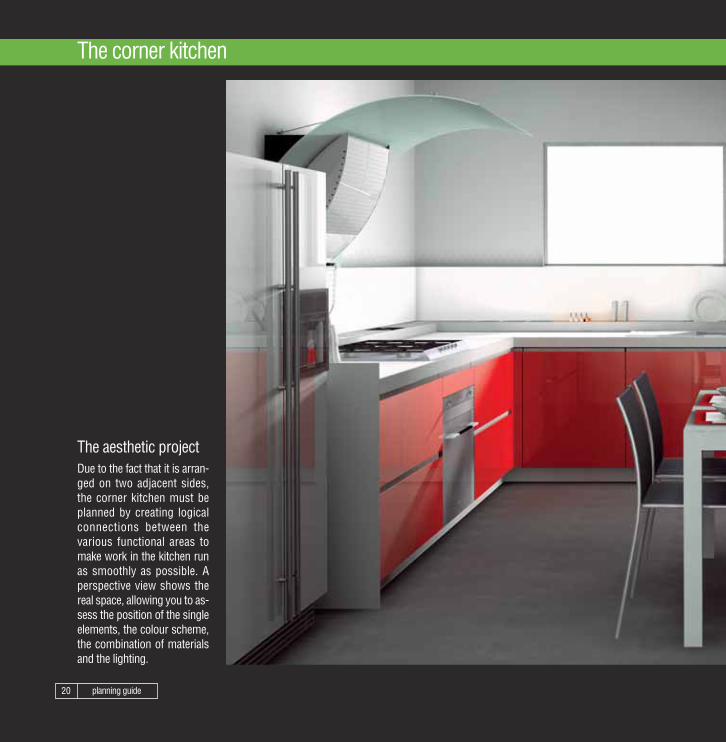
Due to the fact that it is arran-ged on two adjacent sides, the corner kitchen must be planned by creating logical connections between the various functional areas to make work in the kitchen run as smoothly as possible. A perspective view shows the real space, allowing you to as-sess the position of the single elements, the colour scheme, the combination of materials and the lighting.
The aesthetic project
The corner kitchen
70517 VALCUCINE guida.indd 2070517 VALCUCINE guida.indd 20 1-02-2008 18:11:091-02-2008 18:11:09

planning guide 21
70517 VALCUCINE guida.indd 2170517 VALCUCINE guida.indd 21 1-02-2008 18:11:101-02-2008 18:11:10
planning guide22
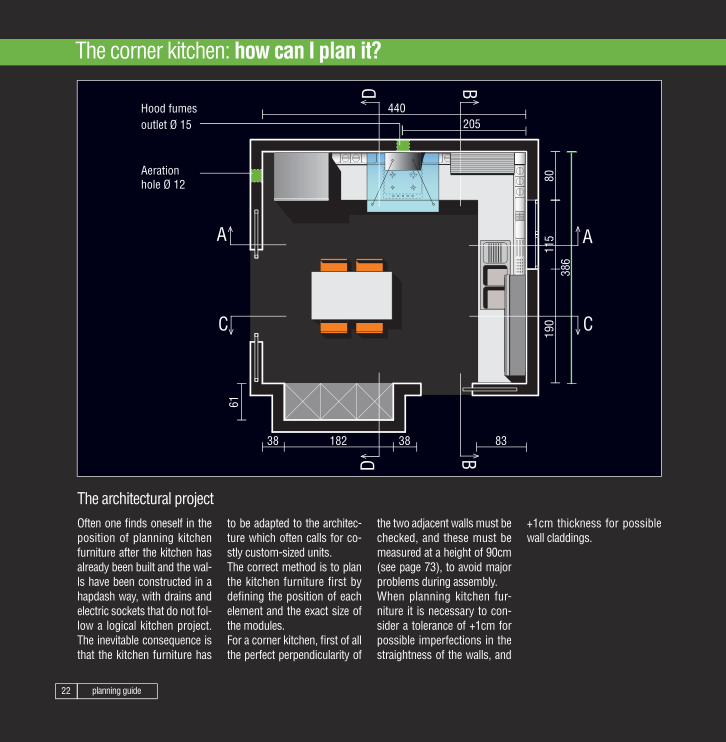
The architectural project
61
190
115
80
386
440
38 182 38 83
205
D
B A
D
B A
C C
Hood fumes outlet Ø 15
Aerationhole Ø 12
Often one fi nds oneself in the position of planning kitchen furniture after the kitchen has already been built and the wal-ls have been constructed in a hapdash way, with drains and electric sockets that do not fol-low a logical kitchen project. The inevitable consequence is that the kitchen furniture has
+1cm thickness for possible wall claddings.
the two adjacent walls must be checked, and these must be measured at a height of 90cm (see page 73), to avoid major problems during assembly.When planning kitchen fur-niture it is necessary to con-sider a tolerance of +1cm for possible imperfections in the straightness of the walls, and
to be adapted to the architec-ture which often calls for co-stly custom-sized units.The correct method is to plan the kitchen furniture first by defi ning the position of each element and the exact size of the modules. For a corner kitchen, fi rst of all the perfect perpendicularity of
The corner kitchen: how can I plan it?
70517 VALCUCINE guida.indd 2270517 VALCUCINE guida.indd 22 1-02-2008 18:11:121-02-2008 18:11:12

planning guide 23
56
82
SECTION C-C SECTION D-D
SECTION B-BSECTION A-A Hood fumes outlet Ø 15
Aeration hole Ø 12
Plasterboard filler
If you want to add a free-stan-ding fridge with a water and ice dispenser it is necessary to plan a space suffi cient for the convex door to open properly (see page 68), as well as for the socket and the water sup-ply/drain tap to be located near the appliance.Another very impotant element
the type of hood (see pages 96 to page 101).
On either side of tower units a plasterboard wall creates an alcove-fi tted effect. This must be made-to-measure after the tower units have been instal-led.
To install a worktop under the window, it is necessary to cal-culate the right height of the window sill (see page 74) and the position of the tap. If the hood is wall-hung, it is advisable to make a fumes outlet hole on the same wall, taking into account that its po-sition will vary depending on
to consider is the size of the side panel against a door: it is calculated by adding +2cm to the depth of the kitchen up to the door frame (see page 72).
70517 VALCUCINE guida.indd 2370517 VALCUCINE guida.indd 23 1-02-2008 18:11:131-02-2008 18:11:13
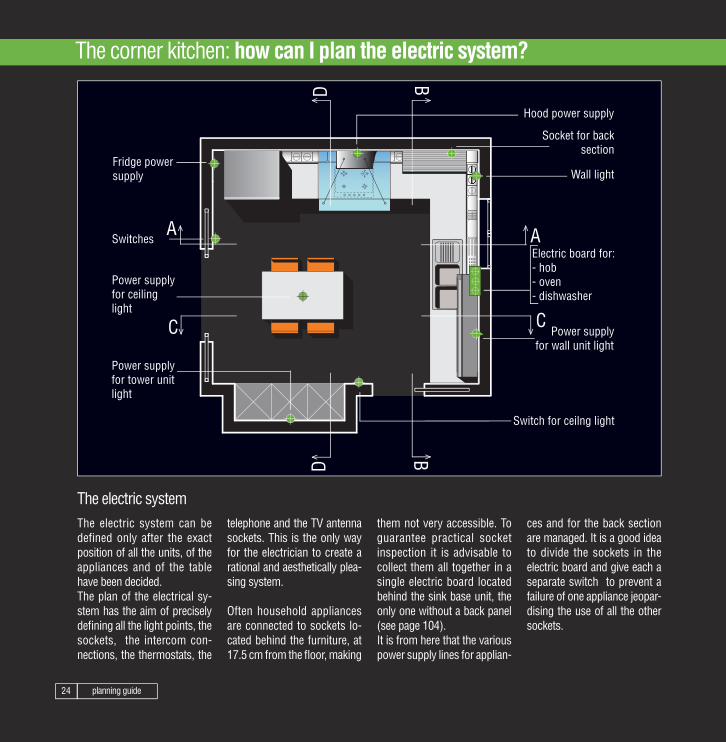
planning guide24
D B
A
D B
A
C C
Switches
Fridge power supply
Power supply for tower unit light
Power supply for ceiling light
Hood power supply
Socket for back section
Wall light
Electric board for:- hob- oven- dishwasher
Power supply
for wall unit light
Switch for ceilng light
The electric systemThe electric system can be defined only after the exact position of all the units, of the appliances and of the table have been decided. The plan of the electrical sy-stem has the aim of precisely defi ning all the light points, the sockets, the intercom con-nections, the thermostats, the
ces and for the back section are managed. It is a good idea to divide the sockets in the electric board and give each a separate switch to prevent a failure of one appliance jeopar-dising the use of all the other sockets.
them not very accessible. To guarantee practical socket inspection it is advisable to collect them all together in a single electric board located behind the sink base unit, the only one without a back panel (see page 104).It is from here that the various power supply lines for applian-
telephone and the TV antenna sockets. This is the only way for the electrician to create a rational and aesthetically plea-sing system.
Often household appliances are connected to sockets lo-cated behind the furniture, at 17.5 cm from the fl oor, making
The corner kitchen: how can I plan the electric system?
70517 VALCUCINE guida.indd 2470517 VALCUCINE guida.indd 24 1-02-2008 18:11:131-02-2008 18:11:13
planning guide 25
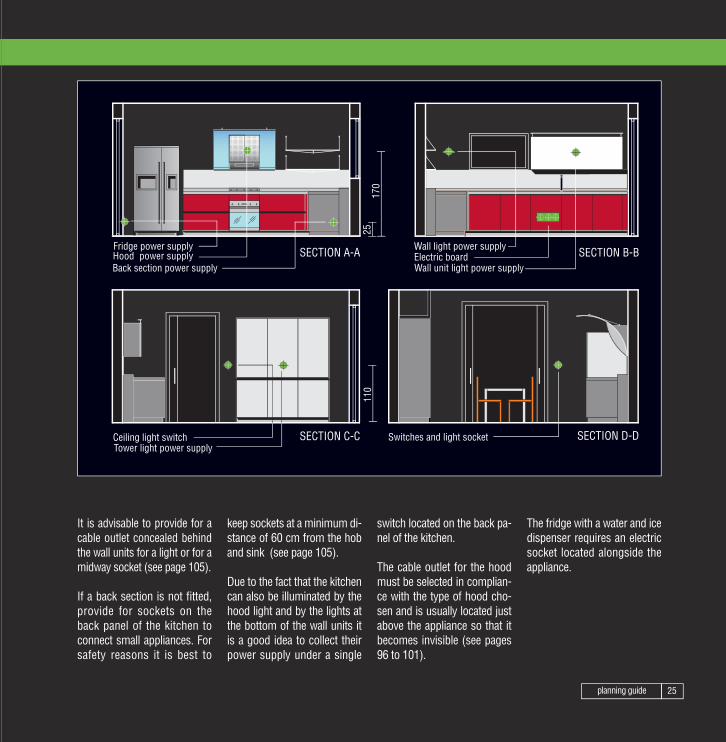
SECTION D-D
SECTION B-BSECTION A-A
SECTION C-C
Hood power supplyFridge power supply
Back section power supply
25
170
110
Tower light power supplyCeiling light switch Switches and light socket
Wall light power supplyElectric boardWall unit light power supply
It is advisable to provide for a cable outlet concealed behind the wall units for a light or for a midway socket (see page 105).
If a back section is not fi tted, provide for sockets on the back panel of the kitchen to connect small appliances. For safety reasons it is best to
The fridge with a water and ice dispenser requires an electric socket located alongside the appliance.
switch located on the back pa-nel of the kitchen.
The cable outlet for the hood must be selected in complian-ce with the type of hood cho-sen and is usually located just above the appliance so that it becomes invisible (see pages 96 to 101).
keep sockets at a minimum di-stance of 60 cm from the hob and sink (see page 105).
Due to the fact that the kitchen can also be illuminated by the hood light and by the lights at the bottom of the wall units it is a good idea to collect their power supply under a single
70517 VALCUCINE guida.indd 2570517 VALCUCINE guida.indd 25 1-02-2008 18:11:141-02-2008 18:11:14
planning guide26
D
B
A
D
B
A
C C
Aeration hole Ø 12
Cold water supply for fridgeDrain
Hood fumes outlet Ø 15
Gas supplyWater supplyDrain
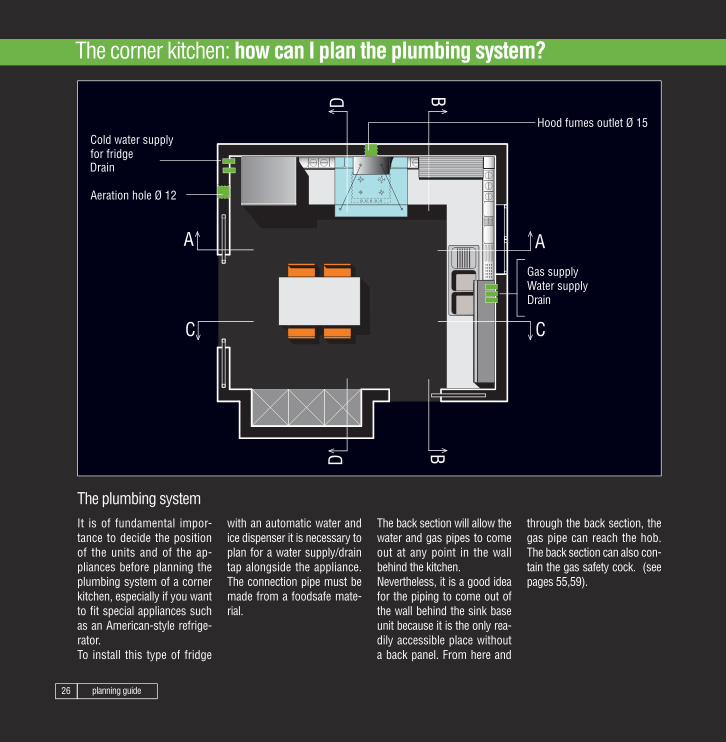
The plumbing systemIt is of fundamental impor-tance to decide the position of the units and of the ap-pliances before planning the plumbing system of a corner kitchen, especially if you want to fi t special appliances such as an American-style refrige-rator.To install this type of fridge
through the back section, the gas pipe can reach the hob. The back section can also con-tain the gas safety cock. (see pages 55,59).
The back section will allow the water and gas pipes to come out at any point in the wall behind the kitchen. Nevertheless, it is a good idea for the piping to come out of the wall behind the sink base unit because it is the only rea-dily accessible place without a back panel. From here and
with an automatic water and ice dispenser it is necessary to plan for a water supply/drain tap alongside the appliance. The connection pipe must be made from a foodsafe mate-rial.
The corner kitchen: how can I plan the plumbing system?
70517 VALCUCINE guida.indd 2670517 VALCUCINE guida.indd 26 1-02-2008 18:11:151-02-2008 18:11:15
planning guide 27
56
SECTION C-C
SECTION B-BSECTION A-A
SECTION D-D
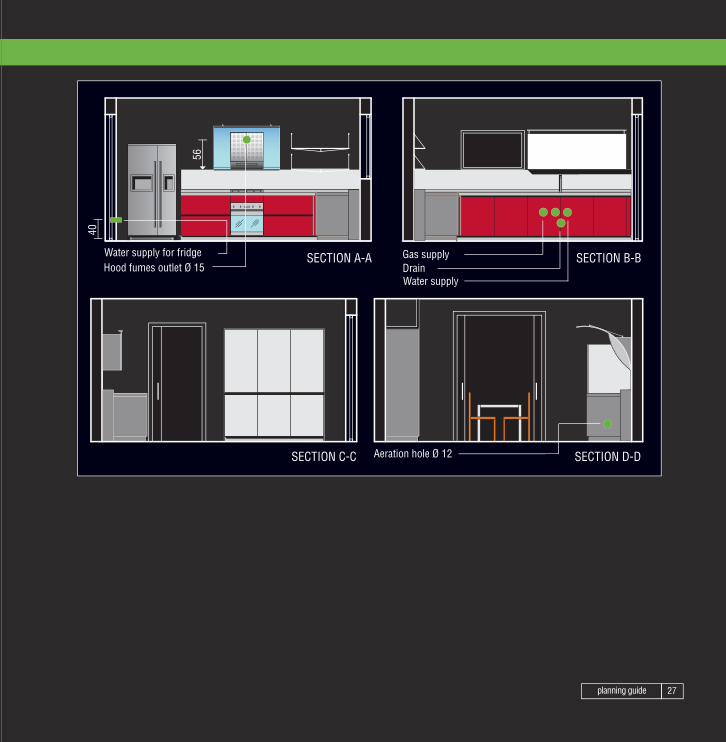
Hood fumes outlet Ø 15 Water supply for fridge
40
DrainGas supply
Water supply
Aeration hole Ø 12
70517 VALCUCINE guida.indd 2770517 VALCUCINE guida.indd 27 1-02-2008 18:11:151-02-2008 18:11:15

planning guide28
A single kitchen-living room area is increasingly becoming the new trend. The open space has become the heart of the home, be it a loft or a bedsitter, an apartment fl at or a single house. The versatility of the Valcucine programmes guarantees the possibility of personalising and constructing the living room, of integrating the functions and of co-ordinating elemen-ts, modules and materials. For example, the Valcucine wall panels can be fitted in the kitchen and in the living room or can be used as a way of visually connecting various rooms of the home. It is possible to co-ordinate the appearance of an open space arrangement by using furniture that aesthetically links the kitchen and the li-ving room but that is fi tted with the specifi c functional elements used in each area.
The aesthetic project
An open space kitchen with a peninsular unit
70517 VALCUCINE guida.indd 2870517 VALCUCINE guida.indd 28 1-02-2008 18:11:161-02-2008 18:11:16

planning guide 29
70517 VALCUCINE guida.indd 2970517 VALCUCINE guida.indd 29 1-02-2008 18:11:181-02-2008 18:11:18

planning guide30
535
635
A
B B
A
76
Opening on false ceiling for hot air discharge from fridge
Aerationhole Ø 12
Hood fumes outlet Ø 15
The architectural projectIn an open space every detail must be carefully planned be-cause the kitchen shares the space with the living room and becomes the heart of the home, the place where you spend most of your time and where you give hospitality to your friends. For a good ae-sthetic result, special attention
with the walls, or with doors or windows to create a logical distinction of the two areas. In an open space it makes sen-se to install tower units so that they look as if they are alcove-fi tted, fl ush with the wall. If you want to fi t refrigerators inside tower units that are as tall as the ceiling, it will be necessary
top of a wall. At this stage, if you want to conceal the fl ue pipe, you will be obliged to build a false ceiling. Due to the fact that we are planning a kitchen-living room, we could take advantage of the need to conceal the fl ue pipe by lowe-ring the ceiling above the enti-re kitchen area and aligning it
must be paid to the hood fl ue that should be concealed and to the tower units that should be fi tted inside an alcove. If it isn’t possible to make a fumes outlet in the ceiling and if you don’t want to do without an island hood, the hood must be connected to the existing outlet that is usually at the
An open space kitchen with a pensinular unit: how can I plan it?
70517 VALCUCINE guida.indd 3070517 VALCUCINE guida.indd 30 1-02-2008 18:11:201-02-2008 18:11:20

planning guide 31
25
SECTION A-A
SECTION B-B
False ceiling
Hood fumes outlet Ø 15
Aeration hole Ø 12
Aeration hole in false ceiling
Hood fumes outlet Ø 15
Aeration hole Ø 12
to make holes to allow the hot air generated by refrigeration to escape. The aeration holes must have a minimum total surface of 400 cm. There are some refrigerators on the market that do not require these holes because they are designed so that cold air en-ters half of the plinth while hot
space must be left to open the door. This space will then be concealed with a filler (see pages 70,71).
air exits the other half. The plasterboard wall must be made-to-measure depending on the height of the tower units. If a tower unit is installed in the corner against a side wall, knobs or vertical hand-les must be used instead of horizontal handles or enough
2
70517 VALCUCINE guida.indd 3170517 VALCUCINE guida.indd 31 1-02-2008 18:11:201-02-2008 18:11:20
planning guide32
A
B B
A
J
Y
K
= =
IntercomCeiling light switchThermostat
Electric board for:- power supply to TV- TV antenna- electric socket- spotlight switch
SocketSwitchesBranch pointsfor hood and falseceiling lights
Power supply for wall lights
Power supply for ceiling light
Power supply for oven
Power supply for fridge
Cable outlet for hood andceiling light
Cable outlet for electric board
Electric board for:- hob- dishwasher- power supply to back section
Power supply for wall light
hob centerline
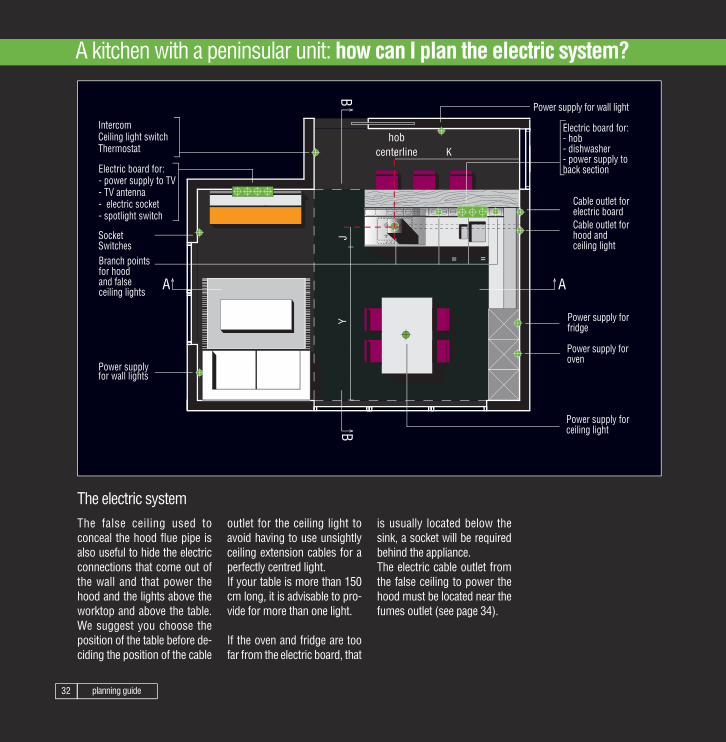
The electric systemThe false ceiling used to conceal the hood fl ue pipe is also useful to hide the electric connections that come out of the wall and that power the hood and the lights above the worktop and above the table. We suggest you choose the position of the table before de-ciding the position of the cable
is usually located below the sink, a socket will be required behind the appliance. The electric cable outlet from the false ceiling to power the hood must be located near the fumes outlet (see page 34).
outlet for the ceiling light to avoid having to use unsightly ceiling extension cables for a perfectly centred light. If your table is more than 150 cm long, it is advisable to pro-vide for more than one light.
If the oven and fridge are too far from the electric board, that
A kitchen with a peninsular unit: how can I plan the electric system?
70517 VALCUCINE guida.indd 3270517 VALCUCINE guida.indd 32 1-02-2008 18:11:211-02-2008 18:11:21

planning guide 33
80
Cable outlet for hood
Cable outlet from false ceiling for hood
Electric board for:- hob- dishwasher- back section
Cable outlet for electric board
Power supply for hood
Oven power supply
Fridge power supplyElectric board for:- hob- dishwasher- back section
Electric board for:- power supply to TV- TV antenna- electric socket- spotlight switch
SECTION A-A
SECTION B-B
Y2
Y1
11
equipped back section
area to usefor cable
outlets fromthe wall
Due to the fact that the penin-sular unit has an equipped back section, the electric cables must come out of the wall behind the back section. After the exact position of the back section has been decided, the electric cables must fall within the 11cm gap, measured across the center-line of the back section and in
an area comprised between Y1 and Y2 (see fi g.A) that varies depending on the height of the base unit (see pages 76 to 79). From here the cables will be di-rected below the sink where they will become part of an electric board to which the various ap-pliances will be connected (see page 104).
A
A
70517 VALCUCINE guida.indd 3370517 VALCUCINE guida.indd 33 1-02-2008 18:11:211-02-2008 18:11:21
planning guide34
A
B B
A
J
Y
K
Gas supplyWater supplyDishwasher supplyDrain
Hood fumes outlet Ø 15
Aeration hole Ø 12
Fumes outlet on false ceiling
hobcenterline
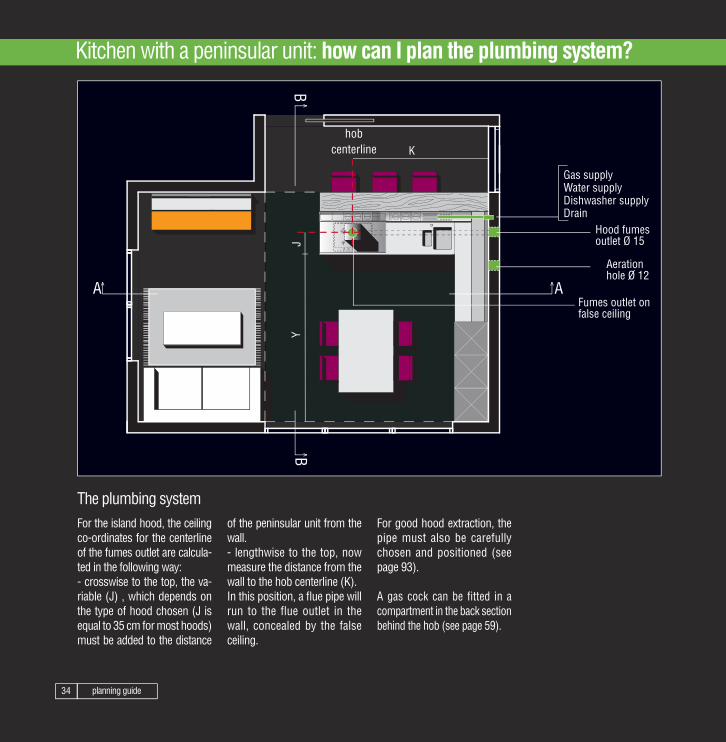
The plumbing systemFor the island hood, the ceiling co-ordinates for the centerline of the fumes outlet are calcula-ted in the following way: - crosswise to the top, the va-riable (J) , which depends on the type of hood chosen (J is equal to 35 cm for most hoods) must be added to the distance
For good hood extraction, the pipe must also be carefully chosen and positioned (see page 93).
A gas cock can be fitted in a compartment in the back section behind the hob (see page 59).
of the peninsular unit from the wall.- lengthwise to the top, now measure the distance from the wall to the hob centerline (K). In this position, a fl ue pipe will run to the flue outlet in the wall, concealed by the false ceiling.
Kitchen with a peninsular unit: how can I plan the plumbing system?
70517 VALCUCINE guida.indd 3470517 VALCUCINE guida.indd 34 1-02-2008 18:11:221-02-2008 18:11:22
planning guide 35
25
Aeration hole Ø 12
SECTION A-A
Hood fumes outlet Ø 15Hood fumes outlet on plasterboard
Gas supplyWater supplyDishwasher supplyDrain
Aeration hole Ø 12
Hood fumes outlet Ø 15
Aeration hole in false ceiling
Gas supplyWater supplyDishwasher supplyDrain
SECTIONB-B
area used forpipe outlets
from the wall
Y2
Y1
11
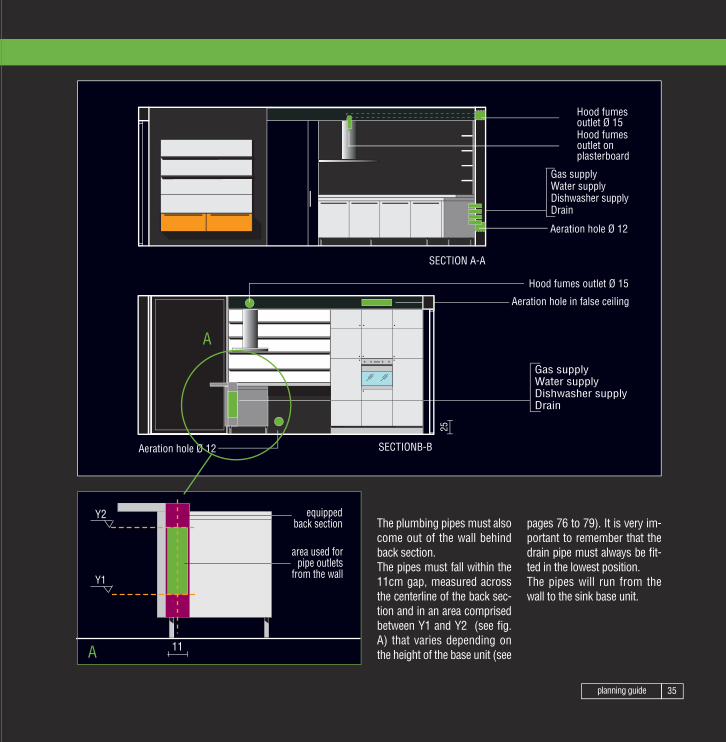
equippedback section The plumbing pipes must also
come out of the wall behind back section. The pipes must fall within the 11cm gap, measured across the centerline of the back sec-tion and in an area comprised between Y1 and Y2 (see fi g.A) that varies depending on the height of the base unit (see
pages 76 to 79). It is very im-portant to remember that the drain pipe must always be fi t-ted in the lowest position. The pipes will run from the wall to the sink base unit.
A
A
70517 VALCUCINE guida.indd 3570517 VALCUCINE guida.indd 35 1-02-2008 18:11:221-02-2008 18:11:22

planning guide36
The perspective view clearly re-veals the most signifi cant fea-tures of this new arrangement with an island. It is complete from a functional viewpoint: as well as the hob, the worktop and the sink, it has a wooden breakfast bar and a back pa-nel with various accessories. Clean lines, pure volumes, light materials and an advanced er-gonomic study distinguish this project. The island hood with its steel casing has a horizontal glass panel and a front one that con-tain and convey the cooking fumes and protect the wooden breakfast bar when cooking.
The aesthetic project
A kitchen with an island and an equipped back section
70517 VALCUCINE guida.indd 3670517 VALCUCINE guida.indd 36 1-02-2008 18:11:231-02-2008 18:11:23
planning guide 37
70517 VALCUCINE guida.indd 3770517 VALCUCINE guida.indd 37 1-02-2008 18:11:241-02-2008 18:11:24

planning guide38
Aeration hole Ø 12
Hood fumesoutlet Ø 15
A
B B
485
650
405
Y 65
A X K
120
10
hob centerline
back
sect
ion
cent
erlin
e
The architectural projectAs well as being aesthetical-ly pleasing, a kitchen with an island is particularly practical to use because of the logical arran-gement of all its elements. The new island has a 20 cm deep back section in stainless steel that stands directly on the fl oor and is located alongside the sink base unit and behind
- crosswise, the distance of the front of the island from the wall (Y) is added to the depth of the base units (65cm) and of the back section centerline (10cm).
Valcucine to the vertical side of the back section.
The exact position of the fl ue outlet centerline for the Vitrum hood is determined in the fol-lowing way: - lengthwise, the distance of the island from the wall (X) is added to the hob centerline (K)
the island. The back section gi-ves more freedom to position the electric and plumbing fl oor outlets because these can run inside it. The fact that the back section is higher than the worktop turns it into a protection from splashing water and makes it possible to fi x the special tap designed by
The kitchen with an island and back section: how can I plan it?
70517 VALCUCINE guida.indd 3870517 VALCUCINE guida.indd 38 1-02-2008 18:11:251-02-2008 18:11:25

planning guide 39
Hood fumes outlet Ø 15
Aeration hole Ø 12
Hood fumes outlet Ø 15
SECTION B-B
SECTION A-A
Due to the fact that it is an island arrangement, the si-zes of the various elements and the necessary distances between them must be care-fully planned to best exploit all its potential. The island requires a surrounding spa-ce of about 120cm which is the optimal distance required
to simultaneoulsy open the doors of the base units and of any tower units installed along the wall (at least 100cm are needed).
70517 VALCUCINE guida.indd 3970517 VALCUCINE guida.indd 39 1-02-2008 18:11:261-02-2008 18:11:26
planning guide40
A
B B
A
Y 65
10
Electric socket
Power supply for:- wine-cellar fridge- fridge- ovens
Switches
Electric board for:- hob- dishwasher- back section
Power supply for Vitrum hood
back
sect
ion
cent
erlin
e
A kitchen with island and back section: how can I plan the electric system?
13
7
5
area usable for floor cable outlets
A
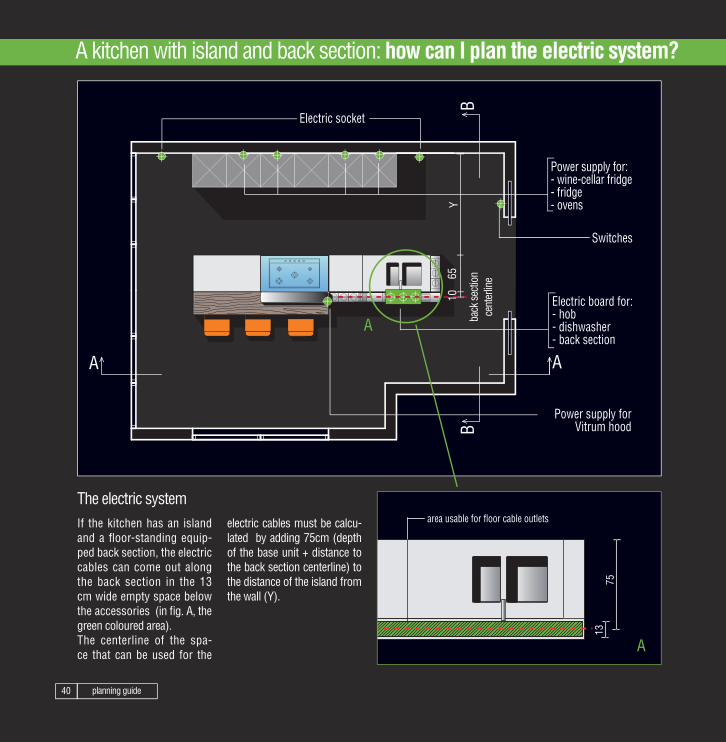
The electric system If the kitchen has an island and a fl oor-standing equip-ped back section, the electric cables can come out along the back section in the 13 cm wide empty space below the accessories (in fi g. A, the green coloured area). The centerline of the spa-ce that can be used for the
electric cables must be calcu-lated by adding 75cm (depth of the base unit + distance to the back section centerline) to the distance of the island from the wall (Y).
A
70517 VALCUCINE guida.indd 4070517 VALCUCINE guida.indd 40 1-02-2008 18:11:261-02-2008 18:11:26
planning guide 41
25
SECTION B-B
SECTION A-A
Power supply for hood
Power supply for:- wine-cellar fridge- fridge- ovens
Electric board for:- hob- dishwasher- back section
Power supply for hood
Electric board for:- hob- dishwasher- back section
Electric socket
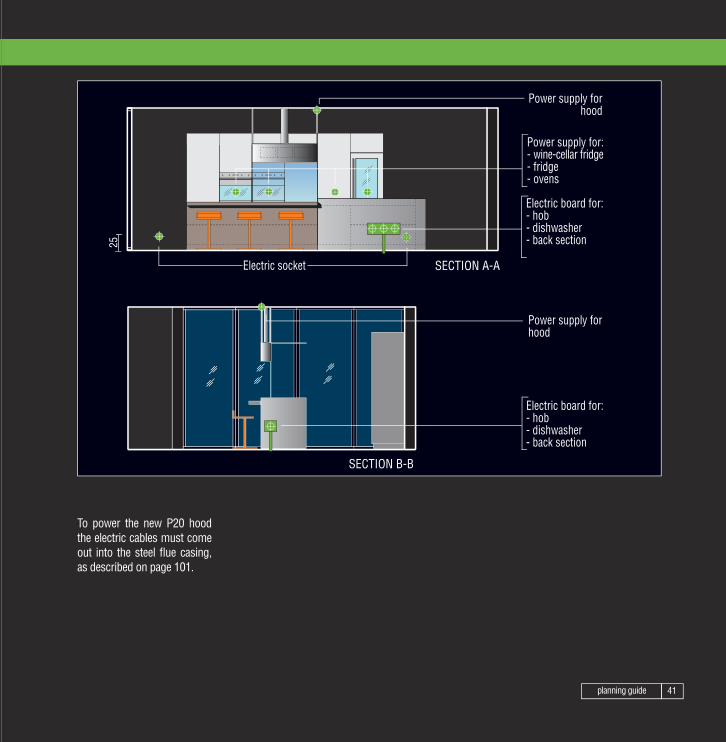
To power the new P20 hood the electric cables must come out into the steel fl ue casing, as described on page 101.
70517 VALCUCINE guida.indd 4170517 VALCUCINE guida.indd 41 1-02-2008 18:11:271-02-2008 18:11:27

planning guide42
A
B B
X A
K
Y 65
10
Aeration hole Ø 12
Gas supplyWater supplyDishwasher supplyDrain
bak
sect
ion
cent
erlin
e
hob centerline
Hood fumes outlet Ø 15
The plumbing systemThe plumbing connections must be effected in the 13cm wide empty space in the back section (see fi g.A). The cen-terline of the space that can be used for the pipes must be cal-culated by adding 75cm (dep-th of base unit + back section centerline) to the distance of the island from the wall (Y).
From here, the pipes can run through the back section until they reach destination.
13
75
area usable for floor pipe outlets
swivel mixer tap
A kitchen with an island and a back section: how can I plan the plumbing system?
A
A
70517 VALCUCINE guida.indd 4270517 VALCUCINE guida.indd 42 1-02-2008 18:11:271-02-2008 18:11:27
planning guide 43
SECTION B-B
SECTION A-A
Hood fumes outlet Ø 15
Gas supplyWater supplyDishwasher supplyDrain
Aeration hole Ø 12
Hood fumes outlet Ø 15
Gas supplyWater supplyDishwasher supplyDrain
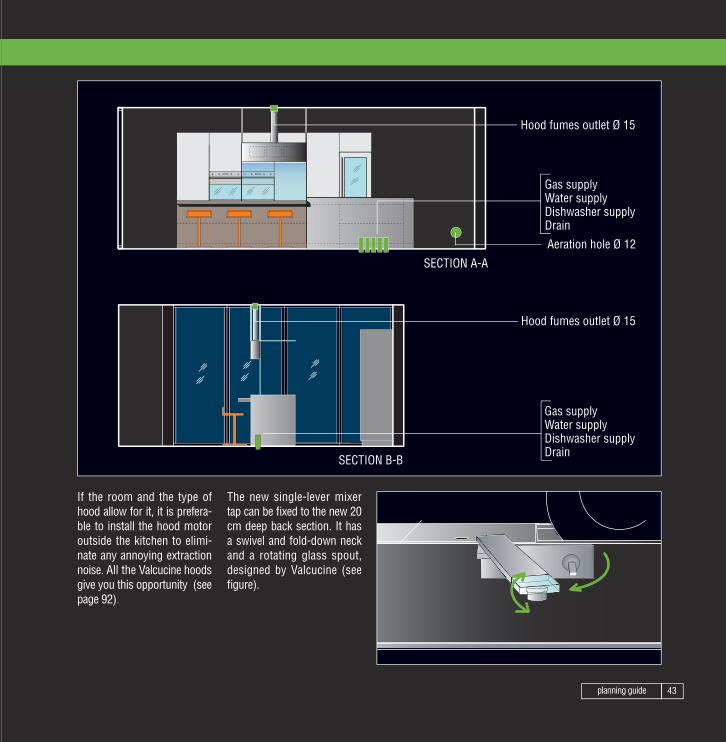
If the room and the type of hood allow for it, it is prefera-ble to install the hood motor outside the kitchen to elimi-nate any annoying extraction noise. All the Valcucine hoods give you this opportunity (see page 92).
The new single-lever mixer tap can be fi xed to the new 20 cm deep back section. It has a swivel and fold-down neck and a rotating glass spout, designed by Valcucine (see fi gure).
70517 VALCUCINE guida.indd 4370517 VALCUCINE guida.indd 43 1-02-2008 18:11:281-02-2008 18:11:28

70517 VALCUCINE guida.indd 4470517 VALCUCINE guida.indd 44 1-02-2008 18:11:281-02-2008 18:11:28
70517 VALCUCINE guida.indd 4570517 VALCUCINE guida.indd 45 1-02-2008 18:11:291-02-2008 18:11:29

planning guide46
How should an ergonomic kitchen be planned?
Ergonomic routesWorking in the kitchen can be very tiring, notwithstan-ding the help given by many accessories and by electrical appliances. Good space orga-nisation can reduce obstacles and unnatural and useless movements. Arranging various kitchen areas by respecting distances
the three sides that connect them should not exceed 650 cm. In an ideal kitchen arrange-ment, the three areas should be divided by worktops.
and organising logical routes is the starting point to make work in the kitchen creative and fun. A simple rule is to connect the preserving area (larders, re-frigerator), the washing area (sink, dishwasher) and the cooking area (hob), by means of small triangles. The sum of
SINKREFRIGERATOR
worktop
HOB
worktop worktop
PRESERVING
COOKING
WASHING
70517 VALCUCINE guida.indd 4670517 VALCUCINE guida.indd 46 1-02-2008 18:11:301-02-2008 18:11:30

planning guide 47
What are the minimum distances to be respected?
A - A distance of 120 cm between the table and a wall or any other obstacle is the minimum distance required to allow a person to walk behind a seated one, in the direction shown in the drawing.
D - A free space of one me-tre must be left in front of the dishwasher to allow for loading and unloading. For another person to walk behind the fi rst one during this ope-ration, the empty space must be increased by an additional 70cm if there is a wall on the opposite side.
C - To determine the distances to leave between the worktops and other elements situated in front of them, it is necessary to keep in mind the space requi-red for people to move around and of the room taken up by appliances and base units with their drawers or doors open.
B - To allow a person to work and even open doors and drawers behind a person sea-ted, it is necessary to leave a minimum distance of 135cm between the edge of the table and the unit behind it. If the unit is 80cm deep, this di-stance must be increased by 15cm.
A B
C D
70517 VALCUCINE guida.indd 4770517 VALCUCINE guida.indd 47 1-02-2008 18:11:301-02-2008 18:11:30

planning guide48
How can I choose the height of the worktop?
To work standing before a worktop that is too low or too high obliges the person to as-sume incorrect postures that, in the long run, can have se-rious consequences on physi-cal health. Due to the fact that the average height of mankind is increasing, it is advisable to offer worktop heights that vary
sockets, the position of the wall units and the height of the hood fl ue outlet.
depending on the needs of the user. This way, he/she will work more comfortably. Valcucine offers various work-top heights depending on the height of the person. It is important to choose the height of the worktop at the outset because it determines the position of the electric
70517 VALCUCINE guida.indd 4870517 VALCUCINE guida.indd 48 1-02-2008 18:11:311-02-2008 18:11:31

planning guide 49
At what height should wall units be hung?
Traditional 60cm deep base units have now evolved towar-ds greater and more ergono-mic depths. Valcucine offers the 65cm depth and the 80cm deep system. By increasing the depth of the base units, it is possible to lower the wall units, that will be in a more ergono-mic position.
C - The 80cm depth, consisting in a special equipped back sec-tion and a 60 cm base unit, gives better visibility on the worktop. The recommended distance of the wall units from the worktop is 42cm. The contents of the wall unit are completely visible and accessible even on the top shelves.
B - By increasing the depth of the base unit to 65 cm, it is pos-sible to lower the wall unit that is then easier to see and reach. This gives you more freedom of movement and better visi-bility on the worktop. The re-commended height of the back panel is 48 cm.
A - For the traditional 60cm depth, the recommended hei-ght of the back panel is 54cm, which is required to allow for suffi cient visibility of the work-top. However, the wall unit creates a couped up feeling and its position makes it diffi cult to see and take the contents out.
A B C
70517 VALCUCINE guida.indd 4970517 VALCUCINE guida.indd 49 1-02-2008 18:11:311-02-2008 18:11:31
planning guide50
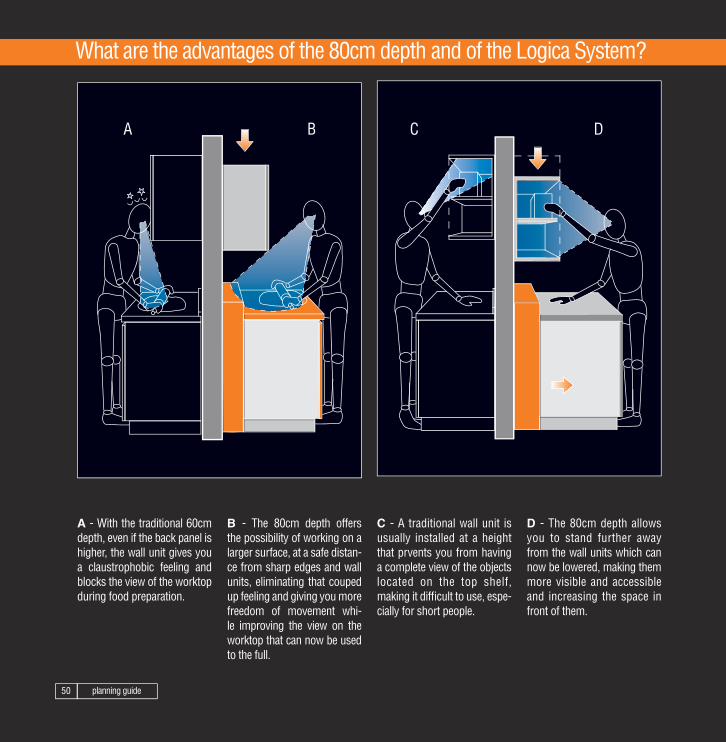
A - With the traditional 60cm depth, even if the back panel is higher, the wall unit gives you a claustrophobic feeling and blocks the view of the worktop during food preparation.
B - The 80cm depth offers the possibility of working on a larger surface, at a safe distan-ce from sharp edges and wall units, eliminating that couped up feeling and giving you more freedom of movement whi-le improving the view on the worktop that can now be used to the full.
A B
C - A traditional wall unit is usually installed at a height that prvents you from having a complete view of the objects located on the top shelf, making it diffi cult to use, espe-cially for short people.
D - The 80cm depth allows you to stand further away from the wall units which can now be lowered, making them more visible and accessible and increasing the space in front of them.
C D
What are the advantages of the 80cm depth and of the Logica System?
70517 VALCUCINE guida.indd 5070517 VALCUCINE guida.indd 50 1-02-2008 18:11:321-02-2008 18:11:32

planning guide 51
G - The dish drainer instal-led at a traditional height is awkward to use: the move-ment to put the plates away is unnatural and tiring and it is inevitable for water to drip down your arm. The dish drai-ner attached to the wall unit is also diffi cult to clean.
H - The 80cm depth makes it possible to fi t the dish drainer inside the back panel, behind the sink. It is possible to put the plates to drain without ti-ring yourself and without wa-ter dripping down your arm. The dish drainer is connected directly to the trap for water drainage.
G H
F - The balanced lift-up door can stay open all the time necessary and allows you to move around sideways and bend over with no fear of bum-ping or banging your head.
E - Wall units with traditionally opening doors are an obstacle and give you a closed-in fee-ling. Furthermore, due to the fact that the door often re-mains open, it is extremely likely that you will bump your head when moving around.
E F
70517 VALCUCINE guida.indd 5170517 VALCUCINE guida.indd 51 1-02-2008 18:11:321-02-2008 18:11:32
planning guide52
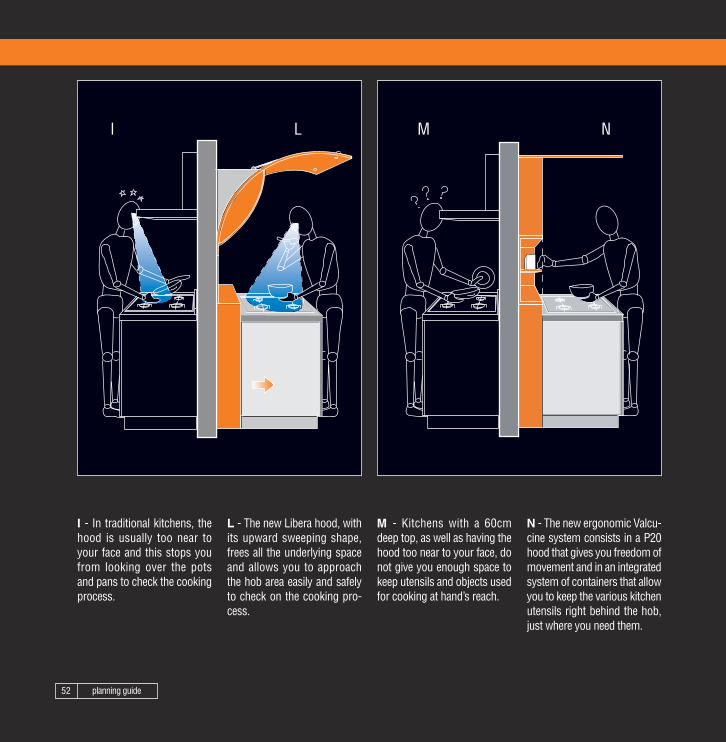
L - The new Libera hood, with its upward sweeping shape, frees all the underlying space and allows you to approach the hob area easily and safely to check on the cooking pro-cess.
I - In traditional kitchens, the hood is usually too near to your face and this stops you from looking over the pots and pans to check the cooking process.
I L
N - The new ergonomic Valcu-cine system consists in a P20 hood that gives you freedom of movement and in an integrated system of containers that allow you to keep the various kitchen utensils right behind the hob, just where you need them.
M - Kitchens with a 60cm deep top, as well as having the hood too near to your face, do not give you enough space to keep utensils and objects used for cooking at hand’s reach.
M N
70517 VALCUCINE guida.indd 5270517 VALCUCINE guida.indd 52 1-02-2008 18:11:321-02-2008 18:11:32
planning guide 53
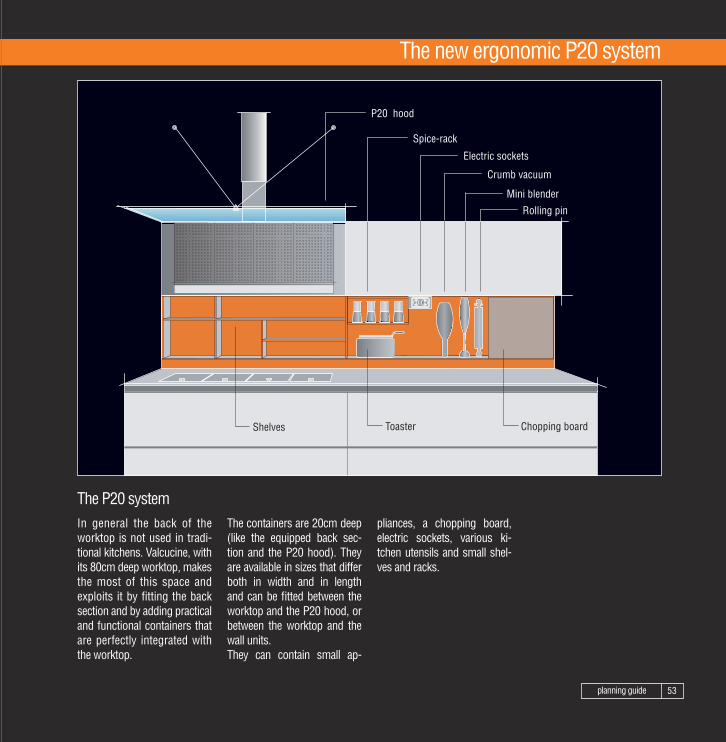
The new ergonomic P20 system
In general the back of the worktop is not used in tradi-tional kitchens. Valcucine, with its 80cm deep worktop, makes the most of this space and exploits it by fitting the back section and by adding practical and functional containers that are perfectly integrated with the worktop.
pliances, a chopping board, electric sockets, various ki-tchen utensils and small shel-ves and racks.
The containers are 20cm deep (like the equipped back sec-tion and the P20 hood). They are available in sizes that differ both in width and in length and can be fi tted between the worktop and the P20 hood, or between the worktop and the wall units. They can contain small ap-
Spice-rack
Electric sockets
P20 hood
Crumb vacuum
Mini blender
Rolling pin
Toaster Chopping boardShelves
The P20 system
70517 VALCUCINE guida.indd 5370517 VALCUCINE guida.indd 53 1-02-2008 18:11:331-02-2008 18:11:33

planning guide54
B - With the pullout jumbo drawer, the entire contents of the base units is visible, more accessible and easy to reach. Valcucine offers base units with full-extension, 80cm deep jumbo drawers, with or without an equipped back section.
A - Traditional base units with doors and shelves oblige you to kneel down and get into awkward positions (that in the long run may cause serious physical problems), to take or put away objects that are usually stored in an almost inaccessible corner or in a scarcely-lit area.
Which are easier to use? Base units with doors or with jumbo drawers?
A B
70517 VALCUCINE guida.indd 5470517 VALCUCINE guida.indd 54 1-02-2008 18:11:331-02-2008 18:11:33

planning guide 55
The Valcucine equipped back section
The equipped back section is a 20cm wide area inside which plumbing and electrical con-nections can be made, giving the interior designer freedom to install the sink and the hob at a certain distance from the positions imposed by the wa-ter and gas supply outlets. Valcucine uses three types of
- a steel back section welded to the top (see page 123): it can be used against the wall or in a kitchen with an island or a peninsular unit. It becomes one with the top, and due to the fact that it is does not have seals, is easier to clean.
ges 116,117): ideal for use in the centre of the room. It has a steel fi nished back panel that reaches the fl oor. It protrudes by 18cm above the top and thus acts as an upstand to contain splashing water. The new swivel tap (see page 43) can be fi xed to the section over looking the sink;
back sections: - an aluminium back section (see pages 126,127): it can be fi tted between the base units and the wall, or used in a cen-tral island (in this case it must be finished using a wooden back panel combined with a wooden snack bar;- a steel back section (see pa-
70517 VALCUCINE guida.indd 5570517 VALCUCINE guida.indd 55 1-02-2008 18:11:331-02-2008 18:11:33

planning guide56
The back section can be fi tted with a set of containers ha-ving precise functions that are normally scattered around the kitchen: a dish and glass rack; compartments with sockets and gas cocks; knife and chop-ping-board racks; food bowls in various sizes; digital weighing scales; bottle and spice racks,
a detergent holder and a small blender; a vacuum pump con-tainer. All the elements can be remo-ved for easy cleaning, some are dishwasher safe. The back section is modular to suit re-quirements and allows you to work more comfortably with everything on hand.
Electric sockets
Food bowls
Vacuum pum
Gas cock Weighing DishdrainerContainer with lift-up door
Chopping board+knife rack
What can I fi t in the back section?
All the accessories can be removed. Some are dishwasher safe.
70517 VALCUCINE guida.indd 5670517 VALCUCINE guida.indd 56 1-02-2008 18:11:351-02-2008 18:11:35
planning guide 57
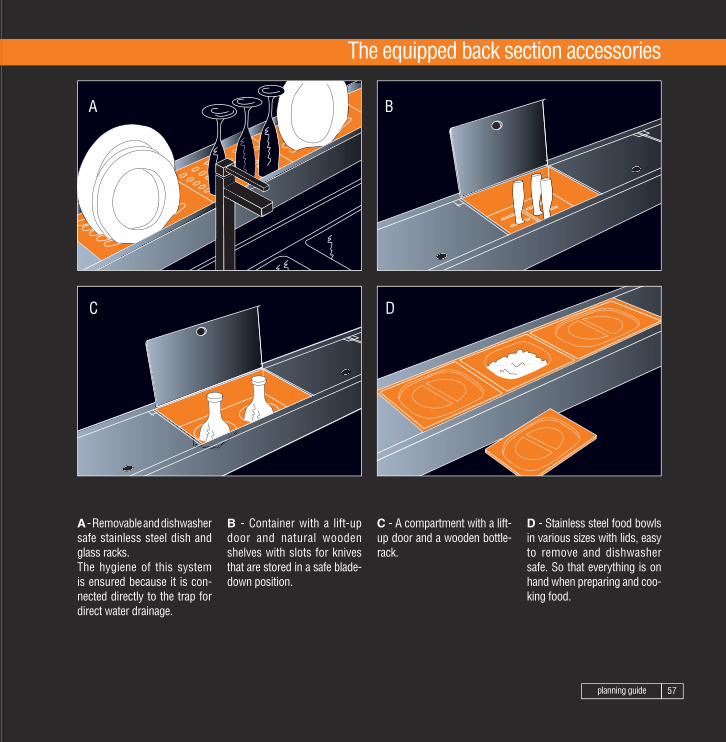
The equipped back section accessories
A - Removable and dishwasher safe stainless steel dish and glass racks.The hygiene of this system is ensured because it is con-nected directly to the trap for direct water drainage.
D - Stainless steel food bowls in various sizes with lids, easy to remove and dishwasher safe. So that everything is on hand when preparing and coo-king food.
C - A compartment with a lift-up door and a wooden bottle-rack.
B - Container with a lift-up door and natural wooden shelves with slots for knives that are stored in a safe blade-down position.
A B
C D
70517 VALCUCINE guida.indd 5770517 VALCUCINE guida.indd 57 1-02-2008 18:11:351-02-2008 18:11:35
planning guide58
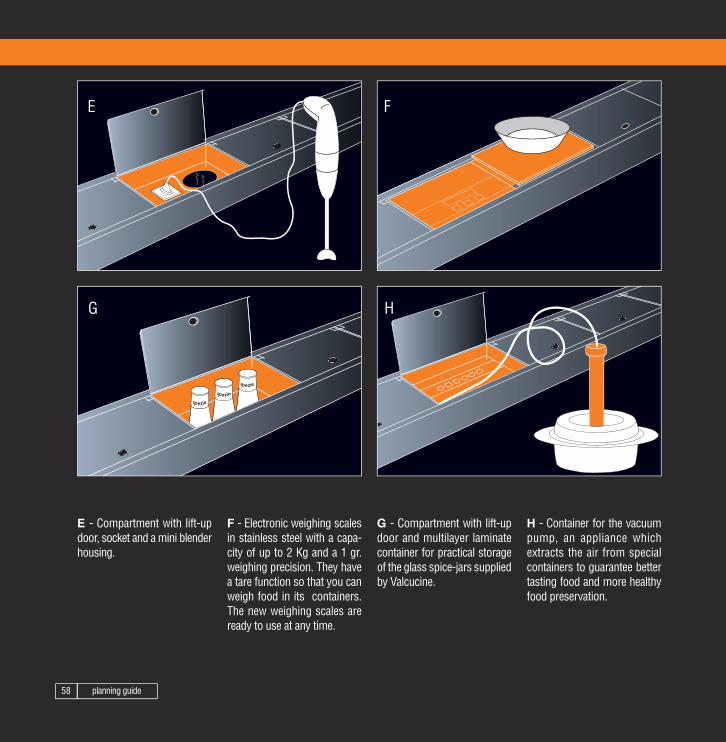
E - Compartment with lift-up door, socket and a mini blender housing.
H - Container for the vacuum pump, an appliance which extracts the air from special containers to guarantee better tasting food and more healthy food preservation.
G - Compartment with lift-up door and multilayer laminate container for practical storage of the glass spice-jars supplied by Valcucine.
F - Electronic weighing scales in stainless steel with a capa-city of up to 2 Kg and a 1 gr. weighing precision. They have a tare function so that you can weigh food in its containers. The new weighing scales are ready to use at any time.
spezie
spezie
spezie
E F
G H
70517 VALCUCINE guida.indd 5870517 VALCUCINE guida.indd 58 1-02-2008 18:11:361-02-2008 18:11:36
planning guide 59
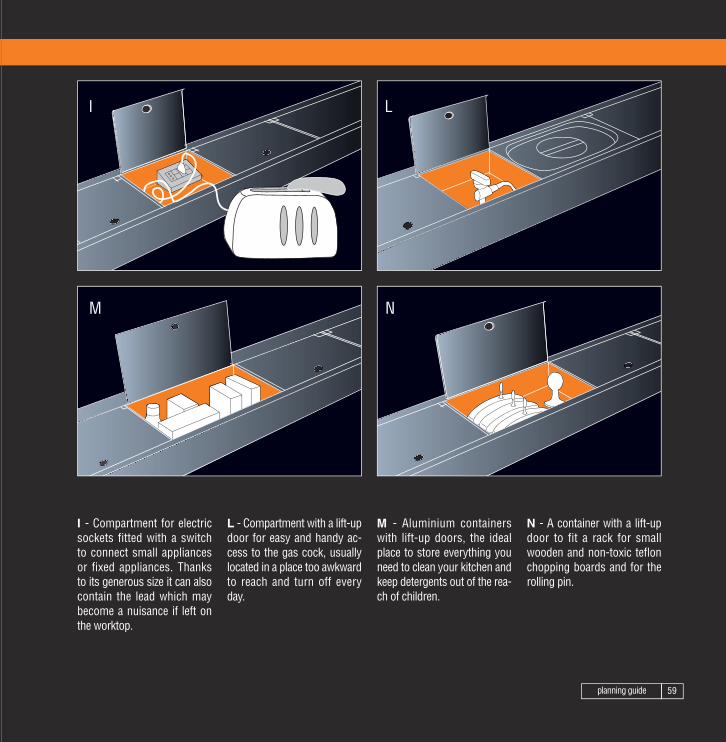
I - Compartment for electric sockets fitted with a switch to connect small appliances or fixed appliances. Thanks to its generous size it can also contain the lead which may become a nuisance if left on the worktop.
N - A container with a lift-up door to fit a rack for small wooden and non-toxic tefl on chopping boards and for the rolling pin.
M - Aluminium containers with lift-up doors, the ideal place to store everything you need to clean your kitchen and keep detergents out of the rea-ch of children.
L - Compartment with a lift-up door for easy and handy ac-cess to the gas cock, usually located in a place too awkward to reach and turn off every day.
I L
M N
70517 VALCUCINE guida.indd 5970517 VALCUCINE guida.indd 59 1-02-2008 18:11:371-02-2008 18:11:37

planning guide60
What is the most comfortable way to open a wall unit?
A - The wall unit with a balanced lift-up door guarantees great prac-ticality and freedom of movement and allows you to work safely even when the door is open. The oleodynamic balancing pistons allow you to open the door with a light upward touch of the hand.
B - The width of the Aerius wall unit can vary with requirements and can reach a maximum of 3 metres for a single unit. In the chipboard or multilayer carcass versions the vertical interior divi-ders are eliminated.
A - The wall unit fi tted with a pa-tented balanced opening system ensures practicality and freedom of movement and allows you to move around safely, even when the door is open. A balancing mechanism adjusts opening and closing speed so that this very light door can be opened with a light upward touch of the hand.
B - The wall unit with horizon-tally-folding doors reduces the space taken up by normal wall unit doors that are an obstacle to movement and to sight. It is easy to open them thanks to a system of hinges and sliding runners.
Ergonomic opening methods The Valcucine Aerius wall unit
A
B
A
B
70517 VALCUCINE guida.indd 6070517 VALCUCINE guida.indd 60 1-02-2008 18:11:371-02-2008 18:11:37
planning guide 61
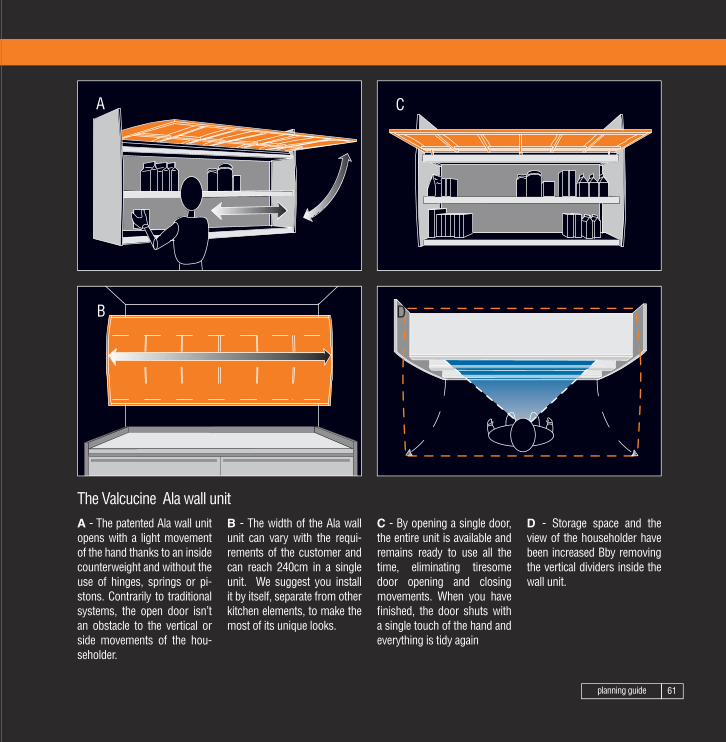
A - The patented Ala wall unit opens with a light movement of the hand thanks to an inside counterweight and without the use of hinges, springs or pi-stons. Contrarily to traditional systems, the open door isn’t an obstacle to the vertical or side movements of the hou-seholder.
D - Storage space and the view of the householder have been increased Bby removing the vertical dividers inside the wall unit.
C - By opening a single door, the entire unit is available and remains ready to use all the time, eliminating tiresome door opening and closing movements. When you have fi nished, the door shuts with a single touch of the hand and everything is tidy again
B - The width of the Ala wall unit can vary with the requi-rements of the customer and can reach 240cm in a single unit. We suggest you install it by itself, separate from other kitchen elements, to make the most of its unique looks.
The Valcucine Ala wall unit
A
B
C
D
70517 VALCUCINE guida.indd 6170517 VALCUCINE guida.indd 61 1-02-2008 18:11:381-02-2008 18:11:38

planning guide62
Wall-hung base unit
Base unit with plinth
Wall-hung baseunit
Base unit with plinth
Floor-heating
Which is best? A kitchen with a plinth or a wall-hung kitchen?
Support for wall-hung base units
Load-bearing wall
Partition wall
Support for wall-hung base units with feet
A - A wall-hung kitchen makes cleaning under the furniture really easy. A kitchen with a plinth is less easy to clean so that perfect hygiene is not possible. Even if you can’t see it, the dirt ac-cumulates behind the plinth which, although it has a gasket, cannot ensure a perfect seal.
B - The wall-hung kitchen is ideal for fl oor-heating because it removes all obstacles for per-fect heat diffusion.
C - Steel L-shaped supporting brackets are supplied to fi x a kitchen to a load-bearing wall. To avoid accidentally drilling the pipes inside the wall it is impor-tant to use an instrument that detects their exact position.
D - If the base units are fi xed to an interior partition wall, add feet to support part of the weight. It is advisable to fi t a quantity of feet that guarantees a distance between them of 120cm. The feet supplied by Valcuci-ne are so slim that they do not detract from the beauty of the kitchen.
Fixing a wall-hung kitchen
A
B
C
D
70517 VALCUCINE guida.indd 6270517 VALCUCINE guida.indd 62 1-02-2008 18:11:381-02-2008 18:11:38
planning guide 63
Can household appliances be installed in a wall-hung kitchen?
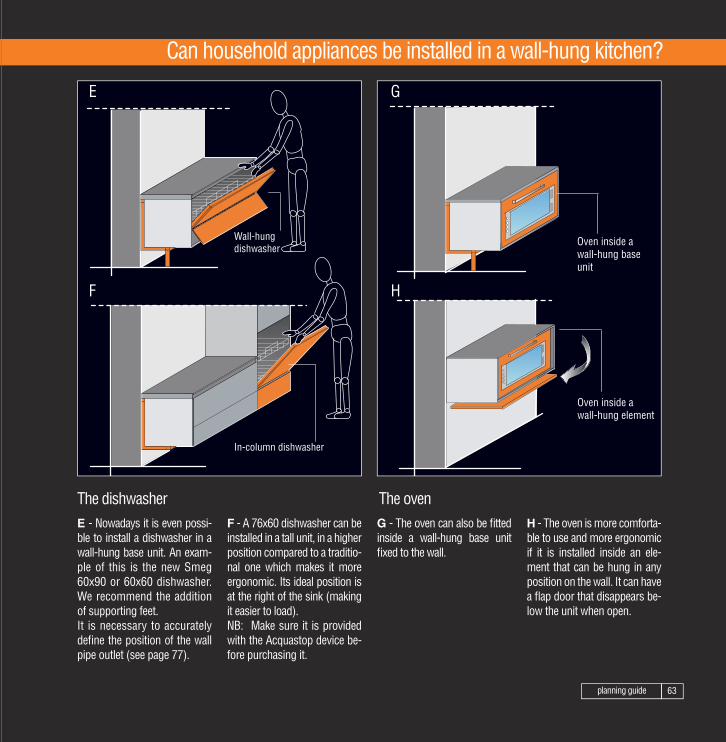
E - Nowadays it is even possi-ble to install a dishwasher in a wall-hung base unit. An exam-ple of this is the new Smeg 60x90 or 60x60 dishwasher. We recommend the addition of supporting feet. It is necessary to accurately defi ne the position of the wall pipe outlet (see page 77).
F - A 76x60 dishwasher can be installed in a tall unit, in a higher position compared to a traditio-nal one which makes it more ergonomic. Its ideal position is at the right of the sink (making it easier to load). NB: Make sure it is provided with the Acquastop device be-fore purchasing it.
G - The oven can also be fi tted inside a wall-hung base unit fi xed to the wall.
H - The oven is more comforta-ble to use and more ergonomic if it is installed inside an ele-ment that can be hung in any position on the wall. It can have a fl ap door that disappears be-low the unit when open.
The dishwasher The oven
Wall-hung dishwasher
In-column dishwasher
Oven inside a wall-hung base unit
Oven inside a wall-hung element
E
F
G
H
70517 VALCUCINE guida.indd 6370517 VALCUCINE guida.indd 63 1-02-2008 18:11:391-02-2008 18:11:39

70517 VALCUCINE guida.indd 6470517 VALCUCINE guida.indd 64 1-02-2008 18:11:391-02-2008 18:11:39

70517 VALCUCINE guida.indd 6570517 VALCUCINE guida.indd 65 1-02-2008 18:11:411-02-2008 18:11:41

planning guide66
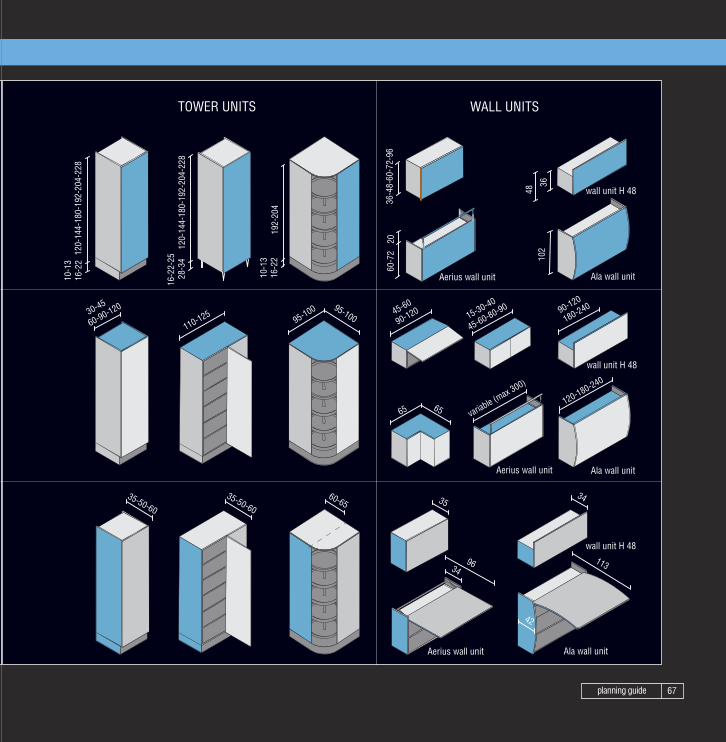
Overall sizes and dimensions of furnishing elements
6-
9 36
-48
60-7
2 6-
9
6
-9
10-1
3 16
-22
60-7
2
1-6-9 60
-72
16-2
2-25
2
8-34
40-5
8-61
64
-70-
75
36
36
36
36
15-30-40-45
60-80-90-120
30-45
60-90-120 30-40
45-60 65-70
95-110-125 95-110-125
35-50 60-65-80 60
20 65
35-40
18-24-3035-50-60
96-120
35
variable
HEIG
HTW
IDTH
DEPT
H
varia
ble
Variable
with plinth with feet wall-hung
varia
ble
WALL PANELSEND PANELS
BASE UNITS
70517 VALCUCINE guida.indd 6670517 VALCUCINE guida.indd 66 1-02-2008 18:11:441-02-2008 18:11:44
planning guide 67
wall unit H 48
36-4
8-60
-72-
96
15-30-40
45-60-80-90
35
60-7
2
102
10-1
3 16
-22
120-
144-
180-
192-
204-
228
120-
144-
180-
192-
204-
228
16-2
2-25
28-3
4
10-1
3 16
-22
192-
204
45-60
90-120
65 65
30-45
60-90-120
110-125 95-100 95-100
96 113
35-50-60
variable (max 300)
60-65 35-50-60
120-180-240
36
90-120
180-240
34
20
48
34
42
Ala wall unit
wall unit H 48
Ala wall unit
wall unit H 48
Ala wall unitAerius wall unit
Aerius wall unit
Aerius wall unit
TOWER UNITS WALL UNITS
70517 VALCUCINE guida.indd 6770517 VALCUCINE guida.indd 67 1-02-2008 18:11:451-02-2008 18:11:45

planning guide68
How can I calculate the length of the wall to which the units are fi tted?
Measuring the wall
Length of wall for in-line kitchen L.300 Length of wall for in-line kitchen L.300 and fridge W. 60 with horizontal handle
Length of wall for in-line kitchen L.300 and fridge with convex door
Length of wall for in-line kitchen L.300 and American-style fridge
1 300 5
1 300 x 10* 1 300 20*
366
311+x 321+x
1 1 300
302
60
x
To calculate the right length of a wall to contain the kitchen unts without the need for costly made-to-measure elements, one must remember that a ki-tchen is composed of modules that are multiples of 15cm. To avoid wasting space and the need for customised mo-difications, the kitchen must
also be planned as a multiple of 15 cm. An extra 1 cm tolerance on each side must always be con-sidered if you will be adding tiles to an unfi nished wall. If a fridge will be installed at the end of an arrangement, add 5cm to allow a door with a horizontal handle to open
completely; an extra 10*cm if you fi t a fridge with a convex door; an extra 20*cm if you in-stall an American-style fridge. The depth of “Free Standing” refrigerators varies depending on their capacity in litres. For American-style refrigerators with an automatic water and ice dispenser, you must con-
sider the space for a tap to fi t alongside the fridge.
*indicative measurements that must be checked with the actual appliance ordered.
70517 VALCUCINE guida.indd 6870517 VALCUCINE guida.indd 68 1-02-2008 18:11:451-02-2008 18:11:45
planning guide 69
Length of wall for corner kitchen D.60, L.300 Length of wall for corner kitchen D. 65, L.300
Length of wall for corner kitchen D.80, L.300 Length of wall for kitchen with corner tower, D.60, L.300
1 300 60 1 65
60 300
1
65
80
372
300
20
1
387
1 1
60
367
1 300 95 1
397
60
5 5
5
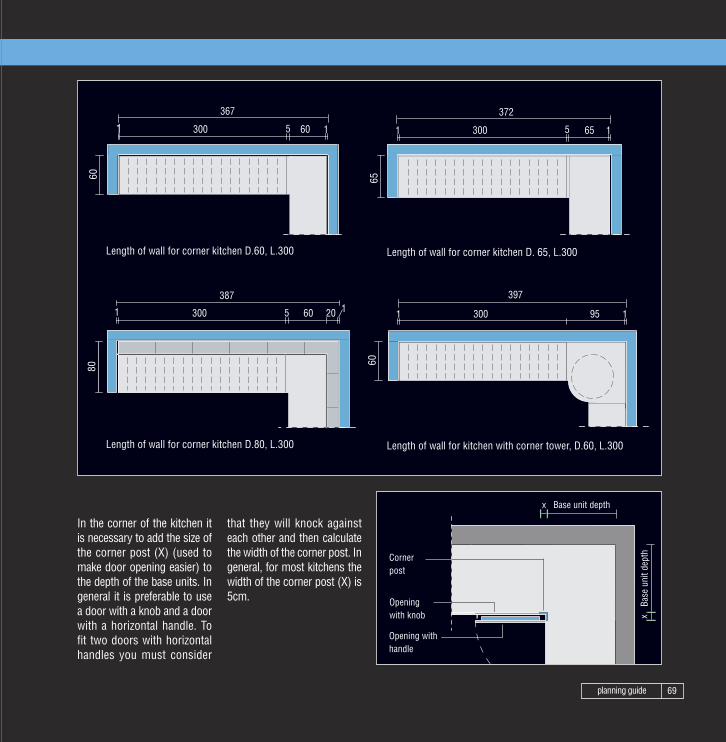
In the corner of the kitchen it is necessary to add the size of the corner post (X) (used to make door opening easier) to the depth of the base units. In general it is preferable to use a door with a knob and a door with a horizontal handle. To fit two doors with horizontal handles you must consider
that they will knock against each other and then calculate the width of the corner post. In general, for most kitchens the width of the corner post (X) is 5cm.
Base unit depth
Base
uni
t dep
thx
x
Corner post
Opening with knob
Opening with handle
70517 VALCUCINE guida.indd 6970517 VALCUCINE guida.indd 69 1-02-2008 18:11:451-02-2008 18:11:45

planning guide70
What problems could arise at the end of an arrangement near a door?
Drawers or jumbo drawersDoor frames usually protrude from the wall by about one centimetre. This is why, when you plan a kitchen that fi nishes against a wall with a door, a few simple rules must be followed. A good rule is to keep the base units detached from the side wall by 5 cm to allow the jumbo drawer to be pulled out
without knocking against the door frame. A fi ller strip will be used to conceal the gap while the top will continue against the side wall.
If the kitchen has doors with horizontal handles, a gap must be left between the end unit and the wall. The width of the gap will depend on the space taken up by the handle when the door is open. A 5cm gap is usually sufficient but it is always best to ask how deep the handles you want to use
are. To avoid this problem, a knob can be fi tted on the door near the wall.
min. 5cm
Door frame
Jumbo drawer end of arrangement
Filler
Gap from the wall
Door frame protrudes by min. 1cm
min. 5cm
Door frame
Horizontal handle at the end of an arrangement
Gap from wall
Filler
Door frame protrudes bymin. 1cm
Horizontal handle
70517 VALCUCINE guida.indd 7070517 VALCUCINE guida.indd 70 1-02-2008 18:11:461-02-2008 18:11:46

planning guide 71
A dishwasher at the end of an arrangement and near a door requires a gap of approximately 5cm from the wall to allow the door to open without knocking against the door frame. Valcu-cine discourages dishwasher installation at the end of an arrangement because, if the corner is not a perfect right-an-
gle, problems may arise both for assembly and for door ope-ning. Furthermore, due to the fact that the dishwasher is not installed inside a base unit but is attached to the side panels of the base units on each side, if it is installed at the end of an arrangement, one side support would be missing.
If a special wall unit with lift-up door such as the Ala or Aerius wall unit have been planned at the end of an arrangement, due to the special size of the door, it will be necessary to install the wall unit at a distance of at least 5 cm from the wall to allow it to open without knocking against the door frame.
However, to make the most of the special aesthetics of these elements, it is preferable to fi t them in an isolated position, at a certain distance from other kitchen cabinets and from the walls.
Dishwashers Wall unit with lift-up door
min. 5cm
Door frame
Dishwasher end of arrangement
Filler
Gap from the wall
Door frame protruding bymin. 1cm
min. 5cm
Door frame
Wall unit with lift-up door at end of arrangement
Gap from wall
Door frame protrudes by min. 1cm
Filler
70517 VALCUCINE guida.indd 7170517 VALCUCINE guida.indd 71 1-02-2008 18:11:461-02-2008 18:11:46

planning guide72
How far should the door be from the corner of the kitchen?
Measuring the wall from corner to door
X
K=X+2
X
K=X+16
A B
The width of the wall (K) from the corner to the door frame must be calculated by con-sidering the depth (X) of the kitchen units that are installed against that wall. In general it is always advisa-ble to maintain a safety gap from the wall of about 2cm.
A - If there are base units, the width of the wall is calculated by adding to the depth of the base units (X), a 2cm gap before the door frame. The total width of the wall will be: K=X+2.
B - If there are tall units, it will not be suffi cient to add a 2cm safety gap, but you must also consider the space taken up by a switch (generally 12cm).In this case, the width of the side panel will be calculated by adding to the depth of the tall units (X=), a 2cm gap between the tall unit and the
switch, 12cm for the switch and a 2cm gap between the switch and the doorframe. The total width of the wall will be: K= X+16cm.
70517 VALCUCINE guida.indd 7270517 VALCUCINE guida.indd 72 1-02-2008 18:11:461-02-2008 18:11:46
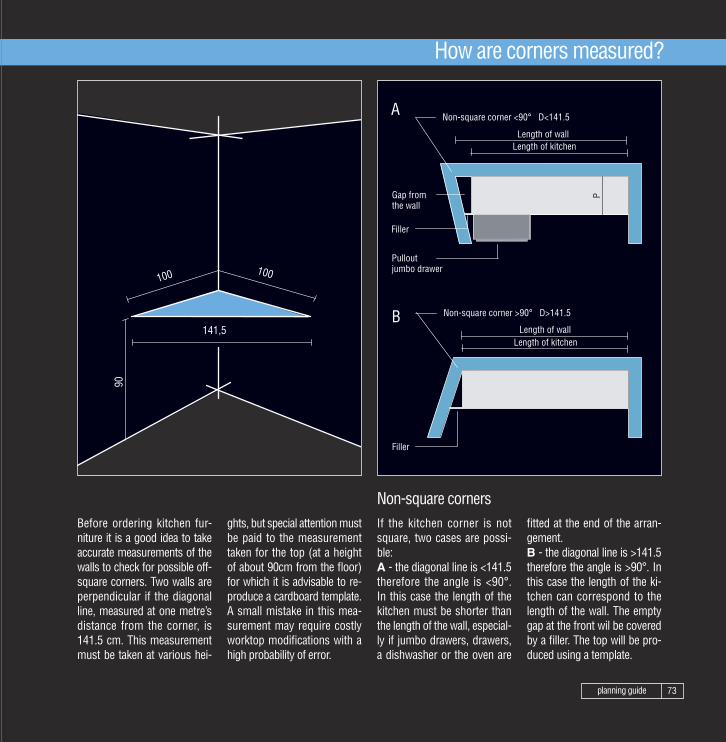
planning guide 73
Before ordering kitchen fur-niture it is a good idea to take accurate measurements of the walls to check for possible off-square corners. Two walls are perpendicular if the diagonal line, measured at one metre’s distance from the corner, is 141.5 cm. This measurement must be taken at various hei-
ghts, but special attention must be paid to the measurement taken for the top (at a height of about 90cm from the fl oor) for which it is advisable to re-produce a cardboard template. A small mistake in this mea-surement may require costly worktop modifi cations with a high probability of error.
fi tted at the end of the arran-gement. B - the diagonal line is >141.5 therefore the angle is >90°. In this case the length of the ki-tchen can correspond to the length of the wall. The empty gap at the front wil be covered by a fi ller. The top will be pro-duced using a template.
Length of kitchenLength of wall
P
Length of wallLength of kitchen
Non-square corner <90° D<141.5
Gap from the wall
Filler
Pullout jumbo drawer
Non-square corner >90° D>141.5
Filler
If the kitchen corner is not square, two cases are possi-ble: A - the diagonal line is <141.5 therefore the angle is <90°. In this case the length of the kitchen must be shorter than the length of the wall, especial-ly if jumbo drawers, drawers, a dishwasher or the oven are
Non-square corners
How are corners measured?
A
B
70517 VALCUCINE guida.indd 7370517 VALCUCINE guida.indd 73 1-02-2008 18:11:461-02-2008 18:11:46
planning guide74
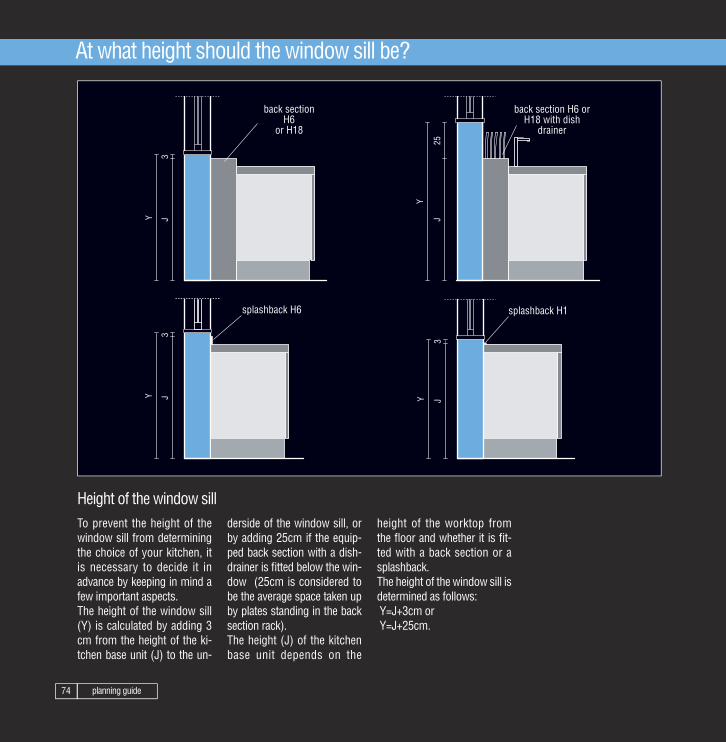
At what height should the window sill be?
To prevent the height of the window sill from determining the choice of your kitchen, it is necessary to decide it in advance by keeping in mind a few important aspects. The height of the window sill (Y) is calculated by adding 3 cm from the height of the ki-tchen base unit (J) to the un-
height of the worktop from the fl oor and whether it is fi t-ted with a back section or a splashback. The height of the window sill is determined as follows: Y=J+3cm or Y=J+25cm.
derside of the window sill, or by adding 25cm if the equip-ped back section with a dish-drainer is fi tted below the win-dow (25cm is considered to be the average space taken up by plates standing in the back section rack).The height (J) of the kitchen base unit depends on the
J3
Y J25
Y
J3
Y J3
Y
splashback H6
back section H6
or H18
back section H6 or H18 with dish
drainer
splashback H1
Height of the window sill
70517 VALCUCINE guida.indd 7470517 VALCUCINE guida.indd 74 1-02-2008 18:11:461-02-2008 18:11:46
planning guide 75
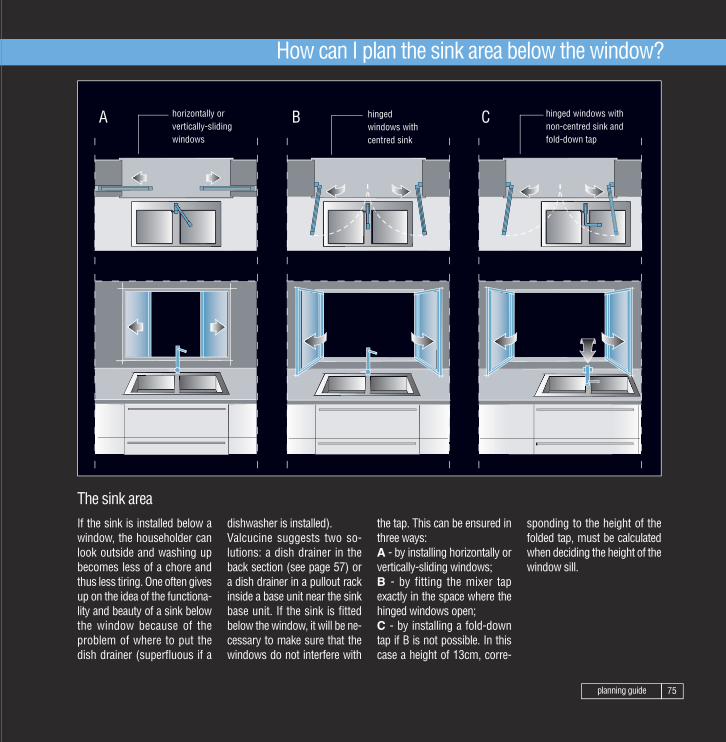
How can I plan the sink area below the window?
If the sink is installed below a window, the householder can look outside and washing up becomes less of a chore and thus less tiring. One often gives up on the idea of the functiona-lity and beauty of a sink below the window because of the problem of where to put the dish drainer (superfl uous if a
dishwasher is installed).Valcucine suggests two so-lutions: a dish drainer in the back section (see page 57) or a dish drainer in a pullout rack inside a base unit near the sink base unit. If the sink is fi tted below the window, it will be ne-cessary to make sure that the windows do not interfere with
the tap. This can be ensured in three ways: A - by installing horizontally or vertically-sliding windows;B - by fitting the mixer tap exactly in the space where the hinged windows open; C - by installing a fold-down tap if B is not possible. In this case a height of 13cm, corre-
sponding to the height of the folded tap, must be calculated when deciding the height of the window sill.
horizontally or vertically-sliding windows
hinged windows with centred sink
hinged windows with non-centred sink and fold-down tap
The sink area
A B C
70517 VALCUCINE guida.indd 7570517 VALCUCINE guida.indd 75 1-02-2008 18:11:471-02-2008 18:11:47

planning guide76
At what height should drains and plumbing connections be?
In this type of kitchen, the spa-ce in which pipes can come out of the wall must corre-spond to the empty space (without a back panel) of the sink base unit.This space is included between Y2 (upper limit) and Y1 (lower limit), where:Y1 is equal to the height from
the floor of the base unit K (be it with a plinth, with feet or wall-hung) increased by 10cm, corresponding to the low bottom back panel + about 6cm for safety’s sake.Y2 is equal to Y1+24cm if the base unit is 60 cm deep, Y1+36cm if the base unit is 72 cm deep.
From a front view, the drains must be centred preferably with the sink centerline and must be kept at a distance of about 7cm from both sides of the base unit.
7 7
Y1
45/60/80/90/120
24/3
6
Y2
Area to use for cable and for pipe outlets on the wall
60/7
2
K 16
31/46/66/76/106
sink centerline
A back-to-wall kitchen
70517 VALCUCINE guida.indd 7670517 VALCUCINE guida.indd 76 1-02-2008 18:11:471-02-2008 18:11:47
planning guide 77
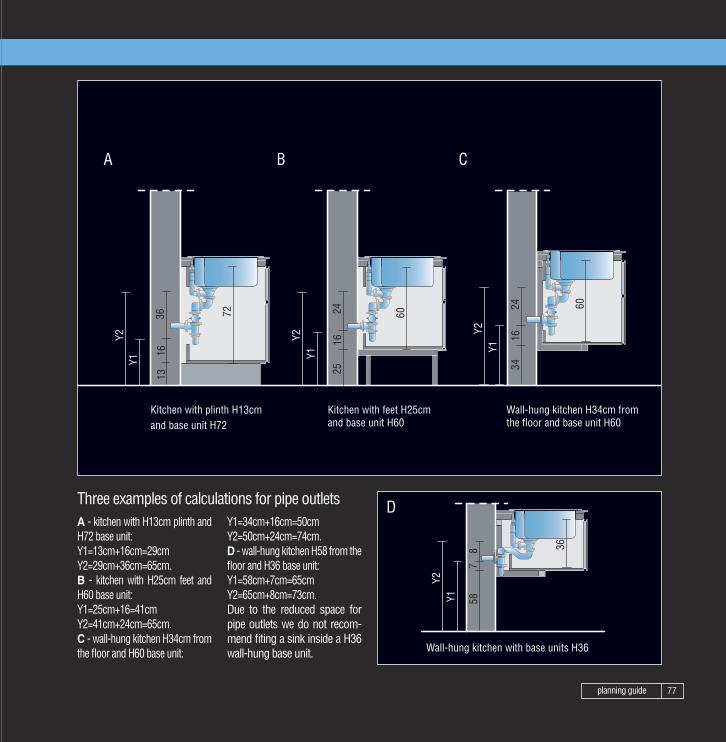
A - kitchen with H13cm plinth and H72 base unit:Y1=13cm+16cm=29cmY2=29cm+36cm=65cm.B - kitchen with H25cm feet and H60 base unit:Y1=25cm+16=41cmY2=41cm+24cm=65cm.C - wall-hung kitchen H34cm from the fl oor and H60 base unit:
Y1=34cm+16cm=50cmY2=50cm+24cm=74cm.D - wall-hung kitchen H58 from the fl oor and H36 base unit:Y1=58cm+7cm=65cmY2=65cm+8cm=73cm.Due to the reduced space for pipe outlets we do not recom-mend fi ting a sink inside a H36 wall-hung base unit.
Three examples of calculations for pipe outlets
Y1Y2
Y1Y2
Y1Y2
72 60
60
1336
16
2416
25
2416
34
Kitchen with plinth H13cm and base unit H72
Kitchen with feet H25cm and base unit H60
Wall-hung kitchen H34cm from the floor and base unit H60
Y1
Y2
36
8 58
7
Wall-hung kitchen with base units H36
A B C
D
70517 VALCUCINE guida.indd 7770517 VALCUCINE guida.indd 77 1-02-2008 18:11:481-02-2008 18:11:48
planning guide78
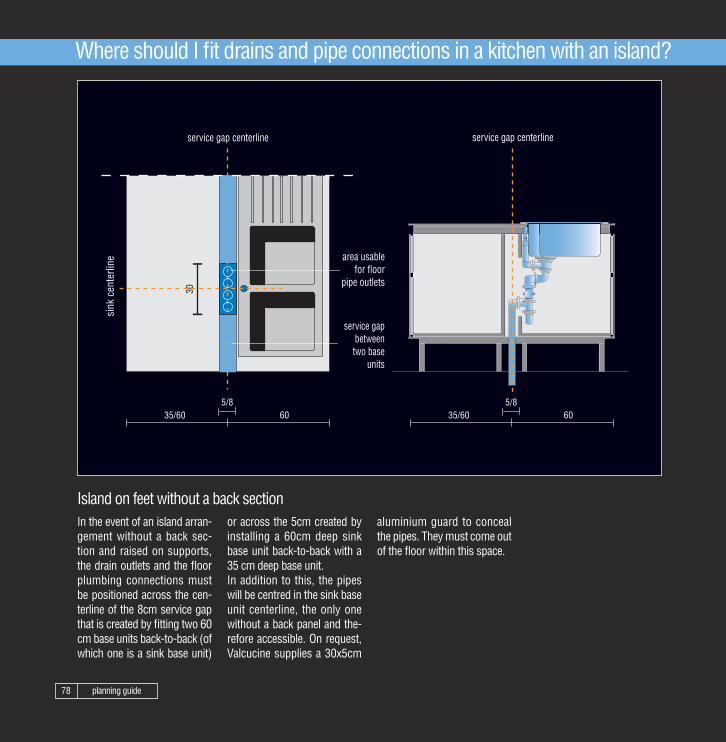
Where should I fi t drains and pipe connections in a kitchen with an island?
In the event of an island arran-gement without a back sec-tion and raised on supports, the drain outlets and the fl oor plumbing connections must be positioned across the cen-terline of the 8cm service gap that is created by fi tting two 60 cm base units back-to-back (of which one is a sink base unit)
or across the 5cm created by installing a 60cm deep sink base unit back-to-back with a 35 cm deep base unit. In addition to this, the pipes will be centred in the sink base unit centerline, the only one without a back panel and the-refore accessible. On request, Valcucine supplies a 30x5cm
aluminium guard to conceal the pipes. They must come out of the fl oor within this space.
35/60 60 5/8
30
35/60 60 5/8
service gap centerlineservice gap centerline
sink
cen
terli
ne area usable for floor
pipe outlets
service gap between two base
units
Island on feet without a back section
70517 VALCUCINE guida.indd 7870517 VALCUCINE guida.indd 78 1-02-2008 18:11:481-02-2008 18:11:48
planning guide 79
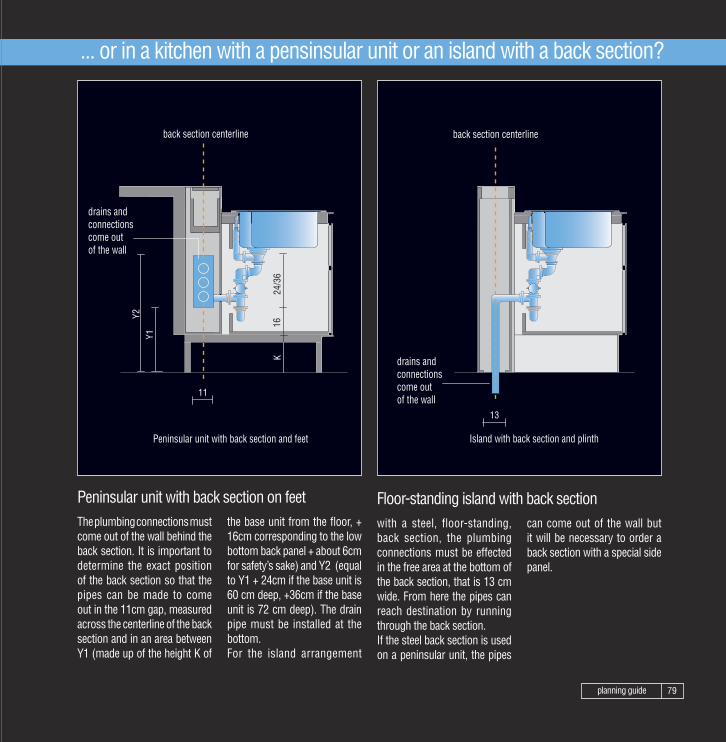
... or in a kitchen with a pensinsular unit or an island with a back section?
The plumbing connections must come out of the wall behind the back section. It is important to determine the exact position of the back section so that the pipes can be made to come out in the 11cm gap, measured across the centerline of the back section and in an area between Y1 (made up of the height K of
the base unit from the fl oor, + 16cm corresponding to the low bottom back panel + about 6cm for safety’s sake) and Y2 (equal to Y1 + 24cm if the base unit is 60 cm deep, +36cm if the base unit is 72 cm deep). The drain pipe must be installed at the bottom. For the island arrangement
Peninsular unit with back section on feetcan come out of the wall but it will be necessary to order a back section with a special side panel.
with a steel, floor-standing, back section, the plumbing connections must be effected in the free area at the bottom of the back section, that is 13 cm wide. From here the pipes can reach destination by running through the back section. If the steel back section is used on a peninsular unit, the pipes
11
drains and connections come out of the wall
Peninsular unit with back section and feet
Y1
Y2
24/3
6 K
16
back section centerline
13
back section centerline
drains and connections come out of the wall
Island with back section and plinth
Floor-standing island with back section
70517 VALCUCINE guida.indd 7970517 VALCUCINE guida.indd 79 1-02-2008 18:11:481-02-2008 18:11:48

planning guide80
A - The kitchen is a room in which relative humidity is very high on the ceiling and unless the heat bridge has been eli-minated during construction, condensation problems may arise and mould may form.
B - There are special insu-lating paints available on the market that avoid the tempe-rature from dropping due to the heat bridge on the ceiling thus preventing the formation of mould.
C - The ideal solution is to add a good thermal insulator to the exterior of the ceiling to completely eliminate the heat bridge and all its negative con-sequences.
THERMALBRIDGE
EXTERNALINSULATION
THERMALBRIDGE
Formation of condensation and mould
Temperature of the wall in the corner: 15° C
Insulating paint
No mould
Temperature of the wall in the corner: 18° C
No mould
Temperature of the wall in the corner: 19° C
Internal wall temperature 19° C
External wall temperature 5 ° C
Internal wall temperature19° C
External wall temperature5 ° C
Internal wall temperature19° C
External wall temperature 5 ° C
Insulator Ceiling Insulator CeilingInsulator Ceiling
How can I prevent mould from forming in the corners?
A B C
70517 VALCUCINE guida.indd 8070517 VALCUCINE guida.indd 80 1-02-2008 18:11:491-02-2008 18:11:49

planning guide 81
Various types of plaster are available on the market, some are synthetic, others are natural. Bio-architecture re-commends the use of natural plaster only, that is less har-mful for our health. It is made of lime and sand mortars and doesn’t contain cement. Lime mortar is resistant to humidi-
tolerance to humidity because they are very permeable to wa-ter vapour. The choice of colours is also important in a kitchen becau-se it affects the luminosity of the room: light colours make spaces look larger while war-mer colours create the right harmony.
sticity. These features result in extreme durability and very high reliability, guaranteeing great resistance to fl exion and compression. For as much as regards paints, silicate paints made of potassium silicate and natural mineral pigments are excellent. They are transpi-ring, hygienic and have a high
ty and mould, anti-bacterial, extremely transpiring and an excellent heat insulator. Slow hardening due to the presence of dicalcium silica-te gives this plaster excellent resistance to sudden changes in temperature, perfect adhe-sion to the base to which it is applied and excellent ela-
Plaster
PLASTERSYNTHETIC
PLASTER
NATURAL
A B
What plaster should I choose?
70517 VALCUCINE guida.indd 8170517 VALCUCINE guida.indd 81 1-02-2008 18:11:491-02-2008 18:11:49

planning guide82
Cotto, stone, marble and gra-nite are natural materials that must be treated using water-repellent products because they tend to stain. Wood gives the kitchen a homely atmo-sphere but only if it is fi nished with natural varnishes that set off its original texture. Care must be taken to avoid wet-
style fl ooring with a different coloured border, it is important to know the exact size of the furniture and where it will be placed to avoid covering the design or obtaining results that differ from those planned.
used which are very resistant because the material mix and the enamel are fi red simulta-neously at a very high tempe-rature. Double-fired tiles are more refi ned but also more de-licate, they chip easily and end up looking unkempt. If you are planning a fl ooring with a de-sign, for example a Venetian-
ting it continuously because humidity makes it swell. It is important to appreciate the “worn” look because even if a resistant wood such as oak is used, sharp object, sauces, wine and coffee will take their toll and leave their mark. As an alternative to natural ma-terials, single-fi red tiles can be
What fl ooring should I choose for my kitchen?
70517 VALCUCINE guida.indd 8270517 VALCUCINE guida.indd 82 1-02-2008 18:11:491-02-2008 18:11:49
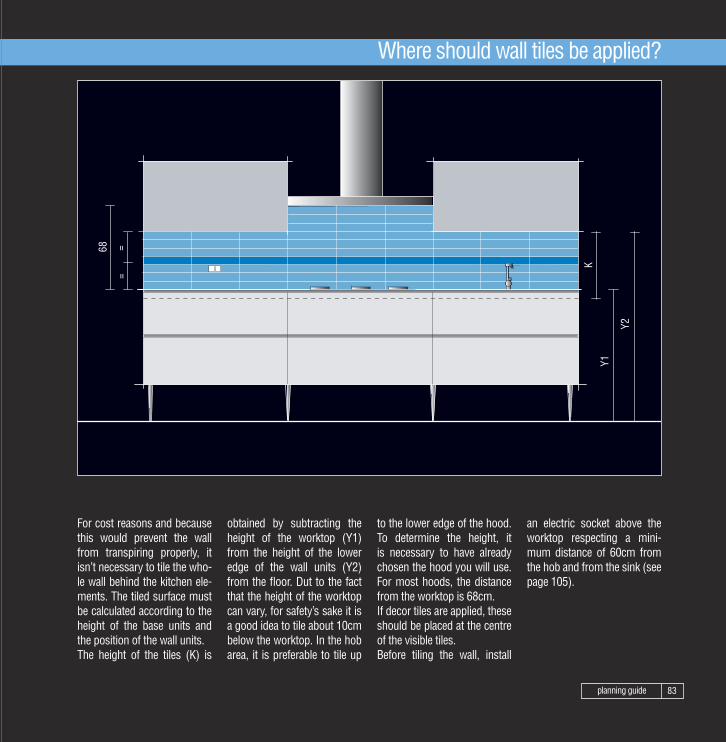
planning guide 83
Where should wall tiles be applied?
For cost reasons and because this would prevent the wall from transpiring properly, it isn’t necessary to tile the who-le wall behind the kitchen ele-ments. The tiled surface must be calculated according to the height of the base units and the position of the wall units. The height of the tiles (K) is
an electric socket above the worktop respecting a mini-mum distance of 60cm from the hob and from the sink (see page 105).
to the lower edge of the hood. To determine the height, it is necessary to have already chosen the hood you will use. For most hoods, the distance from the worktop is 68cm. If decor tiles are applied, these should be placed at the centre of the visible tiles.Before tiling the wall, install
obtained by subtracting the height of the worktop (Y1) from the height of the lower edge of the wall units (Y2) from the fl oor. Dut to the fact that the height of the worktop can vary, for safety’s sake it is a good idea to tile about 10cm below the worktop. In the hob area, it is preferable to tile up
70517 VALCUCINE guida.indd 8370517 VALCUCINE guida.indd 83 1-02-2008 18:11:501-02-2008 18:11:50

70517 VALCUCINE guida.indd 8470517 VALCUCINE guida.indd 84 1-02-2008 18:11:501-02-2008 18:11:50
70517 VALCUCINE guida.indd 8570517 VALCUCINE guida.indd 85 1-02-2008 18:15:161-02-2008 18:15:16

planning guide86
Why are aeration holes necessary?
The quantitiy of air that enters the kitchen must be at least equal to the air used for nor-mal gas combustion. In addi-tion to this, one must consider that without a fl ow of air from outdoors, hood extraction may generate a drop in pressure that would prevent the comple-te expulsion of fumes. To avoid
tchen wall to solve problems connected with the use of LPG which, as well as needing a greater quantity of air for com-bustion, has a relatively lower density compared to natural gas.
kW of heat capacity installed, with a minimum of 100cm ;- if the hob does not have a ther-mocouple (device that stops the gas fl ow if the fl ame goes out) an additional hole is required to obtain a minimum aeration cross-section of 200cm.It is advisable for the second hole to be at the top of the ki-
these two problems the air fl ow must come in directly through permanent openings on the outside walls of the kitchen. These openings are governed by the UNI7129 standards and must comply with the following requirements: - they must have a net cross-section of at least 6cm for each
2 2
Hob with thermocouple and/or use of natural gas
Hob without thermocoupleand/oruse of LPG
Air inlet aeration holes Ø 12cm, total surface 200 cm
Air inlet aeration hole Ø 12cm, minimum surface 100 cm
2
2
2
70517 VALCUCINE guida.indd 8670517 VALCUCINE guida.indd 86 1-02-2008 18:15:191-02-2008 18:15:19

planning guide 87
Odours travel to other rooms in the home
All odours are conveyed in the right direction and expelled by the hood
Aeration hole in an inside kitchen wall
Aeration hole in a room adjacent to the kitchen
Standards also allow indirect ventilation by taking air from an adjacent room, as long as this room is ventilated directly from outdoors, is not a bedroom and is not at a high risk of catching fi re (e.g. a carport, a garage, a warehouse etc.). In addition to this, the adja-cent room must not have a
up) and to prevent odours from going towards other rooms in the home by conveying them in the right direction.
door divides the two rooms, it can enter by increasing the gap between the door and the fl oor (min. 2 cm).Where possible, Valcucine sug-gests to make the aeration ho-les in a room adjacent to the ki-tchen to avoid annoying cold air draughts (before reaching the kitchen the air has time to warm
lower pressure compared to the room to be aired because of the presence of an applian-ce powered by any type of fuel (e.g. a fi replace, a stove, etc.) or of an extraction device for which an air inlet has not been provided. The air can flow in from the adjacent room throu-gh permanent openings or, if a
70517 VALCUCINE guida.indd 8770517 VALCUCINE guida.indd 87 1-02-2008 18:15:211-02-2008 18:15:21

planning guide88
Why do I need a check valve?
For all its hood models, Val-cucine has adopted a special check valve that shuts when the motor is off, preventing unwanted air from flowing in from outdoors, and opens automatically when the motor is on. Unpleasant inconvenien-ces may occur in absence of this valve.
come in from outdoors. Furthermore, due to the chi-mney effect, a hood without a check valve tends to extract the hot air from the room and convey it oudoors even when it is off, thus incresing heating costs.
Due to particular circumstan-ces that may occur in the home (draughts or drops in pressu-re) if the fumes outlet hole is near other fl ues it may take in the toxic gasses coming from the fi replace, stove or boiler of adjacent homes. Furthermore, if a check valve is not installed, cold air may
Low pressureroome
Hot air escapes
Toxic gasses come in from adjacent chiimneys
Hood without a check valve
Hood without a check valve
70517 VALCUCINE guida.indd 8870517 VALCUCINE guida.indd 88 1-02-2008 18:15:211-02-2008 18:15:21

planning guide 89
Odours from other rooms
Hood withouta check valve
Branched common flue pipe
Low pressure room
In a multi-storey building, all the fumes are usually con-veyed into a common fl ue pipe and then discharged outdoors. The fl ue pipe must comply with the UNI EN 1443 standard construction requirements. It must also be heat-insulated to prevent condensation or cooling of fumes and it must
case, a fl ue pipe used in com-mon with other homes may attract the fumes and food odours of neighbouring ki-tchens into your kitchen. If your hood does not have an integrated check valve, we suggest you install a separate one-way valve in the outside wall.
run vertically and be without constrictions. The hood fl ue pipes must run into a common fl ue pipe that is branched and used to this aim only. A problem that must not be underestimated is the possi-ble use of an extraction hood without a check valve. In this
70517 VALCUCINE guida.indd 8970517 VALCUCINE guida.indd 89 1-02-2008 18:15:211-02-2008 18:15:21

planning guide90
What hoods can I choose from?
A - The hood has a fundamen-tal role in the kitchen because it eliminates odours caused by cooking food and extracts the vapours which would otherwise stagnate and tend to condense on cold kitchen surfaces. It is also used to eliminate toxic combustion gasses (carbon monoxide and
B - To reduce the diffusion of odours it is preferable to use hoods that partialise the air inlet to the greatest possible extent. The best system is a hood that is shut in on all three sides.
of the room; - worktop hoods: these can shut and be completely ca-mouflaged with the kitchen worktop.
nitrogen monoxide).Various types of hoods are available on the market: - wall-hung hoods: to use for kitchens installed along a wall;- hoods below wall units: can be completely integrated insi-de the kitchen unit;- island hoods: to use if the cooking area is in the centre
extractionwall-hung
extraction, ceiling-hung for island
extractionfrom worktop
extractionbuilt into wall unit
A
B
70517 VALCUCINE guida.indd 9070517 VALCUCINE guida.indd 90 1-02-2008 18:15:221-02-2008 18:15:22

planning guide 91
What is the right hood size for good extraction?
A - very often, a 80 cm deep kitchen is fitted with a less deep extractor hood (50cm deep) that does not extract fumes well.
B - If a hood wider than the hob is installed, extraction is improved and the aesthetic result is definitely more at-tractive because the hood can become a feature and design element that distinguishes the kitchen.
A - If the width of the hob is greater or equal to the hood, vapours and odours cannot be completely extracted, espe-cially if the hood does not have a powerful motor. For safety reasons the hood must not be installed less than 65cm above the hob.
B - For the 80cm depth, Val-cucine offers hoods with sha-pes and dimensions that are suffi cient to completely cover the cooking area thus ensuring better extraction.
The depth of the hood The width of the hood and the height of the worktop
A
B
A B
70517 VALCUCINE guida.indd 9170517 VALCUCINE guida.indd 91 1-02-2008 18:15:221-02-2008 18:15:22

planning guide92
How can silent extraction be achieved?
The heart of the hood is the motor which determines its extraction capacity. For good extraction, the power of the motor must be suitable for the shape, type and size of the hood. The motor can be fi tted inside the hood. In this case, to redu-ce its noise level, it must be a
recommends the use of a re-mote motor of the same brand as the extractor hood.
All Valcucine hoods have an inside motor of at least 750m (volume of air extracted in an hour). If the hood is particular-ly large, the power is increased by fi itting two motors. On request, all Valcucine hoods can be fi tted with a remote mo-tor instead of an inside one. For excellent results, Valcucine
top quality one. If you want to further reduce noise, a remote motor can be installed outside, taking care to fit a duct that avoids air vortex formations that could make the hood very noisy (see page 93).
...bzzz..
external motor
internal motor
remote motor fixed to the wall
remote motor fixed to the roof
3
70517 VALCUCINE guida.indd 9270517 VALCUCINE guida.indd 92 1-02-2008 18:15:221-02-2008 18:15:22

planning guide 93
What should I remember when fi tting the extractor hose?
A - To increase the effi ciency of the hood, the length of the extraction hose and the quan-tity of 90° curves must be reduced to a minimum (every bend reduces the speed of the fumes and thus the extraction rate by 20%). The hose must also run straight for at least 30cm before a 90° curve.
D - It is best to use hoses that have a smooth inner surface to avoid the formation of tur-bulence. If runs are not strai-ght, fl exible aluminium hoses without sharp edges can be used. It is preferable not to use an extensible hose because the ridges create more resi-stance and noise.
C - The elbows must be roun-ded and not at a right angle because air turbulence forms near sharp edges and these are an obstacle to the com-plete expulsion of odours to the outside. The best solution is for bends to be rounded at 45°.
B - The diameter of the hole in the wall must not be smaller than the diameter of the hood hose, otherwise this narrower section will create turbulence, increased air resistance and a high noise level.
hose with 45° rounded bends
hose with 90° rounded bend
hose with 90° sharp bend
smooth hose
flexible hosein aluminium hose
extensible steel and fibreglass hose
A B
C D
70517 VALCUCINE guida.indd 9370517 VALCUCINE guida.indd 93 1-02-2008 18:15:221-02-2008 18:15:22

planning guide94
How can I hide the hood hose if the outlet is in the wrong place?
When you purchase or rent an old house, it is likely that the fumes outlet will be in a posi-tion that is wrong for the new kitchen plan. The above exam-ples give you three possible solutions to conceal the hood hose that is usually considered unsightly.
for a visible connecting run. Furthermore, great care must be paid to avoid using the exhaust pipe of the gas boi-ler or of the fi replace for the hood.
C - Alternatively, a plaster-board beam or false ceiling can be built.
N.B.: If you are renovating a house we suggest you widen the outlet to a diameter of at least 12cm or, if possible, to make one in the right position for the hood to avoid the need
A - If a flat hose is used it can be camoufl aged by a slim shelf. Valcucine does not re-commend this hose because its has the disadvantage of being very noisy. B - If a normal-sized hose is used, it can be concealed by an overshelf with a raised front edge.
Hood hose concealdedby a 35 or 60 cm deep shelf witha H12 front
Rectangular hoodconcealed by a shelf
Hood hose concealedby a plasterboardbeam
A B C
70517 VALCUCINE guida.indd 9470517 VALCUCINE guida.indd 94 1-02-2008 18:15:231-02-2008 18:15:23
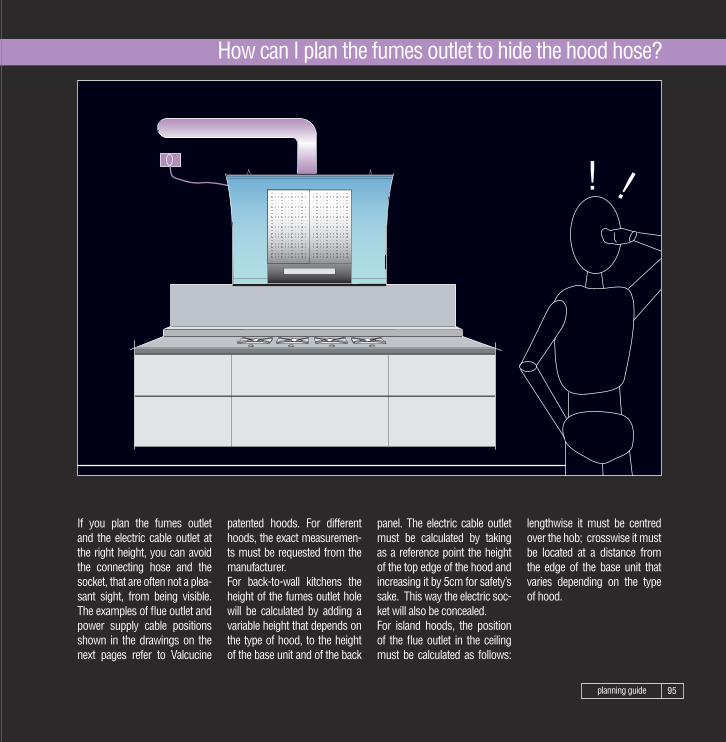
planning guide 95
How can I plan the fumes outlet to hide the hood hose?
If you plan the fumes outlet and the electric cable outlet at the right height, you can avoid the connecting hose and the socket, that are often not a plea-sant sight, from being visible. The examples of fl ue outlet and power supply cable positions shown in the drawings on the next pages refer to Valcucine
lengthwise it must be centred over the hob; crosswise it must be located at a distance from the edge of the base unit that varies depending on the type of hood.
panel. The electric cable outlet must be calculated by taking as a reference point the height of the top edge of the hood and increasing it by 5cm for safety’s sake. This way the electric soc-ket will also be concealed. For island hoods, the position of the fl ue outlet in the ceiling must be calculated as follows:
patented hoods. For different hoods, the exact measuremen-ts must be requested from the manufacturer. For back-to-wall kitchens the height of the fumes outlet hole will be calculated by adding a variable height that depends on the type of hood, to the height of the base unit and of the back
70517 VALCUCINE guida.indd 9570517 VALCUCINE guida.indd 95 1-02-2008 18:15:231-02-2008 18:15:23
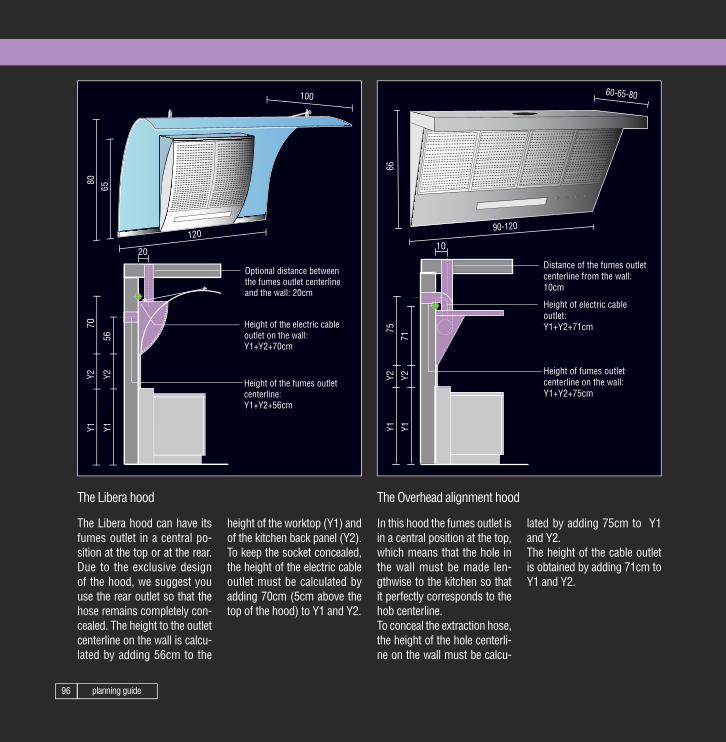
planning guide96
Height of the fumes outlet centerline:Y1+Y2+56cm
Height of the electric cable outlet on the wall:Y1+Y2+70cm
Y1Y2
56
80
120
10065
70Y1
Y2
20
Optional distance between the fumes outlet centerline and the wall: 20cm
66
90-120
60-65-80
Y1
Y2
71
Y1
Y2
75
10
Height of fumes outlet centerline on the wall:Y1+Y2+75cm
Height of electric cable outlet:Y1+Y2+71cm
Distance of the fumes outlet centerline from the wall: 10cm
The Libera hood can have its fumes outlet in a central po-sition at the top or at the rear. Due to the exclusive design of the hood, we suggest you use the rear outlet so that the hose remains completely con-cealed. The height to the outlet centerline on the wall is calcu-lated by adding 56cm to the
lated by adding 75cm to Y1 and Y2.The height of the cable outlet is obtained by adding 71cm to Y1 and Y2.
In this hood the fumes outlet is in a central position at the top, which means that the hole in the wall must be made len-gthwise to the kitchen so that it perfectly corresponds to the hob centerline. To conceal the extraction hose, the height of the hole centerli-ne on the wall must be calcu-
height of the worktop (Y1) and of the kitchen back panel (Y2). To keep the socket concealed, the height of the electric cable outlet must be calculated by adding 70cm (5cm above the top of the hood) to Y1 and Y2.
The Libera hood The Overhead alignment hood
70517 VALCUCINE guida.indd 9670517 VALCUCINE guida.indd 96 1-02-2008 18:15:231-02-2008 18:15:23
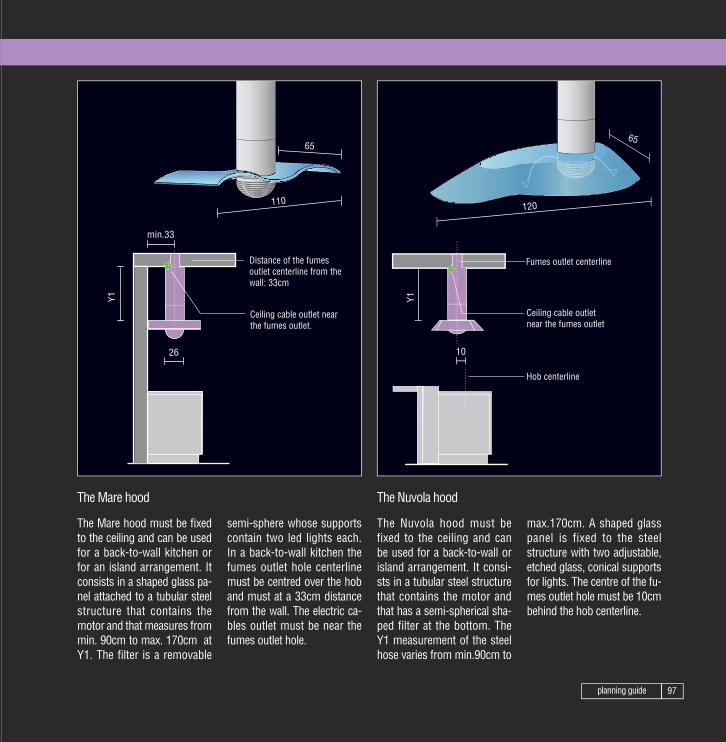
planning guide 97
min.33
110
65
26
Y1
Distance of the fumes outlet centerline from the wall: 33cm
Ceiling cable outlet near the fumes outlet.
65
120
10
Y1
Fumes outlet centerline
Ceiling cable outlet near the fumes outlet
Hob centerline
The Mare hood must be fi xed to the ceiling and can be used for a back-to-wall kitchen or for an island arrangement. It consists in a shaped glass pa-nel attached to a tubular steel structure that contains the motor and that measures from min. 90cm to max. 170cm at Y1. The fi lter is a removable
max.170cm. A shaped glass panel is fixed to the steel structure with two adjustable, etched glass, conical supports for lights. The centre of the fu-mes outlet hole must be 10cm behind the hob centerline.
The Nuvola hood must be fixed to the ceiling and can be used for a back-to-wall or island arrangement. It consi-sts in a tubular steel structure that contains the motor and that has a semi-spherical sha-ped filter at the bottom. The Y1 measurement of the steel hose varies from min.90cm to
semi-sphere whose supports contain two led lights each. In a back-to-wall kitchen the fumes outlet hole centerline must be centred over the hob and must at a 33cm distance from the wall. The electric ca-bles outlet must be near the fumes outlet hole.
The Mare hood The Nuvola hood
70517 VALCUCINE guida.indd 9770517 VALCUCINE guida.indd 97 1-02-2008 18:15:241-02-2008 18:15:24
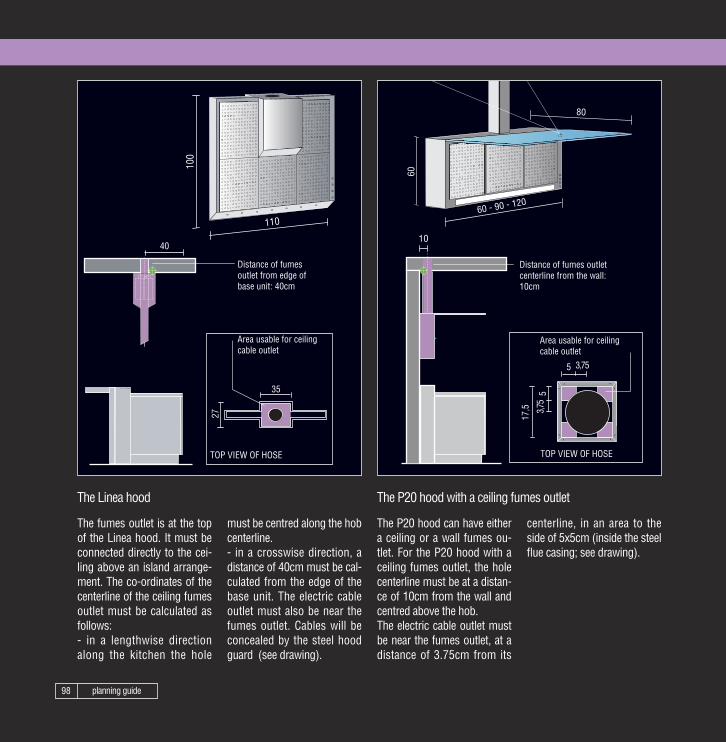
planning guide98
40
35
27
100
110
Distance of fumes outlet from edge of base unit: 40cm
TOP VIEW OF HOSE
Area usable for ceiling cable outlet
10
60 - 90 - 120
60
80
17,5
5
3,75
5 3,75
TOP VIEW OF HOSE
Area usable for ceiling cable outlet
Distance of fumes outlet centerline from the wall: 10cm
The fumes outlet is at the top of the Linea hood. It must be connected directly to the cei-ling above an island arrange-ment. The co-ordinates of the centerline of the ceiling fumes outlet must be calculated as follows: - in a lengthwise direction along the kitchen the hole
centerline, in an area to the side of 5x5cm (inside the steel fl ue casing; see drawing).
The P20 hood can have either a ceiling or a wall fumes ou-tlet. For the P20 hood with a ceiling fumes outlet, the hole centerline must be at a distan-ce of 10cm from the wall and centred above the hob. The electric cable outlet must be near the fumes outlet, at a distance of 3.75cm from its
must be centred along the hob centerline.- in a crosswise direction, a distance of 40cm must be cal-culated from the edge of the base unit. The electric cable outlet must also be near the fumes outlet. Cables will be concealed by the steel hood guard (see drawing).
The Linea hood The P20 hood with a ceiling fumes outlet
70517 VALCUCINE guida.indd 9870517 VALCUCINE guida.indd 98 1-02-2008 18:15:251-02-2008 18:15:25

planning guide 99
12,5
Steel flue hose casing H20cm
Steel guys to fix the glass panel to the wall. Min.h. from floor 250cm
Height of fumes outlet centerline:Y1+Y2+70cm
Height of cable outlet hole:Y1+Y2+65cm
Y1
Y2
60 70
Y1
Y2
250
60 - 90 - 120
60
80
10
For the P20 hood, the height of the fl ue outlet centerline (15cm diameter) on the wall is calcula-ted as follows: Y1+Y2+70cm (see drawing). The fl ue will be concealed by a H17.6cm flue casing.The electric cables must come out of the wall at the following height: Y1+Y2+65cm.
The wall-supports to secure the glass panel guys should be fi xed fl ush with the sides of the hood, at a minimum height of 250cm from the fl oor.
The P20 hood with a wall fumes outlet
70517 VALCUCINE guida.indd 9970517 VALCUCINE guida.indd 99 1-02-2008 18:15:261-02-2008 18:15:26
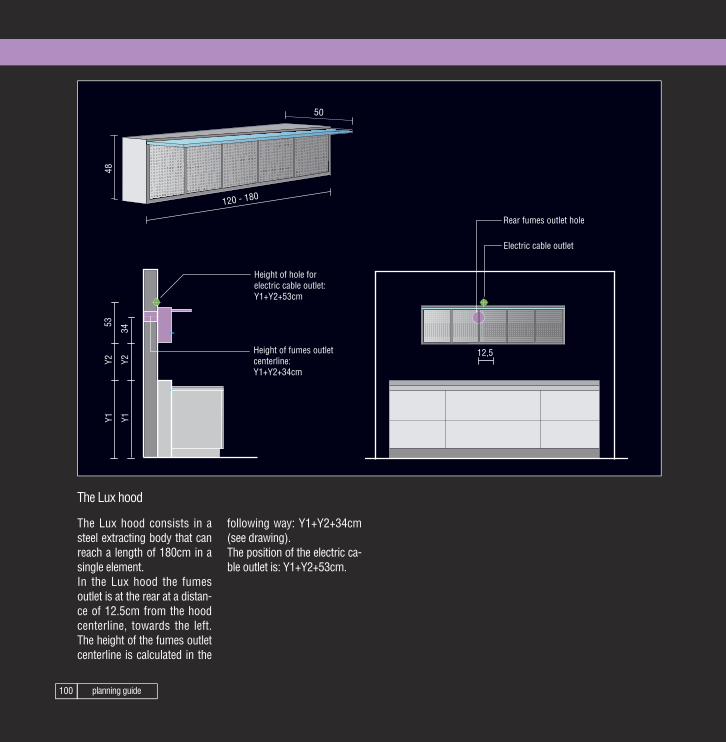
planning guide100
120 - 180
48
50 Y1
Y2
34
53
Y1
Y2
12,5 Height of fumes outlet centerline:Y1+Y2+34cm
Height of hole for electric cable outlet:Y1+Y2+53cm
Rear fumes outlet hole
Electric cable outlet
The Lux hood consists in a steel extracting body that can reach a length of 180cm in a single element. In the Lux hood the fumes outlet is at the rear at a distan-ce of 12.5cm from the hood centerline, towards the left. The height of the fumes outlet centerline is calculated in the
following way: Y1+Y2+34cm (see drawing).The position of the electric ca-ble outlet is: Y1+Y2+53cm.
The Lux hood
70517 VALCUCINE guida.indd 10070517 VALCUCINE guida.indd 100 1-02-2008 18:15:261-02-2008 18:15:26
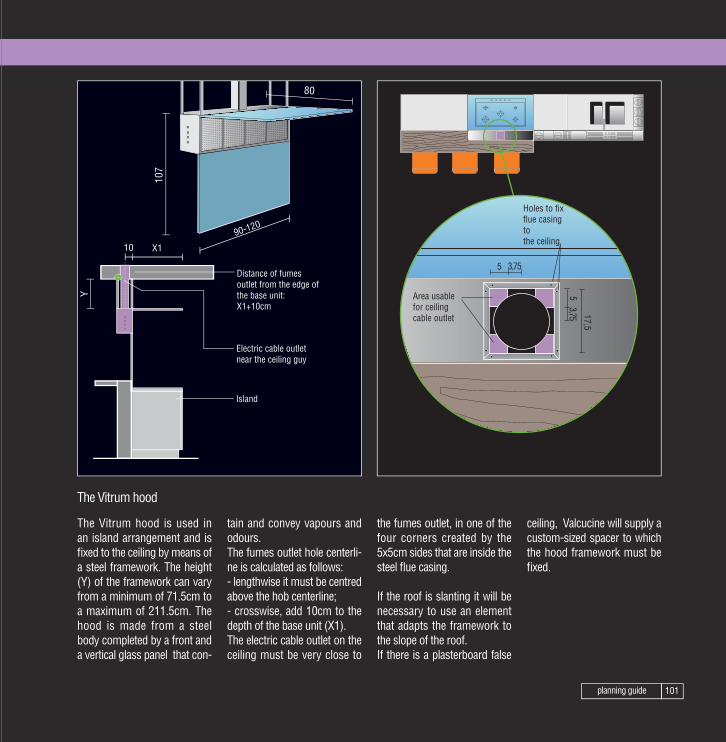
planning guide 101
X1 10
107
80
90-120
Y
Distance of fumes outlet from the edge of the base unit:X1+10cm
Electric cable outlet near the ceiling guy
Island
17,5
5
3,75
5 3,75
Holes to fix flue casing to the ceiling
Area usable for ceiling cable outlet
The Vitrum hood is used in an island arrangement and is fi xed to the ceiling by means of a steel framework. The height (Y) of the framework can vary from a minimum of 71.5cm to a maximum of 211.5cm. The hood is made from a steel body completed by a front and a vertical glass panel that con-
ceiling, Valcucine will supply a custom-sized spacer to which the hood framework must be fi xed.
the fumes outlet, in one of the four corners created by the 5x5cm sides that are inside the steel fl ue casing.
If the roof is slanting it will be necessary to use an element that adapts the framework to the slope of the roof. If there is a plasterboard false
tain and convey vapours and odours. The fumes outlet hole centerli-ne is calculated as follows: - lengthwise it must be centred above the hob centerline;- crosswise, add 10cm to the depth of the base unit (X1). The electric cable outlet on the ceiling must be very close to
The Vitrum hood
70517 VALCUCINE guida.indd 10170517 VALCUCINE guida.indd 101 1-02-2008 18:15:271-02-2008 18:15:27

70517 VALCUCINE guida.indd 10270517 VALCUCINE guida.indd 102 1-02-2008 18:15:291-02-2008 18:15:29
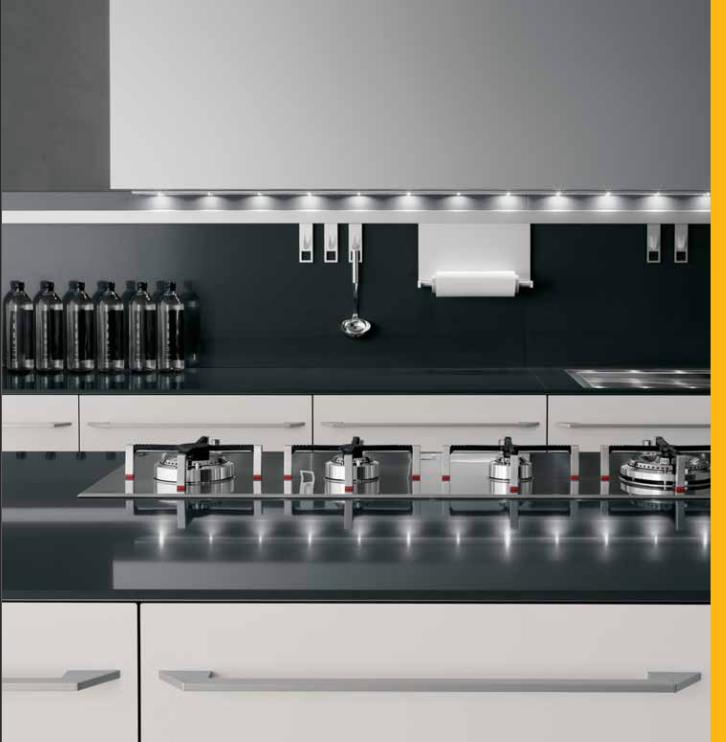
70517 VALCUCINE guida.indd 10370517 VALCUCINE guida.indd 103 1-02-2008 18:15:301-02-2008 18:15:30

planning guide104
refrigerator
electric control board
dishwasher
hob
sink unit
oven
The kitchen is the room con-taining the largest quantity of household applinaces in the house. Some of the appliances are permanently connected while others are turned on or off as needed. Often some refrigerators, di-shwashers and ovens are con-
they should be positioned behind the appliance so that they can be unplugged without dismantling the cabinets.
and switches in the sink base unit, the only one without a back panel. In the event of a failure, this will allow you to cut out the appliance concer-ned without interrupting the power supply to the rest of the kitchen. If it is not possible to collect all the sockets below the sink,
nected to sockets installed at 17.5cm from the fl oor, at the back of base units. Problems may arise when it is necessa-ry to disconnect an appliance for maintenance or repairs: in these cases it will be neces-sary to dismantle the kitchen. The ideal solution is an electric board with individual sockets
The electric sockets
70517 VALCUCINE guida.indd 10470517 VALCUCINE guida.indd 104 1-02-2008 18:15:321-02-2008 18:15:32

planning guide 105
Sockets to connect small ap-pliances in the kitchen should be positioned: A - on the back panel of the kitchen, respecting a safety di-stance of 60cm from the sink and from the hob, because they must not be exposed to heat or water; B - in the aluminium under
wall unit bar near the neon light,C - if there is an equipped back section, inside a compartment fi tted with a switch and a sa-fety cutout.
60 60
A B C
70517 VALCUCINE guida.indd 10570517 VALCUCINE guida.indd 105 1-02-2008 18:15:321-02-2008 18:15:32
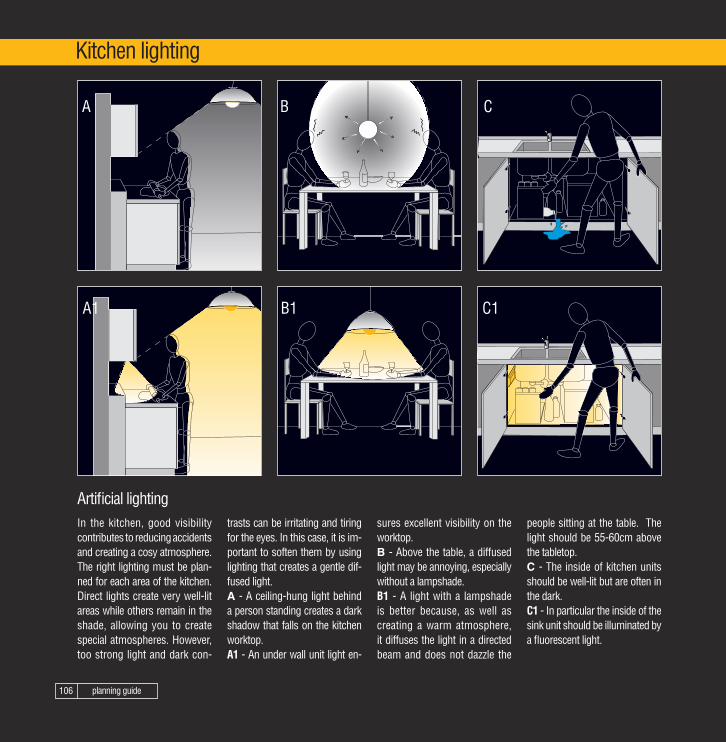
planning guide106
In the kitchen, good visibility contributes to reducing accidents and creating a cosy atmosphere. The right lighting must be plan-ned for each area of the kitchen. Direct lights create very well-lit areas while others remain in the shade, allowing you to create special atmospheres. However, too strong light and dark con-
people sitting at the table. The light should be 55-60cm above the tabletop.C - The inside of kitchen units should be well-lit but are often in the dark. C1 - In particular the inside of the sink unit should be illuminated by a fl uorescent light.
sures excellent visibility on the worktop. B - Above the table, a diffused light may be annoying, especially without a lampshade.B1 - A light with a lampshade is better because, as well as creating a warm atmosphere, it diffuses the light in a directed beam and does not dazzle the
trasts can be irritating and tiring for the eyes. In this case, it is im-portant to soften them by using lighting that creates a gentle dif-fused light. A - A ceiling-hung light behind a person standing creates a dark shadow that falls on the kitchen worktop. A1 - An under wall unit light en-
Artifi cial lighting
Kitchen lighting
A C
A1 C1
B
B1
70517 VALCUCINE guida.indd 10670517 VALCUCINE guida.indd 106 1-02-2008 18:15:331-02-2008 18:15:33

planning guide 107
It is necessary to plan windows and doors carefully to create an environment that is well-lit and comfortable even during the day. Directing light through ade-quately-sized windows allows you to save on electricity as well as promoting greater psycho-logical and physical well-being (badly-lit rooms create a gloomy
and sullen atmosphere).A - If the worktop faces a win-dow, attention must be paid to prevent direct sunlight, or light refl ected by pale-coloured sur-faces facing the window, from dazzling or irritating the eyes. A1 - It is a good idea to fi t a blind on the window to defl ect intense rays so that only the right quan-
tity of light is let into the room. B - A window behind the work-top projects the shadow of the person working at the top, redu-cing visibility and obliging one to switch on the artifi cial light even during the day. B1 - Ideally, kitchen furniture should be installed so that the work area is illuminated by light
coming in sideways to avoid too must light dazzling the eyes and unpleasantly dark areas.
Natural lighting
A B
A1 B1
70517 VALCUCINE guida.indd 10770517 VALCUCINE guida.indd 107 1-02-2008 18:15:341-02-2008 18:15:34

70517 VALCUCINE guida.indd 10870517 VALCUCINE guida.indd 108 1-02-2008 18:15:341-02-2008 18:15:34
70517 VALCUCINE guida.indd 10970517 VALCUCINE guida.indd 109 1-02-2008 18:15:361-02-2008 18:15:36

planning guide110
How can I plan a child safe kitchen?
A
C
B
D
A - The socket inside the back section can be used to connect kitchen appliances. It is very useful for the oven because the power supply can be in-terrupted by a dipole switch, thus preventing children from accidentally switching the oven on.
D - Sometimes, attracted by some object located on the worktop, children climb onto handles and pullout drawers. If the kitchen is wall-hung, it must be provided with a safe wall-fi xing system.
C - Children love pots and pans. To prevent burns, a guard should be fi tted in front of the hob.
B - Detergents are usually sto-red below the sink, an easily accessible place for children. It is a good idea to keep them in a container with a safety lock.
70517 VALCUCINE guida.indd 11070517 VALCUCINE guida.indd 110 1-02-2008 18:15:391-02-2008 18:15:39

planning guide 111
E - It is preferable to choose the latest generation of cool-touch ovens with a tangential fan that ensures effi cient heat insulation. These ovens keep the door cool even when food is cooking inside, avoiding burns that can sometimes be serious.
H - If a child climbs onto a pul-lout drawer or if all the jumbo drawers of a kitchen island are pulled out together, the unit is quite likely to capsize. To avoid this it is necessary to fi x base units with drawers and jumbo drawers to the fl oor using cap-size-prevention brackets.
G - It is a good idea to add cli-ps or magnets to drawers and jumbo drawers to prevent chi-ldren from opening them. This way they are prevented from hurting themselves when they shut them and from reaching the objects located inside (de-tergents, knives, etc.).
F - Tower units must have wall-fixing systems that are tested to prevent them from capsizing in the event of chil-dren climbing on them.
E
F
G
DH
70517 VALCUCINE guida.indd 11170517 VALCUCINE guida.indd 111 1-02-2008 18:15:401-02-2008 18:15:40
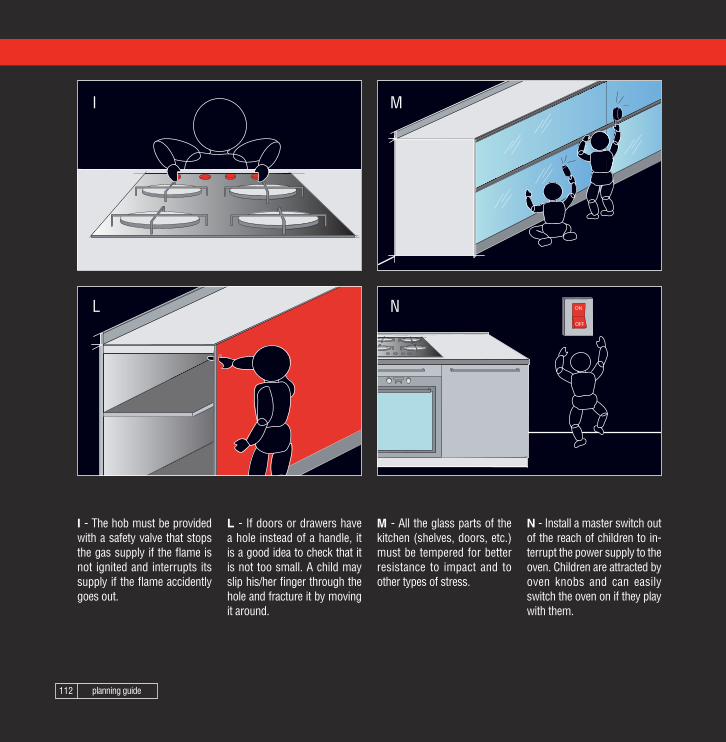
planning guide112
A
I - The hob must be provided with a safety valve that stops the gas supply if the fl ame is not ignited and interrupts its supply if the fl ame accidently goes out.
N - Install a master switch out of the reach of children to in-terrupt the power supply to the oven. Children are attracted by oven knobs and can easily switch the oven on if they play with them.
M - All the glass parts of the kitchen (shelves, doors, etc.) must be tempered for better resistance to impact and to other types of stress.
L - If doors or drawers have a hole instead of a handle, it is a good idea to check that it is not too small. A child may slip his/her fi nger through the hole and fracture it by moving it around.
I
L
M
N
70517 VALCUCINE guida.indd 11270517 VALCUCINE guida.indd 112 1-02-2008 18:15:411-02-2008 18:15:41

planning guide 113
O
P
Q
DR
O - It is preferable to install the hob near the sink to avoid having to walk a long distance holding red hot pots and pans that may be dangerous, espe-cially if children are nearby.
R - It is not a good idea to install the hob near a window because an incoming draught could turn the hob fl ame out and swaying curtains, pe-rhaps moved by a child, could catch fi re.
Q - In general, sharp edged elements are used in modern kitchens and these can beco-me very dangerous for chil-dren. It is preferable to choose a kitchen that has rounded doors, handles and knobs.
P - Make sure that wall unit fixings have been tested for resistance to heavy weights and that they can be adjusted in height and depth.
70517 VALCUCINE guida.indd 11370517 VALCUCINE guida.indd 113 1-02-2008 18:15:411-02-2008 18:15:41

70517 VALCUCINE guida.indd 11470517 VALCUCINE guida.indd 114 1-02-2008 18:15:421-02-2008 18:15:42

70517 VALCUCINE guida.indd 11570517 VALCUCINE guida.indd 115 1-02-2008 18:15:431-02-2008 18:15:43

planning guide116
What is the Valcucine “Home system”?
Kitchen area Living roomarea
Sliding glass panels
The most important revolu-tion in domestic space at the end of the 20th century was undoubtedly the “open space” concept. An undivided space perfectly suited to contempo-rary lifestyles, multi-faceted and unpredictable that puts fl exibility of enrivonments and of furnishings to the fore.
- sliding glass panels to enclo-se the cooking area; - cupboard units with sliding glass doors that can accom-modate both the kitchen units and the household appliances.
it can be partially divided whi-le still maintaining that visual open-space appeal. The Valcucine “Home system” includes:- modular partitions that sepa-rate the kitchen from the living room and that can be transpa-rent (sliding or fi xed panels) or full (wall panels);
It is a well-known fact that open spaces give an airier appeal to home environments but the dispersion of odours from the kitchen to the living room remains a problem to solve. Valcucine has designed a “Home system” that allows you to organise the day area in various ways: if necessary,
70517 VALCUCINE guida.indd 11670517 VALCUCINE guida.indd 116 1-02-2008 18:15:441-02-2008 18:15:44
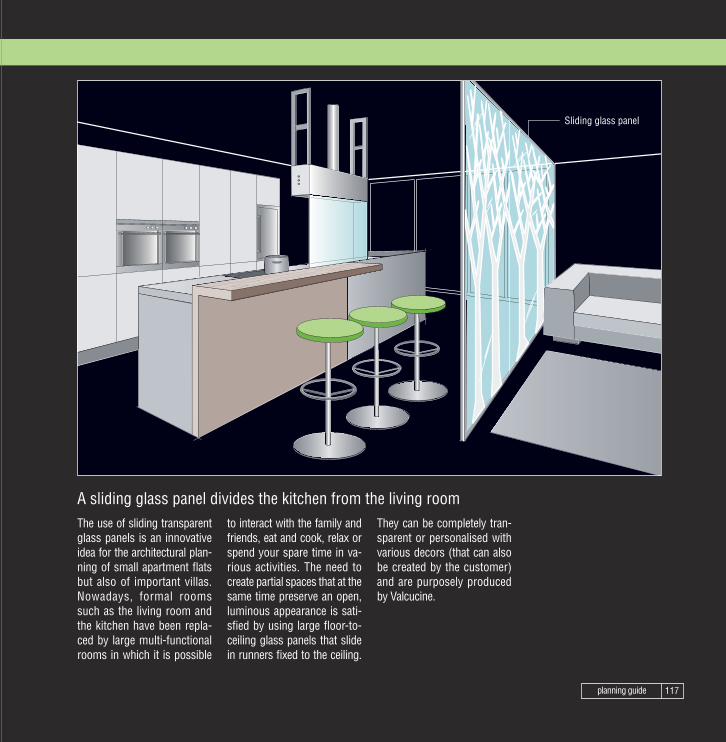
planning guide 117
Sliding glass panel
The use of sliding transparent glass panels is an innovative idea for the architectural plan-ning of small apartment fl ats but also of important villas. Nowadays, formal rooms such as the living room and the kitchen have been repla-ced by large multi-functional rooms in which it is possible
They can be completely tran-sparent or personalised with various decors (that can also be created by the customer) and are purposely produced by Valcucine.
to interact with the family and friends, eat and cook, relax or spend your spare time in va-rious activities. The need to create partial spaces that at the same time preserve an open, luminous appearance is sati-sfi ed by using large fl oor-to-ceiling glass panels that slide in runners fi xed to the ceiling.
A sliding glass panel divides the kitchen from the living room
70517 VALCUCINE guida.indd 11770517 VALCUCINE guida.indd 117 1-02-2008 18:15:451-02-2008 18:15:45
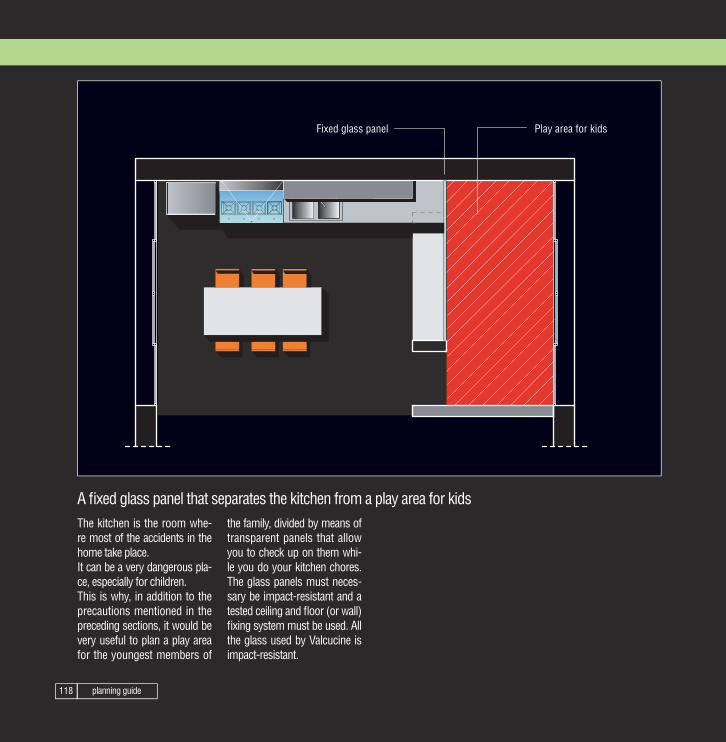
planning guide118
Play area for kids Fixed glass panel
A fi xed glass panel that separates the kitchen from a play area for kidsThe kitchen is the room whe-re most of the accidents in the home take place. It can be a very dangerous pla-ce, especially for children.This is why, in addition to the precautions mentioned in the preceding sections, it would be very useful to plan a play area for the youngest members of
the family, divided by means of transparent panels that allow you to check up on them whi-le you do your kitchen chores. The glass panels must neces-sary be impact-resistant and a tested ceiling and fl oor (or wall) fi xing system must be used. All the glass used by Valcucine is impact-resistant.
70517 VALCUCINE guida.indd 11870517 VALCUCINE guida.indd 118 1-02-2008 18:15:451-02-2008 18:15:45

planning guide 119
Play area for kidsFixed glass panel
70517 VALCUCINE guida.indd 11970517 VALCUCINE guida.indd 119 1-02-2008 18:15:451-02-2008 18:15:45
planning guide120
65
60
Partition composed of double panelling with shelves and an interior sliding glass panel
Wall panels fitted with base units, shelves and wall units
kitchen living room
Double panelling with a sliding glass panel to separate the kitchen from the living room Valcucine has designed a panelling system that can be used in the kitchen or in the living room or that can divide the two areas. In this case it can be fi tted with a glass panel that runs on a track and that, when necessary, can comple-tely divide the two areas. The panelling guarantees utmost
put functional and aesthetic elements together for rational space-planning.
fl exibility of arrangement: it is modular in height (it can be fl oor-standing or raised) and in width to cover any space. It can be fi tted with accessories that are suitable for the kitchen or for the living room. This panelling leaves you free to furnish with co-ordinated materials and fi nishes and to
70517 VALCUCINE guida.indd 12070517 VALCUCINE guida.indd 120 1-02-2008 18:15:471-02-2008 18:15:47
planning guide 121
Partition composed of double panelling with shelves and an interior sliding glass panel
Wall panels fitted with base units, shelves and wall units
70517 VALCUCINE guida.indd 12170517 VALCUCINE guida.indd 121 1-02-2008 18:15:471-02-2008 18:15:47

planning guide122
15
Double panelling that can contain plumbing and electrical connections
Panels fitted with living room elements
Panels fitted with kitchen elements
80
Cupboard unit with sliding doors that contain household appliances
Double panelling fi tted on both sides that can also contain plumbing and electric connectionsThe “Valcucine home system” includes a panelling system that divides the kitchen from the living room and that can be fi tted on one side with base units, shelves and drawers, and on the other side with ki-tchen elements. Water pipes and electric cables are concea-led inside the panelling.
section welded on a steel top must be used preferably on perfectly even walls to avoid making their unevenness more obvious. Alternatively, a back panel can be fi tted to conceal any imperfections in the wall.
The 2.6cm thick Valcucine wall panelling can only be fitted with small shelves while the 6cm thick panelling can also support wall, base and tower units. If these elements are more than 36cm deep, it is a good idea to add feet for extra support. An arrangement with a back
70517 VALCUCINE guida.indd 12270517 VALCUCINE guida.indd 122 1-02-2008 18:15:471-02-2008 18:15:47

planning guide 123
Double panelling with the possibility of containing plumbing and electric connections
Wall panelling fitted with living room elements
Back section welded on steel top
Panels fitted with kitchen elements
70517 VALCUCINE guida.indd 12370517 VALCUCINE guida.indd 123 1-02-2008 18:15:481-02-2008 18:15:48
planning guide124
into decorative elements.Onfalos can be fi tted near a wall-hung extractor hood even capable of capturing the fumes and odours coming from an oven installed facing it.
It is a well-known fact that even the best hoods on the market are not capable of absorbing 100% odours. Valcucine has designed an “ideal anti-odour system” that uses sliding glass panels to completely isolate the cooking area and to stop the odours from escaping. This system even allows you to
use a hotplate barbecue in your kitchen. Onfalos is an exclusive fur-nishing object constructed entirely from stainless steel and featuring a set of original design solutions that have transformed even structu-ral components, that are not usually aesthetically pleasing,
90 90 90 90 90 90
80
540
Wall-hung extractor hood
Onfalos (hotplate cooking system)
Glass sliding doors
Cooking areacan be enclosedusing sliding doors
Hob
Oven facing the wall-hung extractor hood
Sliding glass panels that enclose the whole cooking area
70517 VALCUCINE guida.indd 12470517 VALCUCINE guida.indd 124 1-02-2008 18:15:481-02-2008 18:15:48
planning guide 125
Wall-hung extractor hood
Onfalos(hotplate cooking system)
Oven facing the wall-hung hood
Glass sliding doors
70517 VALCUCINE guida.indd 12570517 VALCUCINE guida.indd 125 1-02-2008 18:15:481-02-2008 18:15:48

planning guide126
installed at a certain distance from heat sources such as ra-diators, ovens and hobs.
If the space available is large enough, it is possible to fit some of the kitchen elements in a purpose-made niche en-closed by sliding glass doors. If the fridge is installed in the niche, it will be necessary to make some openings at the top of the panel above the
glass doors, to allow the hot air generated by refrigeration to escape. The aeration holes must have a total minimum surface of 400cm. To avoid interfering with the effi ciency and durability of the refrigerator and for greater energy-saving, it should be
170
120
80
120
60
Sliding doors that enclose a niche with household appliances
A sliding glass panel that encloses a niche fi tted with household appliances
2
70517 VALCUCINE guida.indd 12670517 VALCUCINE guida.indd 126 1-02-2008 18:15:491-02-2008 18:15:49

planning guide 127
Sliding glass panels thatenclose the niche fitted withhousehold appliances
Fridge aeration opening
Enclosure
70517 VALCUCINE guida.indd 12770517 VALCUCINE guida.indd 127 1-02-2008 18:15:491-02-2008 18:15:49
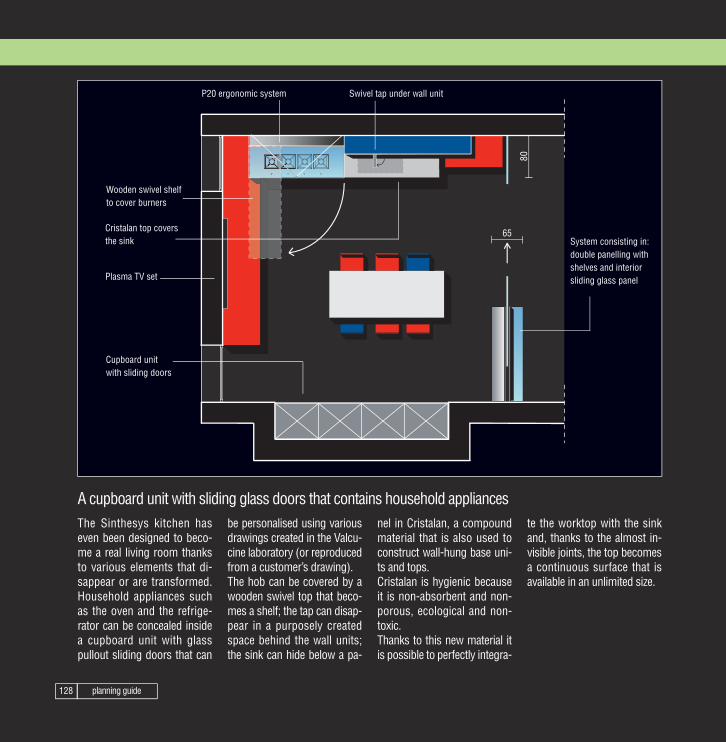
planning guide128
te the worktop with the sink and, thanks to the almost in-visible joints, the top becomes a continuous surface that is available in an unlimited size.
nel in Cristalan, a compound material that is also used to construct wall-hung base uni-ts and tops.Cristalan is hygienic because it is non-absorbent and non-porous, ecological and non-toxic. Thanks to this new material it is possible to perfectly integra-
The Sinthesys kitchen has even been designed to beco-me a real living room thanks to various elements that di-sappear or are transformed. Household appliances such as the oven and the refrige-rator can be concealed inside a cupboard unit with glass pullout sliding doors that can
be personalised using various drawings created in the Valcu-cine laboratory (or reproduced from a customer’s drawing). The hob can be covered by a wooden swivel top that beco-mes a shelf; the tap can disap-pear in a purposely created space behind the wall units; the sink can hide below a pa-
80
65
Swivel tap under wall unit P20 ergonomic system
Wooden swivel shelfto cover burners
Cristalan top covers the sink
Plasma TV set
Cupboard unitwith sliding doors
System consisting in: double panelling with shelves and interior sliding glass panel
A cupboard unit with sliding glass doors that contains household appliances
70517 VALCUCINE guida.indd 12870517 VALCUCINE guida.indd 128 1-02-2008 18:15:491-02-2008 18:15:49
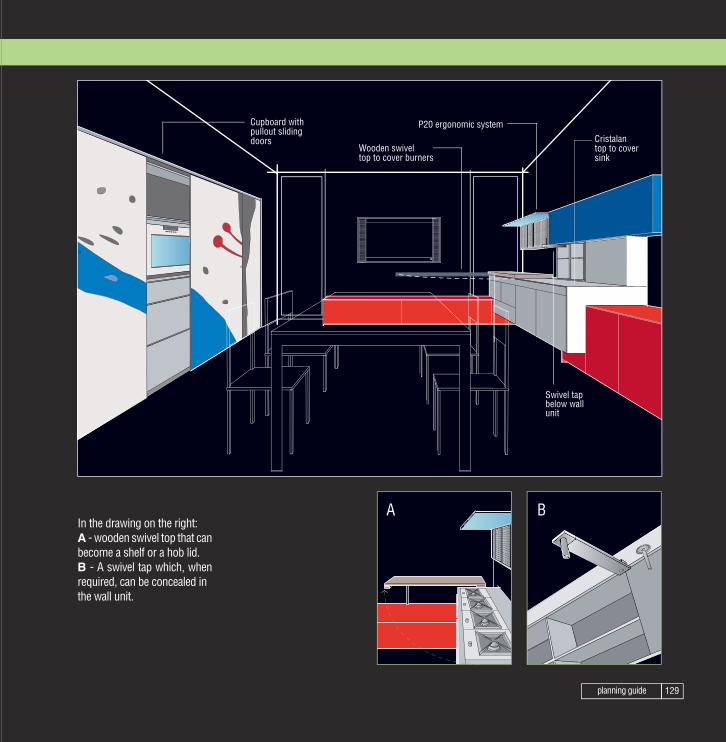
planning guide 129
In the drawing on the right:A - wooden swivel top that can become a shelf or a hob lid. B - A swivel tap which, when required, can be concealed inthe wall unit.
Swivel tap below wall unit
Wooden swivel top to cover burners
P20 ergonomic system Cristalan
top to cover sink
Cupboard with pullout sliding doors
A B
70517 VALCUCINE guida.indd 12970517 VALCUCINE guida.indd 129 1-02-2008 18:15:501-02-2008 18:15:50

planning guide130
How can I plan a kitchen for people with special needs?
Steel cooking and washing modules with raising-lowering mechanism
Wall-hung corner swivel base unit
Wall unit with raising-lowering mechanism
Steel, bracket-concealing guard
Controls for hob and for worktop raising-lowering mechanism
Hob with pasta strainer
Dish drainer and sink
Hability: beauty and accessibility even for the disabledHability can be used by peo-ple in perfect physical condi-tion or by those with special needs without it becoming a way of classifying the per-son using it, as often hap-pens with other products. The distinguishing element of Hability is Easy Food, a stainless steel system that
rack, pullout and mobile sin-ks and a single-lever spray head mixer.
sition one can prepare, cook and strain food without ha-ving to move pots and pans. A self-cleaning system drains the water away from the user and conveys it di-rectly to the service sink between the hotplates. The top can also be fitted with a worktop dish-drainer
is very innovative in terms of ergonomics, safety and technical solutions.The top is made in a single mould (without welded parts or built-in elements) and has an up/down mechanism that can be managed by means of the controls located near the hob. From this same po-
70517 VALCUCINE guida.indd 13070517 VALCUCINE guida.indd 130 1-02-2008 18:15:531-02-2008 18:15:53

planning guide 131
Runner guard for top raising-lowering mechanism
Pasta strainer
Dish drainer
Tap with spray head
Steel cooking and washing modules with raising-lowering mechanism
Controls for hob and for raising-lowering mechanism
Wall unit with raising-lowering mechansm
Wall-hung cupboard
Easy Food has been comple-ted by Valcucine using:- wall-hung units and corner elements with accessories that are fully accessible even by so-meone on a wheelchair; - the steel and tempered glass Libera hood that can be mana-ged by a remote-control;- a wall unit that is more acces-
or as a peninsular unit with various elements to complete them. Easy food has been designed in standard dimensions that are compatible with most ki-tchen furniture on the market.
sible thanks to a raising-lowe-ring mechanism that moves the wall unit forwards to the front of the top; - an oven with a disappearing bottom-hung door. To meet the most varied layout requirements the Easy Food modules can be assembled in-line, in a corner, as an island
70517 VALCUCINE guida.indd 13170517 VALCUCINE guida.indd 131 1-02-2008 18:15:531-02-2008 18:15:53

70517 VALCUCINE guida.indd 13270517 VALCUCINE guida.indd 132 1-02-2008 18:15:531-02-2008 18:15:53

70517 VALCUCINE guida.indd 13370517 VALCUCINE guida.indd 133 1-02-2008 18:15:551-02-2008 18:15:55

Artematica Vitrum:the culture of beauty in the kitchen
Valcucine supplies the culture of beauty with projects and pro-ducts in which original shapes blend with continuous research into innovative technologies and materials mixed with a passion for Italian handicraft tradition. Thus, beauty is born from a harmonious synthesis of design, functionality, respect for Man and for the environment. In Artematica Vitrum, the borderline between art and manufactu-red products becomes very slim in interpreting the pureness and lightness of one of the most fascinating and ecological materials created by man. By means of a balanced synthesis of ongoing experience and research that started two decades ago, Valcucine is now capable of extending its guarantee on all glass elements to 15 years from the date of purchase. The doors consist in a light and resistant aluminium frame to which a matt or gloss, coloured or etched glass panel is ap-plied that can also be personalised with various drawings crea-ted in the Valcucine laboratory or by reproducing a customer’s drawing. The worktop is also in tempered glass and is supported by a drawn aluminium structure. The glass is also used for the side panels applied to base and wall units.
70517 VALCUCINE guida.indd 13470517 VALCUCINE guida.indd 134 1-02-2008 18:15:581-02-2008 18:15:58
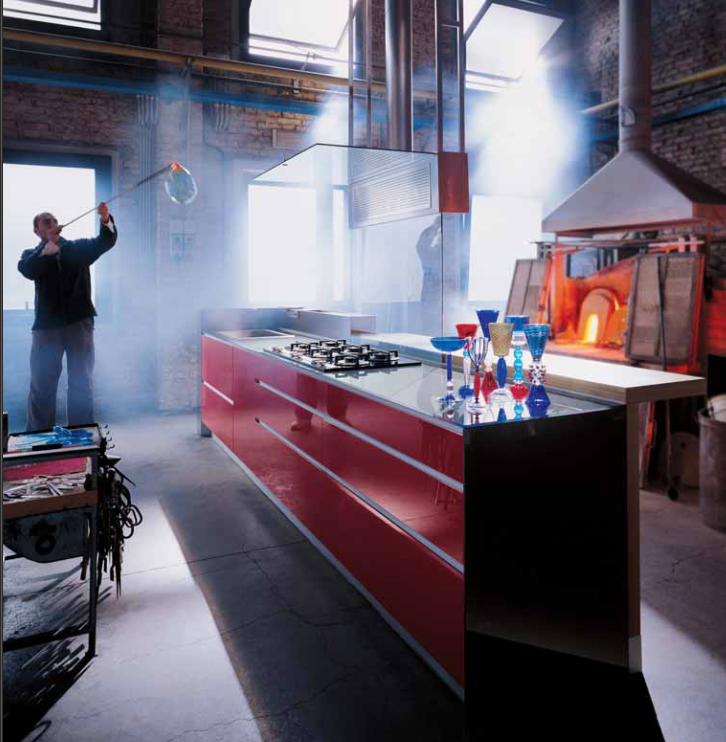
70517 VALCUCINE guida.indd 13570517 VALCUCINE guida.indd 135 1-02-2008 18:16:021-02-2008 18:16:02

70517 VALCUCINE guida.indd 13670517 VALCUCINE guida.indd 136 1-02-2008 18:16:091-02-2008 18:16:09

70517 VALCUCINE guida.indd 13770517 VALCUCINE guida.indd 137 1-02-2008 18:16:151-02-2008 18:16:15

70517 VALCUCINE guida.indd 13870517 VALCUCINE guida.indd 138 1-02-2008 18:16:211-02-2008 18:16:21

70517 VALCUCINE guida.indd 13970517 VALCUCINE guida.indd 139 1-02-2008 18:16:241-02-2008 18:16:24

70517 VALCUCINE guida.indd 14070517 VALCUCINE guida.indd 140 1-02-2008 18:16:261-02-2008 18:16:26

70517 VALCUCINE guida.indd 14170517 VALCUCINE guida.indd 141 1-02-2008 18:16:311-02-2008 18:16:31
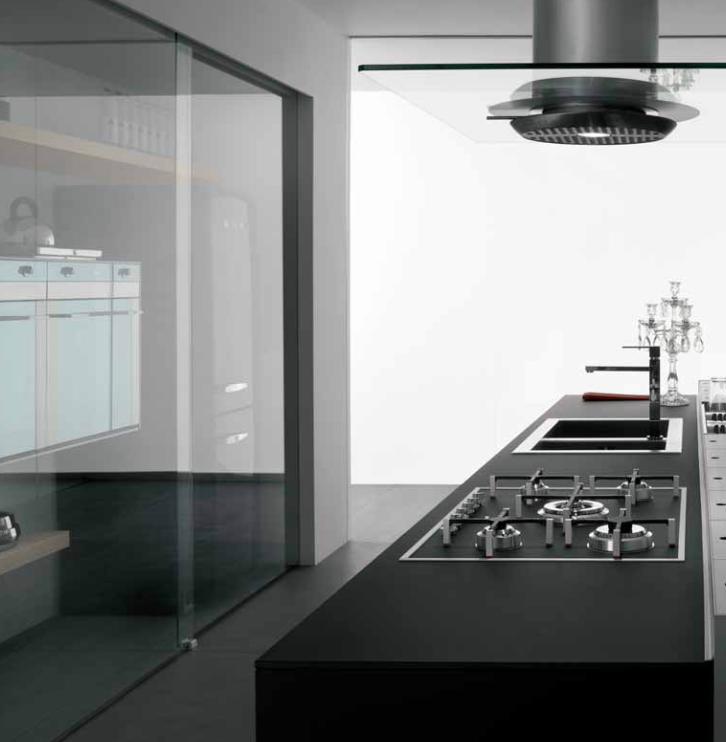
70517 VALCUCINE guida.indd 14270517 VALCUCINE guida.indd 142 1-02-2008 18:16:341-02-2008 18:16:34

70517 VALCUCINE guida.indd 14370517 VALCUCINE guida.indd 143 1-02-2008 18:16:371-02-2008 18:16:37

Artematica Vitrum Art at Palazzo Grassi:design that is inspired by nature
The kitchens of the Artematica Arte line have been created to give artists the possibility of letting their creativity and their many ideas fl ow into the design of the kitchen fronts. After three years’ research, Valcucine has developed a technique to make inlaid drawings on glass. A very hi-tech process that has its roots in handicraft tradition and that sets off the priceless value of handi-craft workmanship. Inside the Valcucine laboratory it is possible to reproduce graphic decors and paintings on glass fronts, thus offering artists the greatest possible freedom of creativity and ab-solute kitchen personalisation.
70517 VALCUCINE guida.indd 14470517 VALCUCINE guida.indd 144 1-02-2008 18:16:391-02-2008 18:16:39

70517 VALCUCINE guida.indd 14570517 VALCUCINE guida.indd 145 1-02-2008 18:16:411-02-2008 18:16:41

70517 VALCUCINE guida.indd 14670517 VALCUCINE guida.indd 146 1-02-2008 18:16:451-02-2008 18:16:45
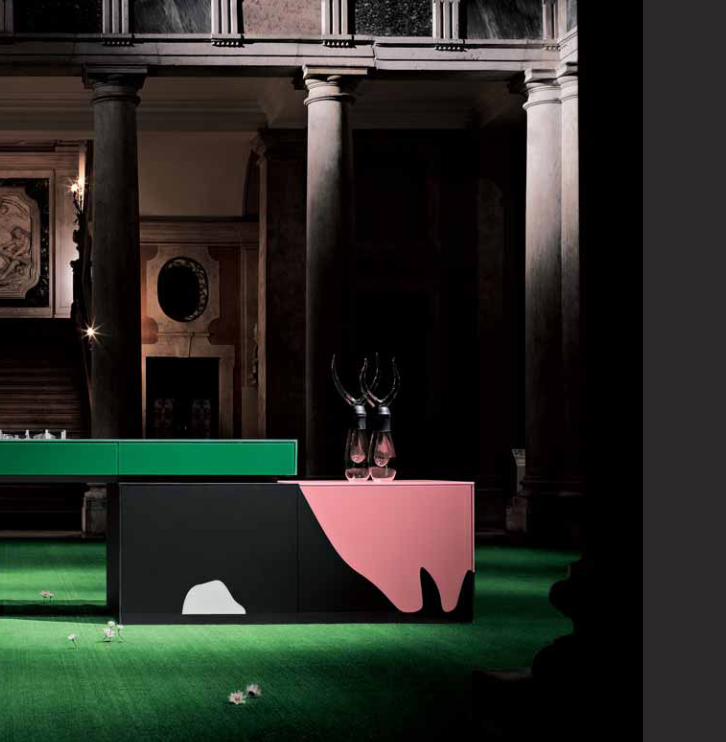
70517 VALCUCINE guida.indd 14770517 VALCUCINE guida.indd 147 1-02-2008 18:16:471-02-2008 18:16:47

Artematica Multiline: high technology and innovative design
The Artematica Multiline programme is distinguished by pure volumes, formal clean-cut lines and great versatility in models that allow you to create a kitchen to satisfy any taste and refl ect different life-styles and personalities. The doors are made of a slim layered laminate panel in various fi -nishes: laminate (matt, lined or gloss), lacquered (matt or gloss) in various sample card colours, veneered (oak, cherry and bee-ch), aluminium, steel or glass. The panel is 5 mm thick and is applied to an aluminium structural frame. This makes the door lighter and the door hinges more durable as well as having a smaller impact on the environment. The layered laminate doors remain completely unaltered by hu-midity and heat: they can in fact soak in water for a long time without undergoing damage. There are no edges that can come unglued because the panel is layered throughout in a single ma-chining phase.
70517 VALCUCINE guida.indd 14870517 VALCUCINE guida.indd 148 1-02-2008 18:16:501-02-2008 18:16:50
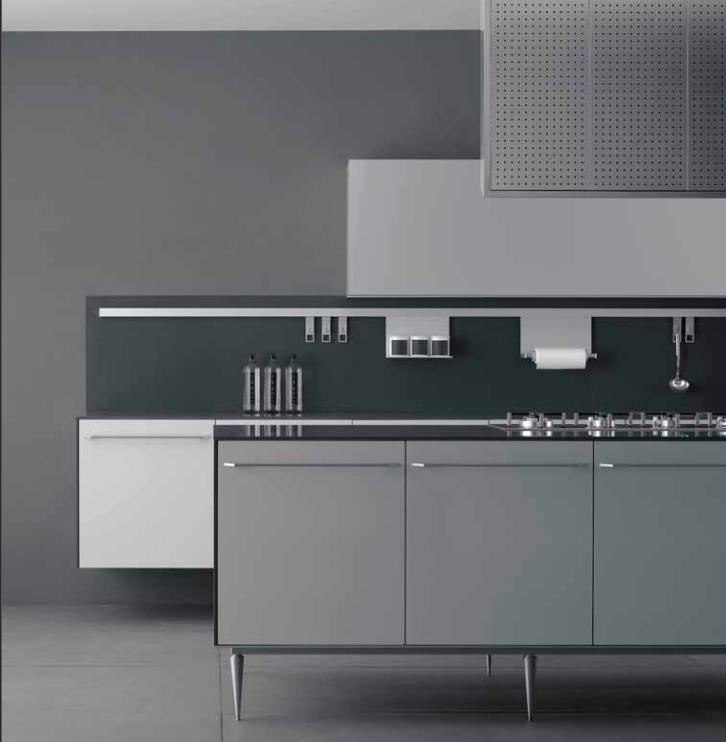
70517 VALCUCINE guida.indd 14970517 VALCUCINE guida.indd 149 1-02-2008 18:16:511-02-2008 18:16:51
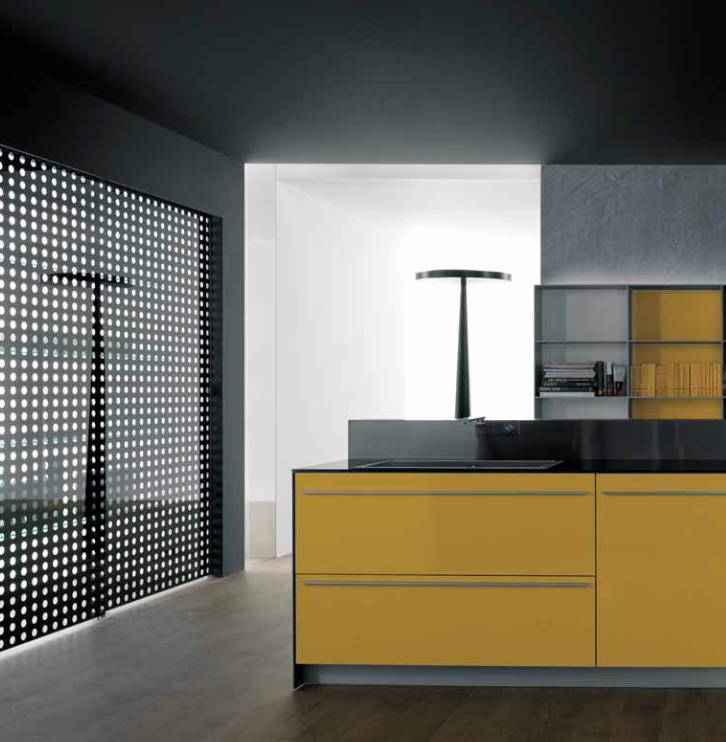
70517 VALCUCINE guida.indd 15070517 VALCUCINE guida.indd 150 1-02-2008 18:16:551-02-2008 18:16:55

70517 VALCUCINE guida.indd 15170517 VALCUCINE guida.indd 151 1-02-2008 18:16:581-02-2008 18:16:58
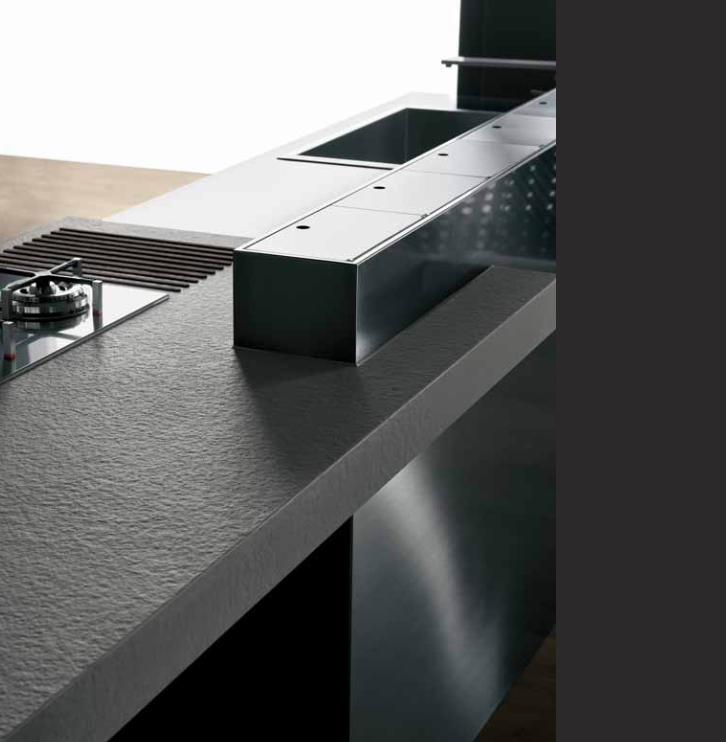
70517 VALCUCINE guida.indd 15270517 VALCUCINE guida.indd 152 1-02-2008 18:17:001-02-2008 18:17:00

70517 VALCUCINE guida.indd 15370517 VALCUCINE guida.indd 153 1-02-2008 18:17:061-02-2008 18:17:06

Riciclantica:the kitchen that is respectful of the environment
Distinguished by new shapes and volumes inspired by nature, it looks like life pulsating within matter. The use of special materials such as carbon, aluminium, steel or layered laminate is backed up by the very accurate planning of construction details: the in-side of the new frame has a pure and clean-cut appearance (no screws or hole caps) and the frame-panel joint is perfectly fl ush at the top of the door. Its membrane swells and changes shape thanks to lots of small raised dots that jutt out to give the impres-sion of pulsating life, like that of many animals or of thousands of plants. Riciclantica is an ecologically-sustainable kitchen: the door, the utmost expression of the dematerialisation concept, can be com-pletely recycled and is long-lasting thanks to its absolute resi-stance to water, steam and heat.
70517 VALCUCINE guida.indd 15470517 VALCUCINE guida.indd 154 1-02-2008 18:17:091-02-2008 18:17:09
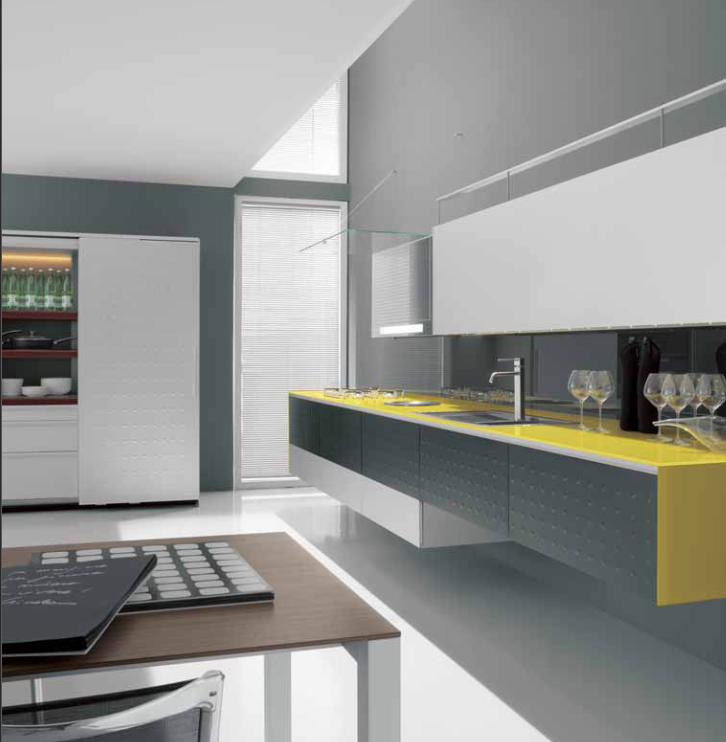
70517 VALCUCINE guida.indd 15570517 VALCUCINE guida.indd 155 1-02-2008 18:17:101-02-2008 18:17:10
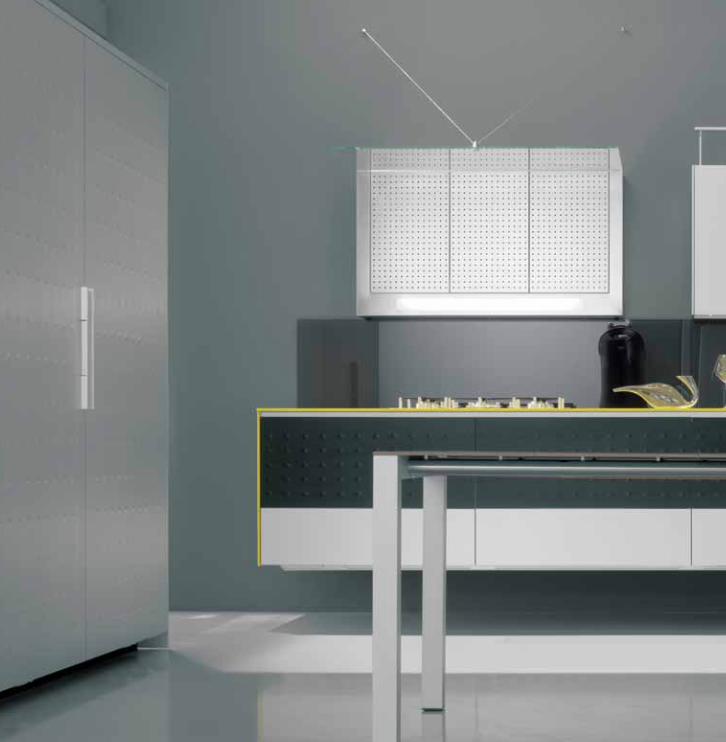
70517 VALCUCINE guida.indd 15670517 VALCUCINE guida.indd 156 1-02-2008 18:17:131-02-2008 18:17:13

70517 VALCUCINE guida.indd 15770517 VALCUCINE guida.indd 157 1-02-2008 18:17:161-02-2008 18:17:16
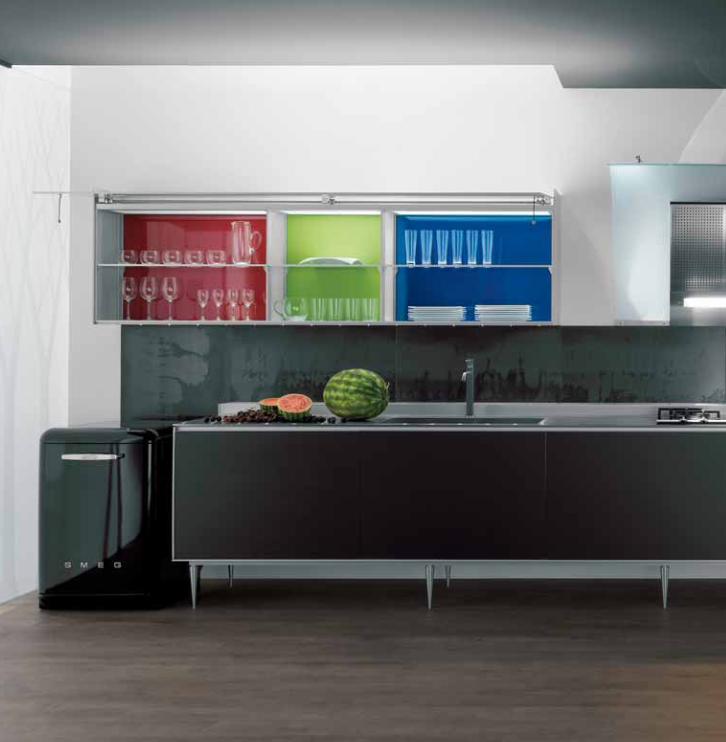
70517 VALCUCINE guida.indd 15870517 VALCUCINE guida.indd 158 1-02-2008 18:17:181-02-2008 18:17:18

70517 VALCUCINE guida.indd 15970517 VALCUCINE guida.indd 159 1-02-2008 18:17:211-02-2008 18:17:21
Pure, single-matter, acrylic resin blocks have been designed to stop the kitchen from looking like a mere workstation. The arrangement contains a system that camoufl ages the hob, sink, tap and ovens, setting off the clean-cut lines of the ar-rangement which, having concealed all its functional elemen-ts, becomes pure domestic architecture.The doors and the worktop are in Cristalan, a compound material that is non-absorbent, non-porous, recyclable and non-toxic. It is supplied in slabs and can take on any sha-pe. Cristalan allows perfect integration of the worktop and sink without gaps and the top has a continuous surface that has no size limitations.
Artematica Sinthesys:a composition of volumes and colours
70517 VALCUCINE guida.indd 16070517 VALCUCINE guida.indd 160 1-02-2008 18:17:231-02-2008 18:17:23
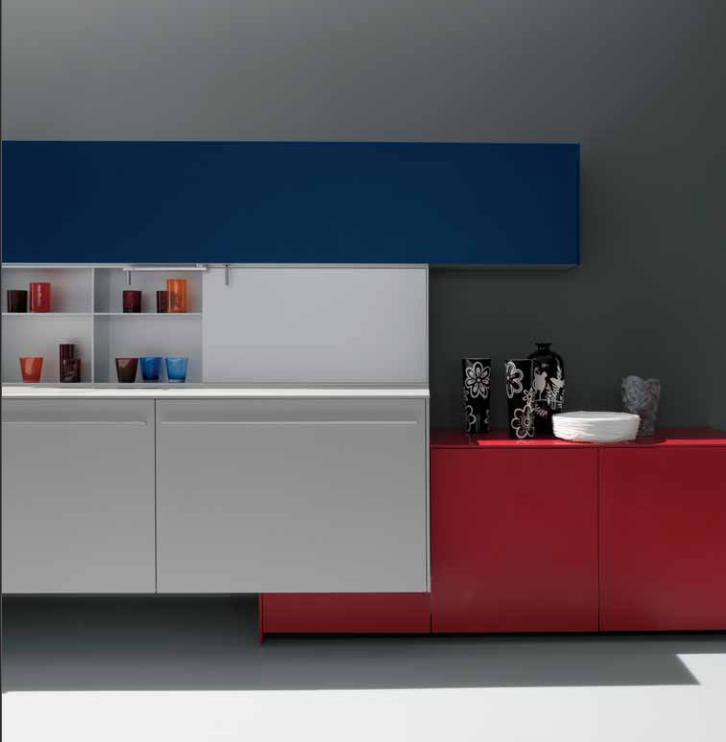
70517 VALCUCINE guida.indd 16170517 VALCUCINE guida.indd 161 1-02-2008 18:17:241-02-2008 18:17:24
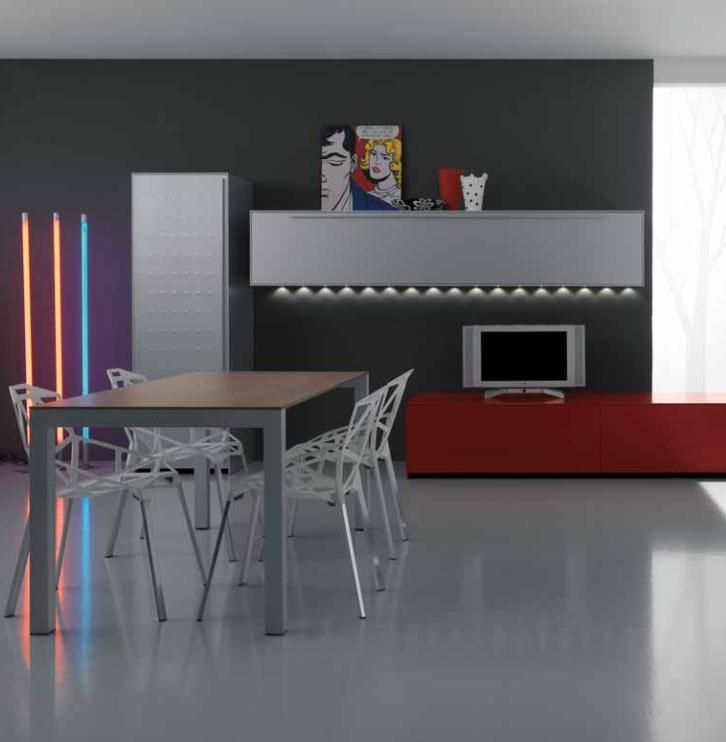
70517 VALCUCINE guida.indd 16270517 VALCUCINE guida.indd 162 1-02-2008 18:17:261-02-2008 18:17:26

70517 VALCUCINE guida.indd 16370517 VALCUCINE guida.indd 163 1-02-2008 18:17:281-02-2008 18:17:28

Hability was born from the need to combine a careful study into the needs of the disabled with a kitchen that is not only accessible but also aesthetically pleasing and accurate in every detail. The collaboration between architect and designer Marco Mi-scioscia and Valcucine, a company that has made the philo-sophy of beauty its forte, has resulted in this industrial pro-duct designed to be extremely accessible to the advantage of everyone using the kitchen. Easy Food is a kitchen system in stainless steel designed to reduce and simplify work during food preparation. It is extremely innovative in terms of ergo-nomics, safety and technical solutions. The stainless steel worktop is made from a single mould. This technological so-lution eliminates the need to weld parts or build-in elements, thus reducing costs and imperfections. Hability is a concrete and tangible example of how it is possi-ble to improve the quality of life in the kitchen for all, without having to forsake beauty.
Hability: ergonomics and beauty even for those with special needs
70517 VALCUCINE guida.indd 16470517 VALCUCINE guida.indd 164 1-02-2008 18:17:301-02-2008 18:17:30

70517 VALCUCINE guida.indd 16570517 VALCUCINE guida.indd 165 1-02-2008 18:17:321-02-2008 18:17:32
70517 VALCUCINE guida.indd 16670517 VALCUCINE guida.indd 166 1-02-2008 18:17:351-02-2008 18:17:35

70517 VALCUCINE guida.indd 16770517 VALCUCINE guida.indd 167 1-02-2008 18:17:381-02-2008 18:17:38

Created by: Gabriele CentazzoGraphics and illustrations: Arch. Lara SantinRendering: Ennio FurlanTexts: Gabriele Centazzo, Arch. Lara SantinPhotographs: Gianni Antoniali (Ikon fotostudio)Our thanks go to: Paola Fracassi, Uffi cio Tecnico Valcucine, Uffi cio Marketing Valcucine, Uffi cio Qualità Valcucine, Uffi cio Commerciale Valcucine.Printed by: Grafi che Risma, April 2007.
If you want to express your opionion, make a comment or a suggestion, please contact us at the following address:E-mail: [email protected]
70517 VALCUCINE guida.indd 16870517 VALCUCINE guida.indd 168 1-02-2008 18:17:411-02-2008 18:17:41
Top Related