


Languages
Pages
Legal


Page 1 of 34
Pancode IP User Manual
from Version 49 and above
Contents
Contents ............................................................................................................................................ 1
Chapter 1. Product Overview ............................................................................................................ 3
1. Introduction .......................................................................................................................... 3
2. Features ................................................................................................................................. 3
Chapter 2. Quick Setup ..................................................................................................................... 5
Chapter 3. Settings ............................................................................................................................ 9
1. IP announcement .................................................................................................................. 9
2. Web Interface Login .............................................................................................................. 9
3. Status ................................................................................................................................... 10
4. Pancode ............................................................................................................................... 11
5. Language Setting ................................................................................................................. 14
6. Network Setting .................................................................................................................. 15
7. SIP Account Configuration ................................................................................................... 18
8. SIP Call Features .................................................................................................................. 22
1) Features ...................................................................................................................... 22
2) Voice ............................................................................................................................ 24
3) Tones ........................................................................................................................... 26
9. PancodeBook ....................................................................................................................... 27
1) Call Log ........................................................................................................................ 27
Chapter 4. Security .......................................................................................................................... 29
1. Web Password Modify ........................................................................................................ 29
2. Web Server Certificate Upload ............................................................................................ 30

Page 2 of 34
Chapter 5. Upgrade ......................................................................................................................... 31
1. Basic Upgrade ...................................................................................................................... 31
2. Advance Upgrade ................................................................................................................ 32

Page 3 of 34
Chapter 1. Product Overview
1. Introduction
2. Features
� Highlights
� HD Voice
� PoE / 12VDC / 12VAC
� Full Compatible with Asterisk and BroadSoft Platform , Cisco , Avaya and cloud
PBX
� Pancode features
� Call Logs (100 entries)
� Volume Adjustable
� Country Ringtone Signal
� Direct IP Call
� Multi-Language: Default: English
� 2 relay operating
� RGB led out
� IP-PBX Features
� HD Voice
� Narrowband Codec: PCMU,Default:PCMU
� VAD, CNG , Echo Canceller
� Full-Duplex Speakerphone

Page 4 of 34
� Network Features
� SIP V1(RFC2543), V2(RFC3261)
� Static IP/DHCP IP Configuration
� HTTP / HTTPS Web Server Management
� TFTP/FTP/HTTP/HTTPS Protocols
� Administration Features
� Auto Provisioning via FTP/TFTP/HTTP/HTTPS/PNP
� Dial through IP PBX Using Phone Number
� Dial through IP PBX using URL address
� Configuration Managements with Web, and Auto Provisioning
� TR069
� Security Features
� Support HTTPS (SSL)
� Support SRTP for Voice Data Encryption
� Support Login for Administration
� SIP Over TLS

Page 5 of 34
Chapter 2. Quick Setup
� IP Announcement
While the Pancode is on idle, press 963#, the voice system will announce its IP.
� Language Setting
Open a web browser, enter the device IP address, login the Web interface with the
correct user name and password. On Pancode -> Time/Lang page, select the desired
language as shown below.
Page 6 of 34
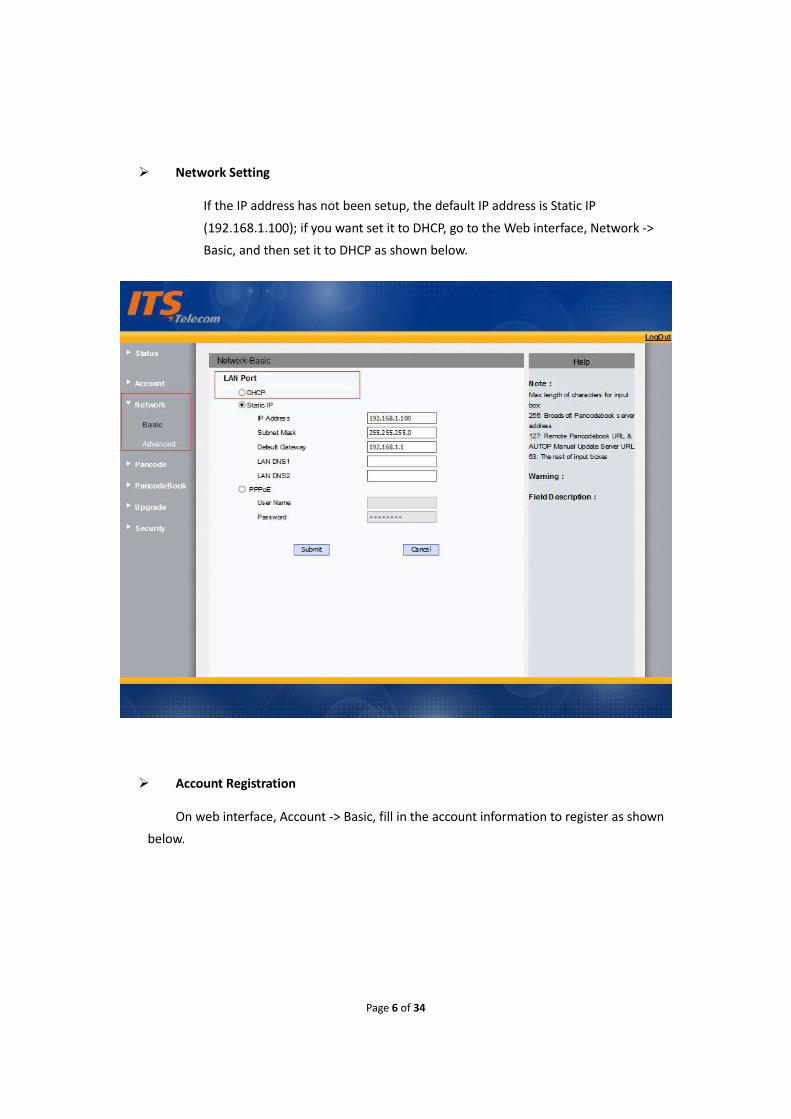
� Network Setting
If the IP address has not been setup, the default IP address is Static IP
(192.168.1.100); if you want set it to DHCP, go to the Web interface, Network ->
Basic, and then set it to DHCP as shown below.
� Account Registration
On web interface, Account -> Basic, fill in the account information to register as shown
below.

Page 7 of 34
� Pancode Setup
To quick setup pancode, go to web interface, Pancode ->Pancode, as shown below.

Page 8 of 34

Page 9 of 34
Chapter 3. Settings
1. IP announcement
While the Pancode is on idle, press 963#, the voice system will announce its IP.
2. Web Interface Login
Open a web browser, enter the IP address (Default IP address is 192.168.1.100) of your Pancode.
On the login page, enter the correct user name and password to login (Both default user name
and password are ”admin”).
Note: If below page does not show up, IP address may be wrong, and check the IP address
again.

Page 10 of 34
3. Status
The device status can be view from Status -> Basic, and the product information, network
information and account information are displayed in status page.

Page 11 of 34
4. Pancode
Pancode can be set from Pancode -> Pancode page as shown below.

Page 12 of 34
Parameter description:
Sections Description
Pan Mode To select Pancode or Pantel
Call Button Pancode can automatically distinguish day and night, and call
out the corresponding destination numbers.
� Call Button Day1、Call Button Day2、Call Button Day3:
Setting for day numbers, when it is in daytime, Pancode will
be using the three numbers. Numbers will be repeated
until the callee answers or hangup
� Call Button Night:When it is night time,the number will
be called out;
� Round Robin Time Out:The time interval of repeated calls
Note:Daytime and night are different depending on Day Night
Setting

Page 13 of 34
Day Night Setting Define that when is the daytime, and when is the night.
� Day Start:Day start time, daytime ends the time when
night starts
� Night Start:Night start time, night ends when the day
starts
Note:Range of Hour from 0 to 23; Range of Min from 0 to
59;Day Start value must be less than the Night Start
value.
Door /Extension Door Door and Extension Door, Door Digit, Door Open Time, Open
Password can be configured for each door;
� Door Digit:DTMF Code for door opening, door can be
open remotely via pressing the number key, the key can be
set from 0 to 9, *, and #;
� Door Open Time:After door opened, the time until the
door locked again. The range of the time setting is from 1s
to 9s;
� Open Password:Password for opening the door, the
password must be numbers, and the length of the
password is 4<=Length<=15;
Cancel To Hangup Cancel the call to hangup;
Max Call Time The durance of every call. When time is up, the call is
automatically ended.
Speed Dial Code Speed dial code can be assigned to numbers from 0 to 9. When
the assigned number is pressed, and leave it for 3 seconds,
Pancode will automatically call the destination number;
Note:If you press any keys in the next 3 seconds right after
pressing the speed dial code, it will fail the speed dial.
Color Define Color define is used to define the indicators’ color on pancode ;
color can be defined for Idle, Replay1 on and Relay2 on.
Only Dial in Tables Only Dial in table feature is used for users who only make calls
of pre-set speed dial code or numbers of push button; users
are not allowed to dialed any other number when Only Dial in
Tables is enabled.

Page 14 of 34
System Reboot To reboot the system. It can be turned off and set to be
rebooting daily or at specific time;
� When it is enabled and reboot time is set, Pancode will be
rebooting at the time which is set
Identify Door Phone Submit Identify Door Phone, and Pancode will be automatically
ringing for 3 ringtone signals.
Door Open Beep When relay is triggered, the device will give beep sound.
5. Language Setting
On web, Pancode -> Time/Lang, select the desired language as shown below.

Page 15 of 34
6. Network Setting
The default IP address is Static IP (192.168.1.100) by default. To customize the network
configuration, go to Web, Network -> Basic.

Page 16 of 34
Parameter description:
Sections Description
DHCP To configure DHCP settings
� If selected, Pancode will get IP address, Subnet Mask,
Default Gateway and DNS server address from DHCP server
automatically.
Static IP To configure Static IP settings
� Static IP: If selected, you have to set IP address, Subnet
Mask, Default Gateway and DNS server manually.
PPPoE To configure PPPoE settings
� Use PPPoE username/password to connect to PPPoE server.

Page 17 of 34
To configure advanced network settings, go to Network -> Advanced, advanced network features
can be configured as shown below.
Parameter description:
Sections Description
Local RTP To display and configure Local RTP settings.
� Max RTP Port: Determine the maximum port that RTP
stream can use.
� Min RTP Port: Determine the minimum port that RTP
stream can use.
TR069 To display and configure TR069 settings.
� Active: To enable or disable TR069 feature.
� Version: To select supported TR069 version (version
1.0 or 1.1).

Page 18 of 34
� ACS/CPE: ACS is short for Auto configuration servers as
server side, CPE is short for Customer-premise
equipment as client side devices.
� URL: To configure URL address for ACS or CPE.
� User name: To configure username for ACS or CPE.
� Password: To configure Password for ACS or CPE.
� Periodic Inform: To enable periodically inform.
� Periodic Interval: To configure interval for periodic
inform.
Note: TR-069(Technical Report 069) is a technical specification
entitled CPE WAN Management Protocol (CWMP).It defines an
application layer protocol for remote management of end-user
devices.
7. SIP Account Configuration
To configure basic account settings,go to web, Account -> Basic. The SIP account parameters
can be configured as shown below.

Page 19 of 34
To configure advanced account settings, go to web, Account -> Advanced. The advanced
parameters can be configured as shown below.

Page 20 of 34
Parameter description:
Sections Description
SIP Account To display and configure the specific Account settings.
� Status: To display register result.
� Display Name: Which is sent to the other call party for
displaying.
� Register Name: Allocated by SIP server provider, used for
authentication.
� User Name: Allocated by your SIP server provide, used for
authentication.

Page 21 of 34
� Password: Used for authorization.
SIP Server 1 To display and configure Primary SIP server settings.
� Server IP: SIP server address, it could be an URL or IP address.
� Registration Period: The registration will expire after
Registration period, Pancode will re-register automatically
within registration period.
SIP Server 2 To display and configure Secondary SIP server settings.
� This is for redundancy, if registering to Primary SIP server fails,
Pancode will go to Secondary SIP server for registering.
Note: Secondary SIP server is used for redundancy; it can be left
blank if there is not redundancy SIP server in user’s environment.
Outbound Proxy Server To display and configure Outbound Proxy server settings.
� An outbound proxy server is used to receive all initiating
request messages and route them to the designated SIP
server.
Note: If configured, all SIP request messages from Pancode w
ill be sent to the outbound proxy server forcefully.
Transport Type To display and configure Transport type for SIP message
� UDP: UDP is an unreliable but very efficient transport layer
protocol.
� TCP: Reliable but less-efficient transport layer protocol.
� TLS: Secured and Reliable transport layer protocol.
� DNS-SRV: A DNS RR for specifying the location of services.
NAT To display and configure NAT (Net Address Translator) settings.
� STUN: Short for Simple Traversal of UDP over NATS, a solution
to solve NAT issues.
Note: By default, NAT is disabled.
Codecs To display and configure available/unavailable codecs list.
� Codec means coder-decoder which is used to transfer analog
signal to digital signal or vice versa.
� Familiar codecs are PCMU (G711U), PCMA (G711A), G722

Page 22 of 34
(wid-bandth codecs), G723, G726, G729 and so on.
Call To display and configure call-related features.
� Max Local SIP Port: To configure maximum local sip port for
designated account.
� Min Local SIP Port: To configure minimum local sip port for
designated account.
Encryption To enable or disabled SRTP feature.
� Voice Encryption (SRTP): If enabled, all audio signals
(technically speaking its RTP streams) will be encrypted for
more security.
NAT To display NAT-related settings.
� UDP Keep Alive message: If enabled, Pancode will send UDP
keep-alive message periodically to router to keep NAT port
alive.
� UDP Alive Msg Interval: Keepalive message interval.
� RPort: Remote Port, if enabled, it will add Remote Port into
outgoing SIP message for designated account.
8. SIP Call Features
1) Features
To configure Pancode features,go to web, Pancode -> Features. Call feature can be set as
shown below.

Page 23 of 34
Parameter description:
Sections Description
Call Waiting To enable or disable Call Waiting.
� Call Waiting Enable: If enabled, it allows Pancode to
receive a new incoming call when there is already an
active call.
� Call Waiting Tone: If enabled, it allows Pancode to play the
call waiting tone to the waiting callee.
Auto Redial Auto redial allows Pancode to redial an unsuccessful call for
designated times within designated interval.
� Auto Redial: To enable or disable auto redial feature.
� Auto Redial Interval: Determine the interval between two
consecutive attempts.

Page 24 of 34
� Auto Redial Times: Determine how many times to redial.
DND DND (Do Not Disturb) allows Pancode to ignore any incoming
calls.
� Return Code when DND: Determine what response code
should be sent back to server when there is an incoming
call if DND on.
� DND On Code: The Code used to turn on DND on server’s
side, if configured, Pancode will send a SIP message to
server to turn on DND on server side if you press DND
when DND is off.
� DND Off Code: The Code used to turn off DND on server’s
side, if configured, Pancode will send a SIP message to
server to turn off DND on server side if you press DND
when DND is on.
Remote Control Remote Control allows specific host to interact with Pancode by
sending HTTP or HTTPS requests. The specific action could be
answering an incoming call, hangup an ongoing call and so on.
� Allowed Access IP List: To configure the allowed host
address.
Note: For now, Pancode can only support IP address, IP a
ddress list and IP address pattern as allowed hosts
Others � Return Code When Refuse: Allows user to assign specific
code as return code to SIP server when an incoming call is
rejected.
� Auto Answer Delay: To configure delay time before an
incoming call is automatically answered.
2) Voice
To configure Voice,go to web, Pancode -> Voice, voice configuration can be done as shown
below.

Page 25 of 34
Parameter description:
Sections Description
Echo Canceller Echo Canceller: To remove acoustic echo from a voice
communication in order to improve the voice quality.
� VAD (Voice Activity Detection): Allow Pancode to detect the
presence or absence of human speech during a call. When
detecting period of “silence,” VAD replaces that silence
efficiently with special packets that indicate silence is
occurring. It can facilitate speech processing, and
deactivate some processes during non-speech section of an
audio session. It can avoid unnecessary coding or
transmission of silence packets in VoIP applications, saving
on computation and network bandwidth.
� CNG (Comfort Noise Generation): Allow Pancode to
generate comfortable background noise for voice
communications during periods of silence in a
conversation. It is a part of the silence suppression or VAD

Page 26 of 34
handling for VoIP technology. CNG, in conjunction with VAD
algorithms, quickly responds when periods of silence occur
and inserts artificial noise until voice activity resumes. The
insertion of artificial noise gives the illusion of a constant
transmission stream, so that background sound is
consistent throughout the call and the listener does not
think the line has released.
Jitter Buffer Jitter buffer is a shared data area where voice packets can be
collected, stored, and sent to the voice processor in even
intervals. Jitter is a term indicating variations in packet arrival
time, which can occur because of network congestion, timing
drift or route changes. The jitter buffer, located at the receiving
end of the voice connection, intentionally delays the arriving
packets so that the end user experiences a clear connection
with very little sound distortion.
Pancode support two types of jitter buffers: fixed and adaptive.
Fixed: Add the fixed delay to voice packets. You can configure
the delay time for the static jitter buffer on Pancode.
Adaptive: Capable of adapting the changes in the network's
delay. The range of the delay time for the dynamic jitter buffer
added to packets can be also configured on Pancode.
Mic Volume To configure Microphone volume for headset, handset and
speaker mode.
3) Tones
To configure tones,go to web, Pancode -> Tone. Tones can be set as shown below.

Page 27 of 34
9. PancodeBook
1) Call Log
To view call logs, go to web, PancodeBook -> Call Log. The call log web page is shown
below.

Page 28 of 34
Parameter description:
Sections Description
Call History To display call history records.
� Available call history types are, All calls, Dialed calls,
Received calls, Missed calls, Forwarded calls.
� HangUp: To click to hangup ongoing call on the Pancode.
Note: For “HangUp” feature, you need to have the remote
control privilege to control Pancode via Web UI. Please refer to
section “Remote Control” in the Web UI->Pancode->Call Feature
page.

Page 29 of 34
Chapter 4. Security
1. Web Password Modify
To modify the web password, go to web, Security -> Basic. Web password can be modified as
shown below.
Parameter description:
Sections Description
Web Password Modify To modify user’s password.
� Current Password: The current password you used.
� New Password: Input new password you intend to use.
� Confirm Password: Repeat the new password.
Note: For now, Pancode can only support user admin.

Page 30 of 34
2. Web Server Certificate Upload
Web server certificate can be uploaded via web, Security -> Advance. Also, the certificate
can be deleted on the same web page.
Parameter description:
Sections Description
Web Server Certificate To display or delete Certificate which is used when Pancode is
connected from any incoming HTTPs request.
Note: The default certificate could not be deleted.
Web Server Certificate
Upload
To upload a certificate file which will be used as server
certificate.
Client Certificate To display or delete Certificates which is used when Pancode is

Page 31 of 34
connecting to any HTTPs server.
Client Certificate Upload To upload certificate files which is used as a client certificate.
Chapter 5. Upgrade
1. Basic Upgrade
To basic upgrade, to go web, Upgrade -> Basic. Upgrade can be down on the page below.
Parameter description:
Sections Description
Upgrade To select upgrading rom file from local or a remote server
automatically.
Page 32 of 34
Note: Please make sure it’s right file format for right model.
Firmware version To display firmware version, firmware version starts with MODEL
name.
Hardware Version To display Hardware version.
Reset to Factory Setting To enable you to reset Pancode’s setting to factory settings.
Reboot To reboot Pancode remotely from Web UI.
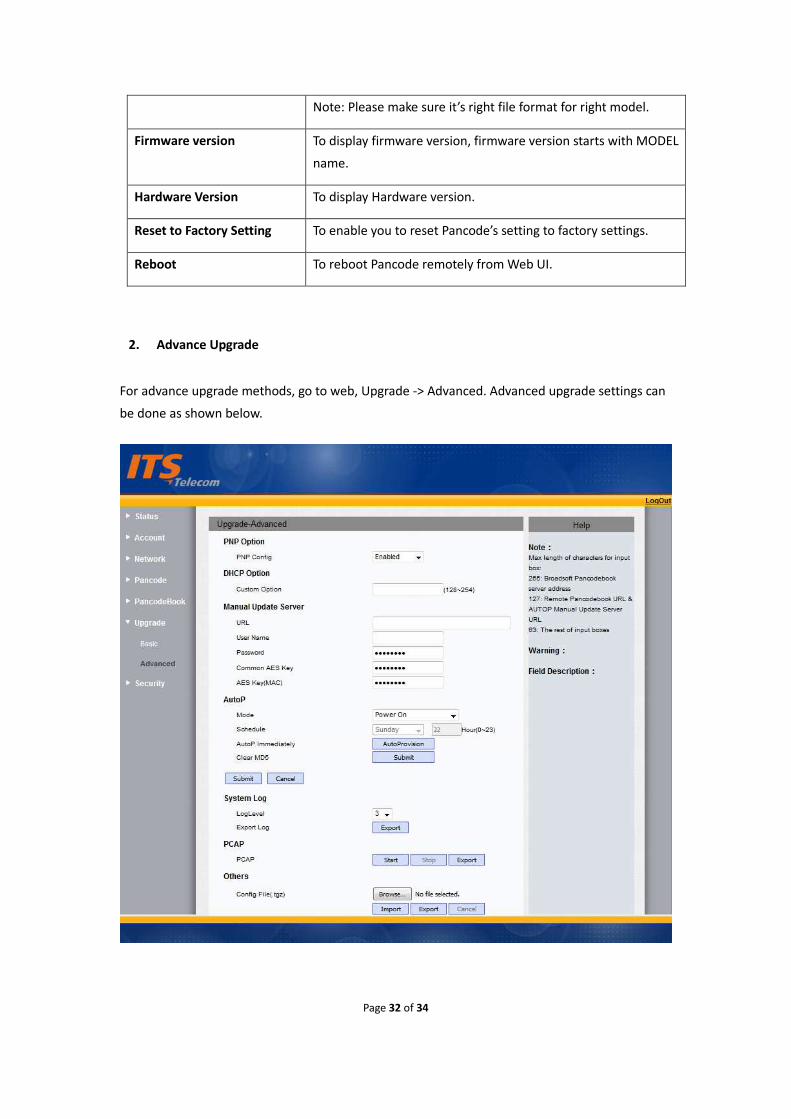
2. Advance Upgrade
For advance upgrade methods, go to web, Upgrade -> Advanced. Advanced upgrade settings can
be done as shown below.
Page 33 of 34
Parameter description:
Sections Description
PNP Option To display and configure PNP setting for Auto Provisioning.
� PNP: Plug and Play, once PNP is enabled, the Pancode will
send SIP subscription message to PNP server automatically
to get Auto Provisioning server’s address.
By default, this SIP message is sent to multicast address 2
24.0.1.75(PNP server address by standard).
DHCP Option To display and configure custom DHCP option.
� DHCP option: If configured, Pancode will use designated
DHCP option to get Auto Provisioning server’s address via
DHCP.
� This setting require DHCP server to support corresponding
option.
Manual Update Server To display and configure manual update server’s settings.
� URL: Auto provisioning server address.
� User name: Configure if server needs a username to
access, otherwise left blank.
� Password: Configure if server needs a password to access,
otherwise left blank.
� Common AES Key: Used for Pancode to decipher common
Auto Provisioning configuration file.
� AES Key (MAC): Used for Pancode to decipher MAC-
oriented auto provisioning configuration file (for example,
file name could be 0c1105888888.conf if Pancode’s MAC
address is 0c1105888888).
Note: AES is one of many encryptions, only configure filed is
ciphered with AES should be configured, otherwise left blank.
AutoP To display and configure Auto Provisioning mode settings.
This Auto Provisioning mode is actually self-explanatory.
For example, mode “Power on” means Pancode will go to do

Page 34 of 34
Provisioning every time it powers on.
System Log To display syslog level and export syslog file.
Syslog level: From level 0~7.The higher level means the more
specific syslog is saved to a temporary file.
By default, it’s level 3.
Export Log: Click to export temporary syslog file to local PC.
PCAP To start, stop packets capturing or to export captured Packet file.
� Start: To start capturing all the packets file sent or received
from Pancode.
� Stop: To stop capturing packets.
Note: Pancode will save captured packets file to a temporary
file, this file maximum size is 1M(mega bytes), and will top
capturing once reaching this maximum size.
Others To display or configure others features from this page.
Config file: To export or import configuration file for Pancode.
Top Related