


Languages
Pages
Legal


Oracle® Hospitality Simphony
Installation Guide Release 2.8 Part Number: E66805-01
May 2016

ii
Copyright © 2010, 2016, Oracle and/ or its affiliates. All rights reserved .
This software and related documentation are provided under a license agreement containing
restrictions on use and disclosure and are protected by intellectual property laws. Except as
expressly permitted in your license agreement or allowed by law, you may not use, copy,
reproduce, translate, broadcast, modify, license, transmit, distribute, exhibit, perform, publish, or
d isplay any part, in any form, or by any means. Reverse engineering, disassembly, or
decompilation of this software, unless required by law for interoperability, is prohibited .
The information contained herein is subject to change without notice and is not warranted to be
error-free. If you find any errors, please report them to us in writing.
If this software or related documentation is delivered to the U.S. Government or anyone licensing it
on behalf of the U.S. Government, then the following notice is applicable:
U.S. GOVERNMENT END USERS: Oracle programs, includ ing any operating system, integrated
software, any programs installed on the hardware, and / or documentation, delivered to U.S.
Government end users are "commercial computer software" pursuant to the applicable Fed eral
Acquisition Regulation and agency-specific supplemental regulations. As such, use, duplication,
d isclosure, modification, and adaptation of the programs, includ ing any operating system,
integrated software, any programs installed on the hardware, and / or documentation, shall be
subject to license terms and license restrictions applicable to the programs. No other rights are
granted to the U.S. Government.
This software or hardware is developed for general use in a variety of information management
applications. It is not developed or intended for use in any inherently dangerous applications,
includ ing applications that may create a risk of personal injury. If you use this software or
hardware in dangerous applications, then you shall be responsible to ta ke all appropriate fail-safe,
backup, redundancy, and other measures to ensure its safe use. Oracle Corporation and its
affiliates d isclaim any liability for any damages caused by use of this software or hardware in
dangerous applications.
Oracle and Java are registered trademarks of Oracle and/ or its affiliates. Other names may be
trademarks of their respective owners.
Intel and Intel Xeon are trademarks or registered trademarks of Intel Corporation. All SPARC
trademarks are used under license and are trad emarks or registered trademarks of SPARC
International, Inc. AMD, Opteron, the AMD logo, and the AMD Opteron logo are trademarks or
registered trademarks of Advanced Micro Devices. UNIX is a registered trademark of The Open
Group.
This software or hardware and documentation may provide access to or information about content,
products, and services from third parties. Oracle Corporation and its affiliates are not responsible
for and expressly d isclaim all warranties of any kind with respect to third -party content, products,
and services unless otherwise set forth in an applicable agreement between you and Oracle. Oracle
Corporation and its affiliates will not be responsible for any loss, costs, or damages incurred due to
your access to or use of third -party content, products, or services, except as set forth in an
applicable agreement between you and Oracle.

Contents iii
Contents
Tables ................................................................................................................................. v
Figures ............................................................................................................................... vi
Preface .............................................................................................................................. vii
Audience ............................................................................................................................... vii
Customer Support ................................................................................................................ vii
Documentation ..................................................................................................................... vii
Revision History ................................................................................................................... vii
1 Getting Started ........................................................................................................... 1-1
Before You Start................................................................................................................... 1-1
Understand ing the Installation Process ........................................................................... 1-1
Deployment Scenarios ........................................................................................................ 1-2
Installing All-In-One ................................................................................................... 1-2
Installing Applications and Databases on Separate Servers .................................. 1-2
Installing Applications on Separate Servers and All Database Components on
one Server ..................................................................................................................... 1-3
Installing Each Application and Database Component on Separate Servers ...... 1-3
Installing on Multiple Servers .................................................................................... 1-4
Adding an Application Server ................................................................................... 1-4
2 Pre-Installation Tasks ................................................................................................ 2-1
Installing Oracle Database 11g or 12c .............................................................................. 2-4
Database User Password s ........................................................................................... 2-4
Increasing Database Process Count ........................................................................... 2-5
Creating Oracle Database Tablespaces ..................................................................... 2-5
3 Upgrading from a Previous Release .......................................................................... 3-1
Upgrad ing Simphony ......................................................................................................... 3-1
Post-Upgrade Tasks ............................................................................................................ 3-2
4 Installation Tasks ...................................................................................................... 4-1
Starting the Installation ...................................................................................................... 4-1
Configuring Simphony Databases during Installation ........................................... 4-1
5 Installing Simphony on a Single Server ................................................................... 5-1
6 Installing Simphony on Multiple Servers ................................................................ 6-1
Overview of Installing Simphony on Multip le Servers ................................................. 6-1
Installing Simphony Database Components on Microsoft SQL Server ....................... 6-2
Installing the Simphony Application on a Single Server ............................................... 6-2
Installing the Simphony Application Components on Multiple Servers .................... 6-3
Installing Reporting and Analytics Advanced on a Separate Server ........................... 6-3
7 Post-Installation Tasks .............................................................................................. 7-5
Installing a Remote EMC ................................................................................................... 7-5

iv Contents
Verifying the Installation ................................................................................................... 7-5
Sample Database Users ............................................................................................... 7-5
Blank Database Users .................................................................................................. 7-6
Configuring the Simphony License Count ...................................................................... 7-6
Updating the Properties Admin and Database Credentials ......................................... 7-7
Setting the Start-Of-Day Sequencer Machine and the App Server Time Zone .......... 7-7
Connecting Reporting and Analytics Advanced to Simphony .................................... 7-8
Updating postingServer.properties.config File for Reporting and Analytics Advanced
Installations .......................................................................................................................... 7-9
Preparing a Multi-Server Environment using a Load Balancer for the Simphony
Import/ Export Service .................................................................................................... 7-10
Enabling Communication between the Enterprise and Workstations ...................... 7-10
8 Uninstalling Simphony ............................................................................................. 8-1
9 Troubleshooting ........................................................................................................ 9-1
Insufficient System Privileges ........................................................................................... 9-1
Cannot Connect to the Database Server during the Simphony Installation ............... 9-1
Adding Simphony to the Windows Firewall Exceptions .............................................. 9-1
Starting the Oracle Listener ........................................................................................ 9-1
EMC Fails to Launch .......................................................................................................... 9-2
10 List of Simphony Components and Services .......................................................... 10-1
11 List of Simphony Database Configuration Fields .................................................. 11-1
.................................................................................................................... A-1
Sample Script for Creating Oracle Tablespaces ............................................................. A-1
..................................................................................................................... B-1
Post-Installation Best Practices .......................................................................................... B-1
Creating Database Backups ........................................................................................ B-1
Changing the Application Server’s Name ................................................................ B-1
Changing an Oracle Database Server’s Name ......................................................... B-3
Changing a Microsoft SQL Server’s Computer Name ............................................ B-3

Tables v
Tables
Table 2-1 - Pre-Installation Tasks for Simphony Version 2.8 ............................................... 2-1 Table 3-1 - Post-Upgrade Tasks for Simphony Version 2.8 .................................................. 3-2 Table 6-1 - Overview of Installing Simphony on Multiple Servers ..................................... 6-1 Table 7-1 - Tasks for Preparing a Multi-Server Simphony Installation using a Load
balancer for the Import/ Export Service ............................................................................... 7-10 Table 10-1 - List of Application and Database Services ...................................................... 10-1 Table 11-1 - List of Database Configuration Fields .............................................................. 11-1 Table 7 - Host Files ..................................................................................................................... B-1 Table 8 - Oracle Database Files ................................................................................................. B-1 Table 9 - Simphony Services and mymicros.net Files ........................................................... B-1 Table 10 - Simphony Install ...................................................................................................... B-2

vi Figures
Figures
Figure 1-1 - Example of an All-In-One Installation ............................................................... 1-2 Figure 1-2 - Example of Applications and Databases on Separate Servers ........................ 1-2 Figure 1-3 - Example of Applications on Separate Servers and All Database components
on One Server ............................................................................................................................. 1-3 Figure 1-4 - Example of Each Application and Database Component on Separate Servers
...................................................................................................................................................... 1-3

Preface vii
Preface
Audience
This installation guide is intended for installers, programmers, technical support teams,
product specialists, and others who are responsible for setting up Oracle Hospitality
Simphony version 2.8.
Customer Support
To contact Oracle Customer Support, access My Oracle Support at the following URL:
https:/ / support.oracle.com
When contacting Customer Support, p lease provide the following:
Product version and program/ module name
Functional and technical description of the problem (include business impact)
Detailed step-by-step instructions to re-create
Exact error message received and any associated log files
Screen shots of each step you take
Documentation
Oracle Hospitality product documentation is available on the Oracle Help Center at
http:/ / docs.oracle.com/ en/ industries/ hosp itality/ .
Revision History
Date Description of Change
October 2015 Initial publication
March 2016 .NET installation ed it
April 2016 Added Oracle Database user password
requirements
May 2016 .NET installation version ed its, Java ed its


Getting Started 1-1
1 Getting Started This guide provides instructions on how to install, upgrade , and configure Simphony
version 2.8 for Microsoft Windows Server 2008 R2 and Microsoft Wind ows Server 2012
R2 operating systems.
Before You Start Make sure you have an operational understand ing of:
PCs and a working knowledge of the Microsoft Windows interface
POS terminology and concepts
Microsoft Wind ows administrative privileges (if installing on Oracle Linux, root
privileges)
Client Application Loader (CAL) technology
Knowing that:
During a fresh installation and the initial linking of a property to Reporting and
Analytics (formerly mymicros.net), do not use the DEMOTWO report location
within the Sample organization.
o You cannot repair or modify installation features due to changes in the setup
process. If a problem occu rs, you must reinstall Simphony.
o You can only install Simphony to local d rives. Simphony does not support
installing to a mapped drive.
Understanding the Installation Process 1. Selecting an appropriate deployment scenario
Prior to installation and configuration, you need to determine which deployment
scenario meets your requ irements. See Deployment Scenarios for more
information.
2. Prerequisite steps
You need to perform these steps prior to installing or upgrad ing to Simphony
version 2.8. Installers for prerequisite components are in the <Installation
Media>\Prerequisites fold er.
3. Installing the database server application
You need to install one of the following d atabase p latforms prior to installing
Simphony application components:
Oracle Database 12c
Oracle Database 11g
Microsoft SQL Server 2008
Microsoft SQL Server 2012 4. Upgrading or installing Simphony
You can run the Simphony version 2.8 installer to upgrade Simphony, to perform
a clean installation or to install and add application servers. See Upgrad ing from
a Previous Release and List of Simphony Components and Services for more
installation information.
Configuring post-installation settings
The post-installation configuration makes sure that the application
components and the database are configured correctly
Verifying the installation
Perform the verification step to make sure the Simphony application and
the database applications are set correctly
Troubleshooting
Follow the instructions in this section to resolve common problems you
might encounter when installing Simphony version 2.8

1-2 Getting Started
Deployment Scenarios
Installing All-In-One
In the all-in-one installation, you install the Simphony database, the Reporting and
Analytics Advanced (formerly mymicros.net) database, the Simphony version 2.8
application, and the Reporting and Analytics Advanced application on one server.
Figure 1-1 - Example of an All-In-One Installation
Installing Applications and Databases on Separate Servers
You can install the Simphony application components on one physical or virtual server
and install the database components on a separate server.
Figure 1-2 - Example of Applications and Databases on Separate Servers
Simphony database
Simphony application
Reporting and Analytics
Advanced application
Reporting and
Analytics Advanced
database
Simphony database
Reporting and
Analytics
Advanced database
Simphony application
Reporting and Analytics
Advanced application

Getting Started 1-3
Installing Applications on Separate Servers and All Database Components
on one Server
You can install the Simphony application and the Reporting and Analytics Advanced
application on two separate servers and install all d atabase components on a third server.
Figure 1-3 - Example of Applications on Separate Servers and All Database components on One Server
Installing Each Application and Database Component on Separate Servers
You can install the Simphony application, Reporting and Analytics Advanced , the
Simphony database, and the Reporting and Analytics Advanced database on separate
servers.
Figure 1-4 - Example of Each Application and Database Component on Separate Servers
Reporting and
Analytics
Advanced database Simphony application
Reporting and Analytics
Advanced application
Simphony database
Simphony database Reporting and
Analytics
Advanced database
Reporting and Analytics
Advanced application
Simphony application

1-4 Getting Started
Installing on Multiple Servers
Depending on the business requirement of the Enterprise, you can extend the Simphony
installation to many server combinations. Simphony can be deployed over multiple
servers to balance the load ensuring service levels are met during peaks in demand or
after a server failure.
Adding an Application Server
You can run the Simphony version 2.8 installer to configure add itional application
servers. Run the Simphony installer to setup a POS-only server and ensure that this
server points to a reporting database server .

Pre-Installation Tasks 2-1
2 Pre-Installation Tasks
Perform all pre-installation tasks to ensure that you can successfully install Simphony
version 2.8. Installers for several of the prerequisite components are in the
<Installation Media>\Prerequisites folder.
Table 2-1 - Pre-Installation Tasks for Simphony Version 2.8
Pre-Installation
Tasks
Instructions
Install Internet
Information
Services (IIS)
Use the Server Manager - Add Roles and Features Wizard on your
sever to install IIS on your application and d atabase servers. For
more information about the Server Manager - Add Roles and
Features Wizard , refer to the Microsoft TechNet Library at
https://technet.microsoft.com/en-us/ .
On Microsoft Windows Server 2008 R2, install IIS with the
following role services:
ASP.NET
ASP
HTTP Logging
Request Monitor
IIS Management Console and IIS 6 Management
compatibility
On Microsoft Windows Server 2012 R2, install IIS with the
following role services and features:
Web Server
Common HTTP Features
HTTP Errors
Directory Browsing
Default Document
Static Content
Health and Diagnostics
HTTP Logging
Request Monitor
Performance
Static Content Compression
Security
Request Filtering
2-2 Pre-Installation Tasks
Pre-Installation
Tasks
Instructions
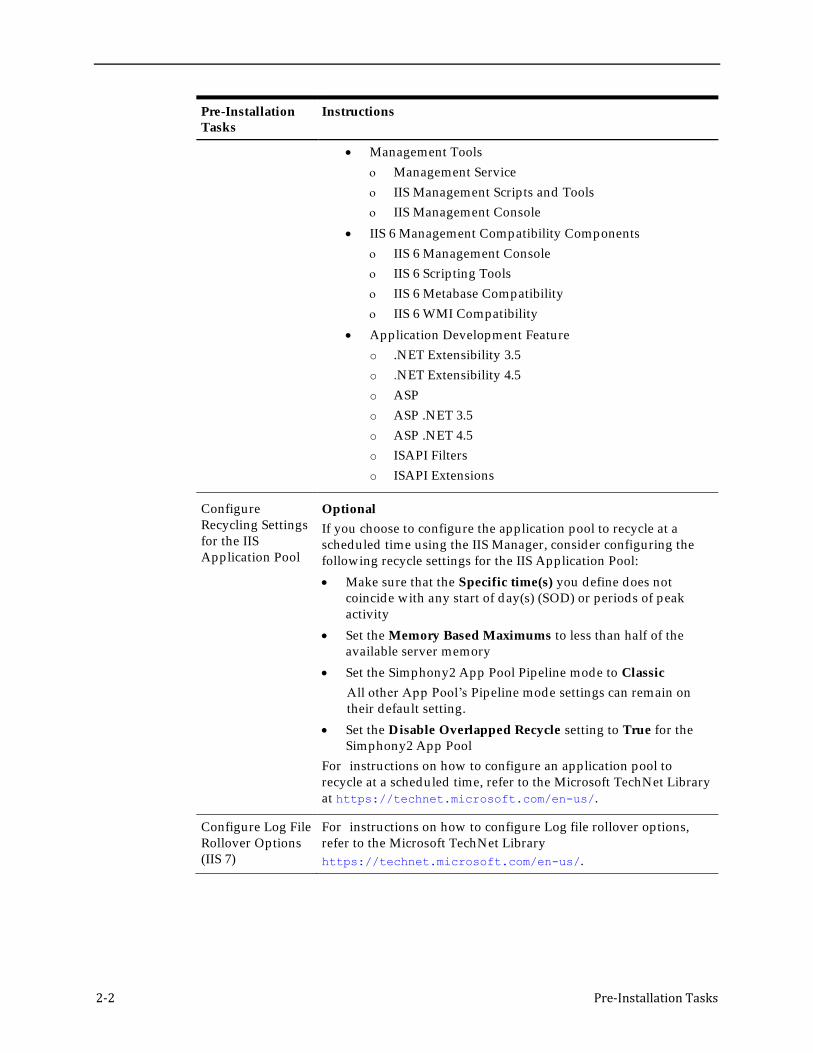
Management Tools
Management Service
IIS Management Scripts and Tools
IIS Management Console
IIS 6 Management Compatibility Components
IIS 6 Management Console
IIS 6 Scripting Tools
IIS 6 Metabase Compatibility
IIS 6 WMI Compatibility
Application Development Feature
o .NET Extensibility 3.5
o .NET Extensibility 4.5
o ASP
o ASP .NET 3.5
o ASP .NET 4.5
o ISAPI Filters
o ISAPI Extensions
Configure
Recycling Settings
for the IIS
Application Pool
Optional
If you choose to configure the application pool to recycle at a
scheduled time using the IIS Manager, consider configuring the
following recycle settings for the IIS Application Pool:
Make sure that the Specific time(s) you define does not
coincide with any start of d ay(s) (SOD) or periods of peak
activity
Set the Memory Based Maximums to less than half of the
available server memory
Set the Simphony2 App Pool Pipeline mode to Classic
All other App Pool’s Pipeline mode settings can remain on
their default setting.
Set the Disable Overlapped Recycle setting to True for the
Simphony2 App Pool
For instructions on how to configure an application pool to
recycle at a scheduled time, refer to the Microsoft TechNet Library
at https://technet.microsoft.com/en-us/.
Configure Log File
Rollover Options
(IIS 7)
For instructions on how to configure Log file rollover options,
refer to the Microsoft TechNet Library
https://technet.microsoft.com/en-us/.

Pre-Installation Tasks 2-3
Pre-Installation
Tasks
Instructions
Install the Java
Development Kit
Install the Java Runtime Environment (JRE) version 1.6 in this
order on the application and database servers.
1. If you are on a 64-bit operating system, install both jdk-6u24-
windows-x64.exe and jdk-6u24-windows-i586.exe.
Install the jdk-6u24-windows-x64.exe first.
2. If you are on a 32-bit operating system, install only jdk-6u24-
windows-i586.exe.
Install .NET
Framework 3.5
SP1 and .NET
Framework 4.5
You must install both .NET Framework 3.5 SP1 and .NET
Framework 4.5 on the Simphony application servers.
If you are using Microsoft Wind ows Server 2008 R2, you
can add .NET Framework 3.5 SP1 for the application server
using the Server Manager. To add .NET Framework 4.5, run
the .NET Framework 4.5 setup in the <Installation
Media>\Prerequisites\DotNetFramework45 folder.
If you are using Microsoft Wind ows Server 2012 R2, you
can add both .NET Framework 3.5 SP1 and .NET
Framework 4.5 for the application server using the Server
Manager.
o Ensure that all Features options are enabled for both
.NET Framework 3.5 SP1 and .NET Framework 4.5,
includ ing all of the WCF Services options.
For instructions on how to add or enable .NET Framework 3.5 SP1
and .NET Framework 4.5 on your server, refer to the Microsoft
TechNet Library at https://technet.microsoft.com/en-
us/.
Turn On Data
Execution
Prevention (DEP)
For instructions on how to turn on Data Execution Prevention on
your server, refer to the Microsoft TechNet Library at
https://technet.microsoft.com/en-us/.
Disable Anti
Denial-Of-Service
(Dos) Attacks
If you are installing Simphony with Microsoft SQL Server as the
database platform, you need to add the SynAttackProtect
registry key to the computer that is running Microsoft SQL Server.
For instructions on how to d isable DOS attacks, refer to the
Microsoft TechNet Library at
https://technet.microsoft.com/en-us/.
Remove anti-virus
software from all
servers
Simphony can silently fail to install because of anti-virus software.
Remove any anti-virus software from all servers before installing
Simphony. You can reinstall the anti-virus software after
Simphony applications and databases are installed .

2-4 Pre-Installation Tasks
Pre-Installation
Tasks
Instructions
Install a database
platform on the
database server
Simphony version 2.8 currently supports the following database
server platforms:
Oracle Database 11g Enterprise Edition
Oracle Database 12c Enterprise Edition
Microsoft SQL Server 2012 Enterprise Edition
Microsoft SQL Server 2008 R2 Enterprise Edition
For instructions on how to install and set up the Oracle Database,
see Installing Oracle Database 11g or 12c.
For instructions on how to install Microsoft SQL Server, refer to
the Microsoft TechNet Library at
https://technet.microsoft.com/en-us/.
You can also install Simphony on a Microsoft SQL Server 2008 or
2012 R2 Failover Cluster. For instructions on how to install a
Microsoft SQL Server 2008 or 2012 R2 Failover Cluster, refer to the
Microsoft TechNet Library at
https://technet.microsoft.com/en-us/.
Installing Oracle Database 11g or 12c
To download and install the Oracle Database, refer to the Oracle Technology Network
(OTN) website at http://www.oracle.com/technetwork/database/enterprise-
edition/downloads/index.html.
Database User Passwords
When performing a database installation, specifically Oracle Database users, passwords
must adhere to the following rules:
Cannot start with a number (for example 1QasHello)
Cannot start with a special character (for example #abc)
Must have at least 8 characters
Must have at least one upper case letter
Must have at least one number
Cannot use a dictionary word, although two dictionary words together may pass
Must have at least one supported special character
Can only use database supported special characters, which include the
underscore (_), dollar sign ($), and pound symbol (#) characters. The following
characters are not recognized and should not be used for Oracle Database user
passwords: ! @ % ^ & *
For example, Hello3&there will not pass because Hello and there are separated
dictionary words by symbols/numbers, but Hellothere$1 would pass.

Pre-Installation Tasks 2-5
Increasing Database Process Count
Run the ALTER SYSTEM SET processes=300 SCOPE=SPFILE; command on the
Oracle Database and restart the Oracle Database Service. If you are on an Oracle Linux
operating system, run the shutdown immediate; command and then run the
STARTUP pfile=init.ora; command to restart the service. The Administrator' s
Reference for Linux and UNIX -Based Operating Systems contains more information about
restarting the Oracle Database Service.
If you are on a Microsoft Windows Server, restart the OracleServiceSIMPHONY
service using the Wind ows Services d ialog. The Platform Guide for Microsoft Windows
contains more information about restarting the Oracle Database Service on Microsoft
Wind ows Servers.
Creating Oracle Database Tablespaces
Create the following Oracle database Tablespaces on the database server or servers:
AGGREGATE_DB
AGGREGATE_INDX
CEDB
COREDB
LOC_INDX
LOCDB
PENTAHO
PORTALDB
RTA
MCRSPOS
MCRSCACHE
See Appendix A for a sample scrip t for creating the database Tablespaces. The Platform
Guide for Microsoft Windows and the Administrator' s Reference for Linux and UNIX -Based
Operating Systems contain more information about creating database Tablespaces.


Upgrading from a Previous Release
3 Upgrading from a Previous Release
Upgrading Simphony
1. Make sure that your Simphony application and database servers meet the
requirements list in Chapter 2.
2. Log in and d ownload the Simphony version 2.8 installer fr om the Oracle
Technology Network (OTN) website at https://edelivery.oracle.com/.
3. Run the Setup and click Next.
If you have the application and the database on separate servers, run the
installer on the application server.
4. Enter the logon credentials for a database ad ministrator, and click OK.
If you are using an Oracle Database, enter the credentials for the SYS user.
If you are using Microsoft SQL Server, enter the credentials for the SA user
and click OK.
5. If you are using the Simphony installer to upgrade Reporting and Analytics
Advanced:
a. Enter the passwords for all existing reporting d atabase users and
enter passwords to configure for the new database users.
b. Click OK.
6. Select Update Application Components on this machine, and click Next.
7. If there are new components, select the components to install, and click Next.
8. Select the services to enable by default , and click Next.
9. If you are using a Load Balancer server and installing the Import/ Export
service or plan to use the Oracle Hospitality Simphony Engagement Cloud
Service, select LoadBalancer for the CA Certificate Location.
If you define a Service Host Secure Port number other than the defau lt 443,
you need to enable that port on the Load Balancer server.
10. If are not u sing a Load Balancer server and installing the Import/ Export
service or plan to use the Engagement Cloud Service, select IIS for the CA
Certificate Location.
If you define a Service H ost Secure Port number other than the defau lt, you
need to configure the IIS Bind ings of each Application Pool to the new port .
For information on how to add IIS Bind ings, refer to the Microsoft TechNet
Library at https://technet.microsoft.com/en-us/ for more
information.
11. Click Next and then click Confirm to begin the upgrad e.
3-2 Upgrading from a Previous Release
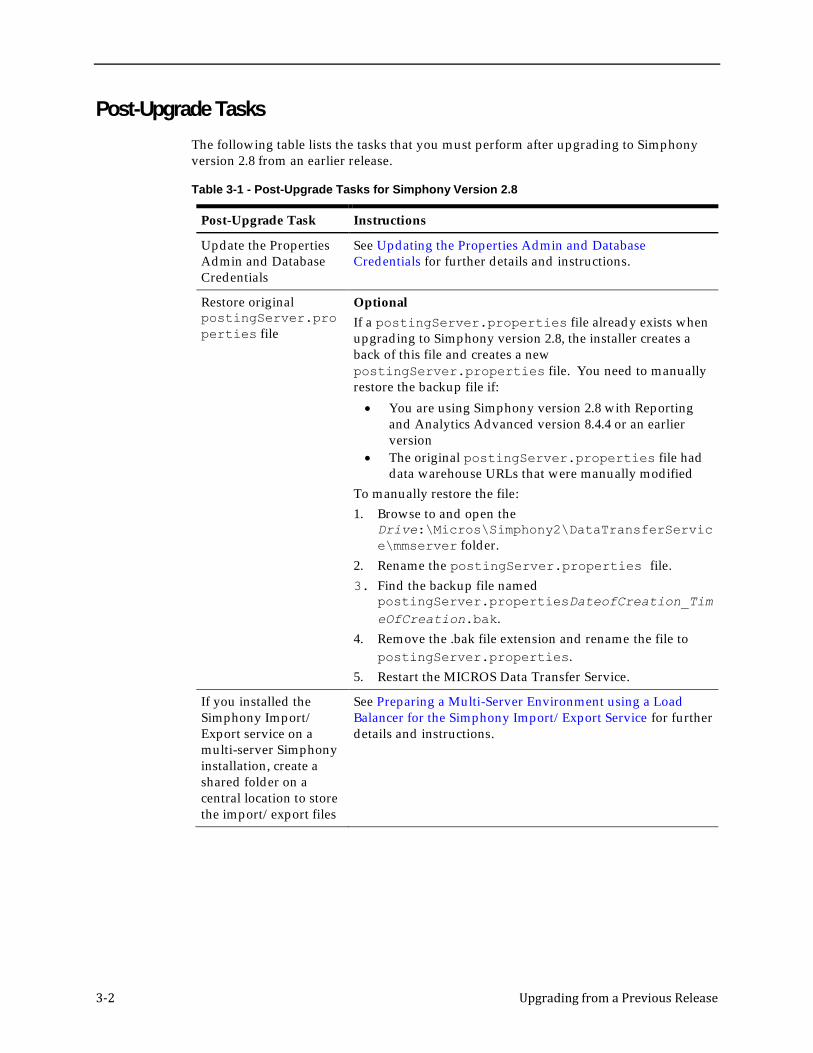
Post-Upgrade Tasks
The following table lists the tasks that you must perform after upgrad ing to Simphony
version 2.8 from an earlier release.
Table 3-1 - Post-Upgrade Tasks for Simphony Version 2.8
Post-Upgrade Task Instructions
Update the Properties
Admin and Database
Credentials
See Updating the Properties Admin and Database
Credentials for further details and instructions.
Restore original
postingServer.pro
perties file
Optional
If a postingServer.properties file alread y exists when
upgrad ing to Simphony version 2.8, the installer creates a
back of this file and creates a new
postingServer.properties file. You need to manually
restore the backup file if:
You are using Simphony version 2.8 with Reporting
and Analytics Advanced version 8.4.4 or an earlier
version
The original postingServer.properties file had
data warehouse URLs that were manually modified
To manually restore the file:
1. Browse to and open the
Drive:\Micros\Simphony2\DataTransferServic
e\mmserver folder.
2. Rename the postingServer.properties file.
3. Find the backup file named
postingServer.propertiesDateofCreation_Tim
eOfCreation.bak.
4. Remove the .bak file extension and rename the file to
postingServer.properties.
5. Restart the MICROS Data Transfer Service.
If you installed the
Simphony Import/
Export service on a
multi-server Simphony
installation, create a
shared folder on a
central location to store
the import/ export files
See Preparing a Multi-Server Environment using a Load
Balancer for the Simphony Import/ Export Service for further
details and instructions.

Installation Tasks 4-1
4 Installation Tasks
This chapter provides a list of tasks that you must perform for each of the installation
scenarios.
Starting the Installation
1. Log in and d ownload the Simphony version 2.8 installer from the Oracle
Technology Network (OTN) website at https://edelivery.oracle.com/.
2. Run the Setup file, and click Next to continue with the installation.
Configuring Simphony Databases during Installation
If you are using an Oracle Database, you need to make sure that the logon credentials
adhere to the Oracle security guidelines when configuring d atabase user passwords.
Refer to the Oracle Database Security Guide, specifically the Guidelines for Securing
Passwords section. It contains more information about configuring password protection
and how your d atabase configurations for an instance affect the case sensitivity,
password reuse, and other factors in the credentials. It’s located a t
http://docs.oracle.com.
1. Enter the IP address of the server for the Service Host Name (computer name). If
the server is using a Domain Name System (DNS) or Host file mapping, you can
enter the name of the server instead of the IP address.
2. Enter the Service Host Port, and click OK.
You can define any free port number for the service host port. If you
define a port number other than the default 8080, you must manually
change the port number when you install subsequent services.
If you are installing all Simphony application and d atabase components
on a single server, do not assign port number 8081 for the Service Host
Port. This is the default port number assigned to the JBoss Server for Back
Office Reports.
3. If you are using a Load Balancer server and installing the Import/ Export service
or plan to use the Oracle Hospitality Simphony Engagement Cloud Service,
select LoadBalancer for the CA Certificate Location.
If you define a Service Host Secure Port number other than the defau lt 433, you
need to enable that port on the Load Balancer server.
4. If are not using a Load Balancer server and installing the Import/ Export service
or plan to use the Engagement Cloud Service, select IIS for the CA Certificate
Location.
If you define a Service Host Secure Port number other than the defau lt, you need
to configure the IIS Bind ings of each Application Pool to the new port. For
information on how to add IIS Bind ings, refer to the Microsoft TechNet Library
at https://technet.microsoft.com/en-us/ for more information.
5. Enter the IP addresses for the Default Gateway and the Default Net Mask, and
then click Next.

4-2 Installation Tasks
6. Select your database platform:
a. If you are using an Oracle Database, select Oracle.
b. If you are using a Microsoft SQL Server, select MS-SQL.
7. Enter or select the location to install Simphony and click Next. Oracle
recommends that you install the Simphony application on a separate partition
from where the Microsoft Wind ows or Oracle Linux operating system resides.
8. Perform one of the following steps:
a. If you want to install both Simphony and Reporting and Analytics
Advanced database components, select Transaction Database and
Reporting Database, and click Next.
b. If the reporting database is alread y installed on a separate server and
you only want to install the Simphony d atabase components, select
Transaction Database, and click Next. In a Transaction Database-only
install, the reporting page is pointed to an existing Reporting and
Analytics Advanced installation.
c. If you only want to install the Reporting and Analytics Advanced
database components, select Reporting Database, and click Next.
9. If you want to install Simphony with a blank d atabase:
a. Select Blank Database.
b. Enter a strong Username and Password to comply with Payment Card
Industry (PCI) security guidelines. The credentials that you enter here
are used to create the Simphony super user to access the EMC.
c. Confirm the password , and click Next.
10. If you want to install Simphony with a sample d atabase:
a. Select Sample Database, and click Next. Do not install the sample
database to be used for an actual food and beverages or retail
environment.
b. Click Yes to continue with the installation.
11. If you selected Oracle as the database platform type:
a. Enter the information to configure the transaction database, and click
Next. See List of Simphony Database Configuration Fields for more
information on the database setup options.
b. Enter the credentials for the default SYS user, and click OK.
c. Enter the information to configure the security d atabase, and click Next.
d . Enter the information to configure the reporting database, and click
Next.
12. If you selected MS-SQL as the database platform type:
a. Enter or select the location to create the transaction database data files,
and click Next. See List of Simphony Database Configuration Fields for
more information on the database setup options.
b. Enter the information to configure the transaction database, and click
Next.
c. Enter the credentials for the SA user, and click OK.
d . Enter or select the location to create the security DB data files, and click
Next.
e. Enter the information to configure the security d atabase, and click Next.

Installation Tasks 4-3
f. Enter or select the location to create the reporting database data files, and
click Next.
g. Enter the information to configure the reporting database, and click
Next.
13. Perform one of the following steps:
a. Enter a unique password for each reporting d atabase user, and click OK.
b. Select Use same password for all users and enter the password for one
user, and click OK.
14. Click Confirm.
15. After the installation is complete, click Finish to exit the Simphony setup.
16. Click Yes to restart the computer.


Installing Simphony on a Single Server 5-1
5 Installing Simphony on a Single Server
In a single-server installation, you install all Simphony application and d atabase
components on one server.
1. If you are using an Oracle Database, m ake sure you have the Simphony d atabase
Tablespaces created in your sever. See Installing Oracle Database 11g or 12c for
more information.
2. Follow the instructions in Starting the Installation .
3. Select Application and Database Components, and click Next.
4. Select all application and d atabase components, and click Next. See List of
Simphony Components and Services for details.
5. Select all the services, and click Next.
6. Follow the instructions in Configuring Simphony Databases during Installation
to complete the installation.


Installing Simphony on Multiple Servers 6-1
6 Installing Simphony on Multiple Servers
In a multi-server installation, you install the Simphony application and d atabase
components on one or more separate servers.
Overview of Installing Simphony on Multiple Servers
The following table outlines the process for installing Simphony on multiple servers
depending on the database platform that you are using.
Table 6-1 - Overview of Installing Simphony on Multiple Servers
Database
Type
Description Instructions
Oracle
Database
When installing Simphony
with an Oracle Database, you
can install Simphony
database components on
separate database servers
from a remote machine while
installing Simphony on the
application servers.
1. Create Simphony Database Tablespaces.
See Creating Database Tablespaces.
2. Install the Simphony application
components.
If you want to install Simphony
applications on a single server, see
Installing Simphony Applications on
a Single Server
If you want to install Simphony
application components on multiple
application servers, see Installing
Simphony Applications on Multiple
Servers
If you want to install Reporting and
Analytics Advanced on a separate
server, see Installing Reporting and
Analytics Advanced on a Separate
Server

6-2 Installing Simphony on Multiple Servers
Database
Type
Description Instructions
Microsoft
SQL Server
When installing Simphony
with Microsoft SQL Server,
you cannot install the
databases from a remote
machine; you must run the
Simphony database setup on
the local d atabase servers and
install the database
components.
1. Install the Simphony database
components on the d atabase servers. See
Installing Simphony Database
Components on Microsoft SQL Server .
2. Install the Simphony application
components.
If you want to install Simphony
applications on a single server, see
Installing Simphony Applications on
a Single Server
If you want to install Simphony
application components on multiple
application servers, see Installing
Simphony Applications on Multiple
Servers
If you want to install Reporting and
Analytics Advanced on a separate
server, see Installing Reporting and
Analytics Advanced on a Separate
Server
Installing Simphony Database Components on Microsoft SQL Server
1. Follow all pre-installation tasks for your site. See Pre-Installation Tasks.
2. Follow the instructions in Starting the Installation .
3. Select Database Components Only, and click Next.
4. Select MS-SQL as the d atabase platform type, and click Next.
5. Follow the instructions in Configuring Simphony Databases during Installation
from Step 6 onwards to complete the installation.
Installing the Simphony Application on a Single Server
This guides you through installing all Simphony application components on a single
server.
1. Make sure that your d atabase server or servers are set up as described in
Overview of Installing Simphony on Multip le Servers.
2. On the Simphony application server, follow the instructions in Starting the
Installation.
3. Select Application and Database Components, and click Next.
4. Select all components, and click Next. See List of Simphony Components and
Services for details.
5. Select all services to enable, and click Next.
6. Follow the instructions in Configuring Simphony Databases during Installation
to complete the installation. When configuring the databases, enter the Server
Host Name or IP address, Service Host Name, and logon credentials for the
Simphony database servers.

Installing Simphony on Multiple Servers 6-3
Installing the Simphony Application Components on Multiple Servers
This guides you through installing Simphony application components across multiple
servers.
1. Make sure that your d atabase server or servers are set up as described in
Overview of Installing Simphony on Multip le Servers.
2. Follow the Steps 1-4 in Installing Simphony Applications on a Single Server .
3. On the primary application server, select all the services and click Next.
4. On all other application servers, deselect Sequencer Service, and click Next.
5. Follow the instructions in Configuring Simphony Databases during Installation
to complete the installation. When configuring the databases, enter the Server
Host Name or IP address, Service Name, and logon credentials for the Simphony
database servers.
Installing Reporting and Analytics Advanced on a Separate Server
1. Make sure that your d atabase server or servers are set up as described in
Overview of Installing Simphony on Multip le Servers.
2. On the Reporting and Analytics Advanced server, follow the instructions in
Starting the Installation .
3. Select Application Components Only, and click Next.
4. Select Clear All to deselect all default selections.
5. Select Simphony Reports, and click Next.
6. Click Next.
7. Enter the IP address of the server for the Service Host Name (computer name)
and enter the Service Host Port.
8. If you are using a Load Balancer server and installing the Import/ Export service
or plan to use the Oracle Hospitality Simphony Engagement Cloud Service,
select LoadBalancer for the CA Certificate Location.
If you define a Service Host Secure Port number other than the defau lt 433, you
need to enable that port on the Load Balancer server.
9. If are not u sing a Load Balancer server and installing the Import/ Export service
or plan to use the Engagement Cloud Service, select IIS for the CA Certificate
Location.
If you define a Service Host Secure Port number other than the defau lt, you need
to configure the IIS Bind ings of each Applica tion Pool to the new port.
10. Enter the IP addresses for the Default Gateway and the Default Net Mask and
then click Next.
11. Select your database platform:
a. If you are using an Oracle Database, select Oracle.
b. If you are using a Microsoft SQL Server, select MS-SQL.
12. Enter or select the location to install Simphony, and click Next.
13. Enter the information to connect to the transaction database. See List of
Simphony Database Configuration Fields for more information on the database
setup options.
14. Enter the credentials for a d atabase ad ministrative user:

6-4 Installing Simphony on Multiple Servers
a. If you are using an Oracle Database, enter the credentials for the SYS user,
and clock OK.
b. If you are using a Microsoft SQL server, enter the cr edentials for the SA
user, and click OK.
15. Enter the security database user and password , and click Next.
16. Enter the information to connect to the reporting d atabase , and click Next.
17. Enter the reporting d atabase users, password or passwords to connect to the
reporting database, and click OK.
18. Click Confirm.
19. Once the installation is complete, click Finish to exit the Simphony setup.
Post-Installation Tasks 7-5
7 Post-Installation Tasks
If you installed Simphony with an Oracle Database, you need to make sure that the
Simphony and SimphonyXDB instances are running.
To show the status of the Simphony and SimphonyXDB instances, run the lsnrctl
STATUS command from a command prompt on the d atabase server.
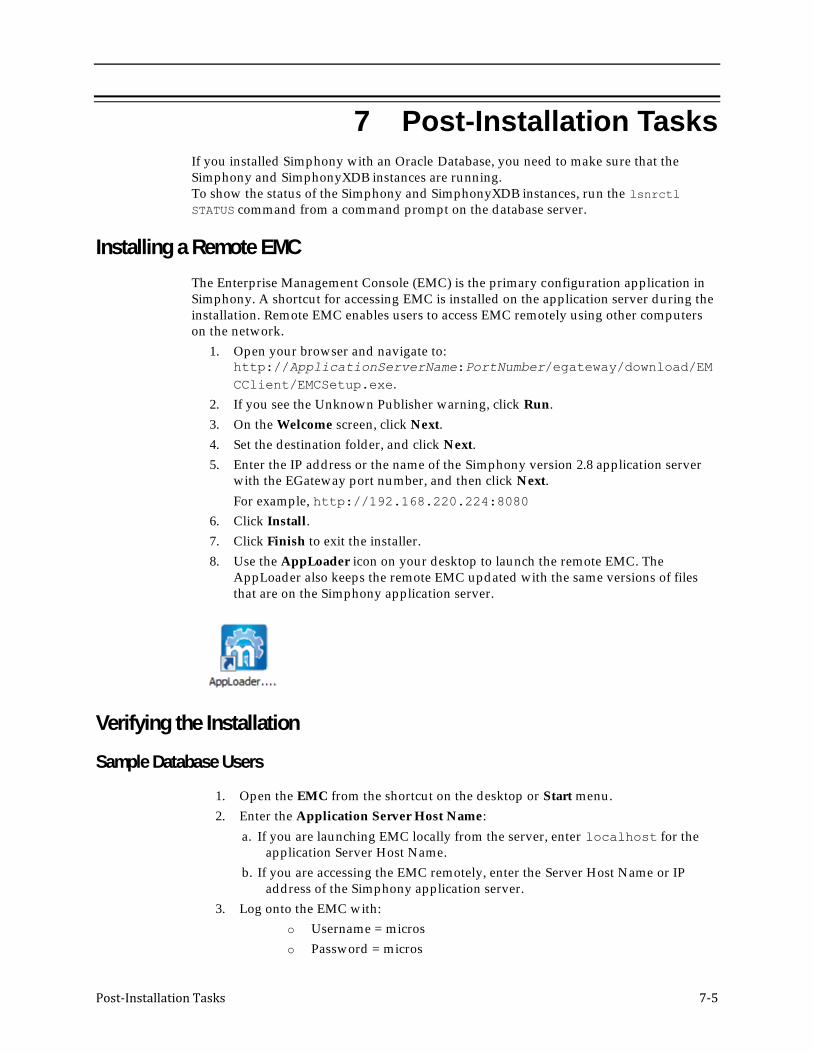
Installing a Remote EMC
The Enterprise Management Console (EMC) is the primary configuration application in
Simphony. A shortcut for accessing EMC is installed on the application server during the
installation. Remote EMC enables users to access EMC remotely using other computers
on the network.
1. Open your browser and navigate to:
http://ApplicationServerName:PortNumber/egateway/download/EM
CClient/EMCSetup.exe.
2. If you see the Unknown Publisher warning, click Run.
3. On the Welcome screen, click Next.
4. Set the destination folder, and click Next.
5. Enter the IP address or the name of the Simphony version 2.8 application server
with the EGateway port number, and then click Next.
For example, http://192.168.220.224:8080
6. Click Install.
7. Click Finish to exit the installer.
8. Use the AppLoader icon on your desktop to launch the remote EMC. The
AppLoader also keeps the remote EMC upd ated with the same versions of files
that are on the Simphony application server.
Verifying the Installation
Sample Database Users
1. Open the EMC from the shortcut on the desktop or Start menu.
2. Enter the Application Server Host Name:
a. If you are launching EMC locally from the server, enter localhost for the
application Server Host Name.
b. If you are accessing the EMC remotely, enter the Server Host Name or IP
address of the Simphony application server.
3. Log onto the EMC w ith:
o Username = micros
o Password = micros

7-6 Post-Installation Tasks
4. Click OK when prompted to update the password .
5. Enter a new strong password (per PCI DSS 8.2.3 / PA-DSS 3.1.6 stand ards) for
the Simphony super user, and click Accept. If you are using an Oracle Database,
refer to the Oracle Database Security Guide for more information about configuring
password protection.
6. Click OK when prompted to update the username.
7. Enter a new username for the EMC super user, and click Accept.
8. Click Login.
9. Click OK for the EMC Database Credentials Non-Compliance message.
If you can see the EMC dashboard , then the Simphony gateway is up and Simphony is
installed successfu lly.
Blank Database Users
1. Open the EMC from the shortcut on the desktop or Start menu.
2. Enter the Application Server Host Name:
a. If you are launching EMC locally from the server, enter localhost for
the app lication Server Host Name.
b. If you are accessing the EMC remotely, enter the Server Host Name or IP
address of the Simphony application server.
3. Enter the logon credentials for the Simphony super user that you created in Step
6 of Configuring Simphony Databases during Installation .
4. Click Login.
5. Click OK for the EMC Database Credentials Non-Compliance message.
If you can see the EMC dashboard , the Simphony gateway is up and Simphony is
installed successfu lly.
Configuring the Simphony License Count
1. In the EMC, select the Enterprise level, and then select Enterprise Parameters in
the Setup tab.
2. Click the License Configuration tab.
3. Click Configure ad jacent to Workstations Client License Count.
4. If you want to add a new license count, select Set new license count.
5. If you want to append licenses to an existing license count, select Add to the
existing license count.
6. Enter the number of client licenses that you have purchased .
7. (Optional) Enter any additional details regard ing the purchased license in
Reference.
8. Click OK.
9. Repeat Steps 3 through 7 for Engagement Client License Count, Transaction
Service Client License Count, and KDS Client License Count.
10. Click Save, and click Yes to agree to the license.

Post-Installation Tasks 7-7
Updating the Properties Admin and Database Credentials
When logging in to the EMC for the first time after installing or upgrad ing to Simphony
version 2.8, you receive a message notifying you that your property credentials are not
compliant w ith the Simphony stand ards. To keep your properties safe from any security
risks, you need to update the Admin and Database credentials, which Simphony uses for
creating and maintaining the workstation d atabases, for each property in your
Enterprise.
To see which of your properties is not compliant and up to date their credentials:
1. In the EMC, select the Enterprise level, and then select Properties in the Setup
tab.
2. In Table View, scroll across the window to your right until you can see the
Admin Credentials and the Database Credentials columns. If a property is not
compliant, the Admin Cred entials and the Database Credentials columns are
highlighted in red .
3. Click either the Admin Credentials or the Database Credentials column of the
non-compliant property, and go to the Property Parameters module.
4. In the Property Parameters module, click the Security tab.
5. Enter User Security Credentials . Simphony uses these credentials to authenticate
the workstations.
The Install User Security Username must have at least two characters and must not
contain any company name, product name, common words, or Structured Query
Language (SQL) keywords. For example, Micros, Oracle, abcd , 1234, and so on.
The Install User Security Password must have a minimum of eight characters and adhere
to the PCI DSS 8.2.3 / PA-DSS 3.1.6 stand ards.
1. Enter the Current Password of the Admin User.
2. Enter a new strong password for the Admin User (per PCI DSS 8.2.3 / PA-DSS
3.1.6 stand ards).
3. Repeat Steps 6 through 7 for the Database User, and click Save.
4. Repeat Steps 3 through 8 for all non-compliant properties.
Simphony requires that you update the system and database ad ministrator credentials
every 90 d ays. If you do not update the credentials, EMC shows the Database Credentials
Non-Compliance message each time you log in until you meet the compliance.
Setting the Start-Of-Day Sequencer Machine and the App Server Time
Zone
1. In the EMC, select the Enterprise level, and then select Enterprise Parameters in
the Setup tab.
2. Click the Miscellaneous tab.
3. Enter the Windows machine name for SOD Sequencer Machine Name .
4. Select the App Server Time Zone.
5. If you are deploying Simphony on multiple servers, the date, time, and the time
zone settings of each app server and database server must correspond .
Additionally, the servers’ time zone must correspond with the App Server Time
Zone setting in the EMC.

7-8 Post-Installation Tasks
6. You can synchronize the time settings between the servers by configuring one of
the servers to be a Network Time Protocol (NTP) server and then point the rest of
the servers to the NTP server. For information on how to set up a Network Time
Protocol server, refer to the Microsoft TechNet Library at
https://technet.microsoft.com/en-us/ for more information.
7. Click Save.
8. If you have installed Simphony on multiple app lication servers, d isable the
Micros Sequencer Service on all servers other than the SOD Sequencer Machine.
In the event the application server that is running the Micros Sequencer Service
has performance issues, you should start the Micros Sequencer Service on
another Simphony application server if the main application server is going to be
down for multiple days.
Connecting Reporting and Analytics Advanced to Simphony
Before you connect EMC to Reporting and Analytics Advanced , you need to have:
At least one property in the Enterprise. The Simphony Configuration Guide
contains more information about add ing properties to the Enterprise
Organizations and report locations created in Reporting and Analytics
Advanced for your properties in the Enterprise. The mymicros.net System
Administrator and User Guide contains more information about reporting
hierarchies.
1. In the EMC, select the Enterprise level, select Enterprise Parameters from the
Setup tab, and then click the mymicros.net tab.
2. In the mymicros.net Machine Name field , enter the name of the computer that is
running the MICROS Portal Service.
3. Select the Enterprise level, and then select Properties from the Setup tab.
4. Double-click a property and go to Form View.
5. Select the Report Location for this property. If the Report Location for this
property is not available in the d rop -down list, click New and create a Report
Location.
6. Select 2 --- Extensible Clients and Architecture as the Simphony Platform .
7. Repeat steps 2 through 4 for all properties in your Enterprise, and click Save.
8. Click Save.

Post-Installation Tasks 7-9
Updating postingServer.properties.config File for Reporting and Analytics
Advanced Installations
If you installed Reporting and Analytics Advanced using the Simphony version 2.8
installer and your Simphony installation has servers other than the central Reporting and
Analytics Advanced server, you need to add the following user, password , and
connection strings to the postingServer.properties file at
Drive: \MICROS\Simphony2\DataTransferService\mmserver folder in the
central Reporting and Analytics Advanced server :
==================
dbUserName = DatabaseUsername
dbPassword = DatabasePassword
ceDbUserName = cedb
ceDbPassword = DatabasePassword
====================
DBDriverClass=net.sourceforge.jtds.jdbc.Driver
LocActConnectURL=jdbc:jtds:sqlserver:// ServerName:1433;databaseName=LOCATION_ACTIVITY_DB
CoreConnectURL=jdbc:jtds:sqlserver://Server
Name:1433;databaseName=COREDB
RTAConnectURL=jdbc:jtds:sqlserver:// ServerName:1433;databaseName=RTA
PortalConnectURL=jdbc:jtds:sqlserver://ServerName:1433;databaseNa
me=PORTALDB
CustActConnectURL=jdbc:jtds:sqlserver://
ServerName:1433;databaseName=CUSTOMER_ACTIVITY_DB
iCareOLTPURL=jdbc:jtds:sqlserver://
ServerName:1433;databaseName=ICARE_OLTP_DB
AggregateConnectURL=$AggregateConnectURL$
CEConnectURL=jdbc:jtds:sqlserver://
ServerName:1433;databaseName=CEDB
7-10 Post-Installation Tasks
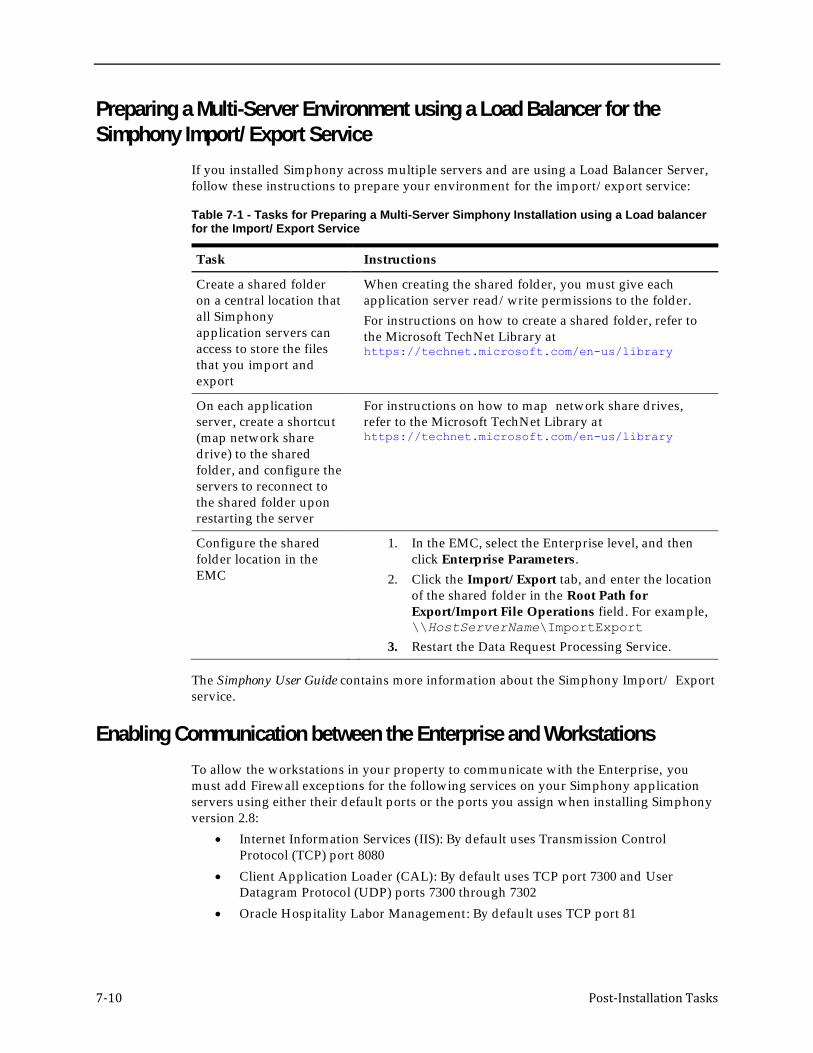
Preparing a Multi-Server Environment using a Load Balancer for the
Simphony Import/ Export Service
If you installed Simphony across multiple servers and are using a Load Balancer Server,
follow these instructions to prepare your environment for the import/ export service:
Table 7-1 - Tasks for Preparing a Multi-Server Simphony Installation using a Load balancer for the Import/ Export Service
Task Instructions
Create a shared folder
on a central location that
all Simphony
application servers can
access to store the files
that you import and
export
When creating the shared folder, you must give each
application server read / write permissions to the folder.
For instructions on how to create a shared folder, refer to
the Microsoft TechNet Library at https://technet.microsoft.com/en-us/library
On each application
server, create a shortcu t
(map network share
d rive) to the shared
folder, and configure the
servers to reconnect to
the shared folder upon
restarting the server
For instructions on how to map network share d rives,
refer to the Microsoft TechNet Library at https://technet.microsoft.com/en-us/library
Configure the shared
folder location in the
EMC
1. In the EMC, select the Enterprise level, and then
click Enterprise Parameters.
2. Click the Import/ Export tab, and enter the location
of the shared folder in the Root Path for
Export/Import File Operations field . For example,
\\HostServerName\ImportExport
3. Restart the Data Request Processing Service.
The Simphony User Guide contains more information about the Simphony Import/ Export
service.
Enabling Communication between the Enterprise and Workstations
To allow the workstations in your property to communicate with the Enterprise, you
must add Firewall exceptions for the following services on your Simphony application
servers using either their d efault ports or the ports you assign when installing Simphony
version 2.8:
Internet Information Services (IIS): By default uses Transmission Control
Protocol (TCP) port 8080
Client Application Loader (CAL): By default uses TCP port 7300 and User
Datagram Protocol (UDP) ports 7300 through 7302
Oracle Hospitality Labor Management: By default uses TCP port 81

Post-Installation Tasks 7-11
You may need to open extra ports for add itional Simphony features, contact your local
support representative or Oracle Hosp itality Support Services for assistance.
For instructions on how to open a port in Wind ows Firewall, refer to the Microsoft
TechNet Library at https://technet.microsoft.com/en-us/library.


Uninstalling Simphony 8-1
8 Uninstalling Simphony
This only removes the Simphony application. If you want to remove Simphony
completely from your servers, you must to manually d elete the Simphony database
components from the d atabase after uninstalling the application .
1. Run the Simphony version 2.8 installer , and click Next.
If you have the application and the database on separate servers, run the installer
on the application server.
2. Enter the credentials for a d atabase ad ministrator , and click OK.
a. If you are using an Oracle Database, enter the credentials for the SYS
user.
b. If you are using Microsoft SQL Server, enter the credentials for the SA
user and click OK.
3. Enter the passwords for the reporting d atabase users, and click OK.
4. Select Uninstall Simphony, and click Next.
5. Click Confirm.


Troubleshooting 9-1
9 Troubleshooting
This section describes common problems you might encounter when installing
Simphony version 2.8 and explains how to solve them.
Insufficient System Privileges
Insufficient System Privileges message appears when the prerequisite, Internet
Information Services (IIS), has not been installed . See Installing Internet Information
Services (IIS) for instructions on how to install IIS.
Cannot Connect to the Database Server during the Simphony Installation
The Simphony installer may not connect to the database server due to the following
reasons:
Wind ows Firewall is running
Simphony and SimphonyXDB instances are not running
Adding Simphony to the Windows Firewall Exceptions
The Wind ows Firewall, which is enabled by default on your operating system, could
prevent the Simphony installer from connecting to the database server. You must set up
an exception ru le on your firewall setting for the Simphony server and the d atabase
server to continue with the installation. For instructions on how to set up exception rules
in Windows Firewall, refer to the Microsoft TechNet Library at
https://technet.microsoft.com/en-us/library.
Installing Simphony on Separate Servers
If you are using a separate database server, you must set up an incoming rule to allow
connections from Simphony depending on your d atabase platform using either the
default port or the port you assign when Configuring Simphony Databases during
Installation. By default, the Oracle Database server uses port 1521 and Microsoft SQL
Server uses port 1433. For instructions on how to open a port in Windows Firewall, refer
to the Microsoft TechNet Library at https://technet.microsoft.com/en-us/library.
Starting the Oracle Listener
If the Oracle Listener is not running, Simphony services cannot start. Make sure that the
Oracle Listener is running:
If you are using Oracle Linux, run the command $ lsnrctl status. If the
listener is running, you should see the listener configuration sett ings and the
services summary.
If you are using Microsoft Wind ows, make sure that the Oracle TNS Listener
service (for example, OracleOraDb11g_home1TNSListener) is set to Started in
the Windows Services utility
If the Oracle Listener is not running, then you need to manually restart the listener using
the Linux command = lsnrctl start. The Platform Guide for Microsoft Windows and the
Administrator' s Reference for Linux and UNIX -Based Operating Systems contain more
information about manually starting Oracle services.

9-2 Troubleshooting
EMC Fails to Launch
Simphony can fail to install completely because of anti-virus software. Remove any anti-
virus software from all servers and reinstall Simphony. You can reinstall the anti-virus
software after Simphony applications and databases are installed .

List of Simphony Components and Services 10-1
10 List of Simphony Components and Services
You can install the following components and services by running the Simphony
installer.
Table 10-1 - List of Application and Database Services
Component Description
Data Transfer Service Moves point of sale (POS) definitions and journal data to
Reporting and Analytics Advanced . This is typically installed
on each Simphony application server.
Direct Posting Service Posts sales data to the Simphony Reports d atabase. This is
typically installed on each Simphony application server.
EMC Client Contains all files necessary to run the Enterprise Management
Console (EMC).
Simphony Reports Installs Reporting and Analytics Advanced and Simphonized
reports.
Open Source This is typically installed on each Simphony application
server.
Sequencer Service Responsible for running the Start of Day Autosequences. This
is typically installed on each Simphony application server,
but is only enabled on one server.
Tools Installs the tools required for import/ export, encryption, etc.
This is typically installed on each Simphony application
server.
Import Export Installs the Import Export Web API and the Web Application
Data Request Processing Service. This is typically installed
on each Simphony application server.
The Web Application Data Request Processing Service
processes Simphony Data Import/ Export requests and any
scheduled Import/ Export requests.


List of Simphony Database Configuration Fields 11-1
11 List of Simphony Database Configuration Fields
The following table describes the fields that appear on the Simphony installer when
configuring the Simphony databases.
Table 11-1 - List of Database Configuration Fields
Field Options
Server Host Name Enter the IP address or the Server Host Name of the database
server.
To install Simphony on a named instance of Microsoft SQL
server, enter the Server Host Name as
ServerName\InstanceName.
Service Name If you are using an Oracle database, enter a service name on
which to install the Simphony database.
Instance Name If you have created a named instanced to install Simphony on
Microsoft SQL Server, enter the instance name.
Username Enter a strong username for the database.
Password Enter a strong password for the user defined in the Username
field to use to connect to the database.
Database Name Enter a name for the database if you want to use a name other
than the default. This field only appears if you select
Microsoft SQL as your database type.
Database Port Enter the port number to use to connect to the d atabase if you
want to use a port other than the defau lt .

Appendix A A-1
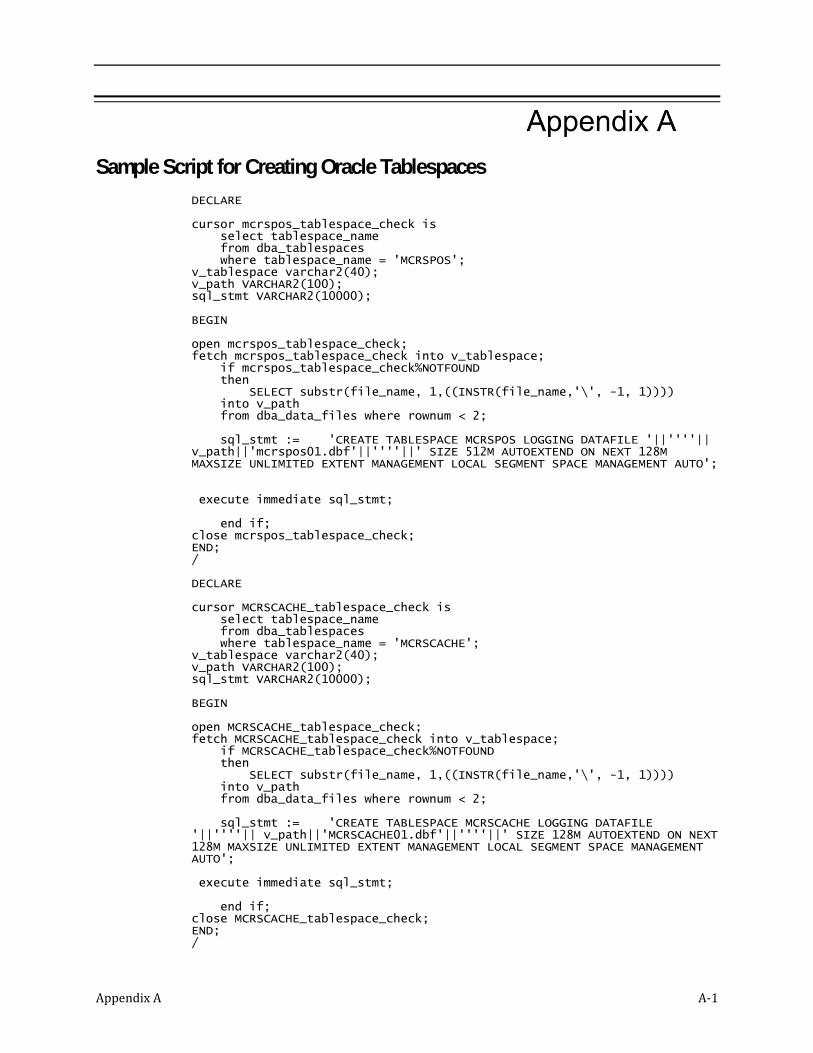
Sample Script for Creating Oracle Tablespaces
DECLARE cursor mcrspos_tablespace_check is select tablespace_name from dba_tablespaces where tablespace_name = 'MCRSPOS'; v_tablespace varchar2(40); v_path VARCHAR2(100); sql_stmt VARCHAR2(10000); BEGIN open mcrspos_tablespace_check; fetch mcrspos_tablespace_check into v_tablespace; if mcrspos_tablespace_check%NOTFOUND then SELECT substr(file_name, 1,((INSTR(file_name,'\', -1, 1)))) into v_path from dba_data_files where rownum < 2; sql_stmt := 'CREATE TABLESPACE MCRSPOS LOGGING DATAFILE '||''''|| v_path||'mcrspos01.dbf'||''''||' SIZE 512M AUTOEXTEND ON NEXT 128M MAXSIZE UNLIMITED EXTENT MANAGEMENT LOCAL SEGMENT SPACE MANAGEMENT AUTO'; execute immediate sql_stmt; end if; close mcrspos_tablespace_check; END; / DECLARE cursor MCRSCACHE_tablespace_check is select tablespace_name from dba_tablespaces where tablespace_name = 'MCRSCACHE'; v_tablespace varchar2(40); v_path VARCHAR2(100); sql_stmt VARCHAR2(10000); BEGIN open MCRSCACHE_tablespace_check; fetch MCRSCACHE_tablespace_check into v_tablespace; if MCRSCACHE_tablespace_check%NOTFOUND then SELECT substr(file_name, 1,((INSTR(file_name,'\', -1, 1)))) into v_path from dba_data_files where rownum < 2; sql_stmt := 'CREATE TABLESPACE MCRSCACHE LOGGING DATAFILE '||''''|| v_path||'MCRSCACHE01.dbf'||''''||' SIZE 128M AUTOEXTEND ON NEXT 128M MAXSIZE UNLIMITED EXTENT MANAGEMENT LOCAL SEGMENT SPACE MANAGEMENT AUTO'; execute immediate sql_stmt; end if; close MCRSCACHE_tablespace_check; END; /

A-2 Appendix A
DECLARE cursor RTA_tablespace_check is select tablespace_name from dba_tablespaces where tablespace_name = 'RTA'; v_tablespace varchar2(40); v_path VARCHAR2(100); sql_stmt VARCHAR2(10000); BEGIN open RTA_tablespace_check; fetch RTA_tablespace_check into v_tablespace; if RTA_tablespace_check%NOTFOUND then SELECT substr(file_name, 1,((INSTR(file_name,'\', -1, 1)))) into v_path from dba_data_files where rownum < 2; sql_stmt := 'CREATE TABLESPACE RTA LOGGING DATAFILE '||''''|| v_path||'RTA01.dbf'||''''||' SIZE 128M AUTOEXTEND ON NEXT 128M MAXSIZE UNLIMITED EXTENT MANAGEMENT LOCAL SEGMENT SPACE MANAGEMENT AUTO'; execute immediate sql_stmt; end if; close RTA_tablespace_check; END; / DECLARE cursor COREDB_tablespace_check is select tablespace_name from dba_tablespaces where tablespace_name = 'COREDB'; v_tablespace varchar2(40); v_path VARCHAR2(100); sql_stmt VARCHAR2(10000); BEGIN open COREDB_tablespace_check; fetch COREDB_tablespace_check into v_tablespace; if COREDB_tablespace_check%NOTFOUND then SELECT substr(file_name, 1,((INSTR(file_name,'\', -1, 1)))) into v_path from dba_data_files where rownum < 2; sql_stmt := 'CREATE TABLESPACE COREDB LOGGING DATAFILE '||''''|| v_path||'COREDB01.dbf'||''''||' SIZE 128M AUTOEXTEND ON NEXT 128M MAXSIZE UNLIMITED EXTENT MANAGEMENT LOCAL SEGMENT SPACE MANAGEMENT AUTO'; execute immediate sql_stmt; end if; close COREDB_tablespace_check; END; / DECLARE cursor PORTALDB_tablespace_check is select tablespace_name from dba_tablespaces where tablespace_name = 'PORTALDB'; v_tablespace varchar2(40); v_path VARCHAR2(100);

Appendix A A-3
sql_stmt VARCHAR2(10000); BEGIN open PORTALDB_tablespace_check; fetch PORTALDB_tablespace_check into v_tablespace; if PORTALDB_tablespace_check%NOTFOUND then SELECT substr(file_name, 1,((INSTR(file_name,'\', -1, 1)))) into v_path from dba_data_files where rownum < 2; sql_stmt := 'CREATE TABLESPACE PORTALDB LOGGING DATAFILE '||''''|| v_path||'PORTALDB01.dbf'||''''||' SIZE 128M AUTOEXTEND ON NEXT 128M MAXSIZE UNLIMITED EXTENT MANAGEMENT LOCAL SEGMENT SPACE MANAGEMENT AUTO'; execute immediate sql_stmt; end if; close PORTALDB_tablespace_check; END; / DECLARE cursor PENTAHO_tablespace_check is select tablespace_name from dba_tablespaces where tablespace_name = 'PENTAHO'; v_tablespace varchar2(40); v_path VARCHAR2(100); sql_stmt VARCHAR2(10000); BEGIN open PENTAHO_tablespace_check; fetch PENTAHO_tablespace_check into v_tablespace; if PENTAHO_tablespace_check%NOTFOUND then SELECT substr(file_name, 1,((INSTR(file_name,'\', -1, 1)))) into v_path from dba_data_files where rownum < 2; sql_stmt := 'CREATE TABLESPACE PENTAHO LOGGING DATAFILE '||''''|| v_path||'PENTAHO01.dbf'||''''||' SIZE 128M AUTOEXTEND ON NEXT 128M MAXSIZE UNLIMITED EXTENT MANAGEMENT LOCAL SEGMENT SPACE MANAGEMENT AUTO'; execute immediate sql_stmt; end if; close PENTAHO_tablespace_check; END; / DECLARE cursor LOCDB_tablespace_check is select tablespace_name from dba_tablespaces where tablespace_name = 'LOCDB'; v_tablespace varchar2(40); v_path VARCHAR2(100); sql_stmt VARCHAR2(10000); BEGIN open LOCDB_tablespace_check; fetch LOCDB_tablespace_check into v_tablespace; if LOCDB_tablespace_check%NOTFOUND then

A-4 Appendix A
SELECT substr(file_name, 1,((INSTR(file_name,'\', -1, 1)))) into v_path from dba_data_files where rownum < 2; sql_stmt := 'CREATE TABLESPACE LOCDB LOGGING DATAFILE '||''''|| v_path||'LOCDB01.dbf'||''''||' SIZE 512M AUTOEXTEND ON NEXT 128M MAXSIZE UNLIMITED EXTENT MANAGEMENT LOCAL SEGMENT SPACE MANAGEMENT AUTO'; execute immediate sql_stmt; end if; close LOCDB_tablespace_check; END; / DECLARE cursor LOC_INDX_tablespace_check is select tablespace_name from dba_tablespaces where tablespace_name = 'LOC_INDX'; v_tablespace varchar2(40); v_path VARCHAR2(100); sql_stmt VARCHAR2(10000); BEGIN open LOC_INDX_tablespace_check; fetch LOC_INDX_tablespace_check into v_tablespace; if LOC_INDX_tablespace_check%NOTFOUND then SELECT substr(file_name, 1,((INSTR(file_name,'\', -1, 1)))) into v_path from dba_data_files where rownum < 2; sql_stmt := 'CREATE TABLESPACE LOC_INDX LOGGING DATAFILE '||''''|| v_path||'LOC_INDX01.dbf'||''''||' SIZE 512M AUTOEXTEND ON NEXT 128M MAXSIZE UNLIMITED EXTENT MANAGEMENT LOCAL SEGMENT SPACE MANAGEMENT AUTO'; execute immediate sql_stmt; end if; close LOC_INDX_tablespace_check; END; / DECLARE cursor AGGREGATE_DB_tablespace_check is select tablespace_name from dba_tablespaces where tablespace_name = 'AGGREGATE_DB'; v_tablespace varchar2(40); v_path VARCHAR2(100); sql_stmt VARCHAR2(10000); BEGIN open AGGREGATE_DB_tablespace_check; fetch AGGREGATE_DB_tablespace_check into v_tablespace; if AGGREGATE_DB_tablespace_check%NOTFOUND then SELECT substr(file_name, 1,((INSTR(file_name,'\', -1, 1)))) into v_path from dba_data_files where rownum < 2; sql_stmt := 'CREATE TABLESPACE AGGREGATE_DB LOGGING DATAFILE '||''''|| v_path||'AGGREGATE_DB01.dbf'||''''||' SIZE 128M AUTOEXTEND ON NEXT 128M MAXSIZE UNLIMITED EXTENT MANAGEMENT LOCAL SEGMENT SPACE MANAGEMENT AUTO';

Appendix A A-5
execute immediate sql_stmt; end if; close AGGREGATE_DB_tablespace_check; END; / DECLARE cursor AGGREGATE_DX_tablespace_check is select tablespace_name from dba_tablespaces where tablespace_name = 'AGGREGATE_INDX'; v_tablespace varchar2(40); v_path VARCHAR2(100); sql_stmt VARCHAR2(10000); BEGIN open AGGREGATE_DX_tablespace_check; fetch AGGREGATE_DX_tablespace_check into v_tablespace; if AGGREGATE_DX_tablespace_check%NOTFOUND then SELECT substr(file_name, 1,((INSTR(file_name,'\', -1, 1)))) into v_path from dba_data_files where rownum < 2; sql_stmt := 'CREATE TABLESPACE AGGREGATE_INDX LOGGING DATAFILE '||''''|| v_path||'AGGREGATE_INDX01.dbf'||''''||' SIZE 128M AUTOEXTEND ON NEXT 128M MAXSIZE UNLIMITED EXTENT MANAGEMENT LOCAL SEGMENT SPACE MANAGEMENT AUTO'; execute immediate sql_stmt; end if; close AGGREGATE_DX_tablespace_check; END; / DECLARE cursor CEDB_tablespace_check is select tablespace_name from dba_tablespaces where tablespace_name = 'CEDB'; v_tablespace varchar2(40); v_path VARCHAR2(100); sql_stmt VARCHAR2(10000); BEGIN open CEDB_tablespace_check; fetch CEDB_tablespace_check into v_tablespace; if CEDB_tablespace_check%NOTFOUND then SELECT substr(file_name, 1,((INSTR(file_name,'\', -1, 1)))) into v_path from dba_data_files where rownum < 2; sql_stmt := 'CREATE TABLESPACE CEDB LOGGING DATAFILE '||''''|| v_path||'CEDB01.dbf'||''''||' SIZE 128M AUTOEXTEND ON NEXT 128M MAXSIZE UNLIMITED EXTENT MANAGEMENT LOCAL SEGMENT SPACE MANAGEMENT AUTO'; execute immediate sql_stmt; end if; close CEDB_tablespace_check; END; /


Appendix B B-1
Post-Installation Best Practices
Creating Database Backups
Create backups of the Simphony database period ically to ensure that you do not
encounter potential data loss due to any unforeseen circumstances.
The Database Backup and Recovery User Guide contains more information about creating
database backups using the Oracle Recovery Manager.
For instructions on creating database backups in Microsoft SQL Server, refer to the
Microsoft TechNet Library at https://technet.microsoft.com/en-us/ for more
information.
Changing the Application Server’s Name
If you change the Server Host Name of your Simphony application server, then make
sure to carry out the following upd ates on the application server.
1. Find and replace the defau lt ServerName in the following host files with the new
ServerName. The defau lt ServerName is associated with the IP address
localhost.
Table 2 - Host Files
Path and filename Variable
C:\ Windows\ System32\ drivers\ etc\ hosts HostIPAddress ServerName
The HostIPAddress is typically
set to localhost.
C:\ Windows\ System32\ drivers\ etc\ lmhosts HostIPAddress ServerName
The HostIPAddress is typically
set to localhost.
2. If you are using an Oracle database, find and replace the default ServerName in
the following Oracle files w ith the new ServerName.
Table 3 - Oracle Database Files
Path and filename Variable
Drive:\ Oracle\ product\ version\ dbhome_1\
NETWORK\ ADMIN \ listener.ora
HOST=ServerName
Drive:\ Oracle\ product\ version\ dbhome_1\
NETWORK\ ADMIN \ tnsnames.ora
HOST=ServerName
3. If the DNS is enabled on the network, find and replace the default ServerName in
the following Simphony and mymicros files with the new ServerName. If DNS is
not enabled , then the server’s IP address must be entered .
Table 4 - Simphony Services and mymicros.net Files

B-2 Appendix B
Path and filename Variable
Drive:\ Micros\ Simphony2\ EgatewayService\
DbSettings.xml
Set the ServerName for all
dataSource entries.
Drive:\ Micros\ Simphony2\ EgatewayService\
Web.config
Set the ServerName in the
<appsettings> element for:
SimphonyCAL
DiscoveryURL
BatchServiceURL
EGatewayURL
BatchServiceURL_1x
KdsCheckAndPosting
ServiceHost
Drive:\ Micros\ Simphony2\ DirectPostingService\
DirectPostingService.exe.config
Set the ServerName on the
EGatewayURL line.
Drive:\ Micros\ Simphony2\ SequencerService\
SequencerService.exe.config
Set the ServerName on the
EGatewayUrl line.
Drive:\ Micros\ Simphony2\ DataTransferService\
mmserver\ postingServer.properties
Set the ServerName on all
URL lines.
Drive:\ Micros\ MyMicros\ myPortal\
microsConfig.properties
Set the ServerName on all
db.server* lines.
Drive:\ Micros\ MyMicros\ infoDelivery\ Db.xml Set the ServerName on all
db.server* lines.
4. Restart IIS and the MyMicros Portal service (or restart the computer for new
installs).
5. If you are using Windows 32 (Win32) devices, follow the steps outlined below:
a. Find and replace the defau lt ServerName in the following file:
Table 5 - Simphony Install
Path and filename Variable
Drive:\Micros\Install\SimphonyInstall.xml Set the ServerName on all
<ServerName>,
<SvcHostName>
b. Log onto the EMC and navigate to the Enterprise level and click the Setup
tab, click CAL Packages, click the Package Content tab, and select the
appropriate Service Host.
c. Click Win32 under the Platforms header.
d . Click Reload Package From Disk to upload the Win32 CAL package to the
database.
When prompted for the CAL package location, specify
Drive:\ Micros\ Simphony2\ EgatewayService\ CAL\ Win32\ Packages\ ServiceHost2.0,
and click OK.

Appendix B B-3
Changing an Oracle Database Server’s Name
Refer to http://docs.oracle.com. for more information about renaming your Oracle
Database server.
Changing a Microsoft SQL Server’s Computer Name
Refer to msdn.microsoft.com for more information about renaming your Microsoft SQL
Server computer.
Top Related