


Languages
Pages
Legal


V 3.0 www.fast-fluid.comwww.fluidman.com
Operating and Safety Manual X-PROTINT®

2
© Fast & Fluid Management B.V.This manual or parts thereof may not be reproduced, stored in a retrieval system, or transmitted, in any form or by any means, electronic, mechanical, photocopying, recording, nor otherwise, without the prior written permission of Fast & Fluid Management B.V.This manual could contain technical inaccuracies or typographical errors.Fast & Fluid Management B.V. reserves the right to revise this manual from time to time in the contents thereof without the obligation of Fast & Fluid Management B.V. to notify any person of such revision or change.Details and values given in this manual are average values and have been compiled with care. They are not binding, however, and Fast & Fluid Management B.V. disclaims any liability for damage or detriments suffered as a result of reliance on the information given herein or the use of products, processes or equipment to which this manual refers. No warranty is made that the use of the information or of the products, processes or equipment to which this manual refers will not infringe any third party’s patents or rights. The information given does not release the user from making their own experiments and tests.

Table of Contents X-PROTINT® V 3.0
Table of Contents
1 About this manual.........................................................................................................51.1 How to work with the manual............................................................................................51.2 Record of changes............................................................................................................5
2 Safety .............................................................................................................................62.1 Intended use .....................................................................................................................62.2 Liability ..............................................................................................................................6
2.2.1 General liability .....................................................................................................62.2.2 Machine-specific liability .......................................................................................6
2.3 User qualification for installation .......................................................................................72.4 Certification.......................................................................................................................72.5 Safety symbols on the machine........................................................................................82.6 Safety symbols in the manual...........................................................................................82.7 Disposal of the machine ...................................................................................................9
3 Operator manual .........................................................................................................103.1 Description......................................................................................................................10
3.1.1 Overview of the machine (front)..........................................................................103.1.2 Overview of the machine (back) .........................................................................113.1.3 Overview of the user interface (controls and indicators)....................................123.1.4 Machine status LEDs..........................................................................................123.1.5 On/Off light..........................................................................................................133.1.6 Type plate: serial number ...................................................................................133.1.7 Type plate: details...............................................................................................13
3.2 Operation ........................................................................................................................143.2.1 General dispensing procedure............................................................................143.2.2 Placing a can ......................................................................................................14
3.3 Maintenance ...................................................................................................................153.3.1 General cleaning: after every dispensing operation ...........................................153.3.2 Cleaning the brush container: daily ....................................................................153.3.3 Refilling of a canister ..........................................................................................183.3.4 Using the emergency stop switch .......................................................................19
4 Installation ...................................................................................................................204.1 Unpack the machine .......................................................................................................20
4.1.1 Remove the cardboard .......................................................................................204.1.2 Remove the plastic transportation parts .............................................................204.1.3 Remove the plastic protection on the canisters ..................................................214.1.4 Remove the plastic protection of the brush ........................................................21
4.2 Put the machine in position.............................................................................................214.2.1 Move the machine to the final location ...............................................................21
3

Table of Contents X-PROTINT® V 3.0
4.3 Install the computer ........................................................................................................224.3.1 Remove the side cover .......................................................................................224.3.2 Install the computer ............................................................................................224.3.3 Put back the side cover ......................................................................................22
4.4 Turning on the machine ..................................................................................................224.5 First use ..........................................................................................................................23
5 Troubleshooting..........................................................................................................245.1 General troubleshooting procedure ................................................................................245.2 Troubleshooting guide ....................................................................................................245.3 Contact service ...............................................................................................................24
6 Technical data .............................................................................................................256.1 General specifications ....................................................................................................256.2 Dimensions and mass ....................................................................................................256.3 Ambient conditions .........................................................................................................266.4 Noise level ......................................................................................................................266.5 Safety classifications ......................................................................................................266.6 Electrical specifications...................................................................................................266.7 Electrical diagram ...........................................................................................................28
4
About this manual X-PROTINT® V 3.0
5
1 About this manual
The manual shows the information necessary to:- install- operate- perform basic maintenance- correct small problems.
The X-PROTINT® and all its versions are referred to in the manual as the ’machine’.
This manual contains the original instructions. The original language of the manual is English. All other language versions are translations of the original instructions.
1.1 How to work with the manual
For the safe use of the machine, it is important:1 To familiarize yourself with the structure and content.2 To read the safety chapter in detail and make sure you understand all the instructions. See chapter § 2.3 To carry out the actions completely and in the given sequence.
1.2 Record of changes/i
Edition Editor Check Date Description
1.0 WBS - 05/2017 First edition
2.0 JSN TB 10/2017 Modification brush, type plates
3.0 EVT TB 06/2020 Complete revision
Safety X-PROTINT® V 3.0
2 Safety
2.1 Intended use
The machine is designed to dispense colorants into a can. Any other use of the machine is strictly forbidden.
2.2 Liability
2.2.1 General liabilityOur machines and accessories are fully compliant with the CE regulations. Any modification can result in not fulfilling the CE safety requirements and is therefore not allowed. Fast & Fluid Management B.V. will not accept any responsibility in case of modifications to machines and/or accessories.
Fast & Fluid Management B.V. is not liable if you do not follow the rules below:- The machine is for indoors use only.- This machine may only be used for commercial settings. The machine is not a household appliance.- Observe all local safety regulations.- Strictly obey the safety instructions in this manual.- Mind the minimal requirement of the building structure of the load capacity of the floor.- Place the machine in a well-lit and well-ventilated room.- Place the machine on a flat, horizontal floor.- Install and connect the machine according to the instructions in this manual.- Connect the machine to a grounded wall socket.- Do not use extension cords or inadequately rated power cables.- Make sure that the power cable is freely accessible.- Do not place objects on top of the machine.- Keep lids, panels, and covers closed and in place whenever possible.- Do not use a damaged machine. When you have doubts, contact your supplier.- Keep the machine in good condition.
- Clean the machine at the intervals and when dirty.- Make sure that defective parts are immediately replaced.
- Remove spilled liquids immediately, and unplug the machine in case of large spillages (> 500mL).- Replace parts only with original Fast & Fluid Management B.V. spare parts.
All maintenance beyond the scope of this manual must be carried out by a qualified service technician that Fast & Fluid Management B.V. has trained and certified.
2.2.2 Machine-specific liabilityThis machine is designed to dispense colorants into a can in non-hazardous conditions.In addition to following the instructions below, please consult with your paint supplier and/or colorant supplier, and review all applicable product information and safety data sheets to fully understand the risks associated with the use of their products, including how risks of fire and explosion may arise during use.
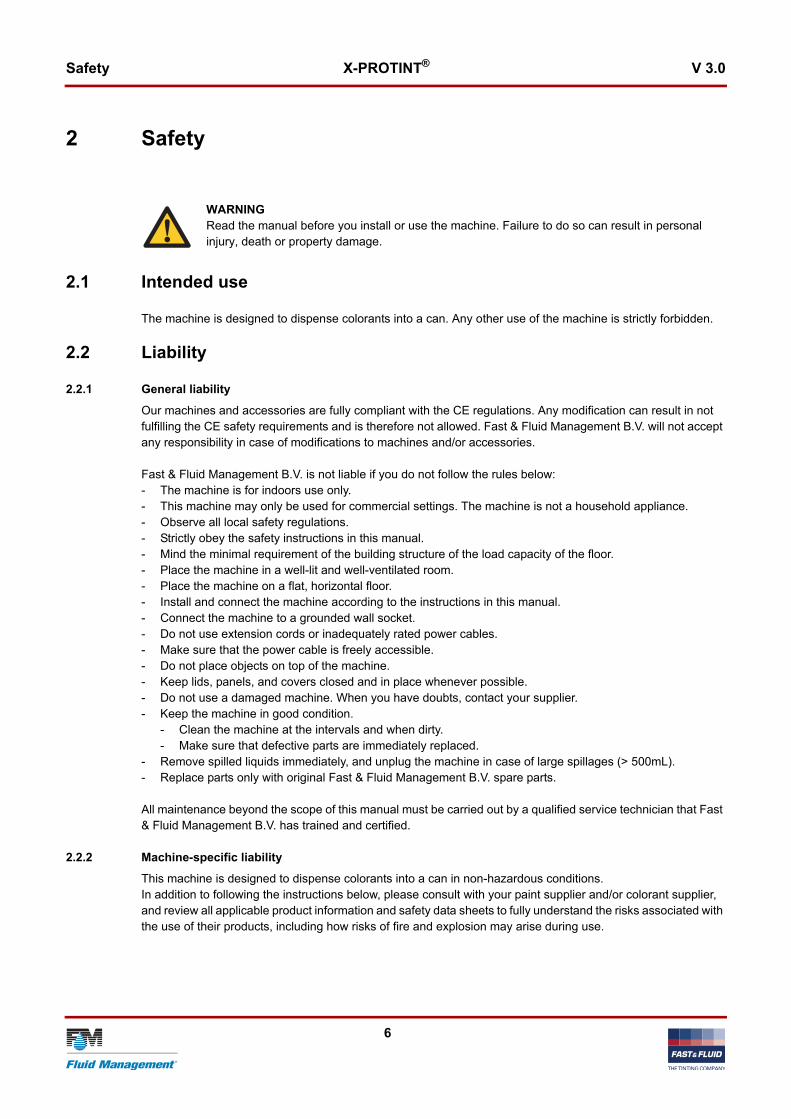
WARNINGRead the manual before you install or use the machine. Failure to do so can result in personal injury, death or property damage.
6

Safety X-PROTINT® V 3.0
- Read and strictly comply with the safety data sheets for all colorants, (base) paint and brush liquids.
- You are responsible for ensuring that Operating Temperature never exceeds the flashpoint of the colorant in use, or, in the alternative, ensuring that there is no build-up of explosive vapors inside or around the dispenser.
- The Operating Temperature consists of the Ambient Temperature in the place of operation, plus an additional 15 °C / 27 °F generated by the dispenser when in use. The Ambient Temperature is determined by factors such as the temperature in the room or space where the dispenser is being operated, the amount of ventilation in and around the machine, or any other factors in your operating environment affecting temperature.
- In the event Operating Temperature exceeds the flashpoint of the colorant in use, you must take the following measures:- reduce the Operating Temperature by taking steps including but not limited to (a) operating the dispenser
in a room or environment with a lower temperature; (b) increasing ventilation in and around the dispenser; and/or (c) taking any other steps to reduce the Ambient Temperature; and/or
- select a different colorant or paint with a flashpoint higher than the likely Operating Temperature.- An operational and environmental assessment is required before using flammable colorants in the dispenser,
taking into account all local circumstances including ventilation around the machine, room and machine operating temperature and room size. Please consult your supplier for more details.
- The place of operation cannot be an ATEX zone or any kind of explosive atmosphere.- In countries for which UL or CSA standards apply: this equipment cannot be used with colorants with a
flashpoint below 38 °C / 100 °F.
2.3 User qualification for installation
Only install the machine when you are a qualified service technician who is trained and certified by Fast & Fluid Management B.V.
2.4 Certification
For some markets machines need a certification to proove the machine complies with the essential requirements concerning safety. The directives that have been taken into consideration in the design are available on the website.
WARNINGThe use of flammable colorants or colorants that diffuse potential explosive vapours may present fire and explosion risks. You are responsible for ensuring there is no build-up of explosive vapours both inside or around the dispenser.
WARNINGDo not use flammable liquids in the brush container.
WARNINGRisk of fire and personal injury if the temperature inside the dispenser when in use (“Operating Temperature”) exceeds the flashpoint of the colorant or paint being used.
7

Safety X-PROTINT® V 3.0
If applicable to your market, the machine contains the logo of the certification either as a seperate sticker or on the type plate./i
2.5 Safety symbols on the machine/i
2.6 Safety symbols in the manual/i
Logo Certification Website
CE www.fast-fluid.com
Rotating parts hazard Electrical hazard
Read the manual
Return this part to its original position.
Do not use flammable liquids in the brush container.
WARNINGCan cause personal injury.
NoteShows further information.
CAUTIONCan cause damage to the machine.
8

Safety X-PROTINT® V 3.0
2.7 Disposal of the machine
1. Sort the machine, the accessories and the packaging for environmentally friendly recycling.
2. Do not dispose of the machine into domestic waste. Dispose of the machine according to local regulations.
3. Dispose of the canisters as chemical waste, according to the local regulations.
9

Operator manual X-PROTINT® V 3.0
3 Operator manual
3.1 Description
3.1.1 Overview of the machine (front)
A: Front doorB: Shelf holderC: Can tableD: WheelsE: Side coverF: Brush drawer with brush container
G: LatchH: Pump with nozzleI: CanisterJ: AgitatorK: Lid
K
A
B
C
J
I
H
G
F
E
D
10
Operator manual X-PROTINT® V 3.0
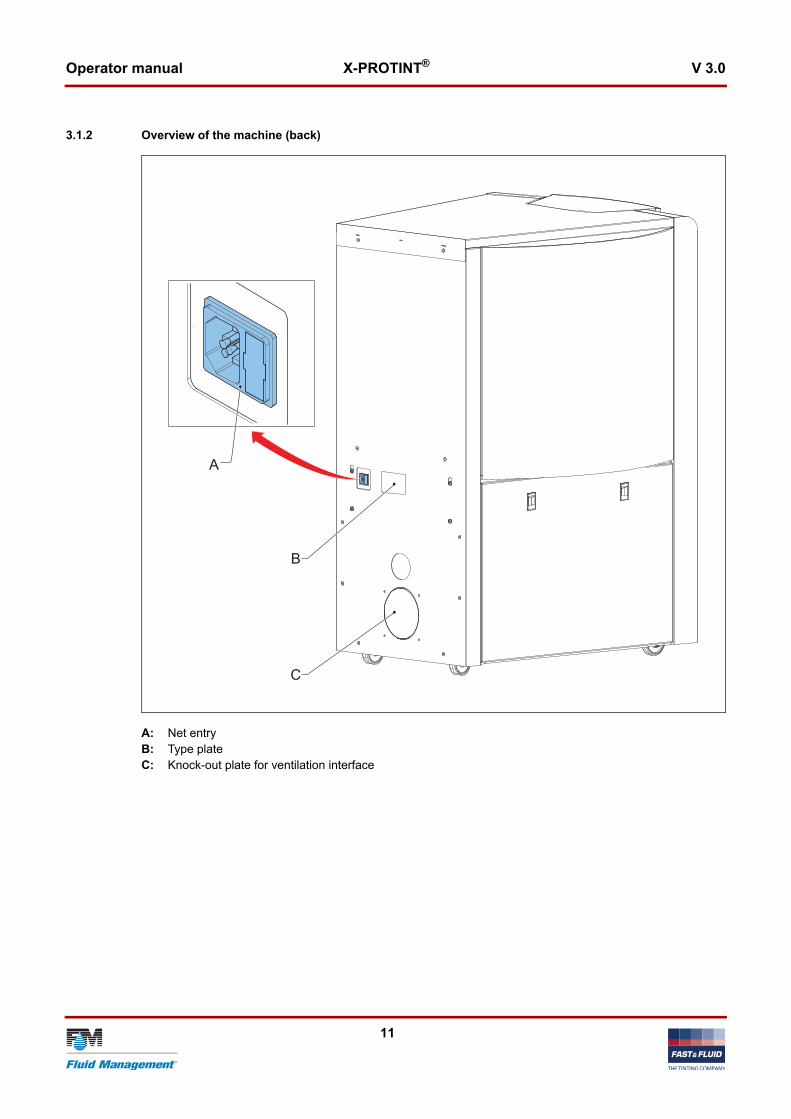
3.1.2 Overview of the machine (back)
A: Net entryB: Type plateC: Knock-out plate for ventilation interface
A
C
B
11

Operator manual X-PROTINT® V 3.0
3.1.3 Overview of the user interface (controls and indicators)
A: On/Off lightB: Emergency stop switch
C: Machine status LEDsD: Can sensor
3.1.4 Machine status LEDs/i
A
B
D C
LED color Function
Red Indicator Valve Sensor
Blue Indicator Pump Sensor
Green Indicator Piston Sensor
12
Operator manual X-PROTINT® V 3.0
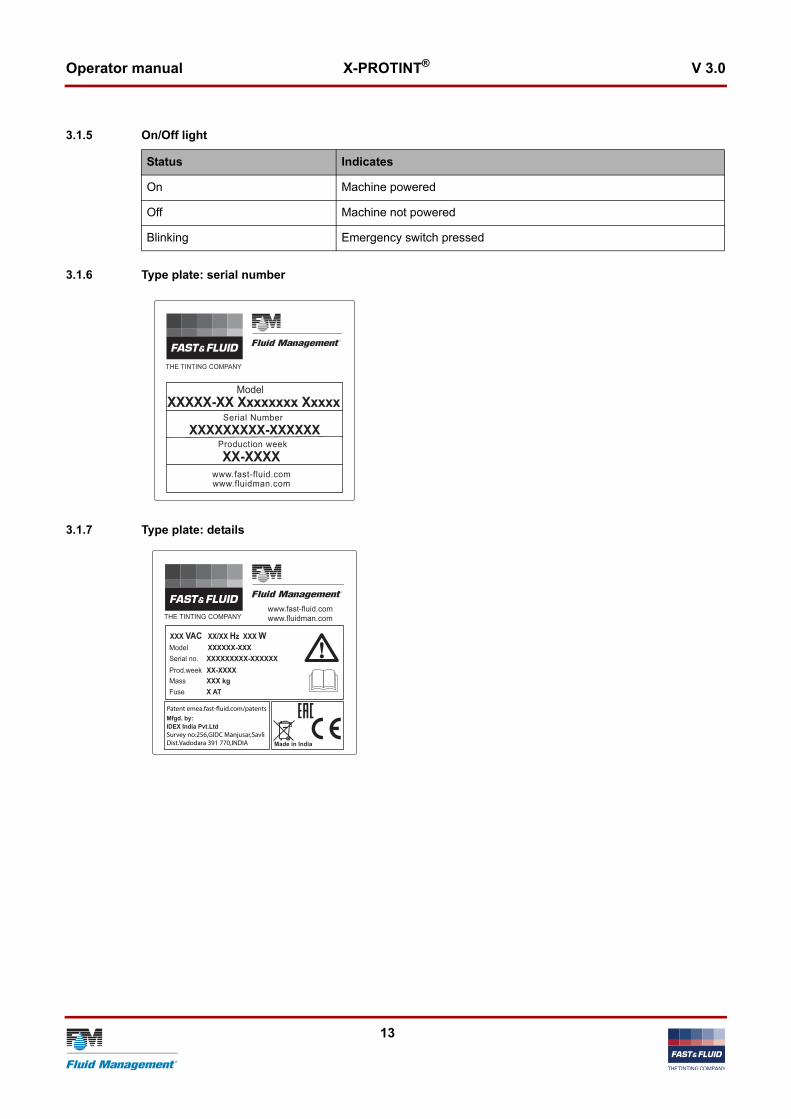
3.1.5 On/Off light/i
3.1.6 Type plate: serial number
3.1.7 Type plate: details
Status Indicates
On Machine powered
Off Machine not powered
Blinking Emergency switch pressed
www.fast-fluid.comwww.fluidman.com
ModelXXXXX-XX Xxxxxxxx Xxxxx
Serial Number
Production weekXXXXXXXXX-XXXXXX
XX-XXXX
THE TINTING COMPANY
Model XXXXXX-XXXXXXXXXXXX-XXXXXXXX-XXXXXXX kgX AT
Serial no.Prod.weekMassFuse
Made in India
Mfgd. by:IDEX India Pvt.LtdSurvey no:256,GIDC Manjusar,SavliDist.Vadodara 391 770,INDIA
Patent emea.fast-fluid.com/patents
www.fast-fluid.comwww.fluidman.comTHE TINTING COMPANY
XXX VAC XX/XX Hz XXX W
13
Operator manual X-PROTINT® V 3.0
3.2 Operation
3.2.1 General dispensing procedureFor all the software instructions: see the software documentation.
1. Place the can table in the correct slots for the correct height. See § 3.2.2.
2. Place the can. See § 3.2.2.3. Choose the recipe and dispense. See the software
documentation.4. Remove the can.
3.2.2 Placing a can
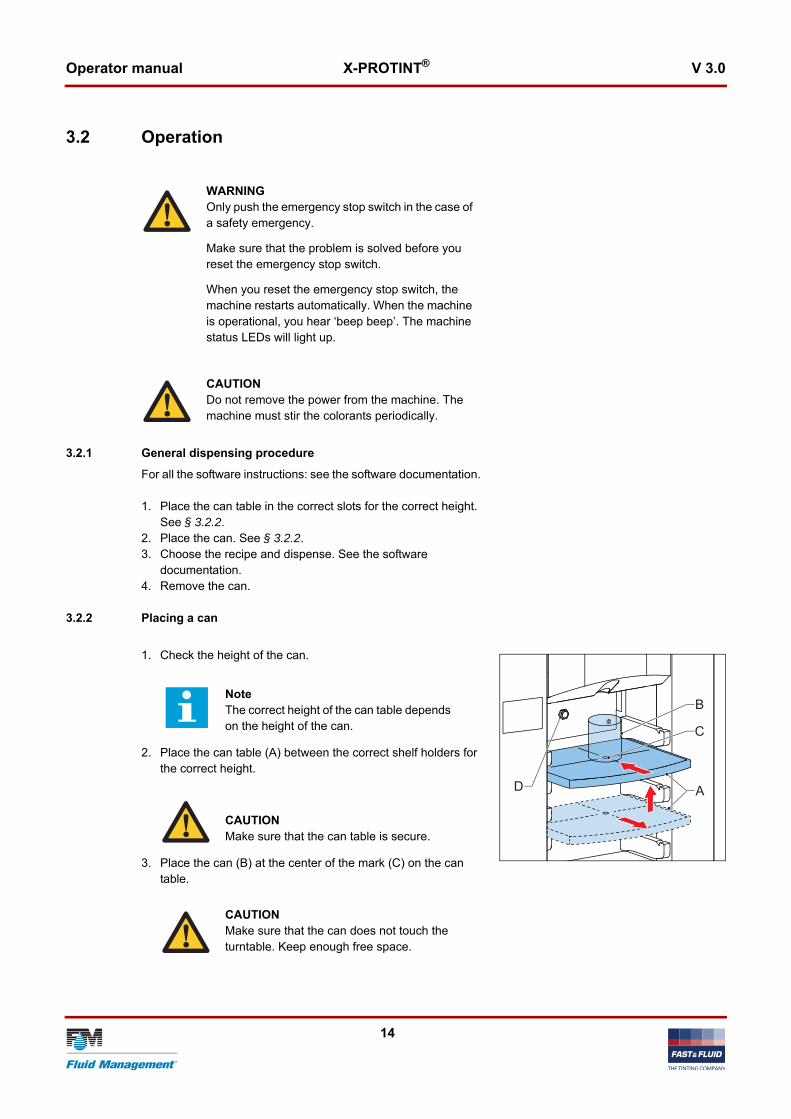
1. Check the height of the can.
2. Place the can table (A) between the correct shelf holders for the correct height.
3. Place the can (B) at the center of the mark (C) on the can table.
WARNINGOnly push the emergency stop switch in the case of a safety emergency.
Make sure that the problem is solved before you reset the emergency stop switch.
When you reset the emergency stop switch, the machine restarts automatically. When the machine is operational, you hear ‘beep beep’. The machine status LEDs will light up.
CAUTIONDo not remove the power from the machine. The machine must stir the colorants periodically.
C
A
B
D
NoteThe correct height of the can table depends on the height of the can.
CAUTIONMake sure that the can table is secure.
CAUTIONMake sure that the can does not touch the turntable. Keep enough free space.
14

Operator manual X-PROTINT® V 3.0
3.3 Maintenance
3.3.1 General cleaning: after every dispensing operation
1. Clean the machine with a cloth and remove all spilled colorant or other liquid.
3.3.2 Cleaning the brush container: daily
NoteMake sure that the can sensor (D) is able to detect the can.
NoteAll maintenance activities in this chapter can be executed by the operator. For other activities, see § 5.3.
NoteWhen the door is opened, the door switch lowers the speed of the turntable.
CAUTIONIn case of necessary emergency maintenance, push the emergency switch for a temporary shutdown of the machine.
WARNINGDo not clean the drip plate and the brush during a dispense job.
CAUTIONDo not use cleaning agents based on organic solvents to clean plastic or painted parts of the machine.
CAUTIONIf you do not clean these items daily, severe polution will occur.
15
Operator manual X-PROTINT® V 3.0
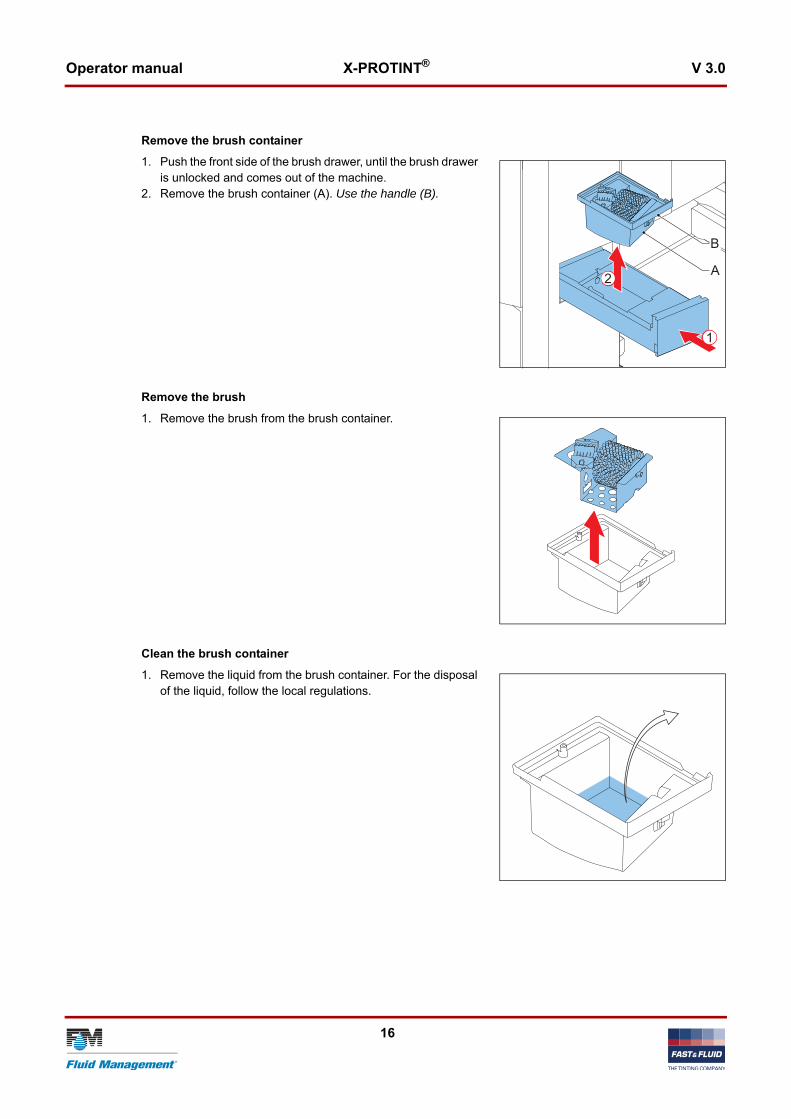
Remove the brush container1. Push the front side of the brush drawer, until the brush drawer
is unlocked and comes out of the machine.2. Remove the brush container (A). Use the handle (B).
Remove the brush1. Remove the brush from the brush container.
Clean the brush container1. Remove the liquid from the brush container. For the disposal
of the liquid, follow the local regulations.
B
A
1
2
16
Operator manual X-PROTINT® V 3.0
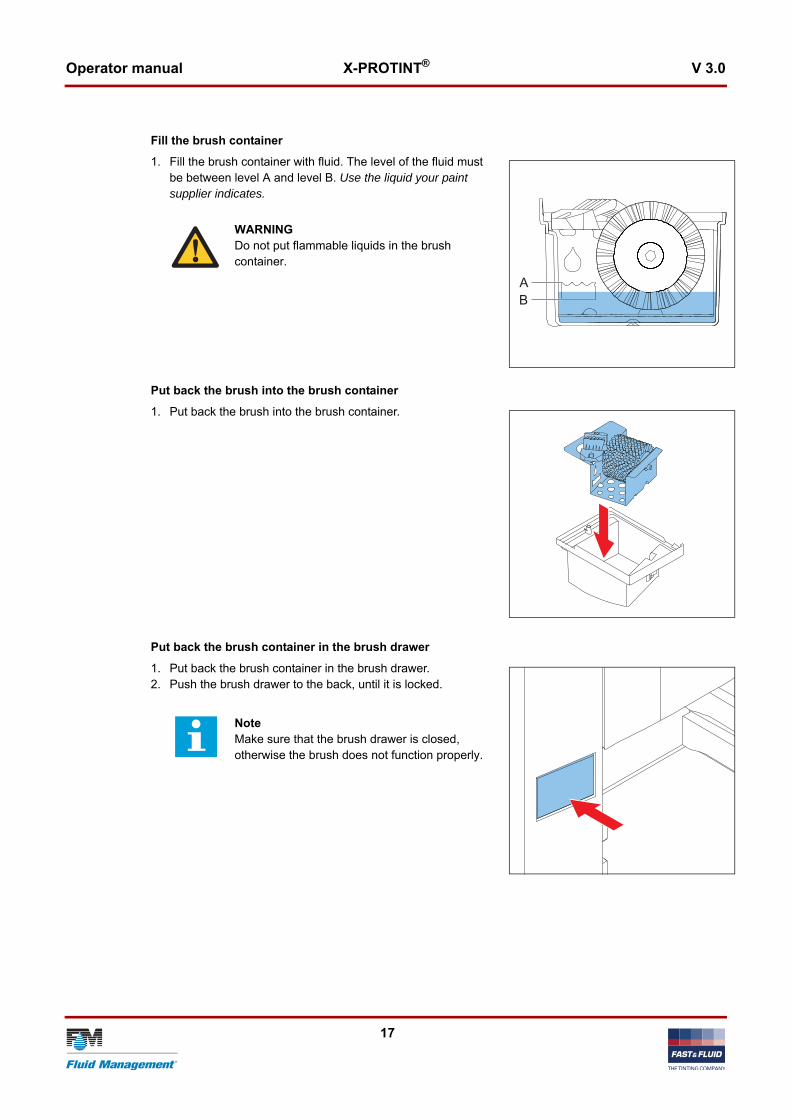
Fill the brush container1. Fill the brush container with fluid. The level of the fluid must
be between level A and level B. Use the liquid your paint supplier indicates.
Put back the brush into the brush container1. Put back the brush into the brush container.
Put back the brush container in the brush drawer1. Put back the brush container in the brush drawer.2. Push the brush drawer to the back, until it is locked.
AB
WARNINGDo not put flammable liquids in the brush container.
NoteMake sure that the brush drawer is closed, otherwise the brush does not function properly.
17

Operator manual X-PROTINT® V 3.0
3.3.3 Refilling of a canister
1. In the software, activate the fill canister option.
2. Open the front door.3. Remove the lid (A) from the canister.4. Add the colorant (B). Do not spill.
5. Put back the lid on the canister.6. Close the front door.
WARNINGCheck the material safety data sheet (MSDS) of the colorants for the personal protection measures that are required for handling the colorant.
CAUTIONMake sure that the colorant level in the canister is correct. If a canister is empty, it can cause an inaccurate dispensing and/or a recipe fault.
NoteThe dispense software checks the level of colorant in each canister. The software on the machine shows when you need to refill a canister.
A
B 2
1
3
NoteThe fill canister command of the dispense software controls the motor of the turntable. The turntable turns the empty canister to the front.
CAUTIONDo not fill the canister to the brim. Leave at least 2.5 cm (1 inch) unfilled.
CAUTIONDo not pour the colorant on the agitator.
18

Operator manual X-PROTINT® V 3.0
3.3.4 Using the emergency stop switch
1. Push the emergency stop switch (A). The machine stops immediately.
2. Solve the problem as quickly as possible.
3. Reset the emergency stop switch by turning the emergency stop switch. The machine restarts automatically.
ACAUTIONOnly push the emergency stop switch in the case of a safety emergency. Do not use the emergency stop switch as an on/off function!
CAUTIONWhen the machine is shut down, the stirring mechanism, which is necessary to keep the colorant in optimal condition, is also shut down.
NoteAfter the reset of the emergency stop switch, the machine is operational.
19
Installation X-PROTINT® V 3.0
4 Installation
4.1 Unpack the machine
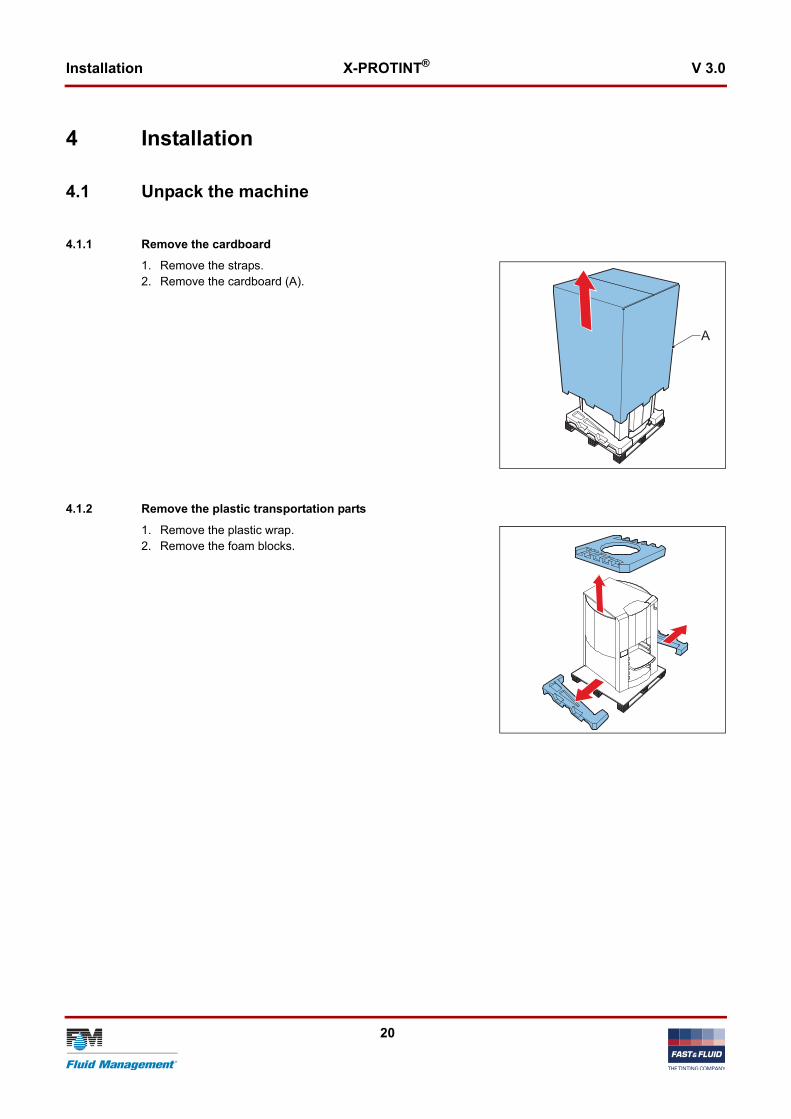
4.1.1 Remove the cardboard1. Remove the straps.2. Remove the cardboard (A).
4.1.2 Remove the plastic transportation parts1. Remove the plastic wrap.2. Remove the foam blocks.
A
20
Installation X-PROTINT® V 3.0
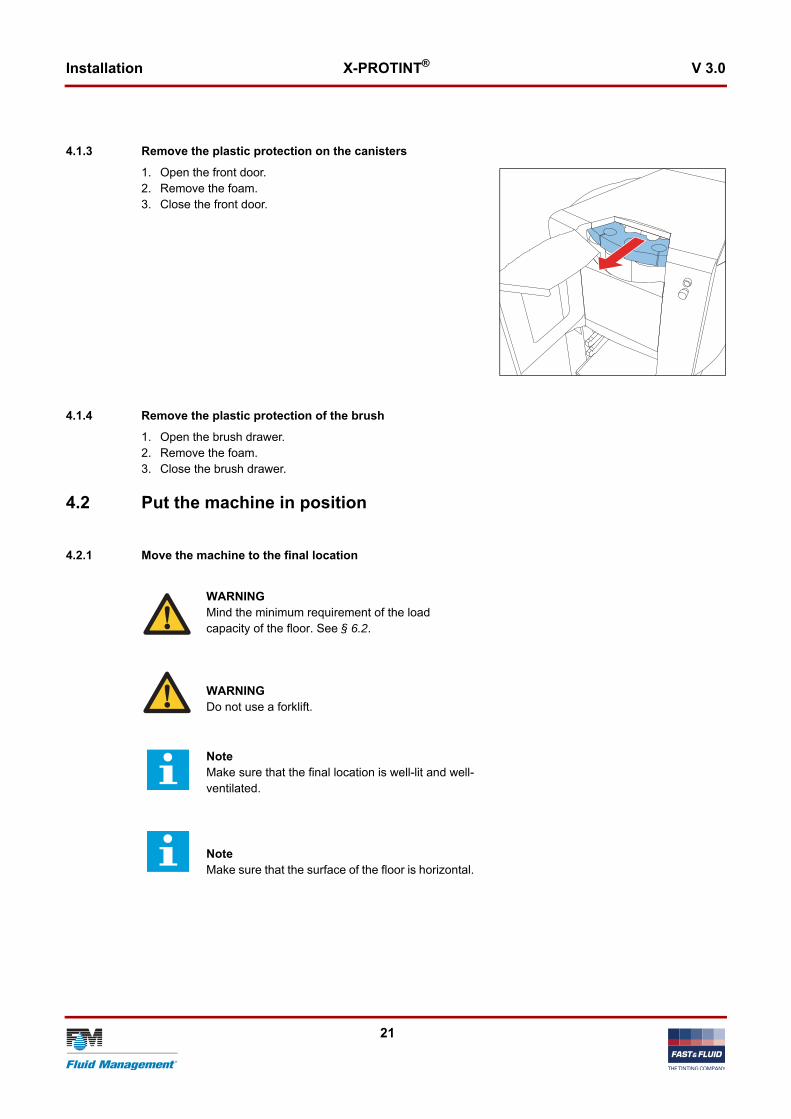
4.1.3 Remove the plastic protection on the canisters1. Open the front door.2. Remove the foam.3. Close the front door.
4.1.4 Remove the plastic protection of the brush1. Open the brush drawer.2. Remove the foam.3. Close the brush drawer.
4.2 Put the machine in position
4.2.1 Move the machine to the final location
WARNINGMind the minimum requirement of the load capacity of the floor. See § 6.2.
WARNINGDo not use a forklift.
NoteMake sure that the final location is well-lit and well-ventilated.
NoteMake sure that the surface of the floor is horizontal.
21

Installation X-PROTINT® V 3.0
To place into position:1. Move the machine backwards from the pallet on to the
ground.2. Move the machine to the final location.
4.3 Install the computer
4.3.1 Remove the side cover
1. Open the side cover. Use the latches.2. Remove the side cover.
4.3.2 Install the computer
1. Allocate the USB cable of the power board. It should be on the floor.
2. Put the computer (A) in the compartment.3. Connect the USB cable to the computer.4. Connect the dispenser and the computer to the wall socket.
4.3.3 Put back the side cover
1. Put back the side cover.2. Close the side cover. Use the latches.
4.4 Turning on the machine
To turn on the machine:
A
22
Installation X-PROTINT® V 3.0
1. Connect the power cable to the wall socket. When the machine is operational, you hear ’beep beep’.
2. Make sure that the emergency stop switch is reset. See § 3.3.4.
3. Make sure that the computer is on.4. Run the dispense software.
4.5 First use
1. Fill and place the brush unit. See § 3.3.2.2. Fill the canisters correctly. See § 3.3.3.
23
Troubleshooting X-PROTINT® V 3.0
24
5 Troubleshooting
5.1 General troubleshooting procedure
1. Try to solve the problem with the information in this manual. See § 5.2.
2. If it is not possible to solve the problem with the information in this manual, contact service. See § 5.3.
5.2 Troubleshooting guide
5.3 Contact service
1. Find the type plate on the lower front side of the machine. See § 3.1.5.
2. Take a note of the model number and the serial number of the machine.
3. Contact your supplier or manufacturer. See www.fast-fluid.com (Fast & Fluid Management B.V. EMEA) or www.fluidman.com (Fluid management, U.S.A.).
Problem Possible cause Possible solution
Main power supply is present but the machine does not work.
The emergency stop switch is active.
Reset the emergency stop switch. See § 3.3.4.
The machine has a failure and does not respond correctly to the request from the dispense software.
The failure could be mechanically or electronically.
Push the emergency stop switch to reset the machine. Reset the emergency stop switch. See § 3.3.4.If the machine still has a failure, contact service. See § 5.3.
The turntable is turning slowly and the machine does not stir the colorants.
The front cover is open Close the front cover.

Technical data X-PROTINT® V 3.0
6 Technical data
6.1 General specifications/i
6.2 Dimensions and mass/i
Parameter Specification
Number of canisters 16
Dispensing Sequential
Pump type Piston pump
Cleaning system Rotary and static brush
Suitable for Water and universal colorants (solvent optional)
Canister size [L] 2.3 / 4.6
Pump speed [mL/min] 500
Maximum can height [cm] 41
Can table dimensions, width x depth [cm] 23 x 37
Turntable Bi-directional
Parameter Specification
Dimensions, height x width x depth [cm] 123 x 82 x 87
Packed dimensions, height x width x depth [cm] 141 x 98 x 98
Mass incl. packaging [kg] 165
Mass filled machine [kg] 220
Required load capacity of the floor [kg] 880
25

Technical data X-PROTINT® V 3.0
6.3 Ambient conditions
/i
6.4 Noise level/i
6.5 Safety classifications/i
6.6 Electrical specifications/i
WARNINGRisk of fire and personal injury for failing to read and follow instructions in § 2.2.
NoteThis machine must be used or stored within the ambient temperature, altitude, and humidity ranges listed in the table below.
Parameter Specification
Temperature [°C], when in use1
1. As defined in § 2.2.2.
+10 to +35
Temperature [°C], when not in use1) -25 to +55
Altitude above sea level [m], operational -10 to 2000
Altitude above sea level [m], out of operation -10 to 12000
Maximum relative humidity [RH], without condensation [%]
90
Parameter Specification
Maximum noise level [dB(A)] < 65
Parameter Specification
IP (Ingress Protection) classification 32
EMC (ElectroMagnetic Compliancy) classification Class B
Overvoltage category Class II
Parameter Specification
Maximum power consumption of the dispenser [W] 75 / 100
Maximum leakage current [mA] 3.5
26
Technical data X-PROTINT® V 3.0
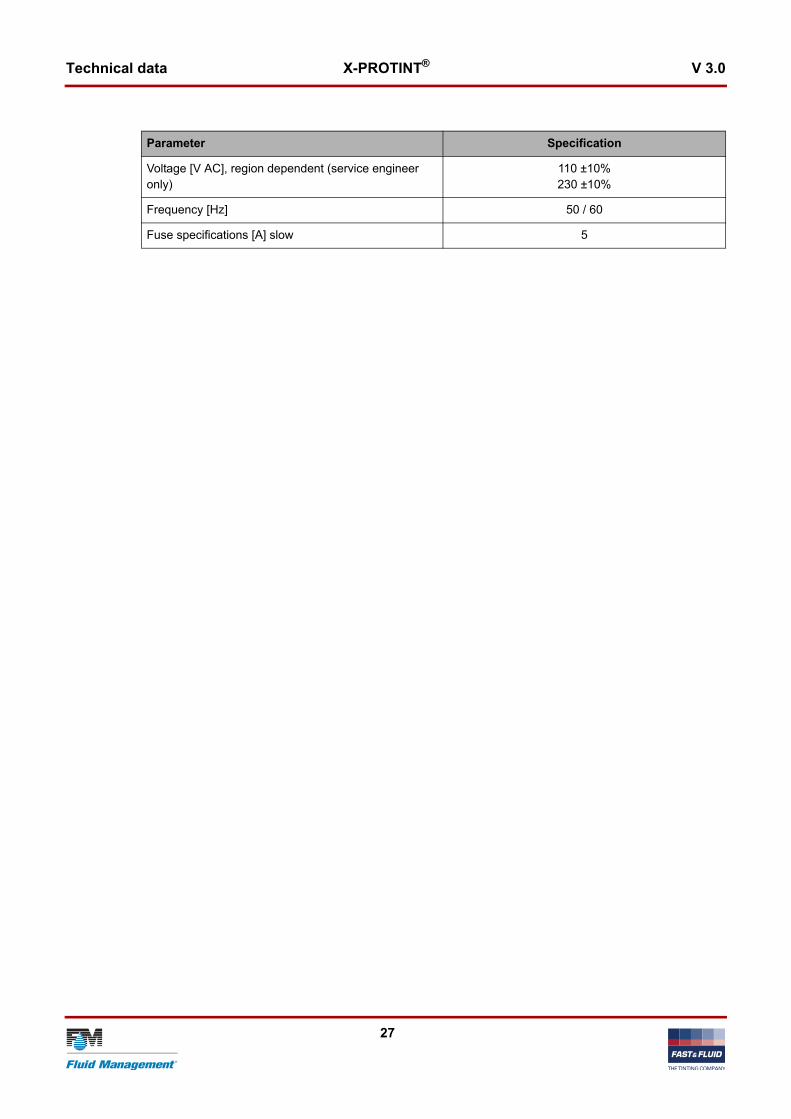
Voltage [V AC], region dependent (service engineer only)
110 ±10%230 ±10%
Frequency [Hz] 50 / 60
Fuse specifications [A] slow 5
Parameter Specification
27

Technical data X-PROTINT® V 3.0
6.7 Electrical diagram
Title
Dra
wn
Nr.
She
etD
ate
Ver
sion
Com
men
tU
nits
: mm
Tole
ranc
es:
0-10
± 1
10-3
0 ±
230
-> ±
5
Dat
e
X-PR
Otin
t Wiri
ng
20-0
9-20
171
V1.
0N
vB
USB
YSM
ART
PCB
rese
t
TABLE
POWER
OPTION
AGIT
INPUTS
CANSENS
OPTION
valv
e
enco
der
pum
p
EM
ER
GE
NC
Y +
5vE
ME
RG
EN
CY
SO
FTE
ME
RG
EN
CY
HA
RD
+48V
48V
-GN
D
M
M
M
TAB
LE M
OTO
RAG
IT M
OTO
R
CA
NS
EN
SO
R
M
VA
LVE
MO
TOR
PU
MP
MO
TOR
RE
DY
ELL
OW
OR
AN
GE
BLU
ERE
D
BLA
CK
RE
D
YE
LLO
WB
LUE
OR
AN
GE
CEN
TRAL
BLUE
BROWN
POW
ER U
NIT
SUPP
LY 1
10/2
30VA
C50
/60H
z, 1
.5Am
axFU
SE 2
x 5
AT
POW
ERSU
PPLY
48V
DC
V -V +
NL
YEL/GRN
EMER
GEN
CYS
WIT
CH
+5V
SO
FT
HA
RD
BLUEBLACK
BROWN & PINK
REDBLACK
1 2
1 2 3
1 2 3
BLACK
RED
EAR
TH
YEL/GRN
DO
OR
SW
ITC
H
12
12
34
56
789
PO
WE
R IN
DIC
ATO
R
6
4
2
5
7
1818
903
1819
245
1818
952
1819
099
1819
098
1817
109
1818
776
1818
817
1818
821
1818
917
1819
460
1819
454
& 1
8194
59
1
1818
950
10
V1.
1N
vB18
-12-
2017
Cha
nged
labe
l em
erge
ncy
cabl
e to
10
1 1
2 2
3 3
4 4
5 5
6 6
7 7
A
A
B
B
C
C
D
D
E
E
28
Top Related