


Languages
Pages
Legal


©2015 BERNINA of America Page 1 of 6
Tips for Stitching Sideways Motion Stitches
Determine stabilizer needs based on fabric choice and stitch se-lections. Light-weigh Tear away stabilizer or starch may be needed
In Sideways Motion Stitching, the feed dogs move the fabric in multiple directions, including sideways, forward and backward to stitch the pattern.
Only fingertip guiding (a very light touch) is recommended to allow the machine to make the angled movements at the pace required
Always use Foot #40C for sideways motion sewing – no other foot is designed to stitch sideways. Sideways motion stitches cannot be sewn with Dual Feed
Drawing parallel lines ½” apart on the fabric provide visual guide-lines to keep the fabric straight and parallel to the foot
Sewing at a consistent medium speed is preferred in order to give the machine time to move the fabric for stitch formation
Engaging Pattern End (programmed as Pattern End only) pro-vides a stopping point to check the sewing
Sideways Motion Scenarios
Built-in Sideways Motion Stitches are in found in Menus 201, 501, 801, 1001,1201 and are indicated by a directional symbol on the menu. A large monogram directional alphabet can be found in the Alphabet menu
Sideways Motion Stitches can be used in Combinations
Sideways Motion Stitches can be created in Stitch designer
Using Drag & Drop to join stitch patterns in combi-mode fre-quently produces a Sideways Motion situation
Sewing with Distortion creates a sideways motion scenario and stitching with Sideways Motion Foot #40C is a must (and will be recommended by presser foot selection)
Engaging the Multi-Directional Sewing Icon creates a Sideways Motion scenario and requires Sideways Motion Foot #40C and allows the angled sewing of stitches without angling the fabric
Sideways Motion Stitches vary in size and when selected display on screen in relation to the presser foot and the entire view of the stitch may not be visible. To see the entire view of the stitch, se-lect Fit to Window
The white dot indicates the start point of the pattern, the red mark indicates the end point of the pattern
Mastery LIVE Lesson 3 by Susan Fears
Not Directionally Challenged
©2015 BERNINA of America Page 2 of 6
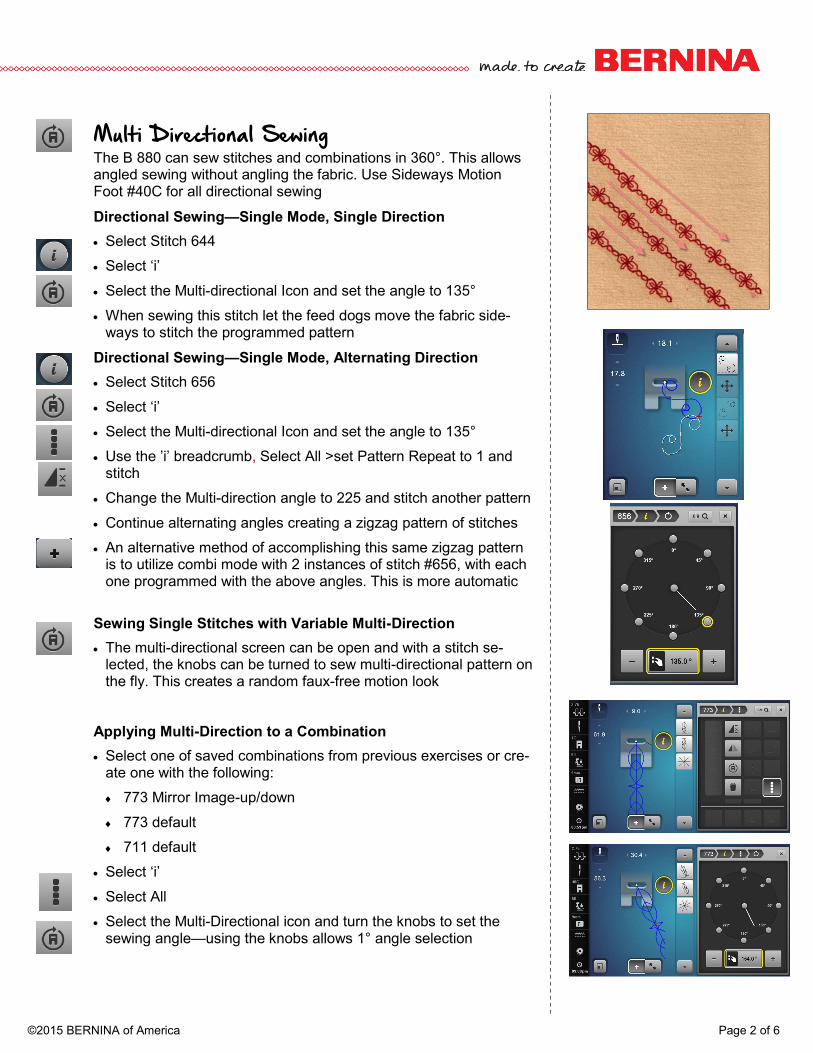
Multi Directional Sewing The B 880 can sew stitches and combinations in 360°. This allows angled sewing without angling the fabric. Use Sideways Motion Foot #40C for all directional sewing
Directional Sewing—Single Mode, Single Direction
Select Stitch 644
Select ‘i’
Select the Multi-directional Icon and set the angle to 135°
When sewing this stitch let the feed dogs move the fabric side-ways to stitch the programmed pattern
Directional Sewing—Single Mode, Alternating Direction
Select Stitch 656
Select ‘i’
Select the Multi-directional Icon and set the angle to 135°
Use the ’i’ breadcrumb, Select All >set Pattern Repeat to 1 and stitch
Change the Multi-direction angle to 225 and stitch another pattern
Continue alternating angles creating a zigzag pattern of stitches
An alternative method of accomplishing this same zigzag pattern is to utilize combi mode with 2 instances of stitch #656, with each one programmed with the above angles. This is more automatic
Sewing Single Stitches with Variable Multi-Direction
The multi-directional screen can be open and with a stitch se-lected, the knobs can be turned to sew multi-directional pattern on the fly. This creates a random faux-free motion look
Applying Multi-Direction to a Combination
Select one of saved combinations from previous exercises or cre-ate one with the following:
773 Mirror Image-up/down
773 default
711 default
Select ‘i’
Select All
Select the Multi-Directional icon and turn the knobs to set the sewing angle—using the knobs allows 1° angle selection
©2015 BERNINA of America Page 3 of 6
Connecting Stitches & Move Multiples
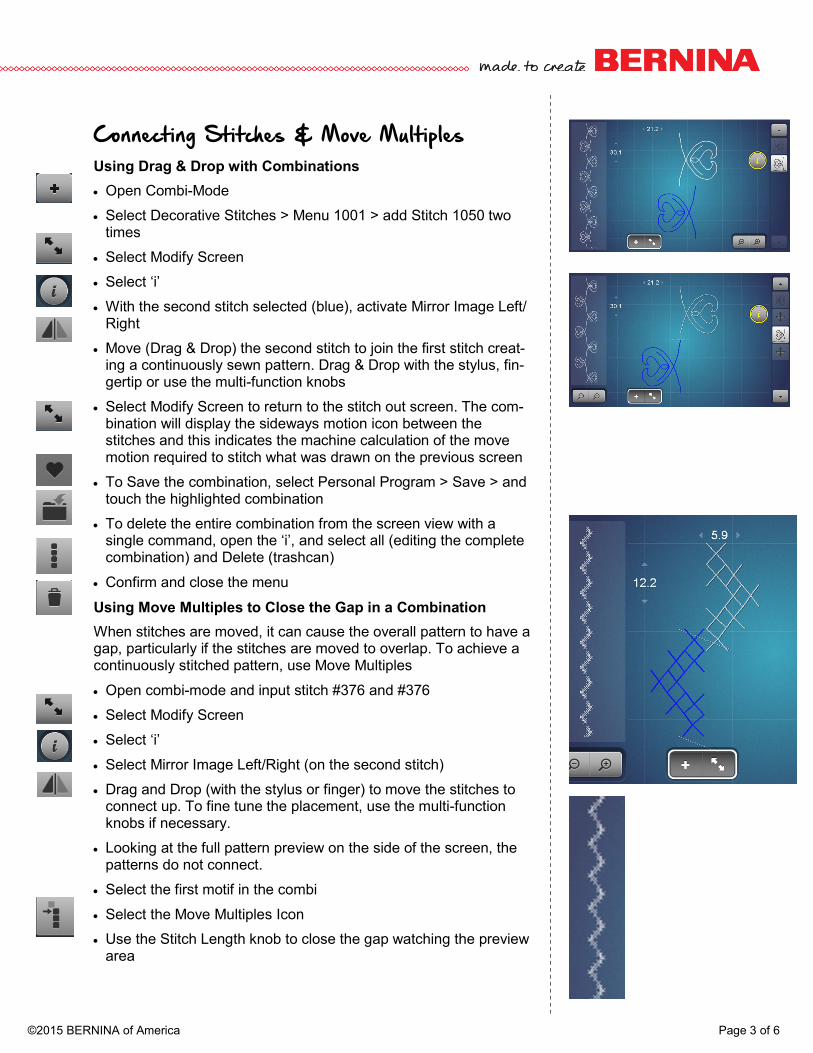
Using Drag & Drop with Combinations
Open Combi-Mode
Select Decorative Stitches > Menu 1001 > add Stitch 1050 two times
Select Modify Screen
Select ‘i’
With the second stitch selected (blue), activate Mirror Image Left/Right
Move (Drag & Drop) the second stitch to join the first stitch creat-ing a continuously sewn pattern. Drag & Drop with the stylus, fin-gertip or use the multi-function knobs
Select Modify Screen to return to the stitch out screen. The com-bination will display the sideways motion icon between the stitches and this indicates the machine calculation of the move motion required to stitch what was drawn on the previous screen
To Save the combination, select Personal Program > Save > and touch the highlighted combination
To delete the entire combination from the screen view with a single command, open the ‘i’, and select all (editing the complete combination) and Delete (trashcan)
Confirm and close the menu
Using Move Multiples to Close the Gap in a Combination
When stitches are moved, it can cause the overall pattern to have a gap, particularly if the stitches are moved to overlap. To achieve a continuously stitched pattern, use Move Multiples
Open combi-mode and input stitch #376 and #376
Select Modify Screen
Select ‘i’
Select Mirror Image Left/Right (on the second stitch)
Drag and Drop (with the stylus or finger) to move the stitches to connect up. To fine tune the placement, use the multi-function knobs if necessary.
Looking at the full pattern preview on the side of the screen, the patterns do not connect.
Select the first motif in the combi
Select the Move Multiples Icon
Use the Stitch Length knob to close the gap watching the preview area
©2015 BERNINA of America Page 4 of 6
Select Modify Screen to return to the main sew out screen
Pattern may be stitched and/or saved through Personal Program
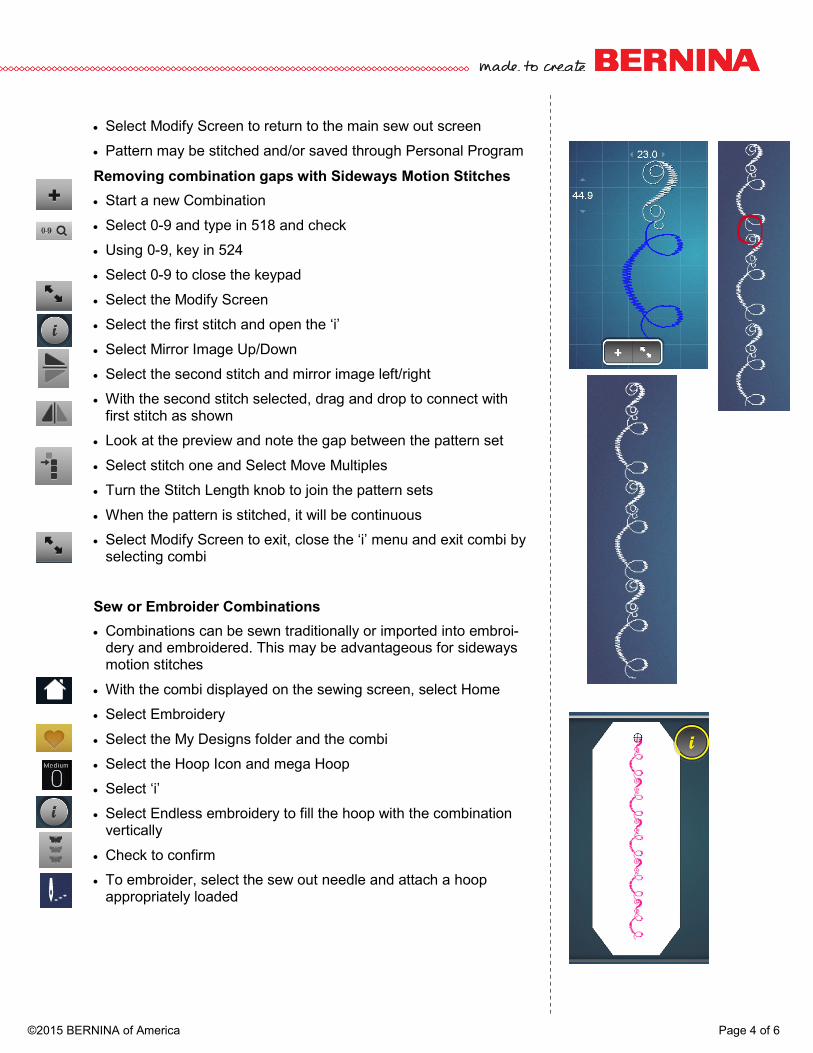
Removing combination gaps with Sideways Motion Stitches
Start a new Combination
Select 0-9 and type in 518 and check
Using 0-9, key in 524
Select 0-9 to close the keypad
Select the Modify Screen
Select the first stitch and open the ‘i’
Select Mirror Image Up/Down
Select the second stitch and mirror image left/right
With the second stitch selected, drag and drop to connect with first stitch as shown
Look at the preview and note the gap between the pattern set
Select stitch one and Select Move Multiples
Turn the Stitch Length knob to join the pattern sets
When the pattern is stitched, it will be continuous
Select Modify Screen to exit, close the ‘i’ menu and exit combi by selecting combi
Sew or Embroider Combinations
Combinations can be sewn traditionally or imported into embroi-dery and embroidered. This may be advantageous for sideways motion stitches
With the combi displayed on the sewing screen, select Home
Select Embroidery
Select the My Designs folder and the combi
Select the Hoop Icon and mega Hoop
Select ‘i’
Select Endless embroidery to fill the hoop with the combination vertically
Check to confirm
To embroider, select the sew out needle and attach a hoop appropriately loaded

©2015 BERNINA of America Page 5 of 6
Distortion
Select Menu 401 and select from the assortment of compact satin stitches
Select ‘i’
Select Distortion
Begin sewing (with foot #40C) and turn the stitch length knob (only) to the right and left while sewing. This creates wavy base-lines for extraordinary creative effects
Try stitches such as 401, 402, 405, 406, 414, 415, 427, 429
Works with 9mm stitches best
Additional Exercises
Tassel Combi with Drag & Drop
Open Combi-Mode
Select Decorative Stitches > Menu 1100 > Stitch 1113 and Stitch 1118
Select ‘i’
With the second stitch selected (blue), activate Mirror Image Left/Right and Mirror Image Up/Down
Select Modify Screen to Preview the combination. This provides a preview of the stitch as multiples would stitch out, plus a larger on-screen view of the elements in the combination
Use Move Multiples if needed (select motif 1 first)
Select Modify Screen to return to the stitch out screen
To Save the combination, select Personal Program > Save > and touch the highlighted combination
Flower and Swirl Combi
Open combi-mode and input stitch #1057 and #1053
Select the Modify Screen
Drag and Drop to connect the stitches. To fine tune the place-ment, use the multi-function knobs if necessary.
Swirl Combi
Open combi-mode and input stitch #1057 and #1059
Select the Modify Screen
Select ‘i’ and mirror image L/R stitch 1059
Drag and Drop to connect the stitches. To fine tune the place-ment, use the multi-function knobs if necessary

©2015 BERNINA of America Page 6 of 6
Putting it all Together
Start a new Combination
Open combi-mode and input the following stitches:
Stitch #1209
Stitch #150. Select ‘i’ > select Multi-directional and set to 270°
Stitch #1209 with Mirror image left/right
Stitch #150 with multi-directional and set to 90°
Select Modify Screen
Drag and Drop the stitches as shown
For Additional Educational Materials:
My BERNINA Workbooks
Video Tutorials packed with B 880 and also on the YouTube BERN-INA channel
B 880 Tool Tips on YouTube BERNINA channel
bernina.com > Experience section for projects written using the B 880
Top Related