


Languages
Pages
Legal


USERS GUIDE
INSTRUCTION MANUAL
NITTA CHANGE SYSTEM
OMEGAOMEGAOMEGAOMEGA ⅣⅣⅣⅣ
NITTA CORPORATION
Head office 4-4-26, Sakuragawa, Naniwa-ku,Osaka 556-0022 Japan TEL +81-6-6563-1273 FAX +81-6-6563-1274
Tokyo Branch 8-2-1, Ginza, Cyuo-ku, Tokyo, 104-0061 Japan TEL +81-3-6744-2708 FAX +81-3-6744-2709
Nagoya Branch 1-17-23, Meieki-minami, Nakamura-ku, Nagoya, 450-0003 Japan
TEL +81-52-589-1310 FAX +81-52-586-5707
Nabari Plant 1300-45, Yabata, Nabari, Mie, 518-0494 Japan TEL +81-595-64-2916 FAX +81-595-64-9527
complete reform:2015-08
Rev.:1 Printed in Japan OMEGA Ⅳ-ENOUG-01
Usage for the instruction manual
Please make sure to deliver this manual to the end user of this product.
Please download it from the below home page if the additional manual is
required.
Thank you for your cooperation
http://www.nitta.co.jp/en/

- i -
CONTENTS
PRECAUTIONARY NOTES .......................................................................................................... I
Preface .......................................................................................................................................................................................... I
Please notice the followings below ........................................................................................................................................... I Checking The inside of packages ............................................................................................................................................. I
Safety Precautions ...................................................................................................................................................... II
1. The Nitta Change system ...................................................................................................................................... 1
1-1. Robot Side ............................................................................................................................................................................ 1 1-1-1. Robot Adaptor ................................................................................................................................................................. 1 1-1-2. Selection of Input Devices ............................................................................................................................................ 2 1-1-3. Robot Adapter Plate (Option) ....................................................................................................................................... 2
1-2. Tool Side .............................................................................................................................................................................. 3 1-2-1. Tooling Adaptor .............................................................................................................................................................. 3 1-2-2. Tooling Adaptor Plate (Option) .................................................................................................................................... 3
1-3. Option .................................................................................................................................................................................... 3
2. COMPONENTS ...................................................................................................................................................... 3
3. Standard Detail ........................................................................................................................................................ 4
3-1. Common Specification ......................................................................................................................................................... 4
3-2. OMEGAⅣ Body Specification list .................................................................................................................................... 5 3-2-1. OMEGAⅣ Body Specification ..................................................................................................................................... 5 3-2-2. Cables Used Inside the Body ....................................................................................................................................... 6 3-2-3. Face Sensor ..................................................................................................................................................................... 6 3-2-4. Chuck・Unchuck Sensor .................................................................................................................................................. 7 3-2-5. LED ASSY Specifications ............................................................................................................................................. 7
3-3. Spot Welding Interface Module Specifications List (Connector Specifications) ........................................................... 7 3-3-1 Spot Welding Interface Module body Specifications ................................................................................................... 8 3-3-2. Spot Welding Interface Module wire used for internal(Motive Power) .............................................................. 9 3-3-3. Spot Welding Interface Module Wire Used for Internal (Grounding) ..................................................................... 9
3-4. Spot Welding Interface Module Specifications list (Seal connector specification) .................................................. 10 3-4-1. Spot Welding Interface Module Body Specifications ............................................................................................... 10
3-5. Spot Welding Electorical Module Specifications list ..................................................................................................... 11 3-5-1. Spot Welding Electrical Module Specifications ......................................................................................................... 11 3-5-2. Spot Welding Electrical Interface Module Cables Used for internal ..................................................................... 12
3-6. Hydraulic Coolant Interface Specification List(Rc3/8Specification) ......................................................................... 13
3-7. Hydraulic Coolant Interface Specification List (Rc1/2specification) ............................................................................. 14
3-8. Pneumatic Module Specification List (Rc1/4specification) ............................................................................................ 15
3-9. Pneumatic Module Specification List (Rc1/2specification) ............................................................................................ 16
3-10. Signal Interface Specification list ................................................................................................................................... 17 3-10-1. Signal Interface Specifications ................................................................................................................................... 17 3-10-2. Signal Interface Cables used for internal................................................................................................................. 18
3-11. Load Allowance and Installation Notes ......................................................................................................................... 19
3-12. Power Load Allowance ................................................................................................................................................... 19
4. IDENTIFYING THE OMEGA Ⅳ ....................................................................................................................... 20

- ii -
5. INSTALLATION .................................................................................................................................................. 21
5-1. Robot Adaptor .................................................................................................................................................................... 21
5-2. Tooling Adaptor ................................................................................................................................................................. 21
5-3. CHUCK/UNCHUCK Port Connections ............................................................................................................................ 21
5-4. Electric wiring .................................................................................................................................................................... 22
5-5. Cable Settlement ................................................................................................................................................................. 22
5-6. Tool Changer Installing Considerations ........................................................................................................................... 23 5-6-1. Tool Changer Installing ................................................................................................................................................ 23 5-6-2. Greasing on Main Unit ................................................................................................................................................ 23 5-6-3.Proximity of Tool Changer ........................................................................................................................................... 24 5-6-4. Precautions for Using a Servo Motor for a Tool .................................................................................................... 24
5-7. Procedure for installing each Module on the Main Unit .............................................................................................. 25 5-7-1. Wiring for seal Connector Specifications .................................................................................................................. 25 5-7-2. When air/water feeding module is used .................................................................................................................... 28 5-7-3. When feeder/signal module is used ............................................................................................................................ 28
6. Operations and programming operation ............................................................................................................... 29
6-1 Basic Flow of The NITTA CHANGE SYSTEM ........................................................................................................... 29
6-2. Nitta change the basic flow of system ........................................................................................................................... 29
6-3. NITTA CHANGE SYSTEM Interlocks ........................................................................................................................... 30
6-4. Notes on operation ............................................................................................................................................................. 30
6-5. Emergency ........................................................................................................................................................................... 32 6-5-1. Manual Separation of OMEGA Ⅳ ............................................................................................................................. 32 6-5-2. Collision or Interference Managements ...................................................................................................................... 32 6-5-3. Water splashing treatment .......................................................................................................................................... 33

- I -
PRECAUTIONARYPRECAUTIONARYPRECAUTIONARYPRECAUTIONARY NOTESNOTESNOTESNOTES Preface This document provides precautions for handling, detailed descriptions of the specifications and mandate inspection and maintenance items for appropriate applications and appropriate maintenance and inspection of the system, focusing on mechanical sections of OMEGA Ⅳ. Therefore, those in charge of introduction line planning, maintenance and inspection, unpacking or actual operations of the product must read this document and fully understand the Nitta Change System before use.
We carefully pack our shipments. But, unfortunately you find any missing parts, please contact with our offices on
the cover of this manual.
・ All rights reserved. ・ External appearance and specifications described in this document are subject to change for improvement. ・ Be sure to read this document carefully before working on the product. ・ Be sure to confirm whether workers are required to be sufficiently trained for applicable expertise. ・ Take note that we assume no responsibility regarding any damage or accident that occurs in works performed by customers.
Please notice the followings below The use of this document is reserved exclusively for the user of Nitta Corporation (hereinafter “the Corporation”)
customers and personnel. The information and drawings contained herein are the sole property of the Corporation,
and shall not be divulged to any third party without the prior written consent of the Corporation.
The Corporation makes no warranty of any kind with regard to this user's guide, including, but not limited to,
implied warranties or fitness for a particular purpose. The Corporation shall not be liable for any errors contained
herein or for incidental or consequential damages in connection with the performance or use of this user's guide.
Checking The inside of packages Please, check the inside of packages, and make sure about next 2 items are inside of the shipment.
1. Installing bolts and washers
2. Preliminary parts (depending on special arrangement)
Thank you for choosing our NITTA CHANGE SYSTEM.

- II -
Safety Precautions
For Safe Use of the Product
a) Hazard, warning and cautions indications in this document In this instruction manual, various symbols are used to indicate safety-related information for prevention of damage to people and properties by promoting safe and proper use of our product. Indications and meanings of the symbols are described below. Be sure to read carefully and understand the contents of this document before use.
Indications in this document
Improper use disregarding this indication may result in imminent risk of death or serious injury of the user(s).
Improper use disregarding this indication may result in risk of death or serious injury of the user(s).
Improper use disregarding this indication may result in risk of injury of the user(s) leading to disabilities, or property damages.
This indicates use examples, etc.
This indicates special instructions less important than cautions.
b) Introduction
The Nitta Change System (adapter and module) does not work alone and is only usable when being equipped on
robot and compatible unit. As for safety, it is necessary to consider not only the single Nitta Change System but also the robot system and compatible unit system as a whole.
For use of the Nitta Change System, be sure to observe safety instructions related to core
robots and compatible units. For any work within the robot safety fence, consider
preparing a safety system design to shut down power over 50V once any person gets
into the fenced area.

- III -
c) General Precautions
Those engaged in installation, programming and maintenance works inside the robot
safety fence for the Nitta Change System are required to acquire robot expertise (expert
training). Additionally, those engaged in disassembly and assembly works of the Nitta
Change System either in or out of the safety fence are required to read this document
and the other maintenance and inspection procedures carefully.
In addition, for works in the safety fence area, be sure to wear appropriate clothing for
the work with personal protective equipment such as a hard hat, safety boots, etc. For
inside disassembly works of the Nitta Change System, use protective glasses for
protection against pop-out parts.
Do not use this product in any of the environments listed below.
Otherwise, operators may be injured.
- Flammable environment
- Explosive environment
- Environment exposed to water/water drops or highly humid environment
- Environment with high degree of radiation
When the product is used under any of the above environment, we assume no re
sponsibility for any failure or damage.
d) Precautions for Installation
For installation of the Nitta Change System, remove the pertinent product and place it out of the robot safety fence as long as possible so that installation can be performed securely.
If installation work is performed inside the safety fence, securely shut off the power over
50V from the Nitta Change System and ensure that the robot is securely stopped before
entering into the fence area.
Be sure to check the following items before starting the installation procedure:
(a) Welding power source, control power source and driving power source are all
shut off before work.
(b) All hydraulic and pneumatic pressure sources are off before work.
(c) All residual hydraulic and pneumatic pressure is released before work.
(d) Note that some connectors and cables may be hot depending on their
specifications.
Turning the power supply or hydraulic/pneumatic pressure source on during installation
without notifying the operator(s) may cause extremely dangerous situation. Establish a
system to prevent such an event at any time to ensure safe work.

- IV -
Be sure to install specified parts. In addition, when you replace parts, install parts to
their original positions and be sure to perform inspections in accordance with certain
procedures.
Ensure that the installation load (moment torque) does not exceed product's rated value. Otherwise, not only the product functionality and life may be adversely affected but also unexpected accident may occur.
Ensure that the electric load applied to the signal pins and welding electrode does not exceed the rated voltage and allowable current. Otherwise, not only the product functionality and life may be adversely affected but also unexpected accident may occur.
Supply water and air to feed-water, feed-air and body fitting/removal ports so as to maintain pressure within the rated range. Otherwise, not only the product functionality and life may be adversely affected but also unexpected accident may occur.
- To install a robot adapter, set the robot mounting surface facing up, rather than horizontal. Then robot adapter installation becomes relatively safer.
- When installing a tool adapter, set tools on the tool stand. Then tool adapter installation becomes relatively safer.
Please make sure to switch the air supply port detachable at the separation state. Operating without doing this may cause tool falling, product damage, or unexpected accident.
When manually switching air supply of the fitting/removal port, set tools on the tool
stand. Otherwise, improper motions or piping may cause tool falling, product damage,
or unexpected accident.
Arrange cables and hoses without causing catching during robot motions.
Otherwise, the main unit or modules may be damaged.
e) Precautions for Teaching
With the tools separated, check that the interlock signals output from the main unit are correct. Operating without doing this may cause tool falling, product damage, or unexpected accident.
For jointing/separation, switch air supply to jointing/separating with the connecting surfaces of robot-side and tool-side adapters are horizontally coherent on the stand. Otherwise, unexpected accident may occur due to tool falling, in addition to damage of each interface and main unit damage due to prying.
When the welding power is on, there is a risk of electricity leakage. Do not touch any component connected with the Nitta Change System.

- 1 -
1. The Nitta Change system The Nitta Change System is a pneumatic-driven automatic tool changing device. Basically, the system consists of a
robot adapter and a tool adapter and it may be mounted to all robot tools with an adapter plate. In addition, the main unit and modules are equipped with transmission mechanisms such as signal pins to transmit signals and power source to tools, and air feeding port.
[[[[Transmission Mechanism]]]]
OMEGA Ⅳ have electric signal pins to transmit /receive signals between robot and tools.
For the number of pins, refer to the drawing
1-1. Robot Side 1-1-1. Robot Adaptor
The robot adapter is a basic constitution moiety of the Nitta Industries change system. This adaptor equips
the sensor, which indicates the state of chucking mechanisms. This sensor outputs “CHUCK”, “UNCHUCK”
and “FACE” signals.
[[[[Detachable mechanism]]]]
The Robot Adaptor and the Tool Adaptor are connected each other by cams. These cams have special mechanism, which automatically continues to adjust for any dimensional error that may occur during chucking for a long time. These cams are driven by air cylinders, and designed so that they will not release even if the units is subjected to more than its rated load capacity. If an extreme load is applied, the chucking surfaces of both the robot and tooling adaptors separate slightly but never release. And the inside spring works as fail-safe mechanism which avoids falling the tooling adaptor off even if the units looses its air pressure accidentally.
The failsafe mechanism serves to prevent falling. Do not continue using the product when the air pressure is decreased. Otherwise, the gap between contact surfaces of robot and tool adapter is increased and unexpected accident may occur.
[[[[Detachable sensor signal]]]]
・Chuck edge signal (Connection edge) Signal that indicates the cam is not fully engaged. When this signal and a joint check signal are both active, the robot can pick the tool adapter from the tool stand. ・Un chuck edge signal (Separation edge) This signal indicates that the locking cam is retracted in the Robot Adaptor. That is, it indicates that the cams are at the proper position to allow the Robot Adaptor to approach or unchuck the Tooling Adaptor.
・Consolidated confirmation signal (Face edge) This signal indicates that the faces of both adaptors are in contact each other. That is, it indicates that the chucking surfaces of both adaptors are properly contacted, so that the cams can be brought into engagement.

- 2 -
1-1-2. Selection of Input Devices
Check specifications of the input device. Signals representing robot adapter status may
not be confirmed.
The fitting/removal sensor signal output circuit of the unit consists of a photo coupler operated by turning the proximity sensor ON/OFF, and serial resistor for photo coupler protection. Therefore, the residual voltage of the signal output circuit varies depending on the input current of the selected input device. For input device selection, check the input current of the device and ON determination voltage and select an input device with which ON determination is possible.
Ex: When input current value is 6 (mA)
- When chuck or uncheck is ON Residual voltage V1 = 680 (Ω) X 6 (mA) + 0.9 + 0.8 = 5.78 (V)
- When face is ON Residual voltage V2 = 680 (Ω) X 6 (mA) + 2.7 + 0.8 = 7.58 (V)
Therefore, select an input device with which ON determination is possible with 8 (V) or higher voltage relative to 0V common. 1-1-3. Robot Adapter Plate (Option) A robot adapter plate is used to install a robot adapter unit to a robot used. No processing of holes and screws for installation to a robot is performed on standard products. (We may perform such processing upon your request. You may also prepare a robot adapter place on your own. For precautions for installation of an adapter plate onto the robot adapter unit, refer to the reference drawing at the end of this document.)
Photo coupler Diode
DC電源
(24V)
フォトカプラ内部回路
+ -GND
IN
ダイオード
0.8V
0.9V
680Ω
6mA
入力回路 オメガ4内部回路
4.08V
DC Power Supply
(24V)
Internal circuit
Input circuit OMEGA Ⅳ Input circuit
Diode
Photo coupler
0.8V
4.08V
680ΩΩΩΩ
0.9ⅤⅤⅤⅤ 0.9ⅤⅤⅤⅤ
++++ - G ND
I N
6 m A Photo coupler Photo coupler
0.9ⅤⅤⅤⅤ
Photo coupler
DC Power Supply
(24V)
Internal circuit
Input circuit OMEGA Ⅳ Input circuit

- 3 -
1-2. Tool Side 1-2-1. Tooling Adaptor The Tooling Adaptor is basic parts that make up the NITTA CHANGE SYSTEM and allows tools to be attached. The tool adapter locking pin engages the locking cam of robot adapter. 1-2-2. Tooling Adaptor Plate (Option) Tool adapter plate is used to attach the tool to your company tool adapter body. To standard products, tool mounting holes and screw machining is not done. (Of course is also possible to provide own adapter plate to your Company.) 1-3. Option
Please ask us about the details of non-standard options such as signal-pin module, electric module and pneumatic
module.
2. COMPONENTS
Fig.1 system figure
1

- 4 -
3. Standard Detail 3-1. Common Specification
Service condition
Ambient Temperature 0~60(But do not condense dew)
Ambient humidity 95%RH or less (But do not condense dew)
The ambient atmosphere
Thing without the corrosive gas
Altimeter 1000m or less
Shakeproof 10~500(Hz) Acceleration50(m/s2) 110(minute) (IEC60068-2-6 confomity)
Transportation condition
Ambient Temperature -25~60(Instantaneous Maximum 70)
Ambient humidity 95%RH or less(But do not condense dew)

- 5 -
3-2. OMEGAⅣⅣⅣⅣ Body Specification list
3-2-1. OMEGAⅣⅣⅣⅣ Body Specification
Model Type Robot adapter Drawing reference
Tooling adapter Drawing reference
Load Weight
Weight capacity 200 kg
Permissible moment 1471 Nm
Permissible torque 1471 Nm
Working pressure 0.39~0.59 MPa
Repeatability positioning precision 0.050 mm
Interface Electricity
A number electric contact
Drawing reference
Rated voltage DC50V or less
Maximum allowed current 3A
Rated frequency 50 or 60 HZ
Overvoltage category Overvoltage categoryⅢ
Permissible degree of contamination Pollution degree 3
Mechanical weight Robot adapter 4.2 kg
Tooling adapter 2.8 kg
Mechanical measure Robot adapter
See below For details, refer to approved drawing.
Tooling adapter See below
For details, refer to approved drawing.
R side adapter (For details, refer to approved drawing.)
T side adapter (For details, refer to approved drawing.)
1
61.5
119 58.5
φ2
28
φ2
28
- 6 -
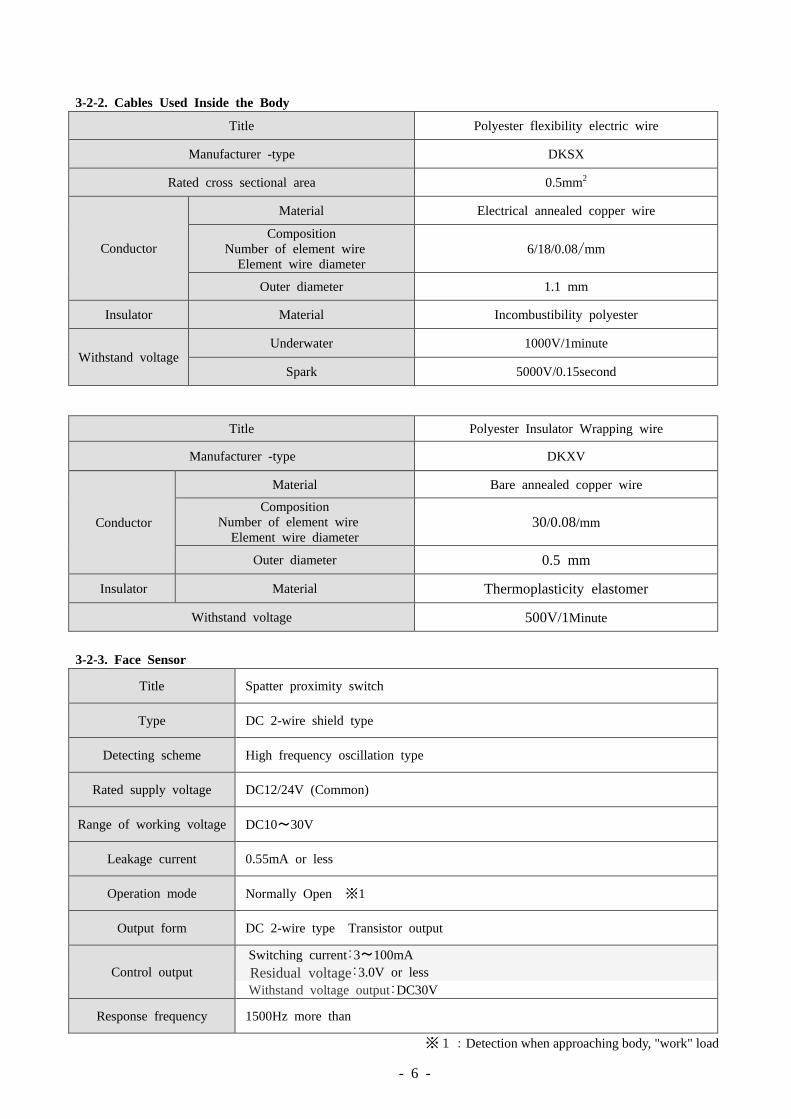
3-2-2. Cables Used Inside the Body
Title Polyester flexibility electric wire
Manufacturer -type DKSX
Rated cross sectional area 0.5mm2
Conductor
Material Electrical annealed copper wire
Composition Number of element wire
Element wire diameter 6/18/0.08/mm
Outer diameter 1.1 mm
Insulator Material Incombustibility polyester
Withstand voltage Underwater 1000V/1minute
Spark 5000V/0.15second
Title Polyester Insulator Wrapping wire
Manufacturer -type DKXV
Conductor
Material Bare annealed copper wire
Composition Number of element wire
Element wire diameter 30/0.08/mm
Outer diameter 0.5 mm
Insulator Material Thermoplasticity elastomer
Withstand voltage 500V/1Minute
3-2-3. Face Sensor
Title Spatter proximity switch
Type DC 2-wire shield type
Detecting scheme High frequency oscillation type
Rated supply voltage DC12/24V (Common)
Range of working voltage DC10~30V
Leakage current 0.55mA or less
Operation mode Normally Open ※1
Output form DC 2-wire type Transistor output
Control output Switching current:3~100mA Residual voltage:3.0V or less Withstand voltage output:DC30V
Response frequency 1500Hz more than
※1:Detection when approaching body, "work" load

- 7 -
3-2-4. Chuck・・・・Unchuck Sensor
Title Proximity switch
Type DC 2-wire type
Detecting scheme High frequency oscillation type
Rated supply voltage DC12/24V (Common)
Range of working voltage DC10~30V
Leakage current 0.55mA or less
Operation mode Normally Open ※1
Output form DC2-wire type Transistor output
Control output Switching current:3~100mA Residual voltage:3.0V or less Withstand voltage output:DC30V
Response frequency 2000Hz more than
※1:Detection when approaching body, "work" load
3-2-5. LED ASSY Specifications Shows the specifications of the photo-coupler being used to LED ASSY adapter that is equipped with a robot.. For details, please refer to the specification.
Title TLP523(Manufactured by Toshiba)
Type light-emitting diode+Phototransistor
Dielectric voltage 2500Vrms (Minimum)
Collector-emitter breakdown voltage 55V (Minimum)
Conversion Efficiency 500% (Minimum) (IF=1mA)
Collector-emitter saturation voltage 1.0V (Maximum) (IC=50mA)
High-temperature dark current 10µA (Maximum) (Ta=85)
UL Certified product UL1577、File NO.E67349
3-3. Spot Welding Interface Module Specifications List (Connector Specifications)

- 8 -
3-3-1 Spot Welding Interface Module body Specifications
Model Type Robot Side Drawing reference
Tool Side Drawing reference
Load Weight Robot Side 1.0 kg
Tool Side 1.0 kg
Material Withstand resin
Overvoltage Category Overvoltage CategoryⅢ
Rated voltage Single‐phase current 600V
Maximum allowed current 100A Rated frequency 1000 HZ
Permissible degree of contamination Pollution degree 3
R side spotwelding interface module (For more information see approved drawing.)
T side spotwelding interface module (For more information see approved drawing.)
Electrode
Center of adapter housing
159 54
Electrode
Seal connector
159 54
Center of adapter housing
Seal connector
- 9 -
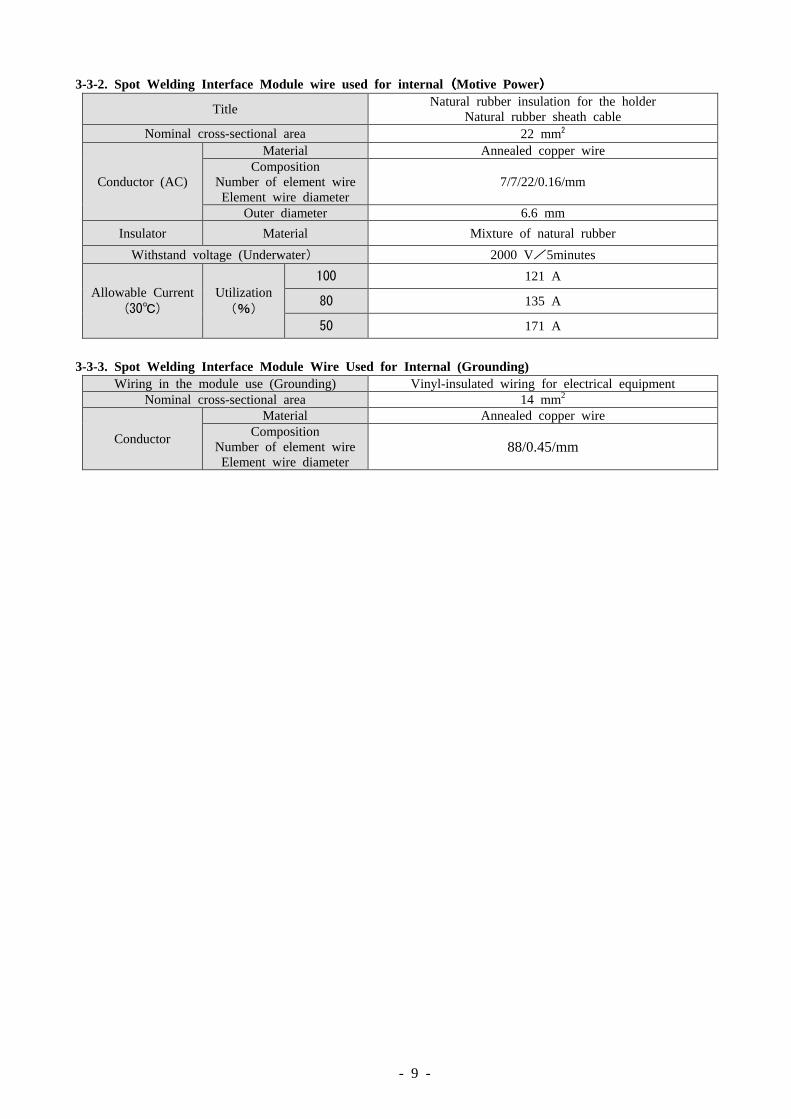
3-3-2. Spot Welding Interface Module wire used for internal((((Motive Power))))
Title Natural rubber insulation for the holder
Natural rubber sheath cable Nominal cross-sectional area 22 mm2
Conductor (AC)
Material Annealed copper wire Composition
Number of element wire Element wire diameter
7/7/22/0.16/mm
Outer diameter 6.6 mm
Insulator Material Mixture of natural rubber
Withstand voltage (Underwater) 2000 V/5minutes
Allowable Current (30)
Utilization(%)
100 121 A
80 135 A
50 171 A
3-3-3. Spot Welding Interface Module Wire Used for Internal (Grounding)
Wiring in the module use (Grounding) Vinyl-insulated wiring for electrical equipment Nominal cross-sectional area 14 mm2
Conductor
Material Annealed copper wire Composition
Number of element wire Element wire diameter
88/0.45/mm

- 10 -
3-4. Spot Welding Interface Module Specifications list (Seal connector specification)))) 3-4-1. Spot Welding Interface Module Body Specifications
Model Type Robot Side Drawing reference
Tool Side Drawing reference
Load Weight Robot Side 1.0 kg
Tool Side 1.0 kg
Material Withstand resin
Overvoltage Category Overvoltage CategoryⅢ
Rated voltage Single‐phase current 600V
Maximum allowed current 100A
Rated frequency 1000 HZ
Permissible degree of contamination Pollution degree 3
R side spot welding interface module (For more information see approved drawing.)
Electrode
Electrode
Center of adapter housing
Seal connector
Center of adapter housing
Seal connector
54
54 159
159
T side spot welding interface module (For more information
see approved drawing.)

- 11 -
3-5. Spot Welding Electorical Module Specifications list
3-5-1. Spot Welding Electrical Module Specifications
Model Type Robot Side Drawing reference
Tool Side Drawing reference
Spec Spot welding Electrode×6
Signal Electrode×15
Load Weight Robot Side 0.8 kg
Tool Side 0.8 kg
Material Withstand resin
Overvoltage Category Overvoltage CategoryⅢ
Rated voltage Spot welding AC200V
Signal DC50V以下
Maximum allowed current Spot welding 20A
Signal 3A
Rated frequency 50or60 HZ
Permissible degree of contamination Pollution degree 3
( 53 ) 145
145 ( 52 )
Signal connector
Center of adapter housing
Center of adapter housing
Spotwelding connector
Signal connector
Welding pin
Signal pins
Signal pins
Welding pin
Spotwelding connector
R side spot welding interface module (For more information
see approved drawing.)
T side spot welding interface module (For more information
see approved drawing.)

- 12 -
3-5-2. Spot Welding Electrical Interface Module Cables Used for internal
FOR SPOTWELDING ELECTORICAL
Title For brake For power
Manufacturer -type CE-531XXSB
0.75×2 MVVS 1.25×4
Rated cross sectional area 0.75 2 1.25 2
Conductor
Material Annealed copper wire Annealed copper wire Composition
Number of element wire Element wire diameter
67/0.12/
50/0.18/mm
Insulator Material Heat-resistant vinyl Mixture Heat-resistant vinyl Mixture
For THE Signal Title Robot cable for durability
Manufacturer -type KDF-SB
Rated cross sectional area 0.52
Conductor
Material Annealed copper complex Stranded wire Composition
Number of element wire Element wire diameter
3×(33/0.08)/
Insulator Material Mixture of natural rubber
Finishing outer diameter Approximately 13mm
Withstand voltage AC1500V/1minute

- 13 -
3-6. Hydraulic Coolant Interface Specification List((((Rc3/8Specification))))
Model Type Robot Side Drawing reference
Tool Side Drawing reference
The ports number of pneumatic 4
Fluid of use Water、Air
Fluid temperature of use 0~80(But do not condense dew)
Ambient temperature of use 0~60
Ambient humidity of use 95%RH below
Working pressure 0.86MPa
Effective sectional area 21.7(mm2)/PORT
Cv value 1.33/PORT
Screw connection size Rc3/8
Machine weight Robot Side 1.0(kg)
Tool side 0.8(kg)
(13)
(63)
(13)
(45) (14)
R114
R11
4
アダプタ中心
アダプタ中心
4-Rc3/8”
4-Rc3/8”
(114)
(114)
16°
8°
8°
16°
16°
8°
8°
16°
R side water supply module (For more information
see approved drawing.)
T side water supply module (For more information
see approved drawing.)
Center of adapter housing
Center of adapter housing

- 14 -
3-7. Hydraulic Coolant Interface Specification List (Rc1/2specification)
Model Type Robot side Drawing reference
Tool side Drawing reference
The ports number of pneumatic 4
Fluid of use Water、Air
Fluid temperature of use 0~80(But do not condense dew)
Ambient temperature of use 0~60
Ambient humidity of use 95%RH below
Working pressure 0.86MPa
Effective sectional area 60.0(mm2)/PORT
Cv value 3.4/PORT
Screw connection size Rc1/2
Machine weight Robot side 1.2(kg)
Tool side 1.2(kg)
(63)
(17)R114
R114
(12)(44)
(17)
アダプタ中心
アダプタ中心
Oリング P-15
4-Rc1/2”
4-Rc1/2”
114
114
15°
7
.
5
°
7
.
5
°
15°
15°
7
.
5
°
7
.
5
°
15°
R side water supply module (For more information
see approved drawing.)
T side water supply module (For more information
see approved drawing.)
Center of adapter housing
Center of adapter housing
O-Ring P-15

- 15 -
3-8. Pneumatic Module Specification List ((((Rc1/4specification)
Model Type Robot side Drawing reference Tool side Drawing reference
The ports number of pneumatic 4
Fluid of use Air
Fluid temperature of use 0~80(But do not condense dew)
Ambient temperature of use 0~60
Ambient humidity of use 95%RH below
Working pressure 0.86MPa
Effective sectional area 19.0(mm2)/PORT
Cv value 0.72/PORT
Screw connection size Rc1/4
Machine weight Robot side 1.0(kg)
Tool side 0.8(kg)
7゜
14
゜
7゜
14
゜
21
(53)
(15)
12
(54)
14゜
7゜
14
゜7
゜
R114
R114
4-Rc1/4”
4-Rc1/4”
アダプタ中心
アダプタ中心
(114)
(114)
R side air supply module (For more information
see approved drawing.)
T side air supply module (For more information
see approved drawing.)
Center of adapter housing
Center of adapter housing

- 16 -
3-9. Pneumatic Module Specification List (Rc1/2specification)
Model Type Robot side Drawing reference
Tool side Drawing reference
The ports number of pneumatic 4
Fluid of use Air
Fluid temperature of use 0~80(But do not condense dew)
Ambient temperature of use 0~60
Ambient humidity of use 95%RH below(But do not condense dew)
Working pressure 0.86MPa
Effective sectional area 61.0(mm2)/PORT
Cv value 3.4/PORT
Screw connection size Rc1/2
Machine weight Robot side 1.0(kg)
Tool side 0.8(kg)
18.3
53.3 (14)
R114
15°
7.
5°
7.5
°15°
Oリング P-16
O-RING P-16
R114
15°
7.
5°
7.5°
15°
18.3
(2)53.3
4-Rc1/2”
4-Rc1/2”
アダプタ中心
アダプタ中心
(114)
(114)
R side air supply module (For more information
see approved drawing.)
T side air supply module (For more information
see approved drawing.)
Center of adapter housing
Center of adapter housing

- 17 -
3-10. Signal Interface Specification list 3-10-1. Signal Interface Specifications
Model Type Robot side Drawing reference
Tool side Drawing reference
Spec Electrode×35
Load Weight Robot side 0.5kg
Tool side 0.5kg
Material Withstand resin
Rated voltage DC50V below
Maximum allowed current 5A
Rated frequency 50or60 HZ
Overvoltage Category Overvoltage CategoryⅢ
Permissible degree of contamination Pollution degree 3
R side signal module (For more information
see approved drawing.)
R side signal module (For more information see approved drawing)
5 4
( 5 4 )
( 6 3 )
Connector
1 2 7
Signal pin
Center of adapter
housing
1 2 7
Center of adapter
housing
Connector
Signal pin
- 18 -
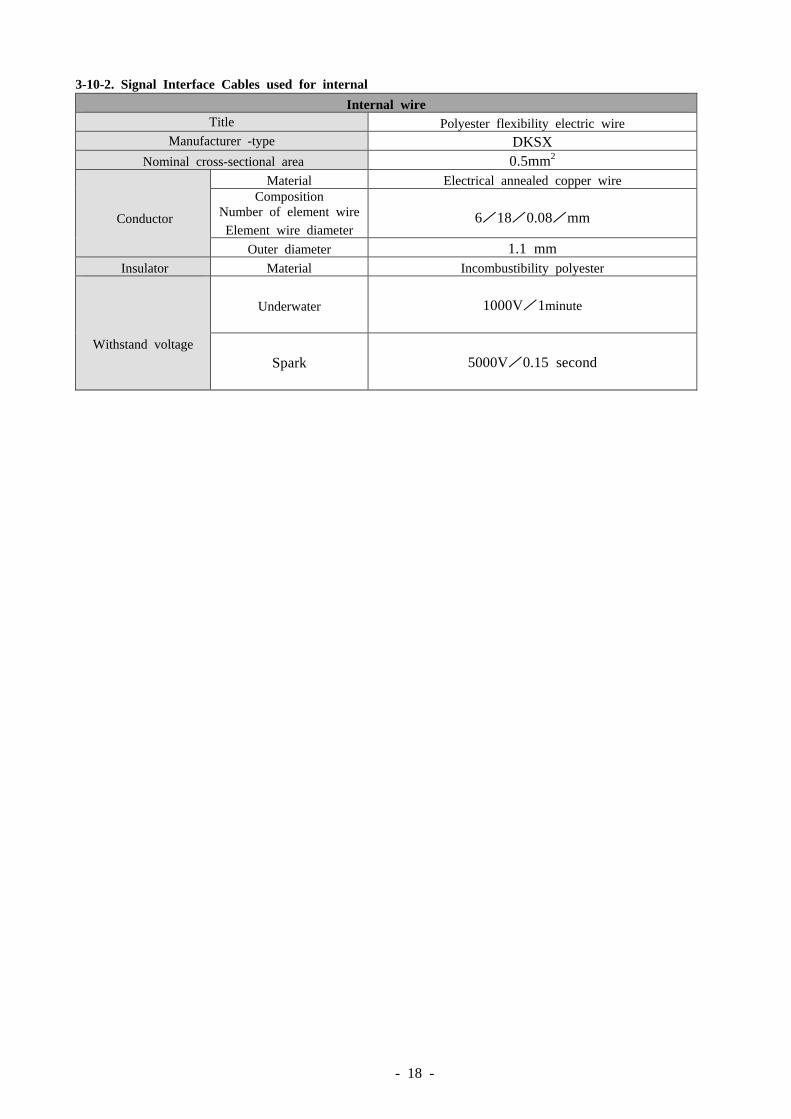
3-10-2. Signal Interface Cables used for internal
Internal wire Title Polyester flexibility electric wire
Manufacturer -type DKSX Nominal cross-sectional area 0.5mm2
Conductor
Material Electrical annealed copper wire Composition
Number of element wire Element wire diameter
6/18/0.08/mm
Outer diameter 1.1 mm Insulator Material Incombustibility polyester
Withstand voltage
Underwater
1000V/1minute
Spark
5000V/0.15 second

- 19 -
3-11. Load Allowance and Installation Notes
The specified rating load, moment and torque of OMEGA Ⅳ expresses the active state
after the system is installed on a robot. The system should be set with consideration of
inertia and acceleration generated by movements of the robot, so that the maximum
load of normal operation will never be over those ratings. The rating load, moment and
torque are explained on figure 2.
carrying load W = 1960N(200kg)
eccentricity L = √(lm2+lt2)
allowable bending moment M = L×W×GR
(※)= 0.5×1960×1.5≦1471N・m (15000kgf・cm)
allowable twisting torque T = 1t×W×GR
(※)= 0.5×1960×1.5≦1471N・m (15000kgf・cm)
【Note】 GR represents the acceleration of the Robot at normal motion in automation operations.
GR value of a robot will be different on each other. Please refer to the manufacture of your robots about the precise GR value.(Generally, GR is set between 1.5 to 2.0G)
Fig. 2 Definition of load rating 3-12. Power Load Allowance
The standard signal pin assembly (20 pins specification) of OMEGAⅣ can carry 13A in max in all. Each pin can carry 3A, 110V. However, please do not let each adjacent pin have 3A in case of the plural pins usage because it causes a short circuit by insulation failure.
10 20 30 40 50 60 70
10
20
30
40
50
60
70
W =15 0k g
W =200k g
W=1960N (200kg)
W=1470N (150kg)
Tooling adaptor
The center of chucking face
Robot adaptor
Gravity W(kg)
lt(cm)
lm(cm)
L(cm)

- 20 -
4. IDENTIFYING THE OMEGA ⅣⅣⅣⅣ
Fig.3 nomenclature
LED ASSY
Tapered pin
Cam
Electric block assy
Pivot pin
Robot adaptor housing
Lock pin
Electric block assy
Tooling adaptor housing
Bush
Solenoid valve (Option)

- 21 -
5. INSTALLATION 5-1. Robot Adaptor
Robot Adaptor is composed of Robot Adaptor Body and Adaptor Plate. To install Robot Adaptor to your robot,
Remove Robot Adaptor Plate from Robot Adaptor Body ,first. Next, machine mating holes in Robot Adaptor
Plate and then, attach the plate to your robot. Last, attach Robot Adaptor Body to Adaptor Plate by 6 bolts.
(Refer to fig.1)
Mounting bolts:6-M10× 65 【Torque value:75Nm】
(※ Combined with spring washer for M10) 5-2. Tooling Adaptor
Tooling Adaptor is also composed of Tooling Adaptor Body and Tooling Adaptor Plate. To install Tooling
Adaptor, remove Tooling Adaptor Plate from Tooling Adaptor Body. And machine mating holes in Tooling
Adaptor Plate. Then, attach the plate to Tooling Adaptor.
(Refer to fig.1)
Mounting bolts:6-M10×60 【Torque value:75Nm】
(※ Combined with spring washer for M10)
At the time of shipment, robot adapter, the tool adapter is plate screw attached
is not fully tightened. In installation work, even if there is no need to remove
from the body of the adapter plate, loosen the screws on the adapter plate once,
please tighten the body after applying the Loctite.
When processing the hole required for mounting the adapter plate at your company
Counterbore processing, please processing deep enough not to protrude from the
mounting surface of the head of the screw mounting adapter plate.
If you are installing a tool to tool adapter using the male screws from the tool side,
The adapter plate from the tip of the male screw, Please do not protrude.
5-3. CHUCK/UNCHUCK Port Connections
Use a solenoid valve for the chucking mechanism ports“CHUCK”and“UNCHUCK.”Be sure to take the
normally pressurized line (solenoid de-energized) to the port “CHUCK”so that the chucking mechanism
will remain in the chucked state in the event of a power failure.
If do not want a detachable, you open the "UNCHUCK" port, please do not use plug for stopping air supply.(Use in the consolidated state) UNCHUK port, please be sure to use in a pressurized state. There is a possibility of falling.
Air piping for driving tool changer Tool changer are even when air pressure was reduced by unforeseen. Although the tool side does not fall for has become a fail-safe mechanism. Tool changer drive air piping have even though the emergency valve is electrically OFF. Air does not flow to "Unchuck" side, please the selection of the solenoid valve and piping circuit. ・・・・Please do not use solenoid valve which has 3 positions closed center style. The robot side may not be able to hold chucking status when it is power OFF and may drop the tool side ・・・・Please do not share the exhaust port with the other equipment. The robot side
may not able to hold chucking status if the air is pressured from back side and may drop the tool side.
・・・・Please do not branch off from the air "CHUCK" port to the other equipment. The robot side may not able to hold chucking status if the air pressure dropped and may drop the tool side.

- 22 -
Perform installation carefully not to bend the hose connected with the Fitting/removal port during robot motions. Otherwise, it may fall off.
Do not cap the exhaust port of the solenoid valve used for switching pressure on the fitting/removal port. Otherwise, it may fall off.
As a solenoid valve used for switching pressure on the fitting/removal port select a double-solenoid type valve. Then effects of any noise malfunction are mitigated..
5-4. Electric wiring Please wire Input/Output line to the terminal (connector) in robot adaptor by referring to the wiring diagram in the end of the book. Please use built-in sensor signals into the control system like robot (line). These sensors signals can be used through the above terminal. Please tighten the connector firmly in case of connector. 5-5. Cable Settlement
Damage of connectors or connector assy, or breakage of wires may occur wh
en a extreme force of stress is
applied. Fix the cables of robot side at a place around the connector of the
Robot Adaptor by using Spiral
tubes or bands, etc.
Make sure that a excessive force is not applied on the cables or hoses during
your robot is rotating its hand.
An example of fixing cable with brackets is showing on figure 4.
Fig.4 An example of how cable fixation
Cable Robot plate
Robot adaptor
Braket for fixed
cable tie

- 23 -
5-6. Tool Changer Installing Considerations
5-6-1. Tool Changer Installing
Tool Changer Mounting direction minimize the GAP for mating surfaces,
Recommend that the maximum install so that the directions shown in the figure belo
wthe center of gravity of load that may occur.
Fig. 5 Tool Changer Installing Direction
5-6-2. Greasing on Main Unit Apply thin coating of SUMIPLEX BN No.1 (Sumico Lubricant co.,ltd.) or equivalent evenly to the external sliding faces. Application points are indicated in Fig.6 6.(Do not use molybdenum grease.)
Without greasing, prying and early wear will be generated on each part.
Fig.6 Greasing points
Positioning bush
Lock-Pin
Cam
2-points
3-points
3-points
2-points

- 24 -
5-6-3.Proximity of Tool Changer
The tool changer may be separated manually in case of emergency by following the proced
ure described later. However, if the lock pin holes, etc. on the tool adapter are capped wit
h a material-handling terminal box, etc., jigs may not be inserted and compulsory separation
is prevented. Ensure that there is not interference.
5-6-4. Precautions for Using a Servo Motor for a Tool
When any tool equipped with a servo motor (servo gun and servo material handling, etc.) is used, the encoder is cleared after fitting/removal, so be sure to install a battery for memory on the tool side. In addition, functionality to electrically disconnect/connect the servo motor is necessary on the robot.

- 25 -
5-7. Procedure for installing each Module on the Main Unit
Table 1. List of module assembly bolt
Feeder Servo Signal
R side T side
Screw shape
M5X40 SUS Spring water + Flat washer with mec (low intensity 222)
Screw shape
M5X40 SUS Spring water + Flat washer with mec (low intensity 222)
Nitta model No.
GWAP05040M Nitta model No.
GWAP05040M
Torque 5Nm Torque 5Nm Remarks Embedded screw Remarks Embedded screw
Feeder Signal
R side T side
Screw shape M5X45 SUS Spring water not included Without mec
Screw shape M5X45 SUS
Spring water not included Without mec
Nitta model No.
GSSH05045S+GWSP05S Nitta model No.
GSSH05045S+GWSP05S
Torque 5Nm Torque 5Nm Remarks Remarks
Water feeding Water/air
feeding
R side T side
Screw shape
M5×55 SUS With mec (low intensity 222) Screw shape
M5 shoulder bolt SUS With mec (low intensity 222)
Nitta model No.
GSSH05055SM Nitta model No.
GSHL5254S
Torque 10Nm Torque 2Nm Remarks Embedded screw Remarks Do not overtighten
Air feeding
R side T side
Screw shape
M5X40 SUS Spring washer with mec (low intensity 222)
Screw shape
M5X40 SUS Spring washer with mec (low intensity 222)
Nitta model No.
GSSH05040S Nitta model No.
GSSH05040S
Torque 10Nm Torque 10Nm Remarks Embedded screw Remarks Embedded screw
5-7-1. Wiring for seal Connector Specifications Use cables of compatible cable profiles indicated in each module drawing. Ex:) ・ "HBR-023-00" : For 30-38 mm2(SQ)
22mm2 (SQ)may be compatible when a sleeve "HBR-031-00" is used. ・ "GLUGR8-6" : For 8 mm2(SQ) ・ "GLUGR14-6" : For 14mm2 (SQ) ・ "GLUGR22SQ6" : For 22mm2 (SQ) ・ "CBR-01C-01" : For 14-22mm2(SQ)
Wrong positioning of the earth may cause electric shock or device damage.
For wiring arrangement, follow the module drawing.

- 26 -
a a+2
* Cable coating cut regardless of whether L-type
Cable Solderless terminal
For wiring, follow the procedure below. 1) Cable preparation
① Remove the cable coating so as to make it L-lag (a) + 2mm. (Refer to Fig.7)
② Cut each core, with care not to make any twisting or crossing.
At this point, let the cable through the module and check that its length is appropriate without any tension, looseness and interference.
2) Fit the shrinkable tube to the cable and put an L-lag at its end. Then temporarily tighten M8X8 lock screw not to let it
off. In case of solderless terminal specifications, tighten the screw further by a crimper according to the appropriate sectional area of the terminal used. (Refer to Photo.1, Photo.2,Photo.3)
3) Tighten M8X8 set screws to 3N.mm using an M5 torque wrench and put a mark on each. Then tighten M5X10 brass
screws to 3.5N.mm using a cross-tip torque wrench and check the electrode motion using a press jig. If the motion is good at 3 points, the work is completed. If the motion is not good, loosen the pertinent M8 set screw and M5 screw and make an adjustment. Then apply appropriate torque (Refer to Photo.4, Photo.5, Photo.6, Photo.7)
4) After motion confirmation, pull out the shrinkable tube by using longnose pliers and shrink it with a heat gun.
(Refer to Photo.8, Photo.9)
Note that overheating or any scratch by the priers may be a cause of shrinkable tube breakage. If it is broken, restart the procedure again.
Photo.2 Photo.3 Photo.1
Photo.4 Photo.7 Photo.6 Photo.5
Photo.9 Photo.8
Fig.7. Cable coating

- 27 -
5) Cut the signal line (6-core only) into No.4 pin 80mm, No.5 pin 70mm and No.6 pin 110mm from the housing Opening peel the coating off by about 7mm, cut the 5φ shrinkable tube into 3 20mm pieces and fit them to each cable.
(Refer to Photo.10, Photo.11, Photo.12, Photo.13)
6) Impregnate the copper line with flux by using cotton buds or the like. (Refer to Photo.14, Photo.15) 7) Cast solder into 3 signal pin holes in order of No.4, No.5 and then No.6 ((Refer to Photo.16, Photo.17, Photo.18) 8) Fit shrinkable tubes to signal pins and cables. (Refer to Photo.19)
Photo.15
Photo.18
Photo.19
Photo.14
Photo.16 Photo.17
Photo.11 Photo.13 Photo.12 Photo.10

- 28 -
After fitting the feeder module to the adapter, fix cables at appropriate position for robot motions to prevent cables from being pulled by robot motions. Tension on the cables may cause connector breakage and electrode failure, resulting in sparking.
5-7-2. When air/water feeding module is used
Ensure no chips of sealing tape on the relay, etc. get into the module. Otherwise, it gets into the O-ring sealing section inside and causes leakage.
Use Sumico Lubricant's Sumiplex BN No.1 or equivalent grease on the module port surface. Without lubrication, early breakage and leakage may occur.
If you take measures for water quality management, i.e. using a filter for coolant, change of corrosion within the module is reduced.
5-7-3. When feeder/signal module is used
For wiring, follow the approved drawing. Improper wiring may cause failure or electric leakage, etc.
Securely apply Type III grounding for earth and shield lines. Otherwise, malfunctions due to electric shock and noise may occur.
1
Axis-5
Fixed-Cable
Axis-6
Axis4

- 29 -
6. Operations and programming operation 6-1 Basic Flow of The NITTA CHANGE SYSTEM
Please adjust the interlocks of your robot with referring to this flow chart. Nitta exchange system, you must have
a confirmation signal synchronized with the operation of the robot and the robot and peripheral devices in order to
ensure reliability and safety. 6-2. Nitta change the basic flow of system
OMEGA Ⅳ has a built-in three sensors for the detection of its own operation.
Table 2.Basic flow of the NITTA CHANGE SYSTEM
Indicates processing condition.
During Robot is working, condition the signal as “Face ON.”
The signal to the solenoid valve for Chuck/Unchuck should be continuous. Please do not use 1 shot signal. It may not be able to hold chucking status by mis-operation with noise and may drop the tool side.
External
input
Fixture Limit
Face Chuck Unchuk Chuk Unchuck Tool side Face Chuck Unchuk
Waiting position OFF OFF ON OFF ON ON OFF OFF ON
↓
Moving ↓ ↓ ↓ ↓ ↓ ↓ ↓ ↓ ↓
↓
Near by chucking position ↓ ↓ ↓ ↓ ↓ ↓ ↓ ↓ ↓
↓
Approaching ↓ ↓ ↓ ↓ ↓ ↓ ↓ ↓ ↓
↓
Chucking position ON ↓ ↓ ↓ ↓ ↓ ON ↓ ↓
↓
Chuck ↓ ON OFF ON OFF ↓ ↓ ON OFF
↓
Chucking completion ↓ ↓ ↓ ↓ ↓ ↓ ↓ ↓ ↓
↓
Moving ↓ ↓ ↓ ↓ ↓ OFF ↓ ↓ ↓
↓
Working ↓ ↓ ↓ ↓ ↓ ↓ ↓ ↓ ↓
Working ON ON OFF ON OFF OFF ON ON OFF
↓
Moving ↓ ↓ ↓ ↓ ↓ ↓ ↓ ↓ ↓
↓
Unchuck position ↓ ↓ ↓ ↓ ↓ ON ↓ ↓ ↓
↓
Unchuck ↓ OFF ON OFF ON ↓ ↓ OFF ON
↓
Leaving OFF ↓ ↓ ↓ ↓ ↓ OFF ↓ ↓
↓
Near by unchucking ↓ ↓ ↓ ↓ ↓ ↓ ↓ ↓ ↓
position
↓ ↓ ↓ ↓ ↓ ↓ ↓ ↓ ↓ ↓
Moving
↓ ↓ ↓ ↓ ↓ ↓ ↓ ↓ ↓ ↓
Waiting
UN
CH
UC
KIN
GC
HU
CK
ING
Input Robot Output LED Output
Chucking Sensor Controlling LED ASSY
Robot motion

- 30 -
6-3. NITTA CHANGE SYSTEM Interlocks
Setting next four signals are suggested for safe and smooth operation of the Tool Changer.
1) Low Pneumatic Detection Signal
This is a signal, which warns lost of the Tool Changer pneumatics. It stops a manner of the robot when the
signal is off.
2) Tool existence detection signal
This is a signal, which detects existence of the tools on the Tool Storage Fixture.
This Interlock signal allows the Unchuck valve open only when all the tools are on the Fixture.
So, it prevents falling off of the tools for the event of unexpected situation.
3) Tool Number Identification Signal
This is a signal, which check the matching between the equipped tool and its programmed number.
So, the signal is useful when several robots chuck with the Material Handling apparatus from the same Tool
Storage Fixture.
4) Tool changer Manner Indication Lamp
Setting lamps, which indicate the ON/OFF state of signal such as the Chuck, Unchuck, Face, or User signal
are suggested for understanding condition of the system for trouble detection.
6-4. Notes on operation
The Tool Changer requires that the chucking surfaces of both the Robot and the tooling
Adaptors are in parallel during chucking action.
If the interface parallelism is not obtained, chucking or separation difficulties may occur.
A compliant Tool Support Fixture is recommended when the parallelism of the Robot or
the Fixture can not be obtained.
When the fixture has compliance, teaching the chucking can be done by that the robot
presses the Robot Adaptor against the Tooling Adaptor as if both faces of the adaptors
cohere each other (design a compliance with considerations about such thing as thrust of
the robot, weight of the tool, flatness, and discrepancy of the center).
A partial load of the tool or reaction forces on electric connections and ports for pneuma
tic or cooling water cause to leaning of the Tooling Adaptor followed by twisting of a
part of the chucking mechanism at their separation, so that the Adaptors will not separate
completely. in this case, it is necessary for the robot to press the Robot Adaptor against
the tooling adaptor, as same as the application of chucking, in order to keep a fixed po
sition of the Tooling Adaptor just after the separation. (Preventing lean, shift, etc.)
At this time of the separation movement, the tool should be certainly on the fixture.
Teach the separation movement to the robot by smooth retreating of the Robot Adaptor
without being trapped. For avoid these troubles, it is recommended that the Fixture of th
e Tool Changer is set in horizontal. But, if a vertical setting is the only plan to be allo
wed because of available space, be sure with next considerations.

- 31 -
For the above. Base of the tool changer, recommend the horizontal place. By the convenience of the location, If you are installing the vertical location, please take into the consideration the following points.
1) No jolting of the Tool Storage Fixture (without compliance).
2) No shifting of the Tool (Material Handling Apparatus, etc.) during chucking/separation movement.
(A structure should be supported at a point as close as possible to the Tooling Adaptor)
3) Satisfying the rigidity of the fixture not to be bent and the anchor bolts of the Fixture should not be pulled
out or loosen by pressure application of the Tooling Adaptor during chucking.
4) Wear resistance of the Fixture support parts at the Tooling Side.
Using exchangeable parts are suggested.
When there is no tool adapter in place, please do not inadvertently disconnected the robot adapter. When you detaching the OMEGA Ⅳ in the absence of a tool adapter in place, There is a risk of injury to workers not only peripheral.
If the Nitta Change System is applied for debarring or other machining, position the stand so that no cutting chips
and cutting oil are adhered to the tool adapter. If the stand position is exposed to adverse environment with spatters,
water drops and dust particles, install an automatic cover (Nitta Change Cover) or the like to protect the tool
adapter. Further, in oily atmosphere, ensure good conduction by, for example, air blow on the signal pin section. We offer standardized peripheral devices for the Nitta Change System such as fall prevention system. For details, please feel free to contact us.

- 32 -
6-5. Emergency 6-5-1. Manual Separation of OMEGA ⅣⅣⅣⅣ
OMEGA Ⅳ has holes on the Tooling Adaptor.
So that the cams will be manually turned off for separation.
① The falling preventions should be strong enough so that the Tooling will not fall.
(Example, suspending Tools by Rope)
The fall prevention should be enough strong so that tool will not fall. (For example, hang the gun by rope.)
② Confirm the air application on "UNCHUCK" port
③ Turn back the cams carefully (without any scratching on the cam's surface) with a screwdriver, etc.
When a cam is turned back, the gap between chucking surfaces of the OMEGA Ⅳ is produced and distortion
may occur. So, minimize the gap not to produce distortion during the separation.
Fig. 8 Manual separation 6-5-2. Collision or Interference Managements
When a robot or the jigs (gun, transformer, etc.) on the robot collides or interfere
with the Work, do the checks and the treatments as the following chart.
A collision applies excessive force which cause to deterioration of the durable years
on the NITTA CHANGE SYSTEM. Therefore, making an earlier periodic inspectio
n is suggested even though the any disorder is not found on the system.
3
1 2 3
FACE
UNCHUCK
CHUCK
Robot adaptor
Tooling adaptor Turn back the cams with
a screwdriver, etc.

- 33 -
Interference, collision treatment
Inspection points Method Disorder management
1 Crack Visually check Body replacement
2 Housing distortion Visually check Body replacement
3 Bolt looseness Check the part Tighten up
4 Cam chuck/unchuck movement
and signals
Manually turn ON/OFF the valve
with checking the signal and the
movement
Body replacement
5 Gap between chucking surfaces
Visually check the damages on
cam surface, lock pin, pivot pin,
and interface.
Replacing damaged parts
6 Jolt for rotating
Visually check the damage of
taper pin, bushing, the looseness
of bolt
Replacing damaged parts
7 Damage on electric signal pin,
connector and cable
Visually check
check signals on I/O plate
Body replacement or replacing
damaged parts
6-5-3. Water splashing treatment
Stop using tool changers, When pour water over them. The first of all, check the inside of them, any liquid sink in or not. If so, It'll cause an error of output signal. And if grease is washed away by any liquid, joint parts might be worn down faster than supported and then cause an error of coupling, sealing off. Please check and treat as indicated at No.3 chart when pour water over them.
Water splashing treatment
Inspection points Method Treatment
1 Electric points and proximity
switch signals
Check any short on I/O unit side. Visually check standing water Check the functions of "CHUCKING SENSOR" and "LED ASSY" and visual observate any liquid sink in or not.
Wipe off with cloth
2 Cam, lock-pin tapered pin Visually check Apply grease
3 O-Ring fitting part Visually check Apply grease
4 Other points covered with water Visually check with standing
water
Wipe and apply oil on naked
part of metal

Top Related