


Languages
Pages
Legal


C o m m u n i t y E x p e r i e n c e D i s t i l l e d
Move beyond basic games and explore the limits of AndEngine
Mastering AndEngine Game DevelopmentM
aya Posch
Mastering AndEngine Game Development
AndEngine is a popular and easy-to-use game framework, best suited for Android game development. After learning the basics of creating an Android game using AndEngine, it's time to move beyond them and explore further. This book provides all the skills and tools you need in order to learn more about Android game development using AndEngine.
You will learn how to use 3D models in a 2D scene, render a visual representation of a scene's objects, and create interactions between these objects. You will explore frame-based animations and learn to use skeletal animations.
As the book progresses, you will be guided through exploring all the relevant aspects of rendering graphics with OpenGL ES, generating audio using OpenSL ES and OpenAL, making the best use of Android's network API, implementing anti-aliasing algorithms, shaders, dynamic lighting and much more.
Who this book is written forThis book is aimed at developers who have gone through all the basic AndEngine tutorials and books, and are looking for something more. It's also very useful for developers with knowledge of other game engines who are looking to develop with AndEngine. Knowledge of Java, C++, and Android development are a prerequisite for getting the most out of this book.
$ 44.99 US£ 28.99 UK
Prices do not include local sales tax or VAT where applicable
Maya Posch
What you will learn from this book
Extend AndEngine to use and render 3D models
Integrate and use various physics engines with AndEngine
Learn about advanced animations and their implementation in AndEngine
Get to grips with lighting theory and its application for both 2D and 3D objects
Use skeletal animation with AndEngine
Use GLSL shaders with AndEngine for effects and anti-aliasing
Add sounds and effects to AndEngine using both basic and 3D audio libraries
Develop effi cient network implementations with AndEngine for multi-players
Mastering A
ndEngine Gam
e Developm
entP U B L I S H I N GP U B L I S H I N G
community experience dist i l led
Visit www.PacktPub.com for books, eBooks, code, downloads, and PacktLib.
Free Sample

In this package, you will find: The author biography
A preview chapter from the book, Chapter 1 'Setting Up the Project'
A synopsis of the book’s content
More information on Mastering AndEngine Game Development
About the Author
Maya Posch is a largely self-taught developer with a profound interest in anything related to technology and science. Having discovered programming at a young age, she proceeded to learn a variety of languages, including C++, PHP, Java, Ada, and VHDL. She has worked on mobile, desktop, and embedded applications and games. Together with a good friend, she started a software and game development company called Nyanko (http://www.nyanko.ws/) in 2006. Maya currently lives in Germany, where she works on games and other projects, and maintains a number of technology- and science-related blogs.

PrefaceBuilding a game for Android is easy, thanks to a multitude of game engines and tools that allow you to quickly get started. This is true for AndEngine as well. If you are reading this text, you have probably already tried your hand at, at least, a basic AndEngine game. After getting started like this, the next questions are: how to move from this game to those wonderful games you have seen elsewhere? How to make those cool animations, lighting, shadows, and other amazing effects? And how to get them with AndEngine?
This book takes you through the many advanced topics you may encounter while making the perfect Android-based game. After explaining the theory behind each technology, it proceeds to show you how to implement it in an AndEngine-based application.
What this book coversChapter 1, Setting Up the Project, runs through the basics of setting up an AndEngine-based application, as well as shows you how to confi gure your development environment.
Chapter 2, Replacing 2D Sprites with 3D Models, illustrates how you can use 3D-mesh-based models with AndEngine, adding further tools to your asset development process. This chapter also provides full sample code to demonstrate how to integrate 3D models into AndEngine's rendering process.
Chapter 3, Physics Engine Integration, demonstrates the use of the Box2D physics add-on for AndEngine and discusses 2D versus 3D physics as well as the use of other physics engines.
Chapter 4, Frame-based Animation Sequences, discusses the various ways of implementing animation using frame-based systems. These are demonstrated using AndEngine-based examples.

Preface
Chapter 5, Skeletal Animations, looks at the advanced topic of using skeleton-based animation in order to achieve highly refi ned animation without exceeding resource budgets.
Chapter 6, Creating 3D Effects in 2D, highlights the differences and similarities between 2D and 3D scenes, and tells you how to achieve 3D effects in a 2D scene.
Chapter 7, Static Lighting, shows the various techniques used to add lighting and shadows to a scene without making any dynamic calculations during runtime, as well as the limitations posed by this approach.
Chapter 8, Dynamic Lighting, balances the advantages of using dynamic lighting and shadows against the disadvantages of its runtime requirements.
Chapter 9, User Interfaces, takes a detailed look at the support available for user interfaces as they exist in AndEngine, as well as the use of native Android widgets in an AndEngine application, for example, for text input.
Chapter 10, Shading, Aliasing, and Resolutions, dives into the complex topic of programming GLSL shaders for OpenGL ES 2.0 and better graphics hardware. This chapter also shows you how to add anti-aliasing using this and other methods. Finally, it looks at how to handle the various resolutions of the Android device that the game will eventually run on.
Chapter 11, Adding Sounds and Effects, explores the topic of music and sound effects in a game, looking at native AndEngine APIs as well as the use of OpenSL ES and OpenAL.
Chapter 12, Building Worlds for Our Project, focuses on the broad topic of world-building, including how to construct and load/unload scenes and the management of resources. It also looks at transitioning between different scenes and the concepts of hierarchies and limitations within a scene.
Chapter 13, Networking and Latency, defi nes the multitude of choices out there for connecting Android devices with each other via a network as well as Bluetooth, and the implications this has on gameplay experiences. This chapter also looks at the MultiPlayer add-on for AndEngine.
Chapter 14, Adding Custom Functionality, fi nally looks at how you can expand on the lessons learned in this book through a number of techniques to extend AndEngine's functionality without modifying a single line of its code. It also looks at implementing plugin systems in both Java and native code.
[ 1 ]
Setting Up the ProjectBefore you learn the advanced techniques covered in this book, you fi rst need something to work with—a project that you can use as a foundation to implement every new piece of logic and algorithm. To this end, we will use this fi rst chapter to set up the basis for the AndEngine-based application that we will build throughout the following chapters. We will also cover the basics of Android development, in both Java code and native C/C++, and see how to run and debug the resulting applications.
In this chapter, we will cover these topics:
• Setting up a basic AndEngine project• Creating scenes• Running Android applications• Debugging
For this chapter, it is assumed that you have at least basic experience with developing Android applications. Experience with either Eclipse/ADT or Android Studio is useful, as is basic knowledge of coordinate systems and OpenGL.
Project requirementsTo quickly set up an AndEngine application, we follow the general procedure of pulling the current AndEngine code from the AndEngine GitHub repository and using it as a library project dependency in our project. We will be using the GLES2-AnchorCenter branch for our project because it's the most current development branch at the time of writing this book. An additional advantage of using the AnchorCenter branch is the main change from the GLES2 branch—it uses the same coordinate system as OpenGL, in the sense that the origin is in the bottom-left part of the screen. This will make our lives easier later on, as it will save us the trouble of having to convert between two different coordinate systems.

Setting Up the Project
[ 2 ]
Another difference between GLES2 and AnchorCenter is that the former positions new objects by default with the corner as the anchor point, while in the latter's case, the default anchor point is at the center of the object. We can change the anchor point wherever needed, of course, but it's good to be aware of this default behavior when we start positioning objects.
When setting up the new Android project, we target the latest available Android SDK version (4.4.2 at the time of writing this book) and use 2.2 as the minimum SDK version, since this is what GLES2 and the related AnchorCenter branch of AndEngine require. The project we are going to create is just a general, blank Android project without any associated themes or input methods. When presented with the choice to enable any of such options in Eclipse/ADT or another wizard, do not choose any of them. What we need is a blank slate, with only a basic Activity class as the starting point.
During the course of this book, we will use Eclipse/ADT as the development environment. In this IDE, we need to get the AndEngine project imported into the workspace so that in the properties of our new project, we can add it as an Android library dependency. Other development environments will have a similar setup, but we'll leave the details of these as an exercise for you.
Application basicsThe base for building an AndEngine application is the BaseGameActivity class, which we'll use instead of the standard Activity class. The former provides the base functionality, which we'll need in our application. There's also the SimpleBaseGameActivity class, which exists for compatibility with GLES1. Unlike GLES2's BaseGameActivity, it does not use callbacks—methods called by AndEngine that we defi ne ourselves—and uses a more basic setup and confi guration model. As we're not using GLES1, we are not interested in using this class.
The BaseGameActivity class has four functions that we override for our own functionality:
• onCreateEngineOptions()
• onCreateResources(OnCreateResourcesCallback, pOnCreateResourcesCallback)
• onCreateScene(OnCreateSceneCallback, pOnCreateSceneCallback)• onPopulateScene(Scene pScene, OnPopulateSceneCallback,
pOnPopulateSceneCallback)

Chapter 1
[ 3 ]
The advantage of the GLES2 base class is that through the calling of the callback in each overridden function, you can explicitly proceed to the next function in the list instead of implicitly having all of them called. Other than this, very little changes. In the onCreateEngineOptions() function, we still create a Camera object and assign it together with the parameters for the screen orientation and ratio to an EngineOptions object, which is returned. No callback is called here yet.
The remaining three functions respectively load the resources for the application, create the scene, and populate the said scene. A basic application skeleton thus looks like this:
public class MainActivity extends BaseGameActivity { private Scene mScene; private static final int mCameraHeight = 480; private static final int mCameraWidth = 800;
@Override public EngineOptions onCreateEngineOptions() { Camera mCamera = new Camera(0, 0, mCameraWidth, mCameraHeight); final EngineOptions engineOptions = new EngineOptions(true, ScreenOrientation.LANDSCAPE_FIXED, new RatioResolutionPolicy( mCameraWidth, mCameraHeight), mCamera); return engineOptions; }
@Override public void onCreateResources( OnCreateResourcesCallback pOnCreateResourcesCallback) throws IOException { // Load any resources here pOnCreateResourcesCallback.onCreateResourcesFinished(); }
@Override public void onCreateScene(OnCreateSceneCallback pOnCreateSceneCallback) throws IOException { mScene = new Scene(); pOnCreateSceneCallback.onCreateSceneFinished(mScene);}
@Override

Setting Up the Project
[ 4 ]
public void onPopulateScene(Scene pScene, OnPopulateSceneCallback pOnPopulateSceneCallback) throws IOException { // Populate the Scene here pOnPopulateSceneCallback.onPopulateSceneFinished(); }}
Creating the sceneTo fi nish this basic application, we will be implementing a simple scene that merely creates a single sprite. For this, we will use the Scene object created in the code shown earlier. This object forms the root of the scene tree to which all the objects, such as sprites in the scene, attach. Before we can create the sprite, we need to set up the bitmap logic to load and handle textures. As we know, a sprite is more or less just a bitmap image. To display it, we fi rst fetch the required image from the application's resources. Probably, you have already preloaded these in the onCreateResources() function, a procedure that, in general, is a very good idea for reducing load times later on in the application in order to prevent slowdowns.
An effi cient way of using textures with OpenGL ES is to have only a single texture loaded at any given time. Since any given scene is likely to have more than one texture, we have to merge our textures into a single large texture. Here, we have two options:
• Texture atlas• Texture packer
The texture atlas is the traditional approach, whereby you create a single, blank texture and place smaller textures on it. The texture atlas must have dimensions of powers of 2, and is limited in size by the memory buffer of the graphics processor of the device. Generally, sticking to an upper limit of 1,024 for either dimension is advisable.
Chapter 1
[ 5 ]
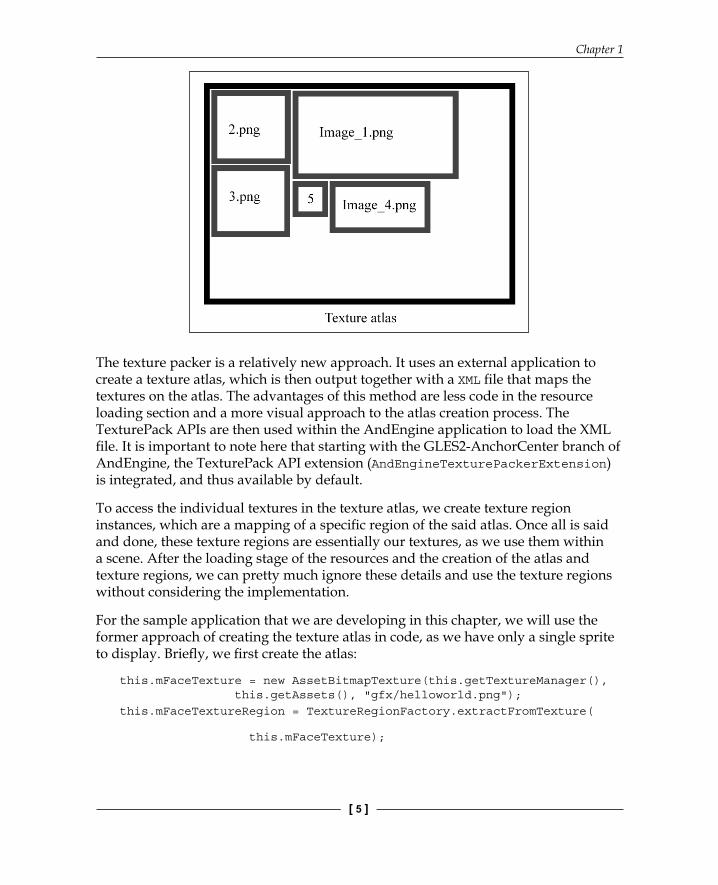
The texture packer is a relatively new approach. It uses an external application to create a texture atlas, which is then output together with a XML fi le that maps the textures on the atlas. The advantages of this method are less code in the resource loading section and a more visual approach to the atlas creation process. The TexturePack APIs are then used within the AndEngine application to load the XML fi le. It is important to note here that starting with the GLES2-AnchorCenter branch of AndEngine, the TexturePack API extension (AndEngineTexturePackerExtension) is integrated, and thus available by default.
To access the individual textures in the texture atlas, we create texture region instances, which are a mapping of a specifi c region of the said atlas. Once all is said and done, these texture regions are essentially our textures, as we use them within a scene. After the loading stage of the resources and the creation of the atlas and texture regions, we can pretty much ignore these details and use the texture regions without considering the implementation.
For the sample application that we are developing in this chapter, we will use the former approach of creating the texture atlas in code, as we have only a single sprite to display. Briefl y, we fi rst create the atlas:
this.mFaceTexture = new AssetBitmapTexture(this.getTextureManager(), this.getAssets(), "gfx/helloworld.png");this.mFaceTextureRegion = TextureRegionFactory.extractFromTexture(
this.mFaceTexture);

Setting Up the Project
[ 6 ]
This code loads a PNG fi le called helloworld.png from the assets folder of the Android application into a texture that we use as the texture atlas. Next, we create a texture region out of it, as we'll need this to actually reference the texture. Then we load the texture atlas into the memory buffer of the video processor:
this.mFaceTexture.load();
Leaving the onCreateResources() function, we move on to onPopulateScene(), in which we basically add sprites to the scene, one sprite in this particular case. After setting the background color of the Scene object to a nice shade of gray using the RGB values in fl oating-point format (three times 0.8f), we determine the center of the camera's view:
final float centerX = mCameraWidth / 2;final float centerY = mCameraHeight / 2;
Finally, we create the sprite using the texture region we created before, and add it to the scene:
final Sprite sprite = new Sprite(centerX, centerY, this.mFaceTextureRegion, this.getVertexBufferObjectManager());pScene.attachChild(sprite);
When we run the application, we see the following appear on the screen:
That's it! We're now ready to build and launch the application. You should look at the sample project (AndEngineOnTour) for this chapter and try to get it running. We will be building upon it in the coming chapters.

Chapter 1
[ 7 ]
Running Android applicationsWhen it comes to running Android applications, we get to choose between using a real device (phone or tablet) and an emulator Android Virtual Device (AVD) as the target. Both have their advantages and drawbacks. While Android devices offer the complete experience at full speed, their disadvantages include the following:
• Slower to start. Loading an application onto an AVD is generally faster, decreasing debugging times.
• Limited access, with the root account unavailable on Android devices unless you enable it in the fi rmware. Full access to the device's fi lesystem is disabled, including application data.
AVDs do not have these disadvantages, but they have the following limitations:
• They are slow: Even when using the Intel Atom images and having Intel's HAXM virtualization add-on installed, any device handily beats an AVD
• Lack of OpenGL ES support: While OpenGL ES support is experimentally being added, it's still unstable and, of course, so slow that it is unsuitable for any serious application
• Lack of microphone support: At the time of writing this book, it's not possible to use a system microphone with an AVD
• No motion sensors: We can only test portrait and landscape modes• No light sensor or LED:• No compass, GPS, and so on: These can be faked, however, by setting GPS
coordinates in the AVD
Beyond these differences, devices and AVDs are quite similar. Which one to use depends largely on your needs. However, any verifi cation and non-simple debugging should, as a rule of thumb, always be done on a device. While an AVD approaches the functionality of a real device, it is still so different and limited that its results should not be relied upon as real device behavior.
That said, both can be used in an identical fashion with ADB, or the Android Debug Bridge. ADB is a client-server program that consists of a server running on the Android device or AVD, and a client running on the system accessing it. The ADB client can either be run as a command-line tool or be used from within an IDE such as Eclipse for purposes such as uploading applications to the Android device or AVD, uploading and downloading fi les, and viewing system and application logs in real time.

Setting Up the Project
[ 8 ]
Especially the ability to view logs in real time for any running application is very helpful to us when we try to debug an application, as we can output any debug messages to the log.
DebuggingAs mentioned before, the easiest way to debug an Android application running on either a device or an AVD instance is to output debug messages to the log output (LogCat) so that they can be read via ADB. The API in Android for this purpose is the Log class. It uses various categories to distinguish between the importance of the messages, ranging from verbose to error.
For example, to output a debug string to LogCat, we use the following code in Java:
Log.d("AndEngineOnTour", "This is debug output.");
The fi rst part is the tag for the application or class that we output from, and the second part is the actual message. The tag is used in fi ltering to, for example, only see the output from our own application. We can also use a fi lter on the log category.
When writing native code in C/C++ using the Native Development Kit (NDK), we may also want to use LogCat. Here, we just have to include one header and use a slightly modifi ed function call, like this:
#include <android/log.h>__android_log_print(ANDROID_LOG_DEBUG, "AndEngineOnTour", "This is debug output");
Finally, we can use a debugger. For Java, this is easy, with IDEs such as Eclipse/ADT offering ready-to-use debugging functionality with full integration. This allows easy debugging, adding of breakpoints, and the like. For native code, this is slightly more complex, as we have to resort to using gdb.
The gdb tool is part of the GNU Compiler Collection (GCC), which also contains the compiler used to compile the native code for an Android application. In this case, we want to use its gdb debugger to attach to the native code process on the Android device or AVD so that we can set breakpoints and otherwise monitor the execution.
For gdb to be able to work with such a process, we need to compile the native code with debug symbols enabled, and modify the Android manifest. This involves the following steps:
• AndroidManifest.xml needs the android:debuggable="true" setting in the <application> tag

Chapter 1
[ 9 ]
• The Application.mk fi le needs APP_OPTIM := debug added• Finally, we use NDK_DEBUG=1 in the command that we use to build the native
code
The NDK contains a script called ndk-gdb that automates the process of setting up gdb, but the essence of what is involved is that we need to push the gdbserver instance onto the device or AVD that we intend to debug on, and connect to this server remotely with gdb. The details of this procedure are beyond the scope of this book, however.
Our goalsBy the end of this book, you will have gained the advanced skills needed to make the most complex AndEngine-based games. These skills will also be useful for other game engines, whether Android-based or not. We will have built a full game application that demonstrates the full possibilities of using AndEngine as the base platform.
These possibilities include advanced graphics options, multiplayer, 3D effects, scene transitions, and user interfaces. With the knowledge gained, you should be able to create your own games with ease, or cooperate with others to make even larger and more complex games.
SummaryIn this chapter, we went over the basics of Android development, as well as the setting up of a basic AndEngine application. We covered the debugging techniques for both Java-based and native code, and explored the advantages and disadvantages of hardware Android devices and emulated devices. Finally, we looked ahead to what our goals for the coming chapters are, including the development of an application that demonstrates the lessons of these chapters.
In the next chapter, we will build on this basic framework as we extend it to support three-dimensional objects (meshes) in our project.

Where to buy this book You can buy Mastering AndEngine Game Development from the
Packt Publishing website.
Alternatively, you can buy the book from Amazon, BN.com, Computer Manuals and most internet
book retailers.
Click here for ordering and shipping details.
www.PacktPub.com
Stay Connected:
Get more information Mastering AndEngine Game Development
Top Related