


Languages
Pages
Legal


MASK INTEGRITY TEST ACCESSORY (MITA)
MODEL 8120
OPERATOR’S MANUAL
P/N 6006153, REVISION G
AUGUST 2015
Model 8120 Mask Integrity Tester is patented under
U.S. Patents No. 8,312,761 and 8,621,914. Additional patents are pending.


MASK INTEGRITY TEST ACCESSORY (MITA)
MODEL 8120
OPERATOR’S MANUAL
P/N 6006153, REVISION G
AUGUST 2015
SHIP TO/MAIL TO:
TSI Incorporated
500 Cardigan Road
Shoreview, MN 55126-3996
USA
U.S.
Technical Support:
(800) 874-2811/(651) 490-2811
Fax:
(651) 490-3824
E-mail address:
Website:
http://www.tsi.com
INTERNATIONAL
Technical Support:
(001 651) 490-2811
Fax:
(001 651) 490-3824

ii Mask Integrity Test Accessory (MITA) Model 8120
Manual H is tory
The following is a history of the Model 8120 Mask Integrity Test Accessory
(MITA) Operator’s Manual.
Revision Date
A September 2012
B October 2012
C October 2012
D May 2013
E December 2013
F January 2014
G August 2015

iii
Warranty
Part Number 6006153 / Revision G / August 2015
Copyright ©TSI Incorporated / 2012-2015 / All rights reserved.
Address TSI Incorporated / 500 Cardigan Road / Shoreview, MN 55126 / USA
Fax No. 651-490-3824
E-mail Address [email protected]
Limitation of Warranty and Liability (effective February 2015)
(For country-specific terms and conditions outside of the USA, please visit www.tsi.com.)
Seller warrants the goods, excluding software, sold hereunder, under normal use and service as described in the operator's manual, to be free from defects in workmanship and material for twelve (12) months, or if less, the length of time specified in the operator's manual, from the date of shipment to the customer. This warranty period is inclusive of any statutory warranty. This limited warranty is subject to the following exclusions and exceptions:
a. Hot-wire or hot-film sensors used with research anemometers, and certain other components when indicated in specifications, are warranted for 90 days from the date of shipment;
b. Pumps are warranted for one year or 3000 hours; whichever comes first;
c. Parts repaired or replaced as a result of repair services are warranted to be free from defects in workmanship and material, under normal use, for 90 days from the date of shipment;
d. Seller does not provide any warranty on finished goods manufactured by others or on any fuses, batteries or other consumable materials. Only the original manufacturer's warranty applies;
e. This warranty does not cover calibration requirements, and seller warrants only that the instrument or product is properly calibrated at the time of its manufacture. Instruments returned for calibration are not covered by this warranty;
f. This warranty is VOID if the instrument is opened by anyone other than a factory authorized service center with the one exception where requirements set forth in the manual allow an operator to replace consumables or perform recommended cleaning;
g. This warranty is VOID if the product has been misused, neglected, subjected to accidental or intentional damage, or is not properly installed, maintained, or cleaned according to the requirements of the manual. Unless specifically authorized in a separate writing by Seller, Seller makes no warranty with respect to, and shall have no liability in connection with, goods which are incorporated into other products or equipment, or which are modified by any person other than Seller.
The foregoing is IN LIEU OF all other warranties and is subject to the LIMITATIONS stated herein. NO OTHER EXPRESS OR IMPLIED WARRANTY OF FITNESS FOR PARTICULAR PURPOSE OR MERCHANTABILITY IS MADE. WITH RESPECT TO SELLER’S BREACH OF THE IMPLIED WARRANTY AGAINST INFRINGEMENT, SAID WARRANTY IS LIMITED TO CLAIMS OF DIRECT INFRINGEMENT AND EXCLUDES CLAIMS OF CONTRIBUTORY OR INDUCED INFRINGEMENTS. BUYER’S EXCLUSIVE REMEDY SHALL BE THE RETURN OF THE PURCHASE PRICE DISCOUNTED FOR REASONABLE WEAR AND TEAR OR AT SELLER’S OPTION REPLACEMENT OF THE GOODS WITH NON-INFRINGING GOODS.
TO THE EXTENT PERMITTED BY LAW, THE EXCLUSIVE REMEDY OF THE USER OR BUYER, AND THE LIMIT OF SELLER'S LIABILITY FOR ANY AND ALL LOSSES, INJURIES, OR DAMAGES CONCERNING THE GOODS (INCLUDING CLAIMS BASED ON CONTRACT, NEGLIGENCE, TORT, STRICT LIABILITY OR OTHERWISE) SHALL BE THE RETURN OF GOODS TO SELLER AND THE REFUND OF THE PURCHASE PRICE, OR, AT THE OPTION OF SELLER, THE REPAIR OR REPLACEMENT OF THE GOODS. IN THE CASE OF SOFTWARE, SELLER WILL REPAIR OR REPLACE DEFECTIVE SOFTWARE OR IF UNABLE TO DO SO, WILL REFUND THE PURCHASE PRICE OF THE SOFTWARE. IN NO EVENT SHALL SELLER BE LIABLE FOR LOST PROFITS, BUSINESS INTERRUPTION, OR ANY SPECIAL, INDIRECT, CONSEQUENTIAL OR INCIDENTAL DAMAGES. SELLER SHALL NOT BE RESPONSIBLE FOR INSTALLATION, DISMANTLING OR REINSTALLATION COSTS OR CHARGES. No Action, regardless of form, may be brought against Seller more than 12 months after a cause of action has accrued. The goods returned under warranty to Seller's factory shall be at Buyer's risk of loss, and will be returned, if at all, at Seller's risk of loss.

iv Mask Integrity Test Accessory (MITA) Model 8120
Buyer and all users are deemed to have accepted this LIMITATION OF WARRANTY AND LIABILITY, which contains the complete and exclusive limited warranty of Seller. This LIMITATION OF WARRANTY AND LIABILITY may not be amended, modified or its terms waived, except by writing signed by an Officer of Seller.
W A R N I N G
This instrument contains (1) non-rechargeable Lithium battery which is not user serviceable. Return to factory for replacement.
Service Policy Knowing that inoperative or defective instruments are as detrimental to TSI as they are to our customers, our service policy is designed to give prompt attention to any problems. If any mal-function is discovered, please contact your nearest sales office or representative, or call TSI at 1-800-874-2811 (USA) or 651-490-2811.
Trademarks TSI, TSI logo, and PORTACOUNT are registered trademarks of TSI Incorporated. Microsoft, Windows XP and Windows 7 are registered trademarks of Microsoft Corporation. StarTech is a trademark of Star Technologies, Bowling Green, KY
Patents Model 8120 Mask Integrity Tester is patented under U.S. Patents No. 8,312,761 and 8,621,914. Additional patents are pending.

v
Safety and Precaut ions
This section provides instructions to ensure safe and proper handling of the
Mask Integrity Test Accessory (MITA).
Please read the entire operator’s manual before operating this equipment.
C A U T I O N
TWO PERSON LIFT RECOMMENDED
C A U T I O N
DO NOT ALLOW CONTAMINANTS TO FALL INTO ANY OF THE
HEADFORM BASE PORTS OR THE AEROSOL MIXER PORT
Do NOT remove or obstruct inlet located in the right hand side of the CEU. There are no user adjustments
necessary for this inlet.

vi Mask Integrity Test Accessory (MITA) Model 8120
(This page intentionally left blank)

vii
Contents
Manual History ............................................................................................ ii
Warranty ..................................................................................................... iii
Safety and Precautions .............................................................................. v
About This Manual .................................................................................... ix Purpose ................................................................................................. ix Organization .......................................................................................... ix Getting Help .......................................................................................... ix Submitting Comments ............................................................................ x
CHAPTER 1 Introduction and Overview ................................................ 1-1
CHAPTER 2 Unpacking and Parts Identification .................................. 2-1 Packing List ......................................................................................... 2-1
Standard Items MITA (Model 8120) ................................................ 2-1 MITA Mask Adapter Kits (not included with general MITA
accessories) ................................................................................. 2-6 Optional Accessories ....................................................................... 2-6 System Components ....................................................................... 2-7
Unpacking Instructions ........................................................................ 2-8 Power-Up Instructions ......................................................................... 2-8
CHAPTER 3 Getting to Know the MITA ................................................. 3-1 Softkey Buttons ................................................................................... 3-3 Set-Up Instructions ............................................................................. 3-5
Set Up Cables and Hoses ............................................................... 3-6 Set Up Aerosol Generator ............................................................... 3-9 Set up the PortaCount Respirator Fit Tester ................................. 3-11 Prepare Masks for Test ................................................................. 3-13
CHAPTER 4 Self Check Procedure ........................................................ 4-1 Starting a Self Check .......................................................................... 4-2 Alert Status Indicator ........................................................................... 4-4 Drink Tube Restriction Calibration ...................................................... 4-5 DP1 DP3 Compare ............................................................................. 4-5 DT Flow/Mask Flow Compare ............................................................. 4-7 Drink Tube Leak Zero Test ................................................................. 4-9 Exhalation Valve Leak Zero Test ........................................................ 4-9 Exhalation Valve Hose Blockage Test .............................................. 4-10 Bladder Leak Test ............................................................................. 4-10 Mask Protection Factor ..................................................................... 4-11
CHAPTER 5 Test Masks Procedure ....................................................... 5-1 Test Masks .......................................................................................... 5-2
Drink Tube Flow ............................................................................... 5-3 Drink Valve Seat .............................................................................. 5-4 Exhalation Valve Leak ..................................................................... 5-4 Mask Protection Factor Test ............................................................ 5-5
Find Mask Leak ................................................................................... 5-8

viii Mask Integrity Test Accessory (MITA) Model 8120
Data Logging .................................................................................... 5-10 View Mask Tests ........................................................................... 5-11 Download All Mask Tests .............................................................. 5-11 View Self Checks ........................................................................... 5-11 Download All Self Checks ............................................................. 5-12 Delete Data .................................................................................... 5-12
CHAPTER 6 User Adjustable Settings .................................................. 6-1 Settings Menu ..................................................................................... 6-1
Select Mask Protocol ....................................................................... 6-2 Define Mask Protocol ...................................................................... 6-3 Upload Mask Protocols.................................................................... 6-6 Aerosol Generator Settings ............................................................. 6-6 General Settings .............................................................................. 6-8 Protected Settings ........................................................................... 6-9
Tech Functions ................................................................................... 6-9 Calibration ..................................................................................... 6-11 Manual Controls ............................................................................ 6-11 View Measurements ...................................................................... 6-12 Self Check Parameters .................................................................. 6-12
CHAPTER 7 Maintenance ....................................................................... 7-1 Suggested Maintenance Schedule for Routine Maintenance
Operations ....................................................................................... 7-1 Consumable Parts .............................................................................. 7-2 Replacement Parts ............................................................................. 7-2
CHAPTER 8 MITA Communicator Software ......................................... 8-1 Introduction ......................................................................................... 8-1 Contents of MITA Communicator Software CD-ROM ........................ 8-1 Installation ........................................................................................... 8-2 MITA to PC Communications Configuration ....................................... 8-5
Setup ............................................................................................... 8-5 Software Operation ............................................................................. 8-8
Download Mask Test Data .............................................................. 8-9 Edit Mask Protocol ......................................................................... 8-10
CHAPTER 9 Packing and Shipping ....................................................... 9-1
CHAPTER 10 Troubleshooting ............................................................ 10-1 Technical Contacts ........................................................................... 10-4
APPENDIX A Specifications .................................................................. A-1
APPENDIX B How to Determine Mask DT Volume .............................. B-1
APPENDIX C StarTech™ FTDI Driver Installation ............................... C-1 Windows
® XP Operating System ....................................................... C-1
Windows® 7 Operating System .......................................................... C-3
Index
Reader’s Comments Sheet

ix
About This Manual
P u r p o s e This is an operation and service manual for the Model 8120 Mask Integrity
Test Accessory (MITA).
O r g a n i z a t i o n The following information is a guide to the organization of this manual.
Chapter 1 Introduction and Overview
Chapter 2 Unpacking and Parts Identification
Chapter 3 Getting to Know the MITA
Chapter 4 Self Check Procedure
Chapter 5 Test Masks Procedure
Chapter 6 User Adjustable Settings
Chapter 7 Maintenance
Chapter 8 MITA Communicator Software
Chapter 9 Packing and Shipping
Chapter 10 Troubleshooting
Appendix A Specifications
Appendix B How to Determine Mask DT Volume
G e t t i n g H e l p To obtain assistance with the Model 8120 Mask Integrity Test Accessory
(MITA), contact TSI Customer Service:
TSI Incorporated
500 Cardigan Road
Shoreview, MN 55126 USA
Fax: (651) 490-3824
Telephone: 1-800-874-2811 (USA) or (651) 490-2811
E-mail Address: [email protected]

x Mask Integrity Test Accessory (MITA) Model 8120
S u b m i t t i n g C o m m e n t s TSI values your comments and suggestions on this manual; please use the
comment sheet on the last page to send us your opinion on the manual’s
usability, to suggest specific improvements, or to report any technical
errors.
If the comment sheet has already been used, please mail your comments
on another sheet of paper to:
TSI Incorporated
Particle Instruments
500 Cardigan Road
Shoreview, MN 55126
Fax: (651) 490-3824
E-mail Address: [email protected]

1-1
C H A P T E R 1 In t roduct ion and Overv iew
The TSI Mask Integrity Test Accessory (MITA) works in tandem with the
PortaCount® Respirator Fit Tester to test for leaks or other defects in
CBRN gas masks and full-face respirators.
The MITA has been designed for ease-of-use and ease-of-transport. The
top half of the carrying case holds the instrument while the bottom half
forms the accessory compartment. The updated Headform design includes
an enhanced bladder seal system to provide a tight seal for most gas
masks and full face respirators of various types and sizes. Masks attach to
the Headform using their own head harness for better representative
results.
The PortaCount Fit Tester (sold separately) serves as a particle detector
for determining the overall integrity of the mask by performing an aerosol
leakage test with the MITA accessory. The mask is mounted on the
Headform and tested under conditions of high vacuum and high constant
flow. The integrated aerosol wand and generator is used to pinpoint source
of leaks so they can be assessed quickly. The operator uses the aerosol
wand to direct a stream of concentrated particles at specific locations
around the mask. When the particle stream is near the leak, PortaCount Fit
Tester detects the suddenly elevated particle concentration and alerts the
operator. The MITA also tests the integrity of the mask exhalation valve
and drink tube train (if applicable).
MITA is easy to use and requires minimum operator training. The display
on the MITA guides the first time operator through step-by-step prompts.
The display also provides detailed guidance to how to use the various
accessories. Experienced operators appreciate the streamlined menu
structure. The experienced operator is able to avoid detailed prompts and
move through the tests quickly. Experienced operators can test 12 or more
good masks per hour. Troubleshooting defective masks is quick and easy
using the aerosol wand to pinpoint leaks.
MITA Mask Adapter kits allow you to perform the mask test using a variety
of gas masks and full face respirators. MITA Mask Adapter kits for most
major brands of CBRN gas masks and full face respirator are available. A
complete list of MITA mask test adapter kits is posted on the TSI Web site
http://www.tsi.com.

1-2 Mask Integrity Test Accessory (MITA) Model 8120
The following acronyms are used in the MITA menu structure and in
this manual:
DT Drink Tube
EV Exhalation Valve
CEU Control Electronics Unit
DP1 Differential Pressure Transducer #1
DP3 Differential Pressure Transducer #3
DP5 Differential Pressure Transducer #5

2-1
C H A P T E R 2 Unpacking and Par ts Ident i f icat ion
Carefully unpack the Mask Integrity Test Accessory (MITA) from the
shipping container. Use the tables and illustrations below to make certain
that there are no missing components. Contact TSI immediately if anything
is missing or damaged.
P a c k i n g L i s t
Note
Mask testing adapters and accessories are sold separately. Refer to
www.tsi.com for more information on the available MITA Mask
Adapter kits.
Standard Items MITA (Model 8120)
Qty Description Part Number Item
1 Mask Integrity Test Accessory with General Accessories
8120
1 Operator’s Manual 6006153

2-2 Mask Integrity Test Accessory (MITA) Model 8120
Qty Description Part Number Item
1 Quick Start Guide 6006154
1 Self Check Components Reference Card
6006218
1 Hood 801773
1 Headform 801774
1 Headform Sample Fitting Refer to MITA Accessory Kit, P/N 801777 Replacement Parts
1 Headform Mask Sample Plug
Refer to MITA Accessory Kit, P/N 801777 Replacement Parts
1 40/74mm Mask Filter Plug
Refer to MITA Accessory Kit, P/N 801777 Replacement Parts

Unpacking and Parts Identification 2-3
Qty Description Part Number Item
1 Mixer Port Stopper
Refer to MITA Accessory Kit, P/N 801777 Replacement Parts
1 #3 Rubber Stopper
Refer to MITA Accessory Kit, P/N 801777 Replacement Parts
1 Mask Bypass Hose
Refer to MITA Accessory Kit, P/N 801777 Replacement Parts
1 Twin Tube with 1 inch relief cut on blue tube
Refer to MITA Accessory Kit, P/N 801777 Replacement Parts
1 DT Sample Hose
Refer to MITA Accessory Kit, P/N 801777 Replacement Parts
1 DT/EV Bypass Hose
Refer to MITA Accessory Kit, P/N 801777 Replacement Parts
1 Aerosol Generator 801771

2-4 Mask Integrity Test Accessory (MITA) Model 8120
Qty Description Part Number Item
1 Aerosol Generator Mounting Bracket
Refer Replacement Parts
2 Thumbscrew(s)
Refer Replacement Parts
1 Aerosol Mixer
Refer to MITA Accessory Kit, P/N 801777 Replacement Parts
1 Aerosol Wand 801770
2 HEPA Filter Cartridge (1 installed on Main Panel, 1 spare)
801772
1 Power Supply
(will include appropriate Line Cord based on destination)
801794
1 PortaCount Fit Tester Interface Cable (for Model 8030/8038 ONLY)
801766

Unpacking and Parts Identification 2-5
Qty Description Part Number Item
1 Isolated USB to Serial Converter Included with PortaCount Interface Cable kit, P/N 801766.
Refer to Note below for more details.
1 MITA Computer Cable 801793
1 Emery Oil™ Container – 500 ml
(Poly-Alpha Olefin)
801776
1 Software CD 7002343
Note
Instructions for installing the Isolated USB-to-Serial Converters Device
Drivers onto the PC can be found on the CD included in the packaging of
each USB-to-Serial Converter and can also be found in Appendix C,
StarTech FTDI Driver Installation. This USB-to-Serial converter is
commonly used for two separate functions:
1. MITA communications to a PortaCount Pro/Pro+ Models 8030
and 8038.
2. MITA communications to a PC which does not have a 9-pin (male)
COM Port installed.

2-6 Mask Integrity Test Accessory (MITA) Model 8120
MITA Mask Adapter Kits (not included with general MITA accessories)
Part Number Applicable Mask Models
8125-01 M40, FR-M40, M45, MCU2P, Millennium
8125-02 M50, C50
8125-03 M53, FM12
8125-04 C4
8125-05 MSA Ultra Elite (w/ 40mm Threaded, Slide- & Push-To-Connect, CBRN Versions); MSA Advantage 3000
8125-06 3M 6000 Series, 7000 Series, 7800S, 7800B CBRN Versions
8125-07 Scott AV2000, AV3000
8125-08 Draeger Panorama Nova; MSA Ultra Twin
8125-09 North series 5400 & 7600
8125-10 Honeywell (Sperian) Survivair Opti-fit
Optional Accessories
Description Part Number Item
PortaCount® Fit Tester Interface Cable (for Model 8020/8020M ONLY)
801767

Unpacking and Parts Identification 2-7
System Components
HEPA Filter
Cartridge
Pressure
Adjustment Valve
Aerosol Generator
Quick Connect Fitting
CEU (Control Electronics Unit)
Mixer
Port
Headform
Mounting Base
DT & EV Quick
Connect Fittings
Keypad
Buttons Display
Test Indicator
LEDs
Aerosol
Generator
Front View of MITA Lid/Main Panel
PortaCount Interface Cable
Connector (Yellow)
Computer Cable
Connector (Green)
Power SwitchPower Indicator
LED
Power Supply
Connector
Connector
Dust CapFuse
Back View of CEU and Main Panel

2-8 Mask Integrity Test Accessory (MITA) Model 8120
U n p a c k i n g I n s t r u c t i o n s 1. Open latches on case.
2. Separate the lid/main-panel from the case and place lid/main-panel on
work surface (see System Components and Standard Items sections to
identify accessories).
3. To remove and expand hood, unfold and pull the white tab outward.
4. Loosen wing-nut fasteners for accessories panel cover on the lower
half of the case and open panel.
5. Remove accessories from case.
6. Store lower half of case out of the way.
P o w e r - U p I n s t r u c t i o n s
Note
If there is an ambient change in temperature greater than 20°F (6.6°C)
from the MITA’s storage location to operating location, wait at least one
hour before operating to allow the internal temperature of the MITA to
equalize.
1. Connect Power Line Cord to Power Supply.

Unpacking and Parts Identification 2-9
2. Remove the Dust Cap and connect Power Supply to the 20 to 32 VDC
Connector.
3. Twist knurled locking ring clockwise until it stops.
4. Plug Power Line Cord to Power Source (100 to 240 VAC).
5. Turn Power Switch On.
6. Refer to Chapter 3, Getting to Know the MITA for information to
operate the MITA.

2-10 Mask Integrity Test Accessory (MITA) Model 8120
(This page intentionally left blank)

3-1
C H A P T E R 3 Get t ing to Know the MITA
The MITA is operated by selecting options from the displayed MENU using
the keypad on the Display Panel. The operator also needs to make
appropriate hardware configuration changes as prompted from the display
during the tests.
The objective of the selected option and instructions are described at the
bottom of each screen.
The row of six circles across the bottom of the display and four circles
across the side of the display are softkeys. The function of the softkeys,
where applicable, is displayed either immediately next to or above them. If
a key action is available, the key function is shown on the display inside a
rectangular box. Momentarily press the softkey button to select the
corresponding softkey option.
Menu
Softkey
Buttons
Screen
Title
Selected
Menu
Item
Objective
of the
Selected
Menu Item
and
Instructions
MITA Display Panel with Main Menu

3-2 Mask Integrity Test Accessory (MITA) Model 8120
When the instrument is turned on, the initial display screen will appear as
shown below:
Model 8120
Serial 8120xxxxxx
Rev x.x.xx
MITA Initial Display
Note
All the LED’s will turn on and then off when the Main Menu is first
displayed. If there are any Errors, the Alert LED will remain on, and the
Errors will be displayed along with suggestions for resolving them. Press
or ESC to continue. Refer to Chapter 10, Troubleshooting if any errors
are displayed and more assistance is needed.
After a few seconds the unit will display the MITA Main menu as shown
below:
MASK INTEGRITY TEST ACCESSORY (MITA)
Setup Instructions
Self Check
Test Masks
Find Mask Leak
Data Logging
Settings Menu
Tech Functions
Show instructions for setting up this equipment.Select using keys then press .
ESC
MITA Main Menu

Getting to Know the MITA 3-3
Information for each of the main menu options are described in the
following sections:
Setup Instructions
Self Check Procedure
Prepare Masks for Test
Find Mask Leak
Data Logging
Settings Menu
Tech Functions
Use the ▲▼ softkeys buttons to highlight the desired option, then press
the softkey button to select the highlighted option. ESC can be selected
to cancel an option or selection and return to the previous menu without
making or saving any changes.
S o f t k e y B u t t o n s
move to the line above
move to the line below
move curser to the left
move curser to the right
Enter
ESC Escape
SAVE & EXIT Save and Exit

3-4 Mask Integrity Test Accessory (MITA) Model 8120
The following acronyms are used in the MITA menu structure:
DT Drink Tube
EV Exhalation Valve
CEU Control Electronics Unit
DP1 Differential Pressure Transducer #1
DP3 Differential Pressure Transducer #3
DP5 Differential Pressure Transducer #5

Getting to Know the MITA 3-5
S e t - U p I n s t r u c t i o n s The Setup Instructions guide the operator through setting up of the
equipment and the steps needed to prepare the MITA for the Self Check
and Mask Testing.
MASK INTEGRITY TEST ACCESSORY (MITA)
Setup Instructions
Self Check
Test Masks
Find Mask Leak
Data Logging
Settings Menu
Tech Functions
Show instructions for setting up this equipment.Select using keys then press .
ESC
To continue with Setup Instructions, select Setup Instructions from the
main menu using the ▲▼ keys to and press . The following menu is
displayed:
SETUP INSTRUCTIONS
Set up Cables and Hoses
Set up Aerosol Generator
Set up the PortaCount
Prepare Masks for Test
Show instructions on how to connect the cables,
Hoses and the HEPA filter.Select using keys then press .
ESC
The Setup Instructions menu includes the following tasks:
Set up Cables and Hoses
Set up Aerosol Generator
Set up the PortaCount® Respirator Fit Tester
Prepare Masks for Test

3-6 Mask Integrity Test Accessory (MITA) Model 8120
It is recommended that a first-time-user goes through each of the tasks
found in the Setup Instructions menu. Each of these Setup tasks is
described below with illustrations.
When each task has been performed, press ESC to return to the Setup
Instructions menu and then select the next available task.
When the tasks for the Setup Instructions are complete, press ESC again
to return to the main menu, and refer to Chapter 4, Self Check Procedure
for information on the next steps to prepare for a mask test.
Set Up Cables and Hoses
1. Remove dust cap from the connector with yellow ring, located on the
back right of MITA CEU.
Note
MITA includes the interface cable needed for the 8030/8038 models of
the PortaCount Respirator Fit Tester. The 8020/8020M interface cable
(P/N 801767) is sold separately.
2. Plug the yellow-ringed PortaCount Fit Tester interface cable to the
connector mentioned previously in step 1.

Getting to Know the MITA 3-7
3. If applicable, plug the yellow Exhalation Valve (EV) Adapter sample
hose to the yellow EV connector.
Exhalation Valve (EV) Adapter
Sample Hose and connection
Note
The EV Adapters discussed in step 3 are provided in the MITA Mask
Adapter Kits and are specific to the make and model of the respirator
being tested. During the Self Check, be sure to use the appropriate EV
Adapter according to the respirator being tested.
Not all respirator models will require the use of an Exhalation Valve
Adapter, including most APR and SCBA respirators.
4. Plug the orange Drink Tube (DT) sample hose to the orange DT
connector.
Drink Tube (DT) Sample Hose
and connection

3-8 Mask Integrity Test Accessory (MITA) Model 8120
5. (If not already installed) Screw in the HEPA Filter cartridge.
6. Install the Headform to the Headform Mounting Base and push
down tight.
Not Fully Seated Fully Seated
Note
The ring along the base of the Headform will be below the top of the
mounting base collar when the Headform is fully seated.

Getting to Know the MITA 3-9
Set Up Aerosol Generator
1. Remove the Aerosol Generator reservoir and fill with Emery Oil. Emery
Oil should be within the indicated minimum and maximum lines on
the reservoir.
2. Reattach reservoir to Aerosol Generator assembly. Screw assembly
on tight, but do NOT over-tighten as this could cause the assembly to
leak particles.
3. Attach the Aerosol Generator Mounting Bracket to the MITA using the
Thumbscrews.

3-10 Mask Integrity Test Accessory (MITA) Model 8120
4. Slide the Aerosol Generator into the mounting bracket.
5. Remove the blue air supply hose from its storage location on the
Aerosol Generator and connect it to the blue Aerosol Generator quick
connect fitting located on the MITA main panel.
6. Install the Aerosol Mixer between the Aerosol Generator output and the
Aerosol Mixer Port.
Note
When storing the Aerosol Generator, it must be dry and empty of oil, and the air supply hose must be plugged into the aerosol generator output.

Getting to Know the MITA 3-11
Set up the PortaCount Respirator Fit Tester
Note
The following examples pictured will use the 8030 and 8038 models of
the PortaCount Respirator Fit Tester.
If you are using the 8030 or 8038 model of PortaCount Fit Tester you
must have version 2.6 or greater firmware installed to communicate with
the MITA.
1. Plug the yellow-ringed PortaCount Fit Tester interface cable into the
yellow connector at the back of the CEU if not already done.
2. Connect the USB-to-Serial Converter to DB9 connection of PortaCount
Fit Tester interface cable.
3. Plug the USB end of the USB-to-Serial Converter to either type A USB
port located on back of PortaCount unit.
4. Connect the power supply barrel connector from the PortaCount Fit
Tester interface cable to the power supply connection on the back of
PortaCount unit.

3-12 Mask Integrity Test Accessory (MITA) Model 8120
5. Connect the end of the Twin Tube provided with the MITA, which is
evenly cut to the color-coded fittings on the PortaCount Fit Tester.
6. Remove the Alcohol Cartridge from the Alcohol Fill Capsule and gently
shake it to allow excess alcohol to drip back into the Capsule. Refer to
the PortaCount User’s Manual for more information on how to properly
charge the alcohol cartridge prior to use.
7. Insert the Alcohol Cartridge into the cartridge cavity of the PortaCount
Respirator Fit Tester. It should slide in with little effort. DO NOT
FORCE IT. When almost fully inserted, firmly twist the Alcohol
Cartridge clockwise until it locks into position.

Getting to Know the MITA 3-13
8. Perform a PortaCount Daily Check every day before use, as described
in the PortaCount Fit Tester User’s Manual before using with MITA.
Note
If operating the model 8038 PortaCount Pro+ Respirator Fit Tester, do
NOT select the N95 checkbox when performing the Daily Checks.
9. At the other end of the Twin Tube sample tubing provided with the
MITA, the clear hose is approximately 1 inch longer than the blue hose.
AFTER performing a PortaCount Daily Check, connect the clear hose
to the mask sample port at the bottom of the Headform.
Clear Twin Tube sample
hose connected to Mask
Sample port
10. If using the 8030 or 8038 models of PortaCount Fit Tester, they must
remain on the “Activities” screen. Trying to use the 8030 or 8038 on
any other screen will cause intermittent “unexpected response” errors
on MITA.
Prepare Masks for Test
This menu option provides information on how to prepare the gas masks
and full-face respirators for testing. The Mask Test Protocol is selected and
defined in the Settings Menu.
Note
If you have not already performed a Self Check for the day, please
complete this process BEFORE testing a mask.
WAIT to install the Mask on the Headform until the Mask Protection
Factor test prompts to install it. The mask is installed ON the Headform
ONLY during the Mask Protection Factor test.
If the mask being tested has a Drink Tube or Exhalation Valve that will
be tested, leave the mask OFF the Headform. Both Drink Tube Test and
Exhalation Valve Test are done with the mask OFF the Headform.
1. Before starting, thoroughly inspect the mask to detect any obvious
defects.
2. If the inside of the mask is dirty or contaminated, it should be cleaned.

3-14 Mask Integrity Test Accessory (MITA) Model 8120
3. Remove the mask filter before conducting the Mask Protection Factor
test.
4. Install the appropriate Mask Filter Plug in place of the mask filter
removed in the previous step.
When installing the Mask to the Headform:
1. Loosen the mask straps completely so they will go around the back of
the Headform
2. Locate the chin cup of the mask on the chin portion of Headform first,
and pull the mask straps up and back over the Headform, making sure
to keep it snug to the Headform.
3. Make sure the Mask is centered on the Headform Bladder Seal.
4. Snug the straps tight.
5. Recheck to make sure the mask is centered from side to side.
Note
Typically masks seal better to the headform bladder when placed slightly
higher up on the headform, so that the upper sealing surface is less than
an inch below the top of the headform bladder. This is not applicable to
all models and sizes of masks, and experience will help to determine
which masks fit best which way. Try adjusting the mask higher or lower
on the headform first when experiencing difficulties passing a Protection
Factor test.

4-1
C H A P T E R 4 Se l f Check Procedure
This chapter describes the information for the Self Check option from the
main menu.
MASK INTEGRITY TEST ACCESSORY (MITA)
Setup Instructions
Self Check
Test Masks
Find Mask Leak
Data Logging
Settings Menu
Tech Functions
Perform a self-test on this equipment.Select using keys then press .
ESC
TSI recommends performing a Self Check each day before the MITA is
used. The purpose of the Self Check is to verify that the MITA is working
properly and that mask testing can be performed successfully. The user
will be prompted, by the MITA display, for the appropriate connections
and/or tasks during each of the Self Check tests.
Note
When the Bladder is being inflated the Aerosol Generator will also run,
and aerosol will exit from the Aerosol Mixer.
The results of each Self Check test will be logged. The last Self Check log
is then checked for a passing result for the 24 hours prior to running Test
Masks.
If there was a problem with the Self Check within the last 24 hours, or the
Self Check has not been tested within the last 24 hours, a message will be
displayed asking the user to run the Self Check or to skip the Self Check. If
the last Self Check passed and the instrument is power cycled within the
last 24 hours, repeating the Self Check is not prompted, however it may be
appropriate to run the Self Check again if the MITA is reset up or in a
different location.
Whether the individual tests performed during the Self Check are enabled
or disabled is determined by the Define Mask Protocol menu (Settings

4-2 Mask Integrity Test Accessory (MITA) Model 8120
Menu) and the Self Check Parameters menu (Tech Functions). For
example, the factory default Mask Test Protocol is “APR,” which has the
separate DT and EV tests disabled. Because these tests are disabled, the
Self Checks will not include additional DT and EV tests. When the “CBRN”
Mask Test Protocol is selected, the DT and EV tests are enabled. The Self
Checks will then include the DT and EV tests. In the Self Check
Parameters menu the “Skip Unused Self Check” must also be set to
Enabled.
The numerical value of the test is then compared to the desired pass/fail
range for each test, as set in the Self Check Parameters menu, to
determine the result of the test.
S t a r t i n g a S e l f C h e c k To start the Self Check option, select Self Check from the main menu and
press .
Self Check
DT Restriction Calibration
DP1 DP3 Compare
DT Flow / Mask Flow Compare
DT Leak Zero Test
EV Leak Zero Test
EV Hose Blockage Test
Bladder Leak Test
Protection Factor Test
DT Restriction Calib. Connect DT Adapter for
selected mask to end of DT Sample Hose.
Press to continue.
ESC
The Self Check starts by zeroing the pressure transducers, the screen
momentarily shows the zeroing pressure transducer, and then continues
with the following test sequence, with the tests that are enabled:
Drink Tube Restriction Calibration
DP1 DP3 Compare
DT Flow / Mask Flow Compare
DT Leak Zero Test
EV Leak Zero Test
EV Hose Blockage Test
Bladder Leak Test
Protection Factor Test

Self Check Procedure 4-3
The process for each of these tests is described in more detail later in this
section.
The display will indicate the status for each test as either:
Not Tested
Test Started
Test Disabled
Passed
Failed
Test Invalid
Not Tested Prior to a test being started, the status for each test will
be displayed as Not Tested.
Test Started When a test has started, the status is displayed as Test
Started.
Test Disabled If a Mask Protocol has a Test Disabled (Settings Menu |
Define Mask Protocol), and the Skip Unused Self Checks
(Tech Functions | Self Check Parameters) is Enabled, the
status will be displayed as Test Disabled.
Passed Upon completion of each test, if the test result is within
the desired range, the test status is displayed as Passed.
The Pass LED will turn on, the status of the test is logged
as Passed, and the next test in the Self Check sequence
will start.
Failed Upon completion of each test, if the test result is not
within the desired range, the Fail LED will turn on, and
the following options to select from are displayed:
Repeat This Test
Fail This Test
Stop Testing
Suggest Help (on some tests)
If the Repeat This Test option is selected the test is run
again. The option to restart a test can be selected for as
many times as the operator chooses to do so or until the
test result is Passed or the ESC, Skip This Test, Fail
This Test, or Stop Testing option is selected.
If the Fail This Test option is selected, the status for the
test is displayed as Failed, the status of the test is logged
as Failed, and the next test in the sequence will start.
If the Stop Testing option is selected the MITA will return
to the main menu.
If Suggest Help is selected more information will be
provided that may help to identify the cause of the failure.
The operator will be prompted to select an option and
press to continue.

4-4 Mask Integrity Test Accessory (MITA) Model 8120
Test Invalid If the Skip This Test option is selected, the test will be
bypassed and the status of the test result will be
displayed as Test Invalid, the status of the test is logged
as Test Invalid, and the next test in the sequence will
start.
Selecting ESC any time during the Self Check will display
the options Skip This Test, Restart this Test, or
Stop Self Check.
If the Stop Testing option is selected, the status of the
test is logged as “Test Invalid”, the remaining tests in the
Self Check that have not been tested are logged as Not
Tested. Any tests that were completed before “Stop Self
Check” was selected are logged by their status of the test
result. The display will return to the Main Menu.
When all enabled Self Check tests are finished, the result
of the Self Check tests is displayed.
If the results of the enabled tests are Passed, the Pass
LED will turn on.
If the results of one or more of the enabled tests are Test
Invalid, the Alert LED will turn on.
If the result of any enabled test is Failed, the Fail LED will
turn on.
A l e r t S t a t u s I n d i c a t o r If the result of a test is an Alert, the Alert LED will turn on and the following
options to select from are displayed:
Restart This Test
Skip This Test
Stop Testing
Fail This Test
On certain tests, when the result has an Alert status, there is information
displayed to recheck a connection or task that could cause a test to be
unable to complete.
The operator will be prompted to select an option and press to continue.
The following describes the process for each of the Self Check tests.

Self Check Procedure 4-5
D r i n k T u b e R e s t r i c t i o n C a l i b r a t i o n This test is to calibrate the restriction of the Drink Tube with the
DT Adapter.
1. Connect DT adapter to end of DT sample hose.
2. Press to continue.
The DT Sample Hose restriction is measured and the flow is set.
The result of the DT Restriction Calibration is displayed, the indicating
LED for the test result will turn on, the status of the test result is
logged, and the next test will start. (The DT adapter can be removed
after the DT Restriction Calibration test is complete.)
D P 1 D P 3 C o m p a r e This test is to compare the pressure transducers to each other.
1. Remove DT and EV sample hoses.
2. Install DT/EV Bypass Hose.

4-6 Mask Integrity Test Accessory (MITA) Model 8120
3. Press to continue.
The pressure is set to 6.00 in H2O (default) or whatever pressure has
been selected by the user in the Tech Functions | Self Check
Parameters menu.
Note
It is recommended that the pressure level remain at 6.00in H2O
during this Self Check test, so that the MITA is tested to the most
stringent standards during the Self Checks.
Depending on the make and model of the mask being tested, this
pressure value may need to be adjusted during the Test Mask
portion. The pressure setting for the Test Mask protocol does not
affect the pressure setting for the Self Check parameters.
The DP1 vs. DP3 pressure is checked.
The result of the DP1 DP3 Compare is displayed, the indicating LED
for the test result will turn on, the status of the test result is logged, and
the next test will start.
Note
If the pressure cannot be set, an alert status is displayed. Turn the
Pressure Adjustment Knob (P) until a pressure of 6.00 in. H2O (or
the value chosen in the Self Check Parameters menu) is displayed
on the lower portion of the MITA screen.

Self Check Procedure 4-7
D T F l o w / M a s k F l o w C o m p a r e This test is to compare the Drink Tube and Mask Flow to each other.
1. Unscrew HEPA Filter Cartridge and screw in the 40/74 mm Mask Filter
Plug in its place.
2. Press to continue
3. Remove the Aerosol Mixer and insert the Mixer Port Stopper into the
Aerosol Mixer Port.
4. Press to continue.
5. Plug the DT Sample Hose into the Mixer Port Stopper.
6. Press to continue.

4-8 Mask Integrity Test Accessory (MITA) Model 8120
7. Plug the lower mask inlet on the Headform with the #3 Rubber
Stopper. Press firmly.
8. Press to continue.
9. Remove the Twin Tube sample hose from Headform and install
Headform Mask Sample Plug.
10. Press to continue.
11. The flow is set. The DT flow and mask flow are then compared.
12. Remove the 40/74mm Mask Filter Plug and reinstall the HEPA Filter
Cartridge. Tighten it securely. Press to continue.
13. Remove all Stoppers installed previously and reinstall the Aerosol
Mixer. Press to continue.
14. Remove the Headform Mask Sample Plug and reinstall the Twin Tube
sample hose to Headform Mask Sample Port. Press to continue.
The result of DT Flow/Mask Flow Compare is displayed, the indicating
LED for the test result will turn on, the status of the test result is
logged, and the next test will start.

Self Check Procedure 4-9
D r i n k T u b e L e a k Z e r o T e s t 1. Plug the DT sample hose into the Headform Mask Sample Plug.
2. Press to continue.
The vacuum is set and the zero leak is checked.
The result of the DT Leak Zero Test is displayed, the indicating LED for
the test result will turn on, the status of the test result is logged, and the
next test will start.
E x h a l a t i o n V a l v e L e a k Z e r o T e s t 1. Attach the EV adapter to EV Self Check Zero Fixture.
Note
There are different types of EV Adapters. The EV Self Check Zero
Fixture is specific to the EV Adapter. The EV Self Check Zero Fixture is
provided, along with the EV Adapter, in the MITA Mask Adapter Kits.
Refer to instruction guide provided with MITA Mask Adapter Kits for
further detail on how to connect the EV and DT adapters.
2. Press to continue.
The pressure is set and the zero leak is tested.
The result of the EV Leak Zero Test is displayed, the indicating LED for
the test result will turn on, the status of the test result is logged, and the
next test will start.

4-10 Mask Integrity Test Accessory (MITA) Model 8120
E x h a l a t i o n V a l v e H o s e B l o c k a g e T e s t 1. Make sure the mask end of EV sample hose is not attached to
anything.
2. Press to continue.
3. The blower will start. MITA is now forcing air out through the EV
sample hose. The pressure across the EV sample hose must be less
than the pass/fail level.
4. The result of the EV Hose Blockage Test is displayed, the indicating
LED for the test result will turn on, the status of the test result is
logged, and the next test will start.
5. The DT sample hose and EV adapter can be removed from the self
check fixture after the DT and EV leak zero and leak span tests are
complete).
B l a d d e r L e a k T e s t 1. Make sure the Headform is installed.
2. Press to continue.
3. The Headform Bladder is inflated.
Note
When the Bladder is being inflated, the Aerosol Generator will also run,
and aerosol will exit from the Aerosol Mixer.
4. Bladder pressure is checked.
5. The result of the Bladder Leak Test is displayed, the indicating LED for
the test result will turn on, the status of the test result is logged, and the
next test will start.

Self Check Procedure 4-11
M a s k P r o t e c t i o n F a c t o r 1. Ensure the PortaCount Fit Tester is turned on.
2. Ensure the Twin Tube sampling hose, with a 1 inch relief cut on the
blue tube, is plugged into Headform base.
3. Plug Mask Bypass Hose into Headform.
4. Cover the Headform with the Hood.
5. Make sure to cover the Aerosol Mixer but not the HEPA filter cartridge.
6. When the PortaCount Fit Tester has finished warm up, and the
procedures discussed in Chapter 3, Set up the PortaCount Respirator
Fit Tester are complete, press .
7. The protection factor test runs.
8. The procedure for this test is similar to the procedure outlined under
Mask Protection Factor Test in the Test Masks section of this manual.
9. Remove the hood.

4-12 Mask Integrity Test Accessory (MITA) Model 8120
10. Remove the Mask Bypass Hose. Press to continue.
11. The status of the Mask Protection Factor test is displayed, the
indicating LED for the test result will turn on, and the status of the test
result is logged.
12. The Self Check tests are finished. The results are displayed and the
indicating LED for the tests results will turn on.
13. Press to continue (this will return to the main menu).
If the overall result of the Self Check is Passed, the unit is ready to
continue with Test Masks.
If there is a problem with any of the Self Check tests, identify and correct
the problem, then retest. In order for the entire Self Check to be considered
a Pass, all of the individual enabled Self Checks must pass without
escaping to the main menu during the Self Check process.

5-1
C H A P T E R 5 Test Masks Procedure
This section describes the information for the Test Masks option from the
main menu.
MASK INTEGRITY TEST ACCESSORY (MITA)
Setup Instructions
Self Check
Test Masks
Find Mask Leak
Data Logging
Settings Menu
Tech Functions
Start Mask Testing.Select using keys then press .
ESC
For more information on how to prepare the mask and install the mask on
the headform prior to test refer to Chapter 3, Prepare Masks for Test.
The mask protocol used for this testing is determined by the mask type.
The appropriate mask protocol is selected from Select Mask Protocol in
the Settings Menu.
The mask test sequence and parameters are set by the Define Mask
Protocol option in the Settings Menu. A password is required to access
the Define Mask Protocol settings.
If the mask tested does not have a drink tube valve or exhalation valve to
be tested then those tests can be disabled according to the Define Mask
Protocol settings.
Note
The EV Adapters and DT Adapters discussed in the following Test
Masks procedure are provided in the MITA Mask Adapter Kits and are
specific to the make and model of the respirator being tested.
Refer to instruction guide provided with MITA Mask Adapter Kit for
further detail on how to connect the EV and DT adapters.

5-2 Mask Integrity Test Accessory (MITA) Model 8120
T e s t M a s k s To select the Test Masks option, select Test Masks from the main menu
and press .
If the last Self Check test did not pass, or if the Self Check has not been
performed since the last power cycle, the message “There are problems
with today’s Self Check. Perform Self Check?” is displayed, select an
option to Start Self Check, or Skip Self Check and press .
Test Masks
Drink Tube Flow
Drink Valve Seat
Exhalation Valve Leak
Mask Protection Factor
Drink Tube Flow test.
The DT Sample Hose
must be recalibrated.Press to continue.
ESC
The following test sequence is an example of a typical test sequence for a
CBRN gas mask with a drink tube valve and exhalation valve to be tested,
this is the default protocol:
Drink Tube Flow
Drink Valve Seat
Exhalation Valve Leak
Mask Protection Factor
The status for each test will be displayed:
Test Started
Test Disabled
Passed
Failed
Not Tested
The following is an example of the Test Masks procedure using the default
protocol settings for a mask:

Test Masks Procedure 5-3
Drink Tube Flow
Not all masks require, or will be able, to have the DT Flow tested. This test
should only be performed on applicable masks with exhalation valves that
can, and ought to be, tested.
1. Plug DT Sample Hose to internal DT mouthpiece.
Example of DT Sample Hose installed on internal DT mouthpiece.
This configuration may vary depending on the mask being tested.
2. Connect DT adapter to external DT valve, press . Instructions
displaying where the DT Adapter is to be installed are included with
each MITA Mask Adapter Kit.
Example of DT Adapter installed on DT Valve. This configuration may
vary depending on the mask being tested.
The flow is set.
The result of the Drink Tube Flow test is displayed, the indicating LED
for the test result will turn on, the status of the test result is logged, and
the next test will start.

5-4 Mask Integrity Test Accessory (MITA) Model 8120
Drink Valve Seat
Not all masks require, or will be able, to have the DT Valve Seat tested.
This test should only be performed on applicable masks with exhalation
valves that can, and ought to be, tested.
1. Remove the DT adapter from external DT valve.
2. Keep DT sample hose connected to internal DT mouthpiece. Press .
The vacuum is set.
The result of the Drink Valve Seat test is displayed (the DT sample
hose can be removed after the Drink Valve Seat test is complete).
Exhalation Valve Leak
Not all masks require, or will be able, to have the exhalation valve tested.
This test should only be performed on applicable masks with exhalation
valves that can, and ought to be, tested.
Note
When operating the MITA in a low humidity environment is may be
necessary to wet the exhalation valve. The masks exhalation valve,
when donned by a person under normal operating conditions, would be
wetted automatically via the humidity from the person’s exhaled breath.
Wetting the exhalation valve, under low humidity conditions, will simulate
the same effect.
1. Connect EV adapter to mask Exhalation Valve. Instructions displaying
where the EV Adapter is to be installed are included with each MITA
Mask Adapter Kit.
Example of EV Adapter installed on mask exhalation valve.
This configuration may vary depending on the mask being tested.

Test Masks Procedure 5-5
2. Keep connected until mask test finished. Press .
The pressure is set.
The result of the Exhalation Valve Leak test is displayed, the indicating
LED for the test result will turn on, the status of the test result is
logged, and the next test will start.
Mask Protection Factor Test
1. Remove mask filter and install appropriate Mask Filter Plug.
Instructions displaying where the Mask Filter Plug and EV Adapter
(where applicable) are to be installed are included with each MITA
Mask Adapter Kit.
40/74 mm Mask
Filter Plug
EV Adapter
(if applicable)
Example of Mask Filter Plug and EV Adapter installed on mask.
This configuration may vary depending on the mask being tested.
2. If testing a CBRN mask using a typical CBRN Test Mask Protocol, then
ensure the EV adapter remains installed on mask during the Protection
Factor Test. The majority of commercial masks do NOT have an EV
adapter, and one is NOT used for the Protection Factor Test.
Press to continue.
3. Mount Mask to the Headform. Refer to Chapter 3, Prepare Masks for
Test for more information.
4. Cover the mask and Headform with the Hood.

5-6 Mask Integrity Test Accessory (MITA) Model 8120
Ensure Hood covers Aerosol
Mixer, and NOT HEPA Filter
Ensure hood covers end of
Ambient Sample Hose (blue)
5. Ensure the front of the hood covers end of ambient sample hose (blue)
and the back of the hood covers the Aerosol Mixer but not the HEPA
filter. Then press .
The Mask Protection Factor Test will run.
The Mask Protection Factor Test will go through the following steps:
Purging mask
Stabilizing hood particle concentration
Setting mask flow
Measuring ambient concentration
Waiting to sample mask
Sampling mask
Preparing to sample ambient
Measuring second ambient concentration
The result of the mask protection factor test is displayed
If the Mask Protection Factor Test result is Fail, the operator is prompted to
Repeat this Test, Probe for Mask Leak, Fail this Test, Test a Different
Mask, or Stop Testing.
The Tests are finished.

Test Masks Procedure 5-7
The Result for the Mask Test is displayed, the indicating LED for the test
result will turn on, the status of the test result is logged, and the next test
will start.
TEST MASKS: Mask A
Drink Tube Flow Passed
Drink Valve Seat Passed
Exhalation Valve Leak Passed
Mask Protection Factor Passed
Tests are finished.
Mark PASSED,Press to test a different mask.
ESC
Result for
Mask Test
The Mask can be removed.
To test a different mask, press .
The Test Masks sequence will repeat, or ESC can be selected to return to
the Main Menu.

5-8 Mask Integrity Test Accessory (MITA) Model 8120
F i n d M a s k L e a k This section describes the information for the Find Mask Leak option from
the main menu.
MASK INTEGRITY TEST ACCESSORY (MITA)
Setup Instructions
Self Check
Test Masks
Find Mask Leak
Data Logging
Settings Menu
Tech Functions
Probe the mask to find a leak.Select using keys then press .
ESC
This option is used to identify a leak in a mask. This can be used for
troubleshooting a mask that fails the Test Masks test.
Note
Attempt to re-seat the mask to the headform prior to using the Find Mask
Leak procedure. Allow the bladder to deflate before re-seating the mask.
Reference the instructions found in the Prepare Masks for Test section.
(continued on next page)

Test Masks Procedure 5-9
1. To begin the Find Mask Leak option, select Find Mask Leak from the
main menu and press .
2. Make sure the Aerosol Generator is installed.
3. Disconnect the Aerosol Mixer from the Aerosol Generator output if
attached.
4. Plug the Aerosol Wand into the Aerosol Generator output.
5. Press .
6. Ensure the PortaCount Fit Tester is turned on.
7. When the PortaCount Fit Tester finishes warm up, and the steps found
in the Setup the PortaCount® Respirator Fit Tester section have been
completed, press .
8. Using the aerosol wand, press the button in short bursts (about
1 second) to allow the aerosol to exit, while moving the wand around
the mask.
Press button in short bursts
(~1 second)

5-10 Mask Integrity Test Accessory (MITA) Model 8120
9. Monitor the concentration reading displayed on the MITA screen. As
the aerosol enters the leak in the mask, the concentration will
increase greatly.
10. Identify and resolve the leak.
Note: There may be more than one source for a leak.
11. When the concentration does not indicate any further leak, mask can
be retested using the Test Masks option.
12. Unplug the aerosol wand from the Aerosol Generator.
13. Reconnect the Aerosol Mixer tubing to the Aerosol Generator output.
14. Press to continue (this will return to the main menu display).
D a t a L o g g i n g This section describes the information for the Data Logging option from the
main menu.
Note
Data Logging is DISABLED by default. To enable Data Logging refer to
the Protected Settings menu.
MASK INTEGRITY TEST ACCESSORY (MITA)
Setup Instructions
Self Check
Test Masks
Find Mask Leak
Data Logging
Settings Menu
Tech Functions
Select the data logging functions.Select using keys then press .
ESC
To access the Data Logging option, select Data Logging from the main
menu and press .

Test Masks Procedure 5-11
DATA LOGGING
View Mask Tests
Download All Mask Tests
View Self Checks
Download All Self Checks
Delete Data
Press to continue.
ESC
Select one of the following options:
View Mask Tests
Download all Mask Tests
View Self Checks
Download All Self Checks
Delete Data
View Mask Tests
This option will display (up to) the last 100 mask tests. Press to select
this option.
The mask tests are saved in a numerical sequence with a time and date
stamp. The highest test number is the most recent Mask Test completed.
Use the ▲▼ keys to select the Mask Test to view and press .
Download All Mask Tests
This option will download all saved Test Masks records to a connected PC.
Refer to Chapter 8, MITA Communicator Software for more information.
View Self Checks
This option will display (up to) the last 100 self checks. Press to select
this option.
The results of each Self Check are saved in a numerical sequence with a
time and date stamp. The highest test number is the most recent Self
Check completed. Use the ▲▼ keys to select the Self Check to view and
press .

5-12 Mask Integrity Test Accessory (MITA) Model 8120
The result for each self check test for the Logged Self Check data will be
displayed. Press to view.
Download All Self Checks
This option will download all saved Self Check records to a connected PC.
Refer to Chapter 8, MITA Communicator Software for more information.
Delete Data
This option will allow access to delete Mask Tests and Self Checks logged
data. Press to select this option.
Select from the options the data to delete. There will be a prompt to
confirm the deletion before the changes are saved.

6-1
C H A P T E R 6 User Adjustable Set t ings
S e t t i n g s M e n u This section describes the information for the Settings Menu option from
the main menu.
MASK INTEGRITY TEST ACCESSORY (MITA)
Setup Instructions
Self Check
Test Masks
Find Mask Leak
Data Logging
Settings Menu
Tech Functions
Select test protocol and access user settings.Select using keys then press .
ESC
To enter the Settings Menu option, select Setting Menu from the main
menu and press .
When Settings Menu option is selected, following will appear on the
display screen.

6-2 Mask Integrity Test Accessory (MITA) Model 8120
SETTINGS MENU
Select Mask Protocol CBRN
Define Mask Protocol
Upload Mask Protocols
Aerosol Gen Settings
General Settings
Protected Settings
Change which protocol is used for mask test.
Select using keys then press .
ESC
As shown above, the Settings Menu gives the following options.
Select Mask Protocol
Define Mask Protocol
Upload Mask Protocols
Aerosol Generator Settings
General Settings
Protected Settings
Each option is described in the following sections.
Select Mask Protocol
Select Mask Protocol allows user to select a mask test protocol from the
available options. MITA offers two default protocols; title “CBRN” and
“APR”. Users may define and save more protocols under a user defined
name (See next section – Define Mask Protocol).
When the Select Mask Protocol option is highlighted and the key is
pressed, the available Mask Protocol options will be shown on the screen.
Any of the options can be highlighted using ▲▼ keys. When the desired
option is highlighted, press key. Changes Saved will appear
momentarily and screen will returned to the Settings Menu.
MITA also provides the user with some helpful shortcut options. For
example, in the Settings Menu, when Select Mask protocol is highlighted,
one of the available protocol options will be flashing at the right side of the
screen. The flashing options can be changed by the use of keys. Once
the desired protocol is flashing, it can be selected using key.
Changes Saved will appear momentarily and screen will return to the
Settings Menu.

User Adjustable Settings 6-3
Default Mask Protocol Settings
Mask Tests (Enabled/Disabled)
CBRN APR
Drink Tube Test Enabled Disabled
Exhalation Valve Test Enabled Disabled
Protection Factor Test Enabled Enabled
Protection Factor Test Settings
CBRN APR
Mask Vacuum 6 in. H2O 1 in. H2O
Plug Exhalation Valve Yes No
Protection Factor 32,000 3,200
The default Mask Protocol settings have been defined for general purpose
use by TSI. These test settings represent accepted industry standards but
are not specific to any regulations.
The default Protection Factor levels were calculated by taking the in-
mask flow rate of 16 L/min (during the Protection Factor Test) and dividing
this value by the acceptable mask leak rate.
For example, if a mask had an acceptable leak rate of 0.5 sccm, then
to calculate the Protection Factor needed take 16 L/min and divide by
0.5 sccm, which equals 32,000.
Define Mask Protocol
Select this option to change the test settings for a pre-defined Mask
Protocol or define a new mask test protocol mask protocol.
Refer to Chapter 8, MITA Communicator Software for more information on
how these protocols can be defined and saved using a PC.
The password required to access this option is “PROTO”. Enter the
password, and then press SAVE & EXIT.
The following options are available in the Define Mask Protocol menu.
For each option, MITA then either gives an Enable or Disable option or the
option of entering a number.
(Press to select the option, change the option or enter the value (if
required), and press to make the change):
Name Protocol (Select User Defined in Select Mask Protocol menu
before entering this menu)
○ Press , key pad shows up. Enter the Name for the Protocol using
key pad. Press SAVE & EXIT to save the new name.
Drink Tube (DT) Test (not applicable to all mask types)
○ Disable or Enable

6-4 Mask Integrity Test Accessory (MITA) Model 8120
Exhalation Valve (EV) Leak Test (not applicable to all mask types)
○ Disable or Enable
Protection Factor (PF) Test
○ Disable or Enable
Set DT Test Parameters.
○ DT Flow (enter value)
DT flow is controlled by this value during the DT flow test
○ DT Unplugged Restriction (enter value)
For DT restriction below this value, the DT is flagged as not
connected
○ DT Restriction (enter value)
For DT restriction above this value, the DT is flagged as blocked
○ DT Leak (enter value) (If DT leak measures above this value, the
DT fails the leak test). Leak rates values can be set as appropriate
for your mask. MITA allows a wide range of leak rates to
accommodate a variety of available masks.
○ DT Full Volume (enter value)
Volume of the drink tube from inside the mask up to the automatic
drink value
○ DT Volume to Valve (enter value)
Volume of the drink tube from inside the mask up to the manual
drink valve (if any)
○ DT Vacuum (enter value)
The DT leak test starts at this vacuum
Set EV Test Parameters.
○ Exhalation Valve Leak (enter value). Leak rates values can be set
as appropriate for your mask. MITA allows a wide range of leak
rates to accommodate a variety of available masks.
○ Exhalation Valve Test Press (enter value)
Set PF Test Parameters.
○ Bladder Pressure (enter value)
Range is 0.2 psi to 1.8 psi.
○ Mask Flow (enter value)
Range is 10 L/min to 25 L/min.
○ Mask Vacuum (enter value)
Range is 1.0 in. H2O to 6.0 in. H2O.
○ Mask Min. Purge Time (enter value)
Range is 5 Sec to 60 Sec.
○ Mask Max. Purge Time (enter value)
Range is 5 Sec to 60 Sec.
○ Mask Test Presample Time (enter value)
Range is 10 Sec to 180 Sec.
○ Mask Min Sample Time (enter value)
The mask sample time is shortened if particle concentration is
high, but the sample will be at least this many seconds
Range is 5 Sec to 120 Sec.

User Adjustable Settings 6-5
○ Mask Max Sample Time (enter value)
If the calculated mask sample time exceeds this many seconds, a
low particle concentration warning will be displayed
Range is 30 Sec to 600 Sec.
○ Protection Factor (enter value)
If the measured Protection Factor is less than this value, red fail
turns on. If the measured Protection Factor is higher than this
value, green pass light turns on.
Range is 1 to 999,000 (but could be limited by ambient
concentration)
○ Mask Sample CV (select 0.05 or 0.10)
Coefficient of Variation for the mask sample, Lower CV is more
accurate but at lower particle concentrations will lengthen mask
sample time
○ Plug Exhalation Valve (enter value)
Controls whether the Exhalation Valve (EV) must be plugged
during Protection Factor Test
No or Yes
○ Mask Sample Time Notes
This menu option provides information on how the Mask Sample
Time is calculated and describes the conditions that will effect this
value. For more detailed information on this calculation refer to the
text found under this menu option on the MITA unit.
The Mask Sample Time, is the time in which a sample is taken
from inside the mask during the Mask Protection Factor Test, the
length of time is calculated from:
The required mask protection factor. (PF)
Ambient aerosol concentration.
The required accuracy of the mask sample (CV).
Note
A higher PF setting may cause the Mask Sample Time to be
extended, and the overall test process may take longer.
A lower CV setting (more accuracy) may cause the test to be longer
A higher aerosol concentration allows the test to be shorter.
Manual Drink Tube valve
○ No or Yes (Yes if there is a manual valve on the drink tube
assembly)

6-6 Mask Integrity Test Accessory (MITA) Model 8120
Upload Mask Protocols
This function allows the user to upload a Test Mask Protocol, which was
created via the MITA menu interface, to a PC with the MITA Communicator
Software installed, where it can then be saved to the PC’s memory. Note,
this function does require the MITA to be connected to a PC.
Refer to Chapter 8, MITA Communicator Software for more information on
this function.
The password required to access this option is “MITACOM”. Enter the
password, and then press SAVE & EXIT.
Aerosol Generator Settings
Select this option to set the operating parameters of the Aerosol Generator.
The Aerosol Generator is used to generate aerosol during the Self Check,
Test Masks and Find Mask Leak procedures. The Aerosol Generator
Pump Voltage is the voltage setting of the pump that supplies compressed
air to the aerosol generator. Pump voltage directly relates to aerosol
concentration produced, and increase in voltage will increase the aerosol
concentration. This menu also allows the operator to set two different
Aerosol Generator Pump Voltage values:
1. Aero Gen Pump V: Purge
2. Aero Gen Pump V: Test
The purpose of these two voltage settings is to stabilize the aerosol
concentration during the Mask Test. It is very desirable that the aerosol
concentration measured at the beginning of the Protection Factor test and
at the end of the Protection Factor test are similar. This is achieved by
setting the “Aero Gen Pump V: Test” slightly (about 1.25 volts) lower than
the “Aero Gen Pump V: Purge” voltage.
The recommended ambient aerosol range during operation is
100,000 pt/cc to 300,000 pt/cc.
These voltage values may need to be adjusted depending on the ambient
temperatures, especially in colder environments. Use the real-time particle
concentrations displayed on the screen to determine which voltage settings
are best for each particular environment. While tuning the voltage settings,
target a concentration of 150,000 pt/cm3. An effective technique is to first
remove the hood from the headform and allow the concentration inside to
deplete. Make an incremental change to the pump voltage (~0.20 V) and
replace the hood. Allow the concentration inside the hood to stabilize for
one to two minutes afterwards. Repeat this process until the desired
concentration is reached.

User Adjustable Settings 6-7
Aero Gen Pump V: Purge
This is the voltage setting during the mask purge cycle. At the beginning of
each Test Mask function, the blower voltage is set to maximum voltage in
order to blow about 50 liters per minute of air though the mask. This is
called the mask purge cycle. The air from the mask is mixed with the
output of the Aerosol Generator and this mixture is supplied to the Hood.
Since the volume of the hood is about 10 liters, it takes about 12 seconds
to get one air exchange. For this reason, the aerosol concentration
continues to build up inside the hood. After about 30 seconds, the blower
voltage is set to the “sample mask” mode. In this mode, the blower is
supplying about 16 liters per minute of clean air to the mask, the voltage
setting for this mode is determined by the “Aero Gen Pump V: Test” value.
This air then exits the mask and mixes with the output of the aerosol
generator and enters the Hood.
Aero Gen Pump V: Test
This is the voltage setting during the mask sampling or “sample mask”
mode. Normally this will be about 1.25 volts lower than the “Aero Gen
Pump V: Purge”. The difference between two voltage settings can be
adjusted to assure similar aerosol concentration at the beginning and at the
end of the mask sampling. If the aerosol generator voltages were kept at
same value, the aerosol concentration inside the hood would continue to
build up during the mask test cycle. If this were to occur, the aerosol
concentration at the end of the mask test would be significantly higher than
at the beginning of the mask test. This is avoided by reducing the Aerosol
Generator Pump V slightly.
Note
Voltage levels may need to be adjusted to accommodate different
ambient and environmental conditions
(continued on next page)

6-8 Mask Integrity Test Accessory (MITA) Model 8120
General Settings
This option allows the operator to make changes to the General Settings.
The following General Settings are user adjustable (press to select the
setting, change the option or enter the value (if required), and press to
make the change.):
Beeper
○ Disable or Enable
Contrast
○ 1 through 10
Set Time (used to time stamp the logged data)
Set Date (used to time stamp the logged data)
Time Format
○ 12 hr option is AM or PM Format , 24 hr option is 00:00 to 23:59
Format
Date Format
○ Three options available - MM/DD/YY, DD/MM/YY or YY/MM/DD
Select Units
○ Temp. (°F or °C)
○ Pressure (in. H2O, Pa, hPa, kPa, mm. Hg, cm. Hg, in. Hg, mm.
H2O, or cm. H2O)
○ Baro Press (in. Hg, hPa, kPa, mm. Hg, cm. Hg, cm. H2O, or in.
H2O)
Number Format
○ Two options available – XX,XXX.YY or XX.XXX,YY
Show Protection Factor
○ Disable or Enable (Displays current setting, adjustable in Protected
Settings menu)
Allow Skip 2nd Ambient
○ Disable or Enable (Displays current setting, adjustable in Protected
Settings menu)
Logging Enable
○ Disable or Enable (Displays current setting, adjustable in Protected
Settings menu)
Logging Report Enable
○ Disable or Enable (Displays current setting, adjustable in Protected
Settings menu)
Data Report Length
○ Short or Long (Displays current setting, adjustable in Protected
Settings menu)

User Adjustable Settings 6-9
Protected Settings
This option will allow access to make changes to the Protected Settings.
The password required to access this option is “SHOWPF”. Enter
password and then press SAVE & EXIT.
The following Protected Settings are user adjustable (press to select the
setting, change the option or enter the value (if required), and press to
make the change.):
Show Protection Factor
○ Disable or Enable
Allow Skip 2nd Ambient
○ Disable or Enable
Logging Enable
○ Disable or Enable
Logging Report Enable
○ Disable or Enable
Data Report Length
○ Short or Long
T e c h F u n c t i o n s This section describes the information for the Tech Functions option from
the main menu.
MASK INTEGRITY TEST ACCESSORY (MITA)
Setup Instructions
Self Check
Test Masks
Find Mask Leak
Data Logging
Settings Menu
Tech Functions
Advanced functions to test and adjust the MITA.Select using keys then press .
ESC
The Tech Functions values are set by the manufacturer. The typical user
would not have need to access to the Tech Functions menu.

6-10 Mask Integrity Test Accessory (MITA) Model 8120
From the Main Menu select the Tech Functions option and press .
The password required to access this option is “TSI”. Enter the password
then press SAVE & EXIT.
The following Menu options are accessed in the Tech Functions menu.
Calibration
Manual Controls
View Measurements
Self Check Parameters
PF Array Test Print
PF Concentration Test Print
UART0 CTS enable
UART0 CTS state
UART0 baud rate
UART3 baud rate (UART3 is used to interface to a future accessory
device)
Pump Run Hours
Pump Hours Weighted
Reset Pump Run Hours
Blower Run Hours
Reset Blower Run Hours
Test LEDs
Restore Mask Protocols
Restore Self Check Parameters
Restore User Configuration
Set MITA Serial Number
The following describes the information for each of the Tech Functions
option.
To access a given option, select it with the ▲▼ keys, and press .
Most of the options are self-explanatory and are not described below. The
options that require more clarifications are described below.

User Adjustable Settings 6-11
Calibration
This menu is used to save the calibration values of the components used in
MITA. Select the calibration parameter to change with the ▲▼ keys,
change the value by pressing or using the keys, and press to
save change.
Set DT Leak Test Volume (enter value) liters
Set EV Leak Test Volume (enter value) liters
DT Flow Calibration Factor (enter value)
Mask Flow Calibration Factor (enter value)
Thermistor J201 Offset (enter value) °F
Thermistor J202 Offset (enter value) °F
Barometric Pressure Calib (enter value) in.Hg
Pressure Sensor DP1 Calib (enter value)
Pressure Sensor DP3 Calib (enter value)
Pressure Sensor DP5 Calib (enter value)
Manual Controls
This menu is used primarily to troubleshoot MITA. Each component of the
MITA can be independently exercised and the result observed.
Select the option to control:
Apply Manual Settings (press to Apply Manual Settings)
Zero Pressure Sensors (press to Zero the Pressure Transducers)
Turn Purge On (press to Turn Purge On)
Turn Purge Off (press to Turn Purge Off)
Bladder Inflate (press to Inflate the Bladder)
For the following options the operator must select Apply Manual Settings
and press to make the control change take effect. “Manual settings
have been applied” will display momentarily and then MITA will return to
the MANUAL CONTROLS menu.
Pump Mode (press to toggle between Off, Fixed V, DT Restriction,
DP1 vs. DP3, DT Flow Actual, DT Flow Std, DT Leak Ctrl, Bladder Infl,
or V Rising)
Pump Control Value (press to set value, This setting must be
entered if pump mode set to DT Flow Control, DT Leak Control, or
Bladder Inflation)
Pump Control Voltage (press to enter the pump control voltage)
Blower Mode (press to toggle between Off, Fixed V, Full On, Mask
Flow Ctrl, EV Press. Ctrl, and DP3 Ctrl)
Blower Control Value (press to set the Blower Control Value, this
setting must be entered based on the Blower Mode selected
previously)
Blower Voltage (press to enter voltage)
Valve 1 (press to toggle between Off and On)

6-12 Mask Integrity Test Accessory (MITA) Model 8120
Valve 2 (press to toggle between Off and On)
Valve 3 (press to toggle between Off and On)
Valve 4 (press to toggle between Off and On)
Valve 5 (press to toggle between Off and On)
Valve 6 (press to toggle between Off and On)
Valve 7 (press to toggle between Off and On)
Valve 8 (press to toggle between Off and On)
View Measurements
Select this option to view the current measurements of the instrument.
Self Check Parameters
This menu allows the operator to change the parameters used for pass/fail
values during the MITA Self Check function described in Chapter 4, Self
Check Procedure.
Adjust the following values using keys then press to save those
changes.
Skip Unused Self Checks (select Enabled or Disabled)
For skipping those Self Checks tests which are not utilized based on
the mask configuration, or the defined Test Masks protocol.
DT Sample Hose Max (enter value) in.H2O
For DT sample tube restriction above this value, the DT sample tube is
flagged as blocked
DT Sample Hose Min (enter value) in.H2O
For DT restriction below this value, the DT sample tube is flagged as
unplugged
DP1-DP3 Target Pressure (enter value) in.H2O
The pressure transducers will be compared at this pressure
DP1-DP3 Tolerance (enter value) %
To pass the self check, the pressure transducers must compare within
this tolerance
DT / Mask Target Flow (enter value) SLPM
The flowmeters will be compared at this flow)
DT / Mask Flow Tolerance (enter value) %
To pass the self check, the flowmeters must compare within this
tolerance
DT Flow Temp Coefficient
For information/troubleshooting purposes only.
Mask Flow Temp Coefficient
For information/troubleshooting purposes only.
DT Target Vacuum in.H2O
The DT leak test starts at this vacuum
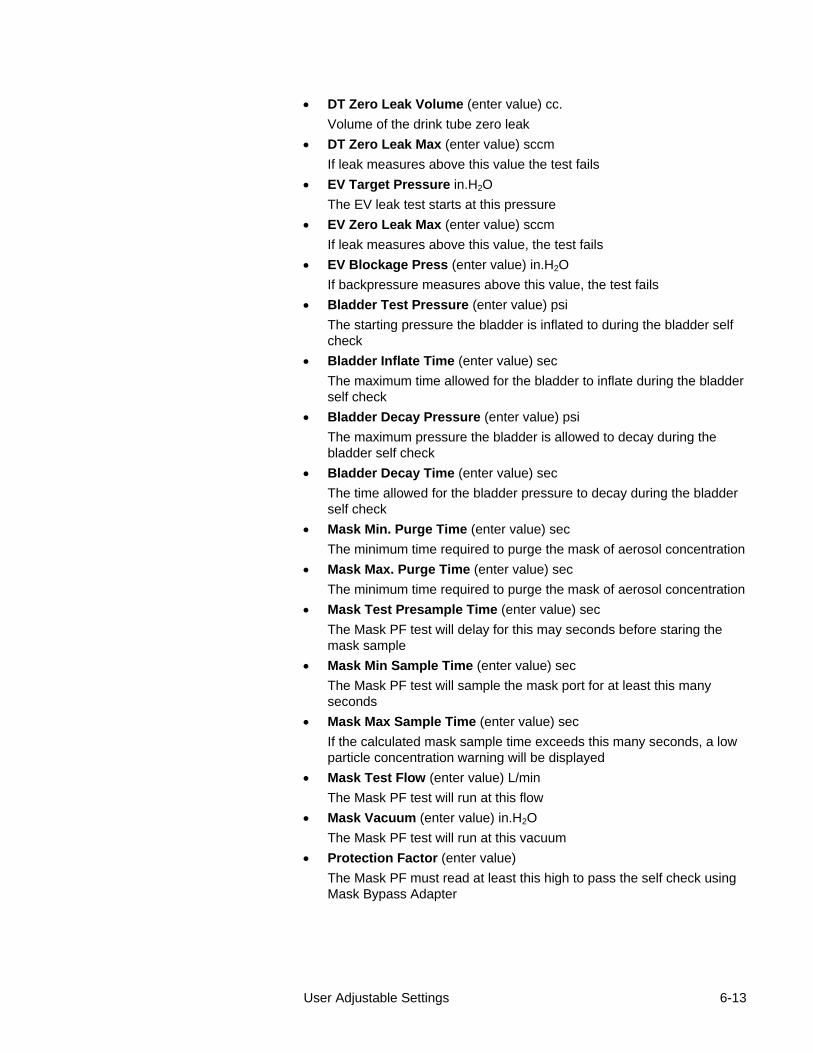
User Adjustable Settings 6-13
DT Zero Leak Volume (enter value) cc.
Volume of the drink tube zero leak
DT Zero Leak Max (enter value) sccm
If leak measures above this value the test fails
EV Target Pressure in.H2O
The EV leak test starts at this pressure
EV Zero Leak Max (enter value) sccm
If leak measures above this value, the test fails
EV Blockage Press (enter value) in.H2O
If backpressure measures above this value, the test fails
Bladder Test Pressure (enter value) psi
The starting pressure the bladder is inflated to during the bladder self
check
Bladder Inflate Time (enter value) sec
The maximum time allowed for the bladder to inflate during the bladder
self check
Bladder Decay Pressure (enter value) psi
The maximum pressure the bladder is allowed to decay during the
bladder self check
Bladder Decay Time (enter value) sec
The time allowed for the bladder pressure to decay during the bladder
self check
Mask Min. Purge Time (enter value) sec
The minimum time required to purge the mask of aerosol concentration
Mask Max. Purge Time (enter value) sec
The minimum time required to purge the mask of aerosol concentration
Mask Test Presample Time (enter value) sec
The Mask PF test will delay for this may seconds before staring the
mask sample
Mask Min Sample Time (enter value) sec
The Mask PF test will sample the mask port for at least this many
seconds
Mask Max Sample Time (enter value) sec
If the calculated mask sample time exceeds this many seconds, a low
particle concentration warning will be displayed
Mask Test Flow (enter value) L/min
The Mask PF test will run at this flow
Mask Vacuum (enter value) in.H2O
The Mask PF test will run at this vacuum
Protection Factor (enter value)
The Mask PF must read at least this high to pass the self check using
Mask Bypass Adapter

6-14 Mask Integrity Test Accessory (MITA) Model 8120
The Tech Functions that require less clarification are mentioned in the
table below.
Press Array Test
Press to enable a special test printout of leak test
pressures, transmitted through UART0.
PF Concentration
Test Print
Select whether to transmit ambient aerosol
concentration on UART0 during mask Protection
Factor test.
UART0 CTS enable Select Enable when using a COM port to interface
MITA to a computer. Select Disable when using the
USB-to-Serial converter.
UART0 CTS state Displays transmit state to PC on UART0.
UART0 Baud Rate Set the MITA baud rate and the computer baud rate to
match when using a COM port to interface MITA to a
computer. Also note on the computer, Flow Control
should be set to “Hardware”
UART3 Baud Rate (reserved for future use)
Pump Run Hours Counts total hours of pump operation
Pump Hours
Weighted
Counts hours of pump operation, weighted by the pump
operating voltage.
Reset Pump Run
Hours
Press to reset pump run hours
Blower Run Hours Counts total hours of blower operation
Reset Blower Run
Hours
Press to Reset the Blower Run Hours
Test LEDs Press to test the LEDs. The Name of the LED will be
displayed and its LED will light. After the LED is lit, it will
stay on until all the LEDs are tested.
Restore Mask
Protocols
Press to erase all changes made to mask test
protocols and restore mask test protocols to factory
defaults.
Restore Self Check
Parameters
Press to erase all changes made to self check
parameters and restore self check parameters to
factory defaults.
Restore User
Configuration
Press to erase all changes made to user
configuration and restore user configuration to factory
defaults.
Set MITA Serial
Number
Press to change the serial number displayed when
the MITA is first powered on.

7-1
C H A P T E R 7 Maintenance
S u g g e s t e d M a i n t e n a n c e S c h e d u l e f o r R o u t i n e M a i n t e n a n c e O p e r a t i o n s
Maintenance Operation Frequency User/Factory
Perform Self Check Daily User
Refill oil in Aerosol Generator Daily or As Needed User
Dump oil from Aerosol Mixer Daily User
Replace HEPA Filter Cartridge Annually or As Needed User
Clean Hood Monthly User
Wash Off Oil Residue As Needed User
Replace Headform Bladder As Needed User
Recalibrate MITA Unit Annually Factory
Clean PortaCount Ambient Sample
Port Inlet screen
Monthly User
Cleaning of the hood and washing off of the oil can be accomplished with
soapy water or other various non-corrosive commercially available cleaning
fluids. There are no specific recommended procedures.
Cleaning of the inlet screen is recommended to remove any accumulation
of oil. The steel screen assembly is located behind the Ambient (blue)
Sample port. Remove the Port by turning it counterclockwise. The screen
can be pulled out using the wooden dowel supplied with the spare screens
in the PortaCount Fit Tester accessory kit. Do NOT damage the gasket by
using sharp objects. Use clean compressed air to blow oil away from the
end of the screen. Replace the screen using the dowel. Make sure it is fully
inserted and replace the Ambient port, screwing clockwise until tight.

7-2 Mask Integrity Test Accessory (MITA) Model 8120
C o n s u m a b l e P a r t s
Description Part Number Item
Emery Oil™ Container – 500 ml
(Poly-Alpha Olefin)
801776
HEPA Filter Cartridge (1 installed on
Main Panel, 1 spare)
801772
R e p l a c e m e n t P a r t s
Description
Part
Number Item
Bladder Kit
(includes 1x Bladder, 2x
Face Sampling Gaskets, 3x
Headform base O-rings)
801769
Aerosol Generator Mounting
Bracket and Thumbscrews
(Qty 4)
801789
Headform Sample Fitting
Refer to MITA Accessory Kit,
P/N 801777 Replacement
Parts
Fuse - 250V, 8.0A
If the fuse (qty. 1 used)
needs to be replaced, first
identify the original fault,
before replacing.
Not
available
from TSI

Maintenance 7-3
Description
Part
Number Item
MITA Accessory Kit
(includes Headform Mask
Sample Plug, 40/74mm Mask
Filter Plug, #1 & #3 Rubber
Stoppers, Mask Bypass
Hose, MITA Twin Tube, DT
Sample Hose, DT/EV Bypass
Hose, and Aerosol Mixer.)
801777

7-4 Mask Integrity Test Accessory (MITA) Model 8120
(This page intentionally left blank)

8-1
C H A P T E R 8 MITA Communicator Software
I n t r o d u c t i o n The MITA Communicator software is designed to be used with the model
8120 Mask Integrity Test Accessory. MITA Communicator software
features include:
Ability to easily create and manage multiple mask protocols.
Uploading from the PC and/or downloading from the MITA user
created mask protocols.
Downloading saved Mask Test records and Self Check records from
MITA to the PC.
C o n t e n t s o f M I T A C o m m u n i c a t o r S o f t w a r e C D - R O M
MITA Communicator software installation files.
MITA Communicator software User’s Manual in PDF format.
Links to the TSI web site (http://www.tsi.com).

8-2 Mask Integrity Test Accessory (MITA) Model 8120
I n s t a l l a t i o n A personal computer running Windows® XP (32-bit), or Windows
® 7 (32-bit
and 64-bit) operating system is required to install the MITA Communicator
software. Only an Administrator can install the MITA Communicator
software.
1. Insert the CD-ROM “MITA Communicator Software CD” into a
CD-ROM drive.
Note
The CD should automatically start running after about 30 seconds. If it
does not, select My Computer and view the root folder on the CD.
Double-click the file “autorun.exe.”
2. The following screen will display:
® Windows is a registered trademark of Microsoft Corporation.

MITA Communicator Software 8-3
3. When the main installation screen appears, click on Install Software.
The following screen will display:
4. Either accept the default installation folder as displayed, or choose a
different preferred installation location. TSI recommends that you
accept the default location.
5. Select Next and the following screen will display:

8-4 Mask Integrity Test Accessory (MITA) Model 8120
6. Select I accept the terms of the License Agreement.
7. Select Next. A similar screen will appear with the TSI license
agreement, repeat this step. After both license agreements screens,
the following screen will display:
8. Select Next. The next screen will display the progress of the MITA
Communicator installation.
9. Once the installation is complete, the following will display:

MITA Communicator Software 8-5
10. Select Finish and the following screen will display:
11. Restart computer to finish installing MITA Communicator software.
M I T A t o P C C o m m u n i c a t i o n s C o n f i g u r a t i o n
Setup
1. Remove the dust cap on the Computer connector on the back of the
MITA. Install the green MITA computer cable.
2. Connect this cable to the 9-pin (male) COM (RS232) port on the
personal computer (PC). If the PC does not have a 9-pin serial
connector then use the USB to Serial converter to connect with a USB
port. Install the drivers for the converter following the instructions
located in Appendix C.
3. Turn the MITA on. Select and open the Tech Functions menu. The
password required to access this menu is “TSI”. Enter the password
then press SAVE & EXIT.
Configure Tech Functions menu as follows:
If USB to Serial converter is not used, set UART0 CTS Enable to
ENABLE.
If USB to Serial converter is used, set UART0 CTS Enable to
DISABLE.
4. Ensure the UART0 Baud Rate on the MITA Tech Functions screen
matches that shown in the MITA Communicator Software Setup tab.
The factory default for both settings is 115200. For slower PCs the
Baud rate may need to be lowered in both locations to ensure data
records are transmitted properly.
5. Determine the COM Port number assigned by the PC to the USB-to-
Serial connection. Locate Ports (COM & LPT) in Device Manager. To
access Device Manager for Windows® XP operating system, go to
Start menu and right-click on My Computer to access System
Properties. On the Hardware tab of the System Properties window
select Device Manager. To access Device Manager for Windows® 7
operating system, go to Start | Control Panel | Device Manager.

8-6 Mask Integrity Test Accessory (MITA) Model 8120
6. Right-click on the COM port associated with the USB-to-Serial
converter and make sure Flow Control is set to Hardware.
7. Locate the MITA icon on your Windows® desktop or select Programs
from the Start menu then go to MITA Communicator and select MITA. Informational window on MITA Communicator asks to select “UPLOAD MASK PROTOCOLS” screen on MITA and enter the password. The password for “UPLOAD MASK PROTOCOLS” screen on MITA is
“MITACOM”. Select OK to proceed.
8. Go to the Setup tab and verify the COM Port number.

MITA Communicator Software 8-7
9. Press the Check Communications with MITA button to initiate
communication. A green check should appear momentarily.
10. Exit MITA Tech Functions and proceed with the Settings Menu options
described in the Software Operation section.

8-8 Mask Integrity Test Accessory (MITA) Model 8120
S o f t w a r e O p e r a t i o n 1. Ensure MITA is turned on and connected to the PC.
2. To open the MITA Communicator software, locate the MITA icon on
your Windows® desktop or select Programs from the Start menu then
go to MITA Communicator and select MITA.
3. When MITA Communicator software starts it displays the following
informational window. Select OK to proceed.
4. Communication can be verified from the Software Setup tab. Press on
Check Communications with MITA and verify the green check mark
momentarily appears. If the green check mark never appears, make
sure the configuration steps outlined in the MITA to PC
Communications Configuration section are complete.
5. Proceed to use the MITA Communicator software functionality:
Download Mask Test data or Edit Mask Protocols. Note that the
software will report “Error in communicating with MITA” when MITA is
not on the expected screen and it will prompt for the correct screen.

MITA Communicator Software 8-9
Download Mask Test Data
The Download Mask Test Data tab in the MITA Communicator software
allows the user to download logged Test Mask data and logged Self Check
data from the MITA device.
Download All Tests
from MITA
Downloads all of the Mask Test and Self Check
data logged on the MITA device.
Save Mask Test
Data to File
Saves the Mask Test data and the Self Check
data to a “.TSV” (Tab Separated Values) file. This
file can then be imported into various
commercially available spreadsheet programs.

8-10 Mask Integrity Test Accessory (MITA) Model 8120
Edit Mask Protocol
The Edit Mask Protocol tab in the MITA Communicator software allows the
user to create new, and edit existing, Test Mask protocols. These user
defined protocols can then be uploaded to, or downloaded from, the MITA
device. The Edit Mask Protocol screen will be blank when first opening this
tab in MITA Communicator, or after pressing the New Mask Protocol
button.
Note: These options are password protected on MITA, refer to Chapter 6:
User Adjustable Settings for passwords and additional information.
Select Mask
Protocol Name
Select previously saved Test Mask protocols from
the drop down menu.
New Mask Protocol Clears all Test Mask protocol fields so that a new
protocol can be created.
Download Mask
Protocol from MITA
Downloads current Test Mask protocols saved on
the MITA device to the MITA Communicator
software.
Upload Mask
Protocol to MITA
Uploads current Test Mask protocols from the
MITA Communicator software to the MITA device.
Read Mask Protocol
from Disk
Populates the Test Mask protocol fields with test
parameters from protocols saved on the PC.
Save Selected Mask
Protocol to Disk
Saves selected Test Mask protocol to the PC
under the “Mask Protocol” folder (by default).
When a Test Mask protocol is saved to disk, it is
saved under the same name as “Mask Protocol
Name” given in the Setting column of the Mask
Protocol Name row.
All parameters in the Edit Mask Protocol tab can
be edited. In order to save a Test Mask protocol to
disk under a new name, edit the Mask Protocol
Name field in the Setting column and then press
the Save Selected Mask Protocol to Disk
button.

9-1
C H A P T E R 9 Packing and Shipping
1. Remove the Hood.
2. Wipe off any oil residue from the Hood.
3. Collapse the Hood.
4. Disconnect the Twin Tube sample hose from the Headform.
5. Disconnect the power and communication cables to the PortaCount Fit
Tester.
6. Remove the Headform.
7. Disconnect the Aerosol Generator (when storing, the aerosol generator
must be stored dry and empty, so the oil doesn’t leak into the MITA.
The oil from the Aerosol Generator can be returned to the Emery Oil
Container).
8. Disconnect the DT sample hose.
9. Disconnect the EV Adapter.
10. Disconnect the PortaCount Fit Tester cable.
11. Disconnect the power supply.
12. Disconnect the power cable.
13. Return the components back to the accessory kit, or case (hood is
stored on top of the closed cover panel in the lower case).
14. Secure the fasteners for the cover panel in the lower half of the case.
15. Place the hood
on the cover
panel in the
lower case.
16. Re-install the
dust caps for
the connectors
on the back of
the MITA CEU.
17. Place the base
unit of the
MITA onto the
lower part of
the case and secure the latches. Make sure the CEU is opposite the
hood when stored.
18. Store the PortaCount Fit Tester as instructed by the PortaCount Fit
Tester manual.

9-2 Mask Integrity Test Accessory (MITA) Model 8120
(This page intentionally left blank)

10-1
C H A P T E R 1 0 Troubleshoot ing
Most error messages displayed on the MITA include a description of the
error and on screen hints for helping to resolve it. This section provides
additional troubleshooting information related to the following issues:
Problem Possible Cause Action
Does not power on AC Adapter not plugged into unit or AC outlet. Connect AC Adapter.
Headform Bladder does not inflate or reach pressure
Bladder has leak.
Bladder has pulled away from Headform.
Headform not fully seated.
Replace Bladder.
Reseat Bladder.
Make sure Headform is fully seated.
Low Aerosol Concentration (less than 25,000 pt/cc)
Refer to the PortaCount User’s Manual for troubleshooting the Low Particle message. Possible PortaCount Fit Tester related issues include:
Low on alcohol. Replenish alcohol.
Hoses are reversed on Twin Tube Assembly.
Verify the hoses are connected properly to the PortaCount Fit Tester.
Twin Tube Assembly is kinked, pinched, or blocked.
Straighten out the Twin Tube Assembly or remove the obstruction.
Moisture build-up inside the Twin Tube sample tubing.
Change Alcohol Wick inside the Alcohol Cartridge. Dump old alcohol from the Alcohol Fill Capsule and add fresh alcohol. Run 2 hours to dry optics (remove the alcohol cartridge and install storage cap).
Inferior or contaminated alcohol. Change Alcohol Wick inside the Alcohol Cartridge. Use only approved alcohol (99.5 % or better isopropyl).
Plugged internal nozzle. See Nozzle Cleaning in Service and Maintenance chapter of the PortaCount Fit Tester Operators Manual.
Incorrect (blue/clear) Twin Tube sample tubing being used.
Ensure that the MITA supplied blue/clear tubing is used, NOT the blue/clear tubing supplied by the PortaCount Fit Tester. The opening for the blue (Ambient Sample) tubing must be located within the Hood during the Protection Factor Test.
MITA Pump Voltage too low. Increase pump voltage. Refer to Aerosol Generator Settings found under the Settings menu.

10-2 Mask Integrity Test Accessory (MITA) Model 8120
Problem Possible Cause Action
Low Aerosol Concentration (less than 25,000 pt/cc) – continued
Restriction in Orifice of Aerosol Generator. Clean or Replace orifice in Aerosol Generator. Isopropyl Alcohol can be utilized as a cleaning agent.
Clogged Aerosol Mixer. Clean the Aerosol Mixer.
Aerosol Generator Inline Coarse Filter Plugged.
Clean or Replace the Aerosol Generator inline coarse filter (p/n 1602088).
There was an ambient change in temperature greater than 20°F (6.6°C) from the MITA’s storage location to operating location.
Wait at least one hour before operating to allow the internal temperature of the MITA to equalize.
High Aerosol Concentration (more than 500,000 pt/cc)
Pump Voltage too high. Decrease pump voltage. Refer to Aerosol Generator Settings found under the Settings menu.
“Unexpected Response” or “Portacount did not respond” displayed on screen
PortaCount Pro/Pro+ is not on the “Activities” tab/screen.
PortaCount® fit tester Interface Cable or the USB-to-Serial adapter is disconnected.
Touch the “Activities” tab on the PortaCount Pro/Pro+ touch screen and retry.
Check the communication cables and retry.
Note: On the Model 8030 or 8038 this may require a 7-second delay while the PortaCount Fit Tester reinitializes the USB cable.
Alert LED is illuminated Skipped Self Check. Rerun a Self Check.
Skipped Tests. Run all tests (if applicable) or adjust Self
Check parameters so Skip Unusued Self Check is disabled.
Self Check Params were changed but a new Self Check with a Pass result was not performed.
Rerun a Self Check.
Self Check Fail, LED during Mask Test only. Rerun a Self Check.
There was an ambient change in temperature greater than 20°F (6.6°C) from MITA’s storage location to operating location
Wait at least one hour before operating to allow the internal temperature of the MITA to equalize.
EV Leak Zero Test failure Leak in the Exhalation Valve Adapter
Disconnect the EV Adapter (yellow connection) from the MITA. Rerun the EV Leak Zero Test.
A passed test at this point signifies a potential leak in the EV Adapter. Replace the EV Adapter.
A failure, with the EV Adapter removed, could signify an internal issue with the MITA.
O-ring on EV Adapter has dried out. Apply a small amount of O-ring grease or moisture to the O-ring on the EV Adapter.

Troubleshooting 10-3
Problem Possible Cause Action
DT Leak Zero Test failure Leak in the Drink Tube Adapter Hose Disconnect the DT Adapter Hose (orange connection) from the MITA. Rerun the DT Leak Zero Test.
A passed test at this point signifies a potential leak in the DT Adapter Hose. Replace the DT Adapter Hose.
A failure, with the DT Adapter Hose removed, could signify an internal issue with the MITA.
DT Flow Test failure DT flow calibration was skipped during Self Checks or a different adapter was used.
Recalibrate DT flow by running the Self Checks.
Protection Factor Test failure or Excessive Leak.
Dry Exhalation Valve.
Mask not properly fitted to Headform or a fold in the bladder.
Wet the sealing surface of the Exhalation Valve. This better replicates real-life operations.
Refit mask to Headform. Allow bladder to deflate before refitting.
Use Aerosol Wand to locate leak, refer to Find Mask Leak section.
Try different bladder pressures.
1” H2O cannot be achieved when adjusting the ∆P valve.
Pressure drop in the flow path has increased.
Mask not properly fitted to Headform or a fold in the bladder.
Replace the HEPA filter.
Remove the headform and observe the three exposed ports. One has a screen. If particulate matter has built up on the screen, remove contaminants with a lint free swab.
Refit mask to Headform. Allow bladder to deflate before refitting.
Use Aerosol Wand to locate leak, refer to Find Mask Leak section.
Try different bladder pressures.
Lost data records during download from MITA to computer
Lower baud rate setting on MITA and computer. Refer to MITA-to-PC Communications Configuration.

10-4 Mask Integrity Test Accessory (MITA) Model 8120
T e c h n i c a l C o n t a c t s If you have any difficulty installing the Model 8120, or if you have
technical or application questions about this instrument, contact an
applications engineer at TSI Incorporated, 1-800-874-2811 (USA) or
(651) 490-2811 or e-mail [email protected].
If the Model 8120 does not operate properly, or if you are returning the
instrument for service, visit our website at http://rma.tsi.com, or contact
TSI Customer Service:
TSI Incorporated
500 Cardigan Road
Shoreview, MN 55126 USA
Phone: +1-800-874-2811 (USA) or +1 (651) 490-2811
E-mail: [email protected]
TSI GmbH Neuköllner Strasse 4 52068 Aachen GERMANY
Telephone: +49 241-52303-0 Fax: +49 241-52303-49 E-mail: [email protected] Web: www.tsiinc.de
TSI Instruments Ltd. Stirling Road Cressex Business Park High Wycombe, Bucks HP12 3ST UNITED KINGDOM
Telephone: +44 (0) 149 4 459200 Fax: +44 (0) 149 4 459700 E-mail: [email protected] Web: www.tsiinc.co.uk

A-1
A P P E N D I X A Speci f icat ions
Table A-1 contains the operating specifications for the Model 8120 Mask
Integrity Accessory (MITA). These specifications are subject to change
without notice.
Overall Mask Integrity Test
Technique ........................................
Aerosol Detector ..............................
Protection Factor Range ..................
Mask Flow Rate ...............................
Test Pressure ..................................
Aerosol leak test on headform
PortaCount Respirator Fit Tester
models; 8020, 8020M, 8030 or 8038
(sold separately)
1 to 999,000
Adjustable, 10 to 25 L/min
Adjustable, -1 to -6 in. H2O
Exhalation Valve Test
Technique ........................................
Pass/Fail Criterion ...........................
Test Pressure ..................................
Pressure decay
Adjustable, 5 to 50 cm3/min
Adjustable, 0.5 to 1.5 in. H2O
Drink Tube Leak Test
Technique ........................................
Pass/Fail Criterion ...........................
Test Pressure ..................................
Pressure decay
Adjustable, 0.2 to 1 cm3/min
Adjustable, 4 to 6 in. H2O
Drink Tube Flow Test
Technique ........................................
Pass/Fail Criterion ...........................
Test Flow Rate ................................
Pressure drop at known flow rate
Adjustable, 0.5 to 3 in. H2O
Adjustable, 1.5 to 2.5 L/min
Leak Location Detection
Technique ........................................
Aerosol .............................................
Aerosol Detector ..............................
Aerosol generation with aerosol
wand and particle counter
Emery Oil (PAO)
PortaCount Respirator Fit Tester
models; 8020, 8020M, 8030 and
8038 (sold separately)
Operating/Storage Conditions
Operating Temperature ...................
Operating Humidity ..........................
Max. Operating Altitude ...................
Storage Temperature ......................
32° to 120°F (0° to 38°C)
0 to 90% RH
10,000 ft. (3,000 m)
-40° to 160°F (-40° to 70°C)

A-2 Mask Integrity Test Accessory (MITA) Model 8120
User Interface
Display ..............................................
Keypad .............................................
LED Indicators ..................................
5.7 in. diagonal (320 x 240 pixels)
monochrome LCD (backlit)
Membrane switch
Power, pass, fail, aerosol, and alert
Physical (not including PortaCount Fit Tester)
Instrument Size ................................
Carrying Case Size (W x D x H) .......
Weight ..............................................
Power ...............................................
26 in. wide x 20 in. deep x 16 in.
high (66 cm wide x 50 cm deep x
40 cm high) carrying case top lid
with headform installed
ATA certified, 26 in. x 20 in. x 22 in.
(66 cm x 50 cm, x 56 cm)
65 lbs (29.5 kg) with carrying case
and accessories
100 to 240 VAC, 50/60 Hz, also
supplies power to PortaCount Fit
Tester
Data Storage Capabilities Range
4,000 mask tests and 100 Self Check tests
MITA Communicator Software
User programmable mask test protocols and logged data downloading.
Minimum PC hardware requirements are Microsoft® Windows
® XP, or
Windows® 7 (32- and 64-bit) software.
* The MITA requires connection to a PortaCount Respirator Fit Tester (sold
separately).
** Other fixtures and adapters to accommodate additional gas masks and full face
respirators are possible. Contact TSI for further information.
Model 8120 Mask Integrity Tester is patented under U.S. Patents No. 8,312,761
and 8,621,914. Additional patents are pending.
TSI, the TSI logo, and PortaCount are registered trademarks of TSI Incorporated.
Microsoft®, Windows
® XP, Windows
® 7, are trademarks of Microsoft Corporation.

B-1
A P P E N D I X B How to Determine Mask DT Volume
The mask DT volume is determined by injecting known volume of water
accounting for any extra volume added due to adapters. Following is the
procedure to determine mask DT volume:
1. Draw distilled or filtered water in to syringe and fill it with a known
volume of water (10 ml or higher)
2. Connect the DT adapter to the mask DT
3. Hold the other end of the drink tube vertically up so that you can see
the injected water as it starts to overflow
4. Start injecting water in to the DT adapter slowly until water starts to
overflow on the other end of the DT
5. Measure the volume of water injected in to the DT. This is the volume
of the DT adapter + DT
6. Remove the DT from the mask
7. Repeat the steps 4-5 for the DT adapter alone
8. Subtract the volume of DT adapter + DT volume from DT adapter
alone to determine the DT volume.
9. Enter the DT volume for the Define Mask Protocol DT Full Volume
value.
If the Mask has a Manual Valve, determine the DT Volume to Manual
Valve value in a similar manner.

B-2 Mask Integrity Test Accessory (MITA) Model 8120
(This page intentionally left blank)

C-1
A P P E N D I X C StarTech™ FTDI Dr iver Insta l la t ion
W i n d o w s®
X P O p e r a t i n g S y s t e m
1. Insert the StarTech™ Driver Installation CD into your computer.
2. Plug the StarTech USB to Serial Adapter Cable into your computer. It
is not necessary to connect to MITA at this point.
3. The Found New Hardware Wizard auto-launches.
4. Select No if prompted to search web.
5. Select Next to install the driver for the USB serial converter.
6. The Found New Hardware Wizard auto-launches a second time.
Select Next to install the driver for the USB Serial Port.
™StarTech is a trademark of Star Technologies, Bowling Green, KY

C-2 Mask Integrity Test Accessory (MITA) Model 8120
7. Go to Start menu and right-click on My Computer to access System
Properties. On the Hardware tab select Device Manager.
8. Locate Ports (COM & LPT).

StarTech FTDI Driver Installation C-3
9. Determine the USB Serial Port COM number assigned for the adapter.
This will vary by computer.
W i n d o w s®
7 O p e r a t i n g S y s t e m 1. Insert the StarTech Driver Installation CD into your computer.
2. Plug the StarTech USB to Serial Adapter Cable into your computer. It
is not necessary to connect to MITA at this point.
3. Access Device Manager: Start | Control Panel | Device Manager.
4. Locate Ports (COM & LPT).
5. Determine the USB Serial Port COM number assigned to the adapter.
This will vary by computer.
Note: Depending on your computer’s Windows 7 operating system
configuration, the drivers may not install automatically and the following
steps will be needed to complete installation.
6. Access Device Manager: Start | Control Panel | Device Manager.

C-4 Mask Integrity Test Accessory (MITA) Model 8120
7. Locate Other devices | FT232R USB UART.
8. Right-click to access FT232R USB UART properties.
(continued on next page)

StarTech FTDI Driver Installation C-5
9. Select Update Driver…
10. Select Browse my computer for driver software.

C-6 Mask Integrity Test Accessory (MITA) Model 8120
11. Browse to the folder containing the Windows 7 FTDI driver. The folder
structure may change; refer to the StarTech adapter instructions for
current information.
12. Click OK to start driver installation.
13. Access Device Manager: Start | Control Panel | Device Manager.
14. Locate Other devices | USB Serial Port.
15. Right-click to access USB Serial Port properties.

StarTech FTDI Driver Installation C-7
16. Select Update Driver...
17. Select Browse my computer for driver software.

C-8 Mask Integrity Test Accessory (MITA) Model 8120
18. Browse to the folder containing the Windows 7 FTDI driver. The folder
structure may change; refer to the StarTech adapter instructions for
current information.
19. Click OK to start driver installation.
20. Access Device Manager: Start | Control Panel | Device Manager.
21. Locate Ports (COM & LPT).
22. Determine the USB Serial Port COM number assigned to the adapter.
This will vary by computer.

Index-1
Index
4 40/74 mm mask filter plug, 5-5
A accessories
optional, 2-6 standard, 2-1
acronyms, 1-2 aero gen pump v-purge, 6-7 aero gen pump v-test, 6-7 aerosol generator, 3-9 aerosol generator mounting bracket,
3-9 aerosol generator settings, 6-6
aero gen pump v-purge, 6-7 aero gen pump v-test, 6-7
aerosol mixer, 5-6 aerosol mixer port, 3-10, 4-7 aerosol wand
pressing button, 5-9 aerosol wand into aerosol generator
output, 5-9 alert status indicator, 4-4
B back view of CEU and main panel, 2-7 bladder leak test, 4-10 blower run hours, 6-14
C calibration, 6-11 CBRN test mask protocol, 5-5 cleaning inlet screen, 7-1 clearing PortaCount hose connected
to mask sample port, 3-13 configuring tech functions menu, 8-5 connecting DT adapter to DT sample
hose, 4-5 connecting power line, 2-8 consumable parts, 7-2 covering aerosol mixer, 4-11 covering headform with hood, 4-11
D data logging, 5-10 data logging screen, 5-10, 5-11
delete data, 5-12 download all mask tests, 5-11 download all self checks, 5-12 view mask tests, 5-11 view self checks, 5-11
data storage capabilities range, A-2 define mask protocol, 6-3
delete data, 5-12 determine mask DT volume, B-1 display panel, 3-1 download all mask tests, 5-11 download all self checks, 5-12 download mask test data, 8-9 DP1 DP3 compare, 4-5 drink tube, 3-7, (see also DT) drink tube flow test, A-1 drink tube leak test, A-1 drink tube test, 3-13 drink valve. (see also DV) DT adapter installed on DT valve, 5-3 DT adapter to external DT valve, 5-3 DT flow, 5-3 DT flow/mask flow compare, 4-7 DT leak zero test, 4-9 DT restriction calibration, 4-5 DT sample hose, 3-7, 4-7 DT sample hose installed on internal
DT mouthpiece, 5-3 DT sample hose to DT mouthpiece,
5-3 DT sample hose to mixer port stopper,
4-7 DT/EV bypass hose, 4-5 DV seat, 5-4
E edit mask protocol, 8-10 EV adapter, 3-7, 5-5 EV adapter installed on mask
exhalation valve, 5-4 EV adapter sample hose, 3-7 EV adapter to mask EV, 5-4 EV adapters, 4-9 EV hose blockage test, 4-10 EV leak, 5-4 EV leak zero test, 4-9 EV self check zero fixture, 4-9 exhalation valve, 3-7, (see also EV) exhalation valve test, 3-13, A-1
F failed, 4-3 find mask leak, 5-8 find mask leak screen, 5-8 front view of MITA, 2-7
G general settings, 6-8 getting to know the MITA, 3-1
H headform mask sample plug, 4-8 help, ix HEPA filter, 5-6 HEPA filter cartridge, 3-8 hood covering end of ambient sample
hose, 5-6
I–J–K initial display screen, 3-2 inlet screen
cleaning, 7-1 interface cable, 3-6 introduction, 1-1
L leak location detection, A-1 lower mask inlet with rubber stopper
#3, 4-8
M main menu, 3-1 main menu screen, 3-2 maintenance
cleaning inlet screen, 7-1 schedule, 7-1
manual controls, 6-11 manual history, ii manual organization, ix mask adapter kits, 2-6 mask bypass hose into headform,
4-11 mask DT volume
determining, B-1 mask filter plug and EV adapter
installed on mask, 5-5 mask protection factor, 4-11, 5-5 mask protection factor test, 5-6 mask to headform, 3-14 MITA, A-2 MITA communicator software, 8-1
CD, 8-1 download mask test data, 8-9 edit mask protocol, 8-10 installation, 8-2
MITA communicator software screen communicator, 8-3 installation, 8-2 installation complete, 8-4 license agreement, 8-3
MITA to PC communications configuration
setup, 8-5 mixer port stopper, 4-7

Index-2 Mask Integrity Test Accessory (MITA) Model 8120
N not tested, 4-3
O operating conditions, A-1 optional accessories, 2-6 overall mask integrity test, A-1 overview, 1-1
P–Q packing, 9-1 packing list, 2-1 parts identification, 2-1 passed, 4-3 PF concentration test print, 6-14 physical properties, A-2 PortaCount fit tester, 1-1 PortaCount interface cable, 3-11 power line, 2-9 power up instructions, 2-8 prepare masks for test, 3-13 press array test print, 6-14 pressure adjustment knob, 4-6 product registration, ii protected settings, 6-9 pump hours weighted, 6-14 pump run hours, 6-14 purpose, ix
R reader’s comments sheet removing hood, 2-8 replacement parts, 7-2 reset blower run hours, 6-14 reset pump run hours, 6-14 restore mask protocols, 6-14 restore self check parameters, 6-14 restore user configuration, 6-14 rubber stopper #1 into aerosol mixer
port, 4-7 rubber stopper #3, 4-8
S safety and precautions, v self check parameters, 6-12 self check procedure, 4-1 self check screen, 4-1, 4-2
bladder leak test, 4-10 DP1 DP3 compare, 4-5 DT flow/mask flow compare, 4-7 DT leak zero test, 4-9 DT restriction calibration, 4-5 EV hose blockage test, 4-10 EV leak zero test, 4-9 mask protection factor, 4-11
set MITA serial number, 6-14 set up aerosol generator, 3-9 set up cables and hoses, 3-6 set up instructions, 3-5 settings menu, 6-1
settings menu screen, 6-1, 6-2 aerosol generator settings, 6-6 define mask protocol, 6-3 general settings, 6-8 protected settings, 6-9 select mask protocol, 6-2 upload mask protocols, 6-6
setup instructions screen, 3-2, 3-5 prepare masks for test, 3-13 set up aerosol generator, 3-9 set up cables and hoses, 3-6 set up the PortaCount Respirator
Fit Tester, 3-11 shipping, 9-1 softkey buttons, 3-3 specifications, A-1 standard items, 2-1 StarTech FTDI driver
installation, Windows 7, C-3 installation, Windows XP, C-1
storage conditions, A-1 submitting comments, x system components, 2-7
T tech functions, 6-9
manual controls, 6-11 self check parameters, 6-12 view measurements, 6-12
tech functions menu, 8-5 tech functions screen, 6-9
calibration, 6-11 test disabled, 4-3 test invalid, 4-4 test LEDs, 6-14 test masks, 5-2 test masks procedure, 5-1 test masks screen, 5-1, 5-2
DT flow, 5-3 DV seat, 5-4 EV leak, 5-4 mask protection factor, 5-5 results, 5-7
test started, 4-3 troubleshooting, 10-1 twin tube sampling hose, 4-11
U UART0 CTS enable, 6-14 UART0 CTS state, 6-14 UART3 baud rate, 6-14 unpacking, 2-1
instructions, 2-8 upload mask protocols, 6-6 usb to serial converter, 2-5 usb to serial converter to DB9, 3-11 user adjustable settings, 6-1 user interface, A-2
V view mask tests, 5-11 view measurements, 6-12
view self checks, 5-11
W–X–Y–Z warranty, iii

Reader ’s Comments Sheet
Please help us improve our manuals by completing and returning this questionnaire to the address listed in the
“About This Manual” section. Feel free to attach a separate sheet of comments.
Manual Title: Mask Integrity Test Accessory (MITA) Model 8120 Operator’s Manual P/N 6006153
1. Was the manual easy to understand and use?
Yes No
Please identify any problem area(s) _________________________________________________________
_____________________________________________________________________________________
_____________________________________________________________________________________
2. Was there any incorrect or missing information? (please explain) __________________________________
_____________________________________________________________________________________
_____________________________________________________________________________________
3. Please rate the manual according to the following features:
Good Adequate Poor
Readability
Accuracy
Completeness (is everything there?)
Organization (finding what you need)
Quality and number of illustrations
Quality and number of examples
Comments: ____________________________________________________________________________
_____________________________________________________________________________________
_____________________________________________________________________________________
4. Which part(s) of this manual did you find most helpful? __________________________________________
_____________________________________________________________________________________
_____________________________________________________________________________________
5. Rate your level of experience with the product:
Beginning Intermediate Expert
6. Please provide us with the following information:
Name _________________________________ Address ____________________________________
Title __________________________________ ____________________________________
Company __________________________________ ________________________________________


TSI Incorporated – Visit our website www.tsi.com for more information. USA Tel: +1 800 874 2811 UK Tel: +44 149 4 459200 France Tel: +33 1 41 19 21 99 Germany Tel: +49 241 523030
India Tel: +91 80 67877200 China Tel: +86 10 8219 7688 Singapore Tel: +65 6595 6388
P/N 6006153 Rev. G ©2015 TSI Incorporated Printed in U.S.A.
Top Related