


Languages
Pages
Legal


Mail Client Agent Admin guide Outlook profile configuration

Mail Client Agent admin guide Page i
Copyright 2017 CLOUDIWAY. All rights reserved.
Use of any CLOUDIWAY solution is governed by the license agreement included in your original
contract.
The copyright and all other intellectual property rights in the Software are and remain the
property of CLOUDIWAY and/or its subsidiaries (“CLOUDIWAY”). The licensee shall not acquire
any title, copyright or other proprietary rights in the Software or any copy than specified in.
You may not attempt to copy, modify, alter, disassemble, de-compile, translate or
convert in human readable form, or reverse engineer all or any part of the
Features and/or Data.
You acknowledge that the Software and all related products (including but not limited to
documentation) are the subject of copyright. You therefore, shall not during or any time after
the expiry or termination of this Agreement, permit any act which infringes that copyright and,
without limiting the generality of the foregoing, You specifically acknowledge that You may not
copy the Software or Products except as otherwise expressly authorized by this Agreement.
CLOUDIWAY provides this publication “as is” without warranty of any either express or implied,
including but not limited to the implied warranties of merchantability or fitness for a particular
purpose. CLOUDIWAY may revise this publication from time to time without notice. Some
jurisdictions do not allow disclaimer of express or implied warranties in certain transactions;
therefore, this statement may not apply to you.
Document history
Date Editor Change details
01/06/2017 DB First draft
14/06/2017 First publication

Mail Client Agent admin guide Page ii
Table of Contents
1 About this guide ................................................................................................................ 1
1.1 Audience ...................................................................................................................... 1
1.2 Using this guide ............................................................................................................ 1
2 Product description .......................................................................................................... 2
2.1 General principles ........................................................................................................ 2
2.2 Details .......................................................................................................................... 2
2.3 Pre-requisites ............................................................................................................... 2
2.4 Supported Outlook versions ........................................................................................ 2
3 Standalone mode (command line operation) .................................................................. 3
3.1 Installation ................................................................................................................... 3
3.2 Operation ..................................................................................................................... 3
3.2.1 Parameters ............................................................................................................. 3
4 Managed by the Cloudiway platform ............................................................................... 5
4.1 Description ................................................................................................................... 5
4.2 Users list ....................................................................................................................... 5
4.2.1 Option 1: CSV upload .............................................................................................. 5
4.2.2 Option 2: Single user creation details ..................................................................... 8
4.3 Actions ....................................................................................................................... 10
4.3.1 Schedule agent installation ................................................................................... 10
4.3.2 Schedule computer Audit ..................................................................................... 14
4.3.3 Schedule Outlook profile configuration ................................................................ 15
4.3.4 Important pre-requisite for Outlook 2013 profile configuration .......................... 15
5 Troubleshooting .............................................................................................................. 20
Mail Client Agent admin guide Page 1/20
1 About this guide
1.1 Audience
This guide is aimed at system administrators who need to configure the Outlook profile for their
users, so that it functions after a mail migration to Office 365 (Exchange online) or to Exchange on
premises.
1.2 Using this guide
This guide explains the functionalities and steps to follow to successfully configure Outlook profiles.
It uses the domain drypizza.com as an example for an Office 365 tenant. It also uses warmsushi.com
as an example of a non-Office 365 system.
The screen dumps used in this guide reflect these business names to provide typical examples of data
to enter into each field.
Whitepapers and guides covering Cloudiway's other products, such as general mail migration, are
available from the Cloudiway website (www.cloudiway.com).

Mail Client Agent admin guide Page 2/20
2 Product description
2.1 General principles
The Mail Client Agent, previously known as Outlook Configurator, is a software utility that executes
locally on the computer that has Outlook installed, to configure the Outlook profile.
It can configure profiles for Exchange or Office 365 (Exchange online). Supported versions of Outlook
are 2016 and 2013 32bit and 64 bit.
What it does: it creates a new profile that points to the destination mailbox post migration. There are
two possible ways of using it:
- Stand alone. You launch the program with specific parameters on a computer. It then
immediately applies the given parameters and creates the new profile.
- Managed by the Cloudiway platform. The administrator remotely deploys the Mail Client
Agent from the Cloudiway Platform. (Click Once must be enabled on the browser).
2.2 Details
The utility creates a profile for the provided email address, with the Cached Exchange Mode property
activated, using an OST file for cached content.
2.3 Pre-requisites
- Microsoft Windows operating system
- .Net framework 4.5 or more
2.4 Supported Outlook versions
- Outlook 2013
- Outlook 2016
- 32 bit and 64 bit

Mail Client Agent admin guide Page 3/20
3 Standalone mode (command line operation)
3.1 Installation
- Download the package at http://apps.cloudiway.com/download/mailclientagent.zip
- Unzip the package
- Open a Windows command prompt
- Navigate to the location where the package has been unzipped
- Run the command-line utility mailclientagent.exe with the parameters as described below
3.2 Operation
3.2.1 Parameters
Here is the list of parameters required by the program:
3.2.1.1 Outlook 2016
Outlook 2016 requires only these parameters to configure the Outlook profile: (it is using
autodiscovery for discovering the servername).
-email [email protected] (email of profile to create) -displayname “Firstname Lastname”
-isdefault (if omitted = false)
Example: MailClientAgent.exe -email [email protected] -displayname "Chloe Page" -isdefault
Here is the output:

Mail Client Agent admin guide Page 4/20
Once the profile is created, the user is prompted for his password the first time he opens Outlook.
Outlook then synchronizes content from the Exchange server to the local .ost file.
3.2.1.2 Outlook 2013
The creation of the profile for Outlook 2013 requires more information. It needs the ExchangeGuid
for the mailbox, and the server url.
You can get the ExchangeGuid property value by using the PowerShell cmdlet Get-Mailbox:
Get-Mailbox chloe | fl, ExchangeGuid
Here is the list of parameters for configuring Outlook 2013:
-email [email protected] (email of profile to create) -displayname "Firstname Lastname" -exchangeguid "exchangeMailboxGuid"
-server ServerName (outlook.office365.com for Office365)
-isdefault (if omitted = false)
Example: MailClientAgent.exe -email [email protected] -displayname "Chloe Page" -exchangeguid "323F79DA-6D3E-41BF-9FC1-C1A67A02B837" -
server outlook.office365.com -isdefault

Mail Client Agent admin guide Page 5/20
4 Managed by the Cloudiway platform
4.1 Description
The managed way of using the MailClientAgent program is different from the standalone usage
described above.
The central point is the user list that is on the Cloudiway platform at https://apps.cloudiway.com
under Mail Migration/Mail Client List. From this list the project administrator can perform and
monitor all actions: Install, Audit and Configure.
4.2 Users list
The Mail Client User List is the list of all profiles that need to be configured for Outlook.
For each user in the user list these properties are defined:
• First name, Last name: used to build the display name in the Outlook profile as "Firstname
Lastname"
• Source email, used by the platform to send out an email for agent installation.
• Target email, the email used to configure the Outlook profile.
The first step in setting up the Mail Client Agent feature is to create the list of users. There are two
ways to add users to the list:
• CSV file upload;
• Creation of single users.
4.2.1 Option 1: CSV upload If you have a CSV file of all your users, you can upload the file to Cloudiway. The file must have the following fields in the header row:
FirstName;LastName;SourceEmail;TargetEmail;BatchName
The platform does not check for duplicate entries, so be careful when you create your csv files.
The BatchName field can be left blank. If required, you can use this field to name different batches
so they can be run in a certain order. A sample CSV file is available for download during the steps
outlined below.

Mail Client Agent admin guide Page 6/20
1. Under Mail Migration, go to Mail Client List
2. Click on Manage in the bottom left corner and select Upload CSV
3. If required, click on Download sample CSV and add your users to the CSV file using the
sample headers (FirstName;LastName;SourceEmail;TargetEmail;BatchName)
4. When you have a complete CSV file with the correct headers, click on the bigger Upload
button
5. Locate your CSV and double-click on it to select it

Mail Client Agent admin guide Page 7/20
6. Click on the Upload button in the bottom right corner.
If the CSV file format is not correct, you will see an error message on your screen:
7. If you see any error messages, check your CSV file to ensure it has five columns, each with a
separator (including the last) and try uploading again
8. Once the CSV file format is correct, you will see a confirmation message at the top of your
screen:
9. Check your email. When you have received confirmation that the upload has been
completed, you can refresh the Cloudiway platform to display your imported users

Mail Client Agent admin guide Page 8/20
4.2.2 Option 2: Single user creation details
Many of our first-time customers create a single user for testing purposes. This provides a means of
testing the features without affecting all users. Single users can also be created for migrations
affecting just a few users.
1. Go to the Mail Client List of the Mail Migration menu
2. Click on Manage in the bottom left corner and select Create Single to display the following
screen:

Mail Client Agent admin guide Page 9/20
3. Fill in all details for a new user
4. Click on the Create button
The new user will be added to the Mail Migration / Mail Client List screen:
5. Repeat steps 1 to 4 for any more users you'd like to create

Mail Client Agent admin guide Page 10/20
4.3 Actions
From the user list, the project administrator can perform various actions:
• schedule the installation of the agent,
• schedule a computer audit on the computer where the agent is installed,
• schedule the creation of the Outlook profile on the computer where the agent is installed.
4.3.1 Schedule agent installation
The first action that must be performed for a user is the installation of the agent on the local
computer.
This is done with ClickOnce, a Microsoft technology. ClickOnce enables the user to install and run a
Windows-based client application by clicking a link in a web page.
When the project administrator chooses the "Install" action for all users or a subset of users, then an
email is sent out to the source email address of all selected users. Each email message contains a link
the user must click to install the agent locally.
When an agent is locally installed, it connects to the platform to report it has installed. The status
appears as "Installed" in the Mail Client users list. It is then listening to commands it gets from the
platform.
When the agent is installed, then the project administrator can choose between 2 new actions: Audit
and Configure.
To schedule the installation of the agent, go through the following steps:
1. Select the users or batch in the Mail Client List for which you want the agent to get installed.
2. In the bottom bar choose Actions and then Install.

Mail Client Agent admin guide Page 11/20
Here is the content of the email that is sent to the user’s source email address:
4.3.1.1 Installation on the user’s computer
Here are the steps for the installation of the agent on the user’s computer:
1. After receiving the email above the user must click on the Mail client agent link in the
message.
The link brings the user to this page:

Mail Client Agent admin guide Page 12/20
2. With Microsoft Internet Explorer, the ClickOnce technology is already embedded in the
browser. Google Chrome or Mozilla Firefox require an additional extension, plugin or add-on
to be installed. The links to the extensions are provided in the message on the page. For
Firefox we recommend FxClickOnce. For Chrome we recommend Meta4 ClickOnce Launcher.
3. After installing the plugin if necessary, check the checkbox confirming that requirements are
installed. Then click Start:
4. Click on the button ClickOnce Install in the popup window.
5. You get a security warning:
When you click Install the program installation starts. Once installed the agent starts and connects to
the platform to listen to requests.

Mail Client Agent admin guide Page 13/20
4.3.1.2 Uninstallation on the user’s computer
If you need to manually uninstall the Mail Client agent follow these steps:
1. Go to Control Panel/Programs and Features
2. In the list of installed programs locate the program with Name MailClientAgent and
Publisher Cloudiway. Right-Click on the line.
3. Choose Uninstall/Change
4. Click OK on the following screen:
The program is entirely removed from the computer.

Mail Client Agent admin guide Page 14/20
4.3.2 Schedule computer Audit
The first step is to select users or a batch/batches in the Mail Client List.
You choose to schedule the audit of the remote computers by then hitting Audit in the Actions menu
item in the bottom bar:
This action sends a command to the agent to perform an Audit of the computer it resides on.
Audit collects several data:
a. Office version and bitness, as well as the install path on the hard drive.
b. System bitness, cpu speed, available disk space on each drive, installed RAM and available
RAM.
c. List of installed browsers with bitness and version.
To view audit results simply click on the user in the Mail Client List.

Mail Client Agent admin guide Page 15/20
4.3.3 Schedule Outlook profile configuration
Choosing Configure in the Actions menu item in the bottom bar sends a command to the agent to
perform the creation of the Outlook profile.
The creation of the Outlook profile is the same as in the stand-alone command line version of the
agent. It uses the user’s target email, as well as first name and last name for the profile’s display
name.
Attention: There are two different cases: Outlook 2016 and Outlook 2013.
• Outlook 2016: nothing more than the previously described steps is necessary.
• Outlook 2013: the agent needs the Exchange Guid of the mailbox to configure the profile.
The steps to get the Guid for each target mailbox in the Mail Client List are described in the
next chapter.
4.3.4 Important pre-requisite for Outlook 2013 profile configuration
We provide a feature that collects Exchange Guids for all target mailboxes in the Mail Client List. This
is a mandatory step before Outlook 2013 profile configuration.
2 steps are required to launch the feature:
1. Create a Mail migration target connector with a domain name that matches the domain of
target emails
2. Launch the Global Action Client Agent Preprocessing
Here is the detail of each of these steps:
4.3.4.1 Create your Office 365 or Exchange target connector
If you already created a target connector for the mail Migration you can skip this step.
Otherwise go through these steps:
1. From your browser, go to https://apps.cloudiway.com and login
2. Click on Mail Migration on the left, then Targets
Mail Client Agent admin guide Page 16/20
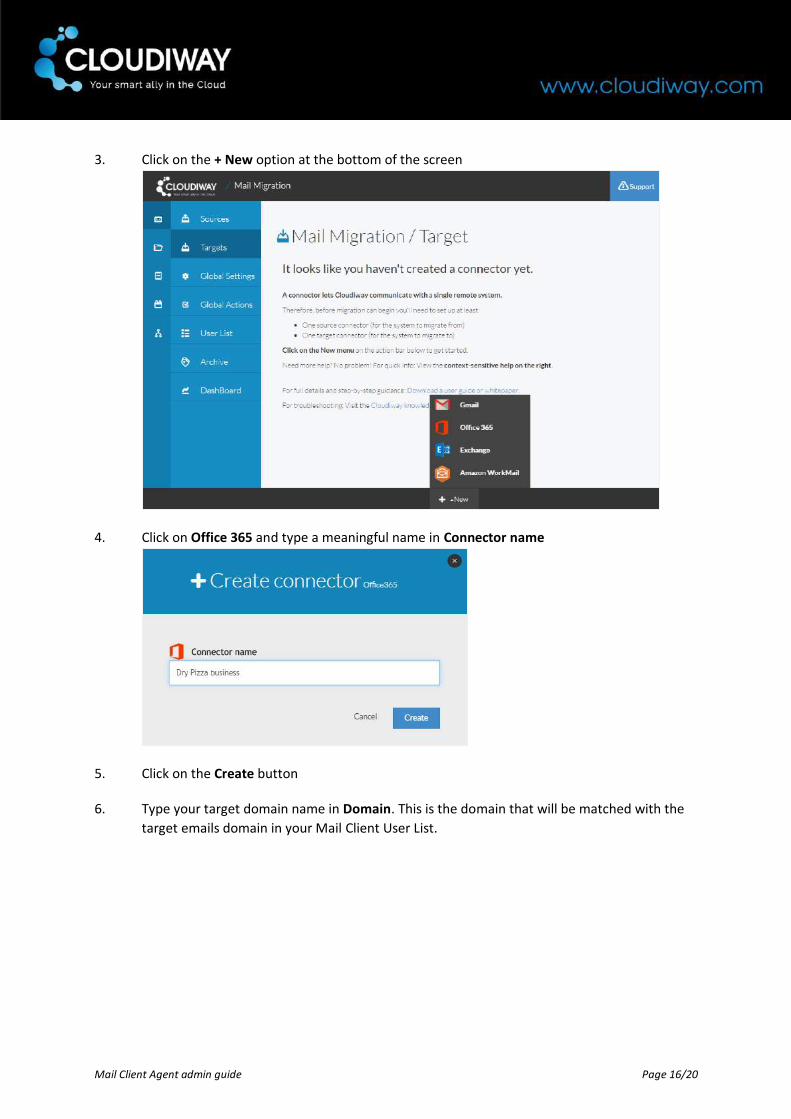
3. Click on the + New option at the bottom of the screen
4. Click on Office 365 and type a meaningful name in Connector name
5. Click on the Create button
6. Type your target domain name in Domain. This is the domain that will be matched with the
target emails domain in your Mail Client User List.

Mail Client Agent admin guide Page 17/20
7. Type your Office 365 account credentials (with administrator and impersonation rights)
8. The remaining field is for archiving older emails from inboxes (switched off by default):
For now, click on the Save button without activating this option (it's only meaningful for mail
migration. Please refer to the Admin Guide for the migration scenario you need to perform
to get detailed information on how to use the parameter).

Mail Client Agent admin guide Page 18/20
4.3.4.2 Launch the Global Action Client Agent Preprocessing
Once the target Office 365 or Exchange connector is created you can go ahead and launch the Global
Action Client Agent Preprocessing. For this, go to Mail Migration; then Global Actions and hit the
Client Agent Preprocessing button.
This process is fast. It uses Microsoft PowerShell. The necessary credentials are taken from the
previously defined target connector and it gets the Exchange Guid for each target email in the Mail
Client User List.
Here is the display once done:

Mail Client Agent admin guide Page 19/20
Once the preprocessing is done for Outlook 2013 users, you can go back to the Mail Client User List
and launch the Outlook profile creation for the users.

Mail Client Agent admin guide Page 20/20
5 Troubleshooting
Cloudiway provides an extensive knowledge base with many resources, including common error
messages, video guides and downloads.
Please visit the mail migration knowledge base area here:
http://kb.cloudiway.com/category/faq-cloudiway/cloudiway-migration-products/mail-migration-faq-
cloudiway/
Please visit the entire knowledge base here (where you can search for keywords or read through
topics): http://kb.cloudiway.com/
The knowledge base also contains information on how you can ask for further support, should you
require it.
Top Related