


Languages
Pages
Legal


Ju 87 B-1 Stuka Dive Bombing(Warbirds Blitzkrieg)
In this exercise we're going to fly a Ju 87 B-1 Stuka with the mission of bombing a train station. The objective will be undefended in order to make this training mission safer. There won't be any threat, nor antiaircraft artillery neither interception flights. We're trying to replicate the actual dive bombing procedure done by the german pilots flying the Ju 87, with the ruleset of Warbirds Blitkrieg.
All the actions done trough the game can be followed in detail with the Flight Log, that is available for download from the link below.
Flight Log Ju 87 B-1
In this image we can see our plane flying level, en route to the objective at an altitude of 15000 ft (5000 m aprox.) with a cruise speed of 3.1 points (150 mph aprox.). The game tactical scale is 4,1 seconds per turn, 300 ft width per hexe and 50 ft per altitude increment.
Our Ju 87's pilot and gunner are rated “Regular” with no other characteristics added. They can sustain +5/-2 G-forces (maneuvers with equal or higher G applied can cause Loss of Conciousness), the pilot has 6 Task Points available and the gunner has 4 of them (Optional Rule 9.8); the pilot's Base Situational Awareness (BSA) value is 6.
The plane will carry four SC-50 bombs located on the wings hard points and one SC-250 bomb on the fuselage hard point, with a total weight of 990 lb. Adding 400 lb of fuel will take the plane to its “load” condition (1390 lb). This will add an ammount of drag equal to 50% of the aircrafts drag due to the turn start speed. The external munitions will also decrease the performance of the plane and will add 1 drag point to the sum each turn.
Now that we know some relevant information about the mission, the crew and the plane, can begin the game First Turn. The first phase of a turn will be the Situational Awareness Phase (SAPh), where we can execute different actions (maybe the most important ones are to assing the Task Point use and determine the players order of movement).We have only one aircraft in the game so, for now, will assign the use of Task Points (TP) and will begin to search and identify the mission objective.
The pilot will employ 2 out of 6 TP to the Stability and Control of the plane (the value is listed in a table, modified by the plane rating, the quality of the pilot and some other factors). We'll employ the
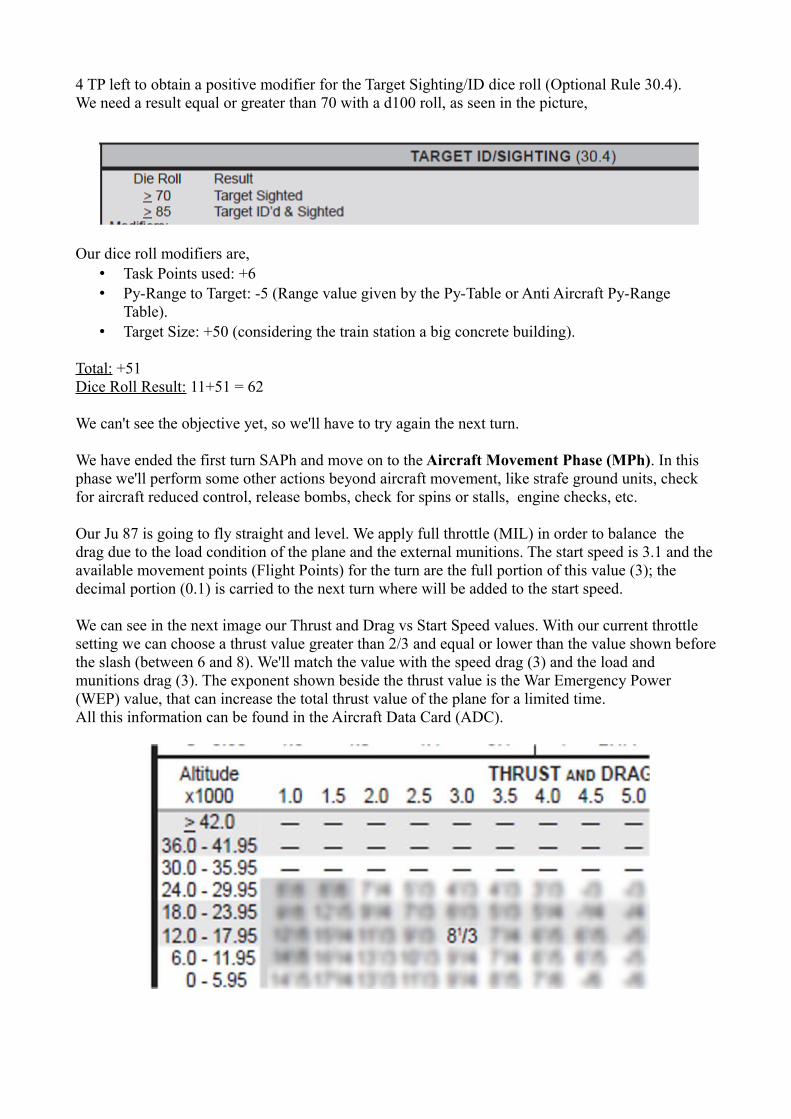
4 TP left to obtain a positive modifier for the Target Sighting/ID dice roll (Optional Rule 30.4).We need a result equal or greater than 70 with a d100 roll, as seen in the picture,
Our dice roll modifiers are,• Task Points used: +6• Py-Range to Target: -5 (Range value given by the Py-Table or Anti Aircraft Py-Range
Table).• Target Size: +50 (considering the train station a big concrete building).
Total: +51Dice Roll Result: 11+51 = 62
We can't see the objective yet, so we'll have to try again the next turn.
We have ended the first turn SAPh and move on to the Aircraft Movement Phase (MPh). In this phase we'll perform some other actions beyond aircraft movement, like strafe ground units, check for aircraft reduced control, release bombs, check for spins or stalls, engine checks, etc.
Our Ju 87 is going to fly straight and level. We apply full throttle (MIL) in order to balance the drag due to the load condition of the plane and the external munitions. The start speed is 3.1 and the available movement points (Flight Points) for the turn are the full portion of this value (3); the decimal portion (0.1) is carried to the next turn where will be added to the start speed.
We can see in the next image our Thrust and Drag vs Start Speed values. With our current throttle setting we can choose a thrust value greater than 2/3 and equal or lower than the value shown before the slash (between 6 and 8). We'll match the value with the speed drag (3) and the load and munitions drag (3). The exponent shown beside the thrust value is the War Emergency Power (WEP) value, that can increase the total thrust value of the plane for a limited time.All this information can be found in the Aircraft Data Card (ADC).
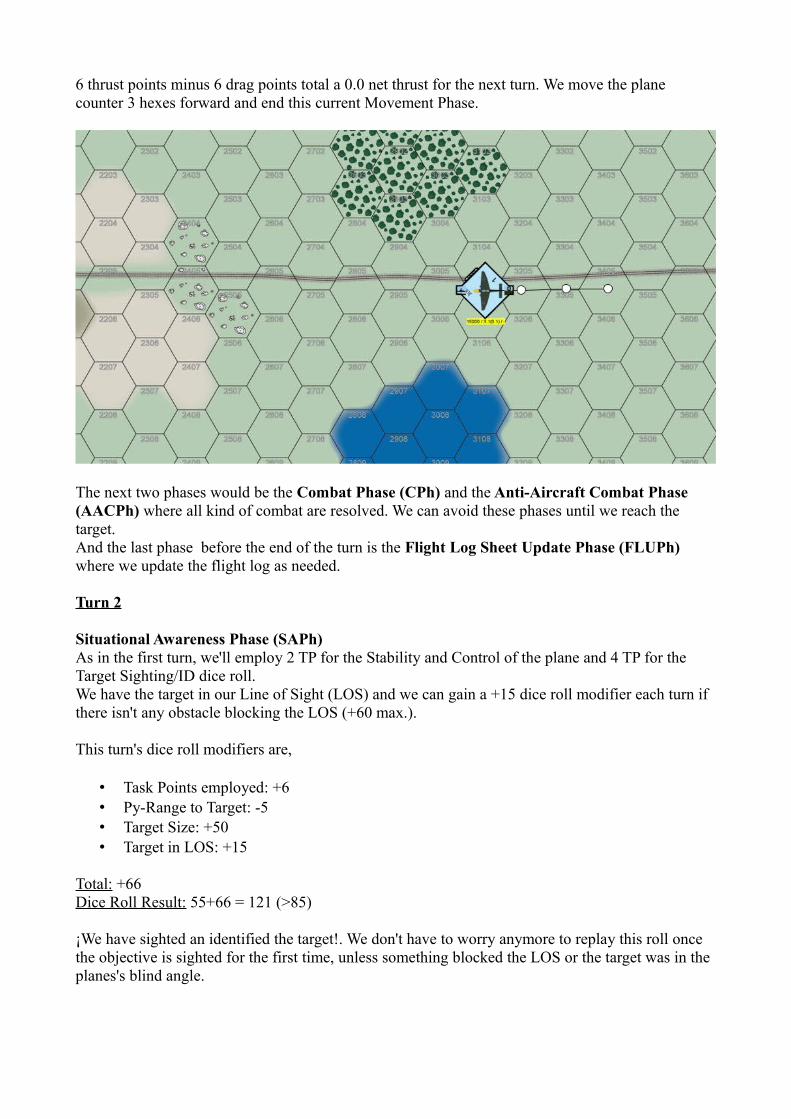
6 thrust points minus 6 drag points total a 0.0 net thrust for the next turn. We move the plane counter 3 hexes forward and end this current Movement Phase.
The next two phases would be the Combat Phase (CPh) and the Anti-Aircraft Combat Phase (AACPh) where all kind of combat are resolved. We can avoid these phases until we reach the target.And the last phase before the end of the turn is the Flight Log Sheet Update Phase (FLUPh) where we update the flight log as needed.
Turn 2
Situational Awareness Phase (SAPh)As in the first turn, we'll employ 2 TP for the Stability and Control of the plane and 4 TP for the Target Sighting/ID dice roll.We have the target in our Line of Sight (LOS) and we can gain a +15 dice roll modifier each turn if there isn't any obstacle blocking the LOS (+60 max.).
This turn's dice roll modifiers are,
• Task Points employed: +6• Py-Range to Target: -5 • Target Size: +50 • Target in LOS: +15
Total: +66Dice Roll Result: 55+66 = 121 (>85)
¡We have sighted an identified the target!. We don't have to worry anymore to replay this roll once the objective is sighted for the first time, unless something blocked the LOS or the target was in the planes's blind angle.

Aircraft Movement Phase (MPh)This turn we'll only control the speed value and will advance towards the target.We'll lower the throttle setting to 2/3 and will use the maximum thrust value available (5). Substracting the drag value (6 points like last turn), the net thrust loss will be -0.1 points (5-6/10= -0.1). We are trying to balance the carried flight points with the net thrust gain in order to avoid speed gains (the flight log shows more clearly these operations).
We move the counter 3 more hexes to end in the position shown in the picture,
We can move on to the next turn as no combats are in sight.
Turn 3
Situational Awareness Phase (SAPh)With the target on sight, we only have to worry about controlling the plane. 2 Task Points are assigned to the aircraft Stability and Control.
Aircraft Movement Phase (MPh)We can see in the image above that our plane is not on a direct path to the train station. We can correct this situation maneuvering without the need of turning with the aircraft. A change of the flight path laterally can be achieved with a SLIP Maneuver (rule 23.1).
This maneuver will suppose an important increase in the movement points requirement and drag incurred, but we have enough room to perform the maneuver and regain speed.
The amount of flight points needed to perform the Slip is shown in the ADC, and is related to the turn start speed,
The Slip maneuver incurs drag for a 2G turn when the first flight point needed to meet the requirement is expended. Our drag incurred value will be 1 point.
We need 4 movement points as requirement for the maneuver plus one additional point to perform it. Our current speed gives 3 flight points per turn, so we're going to extend the maneuver over some turns. This won't be a problem because we have plenty of time and space to do it.
We raise the throttle to full power (MIL) chosing a thrust value of 7 to mantain our speed. With a net thrust of 0.0, we move 3 hexes and note in the flight log the carried maneuver for completing it the next turn.The picture shows the aircraft movement, the bank attitude and nose arc, altitude, next turn start speed, flight points carried and the Slip maneuver carried,
We skip the combat phases and begin a new turn.
Turn 4
Situational Awareness Phase (SAPh)We assign 2 Task Points again to the aircraft Stability and Control.
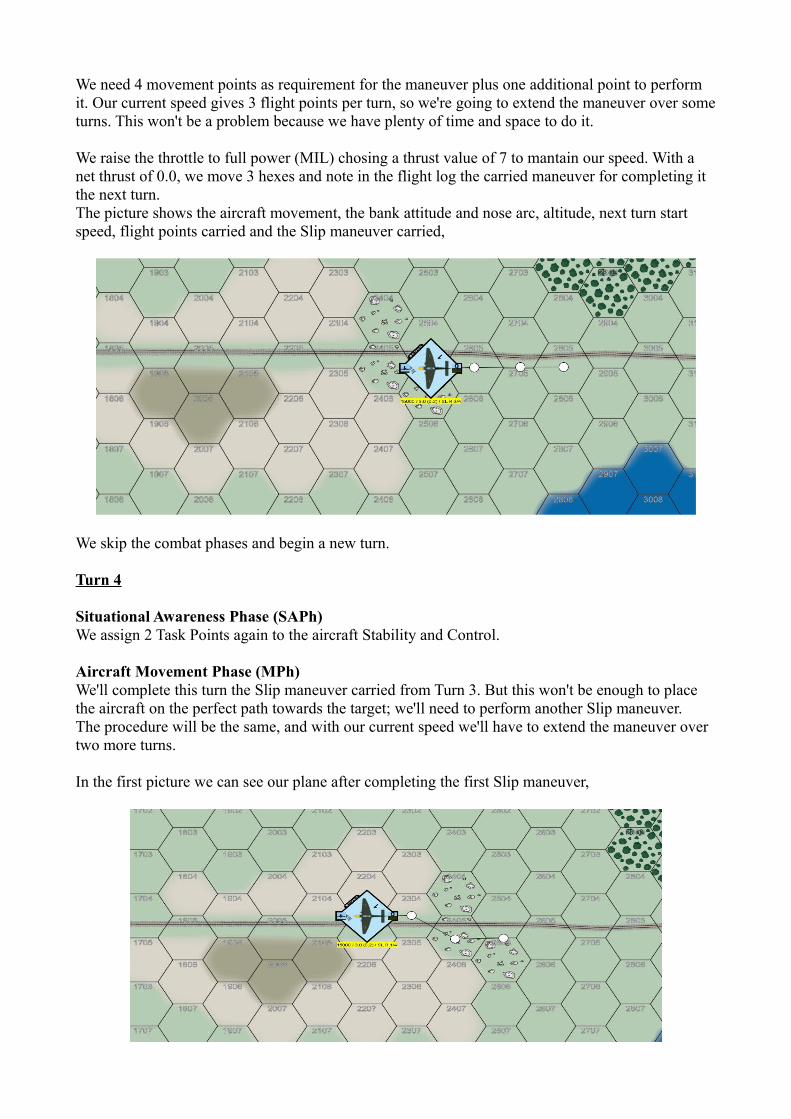
Aircraft Movement Phase (MPh)We'll complete this turn the Slip maneuver carried from Turn 3. But this won't be enough to place the aircraft on the perfect path towards the target; we'll need to perform another Slip maneuver.The procedure will be the same, and with our current speed we'll have to extend the maneuver over two more turns.
In the first picture we can see our plane after completing the first Slip maneuver,

This picture shows our aircraft at the end of Turn 6 with the second Slip maneuver completed,
Nothing new happens for a while; level flight mantaining cruise speed (the flight log provides all the information needed to follow the planes's path trhough these turns).And we jump to Turn 14, almost ready to begin the bomb run.
At this time the pilot should have opened the bombsight window in the cockpit floor used to locate the target, trimmed the plane and set the bomb release altitude in the contact altimeter.Four seconds before the plane passed the altitude set on the contact altimeter a signal came on (some sources say a horn, some others a light indicator) and the pilot released the bombs, activating an automatic pull-out system.
The Ju 87 ADC informs us that the plane is equipped with a 5G Auto Dive Pullout, so we'll set the release altitude to 2100 ft (700 m). If the target was defended, we would set the release altitude to 3000 ft (1000 m).We'll try to perform this procedure as close as possible to the actual maneuver.
Turn 14
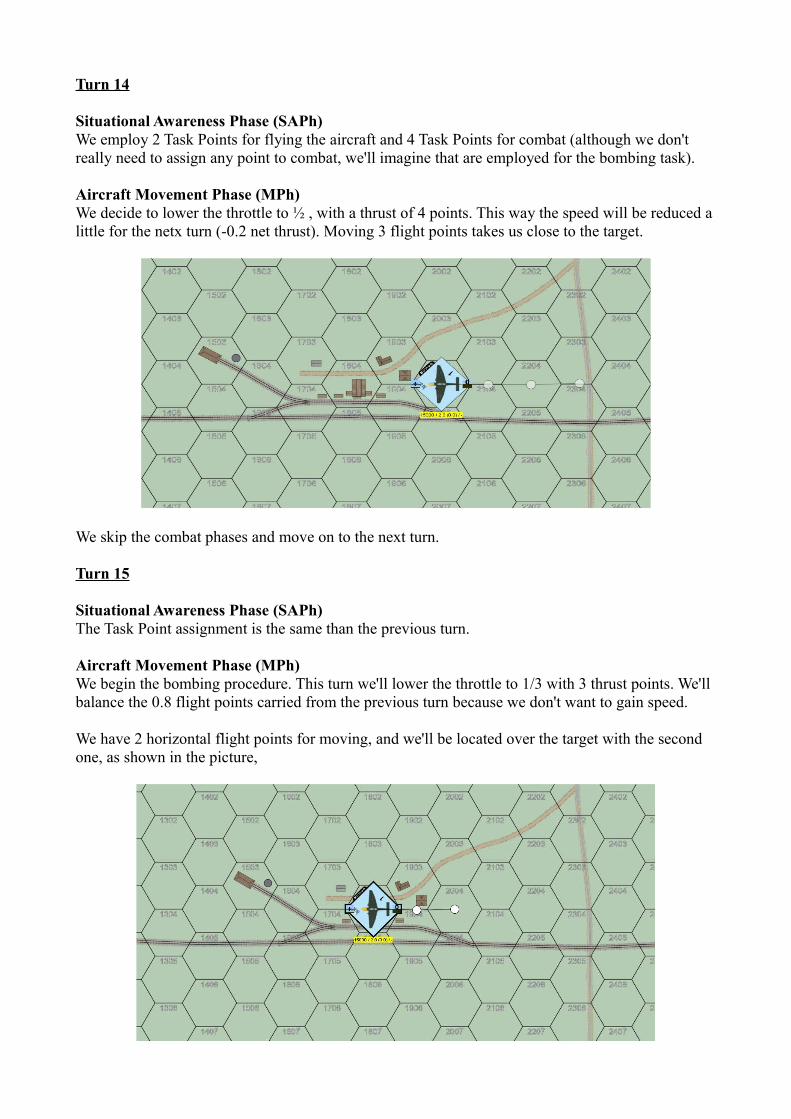
Situational Awareness Phase (SAPh)We employ 2 Task Points for flying the aircraft and 4 Task Points for combat (although we don't really need to assign any point to combat, we'll imagine that are employed for the bombing task).
Aircraft Movement Phase (MPh)We decide to lower the throttle to ½ , with a thrust of 4 points. This way the speed will be reduced a little for the netx turn (-0.2 net thrust). Moving 3 flight points takes us close to the target.
We skip the combat phases and move on to the next turn.
Turn 15
Situational Awareness Phase (SAPh)The Task Point assignment is the same than the previous turn.
Aircraft Movement Phase (MPh)We begin the bombing procedure. This turn we'll lower the throttle to 1/3 with 3 thrust points. We'll balance the 0.8 flight points carried from the previous turn because we don't want to gain speed.
We have 2 horizontal flight points for moving, and we'll be located over the target with the second one, as shown in the picture,
At this time the pilot of the german bomber cut the throttle, opened the dive brake and began to bank until the plane got inverted to peform de dive run.But we have to declare the throttle reduction and the opening of the dive brakes at the beginning of the Movement Phase, actions that will be done next turn. There's one thing that we can do at this moment, start to bank the plane with the second flight point that has placed us over the vertical axis of the target.
We're going to bank the plane performing a “Snap Roll” (Advanced Rule 23.10), that will allow us to double the banks per flight point for each flight point expended.
With the current aircraft speed and factoring the actual bomb load condition, we can perform 1,3 banks per flight point expended. The Snap Roll allows us 2,6 banks per FP expended incurring the drag value of a 3G turn (1 drag point actually).
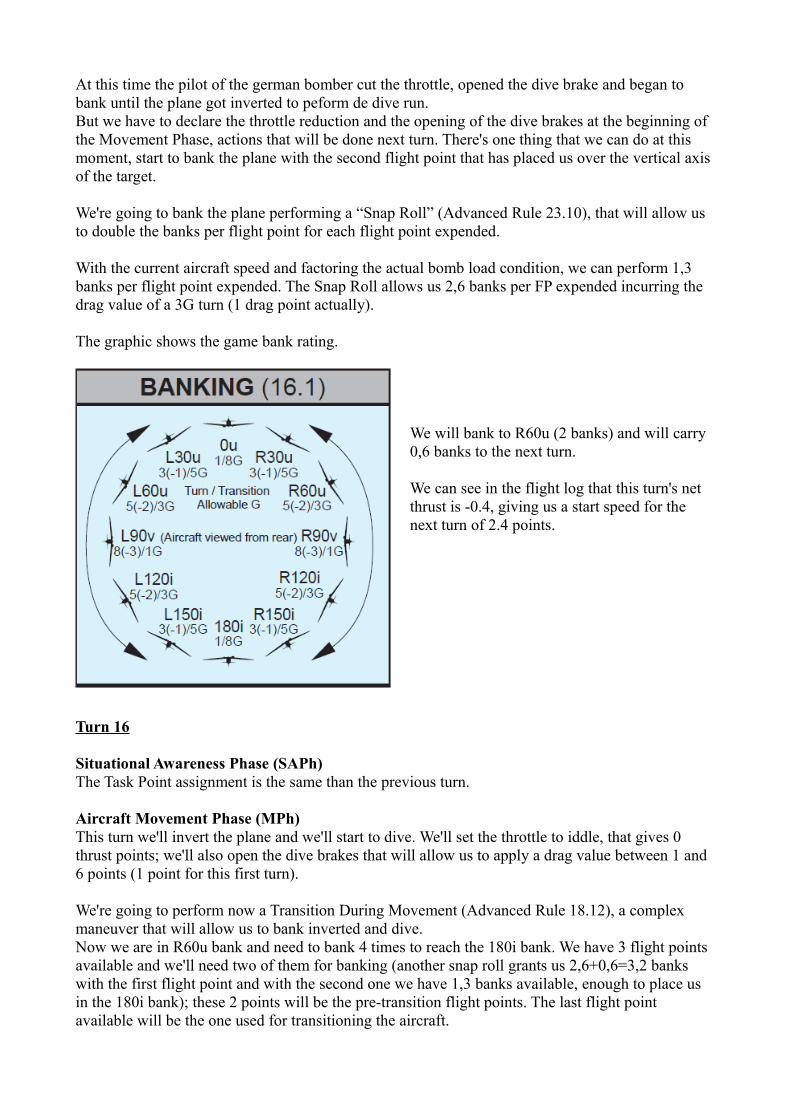
The graphic shows the game bank rating.
We will bank to R60u (2 banks) and will carry 0,6 banks to the next turn.
We can see in the flight log that this turn's net thrust is -0.4, giving us a start speed for the next turn of 2.4 points.
Turn 16
Situational Awareness Phase (SAPh)The Task Point assignment is the same than the previous turn.
Aircraft Movement Phase (MPh)This turn we'll invert the plane and we'll start to dive. We'll set the throttle to iddle, that gives 0 thrust points; we'll also open the dive brakes that will allow us to apply a drag value between 1 and 6 points (1 point for this first turn).
We're going to perform now a Transition During Movement (Advanced Rule 18.12), a complex maneuver that will allow us to bank inverted and dive.Now we are in R60u bank and need to bank 4 times to reach the 180i bank. We have 3 flight points available and we'll need two of them for banking (another snap roll grants us 2,6+0,6=3,2 banks with the first flight point and with the second one we have 1,3 banks available, enough to place us in the 180i bank); these 2 points will be the pre-transition flight points. The last flight point available will be the one used for transitioning the aircraft.

With our current speed we can effectively perform a 1G transition. The table shows the number of nose arcs that the plane will change and the C/D Arc Change (the average arc used in the Py-Table to determine the horizontal and vertical movement and the altitude gain or loss).But we are performing a transition with only a third of the total movement points (1 out of 3), so we have to apply this fraction to the value of the arcs changed and the C/D Arc Change. The result is 1 Arc Change (to 15D) and the C/D Arc Change being the 0 Arc (we won't gain or loose any altitude and the flight point will be horizontal).
Let's see what's the position of the aircraft right now. Our plane is moving away from the target, but we can make up the space during the dive.
With the throttle set to iddle we have 0 thrust, we incur 3 drag points due to speed and we have to add 1 drag point due to the snap roll and 3 due to bomb load (weight and external munitions [2+1]). 1 drag point due to dive brakes and 1 point for the nose arc change. This totals a net thrust of -0.9 for this turn, that gives us a Turn 17 start speed of 1.5.This value is lower than the minimum lift speed needed, that is 2.0 points. The appropiate table and
a dice roll say that our aircraft will enter a stall next turn. Even though it can look bad, the stall will help us to enter the dive faster.
Turn 17
Situational Awareness Phase (SAPh)This turn all the Task Points are employed for controlling the aircraft.
Aircraft Movement Phase (MPh)We are following the Stall procedure that can be found in the appropiate table in the Flight Charts and Tables Book.We're in a 180i bank, so this will not change. The aircraft's nose will pitch down 3 arcs to 60D and the C/D Arc will change 4 arcs to 75D.We'll determine the movement and the altitude loss in the Py-Table with this arc.
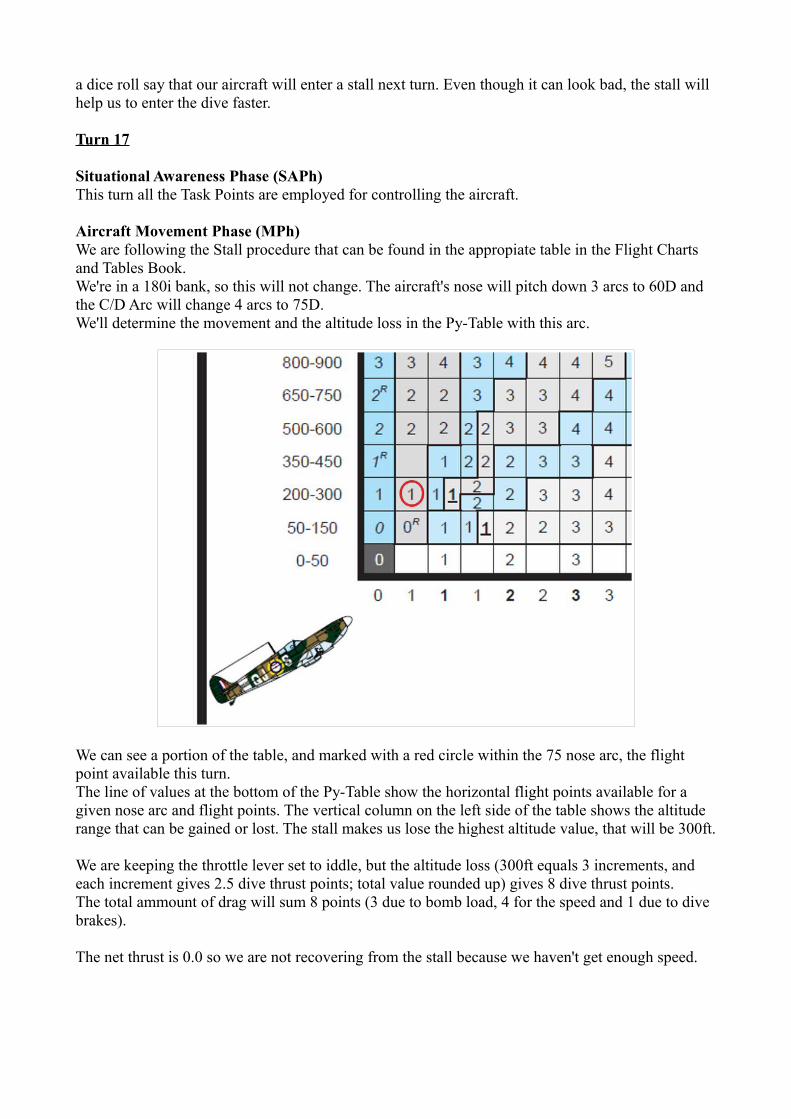
We can see a portion of the table, and marked with a red circle within the 75 nose arc, the flight point available this turn.The line of values at the bottom of the Py-Table show the horizontal flight points available for a given nose arc and flight points. The vertical column on the left side of the table shows the altitude range that can be gained or lost. The stall makes us lose the highest altitude value, that will be 300ft.
We are keeping the throttle lever set to iddle, but the altitude loss (300ft equals 3 increments, and each increment gives 2.5 dive thrust points; total value rounded up) gives 8 dive thrust points. The total ammount of drag will sum 8 points (3 due to bomb load, 4 for the speed and 1 due to dive brakes).
The net thrust is 0.0 so we are not recovering from the stall because we haven't get enough speed.
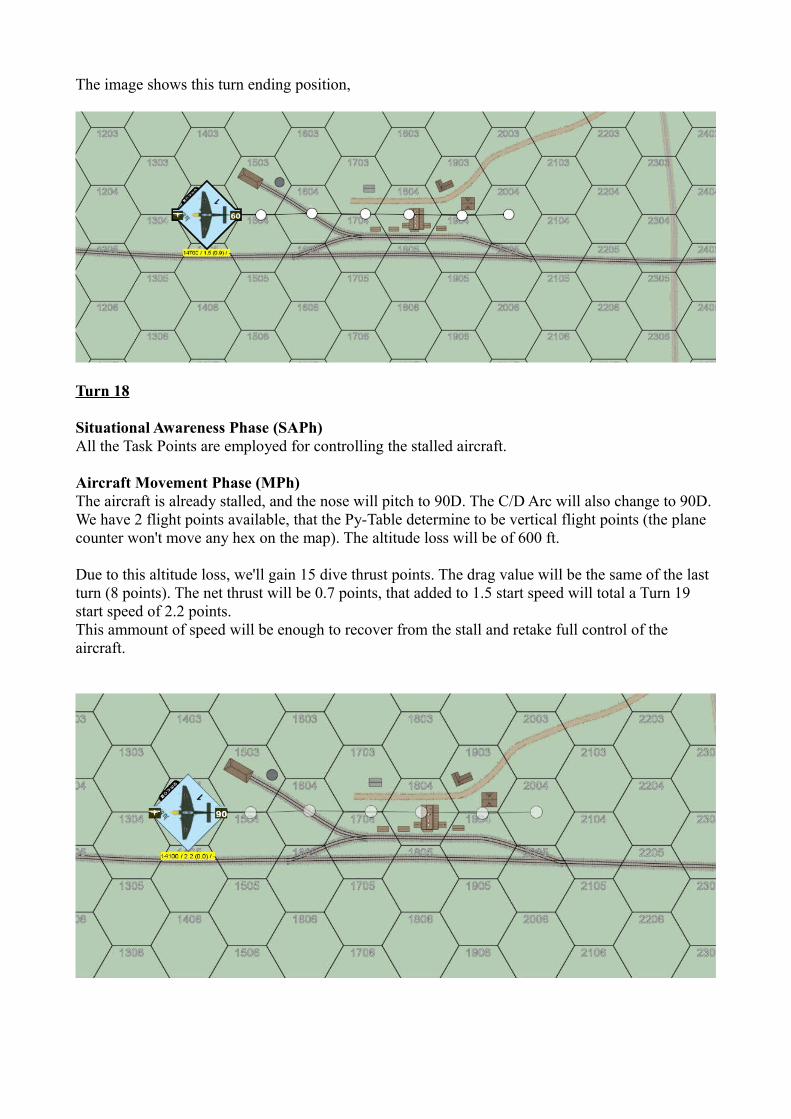
The image shows this turn ending position,
Turn 18
Situational Awareness Phase (SAPh)All the Task Points are employed for controlling the stalled aircraft.
Aircraft Movement Phase (MPh)The aircraft is already stalled, and the nose will pitch to 90D. The C/D Arc will also change to 90D.We have 2 flight points available, that the Py-Table determine to be vertical flight points (the plane counter won't move any hex on the map). The altitude loss will be of 600 ft.
Due to this altitude loss, we'll gain 15 dive thrust points. The drag value will be the same of the last turn (8 points). The net thrust will be 0.7 points, that added to 1.5 start speed will total a Turn 19 start speed of 2.2 points.This ammount of speed will be enough to recover from the stall and retake full control of the aircraft.
Turn 19
Situational Awareness Phase (SAPh)With the aircraft control regained, we'll employ 2 Task Points for the Stability and Control and 4 Task Points for combat.
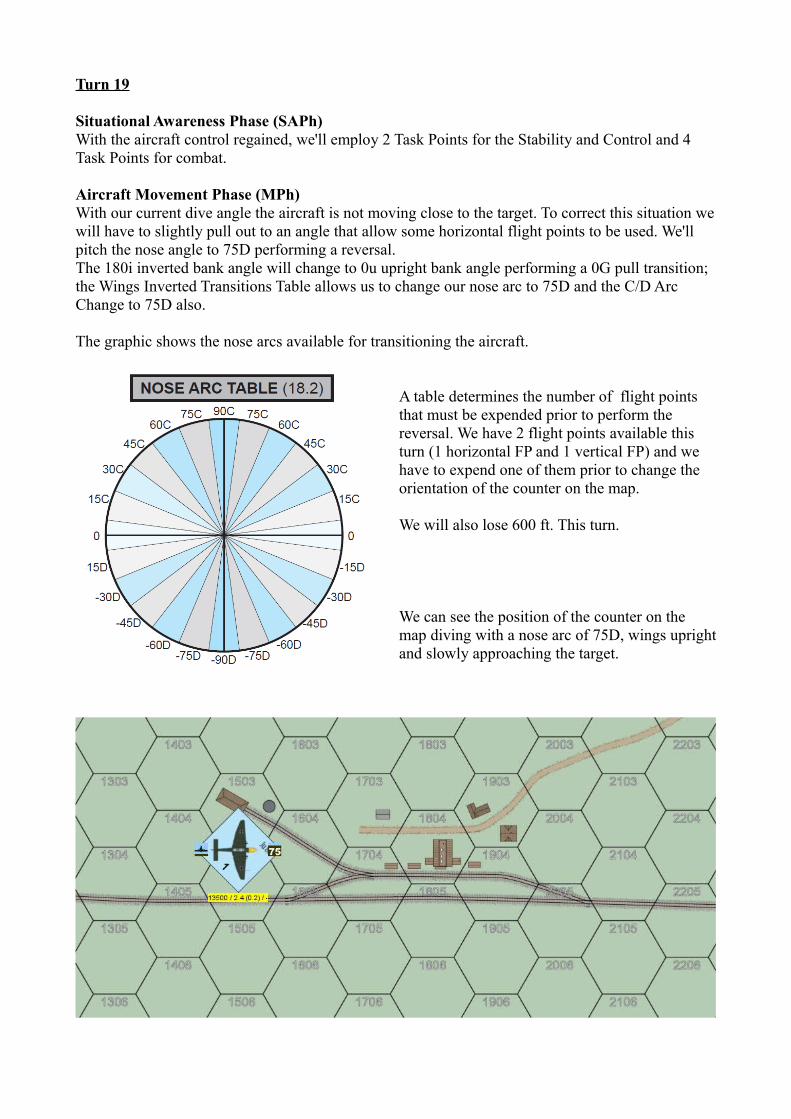
Aircraft Movement Phase (MPh)With our current dive angle the aircraft is not moving close to the target. To correct this situation we will have to slightly pull out to an angle that allow some horizontal flight points to be used. We'll pitch the nose angle to 75D performing a reversal. The 180i inverted bank angle will change to 0u upright bank angle performing a 0G pull transition; the Wings Inverted Transitions Table allows us to change our nose arc to 75D and the C/D Arc Change to 75D also.
The graphic shows the nose arcs available for transitioning the aircraft.
A table determines the number of flight points that must be expended prior to perform the reversal. We have 2 flight points available this turn (1 horizontal FP and 1 vertical FP) and we have to expend one of them prior to change the orientation of the counter on the map.
We will also lose 600 ft. This turn.
We can see the position of the counter on the map diving with a nose arc of 75D, wings upright and slowly approaching the target.
The net thrust for this turn will be 0.1 points (9 dive thrust points minus 3 speed drag points, 3 load drag points, 1 dive brakes drag point and 1 nose arc change drag point).
Turn 20
Situational Awareness Phase (SAPh)The Task Point assignment is the same than the previous turn.
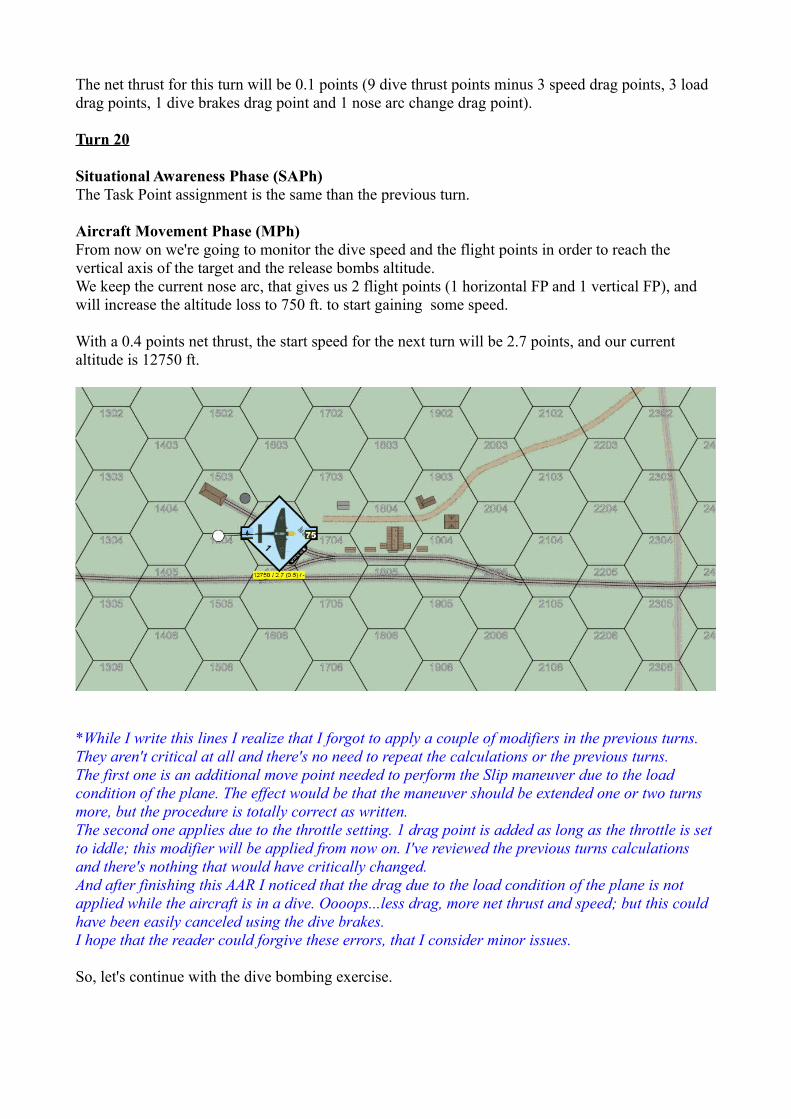
Aircraft Movement Phase (MPh)From now on we're going to monitor the dive speed and the flight points in order to reach the vertical axis of the target and the release bombs altitude.We keep the current nose arc, that gives us 2 flight points (1 horizontal FP and 1 vertical FP), and will increase the altitude loss to 750 ft. to start gaining some speed.
With a 0.4 points net thrust, the start speed for the next turn will be 2.7 points, and our current altitude is 12750 ft.
*While I write this lines I realize that I forgot to apply a couple of modifiers in the previous turns. They aren't critical at all and there's no need to repeat the calculations or the previous turns.The first one is an additional move point needed to perform the Slip maneuver due to the load condition of the plane. The effect would be that the maneuver should be extended one or two turns more, but the procedure is totally correct as written.The second one applies due to the throttle setting. 1 drag point is added as long as the throttle is set to iddle; this modifier will be applied from now on. I've reviewed the previous turns calculations and there's nothing that would have critically changed.And after finishing this AAR I noticed that the drag due to the load condition of the plane is not applied while the aircraft is in a dive. Oooops...less drag, more net thrust and speed; but this could have been easily canceled using the dive brakes.I hope that the reader could forgive these errors, that I consider minor issues.
So, let's continue with the dive bombing exercise.
Turn 21
Situational Awareness Phase (SAPh)The Task Point assignment is the same than the previous turn.
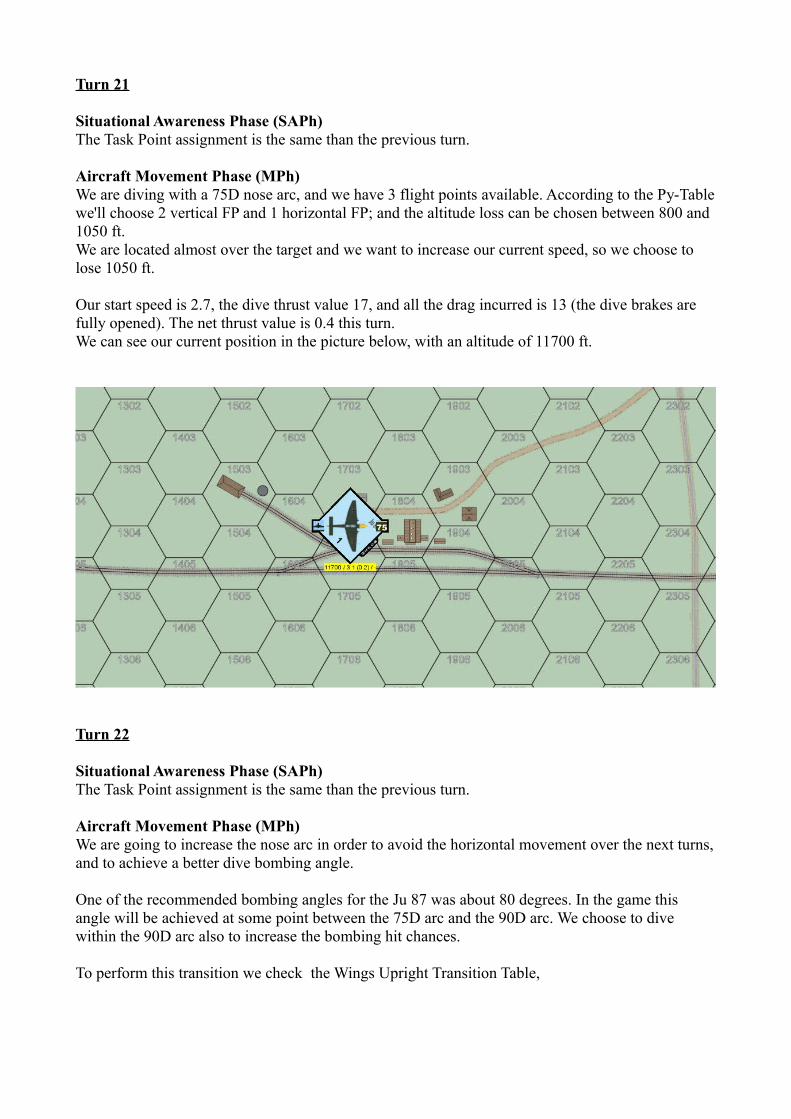
Aircraft Movement Phase (MPh)We are diving with a 75D nose arc, and we have 3 flight points available. According to the Py-Table we'll choose 2 vertical FP and 1 horizontal FP; and the altitude loss can be chosen between 800 and 1050 ft.We are located almost over the target and we want to increase our current speed, so we choose to lose 1050 ft.
Our start speed is 2.7, the dive thrust value 17, and all the drag incurred is 13 (the dive brakes are fully opened). The net thrust value is 0.4 this turn.We can see our current position in the picture below, with an altitude of 11700 ft.
Turn 22
Situational Awareness Phase (SAPh)The Task Point assignment is the same than the previous turn.
Aircraft Movement Phase (MPh)We are going to increase the nose arc in order to avoid the horizontal movement over the next turns, and to achieve a better dive bombing angle.
One of the recommended bombing angles for the Ju 87 was about 80 degrees. In the game this angle will be achieved at some point between the 75D arc and the 90D arc. We choose to dive within the 90D arc also to increase the bombing hit chances.
To perform this transition we check the Wings Upright Transition Table,

With a 1G applied push the aircraft nose will change 1 arc to 90D, but the C/D Arc won't change, so we'll have to use the 75D arc to determine the flight points avalilable and the altitude loss.1050 ft. altitude loss and 3 flight points (1 HFP and 2 VPF) will place our aircraft on the vertical axis of the train station.
As more speed we gain, the ammount of dive thrust is reduced, to the point that we can even lose speed while diving. We can avoid that lowering the ammount of drag incurred by the dive brakes, obtaining a net thrust of 0.1 this turn.
The Ju 87 has a great stability and allows a great control over the dive maneuver. That makes it a lethal weapon absolutelly fitted for the purpose it was designed.
Turn 23
Situational Awareness Phase (SAPh)The Task Point assignment is the same than the previous turn.
Aircraft Movement Phase (MPh)In our current position we only need to control the speed increase and the warning just before reach the bomb release altitude set in the contact altimeter.This turn we'll lose 900 ft to end at an altitude of 9750 ft, and the net thrust will be 0.0 points.
With nothing special to tell for several turns, we're goin to jump forward to a point where we are about to release the ordinance on the target.
Turn 30
Situational Awareness Phase (SAPh)The Task Point assignment is the same than the previous turn.
Aircraft Movement Phase (MPh)We are in the Turn 30 at an altitude of 3750 ft and with a start speed of 3.6 points. The dive follows on, but we are very close to the release altitude (we had set 2100 ft as the point of release).
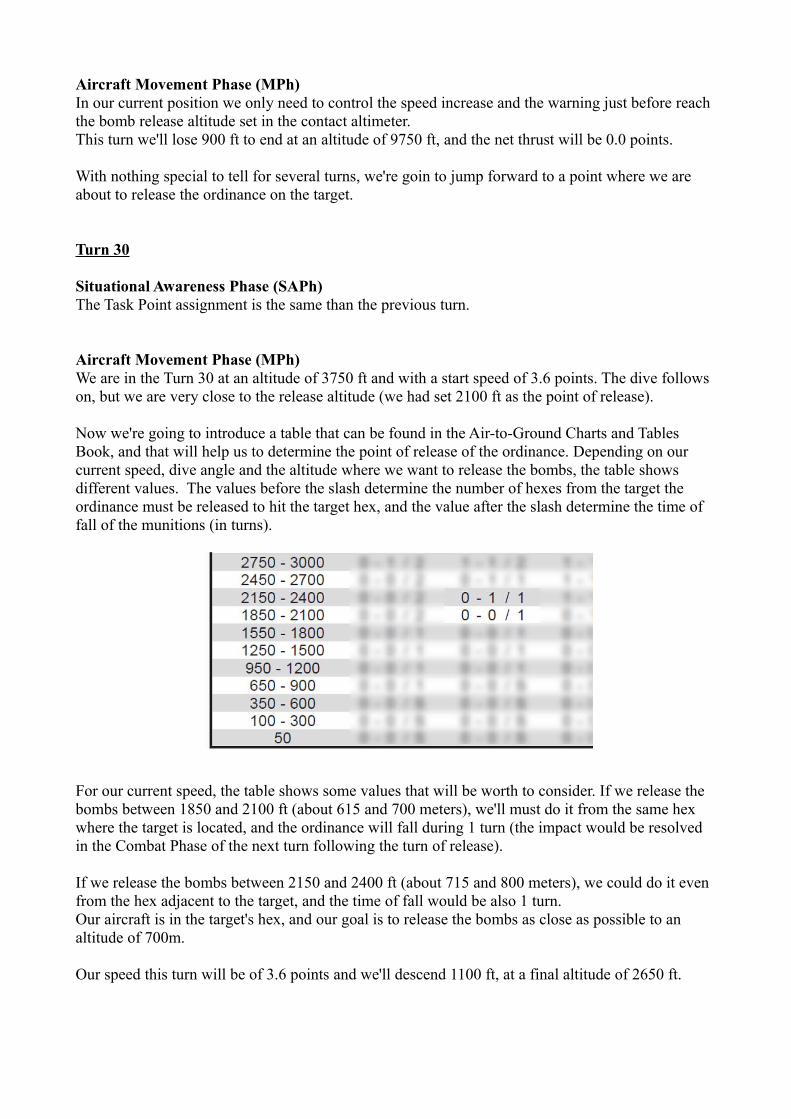
Now we're going to introduce a table that can be found in the Air-to-Ground Charts and Tables Book, and that will help us to determine the point of release of the ordinance. Depending on our current speed, dive angle and the altitude where we want to release the bombs, the table shows different values. The values before the slash determine the number of hexes from the target the ordinance must be released to hit the target hex, and the value after the slash determine the time of fall of the munitions (in turns).
For our current speed, the table shows some values that will be worth to consider. If we release the bombs between 1850 and 2100 ft (about 615 and 700 meters), we'll must do it from the same hex where the target is located, and the ordinance will fall during 1 turn (the impact would be resolved in the Combat Phase of the next turn following the turn of release).
If we release the bombs between 2150 and 2400 ft (about 715 and 800 meters), we could do it even from the hex adjacent to the target, and the time of fall would be also 1 turn.Our aircraft is in the target's hex, and our goal is to release the bombs as close as possible to an altitude of 700m.
Our speed this turn will be of 3.6 points and we'll descend 1100 ft, at a final altitude of 2650 ft.

Turn 31
Situational Awareness Phase (SAPh)The Task Point assignment is the same than the previous turn.
Aircraft Movement Phase (MPh)We start the turn at an altitude of 2650 ft., with a speed of 3.6 and with 4 vertical FP available. The Py-Table allows us to lose altitude in a range between 1100 and 1200 ft. (we'll choose 1100 ft.); our ending altitude will be 1550 ft. and the net thrust 0.1 points.
We're going to determine the exact moment to release the ordinance (with which flight point we'll release the bombs). We'll descend 1100 ft through 4 flight points, so we'll descend 275 ft. each flight point (1100/4=275).
- 1st Vertical Flight Point: ending altitude 2375 ft- 2nd Vertical Flight Point: ending altitude 2100 ft- 3rd Vertical Flight Point: ending altitude 1825 ft- 4th Vertical Flight Point: ending altitude 1550 ft
We choose the second flight point as the release point.
Turn 32
Situational Awareness Phase (SAPh)All the Task Points will be employed to control the aircraft once the bombs had been released.
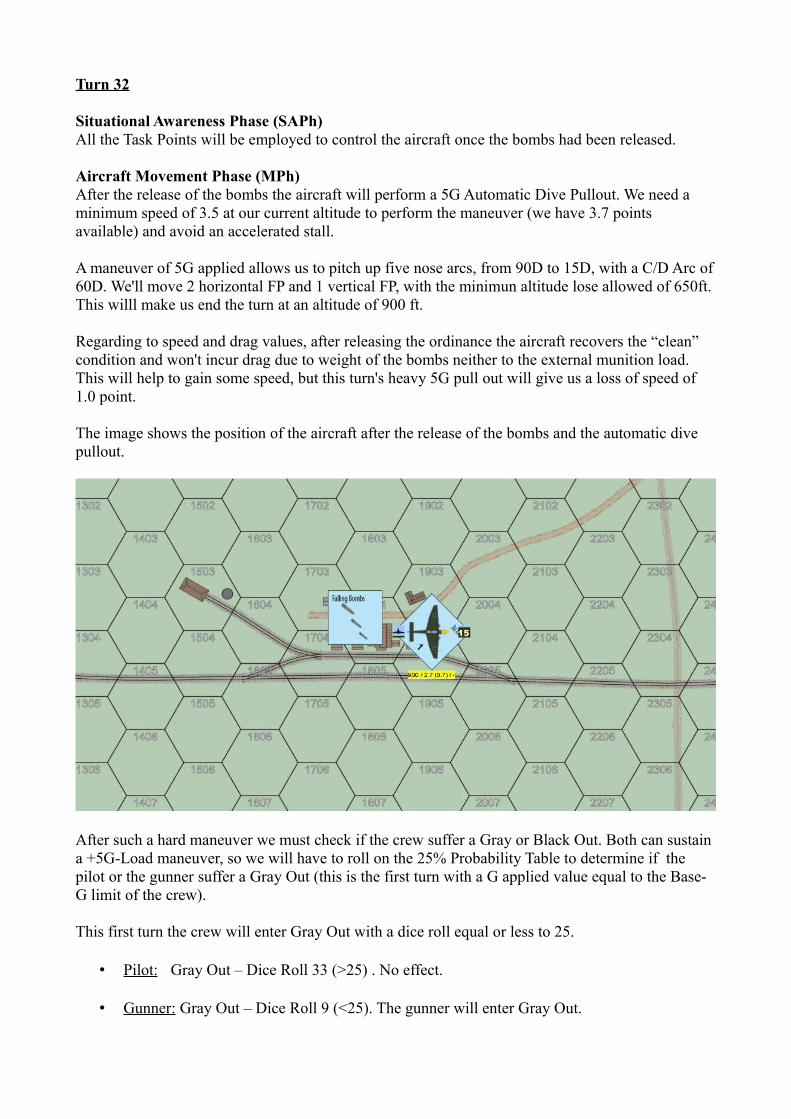
Aircraft Movement Phase (MPh)After the release of the bombs the aircraft will perform a 5G Automatic Dive Pullout. We need a minimum speed of 3.5 at our current altitude to perform the maneuver (we have 3.7 points available) and avoid an accelerated stall.
A maneuver of 5G applied allows us to pitch up five nose arcs, from 90D to 15D, with a C/D Arc of 60D. We'll move 2 horizontal FP and 1 vertical FP, with the minimun altitude lose allowed of 650ft. This willl make us end the turn at an altitude of 900 ft.
Regarding to speed and drag values, after releasing the ordinance the aircraft recovers the “clean” condition and won't incur drag due to weight of the bombs neither to the external munition load. This will help to gain some speed, but this turn's heavy 5G pull out will give us a loss of speed of 1.0 point.
The image shows the position of the aircraft after the release of the bombs and the automatic dive pullout.
After such a hard maneuver we must check if the crew suffer a Gray or Black Out. Both can sustain a +5G-Load maneuver, so we will have to roll on the 25% Probability Table to determine if the pilot or the gunner suffer a Gray Out (this is the first turn with a G applied value equal to the Base-G limit of the crew).
This first turn the crew will enter Gray Out with a dice roll equal or less to 25.
• Pilot: Gray Out – Dice Roll 33 (>25) . No effect.
• Gunner: Gray Out – Dice Roll 9 (<25). The gunner will enter Gray Out.
Fortunately for our gunner we won't have to enter combat through the next turns, because he would be severely punished with adverse combat dice roll modifiers.Recovery from Gray Out is automatically done during the next game turn's Situational Awareness Phase following the initial Gray Out when a G-Load less than the crew Base-G limit is used.
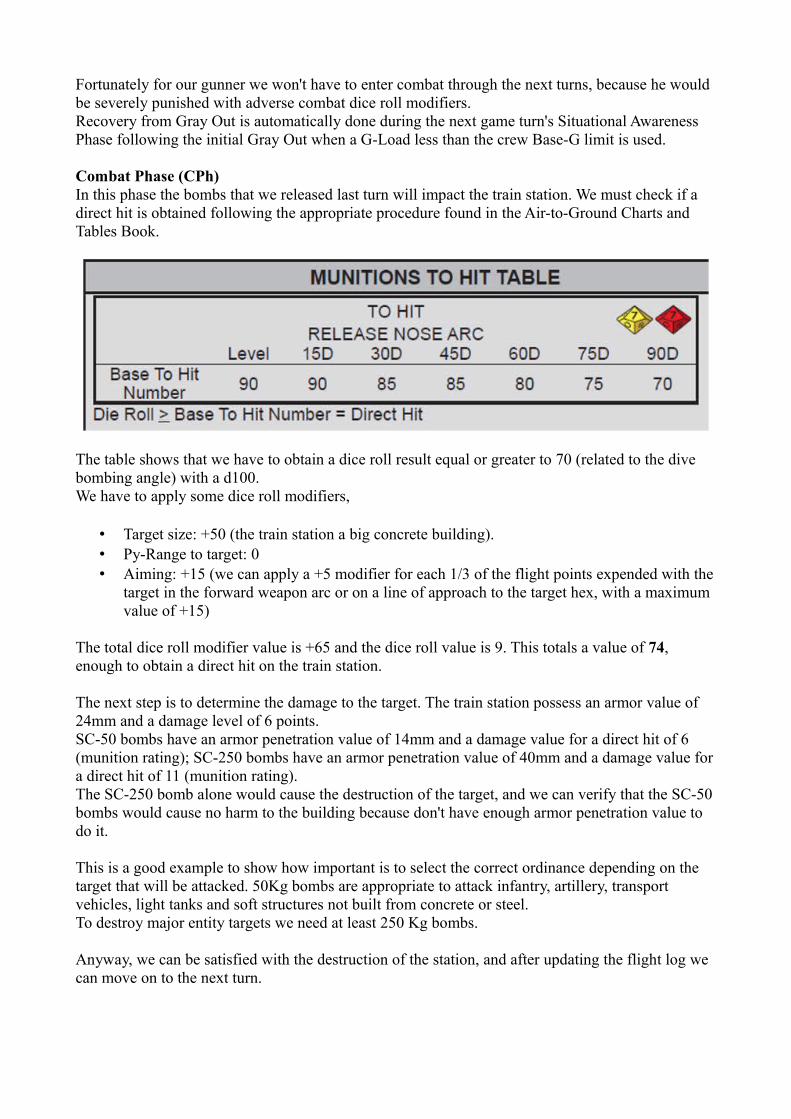
Combat Phase (CPh)In this phase the bombs that we released last turn will impact the train station. We must check if a direct hit is obtained following the appropriate procedure found in the Air-to-Ground Charts and Tables Book.
The table shows that we have to obtain a dice roll result equal or greater to 70 (related to the dive bombing angle) with a d100.We have to apply some dice roll modifiers,
• Target size: +50 (the train station a big concrete building).• Py-Range to target: 0 • Aiming: +15 (we can apply a +5 modifier for each 1/3 of the flight points expended with the
target in the forward weapon arc or on a line of approach to the target hex, with a maximum value of +15)
The total dice roll modifier value is +65 and the dice roll value is 9. This totals a value of 74, enough to obtain a direct hit on the train station.
The next step is to determine the damage to the target. The train station possess an armor value of 24mm and a damage level of 6 points.SC-50 bombs have an armor penetration value of 14mm and a damage value for a direct hit of 6 (munition rating); SC-250 bombs have an armor penetration value of 40mm and a damage value for a direct hit of 11 (munition rating).The SC-250 bomb alone would cause the destruction of the target, and we can verify that the SC-50 bombs would cause no harm to the building because don't have enough armor penetration value to do it.
This is a good example to show how important is to select the correct ordinance depending on the target that will be attacked. 50Kg bombs are appropriate to attack infantry, artillery, transport vehicles, light tanks and soft structures not built from concrete or steel.To destroy major entity targets we need at least 250 Kg bombs.
Anyway, we can be satisfied with the destruction of the station, and after updating the flight log we can move on to the next turn.
Turn 33
Situational Awareness Phase (SAPh)All the Task Points will be employed to control the aircraft. The gunner can't recover yet from the Gray Out.
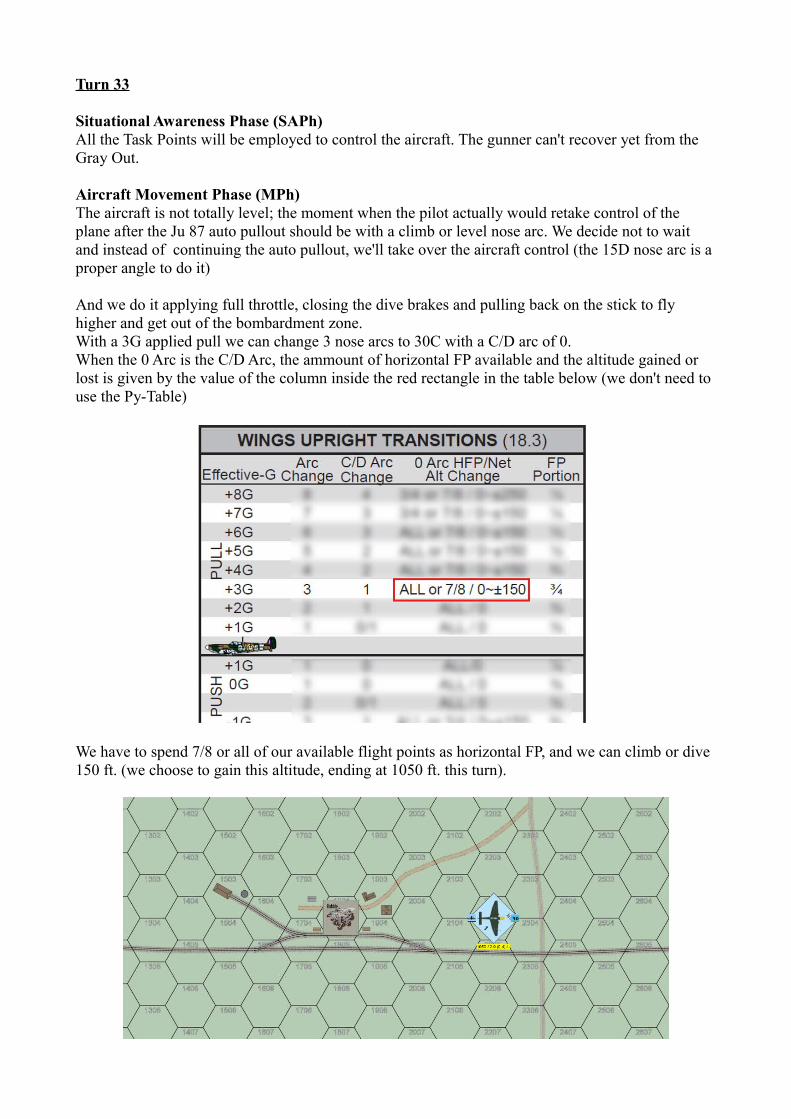
Aircraft Movement Phase (MPh)The aircraft is not totally level; the moment when the pilot actually would retake control of the plane after the Ju 87 auto pullout should be with a climb or level nose arc. We decide not to wait and instead of continuing the auto pullout, we'll take over the aircraft control (the 15D nose arc is a proper angle to do it)
And we do it applying full throttle, closing the dive brakes and pulling back on the stick to fly higher and get out of the bombardment zone.With a 3G applied pull we can change 3 nose arcs to 30C with a C/D arc of 0.When the 0 Arc is the C/D Arc, the ammount of horizontal FP available and the altitude gained or lost is given by the value of the column inside the red rectangle in the table below (we don't need to use the Py-Table)
We have to spend 7/8 or all of our available flight points as horizontal FP, and we can climb or dive 150 ft. (we choose to gain this altitude, ending at 1050 ft. this turn).
Turn 34
Situational Awareness Phase (SAPh)All the Task Points will be employed to control the aircraft. The gunner recovers from the Gray Out because last turn the aricraft performed a 3G transition (lower tha the Base-G of the crew).
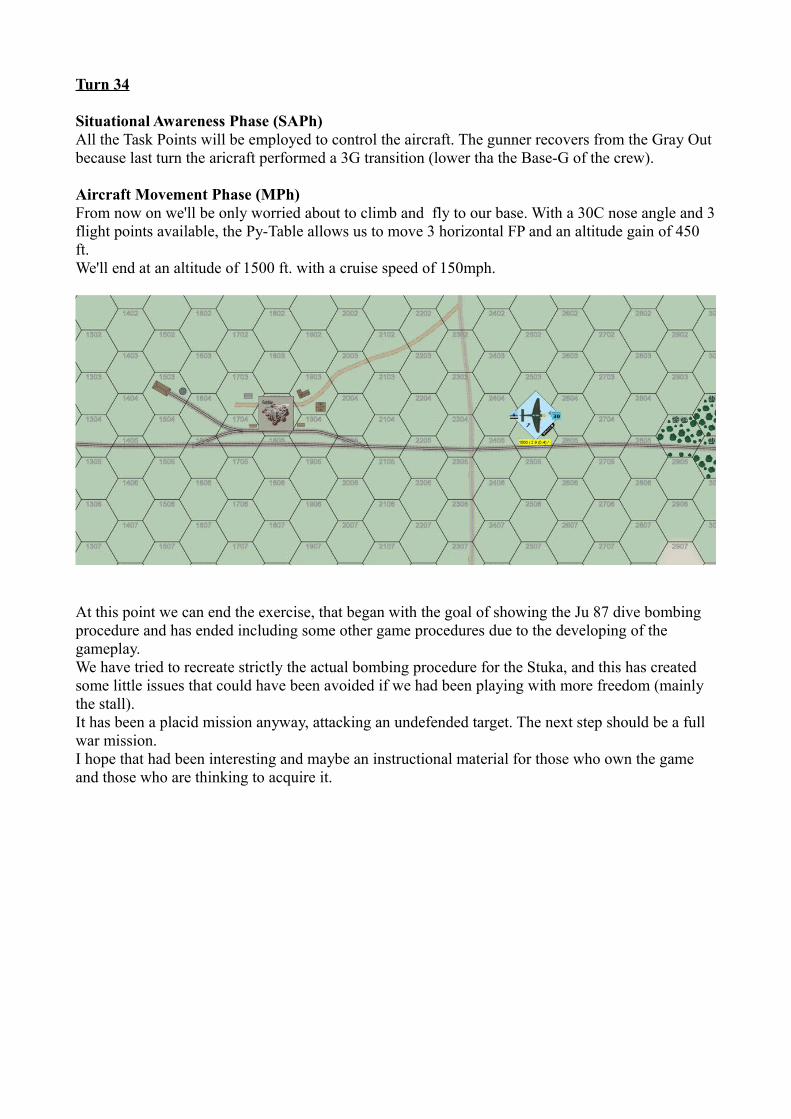
Aircraft Movement Phase (MPh)From now on we'll be only worried about to climb and fly to our base. With a 30C nose angle and 3 flight points available, the Py-Table allows us to move 3 horizontal FP and an altitude gain of 450 ft.We'll end at an altitude of 1500 ft. with a cruise speed of 150mph.
At this point we can end the exercise, that began with the goal of showing the Ju 87 dive bombing procedure and has ended including some other game procedures due to the developing of the gameplay.We have tried to recreate strictly the actual bombing procedure for the Stuka, and this has created some little issues that could have been avoided if we had been playing with more freedom (mainly the stall).It has been a placid mission anyway, attacking an undefended target. The next step should be a full war mission.I hope that had been interesting and maybe an instructional material for those who own the game and those who are thinking to acquire it.
Top Related