


Languages
Pages
Legal

Fact Sheet No. 4.722 Crop Ser ies| I rr igat ion
Quick Facts•Propermaintenanceoftheirrigationsystemiscriticaltoensureuniformapplicationofwaterinturfareas.
• Irrigationsprinklerheadsthattilt,arebelowgrade,plugged,oroperateatthewrongpressure,etc.affecttheapplicationofirrigationwater.
• Inspectundergroundsprinklersystemsatleastonceayeartolocateandcorrectproblems.Ifyoudonotfeelcomfortablelocatingtheseproblems,contactaqualifiedCertifiedLandscapeIrrigationAuditor(CLIA),www.irrigation.org,orfindoutiftheColoradoStateUniversityExtensionLawncheckprogramisavailableinyourcounty.
• Ifyoudon’tfeelcomfortabledoingyourownmaintenance,contactaqualifiedCertifiedIrrigationcontractor(CIA),www.irrigation.org.
©ColoradoStateUniversityExtension.4/09.Revised10/14.
www.ext.colostate.edu
The ProcedureThe following can be accomplished when
the water is first turned on at the beginning of the irrigation season. Examine each irrigation sprinkler to determine if: • Areanypop-upsprayheads,impact
sprinklerorrotorsprinkler,nozzlesorsprinklerbodiesbroken? These need to be replaced with the same size and manufacturer parts (Figure 2).
• Aresprinklerfiltersclean? Replace missing filters.
• Isthesprinklerheadaboveorbelowgrade?Seelevelsprinklerheadswiththetopofthelawn(Figure 3). Use a bulls-eye level to identify tilted sprinkler heads (a $2 hardware store item) (Figure 4). Adjust tilted sprinkler heads by removing soil from the high side of the sprinkler body with a curved garden spade. Adjust the sprinkler body to the level position (half a bubble within the circle) and back-fill the void around the sprinkler body to the top of the lawn (see Figure 1). On sloping lawns, the level bubble should be on the up-slope side of the sprinkler. Sometimes the sprinkler bodies are tilted because a large root is pressing against the body (Figure 5). A solution is to dig the hole around the sprinkler a little bigger and use a dry-wall saw to cut the root on both sides of the sprinkler body. Back-fill the hole with the soil that was removed and realign the sprinkler. - Sprinkler heads that are too low do
not distribute the water properly as the water is deflected (Figure 6). All
by C. Swift and R.D. Khalsa*
sprinkler riser stems should be at least 4 inches or greater in length.
- Sprinkler heads that are too high may be damaged when mowing.
- Sprinkler heads that are too high or too low are a tripping hazard.
- In order to lift or lower the sprinkler head, you may need to adjust the swing pipe or use a different length nipple extension (Figure 7). Level the sprinkler body and back-fill with sand. Remove the nozzle and flush the sprinkler head.
• Isthetopoftheirrigationsprinklerheadparallelwiththeslopeofthelawn(Figure 8)?
• Arethebodiesofimpactsprinklersfilledwithdebris? Debris prevents the inner unit from extending to its full height and restricts the movement of the sprinkler unit. Removing the inner workings and cleaning out the body and the filter may be required (Figure 9). A specialized key is available from irrigation supply companies to remove the inner workings of impact sprinkler heads.
• Isthespacingofthesprinklersappropriateforthesprinklerhead? The proper spacing is critical to ensure uniform coverage of the irrigated area. Using graph paper, sketch a map of the lawn area. Turn each sprinkler zone on and flag each sprinkler head. Turn the water off and measure the distance between each sprinkler and log it on the lawn sketch.- The manufacturer’s web site provides
specifications to include appropriate spacing on each of their spray heads or nozzles. See links below. Irrigation contractors sometimes take shortcuts when installing systems, increasing the distance between sprinkler heads to reduce their cost by reducing the number of sprinkler heads per zone.
Irrigation: Inspecting and Correcting Turf Irrigation System Problems
*C. Swift, former Colorado State University Extension horticulture agent, Tri River Area, Grand Junction, CO.; R.D. Khalsa irrigation designer, Department of Interior, Bureau of Reclamation. Photos provided by C.E. Swift and A. Blessinger, certified landscape irrigation auditors.
**Kurt Jones, Colorado State University Extension agent, natural resources and agriculture, Chaffee County. 10/2014
Revised by Kurt Jones**
- If there is a large variation in sprinkler spacing; there are two options. Either move the sprinklers to improve the spacing or change the sprinkler nozzle size to improve the application uniformity.
• Areallthesprinklersonthesamezoneofthesametypeandmanufacture?- Rotor, impact and spray heads apply
different amounts of water per area. When different sprinkler types are on the same zone different amounts of water will be applied resulting in some areas receiving more water than other areas. The application rate may range from 0.4 inches per hour of water to over 2.0 inches per hour depending on the sprinkler type spacing and nozzle.
• Checkimpactandrotorsprinklerswithinterchangeablenozzlestoensuretheyhavethepropernozzle. Impact sprinklers are typically sold with one nozzle color. These are color coded to identify the amount of water they apply. Rotor sprinklers are sold with a nozzle tree with all of the nozzle sizes. The installer must select the proper nozzle for the application. If two sprinklers have the same nozzle color, and one sprinkler covers 90 degrees, it applies four times the amount of water as the sprinkler that waters 360 degrees. Replace nozzles to balance the application rate as necessary.
• Arenozzlesorsprayheadsdamaged?• Arevalveboxestoohighortoolow
(Figure10)? - Too high is a tripping hazard.- Three and 6-inch extension units are
available for boxes that are too low. - The high valve box may need to be
dug up and reset.
Turn the zone/station on and check the following. • Are the sprinklers applying a uniform
pattern of water (Figure 11)? If not, the nozzles or filter could be plugged. Nozzles for pop-up sprinklers should have a filter located under the nozzle. Remove and clean or replace the nozzle and/or filter.
• Are there cracks or leaks in each sprinkler head? Cracked sprinkler heads are often due to improper winterizing of the system or lawn-mower blight. Replace cracked sprinkler heads.
• Do the caps on top of pop-up spray heads leak? Tighten the cap by hand, or replace the cap and internal parts if necessary.
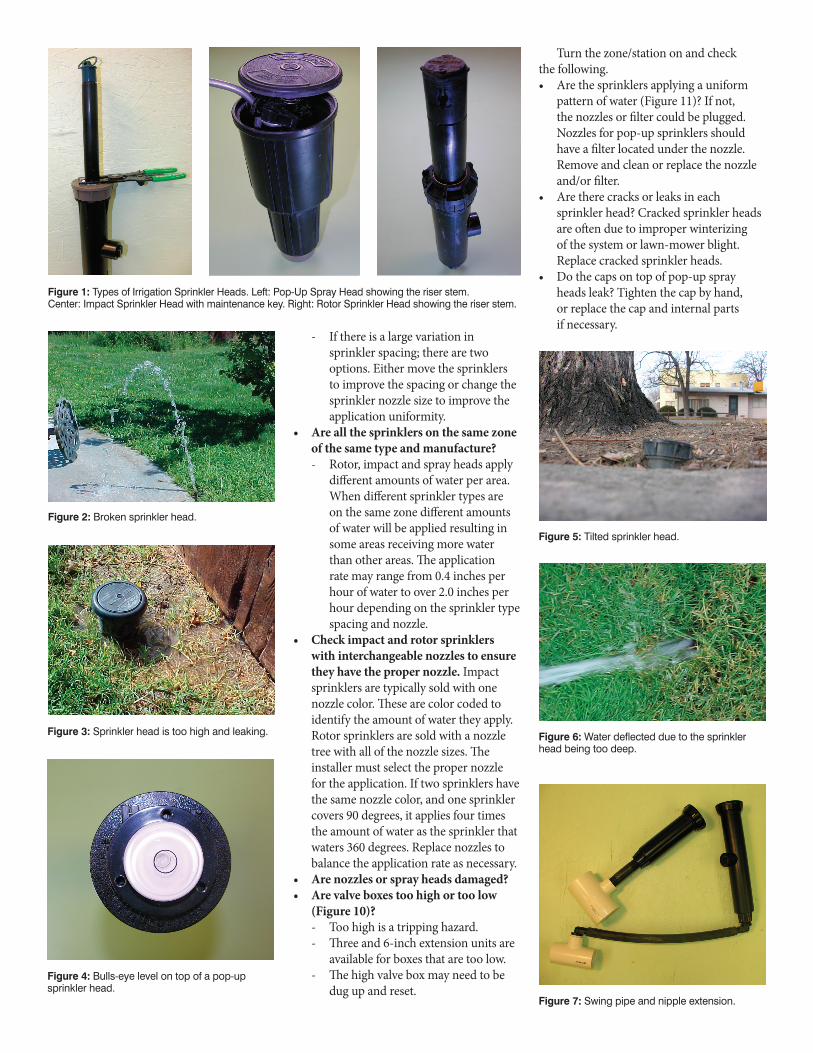
Figure 1:TypesofIrrigationSprinklerHeads.Left:Pop-UpSprayHeadshowingtheriserstem.Center:ImpactSprinklerHeadwithmaintenancekey.Right:RotorSprinklerHeadshowingtheriserstem.
Figure 2:Brokensprinklerhead.
Figure 3:Sprinklerheadistoohighandleaking.
Figure 4:Bulls-eyelevelontopofapop-upsprinklerhead.
Figure 5:Tiltedsprinklerhead.
Figure 6:Waterdeflectedduetothesprinklerheadbeingtoodeep.
Figure 7:Swingpipeandnippleextension.
• Do the sprinkler heads at the bottom of a slope continue to drain when the system is turned off? - Replace draining sprinkler heads
with check valves or seal-a-matic (SAM) sprinkler heads.
- If the problem is a check valve or SAM body, unscrew the cap and remove the inner mechanism to determine if the rubber ring or gasket is missing. If missing, replace the gasket or internal parts of the sprinkler (see Figure 12 and 13).
• Look for breaks in the pipe. This will be evident by extremely spongy and/or wet spots, or high water bills. The turf can even be forced up by the leak creating a bubble of turf. This is often due to improper winterization. Always connect the sprinkler head using the bottom inlet not the inlet on the side of the body. Another way to determine if there is a leak is to count up the nozzles in a zone and determine what the zone flow rate should be. Turn the zone on and time the water meter to see if the actual flow is close to the calculated flow.
• You may need to correct the arc and radius of throw of the water pattern to ensure proper coverage.
• Except for sprinkler heads/nozzle providing 360 degrees (arc) of coverage, most heads/nozzles need to be adjusted by lining up the left side of the arc with the left side of the area to be irrigated. Some brands of rotary sprinkler heads adjust from the left and others adjust from the right. Rotary and pop-up spray heads have a ratchet assembly that permits the riser stem to be twisted. Twist clockwise to avoid screwing the sprinkler body off the barbed elbow or riser nipple. Some nozzles have a flat spot or mark as the left edge indicator to make it easier to set the left edge. Once the left side of the water pattern has been adjusted, the sprinkler head or nozzle will most likely need to be adjusted to cover the remaining area. With stream rotor nozzles, the right side of the arc can be adjusted by turning a collar on the nozzle. With rotary sprinkler heads a special tool may be required to adjust the arc.
• Pop-up spray nozzles come in different degrees of arc; 90 degrees, 180 degrees, 360 degrees, etc. Ensure the nozzles used
Definitions
Arc–thedegreesofwatercoverage,i.e.90degrees,180degrees,360degreesetc.
Matched Precipitation Rate (MPR) nozzles–theprecipitationrateisthesameregardlessofthewateringarcandradiusofthrow.
Nozzle–thefinalorificethatcontrolsthecharacteristicsoftheflowofwaterasitexitsthesprinkler.
Precipitation rate–thevolumeofwaterappliedinaspecificarea,duringaspecificamountoftime.
Radius of throw–thedistancefromthesprinklerheadtothefurthestpointofwaterapplication.
Sprinkler body–thecasinginwhichtheirrigationmechanismisenclosed.
Riser stem–theplasticormetaltubethatextendsabovethesprinklerbodywherethenozzleisattached.
Stream rotor–multiplestreamsofwaterrotatearoundthesprinkler,onestreamfollowingtheother.
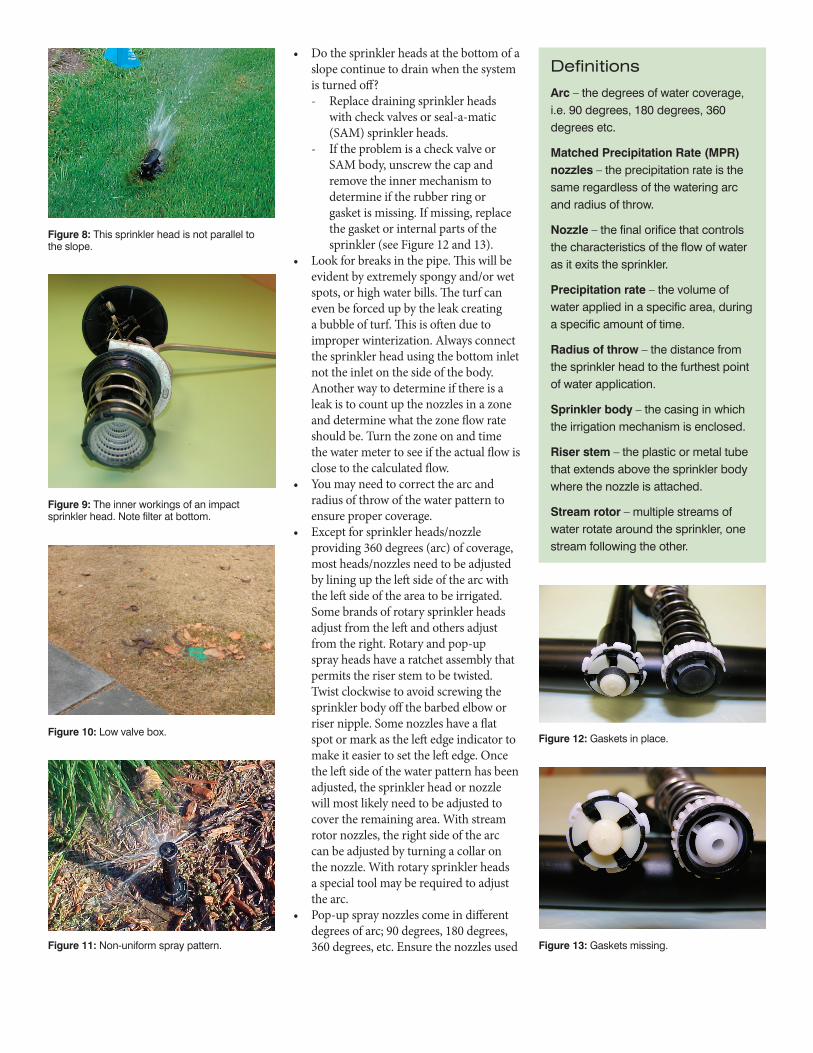
Figure 8:Thissprinklerheadisnotparalleltotheslope.
Figure 9:Theinnerworkingsofanimpactsprinklerhead.Notefilteratbottom.
Figure 10:Lowvalvebox.
Figure 11:Non-uniformspraypattern.
Figure 12:Gasketsinplace.
Figure 13:Gasketsmissing.
are ‘matched precipitation rate (MPR) nozzles.’ Variable and adjustable nozzles can be adjusted to cover a greater arc but may not be MPR nozzles.
• Impact sprinklers have two wire clips on the riser stem just below the nozzle. Squeeze the clips and reset them to cover the desired arc. Some 360-degree rotors and impact sprinklers are non-reversing.
• Once the arc is set, adjust the radius. Rotary and impact sprinkler heads have a variety of nozzle sizes and trajectory angles that can be used to change the flow and radius of throw. If that is unsatisfactory, sprinkler heads have a screw that protrudes into the stream of water emitted from the nozzle. Adjusting the screw changes the radius of throw. The screw on the top of the spray nozzle (Figure 16) is used to change the radius of throw. When adjusting the screw to increase the radius of throw to the proper distance, the nozzle size or type may need to be changed.
Additional Tips• In some cases, a pinched or plugged
pipe results in inadequate water at one or more sprinkler heads. This can be checked by using a pressure gauge. (See Figures 14 and 15).
• If the pressure at the sprinkler head is too low, reduce the nozzle size (rotor and impact sprinkler heads) or change spray nozzles to stream rotor nozzles (pop-up sprinkler body). This may solve the problem (Figure 16), but this will reduce the radius of throw on rotors and impact sprinklers.
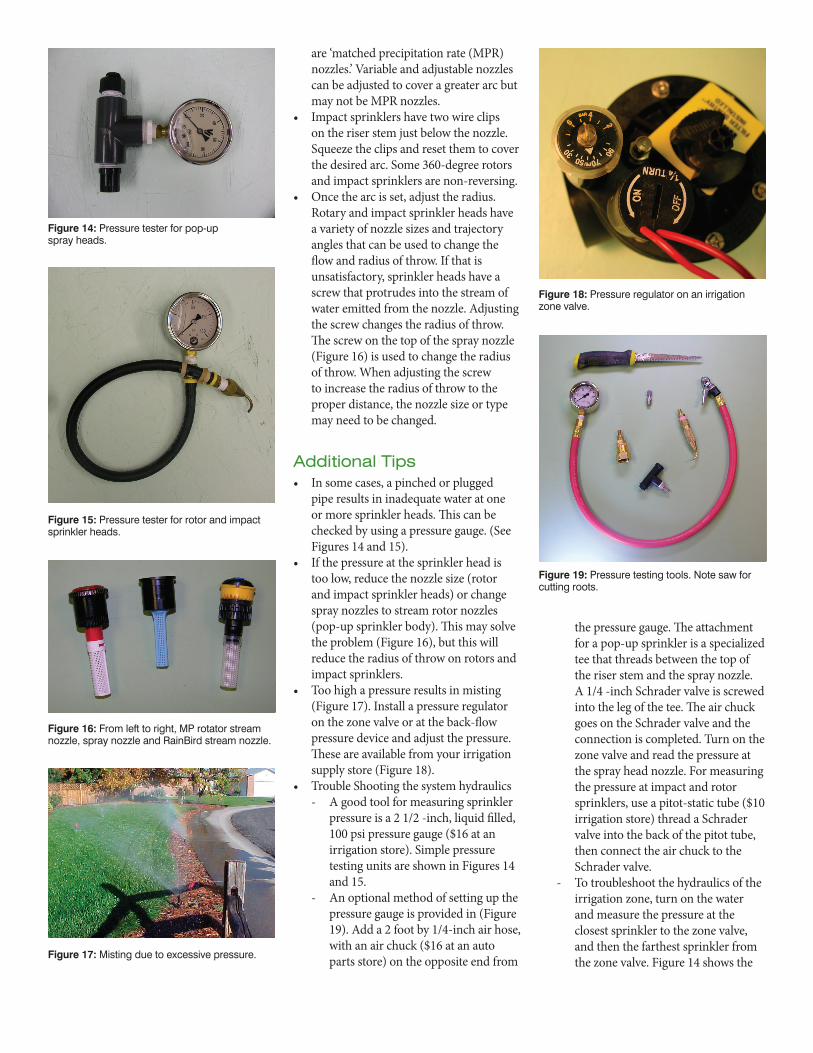
• Too high a pressure results in misting (Figure 17). Install a pressure regulator on the zone valve or at the back-flow pressure device and adjust the pressure. These are available from your irrigation supply store (Figure 18).
• Trouble Shooting the system hydraulics- A good tool for measuring sprinkler
pressure is a 2 1/2 -inch, liquid filled, 100 psi pressure gauge ($16 at an irrigation store). Simple pressure testing units are shown in Figures 14 and 15.
- An optional method of setting up the pressure gauge is provided in (Figure 19). Add a 2 foot by 1/4-inch air hose, with an air chuck ($16 at an auto parts store) on the opposite end from
Figure 14:Pressuretesterforpop-upsprayheads.
Figure 15:Pressuretesterforrotorandimpactsprinklerheads.
Figure 16:Fromlefttoright,MProtatorstreamnozzle,spraynozzleandRainBirdstreamnozzle.
Figure 17:Mistingduetoexcessivepressure.
Figure 18:Pressureregulatoronanirrigationzonevalve.
Figure 19:Pressuretestingtools.Notesawforcuttingroots.
the pressure gauge. The attachment for a pop-up sprinkler is a specialized tee that threads between the top of the riser stem and the spray nozzle. A 1/4 -inch Schrader valve is screwed into the leg of the tee. The air chuck goes on the Schrader valve and the connection is completed. Turn on the zone valve and read the pressure at the spray head nozzle. For measuring the pressure at impact and rotor sprinklers, use a pitot-static tube ($10 irrigation store) thread a Schrader valve into the back of the pitot tube, then connect the air chuck to the Schrader valve.
- To troubleshoot the hydraulics of the irrigation zone, turn on the water and measure the pressure at the closest sprinkler to the zone valve, and then the farthest sprinkler from the zone valve. Figure 14 shows the

ColoradoStateUniversity,U.S.DepartmentofAgricultureandColoradocountiescooperating.CSUExtensionprogramsareavailabletoallwithoutdiscrimination.Noendorsementofproductsmentionedisintendednoriscriticismimpliedofproductsnotmentioned.
Figure 20:Insertthepitottubeinthewaterstream.
Figure 21:Compression.
Figure 22:Slipfittingshowingextensionfitting.
pressure gauge attachment for pop-up spray heads. Remove the nozzle and filter, screw on the adapter tee, and replace the filter and nozzle. To test the pressure of impact and rotor sprinkler heads, insert the pitot tube in the water stream as shown in Figure 20 and read the pressure on the gauge.
- If the difference in pressure is 10 percent or less, the hydraulics for the zone are good. If the pressure is between 10 percent and 20 percent, the system hydraulics are fair. If the difference in pressure is greater than 20 percent, there is a problem. Measure the pressure at the middle sprinkler in the zone. If the pressure is between 5 percent to 10 percent of the first sprinkler, the problem is in the downstream pipe. If the pressure is between 10 percent and 20 percent, the problem is in the upstream pipe, or all the pipes in the zone are too small. The sprinkler nozzle flows are too great for the irrigation zone piping.
• Compression fittings and slip connections make repairs on PVC pipe easy (Figure 21 and 22).
• When you hire an irrigation contractor to correct irrigation system problems, use the Irrigation Association Consumer Handbook, www.irrigation.org, to ensure they are qualified and can explain the above troubleshooting procedure on how to troubleshoot the hydraulics.
• If you make the repairs to any pipes, remove the nozzles from the sprinkler heads downstream of the repair and turn on that zone to flush-out the fillings and dirt resulting from the repair. Replace the nozzles.
ReferencesColorado State University Extension
Lawncheck, www.extension. colostate.edu/lawncheckHunter Industries,
www.hunterindustries.comThe Irrigation Association,
www.irrigation.orgRainBird,
www.rainbird.comToro Irrigation,
www.toro.com/watermgmtColorado State University Extension Fact
Sheet 4.714, Backflow Prevention Devices, and 4.719, Wintering Sprinkler Systems
Top Related