


Languages
Pages
Legal


CENTER FOR CONVERGENCE AND EMERGING
NETWORK TECHNOLOGIES – CCENT
School of Information Studies
Syracuse University
IPv6 Security Analysis TECHNICAL REPORT: T.R. 2014-002
Authored by: Jose Gonzalo Bejar
(revised by) Carlos E. Caicedo
May / 2014

Page 1 of 46
Index
Index .......................................................................................................................................... 1
IPv6 Security Analysis ............................................................................................................... 4
Abstract .................................................................................................................................. 4
Introduction ............................................................................................................................ 4
IPv6 Key Concepts ................................................................................................................. 4
IPv6 Network Discovery Protocol messages...................................................................... 5
IPv6 router advertisement messages................................................................................... 5
IPv6 ICMP redirect messages............................................................................................. 5
IPv6 Security Issues ............................................................................................................... 6
Scanners .............................................................................................................................. 6
Man-In-The-Middle attacks ................................................................................................ 6
Denial of Service attacks .................................................................................................... 6
IPv6 Security Testbed ............................................................................................................ 7
Proposed testing scenarios .................................................................................................. 8
Reconnaissance ............................................................................................................... 8
Man-In-The-Middle ........................................................................................................ 8
Denial of service ............................................................................................................. 8
IPv6 analysis tools .............................................................................................................. 7
IPv6 network setup ............................................................................................................. 9
Tests and Results .................................................................................................................. 12
Scan using global unicast addresses ................................................................................. 12
Conditions ..................................................................................................................... 12
Procedure ...................................................................................................................... 12
Results ........................................................................................................................... 12
Analysis......................................................................................................................... 13
Scan using link-local addresses ........................................................................................ 14
Conditions ..................................................................................................................... 14
Procedure ...................................................................................................................... 14
Results ........................................................................................................................... 14
Analysis......................................................................................................................... 16

Page 2 of 46
Scan using multicast addresses ......................................................................................... 16
Conditions ..................................................................................................................... 16
Procedure ...................................................................................................................... 16
Results ........................................................................................................................... 16
Analysis......................................................................................................................... 17
MITM attack in the local network with a router .............................................................. 18
Conditions ..................................................................................................................... 18
Procedure ...................................................................................................................... 18
Results ........................................................................................................................... 19
Analysis......................................................................................................................... 22
MITM attack in the local network with a router behind a firewall .................................. 22
Conditions ..................................................................................................................... 22
Procedure ...................................................................................................................... 23
Results ........................................................................................................................... 23
Analysis......................................................................................................................... 24
MITM attack in the local network with a firewall ............................................................ 25
Conditions ..................................................................................................................... 25
Procedure ...................................................................................................................... 25
Results ........................................................................................................................... 26
Analysis......................................................................................................................... 27
DoS due to router advertising messages ........................................................................... 28
Conditions ..................................................................................................................... 28
Procedure ...................................................................................................................... 29
Results ........................................................................................................................... 29
Analysis......................................................................................................................... 32
DoS due to invalid gateway .............................................................................................. 33
Conditions ..................................................................................................................... 33
Procedure ...................................................................................................................... 33
Results ........................................................................................................................... 33
Analysis......................................................................................................................... 35
DoS due to ICMPv6 redirects ........................................................................................... 35
Conditions ..................................................................................................................... 35
Procedure ...................................................................................................................... 35
Results ........................................................................................................................... 36
Analysis......................................................................................................................... 36

Page 3 of 46
Conclusions and Recommendations..................................................................................... 37
References ............................................................................................................................ 39
Appendixes ........................................................................................................................... 40
Installation of THC-IPv6 toolkit ....................................................................................... 40
Installation of SI6 Networks' IPv6 Toolkit ....................................................................... 40
Configuration files ............................................................................................................ 40
Cronus router configuration .......................................................................................... 40
Rhea router configuration ............................................................................................. 42
Gaia firewall configuration ........................................................................................... 44

Page 4 of 46
IPv6 Security Analysis
Jose G Bejar
Abstract
A growing concern in networks and the Internet is security. With an increasing necessity to
migrate to the ‘new’ IPv6 protocol, security stands on the center of the discussion since users
expect it to solve problems found in IPv4, along with other limitations. This work aims to test
three traditional security issues for network layer protocols which include scanners, man-in-
the-middle attacks, and denial of service attacks, understand how they work and whether or
not it is a protocol or implementation issue. Through a set of nine different scenarios, this
study shows different tests performed on an IPv6-only network implemented in the CCENT
laboratory at Syracuse University. Each scenario is fully described and documented.
Conclusions and recommendations are listed at the end.
Introduction
ARIN, the entity that manages the assignment of IPv4 resources for Canada, the U.S. and
most Caribbean countries, has announced that it enters phase four of the IPv4 countdown
plan, which means that officially there is only one class-A block of public IPv4 addresses left
in their domain1. This does not only present a new challenge for networks that require public
access to the Internet, but highlights the increasing necessity of deploying IPv6 on current
and new networks. IPv6 offers a much larger space of IP addresses by using blocks of 128
bits to write an address. This ‘new’ protocol also includes additional features meant to solve
inherent problems in IPv4 and some security issues. In this study, three of these security
issues are tested and analyzed. Probably the most important thing to identify a protocol’s
weaknesses and analyze them and propose solutions is to understand how it works. Thus,
tests described below have been planned to use IPv6 audit tools in evaluating protocol
characteristics.
IPv6 Key Concepts
This study has been structured as a continuation of a previous IPv6 security assessment
written in the CCENT laboratory (Rawal et.al, 2010). For this reason, this study does not
provide a full explanation of IPv6 and its features. Instead we start discussing three key
concepts required for the tests mentioned in this study. Understanding these concepts along
with strong network and IPv6 knowledge will help readers understand results of the tests and
identify IPv6 limitations.
1 ARIN Official Website: https://www.arin.net/resources/request/countdown_phase4.html

Page 5 of 46
IPv6 Network Discovery Protocol (NDP) messages
NDP is a protocol created for IPv6 to “solve a set of problems related to the interaction
between nodes attached to the same link.” IPv6 defines local-link addresses in addition to
global and unique addresses. Having these addresses changes how networks deal with
packets in the network layer and creates new issues that need to be addressed. Among these
issues are how to locate routers on the same network, how to advertise network prefix and
other useful parameters to clients on a network, how to provide information required for auto-
configuration, resolve duplicate IPv6 addresses on a link, and how to indicate to clients better
paths for packets across the network (Narten, Nordmark, Simpson & Soliman, 2007).
ICMP packets from IPv4 have been replaced by messages in this protocol which are
supported with the use of ICMPv6. RFC4861states that “Neighbor Discovery defines five
different ICMP packet types: A pair of Router Solicitation and Router Advertisement
messages, a pair of Neighbor Solicitation and Neighbor Advertisements messages, and a
Redirect message.” (Narten et al, 2007)
IPv6 router advertisement messages
The network discovery protocol (NDP) defines router advertisement messages as packets
used to announce a router on a network. Other functions for these packets include
broadcasting network parameters such as prefix and default gateway, and indicate whether a
user should use SLAAC to configure its IP address or find a DHCP on the network. Although
some OS’s allow users to configure how to set up its IPv6 address, these packets indicate
what configuration should be used when automatic IPv6 configuration is in place.
The IETF defines router advertisement messages as “routers advertise their presence together
with various link and Internet parameters either periodically, or in response to a Router
Solicitation message. Router Advertisements contain prefixes that are used for determining
whether another address shares the same link (on-link determination) and/or address
configuration, a suggested hop limit value, etc.” (Narten et al, 2007)
IPv6 ICMP redirect messages
The IPv6 redirect message has been created as a mechanism to inform interfaces on a
network of a different router that should be preferred. Clients listen to these packets and
resend information pointing to the address indicated in the redirect message. Although these
packets are used to point to legitimate routers and gateways, it can also be used to redirect
traffic to malicious destinations when a malicious node is successful at crafting redirect
messages. The IETF describes redirect messages as packets “used by routers to inform hosts
of a better first hop for a destination.” (Narten et al, 2007)

Page 6 of 46
IPv6 Security Issues
Scanners
Scanners are software that tests a network or device to obtain information about it. There are
several types of scanners. For example, some scanners called vulnerability scanners are used
to identify vulnerabilities on devices and their configuration. Other scanners, such as IP and
port scanners, are used to find hosts connected to a network. Port scanners usually consist of
a first stage of finding hosts and a second stage of identifying open ports and other system
information. Systems’ information provided by scanners is not relevant to this study.
However, scanning a network to find hosts is relevant since it covers the network layer where
IPv6 operates.
The IETF describe port scanners as “an attack that sends client requests to a range of server
port addresses on a host, with the goal of finding an active port and exploiting a known
vulnerability of that service” (Shirey, 2000). In this study, scanners are not considered attacks
but a stage previous to a security attack. As in real world, scanners are the equivalent to
surveillance put in place by a thief to understand the best way of breaking into a house.
Man-In-The-Middle attacks
Man-in-the-Middle (MITM) attacks, as its name suggests, is an attack in which a message is
intercepted, read or copied, and re-transmitted to its final destination. In this attack, neither
the sender nor the receiver is aware of the attacker intercepting all messages in their
communication. The OWASP2 lists a couple of techniques that can be used to implement a
MITM attack. Regardless the technique used, the MITM attack is successful when the
attacker intercepts a connection and acts as a proxy, being able to “read, insert and modify the
data in the intercepted communication.”
A MITM attack starts in the network or data link layer. In this study, this attack will be tested
in these two levels regardless of the use that it can have in other layers. MITM techniques
usually set the scenario for a deeper attack that involves capturing user credentials, gathering
confidential information, and so forth. Tests proposed below are designed to verify that a
MITM attack in an IPv6 network can be performed and exploited to access information going
to a victim’s node/system.
Denial of Service attacks
One of the best descriptions of a denial of service attack is provided by the US-CERT in its
website. It states that a Denial of Service (DoS) is an attack where an “attacker attempts to
prevent legitimate users from accessing information or services. By targeting your computer
and its network connection, or the computers and network of the sites you are trying to use,
an attacker may be able to prevent you from accessing email, websites, online accounts
(banking, etc.), or other services that rely on the affected computer” (McDowell, 2009).
2 The Open Web Application Security Project (OWASP) is an open-source web application security project. The
OWASP community includes corporations, educational organizations, and individuals from around the world

Page 7 of 46
In other words, in the IT world a denial of service attack consists of an attacker that finds a
way of keeping legitimate users from accessing a service on a network. This can be by either
performing some technical attack on the victim, or by compromising network devices or
servers so users cannot access services on it. The most common and obvious type of DoS
attack occurs when an attacker "floods" a network with information (McDowell, 2009). Also,
some DoS attacks are designed to keep servers busy with unnecessary tasks to the point that
they cannot attend requests from legitimate users.
IPv6 Security Testbed
IPv6 analysis tools
Evaluation of security on an IPv6 network can be done by using several tools available for
free in the Internet. It is important to mention that these tools have been developed for
auditing, trouble-shooting, and academic purposes only, and shall not be used for other
purposes. These tools implement some of the common attacks and allow researchers and
network administrators to verify IPv6 implementation and protocol features in their networks.
THC-IPv6, also known as The Hackers’ Choice IPv6 toolkit, is the largest and most popular
set of IPv6 auditing tools available on the Internet. At the time of this report, the toolkit in its
version 2.5 includes over 60 different tools capable of performing a wide range of audit
activities from creating fake router advertisement messages and other network discovery
protocol messages, launching smurf and DoS attacks and performing 6to4 tunnel tests and
IPv6 implementation tests on devices. The following list describes the tools relevant to this
study only (description of the tools have been taken from the toolkit website). To find further
information regarding additional tools and updates to the toolkit, refer to its official website3.
alive6: a scanner that detects all systems listening to this address.
denial6: a collection of denial-of-service tests against a target.
dos-new-ip6: detects new devices and tells them that their chosen IP collides on the
network (DOS).
fake_advertiser6: sends fake host announcements on the network.
fake_router6: announce a device as a router on the network (with the highest priority).
flood_advertise6: flood a target with random neighbor advertisements.
flood_redir6: flooding a target with ICMPv6 redirects.
flood_router6: flood a target with random router advertisements.
parasite6: ICMP neighbor solicitation/advertisement spoofer that sets up a MITM
attack.
redir6: redirect traffic to the attacker (MITM) with an ICMP6 redirect spoofer.
sendpees6: generates a special neighbor solicitation requests to keep the CPU busy.
The SI6 Networks' IPv6 Toolkit is a set of security assessment tools developed by Fernando
Gont to evaluate resiliency of IPv6 devices and IPv6 security features. The toolkit includes
13 different tools that can be used to create different types of IPv6 packets. This toolkit is
3 THC-IPv6 Website: https://www.thc.org/thc-ipv6/

Page 8 of 46
particularly famous for its versatility and wide range of options when creating IPv6 packets.
Some tools perform similar tasks as their equivalents in the THC-IPv6 toolkit, but provide
several additional options to teak packets and perform refined attacks. The following list
describes the tools relevant to this study only (description of the tools have been taken from
the toolkit website). To find further information regarding additional tools and updates to the
toolkit, refer to its official website4.
na6: sends arbitrary Neighbor Advertisement messages.
ns6: sends arbitrary Neighbor Solicitation messages.
ra6: sends arbitrary Router Advertisement messages.
rd6: sends arbitrary ICMPv6 Redirect messages.
scan6: an IPv6 address scanning tool.
Finally, monitoring and troubleshooting tools are used in this study to capture messages,
verify requests and responses, and analyze traffic generated before, during, and after an attack
has been launched. Wireshark and TCPdump are utilized to capture and evaluate network
packets on different devices. ‘Monitor session’ is set up on a Cisco switch to redirect all
traffic in the switch to a monitor PC. Other troubleshooting tools such as ifconfig, netstat,
ipconfig, and route print are used to verify network configuration and attack results.
Proposed testing scenarios
Each of the following scenarios has been designed to illustrate different types of
vulnerabilities related to the IPv6 protocol. The list of scenarios is divided in 4 main areas
which include reconnaissance attacks, MITM attacks, DoS attacks, and victim’s resources
exhaustion. Each scenario will be tested using public IPv6 security analysis toolkits on an
IPv6-only network implemented in the CCENT lab at Syracuse University.
Reconnaissance
This scenario tests responses from clients in the network to scanning tools like alive6 or
scan6. The scenario will include the following variants:
1. Scan using global unicast addresses
2. Scan using link-local addresses
3. Scan using multicast addresses
Man-In-The-Middle
This scenario tests three common techniques to launch a MITM attack in the local and to a
remote network. Tools to be used in this scenario include fake_router26, parasite6, redir6,
na6, ra6, and rd6. Variants in this scenario include:
1. MITM attack in the local network with a router
2. MITM attack in the local network with a router behind a firewall
3. MITM attack in the local network with a firewall
Denial of service
4 SI6 Networks' IPv6 Toolkit Website: http://www.si6networks.com/tools/ipv6toolkit/

Page 9 of 46
This scenario tests DoS attacks based on IPv6 ND messages such as, bogus router
advertisements, fake responses to a DAD, and bogus neighbor solicitation requests. Smurf or
ICMP crafted packets attacks will not be tested in this study. Tools to be used in this scenario
include ra6, rd6, and fake_router26. Variants in this scenario include:
1. DoS due to router advertisement messages
2. DoS due to invalid gateway
3. DoS due to ICMPv6 redirects
IPv6 network setup
The testbed designed for this study counts with two routers, one firewall, one switch, one web
server, one DNS and DHCP server, two clients, one monitor machine, and one attacker. On a
first setup, Figure 1, the local network has a router as a default gateway to access the outside.
On a second setup, Figure 2, the local network has a router behind a firewall to access the
outside. On a third setup, Figure 3, the local network has a firewall as a default gateway to
access the outside. The attacker PC can be placed in different areas, depending on the
requirements of each testing scenario.
Virtual Environment
CronusCisco 2811
RheaCisco 2811
Client 1Windows 7
Client 2Ubuntu 12.04
AttackerKali
DNS/DHCP
WEB ServerMedia Server
fdd2:8a70:f46::/64fdd2:8a70:f46:1::/64 fdd2:8a70:f46:2::/64
fdd2:8a70:f46:1::10-ff/64
Fa0/0 Fa0/0Fa0/1 Fa0/1
fdd2:8a70:f46:1::2
fdd2:8a70:f46:2::2MonitorDebian
Figure 1: IPv6 Security Testbed Setup A
The gateway on the local network connects to a second router which is then connected to the
web server. The Second router and web server emulates an external network such as the
Internet.
The whole network is IPv6 only, and the DNS in the local network provides name resolution
to access the web server in the outside. The IPv6 prefix used in the network is
fdd2:8a70:0f46::/48. It is a unique local address (ULA) and it was generated for this study
using the IPv6 Unique Local Address RFC4193 generator provided by SixXS in its website5.
This ULA address has been registered in the SixXS website for use by the CCENT laboratory
in the Syracuse University. This is not mandatory since it is a unique local address, however
it could be useful for future identification.
5 SixXS IPv6 ULA RFC4193 registration Website: https://www.sixxs.net/tools/grh/ula/

Page 10 of 46
Virtual Environment
CronusCisco 2811
RheaCisco 2811
Client 1Windows 7
Client 2Ubuntu 12.04
AttackerKali
DNS/DHCP
WEB ServerMedia Server
fdd2:8a70:f46::/64
fdd2:8a70:f46:1::/64
fdd2:8a70:f46:2::/64fdd2:8a70:f46:1::10-ff/64
Fa0/0
Fa0/0
Fa0/1
Fa0/1
fdd2:8a70:f46:1::2
fdd2:8a70:f46:2::2
GaiaCisco ASA 5510
Fa0/0
Fa0/1
fdd2:8a70:f46:3::/64MonitorDebian
Figure 2: IPv6 Security Testbed Setup B
Virtual Environment
RheaCisco 2811
Client 1Windows 7
Client 2Ubuntu 1204
AttackerKali
DNS/DHCP
WEB ServerMedia Server
fdd2:8a70:f46::/64fdd2:8a70:f46:1::/64 fdd2:8a70:f46:2::/64
fdd2:8a70:f46:1::10-ff/64
Fa0/0 Fa0/0Fa0/1 Fa0/1
fdd2:8a70:f46:1::2
fdd2:8a70:f46:2::2
GaiaCisco ASA 5510
MonitorDebian
Figure 3: IPv6 Security Testbed Setup C
Table 1 and Table 2 summarize network parameters and configuration of devices in the
network. All detail in table 1 has been included in the diagrams.
Parameter Value
Generated ULA fdd2:8a70:0f46::/48
Local area network fdd2:8a70:0f46:1::/64
Servers network fdd2:8a70:0f46:2::/64

Page 11 of 46
Routers network fdd2:8a70:0f46:0::/64
Additional network fdd2:8a70:0f46:3::/64
Domain ipv6tb.edu
Table 1: IPv6 address details
Device Name Model IPv6 Address Network
LAN router cronus Cisco 2811
Fa0/0 – A fdd2:8a70:0f46:0::1/64 Routers
Fa0/0 - B fdd2:8a70:0f46:3::1/64 Additional
Fa0/1 fdd2:8a70:0f46:1::1/64 LAN
Outside router rhea Cisco 2811 Fa0/0 fdd2:8a70:0f46:0::2/64 Routers
Fa0/1 fdd2:8a70:0f46:2::1/64 Servers
Firewall gaia ASA 5510
Fa0/0 - B fdd2:8a70:0f46:3::2/64 Additional
Fa0/0 - C fdd2:8a70:0f46:0::1/64 Routers
Fa0/1 fdd2:8a70:0f46:1::1/64 LAN
Centos Web Server www Virtual Machine Eth0 fdd2:8a70:0f46:2::2/64 Servers
Fedora DNS/DHCP dns Dell Optiplex 745 Eth0 fdd2:8a70:0f46:1::2/64 LAN
Debian Monitor ipv6tbmon Dell Optiplex 745 Eth0 - LAN
Kali Atacker kali Dell M2400 Eth0 fdd2:8a70:0f46:1::f/64 LAN
Eth0 fdd2:8a70:0f46:2::f/64 Servers
Windows 7 PC PC 1 Dell Optiplex 745 Eth0 SLAAC/DHCP LAN
Ubuntu PC PC 2 Dell Optiplex 745 Eth0 SLAAC/DHCP LAN
Table 2: Network devices configuration details
Finally, the diagrams above do not include the switches used to connect the router to the
virtual machine, and the switch in the local network is a layer-2 Cisco 2960. The switch has
been configured with one VLAN and one monitor port. Since this configuration is irrelevant
to the purpose of this study, it has not been included in Table 2.

Page 12 of 46
Tests and Results
Scan using global unicast addresses
Conditions
This test is conducted using the IPv6 Security Testbed Setup A pictured in Figure 1. Only the
local network is used and no access to the outside is required. The attacker PC has been
connected to a port in the LAN switch.
DHCP server is up and running
TCP dump is running on the DHCP server to verify DHCP requests
Both client PCs have IPv4 disabled
Both client PCs have been rebooted before performing the test
The attacker PC has been connected to the LAN switch
Wireshark is running in both client PCs
The monitor PC is listening on the monitor switch port
Procedure
In this test the attacker PC attempts to identify all IPv6 devices active in the local network
using global unicast addresses (GUA). This test consists of 4 different scans. During the first
two scans both client PCs will have their firewalls on. During the last two scans, firewall are
turned off. Devices listed on Table 3 are connect and active.
Device Link-local address ULA address
Router Cronus fe80::215:f9ff:fef7:5949 fdd2:8a70:0f46:1::1/64
Fedora DNS/DHCP Server fe80:21a:a0ff:fe4e:34f0 fdd2:8a70:0f46:1::2/64
Client Windows 7 PC fe80::31f7:a831:a2b3:5a08 fdd2:8a70:0f46:1::5a/64
Client Ubuntu 12.04 PC fe80::21a:a0ff:fea4:4ae9 fdd2:8a70:0f46:1::e8/64
Table 3: Devices connected to the LAN for scan using GUA
The first and third scan using alive6 was run as follow:
alive6 eth0 fdd2:8a70:0f46:1::0-ff
This scan sends ICMPv6 packets to all IPv6 addresses between fdd2:8a70:0f46:1::0 and
fdd2:8a70:0f46:1::ff. The scan is run against this range IPv6 addresses because the DHCP is
configured to give addresses in this range.
The second and fourth scan using scan6 was run as follow:
scan6 –d fdd2:8a70:0f46:1::0-ff –p all -v
This sends ICMPv6 packets to the defined range of IP addresses.
Results
Out of the 4 scans performed 3 were able to identify all 4 devices in the local network. When
the firewall was active in both client PCs, only alive6 was able to identify all 4 devices.

Page 13 of 46
However, when all firewalls were turned off both tools identified all devices. Using alive6 the
scan took approximately 24 minutes to identify all devices and 25 minutes to complete the
scan.
To verify the results scan6 was utilized with different parameters, and even though the
packets generated were the same as alive6, the results in the first and second scan (firewall
on) were different.
Figure 4: Results of scan6 for GUA
Figure 5: Packets sent by scan6 for GUA
Analysis
Both scanners perform well using global unicast IP addresses. However, only alive6 was able
to identify all hosts, including Windows 7 with host firewall on. Most Windows 7 computers
will have its firewall on by default. Additionally, the time required by alive6 to scan a range
of hosts is impractical. Scanning a whole IPv6 network with prefix 64 would take years to
complete giving the size of the network. The scan used solicited-node multicast addresses.
Scan6, on the other hand, is way faster and its results resemble the results of typical IPv4
scanners. It took between 5 to 10 seconds to complete the scan. It is difficult to understand
why scan6 was not able to identify the Windows 7 device with firewall since it uses two
different methods to scan the network, and one of them is the same used by alive6. It leads to

Page 14 of 46
think that the fact that alive6 resends each packet 3 times and invest about 6 seconds on each
IP address makes it more reliable and impractical at the same time.
It is important to note that running scan6 with different parameters identified all systems, but
it did not list the GUA assigned by the DHCP to each client, but the GUA generated using
SLAAC. This IPv6 address is not listed as preferred on any of the clients. Running the same
scan but providing not preferred GUA as target did not produce any result.
Scan using link-local addresses
Conditions
This test is conducted using the IPv6 Security Testbed Setup A pictured in Figure 1. Only the
local network is used and no access to the outside is required. The attacker PC has been
connected to a port in the LAN switch.
DHCP server is up and running
TCP dump is running on the DHCP server to verify DHCP requests
Both client PCs have IPv4 disabled
The attacker PC has been connected to the LAN switch
Wireshark is running in both client PCs
The monitor PC is listening on the monitor switch port
Procedure
In this test the attacker PC attempts to identify all IPv6 devices active in the local network
using their local-link addresses. This test consists of 4 different scans. During the first two
scans both client PCs will have their firewalls on. Details of devices connected to the network
are the same as listed on Table 3.
The first and third scan using alive6 was run as follow:
alive6 eth0 -l
This scan sends ICMPv6 packets to all IPv6 devices connected to the local link. The second
and fourth scan with scan6 was run using the following command:
scan6 -i eth0 -L –p all -P local -v
Results
Both tools identified only 3 hosts in the local network when the host firewalls in the clients
were activated. None of them identified the Windows 7 PC even though the requests where
received by the PC. On the third and fourth scan, both tools were able to identify all PCs. In
this case both firewalls were turned off.

Page 15 of 46
Figure 5: Results of alive6 and scan6 for local-link addresses
Figure 6: Packets sent by alive6 to scan local-link addresses
Figure 7: Packets sent by scan6 to scan local-link addresses
As captures show in Figures 6 and 7, both tools use the all-nodes in the link multicast address
to receive response from devices in the network.

Page 16 of 46
Analysis
In this case both tools do not need to scan a pool of IP address but instead using the all-nodes
multicast address provides the required network information. Windows 7 firewall proves to
prevent scanners using this technique to find them. However, Ubuntu’s firewall does not
prevent scanners to find it. It is consistent with the fact that windows’ firewall blocks
ICMPv6 echo requests by default just like it does in IPv4. Behavior of both scanners using
multicast addresses is further discussed in the next scenario.
Scan using multicast addresses
Conditions
This test is conducted using the IPv6 Security Testbed Setup A pictured in Figure 1. Only the
local network is used and no access to the outside is required. The attacker PC has been
connected to a port in the
DHCP server is up and running
TCP dump is running on the DHCP server to verify DHCP requests
Both client PCs have IPv4 disabled
The attacker PC has been connected in the LAN switch
Wireshark is running in both client PCs
The monitor PC is listening on the monitor switch port
Procedure
In this test the attacker PC attempts to identify all IPv6 devices active in the local network
using multicast addresses. This test consists of 4 different scans. During the first two scans
both client PCs will have their firewalls on. During the last two scans, firewall are turned off.
Details of devices connected to the local network are the same as listed on Table 3.
The first and third scan using alive6 was run as follow:
alive6 eth0 -v
This scan sends ICMPv6 packets to all IPv6 devices connected to the local link. The second
and fourth scan with scan6 was run using the following command:
scan6 -i eth0 -L –p all -v
By default, both tools use multicast addresses and that is the reason why few options are
listed.
Results
The results in this case were basically the same as in the previous scenario. However, both
tools display global IP addresses. Scan6 displays both local-link and global unicast addresses

Page 17 of 46
for the devices identified. When firewalls were activated, both tools only found 3 devices.
Once firewalls were turned off both tools were able to find all devices.
Figure 8: Results of alive6 and scan6 for multicast addresses with firewalls on
Figure 9: Results of alive6 and scan6 for multicast addresses with firewalls off
Figure 10: Packets sent by scan6 using multicast addresses
Analysis
Both tools utilize a tweak on the multicast echo request to be able to identify all devices in
the network. Regardless the fact that windows’ firewall blocks echo requests and prevents
scanners using this techniques to identify them, windows has the characteristic of not
replying to regular multicast echo requests. This was confirmed by executing ping6 against

Page 18 of 46
the all-nodes multicast address from the attacker PC. Windows 7 did not reply to this request
even with the firewall off. According to Microsoft’s documentation, Windows assigns ‘scope
IDs’ to its IP addresses and these scope ID play an important role when using its local-link
address (Microsoft, 2010). For example, in order to send a ping using the local-link address in
windows, the command should specify the zone that points to the correct local-link address.
This must be done to send an echo request to a multicast address, for example.
Other differences between the results of these tools are the way the tools display the results of
the scan. By default, alive6 displays global unicast addresses of the identified hosts while
scan6 presents both local-link and global unicast addresses.
MITM attack in the local network with a router
Conditions
This test is conducted using the IPv6 Security Testbed Setup A pictured in Figure 1. The
attacker PC has been connected to a port in the LAN switch.
DHCP server is up and running
TCP dump is running on the DHCP server to verify DHCP requests
Both client PCs have IPv4 disabled
Both client PCs have been rebooted before performing the test
The attacker PC has been connected to the LAN switch
Wireshark is running in both client PCs and the attacker PC
The monitor PC is listening on the monitor switch port
Procedure
In this test the attacker PC attempts to set up a MITM attack by flooding fake router
advertisements in the local network. The MITM attack is also tested when the victim
accessed the web server in the outside. This scenario will be tested in two different ways
which include using fake router advertisements and ICMP redirect messages.
The attacker PC is configured in forwarding mode to forward all packets received to the real
router and do not disrupt the communication in the network.
Device Link-local address ULA address
Router Cronus fe80::215:f9ff:fef7:5949 fdd2:8a70:0f46:1::1/64
Fedora DNS/DHCP Server fe80:21a:a0ff:fe4e:34f0 fdd2:8a70:0f46:1::2/64
Client Windows 7 PC fe80::31f7:a831:a2b3:5a08 fdd2:8a70:0f46:1::5a/64
Client Ubuntu 12.04 PC fe80::21a:a0ff:fea4:4ae9 fdd2:8a70:0f46:1::e8/64
Attacker Kali fe80::224:e8ff:fee7:7bf8 fdd2:8a70:0f46:1::f/64
Table 4: Devices connected to the LAN for MITM behind a router

Page 19 of 46
To configure the attacker in forwarding mode, the following commands were used:
sysctl -w net.ipv6.conf.all.forwarding=1
ip route add default via fe80::215:f9ff:fef7:5949 dev eth0
The first test is run using fake_router26 as follow:
fake_router26 –A fdd2:8a70:0f46:1::/64 –a 30 eth0
The second test is run using redir6 as follows:
redir6 eth0 fe80::31f7:a831:a2b3:5a08 fdd2:8a70:0f46:2::2
fe80::215:f9ff:fef7:5949 fe80::224:e8ff:fee7:7bf8 00:24:e8:e7:7b:f8
redir6 eth0 fe80::21a:a0ff:fea4:4ae9 fdd2:8a70:0f46:2::2
fe80::215:f9ff:fef7:5949 fe80::224:e8ff:fee7:7bf8 00:24:e8:e7:7b:f8
Before and after each test, ping and traceroute are run on the client PCs to verify the path of
packets. Also, the clients will try to access the web server once the MITM attack is working.
Results
Once the first attack started, both clients received the router advertising messages and added
an IP address to their network interfaces. Windows 7 started using the new router
immediately and all traffic was sent to it. Results with Ubuntu 12.04 were intermittent. In
most situations Ubuntu sent all packets to the router. Ping and traceroute were used to verify
that the packets were sent through the attacker PC. The client went back and forth sending
packets to the attacker and sending packets to the router and during the last tests it only sent
traffic to the router. The traffic was flowing only one way from the clients to the attacker to
the router, and coming back from the router to the clients directly.
Testing access to the website revealed that the attack not only added a new IP address but
changes the network parameters in the clients. Since clients preferred the RA from the
attacker, they did not pay attention to the DNS provided by the DHCP, thus the domain
www.ipv6tb.edu that points to the web server could not be resolved. When trying accessing to
the webserver using its IP address instead of the domain name, it worked, and the attacker
was able to capture some HTTP packets. Specifically, TCP+SYN packets sent at the
beginning of the connection.

Page 20 of 46
Figure 11: Results on Windows PC during the first MITM test (router)
Figure 12: Routing table on Windows PC during the first MITM test (router)

Page 21 of 46
Figure 13: Routing table and results on Ubuntu during the first MITM test (router)
Finally, to verify these findings some changes were made in the commands used to run the
attacks. Fake_route26 includes an option to provide DNS using RDNSS. This feature is not
supported on Windows 7 by default. Ubuntu 12.04 supports this feature and it was able to
resolve the IP address of the web server.
fake_router26 –A fdd2:8a70:0f46:1::/64 –a 30 –D fdd2:8a70:0f46:1::2
eth0
When the client PC connected to the website the attacker was not able to capture any HTTP
traffic. All traffic was sent through the router and not through the MITM. Using traceroute to
verify the path of packets showed that packets are sent through the attacker only a few times.
fake_router26 –A fdd2:8a70:0f46:1::/64 –a 30 –D fdd2:8a70:0f46:1::2 –
p low eth0
parasite6 eth0
Figure 14: IPv6 neighbors registered on the Ubuntu PC during the first MITM test (router)
At this point, trying to capture all traffic, parasite6 was executed and the priority of the RAs
sent by the attacker lowered to stabilize the network, but it did not send all traffic through the

Page 22 of 46
attacker machine. It is important to mention that when checked the routing table in Ubuntu
always showed the router as the default gateway.
Finally, redirect ICMP packets sent using redir6 had no effect on the routing tables of the
clients or their routes. The packets were received, but did not insert the new path into the
clients’ routing tables.
Analysis
This scenario provides evidence that the MITM attack using fake router advertisements in
IPv6 is not as effective as ARP poisoning in IPv4. Although parasite6 performs an IPv6
neighbor spoofing (similar to IPv4 ARP poisoning) on IPv6, the results were inconsistent and
the network itself became instable. Using fake router advertisements successfully injected a
fake route on Windows and capture traffic sent from the inside to the outside. Traffic
traveling the other way was not sent to the attacker PC. It shows that the attacker performed a
“half” MITM since it was only able to capture outgoing traffic. It creates a precedent for the
next scenario where the same testing will be performing using a Firewall as a gateway.
Ubuntu proved to provide better security against this kind of scenario. It was a surprise that
Ubuntu avoided the attacker as a gateway even though it was included in the routing table.
Also, when DNS was specified during the attack, Ubuntu proved to go back and forth from
the attacker PC to the router, using the router more times and providing better stability.
Finally, this scenario also revealed that this kind of MITM attack is not ‘reliable’ in a real
scenario. This attack changes the DNS configuration on clients and prevents them from
resolving websites’ names. It means that in a real scenario, this attack would become a DoS
attack and users would not be able to access websites or servers in the outside. In IPv6 the
role of DNS servers is even more critical than it was in IPv4 given that IPv6 addresses are
much more difficult to remember. Breaking the connection of a user with their DNS makes
this kind of attack of little use.
MITM attack in the local network with a router behind a firewall
Conditions
This test is conducted using the IPv6 Security Testbed Setup B pictured in Figure 2. The
attacker PC has been connected to a port in the LAN switch.
DHCP server is up and running
TCP dump is running on the DHCP server to verify DHCP requests
Both client PCs have IPv4 disabled
Both client PCs have been rebooted before performing the test
The attacker PC has been connected to the LAN switch
Wireshark is running in both client PCs and the attacker PC
The monitor PC is listening on the monitor switch port
Page 23 of 46
Procedure
In this test the attacker PC attempts to set up a MITM attack by flooding fake router
advertisements in the local network. These advertisements will announce the attacker as a
router and direct traffic in the network to it. In this scenario the DCHP is used setting up the
router to advertise it in its RA packets.
The attacker PC is configured in forwarding mode to forward all packets to the real router
and do not disrupt the communication in the network. Table 4 shows the details of devices
connected to the LAN in this scenario.
To configure the attacker in forwarding mode, the following commands were used:
sysctl -w net.ipv6.conf.all.forwarding=1
ip route add default via fe80::215:f9ff:fef7:5949 dev eth0
The test is run using fake_router26 as follow:
fake_router26 –A fdd2:8a70:0f46:1::/64 –a 30 eth0
Redirect ICMP messages are not tested since they did not produce any result in previous
scenarios. Before and after each test, ping and traceroute are run on the client PCs to verify
the path of packets. Also, the clients try to access the web server once the MITM attack is
working.
Results
Before the attack started, the clients obtained IPv6 address and were able to access the web
server without problems using its domain name. Once the attack was launched, the Ubuntu
PC did change its default route after receiving the fake router advertisement packets and
registered the fake router in its routing table. In all tests performed in this scenario, the MITM
attack worked on the Ubuntu client. The Windows PC, similarly, started sending traffic to the
attacker once the attack was lunched. It registered the attacker as default router in its routing
table and all traffic was sent to it. The traceroute command revealed that traffic was first
being sent to the attacker and then to the router.
Traffic captured on the attacker and the monitor machine shows that the attacker is able to see
only outgoing messages sent by the victim. The attacker does not receive any response
coming back. Also, the Windows client lost connectivity had trouble finding the DNS to
resolve the web server’s domain name and could not access it. The actual IPv6 address of the
web server was used instead to reach the web server.

Page 24 of 46
Figure 15: Traceroute from the Windows client to the web server before the MITM attack
Figure 16: Traceroute from the Windows client to the web server during the MITM attack
Figure 17: Packets captured during the MITM attack on a router behind a firewall
Analysis
Similar to the results found in the previous scenario, these results reveal that the attacker is
able to capture traffic however it does not complete a total MITM attack because it cannot
read incoming packets. It is probable that the router identifies the destination of incoming
packets in its neighbors table and sends the packet straight to the client. This cannot be
verified in the packets captured. In fact, some redirect messages captured using Wireshark
suggest that the attacker might not be in the middle of the communication as a MITM attack
should be. If the first hypothesis is true, then having a firewall as default gateway should

Page 25 of 46
break the client’s connection and deny the MITM attack. The ASA 5510 is a stateful firewall
and opens a connection to the outside for the client that starts it. In the MITM case, if it is
truly a ‘half’ MITM attack, the firewall should block the connection since all replies are
destined to the client but the attacker started the connection.
The next scenario will be useful to verify whether there is an actual MITM happening using
RA messages. The monitor machine in this scenario captured traffic between clients and the
web server in the outside which also suggests that the packets are not being forwarded by the
attacker. However, the traceroute messages (Figure 16) show the attacker is the first gateway
reached.
Figure 18: ICMPv6 packets captured during the MITM attack on a router behind a firewall
MITM attack in the local network with a firewall
Conditions
This test is conducted using the IPv6 Security Testbed Setup C pictured in Figure 3. The
attacker PC has been connected to a port in the LAN switch.
DHCP server is up and running
TCP dump is running on the DHCP server to verify DHCP requests
Both client PCs have IPv4 disabled
Both client PCs have been rebooted before performing the test
The attacker PC has been connected to the LAN switch
Wireshark is running in both client PCs and the attacker PC
The monitor PC is listening on the monitor switch port
Procedure
In this test the attacker PC attempts to set up a MITM attack by flooding fake router
advertisements in the local network. In this case, given that the version of the IOS in the
firewall utilized does not support configuration of DHCP on the Router Advertisement
packets, SLAAC will be used without DNS. Tests against the website in the outside are carry
on using the IPv6 address of the web server. This scenario will be tested using fake router
advertisements.
The attacker PC is configured in forwarding mode to forward all packets received to the real
router and do not disrupt the communication in the network.
Page 26 of 46
Device Link-local address ULA address
Firewall Gaia fe80::215:c6ff:fefa:470f fdd2:8a70:0f46:1::1/64
Fedora DNS Server fe80:21a:a0ff:fe4e:34f0 fdd2:8a70:0f46:1::2/64
Client Windows 7 PC fe80::31f7:a831:a2b3:5a08 fdd2:8a70:0f46:1:31f7:a831:a2b3:5a08/64
Client Ubuntu 12.04 PC fe80::21a:a0ff:fea4:4ae9 fdd2:8a70:0f46:1:21a:a0ff:fea4:4ae9/64
Attacker Kali fe80::224:e8ff:fee7:7bf8 fdd2:8a70:0f46:1::f/64
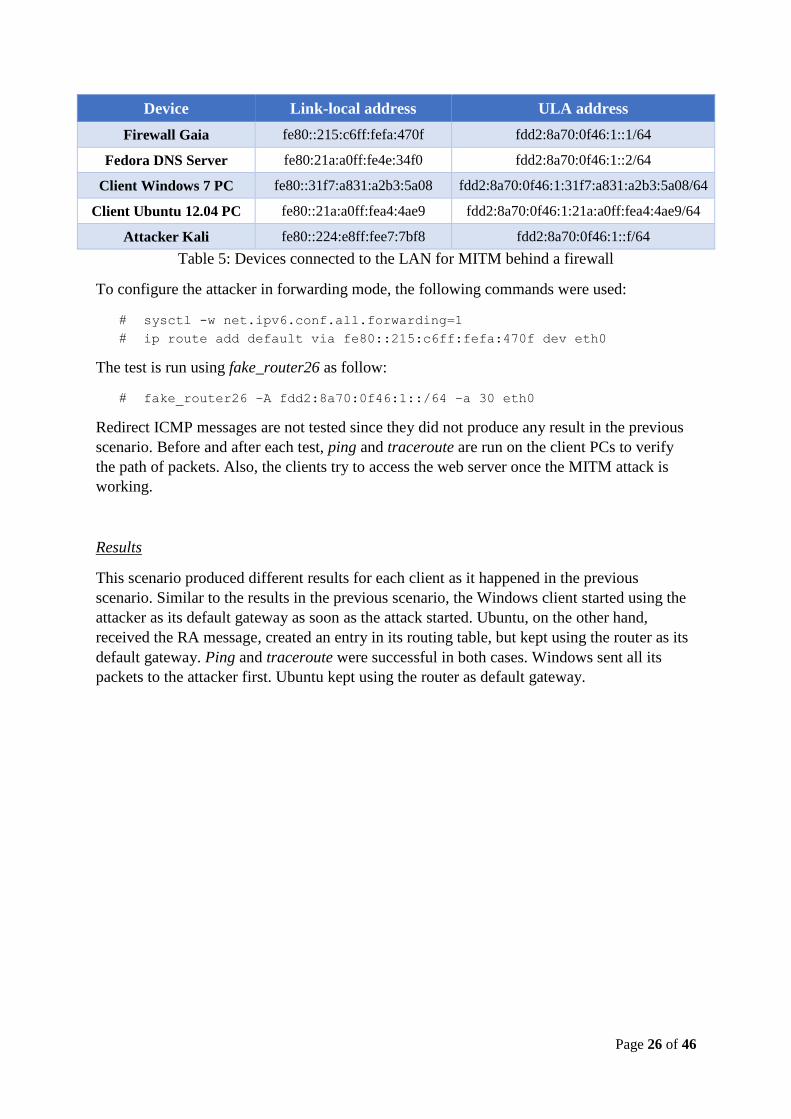
Table 5: Devices connected to the LAN for MITM behind a firewall
To configure the attacker in forwarding mode, the following commands were used:
sysctl -w net.ipv6.conf.all.forwarding=1
ip route add default via fe80::215:c6ff:fefa:470f dev eth0
The test is run using fake_router26 as follow:
fake_router26 –A fdd2:8a70:0f46:1::/64 –a 30 eth0
Redirect ICMP messages are not tested since they did not produce any result in the previous
scenario. Before and after each test, ping and traceroute are run on the client PCs to verify
the path of packets. Also, the clients try to access the web server once the MITM attack is
working.
Results
This scenario produced different results for each client as it happened in the previous
scenario. Similar to the results in the previous scenario, the Windows client started using the
attacker as its default gateway as soon as the attack started. Ubuntu, on the other hand,
received the RA message, created an entry in its routing table, but kept using the router as its
default gateway. Ping and traceroute were successful in both cases. Windows sent all its
packets to the attacker first. Ubuntu kept using the router as default gateway.
Page 27 of 46
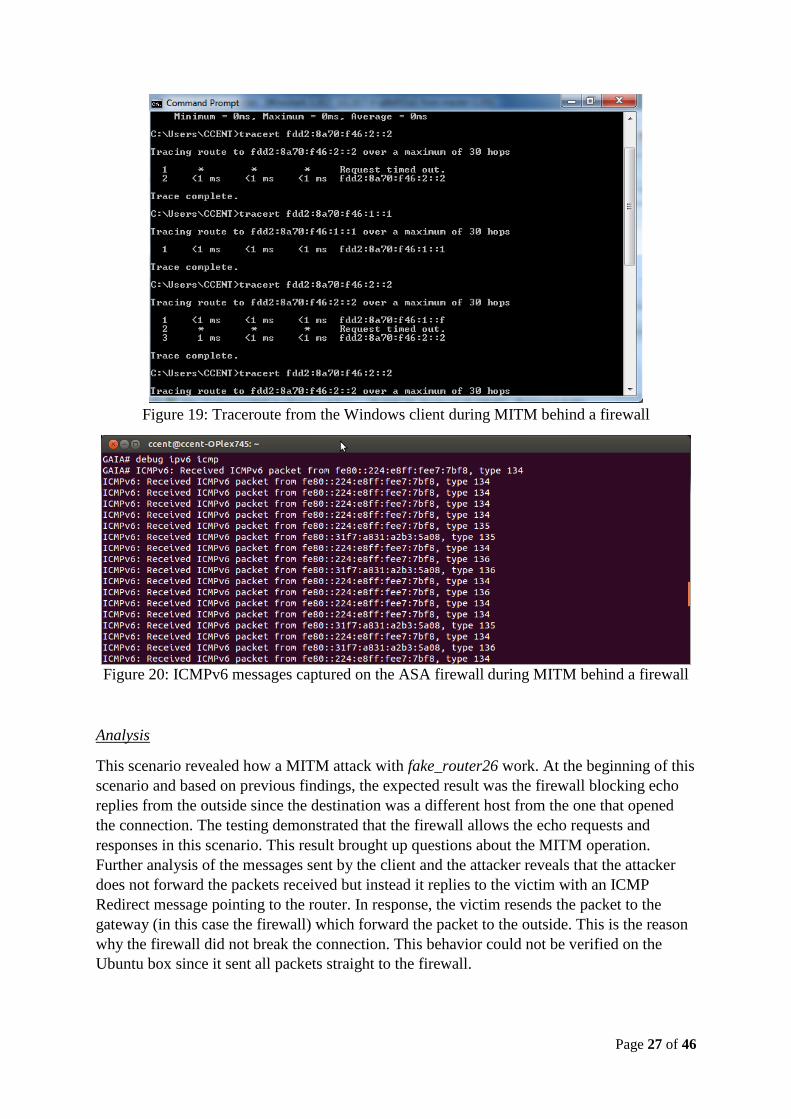
Figure 19: Traceroute from the Windows client during MITM behind a firewall
Figure 20: ICMPv6 messages captured on the ASA firewall during MITM behind a firewall
Analysis
This scenario revealed how a MITM attack with fake_router26 work. At the beginning of this
scenario and based on previous findings, the expected result was the firewall blocking echo
replies from the outside since the destination was a different host from the one that opened
the connection. The testing demonstrated that the firewall allows the echo requests and
responses in this scenario. This result brought up questions about the MITM operation.
Further analysis of the messages sent by the client and the attacker reveals that the attacker
does not forward the packets received but instead it replies to the victim with an ICMP
Redirect message pointing to the router. In response, the victim resends the packet to the
gateway (in this case the firewall) which forward the packet to the outside. This is the reason
why the firewall did not break the connection. This behavior could not be verified on the
Ubuntu box since it sent all packets straight to the firewall.

Page 28 of 46
Figure 21: Packets captured with Wireshark during MITM behind a firewall
These results also reveal that this technique does not create a real MITM attack but instead it
implements a sniffer that uses RA messages to capture all traffic from its victims. A proper
MITM attack would forward all traffic to the real gateway and probably change headers so
the gateway sends the replies back to the attacker. This scenario would require configuring
ip6tables to act as a proxy in the local network. It can be done either by IPv6 neighbor
spoofing (similar to IPv4 ARP spoofing) or generating RA messages without send redirect
ICMP packets. This also explains why the network became unstable in the first MITM attack
when parasite6 and fake_route26 were used at the same time.
Figure 22: HTML packets captured during MITM behind a firewall
Finally, regardless the technique used to receive traffic in the attacker machine, the MITM
attack would be successful if the attacker acts as proxy or gateway. Proxy might be a good
option if the attacker does not mean to change the current network. The proxy should be
configured to forward all packets and alter the header. Configuring the attacker as gateway
would require advertising a second network in order not to disrupt normal operation of the
target’s network. These alternative scenarios are out of the scope of this report.
DoS due to router advertising messages
Conditions
This test is conducted using the IPv6 Security Testbed Setup A pictured in Figure 1. The
attacker PC has been connected to a port in the LAN switch.
DHCP server is up and running
TCP dump is running on the DHCP server to verify DHCP requests
Both client PCs have IPv4 disabled
Both client PCs have been rebooted before performing the test

Page 29 of 46
The attacker PC has been connected to the LAN switch
Wireshark is running in both client PCs and the attacker PC
The monitor PC is listening on the monitor switch port
Procedure
During this test, the attacker attempts to slow down or make the attacker crash. The attacker
sends unlimited number of fake advertising messages on the network announcing routers that
do not exist. Victims will receive these messages and start processing them and recording the
advertised routers. Due to high amount of messages, this attack should exhaust all resources
on the victims and make the PCs crash.
Device Link-local address ULA address
Router Cronus fe80::215:f9ff:fef7:5949 fdd2:8a70:0f46:1::1/64
Fedora DNS/DHCP Server fe80:21a:a0ff:fe4e:34f0 fdd2:8a70:0f46:1::2/64
Client Windows 7 PC fe80::31f7:a831:a2b3:5a08 fdd2:8a70:0f46:1::5a/64
Client Ubuntu 12.04 PC fe80::21a:a0ff:fea4:4ae9 fdd2:8a70:0f46:1::e8/64
Attacker Kali fe80::224:e8ff:fee7:7bf8 fdd2:8a70:0f46:1::f/64
Table 6: Devices connected to the LAN for MITM behind a firewall
The test is run using ra6 as follow to send the RAs in the network:
ra6 -i eth0 -P ::/64#LA -F 2 -f 250 -z 1 -l -d ff02::1
The following commands send RAs to specific clients:
ra6 -i eth0 -P ::/64#LA -F 2 -f 250 -z 1 -l -d
fe80::31f7:a831:a2b3:5a08
ra6 -i eth0 -P ::/64#LA -F 2 -f 250 -z 1 -l -d
fe80::21a:a0ff:fea4:4ae9
Results
Results were different on Window and Linux. The DoS attack worked on Windows but it did
not work on Linux. This test showed two stages of the attack on the windows PC. At the
beginning, the computer started processing RAs and adding entries to its routing table. After
few minutes, the computer started slowing down and freezing for few seconds. After some
additional minutes the PC became totally unresponsive and it was impossible to open any
other application or use the computer at all. This behavior continued until the attack finished.
Once the attack stopped, it took a couple of minutes until Windows became operational one
more time.
Figure 23 below shows the entries added to the routing table in the Windows PC during the
attack. Figure 24 shows the RA packets captured on the monitor PC using Wireshark. The
attack was set up using a multicast address (all-nodes) and affected all devices.

Page 30 of 46
Figure 23: Routing table on the windows client during the fake RAs DoS attack
Figure 24: Fake RAs during the DoS attack captured with Wireshark
Figure 25 and 26 show resources utilization during and shortly after the attack on the
Windows PC. It was complicated to capture further screenshots of the state of the computer
during the attack since it became unresponsive. Once the attack was stopped and started over
again, it crushed the Windows PC quicker, in just few seconds. It may be due to the amount
of resources already assigned to the RA processing tasks on previous packets. The DoS attack

Page 31 of 46
succeeded on exhausting available resources on the client although the CPU was not 100%
utilized during and after the attack.
Figure 25: Windows resources utilization during the RAs DoS attack
Figure 26: Windows resources utilization right after the RAs DoS attack
The Ubuntu client had a different response to the attack. It dedicated some resources but after
several minutes of being under attack, it did not crash or freeze at all. It did show some signs
of slowing down during the attack and took some more time to open applications.
Nevertheless, it was fully responsive and did not stop working. Figure 27 shows the resources
allocation on Ubuntu during the attack. As the figure illustrates, the operating system does
not assign all its CPUs to process RA messages. Instead, it only assigns one CPU and
although that CPU can be exhausted from processing RA messages, the free CPU handles
other requests and keeps the OS operating.

Page 32 of 46
Figure 27: Ubuntu resources utilization during the RAs DoS attack
Analysis
The results of this test suggest that Windows has some issues handling RA messages on an
IPv6 network. Since the standard does not specify how these messages should be handled,
every operating system implements its own algorithms. In the case of Ubuntu, their solution
of limiting the amount of resources that can be assigned to the task of processing RA
messages prevents the OS form crashing. It also keeps it fully functional and mitigates the
impact of this kind of DoS attack.
Windows, on the other hand, did not do as well as Ubuntu handling RA messages. Microsoft
addressed a problem handling RA messages limiting the number of IPv6 gateways that can be
added to its routing table (Economou, 2014), yet it did not addressed the problem of
processing bogus RA messages. In this test is evident that Windows does not limit resources
to be used on RA messages and that causes the operating system to slow down and eventually
crash. Limiting resources as it happens on Ubuntu, or finding a more efficient way of
handling RA messages that does not require such amount of resources is necessary to solve
this problem. However, solving this problem might not be a priority since an attacker requires
layer 2 access to the network to perform this attack.

Page 33 of 46
DoS due to invalid gateway
Conditions
This test is conducted using the IPv6 Security Testbed Setup A pictured in Figure 1. The
attacker PC has been connected to a port in the LAN switch.
DHCP server is up and running
TCP dump is running on the DHCP server to verify DHCP requests
Both client PCs have IPv4 disabled
Both client PCs have been rebooted before performing the test
The attacker PC has been connected to the LAN switch
Wireshark is running in both client PCs and the attacker PC
The monitor PC is listening on the monitor switch port
Procedure
In this test the attacker PC attempts to inject fake outgoing routes on the victim’s routing
table using fake router advertisement messages. The attacker floods RAs with invalid router
IP addresses and uses different priorities. Victims will receive the RAs and process them.
They will insert the invalid routers as outgoing routes. If the attack is successful, victims
should lose connectivity in the network. Table 6 lists details of the devices connected to the
LAN for this test.
The test is run using ra6 as follow to send the RAs in the network:
ra6 -i eth0 -P ::/64#LA -F 2 -f 250 -z 1 -l -d ff02::1
The following commands send RAs to specific clients:
ra6 -i eth0 -P ::/64#LA -F 2 -f 250 -z 1 -l -d
fe80::31f7:a831:a2b3:5a08
ra6 -i eth0 -P ::/64#LA -F 2 -f 250 -z 1 -l -d
fe80::21a:a0ff:fea4:4ae9
Results
Figure 28: Packets on the network captured during the fake gateway DoS attack
The results of this attack were similar to the previous scenario in the sense that the attack
used was the same. In this scenario, few minutes after launching the attack, it was stopped
and connectivity from clients was tested. It included DNS connectivity as well as outside

Page 34 of 46
connectivity using ping ad traceroute. Figure 28 shows the RA packets sent to the victim and
also ICMPv6 echo messages (ping) during the test.
Figure 29: Ping and traceroute tools on the Windows PC during the fake gateway DoS attack
Figure 30: Routing table on the Windows PC during the fake gateway DoS attack

Page 35 of 46
Both PCs Windows and Ubuntu registered the new addresses from the fake RAs on their
IPv6 routing tables, yet none of them used these addresses as default gateway but the router.
In previous tests in the lab, it was possible to create a denial of service due to wrong
information in the RA messages. However, this time neither of them gave priority to the false
RA messages this time.
Analysis
The results in this test are similar to those found in the previous scenario. In this case, using
the tool ra6, the false RA messages were sent and both clients processed these messages.
Using other tools like flood_advertise6 had a slightly different result given the priorities on
the RA messages sent by the tool. When the priority of the RA message is set to high,
chances are that clients will select the new router advertisement messages as their default
gateway. The ra6 tool does not set a high priority on RA messages, thus both clients were
able to continue operating despite the long list of default gateways on their routing tables.
This attack would be successful if the attacker announces the fake RA messages as priority
gateways. This feature in IPv6 ICMP messages can present an issue if clients are not able to
distinguish between valid and bogus RA messages. To verify this, at the end of this testing,
the command fake_router26 was used one more time using the RA message high priority
(default) and announcing an invalid IPv6 address as default gateway. Even though this tool
does not flood the network intensively with RA messages, announcing an invalid IP address
as high priority router was enough to create denial of service attack on the network.
DoS due to ICMPv6 redirects
Conditions
This test is conducted using the IPv6 Security Testbed Setup A pictured in Figure 1. The
attacker PC has been connected to a port in the LAN switch.
DHCP server is up and running
TCP dump is running on the DHCP server to verify DHCP requests
Both client PCs have IPv4 disabled
Both client PCs have been rebooted before performing the test
The attacker PC has been connected to the LAN switch
Wireshark is running in both client PCs and the attacker PC
The monitor PC is listening on the monitor switch port
Procedure
During this scenario, the attacker PC attempts to redirect all traffic from victim’s to invalid
hosts and provoke a denial of service. The attacker sends arbitrary ICMPv6 redirect messages
in the network to make victims resend their messages to invalid IPv6 addresses. Victims will
receive these ICMPv6 packets and resend its messages to a fake IP address. Resending these

Page 36 of 46
messages should make them wait for an answer from the invalid IP and eventually create a
denial of service. Table 6 lists details of the devices connected to the LAN for this test.
The test is run using rd6 as follow to send the RAs in the network:
rd6 –i eth0 –-learn-router –-sanity-filters –L –-make-onlink
The following commands flood redirect messages to specific victims:
rd6 –i eth0 –-learn-router –d fdd2:8a70:0f46:1::5a –r
fdd2:8a70:0f46:2::/64 –t fe80::224:e8ff:fee7:7bf8 –R 100 –l
rd6 –i eth0 –-learn-router –d fdd2:8a70:0f46:1::e8 –r
fdd2:8a70:0f46:2::/64 –t fe80::224:e8ff:fee7:7bf8 –R 100 -l
Results
The attack was run to test redirect messages using multicast addresses and later using unicast
addresses. In the first case, the attack did not cause any effect on the victim. After and during
the attack, there was no change on the routing tables. The tool was set to listen to any packet
on the network and respond to them with redirect messages simulating an on-link device. The
attack was expected to create on-link connections for all packets on the victims, but the
attacker did not send any redirect message. The same command was tried using different
alternatives, like specifying the destination IP address or some other parameters available on
rd6, but with no luck.
The second case the rd6 command was used to send redirect packets every certain time to the
victim. The objective was to send redirect packets once the victim sent out a packet and trick
the victim to retransmit the packet to the attacker. This attack was not successful and no
packets were retransmitted from the victims to the attacker.
Analysis
Redirect messages can be a weak point in IPv6 configurations. However, these tests using
redirect messages show that in order to control the behavior of a victim using these ICMP
packets it is necessary to be passively listening to all traffic on the network and reply
correctly to the right packets. In addition, it would be necessary to create ICMPv6 redirect
packets that appear to be the reply from a packet sent by the victim. This behavior is possible
as it was seen on the MITM attack using fake_router26 but it has to be tuned in order to
obtain the desired results. Routers using these packets simply respond to any packet they
receive indicating the right destination that an IPv6 packet should have and the client resends
the packet. Thus, an attacker should create mock reply packets to redirect messages to either
a sniffer and then forward them to its real destination or simply redirect them to any invalid
IPv6 address and create a denial of service.

Page 37 of 46
Conclusions and Recommendations
Scanners are the first tool used by attacker to identify their victims and determine the
possible attacks to launch. IPv6 offers some protection against these tools although it is not
bulletproof. The large size of IPv6 addresses available for interfaces makes complicated for
scanners to use the traditional method of testing all IP addresses sending ICMP packets. In
the first scenario using alive6, this process took so long that using it in a real network with a
/64 prefix would be impractical.
Using crafted ICMPv6 echo packets as well as simple ICMPv6 echo packets sent to
multicast addresses is a better way of finding IPv6 addresses being used. The advantage of
crafted packets is that they can find Windows hosts as well. During the scanners, one of the
results was that Windows systems do not respond to multicast ICMPv6 echo packets.
However, crafted packets generate response from Windows systems which can be used to
scan a network. Finally, the time required to scan a network using multicast packets is
minimum.
Testing routing advertisement messages in the MITM attacks shows that the way that
operating systems handle these packets can create security vulnerability. It is difficult to
assign responsibility in this case because the standard does not specify how these packets
should be handled, so operating systems have freedom of implementing their own solutions.
As it has been exposed, Windows have some issues handling these packets.
Based on the results, it is concluded that the way that RA messages are handled makes
the difference between secure or unsecure environment. Chances are that a fully compliant
IPv6 network that uses IPsec overcomes these problems, however now OSs should find a
reliable mechanism for validating RA messages. These solutions could imply additional
packets sent over the network, MAC address verification, time-based network prioritization,
or even manual verification. All of these methods also bring new problems that could make
them impractical.
Although MITM attacks in IPv6 are still possible, it is a little bit more complicated to
set them up when compared to doing so in an IPv4 network now that IPv6 nodes use local-
link addresses. However, it is important to mention that a full IPsec implementation in IPv6
would overcome this problem, at least theoretically, due to its authentication process. A
MITM attack could not be successful in IPsec connects, or at least it would be more
complicated to implement.
Using the fake_router26 tool showed that a MITM attack is partially implemented.
This attack, in fact, converts the attacker machine on a sniffer that captures all traffic coming
from the victims but cannot capture traffic to them. It is because once the victim establishes a
connection with the destination, the communication happens between them only and the
attacker cannot sniff the traffic in a switched network. In order to capture all traffic, the
attacker should either advertise a different network and act as a gateway, or impersonate the
router and act as a proxy.
The tests revealed that a MITM attack can also become a Denial of Service attack
because it affects the DNS configuration of a network with DHCP, which also privates
regular users from accessing the Internet. Regular users would try to access a website or

Page 38 of 46
service and will not be able to due to the attack. If an environment like the one in this report
is implemented, other configurations could be tested to evaluate whether they produce similar
results. The main problem of using router advertising messages is that the victim stops
listening to the DHCP server and therefor stops receiving an IP address. It can disrupt the
operation of a corporate network becoming a denial of service attack.
Denials of Service attacks still present an issue in IPv6. The way that operating
systems handle RA packets is not an issue only for MITM attacks but for denial of service
attacks as well. Operating systems that process all RA messages without any kind of
validation or limit are vulnerable to exhaustion of resources using floods of RA messages.
Large amount of these messages make victims use all its resources on processing them and
eventually crashing. Although ways different operating systems handle these messages differ,
they should at least limit the resources available for this task or impose limits on the amount
of resources utilized. Windows systems have made some progress on this field yet it is still
behind.
Operating systems do not to protect their routing tables against fake routes which can
lead to denial of service situations. Operating systems should be able to identify when fake or
invalid routes have been injected to their routing tables through fake routing advertisement
messages. Operating systems can keep adding several routes to their tables and having more
than one gateway. However, routes should be evaluated to establish their validity and based
on those evaluations pick the best route and eliminate or ignore invalid router. Ubuntu does a
good job on this regard. Windows still needs some improvements.
Most of the attacks described in this report are only valid locally and their reach is
limited. However, in a wireless network for example, these attacks can have a great impact
and create serious issues. In corporate networks these kinds of attacks are not as effective as
hackers would like, but still wireless networks such as the ones used on airports or coffee
shops are vulnerable since attackers have access to the physical media and data layer. Users
connected to these networks and using web services that require sensitive information may
face security issues that may affect their information.
Redirect messages can be tested further using techniques to impersonate a router or
packets’ destination. Crafting specific attack packets with redirect messages is a possibility
but it requires some additional work or programming. It would be necessary write a script and
respond to network requests or specific packets. The main conclusion out of this is that
having redirect messages as a “response” packet, requires additional work to take advantage
of certain IPv6 vulnerabilities.
Finally, it is recommended to further extend this study by using some of the ideas
presented here as a starting point for other tests such as MITM attacks using a proxy or DoS
and MITM attacks using redirect messages.

Page 39 of 46
References
Economou, N. (Mar, 2014). Core Security. Microsoft Windows TCP IPv6 Denial of Service
Vulnerability. Retrieved from: http://blog.coresecurity.com/2014/03/25/ms14-006-
microsoft-windows-tcp-ipv6-denial-of-service-vulnerability/#sthash.iBLIqqwp.dpuf
McDowell, M. (Nev, 2009). US-CERT. Understanding Denial-of-Service Attacks. Retrieved
from: http://www.us-cert.gov/ncas/tips/ST04-015
Microsoft. (Apr, 2010). Developer Network. IPv6 Addressing. Retrieved from:
http://msdn.microsoft.com/en-us/library/aa917150.aspx
Narten, T., Nordmark, E., Simpson, W., & Soliman, H. (Sep, 2007). Internet Engineering
Task Force (IETF). RFC4861 Neighbor Discovery for IP version 6 (IPv6). Retrieved
from: http://tools.ietf.org/html/rfc4861
OWASP. (Apr, 2009). The Open Web Application Security Project. Man-in-the-middle
attack. Retrieved from: https://www.owasp.org/index.php/Main_Page
Rawal, A., Gopal, S., Kamat, R., Bejar, J. and Caicedo, C. (January 2010), Study of IPv6
Security Vulnerabilities, Technical Report T.R. 2014-01, Center for Convergence and
Emerging Network Technologies (CCENT) – Syracuse University,
http://ccent.syr.edu.
Shirey, R. (May, 2000). Internet Engineering Task Force (IETF). RFC2828 Internet Security
Glossary. Retrieved from: http://tools.ietf.org/html/rfc2828
Weber, J. (Feb, 2013). Ruhr-University Bochum. IPv6 Security Test Laboratory. Germany.
Retrieved from: http://blog.webernetz.net/2013/05/06/ipv6-security-master-thesis/
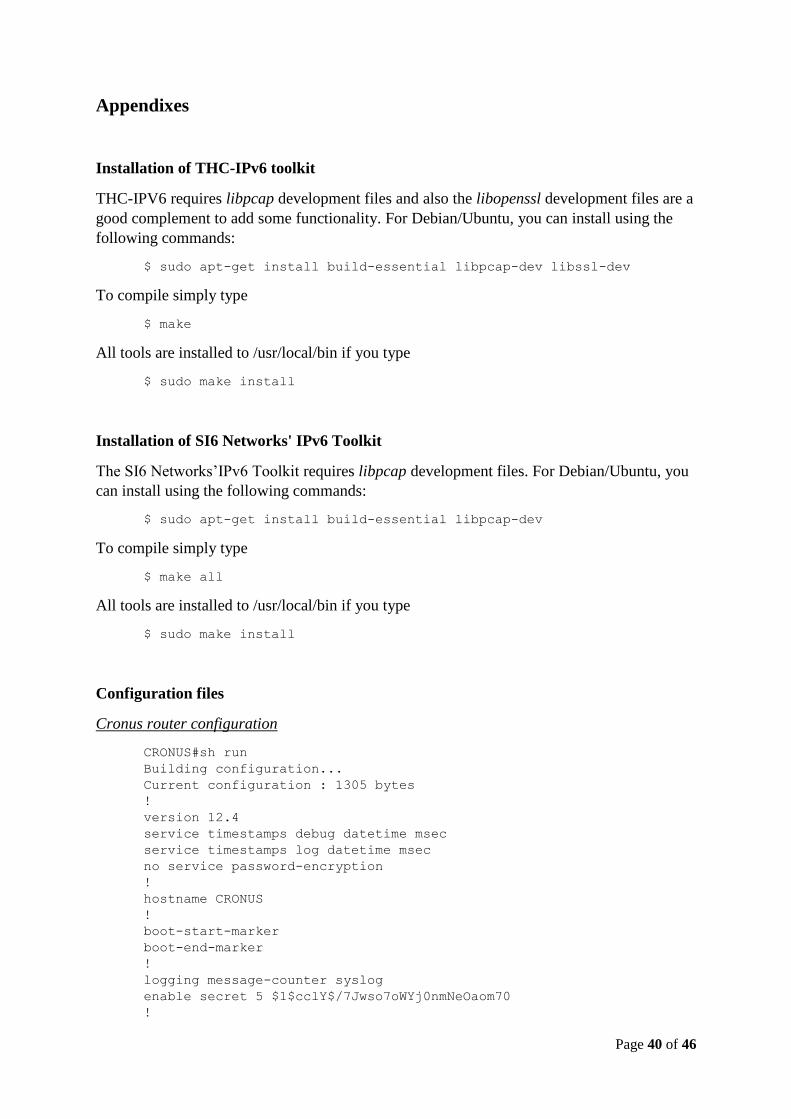
Page 40 of 46
Appendixes
Installation of THC-IPv6 toolkit
THC-IPV6 requires libpcap development files and also the libopenssl development files are a
good complement to add some functionality. For Debian/Ubuntu, you can install using the
following commands:
$ sudo apt-get install build-essential libpcap-dev libssl-dev
To compile simply type
$ make
All tools are installed to /usr/local/bin if you type
$ sudo make install
Installation of SI6 Networks' IPv6 Toolkit
The SI6 Networks’IPv6 Toolkit requires libpcap development files. For Debian/Ubuntu, you
can install using the following commands:
$ sudo apt-get install build-essential libpcap-dev
To compile simply type
$ make all
All tools are installed to /usr/local/bin if you type
$ sudo make install
Configuration files
Cronus router configuration
CRONUS#sh run
Building configuration...
Current configuration : 1305 bytes
!
version 12.4
service timestamps debug datetime msec
service timestamps log datetime msec
no service password-encryption
!
hostname CRONUS
!
boot-start-marker
boot-end-marker
!
logging message-counter syslog
enable secret 5 $1$cclY$/7Jwso7oWYj0nmNeOaom70
!

Page 41 of 46
no aaa new-model
memory-size iomem 15
!
dot11 syslog
ip source-route
!
!
ip cef
!
!
ipv6 unicast-routing
ipv6 cef
!
multilink bundle-name authenticated
!
!
!
voice-card 0
!
!
!
archive
log config
hidekeys
!
!
!
!
interface FastEthernet0/0
no ip address
duplex auto
speed auto
ipv6 address FDD2:8A70:F46::1/64
ipv6 ospf 1 area 0
!
interface FastEthernet0/1
no ip address
duplex auto
speed auto
ipv6 address FDD2:8A70:F46:1::1/64
ipv6 nd managed-config-flag
ipv6 ospf 1 area 0
!
interface Serial0/0/0
no ip address
shutdown
no fair-queue
clock rate 2000000
!
interface Serial0/0/1
no ip address
shutdown
clock rate 2000000
!
interface BRI0/3/0
no ip address
encapsulation hdlc

Page 42 of 46
shutdown
!
ip forward-protocol nd
no ip http server
no ip http secure-server
!
!
!
ipv6 router ospf 1
router-id 10.0.0.1
log-adjacency-changes
!
!
control-plane
!
!
!
line con 0
line aux 0
line vty 0 4
password CCENTadmin
login
!
scheduler allocate 20000 1000
end
CRONUS#
Rhea router configuration
RHEA#sh run
Building configuration...
Current configuration : 1461 bytes
!
version 12.4
service timestamps debug datetime msec
service timestamps log datetime msec
no service password-encryption
!
hostname RHEA
!
boot-start-marker
boot-end-marker
!
logging message-counter syslog
enable secret 5 $1$28xG$x/CL4g9v8dR1gsZV6kAMd1
!
no aaa new-model
memory-size iomem 15
!
dot11 syslog
ip source-route
!
!

Page 43 of 46
ip cef
!
!
ipv6 unicast-routing
ipv6 cef
!
multilink bundle-name authenticated
!
!
!
voice-card 0
!
!
archive
log config
hidekeys
!
!
!
!
interface FastEthernet0/0
no ip address
duplex auto
speed auto
ipv6 address FDD2:8A70:F46::2/64
ipv6 ospf 2 area 0
!
interface FastEthernet0/1
no ip address
duplex auto
speed auto
ipv6 address FDD2:8A70:F46:2::1/64
ipv6 ospf 2 area 0
!
interface Serial0/0/0
no ip address
shutdown
no fair-queue
clock rate 2000000
!
interface Serial0/0/1
no ip address
shutdown
clock rate 2000000
!
interface Serial0/1/0
no ip address
shutdown
clock rate 2000000
!
interface Serial0/1/1
no ip address
shutdown
clock rate 2000000
!
interface BRI0/3/0
no ip address

Page 44 of 46
encapsulation hdlc
shutdown
!
ip forward-protocol nd
no ip http server
no ip http secure-server
!
!
!
ipv6 route FDD2:8A70:F46:1::/64 FDD2:8A70:F46::1
ipv6 router ospf 2
router-id 10.0.0.2
log-adjacency-changes
!
!
!
control-plane
!
!
line con 0
line aux 0
line vty 0 4
password CCENTadmin
login
!
scheduler allocate 20000 1000
end
Gaia firewall configuration
GAIA# sh run
: Saved
:
ASA Version 8.2(5)
!
hostname GAIA
enable password isqIXvBpJkQir.ov encrypted
passwd 2KFQnbNIdI.2KYOU encrypted
names
dns-guard
!
interface Ethernet0/0
nameif outside
security-level 0
no ip address
ipv6 address fdd2:8a70:f46::1/64
!
interface Ethernet0/1
nameif inside
security-level 100
no ip address
ipv6 address fdd2:8a70:f46:3::2/64
!
interface Ethernet0/2
shutdown
no nameif

Page 45 of 46
no security-level
no ip address
!
interface Ethernet0/3
shutdown
no nameif
no security-level
no ip address
!
interface Management0/0
shutdown
no nameif
no security-level
no ip address
!
ftp mode passive
pager lines 24
mtu outside 1500
mtu inside 1500
ipv6 route inside fdd2:8a70:f46:1::/64 fdd2:8a70:f46:3::1
ipv6 route outside fdd2:8a70:f46:2::/64 fdd2:8a70:f46::2
icmp unreachable rate-limit 50 burst-size 10
no asdm history enable
arp timeout 14400
timeout xlate 3:00:00
timeout conn 1:00:00 half-closed 0:10:00 udp 0:02:00 icmp 0:00:02
timeout sunrpc 0:10:00 h323 0:05:00 h225 1:00:00 mgcp 0:05:00 mgcp-
pat 0:05:00
timeout sip 0:30:00 sip_media 0:02:00 sip-invite 0:03:00 sip-
disconnect 0:02:00
timeout sip-provisional-media 0:02:00 uauth 0:05:00 absolute
timeout tcp-proxy-reassembly 0:01:00
timeout floating-conn 0:00:00
dynamic-access-policy-record DfltAccessPolicy
no snmp-server location
no snmp-server contact
snmp-server enable traps snmp authentication linkup linkdown
coldstart
crypto ipsec security-association lifetime seconds 28800
crypto ipsec security-association lifetime kilobytes 4608000
telnet timeout 5
ssh timeout 5
console timeout 0
threat-detection basic-threat
threat-detection statistics access-list
no threat-detection statistics tcp-intercept
!
class-map inspection_default
match default-inspection-traffic
!
!
policy-map global_policy
class inspection_default
inspect icmp
inspect http
inspect ftp
inspect icmp error

Page 46 of 46
!
service-policy global_policy global
prompt hostname context
no call-home reporting anonymous
Cryptochecksum:<value hidden>
: end
Top Related