


Languages
Pages
Legal

Instructions for Installation of Oracle9i (Release 1) and Patches
Oracle9i Version 9.0.1.0 Patchset for Upgrade to Version 9.0.1.3.0 Patchset for Upgrade to Version 9.0.1.4.0
Security Patches
Office of Information and Instructional Technology
April 2003
Note: This is a draft version of the installation instructions. If you have comments or problems with the instructions, please contact OIIT Customer Services at [email protected].

April 2003 Page ii
Table of Contents Introduction ................................................................................................................... 1
Overview ......................................................................................................................................... 1 Rationale ......................................................................................................................................... 1 Assumptions .................................................................................................................................. 1 Objective ......................................................................................................................................... 1 Target Audience ............................................................................................................................. 1 Document Organization................................................................................................................. 2
Graphics and Conventions........................................................................................... 3 Graphics.......................................................................................................................................... 3 Conventions ................................................................................................................................... 4
Support .......................................................................................................................... 4 OIIT Customer Services ................................................................................................................ 4
Verifying Installation Requirements ............................................................................ 5 Section Overview ........................................................................................................................... 5 Time Estimate................................................................................................................................. 5 Check Hardware Requirements.................................................................................................... 5 Operating System Version Requirements................................................................................... 5 Operating System Patches Required........................................................................................... 6
Preparing to Start the Installation Process................................................................. 7 Section Overview ........................................................................................................................... 7 Time Estimate................................................................................................................................. 7 1. Mount CDs ......................................................................................................................... 7 2. Create Area for Disk Contents......................................................................................... 8 3. Copy Disk Contents to Correct Directory....................................................................... 8 4. Establish Network Connection ........................................................................................ 9 5. Log On................................................................................................................................ 9 6. Verify Environment Variables .......................................................................................... 9 7. Install Java Runtime Environment (JRE)...................................................................... 10
Installing Oracle9i Version 9.0.1.0 ............................................................................. 11 Section Overview ......................................................................................................................... 11 Time Estimate............................................................................................................................... 11
Installing the Software with the Oracle Universal Installer ................................ 11 1. Start Oracle Installer....................................................................................................... 11 2. Respond to Welcome ..................................................................................................... 11 3. Establish File Locations................................................................................................. 11 4. Select Product ................................................................................................................. 11 5. Select Installation Type .................................................................................................. 12 6. Install Minimum Components........................................................................................ 12 7. Select Operating System Groups.................................................................................. 12 8. Upgrade/Migrate Existing Database.............................................................................. 12 9. Do Not Create Database ................................................................................................. 12
April 2003 Page iii
Instructions for Installation of Office of Information Oracle9i and Patches and Instructional Technology
10. Review Installation.......................................................................................................... 12 Correcting Disk Error................................................................................................................... 13 11. Run Root.sh..................................................................................................................... 13 12. Finish Install .................................................................................................................... 13 13. Upgrade Database........................................................................................................... 13
Upgrading the Banner Database................................................................................ 14 Section Overview ......................................................................................................................... 14 Time Estimate............................................................................................................................... 14 Examples ...................................................................................................................................... 14 Assumptions ................................................................................................................................ 14
Setting Up the Database Environment................................................................. 15 1. Check Starting Point....................................................................................................... 15 2. Set Environment Variables ............................................................................................ 15 3. Backup Database ............................................................................................................ 15 4. Turn Archiving Off .......................................................................................................... 15 5. Avoid Running Out of Space ......................................................................................... 16 6. Compile Invalid Objects ................................................................................................. 16 7. Stop Listener ................................................................................................................... 17 8. Check Datafile Status ..................................................................................................... 17 9. Default Tablespaces ....................................................................................................... 17
Preparing to Upgrade ............................................................................................ 17 1. Init<sid>.ora Changes .................................................................................................... 17 2. Update the oratab File .................................................................................................... 18 3. Set Environment Variables ............................................................................................ 18 4. Create Database Links ................................................................................................... 18
Upgrading the Database........................................................................................ 19 1. Change Directory ............................................................................................................ 19 2. Start Up the Database..................................................................................................... 19 3. Spool Output ................................................................................................................... 19 4. Run Upgrade Script ........................................................................................................ 19 5. Spool Off .......................................................................................................................... 19 6. Run utlrp.sql .................................................................................................................... 19 7. Restart Database............................................................................................................. 19 8. Upgrade NCHAR Datatypes ........................................................................................... 19
Applying Upgrade Patches......................................................................................... 20 Applying Patches to Upgrade Oracle9i to Version 9.0.1.3.0 .............................. 20
Section Overview ......................................................................................................................... 20 Time Estimate............................................................................................................................... 20 1. Verify Environment Variables ........................................................................................ 20 2. Download the Patch Files .............................................................................................. 21 3. Unzip the Files................................................................................................................. 21 4. Shut Down Existing Databases ..................................................................................... 21 5. Shutdown Listeners........................................................................................................ 21
April 2003 Page iv
Instructions for Installation of Office of Information Oracle9i and Patches and Instructional Technology
6. Start Oracle Installer....................................................................................................... 21 7. Welcome Screen ............................................................................................................. 21 8. Establish File Locations................................................................................................. 21
Completing the Upgrade to 9.0.1.3.0 .................................................................... 22 1. Connect as sys................................................................................................................ 22 2. Start Database................................................................................................................. 22 3. Run catpatch.sql ............................................................................................................. 22 4. Validate All Invalid Objects ............................................................................................ 22 5. Restart Database............................................................................................................. 22
Applying Patch 2517300 to Upgrade Oracle9i to Version 9.0.1.4.0.................... 22 1. Download Patch Files..................................................................................................... 22 2. Check System Tablespace............................................................................................. 23 3. Unzip the Files................................................................................................................. 23 4. Shutdown Existing Databases....................................................................................... 23 5. Shutdown Listeners........................................................................................................ 23 6. Start Oracle 9.0.1.4.0 Installer........................................................................................ 24 7. Respond to Welcome ..................................................................................................... 24 8. Establish File Locations................................................................................................. 24 9. Verify Products................................................................................................................ 24
Completing Patch 2517300 Installation to Upgrade to Oracle9i Version 9.0.1.4.0 ......................................................................................... 25
1. Connect as sys................................................................................................................ 25 2. Start Database................................................................................................................. 25 3. Run catpatch.sql ............................................................................................................. 25 4. Update Internal Oracle Table ......................................................................................... 25 5. Validate All Invalid Objects ............................................................................................ 25 6. Restart database ............................................................................................................. 25
Installing Security Patches......................................................................................... 26 Section Overview ......................................................................................................................... 26 Time Estimate............................................................................................................................... 26
Installing Patch 2540219 ....................................................................................... 26 Patch Introduction ....................................................................................................................... 26 Patch Contents............................................................................................................................. 26 1. Shut Down Listeners ...................................................................................................... 26 2. Install Patch ..................................................................................................................... 26 De-installing if Errors Occur ....................................................................................................... 27
Installing Patch 2620726 ....................................................................................... 27 Patch Introduction ....................................................................................................................... 27 Patch Contents............................................................................................................................. 27 1. Shut Down Databases .................................................................................................... 27 2. Install patch ..................................................................................................................... 27 De-installing if Errors Occur ....................................................................................................... 28
April 2003 Page v
Instructions for Installation of Office of Information Oracle9i and Patches and Instructional Technology
Installing Patch 2642117 ...................................................................................... 28 Patch Introduction ....................................................................................................................... 28 Patch Contents............................................................................................................................. 28 1. Shut Down Databases .................................................................................................... 28 2. Install patch ..................................................................................................................... 29 De-installing the Patch for Errors............................................................................................... 29
Installing Oracle Patch 2642267 ........................................................................... 29 Patch Introduction ....................................................................................................................... 29 Patch Contents............................................................................................................................. 29 1. Shut Down Databases .................................................................................................... 29 2. Install patch ..................................................................................................................... 29 De-installing the Patch for Errors............................................................................................... 30
Installing Patch 2642439 ....................................................................................... 30 Patch Introduction ....................................................................................................................... 30 Patch Contents............................................................................................................................. 30 1. Shut Down Databases .................................................................................................... 30 2. Install patch ..................................................................................................................... 31 De-installing the Patch for Errors............................................................................................... 31
Completing Post-upgrade Procedures...................................................................... 32 Overview ....................................................................................................................................... 32 Time Estimate............................................................................................................................... 32 1. Modify the Listener ......................................................................................................... 32 2. Modify oratab................................................................................................................... 32 3. Make Init<sid>.ora Changes .......................................................................................... 32 4. Turn Archiving On .......................................................................................................... 33 5. Shutdown and Restart Database................................................................................... 33 6. Backup Database ............................................................................................................ 33 7. Restart the Database ...................................................................................................... 33 8. Test Listener.................................................................................................................... 33 9. Compile Demo Programs ............................................................................................... 34 10. Remove Obsolete Parameters ....................................................................................... 34
Recompiling Banner ................................................................................................... 36 Time estimate ............................................................................................................................... 36 1. Download .mk Files for Banner ..................................................................................... 36 2. Recompile Banner Code ................................................................................................ 36
Regenerating Forms ................................................................................................... 36 Regenerate .fmbs......................................................................................................................... 36
Completing the Final Step .......................................................................................... 36 Update COMPATIBLE Parameter ............................................................................................... 36
April 2003 Page vi

Instructions for Installation of Office of Information Oracle9i and Patches and Instructional Technology
Instructions for Installation of Oracle9i (Release 1) and Patches
Introduction Overview This document provides instructions for the OIIT Oracle9i upgrade
path. More detailed explanations are available in supporting documentation from Oracle. The complete reference guide, Oracle9i Installation Guide Release (9.0.1.0.0) for Unix Systems, is located online at http://docs.oracle.com/.
This document defines steps required for both HP-UX and Solaris.
You should preview the entire document before beginning the upgrade process.
Rationale All Banner products, as of Banner 6.x, including Internet Native Banner (INB), require Oracle9i, Release 2.
Oracle9i Release 2 depends upon Oracle9i Release 1 and the patch sets identified in this document being applied before upgrading to Release 2.
Oracle is de-supporting Version 8.1.6.x as of December 2003.
Assumptions These instructions assume that you are starting from Oracle 8.1.6.3.
Objective These instructions guide you through the process of installing the following:
• Oracle9i Release 9.0.1.0.0
• Patchset to upgrade to 9.0.1.3.0
• Patchset to upgrade to 9.0.1.4.0
• Required security patches
Target Audience Database Administrators and System Administrators
April 2003 Page 1
Instructions for Installation of Office of Information Oracle9i and Patches and Instructional Technology
Document Organization
This document includes the following sections:
• Introduction
• Graphics and Conventions
• Support
• Verifying Installation Requirements
• Preparing to Start the Installation Process
• Installing Oracle9i Version 9.0.1.0.0
• Upgrading the Banner Database
• Applying Upgrade Patches
• Installing Security Patches
• Completing Post-upgrade Procedures
• Recompiling Banner
• Regenerating Forms
• Completing the Final Step
April 2003 Page 2
Instructions for Installation of Office of Information Oracle9i and Patches and Instructional Technology
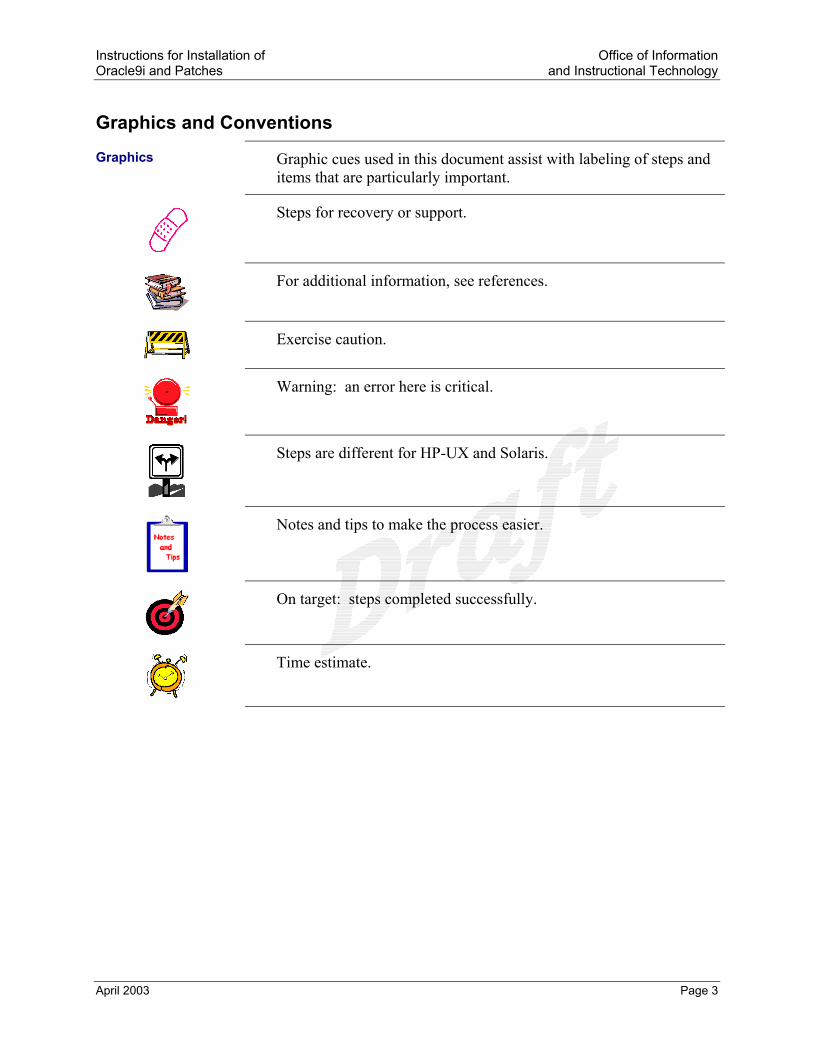
Graphics and Conventions Graphics Graphic cues used in this document assist with labeling of steps and
items that are particularly important.
Steps for recovery or support.
For additional information, see references.
Exercise caution.
Warning: an error here is critical.
Steps are different for HP-UX and Solaris.
Notes and tips to make the process easier.
On target: steps completed successfully.
Time estimate.
April 2003 Page 3

Instructions for Installation of Office of Information Oracle9i and Patches and Instructional Technology
Conventions The following conventions are used in this document:
Commands or code that you enter are shown in bold in a different font that looks like the following example:
HPUX> /usr/sbin/pfs_mount /dev/cdrom /SD_CDROM
Items that you select or “click” are shown in bold small caps like the following example:
Double click FONTS, click the FONT DATABASE button, and click ADD.
Screen names are shown as follows:
Upgrading or Migrating an Existing Database
Support OIIT Customer Services
Report problems or request support by contacting OIIT Customer Services in one of the following ways:
• Web http://www.usg.edu/customer_services
• Toll-free phone 1-888-875-3697
• E-mail [email protected]
April 2003 Page 4
Instructions for Installation of Office of Information Oracle9i and Patches and Instructional Technology
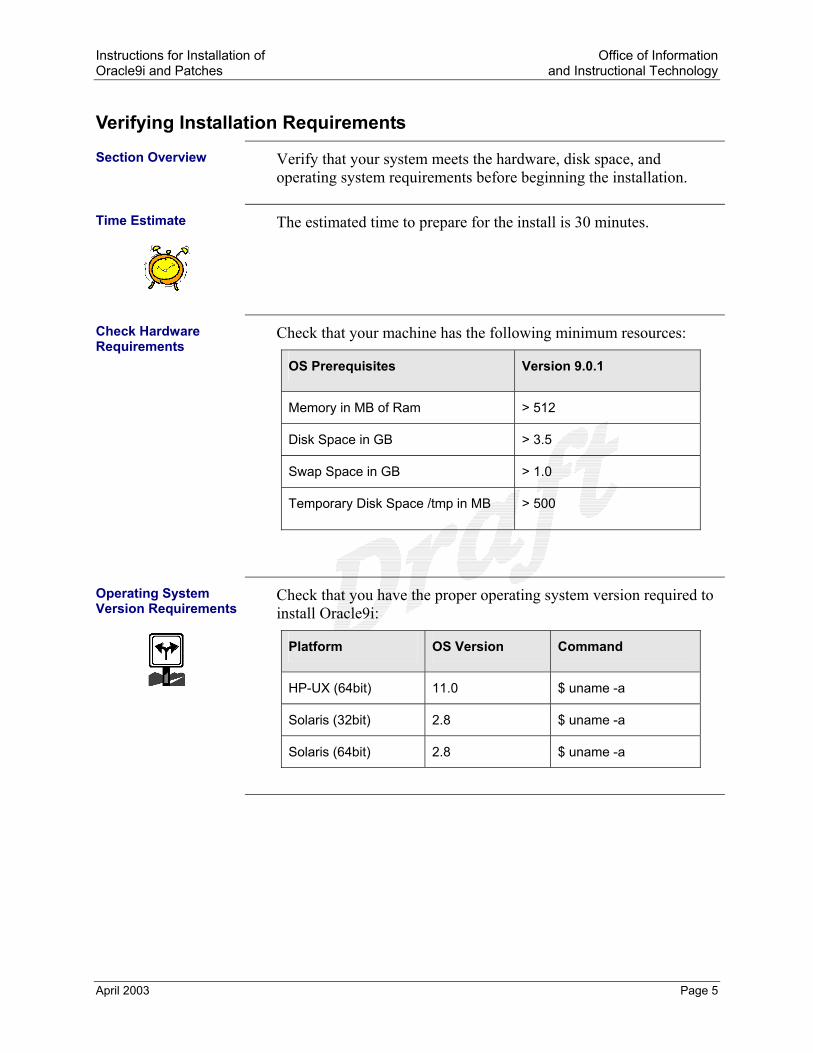
Verifying Installation Requirements Section Overview
Verify that your system meets the hardware, disk space, and operating system requirements before beginning the installation.
Time Estimate
The estimated time to prepare for the install is 30 minutes.
Check Hardware Requirements
Check that your machine has the following minimum resources:
OS Prerequisites Version 9.0.1
Memory in MB of Ram > 512
Disk Space in GB > 3.5
Swap Space in GB > 1.0
Temporary Disk Space /tmp in MB > 500
Operating System Version Requirements
Check that you have the proper operating system version required to install Oracle9i:
Platform OS Version Command
HP-UX (64bit) 11.0 $ uname -a
Solaris (32bit) 2.8 $ uname -a
Solaris (64bit) 2.8 $ uname -a
April 2003 Page 5
Instructions for Installation of Office of Information Oracle9i and Patches and Instructional Technology
Operating System Patches Required
Verify that the correct Operating System patches have been successfully applied. Check with your system administrator to ensure that the latest patches recommended by OIIT Enterprise Infrastructure Services (EIS) have been applied to the HP-UX Operating System. EIS anticipates a mid-to-late April 2003 patchset release.
Operating System Patches
The following patches, among others, are all included in the EIS patchset:
Sept. 2001 Quality Pack
PHCO_23792 PHCO_24148
PHKL_24268 PHKL_24729
PHKL_25475 PHKL_25525
PHNE_24715 PHSS_23670
PHSS_24301 PHSS_24303
HP-UX (64 bit)
PHSS_24627 PHSS_22868
Solaris (32bit) Not Applicable
Solaris (64bit) Update 5 (07/01)
On target: system meets the hardware, disk space, and operating system requirements needed for installation.
April 2003 Page 6
Instructions for Installation of Office of Information Oracle9i and Patches and Instructional Technology
Preparing to Start the Installation Process Section Overview The steps outlined in this section explain how to mount CDs to a
stage area before performing the installation.
Time Estimate
The estimated time to mount the CDs is 30 minutes or less.
1. Mount CDs
The software is provided on three CDROMS for HPUX and three for Solaris.
Mount the CDs with the following mount command for your system: HPUX> /usr/sbin/pfs_mount /dev/cdrom /SD_CDROM
Solaris> /mount –r –F hsfs device_name /cdrom
HP-UX. In order to use the HP-UX pfs_mount command, the pfs daemon must be running. The Oracle installer for HP-UX requires that both the NFS Server and NFS Client daemons be running in order to access Oracle installer CDs properly. Due to the nature of NFS, System Administrators should always know when NFS services have been enabled on their systems. Therefore, the OIIT-TSS Release of HP-UX 11.0 sets up the NFS Server, but it does not enable this service. The System Administrator needs to enable the NFS Client and NFS Server before accessing the Oracle installer CDs.
Note: /usr/sbin/ch_rc -lv -p NFS_SERVER -p NFS_CLIENT will show you the status of your NFS Client and NFS Server. The following should appear:
/etc/rc.config.d/nfsconf: NFS_SERVER=1
/etc/rc.config.d/nfsconf: NFS_CLIENT=1
If not, modify the file /etc/rc.config.d/nfsconf so that the parameters NFS_SERVER and NFS_CLIENT both equal one.
Enter the following ps –ef |grep pfsd
If grep returns the process running, continue with next step. Pfsd –v
Pfsd.rpc
If not please contact TSS System Support.
April 2003 Page 7
Instructions for Installation of Office of Information Oracle9i and Patches and Instructional Technology
The Oracle Product Installation media is in the RockRidge format.
Use a system editor to add the following line to the /etc/pfs_fstab file Syntax
<device_file<mount_point<filesystem_type<translation_method
Example: /dev/dsk/c5t2d0 /SD_CDROM pfs-rrip xlat=unix 0 0
Perform the following as root: #nohup /usr/sbin/pfs_mountd &
#nohup /usr/sbin/pfsd &
Solaris. On Solaris systems, with automounter running, when the CD is inserted into the drive and the door is closed, the CD mounts automatically.
2. Create Area for Disk Contents
You can choose to install directly from CD-ROM, or copy to disk. For simplicity, we assume that all the disks are copied to a file system that is not in use by other applications. For further instructions on mounting the CD-ROMs, consult the Oracle9i Installation Release Guide.
Create a staging area for the contents of each CD. You’ll need about 2GB of space for all the CD contents.
Example: /oracle/stage/
Create a directory off a mount point named something like 9.0.1
Create directories under that directory named Disk1, Disk2, and Disk3.
3. Copy Disk Contents to Correct Directory
Copy the contents of Disk1 to the …/9.0.1/Disk1 directory.
To copy the contents, use the following cpio command from the CD-ROM drive:
% find . –depth –print | cpio –pdmu /oracle/stage/9.0.1/Disk1
Dismount the CD when the copy is complete, using the appropriate command for your operating system. If you need additional assistance, contact OIIT Customer Services.
Repeat the mount step and the copy step for all disks.
April 2003 Page 8
Instructions for Installation of Office of Information Oracle9i and Patches and Instructional Technology
4. Establish Network Connection
Some X terminal installations have experienced problems with Reflection and Xwin32. Exceed seems to be the most reliable software.
During testing, Exceed failed to display some of the Oracle installer buttons properly. Eliminate this problem by setting your Exceed software to load fonts from the server:
Start>>Programs>>Hummingbird>>Exceed>>Xconfig
Double click FONTS, click the FONT DATABASE button, and click ADD.
When the “Add Font Directory” window is displayed, ensure that the Load radio button is selected for State, then select the Server radio button.
When the “Add Font Server” window is displayed, enter the fully qualified domain name of the server to which you plan to connect for installation of Oracle products, click OK twice, click Close and then exit the Xconfig program.
5. Log On
Log in as the Oracle user.
Warning: Do not install the Oracle software as the root user.
6. Verify Environ-ment Variables
Verify that the following environment variables are set correctly before attempting to start the Oracle Installer:
HP-UX Solaris DISPLAY ORACLE_HOME ORACLE_SID ORA_NLS33 ORACLE_BASE TMPD **(See note) SHLIB_PATH PATH
DISPLAY ORACLE_HOME ORACLE_SID ORA_NLS33 ORACLE_BASE TMPD **(See note) LD_LIBRARY_PATH PATH
**If not enough space (1/2 gig) in /tmp, set the following variables to point to a location that has sufficient space available:
Ex. TEMP setenv TEMP /u01/app/oracle/tmp
Ex. TMPDIR setenv TMPDIR /u01/app/oracle/tmp Note: See Oracle9i Installation Guide, Chapter 2, for more information.
April 2003 Page 9
Instructions for Installation of Office of Information Oracle9i and Patches and Instructional Technology
7. Install Java Runtime Environment (JRE)
The Oracle Universal Installer automatically installs the Oracle-supplied version of the Java Runtime Environment (JRE). This version is required to run the installer and several other Oracle assistants.
HP-UX. On HP-UX, the installer prompts for the downloaded version of Java Development Kit (JDK) 1.2.x.
Solaris. On Solaris the installer installs JDK 1.2.x.
On target: preparation steps for installation completed successfully.
April 2003 Page 10
Instructions for Installation of Office of Information Oracle9i and Patches and Instructional Technology
Installing Oracle9i Version 9.0.1.0 Section Overview
This section provides the steps to install Oracle9i using the Oracle Universal Installer. The Oracle Universal Installer runs in an X terminal window and performs the installation of Oracle9i.
This section provides the selections you make for each screen after the installer begins.
Time Estimate
Up to 2 hours
Installing the Software with the Oracle Universal Installer
1. Start Oracle Installer
Start the Oracle Installer from the hard drive:
Example: % cd /oracle/product/9.0.1/Disk1
% runInstaller
2. Respond to Welcome
Welcome Screen
Choose NEXT.
3. Establish File Locations
File Locations Screen
Source: Accept the current value.
Example: /oracle/stage/9.0.1/Disk1/stage/products.jar
Destination: Accept the value if it equals the desired Oracle Home location.
Example: /oracle/product/9.0.1
4. Select Product Available Products
Select a product to install: Oracle9i Database 9.0.1.0.0
Choose NEXT.
April 2003 Page 11
Instructions for Installation of Office of Information Oracle9i and Patches and Instructional Technology
5. Select Installation Type
Installation Types
What type of installation do you want: CUSTOM
Choose NEXT.
6. Install Minimum Components
Available Product Components
Note: During this installation, you are installing only the minimum requirements for Banner. You need the following components:
• Oracle9i 9.0.1.0.0
• Oracle Net Services 9.0.1.0.0
• Oracle9i Development Kit
Choose NEXT.
7. Select Operating System Groups
Privileged Operating System Groups
Database Administrator (OSDBA) Group: DBA
Database Operator (OSOPER) Group: DBA
Choose NEXT
8. Upgrade/Migrate Existing Database
Upgrading or Migrating an Existing Database
You are not upgrading nor migrating a database from the installer. You will manually upgrade the database after the initial installation is complete.
Choose NEXT.
9. Do Not Create Database
Create Database
NO
Choose NEXT.
10. Review Installa-tion
Summary
Review the summary of the installation to make sure you have selected the correct requirements.
Choose INSTALL.
April 2003 Page 12
Instructions for Installation of Office of Information Oracle9i and Patches and Instructional Technology
Correcting Disk Error
If the changing disk dialog appears, then the contents of the CDROM media were not copied correctly.
Try to supply the media location on disk for the next CDROM. Otherwise, restart the install after copying the media exactly as described earlier.
11. Run Root.sh Setup Privileges Dialog Box
Make sure that you have backup copies of your ORAENV and CORAENV files.
Connect as the root in another terminal session and run the script specified on the screen named root.sh in the Oracle Home location.
Choose NEXT.
12. Finish Install
End of Installation Screen
If no errors appear and this screen is presented, you have successfully installed Oracle9i release 9.0.1.0.0.
Choose EXIT.
13. Upgrade Database
Warning
After the software installation is complete, you must upgrade the database to Version 9.0.1.0.0 before doing anything else. This is critical to the upgrade process because of possible data dictionary corruption.
On target: software installation completed successfully.
April 2003 Page 13
Instructions for Installation of Office of Information Oracle9i and Patches and Instructional Technology
Upgrading the Banner Database Section Overview These instructions guide you through upgrading Oracle 8.1.6.3 to 9i
on both HP-UX 11 and Solaris 2.8.
Time Estimate
Up to 2 hours
Examples Example commands and values are given to clarify the instructions. Your install will have different values for some of these variables. During your install, substitute your values for these values as needed.
Variable Example Value
Unix host name for Oracle install
hostname.usg.edu
ORACLE_HOME for 9i install /oracle/product/9.0.1
Any password value password
Assumptions
The media for the release have already been installed.
Example: If upgrading the database to Oracle release 9i, the 9i software must be installed first.
April 2003 Page 14
Instructions for Installation of Office of Information Oracle9i and Patches and Instructional Technology
Setting Up the Database Environment
1. Check Starting Point
Verify that your database environment is 8.1.6.3.
2. Set Environment Variables
Ensure that the current Oracle environment variables are set correctly during initial database configuration:
HPUX Solaris
ORACLE_HOME
ORACLE_SID
ORA_NLS33
ORACLE_BASE
TMPD **
SHLIB_PATH
PATH
ORACLE_HOME
ORACLE_SID
ORA_NLS33
ORACLE_BASE
TMPD**
LD_LIBRARY_PATH
PATH
** If not enough space (1/2 gig) in /tmp, set the following variables to point to a location that has sufficient space available:
TEMP setenv TEMP /u01/app/oracle/tmp
TMPDIR setenv TMPDIR /u01/app/oracle/tmp
Switch back to your 8.1.6.3 environment.
3. Backup Database Perform a full database backup before performing the upgrade.
4. Turn Archiving Off
If you are not running in archivelog mode, skip this section and go to Step 5.
If you are running in archivelog mode, then execute the following steps:
• Verify archiving is turned on: SQL> archive log list;
• Force automatic archive of all full redo logs: SQL> alter system archive log all;
• Shut down the database: SQL> shutdown immediate;
April 2003 Page 15
Instructions for Installation of Office of Information Oracle9i and Patches and Instructional Technology
• Mount the database: SQL> startup mount;
• Turn archiving off: SQL> alter database noarchivelog;
• Start up the database: SQL> alter database open;
5. Avoid Running Out of Space
Warning: If you run out of space, you’ll get an error message and have to start the upgrade process over.
Prepare the system rollback segment: SQL> alter rollback segment system storage (maxextents 121 next 1M);
Ensure that there is plenty of space in the SYSTEM tablespace. A minimum of 150 MB is required.
• To query current free space: SQL> select max(bytes) from dba_free_space where tablespace_name = ‘SYSTEM’;
• To extend datafile as needed: SQL> alter database datafile ‘full path and file name’ resize integer [k|m];
6. Compile Invalid Objects
Warning: Because the upgrade process will leave objects invalid, compile all invalid objects before performing the upgrade or you will have to start the upgrade process over.
The sql script $ORACLE_HOME/rdbms/admin/utlrp.sql will compile all invalid objects.
$ cd $ORACLE_HOME/rdbms/admin
$ sqlplus /nolog
SQL> connect / as sysdba
SQL> @utlrp.sql
Spool out all invalid objects after running the compile script. SQL> spool invalid_objects.log
SQL> select * from dba_objects where status = ‘INVALID’;
SQL> spool off
Note: All invalid objects should be resolved before proceeding with the upgrade procedure unless the objects are deliberately set invalid.
April 2003 Page 16
Instructions for Installation of Office of Information Oracle9i and Patches and Instructional Technology
7. Stop Listener Ensure that the listener for the database being upgraded is stopped. $ lsnrctl
LSNRCTL> stop <listener_name>
8. Check Datafile Status
Ensure that no datafiles need media recovery or are in backup mode: $ sqlplus /nolog
SQL> connect / as sysdba
SQL> select * from v$recover_file;
SQL> select * from v$backup where status!=’NOT ACTIVE’;
Resolve all datafile issues before continuing with the upgrade procedure.
9. Default Tablespaces
Ensure that the users sys and system default to the system tablespace:
SQL> select username, default_tablespace from dba_users where username in (‘SYS’,’SYSTEM’);
To modify users, default tablespace if needed: SQL> alter user <username> default tablespace system;
Make sure database to be upgraded is shutdown. SQL> shutdown immediate;
On target: Database environment should be ready for upgrade.
Preparing to Upgrade
1. Init<sid>.ora Changes
Copy the init<sid>.ora file to init<sid>.ora.old
Copy the config<sid>.ora file to config<sid>.ora.old
Change the init<sid>.ora to reflect the following changes:
• Explicitly set JOB_QUEUE_PROCESSES = 0
• Explicitly set AQ_TM_PROCESSES = 0
• Set the parameter _SYSTEM_TRIG_ENABLED = FALSE
• Explicitly set OPTIMIZER_MODE for Oracle 8.1.6 to RULE.
April 2003 Page 17
Instructions for Installation of Office of Information Oracle9i and Patches and Instructional Technology
• Leave COMPATIBLE at the current setting. Setting this parameter to 9.x.x results in an error during the upgrade.
• Explicity set REMOTE_LOGIN_PASSWORDFILE = NONE
2. Update the oratab File
Update the file /etc/oratab on HPUX or /var/opt/oracle/oratab on Solaris to represent the new $ORACLE_HOME and disable automatic startup:
<SID>:new $ORACLE_HOME:N
Example: TEST:/oracle/product/9.0.1:N
3. Set Environment Variables
After you modify the /etc/oratab file for HPUX and /var/opt/oracle/oratab for Solaris, exit out of the current session as Oracle and then log back in.
If your .login or .profile file has not been set up to execute the shell script automatically, you should set it to do so now so that the environment gets set up properly for the database to be upgraded.
Please verify that the environment variables are set correctly. Any reference to Oracle directories should reflect the new 9i Oracle Home.
HPUX Solaris
$ echo $ORACLE_HOME
$ echo $PATH
$ echo $ORA_NLS33
$ echo $ORACLE_SID
$ echo $ORACLE_BASE
$ echo $TMPD
$ echo $SHLIB_PATH
$ echo $ORACLE_HOME
$ echo $PATH
$ echo $ORA_NLS33
$ echo $ORACLE_SID
$ echo $ORACLE_BASE
$ echo $TMPD
$ echo $LD_LIBRARY_PATH
4. Create Database Links
Create a symbolic link to the parameter and config files that is specific to the database being upgraded or created:
$ cd $ORACLE_HOME/dbs
$ ln –s /oracle/admin/<database_name/pfile/init<sid>.ora .
$ ln –s /oracle/admin/<database_name/pfile/config<sid>.ora .
April 2003 Page 18

Instructions for Installation of Office of Information Oracle9i and Patches and Instructional Technology
Upgrading the Database
1. Change Directory cd:$ORACLE_HOME/rdbms/admin/
2. Start Up the Database
Connect as a user with sysdba priveleges: $ sqlplus /nolog
SQL> connect / as sysdba
Use the following startup command to upgrade to Oracle 9.0.1.0 SQL> startup restrict
3. Spool Output Spool upgrade output to review for possible errors: SQL> spool upgrade_version.log
4. Run Upgrade Script
Run the following upgrade script for the new Oracle version installed:
SQL>start u0801060.sql
5. Spool Off Spool off to review any possible error messages. SQL> spool off
6. Run utlrp.sql Run $ORACLE_HOME/rdbms/admin/utlrp.sql SQL> start utlrp
Execute the following statement: SQL> select * from dba_objects where status = ‘INVALID’;
Compare the current invalid objects with the invalid objects before performing the upgrade.
7. Restart Database Restarting the database performs database housekeeping tasks: SQL> shutdown immediate
SQL> startup restrict
8. Upgrade NCHAR Datatypes
Upgrade NCHAR datatype columns SQL> connect / as sysdba
SQL> $ORACLE_HOME/rdbms/admin/utlnchar.sql
SQL> $ORACLE_HOME/rdbms/admin/n_switch.sql
April 2003 Page 19
Instructions for Installation of Office of Information Oracle9i and Patches and Instructional Technology
Applying Upgrade Patches Applying Patches to Upgrade Oracle9i to Version 9.0.1.3.0
Section Overview A patchset is required to upgrade Oracle9i to Version 9.0.1.3.0.
Time Estimate
4 hours
1. Verify Environment Variables
Verify that the following environment variables are set correctly before attempting to install the patch.
HPUX Solaris
DISPLAY
ORACLE_HOME
ORACLE_SID
ORA_NLS33
ORACLE_BASE
TMPD **
SHLIB_PATH
PATH
DISPLAY
ORACLE_HOME
ORACLE_SID
ORA_NLS33
ORACLE_BASE
TMPD **
LD_LIBRARY_PATH
PATH
** If not enough space (1/2 gig) in /tmp, set the following variables to point to a location that has sufficient space available:
ex. TEMP setenv TEMP /u01/app/oracle/tmp
ex. TMPDIR setenv TMPDIR /u01/app/oracle/tmp
April 2003 Page 20
Instructions for Installation of Office of Information Oracle9i and Patches and Instructional Technology
2. Download the Patch Files
Start the ftp session from your staging directory.
Connect to ftp.usg.edu using your institution’s ID and password.
HP-UX. Navigate to the banner/prod/oracle/hpux11/9idb directory. Download the following zip file: hpux11_64bit_9013patchset.zip.
Solaris. Navigate to the banner/prod/oracle/solaris/9idb directory. Download the following zip file: sol_32bit_9013patchset.zip
At the conclusion of the download, the zip patch files should reside in the staging directory.
3. Unzip the Files If your machine doesn’t have an unzip utility, download it from Oracle via an Oracle Metalink account. Get the file from http://updates.oracle.com/unzips/unzips.html. Use your Metalink account to download the unzip utility.
4. Shut Down Existing Databases
Shut down the existing Oracle Server previously upgraded to release 9.0.1.0.0.
5. Shutdown Listeners
Stop all listeners and other processes running in or against the ORACLE_HOME to be installed into.
6. Start Oracle Installer
Start the Oracle Installer from the hard drive:
Example: % cd $ORACLE_HOME/bin
% runInstaller
7. Welcome Screen Welcome Screen
Choose NEXT.
8. Establish File Locations
File Locations Screen
Click the BROWSE button for the Source entry field and navigate to the stage directory where you unpacked the Patch.
Select the products.jar file. Click the NEXT button
The products file will be read and the installer will load the product definitions. The products to be loaded will be displayed.
Example: /oracle/stage/9.0.1/patches/products.jar
Verify the products listed and then click on the INSTALL button.
April 2003 Page 21
Instructions for Installation of Office of Information Oracle9i and Patches and Instructional Technology
Completing the Upgrade to 9.0.1.3.0
1. Connect as sys Connect to the database as sysdba.
Example: % sqlplus /nolog
SQLPLUS> connect / as sysdba
2. Start Database After the patch has been installed successfully, you need to startup restrict the database.
Example: SQLPLUS> startup restrict
3. Run catpatch.sql
As a user with sysdba privileges, run the following new script that calls the catalog and catalog process scripts to upgrade the data dictionary of the 9i database.
$ORACLE_HOME/rdbms/admin/catpatch.sql
4. Validate All Invalid Objects
Connected as sysdba, run the following script: SQLPLUS> $ORACLE_HOME/rdbms/admin/utlrp.sql
5. Restart Database Restarting the database performs database housekeeping tasks: SQL> shutdown immediate
SQL> startup
On target: upgrade Oracle9i to Version 9.0.1.3.0 completed.
Applying Patch 2517300 to Upgrade Oracle9i to Version 9.0.1.4.0
1. Download Patch Files
Start the ftp session from your staging directory.
Connect to ftp.usg.edu using your institution’s ID and password.
HP-UX. Navigate to the banner/prod/oracle/hpux11/9idb directory. Download the following file:
• p2517300_9014_H64.zip for the upgrade to 9.0.1.4.0
You can also download these additional security patches at this time, although you should not apply these patches until you complete the upgrade.
April 2003 Page 22
Instructions for Installation of Office of Information Oracle9i and Patches and Instructional Technology
• p2540219_9014_H64.zip
• p2620726_9014_HP64.zip
• p2642117_9014_HP64.zip
• p2642267_9014_HP64.zip
• p2642439_9014_HP64.zip
Solaris. Navigate to the banner/prod/oracle/solaris/9idb directory. Download the following file:
• p2517300_9014_SOLARIS.zip
You can also download these additional security patches at this time, although you should not apply these patches until you complete the upgrade.
• p2620726_9014_SOLARIS.zip
• p2642117_9014_SOLARIS.zip
• p2642267_9014_SOLARIS.zip
• p2642439_9014_SOLARIS.zip
At the conclusion of the download, the zip patch files should reside in the staging directory.
2. Check System Tablespace
Make sure that you have 100M of free system tablespace.
Verify that system tablespace is the default tablespace for sys and system.
3. Unzip the Files
Unzip the files. If your machine doesn’t have an unzip utility, download it from Oracle via an Oracle Metalink account. Get the file from http://updates.oracle.com/unzips/unzips.html. Use your Metalink account to download the unzip utility.
4. Shutdown Existing Databases
Shut down the existing Oracle Server previously upgraded to release 9.0.1.3.0.
5. Shutdown Listeners
Stop all listeners and other processes running in or against the ORACLE_HOME to be used for the install.
April 2003 Page 23
Instructions for Installation of Office of Information Oracle9i and Patches and Instructional Technology
6. Start Oracle 9.0.1.4.0 Installer
In your patches directory under $ORACLE_HOME, uncompress the patch zip file using the unzip command.
Make a p257300 directory under $ORACLE_HOME/patches.
HPUX. Untar hpux64_9014_patchset.tar in directory p2517300.
Solaris: Untar 9014_solaris32_release.tar in directory p2517300.
Start your xterm emulator and type xterm at the prompt.
In the xterm window, switch to patches directory p2517300/Disk1
Start the Oracle Installer from unix prompt:
Example: % cd $ORACLE_HOME/patches/p2517300/Disk1
% runInstaller
7. Respond to Welcome
Welcome Screen
Choose NEXT.
8. Establish File Locations
File Locations Screen
Click the BROWSE button for the Source entry field and navigate to the stage directory where you unpacked the patch.
Select the products.jar file. Choose NEXT .
The products file will be read and the installer will load the product definitions. The products to be loaded will be displayed.
Example: /oracle/stage/9.0.1/patches/p2517300/Disk1/stage/ products.jar
9. Verify Products Verify that the products listed are correct and then click INSTALL.
April 2003 Page 24
Instructions for Installation of Office of Information Oracle9i and Patches and Instructional Technology
Completing Patch 2517300 Installation to Upgrade to Oracle9i Version 9.0.1.4.0
1. Connect as sys Connect to the database as sysdba.
Example: % sqlplus /nolog
SQL> connect / as sysdba
2. Start Database To complete the install of this patch set, you need start up each database associated to the upgraded $ORACLE_HOME.
SQL> startup restrict
SQL> ALTER SYSTEM ENABLE RESTRICTED SESSION;
3. Run catpatch.sql
Run the following new script that calls the catalog and catalog process to update the data dictionary of the 9idatabase.
SQL>spool catpatch
SQL> start $ORACLE_HOME/rdbms/admin/catpatch.sql
4. Update Internal Oracle Table
Run the following scripts to update the internal Oracle table. SQL>ALTER SYSTEM DISABLE RESTRICTED SESSION;
SQL>CONNECT / AS SYSDBA
SQL>update obj$ set status=5 where type#=29 and owner#!=0;
SQL> commit;
SQL>shutdown immediate
SQL>startup
Note: Result may be that no rows were updated.
5. Validate All Invalid Objects
Run the following scripts to validate invalid objects: SQL> spool utlrp
SQL> start $ORACLE_HOME/rdbms/admin/utlrp.sql
Execute the following statement to review list for errors:
SQL> SELECT * FROM DBA_OBJECTS WHERE STATUS = ‘INVALID’;
6. Restart database Restarting the database performs database housekeeping tasks: SQL> shutdown immediate
SQL> startup
SQL>exit
On target: Patch 2517300 installed to upgrade to Oracle9i Version 9.0.1.4.0.
April 2003 Page 25
Instructions for Installation of Office of Information Oracle9i and Patches and Instructional Technology
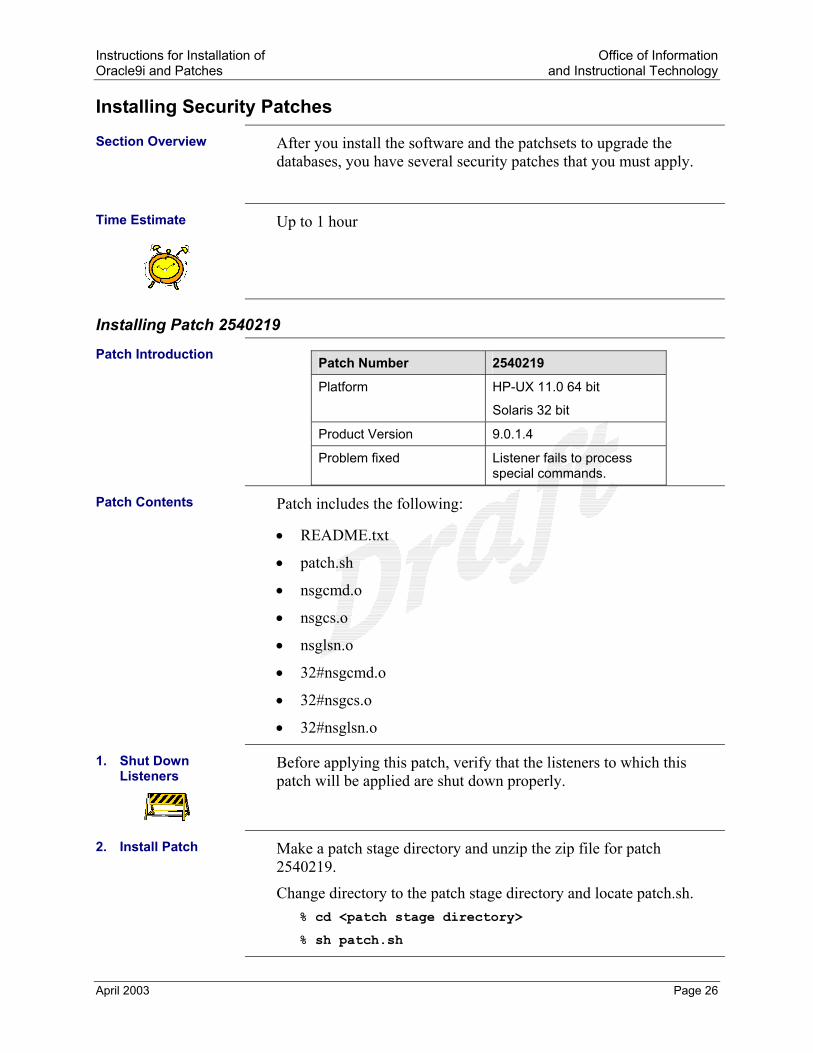
Installing Security Patches Section Overview After you install the software and the patchsets to upgrade the
databases, you have several security patches that you must apply.
Time Estimate
Up to 1 hour
Installing Patch 2540219
Patch Introduction
Patch Number 2540219
Platform HP-UX 11.0 64 bit
Solaris 32 bit
Product Version 9.0.1.4
Problem fixed Listener fails to process special commands.
Patch Contents Patch includes the following:
• README.txt
• patch.sh
• nsgcmd.o
• nsgcs.o
• nsglsn.o
• 32#nsgcmd.o
• 32#nsgcs.o
• 32#nsglsn.o
1. Shut Down Listeners
Before applying this patch, verify that the listeners to which this patch will be applied are shut down properly.
2. Install Patch Make a patch stage directory and unzip the zip file for patch 2540219.
Change directory to the patch stage directory and locate patch.sh. % cd <patch stage directory>
% sh patch.sh
April 2003 Page 26
Instructions for Installation of Office of Information Oracle9i and Patches and Instructional Technology
De-installing if Errors Occur
If there are errors or other problems with this patch and you need to de-install it, you should run the undo_pre<bug number>.sh shell script that was generated automatically when patch.sh was run.
Use the following syntax if you need to run the de-install script: % sh undo_pre2559169_9.0.1.4.0.sh
Installing Patch 2620726
Patch Introduction
Patch Number 2620726
Platforms HP-UX 11.0 64 bit
Solaris 32 bit
Product Version 9.0.1.4
Problem fixed Buffer overflow in Oracle.exe
Patch Contents Patch includes the following:
• README.txt
• patch.sh
• kpolon.o
1. Shut Down Databases
Before applying this patch, verify that all databases running under the ORACLE_HOME being patched are cleanly shut down.
2. Install patch
Make a patch stage directory and unzip zip file for patch 2620726.
HPUX. When the patch is unzipped, a directory 2715585 is created.
Solaris. When the patch is unzipped, a directory 2715587 is created.
Change directory to the patch stage directory and locate patch.sh. % cd <patch stage directory>
% sh patch.sh
April 2003 Page 27
Instructions for Installation of Office of Information Oracle9i and Patches and Instructional Technology
De-installing if Errors Occur
If there are errors or other problem with this patch and you need to de-install it, you should run the undo_pre<bug number>.sh shell script that was generated automatically when patch.sh was run.
Use the following syntax if you need to run the de-install script: % sh undo_pre2715585_9.0.1.4.0.sh
Installing Patch 2642117
Patch Introduction
Patch Number 2642117
Platforms HP-UX 11.0 64 bit
Solaris 32 bit
Product Version 9.0.1.4
Problem fixed Buffer overflow vulnerability in directory parameter of the Bfilename
Patch Contents Patch for HP-UX and Solaris includes the following:
• README.txt
• patch.sh
• pesblt.o
• kol.o
• kolf.o
• kokl.o
Solaris patch also includes the following:
• 32#kol.o
• 32#kolf.o
• 32#pesblt.o
1. Shut Down Databases
Before applying this patch, verify that all databases that you have upgraded to 9.0.1.4.0 to which patch will be applied are shut down properly.
April 2003 Page 28
Instructions for Installation of Office of Information Oracle9i and Patches and Instructional Technology
2. Install patch Make a patch stage directory and unzip the zip file for patch 2642117.
Change directory to the patch stage directory and locate patch.sh. % cd <patch stage directory>
% sh patch.sh
De-installing the Patch for Errors
If there are errors or other problems with this patch and you need to de-install it, you should run the undo_pre<bug number>.sh shell script that was generated automatically when patch.sh was run.
Use the following syntax if you need to run the de-install script: % sh undo_pre2713614_9.0.1.4.0.sh
Installing Oracle Patch 2642267
Patch Introduction
Patch Number 2642267
Platforms HP-UX 11.0 64 bit
Solaris 32 bit
Product Version 9.0.1.4
Problem fixed TZ_OFFSET buffer overflow
Patch Contents Patch includes the following:
• README.txt
• patch.sh
• ldiiftz.o
1. Shut Down Databases
Before applying this patch, verify that all databases that you have upgraded to 9.0.1.4.0 to which patch will be applied are shut down properly.
2. Install patch Make a patch stage directory and unzip zip file for patch 2642267.
Change directory to the patch stage directory and locate patch.sh. % cd <patch stage directory>
% sh patch.sh
April 2003 Page 29
Instructions for Installation of Office of Information Oracle9i and Patches and Instructional Technology
De-installing the Patch for Errors
If there are errors or other problems with this patch and you need to de-install it, you should run the undo_pre<bug number>.sh shell script that was generated automatically when patch.sh was run.
Use the following syntax if you need to run the de-install script: % sh undo_pre2713797_9.0.1.4.0.sh
On target: security patches applied successfully.
Installing Patch 2642439
Patch Introduction
Patch Number 2642439
Platforms HP-UX 11.0 64 bit
Solaris 32 bit
Product Version 9.0.1.4
Problem fixed TO_TIMESTAMP_TZ doesn’t handle long input
Patch Contents Patch for HP-UX and Solaris includes the following:
• README.txt
• Patch_server.sh
• Patch_client.sh
• ldiinp.o
HP-UX patch also includes the following:
• 32#ldiinp.o
1. Shut Down Databases
Before applying this patch, verify that all databases that you have upgraded to 9.0.1.4.0 to which patch will be applied are shut down properly.
April 2003 Page 30
Instructions for Installation of Office of Information Oracle9i and Patches and Instructional Technology
2. Install patch Make a patch stage directory and unzip the zip file for patch 2642439.
Change directory to the patch stage directory and locate patch_server.sh.
% cd <patch stage directory>
% sh patch_server.sh
De-installing the Patch for Errors
If there are errors or other problems with this patch and you need to de-install it, you should run the undo_pre<bug number>.sh shell script that was generated automatically when patch_server.sh was run.
Use the following syntax if you need to run the de-install script: % sh undo_pre2742762_9.0.1.4.0.sh
April 2003 Page 31
Instructions for Installation of Office of Information Oracle9i and Patches and Instructional Technology
Completing Post-upgrade Procedures Overview Post-upgrade procedures are needed to complete the installation.
Time Estimate
1 hour
1. Modify the Listener
Copy the listener.ora file from the previous home to the new $ORACLE_HOME/network/admin/ directory.
Modify the ORACLE_HOME parameter with in the listener.ora to point to the new destination.
Example: SID_LIST_LISTENER =
(SID_LIST =
(SID_DESC =
(GLOBAL_DBNAME = TEST.us.oracle.com)
(ORACLE_HOME = /oracle/product/9.0.1)
(SID_NAME = TEST)
)
Start the listener $ lsnrctl
LSNRCTL> start listener_name
2. Modify oratab Update the oratab file to represent the new $ORACLE_HOME and enable automatic startup:
<SID>:new $ORACLE_HOME:Y
Example: TEST:/oracle/product/9.0.1:Y
3. Make Init<sid>.ora Changes
Change the init<sid>.ora to reflect the following changes:
• Remove _SYSTEM_TRIG_ENABLED = FALSE from the init<sid>.ora.
• Modify LOG_ARCHIVE_DEST to specify only the path and make sure to end the path with ‘/’. To verify archiving is turned on issue: SQL> archive log list;
Note: Verify that all parameters referencing archiving are set correctly before proceeding.
April 2003 Page 32
Instructions for Installation of Office of Information Oracle9i and Patches and Instructional Technology
• Modify the init<sid>.ora to reflect the following changes:
o Replace JOB_QUEUE_PROCESSES with old value
o Replace AQ_TM_PROCESSES with old value
• Alter OPTIMIZER_MODE to the correct setting required by the application. Banner requires RULE.
4. Turn Archiving On
If you are not running in archivelog mode, skip this section and go to the next step.
If you are running in archivelog mode, then execute the following steps:
• Connect as a user with sysdba privileges $sqlplus / nolog
SQL> connect / as sysdba
• Mount the database: SQL> startup mount;
• Turn archiving on: SQL> alter database archivelog;
• Startup the database: SQL> alter database open;
5. Shutdown and Restart Database
Warning: Shutting down and restarting the database performs necessary housekeeping tasks.
SQL> shutdown immediate
SQL> startup restrict
SQL> shutdown immediate
6. Backup Database Perform a full cold database backup.
7. Restart the Database
Restart the database %sqlplus/nolog
SQL> CONNECT / AS SYSDBA
STARTUP EXIT
8. Test Listener To test listener, at UNIX prompt, %SQLPLUS USERNAME/PASSWORD@CONNECTSTRING
April 2003 Page 33
Instructions for Installation of Office of Information Oracle9i and Patches and Instructional Technology
9. Compile Demo Programs
Verify the successful installation of Pro*C, Pro*Cobol, and Micro Focus Cobol Demo programs.
• Pro*C Login as the banner software owner.
% cp $ORACLE_HOME/precomp/demo/proc/sample1.pc
% cp $ORACLE_HOME/precomp/demo/proc/demo_proc.mk
% make –f demo_proc.mk sample1
• Pro*Cobol Login as the banner software owner.
% cp $ORACLE_HOME/precomp/demo/procob/sample1.pco
% cp $ORACLE_HOME/precomp/demo/procob/demo_procob18.mk
% make –f demo_procob18.mk sample1
Sample1 can be executed by:
% sample1
• MicroFocus Cobol Before verifying installation of Procobol application, set the following environment variables:
SHLIB_PATH = $ORACLE_HOME/lib32:
$ORACLE_HOME/network/lib32
COBMODE = 32
Login as the banner software owner.
% cd $COBDIR/demo/tictac.cb1
% cob –xv tictac.cb1
Tictac program can be executed by:
% tictac
10. Remove Obsolete Parameters
Check that there are no obsolete parameters from the following list in init.ora.
If you do find obsolete parameters, remove them or comment out.
On target: Database upgrade is complete.
April 2003 Page 34

Instructions for Installation of Office of Information Oracle9i and Patches and Instructional Technology
Oracle9.i Obsolete Parameters _average_dirties_half_life lm_locks _lm_statistics lm_procs allow_partial_sn_results lm_procs always_anti_join lm_ress always_semi_join lock_sga_areas arch_io_slaves log_block_checksum b_tree_bitmap_plans log_files backup_disk_io_slaves log_simultaneous_copies cache_size_threshold log_small_entry_max_size cleanup_rollback_entries ogms_home close_cached_open_cursors ops_admin_group compatible_no_recovery ops_interconnects complex_view_merging optimizer_percent_parallel cpu_count optimizer_search_limit db_block_checkpoint_batch parallel_default_max_instances db_block_lru_extended_statisti parallel_min_message_pool db_block_lru_latches parallel_server_idle_time db_block_lru_statistics parallel_transaction_resource_ db_block_max_dirty_target push_join_predicate db_file_simultaneous_writes row_cache_cursors delayed_logging_block_cleanout sequence_cache_entries discrete_transactions_enabled sequence_cache_hash_buckets distributed_lock_timeout shared_pool_reserved_min_alloc distributed_recovery_connectio snapshot_refresh_interval fast_full_scan_enabled snapshot_refresh_keep_connecti freeze_DB_for_fast_instance_re snapshot_refresh_processes gc_defer_time sort_direct_writes gc_latches sort_multiblock_read_count gc_lck_procs sort_read_fac gc_releasable_locks sort_spacemap_size gc_rollback_locks sort_write_buffer_size hash_multiblock_io_count sort_write_buffers instance_nodeset spin_count job_queue_interval temporary_table_locks job_queue_keep_connections text_enable large_pool_min_alloc use_ism lgwr_io_slaves
April 2003 Page 35
Instructions for Installation of Office of Information Oracle9i and Patches and Instructional Technology
Recompiling Banner Time estimate
5 hours
1. Download .mk Files for Banner
Download the following new sctproc.mk and sctprocb.mk files from the ftp.usg.edu.
HP-UX: banner/prod/phux11/9idb
sctproc901.mk
sctprocb901.mk
Solaris: banner/prod/solaris/91db
sctproc901.mk
sctprocb901.mk
2. Recompile Banner Code
Following installation of the patches, recompile all C and COBOL for Banner.
On target: Banner code recompiled successfully.
Regenerating Forms Regenerate .fmbs
You must regenerate all .fmbs under 9i environment.
Note: The GUI installer is not available for 9i.
Completing the Final Step Update COMPATIBLE Parameter
After the database is well tested, update the COMPATIBLE variable in init<sid>.ora to 9.0.1.
On target: Oracle9i 9.0.1.4.0 install and upgrade of the Banner database should be complete.
April 2003 Page 36
Top Related