


Languages
Pages
Legal


LOW COST CATCHPIT INSERT
FOR REMOVAL OF LITTER AND
GROSS POLLUTANTS
For installation you will need:
• Measuring Tape
• Box Knife
• Rotary Hammer Drill and 10mm (3/8”) Masonry Bit
• Socket Set with 13mm (1/2”) & 17mm (11/16”) Sockets
• Battery Drill/Driver & 8mm (5/16”) Socket Bit
ENVIROPOD.COM
INSTALLATION MANUAL(MANHOLE)

ENVIROPOD.COM
WARNING
It is essential to follow any local or national Occupational Health and Safety Laws when installing or maintaining LittaTrap™ filters. Ensure all required Personal Protection Equipment (PPE) is worn at all times and Traffic Management rules are adhered to.
When maintaining the LittaTrap™ follow all local or national guidelines for manual lifting whenever hand maintenance is actioned.
We recommend checking your local website for a Site Specific Safety Plan before undertaking any installation.
Personal Protection Equipment (PPE) is required when installing or maintaining a LittaTrap™. This will mean long sleeves, long pants, Hi-Viz, and closed shoes.
We also recommend the use of gloves when maintaining the LittaTrap™.
When maintaining the LittaTrap™ by hand it is essential to identify and assess the weight of the captured material before lifting, as weights can vary depending on the filter contents.
For additional advice on the relevant Health and Safety requirements we recommend that you consult your local website.
All treatment devices require maintenance to remove trapped contaminants and prevent overflow bypass or flooding. Due to the variable nature of stormwater pollution and localised site pollutant loadings, maintenance frequencies vary for different sites and different rainfall characteristics. It is recommended to inspect your LittaTrap™ frequently over the first year of operation to determine seasonal and annual maintenance requirements.
The LittaTrap™ filter should be maintained when it is approximately 2/3 filled with pollutants or if the filter fabric becomes blocked from hydrocarbons, organics or sediment.
Maintenance is carried out by lifting the filter insert out of the frame assembly using ‘J’ hooks and emptying into a suitable vessel or trailer to be taken away from the site and disposed of appropriately for the contaminants. Please ensure that all care is taken when disposing of litter as the rubbish caught could contain sharp and dangerous objects.
If there are no “J” hooks the bag can be lifted out by the pulling the Filterbag handles. If the filter fabric is clogged, it should be water blasted into a contained vessel prior being fitted back into the frame assembly.
When carrying out maintenance of the LittaTrap™, it is essential to inspect the overflow bypass slots at the top of the filter insert to ensure no pollutants have been caught and may restrict the flow.
If the LittaTrap™ insert is too heavy to lift by hand, it will need to be maintained using a vacuum inductor truck. When cleaning using a vacuum inductor truck it is essential to take care to not damage the bag from the induction boom. Sediment and pollutants should be vacuum inducted until approx 3/4 empty, and then the remainder lifted and emptied by hand.
SITE SAFETY
HEALTH AND SAFETY
MAINTENANCE

ENVIROPOD.COM
OPTIONAL EXTRAS
Part I - x1Oil Absorbant Pouches
Part H - x1Liner
IH
J
SUPPLIED COMPONENTS
Part J - x1Extension Flap
ENVIROPOD.COM
ENVIROPOD.COM
D
E
GB
Part B – x1 Bracket
Part A – x1 * Manhole Adaptor Plate & M10 Bolts
Part G – x1Filterbag
Part D – x1Filterbox
Part E Plastic Seals
Part C Masonry Anchor Bolts
Part F Self Drilling Hexhead Screws
C FA1
A2
* Please note this component may come as a separate kit.

ENVIROPOD.COM
01
STEP 01
To fasten the Bracket assembly insert the supplied M10 Bolt and Nut to secure through the bracket onto the Manhole Adaptor Plate and tighten to secure.
BRACKET INSTALLATION
AB
A
AA2
A1
ENVIROPOD.COM
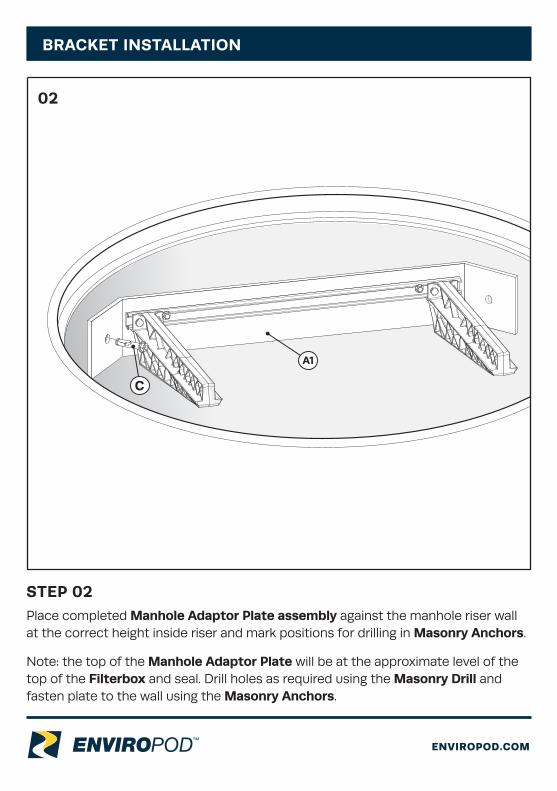
02
BRACKET INSTALLATION
STEP 02Place completed Manhole Adaptor Plate assembly against the manhole riser wall at the correct height inside riser and mark positions for drilling in Masonry Anchors.
Note: the top of the Manhole Adaptor Plate will be at the approximate level of the top of the Filterbox and seal. Drill holes as required using the Masonry Drill and fasten plate to the wall using the Masonry Anchors.
A1
C

ENVIROPOD.COM
AD
FILTERBOX INSTALLATION
STEP 03
Place the Filterbox in the correct position on the Brackets so that the underside of the top face of the Filterbox sits evenly onto the top face of the Brackets.
03

ENVIROPOD.COM
04
STEP 04
Ensure the Pre-Cut Seals are the correct size to seal against the side of the Manhole Wall ensuring they do not overhang the inside wall of the Filterbox.
Note: The seal mat needs to be trimmed to ensure the correct fit – typically the seals need to be approx. 20mm larger than the diameter of Manhole Riser so they are supported against the side-wall.
FILTERBOX INSTALLATION
AE

ENVIROPOD.COM
05
AE
AF
STEP 05
Secure the unit using the Battery Drill to screw the Self Drilling Screws through the Plastic Seals into the Filterbox and into Bracket. Complete on all sides.
FILTERBOX INSTALLATION

ENVIROPOD.COM
STEP 06
Complete the LittaTrap by lowering the complete Filterbag into the pit. Reposition & close grate.
06
AG
109
2 V
1.0
FILTERBAG INSTALLATION & FINAL ASSEMBLY
Top Related