


Languages
Pages
Legal

An Oracle White Paper May 2010
How to Upgrade and Patch with Oraclereg Solaris Live Upgrade
Oracle White PapermdashHow to Upgrade and Patch with Oracle Solaris Live Upgrade
Introduction 1 Oracle Solaris Live Upgrade Overview 2
Operational Model 2 Upgrading 2 Patching 2
Planning Considerations for Oracle Solaris Live Upgrade 3 Disk Space for the Second Boot Environment 3 Disk Space for the Second Boot Environment Under Oracle Solaris ZFS 4
Example Upgrading to a New Release 4 Example Patching a System Using Oracle Solaris Live Upgrade 11 Patching Considerations 12 Summary 13 For More Information 13
Oracle White PapermdashHow to Upgrade and Patch with Oracle Solaris Live Upgrade
Introduction
This white paper demonstrates the use of Oraclereg Solaris Live Upgrade a powerful tool for managing change risk and system availability on Oracle Solaris systems This white paper will cover
bull An overview of Oracle Solaris Live Upgrade for OS upgrades patching and as a mechanism for developers to install the latest OpenSolaris releases
bull Planning issues associated with using Oracle Solaris Live Upgrade
bull An example using Oracle Solaris Live Upgrade to upgrade from one Solaris release to a later one
bull An example using Oracle Solaris Live Upgrade to patch a system
1
Oracle White PapermdashHow to Upgrade and Patch with Oracle Solaris Live Upgrade
Oracle Solaris Live Upgrade Overview
Oracle Solaris Live Upgrade is a useful tool and strategy for minimizing downtime and risk when upgrading or patching systems With the release of the Oracle Solaris 10 1008 operating system Oracle Solaris Live Upgrade is integrated with the Oracle Solaris ZFS
Operational Model
The easiest way to understand the advantages of Oracle Solaris Live Upgrade is to summarize how it works
bull Create a copy of the system environment that is a copy of the root () file system
bull Apply changes (whether OS upgrade patches or other changes) to that copymdashinstead of to the current system environment The software that applies the changes to the copy runs as a background task on your production server
bull Boot to the new environment and assess the impact of the changes If you are satisfied with the new environment you are done
bull If you encountered problems with the new environment reboot to the original environment
All tasks except the reboot can be accomplished on an operational production system the impact on any running process is minimal The combination of maximizing system availability when applying changes and minimizing risk by offering the ability to reboot to a known working state (your original environment) has made Oracle Solaris Live Upgrade a tool of choice for the datacenter since the Oracle Solaris 8 Operating System
Upgrading
Upgrading a system with a later version of Oracle Solaris instead of doing a fresh install is a popular procedure because upgrading preserves all the effort initially spent in configuring the system Oracle offers two ways to upgrade
bull The standard upgrade process requires taking the system offline to do an upgrade and is a one-way operation there is no easy way to revert to the original environment
bull The other approach which uses Oracle Solaris Live Upgrade enables you to upgrade while greatly reducing the maintenance window associated with that activity and gives you the option to revert to the pre-upgrade environment
Patching
Oracle Solaris Live Upgrade is not limited to only OS upgrades you can use it to manage downtime and risk when patching a system
Because you are applying the patches to the inactive boot environment
2
Oracle White PapermdashHow to Upgrade and Patch with Oracle Solaris Live Upgrade
bull Patching has only minimal impact on the currently running environment The production applications continue to run and the patches get applied to the inactive environment
bull You avoid taking the system down to single-user mode which is the standard practice for applying the recommended patch clusters
bull You can boot the new patched environment test the applications and if you are not satisfied reboot to the original environment
bull With Oracle Solaris 10 807 and subsequent releases patching Oracle Solaris Containers with Oracle Solaris Live Upgrade is supported This can have a dramatic impact on decreasing downtime during patching
See the ldquoWeb Resourcesrdquo section of this document for a pointer to the new Oracle white paper on using Oracle Solaris Live Upgrade for patching mirrored disk systems
Planning Considerations for Oracle Solaris Live Upgrade
Planning for the use of Oracle Solaris Live Upgrade is critical
Disk Space for the Second Boot Environment
Oracle Solaris Live Upgrade involves having two simultaneous boot environments so enough disk space for both is a prerequisite Either you need an extra disk or one disk large enough to house both environments With the release of Oracle Solaris 10 1008 it is possible to configure the system to boot from Oracle Solaris ZFS which simplifies this requirement See the next section
The safest approach is to order an extra disk Since virtually all production systems mirror their disks this means ordering 3 disks One disk is for the root () file system a second is for the mirror of the root file system and the third is for Oracle Solaris Live Upgrade Another advantage of the third disk is that it can be used as a hot spare should there be a disk failure Some customers dont want the trade-off between Oracle Solaris Live Upgrade and a hot spare so they put a fourth disk in the system as the hot spare The cost of hardware service calls and downtime is such that it may be less expensive to provision a system with a spare disk at order time than it is to replace disks in the field
The other advantage of a three- or four-disk environment is that you arent dependent on disk mirroring for safety Some customers will use Oracle Solaris Live Upgrade as part of a back-up scenario whenever any changes are being contemplated An operator error (which would of course be duplicated on the mirror) can still be worked around fairly quickly if a copy was created before any system changes were made
A system with three disks (active boot environment mirror of the active environment and inactive boot environment) is generally considered the best practice if you want to use Oracle Solaris Live Upgrade but it is possible to have only two disks (active and mirror) if one of them is large enough to hold both the active and inactive boot environments If they arent large enough its still possible by temporarily breaking the mirror to enable the second disk to be used by Oracle Solaris Live Upgrade
3
Oracle White PapermdashHow to Upgrade and Patch with Oracle Solaris Live Upgrade
The wisdom of the latter approach depends on how critical the application is thats running on the system Can the organization tolerate the risk of the active boot environment disk failing during the creation of the copy Some organizations can tolerate this risk but others canrsquot
Disk Space for the Second Boot Environment Under Oracle Solaris ZFS
With the release of Oracle Solaris 10 1008 it is possible to boot from an Oracle Solaris ZFS-managed pool Also with that Oracle Solaris release the Oracle Solaris Live Upgrade tools have been modified to work in an Oracle Solaris ZFS environment This is significant for 3 reasons
1 You no longer need to have a separate partition for Oracle Solaris Live Upgrade to store the alternate boot environment Oracle Solaris treats the storage as a pool and as long as you have space in the pool for the Oracle Solaris snapshot you can use Oracle Solaris OS and Oracle Solaris Live Upgrade
2 Oracle Solaris snapshots are based on copy on write which means that files that arent changed dont take up any space in the snapshot With UFS Oracle Solaris Live Upgrade makes a complete copy of the existing boot environment in a separate partition With Oracle Solaris this copy is only the files that are different between the original snapshot and whatever subsequent changes you make to it This means that Oracle Solaris Live Upgrade potentially uses much less disk space with Oracle Solaris than with UFS
3 The lucreate step in a UFS environment can take significant time as a copy is made of the root environment With Oracle Solaris the snapshot is created in a matter of seconds It is only when changes are made to the files that the current active environment starts to differ from the snapshot
Example Upgrading to a New Release
This example explains how to upgrade an Oracle Solaris 10 305 system to the Oracle Solaris 10 106 release Oracle Solaris Live Upgrade has many capabilities but for a simple situation like upgrading a system to a new Oracle Solaris release there are three commands
bull lucreate to create the copy
bull luupgrade to upgrade the OS on the copy
bull luactivate to choose the environment to boot
1 Begin by logging into the root account
You must apply a few key patches before using Oracle Solaris Live Upgrade See Technical Instruction 206844 from SunSolve (suncomsunsolve) which describes the Oracle Solaris Live Upgrade SPARC or X86 patches required for each Oracle Solaris release
2 Create a directory vartmplupatches and download the patches to that directory
3 Patch the system
cd vartmplupatches
4
Oracle White PapermdashHow to Upgrade and Patch with Oracle Solaris Live Upgrade
Then add each patch individually
patchadd ltpatch_idgt
where ltpatch_idgt is the patch number The order in which the patches should be applied is specified in Technical Instruction 206844
4 Next if you are running on x86 hardware you must reboot the system
init 6
After the system reboots log back into the root account
Before upgrading you must install the Oracle Solaris Live Upgrade packages from the release to which you are upgrading New capabilities are added to the upgrade tools so installing the new packages from the target release is important In this example you will upgrade from Oracle Solaris 10 305 to Oracle Solaris 10 106 so you must get the Oracle Solaris Live Upgrade packages from the Oracle Solaris 10 106 DVD
5 Install the latest Oracle Solaris Live Upgrade packages using the liveupgrade20 script The script runs silently and installs the latest Oracle Solaris Live Upgrade packages Run the following command without the -noconsole and -nodisplay options and you will see the GUI install tool On SPARC systems
cd cdromcdrom0s0Solaris_10ToolsInstallers
liveupgrade20 -noconsole -nodisplay
On x86 systems
cd cdromcdrom0Solaris_10ToolsInstallers
liveupgrade20 -noconsole -nodisplay
When you migrate from one major Oracle Solaris release to another major release (for example Oracle Solaris 8 to Oracle Solaris 10) there may be additional package requirements The best strategy is to review Chapter 7 Oracle Solaris Live Upgrade (Planning) in the Oracle Solaris 10 Installation Guide Oracle Solaris Live Upgrade and Upgrade Planning document available from docssuncom
6 Run the lucreate command to create a copy of the active boot environment
You are now ready to make a copy of the root () file system Assume you have the situation as pictured in Figure 1 you have two disks and you have created a partition on the second disk to be the same size as the root () partition on the first disk
5
Oracle White PapermdashHow to Upgrade and Patch with Oracle Solaris Live Upgrade
Figure 1mdashBefore running the lucreate command
The object of this step is to create a copy of the current root () file system so that you have the situation pictured in Figure 2
Figure 2mdashAfter running the lucreate command
You will need to name both the current (active) boot environment and the copy (the inactive boot environment) The partition you will use for the copy must not appear in use in etcvfstabmdashin other words it should not have a file system on it In this case the active environment has been named ldquos10Mar05rdquo Because the goal of this exercise is to upgrade to Oracle Solaris 10 106 the new inactive boot environment has been named ldquos10Jan06rdquo You will also need to specify that you want to make a copy of the root () file system and where that new partition is to be located (c0t1d0s0 in this example) Also note that the file system is of type UFS Note how the last three pieces of information are concatenated for the -m argument
Create a new (inactive) boot environment
lucreate -c s10Mar05 -n s10Jan06 -m c0t1d0s0ufs
This command will generate output similar to the following The time to complete varies depending on the speed of the system and its disks
Discovering physical storage devices
Discovering logical storage devices
Cross referencing storage devices with boot environment configurations
6
Oracle White PapermdashHow to Upgrade and Patch with Oracle Solaris Live Upgrade
Determining types of file systems supported
Validating file system requests
The device name ltc0t1d0s0gt expands to device path ltdevdskc0t1d0s0gt
Preparing logical storage devices
Preparing physical storage devices
Configuring physical storage devices
Configuring logical storage devices
Analyzing system configuration
No name for current boot environment
Current boot environment is named lts10Mar05gt
Creating initial configuration for primary boot environment lts10Mar05gt
The device ltdevdskc0t0d0s0gt is not a root device for any boot
environment
PBE configuration successful PBE name lts10Mar05gt PBE Boot Device
ltdevdskc0t0d0s0gt
Comparing source boot environment lts10Mar05gt file systems with the file
system(s) you specified for the new boot environment Determining which
file systems should be in the new boot environment
Updating boot environment description database on all BEs
Searching dev for possible boot environment filesystem devices
Updating system configuration files
The device ltdevdskc0t1d0s0gt is not a root device for any boot
environment
Creating configuration for boot environment lts10Jan06gt
Source boot environment is lts10Mar05gt
Creating boot environment lts10Jan06gt
Creating file systems on boot environment lts10Jan06gt
Creating ltufsgt file system for ltgt on ltdevdskc0t1d0s0gt
Mounting file systems for boot environment lts10Jan06gt
Calculating required sizes of file systems for boot environment lts10Jan06gt
Populating file systems on boot environment lts10Jan06gt
Checking selection integrity
Integrity check OK
Populating contents of mount point ltgt
Copying
Creating shared file system mount points
Creating compare databases for boot environment lts10Jan06gt
Creating compare database for file system ltgt
7
Oracle White PapermdashHow to Upgrade and Patch with Oracle Solaris Live Upgrade
Updating compare databases on boot environment lts10Jan06gt
Making boot environment lts10Jan06gt bootable
Population of boot environment lts10Jan06gt successful
Creation of boot environment lts10Jan06gt successful
You might find it useful particularly if you encounter problems running the Oracle Solaris Live Upgrade commands to use the lustatus utility to see the state of the boot environment
After the new boot environment is created you can then begin the upgrade procedure
In this example you will upgrade from the Oracle Solaris 10 106 DVD After completing this step you will have the situation depicted in Figure 3
Figure 3mdashAfter running the luupgrade command
7 To upgrade to a new Oracle Solaris release you will use the luupgrade command with the -u option The -s option identifies the path to the media Due to slightly different file system organization on x86 installation DVDs than on SPARC DVDs the location -s option varies
For Oracle Solaris running on SPARC hardware a typical command line would be
luupgrade -u -n s10Jan06 -s cdromcdrom0s0
For Oracle Solaris running on x86 platforms
luupgrade -u -n s10Jan06 -s cdromcdrom0
This command will generate output similar to the following
Validating the contents of the media ltcdromcdrom0s0gt
The media is a standard Solaris media
The media contains an operating system upgrade image
The media contains ltSolarisgt version lt10gt
Constructing upgrade profile to use
Locating the operating system upgrade program
8
Oracle White PapermdashHow to Upgrade and Patch with Oracle Solaris Live Upgrade
Checking for existence of previously scheduled Solaris Live Upgrade
requests
Creating upgrade profile for BE lts10Jan06gt
Determining packages to install or upgrade for BE lts10Jan06gt
Performing the operating system upgrade of the BE lts10Jan06gt
CAUTION Interrupting this process may leave the boot environment unstable
or unbootable
Upgrading Solaris 6 completed
Upgrading Solaris 100 completed
Installation of the packages from this media is complete
Updating package information on boot environment lts10Jan06gt
Package information successfully updated on boot environment lts10Jan06gt
Adding operating system patches to the BE lts10Jan06gt
The operating system patch installation is complete
INFORMATION The file ltvarsadmsystemlogsupgrade_loggt on boot
environment lts10Jan06gt contains a log of the upgrade operation
INFORMATION The file ltvarsadmsystemdataupgrade_cleanupgt on boot
environment lts10Jan06gt contains a log of cleanup operations required
INFORMATION Review the files listed above Remember that all of the files
are located on boot environment lts10Jan06gt Before you activate boot
environment lts10Jan06gt determine if any additional system maintenance is
required or if additional media of the software distribution must be
installed
The Solaris upgrade of the boot environment lts10Jan06gt is complete
At this point you have created a new (inactive) boot environment and upgraded it to the Oracle Solaris 10 106 release In the next two steps you will first tell Oracle Solaris to use the new environment the next time you boot and then you will reboot the system so that it comes up running the new environment (as shown in Figure 4)
Figure 4mdashAfter running the luactivate command and rebooting
9
Oracle White PapermdashHow to Upgrade and Patch with Oracle Solaris Live Upgrade
8 Indicate which boot environment is to be used the next time you reboot
luactivate s10Jan06
where s10Jan06 is the boot environment you want to make active
On a running system some files might change during or after the lucreateluupgrade process You might want those changes reflected in the new boot environment in order to synchronize the two systems To address this there is a synchronization mechanism that the luactivate command will automatically call See the synclist(4) man page for more information
The luactivate command can also be used to revert to the previous boot environment In most cases this is very straightforward but due to the adoption on x86 platforms of GRUB (the new bootloader for Oracle Solaris 10 106 and subsequent Oracle Solaris releases) there are some issues when reverting from a GRUB system to a pre-GRUB release These are all explained in the Oracle Solaris Live Upgrade documentation referenced below
The output of the luactivate command will look like the following
The target boot environment has been activated It will be used when you
reboot NOTE You MUST NOT USE the reboot halt or uadmin commands You
MUST USE either the init or the shutdown command when you reboot If you
do not use either init or shutdown the system will not boot using the
target BE
In case of a failure while booting to the target BE the following process
needs to be followed to fallback to the currently working boot environment
1 Enter the PROM monitor (ok prompt)
2 Change the boot device back to the original boot environment by typing
setenv boot-device pci1f0pci11ide3disk00a
3 Boot to the original boot environment by typing
boot
Activation of boot environment lts10Jan06gt successful
Note the warning in the above about the proper command to use to reboot You must use ldquoinitrdquo or ldquoshutdownrdquo
10
Oracle White PapermdashHow to Upgrade and Patch with Oracle Solaris Live Upgrade
9 Reboot the system
init 6
You have now succeeded in upgrading to the Oracle Solaris 10 106 release Note that the reboot is the only downtime experienced using this upgrade methodmdasha far different situation than if you had done a standard install or standard upgrade
One final notemdashmake sure that you dispose of a boot environment properly when you are finished with it The proper way is to use the ludelete command If you destroy the boot environment through some other mechanism (e g newfs or rm -rf) you risk having a system that will not boot
Example Patching a System Using Oracle Solaris Live Upgrade
One of the most common uses of Oracle Solaris Live Upgrade is to minimize downtime for patching Upgrading to a newer Oracle Solaris release is a relatively infrequent activity in comparison to patching a system Depending on the length of the maintenance window and the need to minimize downtime patching an alternate boot environment may be an advantageous operations choice The steps are
bull Create a new boot environment
bull Patch the new boot environment
bull Boot from the new boot environment
bull Assess if the result of the changes is acceptable
As in the case of upgrading Oracle Solaris Live Upgrade has the advantage of applying the patches in the background with little impact on what is running on the system
To begin follow the steps 1-6 in the first example and optionally step 7 (if you wish to upgrade before patching) Now you are ready to apply the recommended patch cluster to the system
bull Obtain the patches
Access the recommended patch cluster for Oracle Solaris 10 from suncomsunsolve Look for the recommended patch clusters menu and select either the ldquoSolaris 10rdquo choice or the ldquoSolaris 10 x86rdquo choice
You will download the file 10_Recommendedzip (or 10_x86_Recommended zip) For this example assume you have downloaded the patches to vartmp Then use the unzip command to uncompress the downloaded file to create the directory ldquo10_Recommendedrdquo containing all the patches The file 10_RecommendedCLUSTER_README will tell you to take the system to single user mode and then use the install_cluster script In our case since you are patching the inactive boot environment you do not have to take the system to single user mode You will also employ a slightly different procedure to apply the patches you do not use the install_cluster script
bull Make sure you are in the patch directory
10 cd vartmp10_Recommended
11
Oracle White PapermdashHow to Upgrade and Patch with Oracle Solaris Live Upgrade
bull Patch the Inactive Boot Environment
luupgrade -n s10Jan06 -s vartmp10_Recommended -t `cat patch_order`
In the above you identify which boot environment to patch (s10Jan06rdquo) where the patches are located (the -s option and path argument) and patches to apply (the -t option followed by the patch numbers) Note the argument to the -t option is placed in backquotes meaning the expression will be evaluated by the shell before sending the results (the list of patches) to the luupgrade command
To finish follow steps 8 and 9 in the first example
As mentioned with Oracle Solaris 10 1008 Oracle Solaris is integrated with Oracle Solaris Live Upgrade The luupgrade command line semantics for patching are unchanged
The above is a very simple introduction on how to use Oracle Solaris Live Upgrade for patching A more realistic treatment is using Oracle Solaris Live Upgrade to patch in an enterprise mirrored-disk environment which is covered in an Oracle technical publication referenced below in the Web Resources section
Patching Considerations
Behind the scenes Oracle Solaris Live Upgrade is simply using the patchadd command You could accomplish the same patching of the inactive boot environment by mounting it and using patchadd with the -R option If you want to understand the behavior of patching using Oracle Solaris Live Upgrade familiarize yourself with the patchadd command
The Oracle Solaris 10 patchadd command is smart enough to order patches correctly but Oracle Solaris 9 and earlier releases require patches to be in dependency order Oracle uses a command line similar to the above as part of the standard testing so it makes sense to use a similar approach when you use Oracle Solaris Live Upgrade to patchmdashno matter what Oracle Solaris release you are patching
Third-party patches may not support being applied through Oracle Solaris Live Upgrade All Oracle patches conform to the requirement that pre- and post-install scripts never modify the running system when the target is an inactive boot environment Furthermore testing the application of recommended patches via Oracle Solaris Live Upgrade is part of Oraclersquos standard test procedures However Oracle cannot guarantee that all third-party patches are equally well behaved Depending on your organizations reliance on non- Oracle patches you may need to verify that a third-party patch does not contain a script that attempts to modify the current environment when you intend only to patch an inactive boot environment
12
Oracle White PapermdashHow to Upgrade and Patch with Oracle Solaris Live Upgrade
Summary
Oracle Solaris Live Upgrade is an enterprise-class tool and these examples have described only a small subset of its possibilities Oracle Solaris Live Upgrade offers many different ways to control the creation of a new boot environment for example there are other options besides making a complete copy of the current environment Oracle Solaris Live Upgrade integrates with Oracle Solaris Volume Manager and with some extra scripting with Veritas Volume Manager 41 or later (contact Symantec for details) Oracle Solaris Live Upgrade can be used to add packages as well as patches and of course remove packages and patches It can also be used to load an Oracle Solaris Flash Archive image a high-performance approach to quickly building a system For more details see the ldquoAdditional Resourcesrdquo section below
In closing Oracle Solaris Live Upgrade offers an excellent value proposition for enterprisesmdashthe ability to make a copy of a system make changes to the copy or the original and then decide which will be the new boot environment The only downtime for such an operation is the actual reboot All the other operations can take place in the background of a running production system The most important factor in using Oracle Solaris Live Upgrade is to plan ahead by configuring your systems properly
For More Information
We have made brief reference to the lucreate(1M) lustatus(1M) luupgrade(1M) and luactivate(1M) commands in this document You might also review other commands (see for example the See Also section of the lucreate(1M) man page) The man pages reference lu(1m) a simple tool for managing Oracle Solaris Live Upgrades However this GUI-like tool is no longer current with the capabilities of the rest of the Oracle Solaris Live Upgrade command-line tools so we do not recommend its use The lu command will likely be dropped in a future Oracle Solaris release
TABLE 1 WEB RESOURCES
The man pages for Oracle Solaris 10 can be found in the Oracle Solaris 10
Reference Manual Collection
docssuncomappdocscoll4010
Oracle Solaris 10 Installation Guide Oracle Solaris Live Upgrade and Upgrade
Planning
docssuncomappdocscoll12361
An excellent Oracle document on patching using Oracle Solaris Live Upgrade
ldquoPatching Mirrored Systems with the Oracle Solaris Live Upgrade Softwarerdquo
suncomblueprints0607820-2188html
Search the Sun forums There are two forums where Oracle Solaris Live Upgrade
questions tend to appear
1) Click on Solaris tab then select Installation
2) Click on Administration tab then select Talk to the Sysop
forumjavasuncom
13
How to Upgrade and Patch with Oracle Solaris Live Upgrade May 2010 Author Jeff McMeekin
Oracle Corporation World Headquarters 500 Oracle Parkway Redwood Shores CA 94065 USA
Worldwide Inquiries Phone +16505067000 Fax +16505067200 oraclecom
Copyright copy 2010 Oracle andor its affiliates All rights reserved This document is provided for information purposes only and the contents hereof are subject to change without notice This document is not warranted to be error-free nor subject to any other warranties or conditions whether expressed orally or implied in law including implied warranties and conditions of merchantability or fitness for a particular purpose We specifically disclaim any liability with respect to this document and no contractual obligations are formed either directly or indirectly by this document This document may not be reproduced or transmitted in any form or by any means electronic or mechanical for any purpose without our prior written permission
Oracle and Java are registered trademarks of Oracle andor its affiliates Other names may be trademarks of their respective owners
AMD Opteron the AMD logo and the AMD Opteron logo are trademarks or registered trademarks of Advanced Micro Devices Intel and Intel Xeon are trademarks or registered trademarks of Intel Corporation All SPARC trademarks are used under license and are trademarks or registered trademarks of SPARC International Inc UNIX is a registered trademark licensed through XOpen Company Ltd 0310
Oracle White PapermdashHow to Upgrade and Patch with Oracle Solaris Live Upgrade
Introduction 1 Oracle Solaris Live Upgrade Overview 2
Operational Model 2 Upgrading 2 Patching 2
Planning Considerations for Oracle Solaris Live Upgrade 3 Disk Space for the Second Boot Environment 3 Disk Space for the Second Boot Environment Under Oracle Solaris ZFS 4
Example Upgrading to a New Release 4 Example Patching a System Using Oracle Solaris Live Upgrade 11 Patching Considerations 12 Summary 13 For More Information 13
Oracle White PapermdashHow to Upgrade and Patch with Oracle Solaris Live Upgrade
Introduction
This white paper demonstrates the use of Oraclereg Solaris Live Upgrade a powerful tool for managing change risk and system availability on Oracle Solaris systems This white paper will cover
bull An overview of Oracle Solaris Live Upgrade for OS upgrades patching and as a mechanism for developers to install the latest OpenSolaris releases
bull Planning issues associated with using Oracle Solaris Live Upgrade
bull An example using Oracle Solaris Live Upgrade to upgrade from one Solaris release to a later one
bull An example using Oracle Solaris Live Upgrade to patch a system
1
Oracle White PapermdashHow to Upgrade and Patch with Oracle Solaris Live Upgrade
Oracle Solaris Live Upgrade Overview
Oracle Solaris Live Upgrade is a useful tool and strategy for minimizing downtime and risk when upgrading or patching systems With the release of the Oracle Solaris 10 1008 operating system Oracle Solaris Live Upgrade is integrated with the Oracle Solaris ZFS
Operational Model
The easiest way to understand the advantages of Oracle Solaris Live Upgrade is to summarize how it works
bull Create a copy of the system environment that is a copy of the root () file system
bull Apply changes (whether OS upgrade patches or other changes) to that copymdashinstead of to the current system environment The software that applies the changes to the copy runs as a background task on your production server
bull Boot to the new environment and assess the impact of the changes If you are satisfied with the new environment you are done
bull If you encountered problems with the new environment reboot to the original environment
All tasks except the reboot can be accomplished on an operational production system the impact on any running process is minimal The combination of maximizing system availability when applying changes and minimizing risk by offering the ability to reboot to a known working state (your original environment) has made Oracle Solaris Live Upgrade a tool of choice for the datacenter since the Oracle Solaris 8 Operating System
Upgrading
Upgrading a system with a later version of Oracle Solaris instead of doing a fresh install is a popular procedure because upgrading preserves all the effort initially spent in configuring the system Oracle offers two ways to upgrade
bull The standard upgrade process requires taking the system offline to do an upgrade and is a one-way operation there is no easy way to revert to the original environment
bull The other approach which uses Oracle Solaris Live Upgrade enables you to upgrade while greatly reducing the maintenance window associated with that activity and gives you the option to revert to the pre-upgrade environment
Patching
Oracle Solaris Live Upgrade is not limited to only OS upgrades you can use it to manage downtime and risk when patching a system
Because you are applying the patches to the inactive boot environment
2
Oracle White PapermdashHow to Upgrade and Patch with Oracle Solaris Live Upgrade
bull Patching has only minimal impact on the currently running environment The production applications continue to run and the patches get applied to the inactive environment
bull You avoid taking the system down to single-user mode which is the standard practice for applying the recommended patch clusters
bull You can boot the new patched environment test the applications and if you are not satisfied reboot to the original environment
bull With Oracle Solaris 10 807 and subsequent releases patching Oracle Solaris Containers with Oracle Solaris Live Upgrade is supported This can have a dramatic impact on decreasing downtime during patching
See the ldquoWeb Resourcesrdquo section of this document for a pointer to the new Oracle white paper on using Oracle Solaris Live Upgrade for patching mirrored disk systems
Planning Considerations for Oracle Solaris Live Upgrade
Planning for the use of Oracle Solaris Live Upgrade is critical
Disk Space for the Second Boot Environment
Oracle Solaris Live Upgrade involves having two simultaneous boot environments so enough disk space for both is a prerequisite Either you need an extra disk or one disk large enough to house both environments With the release of Oracle Solaris 10 1008 it is possible to configure the system to boot from Oracle Solaris ZFS which simplifies this requirement See the next section
The safest approach is to order an extra disk Since virtually all production systems mirror their disks this means ordering 3 disks One disk is for the root () file system a second is for the mirror of the root file system and the third is for Oracle Solaris Live Upgrade Another advantage of the third disk is that it can be used as a hot spare should there be a disk failure Some customers dont want the trade-off between Oracle Solaris Live Upgrade and a hot spare so they put a fourth disk in the system as the hot spare The cost of hardware service calls and downtime is such that it may be less expensive to provision a system with a spare disk at order time than it is to replace disks in the field
The other advantage of a three- or four-disk environment is that you arent dependent on disk mirroring for safety Some customers will use Oracle Solaris Live Upgrade as part of a back-up scenario whenever any changes are being contemplated An operator error (which would of course be duplicated on the mirror) can still be worked around fairly quickly if a copy was created before any system changes were made
A system with three disks (active boot environment mirror of the active environment and inactive boot environment) is generally considered the best practice if you want to use Oracle Solaris Live Upgrade but it is possible to have only two disks (active and mirror) if one of them is large enough to hold both the active and inactive boot environments If they arent large enough its still possible by temporarily breaking the mirror to enable the second disk to be used by Oracle Solaris Live Upgrade
3
Oracle White PapermdashHow to Upgrade and Patch with Oracle Solaris Live Upgrade
The wisdom of the latter approach depends on how critical the application is thats running on the system Can the organization tolerate the risk of the active boot environment disk failing during the creation of the copy Some organizations can tolerate this risk but others canrsquot
Disk Space for the Second Boot Environment Under Oracle Solaris ZFS
With the release of Oracle Solaris 10 1008 it is possible to boot from an Oracle Solaris ZFS-managed pool Also with that Oracle Solaris release the Oracle Solaris Live Upgrade tools have been modified to work in an Oracle Solaris ZFS environment This is significant for 3 reasons
1 You no longer need to have a separate partition for Oracle Solaris Live Upgrade to store the alternate boot environment Oracle Solaris treats the storage as a pool and as long as you have space in the pool for the Oracle Solaris snapshot you can use Oracle Solaris OS and Oracle Solaris Live Upgrade
2 Oracle Solaris snapshots are based on copy on write which means that files that arent changed dont take up any space in the snapshot With UFS Oracle Solaris Live Upgrade makes a complete copy of the existing boot environment in a separate partition With Oracle Solaris this copy is only the files that are different between the original snapshot and whatever subsequent changes you make to it This means that Oracle Solaris Live Upgrade potentially uses much less disk space with Oracle Solaris than with UFS
3 The lucreate step in a UFS environment can take significant time as a copy is made of the root environment With Oracle Solaris the snapshot is created in a matter of seconds It is only when changes are made to the files that the current active environment starts to differ from the snapshot
Example Upgrading to a New Release
This example explains how to upgrade an Oracle Solaris 10 305 system to the Oracle Solaris 10 106 release Oracle Solaris Live Upgrade has many capabilities but for a simple situation like upgrading a system to a new Oracle Solaris release there are three commands
bull lucreate to create the copy
bull luupgrade to upgrade the OS on the copy
bull luactivate to choose the environment to boot
1 Begin by logging into the root account
You must apply a few key patches before using Oracle Solaris Live Upgrade See Technical Instruction 206844 from SunSolve (suncomsunsolve) which describes the Oracle Solaris Live Upgrade SPARC or X86 patches required for each Oracle Solaris release
2 Create a directory vartmplupatches and download the patches to that directory
3 Patch the system
cd vartmplupatches
4
Oracle White PapermdashHow to Upgrade and Patch with Oracle Solaris Live Upgrade
Then add each patch individually
patchadd ltpatch_idgt
where ltpatch_idgt is the patch number The order in which the patches should be applied is specified in Technical Instruction 206844
4 Next if you are running on x86 hardware you must reboot the system
init 6
After the system reboots log back into the root account
Before upgrading you must install the Oracle Solaris Live Upgrade packages from the release to which you are upgrading New capabilities are added to the upgrade tools so installing the new packages from the target release is important In this example you will upgrade from Oracle Solaris 10 305 to Oracle Solaris 10 106 so you must get the Oracle Solaris Live Upgrade packages from the Oracle Solaris 10 106 DVD
5 Install the latest Oracle Solaris Live Upgrade packages using the liveupgrade20 script The script runs silently and installs the latest Oracle Solaris Live Upgrade packages Run the following command without the -noconsole and -nodisplay options and you will see the GUI install tool On SPARC systems
cd cdromcdrom0s0Solaris_10ToolsInstallers
liveupgrade20 -noconsole -nodisplay
On x86 systems
cd cdromcdrom0Solaris_10ToolsInstallers
liveupgrade20 -noconsole -nodisplay
When you migrate from one major Oracle Solaris release to another major release (for example Oracle Solaris 8 to Oracle Solaris 10) there may be additional package requirements The best strategy is to review Chapter 7 Oracle Solaris Live Upgrade (Planning) in the Oracle Solaris 10 Installation Guide Oracle Solaris Live Upgrade and Upgrade Planning document available from docssuncom
6 Run the lucreate command to create a copy of the active boot environment
You are now ready to make a copy of the root () file system Assume you have the situation as pictured in Figure 1 you have two disks and you have created a partition on the second disk to be the same size as the root () partition on the first disk
5
Oracle White PapermdashHow to Upgrade and Patch with Oracle Solaris Live Upgrade
Figure 1mdashBefore running the lucreate command
The object of this step is to create a copy of the current root () file system so that you have the situation pictured in Figure 2
Figure 2mdashAfter running the lucreate command
You will need to name both the current (active) boot environment and the copy (the inactive boot environment) The partition you will use for the copy must not appear in use in etcvfstabmdashin other words it should not have a file system on it In this case the active environment has been named ldquos10Mar05rdquo Because the goal of this exercise is to upgrade to Oracle Solaris 10 106 the new inactive boot environment has been named ldquos10Jan06rdquo You will also need to specify that you want to make a copy of the root () file system and where that new partition is to be located (c0t1d0s0 in this example) Also note that the file system is of type UFS Note how the last three pieces of information are concatenated for the -m argument
Create a new (inactive) boot environment
lucreate -c s10Mar05 -n s10Jan06 -m c0t1d0s0ufs
This command will generate output similar to the following The time to complete varies depending on the speed of the system and its disks
Discovering physical storage devices
Discovering logical storage devices
Cross referencing storage devices with boot environment configurations
6
Oracle White PapermdashHow to Upgrade and Patch with Oracle Solaris Live Upgrade
Determining types of file systems supported
Validating file system requests
The device name ltc0t1d0s0gt expands to device path ltdevdskc0t1d0s0gt
Preparing logical storage devices
Preparing physical storage devices
Configuring physical storage devices
Configuring logical storage devices
Analyzing system configuration
No name for current boot environment
Current boot environment is named lts10Mar05gt
Creating initial configuration for primary boot environment lts10Mar05gt
The device ltdevdskc0t0d0s0gt is not a root device for any boot
environment
PBE configuration successful PBE name lts10Mar05gt PBE Boot Device
ltdevdskc0t0d0s0gt
Comparing source boot environment lts10Mar05gt file systems with the file
system(s) you specified for the new boot environment Determining which
file systems should be in the new boot environment
Updating boot environment description database on all BEs
Searching dev for possible boot environment filesystem devices
Updating system configuration files
The device ltdevdskc0t1d0s0gt is not a root device for any boot
environment
Creating configuration for boot environment lts10Jan06gt
Source boot environment is lts10Mar05gt
Creating boot environment lts10Jan06gt
Creating file systems on boot environment lts10Jan06gt
Creating ltufsgt file system for ltgt on ltdevdskc0t1d0s0gt
Mounting file systems for boot environment lts10Jan06gt
Calculating required sizes of file systems for boot environment lts10Jan06gt
Populating file systems on boot environment lts10Jan06gt
Checking selection integrity
Integrity check OK
Populating contents of mount point ltgt
Copying
Creating shared file system mount points
Creating compare databases for boot environment lts10Jan06gt
Creating compare database for file system ltgt
7
Oracle White PapermdashHow to Upgrade and Patch with Oracle Solaris Live Upgrade
Updating compare databases on boot environment lts10Jan06gt
Making boot environment lts10Jan06gt bootable
Population of boot environment lts10Jan06gt successful
Creation of boot environment lts10Jan06gt successful
You might find it useful particularly if you encounter problems running the Oracle Solaris Live Upgrade commands to use the lustatus utility to see the state of the boot environment
After the new boot environment is created you can then begin the upgrade procedure
In this example you will upgrade from the Oracle Solaris 10 106 DVD After completing this step you will have the situation depicted in Figure 3
Figure 3mdashAfter running the luupgrade command
7 To upgrade to a new Oracle Solaris release you will use the luupgrade command with the -u option The -s option identifies the path to the media Due to slightly different file system organization on x86 installation DVDs than on SPARC DVDs the location -s option varies
For Oracle Solaris running on SPARC hardware a typical command line would be
luupgrade -u -n s10Jan06 -s cdromcdrom0s0
For Oracle Solaris running on x86 platforms
luupgrade -u -n s10Jan06 -s cdromcdrom0
This command will generate output similar to the following
Validating the contents of the media ltcdromcdrom0s0gt
The media is a standard Solaris media
The media contains an operating system upgrade image
The media contains ltSolarisgt version lt10gt
Constructing upgrade profile to use
Locating the operating system upgrade program
8
Oracle White PapermdashHow to Upgrade and Patch with Oracle Solaris Live Upgrade
Checking for existence of previously scheduled Solaris Live Upgrade
requests
Creating upgrade profile for BE lts10Jan06gt
Determining packages to install or upgrade for BE lts10Jan06gt
Performing the operating system upgrade of the BE lts10Jan06gt
CAUTION Interrupting this process may leave the boot environment unstable
or unbootable
Upgrading Solaris 6 completed
Upgrading Solaris 100 completed
Installation of the packages from this media is complete
Updating package information on boot environment lts10Jan06gt
Package information successfully updated on boot environment lts10Jan06gt
Adding operating system patches to the BE lts10Jan06gt
The operating system patch installation is complete
INFORMATION The file ltvarsadmsystemlogsupgrade_loggt on boot
environment lts10Jan06gt contains a log of the upgrade operation
INFORMATION The file ltvarsadmsystemdataupgrade_cleanupgt on boot
environment lts10Jan06gt contains a log of cleanup operations required
INFORMATION Review the files listed above Remember that all of the files
are located on boot environment lts10Jan06gt Before you activate boot
environment lts10Jan06gt determine if any additional system maintenance is
required or if additional media of the software distribution must be
installed
The Solaris upgrade of the boot environment lts10Jan06gt is complete
At this point you have created a new (inactive) boot environment and upgraded it to the Oracle Solaris 10 106 release In the next two steps you will first tell Oracle Solaris to use the new environment the next time you boot and then you will reboot the system so that it comes up running the new environment (as shown in Figure 4)
Figure 4mdashAfter running the luactivate command and rebooting
9
Oracle White PapermdashHow to Upgrade and Patch with Oracle Solaris Live Upgrade
8 Indicate which boot environment is to be used the next time you reboot
luactivate s10Jan06
where s10Jan06 is the boot environment you want to make active
On a running system some files might change during or after the lucreateluupgrade process You might want those changes reflected in the new boot environment in order to synchronize the two systems To address this there is a synchronization mechanism that the luactivate command will automatically call See the synclist(4) man page for more information
The luactivate command can also be used to revert to the previous boot environment In most cases this is very straightforward but due to the adoption on x86 platforms of GRUB (the new bootloader for Oracle Solaris 10 106 and subsequent Oracle Solaris releases) there are some issues when reverting from a GRUB system to a pre-GRUB release These are all explained in the Oracle Solaris Live Upgrade documentation referenced below
The output of the luactivate command will look like the following
The target boot environment has been activated It will be used when you
reboot NOTE You MUST NOT USE the reboot halt or uadmin commands You
MUST USE either the init or the shutdown command when you reboot If you
do not use either init or shutdown the system will not boot using the
target BE
In case of a failure while booting to the target BE the following process
needs to be followed to fallback to the currently working boot environment
1 Enter the PROM monitor (ok prompt)
2 Change the boot device back to the original boot environment by typing
setenv boot-device pci1f0pci11ide3disk00a
3 Boot to the original boot environment by typing
boot
Activation of boot environment lts10Jan06gt successful
Note the warning in the above about the proper command to use to reboot You must use ldquoinitrdquo or ldquoshutdownrdquo
10
Oracle White PapermdashHow to Upgrade and Patch with Oracle Solaris Live Upgrade
9 Reboot the system
init 6
You have now succeeded in upgrading to the Oracle Solaris 10 106 release Note that the reboot is the only downtime experienced using this upgrade methodmdasha far different situation than if you had done a standard install or standard upgrade
One final notemdashmake sure that you dispose of a boot environment properly when you are finished with it The proper way is to use the ludelete command If you destroy the boot environment through some other mechanism (e g newfs or rm -rf) you risk having a system that will not boot
Example Patching a System Using Oracle Solaris Live Upgrade
One of the most common uses of Oracle Solaris Live Upgrade is to minimize downtime for patching Upgrading to a newer Oracle Solaris release is a relatively infrequent activity in comparison to patching a system Depending on the length of the maintenance window and the need to minimize downtime patching an alternate boot environment may be an advantageous operations choice The steps are
bull Create a new boot environment
bull Patch the new boot environment
bull Boot from the new boot environment
bull Assess if the result of the changes is acceptable
As in the case of upgrading Oracle Solaris Live Upgrade has the advantage of applying the patches in the background with little impact on what is running on the system
To begin follow the steps 1-6 in the first example and optionally step 7 (if you wish to upgrade before patching) Now you are ready to apply the recommended patch cluster to the system
bull Obtain the patches
Access the recommended patch cluster for Oracle Solaris 10 from suncomsunsolve Look for the recommended patch clusters menu and select either the ldquoSolaris 10rdquo choice or the ldquoSolaris 10 x86rdquo choice
You will download the file 10_Recommendedzip (or 10_x86_Recommended zip) For this example assume you have downloaded the patches to vartmp Then use the unzip command to uncompress the downloaded file to create the directory ldquo10_Recommendedrdquo containing all the patches The file 10_RecommendedCLUSTER_README will tell you to take the system to single user mode and then use the install_cluster script In our case since you are patching the inactive boot environment you do not have to take the system to single user mode You will also employ a slightly different procedure to apply the patches you do not use the install_cluster script
bull Make sure you are in the patch directory
10 cd vartmp10_Recommended
11
Oracle White PapermdashHow to Upgrade and Patch with Oracle Solaris Live Upgrade
bull Patch the Inactive Boot Environment
luupgrade -n s10Jan06 -s vartmp10_Recommended -t `cat patch_order`
In the above you identify which boot environment to patch (s10Jan06rdquo) where the patches are located (the -s option and path argument) and patches to apply (the -t option followed by the patch numbers) Note the argument to the -t option is placed in backquotes meaning the expression will be evaluated by the shell before sending the results (the list of patches) to the luupgrade command
To finish follow steps 8 and 9 in the first example
As mentioned with Oracle Solaris 10 1008 Oracle Solaris is integrated with Oracle Solaris Live Upgrade The luupgrade command line semantics for patching are unchanged
The above is a very simple introduction on how to use Oracle Solaris Live Upgrade for patching A more realistic treatment is using Oracle Solaris Live Upgrade to patch in an enterprise mirrored-disk environment which is covered in an Oracle technical publication referenced below in the Web Resources section
Patching Considerations
Behind the scenes Oracle Solaris Live Upgrade is simply using the patchadd command You could accomplish the same patching of the inactive boot environment by mounting it and using patchadd with the -R option If you want to understand the behavior of patching using Oracle Solaris Live Upgrade familiarize yourself with the patchadd command
The Oracle Solaris 10 patchadd command is smart enough to order patches correctly but Oracle Solaris 9 and earlier releases require patches to be in dependency order Oracle uses a command line similar to the above as part of the standard testing so it makes sense to use a similar approach when you use Oracle Solaris Live Upgrade to patchmdashno matter what Oracle Solaris release you are patching
Third-party patches may not support being applied through Oracle Solaris Live Upgrade All Oracle patches conform to the requirement that pre- and post-install scripts never modify the running system when the target is an inactive boot environment Furthermore testing the application of recommended patches via Oracle Solaris Live Upgrade is part of Oraclersquos standard test procedures However Oracle cannot guarantee that all third-party patches are equally well behaved Depending on your organizations reliance on non- Oracle patches you may need to verify that a third-party patch does not contain a script that attempts to modify the current environment when you intend only to patch an inactive boot environment
12
Oracle White PapermdashHow to Upgrade and Patch with Oracle Solaris Live Upgrade
Summary
Oracle Solaris Live Upgrade is an enterprise-class tool and these examples have described only a small subset of its possibilities Oracle Solaris Live Upgrade offers many different ways to control the creation of a new boot environment for example there are other options besides making a complete copy of the current environment Oracle Solaris Live Upgrade integrates with Oracle Solaris Volume Manager and with some extra scripting with Veritas Volume Manager 41 or later (contact Symantec for details) Oracle Solaris Live Upgrade can be used to add packages as well as patches and of course remove packages and patches It can also be used to load an Oracle Solaris Flash Archive image a high-performance approach to quickly building a system For more details see the ldquoAdditional Resourcesrdquo section below
In closing Oracle Solaris Live Upgrade offers an excellent value proposition for enterprisesmdashthe ability to make a copy of a system make changes to the copy or the original and then decide which will be the new boot environment The only downtime for such an operation is the actual reboot All the other operations can take place in the background of a running production system The most important factor in using Oracle Solaris Live Upgrade is to plan ahead by configuring your systems properly
For More Information
We have made brief reference to the lucreate(1M) lustatus(1M) luupgrade(1M) and luactivate(1M) commands in this document You might also review other commands (see for example the See Also section of the lucreate(1M) man page) The man pages reference lu(1m) a simple tool for managing Oracle Solaris Live Upgrades However this GUI-like tool is no longer current with the capabilities of the rest of the Oracle Solaris Live Upgrade command-line tools so we do not recommend its use The lu command will likely be dropped in a future Oracle Solaris release
TABLE 1 WEB RESOURCES
The man pages for Oracle Solaris 10 can be found in the Oracle Solaris 10
Reference Manual Collection
docssuncomappdocscoll4010
Oracle Solaris 10 Installation Guide Oracle Solaris Live Upgrade and Upgrade
Planning
docssuncomappdocscoll12361
An excellent Oracle document on patching using Oracle Solaris Live Upgrade
ldquoPatching Mirrored Systems with the Oracle Solaris Live Upgrade Softwarerdquo
suncomblueprints0607820-2188html
Search the Sun forums There are two forums where Oracle Solaris Live Upgrade
questions tend to appear
1) Click on Solaris tab then select Installation
2) Click on Administration tab then select Talk to the Sysop
forumjavasuncom
13
How to Upgrade and Patch with Oracle Solaris Live Upgrade May 2010 Author Jeff McMeekin
Oracle Corporation World Headquarters 500 Oracle Parkway Redwood Shores CA 94065 USA
Worldwide Inquiries Phone +16505067000 Fax +16505067200 oraclecom
Copyright copy 2010 Oracle andor its affiliates All rights reserved This document is provided for information purposes only and the contents hereof are subject to change without notice This document is not warranted to be error-free nor subject to any other warranties or conditions whether expressed orally or implied in law including implied warranties and conditions of merchantability or fitness for a particular purpose We specifically disclaim any liability with respect to this document and no contractual obligations are formed either directly or indirectly by this document This document may not be reproduced or transmitted in any form or by any means electronic or mechanical for any purpose without our prior written permission
Oracle and Java are registered trademarks of Oracle andor its affiliates Other names may be trademarks of their respective owners
AMD Opteron the AMD logo and the AMD Opteron logo are trademarks or registered trademarks of Advanced Micro Devices Intel and Intel Xeon are trademarks or registered trademarks of Intel Corporation All SPARC trademarks are used under license and are trademarks or registered trademarks of SPARC International Inc UNIX is a registered trademark licensed through XOpen Company Ltd 0310

Oracle White PapermdashHow to Upgrade and Patch with Oracle Solaris Live Upgrade
Introduction
This white paper demonstrates the use of Oraclereg Solaris Live Upgrade a powerful tool for managing change risk and system availability on Oracle Solaris systems This white paper will cover
bull An overview of Oracle Solaris Live Upgrade for OS upgrades patching and as a mechanism for developers to install the latest OpenSolaris releases
bull Planning issues associated with using Oracle Solaris Live Upgrade
bull An example using Oracle Solaris Live Upgrade to upgrade from one Solaris release to a later one
bull An example using Oracle Solaris Live Upgrade to patch a system
1
Oracle White PapermdashHow to Upgrade and Patch with Oracle Solaris Live Upgrade
Oracle Solaris Live Upgrade Overview
Oracle Solaris Live Upgrade is a useful tool and strategy for minimizing downtime and risk when upgrading or patching systems With the release of the Oracle Solaris 10 1008 operating system Oracle Solaris Live Upgrade is integrated with the Oracle Solaris ZFS
Operational Model
The easiest way to understand the advantages of Oracle Solaris Live Upgrade is to summarize how it works
bull Create a copy of the system environment that is a copy of the root () file system
bull Apply changes (whether OS upgrade patches or other changes) to that copymdashinstead of to the current system environment The software that applies the changes to the copy runs as a background task on your production server
bull Boot to the new environment and assess the impact of the changes If you are satisfied with the new environment you are done
bull If you encountered problems with the new environment reboot to the original environment
All tasks except the reboot can be accomplished on an operational production system the impact on any running process is minimal The combination of maximizing system availability when applying changes and minimizing risk by offering the ability to reboot to a known working state (your original environment) has made Oracle Solaris Live Upgrade a tool of choice for the datacenter since the Oracle Solaris 8 Operating System
Upgrading
Upgrading a system with a later version of Oracle Solaris instead of doing a fresh install is a popular procedure because upgrading preserves all the effort initially spent in configuring the system Oracle offers two ways to upgrade
bull The standard upgrade process requires taking the system offline to do an upgrade and is a one-way operation there is no easy way to revert to the original environment
bull The other approach which uses Oracle Solaris Live Upgrade enables you to upgrade while greatly reducing the maintenance window associated with that activity and gives you the option to revert to the pre-upgrade environment
Patching
Oracle Solaris Live Upgrade is not limited to only OS upgrades you can use it to manage downtime and risk when patching a system
Because you are applying the patches to the inactive boot environment
2
Oracle White PapermdashHow to Upgrade and Patch with Oracle Solaris Live Upgrade
bull Patching has only minimal impact on the currently running environment The production applications continue to run and the patches get applied to the inactive environment
bull You avoid taking the system down to single-user mode which is the standard practice for applying the recommended patch clusters
bull You can boot the new patched environment test the applications and if you are not satisfied reboot to the original environment
bull With Oracle Solaris 10 807 and subsequent releases patching Oracle Solaris Containers with Oracle Solaris Live Upgrade is supported This can have a dramatic impact on decreasing downtime during patching
See the ldquoWeb Resourcesrdquo section of this document for a pointer to the new Oracle white paper on using Oracle Solaris Live Upgrade for patching mirrored disk systems
Planning Considerations for Oracle Solaris Live Upgrade
Planning for the use of Oracle Solaris Live Upgrade is critical
Disk Space for the Second Boot Environment
Oracle Solaris Live Upgrade involves having two simultaneous boot environments so enough disk space for both is a prerequisite Either you need an extra disk or one disk large enough to house both environments With the release of Oracle Solaris 10 1008 it is possible to configure the system to boot from Oracle Solaris ZFS which simplifies this requirement See the next section
The safest approach is to order an extra disk Since virtually all production systems mirror their disks this means ordering 3 disks One disk is for the root () file system a second is for the mirror of the root file system and the third is for Oracle Solaris Live Upgrade Another advantage of the third disk is that it can be used as a hot spare should there be a disk failure Some customers dont want the trade-off between Oracle Solaris Live Upgrade and a hot spare so they put a fourth disk in the system as the hot spare The cost of hardware service calls and downtime is such that it may be less expensive to provision a system with a spare disk at order time than it is to replace disks in the field
The other advantage of a three- or four-disk environment is that you arent dependent on disk mirroring for safety Some customers will use Oracle Solaris Live Upgrade as part of a back-up scenario whenever any changes are being contemplated An operator error (which would of course be duplicated on the mirror) can still be worked around fairly quickly if a copy was created before any system changes were made
A system with three disks (active boot environment mirror of the active environment and inactive boot environment) is generally considered the best practice if you want to use Oracle Solaris Live Upgrade but it is possible to have only two disks (active and mirror) if one of them is large enough to hold both the active and inactive boot environments If they arent large enough its still possible by temporarily breaking the mirror to enable the second disk to be used by Oracle Solaris Live Upgrade
3
Oracle White PapermdashHow to Upgrade and Patch with Oracle Solaris Live Upgrade
The wisdom of the latter approach depends on how critical the application is thats running on the system Can the organization tolerate the risk of the active boot environment disk failing during the creation of the copy Some organizations can tolerate this risk but others canrsquot
Disk Space for the Second Boot Environment Under Oracle Solaris ZFS
With the release of Oracle Solaris 10 1008 it is possible to boot from an Oracle Solaris ZFS-managed pool Also with that Oracle Solaris release the Oracle Solaris Live Upgrade tools have been modified to work in an Oracle Solaris ZFS environment This is significant for 3 reasons
1 You no longer need to have a separate partition for Oracle Solaris Live Upgrade to store the alternate boot environment Oracle Solaris treats the storage as a pool and as long as you have space in the pool for the Oracle Solaris snapshot you can use Oracle Solaris OS and Oracle Solaris Live Upgrade
2 Oracle Solaris snapshots are based on copy on write which means that files that arent changed dont take up any space in the snapshot With UFS Oracle Solaris Live Upgrade makes a complete copy of the existing boot environment in a separate partition With Oracle Solaris this copy is only the files that are different between the original snapshot and whatever subsequent changes you make to it This means that Oracle Solaris Live Upgrade potentially uses much less disk space with Oracle Solaris than with UFS
3 The lucreate step in a UFS environment can take significant time as a copy is made of the root environment With Oracle Solaris the snapshot is created in a matter of seconds It is only when changes are made to the files that the current active environment starts to differ from the snapshot
Example Upgrading to a New Release
This example explains how to upgrade an Oracle Solaris 10 305 system to the Oracle Solaris 10 106 release Oracle Solaris Live Upgrade has many capabilities but for a simple situation like upgrading a system to a new Oracle Solaris release there are three commands
bull lucreate to create the copy
bull luupgrade to upgrade the OS on the copy
bull luactivate to choose the environment to boot
1 Begin by logging into the root account
You must apply a few key patches before using Oracle Solaris Live Upgrade See Technical Instruction 206844 from SunSolve (suncomsunsolve) which describes the Oracle Solaris Live Upgrade SPARC or X86 patches required for each Oracle Solaris release
2 Create a directory vartmplupatches and download the patches to that directory
3 Patch the system
cd vartmplupatches
4
Oracle White PapermdashHow to Upgrade and Patch with Oracle Solaris Live Upgrade
Then add each patch individually
patchadd ltpatch_idgt
where ltpatch_idgt is the patch number The order in which the patches should be applied is specified in Technical Instruction 206844
4 Next if you are running on x86 hardware you must reboot the system
init 6
After the system reboots log back into the root account
Before upgrading you must install the Oracle Solaris Live Upgrade packages from the release to which you are upgrading New capabilities are added to the upgrade tools so installing the new packages from the target release is important In this example you will upgrade from Oracle Solaris 10 305 to Oracle Solaris 10 106 so you must get the Oracle Solaris Live Upgrade packages from the Oracle Solaris 10 106 DVD
5 Install the latest Oracle Solaris Live Upgrade packages using the liveupgrade20 script The script runs silently and installs the latest Oracle Solaris Live Upgrade packages Run the following command without the -noconsole and -nodisplay options and you will see the GUI install tool On SPARC systems
cd cdromcdrom0s0Solaris_10ToolsInstallers
liveupgrade20 -noconsole -nodisplay
On x86 systems
cd cdromcdrom0Solaris_10ToolsInstallers
liveupgrade20 -noconsole -nodisplay
When you migrate from one major Oracle Solaris release to another major release (for example Oracle Solaris 8 to Oracle Solaris 10) there may be additional package requirements The best strategy is to review Chapter 7 Oracle Solaris Live Upgrade (Planning) in the Oracle Solaris 10 Installation Guide Oracle Solaris Live Upgrade and Upgrade Planning document available from docssuncom
6 Run the lucreate command to create a copy of the active boot environment
You are now ready to make a copy of the root () file system Assume you have the situation as pictured in Figure 1 you have two disks and you have created a partition on the second disk to be the same size as the root () partition on the first disk
5
Oracle White PapermdashHow to Upgrade and Patch with Oracle Solaris Live Upgrade
Figure 1mdashBefore running the lucreate command
The object of this step is to create a copy of the current root () file system so that you have the situation pictured in Figure 2
Figure 2mdashAfter running the lucreate command
You will need to name both the current (active) boot environment and the copy (the inactive boot environment) The partition you will use for the copy must not appear in use in etcvfstabmdashin other words it should not have a file system on it In this case the active environment has been named ldquos10Mar05rdquo Because the goal of this exercise is to upgrade to Oracle Solaris 10 106 the new inactive boot environment has been named ldquos10Jan06rdquo You will also need to specify that you want to make a copy of the root () file system and where that new partition is to be located (c0t1d0s0 in this example) Also note that the file system is of type UFS Note how the last three pieces of information are concatenated for the -m argument
Create a new (inactive) boot environment
lucreate -c s10Mar05 -n s10Jan06 -m c0t1d0s0ufs
This command will generate output similar to the following The time to complete varies depending on the speed of the system and its disks
Discovering physical storage devices
Discovering logical storage devices
Cross referencing storage devices with boot environment configurations
6
Oracle White PapermdashHow to Upgrade and Patch with Oracle Solaris Live Upgrade
Determining types of file systems supported
Validating file system requests
The device name ltc0t1d0s0gt expands to device path ltdevdskc0t1d0s0gt
Preparing logical storage devices
Preparing physical storage devices
Configuring physical storage devices
Configuring logical storage devices
Analyzing system configuration
No name for current boot environment
Current boot environment is named lts10Mar05gt
Creating initial configuration for primary boot environment lts10Mar05gt
The device ltdevdskc0t0d0s0gt is not a root device for any boot
environment
PBE configuration successful PBE name lts10Mar05gt PBE Boot Device
ltdevdskc0t0d0s0gt
Comparing source boot environment lts10Mar05gt file systems with the file
system(s) you specified for the new boot environment Determining which
file systems should be in the new boot environment
Updating boot environment description database on all BEs
Searching dev for possible boot environment filesystem devices
Updating system configuration files
The device ltdevdskc0t1d0s0gt is not a root device for any boot
environment
Creating configuration for boot environment lts10Jan06gt
Source boot environment is lts10Mar05gt
Creating boot environment lts10Jan06gt
Creating file systems on boot environment lts10Jan06gt
Creating ltufsgt file system for ltgt on ltdevdskc0t1d0s0gt
Mounting file systems for boot environment lts10Jan06gt
Calculating required sizes of file systems for boot environment lts10Jan06gt
Populating file systems on boot environment lts10Jan06gt
Checking selection integrity
Integrity check OK
Populating contents of mount point ltgt
Copying
Creating shared file system mount points
Creating compare databases for boot environment lts10Jan06gt
Creating compare database for file system ltgt
7
Oracle White PapermdashHow to Upgrade and Patch with Oracle Solaris Live Upgrade
Updating compare databases on boot environment lts10Jan06gt
Making boot environment lts10Jan06gt bootable
Population of boot environment lts10Jan06gt successful
Creation of boot environment lts10Jan06gt successful
You might find it useful particularly if you encounter problems running the Oracle Solaris Live Upgrade commands to use the lustatus utility to see the state of the boot environment
After the new boot environment is created you can then begin the upgrade procedure
In this example you will upgrade from the Oracle Solaris 10 106 DVD After completing this step you will have the situation depicted in Figure 3
Figure 3mdashAfter running the luupgrade command
7 To upgrade to a new Oracle Solaris release you will use the luupgrade command with the -u option The -s option identifies the path to the media Due to slightly different file system organization on x86 installation DVDs than on SPARC DVDs the location -s option varies
For Oracle Solaris running on SPARC hardware a typical command line would be
luupgrade -u -n s10Jan06 -s cdromcdrom0s0
For Oracle Solaris running on x86 platforms
luupgrade -u -n s10Jan06 -s cdromcdrom0
This command will generate output similar to the following
Validating the contents of the media ltcdromcdrom0s0gt
The media is a standard Solaris media
The media contains an operating system upgrade image
The media contains ltSolarisgt version lt10gt
Constructing upgrade profile to use
Locating the operating system upgrade program
8
Oracle White PapermdashHow to Upgrade and Patch with Oracle Solaris Live Upgrade
Checking for existence of previously scheduled Solaris Live Upgrade
requests
Creating upgrade profile for BE lts10Jan06gt
Determining packages to install or upgrade for BE lts10Jan06gt
Performing the operating system upgrade of the BE lts10Jan06gt
CAUTION Interrupting this process may leave the boot environment unstable
or unbootable
Upgrading Solaris 6 completed
Upgrading Solaris 100 completed
Installation of the packages from this media is complete
Updating package information on boot environment lts10Jan06gt
Package information successfully updated on boot environment lts10Jan06gt
Adding operating system patches to the BE lts10Jan06gt
The operating system patch installation is complete
INFORMATION The file ltvarsadmsystemlogsupgrade_loggt on boot
environment lts10Jan06gt contains a log of the upgrade operation
INFORMATION The file ltvarsadmsystemdataupgrade_cleanupgt on boot
environment lts10Jan06gt contains a log of cleanup operations required
INFORMATION Review the files listed above Remember that all of the files
are located on boot environment lts10Jan06gt Before you activate boot
environment lts10Jan06gt determine if any additional system maintenance is
required or if additional media of the software distribution must be
installed
The Solaris upgrade of the boot environment lts10Jan06gt is complete
At this point you have created a new (inactive) boot environment and upgraded it to the Oracle Solaris 10 106 release In the next two steps you will first tell Oracle Solaris to use the new environment the next time you boot and then you will reboot the system so that it comes up running the new environment (as shown in Figure 4)
Figure 4mdashAfter running the luactivate command and rebooting
9
Oracle White PapermdashHow to Upgrade and Patch with Oracle Solaris Live Upgrade
8 Indicate which boot environment is to be used the next time you reboot
luactivate s10Jan06
where s10Jan06 is the boot environment you want to make active
On a running system some files might change during or after the lucreateluupgrade process You might want those changes reflected in the new boot environment in order to synchronize the two systems To address this there is a synchronization mechanism that the luactivate command will automatically call See the synclist(4) man page for more information
The luactivate command can also be used to revert to the previous boot environment In most cases this is very straightforward but due to the adoption on x86 platforms of GRUB (the new bootloader for Oracle Solaris 10 106 and subsequent Oracle Solaris releases) there are some issues when reverting from a GRUB system to a pre-GRUB release These are all explained in the Oracle Solaris Live Upgrade documentation referenced below
The output of the luactivate command will look like the following
The target boot environment has been activated It will be used when you
reboot NOTE You MUST NOT USE the reboot halt or uadmin commands You
MUST USE either the init or the shutdown command when you reboot If you
do not use either init or shutdown the system will not boot using the
target BE
In case of a failure while booting to the target BE the following process
needs to be followed to fallback to the currently working boot environment
1 Enter the PROM monitor (ok prompt)
2 Change the boot device back to the original boot environment by typing
setenv boot-device pci1f0pci11ide3disk00a
3 Boot to the original boot environment by typing
boot
Activation of boot environment lts10Jan06gt successful
Note the warning in the above about the proper command to use to reboot You must use ldquoinitrdquo or ldquoshutdownrdquo
10
Oracle White PapermdashHow to Upgrade and Patch with Oracle Solaris Live Upgrade
9 Reboot the system
init 6
You have now succeeded in upgrading to the Oracle Solaris 10 106 release Note that the reboot is the only downtime experienced using this upgrade methodmdasha far different situation than if you had done a standard install or standard upgrade
One final notemdashmake sure that you dispose of a boot environment properly when you are finished with it The proper way is to use the ludelete command If you destroy the boot environment through some other mechanism (e g newfs or rm -rf) you risk having a system that will not boot
Example Patching a System Using Oracle Solaris Live Upgrade
One of the most common uses of Oracle Solaris Live Upgrade is to minimize downtime for patching Upgrading to a newer Oracle Solaris release is a relatively infrequent activity in comparison to patching a system Depending on the length of the maintenance window and the need to minimize downtime patching an alternate boot environment may be an advantageous operations choice The steps are
bull Create a new boot environment
bull Patch the new boot environment
bull Boot from the new boot environment
bull Assess if the result of the changes is acceptable
As in the case of upgrading Oracle Solaris Live Upgrade has the advantage of applying the patches in the background with little impact on what is running on the system
To begin follow the steps 1-6 in the first example and optionally step 7 (if you wish to upgrade before patching) Now you are ready to apply the recommended patch cluster to the system
bull Obtain the patches
Access the recommended patch cluster for Oracle Solaris 10 from suncomsunsolve Look for the recommended patch clusters menu and select either the ldquoSolaris 10rdquo choice or the ldquoSolaris 10 x86rdquo choice
You will download the file 10_Recommendedzip (or 10_x86_Recommended zip) For this example assume you have downloaded the patches to vartmp Then use the unzip command to uncompress the downloaded file to create the directory ldquo10_Recommendedrdquo containing all the patches The file 10_RecommendedCLUSTER_README will tell you to take the system to single user mode and then use the install_cluster script In our case since you are patching the inactive boot environment you do not have to take the system to single user mode You will also employ a slightly different procedure to apply the patches you do not use the install_cluster script
bull Make sure you are in the patch directory
10 cd vartmp10_Recommended
11
Oracle White PapermdashHow to Upgrade and Patch with Oracle Solaris Live Upgrade
bull Patch the Inactive Boot Environment
luupgrade -n s10Jan06 -s vartmp10_Recommended -t `cat patch_order`
In the above you identify which boot environment to patch (s10Jan06rdquo) where the patches are located (the -s option and path argument) and patches to apply (the -t option followed by the patch numbers) Note the argument to the -t option is placed in backquotes meaning the expression will be evaluated by the shell before sending the results (the list of patches) to the luupgrade command
To finish follow steps 8 and 9 in the first example
As mentioned with Oracle Solaris 10 1008 Oracle Solaris is integrated with Oracle Solaris Live Upgrade The luupgrade command line semantics for patching are unchanged
The above is a very simple introduction on how to use Oracle Solaris Live Upgrade for patching A more realistic treatment is using Oracle Solaris Live Upgrade to patch in an enterprise mirrored-disk environment which is covered in an Oracle technical publication referenced below in the Web Resources section
Patching Considerations
Behind the scenes Oracle Solaris Live Upgrade is simply using the patchadd command You could accomplish the same patching of the inactive boot environment by mounting it and using patchadd with the -R option If you want to understand the behavior of patching using Oracle Solaris Live Upgrade familiarize yourself with the patchadd command
The Oracle Solaris 10 patchadd command is smart enough to order patches correctly but Oracle Solaris 9 and earlier releases require patches to be in dependency order Oracle uses a command line similar to the above as part of the standard testing so it makes sense to use a similar approach when you use Oracle Solaris Live Upgrade to patchmdashno matter what Oracle Solaris release you are patching
Third-party patches may not support being applied through Oracle Solaris Live Upgrade All Oracle patches conform to the requirement that pre- and post-install scripts never modify the running system when the target is an inactive boot environment Furthermore testing the application of recommended patches via Oracle Solaris Live Upgrade is part of Oraclersquos standard test procedures However Oracle cannot guarantee that all third-party patches are equally well behaved Depending on your organizations reliance on non- Oracle patches you may need to verify that a third-party patch does not contain a script that attempts to modify the current environment when you intend only to patch an inactive boot environment
12
Oracle White PapermdashHow to Upgrade and Patch with Oracle Solaris Live Upgrade
Summary
Oracle Solaris Live Upgrade is an enterprise-class tool and these examples have described only a small subset of its possibilities Oracle Solaris Live Upgrade offers many different ways to control the creation of a new boot environment for example there are other options besides making a complete copy of the current environment Oracle Solaris Live Upgrade integrates with Oracle Solaris Volume Manager and with some extra scripting with Veritas Volume Manager 41 or later (contact Symantec for details) Oracle Solaris Live Upgrade can be used to add packages as well as patches and of course remove packages and patches It can also be used to load an Oracle Solaris Flash Archive image a high-performance approach to quickly building a system For more details see the ldquoAdditional Resourcesrdquo section below
In closing Oracle Solaris Live Upgrade offers an excellent value proposition for enterprisesmdashthe ability to make a copy of a system make changes to the copy or the original and then decide which will be the new boot environment The only downtime for such an operation is the actual reboot All the other operations can take place in the background of a running production system The most important factor in using Oracle Solaris Live Upgrade is to plan ahead by configuring your systems properly
For More Information
We have made brief reference to the lucreate(1M) lustatus(1M) luupgrade(1M) and luactivate(1M) commands in this document You might also review other commands (see for example the See Also section of the lucreate(1M) man page) The man pages reference lu(1m) a simple tool for managing Oracle Solaris Live Upgrades However this GUI-like tool is no longer current with the capabilities of the rest of the Oracle Solaris Live Upgrade command-line tools so we do not recommend its use The lu command will likely be dropped in a future Oracle Solaris release
TABLE 1 WEB RESOURCES
The man pages for Oracle Solaris 10 can be found in the Oracle Solaris 10
Reference Manual Collection
docssuncomappdocscoll4010
Oracle Solaris 10 Installation Guide Oracle Solaris Live Upgrade and Upgrade
Planning
docssuncomappdocscoll12361
An excellent Oracle document on patching using Oracle Solaris Live Upgrade
ldquoPatching Mirrored Systems with the Oracle Solaris Live Upgrade Softwarerdquo
suncomblueprints0607820-2188html
Search the Sun forums There are two forums where Oracle Solaris Live Upgrade
questions tend to appear
1) Click on Solaris tab then select Installation
2) Click on Administration tab then select Talk to the Sysop
forumjavasuncom
13
How to Upgrade and Patch with Oracle Solaris Live Upgrade May 2010 Author Jeff McMeekin
Oracle Corporation World Headquarters 500 Oracle Parkway Redwood Shores CA 94065 USA
Worldwide Inquiries Phone +16505067000 Fax +16505067200 oraclecom
Copyright copy 2010 Oracle andor its affiliates All rights reserved This document is provided for information purposes only and the contents hereof are subject to change without notice This document is not warranted to be error-free nor subject to any other warranties or conditions whether expressed orally or implied in law including implied warranties and conditions of merchantability or fitness for a particular purpose We specifically disclaim any liability with respect to this document and no contractual obligations are formed either directly or indirectly by this document This document may not be reproduced or transmitted in any form or by any means electronic or mechanical for any purpose without our prior written permission
Oracle and Java are registered trademarks of Oracle andor its affiliates Other names may be trademarks of their respective owners
AMD Opteron the AMD logo and the AMD Opteron logo are trademarks or registered trademarks of Advanced Micro Devices Intel and Intel Xeon are trademarks or registered trademarks of Intel Corporation All SPARC trademarks are used under license and are trademarks or registered trademarks of SPARC International Inc UNIX is a registered trademark licensed through XOpen Company Ltd 0310
Oracle White PapermdashHow to Upgrade and Patch with Oracle Solaris Live Upgrade
Then add each patch individually
patchadd ltpatch_idgt
where ltpatch_idgt is the patch number The order in which the patches should be applied is specified in Technical Instruction 206844
4 Next if you are running on x86 hardware you must reboot the system
init 6
After the system reboots log back into the root account
Before upgrading you must install the Oracle Solaris Live Upgrade packages from the release to which you are upgrading New capabilities are added to the upgrade tools so installing the new packages from the target release is important In this example you will upgrade from Oracle Solaris 10 305 to Oracle Solaris 10 106 so you must get the Oracle Solaris Live Upgrade packages from the Oracle Solaris 10 106 DVD
5 Install the latest Oracle Solaris Live Upgrade packages using the liveupgrade20 script The script runs silently and installs the latest Oracle Solaris Live Upgrade packages Run the following command without the -noconsole and -nodisplay options and you will see the GUI install tool On SPARC systems
cd cdromcdrom0s0Solaris_10ToolsInstallers
liveupgrade20 -noconsole -nodisplay
On x86 systems
cd cdromcdrom0Solaris_10ToolsInstallers
liveupgrade20 -noconsole -nodisplay
When you migrate from one major Oracle Solaris release to another major release (for example Oracle Solaris 8 to Oracle Solaris 10) there may be additional package requirements The best strategy is to review Chapter 7 Oracle Solaris Live Upgrade (Planning) in the Oracle Solaris 10 Installation Guide Oracle Solaris Live Upgrade and Upgrade Planning document available from docssuncom
6 Run the lucreate command to create a copy of the active boot environment
You are now ready to make a copy of the root () file system Assume you have the situation as pictured in Figure 1 you have two disks and you have created a partition on the second disk to be the same size as the root () partition on the first disk
5
Oracle White PapermdashHow to Upgrade and Patch with Oracle Solaris Live Upgrade
Figure 1mdashBefore running the lucreate command
The object of this step is to create a copy of the current root () file system so that you have the situation pictured in Figure 2
Figure 2mdashAfter running the lucreate command
You will need to name both the current (active) boot environment and the copy (the inactive boot environment) The partition you will use for the copy must not appear in use in etcvfstabmdashin other words it should not have a file system on it In this case the active environment has been named ldquos10Mar05rdquo Because the goal of this exercise is to upgrade to Oracle Solaris 10 106 the new inactive boot environment has been named ldquos10Jan06rdquo You will also need to specify that you want to make a copy of the root () file system and where that new partition is to be located (c0t1d0s0 in this example) Also note that the file system is of type UFS Note how the last three pieces of information are concatenated for the -m argument
Create a new (inactive) boot environment
lucreate -c s10Mar05 -n s10Jan06 -m c0t1d0s0ufs
This command will generate output similar to the following The time to complete varies depending on the speed of the system and its disks
Discovering physical storage devices
Discovering logical storage devices
Cross referencing storage devices with boot environment configurations
6
Oracle White PapermdashHow to Upgrade and Patch with Oracle Solaris Live Upgrade
Determining types of file systems supported
Validating file system requests
The device name ltc0t1d0s0gt expands to device path ltdevdskc0t1d0s0gt
Preparing logical storage devices
Preparing physical storage devices
Configuring physical storage devices
Configuring logical storage devices
Analyzing system configuration
No name for current boot environment
Current boot environment is named lts10Mar05gt
Creating initial configuration for primary boot environment lts10Mar05gt
The device ltdevdskc0t0d0s0gt is not a root device for any boot
environment
PBE configuration successful PBE name lts10Mar05gt PBE Boot Device
ltdevdskc0t0d0s0gt
Comparing source boot environment lts10Mar05gt file systems with the file
system(s) you specified for the new boot environment Determining which
file systems should be in the new boot environment
Updating boot environment description database on all BEs
Searching dev for possible boot environment filesystem devices
Updating system configuration files
The device ltdevdskc0t1d0s0gt is not a root device for any boot
environment
Creating configuration for boot environment lts10Jan06gt
Source boot environment is lts10Mar05gt
Creating boot environment lts10Jan06gt
Creating file systems on boot environment lts10Jan06gt
Creating ltufsgt file system for ltgt on ltdevdskc0t1d0s0gt
Mounting file systems for boot environment lts10Jan06gt
Calculating required sizes of file systems for boot environment lts10Jan06gt
Populating file systems on boot environment lts10Jan06gt
Checking selection integrity
Integrity check OK
Populating contents of mount point ltgt
Copying
Creating shared file system mount points
Creating compare databases for boot environment lts10Jan06gt
Creating compare database for file system ltgt
7
Oracle White PapermdashHow to Upgrade and Patch with Oracle Solaris Live Upgrade
Updating compare databases on boot environment lts10Jan06gt
Making boot environment lts10Jan06gt bootable
Population of boot environment lts10Jan06gt successful
Creation of boot environment lts10Jan06gt successful
You might find it useful particularly if you encounter problems running the Oracle Solaris Live Upgrade commands to use the lustatus utility to see the state of the boot environment
After the new boot environment is created you can then begin the upgrade procedure
In this example you will upgrade from the Oracle Solaris 10 106 DVD After completing this step you will have the situation depicted in Figure 3
Figure 3mdashAfter running the luupgrade command
7 To upgrade to a new Oracle Solaris release you will use the luupgrade command with the -u option The -s option identifies the path to the media Due to slightly different file system organization on x86 installation DVDs than on SPARC DVDs the location -s option varies
For Oracle Solaris running on SPARC hardware a typical command line would be
luupgrade -u -n s10Jan06 -s cdromcdrom0s0
For Oracle Solaris running on x86 platforms
luupgrade -u -n s10Jan06 -s cdromcdrom0
This command will generate output similar to the following
Validating the contents of the media ltcdromcdrom0s0gt
The media is a standard Solaris media
The media contains an operating system upgrade image
The media contains ltSolarisgt version lt10gt
Constructing upgrade profile to use
Locating the operating system upgrade program
8
Oracle White PapermdashHow to Upgrade and Patch with Oracle Solaris Live Upgrade
Checking for existence of previously scheduled Solaris Live Upgrade
requests
Creating upgrade profile for BE lts10Jan06gt
Determining packages to install or upgrade for BE lts10Jan06gt
Performing the operating system upgrade of the BE lts10Jan06gt
CAUTION Interrupting this process may leave the boot environment unstable
or unbootable
Upgrading Solaris 6 completed
Upgrading Solaris 100 completed
Installation of the packages from this media is complete
Updating package information on boot environment lts10Jan06gt
Package information successfully updated on boot environment lts10Jan06gt
Adding operating system patches to the BE lts10Jan06gt
The operating system patch installation is complete
INFORMATION The file ltvarsadmsystemlogsupgrade_loggt on boot
environment lts10Jan06gt contains a log of the upgrade operation
INFORMATION The file ltvarsadmsystemdataupgrade_cleanupgt on boot
environment lts10Jan06gt contains a log of cleanup operations required
INFORMATION Review the files listed above Remember that all of the files
are located on boot environment lts10Jan06gt Before you activate boot
environment lts10Jan06gt determine if any additional system maintenance is
required or if additional media of the software distribution must be
installed
The Solaris upgrade of the boot environment lts10Jan06gt is complete
At this point you have created a new (inactive) boot environment and upgraded it to the Oracle Solaris 10 106 release In the next two steps you will first tell Oracle Solaris to use the new environment the next time you boot and then you will reboot the system so that it comes up running the new environment (as shown in Figure 4)
Figure 4mdashAfter running the luactivate command and rebooting
9
Oracle White PapermdashHow to Upgrade and Patch with Oracle Solaris Live Upgrade
8 Indicate which boot environment is to be used the next time you reboot
luactivate s10Jan06
where s10Jan06 is the boot environment you want to make active
On a running system some files might change during or after the lucreateluupgrade process You might want those changes reflected in the new boot environment in order to synchronize the two systems To address this there is a synchronization mechanism that the luactivate command will automatically call See the synclist(4) man page for more information
The luactivate command can also be used to revert to the previous boot environment In most cases this is very straightforward but due to the adoption on x86 platforms of GRUB (the new bootloader for Oracle Solaris 10 106 and subsequent Oracle Solaris releases) there are some issues when reverting from a GRUB system to a pre-GRUB release These are all explained in the Oracle Solaris Live Upgrade documentation referenced below
The output of the luactivate command will look like the following
The target boot environment has been activated It will be used when you
reboot NOTE You MUST NOT USE the reboot halt or uadmin commands You
MUST USE either the init or the shutdown command when you reboot If you
do not use either init or shutdown the system will not boot using the
target BE
In case of a failure while booting to the target BE the following process
needs to be followed to fallback to the currently working boot environment
1 Enter the PROM monitor (ok prompt)
2 Change the boot device back to the original boot environment by typing
setenv boot-device pci1f0pci11ide3disk00a
3 Boot to the original boot environment by typing
boot
Activation of boot environment lts10Jan06gt successful
Note the warning in the above about the proper command to use to reboot You must use ldquoinitrdquo or ldquoshutdownrdquo
10
Oracle White PapermdashHow to Upgrade and Patch with Oracle Solaris Live Upgrade
9 Reboot the system
init 6
You have now succeeded in upgrading to the Oracle Solaris 10 106 release Note that the reboot is the only downtime experienced using this upgrade methodmdasha far different situation than if you had done a standard install or standard upgrade
One final notemdashmake sure that you dispose of a boot environment properly when you are finished with it The proper way is to use the ludelete command If you destroy the boot environment through some other mechanism (e g newfs or rm -rf) you risk having a system that will not boot
Example Patching a System Using Oracle Solaris Live Upgrade
One of the most common uses of Oracle Solaris Live Upgrade is to minimize downtime for patching Upgrading to a newer Oracle Solaris release is a relatively infrequent activity in comparison to patching a system Depending on the length of the maintenance window and the need to minimize downtime patching an alternate boot environment may be an advantageous operations choice The steps are
bull Create a new boot environment
bull Patch the new boot environment
bull Boot from the new boot environment
bull Assess if the result of the changes is acceptable
As in the case of upgrading Oracle Solaris Live Upgrade has the advantage of applying the patches in the background with little impact on what is running on the system
To begin follow the steps 1-6 in the first example and optionally step 7 (if you wish to upgrade before patching) Now you are ready to apply the recommended patch cluster to the system
bull Obtain the patches
Access the recommended patch cluster for Oracle Solaris 10 from suncomsunsolve Look for the recommended patch clusters menu and select either the ldquoSolaris 10rdquo choice or the ldquoSolaris 10 x86rdquo choice
You will download the file 10_Recommendedzip (or 10_x86_Recommended zip) For this example assume you have downloaded the patches to vartmp Then use the unzip command to uncompress the downloaded file to create the directory ldquo10_Recommendedrdquo containing all the patches The file 10_RecommendedCLUSTER_README will tell you to take the system to single user mode and then use the install_cluster script In our case since you are patching the inactive boot environment you do not have to take the system to single user mode You will also employ a slightly different procedure to apply the patches you do not use the install_cluster script
bull Make sure you are in the patch directory
10 cd vartmp10_Recommended
11
Oracle White PapermdashHow to Upgrade and Patch with Oracle Solaris Live Upgrade
bull Patch the Inactive Boot Environment
luupgrade -n s10Jan06 -s vartmp10_Recommended -t `cat patch_order`
In the above you identify which boot environment to patch (s10Jan06rdquo) where the patches are located (the -s option and path argument) and patches to apply (the -t option followed by the patch numbers) Note the argument to the -t option is placed in backquotes meaning the expression will be evaluated by the shell before sending the results (the list of patches) to the luupgrade command
To finish follow steps 8 and 9 in the first example
As mentioned with Oracle Solaris 10 1008 Oracle Solaris is integrated with Oracle Solaris Live Upgrade The luupgrade command line semantics for patching are unchanged
The above is a very simple introduction on how to use Oracle Solaris Live Upgrade for patching A more realistic treatment is using Oracle Solaris Live Upgrade to patch in an enterprise mirrored-disk environment which is covered in an Oracle technical publication referenced below in the Web Resources section
Patching Considerations
Behind the scenes Oracle Solaris Live Upgrade is simply using the patchadd command You could accomplish the same patching of the inactive boot environment by mounting it and using patchadd with the -R option If you want to understand the behavior of patching using Oracle Solaris Live Upgrade familiarize yourself with the patchadd command
The Oracle Solaris 10 patchadd command is smart enough to order patches correctly but Oracle Solaris 9 and earlier releases require patches to be in dependency order Oracle uses a command line similar to the above as part of the standard testing so it makes sense to use a similar approach when you use Oracle Solaris Live Upgrade to patchmdashno matter what Oracle Solaris release you are patching
Third-party patches may not support being applied through Oracle Solaris Live Upgrade All Oracle patches conform to the requirement that pre- and post-install scripts never modify the running system when the target is an inactive boot environment Furthermore testing the application of recommended patches via Oracle Solaris Live Upgrade is part of Oraclersquos standard test procedures However Oracle cannot guarantee that all third-party patches are equally well behaved Depending on your organizations reliance on non- Oracle patches you may need to verify that a third-party patch does not contain a script that attempts to modify the current environment when you intend only to patch an inactive boot environment
12
Oracle White PapermdashHow to Upgrade and Patch with Oracle Solaris Live Upgrade
Summary
Oracle Solaris Live Upgrade is an enterprise-class tool and these examples have described only a small subset of its possibilities Oracle Solaris Live Upgrade offers many different ways to control the creation of a new boot environment for example there are other options besides making a complete copy of the current environment Oracle Solaris Live Upgrade integrates with Oracle Solaris Volume Manager and with some extra scripting with Veritas Volume Manager 41 or later (contact Symantec for details) Oracle Solaris Live Upgrade can be used to add packages as well as patches and of course remove packages and patches It can also be used to load an Oracle Solaris Flash Archive image a high-performance approach to quickly building a system For more details see the ldquoAdditional Resourcesrdquo section below
In closing Oracle Solaris Live Upgrade offers an excellent value proposition for enterprisesmdashthe ability to make a copy of a system make changes to the copy or the original and then decide which will be the new boot environment The only downtime for such an operation is the actual reboot All the other operations can take place in the background of a running production system The most important factor in using Oracle Solaris Live Upgrade is to plan ahead by configuring your systems properly
For More Information
We have made brief reference to the lucreate(1M) lustatus(1M) luupgrade(1M) and luactivate(1M) commands in this document You might also review other commands (see for example the See Also section of the lucreate(1M) man page) The man pages reference lu(1m) a simple tool for managing Oracle Solaris Live Upgrades However this GUI-like tool is no longer current with the capabilities of the rest of the Oracle Solaris Live Upgrade command-line tools so we do not recommend its use The lu command will likely be dropped in a future Oracle Solaris release
TABLE 1 WEB RESOURCES
The man pages for Oracle Solaris 10 can be found in the Oracle Solaris 10
Reference Manual Collection
docssuncomappdocscoll4010
Oracle Solaris 10 Installation Guide Oracle Solaris Live Upgrade and Upgrade
Planning
docssuncomappdocscoll12361
An excellent Oracle document on patching using Oracle Solaris Live Upgrade
ldquoPatching Mirrored Systems with the Oracle Solaris Live Upgrade Softwarerdquo
suncomblueprints0607820-2188html
Search the Sun forums There are two forums where Oracle Solaris Live Upgrade
questions tend to appear
1) Click on Solaris tab then select Installation
2) Click on Administration tab then select Talk to the Sysop
forumjavasuncom
13
How to Upgrade and Patch with Oracle Solaris Live Upgrade May 2010 Author Jeff McMeekin
Oracle Corporation World Headquarters 500 Oracle Parkway Redwood Shores CA 94065 USA
Worldwide Inquiries Phone +16505067000 Fax +16505067200 oraclecom
Copyright copy 2010 Oracle andor its affiliates All rights reserved This document is provided for information purposes only and the contents hereof are subject to change without notice This document is not warranted to be error-free nor subject to any other warranties or conditions whether expressed orally or implied in law including implied warranties and conditions of merchantability or fitness for a particular purpose We specifically disclaim any liability with respect to this document and no contractual obligations are formed either directly or indirectly by this document This document may not be reproduced or transmitted in any form or by any means electronic or mechanical for any purpose without our prior written permission
Oracle and Java are registered trademarks of Oracle andor its affiliates Other names may be trademarks of their respective owners
AMD Opteron the AMD logo and the AMD Opteron logo are trademarks or registered trademarks of Advanced Micro Devices Intel and Intel Xeon are trademarks or registered trademarks of Intel Corporation All SPARC trademarks are used under license and are trademarks or registered trademarks of SPARC International Inc UNIX is a registered trademark licensed through XOpen Company Ltd 0310
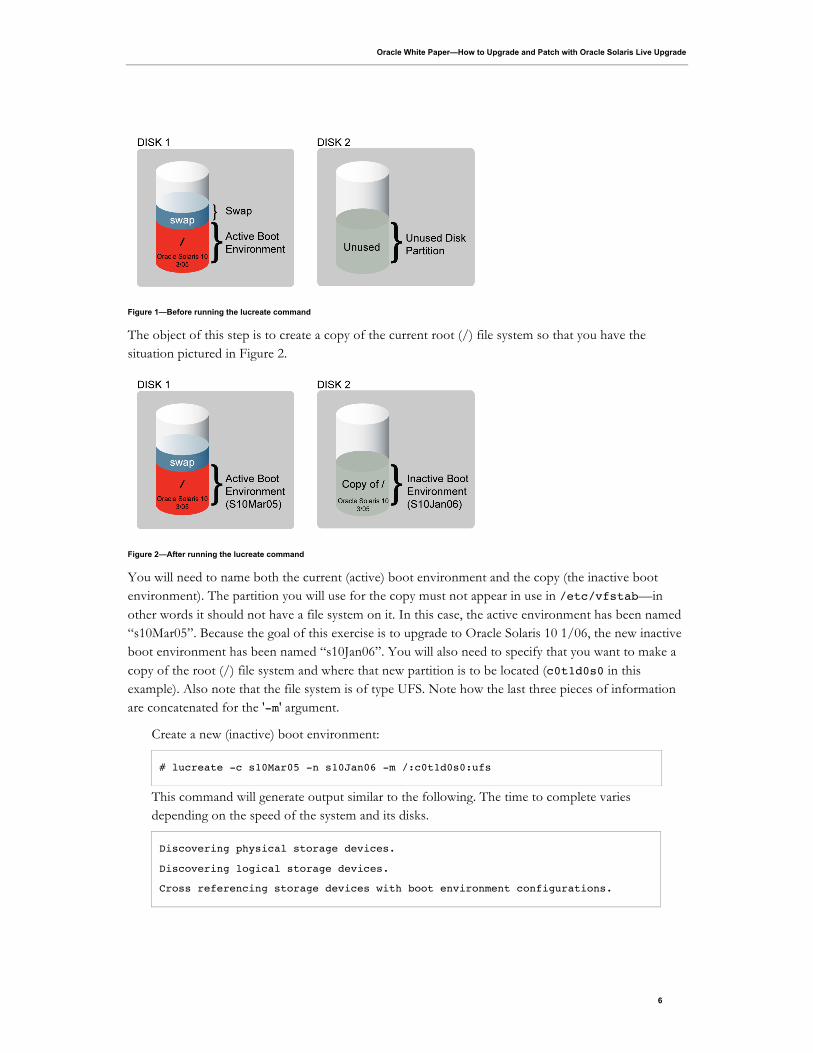
Oracle White PapermdashHow to Upgrade and Patch with Oracle Solaris Live Upgrade
Figure 1mdashBefore running the lucreate command
The object of this step is to create a copy of the current root () file system so that you have the situation pictured in Figure 2
Figure 2mdashAfter running the lucreate command
You will need to name both the current (active) boot environment and the copy (the inactive boot environment) The partition you will use for the copy must not appear in use in etcvfstabmdashin other words it should not have a file system on it In this case the active environment has been named ldquos10Mar05rdquo Because the goal of this exercise is to upgrade to Oracle Solaris 10 106 the new inactive boot environment has been named ldquos10Jan06rdquo You will also need to specify that you want to make a copy of the root () file system and where that new partition is to be located (c0t1d0s0 in this example) Also note that the file system is of type UFS Note how the last three pieces of information are concatenated for the -m argument
Create a new (inactive) boot environment
lucreate -c s10Mar05 -n s10Jan06 -m c0t1d0s0ufs
This command will generate output similar to the following The time to complete varies depending on the speed of the system and its disks
Discovering physical storage devices
Discovering logical storage devices
Cross referencing storage devices with boot environment configurations
6
Oracle White PapermdashHow to Upgrade and Patch with Oracle Solaris Live Upgrade
Determining types of file systems supported
Validating file system requests
The device name ltc0t1d0s0gt expands to device path ltdevdskc0t1d0s0gt
Preparing logical storage devices
Preparing physical storage devices
Configuring physical storage devices
Configuring logical storage devices
Analyzing system configuration
No name for current boot environment
Current boot environment is named lts10Mar05gt
Creating initial configuration for primary boot environment lts10Mar05gt
The device ltdevdskc0t0d0s0gt is not a root device for any boot
environment
PBE configuration successful PBE name lts10Mar05gt PBE Boot Device
ltdevdskc0t0d0s0gt
Comparing source boot environment lts10Mar05gt file systems with the file
system(s) you specified for the new boot environment Determining which
file systems should be in the new boot environment
Updating boot environment description database on all BEs
Searching dev for possible boot environment filesystem devices
Updating system configuration files
The device ltdevdskc0t1d0s0gt is not a root device for any boot
environment
Creating configuration for boot environment lts10Jan06gt
Source boot environment is lts10Mar05gt
Creating boot environment lts10Jan06gt
Creating file systems on boot environment lts10Jan06gt
Creating ltufsgt file system for ltgt on ltdevdskc0t1d0s0gt
Mounting file systems for boot environment lts10Jan06gt
Calculating required sizes of file systems for boot environment lts10Jan06gt
Populating file systems on boot environment lts10Jan06gt
Checking selection integrity
Integrity check OK
Populating contents of mount point ltgt
Copying
Creating shared file system mount points
Creating compare databases for boot environment lts10Jan06gt
Creating compare database for file system ltgt
7
Oracle White PapermdashHow to Upgrade and Patch with Oracle Solaris Live Upgrade
Updating compare databases on boot environment lts10Jan06gt
Making boot environment lts10Jan06gt bootable
Population of boot environment lts10Jan06gt successful
Creation of boot environment lts10Jan06gt successful
You might find it useful particularly if you encounter problems running the Oracle Solaris Live Upgrade commands to use the lustatus utility to see the state of the boot environment
After the new boot environment is created you can then begin the upgrade procedure
In this example you will upgrade from the Oracle Solaris 10 106 DVD After completing this step you will have the situation depicted in Figure 3
Figure 3mdashAfter running the luupgrade command
7 To upgrade to a new Oracle Solaris release you will use the luupgrade command with the -u option The -s option identifies the path to the media Due to slightly different file system organization on x86 installation DVDs than on SPARC DVDs the location -s option varies
For Oracle Solaris running on SPARC hardware a typical command line would be
luupgrade -u -n s10Jan06 -s cdromcdrom0s0
For Oracle Solaris running on x86 platforms
luupgrade -u -n s10Jan06 -s cdromcdrom0
This command will generate output similar to the following
Validating the contents of the media ltcdromcdrom0s0gt
The media is a standard Solaris media
The media contains an operating system upgrade image
The media contains ltSolarisgt version lt10gt
Constructing upgrade profile to use
Locating the operating system upgrade program
8
Oracle White PapermdashHow to Upgrade and Patch with Oracle Solaris Live Upgrade
Checking for existence of previously scheduled Solaris Live Upgrade
requests
Creating upgrade profile for BE lts10Jan06gt
Determining packages to install or upgrade for BE lts10Jan06gt
Performing the operating system upgrade of the BE lts10Jan06gt
CAUTION Interrupting this process may leave the boot environment unstable
or unbootable
Upgrading Solaris 6 completed
Upgrading Solaris 100 completed
Installation of the packages from this media is complete
Updating package information on boot environment lts10Jan06gt
Package information successfully updated on boot environment lts10Jan06gt
Adding operating system patches to the BE lts10Jan06gt
The operating system patch installation is complete
INFORMATION The file ltvarsadmsystemlogsupgrade_loggt on boot
environment lts10Jan06gt contains a log of the upgrade operation
INFORMATION The file ltvarsadmsystemdataupgrade_cleanupgt on boot
environment lts10Jan06gt contains a log of cleanup operations required
INFORMATION Review the files listed above Remember that all of the files
are located on boot environment lts10Jan06gt Before you activate boot
environment lts10Jan06gt determine if any additional system maintenance is
required or if additional media of the software distribution must be
installed
The Solaris upgrade of the boot environment lts10Jan06gt is complete
At this point you have created a new (inactive) boot environment and upgraded it to the Oracle Solaris 10 106 release In the next two steps you will first tell Oracle Solaris to use the new environment the next time you boot and then you will reboot the system so that it comes up running the new environment (as shown in Figure 4)
Figure 4mdashAfter running the luactivate command and rebooting
9
Oracle White PapermdashHow to Upgrade and Patch with Oracle Solaris Live Upgrade
8 Indicate which boot environment is to be used the next time you reboot
luactivate s10Jan06
where s10Jan06 is the boot environment you want to make active
On a running system some files might change during or after the lucreateluupgrade process You might want those changes reflected in the new boot environment in order to synchronize the two systems To address this there is a synchronization mechanism that the luactivate command will automatically call See the synclist(4) man page for more information
The luactivate command can also be used to revert to the previous boot environment In most cases this is very straightforward but due to the adoption on x86 platforms of GRUB (the new bootloader for Oracle Solaris 10 106 and subsequent Oracle Solaris releases) there are some issues when reverting from a GRUB system to a pre-GRUB release These are all explained in the Oracle Solaris Live Upgrade documentation referenced below
The output of the luactivate command will look like the following
The target boot environment has been activated It will be used when you
reboot NOTE You MUST NOT USE the reboot halt or uadmin commands You
MUST USE either the init or the shutdown command when you reboot If you
do not use either init or shutdown the system will not boot using the
target BE
In case of a failure while booting to the target BE the following process
needs to be followed to fallback to the currently working boot environment
1 Enter the PROM monitor (ok prompt)
2 Change the boot device back to the original boot environment by typing
setenv boot-device pci1f0pci11ide3disk00a
3 Boot to the original boot environment by typing
boot
Activation of boot environment lts10Jan06gt successful
Note the warning in the above about the proper command to use to reboot You must use ldquoinitrdquo or ldquoshutdownrdquo
10
Oracle White PapermdashHow to Upgrade and Patch with Oracle Solaris Live Upgrade
9 Reboot the system
init 6
You have now succeeded in upgrading to the Oracle Solaris 10 106 release Note that the reboot is the only downtime experienced using this upgrade methodmdasha far different situation than if you had done a standard install or standard upgrade
One final notemdashmake sure that you dispose of a boot environment properly when you are finished with it The proper way is to use the ludelete command If you destroy the boot environment through some other mechanism (e g newfs or rm -rf) you risk having a system that will not boot
Example Patching a System Using Oracle Solaris Live Upgrade
One of the most common uses of Oracle Solaris Live Upgrade is to minimize downtime for patching Upgrading to a newer Oracle Solaris release is a relatively infrequent activity in comparison to patching a system Depending on the length of the maintenance window and the need to minimize downtime patching an alternate boot environment may be an advantageous operations choice The steps are
bull Create a new boot environment
bull Patch the new boot environment
bull Boot from the new boot environment
bull Assess if the result of the changes is acceptable
As in the case of upgrading Oracle Solaris Live Upgrade has the advantage of applying the patches in the background with little impact on what is running on the system
To begin follow the steps 1-6 in the first example and optionally step 7 (if you wish to upgrade before patching) Now you are ready to apply the recommended patch cluster to the system
bull Obtain the patches
Access the recommended patch cluster for Oracle Solaris 10 from suncomsunsolve Look for the recommended patch clusters menu and select either the ldquoSolaris 10rdquo choice or the ldquoSolaris 10 x86rdquo choice
You will download the file 10_Recommendedzip (or 10_x86_Recommended zip) For this example assume you have downloaded the patches to vartmp Then use the unzip command to uncompress the downloaded file to create the directory ldquo10_Recommendedrdquo containing all the patches The file 10_RecommendedCLUSTER_README will tell you to take the system to single user mode and then use the install_cluster script In our case since you are patching the inactive boot environment you do not have to take the system to single user mode You will also employ a slightly different procedure to apply the patches you do not use the install_cluster script
bull Make sure you are in the patch directory
10 cd vartmp10_Recommended
11
Oracle White PapermdashHow to Upgrade and Patch with Oracle Solaris Live Upgrade
bull Patch the Inactive Boot Environment
luupgrade -n s10Jan06 -s vartmp10_Recommended -t `cat patch_order`
In the above you identify which boot environment to patch (s10Jan06rdquo) where the patches are located (the -s option and path argument) and patches to apply (the -t option followed by the patch numbers) Note the argument to the -t option is placed in backquotes meaning the expression will be evaluated by the shell before sending the results (the list of patches) to the luupgrade command
To finish follow steps 8 and 9 in the first example
As mentioned with Oracle Solaris 10 1008 Oracle Solaris is integrated with Oracle Solaris Live Upgrade The luupgrade command line semantics for patching are unchanged
The above is a very simple introduction on how to use Oracle Solaris Live Upgrade for patching A more realistic treatment is using Oracle Solaris Live Upgrade to patch in an enterprise mirrored-disk environment which is covered in an Oracle technical publication referenced below in the Web Resources section
Patching Considerations
Behind the scenes Oracle Solaris Live Upgrade is simply using the patchadd command You could accomplish the same patching of the inactive boot environment by mounting it and using patchadd with the -R option If you want to understand the behavior of patching using Oracle Solaris Live Upgrade familiarize yourself with the patchadd command
The Oracle Solaris 10 patchadd command is smart enough to order patches correctly but Oracle Solaris 9 and earlier releases require patches to be in dependency order Oracle uses a command line similar to the above as part of the standard testing so it makes sense to use a similar approach when you use Oracle Solaris Live Upgrade to patchmdashno matter what Oracle Solaris release you are patching
Third-party patches may not support being applied through Oracle Solaris Live Upgrade All Oracle patches conform to the requirement that pre- and post-install scripts never modify the running system when the target is an inactive boot environment Furthermore testing the application of recommended patches via Oracle Solaris Live Upgrade is part of Oraclersquos standard test procedures However Oracle cannot guarantee that all third-party patches are equally well behaved Depending on your organizations reliance on non- Oracle patches you may need to verify that a third-party patch does not contain a script that attempts to modify the current environment when you intend only to patch an inactive boot environment
12
Oracle White PapermdashHow to Upgrade and Patch with Oracle Solaris Live Upgrade
Summary
Oracle Solaris Live Upgrade is an enterprise-class tool and these examples have described only a small subset of its possibilities Oracle Solaris Live Upgrade offers many different ways to control the creation of a new boot environment for example there are other options besides making a complete copy of the current environment Oracle Solaris Live Upgrade integrates with Oracle Solaris Volume Manager and with some extra scripting with Veritas Volume Manager 41 or later (contact Symantec for details) Oracle Solaris Live Upgrade can be used to add packages as well as patches and of course remove packages and patches It can also be used to load an Oracle Solaris Flash Archive image a high-performance approach to quickly building a system For more details see the ldquoAdditional Resourcesrdquo section below
In closing Oracle Solaris Live Upgrade offers an excellent value proposition for enterprisesmdashthe ability to make a copy of a system make changes to the copy or the original and then decide which will be the new boot environment The only downtime for such an operation is the actual reboot All the other operations can take place in the background of a running production system The most important factor in using Oracle Solaris Live Upgrade is to plan ahead by configuring your systems properly
For More Information
We have made brief reference to the lucreate(1M) lustatus(1M) luupgrade(1M) and luactivate(1M) commands in this document You might also review other commands (see for example the See Also section of the lucreate(1M) man page) The man pages reference lu(1m) a simple tool for managing Oracle Solaris Live Upgrades However this GUI-like tool is no longer current with the capabilities of the rest of the Oracle Solaris Live Upgrade command-line tools so we do not recommend its use The lu command will likely be dropped in a future Oracle Solaris release
TABLE 1 WEB RESOURCES
The man pages for Oracle Solaris 10 can be found in the Oracle Solaris 10
Reference Manual Collection
docssuncomappdocscoll4010
Oracle Solaris 10 Installation Guide Oracle Solaris Live Upgrade and Upgrade
Planning
docssuncomappdocscoll12361
An excellent Oracle document on patching using Oracle Solaris Live Upgrade
ldquoPatching Mirrored Systems with the Oracle Solaris Live Upgrade Softwarerdquo
suncomblueprints0607820-2188html
Search the Sun forums There are two forums where Oracle Solaris Live Upgrade
questions tend to appear
1) Click on Solaris tab then select Installation
2) Click on Administration tab then select Talk to the Sysop
forumjavasuncom
13
How to Upgrade and Patch with Oracle Solaris Live Upgrade May 2010 Author Jeff McMeekin
Oracle Corporation World Headquarters 500 Oracle Parkway Redwood Shores CA 94065 USA
Worldwide Inquiries Phone +16505067000 Fax +16505067200 oraclecom
Copyright copy 2010 Oracle andor its affiliates All rights reserved This document is provided for information purposes only and the contents hereof are subject to change without notice This document is not warranted to be error-free nor subject to any other warranties or conditions whether expressed orally or implied in law including implied warranties and conditions of merchantability or fitness for a particular purpose We specifically disclaim any liability with respect to this document and no contractual obligations are formed either directly or indirectly by this document This document may not be reproduced or transmitted in any form or by any means electronic or mechanical for any purpose without our prior written permission
Oracle and Java are registered trademarks of Oracle andor its affiliates Other names may be trademarks of their respective owners
AMD Opteron the AMD logo and the AMD Opteron logo are trademarks or registered trademarks of Advanced Micro Devices Intel and Intel Xeon are trademarks or registered trademarks of Intel Corporation All SPARC trademarks are used under license and are trademarks or registered trademarks of SPARC International Inc UNIX is a registered trademark licensed through XOpen Company Ltd 0310
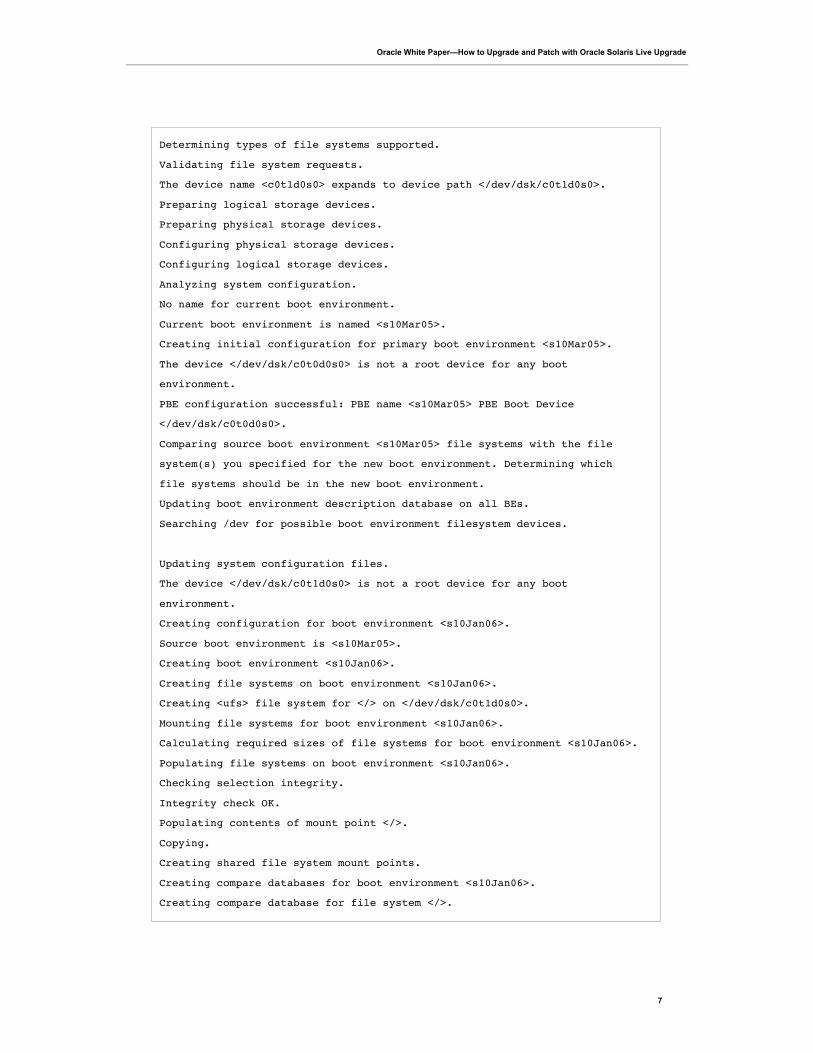
Oracle White PapermdashHow to Upgrade and Patch with Oracle Solaris Live Upgrade
Determining types of file systems supported
Validating file system requests
The device name ltc0t1d0s0gt expands to device path ltdevdskc0t1d0s0gt
Preparing logical storage devices
Preparing physical storage devices
Configuring physical storage devices
Configuring logical storage devices
Analyzing system configuration
No name for current boot environment
Current boot environment is named lts10Mar05gt
Creating initial configuration for primary boot environment lts10Mar05gt
The device ltdevdskc0t0d0s0gt is not a root device for any boot
environment
PBE configuration successful PBE name lts10Mar05gt PBE Boot Device
ltdevdskc0t0d0s0gt
Comparing source boot environment lts10Mar05gt file systems with the file
system(s) you specified for the new boot environment Determining which
file systems should be in the new boot environment
Updating boot environment description database on all BEs
Searching dev for possible boot environment filesystem devices
Updating system configuration files
The device ltdevdskc0t1d0s0gt is not a root device for any boot
environment
Creating configuration for boot environment lts10Jan06gt
Source boot environment is lts10Mar05gt
Creating boot environment lts10Jan06gt
Creating file systems on boot environment lts10Jan06gt
Creating ltufsgt file system for ltgt on ltdevdskc0t1d0s0gt
Mounting file systems for boot environment lts10Jan06gt
Calculating required sizes of file systems for boot environment lts10Jan06gt
Populating file systems on boot environment lts10Jan06gt
Checking selection integrity
Integrity check OK
Populating contents of mount point ltgt
Copying
Creating shared file system mount points
Creating compare databases for boot environment lts10Jan06gt
Creating compare database for file system ltgt
7
Oracle White PapermdashHow to Upgrade and Patch with Oracle Solaris Live Upgrade
Updating compare databases on boot environment lts10Jan06gt
Making boot environment lts10Jan06gt bootable
Population of boot environment lts10Jan06gt successful
Creation of boot environment lts10Jan06gt successful
You might find it useful particularly if you encounter problems running the Oracle Solaris Live Upgrade commands to use the lustatus utility to see the state of the boot environment
After the new boot environment is created you can then begin the upgrade procedure
In this example you will upgrade from the Oracle Solaris 10 106 DVD After completing this step you will have the situation depicted in Figure 3
Figure 3mdashAfter running the luupgrade command
7 To upgrade to a new Oracle Solaris release you will use the luupgrade command with the -u option The -s option identifies the path to the media Due to slightly different file system organization on x86 installation DVDs than on SPARC DVDs the location -s option varies
For Oracle Solaris running on SPARC hardware a typical command line would be
luupgrade -u -n s10Jan06 -s cdromcdrom0s0
For Oracle Solaris running on x86 platforms
luupgrade -u -n s10Jan06 -s cdromcdrom0
This command will generate output similar to the following
Validating the contents of the media ltcdromcdrom0s0gt
The media is a standard Solaris media
The media contains an operating system upgrade image
The media contains ltSolarisgt version lt10gt
Constructing upgrade profile to use
Locating the operating system upgrade program
8
Oracle White PapermdashHow to Upgrade and Patch with Oracle Solaris Live Upgrade
Checking for existence of previously scheduled Solaris Live Upgrade
requests
Creating upgrade profile for BE lts10Jan06gt
Determining packages to install or upgrade for BE lts10Jan06gt
Performing the operating system upgrade of the BE lts10Jan06gt
CAUTION Interrupting this process may leave the boot environment unstable
or unbootable
Upgrading Solaris 6 completed
Upgrading Solaris 100 completed
Installation of the packages from this media is complete
Updating package information on boot environment lts10Jan06gt
Package information successfully updated on boot environment lts10Jan06gt
Adding operating system patches to the BE lts10Jan06gt
The operating system patch installation is complete
INFORMATION The file ltvarsadmsystemlogsupgrade_loggt on boot
environment lts10Jan06gt contains a log of the upgrade operation
INFORMATION The file ltvarsadmsystemdataupgrade_cleanupgt on boot
environment lts10Jan06gt contains a log of cleanup operations required
INFORMATION Review the files listed above Remember that all of the files
are located on boot environment lts10Jan06gt Before you activate boot
environment lts10Jan06gt determine if any additional system maintenance is
required or if additional media of the software distribution must be
installed
The Solaris upgrade of the boot environment lts10Jan06gt is complete
At this point you have created a new (inactive) boot environment and upgraded it to the Oracle Solaris 10 106 release In the next two steps you will first tell Oracle Solaris to use the new environment the next time you boot and then you will reboot the system so that it comes up running the new environment (as shown in Figure 4)
Figure 4mdashAfter running the luactivate command and rebooting
9
Oracle White PapermdashHow to Upgrade and Patch with Oracle Solaris Live Upgrade
8 Indicate which boot environment is to be used the next time you reboot
luactivate s10Jan06
where s10Jan06 is the boot environment you want to make active
On a running system some files might change during or after the lucreateluupgrade process You might want those changes reflected in the new boot environment in order to synchronize the two systems To address this there is a synchronization mechanism that the luactivate command will automatically call See the synclist(4) man page for more information
The luactivate command can also be used to revert to the previous boot environment In most cases this is very straightforward but due to the adoption on x86 platforms of GRUB (the new bootloader for Oracle Solaris 10 106 and subsequent Oracle Solaris releases) there are some issues when reverting from a GRUB system to a pre-GRUB release These are all explained in the Oracle Solaris Live Upgrade documentation referenced below
The output of the luactivate command will look like the following
The target boot environment has been activated It will be used when you
reboot NOTE You MUST NOT USE the reboot halt or uadmin commands You
MUST USE either the init or the shutdown command when you reboot If you
do not use either init or shutdown the system will not boot using the
target BE
In case of a failure while booting to the target BE the following process
needs to be followed to fallback to the currently working boot environment
1 Enter the PROM monitor (ok prompt)
2 Change the boot device back to the original boot environment by typing
setenv boot-device pci1f0pci11ide3disk00a
3 Boot to the original boot environment by typing
boot
Activation of boot environment lts10Jan06gt successful
Note the warning in the above about the proper command to use to reboot You must use ldquoinitrdquo or ldquoshutdownrdquo
10
Oracle White PapermdashHow to Upgrade and Patch with Oracle Solaris Live Upgrade
9 Reboot the system
init 6
You have now succeeded in upgrading to the Oracle Solaris 10 106 release Note that the reboot is the only downtime experienced using this upgrade methodmdasha far different situation than if you had done a standard install or standard upgrade
One final notemdashmake sure that you dispose of a boot environment properly when you are finished with it The proper way is to use the ludelete command If you destroy the boot environment through some other mechanism (e g newfs or rm -rf) you risk having a system that will not boot
Example Patching a System Using Oracle Solaris Live Upgrade
One of the most common uses of Oracle Solaris Live Upgrade is to minimize downtime for patching Upgrading to a newer Oracle Solaris release is a relatively infrequent activity in comparison to patching a system Depending on the length of the maintenance window and the need to minimize downtime patching an alternate boot environment may be an advantageous operations choice The steps are
bull Create a new boot environment
bull Patch the new boot environment
bull Boot from the new boot environment
bull Assess if the result of the changes is acceptable
As in the case of upgrading Oracle Solaris Live Upgrade has the advantage of applying the patches in the background with little impact on what is running on the system
To begin follow the steps 1-6 in the first example and optionally step 7 (if you wish to upgrade before patching) Now you are ready to apply the recommended patch cluster to the system
bull Obtain the patches
Access the recommended patch cluster for Oracle Solaris 10 from suncomsunsolve Look for the recommended patch clusters menu and select either the ldquoSolaris 10rdquo choice or the ldquoSolaris 10 x86rdquo choice
You will download the file 10_Recommendedzip (or 10_x86_Recommended zip) For this example assume you have downloaded the patches to vartmp Then use the unzip command to uncompress the downloaded file to create the directory ldquo10_Recommendedrdquo containing all the patches The file 10_RecommendedCLUSTER_README will tell you to take the system to single user mode and then use the install_cluster script In our case since you are patching the inactive boot environment you do not have to take the system to single user mode You will also employ a slightly different procedure to apply the patches you do not use the install_cluster script
bull Make sure you are in the patch directory
10 cd vartmp10_Recommended
11
Oracle White PapermdashHow to Upgrade and Patch with Oracle Solaris Live Upgrade
bull Patch the Inactive Boot Environment
luupgrade -n s10Jan06 -s vartmp10_Recommended -t `cat patch_order`
In the above you identify which boot environment to patch (s10Jan06rdquo) where the patches are located (the -s option and path argument) and patches to apply (the -t option followed by the patch numbers) Note the argument to the -t option is placed in backquotes meaning the expression will be evaluated by the shell before sending the results (the list of patches) to the luupgrade command
To finish follow steps 8 and 9 in the first example
As mentioned with Oracle Solaris 10 1008 Oracle Solaris is integrated with Oracle Solaris Live Upgrade The luupgrade command line semantics for patching are unchanged
The above is a very simple introduction on how to use Oracle Solaris Live Upgrade for patching A more realistic treatment is using Oracle Solaris Live Upgrade to patch in an enterprise mirrored-disk environment which is covered in an Oracle technical publication referenced below in the Web Resources section
Patching Considerations
Behind the scenes Oracle Solaris Live Upgrade is simply using the patchadd command You could accomplish the same patching of the inactive boot environment by mounting it and using patchadd with the -R option If you want to understand the behavior of patching using Oracle Solaris Live Upgrade familiarize yourself with the patchadd command
The Oracle Solaris 10 patchadd command is smart enough to order patches correctly but Oracle Solaris 9 and earlier releases require patches to be in dependency order Oracle uses a command line similar to the above as part of the standard testing so it makes sense to use a similar approach when you use Oracle Solaris Live Upgrade to patchmdashno matter what Oracle Solaris release you are patching
Third-party patches may not support being applied through Oracle Solaris Live Upgrade All Oracle patches conform to the requirement that pre- and post-install scripts never modify the running system when the target is an inactive boot environment Furthermore testing the application of recommended patches via Oracle Solaris Live Upgrade is part of Oraclersquos standard test procedures However Oracle cannot guarantee that all third-party patches are equally well behaved Depending on your organizations reliance on non- Oracle patches you may need to verify that a third-party patch does not contain a script that attempts to modify the current environment when you intend only to patch an inactive boot environment
12
Oracle White PapermdashHow to Upgrade and Patch with Oracle Solaris Live Upgrade
Summary
Oracle Solaris Live Upgrade is an enterprise-class tool and these examples have described only a small subset of its possibilities Oracle Solaris Live Upgrade offers many different ways to control the creation of a new boot environment for example there are other options besides making a complete copy of the current environment Oracle Solaris Live Upgrade integrates with Oracle Solaris Volume Manager and with some extra scripting with Veritas Volume Manager 41 or later (contact Symantec for details) Oracle Solaris Live Upgrade can be used to add packages as well as patches and of course remove packages and patches It can also be used to load an Oracle Solaris Flash Archive image a high-performance approach to quickly building a system For more details see the ldquoAdditional Resourcesrdquo section below
In closing Oracle Solaris Live Upgrade offers an excellent value proposition for enterprisesmdashthe ability to make a copy of a system make changes to the copy or the original and then decide which will be the new boot environment The only downtime for such an operation is the actual reboot All the other operations can take place in the background of a running production system The most important factor in using Oracle Solaris Live Upgrade is to plan ahead by configuring your systems properly
For More Information
We have made brief reference to the lucreate(1M) lustatus(1M) luupgrade(1M) and luactivate(1M) commands in this document You might also review other commands (see for example the See Also section of the lucreate(1M) man page) The man pages reference lu(1m) a simple tool for managing Oracle Solaris Live Upgrades However this GUI-like tool is no longer current with the capabilities of the rest of the Oracle Solaris Live Upgrade command-line tools so we do not recommend its use The lu command will likely be dropped in a future Oracle Solaris release
TABLE 1 WEB RESOURCES
The man pages for Oracle Solaris 10 can be found in the Oracle Solaris 10
Reference Manual Collection
docssuncomappdocscoll4010
Oracle Solaris 10 Installation Guide Oracle Solaris Live Upgrade and Upgrade
Planning
docssuncomappdocscoll12361
An excellent Oracle document on patching using Oracle Solaris Live Upgrade
ldquoPatching Mirrored Systems with the Oracle Solaris Live Upgrade Softwarerdquo
suncomblueprints0607820-2188html
Search the Sun forums There are two forums where Oracle Solaris Live Upgrade
questions tend to appear
1) Click on Solaris tab then select Installation
2) Click on Administration tab then select Talk to the Sysop
forumjavasuncom
13
How to Upgrade and Patch with Oracle Solaris Live Upgrade May 2010 Author Jeff McMeekin
Oracle Corporation World Headquarters 500 Oracle Parkway Redwood Shores CA 94065 USA
Worldwide Inquiries Phone +16505067000 Fax +16505067200 oraclecom
Copyright copy 2010 Oracle andor its affiliates All rights reserved This document is provided for information purposes only and the contents hereof are subject to change without notice This document is not warranted to be error-free nor subject to any other warranties or conditions whether expressed orally or implied in law including implied warranties and conditions of merchantability or fitness for a particular purpose We specifically disclaim any liability with respect to this document and no contractual obligations are formed either directly or indirectly by this document This document may not be reproduced or transmitted in any form or by any means electronic or mechanical for any purpose without our prior written permission
Oracle and Java are registered trademarks of Oracle andor its affiliates Other names may be trademarks of their respective owners
AMD Opteron the AMD logo and the AMD Opteron logo are trademarks or registered trademarks of Advanced Micro Devices Intel and Intel Xeon are trademarks or registered trademarks of Intel Corporation All SPARC trademarks are used under license and are trademarks or registered trademarks of SPARC International Inc UNIX is a registered trademark licensed through XOpen Company Ltd 0310
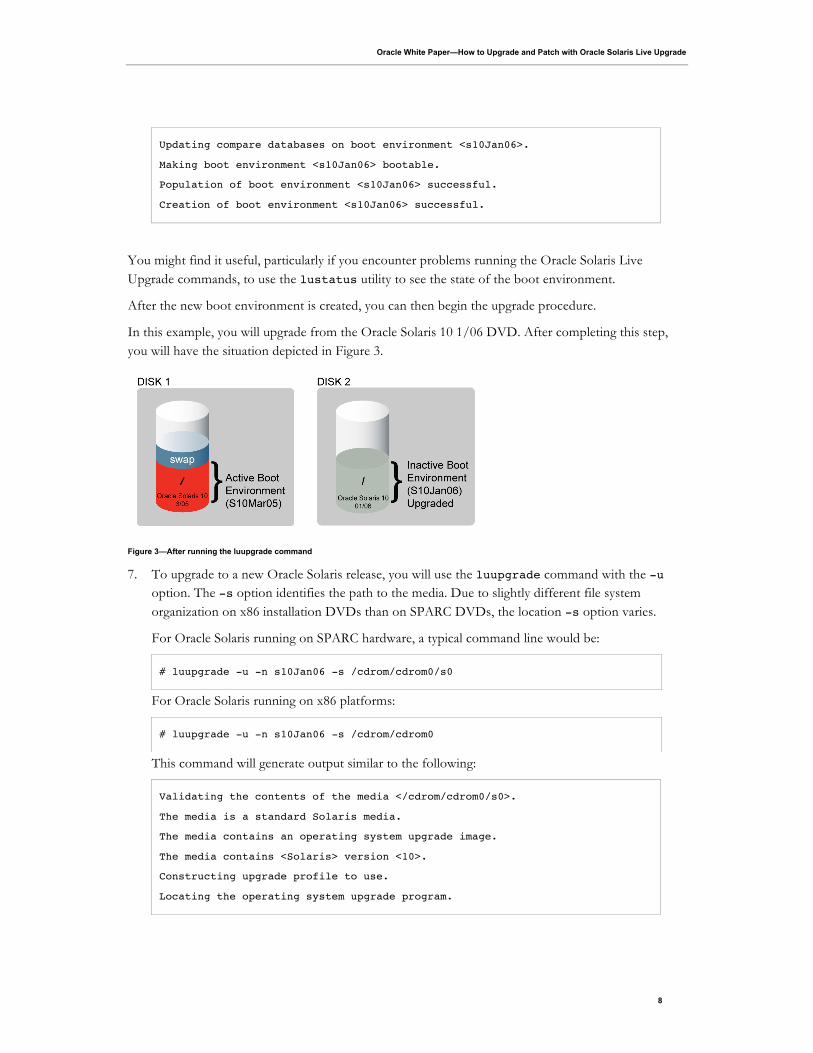
Oracle White PapermdashHow to Upgrade and Patch with Oracle Solaris Live Upgrade
Updating compare databases on boot environment lts10Jan06gt
Making boot environment lts10Jan06gt bootable
Population of boot environment lts10Jan06gt successful
Creation of boot environment lts10Jan06gt successful
You might find it useful particularly if you encounter problems running the Oracle Solaris Live Upgrade commands to use the lustatus utility to see the state of the boot environment
After the new boot environment is created you can then begin the upgrade procedure
In this example you will upgrade from the Oracle Solaris 10 106 DVD After completing this step you will have the situation depicted in Figure 3
Figure 3mdashAfter running the luupgrade command
7 To upgrade to a new Oracle Solaris release you will use the luupgrade command with the -u option The -s option identifies the path to the media Due to slightly different file system organization on x86 installation DVDs than on SPARC DVDs the location -s option varies
For Oracle Solaris running on SPARC hardware a typical command line would be
luupgrade -u -n s10Jan06 -s cdromcdrom0s0
For Oracle Solaris running on x86 platforms
luupgrade -u -n s10Jan06 -s cdromcdrom0
This command will generate output similar to the following
Validating the contents of the media ltcdromcdrom0s0gt
The media is a standard Solaris media
The media contains an operating system upgrade image
The media contains ltSolarisgt version lt10gt
Constructing upgrade profile to use
Locating the operating system upgrade program
8
Oracle White PapermdashHow to Upgrade and Patch with Oracle Solaris Live Upgrade
Checking for existence of previously scheduled Solaris Live Upgrade
requests
Creating upgrade profile for BE lts10Jan06gt
Determining packages to install or upgrade for BE lts10Jan06gt
Performing the operating system upgrade of the BE lts10Jan06gt
CAUTION Interrupting this process may leave the boot environment unstable
or unbootable
Upgrading Solaris 6 completed
Upgrading Solaris 100 completed
Installation of the packages from this media is complete
Updating package information on boot environment lts10Jan06gt
Package information successfully updated on boot environment lts10Jan06gt
Adding operating system patches to the BE lts10Jan06gt
The operating system patch installation is complete
INFORMATION The file ltvarsadmsystemlogsupgrade_loggt on boot
environment lts10Jan06gt contains a log of the upgrade operation
INFORMATION The file ltvarsadmsystemdataupgrade_cleanupgt on boot
environment lts10Jan06gt contains a log of cleanup operations required
INFORMATION Review the files listed above Remember that all of the files
are located on boot environment lts10Jan06gt Before you activate boot
environment lts10Jan06gt determine if any additional system maintenance is
required or if additional media of the software distribution must be
installed
The Solaris upgrade of the boot environment lts10Jan06gt is complete
At this point you have created a new (inactive) boot environment and upgraded it to the Oracle Solaris 10 106 release In the next two steps you will first tell Oracle Solaris to use the new environment the next time you boot and then you will reboot the system so that it comes up running the new environment (as shown in Figure 4)
Figure 4mdashAfter running the luactivate command and rebooting
9
Oracle White PapermdashHow to Upgrade and Patch with Oracle Solaris Live Upgrade
8 Indicate which boot environment is to be used the next time you reboot
luactivate s10Jan06
where s10Jan06 is the boot environment you want to make active
On a running system some files might change during or after the lucreateluupgrade process You might want those changes reflected in the new boot environment in order to synchronize the two systems To address this there is a synchronization mechanism that the luactivate command will automatically call See the synclist(4) man page for more information
The luactivate command can also be used to revert to the previous boot environment In most cases this is very straightforward but due to the adoption on x86 platforms of GRUB (the new bootloader for Oracle Solaris 10 106 and subsequent Oracle Solaris releases) there are some issues when reverting from a GRUB system to a pre-GRUB release These are all explained in the Oracle Solaris Live Upgrade documentation referenced below
The output of the luactivate command will look like the following
The target boot environment has been activated It will be used when you
reboot NOTE You MUST NOT USE the reboot halt or uadmin commands You
MUST USE either the init or the shutdown command when you reboot If you
do not use either init or shutdown the system will not boot using the
target BE
In case of a failure while booting to the target BE the following process
needs to be followed to fallback to the currently working boot environment
1 Enter the PROM monitor (ok prompt)
2 Change the boot device back to the original boot environment by typing
setenv boot-device pci1f0pci11ide3disk00a
3 Boot to the original boot environment by typing
boot
Activation of boot environment lts10Jan06gt successful
Note the warning in the above about the proper command to use to reboot You must use ldquoinitrdquo or ldquoshutdownrdquo
10
Oracle White PapermdashHow to Upgrade and Patch with Oracle Solaris Live Upgrade
9 Reboot the system
init 6
You have now succeeded in upgrading to the Oracle Solaris 10 106 release Note that the reboot is the only downtime experienced using this upgrade methodmdasha far different situation than if you had done a standard install or standard upgrade
One final notemdashmake sure that you dispose of a boot environment properly when you are finished with it The proper way is to use the ludelete command If you destroy the boot environment through some other mechanism (e g newfs or rm -rf) you risk having a system that will not boot
Example Patching a System Using Oracle Solaris Live Upgrade
One of the most common uses of Oracle Solaris Live Upgrade is to minimize downtime for patching Upgrading to a newer Oracle Solaris release is a relatively infrequent activity in comparison to patching a system Depending on the length of the maintenance window and the need to minimize downtime patching an alternate boot environment may be an advantageous operations choice The steps are
bull Create a new boot environment
bull Patch the new boot environment
bull Boot from the new boot environment
bull Assess if the result of the changes is acceptable
As in the case of upgrading Oracle Solaris Live Upgrade has the advantage of applying the patches in the background with little impact on what is running on the system
To begin follow the steps 1-6 in the first example and optionally step 7 (if you wish to upgrade before patching) Now you are ready to apply the recommended patch cluster to the system
bull Obtain the patches
Access the recommended patch cluster for Oracle Solaris 10 from suncomsunsolve Look for the recommended patch clusters menu and select either the ldquoSolaris 10rdquo choice or the ldquoSolaris 10 x86rdquo choice
You will download the file 10_Recommendedzip (or 10_x86_Recommended zip) For this example assume you have downloaded the patches to vartmp Then use the unzip command to uncompress the downloaded file to create the directory ldquo10_Recommendedrdquo containing all the patches The file 10_RecommendedCLUSTER_README will tell you to take the system to single user mode and then use the install_cluster script In our case since you are patching the inactive boot environment you do not have to take the system to single user mode You will also employ a slightly different procedure to apply the patches you do not use the install_cluster script
bull Make sure you are in the patch directory
10 cd vartmp10_Recommended
11
Oracle White PapermdashHow to Upgrade and Patch with Oracle Solaris Live Upgrade
bull Patch the Inactive Boot Environment
luupgrade -n s10Jan06 -s vartmp10_Recommended -t `cat patch_order`
In the above you identify which boot environment to patch (s10Jan06rdquo) where the patches are located (the -s option and path argument) and patches to apply (the -t option followed by the patch numbers) Note the argument to the -t option is placed in backquotes meaning the expression will be evaluated by the shell before sending the results (the list of patches) to the luupgrade command
To finish follow steps 8 and 9 in the first example
As mentioned with Oracle Solaris 10 1008 Oracle Solaris is integrated with Oracle Solaris Live Upgrade The luupgrade command line semantics for patching are unchanged
The above is a very simple introduction on how to use Oracle Solaris Live Upgrade for patching A more realistic treatment is using Oracle Solaris Live Upgrade to patch in an enterprise mirrored-disk environment which is covered in an Oracle technical publication referenced below in the Web Resources section
Patching Considerations
Behind the scenes Oracle Solaris Live Upgrade is simply using the patchadd command You could accomplish the same patching of the inactive boot environment by mounting it and using patchadd with the -R option If you want to understand the behavior of patching using Oracle Solaris Live Upgrade familiarize yourself with the patchadd command
The Oracle Solaris 10 patchadd command is smart enough to order patches correctly but Oracle Solaris 9 and earlier releases require patches to be in dependency order Oracle uses a command line similar to the above as part of the standard testing so it makes sense to use a similar approach when you use Oracle Solaris Live Upgrade to patchmdashno matter what Oracle Solaris release you are patching
Third-party patches may not support being applied through Oracle Solaris Live Upgrade All Oracle patches conform to the requirement that pre- and post-install scripts never modify the running system when the target is an inactive boot environment Furthermore testing the application of recommended patches via Oracle Solaris Live Upgrade is part of Oraclersquos standard test procedures However Oracle cannot guarantee that all third-party patches are equally well behaved Depending on your organizations reliance on non- Oracle patches you may need to verify that a third-party patch does not contain a script that attempts to modify the current environment when you intend only to patch an inactive boot environment
12
Oracle White PapermdashHow to Upgrade and Patch with Oracle Solaris Live Upgrade
Summary
Oracle Solaris Live Upgrade is an enterprise-class tool and these examples have described only a small subset of its possibilities Oracle Solaris Live Upgrade offers many different ways to control the creation of a new boot environment for example there are other options besides making a complete copy of the current environment Oracle Solaris Live Upgrade integrates with Oracle Solaris Volume Manager and with some extra scripting with Veritas Volume Manager 41 or later (contact Symantec for details) Oracle Solaris Live Upgrade can be used to add packages as well as patches and of course remove packages and patches It can also be used to load an Oracle Solaris Flash Archive image a high-performance approach to quickly building a system For more details see the ldquoAdditional Resourcesrdquo section below
In closing Oracle Solaris Live Upgrade offers an excellent value proposition for enterprisesmdashthe ability to make a copy of a system make changes to the copy or the original and then decide which will be the new boot environment The only downtime for such an operation is the actual reboot All the other operations can take place in the background of a running production system The most important factor in using Oracle Solaris Live Upgrade is to plan ahead by configuring your systems properly
For More Information
We have made brief reference to the lucreate(1M) lustatus(1M) luupgrade(1M) and luactivate(1M) commands in this document You might also review other commands (see for example the See Also section of the lucreate(1M) man page) The man pages reference lu(1m) a simple tool for managing Oracle Solaris Live Upgrades However this GUI-like tool is no longer current with the capabilities of the rest of the Oracle Solaris Live Upgrade command-line tools so we do not recommend its use The lu command will likely be dropped in a future Oracle Solaris release
TABLE 1 WEB RESOURCES
The man pages for Oracle Solaris 10 can be found in the Oracle Solaris 10
Reference Manual Collection
docssuncomappdocscoll4010
Oracle Solaris 10 Installation Guide Oracle Solaris Live Upgrade and Upgrade
Planning
docssuncomappdocscoll12361
An excellent Oracle document on patching using Oracle Solaris Live Upgrade
ldquoPatching Mirrored Systems with the Oracle Solaris Live Upgrade Softwarerdquo
suncomblueprints0607820-2188html
Search the Sun forums There are two forums where Oracle Solaris Live Upgrade
questions tend to appear
1) Click on Solaris tab then select Installation
2) Click on Administration tab then select Talk to the Sysop
forumjavasuncom
13
How to Upgrade and Patch with Oracle Solaris Live Upgrade May 2010 Author Jeff McMeekin
Oracle Corporation World Headquarters 500 Oracle Parkway Redwood Shores CA 94065 USA
Worldwide Inquiries Phone +16505067000 Fax +16505067200 oraclecom
Copyright copy 2010 Oracle andor its affiliates All rights reserved This document is provided for information purposes only and the contents hereof are subject to change without notice This document is not warranted to be error-free nor subject to any other warranties or conditions whether expressed orally or implied in law including implied warranties and conditions of merchantability or fitness for a particular purpose We specifically disclaim any liability with respect to this document and no contractual obligations are formed either directly or indirectly by this document This document may not be reproduced or transmitted in any form or by any means electronic or mechanical for any purpose without our prior written permission
Oracle and Java are registered trademarks of Oracle andor its affiliates Other names may be trademarks of their respective owners
AMD Opteron the AMD logo and the AMD Opteron logo are trademarks or registered trademarks of Advanced Micro Devices Intel and Intel Xeon are trademarks or registered trademarks of Intel Corporation All SPARC trademarks are used under license and are trademarks or registered trademarks of SPARC International Inc UNIX is a registered trademark licensed through XOpen Company Ltd 0310
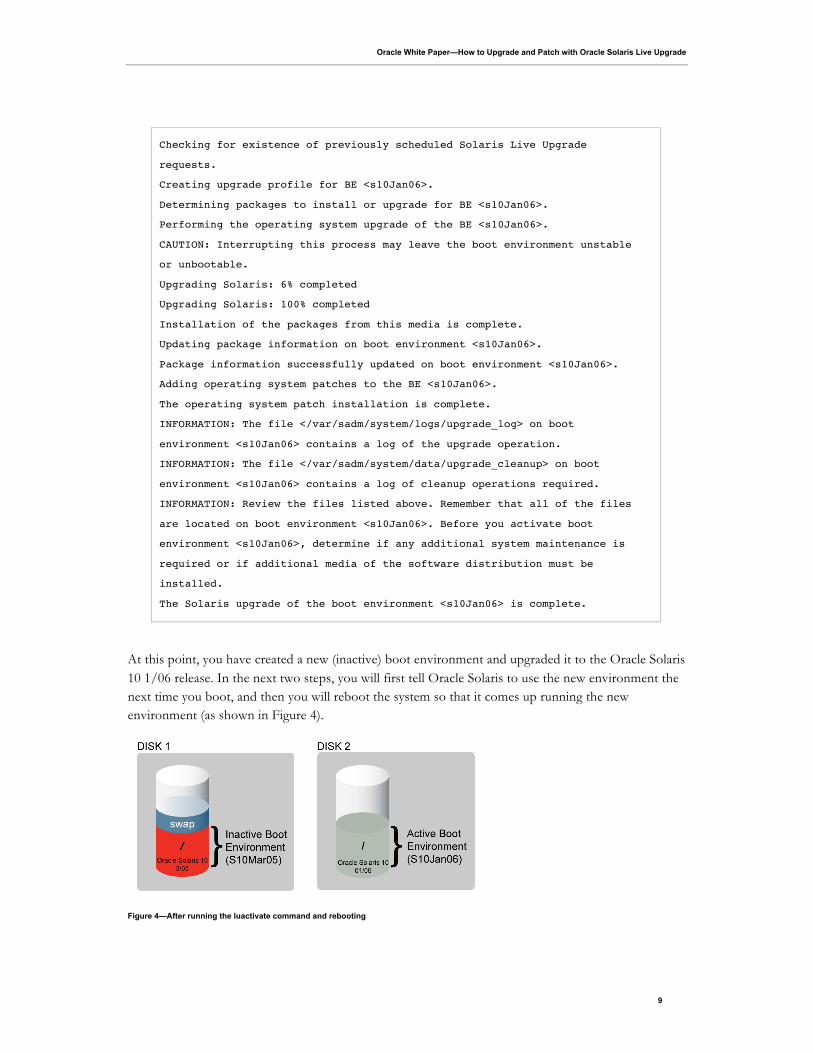
Oracle White PapermdashHow to Upgrade and Patch with Oracle Solaris Live Upgrade
Checking for existence of previously scheduled Solaris Live Upgrade
requests
Creating upgrade profile for BE lts10Jan06gt
Determining packages to install or upgrade for BE lts10Jan06gt
Performing the operating system upgrade of the BE lts10Jan06gt
CAUTION Interrupting this process may leave the boot environment unstable
or unbootable
Upgrading Solaris 6 completed
Upgrading Solaris 100 completed
Installation of the packages from this media is complete
Updating package information on boot environment lts10Jan06gt
Package information successfully updated on boot environment lts10Jan06gt
Adding operating system patches to the BE lts10Jan06gt
The operating system patch installation is complete
INFORMATION The file ltvarsadmsystemlogsupgrade_loggt on boot
environment lts10Jan06gt contains a log of the upgrade operation
INFORMATION The file ltvarsadmsystemdataupgrade_cleanupgt on boot
environment lts10Jan06gt contains a log of cleanup operations required
INFORMATION Review the files listed above Remember that all of the files
are located on boot environment lts10Jan06gt Before you activate boot
environment lts10Jan06gt determine if any additional system maintenance is
required or if additional media of the software distribution must be
installed
The Solaris upgrade of the boot environment lts10Jan06gt is complete
At this point you have created a new (inactive) boot environment and upgraded it to the Oracle Solaris 10 106 release In the next two steps you will first tell Oracle Solaris to use the new environment the next time you boot and then you will reboot the system so that it comes up running the new environment (as shown in Figure 4)
Figure 4mdashAfter running the luactivate command and rebooting
9
Oracle White PapermdashHow to Upgrade and Patch with Oracle Solaris Live Upgrade
8 Indicate which boot environment is to be used the next time you reboot
luactivate s10Jan06
where s10Jan06 is the boot environment you want to make active
On a running system some files might change during or after the lucreateluupgrade process You might want those changes reflected in the new boot environment in order to synchronize the two systems To address this there is a synchronization mechanism that the luactivate command will automatically call See the synclist(4) man page for more information
The luactivate command can also be used to revert to the previous boot environment In most cases this is very straightforward but due to the adoption on x86 platforms of GRUB (the new bootloader for Oracle Solaris 10 106 and subsequent Oracle Solaris releases) there are some issues when reverting from a GRUB system to a pre-GRUB release These are all explained in the Oracle Solaris Live Upgrade documentation referenced below
The output of the luactivate command will look like the following
The target boot environment has been activated It will be used when you
reboot NOTE You MUST NOT USE the reboot halt or uadmin commands You
MUST USE either the init or the shutdown command when you reboot If you
do not use either init or shutdown the system will not boot using the
target BE
In case of a failure while booting to the target BE the following process
needs to be followed to fallback to the currently working boot environment
1 Enter the PROM monitor (ok prompt)
2 Change the boot device back to the original boot environment by typing
setenv boot-device pci1f0pci11ide3disk00a
3 Boot to the original boot environment by typing
boot
Activation of boot environment lts10Jan06gt successful
Note the warning in the above about the proper command to use to reboot You must use ldquoinitrdquo or ldquoshutdownrdquo
10
Oracle White PapermdashHow to Upgrade and Patch with Oracle Solaris Live Upgrade
9 Reboot the system
init 6
You have now succeeded in upgrading to the Oracle Solaris 10 106 release Note that the reboot is the only downtime experienced using this upgrade methodmdasha far different situation than if you had done a standard install or standard upgrade
One final notemdashmake sure that you dispose of a boot environment properly when you are finished with it The proper way is to use the ludelete command If you destroy the boot environment through some other mechanism (e g newfs or rm -rf) you risk having a system that will not boot
Example Patching a System Using Oracle Solaris Live Upgrade
One of the most common uses of Oracle Solaris Live Upgrade is to minimize downtime for patching Upgrading to a newer Oracle Solaris release is a relatively infrequent activity in comparison to patching a system Depending on the length of the maintenance window and the need to minimize downtime patching an alternate boot environment may be an advantageous operations choice The steps are
bull Create a new boot environment
bull Patch the new boot environment
bull Boot from the new boot environment
bull Assess if the result of the changes is acceptable
As in the case of upgrading Oracle Solaris Live Upgrade has the advantage of applying the patches in the background with little impact on what is running on the system
To begin follow the steps 1-6 in the first example and optionally step 7 (if you wish to upgrade before patching) Now you are ready to apply the recommended patch cluster to the system
bull Obtain the patches
Access the recommended patch cluster for Oracle Solaris 10 from suncomsunsolve Look for the recommended patch clusters menu and select either the ldquoSolaris 10rdquo choice or the ldquoSolaris 10 x86rdquo choice
You will download the file 10_Recommendedzip (or 10_x86_Recommended zip) For this example assume you have downloaded the patches to vartmp Then use the unzip command to uncompress the downloaded file to create the directory ldquo10_Recommendedrdquo containing all the patches The file 10_RecommendedCLUSTER_README will tell you to take the system to single user mode and then use the install_cluster script In our case since you are patching the inactive boot environment you do not have to take the system to single user mode You will also employ a slightly different procedure to apply the patches you do not use the install_cluster script
bull Make sure you are in the patch directory
10 cd vartmp10_Recommended
11
Oracle White PapermdashHow to Upgrade and Patch with Oracle Solaris Live Upgrade
bull Patch the Inactive Boot Environment
luupgrade -n s10Jan06 -s vartmp10_Recommended -t `cat patch_order`
In the above you identify which boot environment to patch (s10Jan06rdquo) where the patches are located (the -s option and path argument) and patches to apply (the -t option followed by the patch numbers) Note the argument to the -t option is placed in backquotes meaning the expression will be evaluated by the shell before sending the results (the list of patches) to the luupgrade command
To finish follow steps 8 and 9 in the first example
As mentioned with Oracle Solaris 10 1008 Oracle Solaris is integrated with Oracle Solaris Live Upgrade The luupgrade command line semantics for patching are unchanged
The above is a very simple introduction on how to use Oracle Solaris Live Upgrade for patching A more realistic treatment is using Oracle Solaris Live Upgrade to patch in an enterprise mirrored-disk environment which is covered in an Oracle technical publication referenced below in the Web Resources section
Patching Considerations
Behind the scenes Oracle Solaris Live Upgrade is simply using the patchadd command You could accomplish the same patching of the inactive boot environment by mounting it and using patchadd with the -R option If you want to understand the behavior of patching using Oracle Solaris Live Upgrade familiarize yourself with the patchadd command
The Oracle Solaris 10 patchadd command is smart enough to order patches correctly but Oracle Solaris 9 and earlier releases require patches to be in dependency order Oracle uses a command line similar to the above as part of the standard testing so it makes sense to use a similar approach when you use Oracle Solaris Live Upgrade to patchmdashno matter what Oracle Solaris release you are patching
Third-party patches may not support being applied through Oracle Solaris Live Upgrade All Oracle patches conform to the requirement that pre- and post-install scripts never modify the running system when the target is an inactive boot environment Furthermore testing the application of recommended patches via Oracle Solaris Live Upgrade is part of Oraclersquos standard test procedures However Oracle cannot guarantee that all third-party patches are equally well behaved Depending on your organizations reliance on non- Oracle patches you may need to verify that a third-party patch does not contain a script that attempts to modify the current environment when you intend only to patch an inactive boot environment
12
Oracle White PapermdashHow to Upgrade and Patch with Oracle Solaris Live Upgrade
Summary
Oracle Solaris Live Upgrade is an enterprise-class tool and these examples have described only a small subset of its possibilities Oracle Solaris Live Upgrade offers many different ways to control the creation of a new boot environment for example there are other options besides making a complete copy of the current environment Oracle Solaris Live Upgrade integrates with Oracle Solaris Volume Manager and with some extra scripting with Veritas Volume Manager 41 or later (contact Symantec for details) Oracle Solaris Live Upgrade can be used to add packages as well as patches and of course remove packages and patches It can also be used to load an Oracle Solaris Flash Archive image a high-performance approach to quickly building a system For more details see the ldquoAdditional Resourcesrdquo section below
In closing Oracle Solaris Live Upgrade offers an excellent value proposition for enterprisesmdashthe ability to make a copy of a system make changes to the copy or the original and then decide which will be the new boot environment The only downtime for such an operation is the actual reboot All the other operations can take place in the background of a running production system The most important factor in using Oracle Solaris Live Upgrade is to plan ahead by configuring your systems properly
For More Information
We have made brief reference to the lucreate(1M) lustatus(1M) luupgrade(1M) and luactivate(1M) commands in this document You might also review other commands (see for example the See Also section of the lucreate(1M) man page) The man pages reference lu(1m) a simple tool for managing Oracle Solaris Live Upgrades However this GUI-like tool is no longer current with the capabilities of the rest of the Oracle Solaris Live Upgrade command-line tools so we do not recommend its use The lu command will likely be dropped in a future Oracle Solaris release
TABLE 1 WEB RESOURCES
The man pages for Oracle Solaris 10 can be found in the Oracle Solaris 10
Reference Manual Collection
docssuncomappdocscoll4010
Oracle Solaris 10 Installation Guide Oracle Solaris Live Upgrade and Upgrade
Planning
docssuncomappdocscoll12361
An excellent Oracle document on patching using Oracle Solaris Live Upgrade
ldquoPatching Mirrored Systems with the Oracle Solaris Live Upgrade Softwarerdquo
suncomblueprints0607820-2188html
Search the Sun forums There are two forums where Oracle Solaris Live Upgrade
questions tend to appear
1) Click on Solaris tab then select Installation
2) Click on Administration tab then select Talk to the Sysop
forumjavasuncom
13
How to Upgrade and Patch with Oracle Solaris Live Upgrade May 2010 Author Jeff McMeekin
Oracle Corporation World Headquarters 500 Oracle Parkway Redwood Shores CA 94065 USA
Worldwide Inquiries Phone +16505067000 Fax +16505067200 oraclecom
Copyright copy 2010 Oracle andor its affiliates All rights reserved This document is provided for information purposes only and the contents hereof are subject to change without notice This document is not warranted to be error-free nor subject to any other warranties or conditions whether expressed orally or implied in law including implied warranties and conditions of merchantability or fitness for a particular purpose We specifically disclaim any liability with respect to this document and no contractual obligations are formed either directly or indirectly by this document This document may not be reproduced or transmitted in any form or by any means electronic or mechanical for any purpose without our prior written permission
Oracle and Java are registered trademarks of Oracle andor its affiliates Other names may be trademarks of their respective owners
AMD Opteron the AMD logo and the AMD Opteron logo are trademarks or registered trademarks of Advanced Micro Devices Intel and Intel Xeon are trademarks or registered trademarks of Intel Corporation All SPARC trademarks are used under license and are trademarks or registered trademarks of SPARC International Inc UNIX is a registered trademark licensed through XOpen Company Ltd 0310
Oracle White PapermdashHow to Upgrade and Patch with Oracle Solaris Live Upgrade
8 Indicate which boot environment is to be used the next time you reboot
luactivate s10Jan06
where s10Jan06 is the boot environment you want to make active
On a running system some files might change during or after the lucreateluupgrade process You might want those changes reflected in the new boot environment in order to synchronize the two systems To address this there is a synchronization mechanism that the luactivate command will automatically call See the synclist(4) man page for more information
The luactivate command can also be used to revert to the previous boot environment In most cases this is very straightforward but due to the adoption on x86 platforms of GRUB (the new bootloader for Oracle Solaris 10 106 and subsequent Oracle Solaris releases) there are some issues when reverting from a GRUB system to a pre-GRUB release These are all explained in the Oracle Solaris Live Upgrade documentation referenced below
The output of the luactivate command will look like the following
The target boot environment has been activated It will be used when you
reboot NOTE You MUST NOT USE the reboot halt or uadmin commands You
MUST USE either the init or the shutdown command when you reboot If you
do not use either init or shutdown the system will not boot using the
target BE
In case of a failure while booting to the target BE the following process
needs to be followed to fallback to the currently working boot environment
1 Enter the PROM monitor (ok prompt)
2 Change the boot device back to the original boot environment by typing
setenv boot-device pci1f0pci11ide3disk00a
3 Boot to the original boot environment by typing
boot
Activation of boot environment lts10Jan06gt successful
Note the warning in the above about the proper command to use to reboot You must use ldquoinitrdquo or ldquoshutdownrdquo
10
Oracle White PapermdashHow to Upgrade and Patch with Oracle Solaris Live Upgrade
9 Reboot the system
init 6
You have now succeeded in upgrading to the Oracle Solaris 10 106 release Note that the reboot is the only downtime experienced using this upgrade methodmdasha far different situation than if you had done a standard install or standard upgrade
One final notemdashmake sure that you dispose of a boot environment properly when you are finished with it The proper way is to use the ludelete command If you destroy the boot environment through some other mechanism (e g newfs or rm -rf) you risk having a system that will not boot
Example Patching a System Using Oracle Solaris Live Upgrade
One of the most common uses of Oracle Solaris Live Upgrade is to minimize downtime for patching Upgrading to a newer Oracle Solaris release is a relatively infrequent activity in comparison to patching a system Depending on the length of the maintenance window and the need to minimize downtime patching an alternate boot environment may be an advantageous operations choice The steps are
bull Create a new boot environment
bull Patch the new boot environment
bull Boot from the new boot environment
bull Assess if the result of the changes is acceptable
As in the case of upgrading Oracle Solaris Live Upgrade has the advantage of applying the patches in the background with little impact on what is running on the system
To begin follow the steps 1-6 in the first example and optionally step 7 (if you wish to upgrade before patching) Now you are ready to apply the recommended patch cluster to the system
bull Obtain the patches
Access the recommended patch cluster for Oracle Solaris 10 from suncomsunsolve Look for the recommended patch clusters menu and select either the ldquoSolaris 10rdquo choice or the ldquoSolaris 10 x86rdquo choice
You will download the file 10_Recommendedzip (or 10_x86_Recommended zip) For this example assume you have downloaded the patches to vartmp Then use the unzip command to uncompress the downloaded file to create the directory ldquo10_Recommendedrdquo containing all the patches The file 10_RecommendedCLUSTER_README will tell you to take the system to single user mode and then use the install_cluster script In our case since you are patching the inactive boot environment you do not have to take the system to single user mode You will also employ a slightly different procedure to apply the patches you do not use the install_cluster script
bull Make sure you are in the patch directory
10 cd vartmp10_Recommended
11
Oracle White PapermdashHow to Upgrade and Patch with Oracle Solaris Live Upgrade
bull Patch the Inactive Boot Environment
luupgrade -n s10Jan06 -s vartmp10_Recommended -t `cat patch_order`
In the above you identify which boot environment to patch (s10Jan06rdquo) where the patches are located (the -s option and path argument) and patches to apply (the -t option followed by the patch numbers) Note the argument to the -t option is placed in backquotes meaning the expression will be evaluated by the shell before sending the results (the list of patches) to the luupgrade command
To finish follow steps 8 and 9 in the first example
As mentioned with Oracle Solaris 10 1008 Oracle Solaris is integrated with Oracle Solaris Live Upgrade The luupgrade command line semantics for patching are unchanged
The above is a very simple introduction on how to use Oracle Solaris Live Upgrade for patching A more realistic treatment is using Oracle Solaris Live Upgrade to patch in an enterprise mirrored-disk environment which is covered in an Oracle technical publication referenced below in the Web Resources section
Patching Considerations
Behind the scenes Oracle Solaris Live Upgrade is simply using the patchadd command You could accomplish the same patching of the inactive boot environment by mounting it and using patchadd with the -R option If you want to understand the behavior of patching using Oracle Solaris Live Upgrade familiarize yourself with the patchadd command
The Oracle Solaris 10 patchadd command is smart enough to order patches correctly but Oracle Solaris 9 and earlier releases require patches to be in dependency order Oracle uses a command line similar to the above as part of the standard testing so it makes sense to use a similar approach when you use Oracle Solaris Live Upgrade to patchmdashno matter what Oracle Solaris release you are patching
Third-party patches may not support being applied through Oracle Solaris Live Upgrade All Oracle patches conform to the requirement that pre- and post-install scripts never modify the running system when the target is an inactive boot environment Furthermore testing the application of recommended patches via Oracle Solaris Live Upgrade is part of Oraclersquos standard test procedures However Oracle cannot guarantee that all third-party patches are equally well behaved Depending on your organizations reliance on non- Oracle patches you may need to verify that a third-party patch does not contain a script that attempts to modify the current environment when you intend only to patch an inactive boot environment
12
Oracle White PapermdashHow to Upgrade and Patch with Oracle Solaris Live Upgrade
Summary
Oracle Solaris Live Upgrade is an enterprise-class tool and these examples have described only a small subset of its possibilities Oracle Solaris Live Upgrade offers many different ways to control the creation of a new boot environment for example there are other options besides making a complete copy of the current environment Oracle Solaris Live Upgrade integrates with Oracle Solaris Volume Manager and with some extra scripting with Veritas Volume Manager 41 or later (contact Symantec for details) Oracle Solaris Live Upgrade can be used to add packages as well as patches and of course remove packages and patches It can also be used to load an Oracle Solaris Flash Archive image a high-performance approach to quickly building a system For more details see the ldquoAdditional Resourcesrdquo section below
In closing Oracle Solaris Live Upgrade offers an excellent value proposition for enterprisesmdashthe ability to make a copy of a system make changes to the copy or the original and then decide which will be the new boot environment The only downtime for such an operation is the actual reboot All the other operations can take place in the background of a running production system The most important factor in using Oracle Solaris Live Upgrade is to plan ahead by configuring your systems properly
For More Information
We have made brief reference to the lucreate(1M) lustatus(1M) luupgrade(1M) and luactivate(1M) commands in this document You might also review other commands (see for example the See Also section of the lucreate(1M) man page) The man pages reference lu(1m) a simple tool for managing Oracle Solaris Live Upgrades However this GUI-like tool is no longer current with the capabilities of the rest of the Oracle Solaris Live Upgrade command-line tools so we do not recommend its use The lu command will likely be dropped in a future Oracle Solaris release
TABLE 1 WEB RESOURCES
The man pages for Oracle Solaris 10 can be found in the Oracle Solaris 10
Reference Manual Collection
docssuncomappdocscoll4010
Oracle Solaris 10 Installation Guide Oracle Solaris Live Upgrade and Upgrade
Planning
docssuncomappdocscoll12361
An excellent Oracle document on patching using Oracle Solaris Live Upgrade
ldquoPatching Mirrored Systems with the Oracle Solaris Live Upgrade Softwarerdquo
suncomblueprints0607820-2188html
Search the Sun forums There are two forums where Oracle Solaris Live Upgrade
questions tend to appear
1) Click on Solaris tab then select Installation
2) Click on Administration tab then select Talk to the Sysop
forumjavasuncom
13
How to Upgrade and Patch with Oracle Solaris Live Upgrade May 2010 Author Jeff McMeekin
Oracle Corporation World Headquarters 500 Oracle Parkway Redwood Shores CA 94065 USA
Worldwide Inquiries Phone +16505067000 Fax +16505067200 oraclecom
Copyright copy 2010 Oracle andor its affiliates All rights reserved This document is provided for information purposes only and the contents hereof are subject to change without notice This document is not warranted to be error-free nor subject to any other warranties or conditions whether expressed orally or implied in law including implied warranties and conditions of merchantability or fitness for a particular purpose We specifically disclaim any liability with respect to this document and no contractual obligations are formed either directly or indirectly by this document This document may not be reproduced or transmitted in any form or by any means electronic or mechanical for any purpose without our prior written permission
Oracle and Java are registered trademarks of Oracle andor its affiliates Other names may be trademarks of their respective owners
AMD Opteron the AMD logo and the AMD Opteron logo are trademarks or registered trademarks of Advanced Micro Devices Intel and Intel Xeon are trademarks or registered trademarks of Intel Corporation All SPARC trademarks are used under license and are trademarks or registered trademarks of SPARC International Inc UNIX is a registered trademark licensed through XOpen Company Ltd 0310

Oracle White PapermdashHow to Upgrade and Patch with Oracle Solaris Live Upgrade
Summary
Oracle Solaris Live Upgrade is an enterprise-class tool and these examples have described only a small subset of its possibilities Oracle Solaris Live Upgrade offers many different ways to control the creation of a new boot environment for example there are other options besides making a complete copy of the current environment Oracle Solaris Live Upgrade integrates with Oracle Solaris Volume Manager and with some extra scripting with Veritas Volume Manager 41 or later (contact Symantec for details) Oracle Solaris Live Upgrade can be used to add packages as well as patches and of course remove packages and patches It can also be used to load an Oracle Solaris Flash Archive image a high-performance approach to quickly building a system For more details see the ldquoAdditional Resourcesrdquo section below
In closing Oracle Solaris Live Upgrade offers an excellent value proposition for enterprisesmdashthe ability to make a copy of a system make changes to the copy or the original and then decide which will be the new boot environment The only downtime for such an operation is the actual reboot All the other operations can take place in the background of a running production system The most important factor in using Oracle Solaris Live Upgrade is to plan ahead by configuring your systems properly
For More Information
We have made brief reference to the lucreate(1M) lustatus(1M) luupgrade(1M) and luactivate(1M) commands in this document You might also review other commands (see for example the See Also section of the lucreate(1M) man page) The man pages reference lu(1m) a simple tool for managing Oracle Solaris Live Upgrades However this GUI-like tool is no longer current with the capabilities of the rest of the Oracle Solaris Live Upgrade command-line tools so we do not recommend its use The lu command will likely be dropped in a future Oracle Solaris release
TABLE 1 WEB RESOURCES
The man pages for Oracle Solaris 10 can be found in the Oracle Solaris 10
Reference Manual Collection
docssuncomappdocscoll4010
Oracle Solaris 10 Installation Guide Oracle Solaris Live Upgrade and Upgrade
Planning
docssuncomappdocscoll12361
An excellent Oracle document on patching using Oracle Solaris Live Upgrade
ldquoPatching Mirrored Systems with the Oracle Solaris Live Upgrade Softwarerdquo
suncomblueprints0607820-2188html
Search the Sun forums There are two forums where Oracle Solaris Live Upgrade
questions tend to appear
1) Click on Solaris tab then select Installation
2) Click on Administration tab then select Talk to the Sysop
forumjavasuncom
13
How to Upgrade and Patch with Oracle Solaris Live Upgrade May 2010 Author Jeff McMeekin
Oracle Corporation World Headquarters 500 Oracle Parkway Redwood Shores CA 94065 USA
Worldwide Inquiries Phone +16505067000 Fax +16505067200 oraclecom
Copyright copy 2010 Oracle andor its affiliates All rights reserved This document is provided for information purposes only and the contents hereof are subject to change without notice This document is not warranted to be error-free nor subject to any other warranties or conditions whether expressed orally or implied in law including implied warranties and conditions of merchantability or fitness for a particular purpose We specifically disclaim any liability with respect to this document and no contractual obligations are formed either directly or indirectly by this document This document may not be reproduced or transmitted in any form or by any means electronic or mechanical for any purpose without our prior written permission
Oracle and Java are registered trademarks of Oracle andor its affiliates Other names may be trademarks of their respective owners
AMD Opteron the AMD logo and the AMD Opteron logo are trademarks or registered trademarks of Advanced Micro Devices Intel and Intel Xeon are trademarks or registered trademarks of Intel Corporation All SPARC trademarks are used under license and are trademarks or registered trademarks of SPARC International Inc UNIX is a registered trademark licensed through XOpen Company Ltd 0310
Top Related