


Languages
Pages
Legal


User manual
120.515.085
Doc. version 1
28. March 2012
FIRECLASS Addressable Fire Alarm Control PanelsFirmware version 21

© FIRECLASS. Hillcrest Business Park, Dudley, West Midlands, DY2 9AP, UK, 2012
Contents subject to change without notice.
All rights to this documentation, including the contents of the online help, are reserved, in particular but not limited to the rights of copying, distribution and translation.
No portion of this documentation, including the online help, may be reproduced, edited, copied or distributed in any form without prior written authorization from FIRECLASS. Use of the data medium provided with this product is restricted to cop-ying the software for the purpose of data backup only.

FireClass Fire Alarm Control Panels Contents
Contents
1 Guide through this manual ............................................................................................ 51.1 Keywords and symbols ................................................................................................................51.2 Helpful information .......................................................................................................................51.3 Who this guide is for .....................................................................................................................5
2 Operating Instructions ................................................................................................... 62.1 Indicators and Controls ................................................................................................................62.2 LCD Display Details .......................................................................................................................72.2.1 Normal Screen............................................................................................................................................................................................ 72.2.2 LCD Windows Overview......................................................................................................................................................................... 72.2.3 Fire Window ................................................................................................................................................................................................ 72.2.4 Status Window........................................................................................................................................................................................... 82.2.5 Operator Window...................................................................................................................................................................................... 82.2.6 Function key Labels .................................................................................................................................................................................. 82.3 Selecting Day or Night Mode .......................................................................................................82.4 Event Panel Behaviour ..................................................................................................................82.4.1 Event Alerts .................................................................................................................................................................................................. 82.4.2 Logging Inputs............................................................................................................................................................................................ 92.5 Event Operator Actions.................................................................................................................92.6 Alarm Panel Behaviour ...............................................................................................................102.6.1 Alarm Warnings ...................................................................................................................................................................................... 102.6.2 Pre-Alarm Warnings .............................................................................................................................................................................. 102.6.3 Alarm ........................................................................................................................................................................................................... 102.7 Alarm Operator Actions..............................................................................................................102.7.1 Alarm Investigate Option..................................................................................................................................................................... 112.7.2 Evacuate key............................................................................................................................................................................................. 112.7.3 Silencing the Sounders ........................................................................................................................................................................ 112.7.4 Resetting the Panel ................................................................................................................................................................................ 122.8 Auxiliary Display Devices...........................................................................................................122.8.1 General ....................................................................................................................................................................................................... 122.8.2 Repeaters................................................................................................................................................................................................... 122.8.3 Printers........................................................................................................................................................................................................ 12
3 Functions ....................................................................................................................... 133.1 Access Levels ..............................................................................................................................133.1.1 Logging On ............................................................................................................................................................................................... 143.2 Valid Values..................................................................................................................................153.3 Using the Menus..........................................................................................................................153.3.1 Network and Non-Network Addresses .......................................................................................................................................... 17
4 Menu Details ................................................................................................................. 184.1 Accept Events ..............................................................................................................................184.2 View Status ..................................................................................................................................184.2.1 Point............................................................................................................................................................................................................. 184.2.2 Point I/P only ............................................................................................................................................................................................ 194.2.3 Point O/P only.......................................................................................................................................................................................... 194.2.4 Zone............................................................................................................................................................................................................. 204.2.5 Zone Maps ................................................................................................................................................................................................ 204.2.6 Network Status........................................................................................................................................................................................ 204.2.7 Commissioning Overview ................................................................................................................................................................... 21
User manual Doc. version 1 3

Contents FireClass Fire Alarm Control Panels
4.3 Disablements ...............................................................................................................................214.3.1 Point............................................................................................................................................................................................................. 224.3.2 Point I/P Only ........................................................................................................................................................................................... 224.3.3 Point O/P Only......................................................................................................................................................................................... 224.3.4 By Function ............................................................................................................................................................................................... 224.3.5 By Device Type ........................................................................................................................................................................................ 224.3.6 F Key Shortcuts........................................................................................................................................................................................ 234.4 Time/Date.....................................................................................................................................234.4.1 Set Time/Date ......................................................................................................................................................................................... 234.4.2 Summer/Winter ..................................................................................................................................................................................... 234.5 Event Log ......................................................................................................................................244.5.1 View Event Log........................................................................................................................................................................................ 244.5.2 Print Event Log......................................................................................................................................................................................... 244.5.3 Filter ............................................................................................................................................................................................................. 254.6 View/Print Data ...........................................................................................................................254.6.1 Points Disabled........................................................................................................................................................................................ 254.6.2 Points Unt./Failed................................................................................................................................................................................... 254.6.3 Point Values .............................................................................................................................................................................................. 254.6.4 View Faults ................................................................................................................................................................................................ 264.6.5 Loop Info .................................................................................................................................................................................................... 264.6.6 Forced Points............................................................................................................................................................................................ 264.6.7 Active Points............................................................................................................................................................................................. 264.6.8 By Function ............................................................................................................................................................................................... 264.7 Service ..........................................................................................................................................274.7.1 Walk Test ................................................................................................................................................................................................... 274.8 Configuration ...............................................................................................................................294.9 Test Buzzer, LEDs & Display .......................................................................................................29
5 Routine Checks............................................................................................................. 305.1 General..........................................................................................................................................305.2 Daily Checks ................................................................................................................................305.3 Weekly Checks............................................................................................................................305.4 CPD Information ..........................................................................................................................30
4 User manual Doc. version 1

FireClass Fire Alarm Control Panels 1 Guide through this manual
User manual Doc. version 1 5
1 Guide through this manual
1.1 Keywords and symbolsThis documentation uses special notations that you can use for better orientation. Symbols in the margins indicate warnings, infos or instructions. You find an explanation of these symbols in table 1.
1.2 Helpful information
1.3 Who this guide is forThis guide is aimed at technicians who have to install a FireClass fire detection system. They should already have been given training.
Keyword Symbol Explanation
DANGER Warning.
Imminent danger.
Death or severe injury when disregarded.
WARNING Warning.
Potentially dangerous situa-tion.
Death or severe injury possi-ble when disregarded.
CAUTION Warning.
Potentially dangerous situa-tion.
Minor injury possible when disregarded.
NOTICE Warning.
Potentially dangerous situa-tion.
Material damage possible when disregarded.
Table 1: Keywords and symbols in this documentation
Helpful information.
Choose a command via the menu
This documentation explains how you can choose commands in instructions via the menus of the menu bar.
Additionally you can choose commands that are often needed via the toolbar, keyboard shortcuts or the context menu (right mouse click).
Keyword Symbol Explanation
Table 1: Keywords and symbols in this documentation (cont.)

2 Operating Instructions FireClass Fire Alarm Control Panels
2 Operating Instructions
2.1 Indicators and ControlsThe front panel is shown in Figure 1. The numbered items in the figure are explained in the following paragraphs. Your panel version may not match the figure exactly, but the same items will be present, although perhaps not in the positions shown.
LCD display
A 640 character backlit LCD alphanumeric display, arranged in 16 rows of 40 characters.
This is used to display user interaction information, such as alarms, status messages and responses to user input.
Alphanumeric Keypad
Alphanumeric keys used for entering access codes, text strings or general information.
Function Keys
Use these keys (F1 to F5) to carry out the functions displayed on the bottom line of the LCD display. These functions vary between the different display screens.
Enable Keyswitch
This can only be changed using a key.
You need to switch this from 0 (OFF – disabled) to 1 (ON – enabled) before you can use most of the Control keys (below), and the menus. (The menu items you can use, is controlled by your level of access. For details see section 3.1 “Access Levels“ on page 13.)
Control Keys
There are seven control keys, as follows:
SILENCE BUZZER - used to silence the internal buzzer.
SILENCE/RESOUND - used to silence/resound external sounders.
RESET - used to reset the system after an alarm has been resolved.
DAY/NIGHT - used to switch between Day mode (DAY MODE LED lit) and Night mode (DAY MODE LED not lit).
INVESTIGATE DELAY - used to end signalling delay time and start the investigation time.
SPARE - Not configurable to customer requirements.
EVACUATE - used to activate the external sounders and signalling.
Fig. 1: FireClass Front Panel 1 –LCD Display2 –Alphanumeric keypad3 –Function keys4 –Enable Keyswitch5 –Control keys6 –Status LEDs7 –32 red fire leds on FireClass 32-1 and 32RA; 64 red fire leds
on FireClass 64-2, 64-4 and 64RA; no fire leds are provided on FireClass 240-2, 240-4, 240RA
1
2
34
5
6
7
Key Usage
Used to enter the number 0 or a space.
Used to enter the number1 or special symbols.
....
Used to enter the number 2 or letters A, B or C.
Similarly for the rest of the number keys.
Used to scroll up a long screen list, or to switch to upper case (capital) letter entry.
Used to scroll down a long screen list, or to switch to lower case letter entry.
Table 2: Alphanumeric keys and arrow keys
0
1*
2ABC
9WXYZ
6 User manual Doc. version 1

FireClass Fire Alarm Control Panels 2.2 LCD Display Details
Status LEDs
The status LEDs light to alert you to unusual conditions (apart from POWER ON which should normally be lit). They are arranged in the following groups:
GENERAL
– FIRE (red)
– FAULT (yellow)
– DISABLED (yellow)
– TEST (yellow)
Panel
– POWER ON (green)
– MAINS FAULT (yellow)
– SYSTEM FAULT (yellow)
– DAY MODE (yellow)
Sounders
– ACTIVATED (red)
– FAULT (yellow)
– DISABLED (yellow)
Signalling
– ACTIVATED (red)
– FAULT (yellow)
– DISABLED (yellow)
Protection
– ACTIVATED (red)
– FAULT (yellow)
– DISABLED (yellow)
Zone Status LEDs
On FireClass, all zonal LEDs are used for fire. There are no zonal fault LEDs.
On FireClass 240 models, there are no zonal fire or fault LEDs, as this information is provided by the LCD.
2.2 LCD Display Details2.2.1 Normal ScreenWhen the controller is initially powered up, with no faults or alarms in the system and the Enable Keyswitch is in the OFF (0) position, the LCD displays a screen of the type shown in Figure 2.
The top-left area of the screen is the Fire window (see below). If there are no alarms (as in Figure 2), the Fire window features the following items:
The text FireClass.
The date and time.
The “panel text” (this is configurable, being set to High Street Office in Fig 2, as an example).
The backlight activates when necessary, such as when there is an alarm, or a key is pressed, or the Enable Keyswitch is set to the ON (1) position.
You can also use the Light (F5) key, which activates the backlight for approximately 30 seconds.
2.2.2 LCD Windows OverviewThe LCD display is divided into windows (areas) that show specific types of information, when this needs to be displayed. These windows are shown in Figure 3, and explained in the following few sections.
2.2.3 Fire WindowThis shows fire alarm details. For more details see section 2.6 “Alarm Panel Behaviour“ on page 10.
The “normal” state of this window (when there are no alarms) is shown in 2.2.1 “Normal Screen“ on page 7.
Fig. 2: Normal Operation
Fig. 3: LCD Display
FireClass
Wed, 03-Aug-1114:51
High Street Office
General
Menu Info Passcode Not Clr More
FireWindow
OperatorWindow
StatusWindow
F’key 1 F’key 2 F’key 3 F’key 4 F’key 5
User manual Doc. version 1 7

2.3 Selecting Day or Night Mode FireClass Fire Alarm Control Panels
2.2.4 Status WindowThe status window displays the number of faults, disablements and other conditions that may be present.
2.2.5 Operator WindowThe Operator window forms the “user interface”, in conjunction with the Function keys and the menu options.
For example this window displays the event information that you have requested.
2.2.6 Function key LabelsThese are the F’ key 1, F’ key 2 etc items at the bottom of the screen.
Each of these is a label for the function key below it. They change depending on the function you are carrying out.
2.3 Selecting Day or Night Mode
The panel has Day and Night modes of operation.
The Day mode has the following characteristics, which differentiate it from Night mode:
The “investigate delay” option is available (see section 2.7.1 “Alarm Investigate Option“ on page 11).
The delay option is not available in Night mode on the grounds that there is unlikely to be anyone available to carry out the investigation.
There may be a higher threshold before detectors alarm. For example smoke detectors may have a higher threshold to allow for daytime activities creating dust (which could be detected as smoke).
Your panel may be programmed to automatically switch between Day and Night modes, at set times in the day.
To manually switch between modes, press the DAY/NIGHT key (the Enable Keyswitch needs to be ON).
The DAY MODE LED lights to indicate Day mode.
2.4 Event Panel BehaviourEvents result from a change in the state of the system. Examples of events include the following:
Alarms
Faults
Mains failures
Disablements
Logging Inputs
The remainder of this section covers how you are alerted to events and how you should respond. Alarm events however are in a special category, for details on these see section 2.6 “Alarm Panel Behaviour“ on page 10, and section 2.7 “Alarm Operator Actions“ on page 10.
Events are stored in the Event Log. Events are not removed from the log unless it is full. The log holds up to 3000 events, and once full a new event displaces the oldest event. At any time you can view the complete event log, for details see section 4.5.1 “View Event Log“ on page 24.
2.4.1 Event AlertsTo alert you to an event, any combination of the following may occur:
The internal buzzer pulses.
LEDs light. Examples are the yellow (GENERAL) FAULT LED and the (PANEL) MAINS FAULT LED.
The fault signalling output activates. Note that this is not a visible or audible warning at the panel. It is an electrical signal for use by circuitry that is external to the panel. Do not confuse this with the (SIGNALLING) FAULT LED.
The LCD backlight activates and the type of screen shown in Figure 4 is displayed. The General Window will show a “count” message, and the Operator Window will show an event message.
In Figure 4 the example event message is for a fault. (Not all events are faults. For example you may see a non-fault alert that the printer is offline.)
DANGER
Incorrectly switching between Day and Night modes may lead to death, serious injuries or damage to property.
For example switching to Day mode at night may lead to failure or delay in the fire brigade attending.
Only switch modes in accordance with local site procedures.
Fig. 4: A Fault Event Message
FAULTFireClass
Mon, 08-Aug-1111:19
High Street Office
Zone 000 R011System ZoneMains Supply IP
MAINS FAULT
15-Mar-10 14:43:00Digital InputUnaccepted
General
Flt P 011
Back Info Not Clr More
8 User manual Doc. version 1

FireClass Fire Alarm Control Panels 2.5 Event Operator Actions
The format of the fault message in Figure 4 is as follows:
The top line shows the Zone and point number in fault condition.
The second line shows the zone description.
The third line shows the point description.
The fourth line shows the type of fault.
To see these next two lines, you might have to press the Info (F2) key to clear the general information:
The fifth line shows the date and time.
The sixth line shows the device type.
The seventh line always shows Unaccepted. Details of what this means are provided below.
2.4.2 Logging InputsLogging Inputs are indicated as follows:
The internal buzzer pulses.
The LCD backlight activates and the type of screen shown in Figure 5 is displayed. The Operator Window will show an information message.
The format of the Log Input message in Figure 5 is as follows:
The top line shows the Zone and point number for the active Logging Input.
The second line shows the zone description.
The third line shows the point description.
The fourth line shows the type of event.
To see these next two lines, you might have to press the Info (F2) key to clear the general information:
The fifth line shows the date and time.
The sixth line shows the device type.
The seventh line always shows Unaccepted. Details of what this means are provided below.
2.5 Event Operator Actions
For details of handling pre-alarm warning events, alarm warning events and alarm events, see section 2.7 “Alarm Operator Actions“ on page 10. The remainder of this section covers non-alarm events.
How to respond if you are alerted to an event
1 Optionally press the SILENCE BUZZER key.
2 Check whether there are any other “active” (not clear) events. These may be related, helping you gain an overview of the situation, or they may be more urgent. (Although note that there is a priority based selection for the event shown in the Operator window.)
To see the active events press the Not Clr (F4) key. You now see, for example, mains failure events that have not been “cleared” by a restoration of the mains supply. These are shown as the Unrestored Events list.
3 Check whether there are any other events that may not be active, but might have been active in the past and cleared themselves. Again these may be related.
To do this press the More (F5) key, to see the “unaccepted” events. These are events that you have not yet acknowledged that you are aware of. You might also see earlier events that you have left unaccepted as a reminder of an issue that still needs resolving. (Details of accepting events are provided below.)
These events are shown in categories, with various priorities (for details of the categories see 4.5.3 “Filter“ on page 25). Press the More again to step to the next category. Press the All (F4) key to see all the unaccepted events (the All key label may take a second or two to appear).
4 Try to resolve the situation. Do this by, for example, restoring the mains supply, or enabling a disabled point.
Fig. 5: A Log Input Message
INFOFireClass
Fri, 05-Aug-1110:59
High Street Office
Zone 001 A011System ZoneInhibit Input
INPUT ON
05-Aug-11 10:43:04FC410CIMUnaccepted
General
Flt P 001
Service Mode Test Firmware Back Info Not Clr More
DANGER
Incorrect responses to event alerts may lead to death, serious injuries or damage to property.
For example it is important that alerts for mains failure faults are acted upon. (The battery backup will maintain panel operation for a period, but this will eventually fail.)
This guide includes step by step instructions on carrying out operations on the panel, but users must ensure the operation is appropriate, according to the local site procedures.
User manual Doc. version 1 9

2.6 Alarm Panel Behaviour FireClass Fire Alarm Control Panels
If there is a fault that cannot be cured, contact your local supplier and arrange for a service visit.
5 Repeat from step 2 in case there are any more active events.
6 Accept the events that you have resolved (as a double check you will be again reviewing the events as part of the accepting process). You use the Accept Events menu option. For details see section 4.1 “Accept Events“ on page 18.
Note that the Operator Window will continue to display an unaccepted event, if one exists, so the “normal” display will only be shown once all events are accepted.
2.6 Alarm Panel BehaviourDepending on the configuration, the panel may respond in stages to device activations, as described below.
2.6.1 Alarm WarningsYou may see an Alarm Warning type message (as well as the internal buzzer sounding).
This will be because the control panel has been configured for a partial alarm response if only one detector is in alarm.
The panel will be waiting for another device to alarm, before issuing an alarm.
2.6.2 Pre-Alarm WarningsYou may see a a Pre Alarm Warning type message (as well as the internal buzzer sounding).
This will be because, for example, a detector has identified a build-up of smoke or heat that might be the result of a fire, but the alarm threshold has not yet been reached.
The panel will be waiting for the alarm threshold to be reached, before issuing an alarm.
2.6.3 AlarmThe panel issues an alarm as follows:
The internal buzzer sounds continuously.
The red FIRE LED lights.
The (SOUNDERS) ACTIVATED LED lights.
The (SIGNALLING) ACTIVATED LED may light (see section 2.7.1 “Alarm Investigate Option“ on page 11).
The LCD displays a message in the format shown in Figure 6.
The First Fire window shows the first fire to occur, including details of the zone number and description, and the point address.
The Last Fire window shows the same information, but is dedicated to the last zone that entered alarm.
This window is zonally based because it is more important to know that a fire has spread to another zone than to know that the fire has spread to a second detector in the first “on fire” zone.
To fulfil this requirement, the window updates to show the last fire, but only if this is the first fire to occur in its zone.
The number of alarms (002) is displayed at the right hand side of line 5 in the fire window.
(There may be other event alerts, that you can see using the More (F5) key, for example. For details see 2.7 “Alarm Operator Actions“ on page 10.)
2.7 Alarm Operator ActionsThis section gives options for responding to pre-alarm warnings, alarm warnings and alarms.
In an alarm situation, follow the local site procedures.
Even if an event is still “active”, accepting it will remove it from the Operator Window (but it will still contribute to the “count” displayed in the General Window, so this count is the best indication of any outstanding problems).
Fig. 6: Alarm Window
DANGER
In an alarm situation, inappropriate use of the panel functions may lead to death, serious injuries or damage to property.
This guide includes step by step instructions on carrying out operations on the panel. However you must ensure the operation is appropriate for the circumstances, according to the local site procedures.
First FireZone 002 B0021st Floor CorridorHeat Sensor DeviceLast Fire 002Zone 001 B005Stock roomPhoto Sensor Device
General Information
Menu Passcode Not Clr More
10 User manual Doc. version 1

FireClass Fire Alarm Control Panels 2.7 Alarm Operator Actions
2.7.1 Alarm Investigate OptionIn Day mode you can delay the fire brigade signalling. This gives you time to investigate the alarm, and cancel the signalling if you discover the alarm is a false one (for full details see section 2.3 “Selecting Day or Night Mode“ on page 8).
There is no delay option, and the signalling immediately activates, in these circumstances:
Night mode is active.
A call point was activated.
There is a sounder fault.
How to investigate an alarm
1 On the alarm occurring, check the (SIGNALLING) ACTIVATED LED. If this LED is lit, the signalling has already activated, so abandon this procedure.
2 Optionally silence the buzzer and/or sounders using the SILENCE BUZZER and SILENCE/RESOUND keys.
3 In the LCD General Window, note the Del mm:ss (minutes:seconds) indication. Before this delay counts down to 0, press the INVESTIGATE DELAY key.
Note that you now see an Inv mm:ss (minutes:seconds) countdown of the remaining investigation time (updates in 5 second steps). Once this reaches 0 the signalling activates.
4 You can now determine the cause of the alarm and carry out the necessary measures.
Note that you can investigate any other current events using the More and All keys, as you can with non-alarm events. For more information see steps 2 and 3 in section 2.5 “Event Operator Actions“ on page 9.
5 If you confirm there is a fire, you can override the delay and activate signalling by pressing the EVACUATE key or by activating a call point.
6 If you determine there is a false alarm, you can reset the control panel, as described in section 2.7.4 “Resetting the Panel“ on page 12.
2.7.2 Evacuate keyWith the Enable Keyswitch set to ON, pressing EVACUATE will produce the same response as a Call Point (see 2.6 “Alarm Panel Behaviour“ on page 10).
The exception is that the LCD will display the type of screen shown in Figure 7.
2.7.3 Silencing the SoundersAll the fire alarm sounders that are configured via the Bell Map feature will respond to the Silence Alarm and Resound control.
How to silence the sounders
1 Insert the key into the Enable Keyswitch, and turn to the ON (1) position.
Press the SILENCE/RESOUND key.The system responds as follows:
– The sounders are silenced.
– The (SOUNDERS) ACTIVATED LED goes out.
– All other outputs remain activated.
The LCD display remains on and shows the alarm type and the complete zone identification. A Sound SIL message appears.
DANGER
When investigating an area of a building protected by a CO detector that has raised an alarm, there is a particular danger of fires not being detected, leading to possible death, serious injuries or damage to property.
This is because CO detectors are liable to raise an alarm earlier than other types of detector, so as no other detectors are in alarm you might dismiss this as a false alarm. The CO detector may also have alarmed before the fire is visible (this applies particular to fires in hard-to-access areas, such as between tightly packed materials or in cupboards and storage rooms, or in areas far away from the detector).
You should take care in your investigation, and not clear an area as being safe until you are absolutely sure.
Fig. 7: Evacuate
First FireZone 000 RB002R12System ZoneEvacuate Button
dGeneral
001 Information�
Not AvailableGeneral
Menu Info Passcode Not Clr More
User manual Doc. version 1 11

2.8 Auxiliary Display Devices FireClass Fire Alarm Control Panels
If you need to re-activate the sounders, press the SILENCE/RESOUND key again.
2.7.4 Resetting the PanelResetting the panel “cancels” the alarm, returning the panel to the state prior to the alarm (apart from the alarm now being logged as an event).
How to reset the panel
1 Silence the sounders as described above.
2 Press the RESET key. The display will show a “resetting” message for approximately 20 seconds, after which the reset will be complete.
If there are no faults or other abnormal conditions, the LCD display will now show the normal screen, as shown in Fig 2 on page 7.
2.8 Auxiliary Display Devices2.8.1 GeneralThe system may be fitted with printers and repeaters.
2.8.2 RepeatersA repeater allows the controller to be operated from a remote location and provides remote indications of the state of the controller. The front panel of the repeater is identical to that of the controller (see Figure 1 on page 6) and all controller operations may be performed at the repeater panel.
2.8.3 PrintersRefer to the manual supplied with the printer for operating instructions.
12 User manual Doc. version 1

FireClass Fire Alarm Control Panels 3 Functions
3 FunctionsThe control panel functions allow you to view the event log, set the date and time, view and print data etc. Each of these functions are described in 4 “Menu Details“ on page 18.
3.1 Access LevelsTo access most of the functions you need to log on to the panel, using your user ID and Passcode (see section 3.1.1 “Logging On“ on page 14).
Each user ID has an assigned access level to the functions. You should have been told the access level of your user ID.
The 5 levels of access available are:
View only (no keyswitch/no code)
Access key operated
User
Supervisor
Engineer
An access level in this list can access all the functions of the levels below it in the list.
The access levels are as follows:
Covered in this FireClass User guide:
– User
– Supervisor
Covered in FireClass Service and Maintenance guide:
– Engineer
Table 3 shows the minimum access level required to use each function.
Function See Page Access Level Enable Key
Press SILENCE BUZZER key 6 No logon needed OFF
View menu (press F1)
Contains same items as View/Print Data > By Function (below), and also Test Buzzer LEDs & Display (below)
No logon needed OFF
Press DAY/NIGHT key 8 No logon needed ON
Press Not Clr key (F4) 9 No logon needed OFF
Press SILENCE/RESOUND key 11 No logon needed ON
Press RESET key 12 No logon needed ON
Press INVESTIGATE DELAY key 8 No logon needed ON/OFF
Press EVACUATE key 11 No logon needed ON
MAIN MENU 15 No logon needed ON
Accept Events 18 User ON
View Status 18 No logon needed ON
Point 18 No logon needed ON
Point I/P only 19 No logon needed ON
Point O/P only 19 No logon needed ON
Zone 20 No logon needed ON
Zone Maps 20 No logon needed ON
Network Status 20 No logon needed ON
Comis. O/View 21 No logon needed ON
Disablements 21 User ON
Point 22 User ON
Point I/P Only 22 User ON
Table 3: Functions and required access levels
User manual Doc. version 1 13

3.1 Access Levels FireClass Fire Alarm Control Panels
3.1.1 Logging OnYou need to log on to the panel to access most of the control panel functions.
How to log on to the panel
1 Turn the Enable Keyswitch to the ON (1) position.
2 Press the Passcode key (F3).
3 Enter your user ID. You only need to press Enter (F5) if your ID has only one digit.
If you are already logged on, you see an “open” message. Press the Back (F1) key.
4 Enter your passcode. You only need to press Enter (F5) if your passcode has less than six digits.
If another user was logged on, this user is automatically logged off.
Point O/P Only 22 User ON
By Function 22 User ON
By Device Type 22 User ON
Time/Date 23 User ON
Set Time/Date 23 User ON
Summer/Winter 23 User ON
Event Log 24 User ON
View Event Log 24 User ON
Print Event Log 24 User ON
Filter 25 User ON
View/Print Data 25 User ON
Points Disabled 25 User ON
Points Unt./Failed 25 User ON
Point Values 25 User ON
View Faults 26 User ON
Loop Info 26 Engineer ON
Forced Points 26 Engineer ON
Active Points 26 User ON
By Function 26 User ON
– Fire Inputs 26 User ON
– Non-Fire Inputs 26 User ON
– All Loop O/Ps 26 User ON
– Sounders 26 User ON
– Protection Eqp. 26 User ON
– Plant Equipment 26 User ON
Service 27 Supervisor ON
Walk Test 27 Supervisor ON
Test Buzzer, LEDs & Display 29 No logon needed OFF (using View menu above) or ON
Function See Page Access Level Enable Key
Table 3: Functions and required access levels (cont.)
14 User manual Doc. version 1
FireClass Fire Alarm Control Panels 3.2 Valid Values
3.2 Valid ValuesWhen using the menus you will be entering various values, such as point numbers.
In general, you can set these to any value, including invalid values. If you make an invalid setting there will be an audible or on screen warning.
As an example if you enter a loop address of “A132”, and a device has not been configured into this address, you will see an “Invalid entry!” message.
If you are in a position to use a particular option, you will probably know which are the valid values, that you will using.
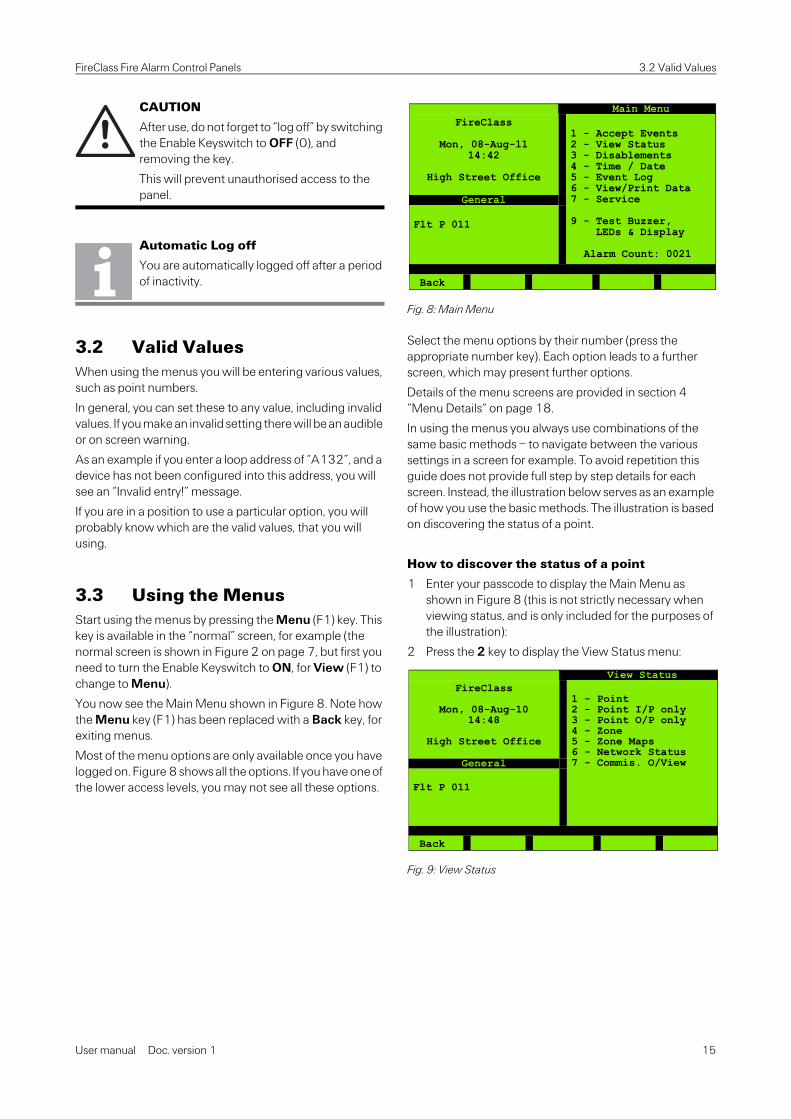
3.3 Using the MenusStart using the menus by pressing the Menu (F1) key. This key is available in the “normal” screen, for example (the normal screen is shown in Figure 2 on page 7, but first you need to turn the Enable Keyswitch to ON, for View (F1) to change to Menu).
You now see the Main Menu shown in Figure 8. Note how the Menu key (F1) has been replaced with a Back key, for exiting menus.
Most of the menu options are only available once you have logged on. Figure 8 shows all the options. If you have one of the lower access levels, you may not see all these options.
Select the menu options by their number (press the appropriate number key). Each option leads to a further screen, which may present further options.
Details of the menu screens are provided in section 4 “Menu Details“ on page 18.
In using the menus you always use combinations of the same basic methods – to navigate between the various settings in a screen for example. To avoid repetition this guide does not provide full step by step details for each screen. Instead, the illustration below serves as an example of how you use the basic methods. The illustration is based on discovering the status of a point.
How to discover the status of a point
1 Enter your passcode to display the Main Menu as shown in Figure 8 (this is not strictly necessary when viewing status, and is only included for the purposes of the illustration):
2 Press the 2 key to display the View Status menu:
CAUTION
After use, do not forget to “log off” by switching the Enable Keyswitch to OFF (0), and removing the key.
This will prevent unauthorised access to the panel.
Automatic Log off
You are automatically logged off after a period of inactivity.
Fig. 8: Main Menu
Fig. 9: View Status
Main MenuFireClass
Mon, 08-Aug-1114:42
High Street Office
1 - Accept Events2 - View Status3 - Disablements4 - Time / Date5 - Event Log6 - View/Print Data7 - Service
9 - Test Buzzer,� LEDs & Display
Alarm Count: 0021
General
Flt P 011
Back
View StatusFireClass
Mon, 08-Aug-1014:48
High Street Office
1 - Point2 - Point I/P only3 - Point O/P only4 - Zone5 - Zone Maps6 - Network Status7 - Commis. O/ViewGeneral
Flt P 011
Back
User manual Doc. version 1 15

3.3 Using the Menus FireClass Fire Alarm Control Panels
3 Press the 1 key to display the next menu:
4 Press the 1 key to display the next screen: In Fig 11, the loop setting is highlighted.
Press the + key (F4) to increment the panel number as required. (For this example, the loop setting (A) does not need changing).
5 You press the >> key (F2) to move the highlight to the point number.
6 Press the + key (F4) to increment the point number (or press the 2 key):
Fig. 10: View Status Point Selected
Fig. 11: View Status Loop Highlighted
View StatusFireClass
Mon, 08-Aug-1014:48
High Street Office
Point
1 - Loop Point2 - RBus Point3 - Local I/O Point
General
Flt P 011
Back
View StatusFireClass
Mon, 08-Aug-1014:48
High Street Office
Point
Panel01
Loop Point 001
General
Flt P 011
Back >> - + Enter
A
Fig. 12: View Status Point Highlighted
Fig. 13: View Status Point Highlighted
View StatusFireClass
Thu, 11-Aug-1109:51
High Street Office
Point
Panel01
Loop PointAGeneral
Flt P 011
Back >> - + Enter
001
View StatusFireClass
Thu, 11-Aug-1109:51
High Street Office
Point
Panel01
Loop PointA
General
Flt P 011
Back >> - + Enter
002
16 User manual Doc. version 1

FireClass Fire Alarm Control Panels 3.3 Using the Menus
7 Press the Enter key (F5) to display the point status:
3.3.1 Network and Non-Network Addresses
You will sometimes need to enter an address in the system.
For example, to view the status of a point, (see 4.2.1 “Point“ on page 18), you specify the point address, using the type of screen shown in Figure 15.
In this screen, note the Panel 02 item. This only applies to a networked system. In a non-networked system you do not need to specify the panel number (as there is only one), so the item does not exist.
In some cases there is a separate screen for specifying the panel number – again this will not be shown in a non-networked system.
Fig. 14: View Status Point
View StatusFireClass
Thu, 11-Aug-1110:11
High Street Office
PointZone 001 A002
Zone 01Call alarm in room460PH
General
Flt P 011
Menu
Input Output
Normal
Fig. 15: View Status – Panel Number
View StatusFireClass
Thu, 11-Aug-1110:11
High Street Office
Point
Panel02
Loop PointA 005General
Flt P 011
Back >> + - Enter
User manual Doc. version 1 17

4 Menu Details FireClass Fire Alarm Control Panels
4 Menu DetailsA typical Main Menu screen is shown in Figure 16.
For information on accessing this, see section 3.1.1 “Logging On“ on page 14 (this section also explains how you may not be able to see all the menu options).
The sections below detail the menu options. The section headings correspond to the menu option numbers (so in the heading 4.1 “Accept Events”, the “1” corresponds to the number of the “Accept Events” menu option).
4.1 Accept EventsUse this Accept Events option to “accept” an event. These events refer to non-hazardous incidents. This acknowledges that you have read the event and are aware of it. Figure 17 shows the type of screen that will be displayed.
4.2 View StatusUse this View Status option to view the details and status of items in the system. The status might be “Normal” or “Fault”, for example. Figure 18 shows the type of screen that will be displayed.
4.2.1 PointUse this Point option to see details and status information of points.
There are different types of point: as well as “Real” (physical) points, there are “Psuedo” (logical) points, that relate to diagnostic status, for example. Figure 19 shows the type of screen that will be displayed.
Select the option for the type of point, as appropriate. The types of point are as follows:
Loop Point: Points on the addressable loop.
RBus Point: Points on the Remote Bus, such as I/O expansion boards.
Fig. 16: Main Menu
Fig. 17: Accept Events
Main MenuFireClass
Mon, 08-Aug-1114:42
High Street Office
1 - Accept Events2 - View Status3 - Disablements4 - Time / Date5 - Event Log6 - View/Print Data7 - Service
9 - Test Buzzer,� LEDs & Display
Alarm Count: 0021
General
Flt P 011
Back
Main MenuFireClass
Mon, 08-Aug-1114:42
High Street Office
1 - Accept Events2 - View Status3 - Disablements4 - Time / Date5 - Event Log6 - View/Print Data7 - Service
9 - Test Buzzer,� LEDs & Display
Alarm Count: 0021
General
Flt P 011
Back
Accept EventsFireClass
Mon, 11-Aug-1114:51
High Street Office
Zone 001 A 003System ZoneSupervised Input
BATTERY FAULT
03-Aug-11 14:01:02460PH
General
Flt P 011
1000 Back Accept << >>
Fig. 18: View Status
Fig. 19: View Status, point
Reference Document
Pseudo points are points that are activated when a monitored event occurs. For additional information on points, refer to FireClass Fire Alarm Control Panels Fault Finding Information for Version 21 firmware guide.
View StatusFireClass
Mon, 08-Aug-1014:48
High Street Office
1 - Point2 - Point I/P only3 - Point O/P only4 - Zone5 - Zone Maps6 - Network Status7 - Commis. O/ViewGeneral
Flt P 011
Back
View StatusFireClass
Mon, 11-Aug-1114:51
High Street Office
Point
1 - Loop Point2 - RBus Point3 - Local I/O Point
General
Flt P 011
Back
18 User manual Doc. version 1

FireClass Fire Alarm Control Panels 4.2 View Status
Local I/O Point: Local points that are not on the Remote Bus or addressable loop.
Each of these has an explanatory section below.
Loop Point
For the Loop Point option, you next specify a point address. You then see the type of screen shown in Figure 20. The screen shows the point information and status. The information includes the point’s zone number and description, the device description and the loop ID. For input devices, the Output column is not applicable and will always be blank. Similarly, for output devices the Input column will be blank.
The status for input devices can be one of the following:
Normal
Fault
Active
Pre-Alarm
The status for output devices can be one of the following:
On
Off
Pulse 1
Pulse 2
RBus Point
After selecting the RBus option in Figure 19 above, you see the type of screen shown in Figure 21.
Specify the appropriate Point and RBus numbers. Select the Category option according to what you want to interrogate at your specified numbers. Select from this list of options:
Real: Physical items (as opposed to “logical” items), that are directly connected at the RBus point.
XBus: Further expansion hardware.
Pseudo: “Logical” items (as apposed to “physical” items), such as diagnostic status indications.
Local I/O Points
After selecting the Local I/O option in Figure 19 above, you see the type of screen shown in Figure 21 above, but without the RBus item.
For Category, the same options are available, but with the addition of these options:
Timer: Timed events such as switching events between Day and Night modes.
Menu: Additional menu items that may have been configured into the panel. These can be enabled or disabled.
4.2.2 Point I/P onlyThis Point I/P only option refers to input points on the loop, which are, for example, call points and detectors.
If you specify an output point address, this will be indicated as “invalid”.
4.2.3 Point O/P onlyThis Point O/P only option refers to output points on the loop, such as sounders.
If you specify an input point address, this will be indicated as “invalid”.
Fig. 20: View Status Point Details
View StatusFireClass
Mon, 11-Aug-1114:51
High Street Office
PointZone 01.001 A005Zone 01Call alarm in room460 PH
General
Flt P 011
Back
Input Output
Normal
Fig. 21: View Status RBus Details
View StatusFireClass
Mon, 11-Aug-1114:51
High Street Office
Point
Panel01
RBus Category00 Real
Point01
General
Flt P 011
Back >> - + Enter
User manual Doc. version 1 19
4.2 View Status FireClass Fire Alarm Control Panels
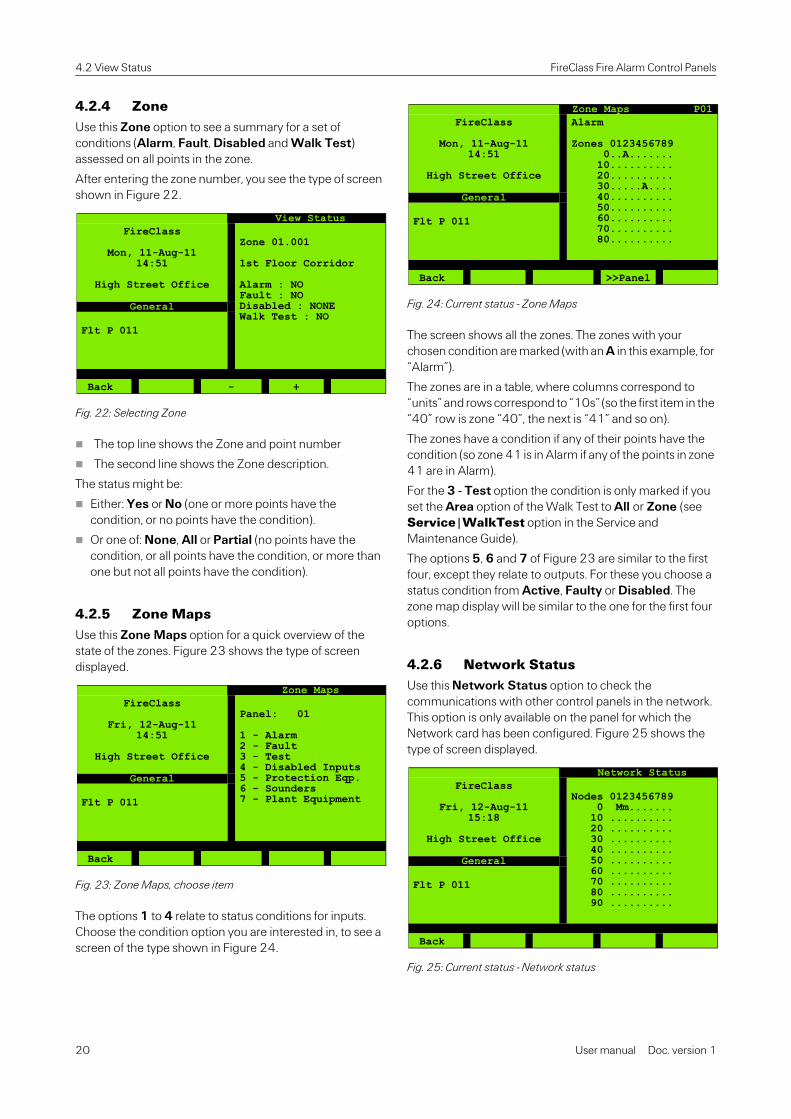
4.2.4 ZoneUse this Zone option to see a summary for a set of conditions (Alarm, Fault, Disabled and Walk Test) assessed on all points in the zone.
After entering the zone number, you see the type of screen shown in Figure 22.
The top line shows the Zone and point number
The second line shows the Zone description.
The status might be:
Either: Yes or No (one or more points have the condition, or no points have the condition).
Or one of: None, All or Partial (no points have the condition, or all points have the condition, or more than one but not all points have the condition).
4.2.5 Zone MapsUse this Zone Maps option for a quick overview of the state of the zones. Figure 23 shows the type of screen displayed.
The options 1 to 4 relate to status conditions for inputs. Choose the condition option you are interested in, to see a screen of the type shown in Figure 24.
The screen shows all the zones. The zones with your chosen condition are marked (with an A in this example, for “Alarm”).
The zones are in a table, where columns correspond to “units” and rows correspond to “10s” (so the first item in the “40” row is zone “40”, the next is “41” and so on).
The zones have a condition if any of their points have the condition (so zone 41 is in Alarm if any of the points in zone 41 are in Alarm).
For the 3 - Test option the condition is only marked if you set the Area option of the Walk Test to All or Zone (see Service|WalkTest option in the Service and Maintenance Guide).
The options 5, 6 and 7 of Figure 23 are similar to the first four, except they relate to outputs. For these you choose a status condition from Active, Faulty or Disabled. The zone map display will be similar to the one for the first four options.
4.2.6 Network StatusUse this Network Status option to check the communications with other control panels in the network. This option is only available on the panel for which the Network card has been configured. Figure 25 shows the type of screen displayed.
Fig. 22: Selecting Zone
Fig. 23: Zone Maps, choose item
View StatusFireClass
Mon, 11-Aug-1114:51
High Street Office
Zone 01.001
1st Floor Corridor
Alarm : NOFault : NODisabled : NONEWalk Test : NO
General
Flt P 011
Back - +
Zone MapsFireClass
Fri, 12-Aug-1114:51
High Street Office
Panel: 01
1 - Alarm2 - Fault3 - Test4 - Disabled Inputs5 - Protection Eqp.6 - Sounders7 - Plant Equipment
General
Flt P 011
Back
Fig. 24: Current status - Zone Maps
Fig. 25: Current status - Network status
Zone Maps P01FireClass
Mon, 11-Aug-1114:51
High Street Office
Alarm
Zones 0123456789 0..A....... 10.......... 20.......... 30.....A.... 40.......... 50.......... 60.......... 70.......... 80..........
General
Flt P 011
Back >>Panel
Network StatusFireClass
Fri, 12-Aug-1115:18
High Street Office
Nodes 0123456789 0 Mm....... 10 .......... 20 .......... 30 .......... 40 .......... 50 .......... 60 .......... 70 .......... 80 .......... 90 ..........
General
Flt P 011
Back
20 User manual Doc. version 1

FireClass Fire Alarm Control Panels 4.3 Disablements
The network nodes are set out in a similar way to zones in a zone map (see above).
For each node there is an indication as follows:
The actual letter varies to indicate the type of equipment at the node:
– M/m= Fire Alarm Control Panel.
– O/o = Other equipment, such as TXG.
An upper case (capital) letter indicates that communications between the equipment and the node are OK.
A lower case letter indicates there is a problem with communications between the equipment and the node.
In the illustration above, Node 01 shows M (OK), Node 02 shows m (not OK).
(The panels show themselves in their screens. In this example the panel is Node 01, so this will be OK by definition.)
. (a dot) Indicates a non-configured node.
? Indicates an unexpected response from non-configured nodes.
4.2.7 Commissioning OverviewThe option is abbreviated to “Commis. O/View” on the screen.
Use this option to review various mode settings, that relate to the detailed control panel operation. You see the type of screen shown in Figure 26.
The screen shows a Y for each option that does not have the default setting from the configuration template.
The screen shows a Y for Commis. User if the logged on user has the Commissioning access level.
The screen shows a Y for Test Equipment if there is any external test equipment connected to the control panel. As an example, this would be a connected PC running FireClass Checker.
These settings can only be changed by service personnel, with the higher level engineering access levels.
Although normal users cannot change these settings, it may be useful to know them, perhaps for use in a telephone consultation with service personnel, for example.
4.3 Disablements
Use the Disablements option to disable or enable items. You might want to disable because some planned activity will produce smoke (such as welding), and you want to prevent an alarm.
Figure 27 shows the type of screen displayed.
Choose the type of item (Point or Point I/P only and so on), and specify the address. The Point I/P only item refers to detectors for example, while the Point O/P only refers to sounders for example.
Reference Document
For details on the options SDevPoll, Lp.Shtdn, Fastlogic Mode, Rate of Rise, Fast Fault, Device PowerUp, Noisy Device, refer to the FireClass Service and Maintenance Guide.
Fig. 26: Commissioning Overview
DANGER
Disabling points may lead to a fire being undetected, leading to possible death, serious injuries or damage to property, and may break compliance with EN54.
You should only enable points with caution, and disable the points as soon as possible afterwards.
Fig. 27: Disablements
Commis. OverviewFireClass
Fri, 12-Aug-1115:18
High Street Office
Panel :01SDevPoll:Lp.Shtdn:FastLogic Mode: YRate of Rise :Fast Fault : YDevice PowerUp:Noisy Device :Dis.NonLED OPs:
Test Equipment: Commis. User : Y
General
Flt P 011
Back >>
DisablementsFireClass
Fri, 12-Aug-1115:18
High Street Office
1 - Point2 - Point I/P only3 - Point O/P only4 - By Function5 - By Device Type
Zones 000 A.I/P 000Sndrs 000
General
Flt P 011
Back Ext.Ctl Flt Sig Alm Sig All SND
User manual Doc. version 1 21

4.3 Disablements FireClass Fire Alarm Control Panels
You then see a screen with the option 1 - Disable or
2 - Enable, depending on the current status. Press the indicated number key to switch between the two.
While any disablements are in force, the (GENERAL) DISABLED LED is lit, and you see an DISABLED INPUT message in the LCD display.
Note that only for the “User” access level, points on the addressable loop can be disabled or enabled.
As an illustration, the steps required to disable a point are provided below.
How to disable a point
1 From the Disablements screen, select 1 - Point.
2 Specify the point type and address. This is described in the example in section 3.3 “Using the Menus“ on page 15.
You see the type of screen shown in Figure 28.
3 Press the 1 key to disable. The text 1 - Disable changes to 2 - Enable (both immediately, and also when you return to this screen to enable the point. Follow the same steps to return to the screen).
4.3.1 PointUse this Point option to disable input or output devices.
For devices that are both input and output, this disables both input and output functions.
4.3.2 Point I/P OnlyUsing this Point I/P Only option you can only disable input points (specifying an output point address results in an “invalid” message).
For devices that are both input and output, this only disables the input function.
4.3.3 Point O/P OnlyUsing this Point O/P Only option you can only isolate output points (specifying an input point address results in an “invalid” message).
For devices that are both input and output, this only disables the output function.
4.3.4 By FunctionUsing this By Function option you can disable or enable multiple devices of the same function in one operation.
How to use the By Function option
1 From the Disablements screen, select 4 - By Function.
2 Select the function. You can choose from:
– Detectors
– Callpoints
– Fire I/Ps (combination of “Detectors” and “Callpoints”)
– Sounders
These remaining items refer to any interfaces to external equipment that may be fitted to the loops.
– Protection Eqp.
– Extinguishing
– Plant Equipment
3 Specify the zone in which to disable or enable (for example 001).
4 Choose Disable Options or Enable Options.
5 If disabling, choose one of the “disable options”. These are All, In Fault, Active and Not Normal (combination of “Active” and “In Fault”).
Some of these may not be available. For Sounders for example, only All and In Fault are available.
If enabling, choose one of the “enable options”. These are All or Normal.
4.3.5 By Device TypeUsing this By Device Type option you can disable or enable multiple devices of the same type in one operation.
Dual input and output device disablement
Some devices are both input and output devices, on the same point address. These points are classified as disabled (in the status screen for the point, for example) even if only the input or output is disabled.
Fig. 28: Point Disable
DisablementsFireClass
Fri, 12-Aug-1115:18
High Street Office
PointZone 01.001 A003
Zone 01CO Device460 PH
Status IP: Normal
1 - Disable
General
Flt P 011
Back
22 User manual Doc. version 1

FireClass Fire Alarm Control Panels 4.4 Time/Date
How to use the By Device Type option
1 From the Disablements screen, select 5 - By Device Type.
2 Specify the zone in which to disable or enable (or specify All (zones).
3 Select the type of the devices you want to disable/enable.
4 Choose Disable Options or Enable Options.
5 If disabling, choose one of the “disable options”. These are All, In Fault, Active and Not Normal (combination of “Active” and “In Fault”).
Some of these may not be available. For Sounders for example, only All and In Fault are available.
If enabling, choose one of the “enable options”. These are All or Normal.
4.3.6 F Key ShortcutsUse the function keys in the screen to disable or enable as follows:
Ext. Ctl (F2): Any external controls fitted to the system (such as door releases).
Flt Sig (F3): The fault signalling output. A signalling output may not be fitted to the system. If fitted, the (SIGNALLING) DISABLED LED lights.
Alm Sig (F4): The alarm signalling output. An alarm signalling output may not be fitted to the system. If fitted, the (SIGNALLING) DISABLED LED lights.
All SND (F5): All the sounders.
4.4 Time/DateUse this Time/Date option to make the time and date and settings, and review the daylight saving adjustment settings.
4.4.1 Set Time/DateUse this Set Time/Date option to set the time and date. Figure 29 shows the type of screen that will be displayed.
To confirm your changes press the Save (F5) key.
To cancel your changes press the Back (F1) key and respond with a “No” to the “save changes” prompt.
4.4.2 Summer/WinterThe panel automatically adjusts to stay synchronised with British Summer Time.
Use this Summer/Winter option to review the settings. Figure 30 shows the type of screen that will be displayed.
Figure 30 is showing the dates on which the time will be advanced, and by how much, at the start of summertime.
Press the Winter (F5) key to see the dates on which the time will be retarded, at the end of summertime (F5 then changes to Summer so you can switch back).
Disablements count
When disabling, you may see a Matches and a Successes number indicated.
For example you might use All SND, and see:
Matches 24 Successes 23
Here Matches is the number of units (sounders) which were liable to be disabled, and Successes is the number of units that actually became disabled (the two numbers being different because a sounder was already disabled).
Fig. 29: Set Time/Date
Setting the date and time with networked fire alarm control panels
For networked control panels, the time and date settings must be made on the network’s “timekeeper” control panel.
Months can be entered with the keypad
As an alternative to stepping through the months with the + or - keys, you can use the number keys (1 for January through to 9 for September, then use + for October on).
Set Time / DateFireClass
Mon, 15-Aug-1109:18
High Street Office
Date : 15-Aug-11Time : 14:15:17
General
Flt P 011
Back >> - +
User manual Doc. version 1 23

4.5 Event Log FireClass Fire Alarm Control Panels
4.5 Event LogUse this Event Log option to examine the event log. For more information on the Event log, see section 2.4 “Event Panel Behaviour“ on page 8.
Figure 31 shows the type of screen that will be displayed.
4.5.1 View Event LogUse this View Event Log option to step through the event log, viewing the details. Figure 32 shows the type of screen that will be displayed.
As well as the normal “step” keys (<< and >>), there are keys for moving to the first event (|<<) and last event (>>|).
There is a “current event/total number of events” indication (0107/0107 in the screen example). The newest event has the largest number,
4.5.2 Print Event LogUse this Print Event Log option to print events. Figure 33 shows the type of screen that will be displayed.
This menu option is only available if at least one printer is configured.
The destination printer can be selected if more than one printer is configured.
Change the Lowest priority of interest setting using the + or - keys. Here is a list of the possible settings that can be selected:
Highest Priority: From the Event log that records events upto 3000, you can designate an event as the most important event details that should be printed first.
General Alarm:
Life Risk Alarms
Level 12
Non Life Risk
Alarm Threshold
Gas Alert
Critical Faults
Other Faults
Visible Disablements
Warnings
Disablements
Expected Events
Level 2
Information Only
Lowest Priority: From the Event log that records events upto 3000, you can designate an event as the least important event details that should be printed last.
Fig. 30: Summer/Winter
Fig. 31: Event Log
Fig. 32: View Event Log
Summer/WinterFireClass
Mon, 15-Aug-1109:38
High Street Office
Summertime 29-Mar-10 +1h 28-Mar-11 +1h 27-Mar-12 +1h 25-Mar-13 +1h 31-Mar-14 +1h 30-Mar-15 +1h 29-Mar-16 +1h 27-Mar-17 +1h 26-Mar-18 +1h 25-Mar-19 +1h
General
Flt P 011
Back Winter
Event LogFireClass
Mon, 15-Aug-1109:58
High Street Office
1 - View Event Log2 - Print Event Log3 - Filter
General
Flt P 011
Back
Event LogFireClass
Mon, 15-Aug-1110:10
High Street Office
Zone 01.000 U001System ZoneUser Access
USER LOG ON
15-Aug-11 10:09:12Digital I/PInformation only
0107/0107
General
Flt P 011
Back |<< << >> >>|
Fig. 33: Print Event Log
Event LogFireClass
Mon, 15-Aug-1111:10
High Street Office
Destination :PANEL 1
How far back to first entry: 0010and print how many entries back from there: 0011
Lowest priorityof interest :
Expected Events
General
Flt P 011
Disbd 002
Back >> - + Print
24 User manual Doc. version 1

FireClass Fire Alarm Control Panels 4.6 View/Print Data
Events corresponding to your “Lowest priority of interest” setting are printed, along with all other events with a higher priority than this (higher up the list).
4.5.3 FilterUse this Filter option to view or print events, selected according to their category. You use the type of screen shown in Figure 34. The screen lists the events in descending order of priority.
To include an item for printing, note its number and press this key. For the item, this changes the – to a + (as for 1- Fire and 2 - Gas Alert in Figure 34). Press the number key again if you need to change back to a –.
4.6 View/Print DataUse this View/Print Data option to see status type information, either displayed on the screen or printed. Figure 35 shows the type of screen that will be displayed. Start by selecting the category of information you want to see. You might then need to specify an address.
4.6.1 Points DisabledUse this Points disabled option to see a summary screen of disabled points.
Figure 36 shows the type of screen that will be displayed.
To switch between viewing disabled inputs and disabled outputs, press the “Output” key (F2).
Points that are both input and output points can appear in either list, or both lists, depending on the function(s) that are disabled.
4.6.2 Points Unt./FailedUse this Points Untested/Failed option during a Walk Test. For more information see section 4.8 “Configuration“ on page 29.
The option is abbreviated to Pts Unt./Failed on the screen.
4.6.3 Point ValuesUse this Point Values option to see a screen of information on the point. For both the loop and point number, you can set specific values or opt for All. Figure 37 shows the type of screen displayed. The screen shows the device type, operating mode and so on.
The << (F3) and >> (F4) keys are only available if you selected the All option.
The raw values sent by the device, before conversion to meaningful values, are displayed in brackets.
Fig. 34: Event Log – Filter
Fig. 35: View/Print Data
Event - FilterFireClass
Mon, 15-Aug-1116:10
High Street Office
1 - Fire +2 - Gas Alert +3 - Pre Alarm -4 - Supervisory -5 - Fault -6 - Disabled -7 - Test Mode -8 - Warning -9 - Information -
General
Flt P 011
Disbd 002
Back View Print
View/Print DataFireClass
Mon, 15-Aug-1110:10
High Street Office
1 - Points Disabled2 - Pts Unt./Failed3 - Point Values4 - View Faults
7 - Active Points8 - By Function
General
Flt P 011
Disbd 002
Back
Fig. 36: View/Print Points Disabled
Fig. 37: Point Values
Points DisabledFireClass
Mon, 15-Aug-1116:20
High Street Office
Panel :01InputTotal : 002Zone 01.001 A003Point Text--------------------Zone 01.001 A005Point TextGeneral
Flt P 011
Disbd 002
Back Output Print
Point ValuesFireClass
Tue, 16-Aug-1110:51
High Street Office
Zone 01.001 A023
Zone 03Heat Sensor Device460PHReal: 460 PH (010)Mode: HPO and 60ºCSens: 1 0.0 %/m (023)24ºC (078)
3%Dirt/LTA (023)
General
Flt P 009
Disbd 002
Back << >> Print
User manual Doc. version 1 25

4.6 View/Print Data FireClass Fire Alarm Control Panels
For devices not sending a value, this is shown as (000) and converted to a pre-programmed value (such as -8 °C for temperature).
On printing, all the point values in the selected loop are output, not just the displayed point.
4.6.4 View FaultsUse this View Faults option to see the number of points in fault, and details of these points. Figure 38 shows the type of screen that will be displayed.
There is no print option.
4.6.5 Loop InfoThis option is not accessible by the “user”. It can be accessed only by the “Engineer“.
4.6.6 Forced PointsThis option is not accessible by the “user”. It can be accessed only by the “Engineer“.
4.6.7 Active PointsUse this Active Points option to see a count of active points. For a point to be “active”, the device at the point must be in the state that triggers an alarm (or that
contributes to an alarm, there may be an alarm warning for example – for more information see 2.6.1 “Alarm Warnings“ on page 10).
On using the option you see the type of screen shown in Figure 39.
Press the Dis&Act key (F2) to step to the next screen (when the key changes to Dis&For). Press again to step to the next screen. Keep pressing F2 to complete the loop. The complete loop is shown in table 4.
4.6.8 By FunctionUse this By Function option to see counts of items categorised by their function (such as “Fire Inputs” and “Loop Outputs”), and status (one of “Active”, “Fault” or “Disabled”). Figure 40 shows the type of screen that will be displayed.
Contamination up to 20 %
Values in the range up to 20 % do not necessarily relate to contamination but can occur due to the calibration and the new environmental conditions.
Fig. 38: View Faults
View FaultsFireClass
Tue, 16-Aug-1111:21
High Street Office
Zone 001 A001
General
Flt P 001
Disbd 002
Back >> Print
Fig. 39: Active Points, Fire Inputs
Screen lists Next screen key
“Current active pts.” Dis&Act
“Disabled active pts.” Dis&For
“Disabled forced pts.” All Act
“All pot. active pts.” Cur.Act
“Current active pts.” Dis&Act
back to the start
Table 4: Active point display sequence
Dis&For
Points in this condition are actually disabled and are not capable of responding to any hazardous event.
Active PointsFireClass
Tue, 16-Aug-1111:51
High Street Office
Panel: 1
Current active pts.Total : 0
General
Flt P 009
Disbd 002
Back Dis&Act Print
26 User manual Doc. version 1

FireClass Fire Alarm Control Panels 4.7 Service
Note that Fire Inputs are callpoints and detectors, whereas a Non-Fire input is, for example, the open/closed state of a fire door that the panel controls.
After selecting a function, you see a screen for selecting the status, as shown in Figure 41.
After selecting a status, you see a “count” screen, of the type shown in Figure 42.
4.7 ServiceUse this Service option for maintenance and diagnostics The Service menu options are shown in Fig. 43.
4.7.1 Walk TestWalk Test is a mode that allows you to check that devices will activate correctly (by physically applying smoke for example), without triggering an actual alarm.
You choose the scope of the test (whether to switch individual devices, or whole loops to Walk Test mode, for example), and whether to use the self test facility of devices.
Select Walk Test to see the type of screen shown in Fig. 44. If you see the type of display shown in Fig. 45, Walk test is already active.
Fig. 40: By Function
Fig. 41: Fire Inputs
Fig. 42: Active Fire IPs
By FunctionFireClass
Tue, 16-Aug-1111:51
High Street Office
1 - Fire Inputs2 - Non-Fire Inputs3 - All Loop O/Ps4 - Sounders5 - Protection Eqp.6 - Plant Equipment
General
Flt P 009
Disbd 002
Back
Fire InputsFireClass
Tue, 16-Aug-1113:51
High Street Office
Panel: 1
1 - Active2 - Fault3 - Disabled
General
Flt P 009
Disbd 002
Back
Disabled Fire IPsFireClass
Tue, 16-Aug-1114:01
High Street Office
Panel: 1Total: 1Page: 1/ 1
Zone 01.001 A003CO Device
General
Flt P 009
Disbd 002
Back >>Panel
Fig. 43: Service Menu
DANGER
While Walk Test mode is active, fires may go undetected, leading to possible death, serious injuries or damage to property.
This is because the normal response (triggering an alarm) to activations in one or more devices is overridden.
You should use Walk Test with caution, and only use Walk Test for as short a time as possible.
WARNING
There is a danger of accidentally triggering an alarm in Walk Test. This is because Walk Test mode does not necessarily apply to all devices. For example you could choose to perform a walk test only on detectors. Because this will not place call points in Walk Test mode, activating a call point during the walk test will trigger an alarm.
Service MenuFireClass
Thu, 18-Aug-1111:27
High Street Office
1 - Walk Test2 - Maintenance3 - Diagnostics4 - Calibrate DDM5 - Restart System6 - Switches
General
Flt P 011
Back
User manual Doc. version 1 27

4.7 Service FireClass Fire Alarm Control Panels
Now set the options in the screen. As you set the options, other displayed options may change. The options are:
Panel: Only applies to networked panels. Set this to the panel network address.
Area: Use this to specify the scope of the test. You can choose All, or Zone (an individual zone) or Point (an individual point).
Type: For “multiple device” Area settings (such as All), this is a “filter” setting that you use to specify the type of detectors to be in test. Choose between Input, Detectrs, Callpnts, Alarm I/Ps or Sounders.
There are separate Input and Alarm I/P (input) options because not all inputs are alarm inputs. Alarm inputs are detectors and call points, while a non-alarm input might be used to monitor the open/closed state of a panel-controlled fire door, for example.
With Sounders selected, you can set Loop to All + FIM. This also permits the inspection of two sounders connected to the FIM. Sounders’ status is not shown on the display (see below). The selected sounders will be activated in a pulsing mode.
Loop: Use this to (optionally) narrow the scope of the test to a specific loop, or to specify the loop part of a point address.
Mode: Make one of the following settings:
– MANUAL: Apply the test yourself.
– AUTOMATIC: Use the self-test facility of devices. The self-test is automatically triggered by the control panel. For more information see the section “Devices Supporting Automatic Test“ on page 29.
Multisensor: This option applies to multi-sensor devices (that are also configured for multi-sensor mode). Select Full if you only want the device to pass as “Successful” if your test activates all the sensors, otherwise select Part.
You can only select either Automatic mode (above), or one of the Multisensor options.
Press the Start (F5) key to enter Walk Test mode.The type of screen shown in Fig. 45 is displayed.
Now start to make your tests – by applying smoke, for example. Alternatively, automatic testing starts.
While any device is in Walk Test, the Test LED is lit.
If you need a reminder of the settings you made, press Settings (F3).
As you make the tests, the Fig. 45 screen dynamically updates. with a summary of the results. There is also a screen dedicated to individual point results – see Fig. 47 on page 29.
The items in the Fig. 45 screen are as follows:
Selected: Number of devices in Walk Test.
Excluded: Number of disabled devices in the “scope” of the test, for example.
Been Active: Number of devices that have been in the active state since the test was started.
Been Clear: Number of devices that have been in the clear state (that is the “not active” state) since the test was started. This will most probably match the “Selected” value, as all devices will probably start in the clear state. (You are unlikely to start the Walk Test with devices active.)
Successful: Number of devices that have switched from the “clear” to the “active” states. This will increase as you test devices, and the test is successful. Again, this will most probably match the “Been Active” value, as all devices will probably start in the “clear” state.
Curr.Active: Devices currently active.
TestZ: Number of zones with a device in Walk Test. (appears on the left hand side of the screen below General)
To summarize, if all the devices pass, the Selected and Successful values will be the same, and they will also most probably match the Been Active and Been Clear values. (But for the results you mainly use the untested or failed status screen, of the type shown in Fig. 47.)
Fig. 44: Walk test
Walk TestFireClass
Thu, 18-Aug-1111:27
High Street Office
Panel: 01Area : AllType : InputLoop : All
Mode : MANUAL
Multisensor : Part
General
Flt P 011
Back >> - + Start
Fig. 45: Walk test example
Walk TestFireClass
Thu, 18-Aug-1114:27
High Street Office
All Inputs
Selected : 7Excluded : 0Been Active : 5Been Clear : 7Successful : 5Curr.Active : 0
GeneralFlt P 011TestZ 001
Back Details Settings End
28 User manual Doc. version 1

FireClass Fire Alarm Control Panels 4.8 Configuration
For a single device test, you see a status screen of the type shown in Fig. 46.
Press the Details key (F2) to see the untested or failed status screen, of the type shown in Fig. 47.
On first enabling Walk Test, all selected devices appear in this list, as you will not yet have tested them. Devices disappear when you test them (and if this is successful).
If any devices are left in the list at the end of the test, you should test them again to make sure you did not accidentally miss them. Any remaining devices have then failed.
In AUTOMATIC mode, devices will disappear as their self-test is triggered by the control panel (and this is successful).
To exit Walk Test mode, press the End key (F5). Note that you can leave the Walk Test screens leaving Walk Test still active, so you may need to first return to the Walk Test screen using the menus.
Devices Supporting Automatic Test
The following detectors support self-test:
460PH
460P
460H
460PC
4.8 ConfigurationThis option is not accessible by the “User”. It can be accessed only by the “Engineer“.
4.9 Test Buzzer, LEDs & DisplaySelecting this should momentarily activate the internal buzzer, all the pixels of the LCD and all the LEDs.
If any of these do not happen there is a fault.
Fig. 46: Walk test (point)
Fig. 47: Walk Test - Pts Untested/Failed
Walk TestFireClass
Thu, 18-Aug-1115:07
High Street Office
Point I/P onlyZone 001.001 A001
Zone 01 - EntranceCO Device460 PC
Selected : 1Excluded : 0Activations : 0Curr.Active : NO
General
Flt P 011TestZ 001
Back Details Settings End
Pts Untested/FailedFireClass
Thu, 18-Aug-1115:27
High Street Office
Panel :01
Total : 027
Zone 001 A001CO Device---------------------Zone 001 A002CO Device---------------------Zone 002 A003Heat Sensor Device
General
Flt P 011TestZ 001
Back >> Print
User manual Doc. version 1 29

5 Routine Checks FireClass Fire Alarm Control Panels
5 Routine Checks
5.1 GeneralIn order to comply with the requirements of British Standard BS 5839 Part 1, the installation must be checked on a regular basis by a responsible member of staff.
This is to confirm that the fire alarm control panel and all ancillary devices are operating correctly. The required routine checks are described in the following paragraphs.
5.2 Daily Checks
How to do a daily check
1 Ensure the front panel of the fire alarm control panel is indicating a normal condition (i.e. no alarm or fault LEDs are lit and the LCD is displaying the date and time).
If the panel is not indicating a normal condition record the condition in the log book and take any necessary action.
2 Check that any fault recorded on the previous day has received attention.
5.3 Weekly Checks
How to do a weekly check
1 If necessary, clean the front panel of the fire alarm control panel with a suitable cleansing agent.
CAUTION: To avoid unnecessary evacuation, warn all personnel that the sounders are about to be tested.
2 Activate a device (either a callpoint or detector).
3 Check that the system responds as follows:
The control panel’s buzzer sounds in a continuous tone.
The (GENERAL) FIRE LED on the control panel front lights.
The appropriate red ZONE STATUS LED flashes.
The sounders operate.
The LCD display shows the location of the alarm.
4 Record the device used to initiate the test in the site log book and reset the fire alarm control panel.
5 Check the condition of the printout on any printers attached to the system and replace the ribbon if it is becoming feint.
6 Ensure that each printer has an adequate supply of paper.
Record any defect in the log book and take the appropriate action to remedy this.
5.4 CPD Information
0832
Control Equipment Ltd
Hillcrest Business Park
Cinderbank Dudley
West Midlands DY2 9AP
UK
11
0832-CPD-1705
EN54-2:1997+A1:2006
EN54-4:1997+A1:2002+A2:2006
Control and indicating equipment for fire detection and fire alarm systems for buildings
FireClass 32-1
Provided options:
Alarm counter
Fault signals from points
Delays to outputs
Dependency on more than one alarm signal (type A and type B)
Disablement of points
Test condition
Outputs to:
Fire alarm devices
Fire alarm routing equipment
Automatic fire protection equipment
Fault warning routing equipment
Standardised I/O interface
User Documentation:
Installation and Commissioning FC-P-I
Service and Maintenance FC-P-S
Product Application & Design Information FC-P-A
User Guide FC-P-U
30 User manual Doc. version 1

FireClass Fire Alarm Control Panels 5.4 CPD Information
0832
Control Equipment Ltd
Hillcrest Business Park
Cinderbank Dudley
West Midlands DY2 9AP
UK
11
0832-CPD-1706
EN54-2:1997+A1:2006
EN54-4:1997+A1:2002+A2:2006
Control and indicating equipment for fire detection and fire alarm systems for buildings
FireClass 64-2
Provided options:
Alarm counter
Fault signals from points
Delays to outputs
Dependency on more than one alarm signal (type A and type B)
Disablement of points
Test condition
Outputs to:
Fire alarm devices
Fire alarm routing equipment
Automatic fire protection equipment
Fault warning routing equipment
Standardised I/O interface
User Documentation:
Installation and Commissioning FC-P-I
Service and Maintenance FC-P-S
Product Application & Design Information FC-P-A
User Guide FC-P-U
0832
Control Equipment Ltd
Hillcrest Business Park
Cinderbank Dudley
West Midlands DY2 9AP
UK
11
0832-CPD-1707
EN54-2:1997+A1:2006
EN54-4:1997+A1:2002+A2:2006
Control and indicating equipment for fire detection and fire alarm systems for buildings
FireClass 64-4
Provided options:
Alarm counter
Fault signals from points
Delays to outputs
Dependency on more than one alarm signal (type A and type B)
Disablement of points
Test condition
Outputs to:
Fire alarm devices
Fire alarm routing equipment
Automatic fire protection equipment
Fault warning routing equipment
Standardised I/O interface
User Documentation:
Installation and Commissioning FC-P-I
Service and Maintenance FC-P-S
Product Application & Design Information FC-P-A
User Guide FC-P-U
User manual Doc. version 1 31

5.4 CPD Information FireClass Fire Alarm Control Panels
0832
Control Equipment Ltd
Hillcrest Business Park
Cinderbank Dudley
West Midlands DY2 9AP
UK
11
0832-CPD-1708
EN54-2:1997+A1:2006
EN54-4:1997+A1:2002+A2:2006
Control and indicating equipment for fire detection and fire alarm systems for buildings
FireClass 240-2
Provided options:
Alarm counter
Fault signals from points
Delays to outputs
Dependency on more than one alarm signal (type A and type B)
Disablement of points
Test condition
Outputs to:
Fire alarm devices
Fire alarm routing equipment
Automatic fire protection equipment
Fault warning routing equipment
Standardised I/O interface
User Documentation:
Installation and Commissioning FC-P-I
Service and Maintenance FC-P-S
Product Application & Design Information FC-P-A
User Guide FC-P-U
0832
Control Equipment Ltd
Hillcrest Business Park
Cinderbank Dudley
West Midlands DY2 9AP
UK
11
0832-CPD-1709
EN54-2:1997+A1:2006
EN54-4:1997+A1:2002+A2:2006
Control and indicating equipment for fire detection and fire alarm systems for buildings
FireClass 240-4
Provided options:
Alarm counter
Fault signals from points
Delays to outputs
Dependency on more than one alarm signal (type A and type B)
Disablement of points
Test condition
Outputs to:
Fire alarm devices
Fire alarm routing equipment
Automatic fire protection equipment
Fault warning routing equipment
Standardised I/O interface
User Documentation:
Installation and Commissioning FC-P-I
Service and Maintenance FC-P-S
Product Application & Design Information FC-P-A
User Guide FC-P-U
32 User manual Doc. version 1
FireClass Fire Alarm Control Panels 5.4 CPD Information
0832
Control Equipment Ltd
Hillcrest Business Park
Cinderbank Dudley
West Midlands DY2 9AP
UK
11
0832-CPD-1757
EN54-4:1997+A1:2002+A2:2006
Fire detection and alarm repeater equipment with power supply
FireClass 32RA
User Documentation:
Installation and Commissioning FC-P-I
Service and Maintenance FC-P-S
Product Application & Design Information FC-P-A
User Guide FC-P-U
0832
Control Equipment Ltd
Hillcrest Business Park
Cinderbank Dudley
West Midlands DY2 9AP
UK
11
0832-CPD-1758
EN54-4:1997+A1:2002+A2:2006
Fire detection and alarm repeater equipment with power supply
FireClass 64RA
User Documentation:
Installation and Commissioning FC-P-I
Service and Maintenance FC-P-S
Product Application & Design Information FC-P-A
User Guide FC-P-U
User manual Doc. version 1 33
5.4 CPD Information FireClass Fire Alarm Control Panels
0832
Control Equipment Ltd
Hillcrest Business Park
Cinderbank Dudley
West Midlands DY2 9AP
UK
11
0832-CPD-1759
EN54-4:1997+A1:2002+A2:2006
Fire detection and alarm repeater equipment with power supply
FireClass 240RA
User Documentation:
Installation and Commissioning FC-P-I
Service and Maintenance FC-P-S
Product Application & Design Information FC-P-A
User Guide FC-P-U
34 User manual Doc. version 1

FireClass Fire Alarm Control Panels Index
Index
AAccept Events menu option 18access levels 13active point - definition 26Active Points (View/Print Data) menu option 26Address - network and non-network 17alarm
investigating 11operator response 10panel behaviour 10
Alarm I/P – difference to Input 28Alarm Warning 10All key 9auxiliary display devices 12
BBy Function 22By Function (Isolate/De-isol) menu option 22By Function (View/Print Data) menu option 26
CCAUTION 5Configuration menu option 29control keys 6controls 6
DDANGER 5Day Mode 8DAY/NIGHT control key 6de-isolating 21Disablements 21Display LEDs 7
EEnable Keyswitch 6entering passcodes 14EVACUATE control key 6Event Log
menu option 24size 8
Ffault
operator response 9panel behaviour 8
Filter menu option 25
Fire Input - definition 27Function keys 6
GGuide 5
Iindicators 6Information 5Input – difference to Alarm I/P 28INVESTIGATE DELAY control key 6Isolate/De-Isol menu option 21isolated points - discovering 25isolating 21
KKeypad 6Keywords 5
LLCD Display 7
Fire Window 7Main Window 8Softkey Window 8Status Window 8
LCD Repeaters 12Local I/P Points (Status) menu option 19logging off 15logging on 14Loop Point Ctrs (View/Print Data) menu option 26
MMain Menu 15, 18menu point
enabling/disabling 19menus - using 15More key 9
NNetwork Status (Status) menu option 20Night Mode 8Non-Fire Input - definition 27normal operation 7Not Clr key 9NOTICE 5
User manual Doc. version 1 35

Index FireClass Fire Alarm Control Panels
Ppasscodes – entering 14Point I/P Only (Isolate/De-isol) menu option 22Point I/P only (Status) menu item 19Point O/P only (Status) menu option 19Point Values (View/Print Data) menu option 25Points Disabled 25Points Isolated (View/Print Data) menu option 25Pre-Alarm Warnings 10Print Event Log menu option 24printers 12Pts Unt./Failed (View/Print Data) menu option 25
RRBus point (Status) menu option 19repeaters 12RESET control key 6
SService menu option 27Set Time/Date menu option 23SILENCE BUZZER key 6SILENCE/RESOUND control key 6sounders
silenced indication 11silencing 11
SPARE control key 6Summer/Winter menu option 23Symbols 5
TTest Buzzer, LEDs & Display menu item 29
UUnaccepted events 9Unrestored Events 9using the menus 15
VView Event Log menu option 24View Faults (View/Print Data) menu option 26View Status menu option 18View/Print Data menu option 25
WWalk test
ending 29setting scope 28starting 28
Walk Test menu option 27, 29WARNING 5Warnings 5
ZZone (Status) menu option 20Zone Display LEDs 7Zone Maps (Status) menu option 20
36 User manual Doc. version 1

FireClass Fire Alarm Control Panels Index
User manual Doc. version 1 37

Company stamp
Further information about FIRECLASS can be found on the Internet at www.fireclass.co.uk
ItalyFIRECLASSVia Gabbiano 22Zona Industriale, S. Scolastica64013 Corropoli (TE)[email protected]
United KingdomFIRECLASSHillcrest Business ParkCinder BankDudleyWest MidlandsDY2 9APUnited [email protected]
12
0.5
15
.08
5_F
C-P
-U, d
oc. v
ersi
on 1
, 28
. Mar
20
12
. Sub
ject
to c
hang
e w
ithou
t not
ice.
Top Related