


Languages
Pages
Legal

Version 2, 15 Oct 2013
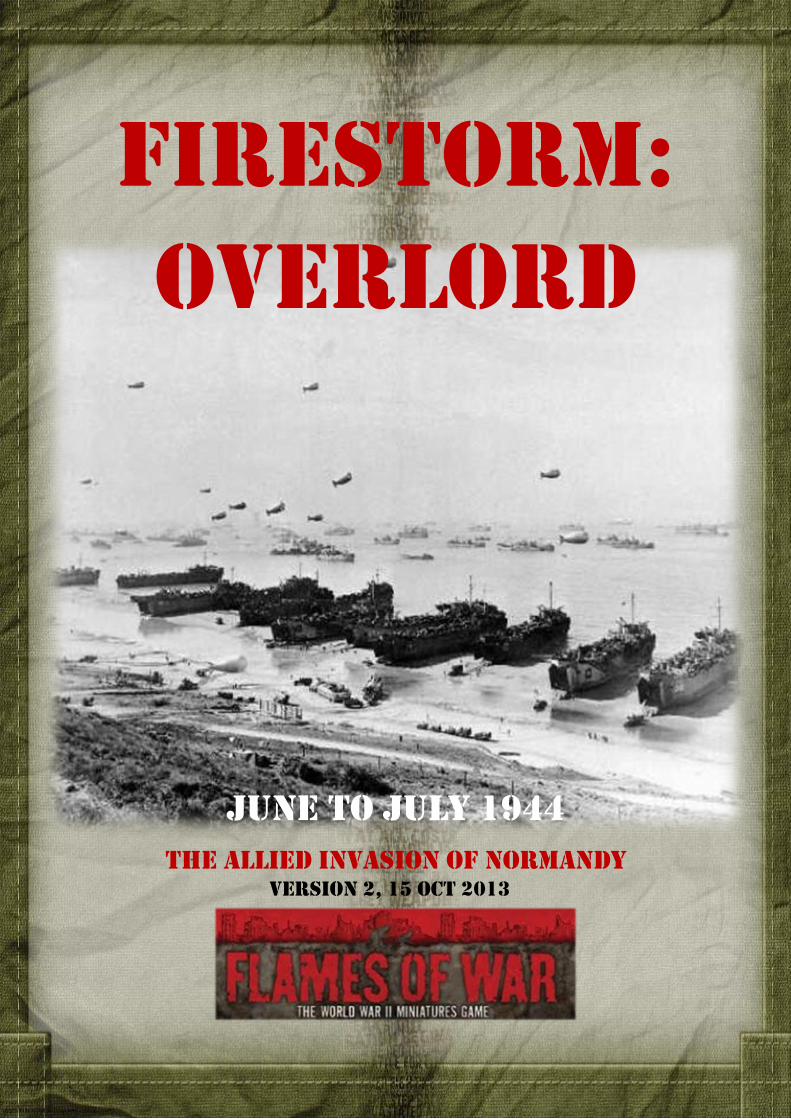
JUNE TO JULY 1944
THE ALLIED INVASION OF NORMANDY
Firestorm:
overlord
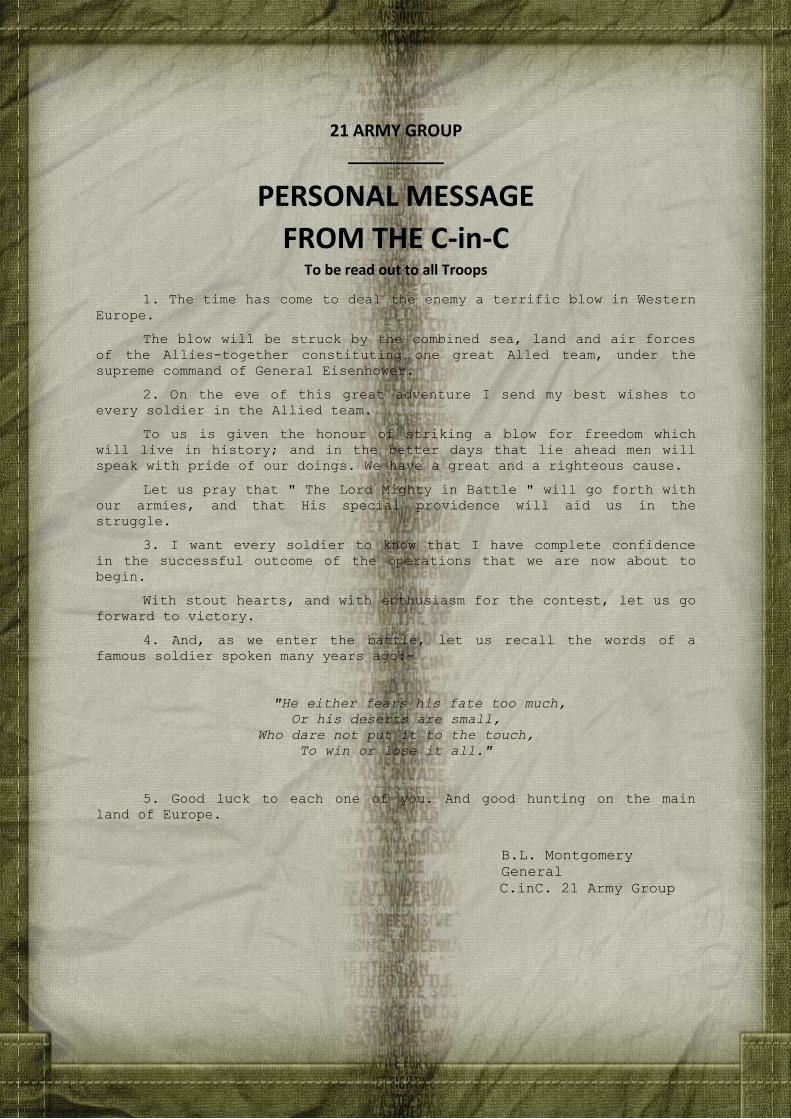
21 ARMY GROUP
PERSONAL MESSAGE
FROM THE C-in-C To be read out to all Troops
1. The time has come to deal the enemy a terrific blow in Western
Europe.
The blow will be struck by the combined sea, land and air forces
of the Allies-together constituting one great Alled team, under the
supreme command of General Eisenhower.
2. On the eve of this great adventure I send my best wishes to
every soldier in the Allied team.
To us is given the honour of striking a blow for freedom which
will live in history; and in the better days that lie ahead men will
speak with pride of our doings. We have a great and a righteous cause.
Let us pray that " The Lord Mighty in Battle " will go forth with
our armies, and that His special providence will aid us in the
struggle.
3. I want every soldier to know that I have complete confidence
in the successful outcome of the operations that we are now about to
begin.
With stout hearts, and with enthusiasm for the contest, let us go
forward to victory.
4. And, as we enter the battle, let us recall the words of a
famous soldier spoken many years ago:-
"He either fears his fate too much,
Or his deserts are small,
Who dare not put it to the touch,
To win or lose it all."
5. Good luck to each one of you. And good hunting on the main
land of Europe.
B.L. Montgomery
General
C.inC. 21 Army Group
Background to Invasion of
France
“…the first 24 hours of the invasion will be decisive…the fate of Germany depends on the
outcome. For the Allies, as well as Germany, it will be the longest day.”
Feldmarschall Erwin Rommel
“Your task will not be an easy one. Your enemy is well trained, well equipped, and battle-
hardened. He will fight savagely....I have full confidence in your courage, devotion to duty,
and skill in battle. We will accept nothing less than full victory.”
General Dwight D. Eisenhower
n the spring of 1944, General Dwight D.
Eisenhower, the Allied Supreme
Commander in Europe, had to make one
of the most important decisions of World War
II. Hundreds of thousands of Allied troops,
sailors, and airmen awaited his orders to
begin Operation Overlord, the invasion of
Europe. Eisenhower had already delayed
Overlord for a month and postponed other
military operations to allow the Allies enough
time to build and gather together the landing
craft they needed. He now set a date, June 5,
1944.
The original focus was to be a combined
Overlord – Dragoon operation originally
scheduled for May 1944 but at the time
Winston Churchill felt that continued
operations in Italy and elsewhere in the
Mediterranean would afford better use of
resources, furthermore any amphibious
operation would detract from the Normandy
landings.
Operation Overlord
Allied planners knew they could not control
the weather for D-Day. Late on the evening of
June 2, 1944, Eisenhower, his top generals,
and British Prime Minister Winston
Churchill met to review the weather forecast.
The news was not good, D-Day, June 5,
promised cloudy skies, rain, and heavy seas.
Eisenhower decided to wait another day to
see whether the forecast might improve. Less
than 24 hours before the scheduled invasion
Eisenhower gathered his advisers again. The
forecast indicated that the rain would stop
and there would be breaks in the clouds by
mid-afternoon June 5. Eisenhower decided
to change D-Day to June 6.
The D-Day operation of June 6, 1944
brought together the land, air and sea forces
of the allied armies in what became known
as the largest seaborne invasion force in
human history. The operation, given the
codename OVERLORD, delivered five naval
I
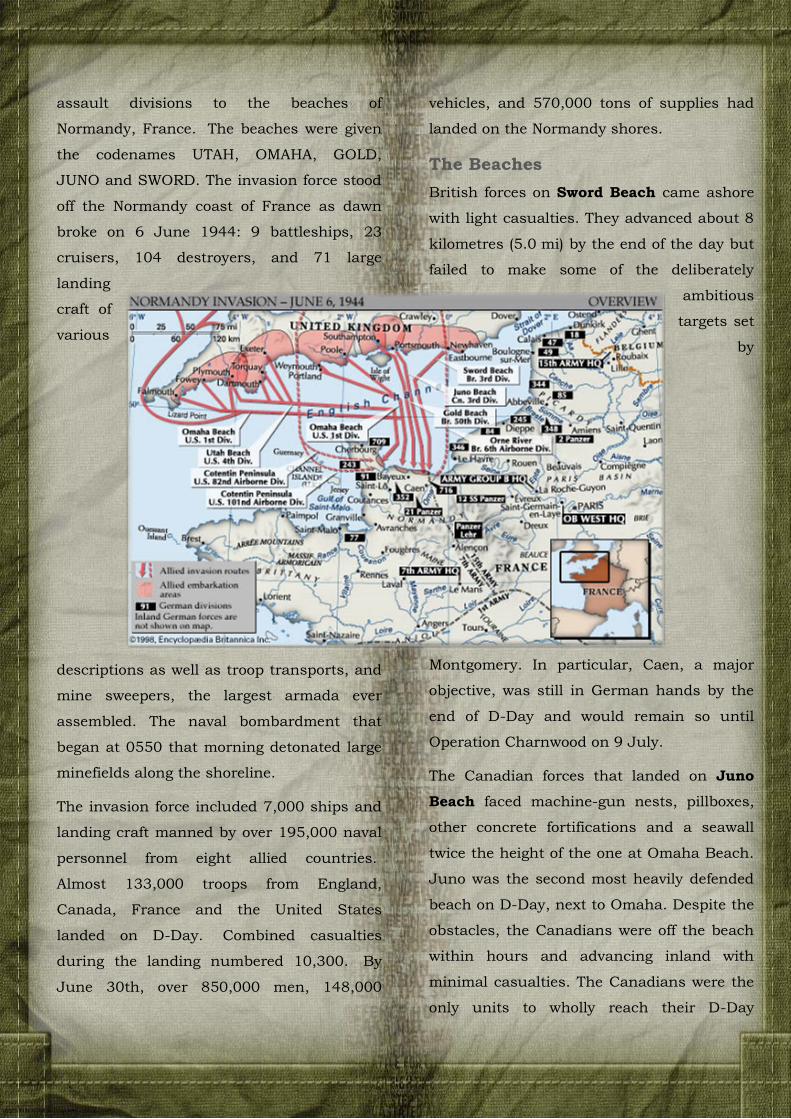
assault divisions to the beaches of
Normandy, France. The beaches were given
the codenames UTAH, OMAHA, GOLD,
JUNO and SWORD. The invasion force stood
off the Normandy coast of France as dawn
broke on 6 June 1944: 9 battleships, 23
cruisers, 104 destroyers, and 71 large
landing
craft of
various
descriptions as well as troop transports, and
mine sweepers, the largest armada ever
assembled. The naval bombardment that
began at 0550 that morning detonated large
minefields along the shoreline.
The invasion force included 7,000 ships and
landing craft manned by over 195,000 naval
personnel from eight allied countries.
Almost 133,000 troops from England,
Canada, France and the United States
landed on D-Day. Combined casualties
during the landing numbered 10,300. By
June 30th, over 850,000 men, 148,000
vehicles, and 570,000 tons of supplies had
landed on the Normandy shores.
The Beaches
British forces on Sword Beach came ashore
with light casualties. They advanced about 8
kilometres (5.0 mi) by the end of the day but
failed to make some of the deliberately
ambitious
targets set
by
Montgomery. In particular, Caen, a major
objective, was still in German hands by the
end of D-Day and would remain so until
Operation Charnwood on 9 July.
The Canadian forces that landed on Juno
Beach faced machine-gun nests, pillboxes,
other concrete fortifications and a seawall
twice the height of the one at Omaha Beach.
Juno was the second most heavily defended
beach on D-Day, next to Omaha. Despite the
obstacles, the Canadians were off the beach
within hours and advancing inland with
minimal casualties. The Canadians were the
only units to wholly reach their D-Day
objectives, although most units fell back a
few kilometres to stronger defensive
positions.
At Gold Beach, the casualties were also
quite heavy, because the Germans had
strongly fortified a village on the beach.
However, the 50th (Northumbrian) Infantry
Division overcame these difficulties and
advanced almost to the outskirts of Bayeux
by the end of the day. The link with
commando units securing the Port-en-Bessin
gave the Allies a base to deploy their PLUTO
pipeline, as an alternative to the
experimental 'Tombola', a conventional
tanker ship-to-shore storage system.
The Americans who landed on Omaha Beach
faced the veteran German 352nd Infantry
Division, one of the best trained on the
beaches. Furthermore, Omaha was the most
heavily fortified beach and the majority of
landings missed their assigned sectors.
Commanders considered abandoning the
beachhead but small units of infantry, often
forming ad hoc groups, eventually infiltrated
the coastal defences. Further landings were
able to exploit the penetrations and by the
end of day two footholds had been
established. The tenuous beachhead was
expanded over the following days and the D-
Day objectives were accomplished by D+3.
At Pointe du Hoc, the task for the 2nd
Ranger battalion commanded by Lt. Colonel
James Rudder, was to scale the 30 metres
(98 ft) cliffs under enemy fire and grenades
with ropes and ladders and then destroy the
guns there. The beach fortifications were
vital targets since a single artillery forward
observer based there could have directed fire
on the U.S. beaches. The Rangers were
eventually successful and captured the
fortifications. They then had to fight for 2
days to hold the location, losing more than
60 percent of their men.
Casualties on Utah Beach, the westernmost
landing zone, were the lightest of any beach,
at 197 out of the roughly 23,000 troops that
landed. Although the 4th Infantry Division
troops that landed on the beach found
themselves too far to the southeast, they
landed on a lightly defended sector that had
relatively little German opposition and the
4th Infantry Division was able to press
inland by early afternoon, linking up with
the 101st Airborne Division.
Once the beachhead was established, the
Mulberry Harbours were made operational
around 9 June. One was constructed at
Arromanches by British forces, the other at
Omaha Beach by American forces. Severe
storms on 19 June interrupted the landing of
supplies and destroyed the Omaha harbour.
The Arromanches harbour was able to
supply around 9,000 tons of materiel daily
until the end of August 1944, by which time
the port of Cherbourg had been secured by
the Allies.
Despite this, the German 21st Panzer
division mounted a counterattack, between
Sword and Juno beaches and succeeded in
nearly reaching the channel. Stiff resistance
by anti-tank gunners and fear of being cut
off caused them to withdraw before the end
of 6 June. According to some reports, the
sighting of a wave of airborne troops flying
over them was instrumental in the decision
to retreat.
The Allied invasion plans had called for the
capture of Carentan, St. Lô, Caen and
Bayeux on the first day, with all the beaches
linked except Utah and Sword (the last
linked with paratroopers) and a front line 10
to 16 kilometres (6.2 to 9.9 mi) from the
beaches; none of these had been achieved.
Casualties had not been as heavy as some
had feared (around 10,000 compared to the
20,000 Churchill had estimated) and the
bridgeheads had withstood the expected
counterattacks.
Cherbourg
In the western part of the lodgement, US
troops were to occupy the Cotentin
Peninsula, especially Cherbourg, which
would provide the Allies with a deep water
harbour. The country behind Utah and
Omaha beaches was characterised by
bocage; ancient banks and hedgerows, up to
3 metres (9.8 ft) thick, spread 100 to 200
metres (330 to 660 ft) apart, both seemingly
being impervious to tanks, gunfire and
vision, thus making ideal defensive positions.
The U.S. infantry made slow progress and
suffered many casualties as they pressed
towards Cherbourg. The airborne troops
were called on several times to restart an
advance. The far side of the peninsula was
reached on 18 June. Hitler prevented
German forces from retreating to the strong
Atlantic Wall fortifications in Cherbourg and
after initially offering stiff resistance, the
Cherbourg commander, Lieutenant General
von Schlieben, capitulated on 26 June.
Before surrendering he had most of the
facilities destroyed, making the harbour
inoperable until the middle of August, by
which time the combat front had moved so
far east that it was less helpful.
Caen
While the Americans headed for Cherbourg,
British forces moved towards the city of
Caen. Believing Caen to be the "crucible" of
the battle, Montgomery made it the target of
a series of attacks. The first was Operation
Perch, which attempted to push south from
Bayeux to Villers-Bocage where the armour
could then head towards the Orne and
envelop Caen but was halted at the Battle of
Villers-Bocage. After a delay owing to the
difficulty of supply because of storms from
17 June until 23 June, a German
counterattack (which was known through
Ultra intelligence) was forestalled by
Operation Epsom. Caen was severely
bombed and then occupied north of the River
Orne in Operation Charnwood from 7 July
until 9 July. An offensive in the Caen area
followed with all three British armoured
divisions, codenamed Operation Goodwood
from 18 July until 21 July that captured the
high ground south of Caen while the
remainder of the city was captured by
Canadian forces during Operation Atlantic. A
further operation, Operation Spring, from 25
July until 28 July, by the Canadians secured
limited gains south of the city at a high cost.
Breakout from the beachhead
An important element of Montgomery's
strategy was to cause the Germans to
commit their reserves to the eastern part of
the theatre to allow an easier breakout from
the west. By the end of Operation Goodwood,
the Germans had committed the last of their
reserve divisions; there were six and a half
Panzer divisions facing the British and
Canadian forces compared to one and a half
facing the United States armies. Operation
Cobra was launched on 25 July by the US
1st Army and was extremely successful with
the advance guard of VIII Corps entering
Coutances at the western end of the Cotentin
Peninsula on 28 July, after a penetration
through the German lines.
On 1 August, VIII Corps became part of
Lieutenant General George S. Patton's newly-
arrived US 3rd Army. On 4 August,
Montgomery altered the invasion plan by
detaching only Corps to occupy Brittany and
hem the German troops there into enclaves
around the ports, while the rest of the Third
Army continued east. The US 1st Army
turned the German front at its western end.
Because of the concentration of German
forces south of Caen, Montgomery moved the
British armour west and launched Operation
Bluecoat from 30 July until 7 August to add
to the pressure from the United States
armies.
FIRESTORM-OVERLORD
Firestorm—Overlord covers the period from
D-Day to D+40, in the British and US
sectors, using the Firestorm system. This
campaign allows you to re-fight Operation
Overlord on a grand scale. While the course
and outcome of the real battles can't be
changed, the outcome of your campaign is
up to you. Either side can win. Even if the
Allies have an advantage in initiative then
they will be hard pressed to break through
the Axis defence.
This campaign can be played in a number of
iterations – on a smaller scale by playing
either the US or British Sectors, or not
including the landings and starting from
D+1.
No matter who wins, the campaign is a great
opportunity to get in plenty of Flames of War
games, play new opponents, win glory for
your army, and perhaps meet new friends
and rewrite history along the way!
Why Play a Campaign?
The short answer is to play more games, and
to have those games mean something in a
bigger context. Rather than just adding to
your tally of wins and losses, your victories
could result in the encirclement of enemy
forces, the capture of key terrain, or the
cutting of the enemy off from their
reinforcements. All of these things happen in
the campaign and they all have a major

effect on the games that follow. Every battle
makes an immediate difference to the
outcome of the whole campaign.
The Overlord Campaign
Firestorm—Overlord uses a map to plot the
strategic situation and show the effects of
your table top games on the battles for
Normandy. All of the important units,
territory, and objectives of the operation are
represented on the map.
Campaign Turns
Firestorm-Overlord has five Campaign
Turns, each turn consisting of a maximum of
14 battles in the overall campaign. Initiative
will initially lay with the Allies, but the
Germans quickly recover and may wrest that
initiative as the campaign progresses.
Flexibility
As with any Firestorm Campaign you are
allowed certain flexibility. Firestorm Overlord
is intended to be fun so if you all agree then
feel free to make small adjustments to fit
your needs. Players use their normal Flames
of War forces to fight battles to capture
areas, reinforced by the main combat units
shown on the campaign map. Firestorm—
Overlord is best suited for standard 1000-
1500 point games, but you certainly can play
whatever points you and your opponent
would like. The aim is to ensure that
Firestorm units are influential at key points.
Small games are generally resolved more
quickly and remember that you add the
Firestorm Troops to this total so the games
are in effect bigger.
Terrain
There are five terrain types in play:
Bocage
Open/Farmlands
Urban
Hills
Woods
The battles took place from (in the British
Sector) the end of the tight Bocage country
with most of the area east of Caen as open
farmland, dotted with small villages and
gentle hills to the US Sector which was
littered with dense bocage country. So some
areas will be Bocage and others more open
plains. Then there are many towns and cities
which will be heavily
damaged with mostly
difficult going and a lot of
cover. In addition to this
then the rivers run on the
borders of areas. If they
should be attacked across
they should form part of
your terrain, usually in the
defenders advantage. In fact there are a
number of other rivers in the area but they
affected the battles to a less extent.
Fortified Cities
Caen
Cherbourg
Defended Cities/Areas US Sector British Sector
Carentan Pegasus Bridge
St Lo Bayeux
Coutances Villers-Bocage
Caumont
La Haye-du-Puits
St Mere Eglise
Valonges
Foret de Cerisy
Gaining Sectors
In Normandy, battlelines were largely static,
and a failed attack rarely ceded ground to
the enemy. In Firestorm Overlord, a sector
may only be gained by launching an attack
(winning the initiative roll). A successful
defence leaves both sectors in the control of
the original side.
Exploitation
Exploitation by both sides is possible, 2 for
the Germans, and 2 for the Allies (1 in each
sector). Exploitation by the Allies costs
supply points equivalent to their allocation to
an Attack.
Note, a unit that made an exploitation move
may not make a Strategic Move. Note that a
Sector captured by an Exploitation move
may not be entered by a Firestorm Unit in
the same turn by Strategic movement.
German Firestorm (FS) Unit
Movement
Allied air superiority severely impacted the
German ability to mover reinforcements, and
prepare for attacks, limiting safe movement
to night only. German FS units may move up
to 3 sectors, providing that all sectors are
already controlled by the Germans. When
moving FS units, German Generals need to
count the number of sectors that they have
directed the unit to move, and then
determine whether or not the unit is
interdicted by Allied air.
If the unit moves more than one sector then
they need to count the total number of
sectors and roll a die:
If the die roll is less than the number of
sectors the unit is returned to the
reinforcement pool
If the die roll is equal to the number of
sectors the unit stops in the first sector
entered; and
If the die roll is greater than the number
of sectors the unit completes its move
safely.
German Firestorm units destroyed whilst
moving are returned to the reinforcement
pool and re-enter at a random reinforcement
point in the next reinforcement phase.
Allied Firestorm (FS) Unit
Movement
Allied Firestorm can move 3 sectors in the
strategic movement phase, provided all of the
sectors are already controlled by the Allies.
Remember units may not use Strategic
Movement to enter a sector gained by
Exploitation on the same turn.
Firestorm Units
The requirement for FS units is extensive for
this campaign – on the campaign map the
numbers indicate an entry to the AO that is
prescribed in some cases; but is also used to
randomise German FS arrival in theatre.
General Points
In addition to the available Firestorm Units
in a Sector there are:
German
Any Defended City – Luftwaffe Heavy
Anti-Aircraft Platoon; either 2 x 8.8cm
FlaK36 (d1-3) or 1 x 8.8cm FlaK36
and 2 x 20mm (d4-6).
Foret de Cerisy – this sector is 100%
bocage – either a FJ Platoon (d1-3) or
a SS Infantry Platoon (d4-6)
Scattered Defender Platoon in any
sector (+1 in the Generals Game)
CAEN and any sector adjacent to
CAEN an 88 Area Defence Platoon (+1
in the Generals Game).
Allied
Beaches – protected by NGFS
(Destroyer) if attacked.
Note whilst the German ‘bonus’ Firestorm
Troops (except for the 88 Area Defence
Platoon) count as one of the two possible
Firestorm Troops allocated to a battle the
Allied NGFS does not.
Initial Deployment of FS Units
(Round 1)
Germans – FS Unit Starting Locations:
Cherbourg – Heer Infantry Platoon
Volonges – Heer Infantry Platoon (deploy
at Utah it the Beach Invasion is lost)
Carentan – FJ Platoon
Caen – Heer Infantry Platoon, Pz IV
Platoon (deploy PzIV at Ranville if British
Airborne Invasion game lost)
Esquay – Heer Infantry Platoon (deploy at
Omaha if Beach invasion is lost)
Bourgebus – Panther Platoon (3 tanks)
Villers Bocage – Heavy Tank Platoon (2 x
Tiger I) Heer Infantry Platoon (deploy Heer
at Sword Beach if the Beach Invasion
game is lost)
Germans – from Round 2:
If the Germans had an overall win in the Invasion Scenario, the Arrival turn is reduced by 1 to a minimum of 1.
All troops are rated Confident Veteran (unless otherwise noted)
Following German Firestorm units required by arrival rounds and entry points):
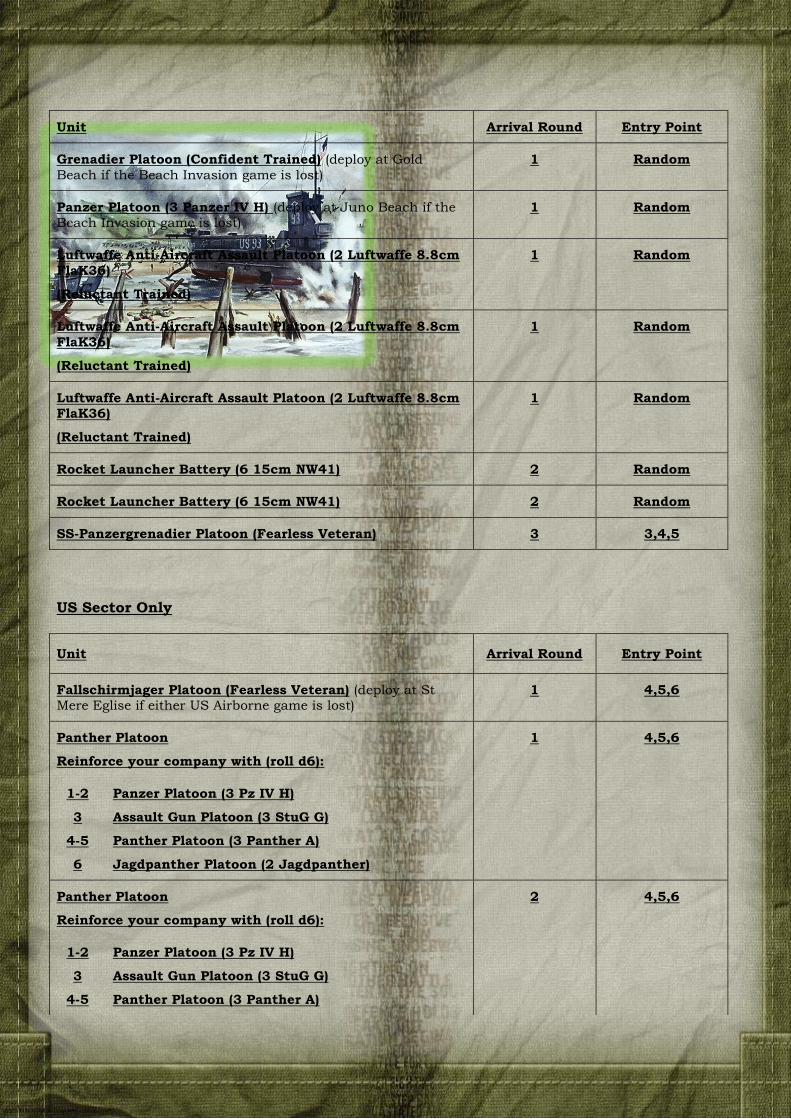
US Sector Only
Unit Arrival Round Entry Point
Grenadier Platoon (Confident Trained) (deploy at Gold
Beach if the Beach Invasion game is lost)
1 Random
Panzer Platoon (3 Panzer IV H) (deploy at Juno Beach if the Beach Invasion game is lost)
1 Random
Luftwaffe Anti-Aircraft Assault Platoon (2 Luftwaffe 8.8cm
FlaK36)
(Reluctant Trained)
1 Random
Luftwaffe Anti-Aircraft Assault Platoon (2 Luftwaffe 8.8cm
FlaK36)
(Reluctant Trained)
1 Random
Luftwaffe Anti-Aircraft Assault Platoon (2 Luftwaffe 8.8cm FlaK36)
(Reluctant Trained)
1 Random
Rocket Launcher Battery (6 15cm NW41) 2 Random
Rocket Launcher Battery (6 15cm NW41) 2 Random
SS-Panzergrenadier Platoon (Fearless Veteran) 3 3,4,5
Unit Arrival Round Entry Point
Fallschirmjager Platoon (Fearless Veteran) (deploy at St Mere Eglise if either US Airborne game is lost)
1 4,5,6
Panther Platoon
Reinforce your company with (roll d6):
1 4,5,6
1-2
3
4-5
6
Panzer Platoon (3 Pz IV H)
Assault Gun Platoon (3 StuG G)
Panther Platoon (3 Panther A)
Jagdpanther Platoon (2 Jagdpanther)
Panther Platoon
Reinforce your company with (roll d6):
2 4,5,6
1-2
3
4-5
Panzer Platoon (3 Pz IV H)
Assault Gun Platoon (3 StuG G)
Panther Platoon (3 Panther A)
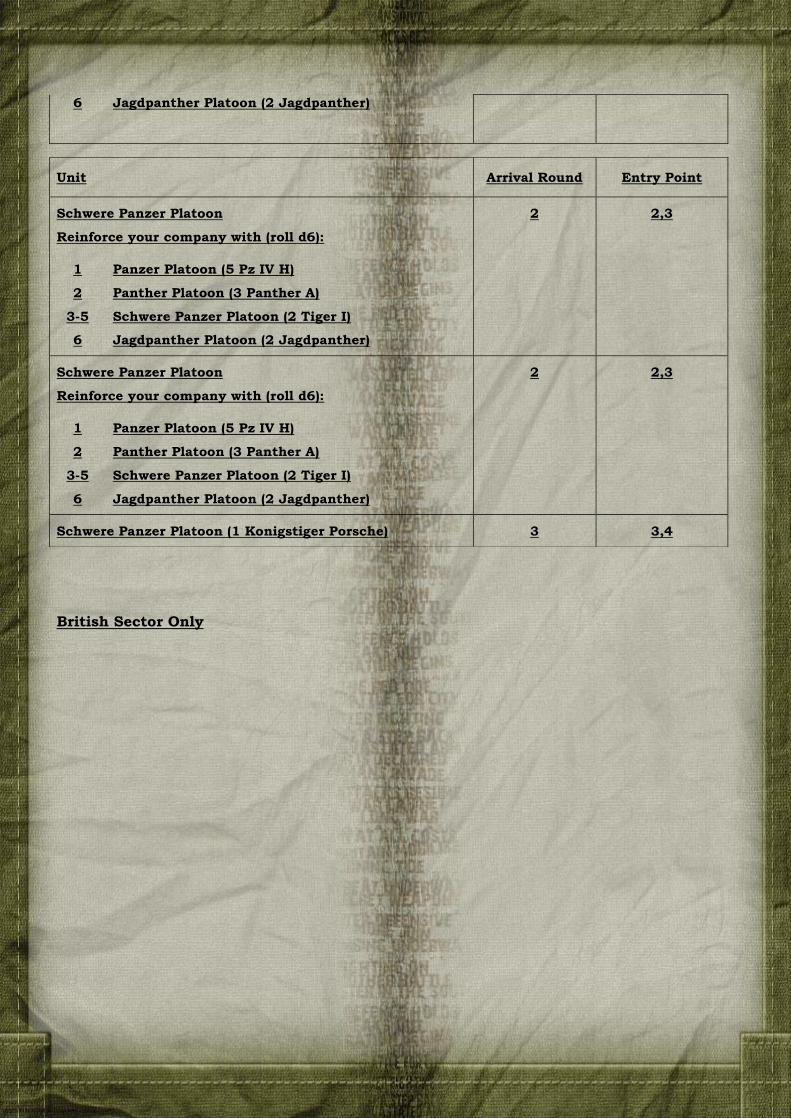
British Sector Only
6 Jagdpanther Platoon (2 Jagdpanther)
Unit Arrival Round Entry Point
Schwere Panzer Platoon
Reinforce your company with (roll d6):
2 2,3
1
2
3-5
6
Panzer Platoon (5 Pz IV H)
Panther Platoon (3 Panther A)
Schwere Panzer Platoon (2 Tiger I)
Jagdpanther Platoon (2 Jagdpanther)
Schwere Panzer Platoon
Reinforce your company with (roll d6):
2 2,3
1
2
3-5
6
Panzer Platoon (5 Pz IV H)
Panther Platoon (3 Panther A)
Schwere Panzer Platoon (2 Tiger I)
Jagdpanther Platoon (2 Jagdpanther)
Schwere Panzer Platoon (1 Konigstiger Porsche) 3 3,4
Scattered Defenders
The Allies encountered a myriad of scattered
units as they advanced through Normandy.
Many of these “units” did little more than
impose delay. Each German controlled sector
on the map (other than towns) is a
These troops may be used only to Defend the
area they are based in, they may not launch
an attack. They count as one of the two
available Firestorm Troops to be committed
to a battle.
In the Generals Game these troops add +1 to
the Defence of a sector, in a Flames of War
battle, roll a die on the Scattered variable
troop table.
Town Defence
Each town was defended by the Germans,
and each town is thus allocated a non-
mobile Firestorm Unit known as a Town
Defence. Primarily these were anti-aircraft
batteries, but occasionally an infantry
platoon was also available.
These troops may be used only to Defend the
town they are based in, they may not launch
an attack. They count as one of the two
available Firestorm Troops to be committed
to a battle.
In the Generals Game these troops add +1 to
the Defence of a town, in a Flames of War
battle, roll a die on the Town Defence
variable troop table.
Area 88mm Defence
Around CAEN, the Germans had a large
number of 88 mm anti-aircraft batteries. As
artillery ammunition became scarce, these
batteries were employed as additional
artillery support for the hard pressed
defenders.
In any sector adjacent to CAEN and CAEN
itself, the Germans may utilise the 88mm
Area Defence as a Firestorm Troop. This
troop may be used in addition to any other
Firestorm units allocated to the Attack or
Defence
In the Generals Game these troops add +1 to
the combat total, in a Flames of War battle,
this Firestorm Troop is represented by a
Single observer, who has a Luftwaffe (RT) 4
gun 88mm battery on available. This battery
does not have a staff team, and the Company
CO or a Higher Command Team may spot for
it as per normal.
Allies – Round 1:
In DZ’s; 2 x US Parachute, 1 x British
Parachute Platoons (US platoons
withdraw from campaign after Round 2),
each with 1 supply point.
Air Support; 2 x Priority Air Support (1
per US and British Sectors) (turn 1 only).
NGS; Light Cruiser x 2 (noting can only
support operations one sector from
coast).
Each Beach
Tank Platoon (3 Tanks); 1 per
beach.
Artillery (4 x 5.5” or 155mm); 1 per
beach.
Infantry Platoons; 2
Tank Hunter Platoon (2 Jagdpanzer IV) 3 2,3
Supply Points – US: 6, British: 4
If the Allies loose an Invasion game at a
Beach, at that Beach they begin the action
off shore and must invade the Beach.
Invading a Beach
If the Allies failed to gain a toehold, then they
may launch an attack from offshore to gain
the Beach sector. Battle arrows for this
attack are placed as per normal. In this
instance, and only in this instance, more
than one attack can be placed in the same
pair of sectors (ie 2+ landing attempts can be
made). If any Attack succeeds then the Allies
gain the beach sector. Every failed Attack
concedes 10 VP to the German Player. Note
that each Allied Attack has a NGFS
(Destroyer) Firestorm Troop in addition to
any other Firestorm Units committed.
Note that once gained the Allies cannot lose
a Beach Sector once it has been gained (they
only surrender VP and risk destruction of
supplies and Mulberry harbours), so that
this can only be a result of a loss prior to the
commencement of the campaign.
Allies – From Round 2 – available
from reinforcement pool for
landing:
Tank Platoons (3 Tanks); 5 US Armour, 5
British Armour
Artillery (4 x 5.5” or 155mm); 2 155mm, 3
x 5.5”
Mechanised Artillery (Sexton or Priests); 3
Sexton; 2 Priests
Infantry Platoons; 5 US Infantry Platoons;
5 British Infantry Platoons
Air Support; 2 x Limited Air Support (1 per
US and British Sectors) no supply cost to
use each round.
Unit
British Armoured Platoon
Reinforce your company with (roll d6):
1-3
4-5
6
Armoured Platoon (2 Sherman V,
Firefly VC)
Tank Platoon (2 Churchill VI,
Churchill IV)
Armoured Recce Platoon (2 Cromwell
IV, Firefly VC) (Reluctant Veteran)
US Armoured Platoon
Reinforce your company with (roll d6):
1-4
5
6
Medium Tank Platoon (3 M4 Sherman)
Medium Tank Platoon (3 M4 Sherman
76mm)
Corps Tank Destroyer Platoon
(Security Section, 4 M10 3” GMC)
US Priest Platoon
Reinforce your company with (roll d6):
1-5
6
Armoured Field Battery (3 Priests)
GMC M12 Battery (2 GMC 155mm)
British Infantry Platoon
Reinforce your company with (roll d6):
1-5
6
British Rifle Platoon
British Commando Platoon
US Infantry Platoon
Reinforce your company with (roll d6):
1-5
6
US Infantry Platoon
US Armoured Infantry Platoon

Warriors
The following warriors are available for the
turns indicated, and in the sector noted. In
a turn when a warrior is available he must
be allocated to a player for use. If the CinC
chooses not to allocate the warrior he is
removed from the campaign, and 5 VP
surrendered to the enemy. (He has returned
home and publicly complained about the
performance of the CinC!).
If the Warrior is Killed-in-Action they are not
available for allocation in future rounds (and
surrenders 5 VP to the enemy).
German Round
Active Allied
Round
Active
Wittman1 2+ Hollis (UK) 1-3
Barkman3 3+ Pine-Coffin (UK)
1+
Von Luck2 1+ Lovatt4 (UK)
1-2
Noak3 3+ Young4 (UK)
1-2
Currie5 (UK)
3+
Trevallen (UK)
2+
Stanley7 (UK)
2+
Turnbull (US)
1-2
Cota (US) 1 only
Pool6 (US) 2+
1 Includes his own Tiger Tank
2 In Kubelwagen or PzIVH
3 includes his own Panther Tank
4 may join any infantry platoon
5 includes a Sherman V
6 includes a Sherman M4A1 or may take over a M4A1(76mm) if one is available
7 includes a 1 section (2 gun) 6pdr platoon if no platoon is available for him to join
Pre-Game Invasion Day Prior to the tournament we are playing an
Invasion Day, the results of this turn 0 will
impact the starting positions of the
Firestorm Units, and the territories
controlled by the Allies.
- For Beaches; should the Germans
win the ‘Hit the Beach’ mission then
Round 1 of the main tournament will
see the Allies having to fight ashore in
a standard FoW battle per the battle
table (ie not another Hit the Beach
Mission). However the Germans will
have a Firestorm Troop from their
pool advanced to defend the beach.
Should the Allies win, forces for that
beach will begin Round 1 of the main
tournament in possession of the
territory associated with each beach
(see the attached map). It is entirely
feasible that some forces will still be
fighting ashore, while others have
consolidated and are postured to
break out. (Note: if we don’t get any
more players to cover Utah Beach,
our assumption will be the US forces
there are ashore and consolidating).
- In the event of battle points that
exceed 4, Allied commanders will
benefit from an extra supply point on
that beach (i.e. a 5-2/6-1 victory will
gain an extra supply point for that
beach).
- For Airborne Attacks; failure to win
the ‘Seize and Hold’ mission will
result in losing control of DZ’s. In the
US sector the Parachute Firestorm
Troop will deploy with no supply. In
the British Sector, if the Merville
Battery (Sword) raid is lost, in turn 1
the British NGFS(Light Cruiser) and
Air will be busy destroying the
battery, and if the Gold Beach ‘Seize
and Hold’ is lost by the Allies then the
British Parachute Firestorm Troop
will deploy with no supply. If the US
players win both Battles the German
Infantry FS at Voluges will be put
into the German Reinforcement Pool.
If the British players win both Battles
a German Firestorm Unit from CAEN
will be put in reserve (1-3 Infantry, 4-
6 PzIV).
Battle Losses
Warriors
Warriors killed in battle are permanently
removed from the game, surrendering 5 VP
to the enemy
Firestorm Troops
At the conclusion of a battle, Firestorm
Troops committed to the action may be
destroyed. Roll a d6 for each Firestorm
Troop and consult the appropriate table to
determine if it is destroyed. Fixed German
Defences (Scattered Defender, Area 88mm
and Town Defences) cannot be destroyed.
Allied Air and NGFS cannot be destroyed.
If a Firestorm Troop fought out of supply, or
cannot withdraw, then it is permanently
destroyed and removed from the game,
awarding the opponent 10 VP.
Non-permanently destroyed Allied Firestorm
Troops are returned to the Allied
Reinforcement Pool and are available for
landing in the Reinforcement phase
For each non-permanently German
Firestorm Units destroyed in action roll a
die, on:
1-3 they are placed in the German
Reinforcement Pool and will reappear at
a random reinforcement point;
4-6 they are permanently destroyed and
removed from the game (no VP penalty).
Supply Supply in the Normandy Campaign was the
great limitation for the allied cause, and was
the reason that 2 Mulberry harbours were
pre-fabricated and established at Normandy,
and the reason that Cherbourg was
considered an important objective to ease
supply problems.
Germans The German troops may draw supply from
any German re-enforcement point on a
continuous road or rail route. Units fighting

out of supply suffer the appropriate
penalties.
Cherbourg is always in Supply, but cannot
act as a supply point for other sectors.
Firestorm units that are destroyed when out
of supply (or cannot retreat) are
permanently destroyed.
Allies The ability to land supplies on the beach
and transport them was the allies Achilles
heel.
Each turn in the supply and reinforcement
phase, the Allied Generals must determine
the amount of supplies and reinforcements
to be landed on each beach or port.
A Beach gains US – 6 or British – 4
supply points per turn
A Mulberry harbour at a beach adds
3 additional supply points
Port of Cherbourg can land 12
supply points per turn
As well as enabling an Attack or Defence, a
supply point can be used to:
Land one Firestorm unit from the
Reinforcement Pool (only at a Beach)
An allied attack may draw supply from any
beach that it can trace a continuous line
through roads.
Supply points are used as follows:
To commit a Firestorm Troop to an
Attack
o 1 point to enable an Infantry
or NGFS (away from a Beach)
to be used on a battle arrow
o 2 points to enable a non-
mechanised artillery firestorm
unit to be used on a battle
arrow
o 3 points to enable a
mechanised or armour
firestorm unit to be used on a
battle arrow
To commit a Firestorm Troop to a
Defence
o 0 points to enable an Infantry
to be used on a battle arrow
o 1 point to enable a non-
mechanised artillery firestorm
or NGFS (away from a Beach)
unit to be used on a battle
arrow
o 2 points to enable a
mechanised or armour
firestorm unit to be used on a
battle arrow
NB NGFS at a Beach (any sector between
the Utah and Sword sectors, inclusive) does
not require the expenditure of Supply
Points. Air allocation never requires the
expenditure of Supply Points.
At the start of the game:
Each drop zone has 1 supply point
per Firestorm unit on it
Each US beach starts with 6 supply
points
Each British Beach starts with 4
supply points
(Pointe-du-Hoc has 2 supply points
and 1 Ranger firestorm unit if used)
Battles on the Beach If a German player wins an attack on an
Allied landing beach, he gains 10 VP, and
every supply point and Firestorm unit on
the beach must be tested for destruction. Eg
if the German wins by 2 points, and there
are 3 Supply Points and 2 Firestorm units
that were not committed to this particular
action, then they are each tested for
destruction on a 6+ (NB this includes FS
units that may be involved in other battles
on the beach)
If there is a Mulberry Harbour on the beach,
this is treated as an additional Firestorm
unit that may be destroyed. If it is destroyed
it is permanently lost (no VP impact).
Airborne Supply There is no airborne resupply in Normandy,
as it was anticipated that by the end of the
D-Day, the ground troops would have joined
up with the Airborne units.
In Turn 1 all Allied airborne units are
assumed to be in supply (1 supply point per
firestorm unit) and may be committed to an
action.
From turn 2 onwards they require supply
traced from a beach head, or are out of
supply.
Victory Points
Certain Sectors are worth Victory Points as
indicated in the following table:
Town Victory Points
Sector
Caen (North) 20 British
Caen (South) 80 British
Ranville (Pegasus Bridge)
40 British
Bayeux 20 British
Villers-Bocage 20 British
St Lo 40 US
Carentan 20 US
St Mere Eglise 20 US
Cherbourg 60 US
Coutances 20 US
Volognes 20 US
For Each Firestorm Troop permanently
destroyed by being out of supply: 10 points
For Each successful German attack on an
Allied Landing Beach: 10 points
For Each successful Allied attack on a
German Reinforcement Point: 10 points
For Each enemy warrior killed: 5 points


Game Charts
Terrain Mission Table – Normandy
(S)ame: same company type e.g. Mech-Mech ; (D)iff.: Different company type e.g. Tank – Infantry
Are
a
Die Roll
1 2 3 4 5 6
Fair Fight Defensive Mission Defensive Mission Mobile Battle
S D S D S D S D S D S D
Open
Dust
Up Encounter
No
Retreat Pincer Pincer No Retreat Break Through
German
General’s
Choice
from:
Dust Up
No
Retreat
Pincer
Fighting
Withdraw
al
Hasty
Attack
Counter
Attack
Break
Through
Allied
General’s
Choice
from:
Dust Up
No
Retreat
Pincer
Fighting
Withdraw
al
Hasty
Attack
Counter
Attack
Break
Through
Hil
ls
Free
for All Encounter Pincer
Hold the
Line No Retreat Counter Attack
Lig
ht
Bocage
Dust Up Fighting Withdrawal Pincer Hold the
Line
Break
Through
Counter
Attack
Heavy
Bocage
Encounter Surrounded No
Retreat
Fighting
Withdrawal
Counter
Attack
Hasty
Attack
Wood
Encounter Pincer No
Retreat
Fighting
Withdrawal
Counter
Attack
Break
Throug
h
Tow
ns
Encounter Pincer Fighting
Withdrawal
No
Retreat
Hold the
Line Hasty Attack
Roll to Destroy Your Victory
Points Roll to Destroy
En FS Unit
6+ 4+
5 5+
3 or 4 6+
2 or less No roll
Out of Supply Table: Die Roll Effect
1 or 2 All platoons
Morale 1 grade down
3 or 4
Reduced 20% (eg 1500 pt
becomes 1200 pt list)
5 No Effect
6 All platoons
Morale 1 grade up
Generals Game Roll to Destroy Difference Roll to
Destroy loosing FS
Roll to Destroy Winning
FS
0 6 6
1 or 2 6 6
3 or 4 5+ No roll
5+ 4+ No roll
Situation Modifiers Situation Modifier
German Defend City
+11
German Defend
Fortified line
+11
Scattered Defenders
+12
88mm Area Defence
+11
Out of Supply -2 1 stack with any Defending unit
2 counts as 1 of two Firestorm Units
German Variable Firestorm Die Roll
Tiger 1 Panther Town Defence Scattered
1 5 x PzIVH 3 x PzIVH Grenadier Pl
(CT) 2x snipers
2 3 PzV A 3 x PzIVH 88mm, 2 x
20mm (RT)
1 x HMG nest, 2 x Minefield
3 2 x PzVI 3 x STUG III 8mm, 2 x
20mm (RT)
Mortar Platoon (CT) 2 sections
4 2 x PzVI 3 PzV A 2 x 88mm (RT) Grenadier
Platoon (2 sec + Pak 40) (CT)
5 2 x PzVI 3 PzV A 2 x 88mm (RT) Grenadier
Platoon (2 sec + Pak 40) (CT)
6
2 x JgdPz V
2 x JgdPz V 2 x 88mm (RT) 2 x StuG G (CT)
Troop and Terrain Modifiers
Firestorm troop type
Terrain Type
Open Light
Bocage
Hvy
Bocage Wood Hill Town
KonigsTiger
Tiger I +4 +3 +3 +2 +3 +3
Panther
Jagdpanther +4 +3 +2 +2 +3 +2
Sherman
Panzer
StuG
+3 +2 +1 +1 +2 +1
Sexton
Priest +2 +2 +1 +2 +2 +3
Paratrooper
SS Infantry
Commando
Fallschirmjager
+1 +2 +3 +3 +3 +3
Infantry
Ranger +1 +2 +2 +2 +2 +2
Scattered Defender +1 +1 +1 +1 +1 +1
88mm Area Defence1 +1 +1 N/A N/A +1 +1
8.8cm gun +2 +2 +2 +2 +2 +2
5.5” gun/155mm Art
Nebelwerfer +2 +2 +1 +2 +2 +2
Typhoon
Thunderbolt +3 +1 N/A +1 +2 N/A
NGFS (Destroyer) 1 +2 +1 +1 +1 +1 N/A
NGFS (Light Cruiser) 1 +3 +2 +1 +2 +3 N/A
1 May be used as a third Firestorm Troop in Attack or Defence
PHASE 1
D-DAY
INVASION!
Mission Overview
The first game in the campaign is designed to set the scene for the Firestorm
OVERLORD campaign. This will involve games being played using ‘Hit the
Beach’ and ‘Seize and Hold’ missions. This game will not count towards game
points in the main tournament although German victory will impact on start
positions for German panzer forces.
Concept of Operations
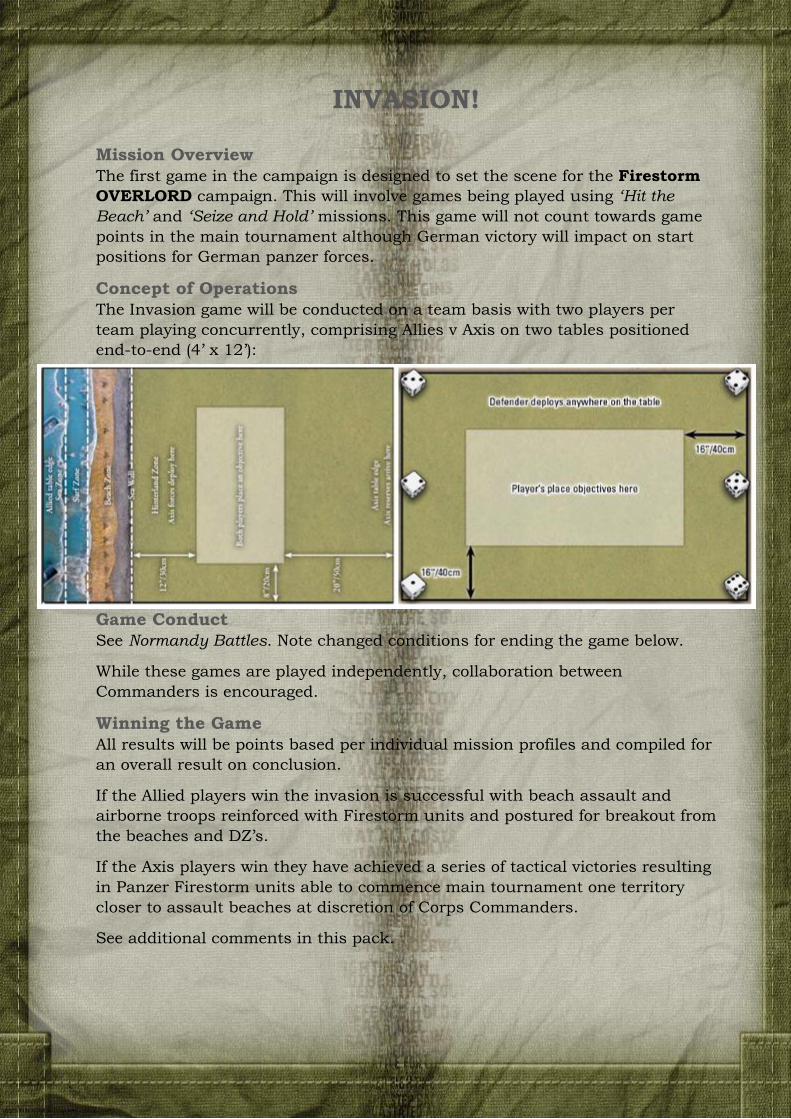
The Invasion game will be conducted on a team basis with two players per
team playing concurrently, comprising Allies v Axis on two tables positioned
end-to-end (4’ x 12’):
Game Conduct
See Normandy Battles. Note changed conditions for ending the game below.
While these games are played independently, collaboration between
Commanders is encouraged.
Winning the Game
All results will be points based per individual mission profiles and compiled for
an overall result on conclusion.
If the Allied players win the invasion is successful with beach assault and
airborne troops reinforced with Firestorm units and postured for breakout from
the beaches and DZ’s.
If the Axis players win they have achieved a series of tactical victories resulting
in Panzer Firestorm units able to commence main tournament one territory
closer to assault beaches at discretion of Corps Commanders.
See additional comments in this pack.
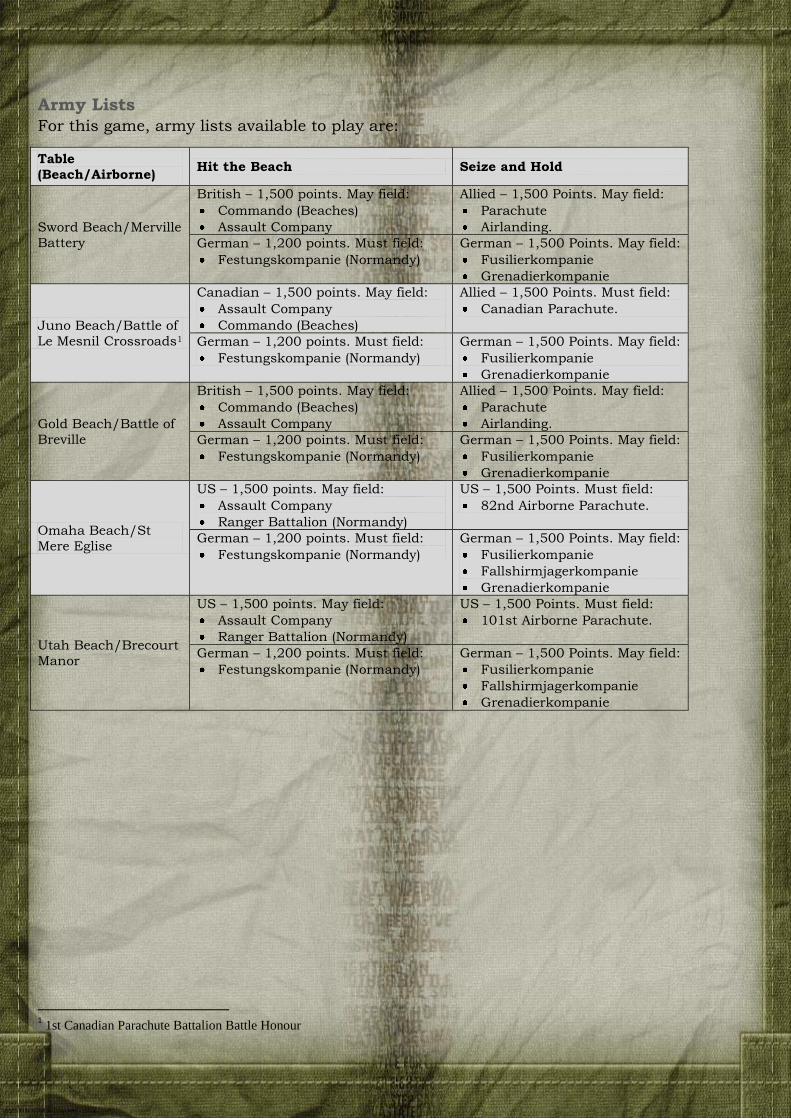
Army Lists
For this game, army lists available to play are:
Table
(Beach/Airborne) Hit the Beach Seize and Hold
Sword Beach/Merville
Battery
British – 1,500 points. May field:
Commando (Beaches)
Assault Company
Allied – 1,500 Points. May field:
Parachute
Airlanding.
German – 1,200 points. Must field:
Festungskompanie (Normandy)
German – 1,500 Points. May field:
Fusilierkompanie
Grenadierkompanie
Juno Beach/Battle of
Le Mesnil Crossroads1
Canadian – 1,500 points. May field:
Assault Company
Commando (Beaches)
Allied – 1,500 Points. Must field:
Canadian Parachute.
German – 1,200 points. Must field:
Festungskompanie (Normandy)
German – 1,500 Points. May field:
Fusilierkompanie
Grenadierkompanie
Gold Beach/Battle of
Breville
British – 1,500 points. May field:
Commando (Beaches)
Assault Company
Allied – 1,500 Points. May field:
Parachute
Airlanding.
German – 1,200 points. Must field:
Festungskompanie (Normandy)
German – 1,500 Points. May field:
Fusilierkompanie
Grenadierkompanie
Omaha Beach/St
Mere Eglise
US – 1,500 points. May field:
Assault Company
Ranger Battalion (Normandy)
US – 1,500 Points. Must field:
82nd Airborne Parachute.
German – 1,200 points. Must field:
Festungskompanie (Normandy)
German – 1,500 Points. May field:
Fusilierkompanie
Fallshirmjagerkompanie
Grenadierkompanie
Utah Beach/Brecourt
Manor
US – 1,500 points. May field:
Assault Company
Ranger Battalion (Normandy)
US – 1,500 Points. Must field:
101st Airborne Parachute.
German – 1,200 points. Must field:
Festungskompanie (Normandy)
German – 1,500 Points. May field:
Fusilierkompanie
Fallshirmjagerkompanie
Grenadierkompanie
1 1st Canadian Parachute Battalion Battle Honour

Notes:
1. Allied Airborne players may only field platoons and batteries with the title Airborne/
Airlanding/ Parachute/ Glider platoon or battery.
2. A British/Canadian Airborne player may not field the Airborne Armoured Recce Squadron,
however, may field 1 x Airborne Armoured Recce platoon equipped with Tetrarchs. This
reflects the limited types of platoons that were able be to airlanded on D-Day.
3. A German player taking a Fallshirmjagerkompanie may not take any SS support choices to
reflect their delayed arrival.

PHASE 2
D+1 to D+40
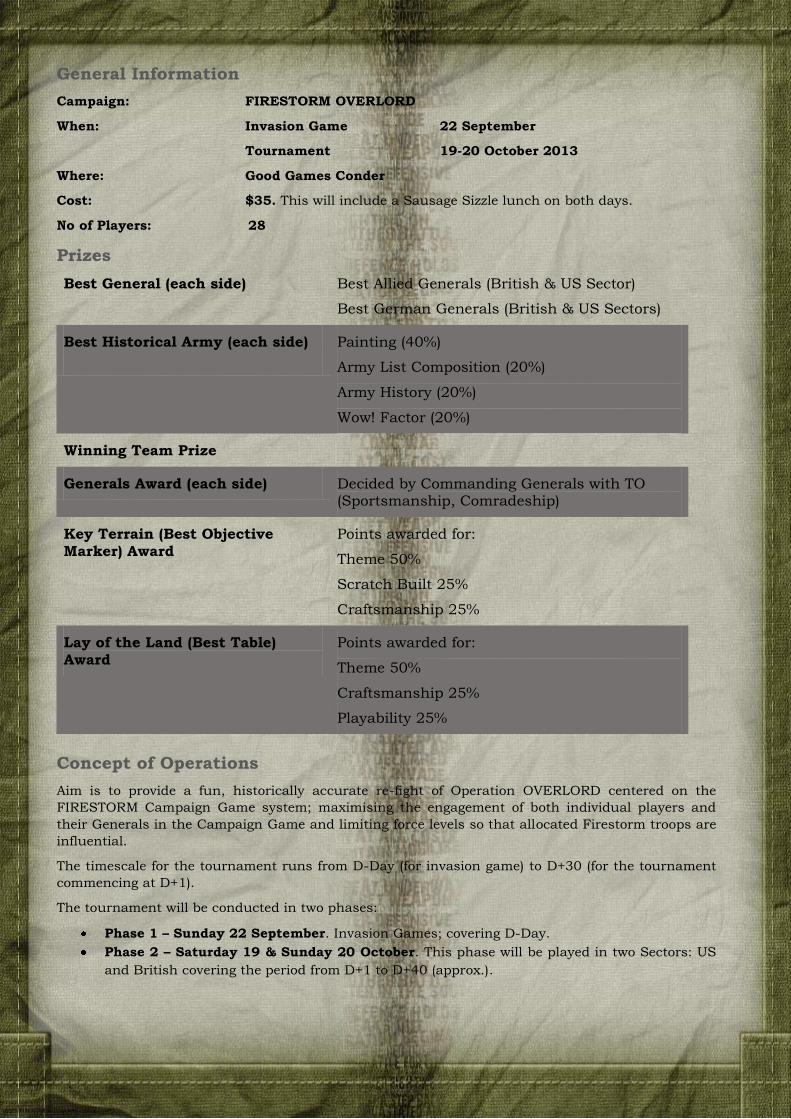
General Information
Campaign: FIRESTORM OVERLORD
When: Invasion Game 22 September
Tournament 19-20 October 2013
Where: Good Games Conder
Cost: $35. This will include a Sausage Sizzle lunch on both days.
No of Players: 28
Prizes
Concept of Operations
Aim is to provide a fun, historically accurate re-fight of Operation OVERLORD centered on the
FIRESTORM Campaign Game system; maximising the engagement of both individual players and
their Generals in the Campaign Game and limiting force levels so that allocated Firestorm troops are
influential.
The timescale for the tournament runs from D-Day (for invasion game) to D+30 (for the tournament
commencing at D+1).
The tournament will be conducted in two phases:
Phase 1 – Sunday 22 September. Invasion Games; covering D-Day.
Phase 2 – Saturday 19 & Sunday 20 October. This phase will be played in two Sectors: US
and British covering the period from D+1 to D+40 (approx.).
Best General (each side) Best Allied Generals (British & US Sector)
Best German Generals (British & US Sectors)
Best Historical Army (each side)
Painting (40%)
Army List Composition (20%)
Army History (20%)
Wow! Factor (20%)
Winning Team Prize
Generals Award (each side) Decided by Commanding Generals with TO (Sportsmanship, Comradeship)
Key Terrain (Best Objective Marker) Award
Points awarded for:
Theme 50%
Scratch Built 25%
Craftsmanship 25%
Lay of the Land (Best Table) Award
Points awarded for:
Theme 50%
Craftsmanship 25%
Playability 25%
Armies
Your Company has to be built from the recently released D-Day compilation or approved and
updated post June 2013 V3 PDF’s (with prior arrangement and noting restriction below).
Following exceptions should be noted:
Naval Gunfire Support (NGS). NGS will only be available as a Firestorm Unit choice.
Attack and Defensive Army Lists. Players are permitted to prepare an attack and defensive
army list; the only proviso is that Combat Platoons are to be the same in all lists.
You will need both a 1,500 pt and 1,200 pt version of your list. The 1,200 pt list will only come into
play if you are Out of Supply and roll the 20% Reduction effect.
References Sources
Army lists are to come from the following sources:
Overlord
Atlantik Wall
Other approved V3 PDF briefings by prior arrangement (in this instance the chosen unit must
have deployed in theatre between D+1 to D+30).
Army Histories
For this tournament, players are asked to provide not more than five PowerPoint slides that
depict:
historical information for your army list
photographs
maps
All slides will be combined and on display in a rolling slideshow for the duration of the tournament.
Firestorm Units & Warriors
Firestorm units will play a key role in the outcome of this campaign. As a result of German troop
dispositions, no Heavy Panzer or Schwere platoons will be allocated to the US Sector.
Warriors will be included as extra Firestorm Units that will be allocated by Corps Commanders.
Warriors must be allocated every round. The loss of a Warrior counts the same as the loss of a
firestorm unit.
Be warned, if they are KIA they will be removed for the remainder of the tournament.
Generals
Corps Commanders (Generals) for the Germans and Allies in each game sector are required.
Following nominations are required:
Allied General (British Sector) – Craig Jones
Allied General (US Sector) – John McGarry
German General (British Sector) – Chris Wood
German General (US Sector) – Scott Cooper
Larry Wood and Ben Staughton has agreed to be Deputy Corps Commanders for the Germans and
Allies respectively. Deputy Commanders will assist with terrain and table arrangements and
assisting their Generals making ‘sound’ war-winning decisions!
Sector Limitations
Certain forces (as far as possible) will be constrained to certain areas of the Board. For example,
Bocage will be a key feature of this campaign and forces in the US sector faced more of this terrain
type than forces in the British sector.
FoW Scenarios
Attacker/Defender choices will be based on the Army Type where that is applicable. However the
specific choice of scenario will reflect the nature of the Board Game at the time. For example, the
opening round will see Allied forces engaged as Attackers (wherever possible) in Defensive Battles. In
game terms on FS turn 1 Allied forces will count as Always Attacks against companies of the same
company type.
Further advice and separate mission briefing will be provided around playing Game 1; which is the
lodgement through playing Hit the Beach and Seize and Hold missions.
In keeping with the pre-arranged nature of the campaign and objectives allocated to the Allied
commanders, consequently Game 2 objectives will be allocated to Allied commanders to allocate to
company commanders. A majority of losses in Game 2 for the Allied team will result in German
commanders gaining access to additional armoured resources (e.g. Hitler has released panzer
formations earlier).
Tweaks
(Note: this section will be refined further through play-testing)
Tweak #1 – Invasion Game (Phase 1)
For purpose of scene setting, the Invasion Game will be played in isolation of main tournament with
following notes:
Hit the Beach Missions: if the Allies win they get one firestorm unit for that beach, if they
lose they start with nil when launching out of that beach (or defending it if the Germans
attack there and try to gain extra points).
Seize and Hold Missions: if the Allies win the German FS units deploy as per plan in that
region, if the Allies then the German armour gets to start closer to the beach (ie the Para’s
didn’t stop them).
Tweak #2 – Deployment (Phase 2)
All players will have 15 minutes to deploy their Army in each game round. At the end of that
deployment period any troops not yet placed will move into Delayed Reserve.
Tweak #3 – Naval Gunfire Support
In addition to any Firestorm Units allocated, all beaches are defended by Naval Gunfire Support. If
the Germans attack the beaches then the Allies may defend with up to two Firestorm Troops and
Naval Gunfire Support (Light Cruiser) which will consume one supply point.

Schedule
This tournament will be played in two phases:
PHASE 1 - D-Day 6 June
SUNDAY (22 Sep)
1000 Set Up
1030 Invasion Game
1230 Lunch
1430 Finish
1500 Phase 2 Briefing
PHASE 2 - D+1 TO D+40
SATURDAY (19 Oct) SUNDAY (20 Oct)
0830 Generals Game & Set-up 0900 Game 4
0900 Game 1 1130 Generals Game
1130 Generals Game Lunch
Lunch 1230 Game 5
1200 Game 2 1500 Generals Game
1430 Generals Game 1530 Prizes
1500 Game 3
1730 Generals Game

NOTES
Top Related