


Languages
Pages
Legal

E L E C T R O N I C
I N V O I C I N G AT
Z AL A N D O
2 0 1 8 - 1 2 - 0 3
I N V O I C E
2
1. Zalando Electronic Procurement : Zupply & Invoicing (p.3)
7. Contact Information
3. Register on the Coupa Supplier Portal (p.5-17)
4. Creating an Invoice in CSP (p.18-25)
5. Creating a Credit Note in CSP (p. 26-32)
T A B L E O F C O N T E N T S
6. Creating an Invoice with SAN (p. 33-41)
2. Ways of Electronic Invoicing (p.4)
3
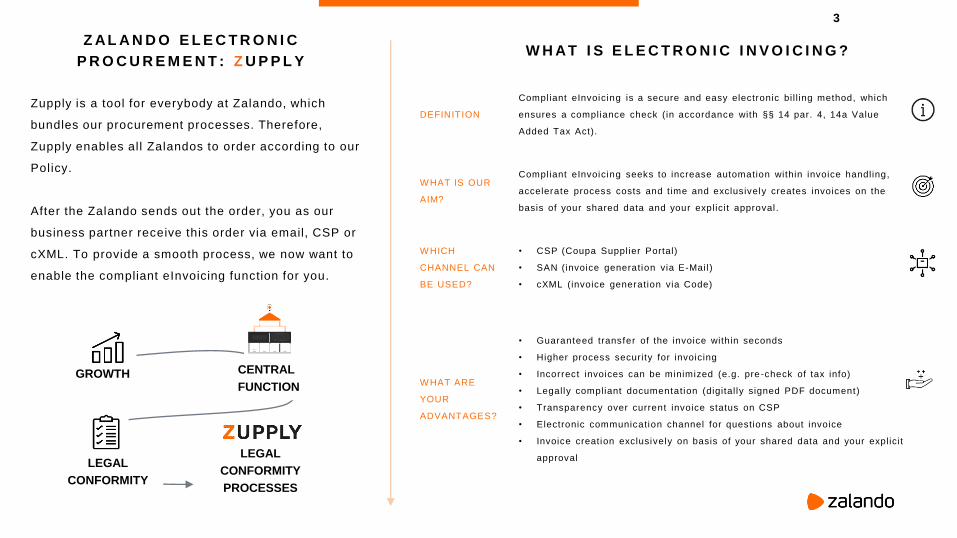
Zupply is a tool for everybody at Zalando, which
bundles our procurement processes. Therefore,
Zupply enables all Zalandos to order according to our
Policy.
After the Zalando sends out the order, you as our
business partner receive this order via email, CSP or
cXML. To provide a smooth process, we now want to
enable the compliant eInvoicing function for you.
GROWTH
LEGAL
CONFORMITY
LEGAL
CONFORMITY
PROCESSES
CENTRAL
FUNCTION
DEFINITION
Compliant eInvoicing is a secure and easy electronic bi l l ing method, which
ensures a compliance check (in accordance with §§ 14 par. 4, 14a Value
Added Tax Act).
W HAT IS OUR
AIM?
Compliant eInvoicing seeks to increase automation within invoice handling,
accelerate process costs and time and exclusively creates invoices on the
basis of your shared data and your explicit approval .
W HICH
CHANNEL CAN
BE USED?
• CSP (Coupa Supplier Portal)
• SAN (invoice generation via E-Mail )
• cXML (invoice generation via Code)
W HAT ARE
YOUR
ADVANTAGES?
• Guaranteed transfer of the invoice within seconds
• Higher process security for invoicing
• Incorrect invoices can be minimized (e.g. pre -check of tax info)
• Legally compliant documentation (digital ly signed PDF document)
• Transparency over current invoice status on CSP
• Electronic communication channel for questions about invoice
• Invoice creation exclusively on basis of your shared data and your explicit
approval
W H AT I S E L E C T R O N I C I N V O I C I N G ?Z AL A N D O E L E C T R O N I C
P R O C U R E M E N T : Z U P P L Y
4
S U P P L I E R
1 ) C o u p a S u p p l i e r
P o r t a l ( C S P )
2 ) S u p p l i e r
A c t i o n a b l e
N o t i f i c a t i o n
( S A N )
3 ) c XML
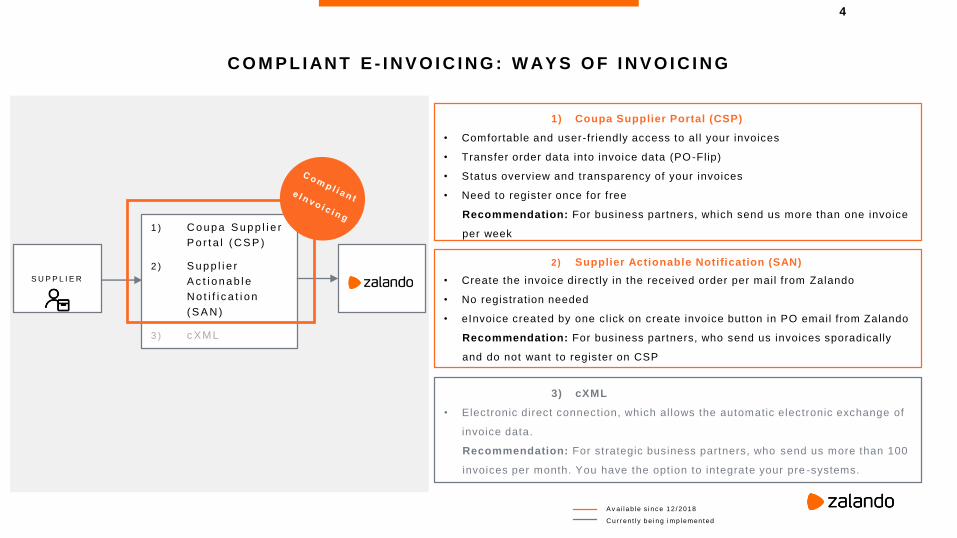
C O M P L I AN T E - I N V O I C I N G : W AY S O F I N V O I C I N G
A v ai l ab le s i nc e 12 / 2018
Cur r ent l y be i ng i m p lemen ted
1) Coupa Supplier Portal (CSP)
• Comfortable and user-fr iendly access to al l your invoices
• Transfer order data into invoice data (PO-Flip)
• Status overview and transparency of your invoices
• Need to register once for free
Recommendation: For business partners, which send us more than one invoice
per week
2) Supplier Actionable Notification (SAN)
• Create the invoice directly in the received order per mail f rom Zalando
• No registration needed
• eInvoice created by one cl ick on create invoice button in PO email f rom Zalando
Recommendation: For business partners, who send us invoices sporadically
and do not want to register on CSP
3) cXML
• Electronic direct connect ion, which al lows the automatic electronic exchange of
invoice data.
Recommendation: For strategic business partners, who send us more than 100
invoices per month. You have the opt ion to integrate your pre -systems.
5
R E G I S T E R O N T H E C O U P A S U P P L I E R P O R T AL
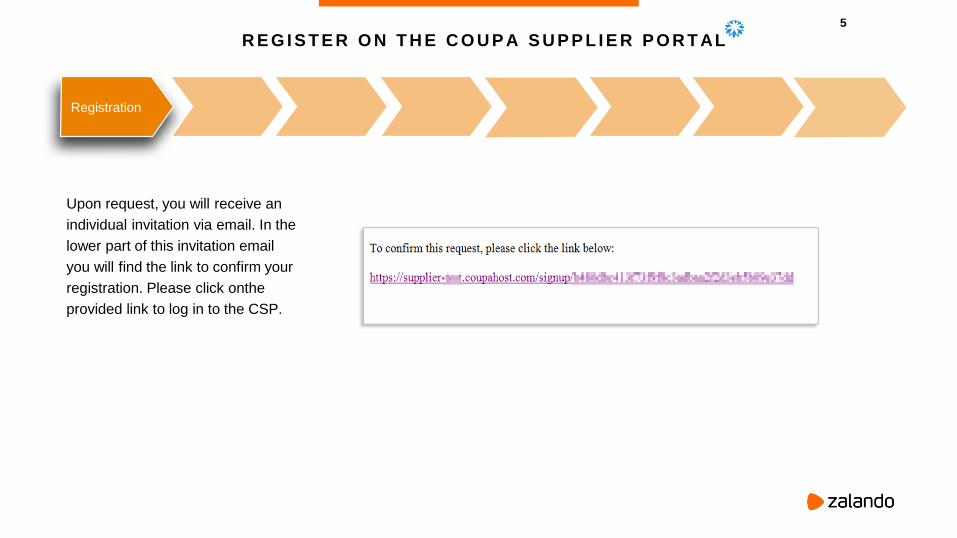
Upon request, you will receive an
individual invitation via email. In the
lower part of this invitation email
you will find the link to confirm your
registration. Please click onthe
provided link to log in to the CSP.
Registration
6
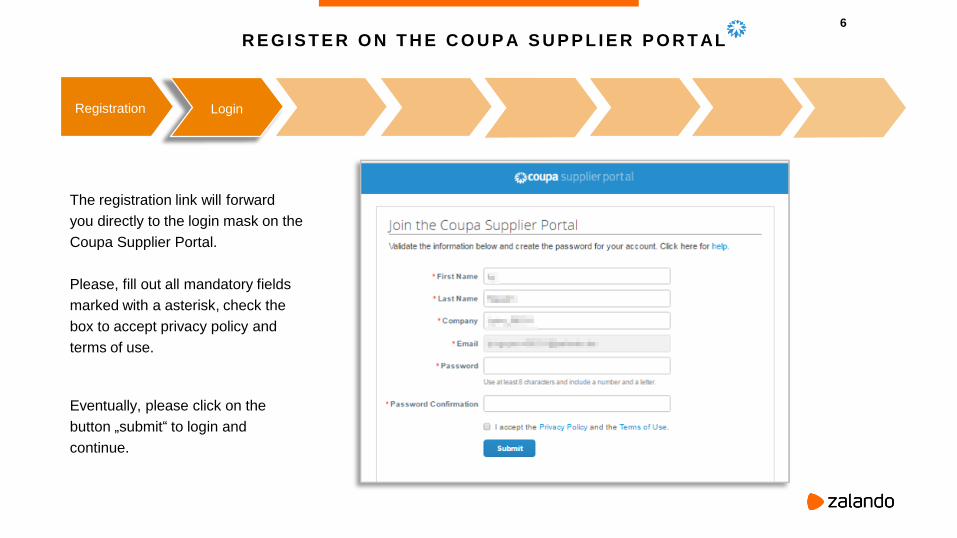
The registration link will forward
you directly to the login mask on the
Coupa Supplier Portal.
Please, fill out all mandatory fields
marked with a asterisk, check the
box to accept privacy policy and
terms of use.
Eventually, please click on the
button „submit“ to login and
continue.
Registration Login
R E G I S T E R O N T H E C O U P A S U P P L I E R P O R T AL
7
R E G I S T E R O N T H E C O U P A S U P P L I E R P O R T AL
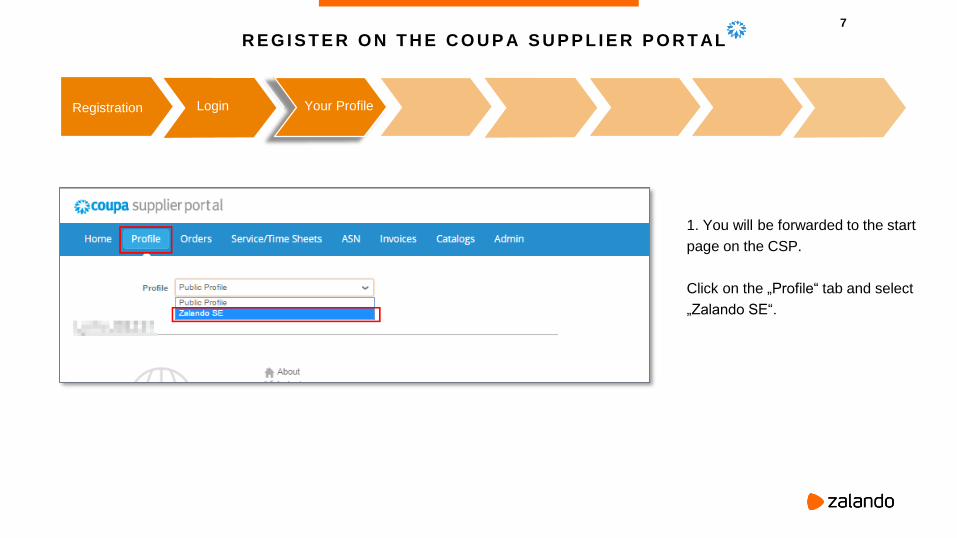
1. You will be forwarded to the start
page on the CSP.
Click on the „Profile“ tab and select
„Zalando SE“.
Registration Login Your Profile
8
R E G I S T E R O N T H E C O U P A S U P P L I E R P O R T AL
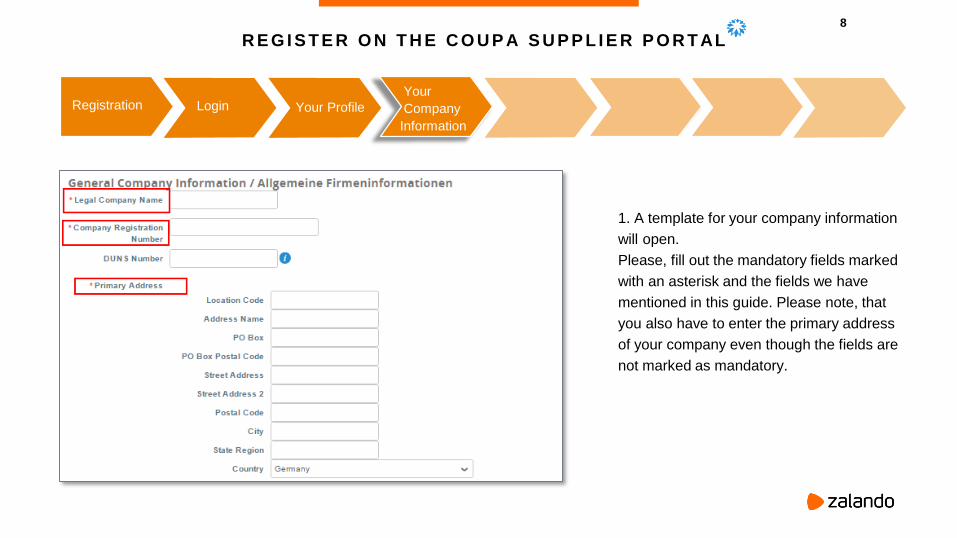
1. A template for your company information
will open.
Please, fill out the mandatory fields marked
with an asterisk and the fields we have
mentioned in this guide. Please note, that
you also have to enter the primary address
of your company even though the fields are
not marked as mandatory.
Registration Login Your Profile
Your
Company
Information
9
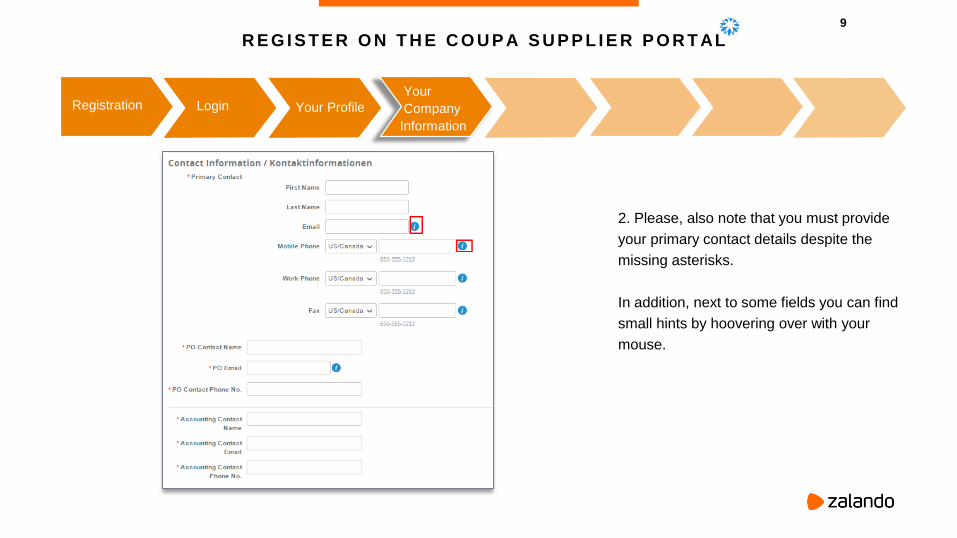
R E G I S T E R O N T H E C O U P A S U P P L I E R P O R T AL
2. Please, also note that you must provide
your primary contact details despite the
missing asterisks.
In addition, next to some fields you can find
small hints by hoovering over with your
mouse.
Registration Login Your Profile
Your
Company
Information
10
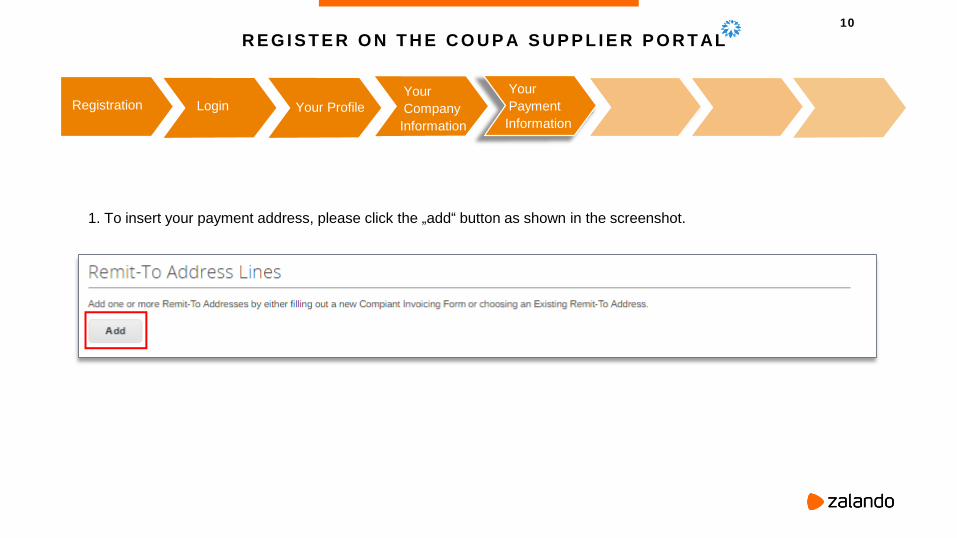
R E G I S T E R O N T H E C O U P A S U P P L I E R P O R T AL
1. To insert your payment address, please click the „add“ button as shown in the screenshot.
Registration Login Your Profile
Your
Company
Information
Your
Payment
Information
11
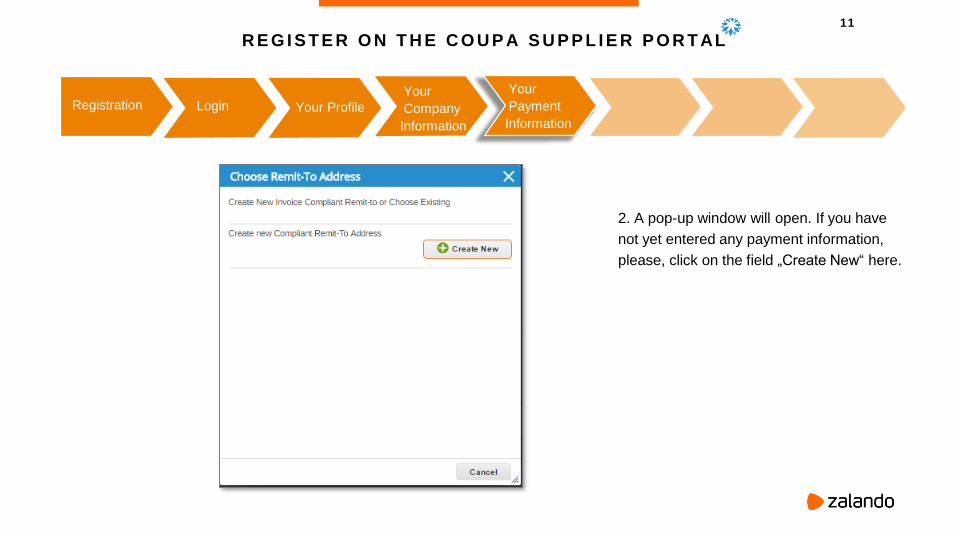
R E G I S T E R O N T H E C O U P A S U P P L I E R P O R T AL
2. A pop-up window will open. If you have
not yet entered any payment information,
please, click on the field „Create New“ here.
Registration Login Your Profile
Your
Company
Information
Your
Payment
Information
12
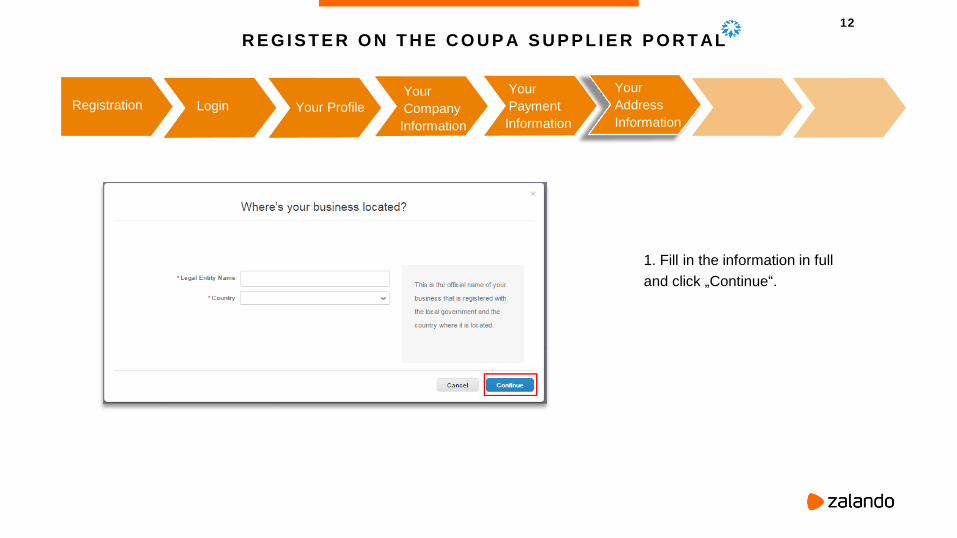
R E G I S T E R O N T H E C O U P A S U P P L I E R P O R T AL
1. Fill in the information in full
and click „Continue“.
Registration Login Your Profile
Your
Company
Information
Your
Payment
Information
Your
Address
Information
13
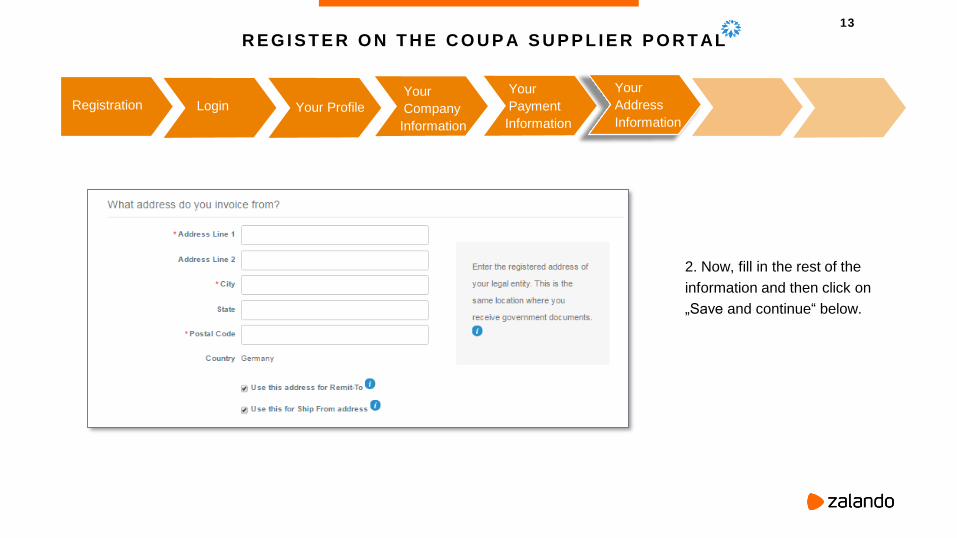
R E G I S T E R O N T H E C O U P A S U P P L I E R P O R T AL
2. Now, fill in the rest of the
information and then click on
„Save and continue“ below.
Registration Login Your Profile
Your
Company
Information
Your
Payment
Information
Your
Address
Information
14
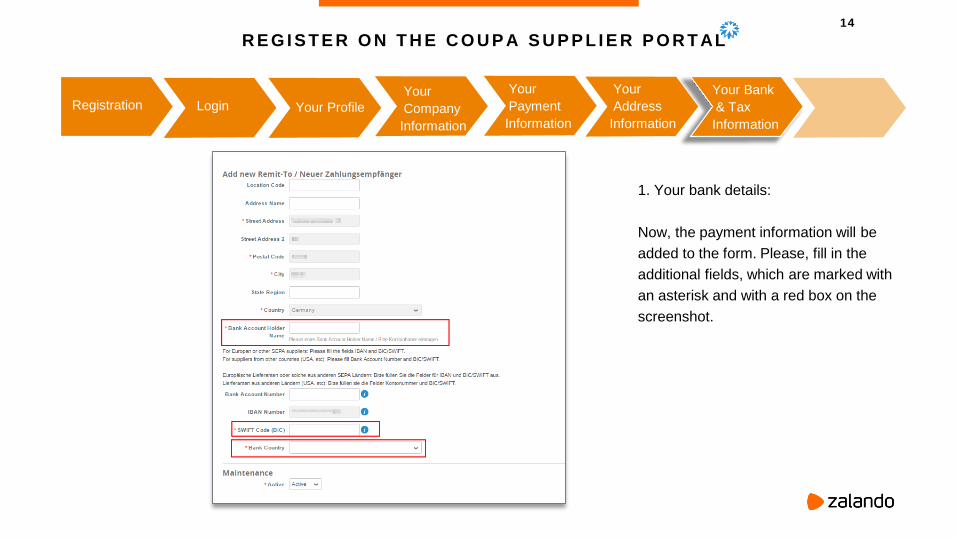
R E G I S T E R O N T H E C O U P A S U P P L I E R P O R T AL
1. Your bank details:
Now, the payment information will be
added to the form. Please, fill in the
additional fields, which are marked with
an asterisk and with a red box on the
screenshot.
Registration Login Your Profile
Your
Company
Information
Your
Payment
Information
Your Bank
& Tax
Information
Your
Address
Information
15
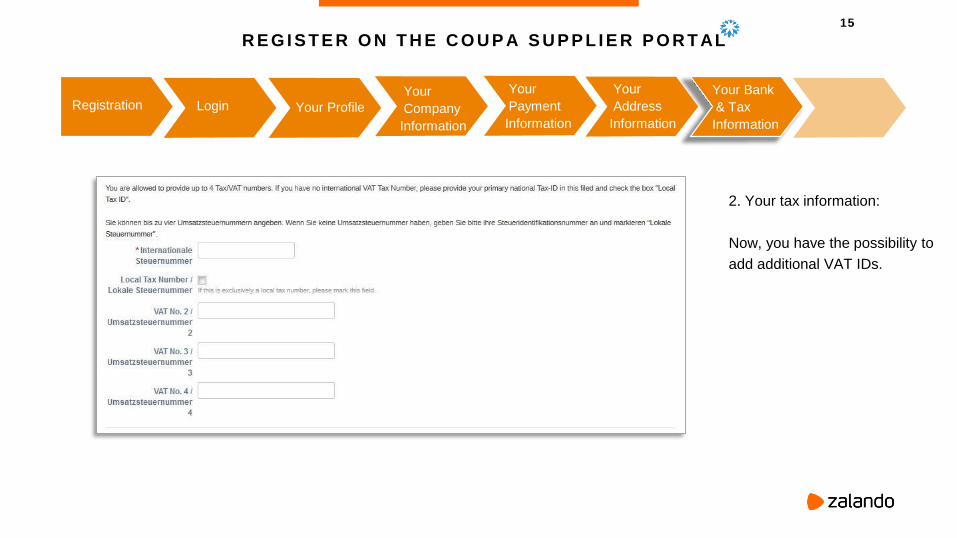
R E G I S T E R O N T H E C O U P A S U P P L I E R P O R T AL
2. Your tax information:
Now, you have the possibility to
add additional VAT IDs.
Registration Login Your Profile
Your
Company
Information
Your
Payment
Information
Your Bank
& Tax
Information
Your
Address
Information
16
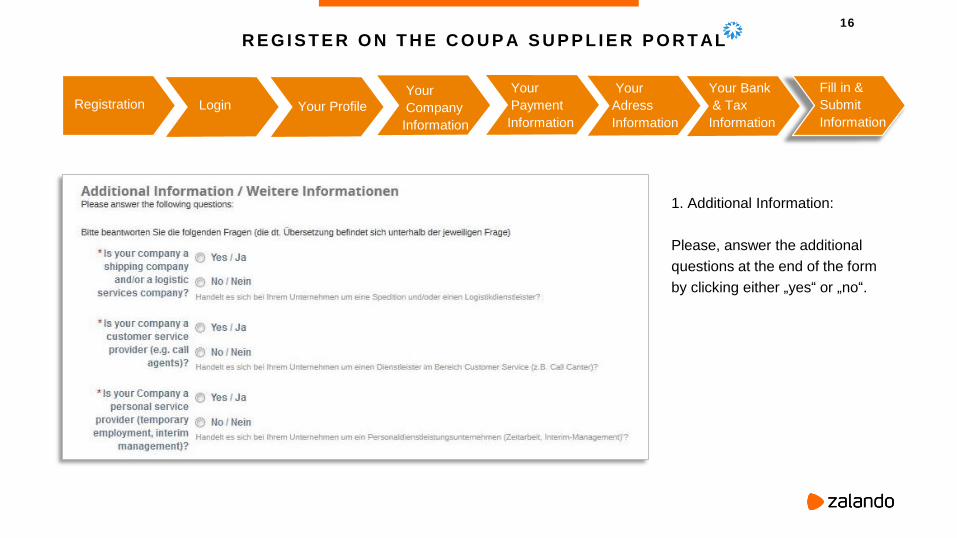
R E G I S T E R O N T H E C O U P A S U P P L I E R P O R T AL
1. Additional Information:
Please, answer the additional
questions at the end of the form
by clicking either „yes“ or „no“.
Registration Login Your Profile
Your
Company
Information
Your
Payment
Information
Fill in &
Submit
Information
Your Bank
& Tax
Information
Your
Adress
Information
17
R E G I S T E R AT T H E C O U P A S U P P L I E R P O R T AL
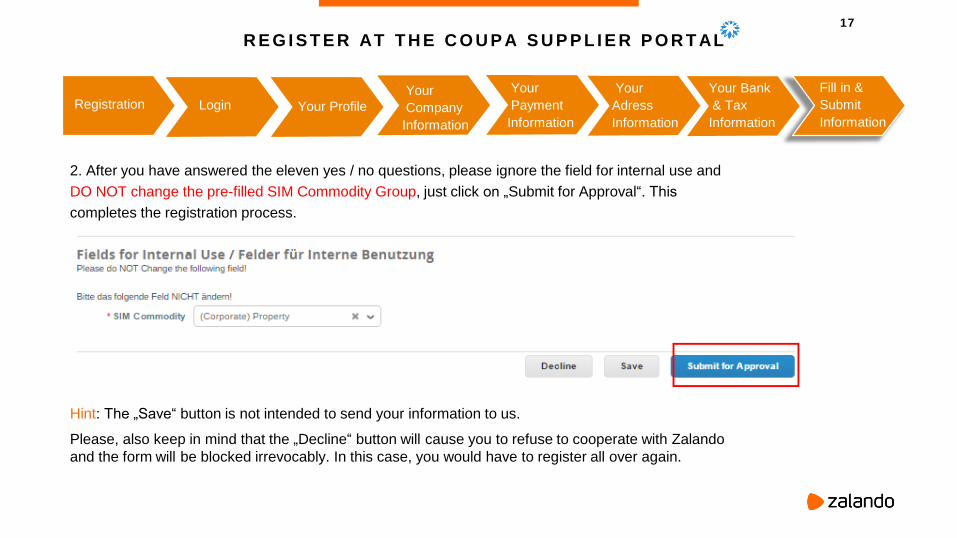
2. After you have answered the eleven yes / no questions, please ignore the field for internal use and
DO NOT change the pre-filled SIM Commodity Group, just click on „Submit for Approval“. This
completes the registration process.
Hint: The „Save“ button is not intended to send your information to us.
Please, also keep in mind that the „Decline“ button will cause you to refuse to cooperate with Zalando
and the form will be blocked irrevocably. In this case, you would have to register all over again.
Registration Login Your Profile
Your
Company
Information
Your
Payment
Information
Fill in &
Submit
Information
Your Bank
& Tax
Information
Your
Adress
Information
18
C R E AT I N G AN I N V O I C E I N T H E C O U P A S U P P L I E R P O R T AL
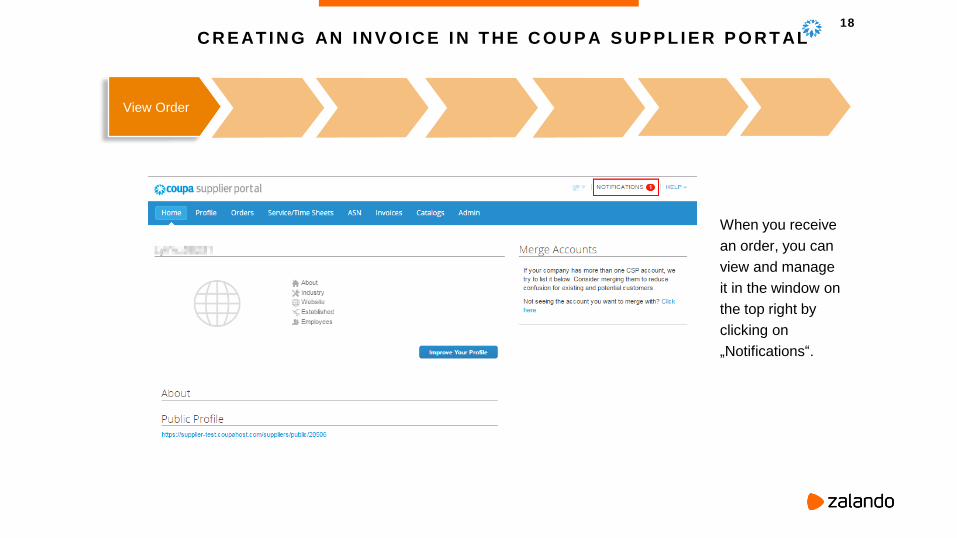
When you receive
an order, you can
view and manage
it in the window on
the top right by
clicking on
„Notifications“.
View Order
19
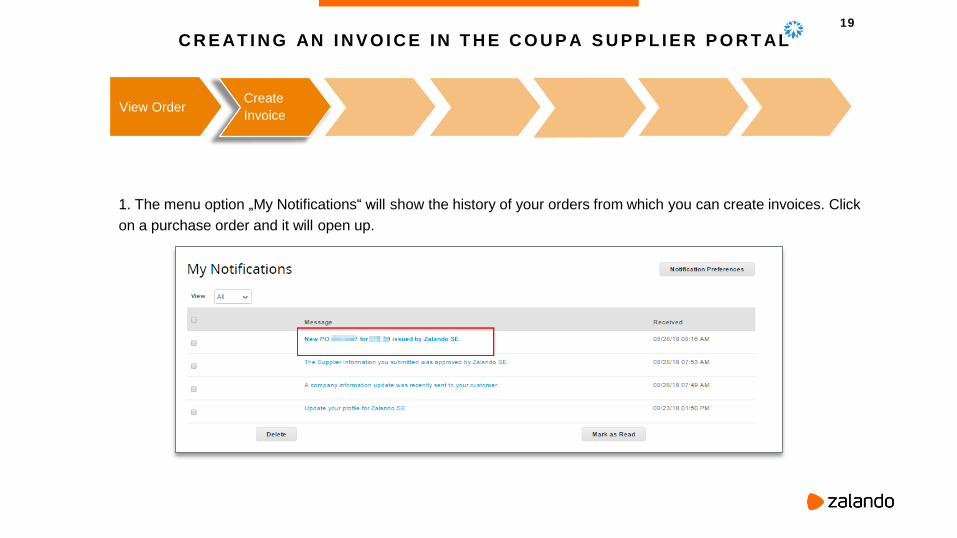
1. The menu option „My Notifications“ will show the history of your orders from which you can create invoices. Click
on a purchase order and it will open up.
C R E AT I N G AN I N V O I C E I N T H E C O U P A S U P P L I E R P O R T AL
View OrderCreate
Invoice
20
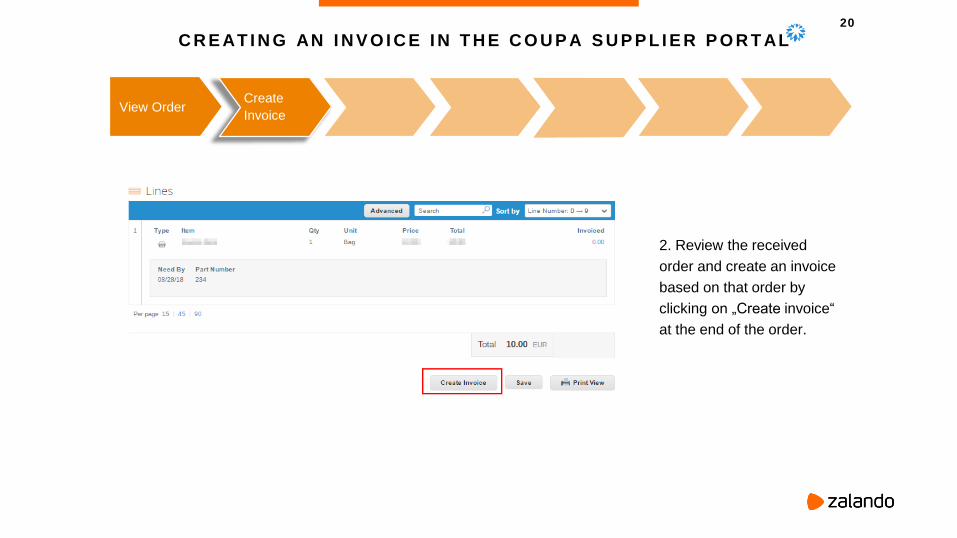
2. Review the received
order and create an invoice
based on that order by
clicking on „Create invoice“
at the end of the order.
C R E AT I N G AN I N V O I C E I N T H E C O U P A S U P P L I E R P O R T AL
View OrderCreate
Invoice
21
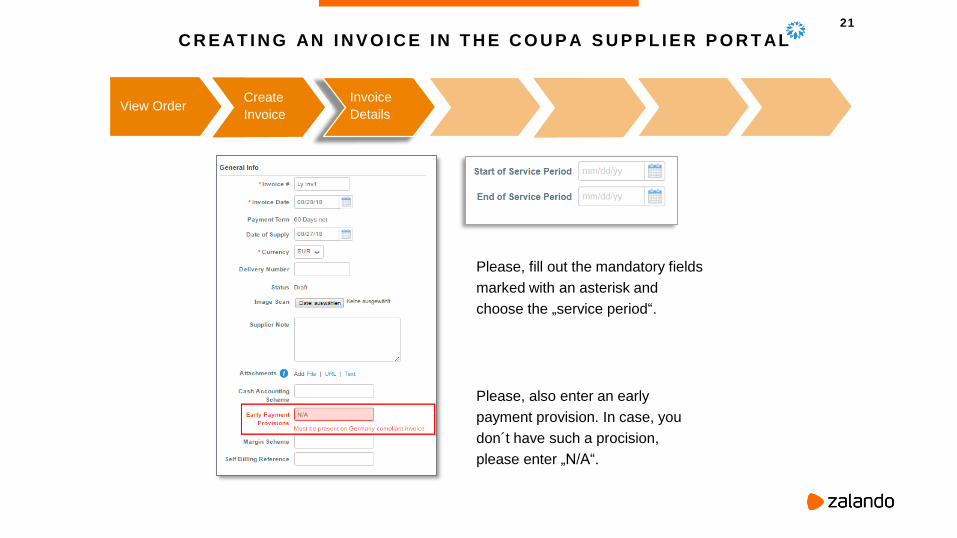
Please, fill out the mandatory fields
marked with an asterisk and
choose the „service period“.
Please, also enter an early
payment provision. In case, you
don´t have such a procision,
please enter „N/A“.
View OrderCreate
Invoice
C R E AT I N G AN I N V O I C E I N T H E C O U P A S U P P L I E R P O R T AL
Invoice
Details
22
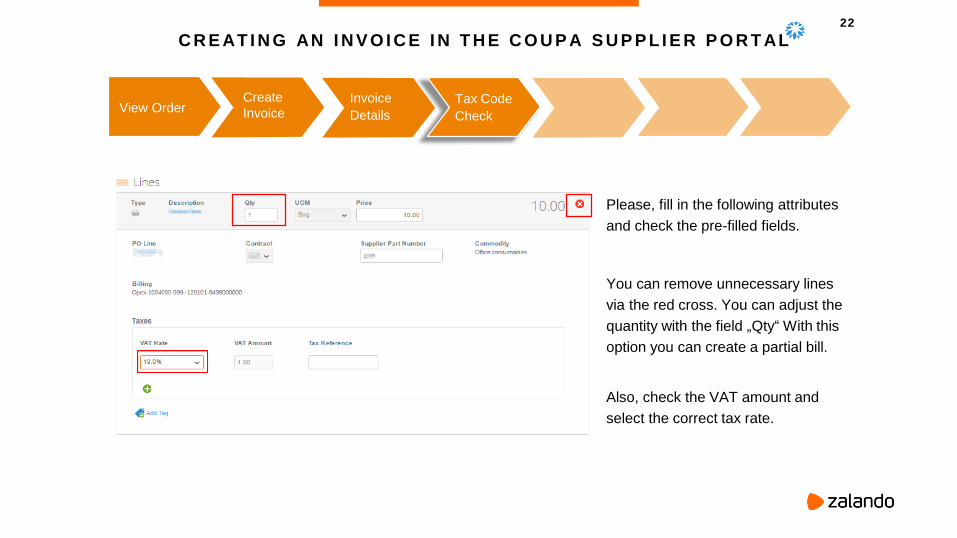
Please, fill in the following attributes
and check the pre-filled fields.
You can remove unnecessary lines
via the red cross. You can adjust the
quantity with the field „Qty“ With this
option you can create a partial bill.
Also, check the VAT amount and
select the correct tax rate.
View OrderCreate
Invoice
C R E AT I N G AN I N V O I C E I N T H E C O U P A S U P P L I E R P O R T AL
Invoice
Details
Tax Code
Check
23
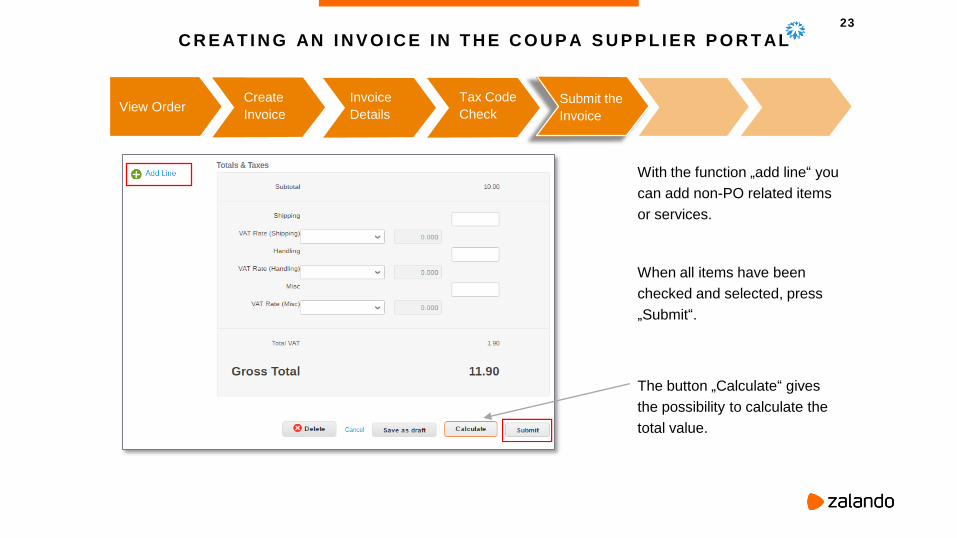
With the function „add line“ you
can add non-PO related items
or services.
When all items have been
checked and selected, press
„Submit“.
The button „Calculate“ gives
the possibility to calculate the
total value.
View OrderCreate
Invoice
C R E AT I N G AN I N V O I C E I N T H E C O U P A S U P P L I E R P O R T AL
Invoice
Details
Tax Code
Check
Submit the
Invoice
24
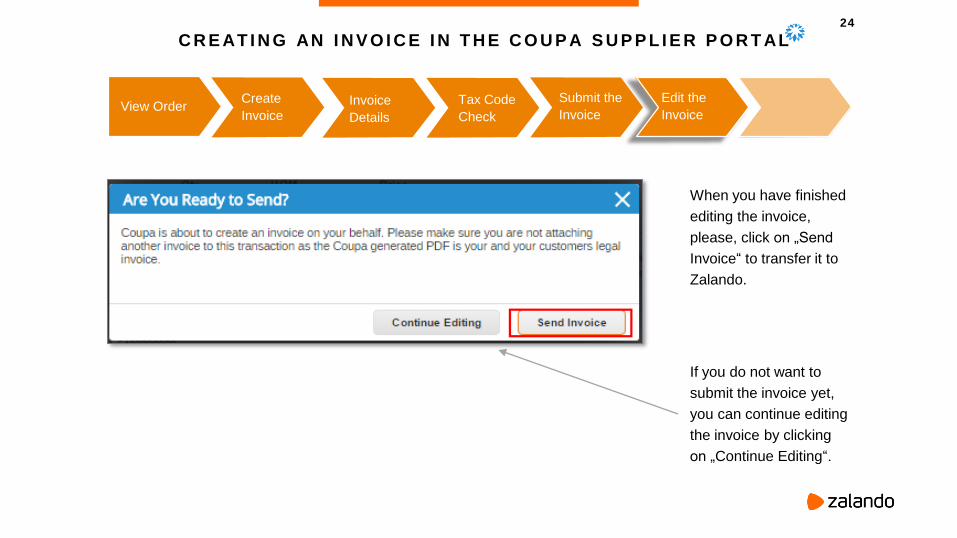
When you have finished
editing the invoice,
please, click on „Send
Invoice“ to transfer it to
Zalando.
If you do not want to
submit the invoice yet,
you can continue editing
the invoice by clicking
on „Continue Editing“.
View OrderCreate
Invoice
C R E AT I N G AN I N V O I C E I N T H E C O U P A S U P P L I E R P O R T AL
Invoice
Details
Tax Code
Check
Submit the
Invoice
Edit the
Invoice
25
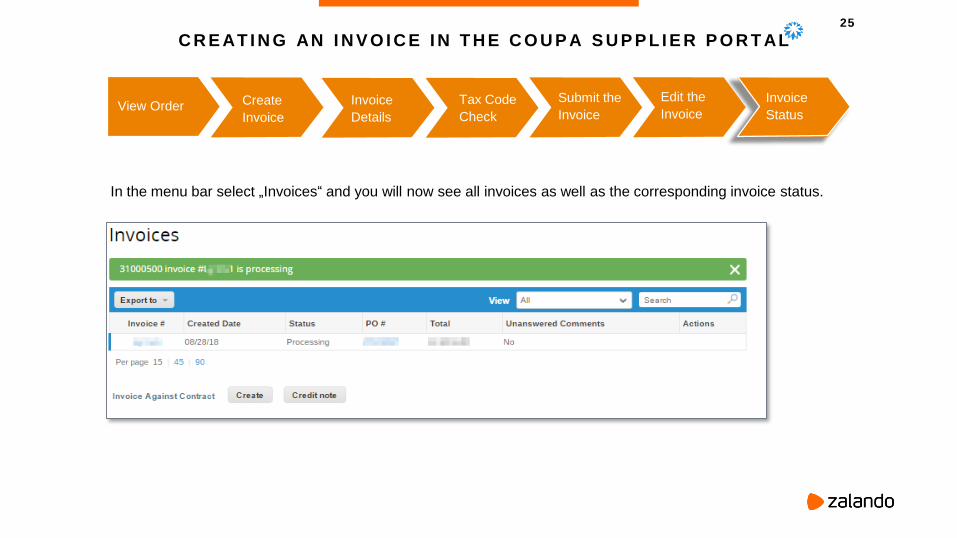
In the menu bar select „Invoices“ and you will now see all invoices as well as the corresponding invoice status.
View Order Create
Invoice
C R E AT I N G AN I N V O I C E I N T H E C O U P A S U P P L I E R P O R T AL
Invoice
Details
Tax Code
Check
Submit the
Invoice
Edit the
Invoice
Invoice
Status

26
C R E AT I N G A C R E D I T N O T E I N T H E C O U P A S U P P L I E R P O R T AL
In the CSP, go to the
menu bar and select
„Invoices“. Here, you
can see the status of
the individual invoices
as well as the „Credit
note“ button.
Invoice
Overview
27
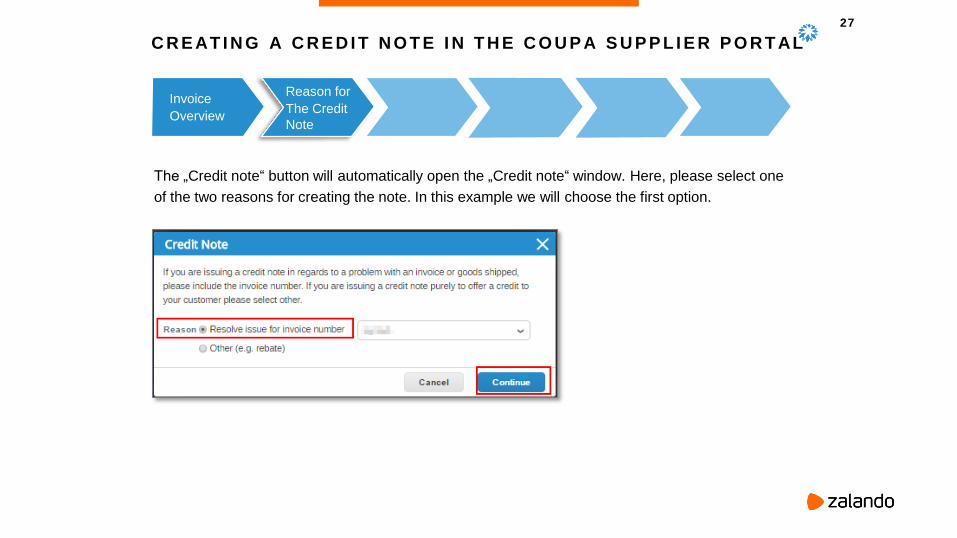
The „Credit note“ button will automatically open the „Credit note“ window. Here, please select one
of the two reasons for creating the note. In this example we will choose the first option.
Invoice
Overview
Reason for
The Credit
Note
C R E AT I N G A C R E D I T N O T E I N T H E C O U P A S U P P L I E R P O R T AL
28
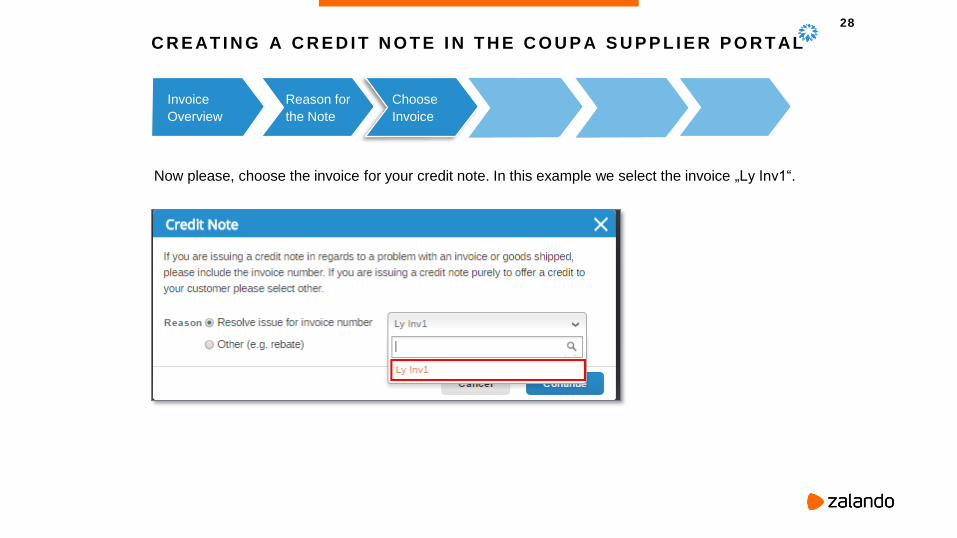
Now please, choose the invoice for your credit note. In this example we select the invoice „Ly Inv1“.
Invoice
Overview
Reason for
the Note
Choose
Invoice
C R E AT I N G A C R E D I T N O T E I N T H E C O U P A S U P P L I E R P O R T AL
29
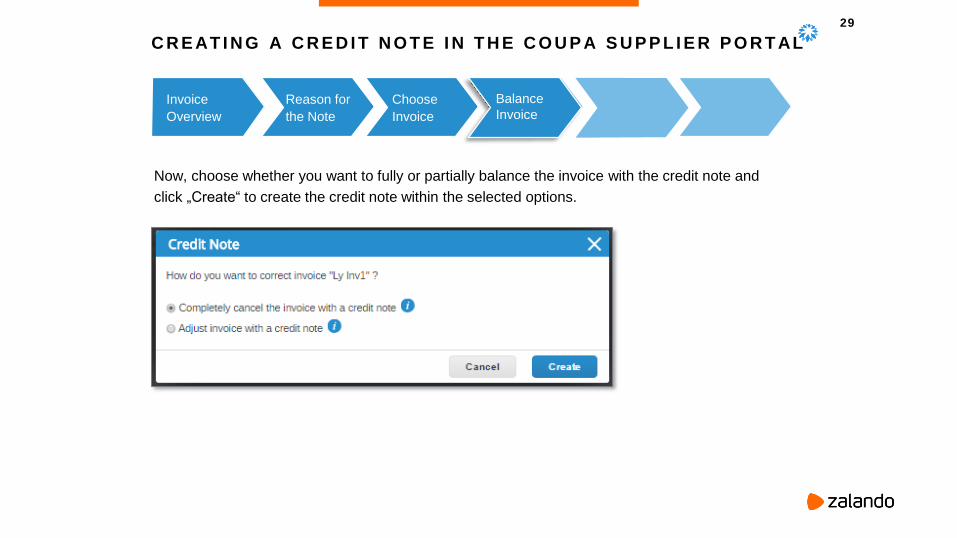
Now, choose whether you want to fully or partially balance the invoice with the credit note and
click „Create“ to create the credit note within the selected options.
Invoice
Overview
Reason for
the Note
Choose
Invoice
Balance
Invoice
C R E AT I N G A C R E D I T N O T E I N T H E C O U P A S U P P L I E R P O R T AL
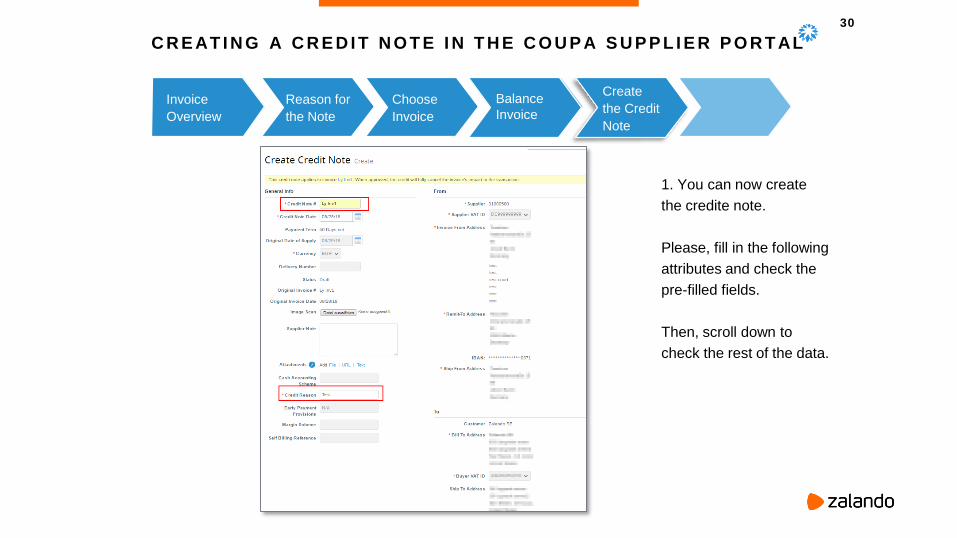
30
1. You can now create
the credite note.
Please, fill in the following
attributes and check the
pre-filled fields.
Then, scroll down to
check the rest of the data.
Invoice
Overview
Reason for
the Note
Choose
Invoice
Balance
Invoice
Create
the Credit
Note
C R E AT I N G A C R E D I T N O T E I N T H E C O U P A S U P P L I E R P O R T AL
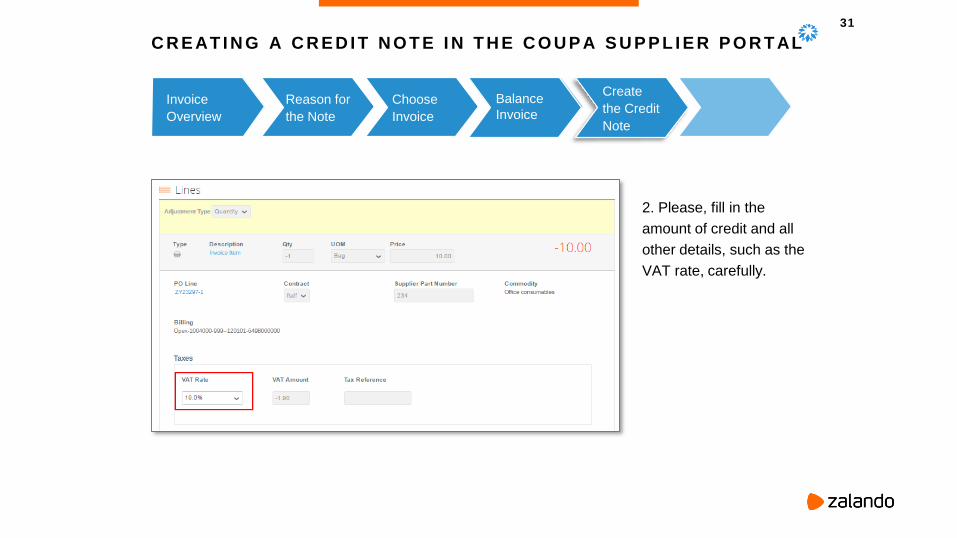
31
2. Please, fill in the
amount of credit and all
other details, such as the
VAT rate, carefully.
Invoice
Overview
Reason for
the Note
Choose
Invoice
Balance
Invoice
Create
the Credit
Note
C R E AT I N G A C R E D I T N O T E I N T H E C O U P A S U P P L I E R P O R T AL
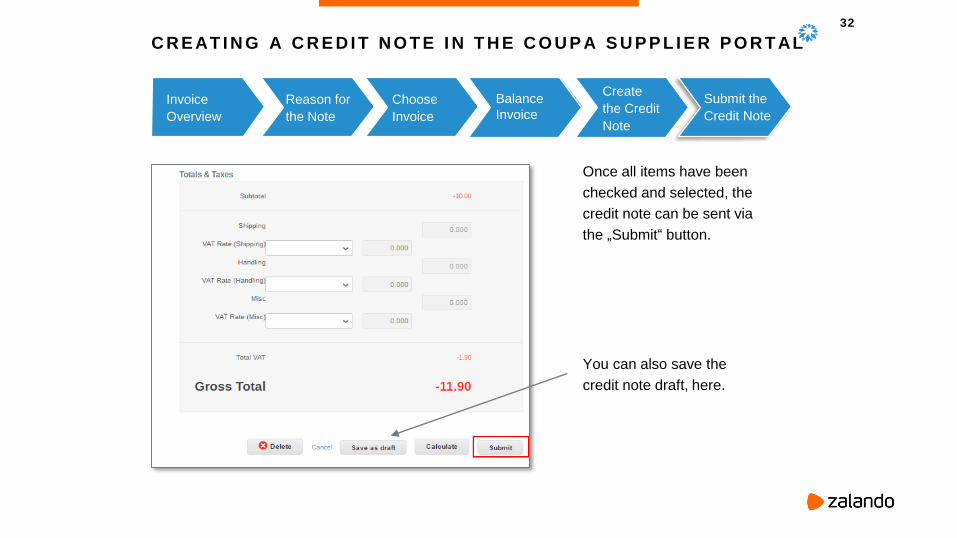
32
Once all items have been
checked and selected, the
credit note can be sent via
the „Submit“ button.
You can also save the
credit note draft, here.
Invoice
Overview
Reason for
the Note
Choose
Invoice
Balance
Invoice
Create
the Credit
Note
Submit the
Credit Note
C R E AT I N G A C R E D I T N O T E I N T H E C O U P A S U P P L I E R P O R T AL

33
C R E AT I N G AN I N V O I C E W I T H S AN
Open The
Order Email
Open the purchase order email and click on the „Create Invoice“ button to generate the invoice. You will
automatically be forwarded to a separate page in your browser. On this page, you can easily and
digitally create the invoice from the corresponding order.
34
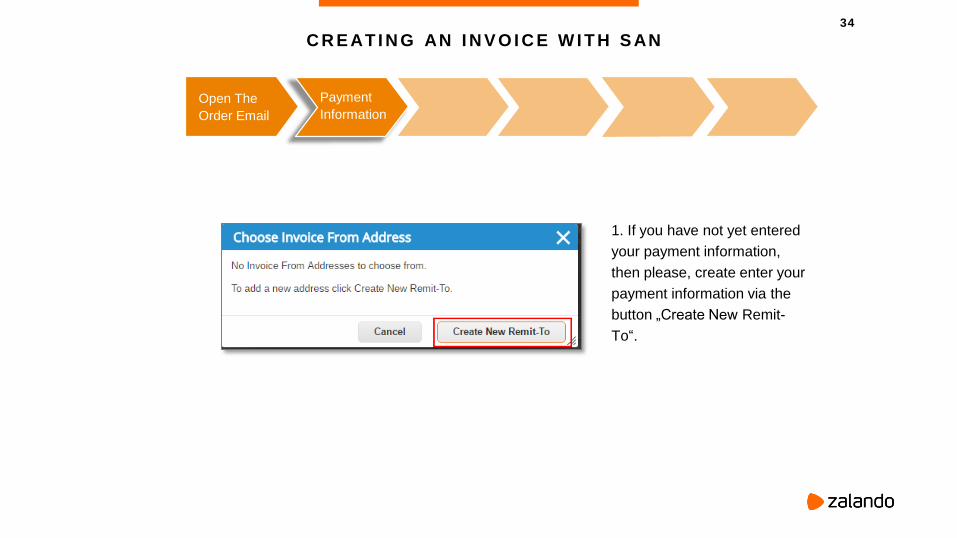
C R E AT I N G AN I N V O I C E W I T H S AN
1. If you have not yet entered
your payment information,
then please, create enter your
payment information via the
button „Create New Remit-
To“.
Open The
Order Email
Payment
Information
35
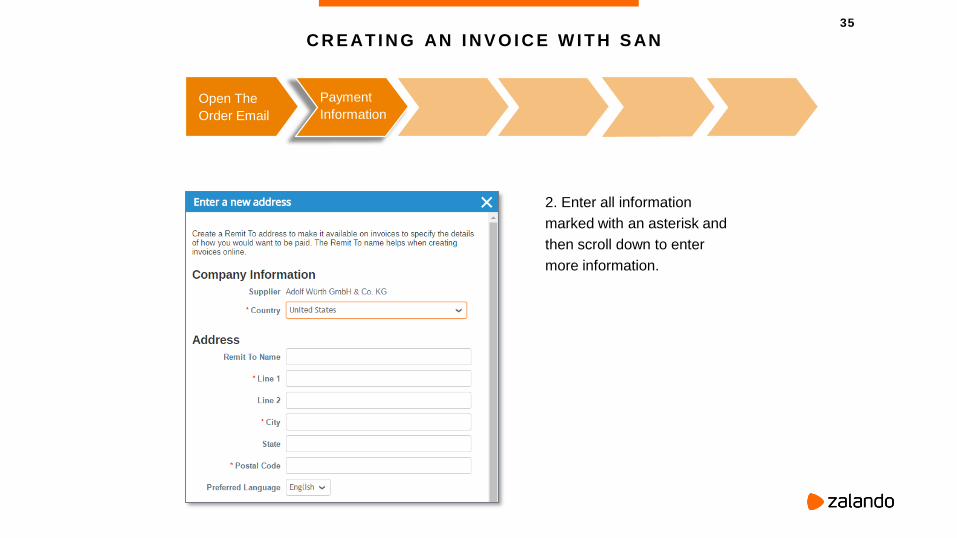
C R E AT I N G AN I N V O I C E W I T H S AN
2. Enter all information
marked with an asterisk and
then scroll down to enter
more information.
Open The
Order Email
Payment
Information
36
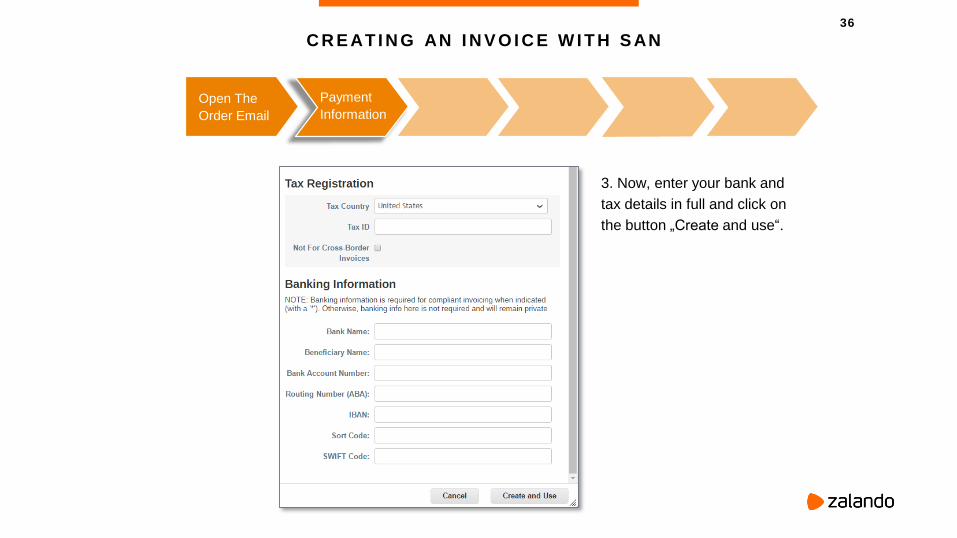
C R E AT I N G AN I N V O I C E W I T H S AN
3. Now, enter your bank and
tax details in full and click on
the button „Create and use“.
Open The
Order Email
Payment
Information
37
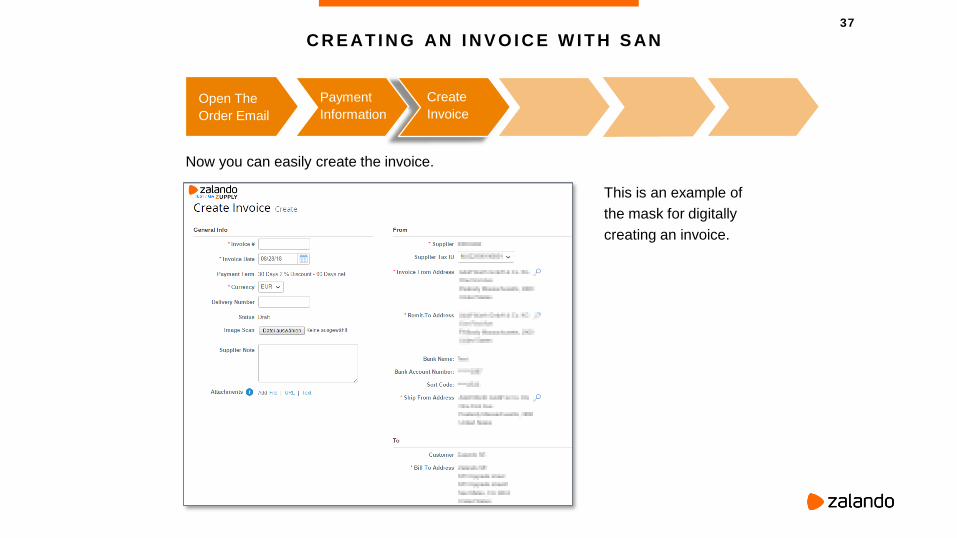
C R E AT I N G AN I N V O I C E W I T H S AN
Now you can easily create the invoice.
Create
Invoice
This is an example of
the mask for digitally
creating an invoice.
Open The
Order Email
Payment
Information
38
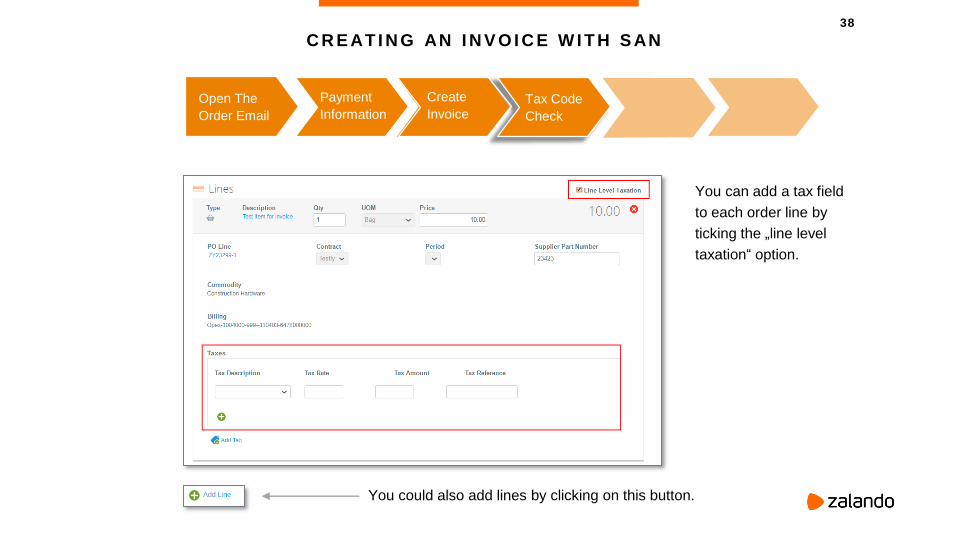
C R E AT I N G AN I N V O I C E W I T H S AN
You can add a tax field
to each order line by
ticking the „line level
taxation“ option.
Tax Code
Check
You could also add lines by clicking on this button.
Create
Invoice
Open The
Order Email
Payment
Information
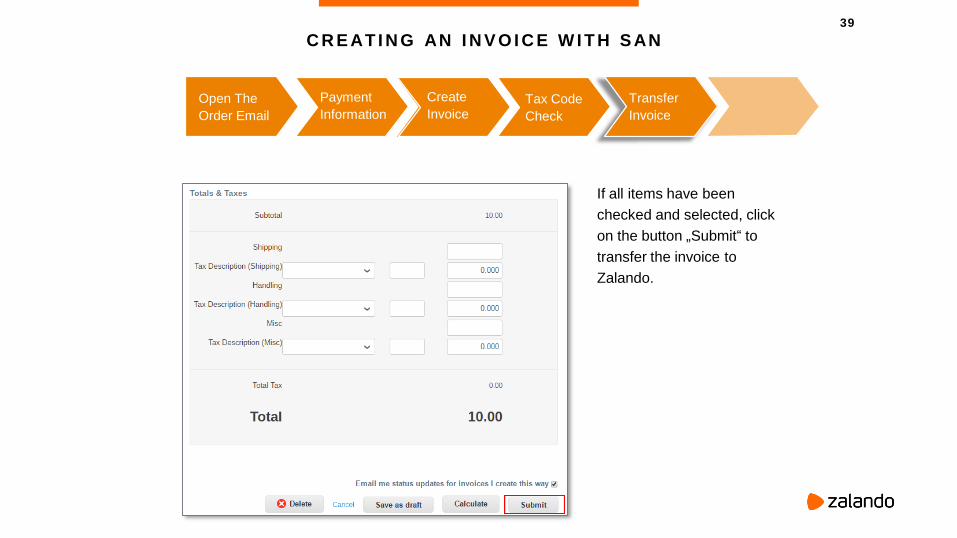
39
C R E AT I N G AN I N V O I C E W I T H S AN
If all items have been
checked and selected, click
on the button „Submit“ to
transfer the invoice to
Zalando.
Transfer
Invoice
Tax Code
Check
Create
Invoice
Open The
Order Email
Payment
Information
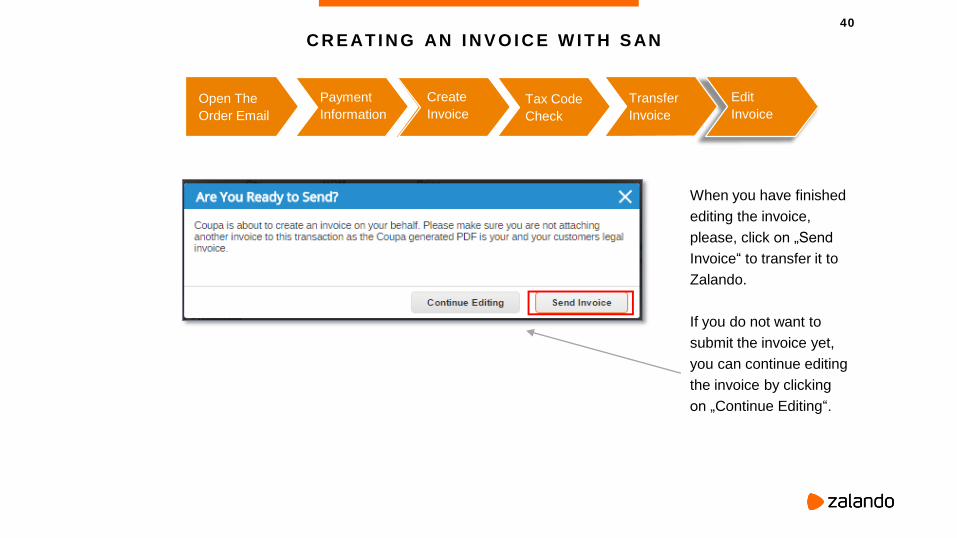
40
C R E AT I N G AN I N V O I C E W I T H S AN
Edit
Invoice
When you have finished
editing the invoice,
please, click on „Send
Invoice“ to transfer it to
Zalando.
If you do not want to
submit the invoice yet,
you can continue editing
the invoice by clicking
on „Continue Editing“.
Transfer
Invoice
Tax Code
Check
Create
Invoice
Open The
Order Email
Payment
Information
41
YOU STILL HAVE QUESTION?
If you have any questions, would like to be
called back or would like to be invited to the
CSP, send us an e-mail to:
Or have a look at our website:
https://eprocurement.zalando.com/
Top Related