


Languages
Pages
Legal


DOCUMENT RESUME
ED 354 854 IR 015 942
AUTHOR Gillan, Bob; Williams, RossTITLE Where in Louisiana [with] Teacher Manual.PUB DATE [12 Dec 92]NOTE 32p.AVAILABLE FROM Where in Louisiana, Education Technology Center,
NEC-NSU, Natchitoches, LA 71497 (for a free copy senda formatted 3.5 diskette with mailer, return address,and postage).Guides Classroom Use Teaching Guides (ForTeacher) (052) Reports Descriptive (141)
PUB TYPE
EDRS PRICE MF01/PCO2 Plus Postage.DESCRIPTORS Authoring Aids (Programing); *Computer Assisted
Instruction; Computer Literacy; *CooperativeLearning; Courseware; Curriculum Enrichment;Elementary Secondary Education; *Hypermedia; Models;Online Searching; Research Skills; *Social Studies
IDENTIFIERS IBM LinkWay; *Louisiana; Multimedia Materials; ScreenFormat; *Where in Louisiana
ABSTRACTThe first part of this document is a report
describing "Where in Louisiana," a program model using IBM LinkWay(i.e., a multimedia software package providing tools to merge textand graphics) that was created as a cooperative learning activity toenhance and expand state studies. The introductory report discussesways the model promotes learning, capabilities of LinkWay, andsuggested project organization; an address for ordering a free copyof the program on diskette is provided. The second part of thedocument is a supporting teacher manual which presents beginningLinkWay users with the background to initiate classroom activities orextend this model to other states and regions. Areas of cooperativelearning addressed by the model are listed, including: (1) initiatingcomputer literacy; (2) providing relevance to state and localstudies; (3) incorporating link-knowledge through design and researchactivities; (4) and emphasizing cooperative learning throughstudent/teacher and group activities. Instructions for specificLinkWay functions such as creating button icons, folders, and buttonsare given; and sample screen displays are included. (ALF)
************************************************************************ Reproductions supplied by EDRS are the best that can be made
from the original document.***********************************************************************
WHERE IN LOUISIANAR. E. GillanRoss Williams
U.S DEPARTMENT OF EDUCATION°Rice of Educational Research and Improvement
EDUCATIONAL RESOURCES INFORMATIONCENTER (ERIC)
C This document has been reproduced asreceived from the person or organizationOriginating it
C Minor changes have been made to improvereproduction Quality
Points 01 view or opinions Stated in this documeet do not necessarily represent officialOERI position or policy
"Where in Louisiana," a program model using IBM LinkWay, was
created as an cooperative learning activity to enhance and expand
state studies (Louisiana Social Studies). Teachers and students
from each parish or region of the state can tailor relevant
information to extend the curriculum to local studies. Gathering
and compiling local facts and information provides student
motivation and individualizes studies. Required research skills
are enhanced by working with relevant history, demographics,
government, maps, pictures, and general facts unique to a Parish,
community or region of the state. The supporting teacher manual
provides beginning LinkWay users with the background to initiate
classroom activities or extend this model to other states and
regions. Additional, this concept can easily be adapted for
other hypermedia programs such as Toolbook and the MAC Hypercard.
This model promotes learning in the following ways:
1. applies computer literacy skills, introduces
programming design and application of computer art
(graphics).
2. gives relevance to state and local studies through the
search for facts, history, demographics, maps,
industry, and natural resources as outlined in state
curriculum guides.
043. incorporating link-knowledge through design and
research activities. PERMISSION TO REPRODUCE THIStr) MATERIAL HAS BEEN GRANTED BY
t. _11 la:,
(\J Ross Williams
BEST COPY AVAILABLE TO THE EDUCATIONAL RESOURCESINFORMATION CENTER (ERIC)."
4. Emphasizing cooperative learning through
student/teacher and group activities.
LinkWay (c) is a multimedia software package which
provides simple tools to merge text and graphics. Information is
organized on individual pages residing in "folders". Folder
pages and related folders can be linked with "buttons" activated
with a mouse. These "buttons" can take the form of a graphic
object or word(s). Buttons can also provide information on
individual pages (such as credits, text reference files, help
information, and graphics). The LinkWay (c) software includes an
effective tutorial and documentation.
"Where in Louisiana" provides an example of LinkWay's (c)
capability and a manual for teachers and students to acquire
skills to become competent users of LinkWay (c). Computer
literacy is enhanced through the application of keyboarding,
mouse manipulation, and the use of basic DOS commands. Keyboard
skills are used in LinkWay's (c) simple text editor (which
emulates word processors). The program uses the mouse with a
simple menu format similar to most computer software programs.
The paint program offers familiar tools to create complex
graphics for a presentation.
The logical sequence of producing a LinkWay (c) presentation
requires planning and research before organizing information in
the program environment. "Where in Louisiana" provides
sufficient examples and models for a classroom teacher to design
a research activity that correlates with the scope of "Where in
Louisiana". Individual and group/team research becomes an
obvious method for compiling needed information. "Where in
Louisiana" is multi-leveled and open-ended, offering a means for
teams of students to develop information unique to each
individual student's interest.
Project organization may be as follows:
1. Teacher or instructor.
2. LinkWay program coordinator
a. Teacher
b. Computer Literacy instructor
c. Proficient student
3. Team project coordinator
a. Student with leadership abilities to:
1) coordinate overall project
2) assist group integration of graphics, research, etc.
4. Group leaders for:
a. Graphics
b. Research
c. Composition
d. Programming
5. Team members
Students can include any system of organization that meet
the needs of the activity. As each page is created, flow charts,
time lines, story boards, etc. help to keep the project on
track.
"Where in Louisiana" provides a parish model (Sabine
Parish), an example of directions to be followed in developing
other parish or region models. A graphic outline is provided for
each of the 64 Louisiana parishes. LinkWay Paint, the graphic
module of LinkWay, is used to expand a parish outline to include
terrain details, location of transportation systems, and towns
and communities.
In order to demonstrate the transportability of the "Where
in Louisiana" model, a "Where in Texas" has been developed to
support Texas state studies. This model follows the Louisiana
concept and provides a vehicle to study Texas state facts as well
as research and present information on the county and local
level. Further, Tookbook and Hypercard versions are in the
development process.
To receive a free copy of "Where In Louisiana" or "Where in
Texas," send a formatted 3 1/2 diskette with mailer, return
address, and postage to:
Where In Louisiana/Texas
Education Technology Center
TEC-NSU
Natchitoches, LA 71497
Direct questions about these products to Bob Gillan or Ross
Williams at (318) 357-5091.
SE,:p.,.? :
ffef.. ...
Bob Gil lan, DirectorNorthwestern State University
Educational Technology CenterNatchitoches, Louisiana
Ross Williams, InstructorFlorien High SchoolFlorien, Louisiana
1992
Where in Louisiana was created using IBM Link Way, version 2.01Where in Louisiana meets all IBM Program License Agreements
Contents
Introduction 2
Getting Started 2
Using Where in Louisiana Runtime 2
Copy Where in Louisiana to LWWORK 2
Opening a Where in Louisiana Folder 3
Changing the ACCESS LEVEL 3
Opening LWPAINT 3
Working with Link Way Paint 4
Saving a graphic file 5
Editing the parish outline 5
Creating button icons 6
Opening a paint file from LWWORK 6
Opening a paint file from drive A 6
CUT and PASTE 6
Creating a BUTTON ICON 7
Using the UNDO command 7
Using COPY 7
COPY and duplicate 8
Resize objects 8
COPY and erase 8
Modifying the COLOR pallet 9
Create a custom pallet with MAKE FADE 9
FILLS 10
TEXT 10
Working with Link Way 11
Create a FOLDER 11
Create a PAGE 11
Placing the parish graphic on PAGE Id=1 11
Create BUTTONS 13
Linking PAGES 13
Linking FOLDERS 14Create a HELP BUTTON 14Create a DOCUMENT BUTTON 14Copy LWWORK files to disk 15Other Link Way Options 16
DOS 16MOVE 16MOVE + SIZE 16
DELETE 16Appendix 17
HINTS 17LWPAINT HINTS 17REFERENCE BUTTONS 18Extension and Description of Link Way Files 19GRAPHICS 19GUIDE TO GRAPHICS FILE FORMATS 20GRAPHIC TERMS 20LWCaptur 21SCREEN CAPTURE 21LinkWay Runtime 22
Creating a Batch File 22
Page 1

WHERE IN LOUISIANA: A WORKING MODELUSING IBM LINKWAY
A Presentation/Multimedia Tool for the ClassroomWhere in Louisiana provides Louisiana studies
teachers a model for incorporating computer appli-cations into their curriculum. The model model wascreated with IBM Link Way, an "authoring" program,designed for available classroom computer tech-nology. It gives teachers and students a medium forcreating tutorials, presentations, and multimediaapplications in all curriculums.
The Where in Louisiana model was created asan interactive presentation to enhance and expandstate studies. The development of a comprehen-sive Louisiana studies program with the scope andsequence covering the course is evident. Eachparish or region of the state can tailor relevantinformation to enhance a part of the curriculummarginally addressed.
Gathering and compiling local facts and infor-mation can provide student motivation and individu-alize the studies. Required research skills arehoned by working with relevant history, demograph-ics, government, maps, pictures, and general factsunique to a parish, community or region of the state.This information can be compiled to offer a currentand comprehensive vehicle for maintaining an up-dated state studies curriculum.
The Where in Louisiana model addresses fourareas of cooperative learning:
1. Initiating computer literacy through use ofkeyboard skills, introduction of programming, andapplication of DOS. Word-processing and graphicsare also utilized.
2. Gives relevance to state and local studiesthrough history, demographics, maps, and naturalresources as outlined in the state curriculum guide.
3. Incorporates link-knowledge through designand research activities.
4. Emphasizes cooperative learning throughstudent/teacher and group activities.
Linkway is a software package that is compat-ible with hardware in the education environment. Itcan be used with the older computer hardwareplatforms or upgraded to the current level of PCtechnology. The latest upgrade, LinkWay Live,provides options for utilizing multimedia applica-tions.
Minimum PC requirements for LinkWay is a286 based computer, a color monitor, 640K basememory, and a mouse. Although not necessary, a
hard drive is preferred.The documentation and tutorial accompany-
ing the LinkWay software provides an introductionand examples of LinkWay's procedures and tools.Allow for several hours to get acquainted with theprogram.
This manual outlines steps for introducingteachers and students to LinkWay and for incorpo-rating their parish into the Where in Louisiana
model.
GETTING STARTED
The Where in Louisiana diskette is in runtime.A runtime version allows users to run the programwithout LinkWay being resident on your computer.However, LinkWay must be used to edit or expandWhere in Louisiana.
Using Where in Louisiana Runtime
1. Insert the runtime version of Where inLouisiana disk into drive A:
2. At the C:> prompt type A: and press EN-TER.
3. At A: type LA and press ENTER.4. Use the mouse to move the cursor. When
the cursor changes to a hand, click the left mousebutton once.
5. The first screen contains a help button withinstructions for viewing Where In Louisiana.
6. Press ALT Q to quit.
Copy Where in Louisiana to LWWORK
Although Where in Louisiana may be editedand expanded while working from drive A, it is easierto copy the files to the hard drive (drive C:). To copythe Where in Lousiana files to the LWWORK direc-tory on drive C:
1. Insert the Where in Louisiana disk intofloppy drive A.
2. At the C:> type CD LWWORK and pressENTER.
3. Type copy A: *. * and press ENTER.The directory LWWORK is the default working
directory of LinkWay. These files and all newfiles can later be copied to a floppy disk.
Page 2
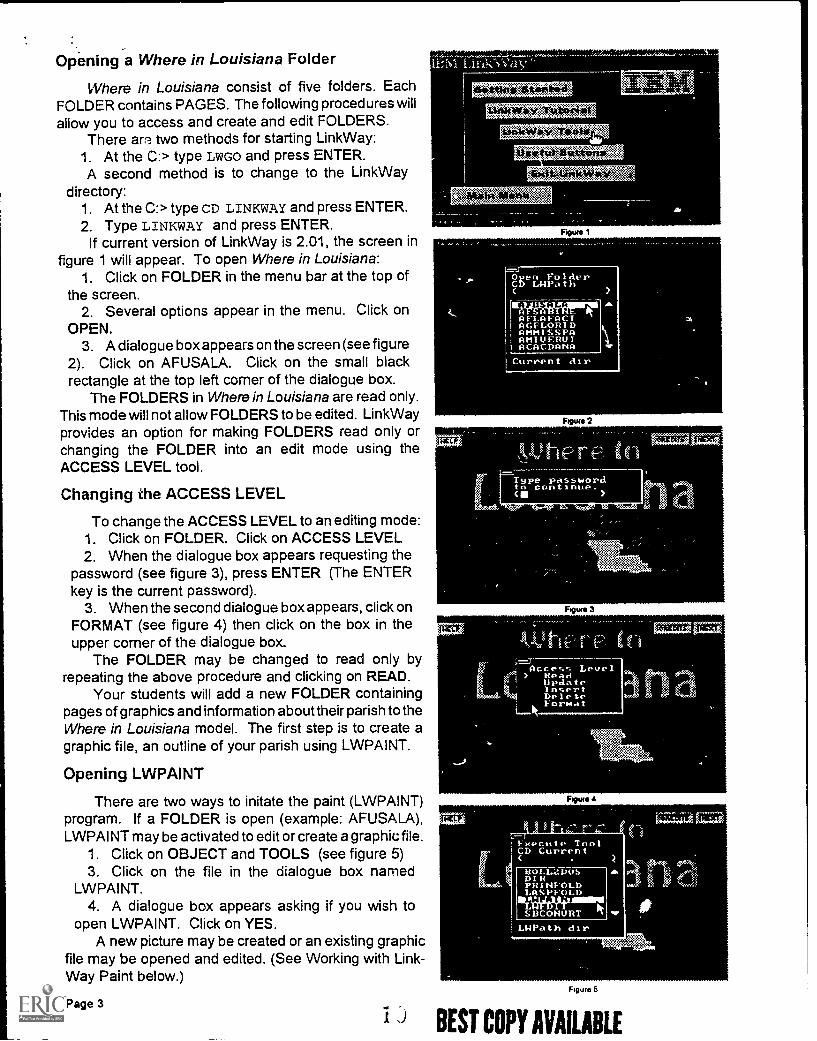
Opening a Where in Louisiana Folder
Where in Louisiana consist of five folders. EachFOLDER contains PAGES. The following procedures willallow you to access and create and edit FOLDERS.
There are two methods for starting Link Way:1. At the C:> type LWGO and press ENTER.A second method is to change to the Link Way
directory:1. At the C:> type CD LINKWAY and press ENTER.
2. Type LINKWAY and press ENTER.If current version of Link Way is 2.01, the screen in
figure 1 will appear. To open Where in Louisiana:1. Click on FOLDER in the menu bar at the top of
the screen.2. Several options appear in the menu. Click on
OPEN.3. A dialogue box appears on the screen (see figure
2). Click on AFUSALA. Click on the small blackrectangle at the top left corner of the dialogue box.
The FOLDERS in Where in Louisiana are read only.This mode will not allow FOLDERS to be edited. LinkWayprovides an option for making FOLDERS read only orchanging the FOLDER into an edit mode using theACCESS LEVEL tool.
Changing the ACCESS LEVEL
To change the ACCESS LEVEL to an editing mode:1. Click on FOLDER. Click on ACCESS LEVEL2. When the dialogue box appears requesting the
password (see figure 3), press ENTER (The ENTERkey is the current password).
3. When the second dialogue box appears, click onFORMAT (see figure 4) then click on the box in theupper corner of the dialogue box.
The FOLDER may be changed to read only byrepeating the above procedure and clicking on READ.
Your students will add a new FOLDER containingpages of graphics and information abouttheir parish to theWhere in Louisiana model. The first step is to create agraphic file, an outline of your parish using LWPAINT.
Opening LWPAINT
There are two ways to initate the paint (LWPAINT)program. If a FOLDER is open (example: AFUSALA),LWPAINT may be activated to edit or create a graphic file.
1. Click on OBJECT and TOOLS (see figure 5)3. Click on the file in the dialogue box named
LWPAINT.4. A dialogue box appears asking if you wish to
open LWPAINT. Click on YES.A new picture may be created or an existing graphic
file may be opened and edited. (See Working with Link-Way Paint below.)
Page 3
-,gyp thin ipaterktii±C
tiiskWiky 3 uttat$41.
tilsiiittakysl***_11,;;;
Aiwetut-84it4rar";':,
kVissItAtratW*10,:. tk4061,44.14,44,P
Figure
t
0
Ftguto 2
4
Ear
C=0
ALM.
Nitwit 3
ViZtytt NW-
arritt Tarr
Nut* I
Figure 5
BEST COPY AVAILABLE
,10044-71443:*
Figure I
MAIN
Figure 7
Figure
Figure 9
Fogure 10
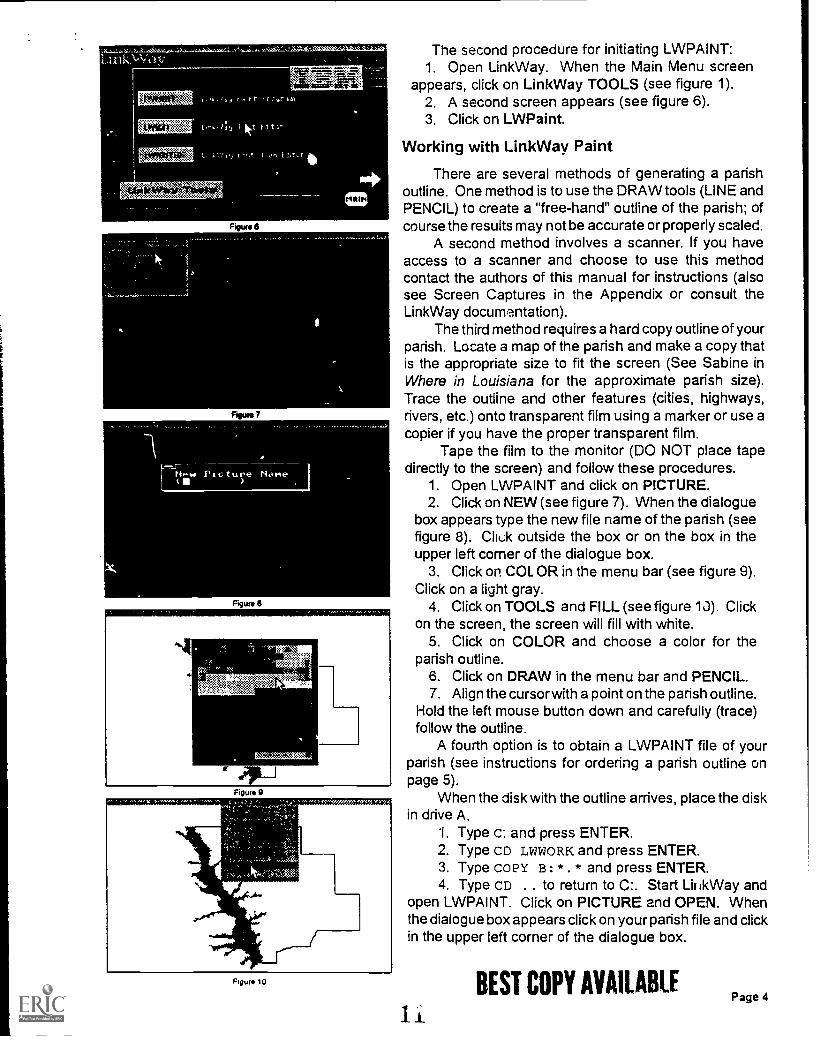
The second procedure for initiating LWPAINT:1. Open LinkWay. When the Main Menu screen
appears, click on LinkWay TOOLS (see figure 1).2. A second screen appears (see figure 6).3. Click on LWPaint.
Working with LinkWay Paint
There are several methods of generating a parishoutline. One method is to use the DRAW tools (LINE andPENCIL) to create a "free-hand" outline of the parish; ofcourse the results may not be accurate or properly scaled.
A second method involves a scanner. If you haveaccess to a scanner and choose to use this methodcontact the authors of this manual for instructions (alsosee Screen Captures in the Appendix or consult theLinkWay documentation).
The third method requires a hard copy outline of yourparish. Locate a map of the parish and make a copy thatis the appropriate size to fit the screen (See Sabine inWhere in Louisiana for the approximate parish size).Trace the outline and other features (cities, highways,rivers, etc.) onto transparent film using a marker or use acopier if you have the proper transparent film.
Tape the film to the monitor (DO NOT place tapedirectly to the screen) and follow these procedures.
1. Open LWPAINT and click on PICTURE.2. Click on NEW (see figure 7). When the dialogue
box appears type the new file name of the parish (seefigure 8). Clit:k outside the box or on the box in theupper left corner of the dialogue box.
3. Click on COL OR in the menu bar (see figure 9).Click on a light gray.
4. Click on TOOLS and FILL (see figure 13). Clickon the screen, the screen will fill with white.
5. Click on COLOR and choose a color for theparish outline.
6. Click on DRAW in the menu bar and PENCIL.7. Align the cursorwith a point on the parish outline.
Hold the left mouse button down and carefully (trace)follow the outline.
A fourth option is to obtain a LWPAINT file of yourparish (see instructions for ordering a parish outline onpage 5).
When the disk with the outline arrives, place the diskin drive A.
1. Type c: and press ENTER.2. Type CD LWWORK and press ENTER.3. Type COPY B: *. * and press ENTER.4. Type CD . . to return to C:. Start LiiikWay and
open LWPAINT. Click on PICTURE and OPEN. Whenthe dialogue box appears click on your parish file and clickin the upper left corner of the dialogue box.
it
BEST COPY MAW Page 4
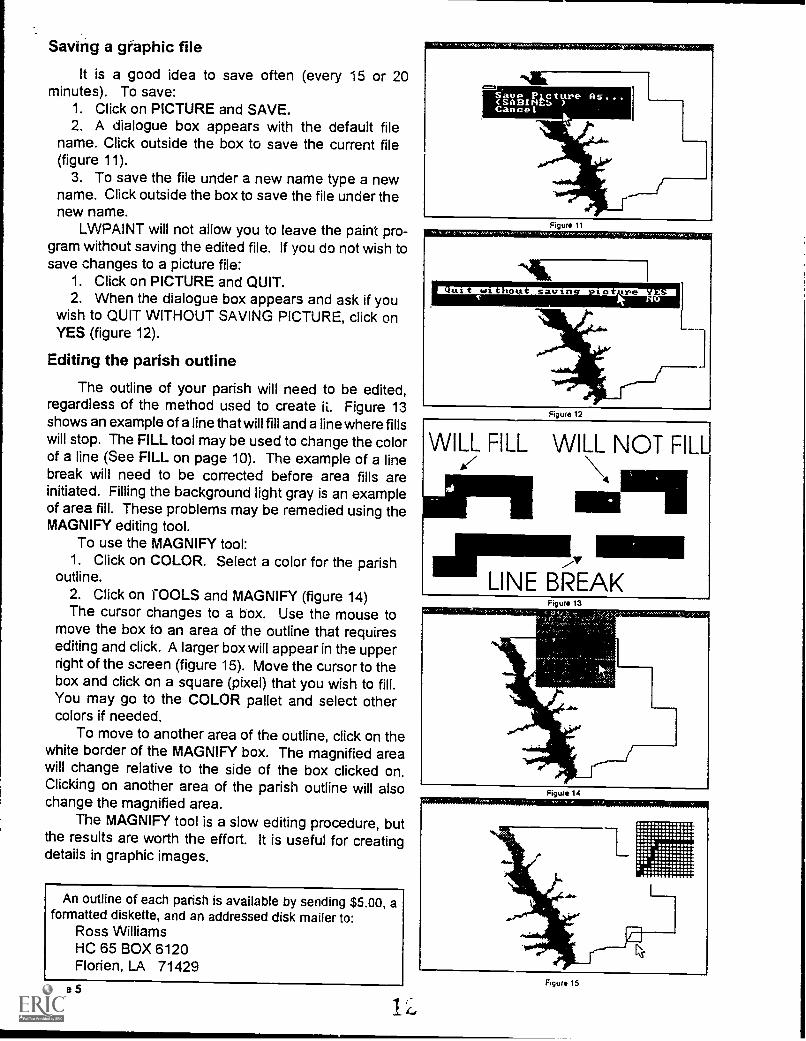
Saving a graphic file
It is a good idea to save often (every 15 or 20minutes). To save:
1. Click on PICTURE and SAVE.2. A dialogue box appears with the default file
name. Click outside the box to save the current file(figure 11).
3. To save the file under a new name type a newname. Click outside the box to save the file under thenew name.
LVrJPAINT will not allow you to leave the paint program without saving the edited file. If you do not wish tosave changes to a picture file:
1. Click on PICTURE and QUIT.2. When the dialogue box appears and ask if you
wish to QUIT WITHOUT SAVING PICTURE, click onYES (figure 12).
Editing the parish outline
The outline of your parish will need to be edited,regardless of the method used to create it. Figure 13shows an example of a line that will fill and a line where fillswill stop. The FILL tool may be used to change the colorof a line (See FILL on page 10). The example of a linebreak will need to be corrected before area fills areinitiated. Filling the background light gray is an exampleof area fill. These problems may be remedied using theMAGNIFY editing tool.
To use the MAGNIFY tool:1. Click on COLOR. Select a color for the parish
outline.2. Click on TOOLS and MAGNIFY (figure 14)The cursor changes to a box. Use the mouse to
move the box to an area of the outline that requiresediting and click. A larger box will appear in the upperright of the screen (figure 15). Move the cursor to thebox and click on a square (pixel) that you wish to fill.You may go to the COLOR pallet and select othercolors if needed.
To move to another area of the outline, click on thewhite border of the MAGNIFY box. The magnified areawill change relative to the side of the box clicked on.Clicking on another area of the parish outline will alsochange the magnified area.
The MAGNIFY tool is a slow editing procedure, butthe results are worth the effort. It is useful for creatingdetails in graphic images.
An outline of each parish is available by sending $5.00, aformatted diskette, and an addressed disk mailer to:
Ross WilliamsHC 65 BOX 6120Florien, LA 71429
Page 5
Figure 11
Figure 12
WILL FILL WILL NOT FIL
.111111.11YLINE BREAKFigure 13
Figure 14
Figure 15
, , 0.0 '4,"
Figur* 16
Figure 17
He Directory Namec:mCurrent Directory is-S:MWORK
Fissuco 18
496866M ietskit F 1L ffictt4W riiMr lindspo
Figure 19
< vv.,
OGRhuLAST CLICK
Figuie 20
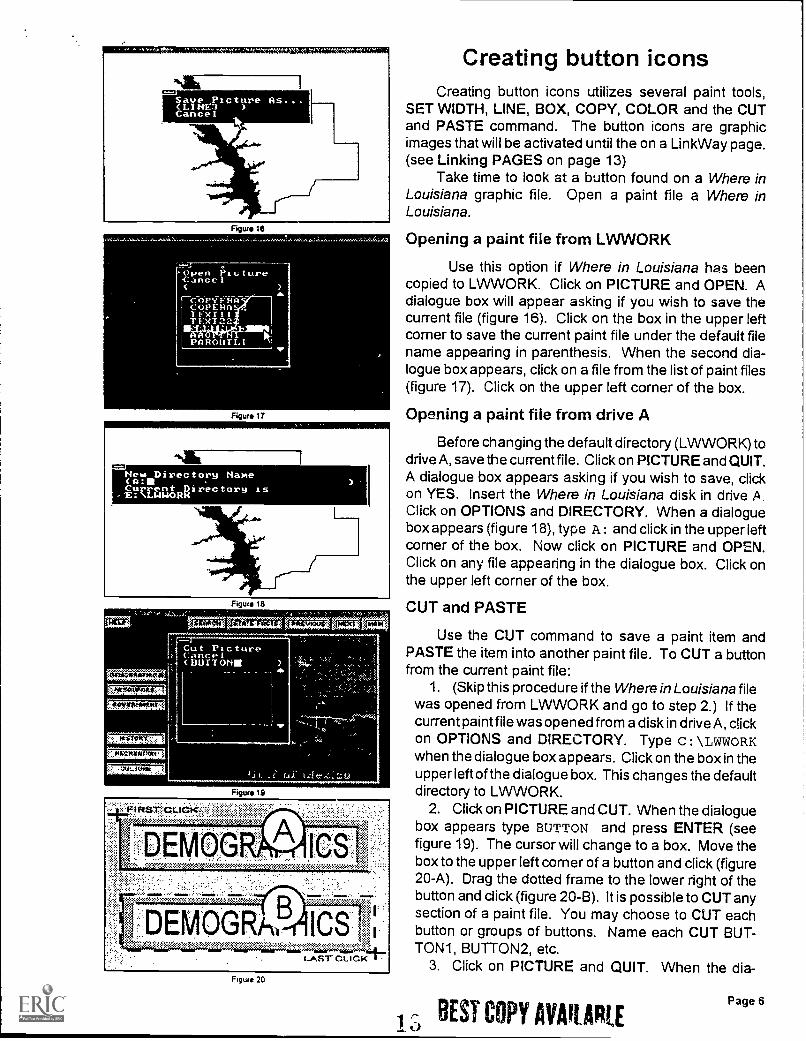
Creating button iconsCreating button icons utilizes several paint tools,
SET WIDTH, LINE, BOX, COPY, COLOR and the CUTand PASTE command. The button icons are graphicimages that will be activated until the on a LinkWay page.(see Linking PAGES on page 13)
Take time to look at a button found on a Where inLouisiana graphic file. Open a paint file a Where inLouisiana.
Opening a paint file from LWWORK
Use this option if Where in Louisiana has beencopied to LWWORK. Click on PICTURE and OPEN. Adialogue box will appear asking if you wish to save thecurrent file (figure 16). Click on the box in the upper leftcorner to save the current paint file under the default filename appearing in parenthesis. When the second dia-logue box appears, click on a file from the list of paint files(figure 17). Click on the upper left corner of the box.
Opening a paint file from drive A
Before changing the default directory ( LWWORK) todrive A, save the currentfile. Click on PICTURE and QUIT.A dialogue box appears asking if you wish to save, clickon YES. Insert the Where in Louisiana disk in drive A.Click on OPTIONS and DIRECTORY. When a dialoguebox appears (figure 18), type A: and click in the upper leftcorner of the box. Now click on PICTURE and OPEN.Click on any file appearing in the dialogue box. Click onthe upper left corner of the box.
1
CUT and PASTE
Use the CUT command to save a paint item andPASTE the item into another paint file. To CUT a buttonfrom the current paint file:
1. (Skip this procedure if the Where in Louisiana filewas opened from LWWORK and go to step 2.) If thecurrent paint file was opened from a disk in drive A, dickon OPTIONS and DIRECTORY. Type C: \LWWORKwhen the dialogue box appears. Click on the box in theupperleft of the dialogue box. This changes the defaultdirectory to LWWORK.
2. Click on PICTURE and CUT. When the dialoguebox appears type BUTTON and press ENTER (seefigure 19). The cursor will change to a box. Move thebox to the upper left corner of a button and click (figure20-A). Drag the dotted frame to the lower right of thebutton and click (figure 20-B). It is possible to CUT anysection of a paint file. You may choose to CUT eachbutton or groups of buttons. Name each CUT BUT-TONI , BUTTON2, etc.
3. Click on PICTURE and QUIT. When the dia-
BEST COPY AVAII AREPage 6
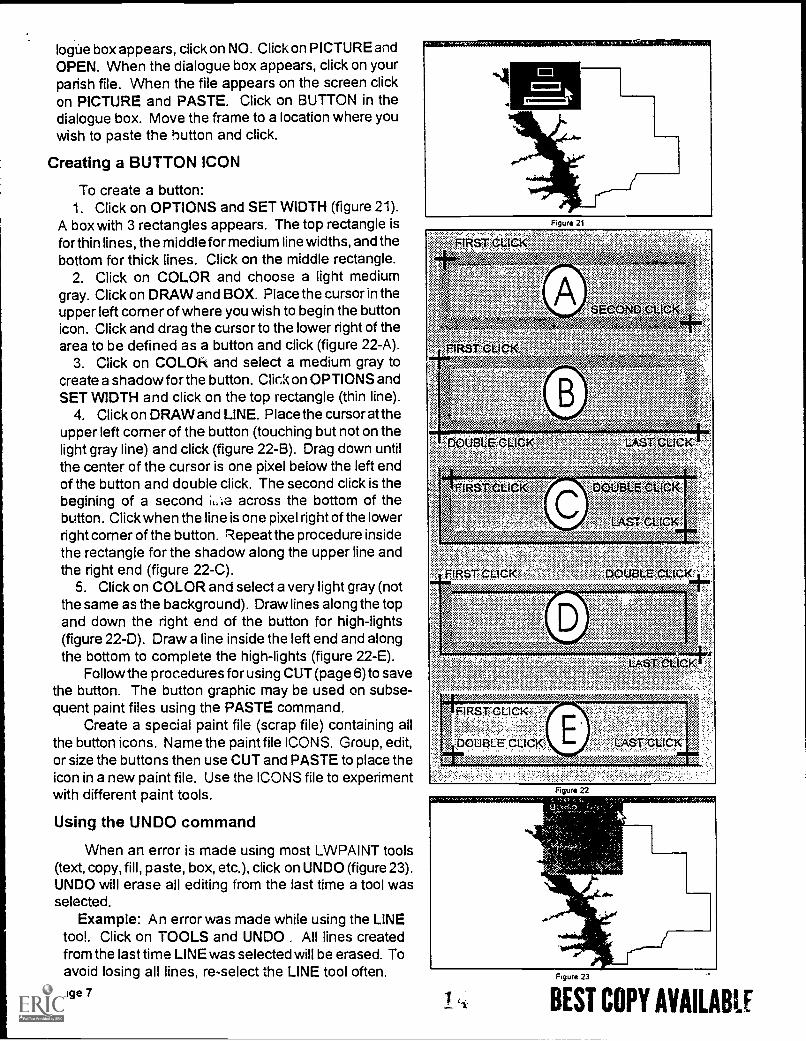
logue box appears, click on NO. Click on PICTURE andOPEN. When the dialogue box appears, click on yourparish file. When the file appears on the screen clickon PICTURE and PASTE. Click on BUTTON in thedialogue box. Move the frame to a location where youwish to paste the button and click.
Creating a BUTTON ICON
To create a button:1. Click on OPTIONS and SET WIDTH (figure 21).
A box with 3 rectangles appears. The top rectangle isforthin lines, the middle for medium line widths, and thebottom for thick lines. Click on the middle rectangle.
2. Click on COLOR and choose a light mediumgray. Click on DRAW and BOX. Place the cursor in theupper left corner of where you wish to begin the buttonicon. Click and drag the cursor to the lower right of thearea to be defined as a button and click (figure 22-A).
3. Click on COLOR and select a medium gray tocreate a shadow forthe button. Click on OPTIONS andSET WIDTH and click on the top rectangle (thin line).
4. Click on DRAW and LINE. Place the cursor at theupper left corner of the button (touching but not on thelight gray line) and click (figure 22 -B). Drag down untilthe center of the cursor is one pixel below the left endof the button and double click. The second click is thebegining of a second across the bottom of thebutton. Click when the line is one pixel right of the lowerright corner of the button. Repeatthe procedure insidethe rectangle for the shadow along the upper line andthe right end (figure 22-C).
5. Click on COLOR and select a very light gray (notthe same as the background). Draw lines along the topand down the right end of the button for high-lights(figure 22-D). Draw a line inside the left end and alongthe bottom to complete the high-lights (figure 22-E).
Follow the procedures for using CUT (page 6) to savethe button. The button graphic may be used on subse-quent paint files using the PASTE command.
Create a special paint file (scrap file) containing allthe button icons. Name the paint file ICONS. Group, edit,or size the buttons then use CUT and PASTE to place theicon in a new paint file. Use the ICONS file to experimentwith different paint tools.
Using the UNDO command
When an error is made using most LWPAINT tools(text, copy, fill, paste, box, etc.), click on UNDO (figure 23).UNDO will erase all editing from the last time a tool wasselected.
Example: An error was made while using the LINEtoo!. Click on TOOLS and UNDO . All lines createdfrom the last time LINE was selected will be erased. Toavoid losing all lines, re-select the LINE tool often.
Page 7
Figure 21
FIRST-CLICKaptittektegZeig:5,Mita,;atiart:,
SECOISID CLICK-345tM-4altNizale-Wattelaft0+
FIRST CLICKZ.Naia7,1512r-"mgEfiklaNZRN'A
IX)UBLE CLICK LAST CLICK
B
FIRST CLICK
LAST CLICK
' DOUBLE CLICK_L_
nsTalmr,...ILAST CLICKI-
" ".<
FIRST CLICK
auBI E: CLICK:., .. , .
CLICK
: . .:. .
Figure 22
Figure 23
eT COPY AVAILABLE
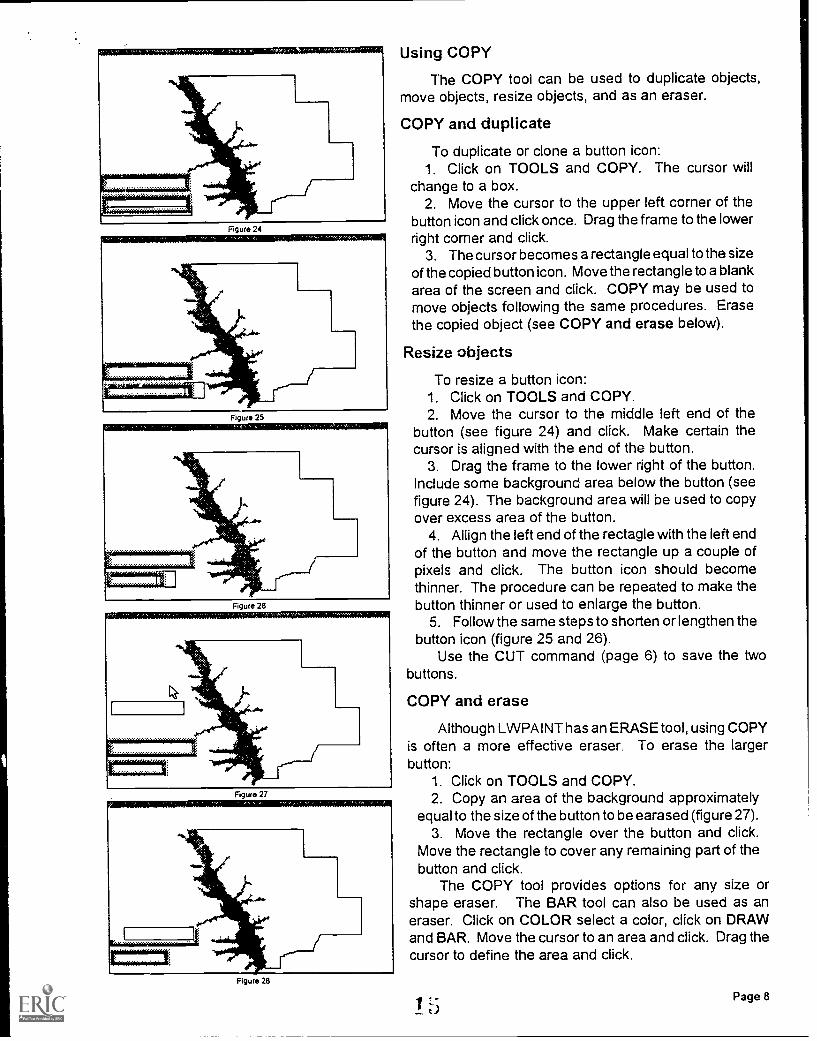
Figure 28
Using COPY
The COPY tool can be used to duplicate objects,move objects, resize objects, and as an eraser.
COPY and duplicate
To duplicate or clone a button icon:1. Click on TOOLS and COPY. The cursor will
change to a box.2. Move the cursor to the upper left corner of the
button icon and click once. Drag the frame to the lowerright corner and click.
3. The cursor becomes a rectangle equal to the sizeof the copied button icon. Move the rectangle to a blankarea of the screen and click. COPY may be used tomove objects following the same procedures. Erasethe copied object (see COPY and erase below).
Resize objects
To resize a button icon:1. Click on TOOLS and COPY.2. Move the cursor to the middle left end of the
button (see figure 24) and click. Make certain thecursor is aligned with the end of the button.
3. Drag the frame to the lower right of the button.Include some background area below the button (seefigure 24). The background area will be used to copyover excess area of the button.
4. Allign the left end of the rectagle with the left endof the button and move the rectangle up a couple ofpixels and click. The button icon should becomethinner. The procedure can be repeated to make thebutton thinner or used to enlarge the button.
5. Follow the same steps to shorten or lengthen thebutton icon (figure 25 and 26).
Use the CUT command (page 6) to save the twobuttons.
COPY and erase
Although LWPAINT has an ERASE tool, using COPYis often a more effective eraser. To erase the largerbutton:
1. Click on TOOLS and COPY.2. Copy an area of the background approximately
equal to the size of the button to be earased (figure 27).3. Move the rectangle over the button and click.
Move the rectangle to cover any remaining part of thebutton and click.
The COPY tool provides options for any size orshape eraser. The BAR tool can also be used as aneraser. Click on COLOR select a color, click on DRAWand BAR. Move the cursor to an area and click. Drag thecursor to define the area and click.
Page 8
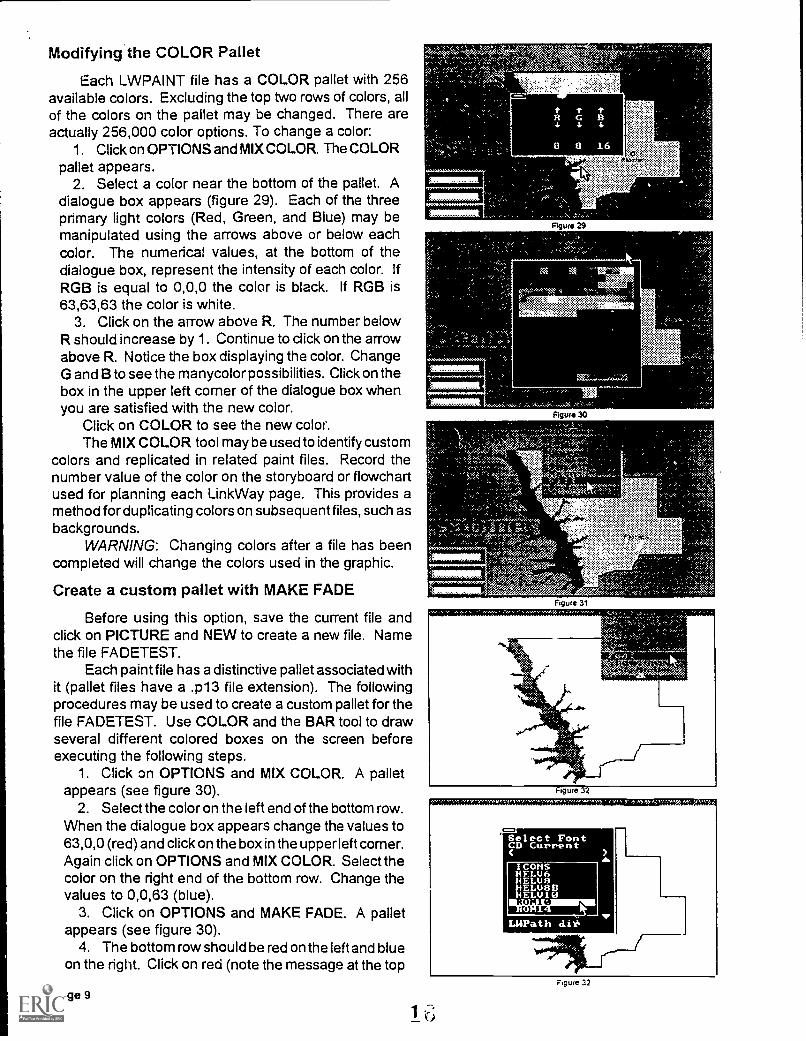
Modifying the COLOR Pallet
Each LWPAINT file has a COLOR pallet with 256available colors. Excluding the top two rows of colors, allof the colors on the pallet may be changed. There areactually 256,000 color options. To change a color:
1. Click on OPTIONS and MIX COLOR. The COLORpallet appears.
2. Select a color near the bottom of the pallet. Adialogue box appears (figure 29). Each of the threeprimary light colors (Red, Green, and Blue) may bemanipulated using the arrows above or below eachcolor. The numerical values, at the bottom of thedialogue box, represent the intensity of each color. IfRGB is equal to 0,0,0 the color is black. If RGB is63,63,63 the color is white.
3. Click on the arrow above R. The number belowR should increase by 1. Continue to click on the arrowabove R. Notice the box displaying the color. ChangeG and B to see the manycolor possibilities. Click on thebox in the upper left corner of the dialogue box whenyou are satisfied with the new color.
Click on COLOR to see the new color.The MIX COLOR tool may be used to identify custom
colors and replicated in related paint files. Record thenumber value of the color on the storyboard or flowchartused for planning each LinkWay page. This provides amethod for duplicating colors on subsequent files, such asbackgrounds.
WARNING: Changing colors after a file has beencompleted will change the colors used in the graphic.
Create a custom pallet with MAKE FADE
Before using this option, save the current file andclick on PICTURE and NEW to create a new file. Namethe file FADETEST.
Each paint file has a distinctive pallet associated withit (pallet files have a .p13 file extension). The followingprocedures may be used to create a custom pallet for thefile FADETEST. Use COLOR and the BAR tool to drawseveral different colored boxes on the screen beforeexecuting the following steps.
1. Click on OPTIONS and MIX COLOR. A palletappears (see figure 30).
2. Select the color on the left end of the bottom row.When the dialogue box appears change the values to63,0,0 (red) and click on the box in the upper left corner.Again click on OPTIONS and MIX COLOR. Select thecolor on the right end of the bottom row. Change thevalues to 0,0,63 (blue).
3. Click on OPTIONS and MAKE FADE. A palletappears (see figure 30).
4. The bottom row should be red on the left and blueon the right. Click on red (note the message at the top
Page 9
e1errier.
Flung 29
,
Figure 30
Figure 31
figurenr-s, 5. ^
Select FontCD Current
ICONSHFLU6HELUO
MYRLilPath cli16
Figure 32
Figur* 33
Figure 34
Topics for Expanding Where in Louisiana
The following list provides topics for researchto expand Where in Louisiana. Each topic maybe incorporated into STATE, REGION, or PAR-ISH studies.
1. Natural Resources2. Places to See in Louisiana3. Famous People of Louisiana4. Early Louisiana History5. The Political History of Louisiana6. Ethnic Groups 7. Demographics8. Agriculture 9. Industry
10. Sports12. Customs14. Religion16. Folklore18. Literature20. Architecture
11. Food13. Music15. Wildlife17. Art19. Recreation21. Customs
The Northwestern State University, Educa-tion Technology Center would like a copy ofclass projects related to Where in Louisiana.When sufficient information covers the scope ofLouisiana Studies, a CD-ROM will be producedand made available. For more informationcontact Bob Gillen at (318) 357-5091. Copies ofWhere in Lousiana are available. Send aformated disi.ette and self addressed envelope/mailer to:
Education Technology CenterTeacher Education Bldg, C247Northwestern State University
Natchitoches, LA. 71497
of the screen). Click on blue. Now click on the middleof the bottom row. The row should change to a rangeof violets (purple).
This procedure can be repeated for each row tocreate a custom pallet. Remember, only use this optionbefore using lines or fills.
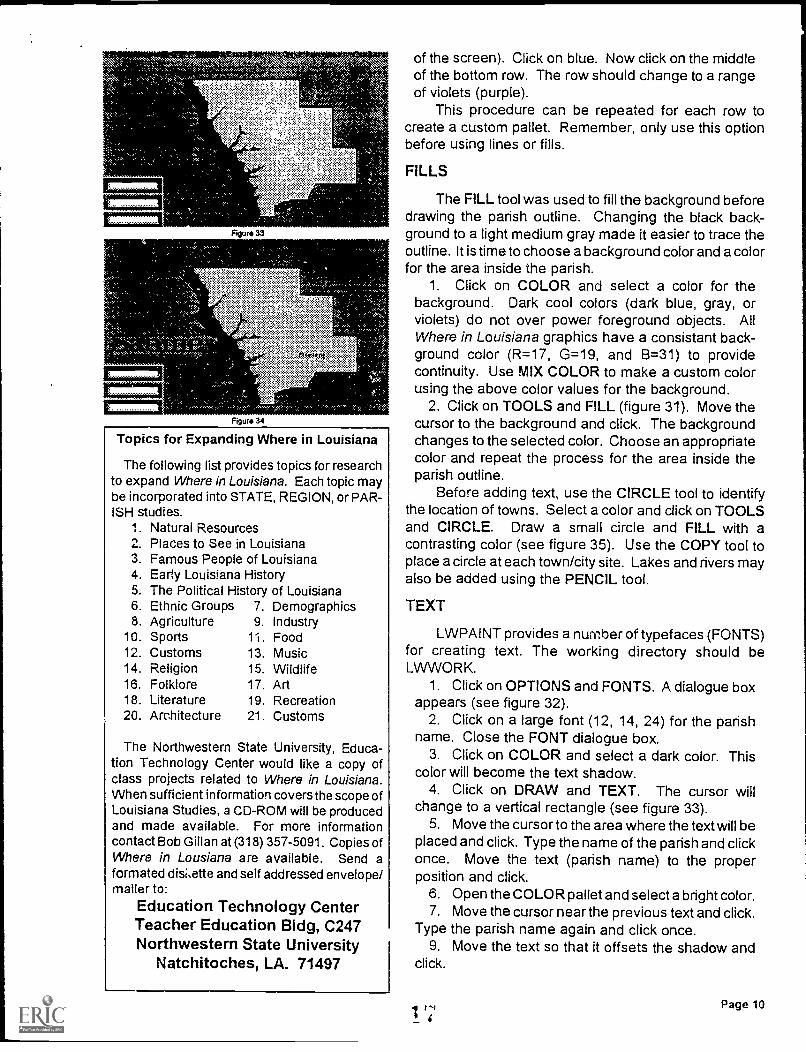
FILLS
The FILL tool was used to fill the background beforedrawing the parish outline. Changing the black back-ground to a light medium gray made it easier to trace theoutline. It is time to choose a background color and a colorfor the area inside the parish.
1. Click on COLOR and select a color for thebackground. Dark cool colors (dark blue, gray, orviolets) do not over power foreground objects. AllWhere in Louisiana graphics have a consistant back-ground color (R=17, G=19, and B=31) to providecontinuity. Use MIX COLOR to make a custom colorusing the above color values for the background.
2. Click on TOOLS and FILL (figure 31). Move thecursor to the background and click. The backgroundchanges to the selected color. Choose an appropriatecolor and repeat the process for the area inside theparish outline.
Before adding text, use the CIRCLE tool to identifythe location of towns. Select a color and click on TOOLSand CIRCLE. Draw a small circle and FILL with acontrasting color (see figure 35). Use the COPY tool toplace a circle at each town/city site. Lakes and rivers mayalso be added using the PENCIL tool.
TEXT
LWPAINT provides a number of typefaces (FONTS)for creating text. The working directory should beLVVWO R K.
1. Click on OPTIONS and FONTS. A dialogue boxappears (see figure 32).
2. Click on a large font (12, 14, 24) for the parishname. Close the FONT dialogue box.
3. Click on COLOR and select a dark color. Thiscolor will become the text shadow.
4. Click on DRAW and TEXT. The cursor willchange to a vertical rectangle (see figure 33).
5. Move the cursor to the area where the text will beplaced and click. Type the name of the parish and clickonce. Move the text (parish name) to the properposition and click.
6. Open the COLOR pallet and select a bright color.7. Move the cursor near the previous text and click.
Type the parish name again and click once.9. Move the text so that it offsets the shadow and
click.
1 7 Page 10
Change the FONT to HELV 6 to type text into eachbutton. This may be done on the ICON page prior topasting buttons onto the parish page.
Click on PICTURE and EXIT LWPAINT.The tools used to create and edit the parish outline
are considered basic to any graphic program. There areother tools that should be examined, but becoming famil-iar with the capabilities of the basic LWPAINT commandsand tools will soon make a pro out of a novice. Practiceis perhaps the most essential element if one is to becomeproficient with Link Way or any other program.
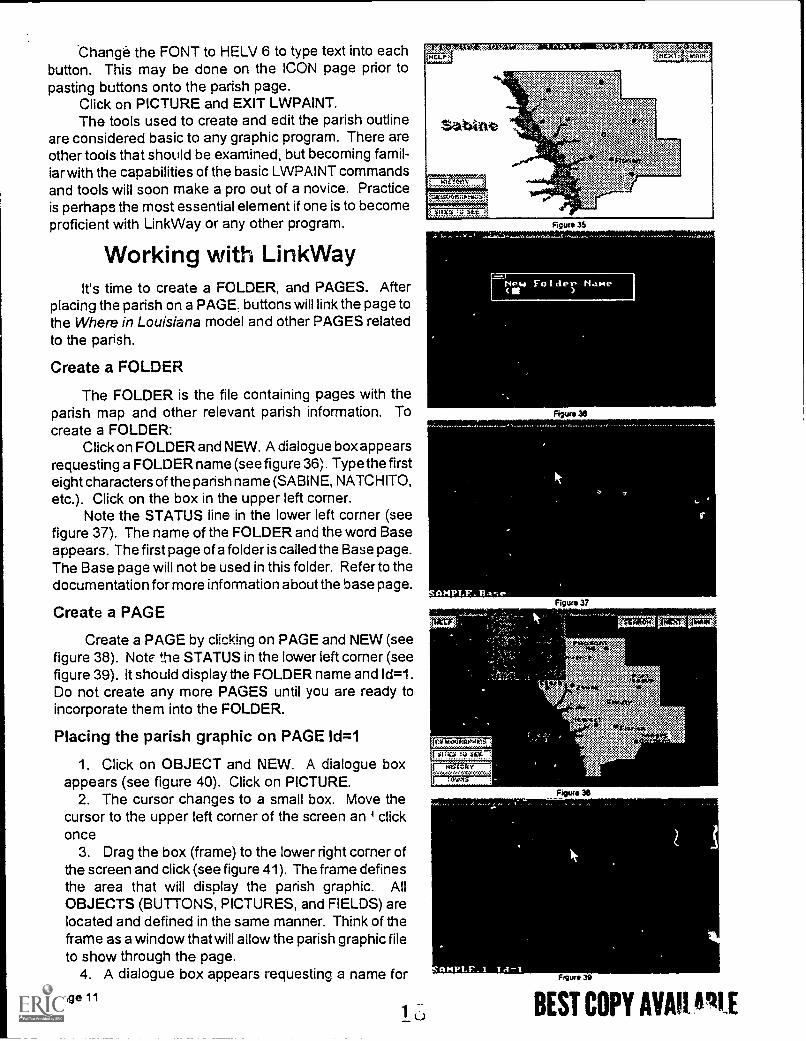
Working with Link WayIt's time to create a FOLDER, and PAGES. After
placing the parish on a PAGE: buttons will link the page tothe Where in Louisiana model and other PAGES relatedto the parish.
Create a FOLDER
The FOLDER is the file containing pages with theparish map and other relevant parish information. Tocreate a FOLDER:
Click on FOLDER and NEW. A dialogue box appearsrequesting a FOLDER name (see figure 36). Type the firsteight characters of the parish name (SABINE, NATCHITO,etc.). Click on the box in the upper left corner.
Note the STATUS line in the lower left corner (seefigure 37). The name of the FOLDER and the word Baseappears. The first page of a folder is called the Base page.The Base page will not be used in this folder. Refer to thedocumentation for more information about the base page.
Create a PAGE
Create a PAGE by clicking on PAGE and NEW (seefigure 38). Note the STATUS in the lower left corner (seefigure 39). It should display the FOLDER name and Id=1.Do not create any more PAGES until you are ready toincorporate them into the FOLDER.
Placing the parish graphic on PAGE Id=1
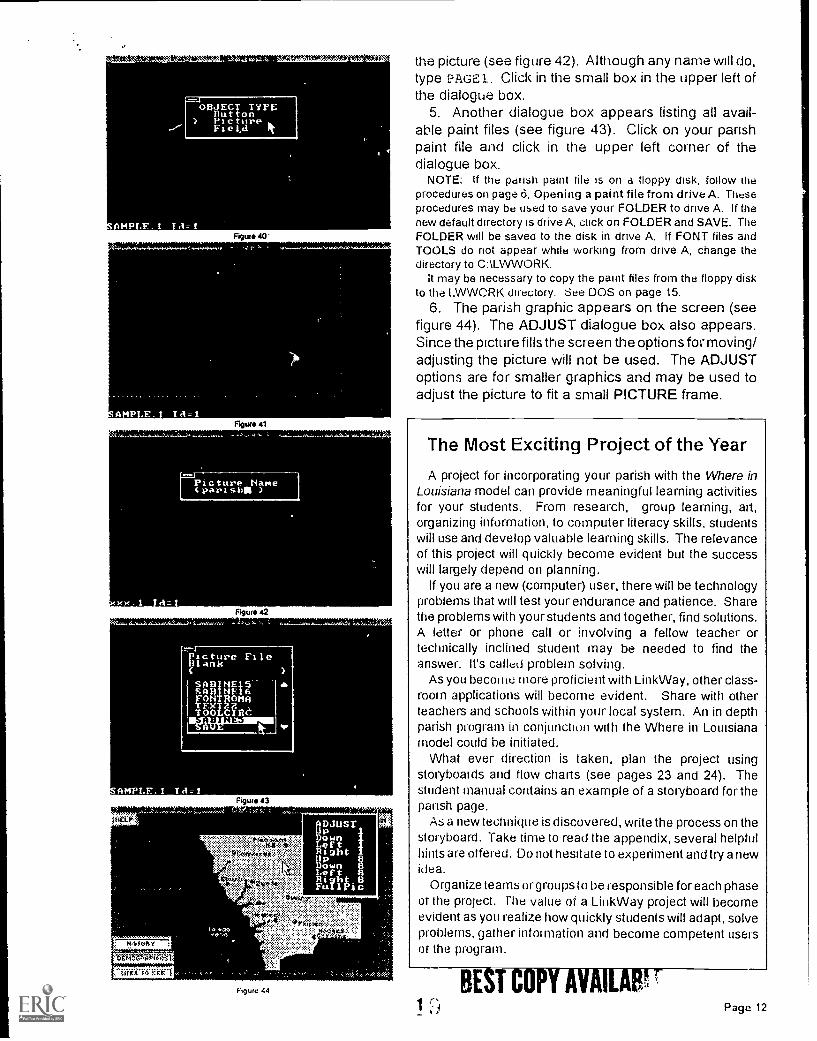
1. Click on OBJECT and NEW. A dialogue boxappears (see figure 40). Click on PICTURE.
2. The cursor changes to a small box. Move thecursor to the upper left corner of the screen an clickonce
3. Drag the box (frame) to the lower right corner ofthe screen and click (see figure 41). The frame definesthe area that will display the parish graphic. AllOBJECTS (BUTTONS, PICTURES, and FIELDS) arelocated and defined in the same manner. Think of theframe as a window that will allow the parish graphic fileto show through the page.
4. A dialogue box appears requesting a name for
Page 11
j
Figure 35
Figure 30
Figure 37
joislitrireait
Figure 38
.16W4'.. tare ow,
OrmArre"f,.ife,roeY*6,
te;
Figure 39
BEST COPY AVM 41/11
,AMPLF.1 A=t
- 4 - ,
.AMPLE. 1 cl 1
Rip:440
tt 1401:
"6-rtMra`iiWil
:I/I1
Nuts 41
Nur* 42
::
I
I
Figure 43
34:cmvorycg
JP'
41f',A` 4c:sok.
r.
4:any
sr. ..42.k
rk1{.4r,a
vit,rdtra
Flgure 44
the picture (see figure 42). Although any name will do,type PAGE 1. Click in the small box in the upper left ofthe dialogue box.
5. Another dialogue box appears listing ail avail-able paint files (see figure 43). Click on your parishpaint file and click in the upper left corner of thedialogue box.
NOTE: If the parish paint tile is on a floppy disk, follow theprocedui es on paged, Opening a paint file from drive A. Theseprocedures may be used to save your FOLDER to drive A. If thenew default directory is di ive A, click on FOLDER and SAVE. TheFOLDER will be saved to the disk in drive A. If FONT files andTOOLS do riot appear while working from drive A, change thedirectory to CALWWORK.
It may be necessary to copy the paint files from the floppy diskto the LWWCRK directory. See DOS on page 15.
6. The parish graphic appears on the screen (seefigure 44). The ADJUST dialogue box also appears.Since the picture fills the screen the options fof moving/adjusting the picture will not be used. The ADJUSToptions are for smaller graphics and may be used toadjust the picture to fit a small PICTURE frame.
The Most Exciting Project of the Year
A project for incorporating your parish with the Where inLouisiana model can provide meaningful learning activitiesfor your students. From research, group learning, ail,organizing information, to computer literacy skills, studentswill use and develop valuable learning skills. The relevanceof this project will quickly become evident but the successwill largely depend on planning.
If you are a new (computer) user, there will be technologyproblems that will test your endurance and patience. Sharethe problems with your students and together, find solutions.A letter or phone call or involving a fellow teacher ortechnically inclined student may be needed to find theanswer. It's called problem solving.
As you become more proficient with LinkWay, other class-room applications will become evident. Share with otherteachers and schools within your local system. An in depthparish program in conjunction with the Where in Louisianamodel could he initiated.
What ever direction is taken, plan the project usingstoryboaids and flow charts (see pages 23 and 24). Thestudent manual contains an example of a storyboard for theparish page.
As a new technique is discovered, write the process on thestoryboard. Take time to read the appendix, several helpfulhints are offered. Do not hesitate to experiment and try a newidea.
Organize teams or groups to be responsible for each phaseof the project. The value of a LinkWay project will becomeevident as you realize how quickly students will adapt, solveproblems, gather information and become competent usersof the program.
BEST COPY MAW:4 Page 12
Create BUTTONSThe power of LinkWay is the ability to link information
and pages through BUTTONS without writing code. Theauthoring ability of LinkWay provides teachers and stu-dents tools to use computer technology to create presen-tations and tutorials that have been available only toprogrammers.
Linking PAGES
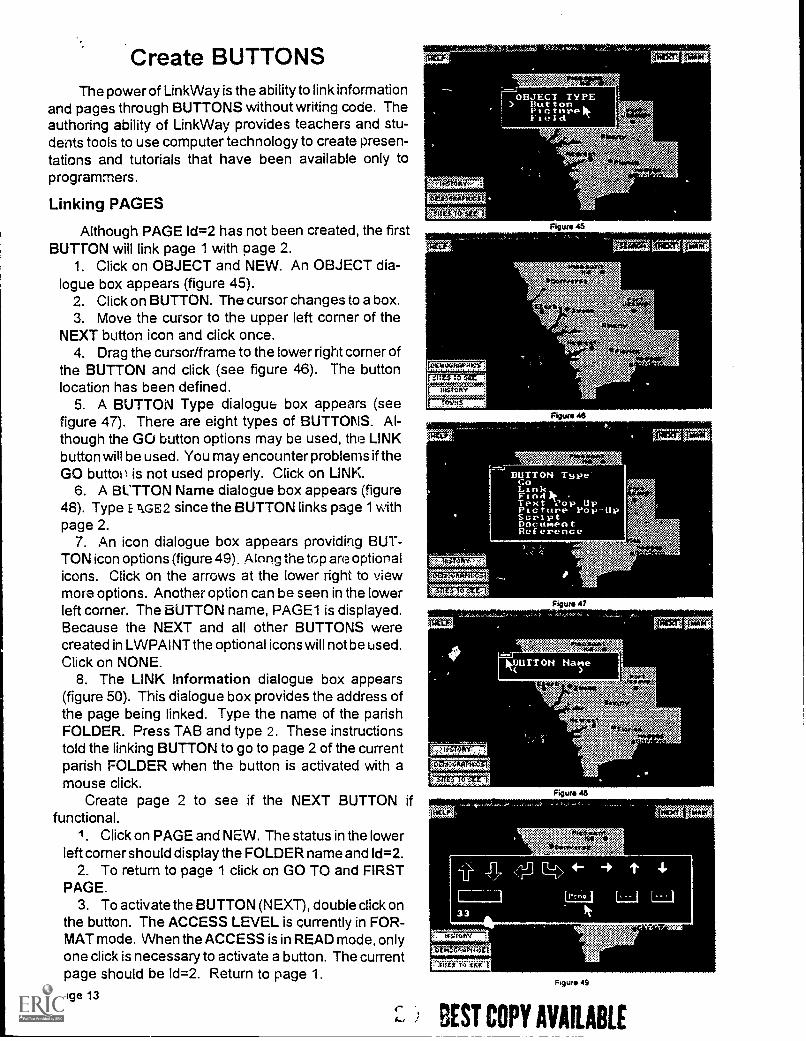
Although PAGE Id=2 has not been created, the firstBUTTON will link page 1 with page 2.
1. Click on OBJECT and NEW. An OBJECT dia-logue box appears (figure 45).
2. Click on BUTTON. The cursor changes to a box.3. Move the cursor to the upper left corner of the
NEXT button icon and click once.4. Drag the cursor/frame to the lower right corner of
the BUTTON and click (see figure 46). The buttonlocation has been defined.
5. A BUTTON Type dialogue box appears (seefigure 47). There are eight types of BUTTONS. Al-though the GO button options may be used, the LINKbutton will be used. You may encounter problems if theGO buttoil is not used properly. Click on LINK.
6. A BUTTON Name dialogue box appears (figure48). Type E kGE2 since the BUTTON links page 1 withpage 2.
7. An icon dialogue box appears providing BUT-TON icon options (figure 49). Along the top are optionalicons. Click on the arrows at the lower right to viewmore options. Another option can be seen in the lowerleft corner. The BUTTON name, PAGE1 is displayed.Because the NEXT and all other BUTTONS werecreated in LWPAINT the optional icons will not be used.Click on NONE.
8. The LINK Information dialogue box appears(figure 50). This dialogue box provides the address ofthe page being linked. Type the name of the parishFOLDER. Press TAB and type 2. These instructionstold the linking BUTTON to go to page 2 of the currentparish FOLDER when the button is activated with amouse click.
Create page 2 to see if the NEXT BUTTON iffunctional.
1. Click on PAGE and NEW. The status in the lowerleft corner should display the FOLDER name and Id=2.
2. To return to page 1 click on GO TO and FIRSTPAGE.
3. To activate the BUTTON (NEXT), double click onthe button. The ACCESS LEVEL is currently in FOR-MAT mode. When the ACCESS is in READ mode, onlyone click is necessary to activate a button. The currentpage should be Id=2. Return to page 1.
Page 13
`"Ir6via4'ffiGio'ortiira£1
`Viiki's6 set 1
si Roo<
oah.ostar41.M
srscr. TO ,Ft,
If:MAY ,
Osa ..,,,,A141'011
Soca so =t).Figure 46
ilaor raw
fet '<$;,,trtariMi;
Figure 45
l'et rase low
Figure 46
'',W0"/nmtak14
Figure 47
"sitemin>,
cest` -am4; ;7.1- ',94;4,t; ,,,/"./.;r4;
' '46,,.f.
UM"
C4*
,',NA.f.P4IrOieract $
nod lotion
Figure 49
BEST COPY AVAILABLE
Z676;sratitkiti
1116. 10-ati
W.Mi5sVitiEVNIMtheir
414641et.
Figure 50
0:4141!JUL,140.4".0?id*RI.414 I ', 4 4:1114/ Zgt.,LE
:44:112100C0K4:CS 1-AAPICCA71124,TASPICe
Figure 51
,, <
"s,
FhltNAIN..k
'JHrrcaY
II' urns
..ttottc-... taw 1.0
to flies't"t' :alft *c F.,
uhvon."-
ame:44.
Figure 52
}Ku, laser fira-r,
I
N irOf: I
i'q'er 1
Flpur. 54
Inex {wan
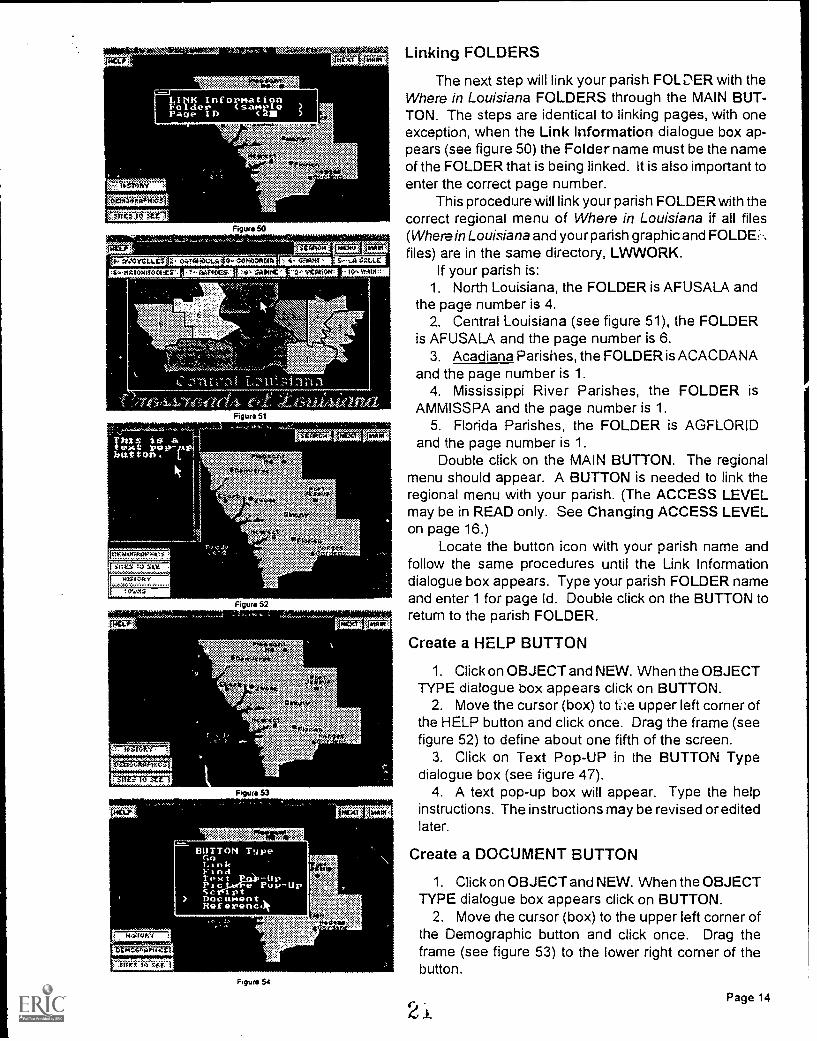
Linking FOLDERS
The next step will link your parish FOLDER with theWhere in Louisiana FOLDERS through the MAIN BUT-TON. The steps are identical to linking pages, with oneexception, when the Link Information dialogue box ap-pears (see figure 50) the Folder name must be the nameof the FOLDER that is being linked. It is also important toenter the correct page number.
This procedure will link your parish FOLDER with thecorrect regional menu of Where in Louisiana if all files(Wherein Louisiana and yourparish graphic and FOLDEi.,.files) are in the same directory, LWWORK.
If your parish is:1. North Louisiana, the FOLDER is AFUSALA and
the page number is 4.2. Central Louisiana (see figure 51), the FOLDER
is AFUSALA and the page number is 6.3. Acadiana Parishes, the FOLDER is ACACDANA
and the page number is 1.4. Mississippi River Parishes, the FOLDER is
AMMISSPA and the page number is 1.5. Florida Parishes, the FOLDER is AGFLORID
and the page number is 1.Double click on the MAIN BUTTON. The regional
menu should appear. A BUTTON is needed to link theregional menu with your parish. (The ACCESS LEVELmay be in READ only. See Changing ACCESS LEVELon page 16.)
Locate the button icon with your parish name andfollow the same procedures until the Link Informationdialogue box appears. Type your parish FOLDER nameand enter 1 for page Id. Double click on the BUTTON toreturn to the parish FOLDER.
Create a HELP BUTTON
1. Click on OBJECT and NEW. When the OBJECTTYPE dialogue box appears click on BUTTON.
2. Move the cursor (box) to upper left corner ofthe HELP button and click once. Drag the frame (seefigure 52) to define about one fifth of the screen.
3. Click on Text Pop-UP in the BUTTON Typedialogue box (see figure 47).
4. A text pop-up box will appear. Type the helpinstructions. The instructions may be revised or editedlater.
Create a DOCUMENT BUTTON
1. Click on OBJECT and NEW. When the OBJECTTYPE dialogue box appears click on BUTTON.
2. Move the cursor (box) to the upper left corner ofthe Demographic button and click once. Drag theframe (see figure 53) to the lower right corner of thebutton.
21Page 14
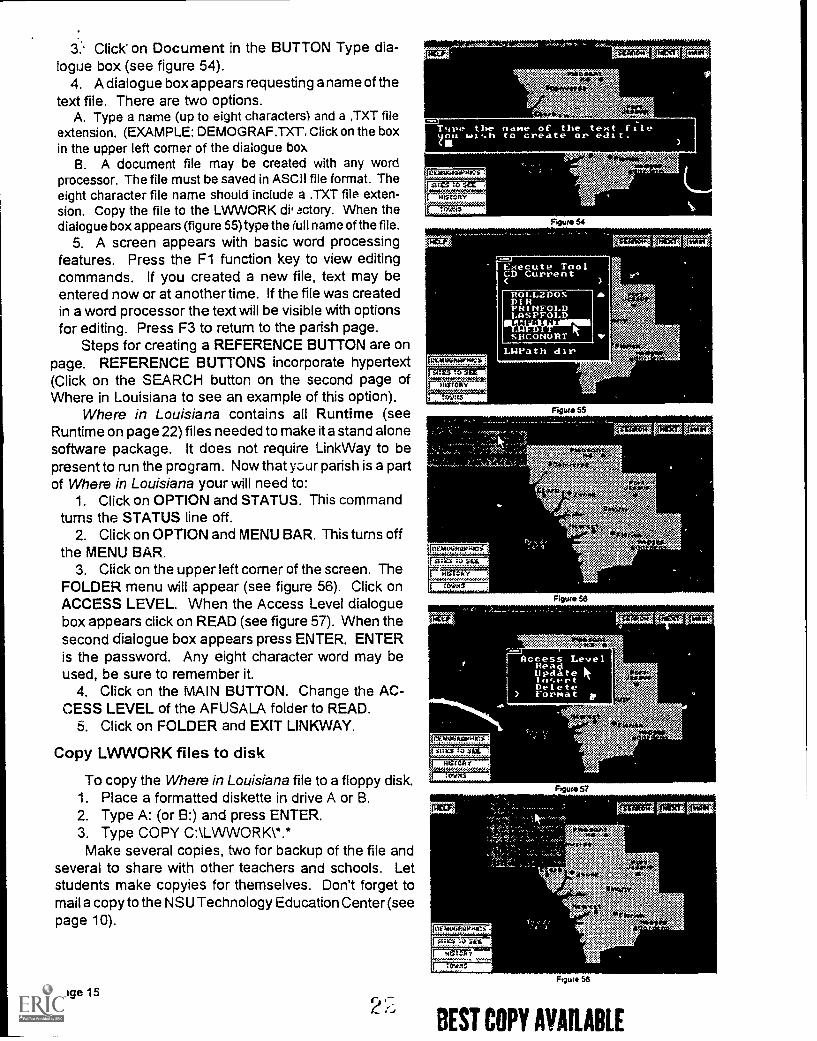
3: Click' on Document in the BUTTON Type dia-logue box (see figure 54).
4. A dialogue box appears requesting a name of thetext file. There are two options.
A. Type a name (up to eight characters) and a ,TXT fileextension. (EXAMPLE: DEMOGRAF.TXT, Click on the boxin the upper left corner of the dialogue box
B. A document file may be created with any wordprocessor. The file must be saved in ASCII file format. Theeight character file name should include a .TXT file exten-sion. Copy the file to the LWWORK dig actory. When thedialogue box appears (figure 55) type the full name of the file.
5. A screen appears with basic word processingfeatures. Press the Fl function key to view editingcommands. If you created a new file, text may beentered now or at another time. If the file was createdin a word processor the text will be visible with optionsfor editing. Press F3 to return to the parish page.
Steps for creating a REFERENCE BUTTON are onpage. REFERENCE BUTTONS incorporate hypertext(Click on the SEARCH button on the second page ofWhere in Louisiana to see an example of this option).
Where in Louisiana contains all Runtime (seeRuntime on page 22) files needed to make it a stand alonesoftware package. It does not require LinkWay to bepresent to run the program. Now that your parish is a partof Where in Louisiana your will need to:
1. Click on OPTION and STATUS. This commandturns the STATUS line off.
2. Click on OPTION and MENU BAR. This turns offthe MENU BAR.
3. Click on the upper left corner of the screen. TheFOLDER menu will appear (see figure 56). Click onACCESS LEVEL. When the Access Level dialoguebox appears click on READ (see figure 57). When thesecond dialogue box appears press ENTER. ENTERis the password. Any eight character word may beused, be sure to remember it.
4. Click on the MAIN BUTTON. Change the AC-CESS LEVEL of the AFUSALA folder to READ.
5. Click on FOLDER and EXIT LINKWAY.
Copy LVVWORK files to disk
To copy the Where in Louisiana file to a floppy disk.1. Place a formatted diskette in drive A or B.2. Type A: (or B:) and press ENTER.3. Type COPY C: \LWWORK \ *.*Make several copies, two for backup of the file and
several to share with other teachers and schools. Letstudents make copyies for themselves. Don't forget tomail a copy to the NSU Technology Education Center (seepage 10).
Page 15
Pra
fr ')41r4
CD
Cit1.411141,3411,:),
CI
;A:4S1SVttKroRr
qtr rae
C.
.0.
I.
: Atg e540at ;>.$
Sf45,§R.02141tek %
0.47
Figure 55
ISS
aggtvg"-;
Figure 58
rgi gicdaen4 -1
ruiwueret,.0. v
Figure 57
IMF
114
fr**.
Figur* 58
2r.:BEST COPY AVAILABLE
*440,k. 45,4,0%w
4
;flivrtsie,,sor
"41
Saute Se
PO'
Figur* 61
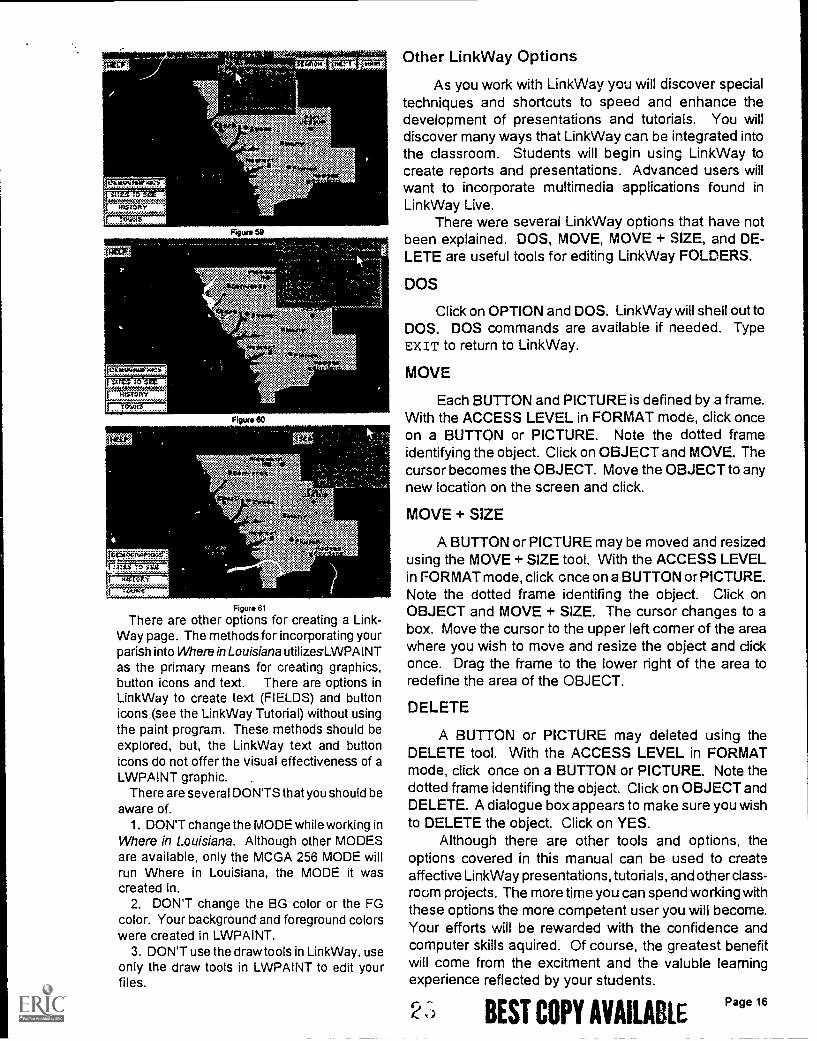
There are other options for creating a Link-Way page. The methods for incorporating yourparish into Wherein Louisiana utilizesLWPAINTas the primary means for creating graphics,button icons and text. There are options inLinkWay to create text (FIELDS) and buttonicons (see the LinkWay Tutorial) without usingthe paint program. These methods should beexplored, but, the LinkWay text and buttonicons do not offer the visual effectiveness of aLWPAINT graphic. .
There are several DON'TS that you should beaware of.
1. DON'T change the MODE while working inWhere in Louisiana. Although other MODESare available, only the MCGA 256 MODE willrun Where in Louisiana, the MODE it wascreated in.
2. DON'T change the BG color or the FGcolor. Your background and foreground colorswere created in LWPAINT.
3. DON'T use the draw tools in LinkWay, useonly the draw tools in LWPAINT to edit yourfiles.
Other LinkWay Options
As you work with LinkWay you will discover specialtechniques and shortcuts to speed and enhance thedevelopment of presentations and tutorials. You willdiscover many ways that LinkWay can be integrated intothe classroom. Students will begin using LinkWay tocreate reports and presentations. Advanced users willwant to incorporate multimedia applications found inLinkWay Live.
There were several LinkWay options that have notbeen explained. DOS, MOVE, MOVE + SIZE, and DE-LETE are useful tools for editing LinkWay FOLDERS.
DOS
Click on OPTION and DOS. LinkWay will shell out toDOS. DOS commands are available if needed. TypeEXIT to return to LinkWay.
MOVE
Each BUTTON and PICTURE is defined by a frame.With the ACCESS LEVEL in FORMAT mode, click onceon a BUTTON or PICTURE. Note the dotted frameidentifying the object. Click on OBJECT and MOVE. Thecursor becomes the OBJECT. Move the OBJECT to anynew location on the screen and click.
MOVE + SIZE
A BUTTON or PICTURE may be moved and resizedusing the MOVE + SIZE tool. With the ACCESS LEVELin FORMAT mode, click once on a BUTTON or PICTURE.Note the dotted frame identifing the object. Click onOBJECT and MOVE + SIZE. The cursor changes to abox. Move the cursor to the upper left corner of the areawhere you wish to move and resize the object and clickonce. Drag the frame to the lower right of the area toredefine the area of the OBJECT.
DELETE
A BUTTON or PICTURE may deleted using theDELETE tool. With the ACCESS LEVEL in FORMATmode, click once on a BUTTON or PICTURE. Note thedotted frame identifing the object. Click on OBJECT andDELETE. A dialogue box appears to make sure you wishto DELETE the object. Click on YES.
Although there are other tools and options, theoptions covered in this manual can be used to createaffective LinkWay presentations, tutorials, and other class-room projects. The more time you can spend working withthese options the more competent user you will become.Your efforts will be rewarded with the confidence andcomputer skills aquired. Of course, the greatest benefitwill come from the excitment and the valuble learningexperience reflected by your students.
20 BEST COPY AVAILABLEPage 16
Appendix
HINTS1. Use a word processor to create document
files longer than one page. Short document files maybe created using LWEDIT. Save the file in ASCIIformat and add . DOC to the file extension. Copy thefile to LWWORK. When using a word processor, donot use formatting or style commands such as bold,center, underline, tab, etc.
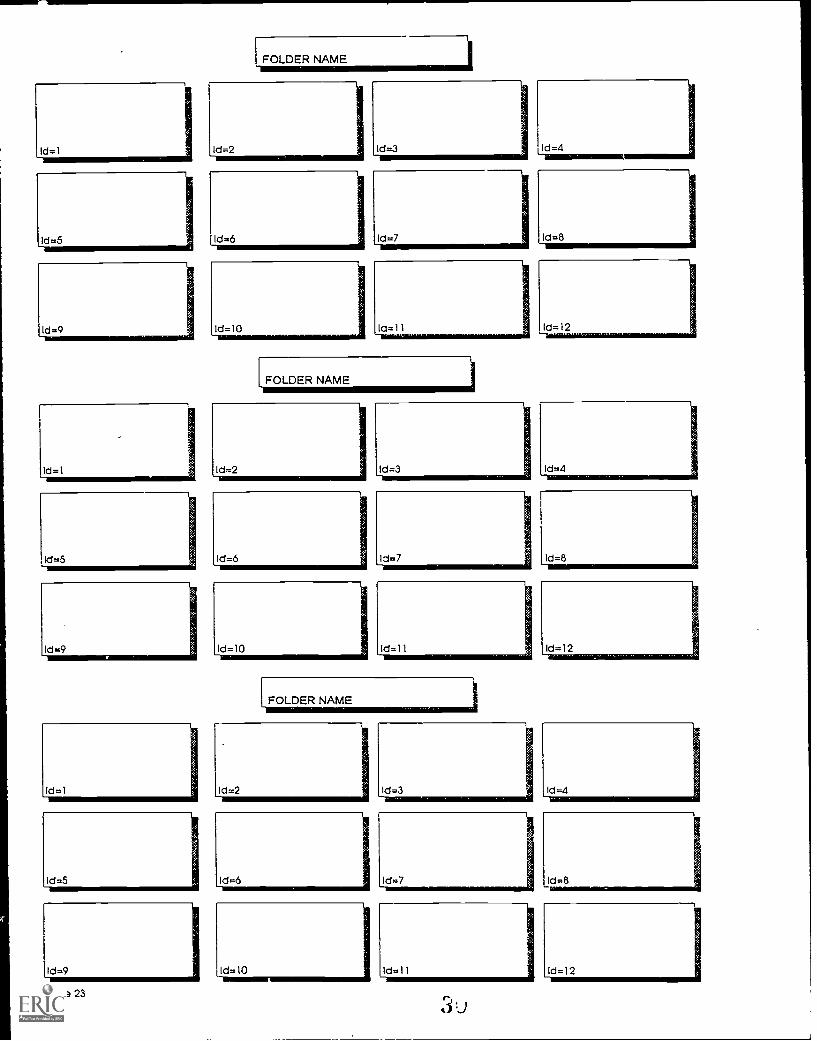
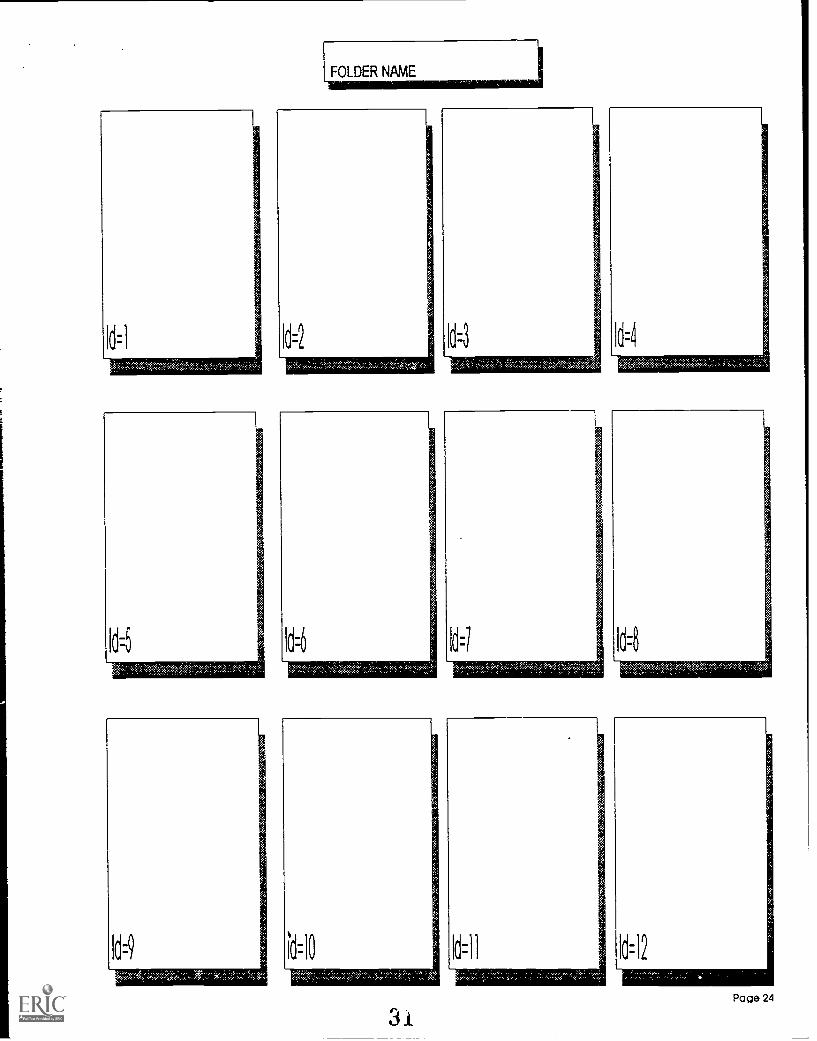
2. Use a flow chart for planning a presentation.Make adjustments to the flow chart as changes aremade during the process of creating the presentation.(See the flow chart for Where in Louisiana on page 23-24). Don't forget to include folder name, page names,and object names.
3. View other presentation programs to seecolors, styles and graphics that effectively project amessage. Television commercials and magazine adsare good sources of examples.
4. Never delete a page. Delete only the text orpictures placed on the page.
5. Do not create a new page until informationand graphics are ready to be placed on the page.
6. Keep the BASE page clean. Avoid placinggraphics. Every object placed on the BASE page willappear on all pages of the FOLDER. Note the low keygraphic CLICK HERE on the Where in Louisiana BASEpage used to indicate how to do to begin the program.
7. Explore Where in Louisiana to see how but-tons are linked. Click on ACCESS LEVEL (see AccessLevel, page 15) in the FOLDER menu. In the FOR-MAT mode, click on the button once then click onOBJECT and EDIT.
8. Confident users of LinkWay should, considerupgrading to LinkWay Live. The latest version ofL *nkWay offers relatively simple tools for incorporat-ing multimedia. Multimedia applications require up-to-date hardware that should be considered (soundcards, video adapters, CD-ROM, Video DISC players,etc.).
An excellent book by Annette Lamb is availablefor those wishing to explore the power of the LinkWaySCRIPTING language.
IBM LinkWay Plus LinkWay Live!Authoring Tool for Presentations, Tutorials &
Information ExplorationCAREER Publishing
910 N. Main St.Orange, CA 92667
Phone: (800) 354-4041
Page 17
LWPAINT HINTS(See Chapter 5 Creating Pictures in the Link-Way documentation)
1. The MIX COLOR in the OPTIONS menushould be explored. Create a sample paint file beforeusing this option. First make a backup copy of yourwork before applying this tool to a paint file.
2. Create a palette with new colors, then importthe palette using the PALETTE command in theOPTIONS menu. Import the palette before you beginwork on the picture. Try to keep a palette that isconsistent for every picture file. Problems can occurwhen using the CUT option from one palette and thenpasting to a picture with a different palette. Makecertain there is backup copy before using this option.
3. Copy a portion of the background and copyover areas to erase or choose the same color from thepalette and use the fill command. Select the color ofthe area to be erased and select BAR as another eraseoption. These tool options are more powerful than theERASE tool.
4. Create a single picture of button icons. Usethe CUT command to save single or groups of buttons.PASTE the icons to any paint file to save time, providecontinuity, and to avoid re-drawing buttons.
5. Creating text in LWPAINT allows for moreflexibility than using the text FIELD in the LinkWayprogram. This is true only for small strings of text. It
works well for hot words/hyper text. Follow normalprocedures for placing text in a graphic. After all texthas been placed on the page, select a different colorand type a word that is to be designated a hot word.Place the new colored word over the word in the textand click. Linking buttons, document buttons and textpop-up buttons can be placed over the word after thegraphic has been place on a LinkWay PAGE.
7. Experimentwith picture pop-up buttons. Oneexample might be to create a smile face and frownface in paint. A response to a question could have theappropriate face appear.
8. IBM STORYBOARD and a shareware pro-gram, CSHOW, are ideal environments for executingscreen captures. Each will accept several graphic fileformats. STORYBOARD provides tools for editingand scaling pictures. LWPAINT has the ability to scale,but is limited when scaling large screen-capturedgraphics or for proportioned scales.
9. Use the line drawing tool to create a marginfor multiple rows of text. Select an unused color anddraw a line forthe left text margin. After creating a row
of text, move the text where it is touching the line andclick. When all rows of text have been placed, selectthe background color and fill the line.
10. You can trace a graphic by making a trans-parency of the outlined graphic. Tape the transpar-ency to the monitor (NOT THE SCREEN) and use thePENCIL tool found under the DRAW menu and themouse to trace. Keep the graphic simple, similar to acolor book outline. When you finish tracing, use the filltool to add color.
11. When pages call for small graphic items,create a paint file for odds and ins graphics (fill thepage with graphics). You will save memory and easyaccess to the graphic it-ms. Yes, you can access thegraphics from any paint file or folder page.
12. The Cannon XAP shot camera is a handytool for taking photos for a presentation. Don't forgetthe hand scanner for clip art. Those first gradedrawings can be very exciting graphics. ImportingXAP shot images requires using the screen capture
program to convert the image to a LinkWay file format.The XAP shot requires a special card and software.Computer Eyes RT is the preferred interface andsoftware to allow XAP shot images to ,be imported intothe computer. Set the resolution to 2.56 color MCGA(320 X 200)
13. Create a custom background. Open the filefor each new picture and save the foie under a newpicture name. Button icons could be included on thebackground to save time.
14. Avoid placing small items or to many itemson a tingle graphic file. Cluttered pages are in-effective for conveying ideas.
15. Do not use more than two fonts .1 a page andmore than three fonts in a presentation. Use the samefont for all main headings. Keep button fonts consis-tent.
16. Take time to design unique button icons forspecial linking task. An example may be a page witha left corner turned down to indicate a button thatreturns to the previous page.
REFERENCE BUTTONS
A Reference button will display a document's textin a pop-up window. This is different from a Documentbutton, which brings up a full-screen text editorcontaining the document. The Reference button isused to look up information. It can have highlightedwords or "triggers," which act like a button within thetext. Triggers are described in "Creating Documentsfor Reference Buttons" on page 4-88 in the LinkWaymanual.
Afteryou have completed the first steps for creatinga Reference button (see "Creating New Buttons" onpage 4-35 in the LinkWay manual), the ReferenceFile Name window appears.
1. Enter the full path and file name of the file youwant to reference and close the window. Themaximum length of the path is 16 characters. Anexample follows: (c:\lwref\sci\tree)
2. If you want to view the reference file, click twicequickly on the button.
If the file you specified cannot be found, thefollowing pop-up window will appear: Missingreference file.
If the file you specified is found, it will be displayedin the pop-up window. The user can scroll up anddown and click on triggers you have specified.
3. Close the window.CREATING DOCUMENTS FORREFERENCE BUTTONS:
Triggers and color changes, in the next twosections, are called mark-ups for documents. Theytell LinkWay how to display the text in Reference
buttons.You can create a document for a Reference button
using any word processor. The LinkWay Text Editor(LWEdit) has a function that helps you format textfor Reference buttons.
Triggers: A trigger is a highlighted word or phrasein a reference window. When you create a documentto be used in a Reference button, you can includetriggers. The user uses the trigger exactly like abutton. The user clicks on the word or phrase, andthe new information or action linked to the trigger isinvoked.
GENERAL RULES FOR ALL TRIGGERSAll mark-ups must be enclosed in matching
percentage sign (%) characters.Multi-word entries can be triggers by connecting
the words with underscores. The entire phrase mustappearon one line in the text pop-up. The underscorewill not be displayed.FILENAME
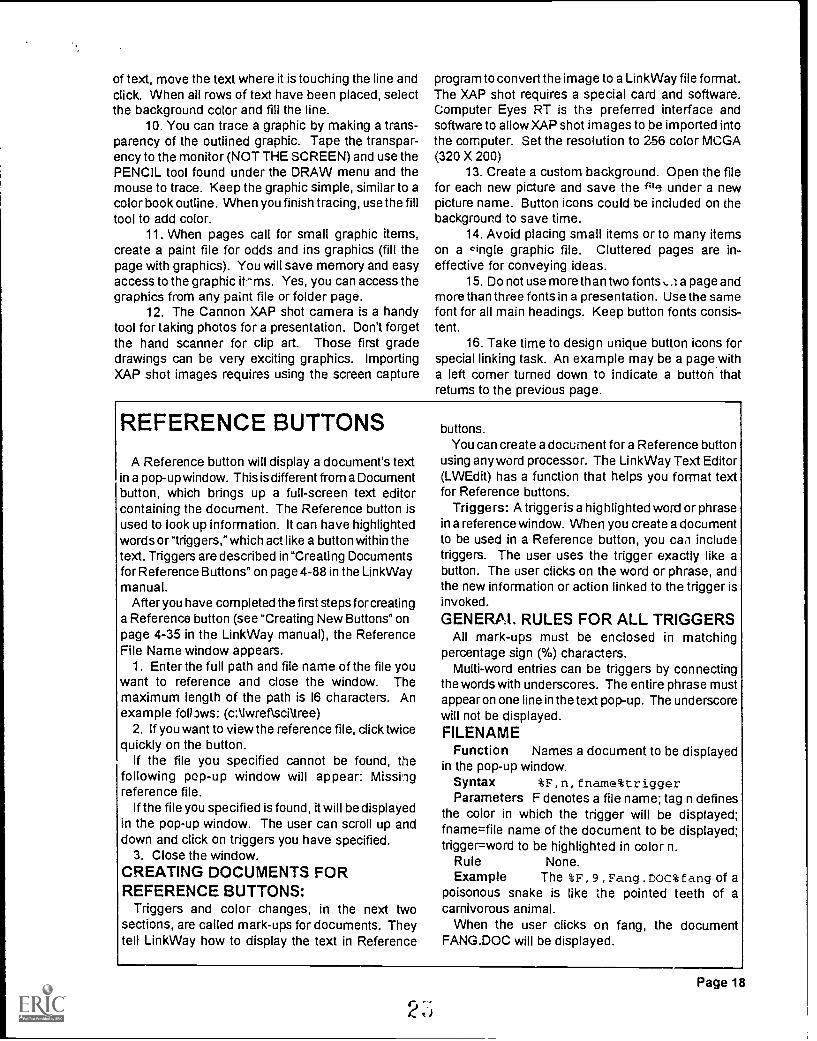
Function Names a document to be displayedin the pop-up window.
Syntax %F,n,fname%triggerParameters F denotes a file name; tag n defines
the color in which the trigger will be displayed;fname=file name of the document to be displayed;trigger=word to be highlighted in color n.
Rule None.Example The %F , 9 , Fang . DOC% f ang of a
poisonous snake is like the pointed teeth of acarnivorous animal.
When the user clicks on fang, the documentFANG.DOC will be displayed.
Page 18
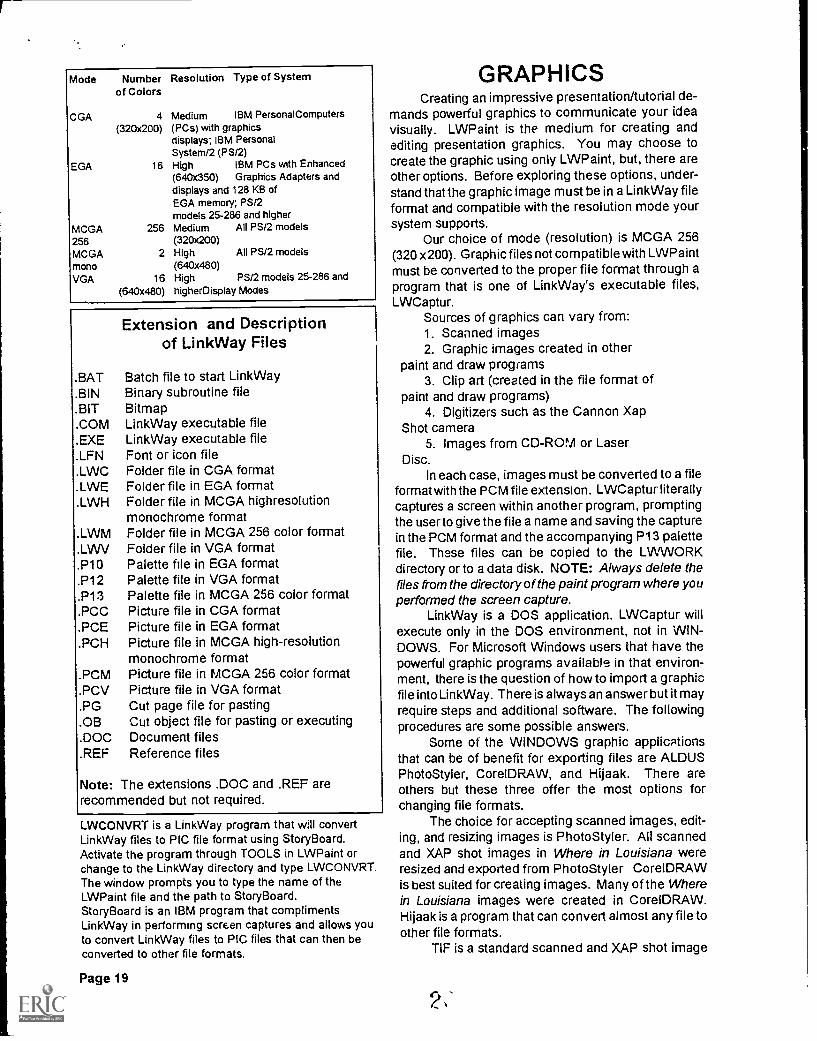
Mode
CGA
EGA
Number Resolution Type of Systemof Colors
4 Medium IBM PersonalComputers(320x200) (PCs) with graphics
displays; IBM PersonalSystem/2 (PS/2)
16 High IBM PCs with Enhanced(640x350) Graphics Adapters anddisplays and 128 KB ofEGA memory; PS/2models 25-286 and higherMedium All PS/2 models(320x200)High All PS/2 models(640x480)High PS/2 models 25-286 andhigherDisplay Modes
MCGA 256256MCGA 2monoVGA 16
(640x480)
.BAT.BIN.BIT.COM.EXE.LFN.LWC.LWE.LWH
.LWM
.LWV
.P10.P12.P13.PCC.PCE.PCH
.PCM
.PCV
.PG
.0B
.DOC
.REF
Extension and Descriptionof LinkWay Files
Batch file to start LinkWayBinary subroutine fileBitmapLinkWay executable fileLinkWay executable fileFont or icon fileFolder file in CGA formatFolder file in EGA formatFolder file in MCGA highresolutionmonochrome formatFolder file in MCGA 256 color formatFolder file in VGA formatPalette file in EGA formatPalette file in VGA formatPalette file in MCGA 256 color formatPicture file in CGA formatPicture file in EGA formatPicture file in MCGA high-resolutionmonochrome formatPicture file in MCGA 256 color formatPicture file in VGA formatCut page file for pastingCut object file for pasting or executingDocument filesReference files
Note: The extensions .DOC and .REF arerecommended but not required.
LWCONVRT is a LinkWay program that will convertLinkWay files to PIC file format using StoryBoard.Activate the program through TOOLS in LWPaint orchange to the LinkWay directory and type LWCONVRT.The window prompts you to type the name of theLWPaint file and the path to StoryBoard.StoryBoard is an IBM program that complimentsLinkWay in performing screen captures and allows youto convert LinkWay files to PIC files that can then beconverted to other file formats.
Page 19
GRAPHICSCreating an impressive presentation/tutorial de-
mands powerful graphics to communicate your ideavisually. LWPaint is the medium for creating andediting presentation graphics. You may choose tocreate the graphic using only LWPaint, but, there areother options. Before exploring these options, under-stand thatthe graphic image must be in a LinkWay fileformat and compatible with the resolution mode yoursystem supports.
Our choice of mode (resolution) is MCGA 256(320 x200). Graphic files not compatible with LWPaintmust be converted to the proper file format through aprogram that is one of LinkWay's executable files,LWCaptur.
Sources of graphics can vary from:1. Scanned images2. Graphic images created in other
paint and draw programs3. Clip art (created in the file format of
paint and draw programs)4. Digitizers such as the Cannon Xap
Shot camera5. Images from CD-ROM or Laser
Disc.In each case, images must be converted to a file
format with the PCM file extension. LWCaptur literallycaptures a screen within another program, promptingthe userto give the file a name and saving the capturein the PCM format and the accompanying P13 palettefile. These files can be copied to the LWWORKdirectory or to a data disk. NOTE: Always delete thefiles from the directory of the paint program where youperformed the screen capture.
LinkWay is a DOS application. LWCaptur willexecute only in the DOS environment, not in WIN-DOWS. For Microsoft Windows users that have thepowerful graphic programs available in that environ-ment, there is the question of how to import a graphicfile into LinkWay. There is always an answer but it mayrequire steps and additional software. The followingprocedures are some possible answers.
Some of the WINDOWS graphic applicationsthat can be of benefit for exporting files are ALDUSPhotoStyler, CorelDRAW, and Hijaak. There areothers but these three offer the most options forchanging file formats.
The choice for accepting scanned images, edit-ing, and resizing images is PhotoStyler. All scannedand XAP shot images in Where in Louisiana wereresized and exported from PhotoStyler CorelDRAWis best suited for creating images. Many of the Wherein Louisiana images were created in CoreIDRAW.Hijaak is a program that can convert almost any file toother file formats.
TIF is a standard scanned and XAP shot image
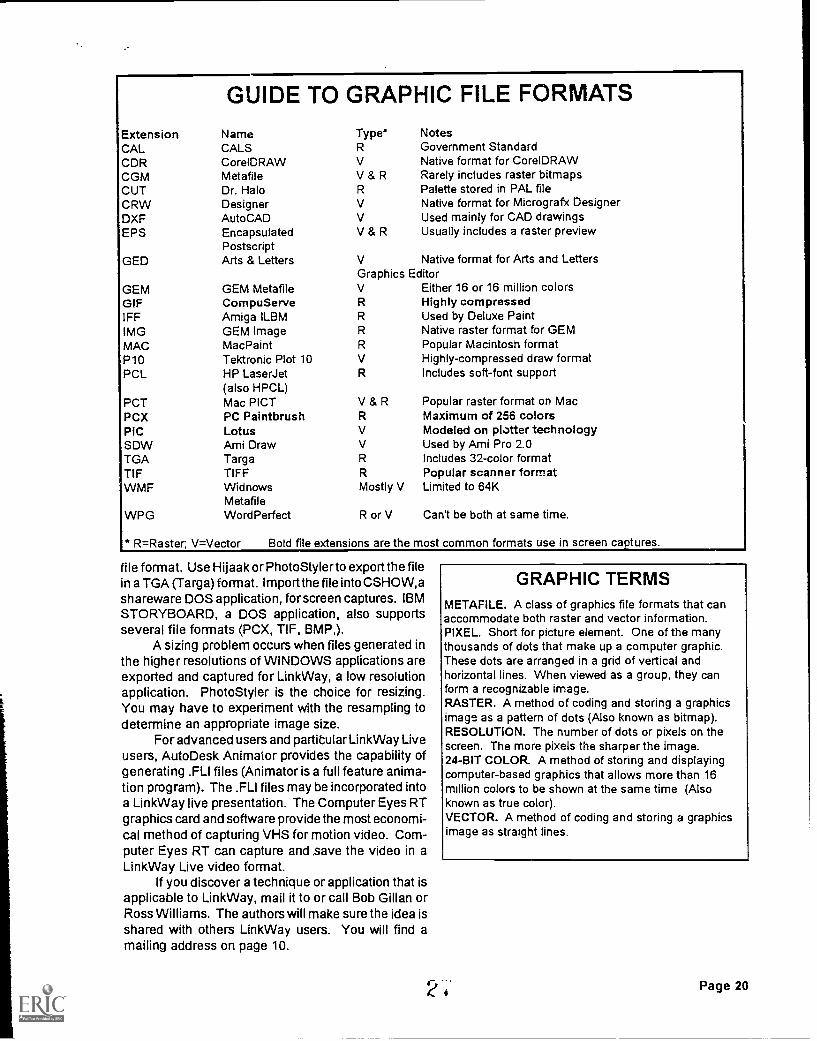
GUIDE TO GRAPHIC FILE FORMATS
Extension Name TypeCAL CALSCDR CoreIDRAW V
CGM Metafile V & RCUT Dr. HaloCRW Designer V
DXF AutoCAD V
EPS Encapsulated V & RPostscript
GED Arts & Letters
GEM GEM MetafileGIF CompuServeI FF Amiga ILBMI MG GEM ImageMAC Mac PaintP10 Tektronic Plot 10 V
PCL HP Laser Jet(also HPCL)
PCT Mac PICT V & RPCX PC PaintbrushPIC Lotus VSOW Ami Draw V
TGA TargaTIF TIFFWMF Widnows Mostly V
MetafileWPG WordPerfect R or V Can't be both at same time.
NotesGovernment StandardNative format for CoreIDRAWRarely includes raster bitmapsPalette stored in PAL fileNative format for Micrografx DesignerUsed mainly for CAD drawingsUsually includes a raster preview
V Native format for Arts and LettersGraphics EditorV Either 16 or 16 million colors
Highly compressedUsed by Deluxe PaintNative raster format for GEMPopular Macintosh formatHighly-compressed draw formatIncludes soft-font support
Popular raster format on MacMaximum of 256 colorsModeled on plotter technologyUsed by Ami Pro 2.0Includes 32-color formatPopular scanner formatLimited to 64K
R=Raster: V=Vector Bold file extensions are the most common formats use in screen ca tures.
file format. Use Hijaak or PhotoStylerto export the filein a TGA (Targa) format. Import the file into CSHOW,ashareware DOS application, for screen captures. IBMSTORYBOARD, a DOS application, also supportsseveral file formats (PCX, TIF, BMP,).
A sizing problem occurs when files generated inthe higher resolutions of WINDOWS applications areexported and captured for LinkWay, a low resolutionapplication. PhotoStyler is the choice for resizing.You may have to experiment with the resampling todetermine an appropriate image size.
For advanced users and partitular LinkWay Liveusers, AutoDesk Animator provides the capability ofgenerating .FLI files (Animator is a full feature anima-tion program). The .FLI files may be incorporated intoa LinkWay live presentation. The Computer Eyes RTgraphics card and software provide the most economi-cal method of capturing VHS for motion video. Com-puter Eyes RT can capture and save the video in aLinkWay Live video format.
If you discover a technique or application that isapplicable to LinkWay, mail it to or call Bob Gillan orRoss Williams. The authors will make sure the idea isshared with others LinkWay users. You will find amailing address on page 10.
GRAPHIC TERMSMETAFILE. A class of graphics file formats that canaccommodate both raster and vector information.PIXEL. Short for picture element. One of the manythousands of dots that make up a computer graphic.These dots are arranged in a grid of vertical andhorizontal lines. When viewed as a group, they canform a recognizable image.RASTER. A method of coding and storing a graphicsimage as a pattern of dots (Also known as bitmap).RESOLUTION. The number of dots or pixels on thescreen. The more pixels the sharper the image.24-BIT COLOR. A method of storing and displayingcomputer-based graphics that allows more than 16million colors to be shown at the same time (Alsoknown as true color).VECTOR. A method of coding and storing a graphicsimage as straight lines.
Page 20
LWCapturLWCaptur is a Link Way program that formats
graphics from other sources to files LInkWay canuse in picture objects and Picture Pop-up buttons.You can use LWCaptur to "capture" a picture fromany application program, graphics package, picturescanner, or any software which displays a picture onthe screen. Then LWCaptur saves the picture in theappropriate file format for display in a LinkWayfolder.Many of the pictures you display on your monitor canbe incorporated into LinkWay this way.
LWCaptur is a program that gets loaded into yourcomputer's memory and stays there until you removeit or turn off your computer.
Starting LWCaptur
See 'Getting Started* on page 2-6 to load LWCapturinto your computer's memory. When it has beenloaded, the following message will appear:LWCapture installed.Once LWCaptur has been installed, it is ready to
be used at any time.
NOTE: If you want to capture a picture in the EGAgraphics mode on a PC, PC XT, or PC AT, you mustfirst perform one step before starting LWCaptur. Atthe DOS prompt, type eqapal and press Enter.
Capturing Screens with LWCaptur
After you have started LWCaptur, you can capturescreens from another program following these steps:
1 At the DOS prompt, load the program containingthe screen you want to capture. This could beanother graphics program or images from a picturescanner.
Note: LwCaptur may be hindered in the followingcircumstances: If you are using a program that usesthe Shift+PrintScr combination, LWCaptur maynot work. If you are using PC/Paintbrush, the FRIEZEprogram will deactivate LWCaptur. Some programsuse nonstandard ways of displaying pictures or settingpalettes. These may not work correctly withLWCaptur.
2 When the picture you want to capture is on thescreen, press Shift + PrtScr to capture it.
3 A prompt appears on the top line displaying adefault file name for the captured picture. If you like,you may type a new name for the picture file. Thenpress Enter. If your program uses a mouse, do notmove the mouse while the capture is taking place.
4 The picture is saved in the current directory. Theprompt at the top of your screen disappears and youcan continue using the program. You can capture as
Page 21
many pictures as you like. Each will be given adifferent default file name. After capturing picturesin the MCGA 256 graphics mode, you should use theLWPalett utility described on page 5-57 in theLinkWay manual.
Th.. picture will be saved in a file with an extensionwhich indicates the graphics mode of the picture. Apalette file that contains information about the colorpalette will also be saved for pictures in EGA, VGA,and MCGA 256 graphics modes.
If a picture was stored in a file namedSAMPLE.PCM, then the associate palette would bestored in the file SAMPLE.P13. In order for a pictureto be displayed in a folder, be sure to keep thepalette file with the picture file.
You must copy the picture and the associatedpalette file into the directory containing the folder inwhich it will be used.
Graphics Modes in LWCaptur
LWCapturwill determine the graphics mode of thepicture you are trying to capture and produce a filefor the appropriate mode in the current directory ordrive. If the display screen is in a mode not supportedby LinkWay, the program will still save a file, but thefile will not be usable with LinkWay.
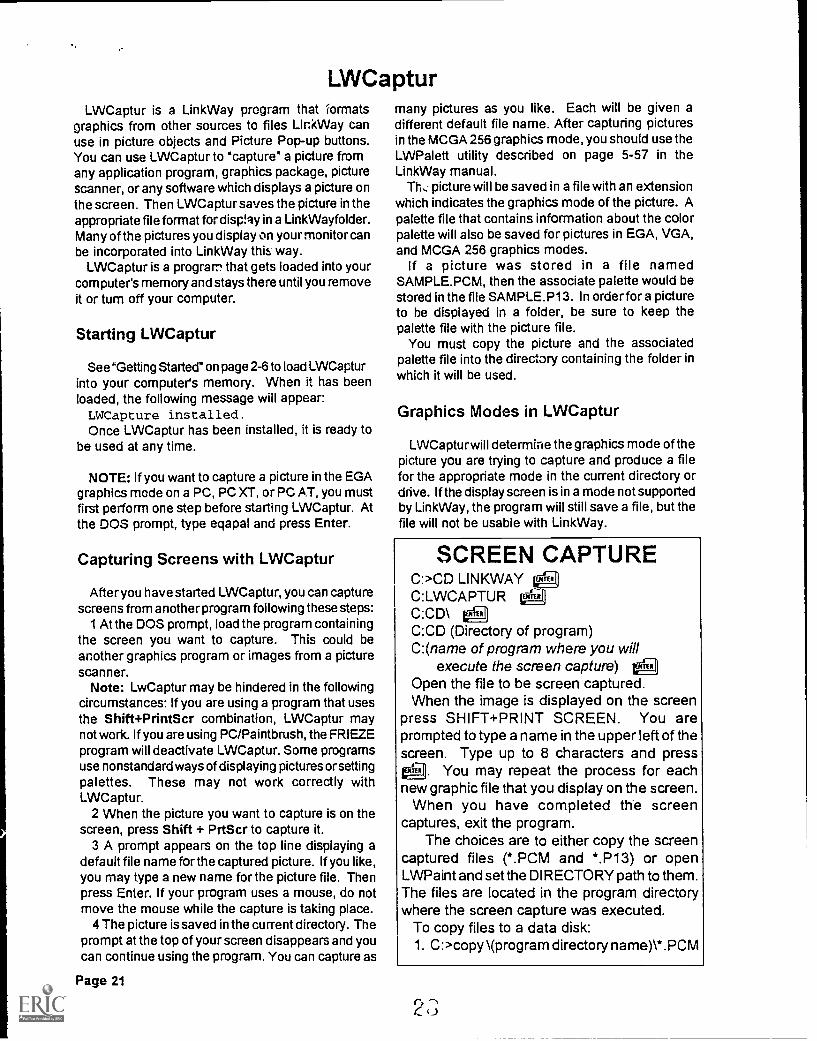
SCREEN CAPTUREC:>CD LINKWAY t)4C:LWCAPTURC:CD\C:CD (Directory of program)C:(name of program where you will
execute the screen capture) elOpen the file to be screen captured.When the image is displayed on the screen
press SHIFT+PRINT SCREEN. You areprompted to type a name in the upper left of thescreen. Type up to 8 characters and press
. You may repeat the process for eachnew graphic file that you display on the screen.
When you have completed the screencaptures, exit the program.
The choices are to either copy the screencaptured files (*.PCM and *.P13) or openLWPaint and set the DIRECTORY path to them.The files are located in the program directorywhere the screen capture was executed.
To copy files to a data disk:1. C: >copy \(program directory name)\*.PCM
A: will copy all files with a PCM extension todiskette in drive A. Do not forget to copy all P13files. If you successfully copied the files, deletethe PCM and P13 files that are in the programdirectory. You may choose to access the filesfrom LWPaint through the Directory option.Make certain the path is correct.
2. Open LWPaint and set the path to theprogram and open the files. Do not forget tochange the path back to your data disk andsave the file.
Because of their compatibility of common
graphic file formats, two programs, StoryBoardand CSHOW complement LinkWay screencaptures (many DOS programs will allow screencaptures). StoryBoard provides tools toenchance the image before the capture.CSHOW is a shareware program that acceptsseveral file formats that StoryBoard notrecognize.
NOTE: The resolution of the programdisplaying files for the screen capture MUSTsupport the current LinkWay screen mode.
LinkWay RuntimeThe LinkWay Runtime program allows LinkWay
applications to be displayed without the LinkWayprogram. The following files are included with theRuntime program and may be distributed with yourLinkWay application:RLINKWAY.COM LinkWay Runtime
command file.LWR. EXE LinkWay Runtime
executable file.LWEDIT.EXE Text editor. If your
application includes any Document button, this filemust be included.
LWPRINT.EXE Used to print pages on agraphics printer.
PRINTLAS.EXE Used to print pages on alaser printer.
*.LFN Standard font and icon files.All other portions of the IBM LinkWay program are
subject to the terms and conditions of the ProgramLicense Agreement. If you installed LinkWay ondiskettes, a Runtime diskette was created for you. Ifyou installed LinkWay on a fixed disk, you cancreate a Runtime diskette by following the stepsdescribed here:
1 Type cd \ linkway and press Enter.2 Insert a blank, formatted diskette in drive A.3 Type makerun and press Enter.4 The Runtime files are copied to the diskette in
drive A.You may not need all of these files for your
application. Delete any unnecessary files and thencopy your completed folder and all correspondingfiles (picture, document, and so on) to the diskette.
Using Runtime
Start the Runtime program by entering thefollowing:RLINKWAY foldername
An IBM title is displayed for 2 seconds and thenthe specified folder is displayed.Runtime Limitations
The features normally used for "authoring" anapplication will be disabled in Runtime. Any attemptto execute a disabled feature will result in the followingerror message:
Runtime version Function notavailable.
Creating a Batch File
After you have created a Runtime disk and copiedall of the work files to the disk, a batch file can becreated to simplify the process of starting anapplication. Start options can be included in thebatch file to tailorthe program modes, save memory,and control the environment (See Start Options onpages B-11 to B-14 in LinkWay manual).
Use a word processing software program to createthe following batch file. Type:@echo offrlinkway foldername.lwm /r /b It@echo offclsThe "folder name" refers to the first folder in the
application. Type the name of the folder and includethe . LWM extension.
Save the batch file in ASCII to the floppy diskettecontaining your application files. The batch filename you are saving should consist of a simplename and must contain the extension . BAT
(Example: The Where in Louisiana batch fi;ename is LA.BAT. Typing LA at the A prompt is allthat is needed to start the Where in LouisianaRuntime application that is on the floppy diskette.)The AIt +Q key combination can be used to exit
LinkWay. Remember to include this information onyour diskette label and in the HELP buttons.
Page 22
FOLDER NAME
Id=2
Id=6
Id=10
Id=7
FOLDER NAME
Id =2
Id=6
Id=3
Id=8
Id=12
Id=10 lId =11
FOLDER NAME
Id=2
Id=6
Id=1
Id=5
Id=9
Id=1
Id=5ti
Id=9
Id=9
Page 23
3u
Id=8
Id=12
FOLDER NAME
Id=2
d :10
3Page 24
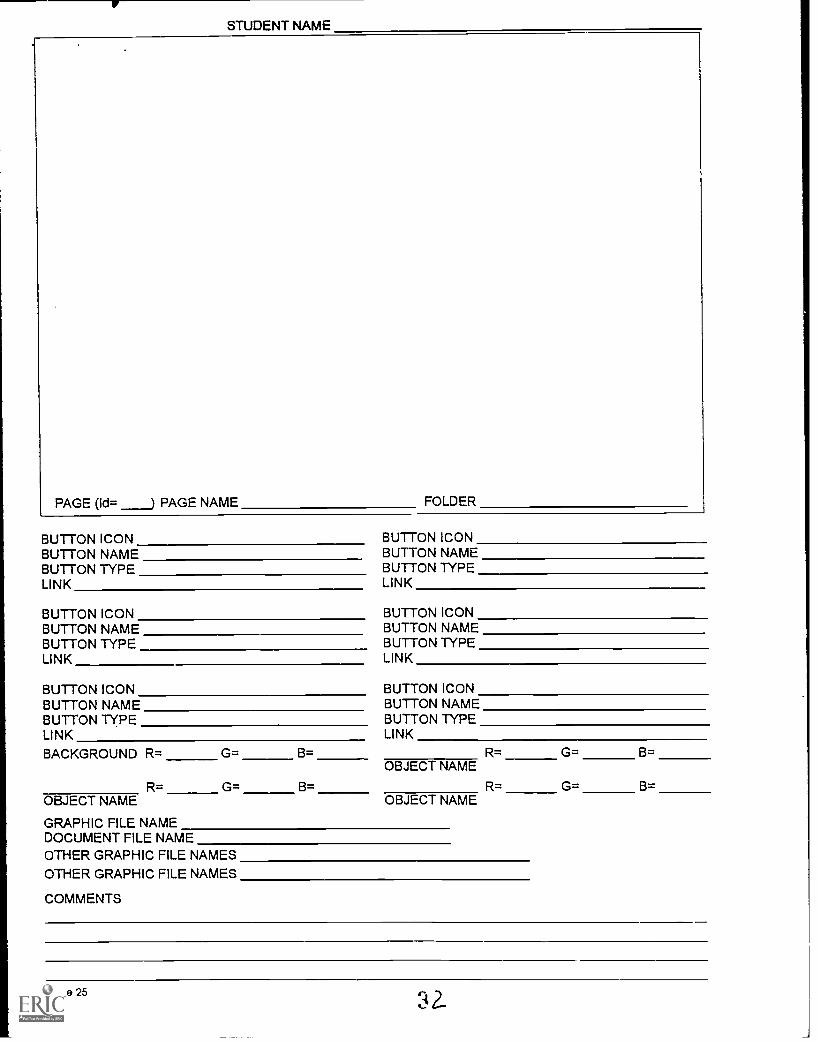
STUDENT NAME
PAGE (Id= ) PAGE NAME FOLDER
BUTTON ICON BUTTON ICONBUTTON NAME BUTTON NAMEBUTTON TYPE BUTTON TYPELINK LINK
BUTTON ICON BUTTON ICONBUTTON NAME BUTTON NAMEBUTTON TYPE BUTTON TYPELINK LINK
BUTTON ICON BUTTON ICONBUTTON NAME BUTTON NAMEBUTTON TYPE BUTTON TYPELINK LINK
BACKGROUND R= G= B= R= G= B=OBJECT NAME
R= G= 3= R= G= B=OBJECT NAME OBJECT NAME
GRAPHIC FILE NAMEDOCUMENT FILE NAMEOTHER GRAPHIC FILE NAMESOTHER GRAPHIC FILE NAMES
COMMENTS
Page 2532_
Top Related