


Languages
Pages
Legal


DESTORTION IN PORTAITURE

Portraiture Through History
In order to achieve in this topic the first thing I need to do is really know how to take a perfect portrait.
• Alter perspective, don’t just take a photo from eye level • Play with eye contact, direct stares, looking off camera looking
within the frame • Brake the rules of composition, try the rule of thirds brake up
the photo don’t always have the subject completely central • Getting the correct lighting for a photo, do you need natural light
or artificial light heavy back or side light?• Some times you may need to shoot candidly, so your sitter is
much more at ease, this works well with children.
The word portrait carries a great deal meaning. In the early days of photography portraits had only every been paintings so all the portraits were done with complete perfection. For example the cameras used to have very long exposures so the sitter used to have a neck clamp to not let the sitters
face blur.
2) One of the oldest photographic
portraits known, made by Joseph
Draper 1839.
1) Portrait of Pope Julius II is an oil painting of
1511–12 by the Italian High Renaissance painter Raphael.
3) Jack Cardiff photo of Audrey Hepburn 1956
4) David LaChapelle "Uma Thurman: Gossip", 1997
1) The first kind of portraits were all painted. The portraits were mostly idealised and only really available to the rich and powerful. There was often a use of symbolism in the photos for example in the painting of pope Julius you can see he is wearing rings which symbolises wealth, he's also wearing papal clothing showing he is the pope.
2) As shown in the next photo on my time line, this was a very earl portrait of someone with a under-developed camera there is no depth to the photo as there is a huge lack of contrast. The sitter is very formal, the pose is similar to that of someone being painted.
3) This photo was taken with a much more developed camera and setting. The photo is taken with a thing called beauty lighting. This is when direct light is used to spotlight a person to highlight there natural contours combine this with the high contrast then you have a much more developed photo.
4) This is when photos took a new form and style. Portraits became much more unconventional, the angles, lighting and make-up took a new arrangement. Photographers began to be able to really express themselves.
5) Now we can even take some of the first portraits and re-work them in to new photographs with unconventional meanings. This is giving the photos new life and turning the convention of then upside down.
5) Jane long “underneath” 2015

Mood Bored of Distorted Portraits Unconventional definition: Anything that's nonconformist or out of the ordinary can be described as unconventional. Every culture has its own conventions or norms and what may be unconventional in one region might be typical in another.
The perception of what's unconventional is determined by context.

MAURIZIO ANZERI
“Maurizio Anzeri makes his portraits by sewing directly into found vintage photographs. His embroidered patterns garnish the figures
like elaborate costumes, but also suggest a psychological aura, as if revealing the person’s thoughts or feelings. The antique appearance
of the photographs is often at odds with the sharp lines and silky shimmer of the threads. The combined media gives the effect of a
dimension where history and future converge.”http://www.saatchigallery.com/artists/maurizio_anzeri.htm?section_na
me=new_britannia
The Italian born artist, in creating this series of photos he went around old flea markets and charity shops finding old portraits of people. He then stitched intercut patterns over the faces giving
them a new life and a whole new meaning such as was previously said “A psychological aura” this is showing how he's turning these mundane portrait inside out to reveal there inner feelings for the
rest of the world to see.
MAURIZIO ANZERI INSPIRED
SHOOT PLAN AESTHETIC
CONSIDERATIONS AND INSPARATION
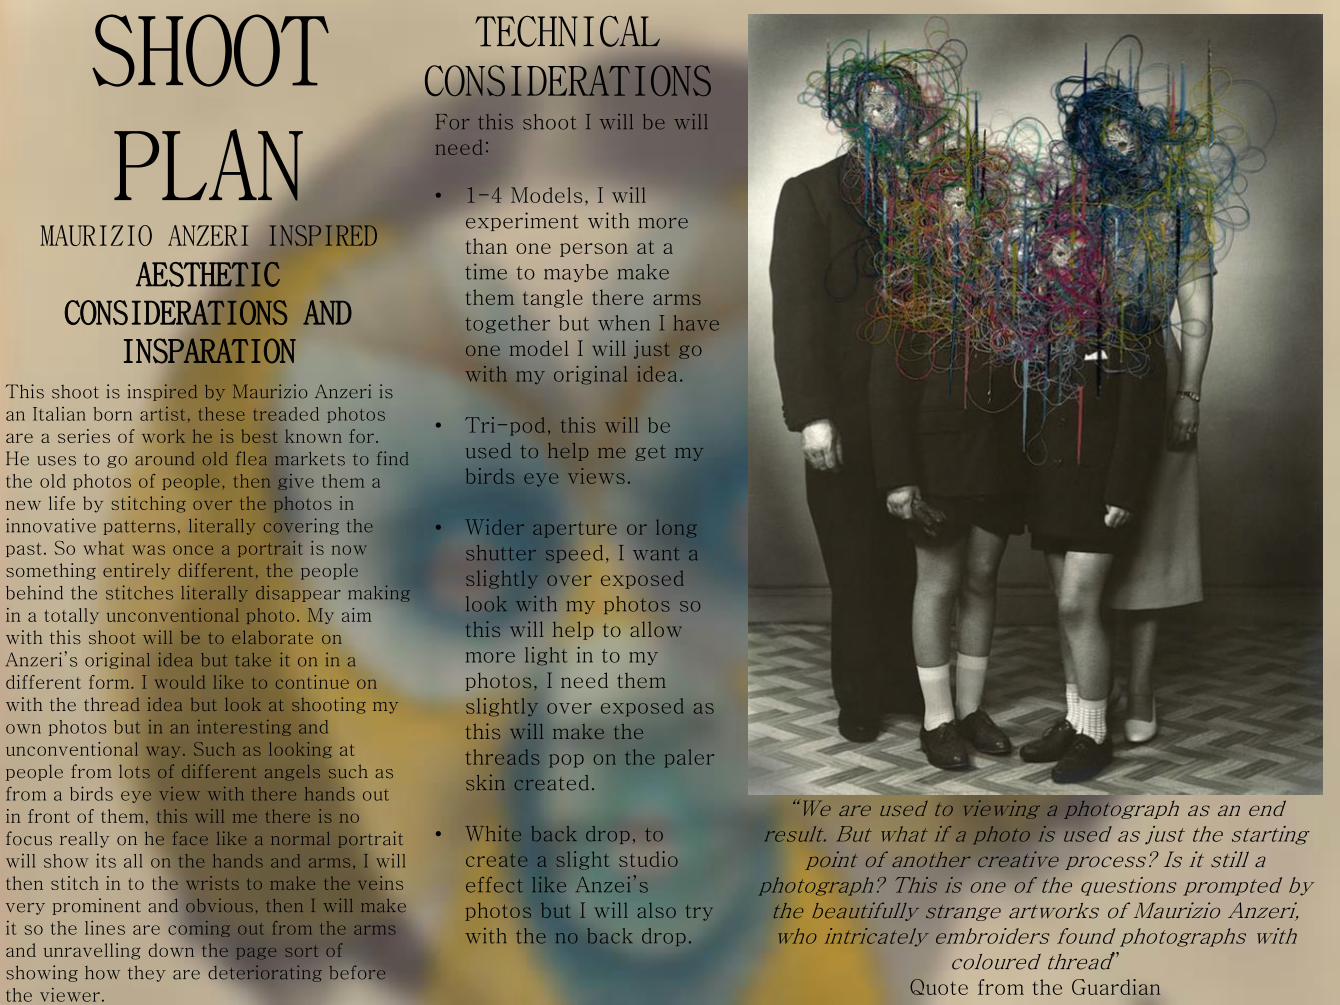
This shoot is inspired by Maurizio Anzeri is an Italian born artist, these treaded photos are a series of work he is best known for. He uses to go around old flea markets to find the old photos of people, then give them a new life by stitching over the photos in innovative patterns, literally covering the past. So what was once a portrait is now something entirely different, the people behind the stitches literally disappear making in a totally unconventional photo. My aim with this shoot will be to elaborate on Anzeri’s original idea but take it on in a different form. I would like to continue on with the thread idea but look at shooting my own photos but in an interesting and unconventional way. Such as looking at people from lots of different angels such as from a birds eye view with there hands out in front of them, this will me there is no focus really on he face like a normal portrait will show its all on the hands and arms, I will then stitch in to the wrists to make the veins very prominent and obvious, then I will make it so the lines are coming out from the arms and unravelling down the page sort of showing how they are deteriorating before the viewer.
“We are used to viewing a photograph as an end result. But what if a photo is used as just the starting
point of another creative process? Is it still a photograph? This is one of the questions prompted by the beautifully strange artworks of Maurizio Anzeri, who intricately embroiders found photographs with
coloured thread”Quote from the Guardian
TECHNICAL CONSIDERATIONSFor this shoot I will be will need:
• 1-4 Models, I will experiment with more than one person at a time to maybe make them tangle there arms together but when I have one model I will just go with my original idea.
• Tri-pod, this will be used to help me get my birds eye views.
• Wider aperture or long shutter speed, I want a slightly over exposed look with my photos so this will help to allow more light in to my photos, I need them slightly over exposed as this will make the threads pop on the paler skin created.
• White back drop, to create a slight studio effect like Anzei’sphotos but I will also try with the no back drop.

CONTACTS AND EDIT IDEAS
The plan with these photos was to try and edit them by stitching in to them, and experimenting with a few different techniques I tried inks which created an interesting effect but no one
that worked well with the photo its self.

CHOSEN SHOT
While I went on with the stitching idea I also had the idea of maybe trying to show the lines threw dripping ink on the page, so I did a tester photo on a spare print. I really disliked the final outcome of the inks as it was not as refined as I wanted and it felt like a very dark photo which really isn't my
style. I tried to make my final photo look as antiqued as possible giving it a sepia effect which also helped to make the red thread stand out. The idea at first was that I would bring the stitching down in to the negative space and
leave it in a tangled mess trying to replicate the models feelings of unravelling. In the end I did not continue with this idea as I found the
composition was wrong and didn’t make as much sense as I would have liked.If I was to re-do this shoot I would have started with more interesting photos
or possibly replicated the artists idea of using old photos I had found and I don’t think I would have added the sepia effect as I fell the photo is much
more eye catching in black and white.

WES NAMAN
“The practice of modifying the human body has been a facet of artistic expression since
time immemorial. In particular, facial manipulation,
reconfiguration and distortion have enabled us to explore
how we present ourselves and are perceived by our peers; to
investigate how specific alterations to appearance can
change perceptions of character.”Taken from:
https://contrastly.com/wes-naman-interview/
“Wes Naman’s series of photographs evokes feelings of horror and
humour in equal measure. What these images demonstrate is that even minor, subtle changes can provoke diametrically opposed
reactions in the viewer. The point Naman makes so eloquently is that what separates the beautiful from
the grotesque, the symmetrical from the asymmetrical or the appealing from the repulsive is actually very
little.”Taken from:
https://contrastly.com/wes-naman-interview/
These photos by Wes Naman are very thought provoking and interesting as lots of ideas spring
to mind when the photo if first seen. After looking in a little more depth and researching the photos I
was able to establish an understanding of the photos. They are really showing how one little change in a persons face can make he biggest
difference on how they are then perceived. I love the idea that you can take a portrait that may have a simple meaning and simply distort it to make the
viewer perceive it in a whole new light.

WES NAMANINSPIRED SHOOT
SHOOT PLAN
AESTHETIC CONSIDERATIONS AND
INSPARATION These photos directly stood out to me as I felt they had something more to say rather than being just standard portraits they are almost showing something being supressed under the tangled web of tape. They again are showing very untraditional styles of portrait. The other clever thing about these photos is the simplicity about them there is nothing to take any distractions away from the eye making the faces far more fixating. When I do this I want to use the idea of taping up the face but I will look at taking much more close up photos and making the faces look almost abstracted.
TECHNICAL CONSIDERATIONSFor this shoot I will be will need:
• 1-2 different models- so it will create different looks threw the tape.
• Natural light- to contrast with the artists used of studio light
• Tape – to tape up the face and make the skin on the face

CONTACTS AND EDITING IDEASThis shoot was very enjoyable and I was very happy with the outcome of the photos. I really like how the use of natural light reflects off the tape
adding a whole new dimension to the photo. The close up nature didn’t give me a huge depth of field to
work with which was a little bit of a struggle but I managed to fix this
problem by taping the noses of my models down. I will be editing these
photos with a high contrast and possibly trying them in back and
white to see if this adds to he photo.

For one photo I decided to turn it black and white as it helped to show up the contrast in the creases.
Crop tool used to square off my photos
I also edited the contrast on curves this enhances the creases the tape has created.
These photos astatically have tuned out well I really like he effect that has been created,
because of the dark chiaroscuro it looks as if it
was a two dimensional photo scrunched up and then
flattened. By increasing the contrast this has really given the photo a significant amount
more depth in the photo, threw modelling. The camera I was using had a very narrow
depth of field so getting everything in focus was a
challenge.

1st SHOTS & ARTIST REFRENCES These photos came out really well as an end result. I really liked the way the photos almost look like they were printed on photo paper, then someone screwed it all up and then flattened it back out. When doing these final shots I came across the artist Ken O'Hara and it actually really related to my photos and how he was striping back identity and then that research lead me to azizand cucher two artists who tamper with identity like O’Hara but they don’t just strip it back they take it away completely. By totally removing features. I now feel by combining these two artists to inspire a new shoot this could be a really interesting development. Using these two artists tied together can start to make a really interesting base of lots of future photo shoots.
Basic plan:
• Re-take tape photos in a similar way to the last time.
• When editing turn it black and white then burnish out the tape and leave the creases.
• This will show how both artists inspired the next shoot.
ARTIST REFRENCE PAGE
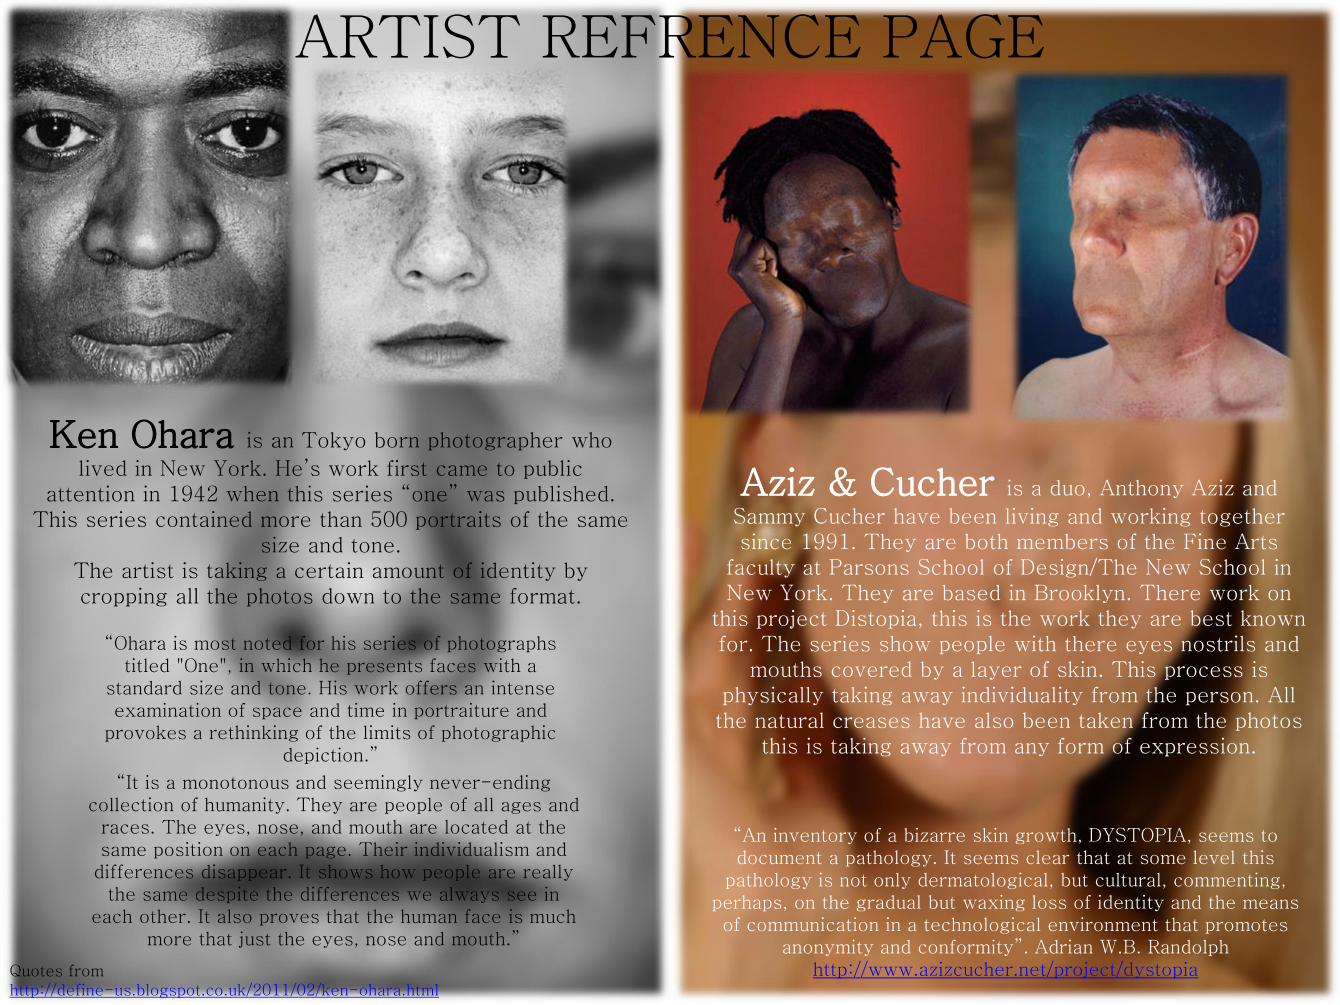
“Ohara is most noted for his series of photographs titled "One", in which he presents faces with a
standard size and tone. His work offers an intense examination of space and time in portraiture and
provokes a rethinking of the limits of photographic depiction.”
“It is a monotonous and seemingly never-ending collection of humanity. They are people of all ages and
races. The eyes, nose, and mouth are located at the same position on each page. Their individualism and
differences disappear. It shows how people are really the same despite the differences we always see in
each other. It also proves that the human face is much more that just the eyes, nose and mouth.”
Quotes from http://define-us.blogspot.co.uk/2011/02/ken-ohara.html
“An inventory of a bizarre skin growth, DYSTOPIA, seems to document a pathology. It seems clear that at some level this
pathology is not only dermatological, but cultural, commenting, perhaps, on the gradual but waxing loss of identity and the means of communication in a technological environment that promotes
anonymity and conformity”. Adrian W.B. Randolphhttp://www.azizcucher.net/project/dystopia
Ken Ohara is an Tokyo born photographer who
lived in New York. He’s work first came to public attention in 1942 when this series “one” was published.
This series contained more than 500 portraits of the same size and tone.
The artist is taking a certain amount of identity by cropping all the photos down to the same format.
Aziz & Cucher is a duo, Anthony Aziz and
Sammy Cucher have been living and working together since 1991. They are both members of the Fine Arts
faculty at Parsons School of Design/The New School in New York. They are based in Brooklyn. There work on
this project Distopia, this is the work they are best known for. The series show people with there eyes nostrils and
mouths covered by a layer of skin. This process is physically taking away individuality from the person. All the natural creases have also been taken from the photos
this is taking away from any form of expression.
CO
NT
AC
TS A
ND
ED
ITIN
G ID
EA
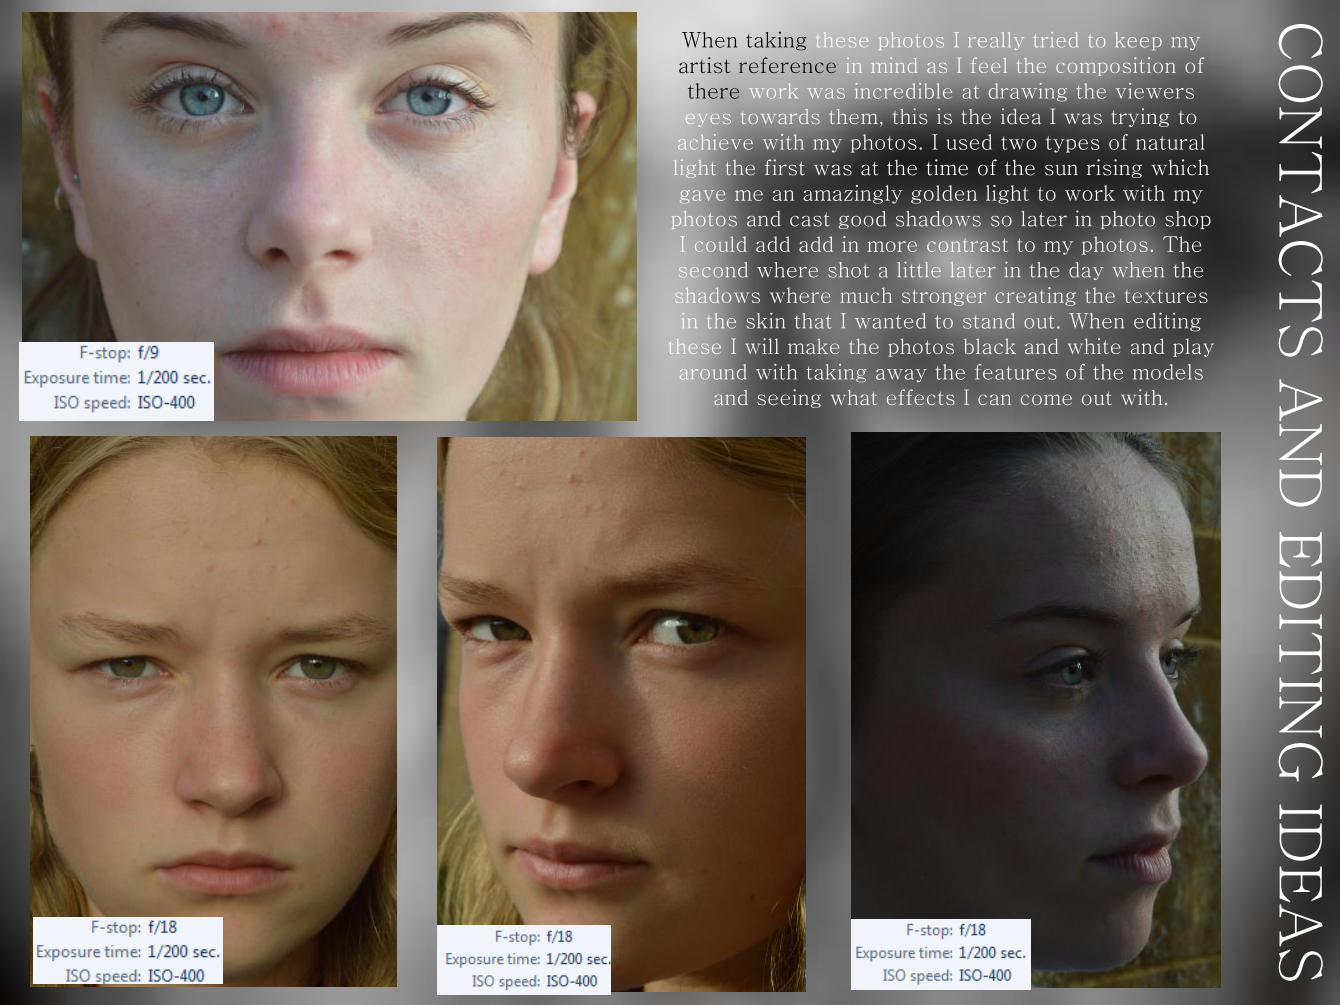
SWhen taking these photos I really tried to keep my artist reference in mind as I feel the composition of there work was incredible at drawing the viewers eyes towards them, this is the idea I was trying to
achieve with my photos. I used two types of natural light the first was at the time of the sun rising which gave me an amazingly golden light to work with my
photos and cast good shadows so later in photo shop I could add add in more contrast to my photos. The second where shot a little later in the day when the shadows where much stronger creating the textures in the skin that I wanted to stand out. When editing
these I will make the photos black and white and play around with taking away the features of the models
and seeing what effects I can come out with.

Ken Ohara and Aziz and Cucher ShootI was really happy with the shots that came out of this shoot, as I fell that
he inspiration from he artists and my own ideas came out really well. I took these photos with natural light so this created a really soft lighting which I really love he effect of as I contrasts with the chilling reality of my photos. I didn’t want to take away all of the features like Aziz and
Cucher, because I wanted to keep the detail of the skin and the shadows around the face as I feel this gives the photo the depth it needs to work as a good photograph. The high contrast I gave to these photos works
well to give the photo a haunting feel of an old black and white portrait.
How I edited my shots
-turned it black and white
-upped the contrast
-used the magnet tool to select the feature I wanted to remove then used the fill tool, filling with it from skin around the face.
-then I blended the filed areas I make them look more natural

ARTIST REFRENCE JENNY SAVILE
Jenny Savile is a contemporary British painter from Oxford. She’s best known for her work
with nude women. The work I’m looking at here is a series of hers and Glen Lunchfords
collaborative work called Closed Contact 1995-1996 they are mostly self portrait pictures of
Saville as the model. the artists say that “Distortions confront and force the viewer into
an examination of one's own body and the grotesqueries and beauties inherent within.”These set of photos remained me of a thing called scanography, which is a technique of
camera less photography.

SAVILLE IMAGE ANALYSIS
The photo is almost verging on abstracted
The figure looks un comfortable and contorted hence the clenched fist
The body is still visible and is clearly outlined but is clearly pressed against the glass
The use of contrasting light and dark really works with the harsh effect of this photo.
The whole composition screams the anguish of the model

CO
NT
AC
TS

SCANOGRAPHY SHOOT
These are my scanography photos they have turned out really well I like how it gives the feeling of being trapped
across. I asked my models to be very emotionless, so it
would help a viewer to focus on he distortion and not the
figure in the photo. This concept really adds to the
feeling of being trapped and helpless. The use of the hands as well as he face
creates a real impact on the photo as it really shows the glass barrier even if is not really visible. The hair also
gives the photo a new texture and really contributes to the
manic feel of the photo.

IDEA DEVELOPMENT After doing the scanography shoot I wanted to try taking my next photos actually using the camera. I found a distorted tile which I thought would work well as an
interesting filter. I really liked how the distortion looked in these very quick experiment photos.

CO
NT
AC
TS A
ND
ED
ITIN
G ID
EA
SI was really happy with the outcome of these
photos. I love the effect created with the distortion
only seen on the face. When editing these I think I will make them black and white and put the contrast
up high. This will emphasize the
concentrated element of distortion in the photo.
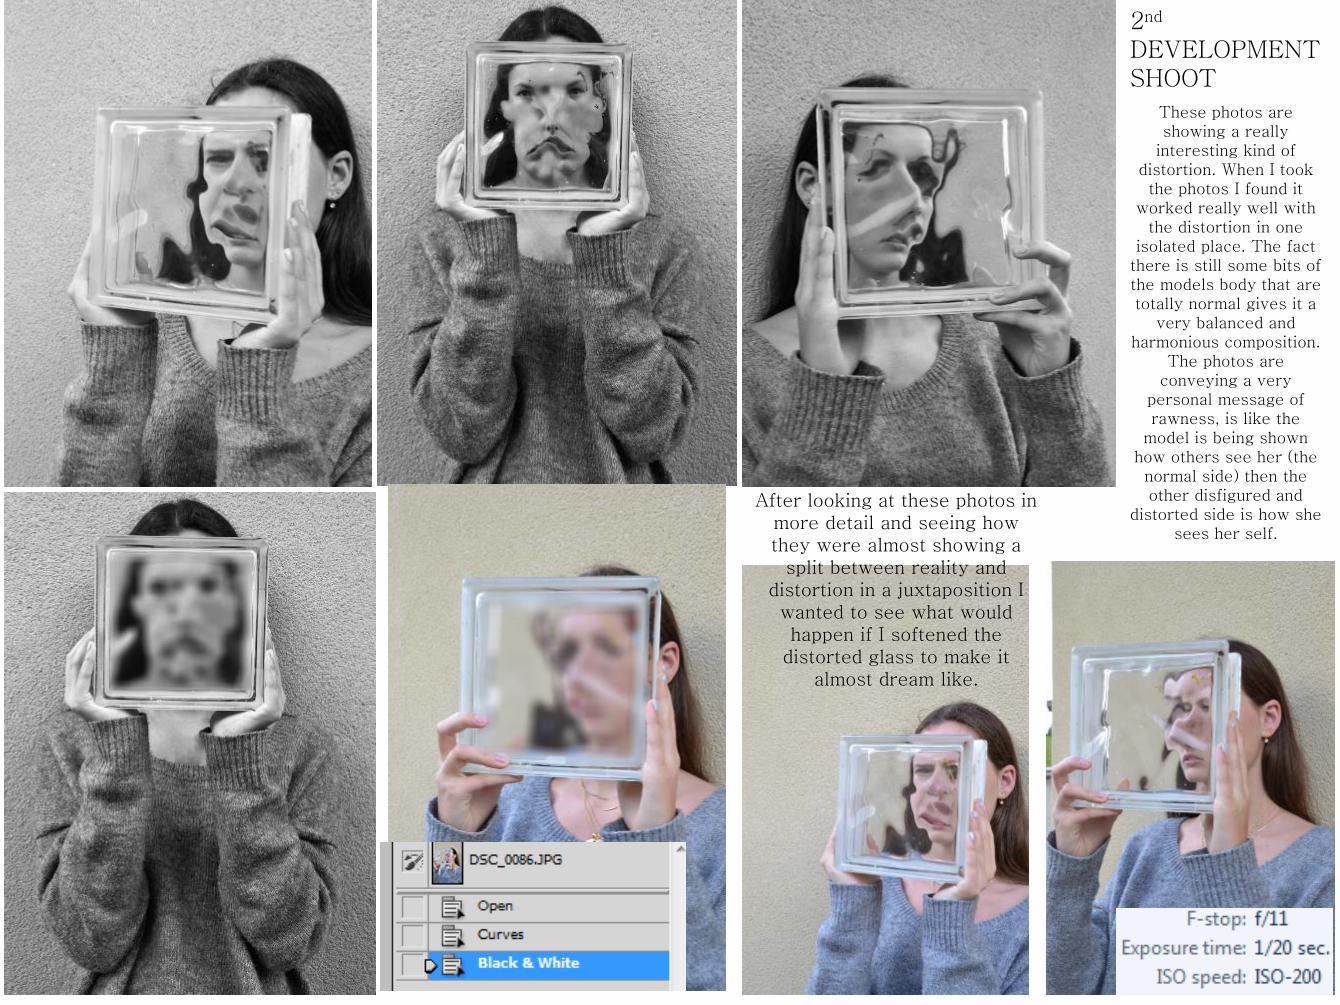
2nd
DEVELOPMENT SHOOT
These photos are showing a really
interesting kind of distortion. When I took the photos I found it
worked really well with the distortion in one
isolated place. The fact there is still some bits of the models body that are totally normal gives it a
very balanced and harmonious composition.
The photos are conveying a very
personal message of rawness, is like the
model is being shown how others see her (the normal side) then the other disfigured and
distorted side is how she sees her self.
After looking at these photos in more detail and seeing how they were almost showing a
split between reality and distortion in a juxtaposition I wanted to see what would happen if I softened the
distorted glass to make it almost dream like.

I found these photos after looking at softening down my distorted tile photos. These photos really show off that dream like state that I was looking at
producing. These photos are taken underwater hence the feeling of soft weightlessness. This has inspired me to do a shoot that will give the same effect and feel to a portrait. As I have only done
very harsh photos it will contrast nicely to look at much indulgent types of portraiture. For the
response shoot to this artist Id like to keep some distortion in the photo but let it give way to an un-
focus sheen in front.
JACOB SUTTONShoot plan……Shoot plan……- Take photos from
behind a steamed up screen.
- - try with water on the screen
- Don’t over abstract the photos keep a simple form

SUTTON IMAGE ANAYLSISThis photo has an extremely soft contrast and therefor as a very delicate feel to the photo.
The composition is simple and has a little amount of liner perspective threw the outwards strands of hair.
The light threw out the photo is soft and there is a little modeling on the face creating the shadowy out line of the features.
The way the face emerges from the white mist creates a very clam and serein quality to the photo which really adds to the composition.
What really strikes me about the cleverness of this photo is that you would think it would be a very flat imaged due to the lack of composition but the very subtle use of contrast has really given the photo a new kind of depth.

CO
NT
AC
TS A
ND
ED
ITIN
G ID
EA
SThese photos were done threw a steamed up shower window to create the soft light effect of the photo, I also experimented with some underwater shots which also created a less detailed filter. This creates the effect used by Sutton. When editing these photos I will look at making them black and white or making them cooler but on the whole will leave most un-edited.

RESPONSE SHOOT These shots came out really well I love how the distortion creates a
new dimension to the photo. These photos were easy to do as all I needed was a shower screen which was sprayed with water. The photos have an un-nerving sense as the viewer is not really
able to tell what's going on bellow the surface of the distorted glass.
The picture is only slightly abstracted and out of focus so you
can still tell what form is underneath, but you cant tell
anything about the individual as the purposeful lack of focus
creates an uneasy sense threw he distortion like my artists
reference.
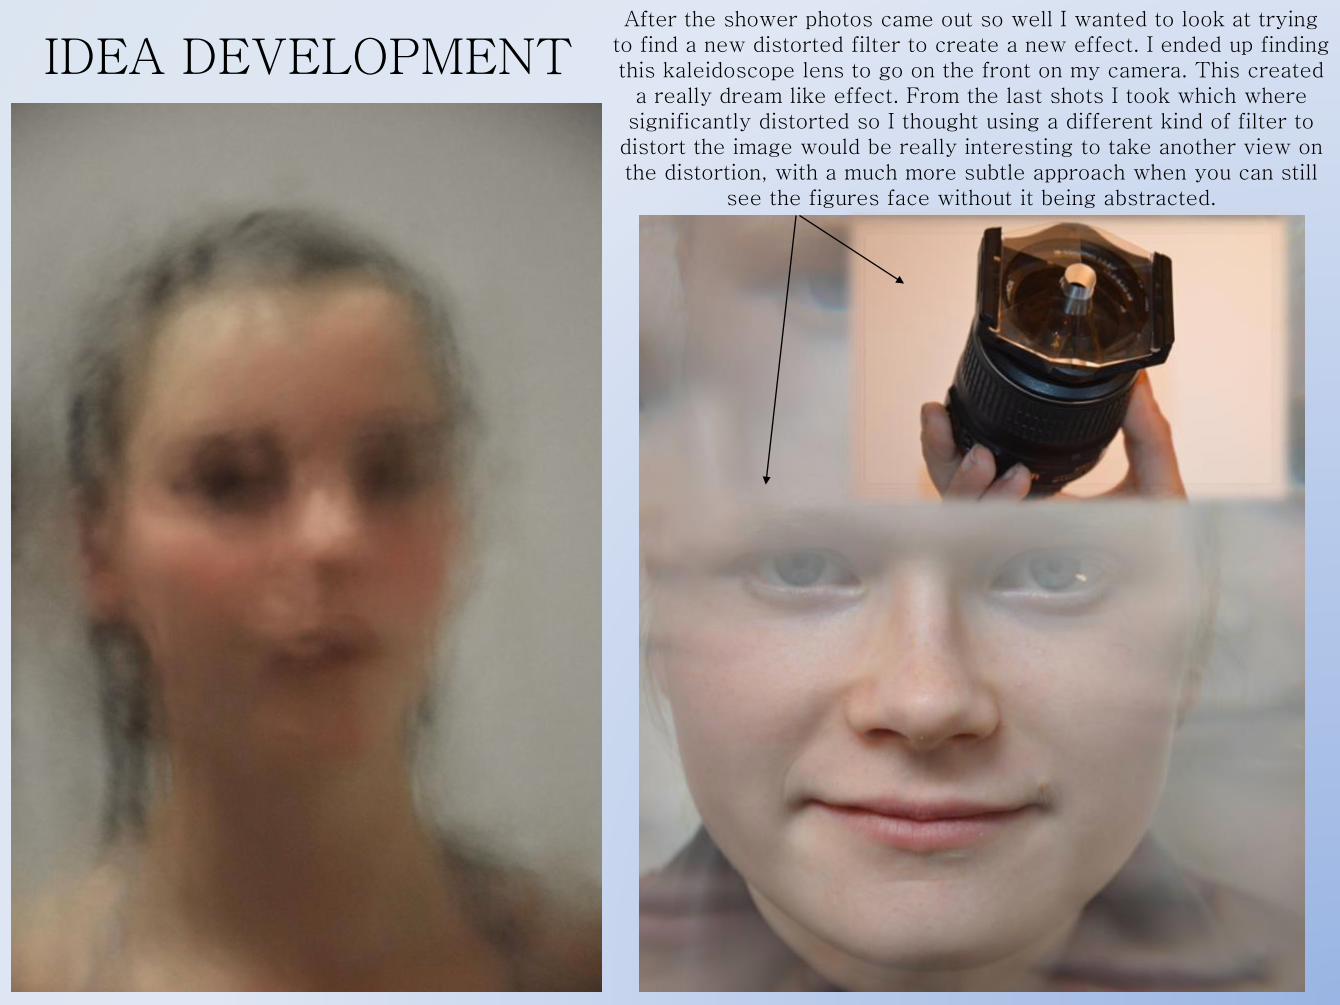
IDEA DEVELOPMENTAfter the shower photos came out so well I wanted to look at trying
to find a new distorted filter to create a new effect. I ended up finding this kaleidoscope lens to go on the front on my camera. This created
a really dream like effect. From the last shots I took which where significantly distorted so I thought using a different kind of filter to
distort the image would be really interesting to take another view on the distortion, with a much more subtle approach when you can still
see the figures face without it being abstracted.

CO
NT
AC
TS A
ND
ED
ITIN
G ID
EA
SWhen it comes to editing these photos I don’t this I will do much with them except out some in to black and white. This is because the light has worked so well in these photos meaning there's a good sign of texture and contrast in the features of the face. There is no real sign of distortion but addition of multiple faces around the single face.

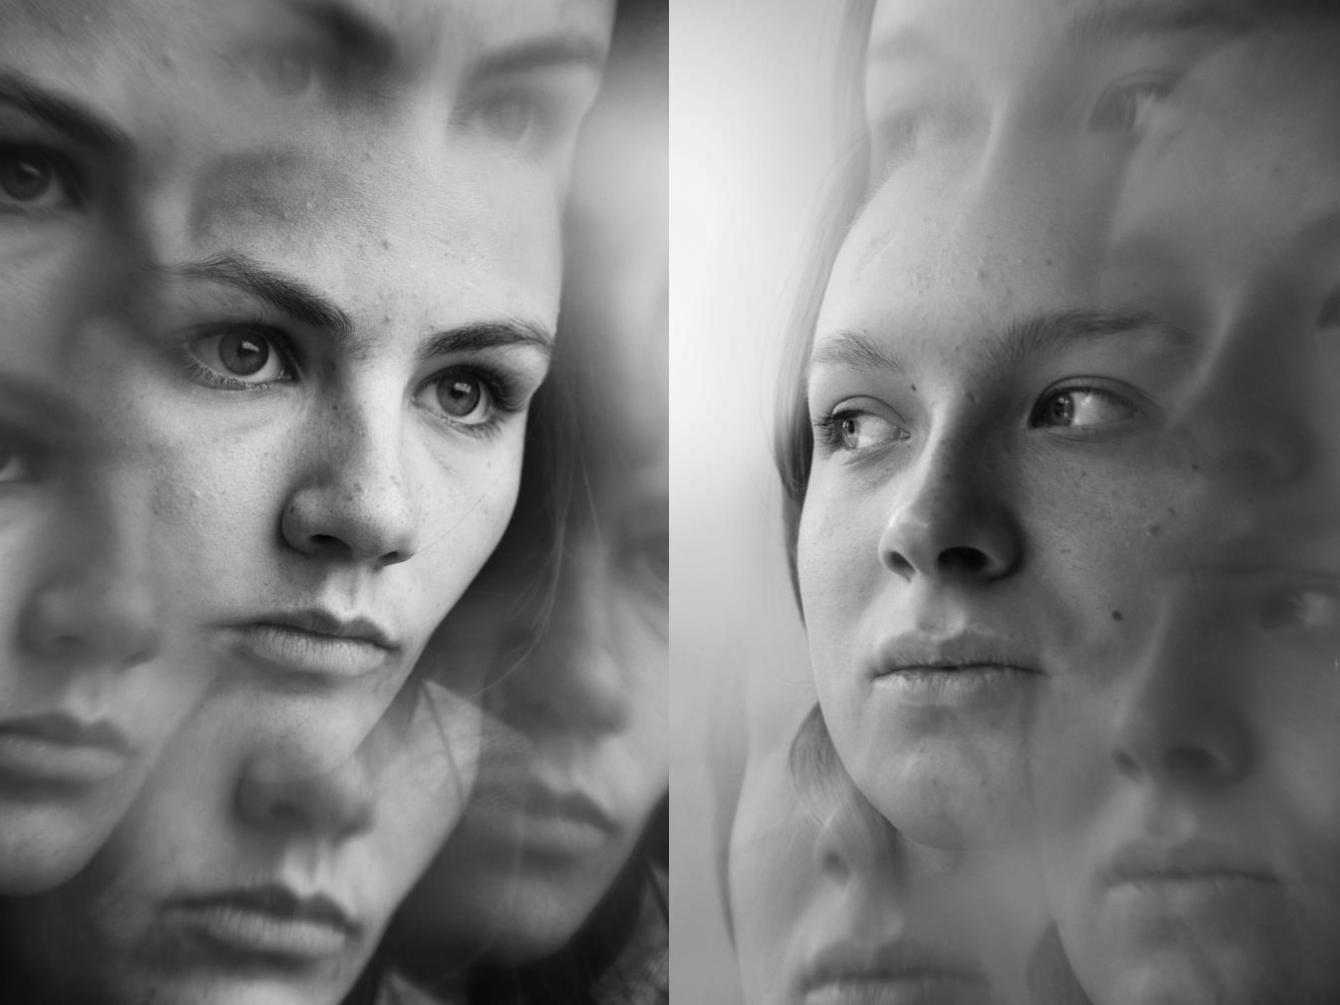
KALEIDOSCOPE PHOTOS
Shoot planFor this shoot I wanted to try shooting threw a different filter on the lenses its self rather than shooting threw one sheet of steamed glass like I did last time. So I found a kaleidoscope filter that fitted on to my camera. I wanted to create a dream like state so the light had to be just right. I want to use natural light for my photos so the ones in colour would have a strong gold light but when made black and white would create a heavy contrast to enhance the dream like effect of the photo.
I was really happy with the outcome of the photos as I felt they had a really haunted feel about them creating a juxtaposition between reality and fantasy. I feel this effect comes across threw having the multiplicity of features in the photo.How I edited them:None of he photos had any editing apart from I turned back and white.
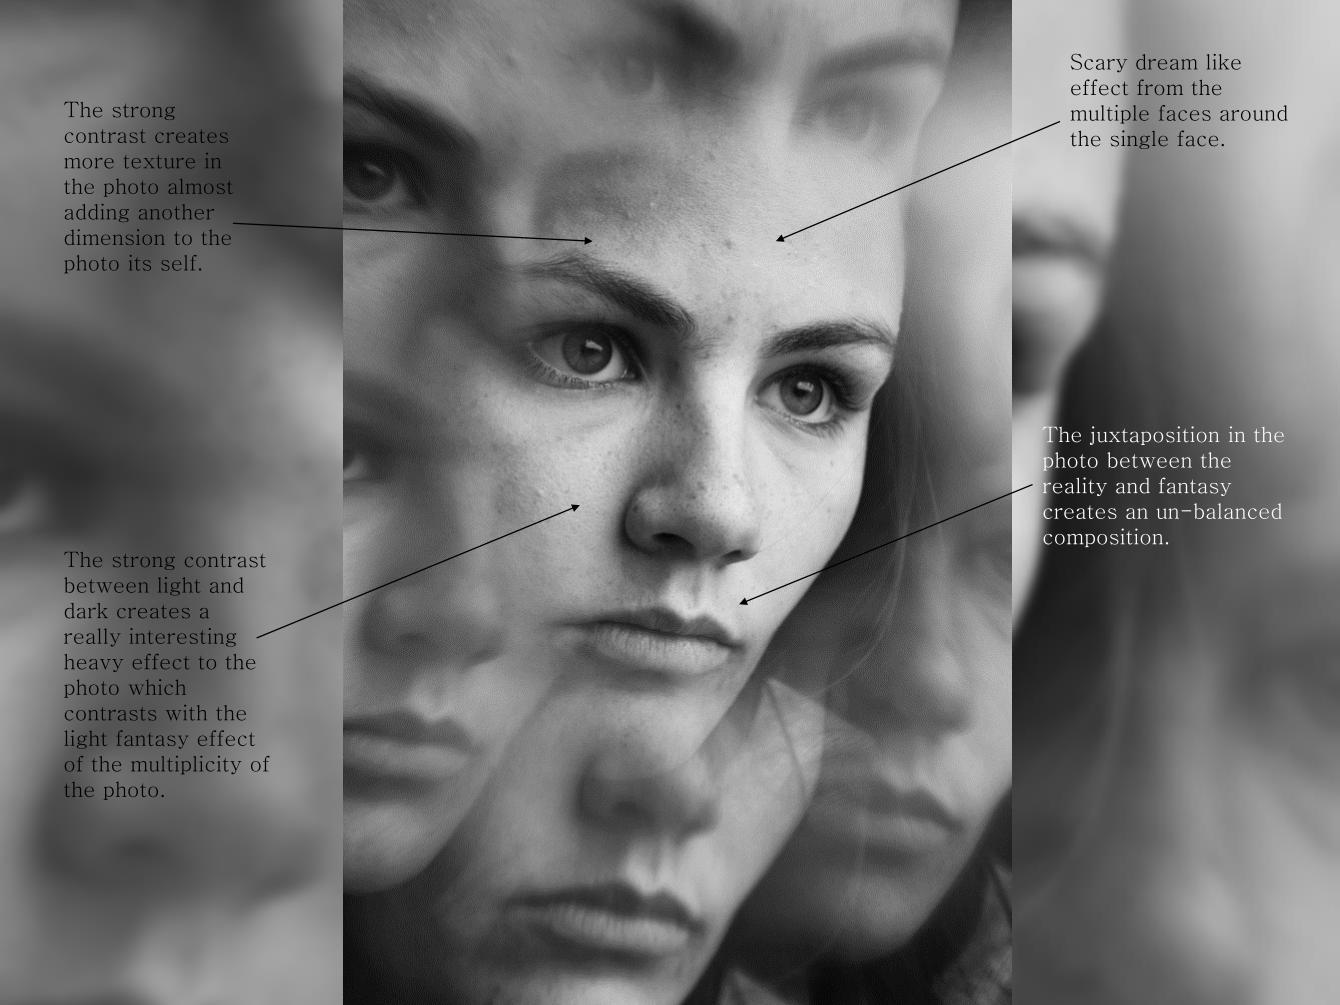
The strong contrast creates more texture in the photo almost adding another dimension to the photo its self.
Scary dream like effect from the multiple faces around the single face.
The strong contrast between light and dark creates a really interesting heavy effect to the photo which contrasts with the light fantasy effect of the multiplicity of the photo.
The juxtaposition in the photo between the reality and fantasy creates an un-balanced composition.

CO
NT
AC
TS
These photos where part of a big experiment. I experimented with different
shapes of glass to try and
distort the face. He idea with
this shoot was to go back to
the glass distortion with the tile which
worked so well. When editing
these I will take the same sort of approach with
the high contrast in black
and white.
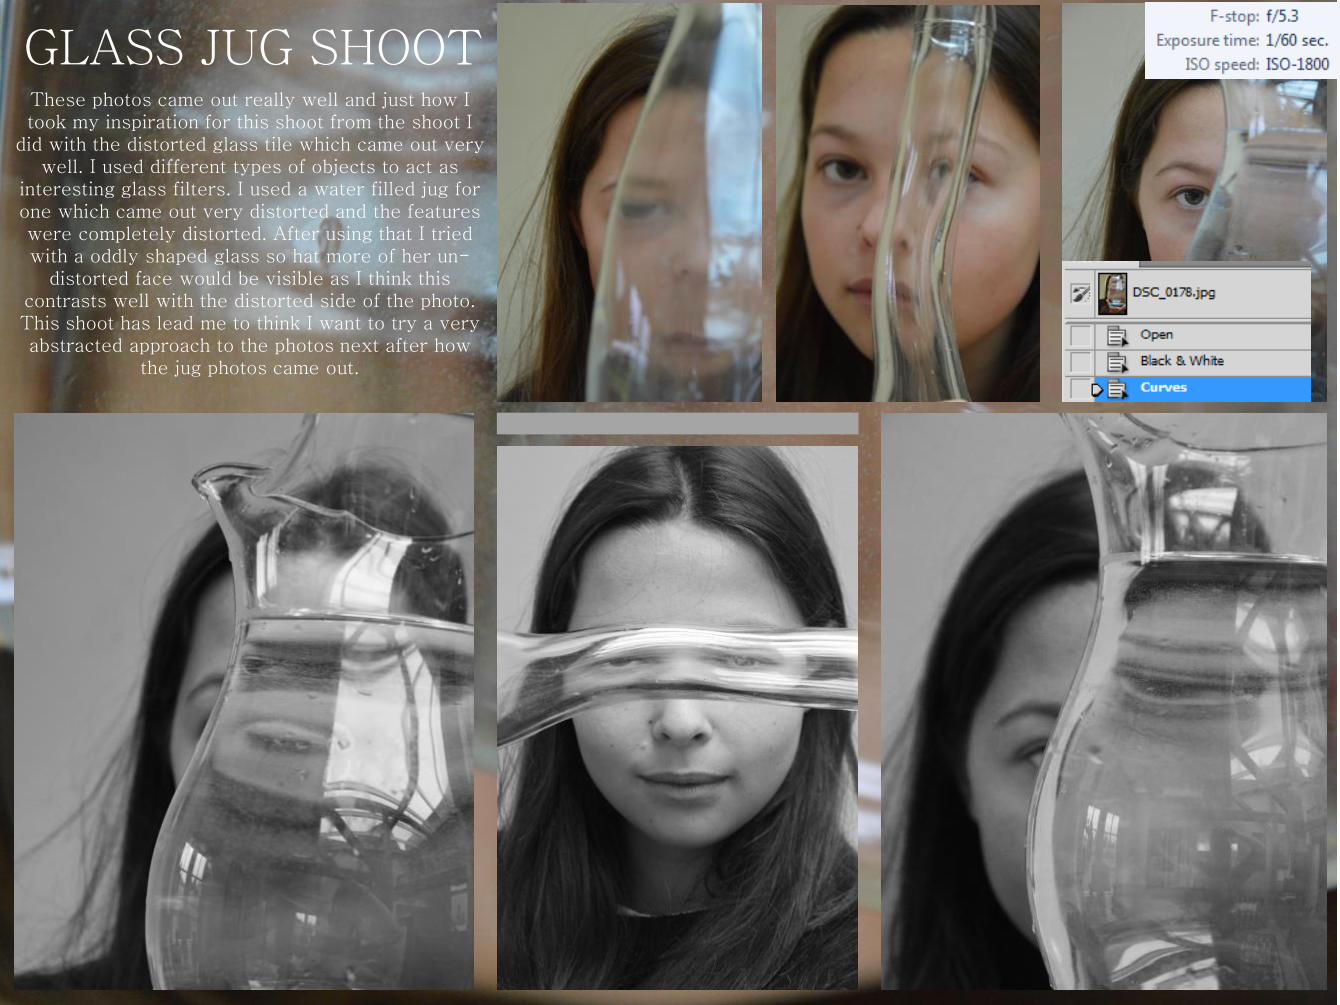
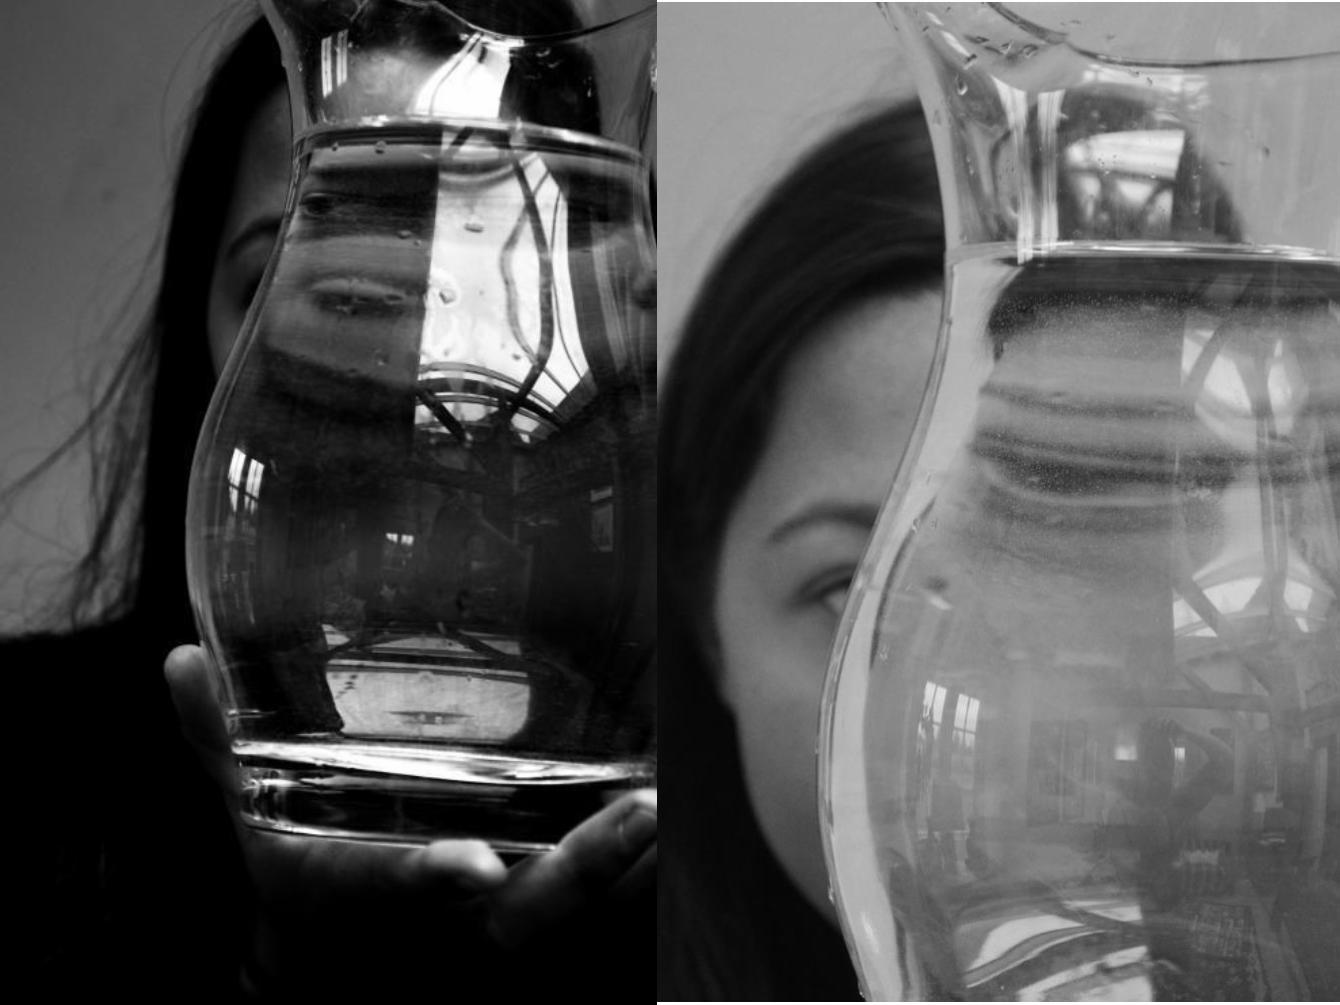
GLASS JUG SHOOTThese photos came out really well and just how I took my inspiration for this shoot from the shoot I
did with the distorted glass tile which came out very well. I used different types of objects to act as
interesting glass filters. I used a water filled jug for one which came out very distorted and the features were completely distorted. After using that I tried with a oddly shaped glass so hat more of her un-
distorted face would be visible as I think this contrasts well with the distorted side of the photo. This shoot has lead me to think I want to try a very abstracted approach to the photos next after how
the jug photos came out.
CO
NT
AC
TS A
ND
ED
ITIN
G ID
EA
S
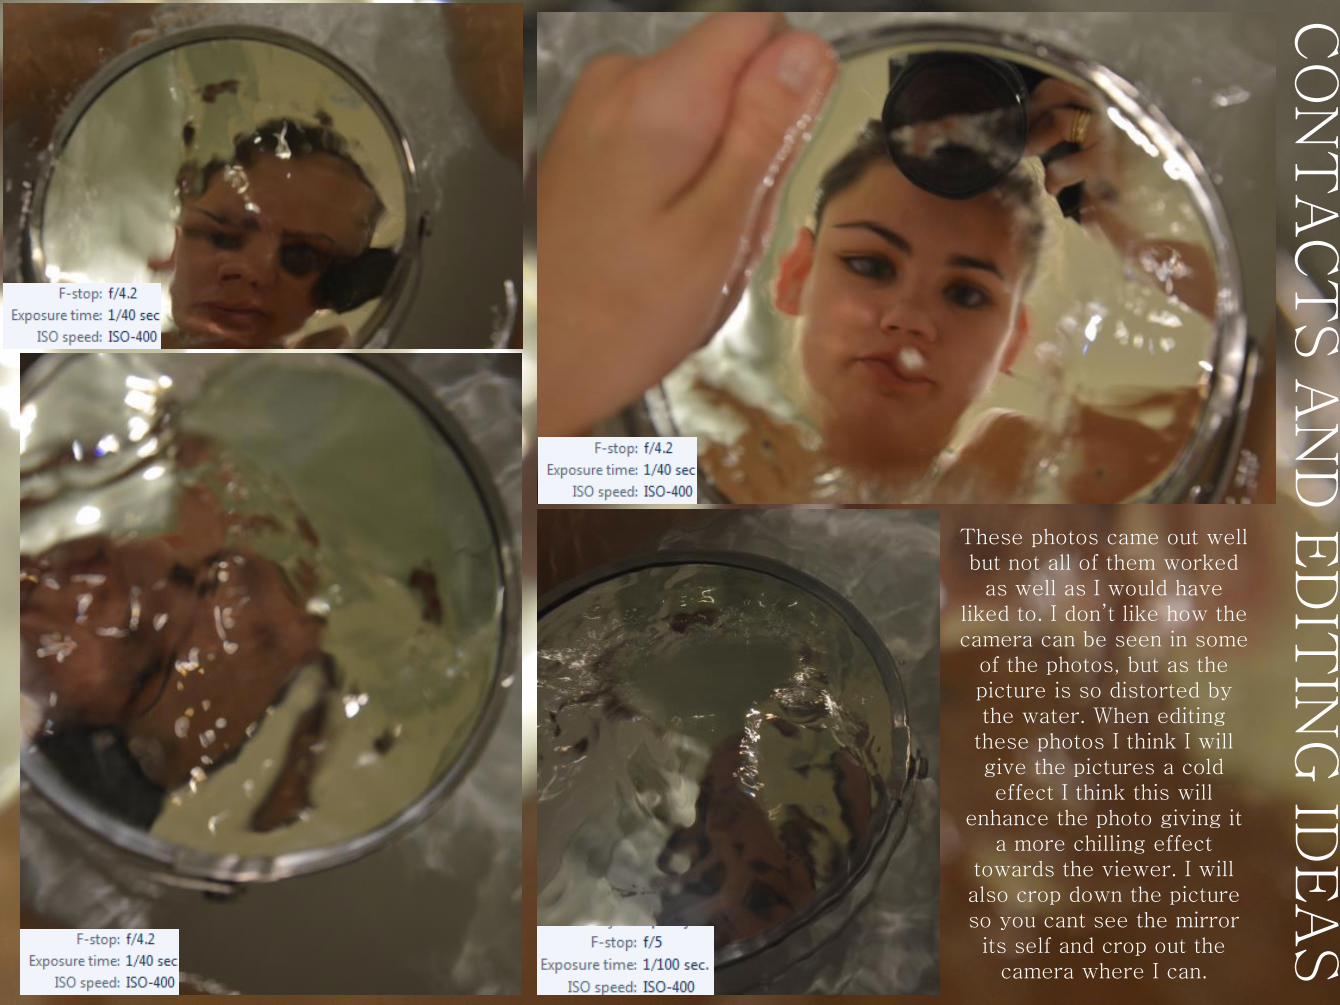
These photos came out well but not all of them worked
as well as I would have liked to. I don’t like how the camera can be seen in some
of the photos, but as the picture is so distorted by the water. When editing
these photos I think I will give the pictures a cold effect I think this will
enhance the photo giving it a more chilling effect
towards the viewer. I will also crop down the picture so you cant see the mirror its self and crop out the
camera where I can.

MIRRORS UNDER WATER
These photos where taken with a mirror placed under water and then I made ripples on the surface of the water which distorted the reflection in the mirror. These were self portraits and were quite hard to take as I had to hold the mirror while making ripples, and actually take the photo.

CO
NT
AC
TS A
ND
ED
ITIN
G ID
EA
S
When taking these photos I was really experimenting with the
bubble as a filter, and not only did the bubble help with the distortion the close up angle of the photos
helped with the abstraction of the photo. The focus of this photo was tricky as the camera I was using had a very narrow depth of field but I managed to make that work towards my advantage. Even if
some are out of focus they work well to boost the quality of the
photo. When editing these photos I will
turn them black and white to add to the abstracted feel of the photos. I will also up the contrast to come threw the monotone of the black
and white photos.

BUBBLE SHOOTThese shots where very experimental, as I just wanted to find an interesting transparent or reflective filter for this shoot, to follow on from my underwater reflections
shoot. So I came up with the idea of looking at how bubbles distorted the form behind them I was interested to look at a small range of compositions one of which,
that you can see here, is the moment of the bubble being blown as I feel the added element of movement adds to
the distortion. I liked the narrow depth of field and slightly out of focus feel as it really adds to the
composition and the over all distortion of the photos.

CO
NT
AC
TS A
ND
ED
ITIN
G ID
EA
SThis photo has
created a grate depth from the reflections threw the one mirror in to the many figures
created. The distortion is again
crated by the addition of lots of faces over one. When editing
theses I will put them in a high black and
white contrast.

MULTIPLE MIRRORS This again was an experimental shoot I wanted to play with lots of different angles and mirrors. I tried to get as many reflections as possible to try and distort the original image as much as possible
to create the most amount of depth possible. I was very happy with the out come of the photos, but I feel the photos with the multiple reflections were much more attention-grabbing than the single reflection photos as the complexity of
depth that is created in he others makes a much more harmonies and balanced composition.

Top Related