


![Creating a DVD-R from a VHS Video - UIS...[ NOT FOR CIRCULATION ] Information Technology Services,UIS 1 Creating a DVD-R from a VHS Video The first portion of work that must be done](https://static.fdocuments.net/doc/165x107/60d24c2a4df9fe2e52726a12/creating-a-dvd-r-from-a-vhs-video-uis-not-for-circulation-information.jpg)

Languages
Pages
Legal


Create Windows 98/ME/NT/2K/XP/2003 all in one installation DVD
1. Prepare Windows installation CD
• Windows 98 installation CD.
• Windows ME installation CD.
• Windows NT 4.0 Server installation CD.
• Windows 2000 professional installation CD.
• Windows XP installation CD.
• Windows 2003 installation CD.
2. Collection of the bootable image file from Windows installation CD
• Make "boot_os" folder on C: (you may change to other driver)
• Insert Windows 98 installation CD into CD/DVD-ROM
• Export bootable information from Window 98 installation CD to c:\boot_os\boot98.bif
1. Click "Make CD/DVD image file from CD/DVD-ROM " button to open "make iso from cd-rom" dialog
2. Choose CD-ROM, Input the output file name and choose "export boot image" option.

3. Click OK.• Insert Windows ME installation CD into CD/DVD-ROM
• Export bootable information from Window ME installation CD to c:\boot_os\bootme.bif
• Insert Windows NT 4.0 installation CD into CD/DVD-ROM
• Export bootable information from Window NT4.0 installation CD to c:\boot_os\bootnt.bif
• Insert Windows 2000 professional installation CD into CD/DVD-ROM
• Export bootable information from 2000 professional installation CD to c:\boot_os\boot2k.bif
• Insert Windows XP installation CD into CD/DVD-ROM
• Export bootable information from Window XP installation CD to c:\boot_os\bootxp.bif
• Insert Windows 2003 installation CD into CD/DVD-ROM
• Export bootable information from Window 2003 installation CD to c:\boot_os\boot2k3.bif
3. Making of multiple OS installation DVD image file
• Click "Create new image file" button on toolbar.
• Click button to create "Win98" folder into root directory.
• Insert Windows 98 installation CD to CD-ROM.
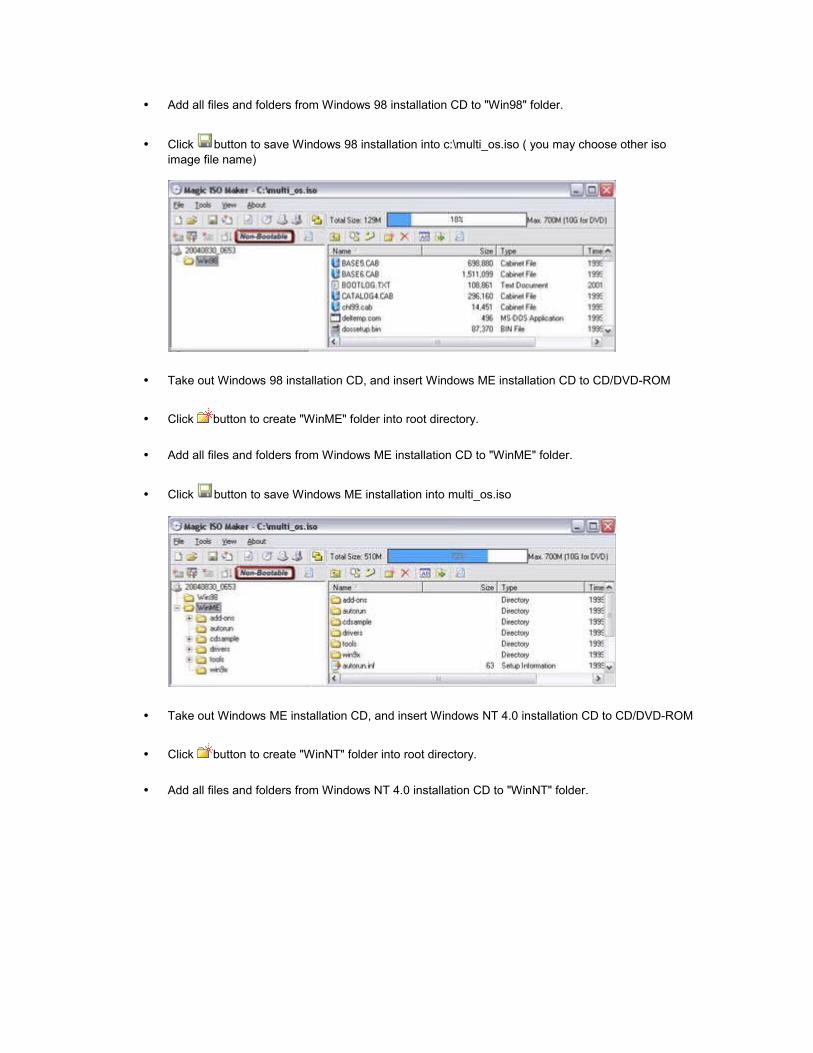
• Add all files and folders from Windows 98 installation CD to "Win98" folder.
• Click button to save Windows 98 installation into c:\multi_os.iso ( you may choose other iso image file name)
• Take out Windows 98 installation CD, and insert Windows ME installation CD to CD/DVD-ROM
• Click button to create "WinME" folder into root directory.
• Add all files and folders from Windows ME installation CD to "WinME" folder.
• Click button to save Windows ME installation into multi_os.iso
• Take out Windows ME installation CD, and insert Windows NT 4.0 installation CD to CD/DVD-ROM
• Click button to create "WinNT" folder into root directory.
• Add all files and folders from Windows NT 4.0 installation CD to "WinNT" folder.
• Click button to save Windows NT 4.0 installation into multi_os.iso
• Take out Windows NT 4.0 installation CD, and insert Windows 2000 Professional installation CD to CD/DVD-ROM
• Click button to create "Win2K" folder into root directory.
• Add all files and folders from Windows 2000 Professional installation CD to "Win2K" folder.
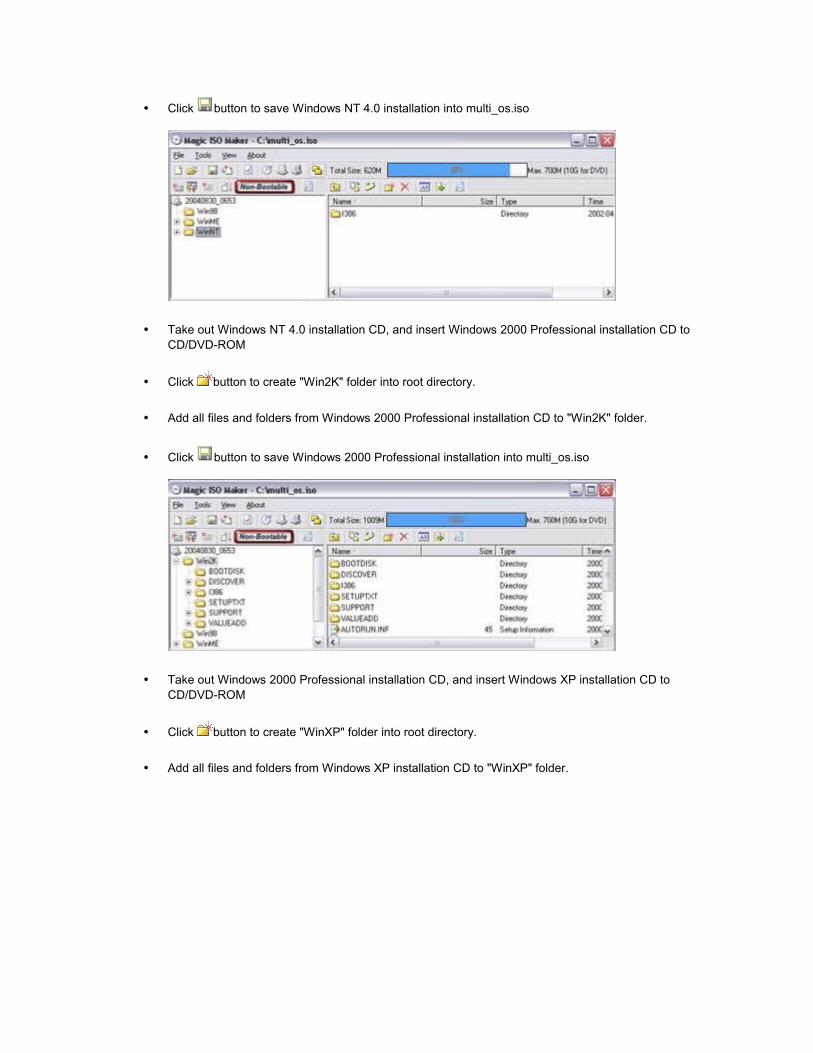
• Click button to save Windows 2000 Professional installation into multi_os.iso
• Take out Windows 2000 Professional installation CD, and insert Windows XP installation CD to CD/DVD-ROM
• Click button to create "WinXP" folder into root directory.
• Add all files and folders from Windows XP installation CD to "WinXP" folder.

• Click button to save Windows XP installation into multi_os.iso
• Take out Windows XP installation CD, and insert Windows 2003 installation CD to CD/DVD-ROM
• Click button to create "Win2K3" folder into root directory.
• Add all files and folders from Windows 2003 installation CD to "WinXP" folder.
• Click button to save Windows 2003 installation into multi_os.iso
4. Do some change of multiple OS installation DVD image file for creating multiple bootable DVD
• Open c:\multi_os.iso with MagicISO.
• Copy the folder "\Win2K\i386" to "\iW2K".
1. Hold the CTRL key down, and use mouse to drag folder "\Win2K\i386" to root.
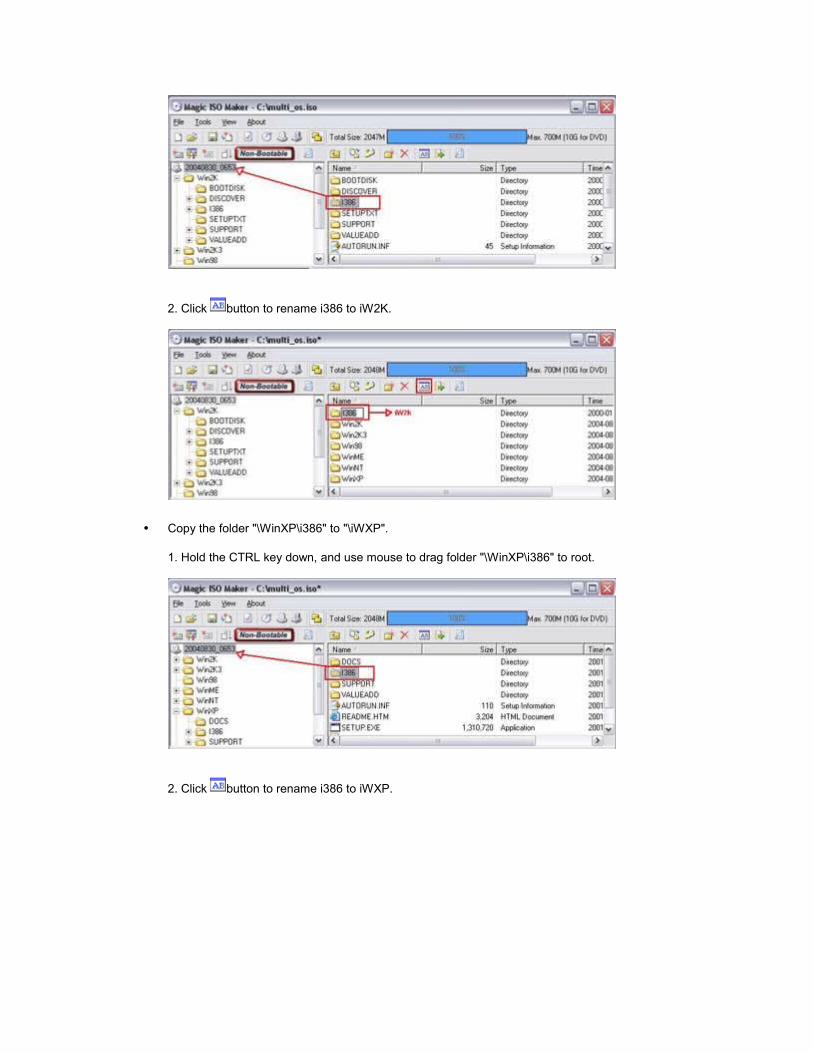
2. Click button to rename i386 to iW2K.
• Copy the folder "\WinXP\i386" to "\iWXP".
1. Hold the CTRL key down, and use mouse to drag folder "\WinXP\i386" to root.
2. Click button to rename i386 to iWXP.

• Copy the folder "\Win2K3\i386" to "\i2K3".
1. Hold the CTRL key down, and use mouse to drag folder "\Win2K3\i386" to root.
2. Click button to rename i386 to i2K3.
• Copy the file "\Win2K\CDROM_IP.5" and "\Win2K\CDROM_NT.5" to root directory.Hold the CTRL key down, and use mouse to drag the files "\Win2K\CDROM_IP.5" and "\Win2K\CDROM_NT.5" to root.

• Copy the file "\WinXP\WIN51" and "\WinXP\WIN51IP" to root directory.Hold the CTRL key down, and use mouse to drag the files "\WinXP\WIN51" and "\WinXP\WIN51IP" to root.
• Copy the file "\Win2K3\WIN51IA" to root directory.Hold the CTRL key down, and use mouse to drag the files "\Win2K3\WIN51IA" to root.
• Create "iW2K" folder into "c:\boot_os"
• Extract "\iW2K\SETUPLDR.BIN" file to "c:\boot_os\iW2K".
1. Select "\iW2K\SETUPLDR.BIN" file.
2. Click button to extract the file to "c:\boot_os\iW2K".
• Open "c:\boot_os\iW2K\SETUPLDR.BIN" with UltraEdit or WinHex.

• Replace all words "I386" with "IW2K"(Must be capitalization).
1.Click "seach"->"Replace" menu item. Or Press "CTRL+R"
2. Input "I386" into "Find What". Input "IW2K"(Must be capitalization) into "Replace With"
3. Click "Replace All" button.
4. Press CTRL+S to save the modified file.
• Copy c:\boot_os\iW2K\SETUPLDR.BIN back to "\iW2K\SETUPLDR.BIN" within c:\multi_os.iso.
• Extract "\iW2K\TXTSETUP.SIF" file to "c:\boot_os\iW2K".
1. Select "\iW2K\TXTSETUP.SIF" file.
2. Click button to extract the file to "c:\boot_os\iW2K".
• Open "c:\boot_os\iW2K\TXTSETUP.SIF" with UltraEdit or NotePad

• Replace all words "\i386" within the section "[SourceDisksNames.x86]" with "\IW2K"

• Copy "c:\boot_os\iW2K\TXTSETUP.SIF" back to "\iW2K\TXTSETUP.SIF" within c:\multi_os.iso.
• Create "iWXP" folder into "c:\boot_os"
• Extract "\iWXP\SETUPLDR.BIN" file to "c:\boot_os\iWXP".
1. Select \iWXP\SETUPLDR.BIN file.
2. Click button to extract the file to "c:\boot_os\iWXP".
• Open "c:\boot_os\iWXP\SETUPLDR.BIN" with UltraEdit or WinHex
• Replace all words "I386" with "IWXP"(Must be capitalization).
• Copy c:\boot_os\iWXP\SETUPLDR.BIN back to "\iWXP\SETUPLDR.BIN" within c:\multi_os.iso
• Extract "\iWXP\TXTSETUP.SIF" file to "c:\boot_os\iWXP".
1. Select "\iWXP\TXTSETUP.SIF" file.
2. Click button to extract the file to "c:\boot_os\iWXP".
• Open "c:\boot_os\iWXP\TXTSETUP.SIF" with UltraEdit or NotePad
• Replace all words "\i386" within the section "[SourceDisksNames.x86]" with "\IWXP"
• Copy "c:\boot_os\iWXP\TXTSETUP.SIF" back to "\iWXP\TXTSETUP.SIF" within c:\multi_os.iso.
• Create "i2K3" folder into "c:\boot_os"
• Extract "\i2K3\SETUPLDR.BIN" file to "c:\boot_os\i2K3".
1. Select \i2K3\SETUPLDR.BIN file.
2. Click button to extract the file to "c:\boot_os\i2K3".
• Open "c:\boot_os\i2K3\SETUPLDR.BIN" with UltraEdit or WinHex
• Replace all words "I386" with "I2K3"(Must be capitalization).
• Copy c:\boot_os\W2K3\SETUPLDR.BIN back to "\i2K3\SETUPLDR.BIN" within c:\multi_os.iso.
• Extract "\i2K3\TXTSETUP.SIF" file to "c:\boot_os\i2K3".
1. Select "\i2K3\TXTSETUP.SIF" file.
2. Click button to extract the file to "c:\boot_os\i2K3".
• Open "c:\boot_os\i2K3\TXTSETUP.SIF" with UltraEdit or NotePad
• Replace all words "\i386" within the section "[SourceDisksNames.x86]" with "\I2K3"
• Copy "c:\boot_os\i2K3\TXTSETUP.SIF" back to "\iWXP\TXTSETUP.SIF" within c:\multi_os.iso.
• Click button to save c:\multi_os.iso.
• Open "c:\boot_os\boot2k.bif" with UltraEdit or WinHex.
• Replace all words "I386" with "IW2K"(Must be capitalization).
• Open "c:\boot_os\bootxp.bif" with UltraEdit or WinHex.
• Replace all words "I386" with "IWXP"(Must be capitalization).
• Open "c:\boot_os\boot2k3.bif" with UltraEdit or WinHex.
• Replace all words "I386" with "I2K3"(Must be capitalization).
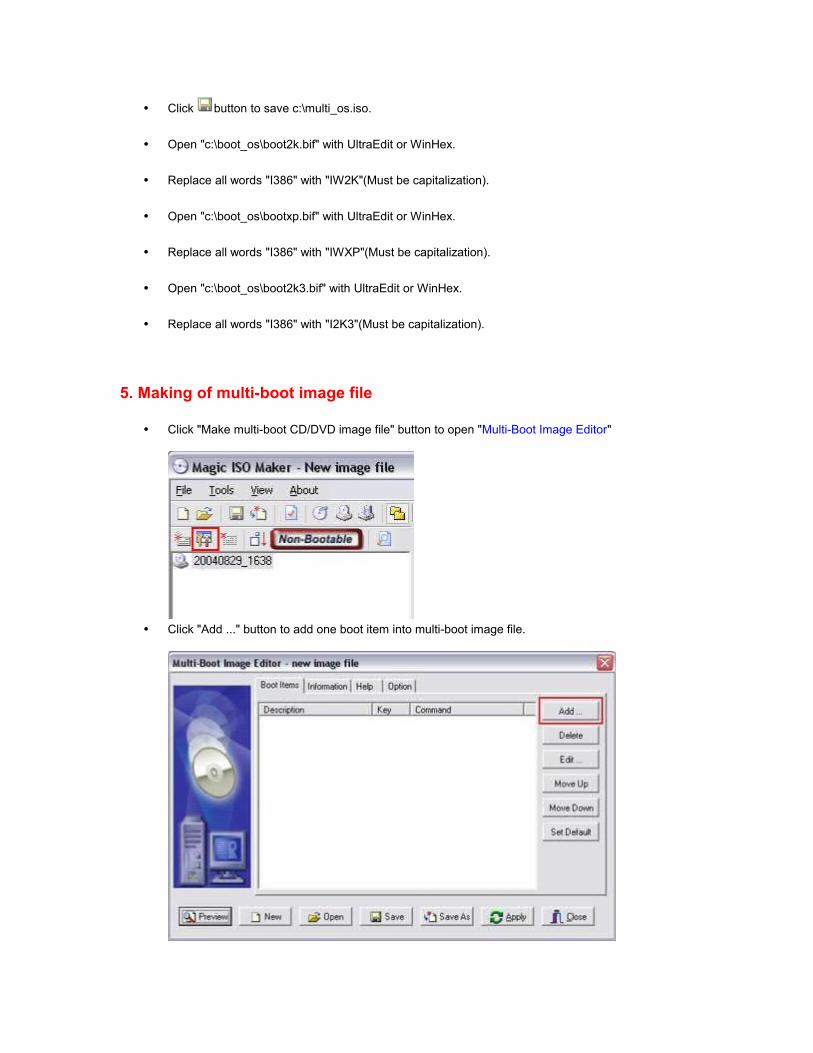
5. Making of multi-boot image file
• Click "Make multi-boot CD/DVD image file" button to open "Multi-Boot Image Editor"
• Click "Add ..." button to add one boot item into multi-boot image file.

• Choose "Boot from bootable image file" option. and click "Next" button to next step.
• Choose "From Local Computer" option, and input "c:\boot_os\boot98.bif", and click "Next" button to next step.

• Input description of Window 98 boot image, and set "Hot Key" to "1"
• Click "Finish" to complete Windows 98 bootable item.
• Add Windows ME bootable item in the same way as creating Windows 98 bootable item.
From Local Computer: c:\boot_os\bootme.bif Description: 2. Install Window ME
Hok Key: 2• Add Windows NT 4.0 bootable item in the same way as creating Windows 98 bootable item.
From Local Computer: c:\boot_os\bootnt.bif Description: 3. Install Window NT 4.0
Hok Key: 3• Add Windows 2000 professional bootable item in the same way as creating Windows 98 bootable
item.
From Local Computer: c:\boot_os\boot2k.bif

Description: 4. Install Window 2000 ProfessionalHok Key: 4
• Add Windows XP bootable item in the same way as creating Windows 98 bootable item.
From Local Computer: c:\boot_os\bootxp.bif Description: 5. Install Window XP
Hok Key: 5• Add Windows 2003 bootable item in the same way as creating Windows 98 bootable item.
From Local Computer: c:\boot_os\boot2k3.bif Description: 6. Install Window 2003
Hok Key: 6• Add first assistant bootable item for booting from hard disk.
• Choose booting from first hard disk
• Input "7. Boot from hard disk" into description of bootable item, and set "Hot Key" to "7", and click "finish" button

• Add second assistant bootable item for booting from floppy driver.
• Input "8. Boot from floppy driver" into description of bootable item, and set "Hot Key" to "8", and click "finish" button

• Add third assistant bootable item for reboot

• Input "9. Reboot" into description of bootable item, and set "Hot Key" to "9", and click "finish" button
• Set "boot from hard disk" as default bootable item. (you may choose other bootable item)
• Click "Save" button to save multi-boot image file to c:\boot_os\multi_os_boot.mbi
• Click "Close" to complete making of multi-boot image file.
6. Apply multi-boot image file into DVD image file
• Open c:\multi_os.iso with MagicISO.
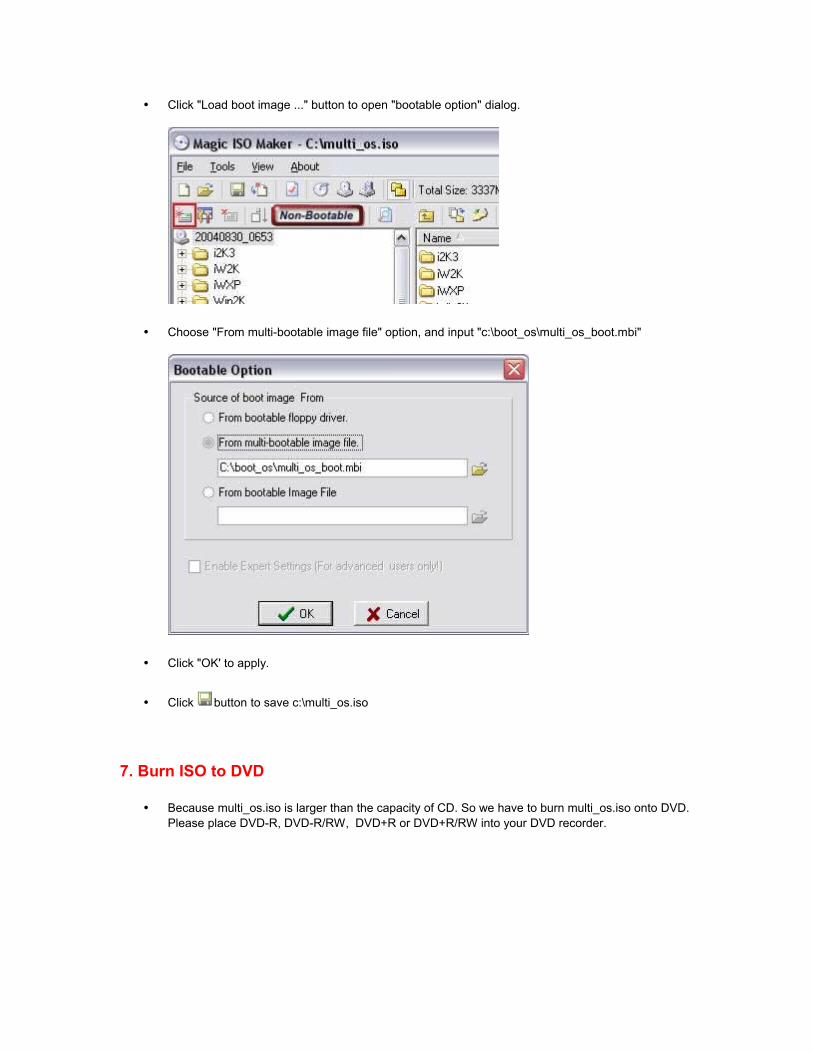
• Click "Load boot image ..." button to open "bootable option" dialog.
• Choose "From multi-bootable image file" option, and input "c:\boot_os\multi_os_boot.mbi"
• Click "OK' to apply.
• Click button to save c:\multi_os.iso
7. Burn ISO to DVD
• Because multi_os.iso is larger than the capacity of CD. So we have to burn multi_os.iso onto DVD. Please place DVD-R, DVD-R/RW, DVD+R or DVD+R/RW into your DVD recorder.

• Click button to open "Burn CD!" Dialog
• Choose your DVD recorder, the CD/DVD image file, and other parameters.
• Click "Burn It" to start
• Finish
Top Related