


Languages
Pages
Legal

Building E-Commerce Solutions with WooCommerce
Robbert Ravensbergen
Chapter No. 2 "Creating Your First Products"
In this package, you will find: A Biography of the author of the book
A preview chapter from the book, Chapter NO.2 "Creating Your First Products"
A synopsis of the book’s content
Information on where to buy this book
About the Author Robbert Ravensbergen is an experienced IT Manager who worked for several companies in The Netherlands. In 2009, he became interested in open source technology. Joomla was very popular during those days. He started his company Joomblocks.com, created his first Joomla extensions, and worked on multiple Joomla projects.
As time went by, he learned about other open source solutions as well, and got interested in WordPress. During 2010, his first book about WordPress was released in The Netherlands. After that, several Dutch titles followed about WordPress, Joomla, and Magento, all of which were very successful.
In 2013, he released his first English book with Packt Publishing, Magento Beginner's Guide second edition. He wrote the book together with Co-author Sander Schoneville. This book about WooCommerce is his first solo title that is released by Packt Publishing.
I would like to thank the people at Packt Publishing for their hard work and giving me the opportunity to release two books within a very short period of time! I also would like to thank the reviewers for spending their valuable time just to create a better end product.
For More Information: www.packtpub.com/building-ecommerce-solutions-with-woocommerce/book
Building E-Commerce Solutions with WooCommerce Until a few years ago setting up an online store was not something you could easily do yourself. Sure, there were solutions available on the market such as osCommerce and Virtuemart for Joomla, but they never offered the functionality and ease of use we were all waiting for.
Since 2009, this started to change. WordPress was becoming more and more popular and soon people started to use the platform for more than just a blog. We also saw several plugins passing by, which offered e-commerce functions for WordPress. Some good ones, some buggy ones, and some never got out of the beta stage.
In 2011, the WooCommerce plugin became available in the market, developed by the popular creators of Woothemes.com, where you can buy premium WordPress themes. WooCommerce was an instant hit and reached over ten thousand downloads in the first couple of weeks. A few years later the plugin was downloaded almost 1.4 million times and it received a complete makeover during 2013 with the release of WooCommerce 2.0.
The reason the plugin became so popular is that it is so easy to use. Millions of people were already using WordPress for their blogs and websites and were looking for an easy way to be able to sell products and services directly on their website. WooCommerce made that possible for all of us.
This book will explain you how to setup WooCommerce, create products, and use payment and shipping methods. It will help you learn how to create and run your own online store in a very easy and straightforward manner.
It's time to get started!
What This Book Covers Chapter 1, Setting Up WooCommerce, explains that WooCommerce is a free but versatile plugin for WordPress, that you may use to easily set up your own online store. Using WooCommerce, setting up your own web shop is finally within reach for everyone, even if you have no coding experience at all.
Chapter 2, Creating Your First Products, explains that WooCommerce gives you the possibility to quickly set up your store and add products to it. In this chapter we'll do just that to get you started.
Chapter 3, Other Product Types, describes that using WooCommerce it's also possible to sell other product types, such as downloadable items and products with options. This chapter helps you learn how to use those WooCommerce possibilities.
For More Information: www.packtpub.com/building-ecommerce-solutions-with-woocommerce/book
Chapter 4, Payments, Shipping, and Coupons, describes taking your store to the next level means that you need to get familiar with payment and shipping methods. This chapter helps you learn how to do that. We'll also discuss how to use WooCommerce capabilities of giving discount to your customers to increase engagement and sales.
Chapter 5, Working with WooCommerce Themes, discusses how every WordPress website needs a theme. The theme determines the look and feel of the site. WooCommerce requires some additional markup as well. This chapter helps you learn how to select a WooCommerce compatible theme and how to install it.
Chapter 6, Customize or Create a WooCommerce Theme, discusses about creating a WordPress and WooCommerce theme is worth a book on itself. In this chapter we'll give you a brief introduction in this topic to get you started.
Chapter 7, Running Your Online Store, explains how to use WooCommerce to make sure everything is handled correctly? Time to bring your store online and start selling! But what to do when the first orders flow in?
Chapter 8, More Possibilities Using Plugins, discusses that WooCommerce is a plugin for WordPress, but you may add additional plugins to it to expand its functionality. We'll show you an overview of the top and not to be missed plugins.
For More Information: www.packtpub.com/building-ecommerce-solutions-with-woocommerce/book
Creating Your First ProductsNow that WooCommerce is up and running and we had a look at its settings, it's time to start creating a couple of products and fi ll our online store. WooCommerce offers several possibilities to create your product catalog. In this chapter we'll stick to the basics. You'll learn to:
• Setup categories• Create your fi rst product• Set categories, tags, and images for your product
Setting up categoriesWhen setting up your product catalog, it often makes sense to create categories for your products, even if you do not have not so many products. Using a clear category structure makes it easier for your visitors to navigate and search your store. Further on, you can use tags and attributes in your product catalog. Categories and tags work in the same way you're used to, from WordPress itself. Attributes are important for more complex product types. For instance, if I have a category for women's dresses, I could add attributes for size and color. We'll discuss that in more depth in Chapter 3, Other Product Types. Besides this, attributes can also be used to add additional information to simple products.
For now, we'll just set up our category structure. Let's assume we are going to sell apparel in our store. We could start with three main categories in that case: Women, Men, and Children. If you're used to working with categories for (blog) posts in WordPress, you'll have no problem in creating them for your products.
For More Information: www.packtpub.com/building-ecommerce-solutions-with-woocommerce/book
Creating Your First Products
[ 26 ]
We'll perform the following steps:
1. Click on the left menu on Products | Categories. A form opens that lets you create a new category immediately.
2. Just fi ll in the Name of your category. If you want to you may change the Slug fi eld , that is used to create the link to your product category. If you do not enter a slug, it will automatically be created for you. In that case the category name is used, where spaces are replaced by hyphens.
3. Keep the Parent fi eld as None. This is the fi rst category we create, so automatically this fi eld gives you no other choice.
4. You may use the description for your own purposes. Sometimes there are themes that actively use the description of the category, but that isn't very common.
5. It's possible to add a Thumbnail image to your category as well. Also in here, it depends on the theme whether or not this image is used on the product category page. Still in doubt? Don't worry, you can always come back later here and adjust the settings of your categories.
6. Click on the Save button to store the category.
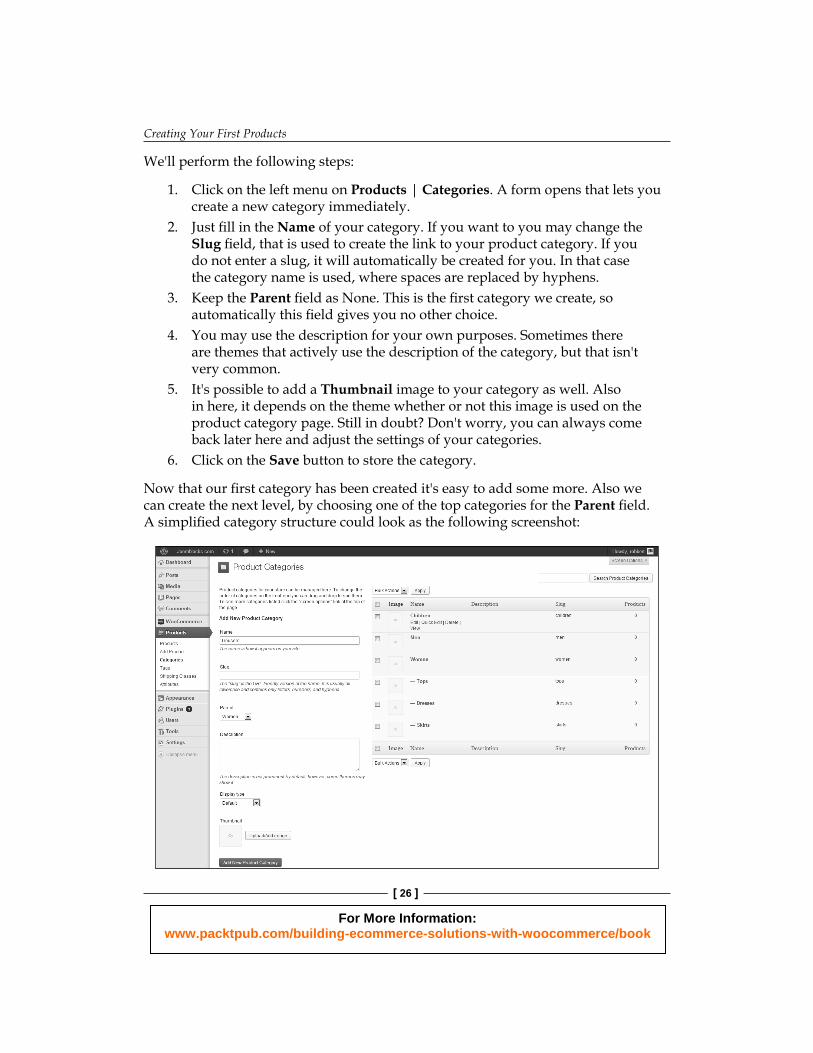
Now that our fi rst category has been created it's easy to add some more. Also we can create the next level, by choosing one of the top categories for the Parent fi eld. A simplifi ed category structure could look as the following screenshot:
For More Information: www.packtpub.com/building-ecommerce-solutions-with-woocommerce/book
Chapter 2
[ 27 ]
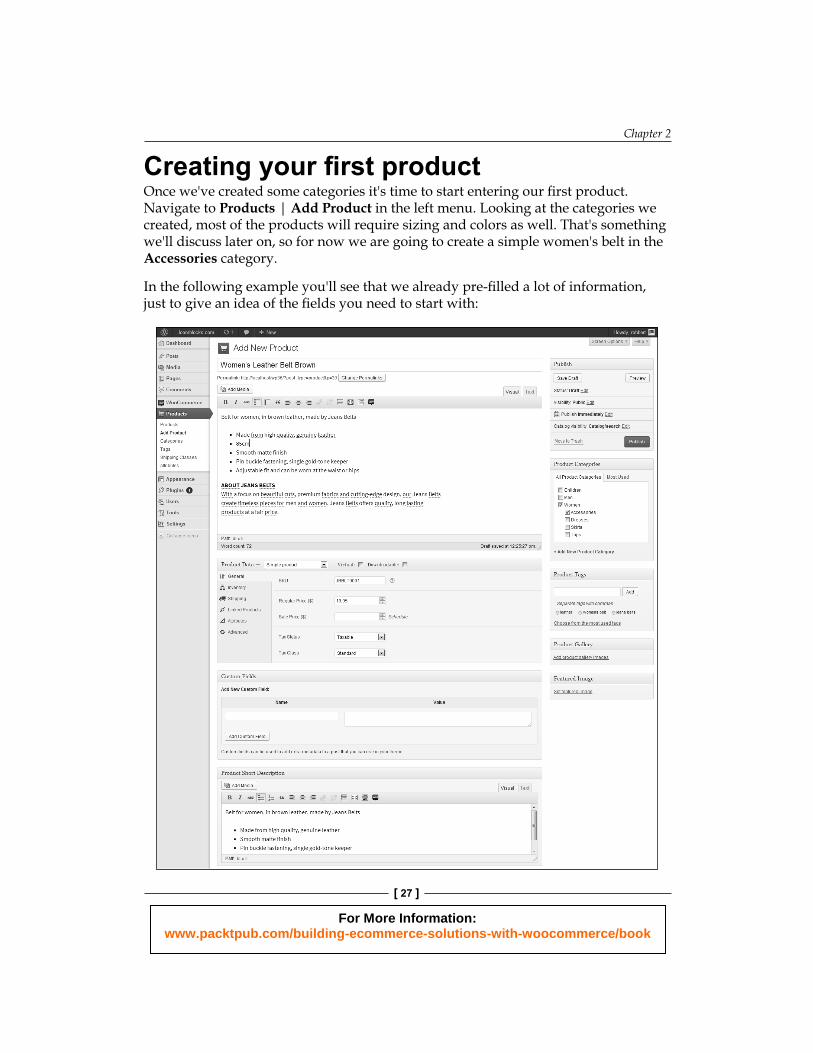
Creating your fi rst productOnce we've created some categories it's time to start entering our fi rst product. Navigate to Products | Add Product in the left menu. Looking at the categories we created, most of the products will require sizing and colors as well. That's something we'll discuss later on, so for now we are going to create a simple women's belt in the Accessories category.
In the following example you'll see that we already pre-fi lled a lot of information, just to give an idea of the fi elds you need to start with:
For More Information: www.packtpub.com/building-ecommerce-solutions-with-woocommerce/book
Creating Your First Products
[ 28 ]
Let's have a closer look at all available fi elds:
• Start with the product name on the top. Make sure you use important key words in this fi eld. The permalink will automatically be created, just as with regular WordPress posts, but you may change it if you want to.
• In the editor underneath that, you may type the description of your product. Please note that this is the 'long description', which will be displayed at the bottom of your product page! The Product Short Description is more important, because that one will be displayed near your Add to cart button . Strangely enough, this fi eld can be found at the bottom of this page. You can move it to another position on the page by dragging it, but you cannot move it above the long description. Also, in both description fi elds, make sure that important key words are mentioned to improve rankings in the search engines. It makes sense to fi ll both description fi elds at once and continue with all other product data after that.
• Below the description fi elds, there's an area containing a lot of fi elds that are important to understand. Using this area you can control how your product will behave.
If you want to do more on the optimization of your online store for the search engines, we highly recommend using the SEO plugin of Joost de Valk (Yoast). It's a general SEO plugin for WordPress, but it works fine with WooCommerce as well. You may find it at http://wordpress.org/plugins/wordpress-seo/.
General dataThe fi rst tab in the area with product data is active by default and is named General. Just above that, you'll notice that it's possible to select a product type and that there are two checkboxes available: Virtual and Downloadable. These are all items that will be discussed in Chapter 3, Other Product Types. For this moment we'll stick to the Simple products. These are suitable for anything that is a regular, physical product, without the need for the buyer to choose options or variables. Let's take a closer look at the available fi elds for our simple product:
For More Information: www.packtpub.com/building-ecommerce-solutions-with-woocommerce/book
Chapter 2
[ 29 ]
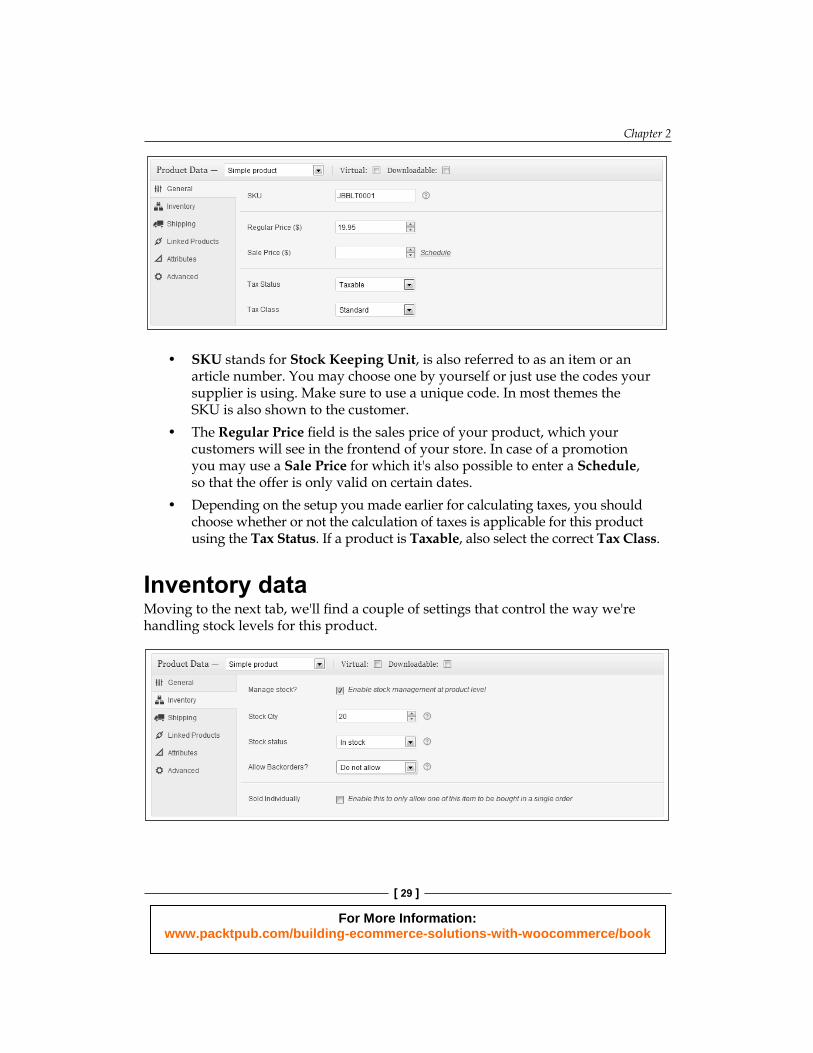
• SKU stands for Stock Keeping Unit , is also referred to as an item or an article number. You may choose one by yourself or just use the codes your supplier is using. Make sure to use a unique code. In most themes the SKU is also shown to the customer.
• The Regular Price fi eld is the sales price of your product, which your customers will see in the frontend of your store. In case of a promotion you may use a Sale Price for which it's also possible to enter a Schedule, so that the offer is only valid on certain dates.
• Depending on the setup you made earlier for calculating taxes, you should choose whether or not the calculation of taxes is applicable for this product using the Tax Status. If a product is Taxable, also select the correct Tax Class.
Inventory dataMoving to the next tab, we'll fi nd a couple of settings that control the way we're handling stock levels for this product.
For More Information: www.packtpub.com/building-ecommerce-solutions-with-woocommerce/book
Creating Your First Products
[ 30 ]
• First, decide if it's necessary to manage stock levels at all for this item. It's not always necessary to do so, if you have a small shop with only a couple of items. If you check the Manage stock? fi eld, the Stock Qty fi eld automatically becomes visible. In there enter the stock level you have available at the moment of item creation.
• Next, make sure that the item's Stock status is set to In stock.• Decide if you want to accept backorders from your customer if an item is
no longer on stock. If you do, consider that customers might start asking you questions about the delivery date of the item they ordered.
• Finally, there's a parameter named Sold individually. If you check it, your customers will only be able to add one of this item to their order.
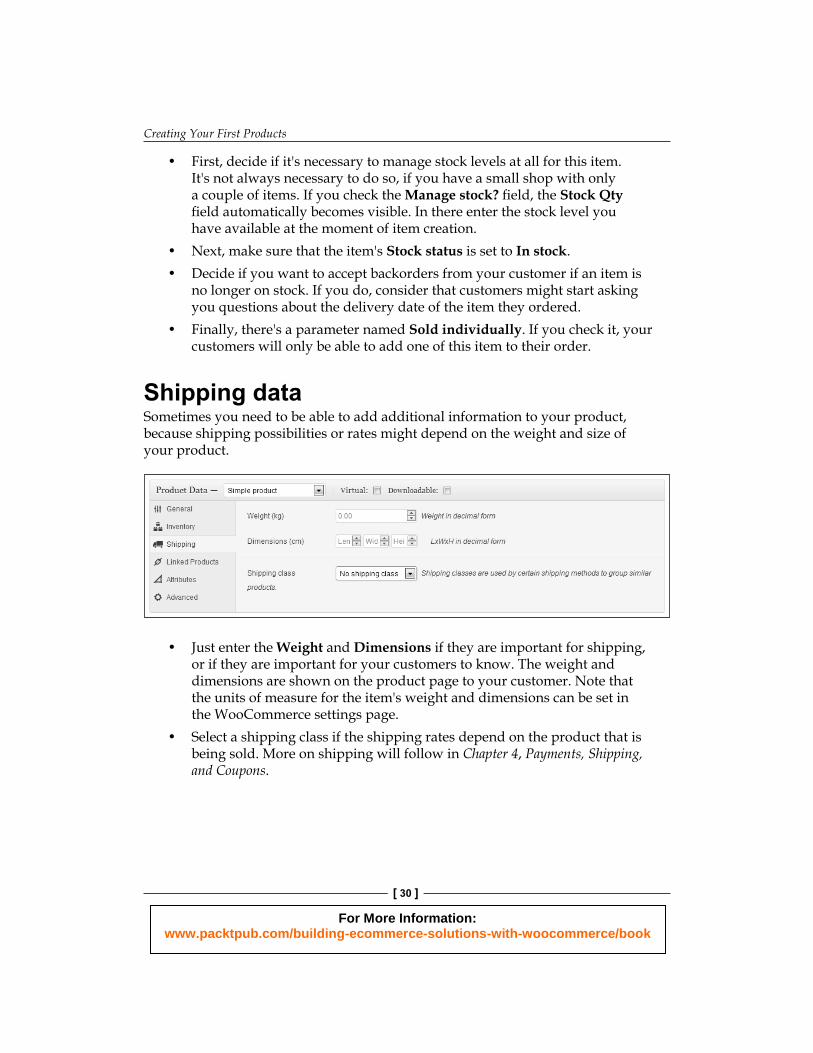
Shipping dataSometimes you need to be able to add additional information to your product, because shipping possibilities or rates might depend on the weight and size of your product.
• Just enter the Weight and Dimensions if they are important for shipping, or if they are important for your customers to know. The weight and dimensions are shown on the product page to your customer. Note that the units of measure for the item's weight and dimensions can be set in the WooCommerce settings page.
• Select a shipping class if the shipping rates depend on the product that is being sold. More on shipping will follow in Chapter 4, Payments, Shipping, and Coupons.
For More Information: www.packtpub.com/building-ecommerce-solutions-with-woocommerce/book
Chapter 2
[ 31 ]
AttributesWe'll be using attributes a lot during the next chapter, when we'll be discussing more complex product types. However, also for simple products, using attributes makes senses. Instead of entering for instance the fabric as text, we could create an attribute for it. Using this method will give more possibilities to your customers to fi lter your product catalog. Besides that the attributes will be shown to the customer in the frontend on the product page, in the More information tab.
Refer to Chapter 3, Other Product Types for more information on using attributes.
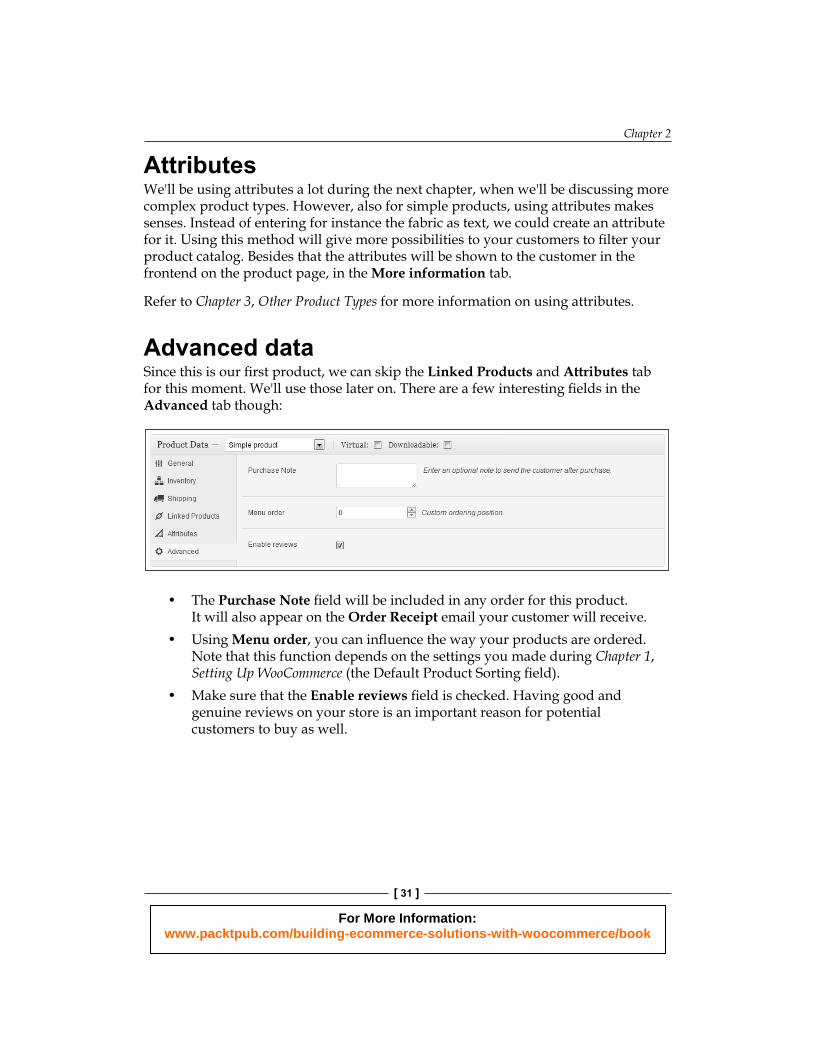
Advanced dataSince this is our fi rst product, we can skip the Linked Products and Attributes tab for this moment. We'll use those later on. There are a few interesting fi elds in the Advanced tab though:
• The Purchase Note fi eld will be included in any order for this product. It will also appear on the Order Receipt email your customer will receive.
• Using Menu order, you can infl uence the way your products are ordered. Note that this function depends on the settings you made during Chapter 1, Setting Up WooCommerce (the Default Product Sorting fi eld).
• Make sure that the Enable reviews fi eld is checked. Having good and genuine reviews on your store is an important reason for potential customers to buy as well.
For More Information: www.packtpub.com/building-ecommerce-solutions-with-woocommerce/book
Creating Your First Products
[ 32 ]
Setting up categories, tags, and product imagesWe're almost there now. Under our area with product fi elds there's a possibility to use custom fi elds that we also know from regular WordPress posts. We do not need that now and besides that, if you do, always fi rst try if you can solve your need using the standard available attributes and tags.
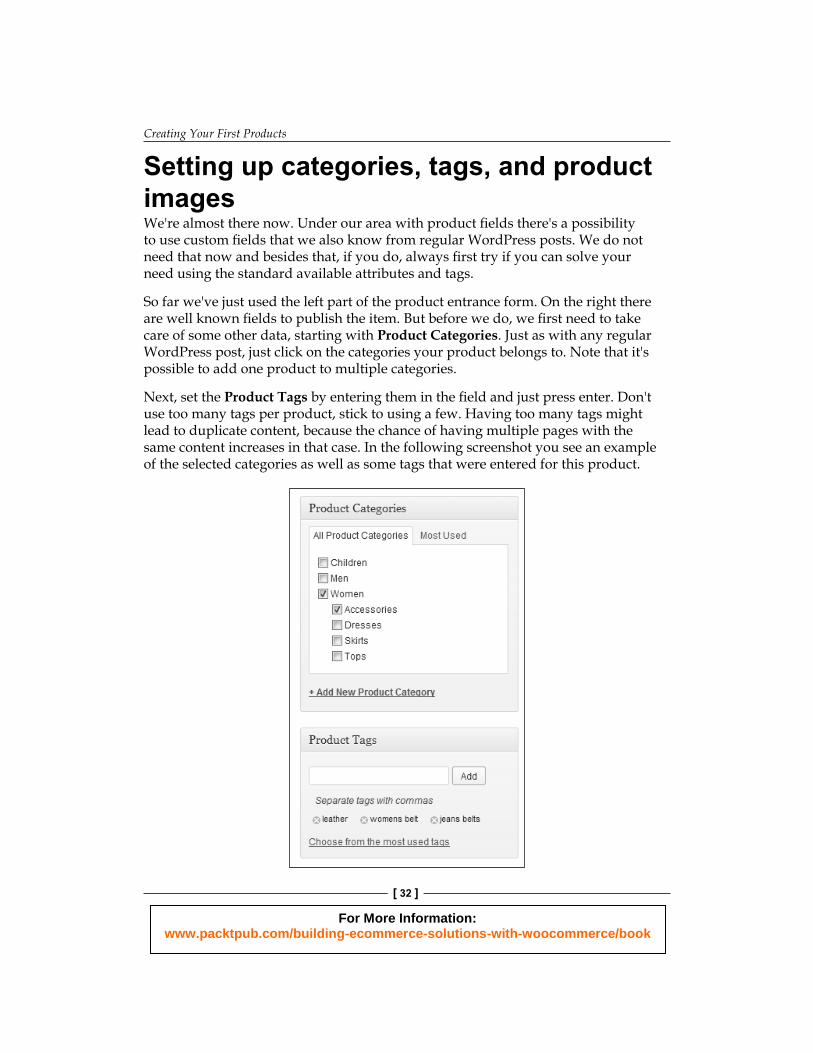
So far we've just used the left part of the product entrance form. On the right there are well known fi elds to publish the item. But before we do, we fi rst need to take care of some other data, starting with Product Categories. Just as with any regular WordPress post, just click on the categories your product belongs to. Note that it's possible to add one product to multiple categories.
Next, set the Product Tags by entering them in the fi eld and just press enter. Don't use too many tags per product, stick to using a few. Having too many tags might lead to duplicate content, because the chance of having multiple pages with the same content increases in that case. In the following screenshot you see an example of the selected categories as well as some tags that were entered for this product.
For More Information: www.packtpub.com/building-ecommerce-solutions-with-woocommerce/book
Chapter 2
[ 33 ]
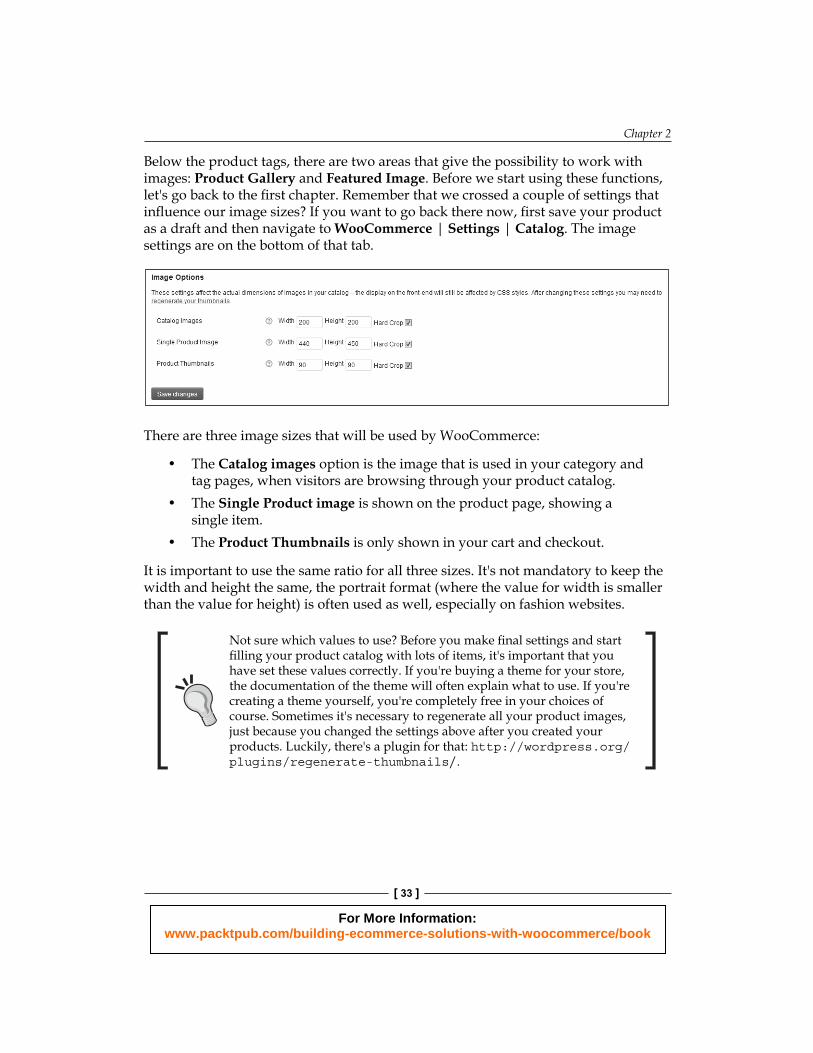
Below the product tags, there are two areas that give the possibility to work with images: Product Gallery and Featured Image. Before we start using these functions, let's go back to the fi rst chapter. Remember that we crossed a couple of settings that infl uence our image sizes? If you want to go back there now, fi rst save your product as a draft and then navigate to WooCommerce | Settings | Catalog. The image settings are on the bottom of that tab.
There are three image sizes that will be used by WooCommerce:
• The Catalog images option is the image that is used in your category and tag pages, when visitors are browsing through your product catalog.
• The Single Product image is shown on the product page, showing a single item.
• The Product Thumbnails is only shown in your cart and checkout.
It is important to use the same ratio for all three sizes. It's not mandatory to keep the width and height the same, the portrait format (where the value for width is smaller than the value for height) is often used as well, especially on fashion websites.
Not sure which values to use? Before you make fi nal settings and start fi lling your product catalog with lots of items, it's important that you have set these values correctly. If you're buying a theme for your store, the documentation of the theme will often explain what to use. If you're creating a theme yourself, you're completely free in your choices of course. Sometimes it's necessary to regenerate all your product images, just because you changed the settings above after you created your products. Luckily, there's a plugin for that: http://wordpress.org/plugins/regenerate-thumbnails/.
For More Information: www.packtpub.com/building-ecommerce-solutions-with-woocommerce/book
Creating Your First Products
[ 34 ]
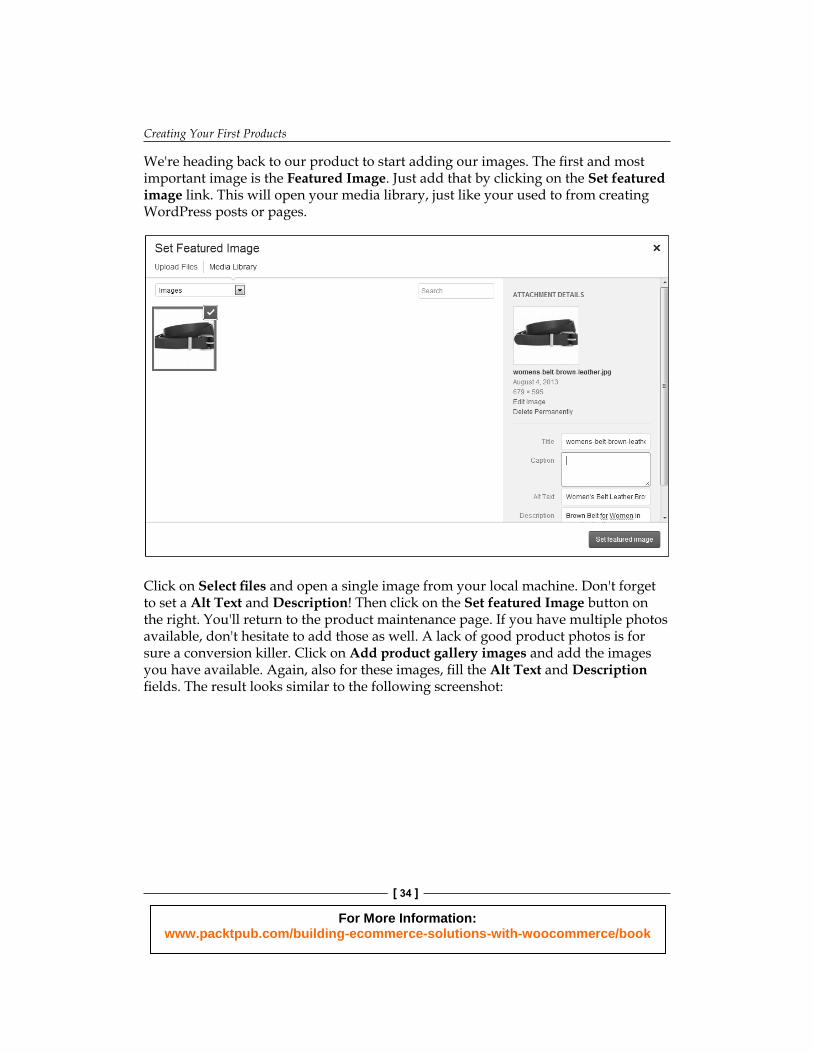
We're heading back to our product to start adding our images. The fi rst and most important image is the Featured Image. Just add that by clicking on the Set featured image link. This will open your media library, just like your used to from creating WordPress posts or pages.
Click on Select fi les and open a single image from your local machine. Don't forget to set a Alt Text and Description! Then click on the Set featured Image button on the right. You'll return to the product maintenance page. If you have multiple photos available, don't hesitate to add those as well. A lack of good product photos is for sure a conversion killer. Click on Add product gallery images and add the images you have available. Again, also for these images, fi ll the Alt Text and Description fi elds. The result looks similar to the following screenshot:
For More Information: www.packtpub.com/building-ecommerce-solutions-with-woocommerce/book
Chapter 2
[ 35 ]
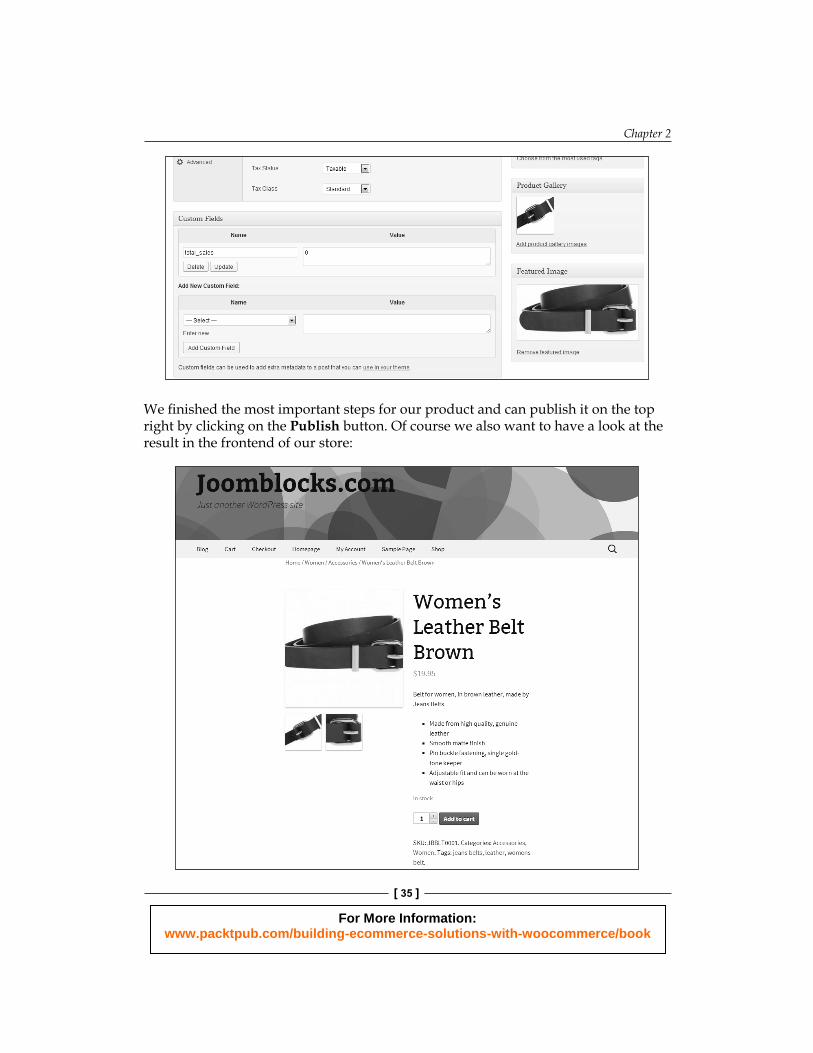
We fi nished the most important steps for our product and can publish it on the top right by clicking on the Publish button. Of course we also want to have a look at the result in the frontend of our store:
For More Information: www.packtpub.com/building-ecommerce-solutions-with-woocommerce/book
Creating Your First Products
[ 36 ]
Since we are using the default Twenty thirteen theme here, the layout of the page is ok, but could be improved. Things could be better if we'd used an optimized WooCommerce theme. More on that topic will follow during Chapter 5, Working with WooCommerce Themes.
SummaryDuring this chapter we've learned to create our very fi rst products in WooCommerce. We've seen how to use the most important WooCommerce fi elds to determine the behavior of our product. In the next chapter, we'll be adding more complex products and learn how to use attributes to create them.
For More Information: www.packtpub.com/building-ecommerce-solutions-with-woocommerce/book
Where to buy this book You can buy Building E-Commerce Solutions with WooCommerce from the Packt Publishing website: http://www.packtpub.com/building-ecommerce-solutions-with-woocommerce/book. Free shipping to the US, UK, Europe and selected Asian countries. For more information, please read our shipping policy.
Alternatively, you can buy the book from Amazon, BN.com, Computer Manuals and most internet book retailers.
www.PacktPub.com
For More Information: www.packtpub.com/building-ecommerce-solutions-with-woocommerce/book
Top Related