


Languages
Pages
Legal

8/8/2019 Biped Setup
http://slidepdf.com/reader/full/biped-setup 1/15
Positioning biped into your character and getting ready to add the physique modifier.
CHAPTER 1This tutorial is geared toward beginner and intermediate users of Studio Max and Character Studio.A few words about this process…
Keep in mind that there is no “perfect” way of doing this. What I am about to show you is simply one of many ways toget the same result. Once you go through this tutorial, I suggest you experiment with various techniques and find out whatworks best for you.
Take your time and learn as you go. Be prepared to rework areas over and over until you get the desired result. Inmost cases, you may not see errors in your mesh until you’re on your final step, or well into the animation process.
I have chosen to use the model pictured above as a base for this tutorial; mainly because it contains a lot of the“situations” you may run into when setting up (rigging, physiquing) a character. There are also areas in this model that willrequire some reworking during the physique process. As with many character models, not ever joint on the mesh will deformcorrectly, so there will be times when you have to go into the mesh and make adjustments, by either adding or subtractingverts.
This tutorial is GAME based, meaning that it uses the rigid physique settings. A lot of what is talked about in this
tutorial can relate to the Deformable(smooth) physique setting and I encourage you to experiment with both so you can see thedifferences in deformation and outcome.
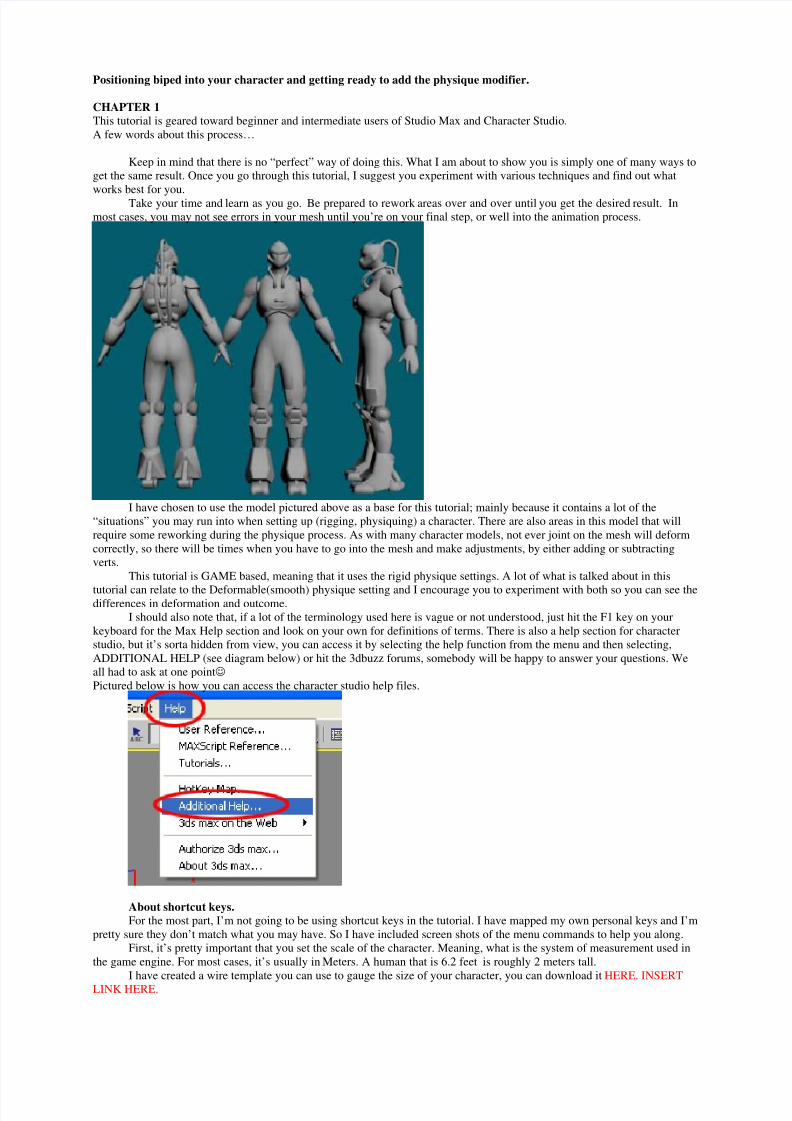
I should also note that, if a lot of the terminology used here is vague or not understood, just hit the F1 key on yourkeyboard for the Max Help section and look on your own for definitions of terms. There is also a help section for characterstudio, but it’s sorta hidden from view, you can access it by selecting the help function from the menu and then selecting,ADDITIONAL HELP (see diagram below) or hit the 3dbuzz forums, somebody will be happy to answer your questions. Weall had to ask at one point ☺ Pictured below is how you can access the character studio help files.
About shortcut keys.For the most part, I’m not going to be using shortcut keys in the tutorial. I have mapped my own personal keys and I’m
pretty sure they don’t match what you may have. So I have included screen shots of the menu commands to help you along.First, it’s pretty important that you set the scale of the character. Meaning, what is the system of measurement used in
the game engine. For most cases, it’s usually in Meters. A human that is 6.2 feet is roughly 2 meters tall.I have created a wire template you can use to gauge the size of your character, you can download it HERE. INSERT
LINK HERE.
8/8/2019 Biped Setup
http://slidepdf.com/reader/full/biped-setup 2/15
This scale template is set for the meter scale system. For instructional purposes, we will be using the meter scale system
through out this tutorial.1. Open your mesh file2. Merge the scale template into your current scene
When you merge an object into the scene, you maybe presented with a popup dialog that states something about thescale differences. This is because the scale system (units) that you created your character at does not match that of the scale. If this is the case, check the adopt new file scale. This will change your scale settings to match those of the merged file. If you arenot presented with this message, don’t worry…that’s a good thing ☺
If your character is too big, you may not see the scale template.Use the select by name dialog to highlight your scale template, or start scaling down your character mesh so it roughly matchesthe template.
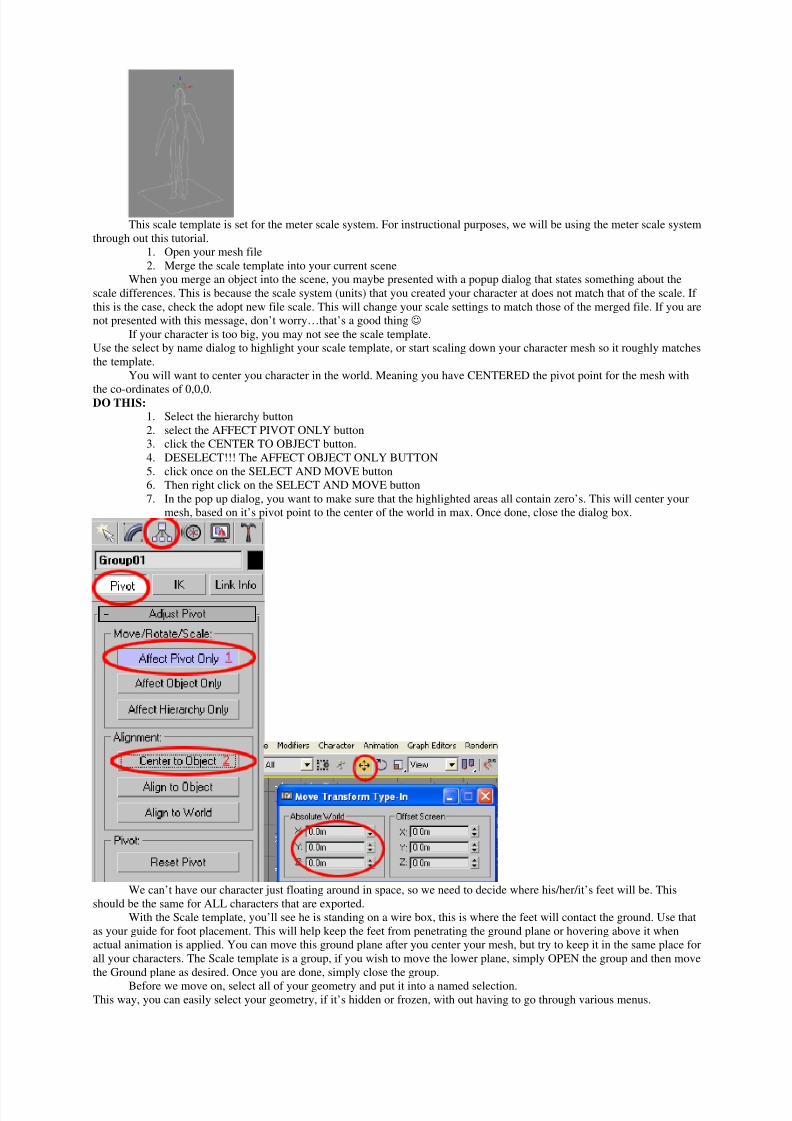
You will want to center you character in the world. Meaning you have CENTERED the pivot point for the mesh with
the co-ordinates of 0,0,0.DO THIS:1. Select the hierarchy button2. select the AFFECT PIVOT ONLY button3. click the CENTER TO OBJECT button.4. DESELECT!!! The AFFECT OBJECT ONLY BUTTON5. click once on the SELECT AND MOVE button6. Then right click on the SELECT AND MOVE button7. In the pop up dialog, you want to make sure that the highlighted areas all contain zero’s. This will center your
mesh, based on it’s pivot point to the center of the world in max. Once done, close the dialog box.
We can’t have our character just floating around in space, so we need to decide where his/her/it’s feet will be. Thisshould be the same for ALL characters that are exported.
With the Scale template, you’ll see he is standing on a wire box, this is where the feet will contact the ground. Use thatas your guide for foot placement. This will help keep the feet from penetrating the ground plane or hovering above it whenactual animation is applied. You can move this ground plane after you center your mesh, but try to keep it in the same place forall your characters. The Scale template is a group, if you wish to move the lower plane, simply OPEN the group and then movethe Ground plane as desired. Once you are done, simply close the group.
Before we move on, select all of your geometry and put it into a named selection.This way, you can easily select your geometry, if it’s hidden or frozen, with out having to go through various menus.
8/8/2019 Biped Setup
http://slidepdf.com/reader/full/biped-setup 3/15
If you need help with using named selections, look in your manual or hit F1 for online help and do a search for named
selections.
Ok, check list time:• Your character is scaled correctly• Your character is centered in the world• Your character has some sort of guide as to where the feet will be placed.
CHAPTER 2.BIPED TIME!!!!
CHECK LIST:• In the front viewport, your character is facing towards the front• You have successfully completed the above check list
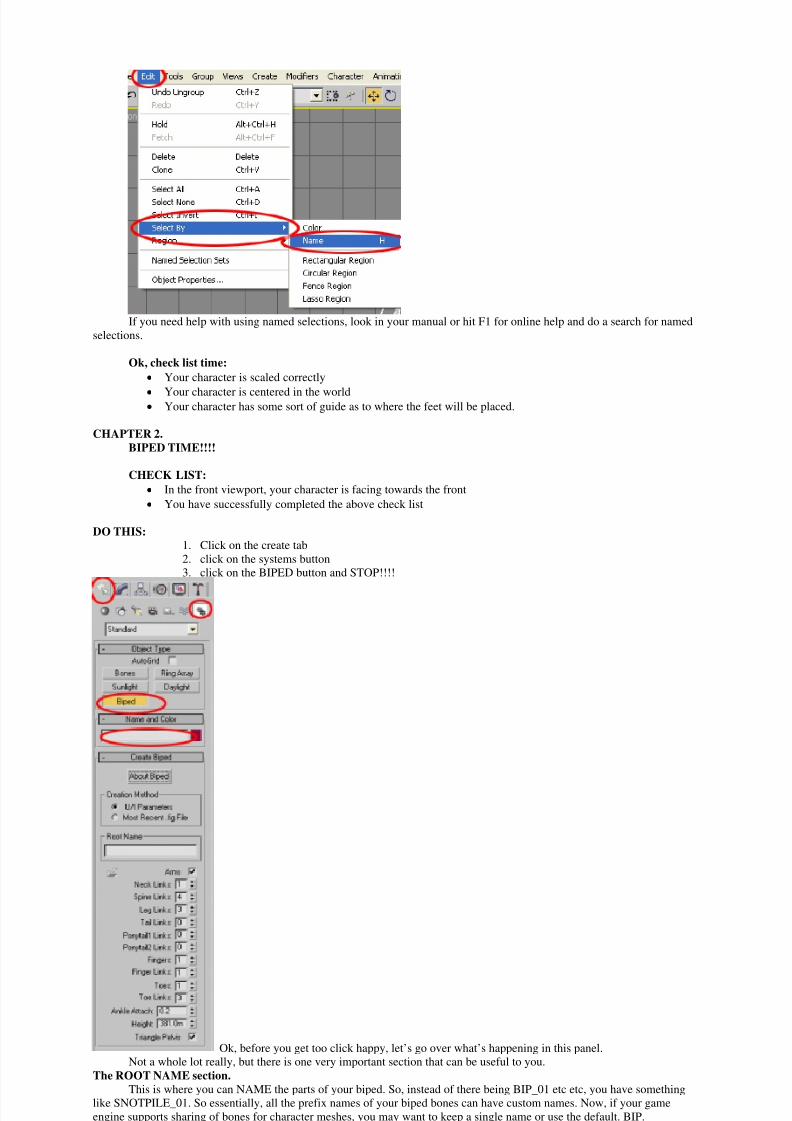
DO THIS:1. Click on the create tab2. click on the systems button3. click on the BIPED button and STOP!!!!
Ok, before you get too click happy, let’s go over what’s happening in this panel.Not a whole lot really, but there is one very important section that can be useful to you.
The ROOT NAME section.This is where you can NAME the parts of your biped. So, instead of there being BIP_01 etc etc, you have something
like SNOTPILE_01. So essentially, all the prefix names of your biped bones can have custom names. Now, if your gameengine supports sharing of bones for character meshes, you may want to keep a single name or use the default. BIP.
8/8/2019 Biped Setup
http://slidepdf.com/reader/full/biped-setup 4/15
Don’t worry about the section below root name, we’ll cover that later in a separate panel.
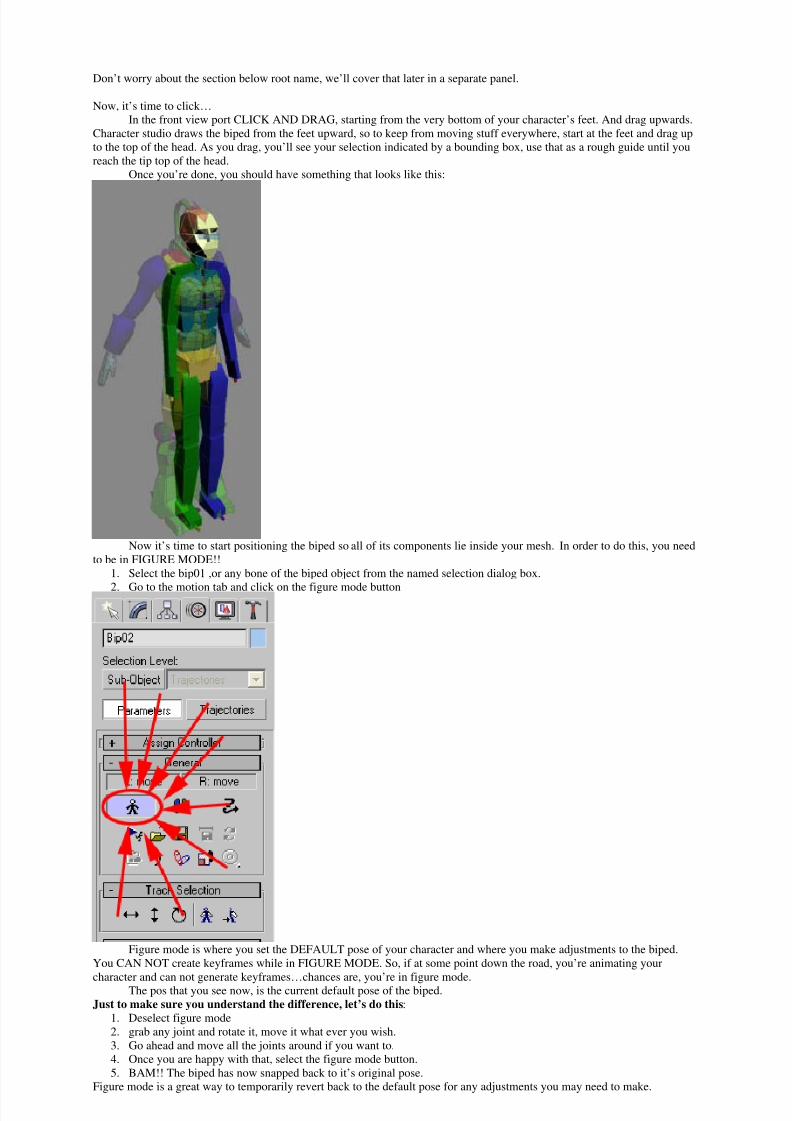
Now, it’s time to click…In the front view port CLICK AND DRAG, starting from the very bottom of your character’s feet. And drag upwards.
Character studio draws the biped from the feet upward, so to keep from moving stuff everywhere, start at the feet and drag upto the top of the head. As you drag, you’ll see your selection indicated by a bounding box, use that as a rough guide until youreach the tip top of the head.
Once you’re done, you should have something that looks like this:
Now it’s time to start positioning the biped so all of its components lie inside your mesh. In order to do this, you needto be in FIGURE MODE!!
1. Select the bip01 ,or any bone of the biped object from the named selection dialog box.
2. Go to the motion tab and click on the figure mode button
Figure mode is where you set the DEFAULT pose of your character and where you make adjustments to the biped.You CAN NOT create keyframes while in FIGURE MODE. So, if at some point down the road, you’re animating your
character and can not generate keyframes…chances are, you’re in figure mode.The pos that you see now, is the current default pose of the biped.Just to make sure you understand the difference, let’s do this :
1. Deselect figure mode2. grab any joint and rotate it, move it what ever you wish.3. Go ahead and move all the joints around if you want to.4. Once you are happy with that, select the figure mode button.5. BAM!! The biped has now snapped back to it’s original pose.
Figure mode is a great way to temporarily revert back to the default pose for any adjustments you may need to make.
8/8/2019 Biped Setup
http://slidepdf.com/reader/full/biped-setup 5/15
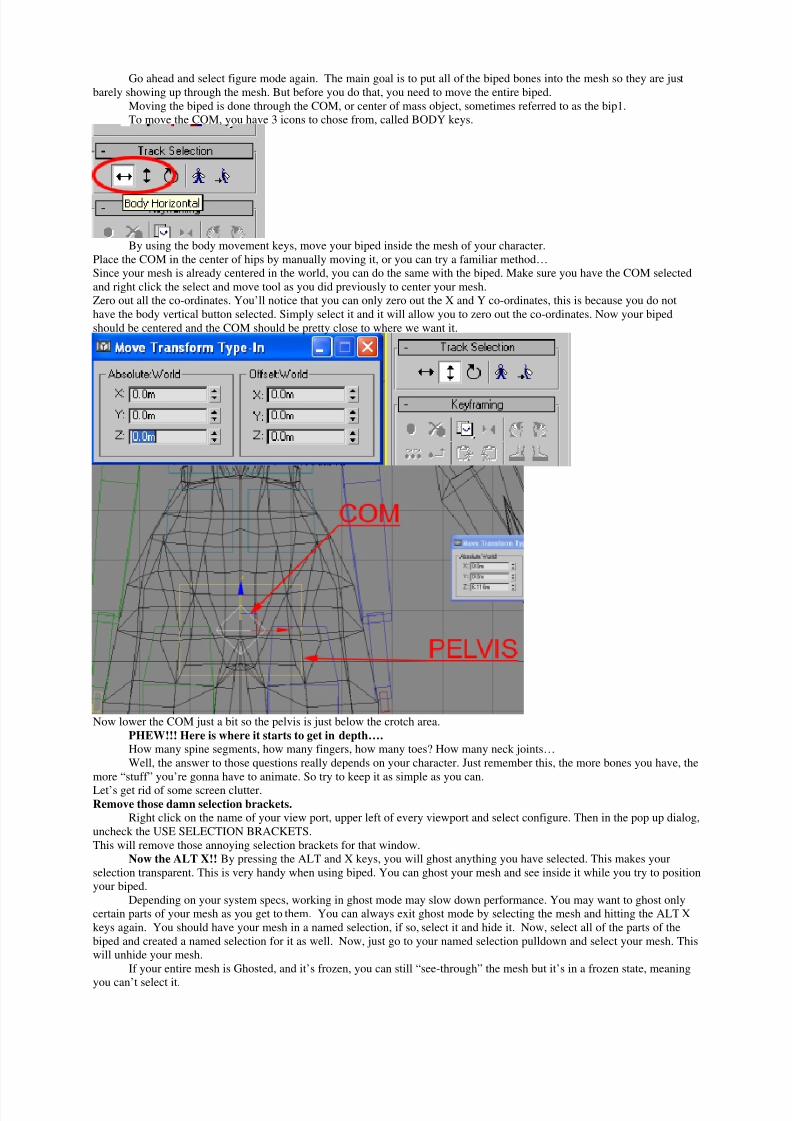
Go ahead and select figure mode again. The main goal is to put all of the biped bones into the mesh so they are justbarely showing up through the mesh. But before you do that, you need to move the entire biped.
Moving the biped is done through the COM, or center of mass object, sometimes referred to as the bip1.To move the COM, you have 3 icons to chose from, called BODY keys.
By using the body movement keys, move your biped inside the mesh of your character.Place the COM in the center of hips by manually moving it, or you can try a familiar method…Since your mesh is already centered in the world, you can do the same with the biped. Make sure you have the COM selectedand right click the select and move tool as you did previously to center your mesh.Zero out all the co-ordinates. You’ll notice that you can only zero out the X and Y co-ordinates, this is because you do nothave the body vertical button selected. Simply select it and it will allow you to zero out the co-ordinates. Now your bipedshould be centered and the COM should be pretty close to where we want it.
Now lower the COM just a bit so the pelvis is just below the crotch area.PHEW!!! Here is where it starts to get in depth….How many spine segments, how many fingers, how many toes? How many neck joints…Well, the answer to those questions really depends on your character. Just remember this, the more bones you have, the
more “stuff” you’re gonna have to animate. So try to keep it as simple as you can.Let’s get rid of some screen clutter.Remove those damn selection brackets.
Right click on the name of your view port, upper left of every viewport and select configure. Then in the pop up dialog,uncheck the USE SELECTION BRACKETS.This will remove those annoying selection brackets for that window.
Now the ALT X!! By pressing the ALT and X keys, you will ghost anything you have selected. This makes yourselection transparent. This is very handy when using biped. You can ghost your mesh and see inside it while you try to positionyour biped.
Depending on your system specs, working in ghost mode may slow down performance. You may want to ghost onlycertain parts of your mesh as you get to them. You can always exit ghost mode by selecting the mesh and hitting the ALT Xkeys again. You should have your mesh in a named selection, if so, select it and hide it. Now, select all of the parts of thebiped and created a named selection for it as well. Now, just go to your named selection pulldown and select your mesh. Thiswill unhide your mesh.
If your entire mesh is Ghosted, and it’s frozen, you can still “see-through” the mesh but it’s in a frozen state, meaning
you can’t select it.
8/8/2019 Biped Setup
http://slidepdf.com/reader/full/biped-setup 6/15
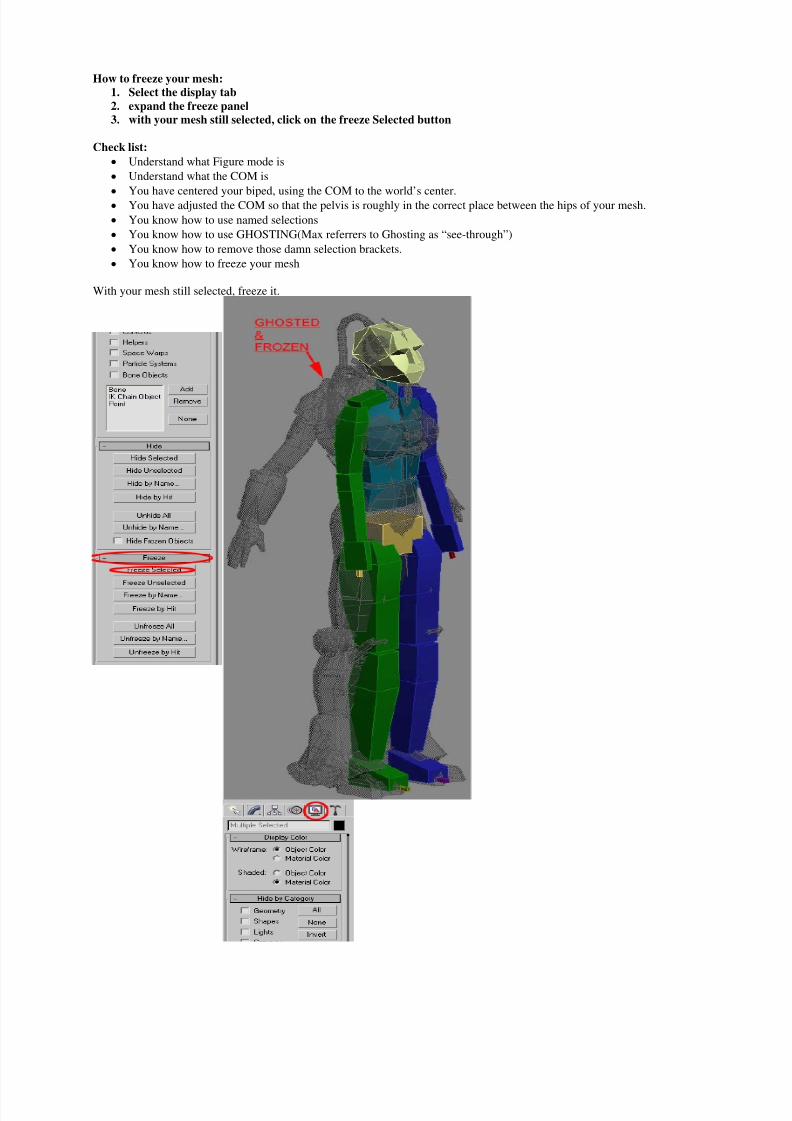
How to freeze your mesh:1. Select the display tab2. expand the freeze panel3. with your mesh still selected, click on the freeze Selected button
Check list:• Understand what Figure mode is• Understand what the COM is•
You have centered your biped, using the COM to the world’s center.• You have adjusted the COM so that the pelvis is roughly in the correct place between the hips of your mesh.• You know how to use named selections• You know how to use GHOSTING(Max referrers to Ghosting as “see-through”)• You know how to remove those damn selection brackets.• You know how to freeze your mesh
With your mesh still selected, freeze it.
8/8/2019 Biped Setup
http://slidepdf.com/reader/full/biped-setup 7/15
Let’s start with the spine.
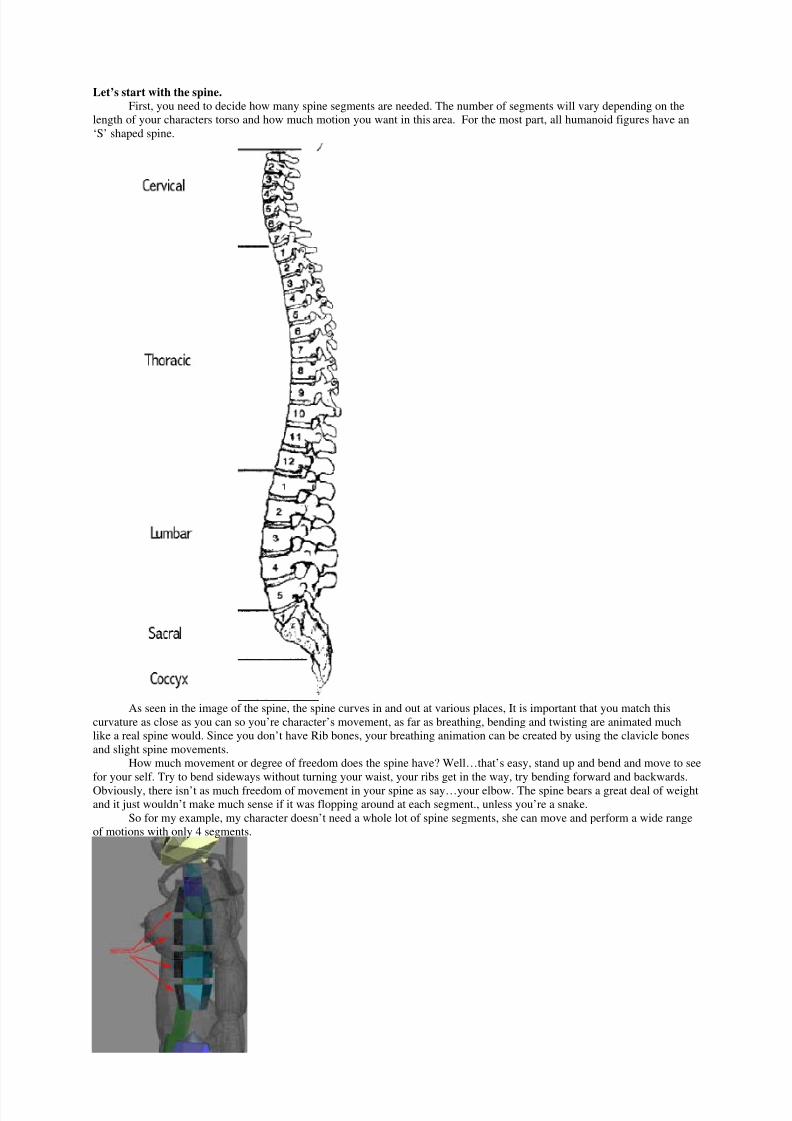
First, you need to decide how many spine segments are needed. The number of segments will vary depending on thelength of your characters torso and how much motion you want in this area. For the most part, all humanoid figures have an‘S’ shaped spine.
As seen in the image of the spine, the spine curves in and out at various places, It is important that you match thiscurvature as close as you can so you’re character’s movement, as far as breathing, bending and twisting are animated muchlike a real spine would. Since you don’t have Rib bones, your breathing animation can be created by using the clavicle bonesand slight spine movements.
How much movement or degree of freedom does the spine have? Well…that’s easy, stand up and bend and move to seefor your self. Try to bend sideways without turning your waist, your ribs get in the way, try bending forward and backwards.Obviously, there isn’t as much freedom of movement in your spine as say…your elbow. The spine bears a great deal of weightand it just wouldn’t make much sense if it was flopping around at each segment., unless you’re a snake.
So for my example, my character doesn’t need a whole lot of spine segments, she can move and perform a wide rangeof motions with only 4 segments.
8/8/2019 Biped Setup
http://slidepdf.com/reader/full/biped-setup 8/15
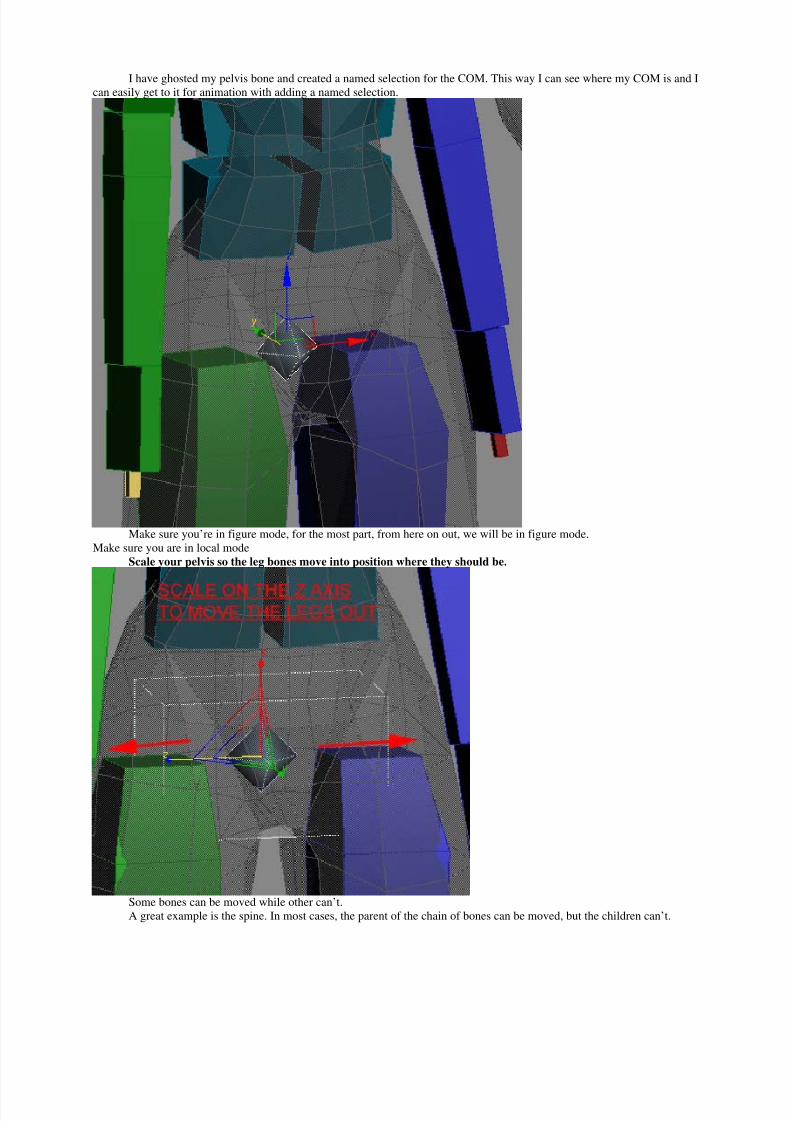
I have ghosted my pelvis bone and created a named selection for the COM. This way I can see where my COM is and Ican easily get to it for animation with adding a named selection.
Make sure you’re in figure mode, for the most part, from here on out, we will be in figure mode.Make sure you are in local mode
Scale your pelvis so the leg bones move into position where they should be.
Some bones can be moved while other can’t.A great example is the spine. In most cases, the parent of the chain of bones can be moved, but the children can’t.
8/8/2019 Biped Setup
http://slidepdf.com/reader/full/biped-setup 9/15
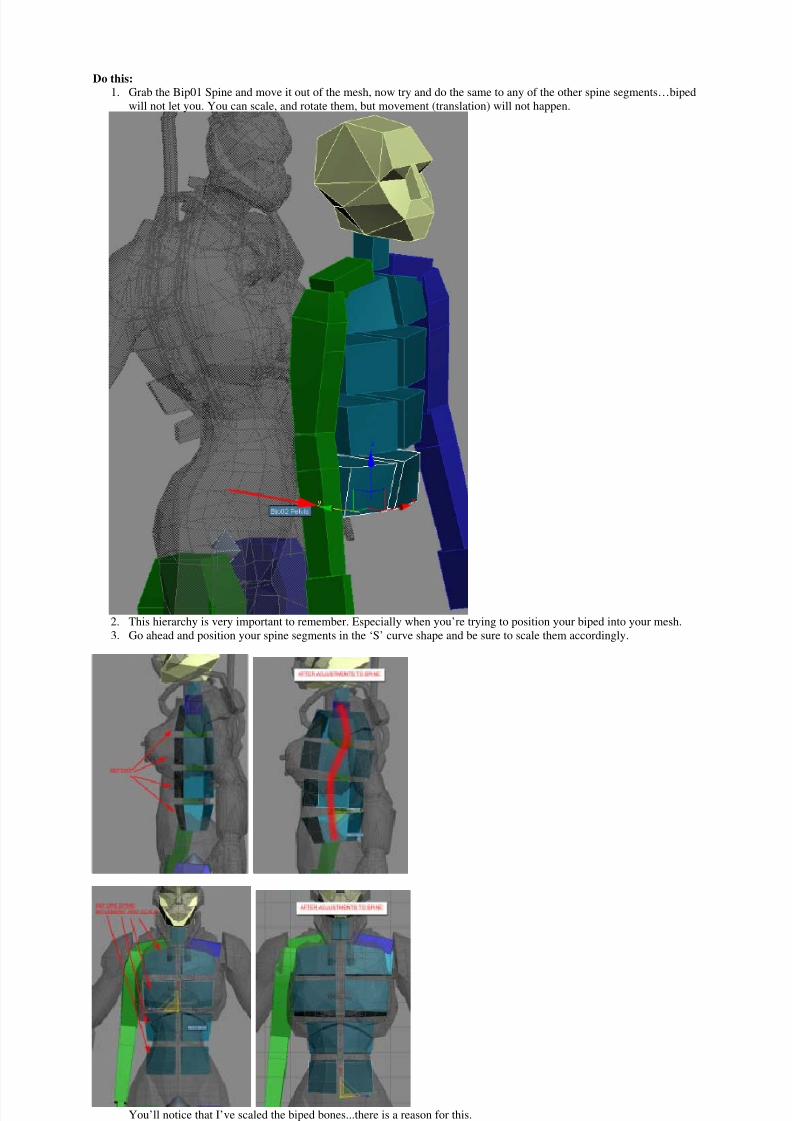
Do this:1. Grab the Bip01 Spine and move it out of the mesh, now try and do the same to any of the other spine segments…biped
will not let you. You can scale, and rotate them, but movement (translation) will not happen.
2. This hierarchy is very important to remember. Especially when you’re trying to position your biped into your mesh.3. Go ahead and position your spine segments in the ‘S’ curve shape and be sure to scale them accordingly.
You’ll notice that I’ve scaled the biped bones...there is a reason for this.
8/8/2019 Biped Setup
http://slidepdf.com/reader/full/biped-setup 10/15
First off...BIPEDS ARE NOT MENT TO BE PRETTY!!!!!!!! These are bones, and the physique modifier works byVOLUME (this will be evident later on) so it’s important that you scale your bones to match your mesh as close as possiblewith out completely penetrating the mesh.. By doing this, you will save your self a lot of time later on.It may look funny to you once you’re done, but remember, it’s the mesh that deforms...not the bones. UGLY LOOKINGBIPED BONE ARE COOL!!! Wait until you do a quadruped ☺ NOTE: The neck bone is part of the spine, so be sure to position it as needed to finish the curvature of the spine.
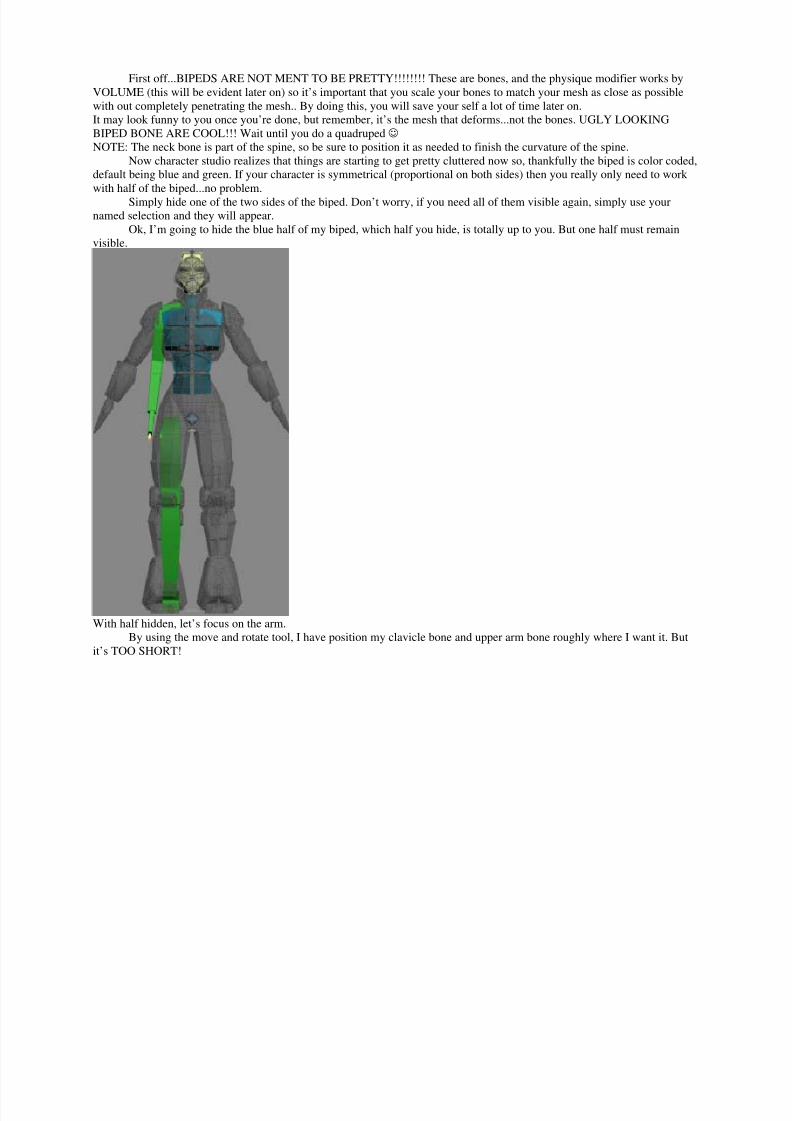
Now character studio realizes that things are starting to get pretty cluttered now so, thankfully the biped is color coded,default being blue and green. If your character is symmetrical (proportional on both sides) then you really only need to work with half of the biped...no problem.
Simply hide one of the two sides of the biped. Don’t worry, if you need all of them visible again, simply use yournamed selection and they will appear.
Ok, I’m going to hide the blue half of my biped, which half you hide, is totally up to you. But one half must remainvisible.
With half hidden, let’s focus on the arm.By using the move and rotate tool, I have position my clavicle bone and upper arm bone roughly where I want it. But
it’s TOO SHORT!
8/8/2019 Biped Setup
http://slidepdf.com/reader/full/biped-setup 11/15
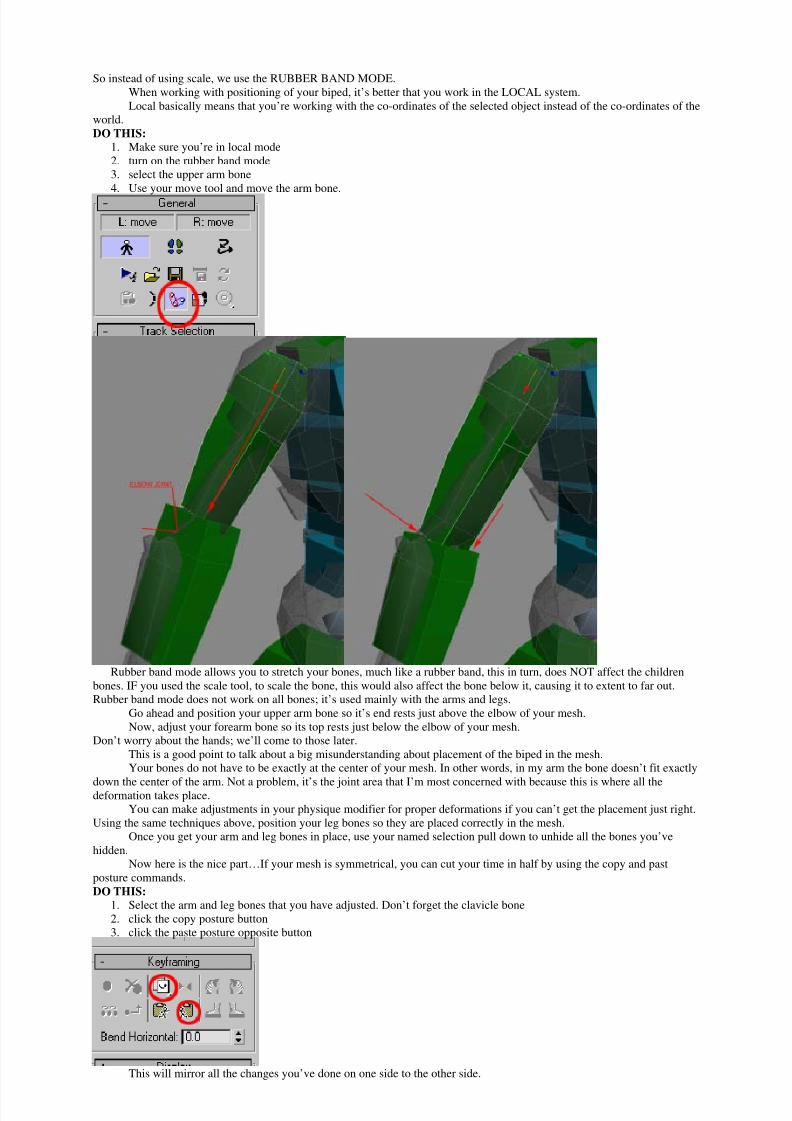
So instead of using scale, we use the RUBBER BAND MODE.When working with positioning of your biped, it’s better that you work in the LOCAL system.Local basically means that you’re working with the co-ordinates of the selected object instead of the co-ordinates of the
world.DO THIS:
1. Make sure you’re in local mode2. turn on the rubber band mode3. select the upper arm bone4. Use your move tool and move the arm bone.
Rubber band mode allows you to stretch your bones, much like a rubber band, this in turn, does NOT affect the childrenbones. IF you used the scale tool, to scale the bone, this would also affect the bone below it, causing it to extent to far out.Rubber band mode does not work on all bones; it’s used mainly with the arms and legs.
Go ahead and position your upper arm bone so it’s end rests just above the elbow of your mesh.Now, adjust your forearm bone so its top rests just below the elbow of your mesh.
Don’t worry about the hands; we’ll come to those later.This is a good point to talk about a big misunderstanding about placement of the biped in the mesh.Your bones do not have to be exactly at the center of your mesh. In other words, in my arm the bone doesn’t fit exactly
down the center of the arm. Not a problem, it’s the joint area that I’m most concerned with because this is where all thedeformation takes place.You can make adjustments in your physique modifier for proper deformations if you can’t get the placement just right.
Using the same techniques above, position your leg bones so they are placed correctly in the mesh.Once you get your arm and leg bones in place, use your named selection pull down to unhide all the bones you’ve
hidden.Now here is the nice part…If your mesh is symmetrical, you can cut your time in half by using the copy and past
posture commands.DO THIS:
1. Select the arm and leg bones that you have adjusted. Don’t forget the clavicle bone2. click the copy posture button3. click the paste posture opposite button
This will mirror all the changes you’ve done on one side to the other side.
8/8/2019 Biped Setup
http://slidepdf.com/reader/full/biped-setup 12/15
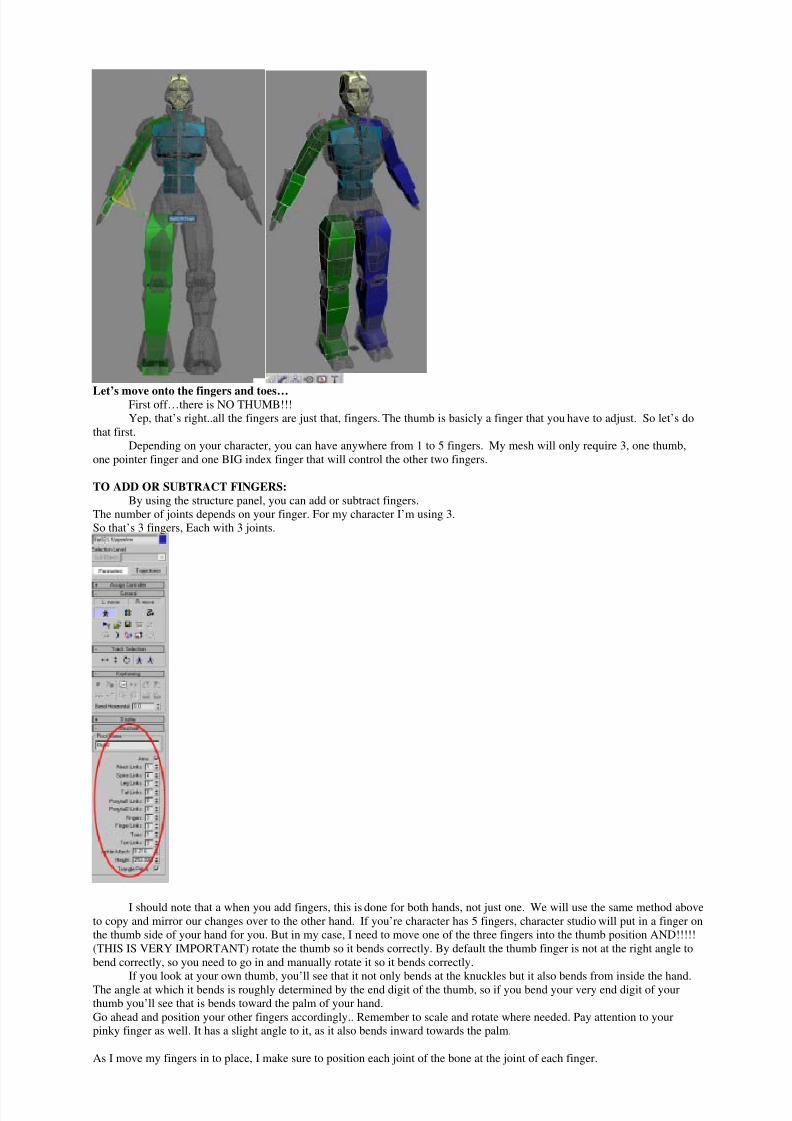
Let’s move onto the fingers and toes…First off…there is NO THUMB!!!Yep, that’s right..all the fingers are just that, fingers. The thumb is basicly a finger that you have to adjust. So let’s do
that first.Depending on your character, you can have anywhere from 1 to 5 fingers. My mesh will only require 3, one thumb,
one pointer finger and one BIG index finger that will control the other two fingers.
TO ADD OR SUBTRACT FINGERS:By using the structure panel, you can add or subtract fingers.
The number of joints depends on your finger. For my character I’m using 3.So that’s 3 fingers, Each with 3 joints.
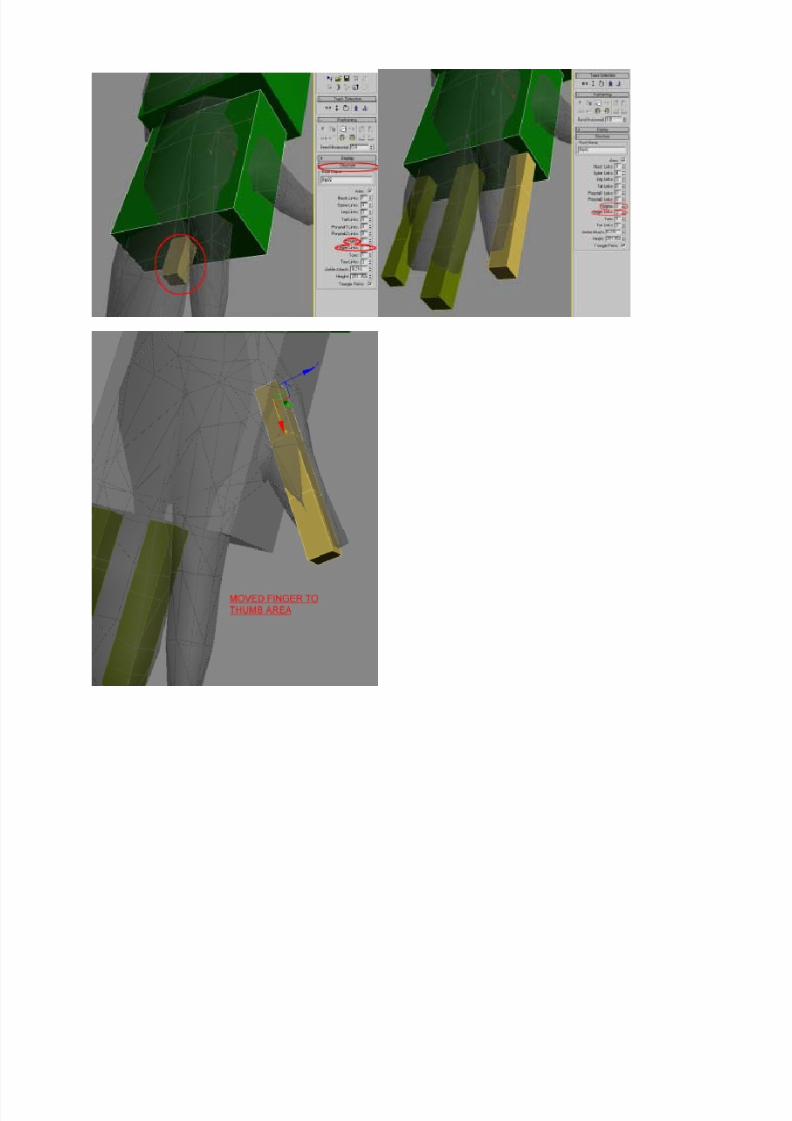
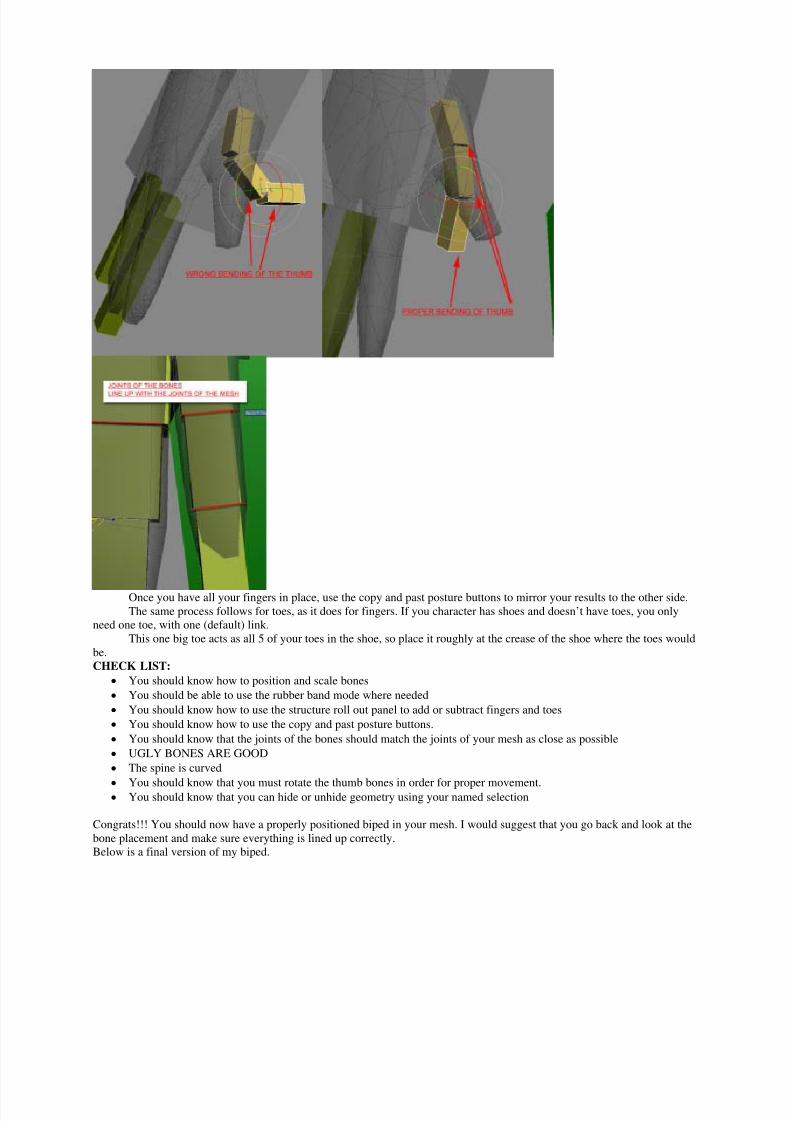
I should note that a when you add fingers, this is done for both hands, not just one. We will use the same method aboveto copy and mirror our changes over to the other hand. If you’re character has 5 fingers, character studio will put in a finger onthe thumb side of your hand for you. But in my case, I need to move one of the three fingers into the thumb position AND!!!!!(THIS IS VERY IMPORTANT) rotate the thumb so it bends correctly. By default the thumb finger is not at the right angle tobend correctly, so you need to go in and manually rotate it so it bends correctly.
If you look at your own thumb, you’ll see that it not only bends at the knuckles but it also bends from inside the hand.The angle at which it bends is roughly determined by the end digit of the thumb, so if you bend your very end digit of yourthumb you’ll see that is bends toward the palm of your hand.Go ahead and position your other fingers accordingly.. Remember to scale and rotate where needed. Pay attention to yourpinky finger as well. It has a slight angle to it, as it also bends inward towards the palm.
As I move my fingers in to place, I make sure to position each joint of the bone at the joint of each finger.
8/8/2019 Biped Setup
http://slidepdf.com/reader/full/biped-setup 13/15
8/8/2019 Biped Setup
http://slidepdf.com/reader/full/biped-setup 14/15
Once you have all your fingers in place, use the copy and past posture buttons to mirror your results to the other side.The same process follows for toes, as it does for fingers. If you character has shoes and doesn’t have toes, you only
need one toe, with one (default) link.This one big toe acts as all 5 of your toes in the shoe, so place it roughly at the crease of the shoe where the toes would
be.CHECK LIST:
• You should know how to position and scale bones• You should be able to use the rubber band mode where needed• You should know how to use the structure roll out panel to add or subtract fingers and toes• You should know how to use the copy and past posture buttons.• You should know that the joints of the bones should match the joints of your mesh as close as possible• UGLY BONES ARE GOOD• The spine is curved•
You should know that you must rotate the thumb bones in order for proper movement.• You should know that you can hide or unhide geometry using your named selection
Congrats!!! You should now have a properly positioned biped in your mesh. I would suggest that you go back and look at thebone placement and make sure everything is lined up correctly.Below is a final version of my biped.
8/8/2019 Biped Setup
http://slidepdf.com/reader/full/biped-setup 15/15
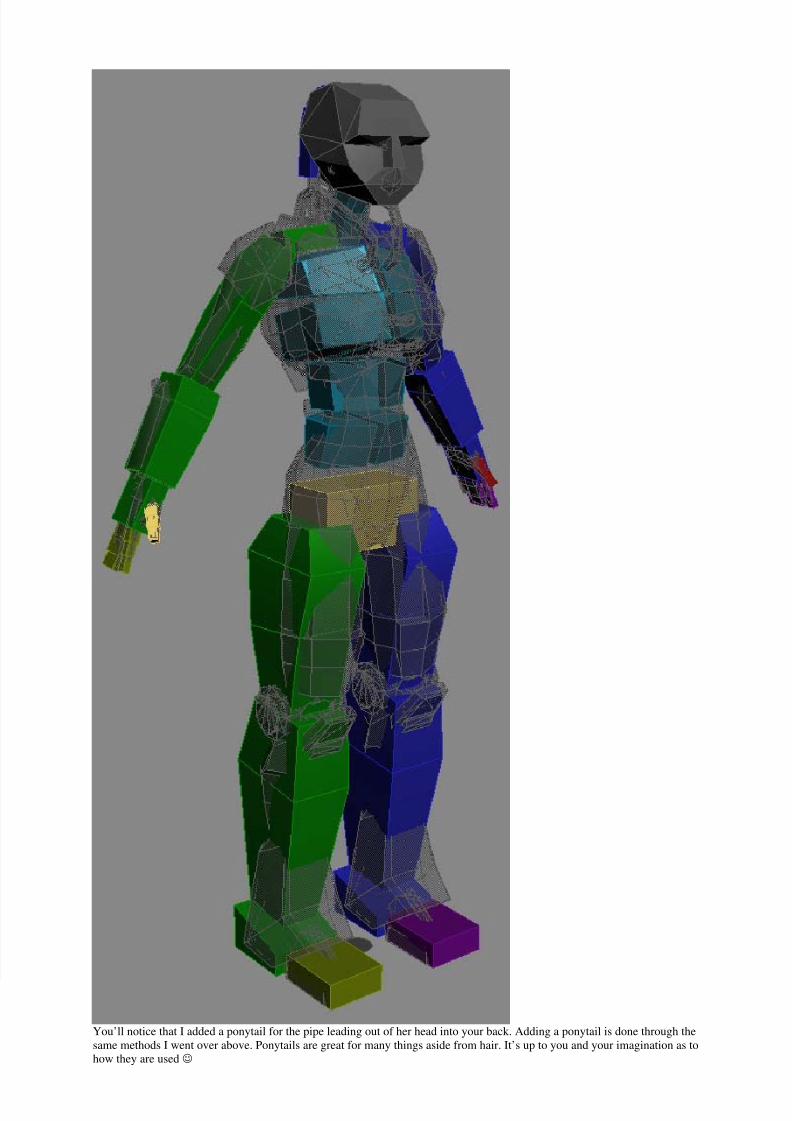
You’ll notice that I added a ponytail for the pipe leading out of her head into your back. Adding a ponytail is done through thesame methods I went over above. Ponytails are great for many things aside from hair. It’s up to you and your imagination as tohow they are used ☺
Top Related